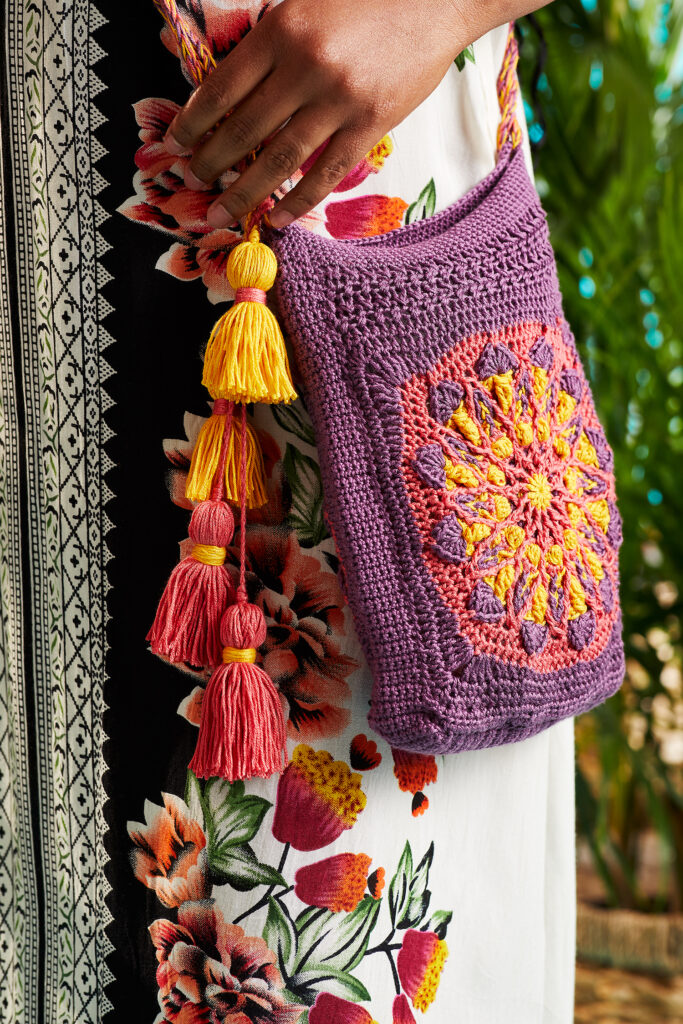
Crocheting into a magic circle makes evenly placing your starting stitches a snap! This technique offers a way to place as many stitches as you need into a perfectly circular shape with the tug of some yarn.
Using a magic circle takes away the guesswork involved with a different method of creating a circular base, where you create a chain, then slip stitch to form a ring. Because this other method with a starting chain has a fixed circumference, it may leave a gap in the center if you make it too big, or be impossible to work into if it’s too small. With the magic circle being adjustable, these sizing problems while starting a project magically disappear!
One thing that can be a bit tricky is that not everyone calls this method a “magic circle” as seen in the Paradise Pouch. When getting started with a pattern, you may also read “adjustable ring,” as seen in the Cotton Candy Swirl, or a blend of both called a “magic ring.” It can also be called a loop, as in “magic loop” or “adjustable loop.” Lastly, you may see it represented visually in a chart, denoted by a swirled shape before any stitches start, like in the Spice Market Shawl. Now that you know what to look for, let’s take a look at how to do it! There are just 6 simple steps to do to create a magic circle.
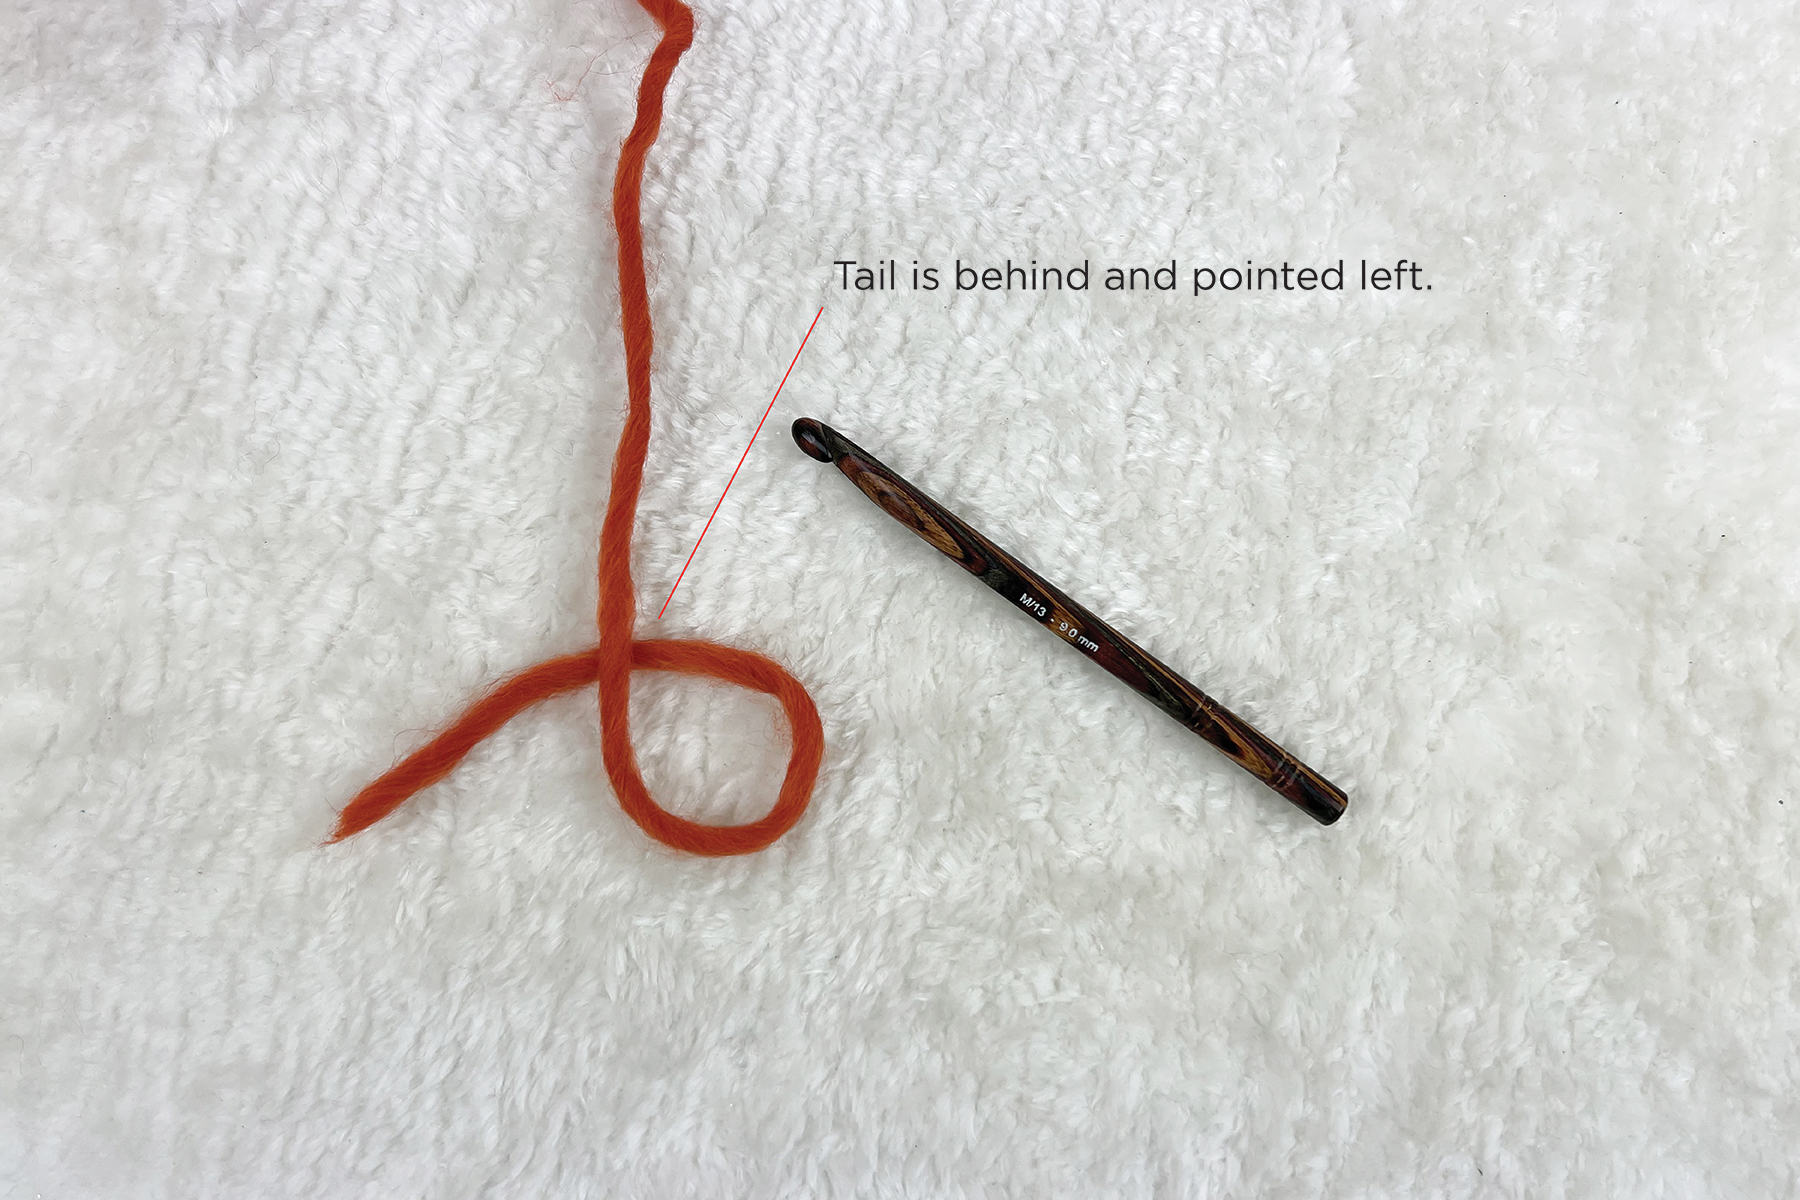
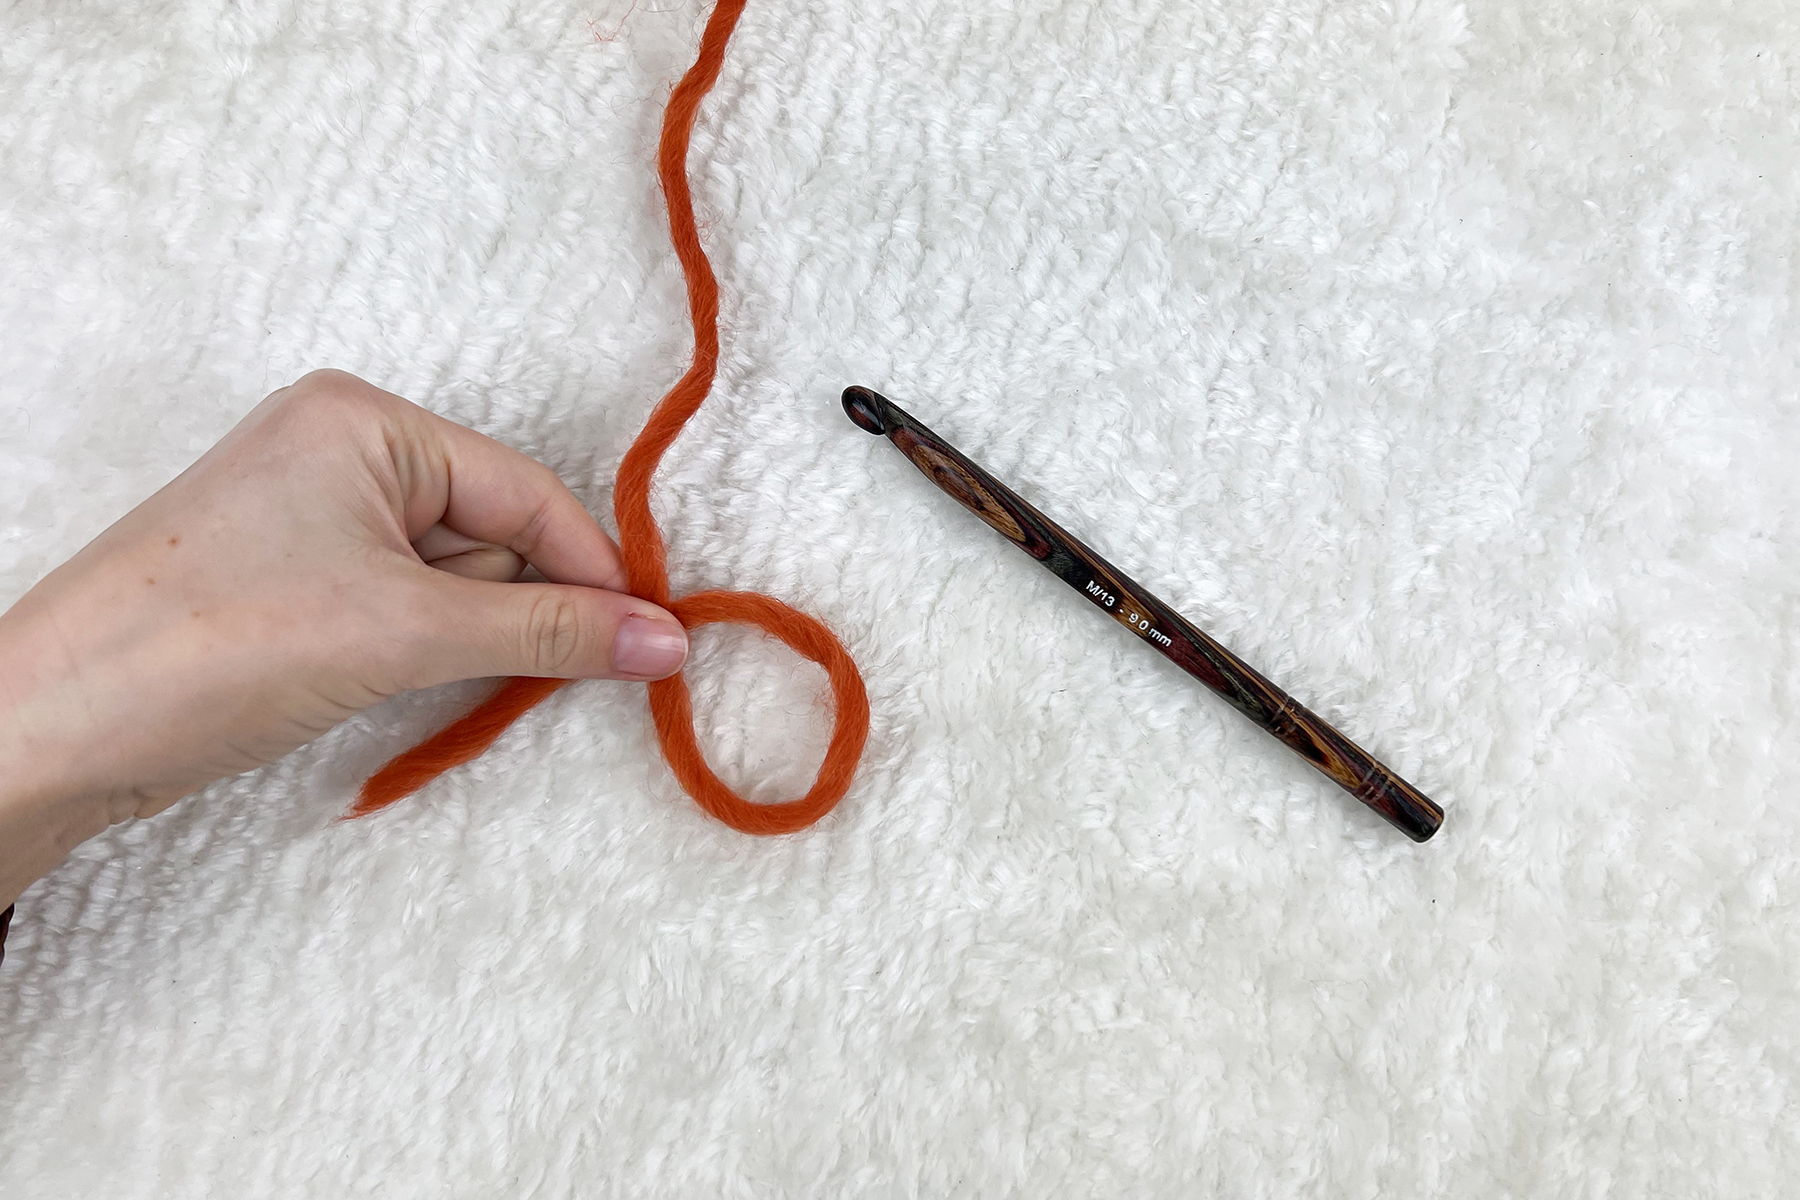
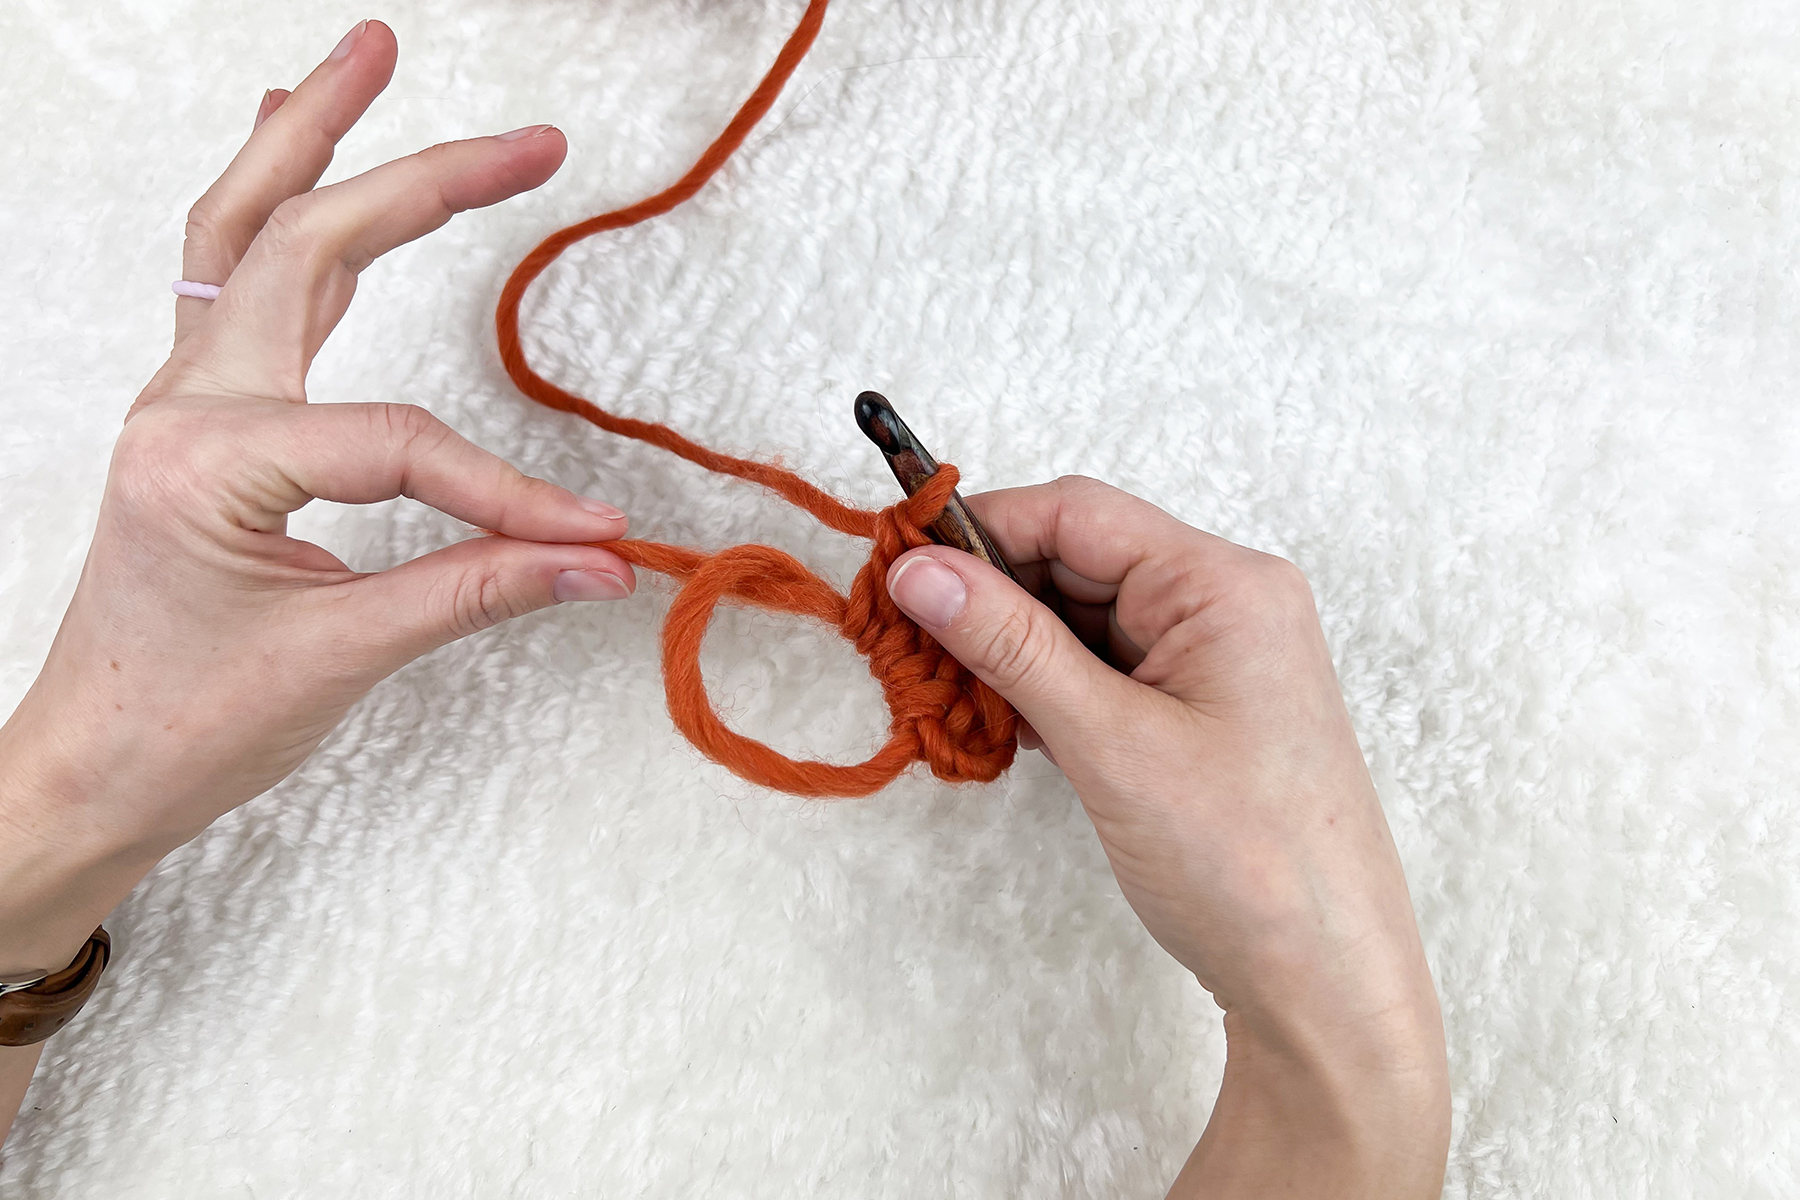
Step 1: Create the circle.
Create an initial loop by laying flat, if it helps, or held in your hand. Place the tail behind the working yarn, and pointed to the left. Pinch yarn where it overlaps to hold the loop in place while you work.
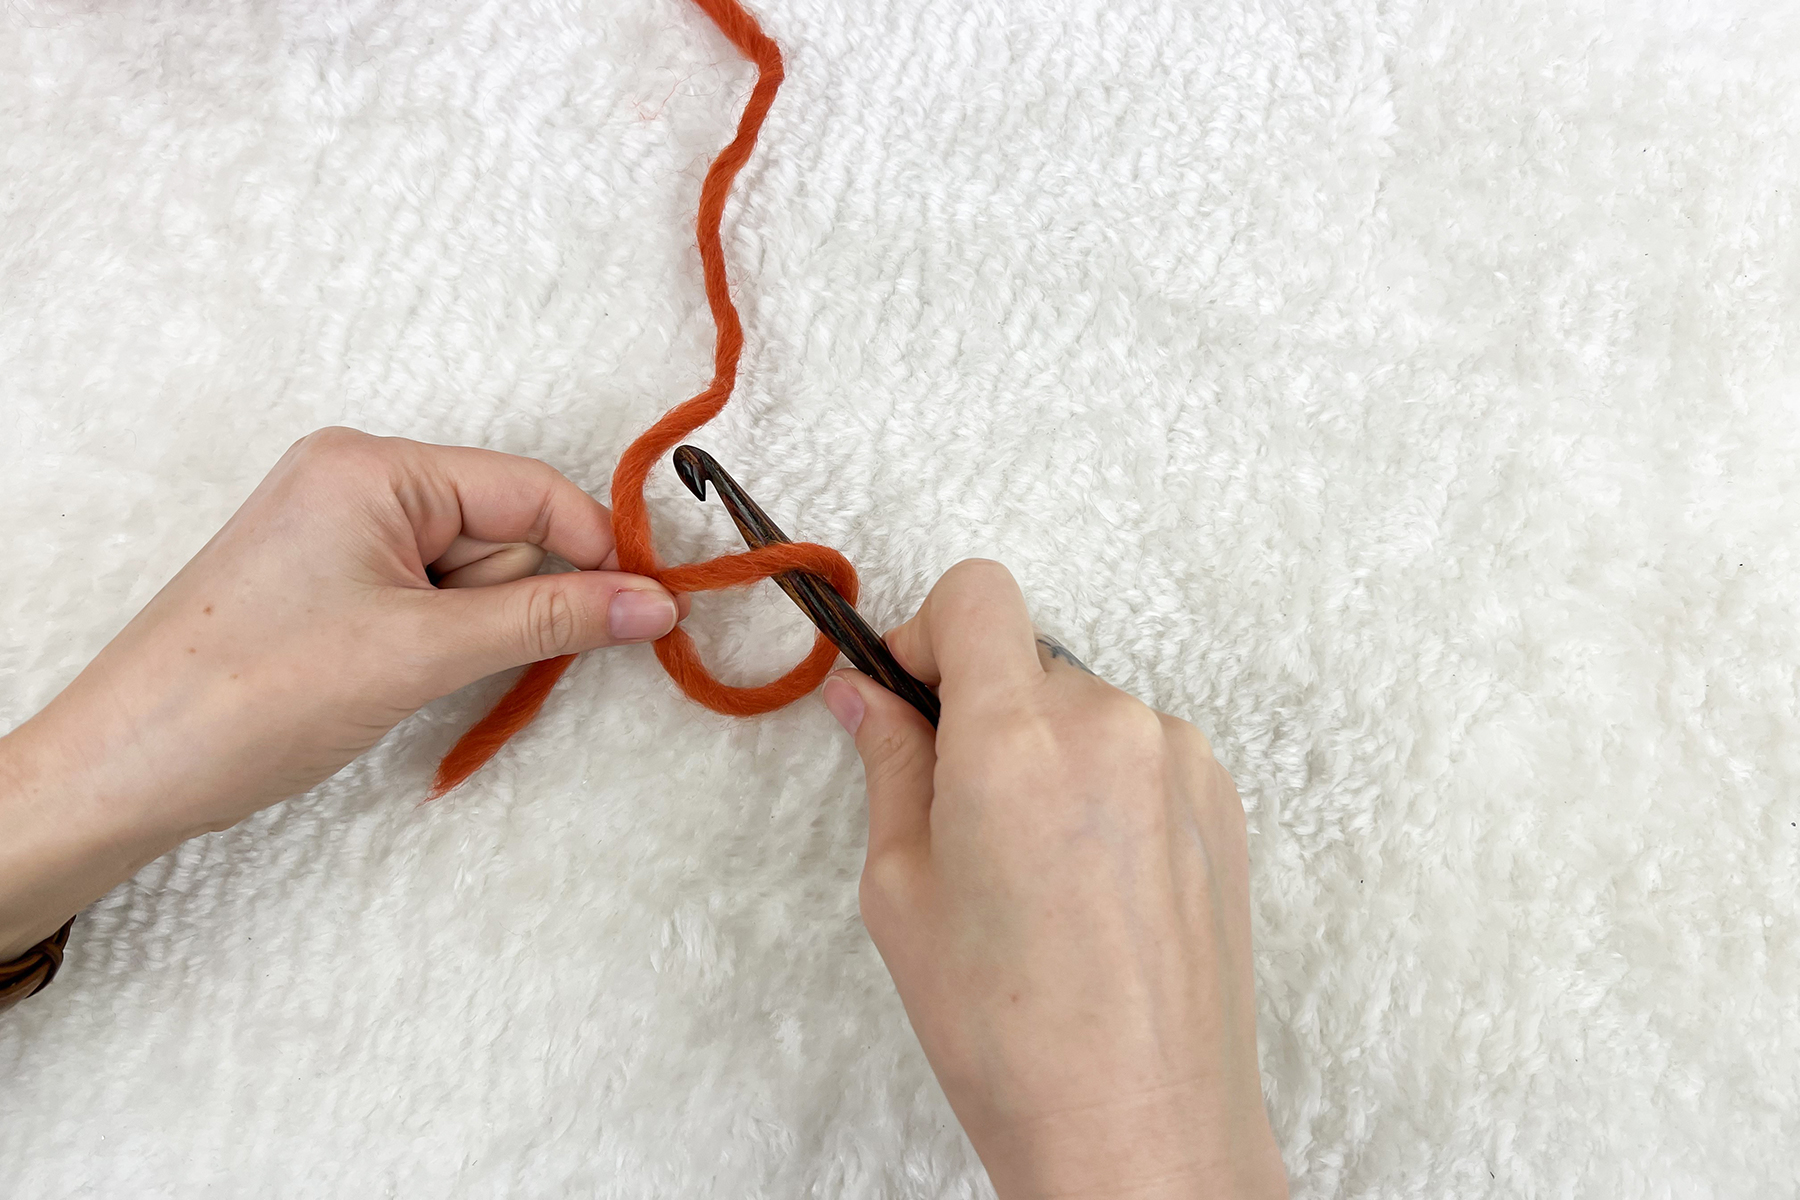
Step 2: Insert hook.
Reach your crochet hook into the loop.
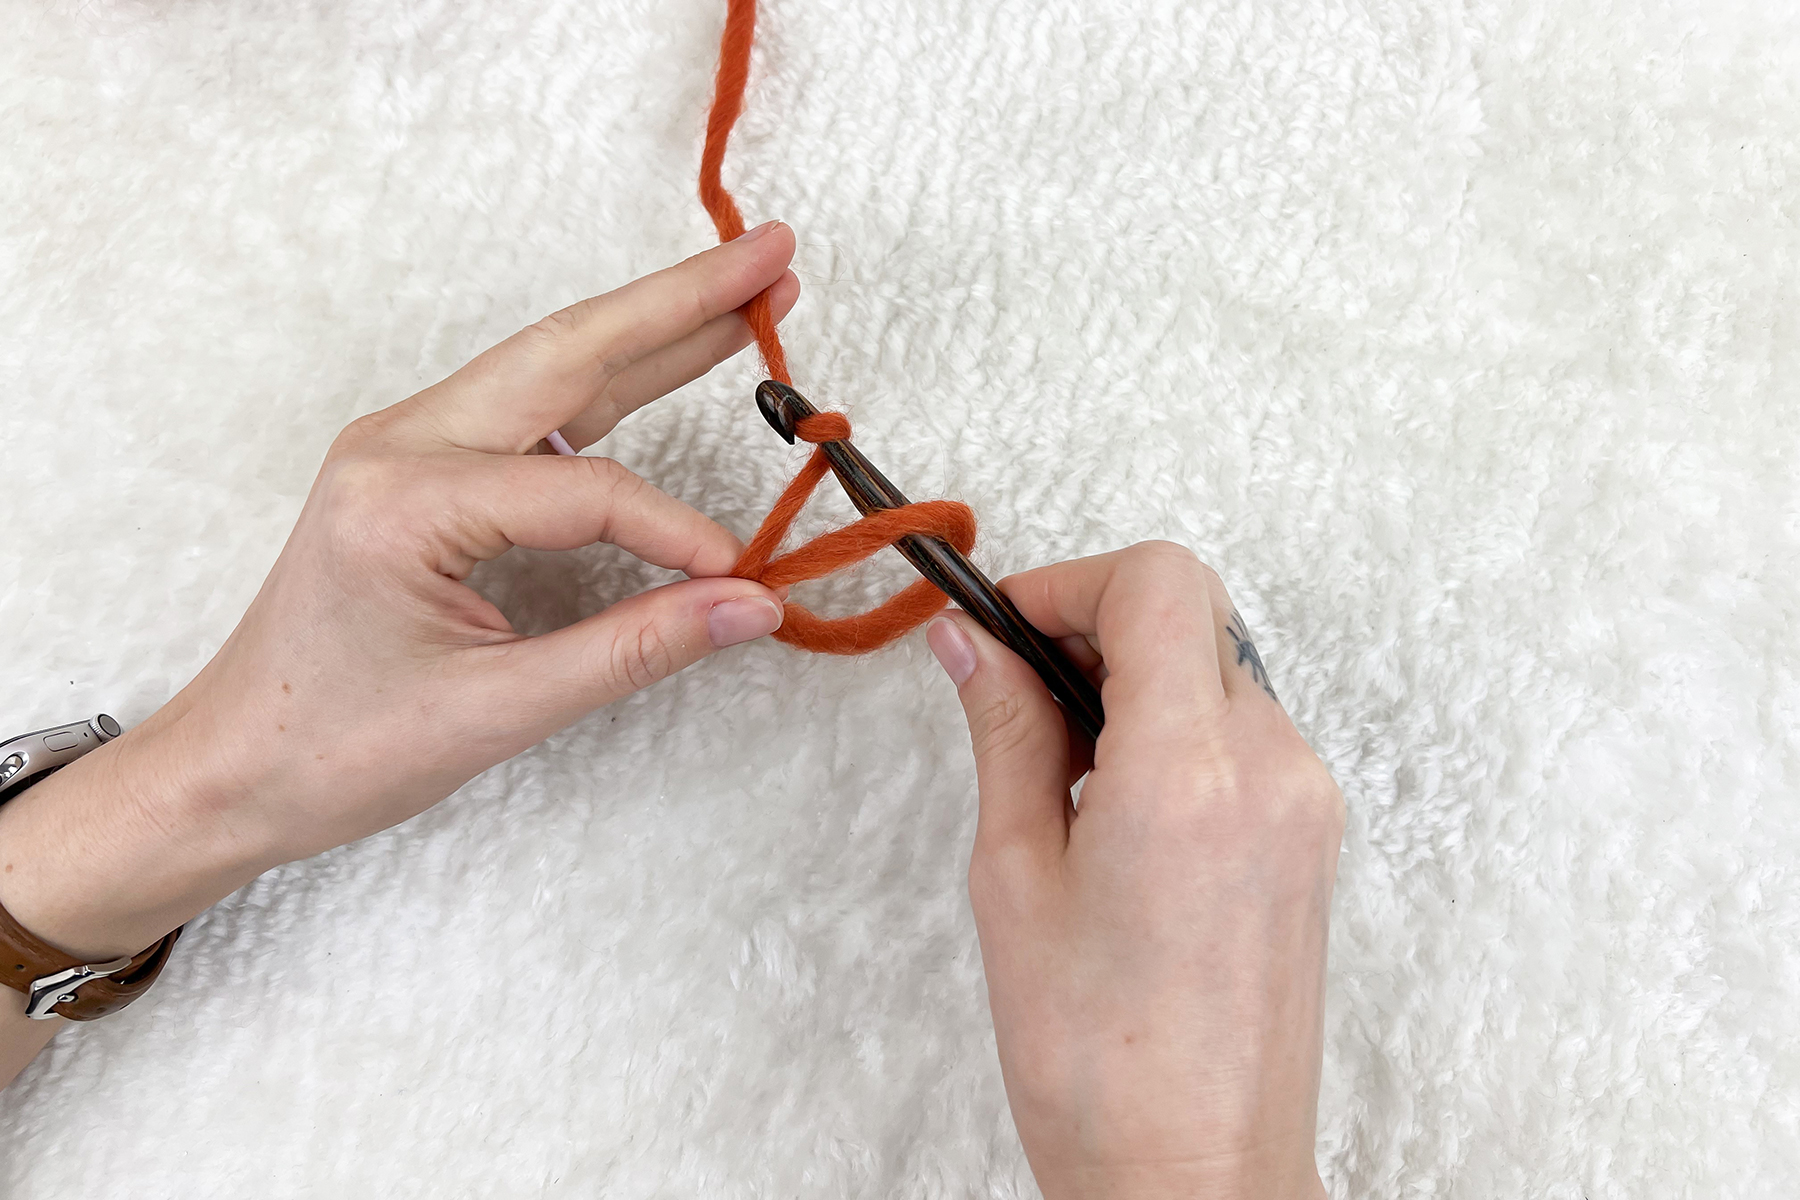
Step 3: Yarn over.
It may feel strange to tension the yarn while pinching the circle. You may try holding it as seen above or switch to holding the circle with your thumb and middle finger to tension with your pointer finger. I have a habit of starting like this then switching my grip when I begin chaining and stitching as normal (as shown, beginning in step 5).
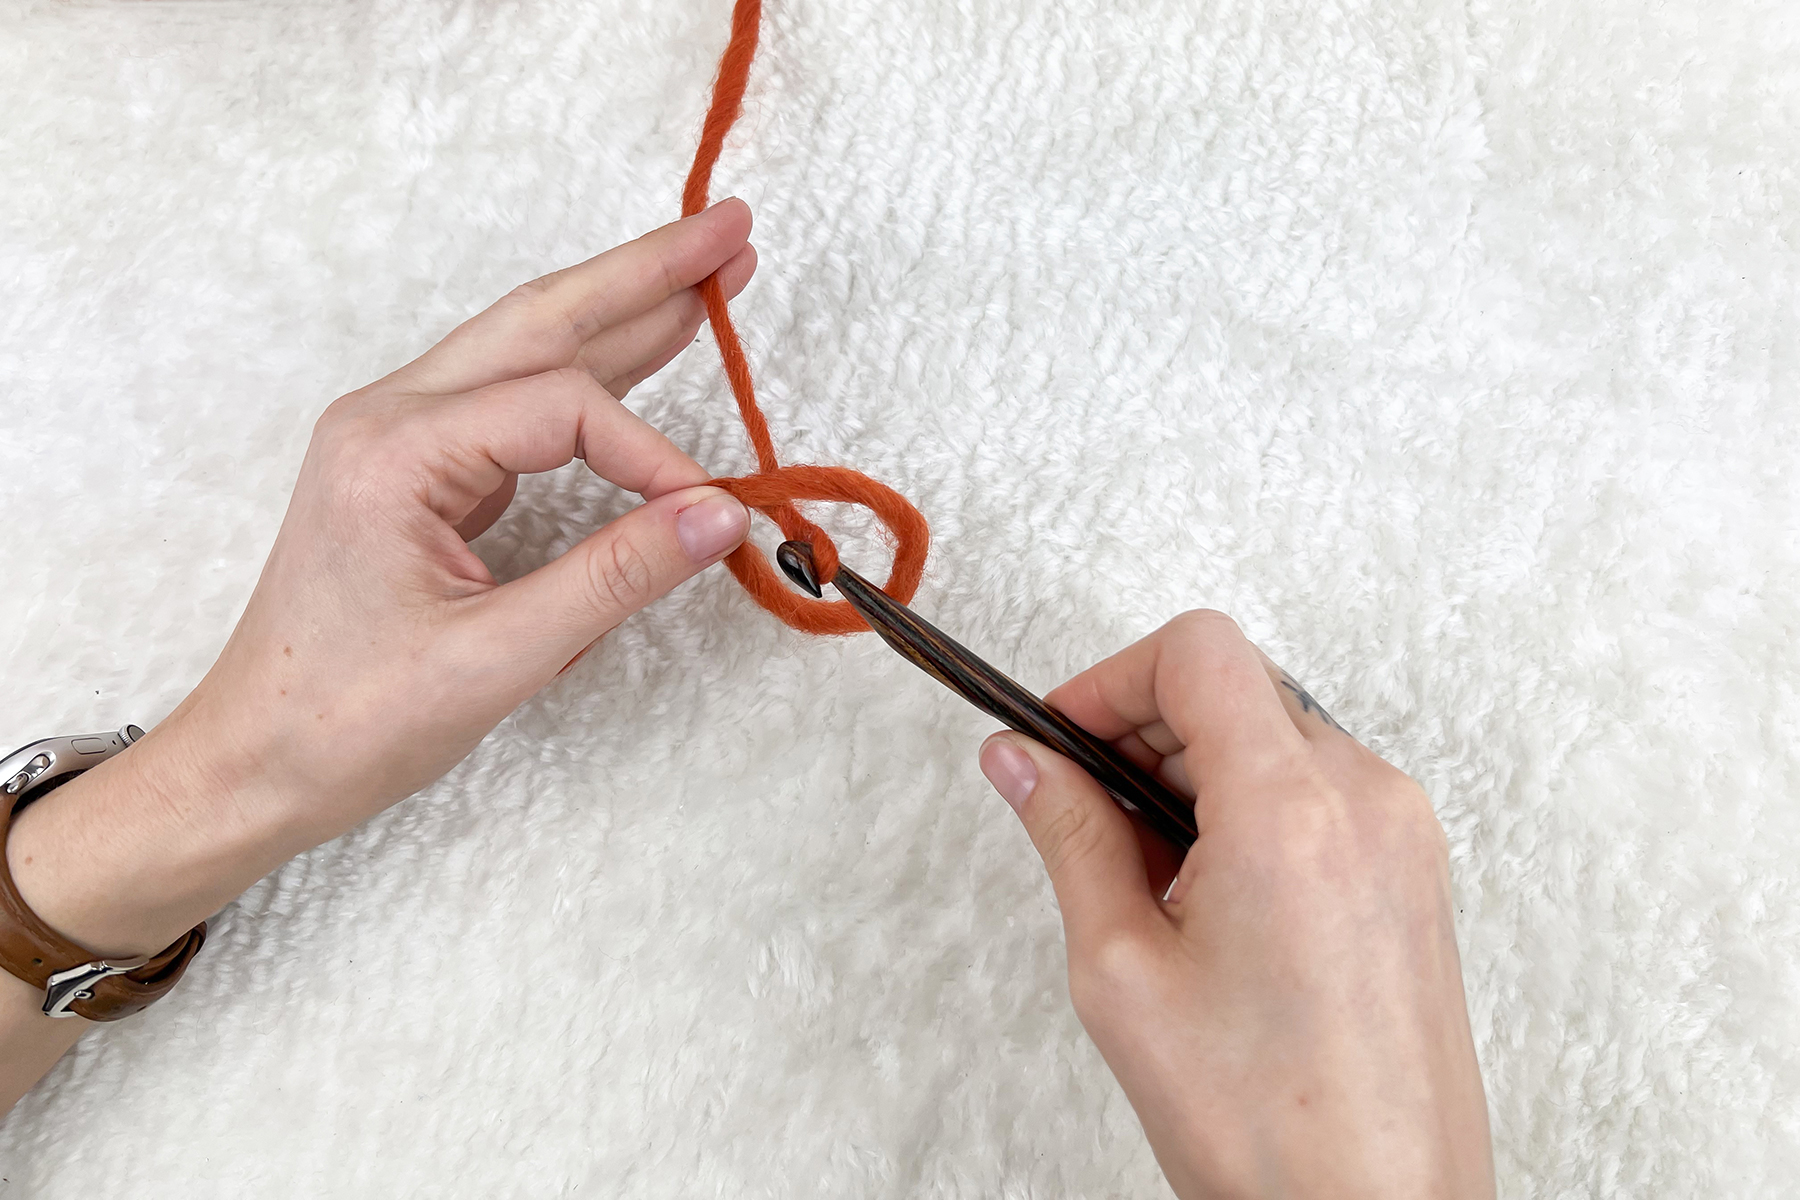
Step 4: Pull through.
Pull the working yarn through the loop with your crochet hook.
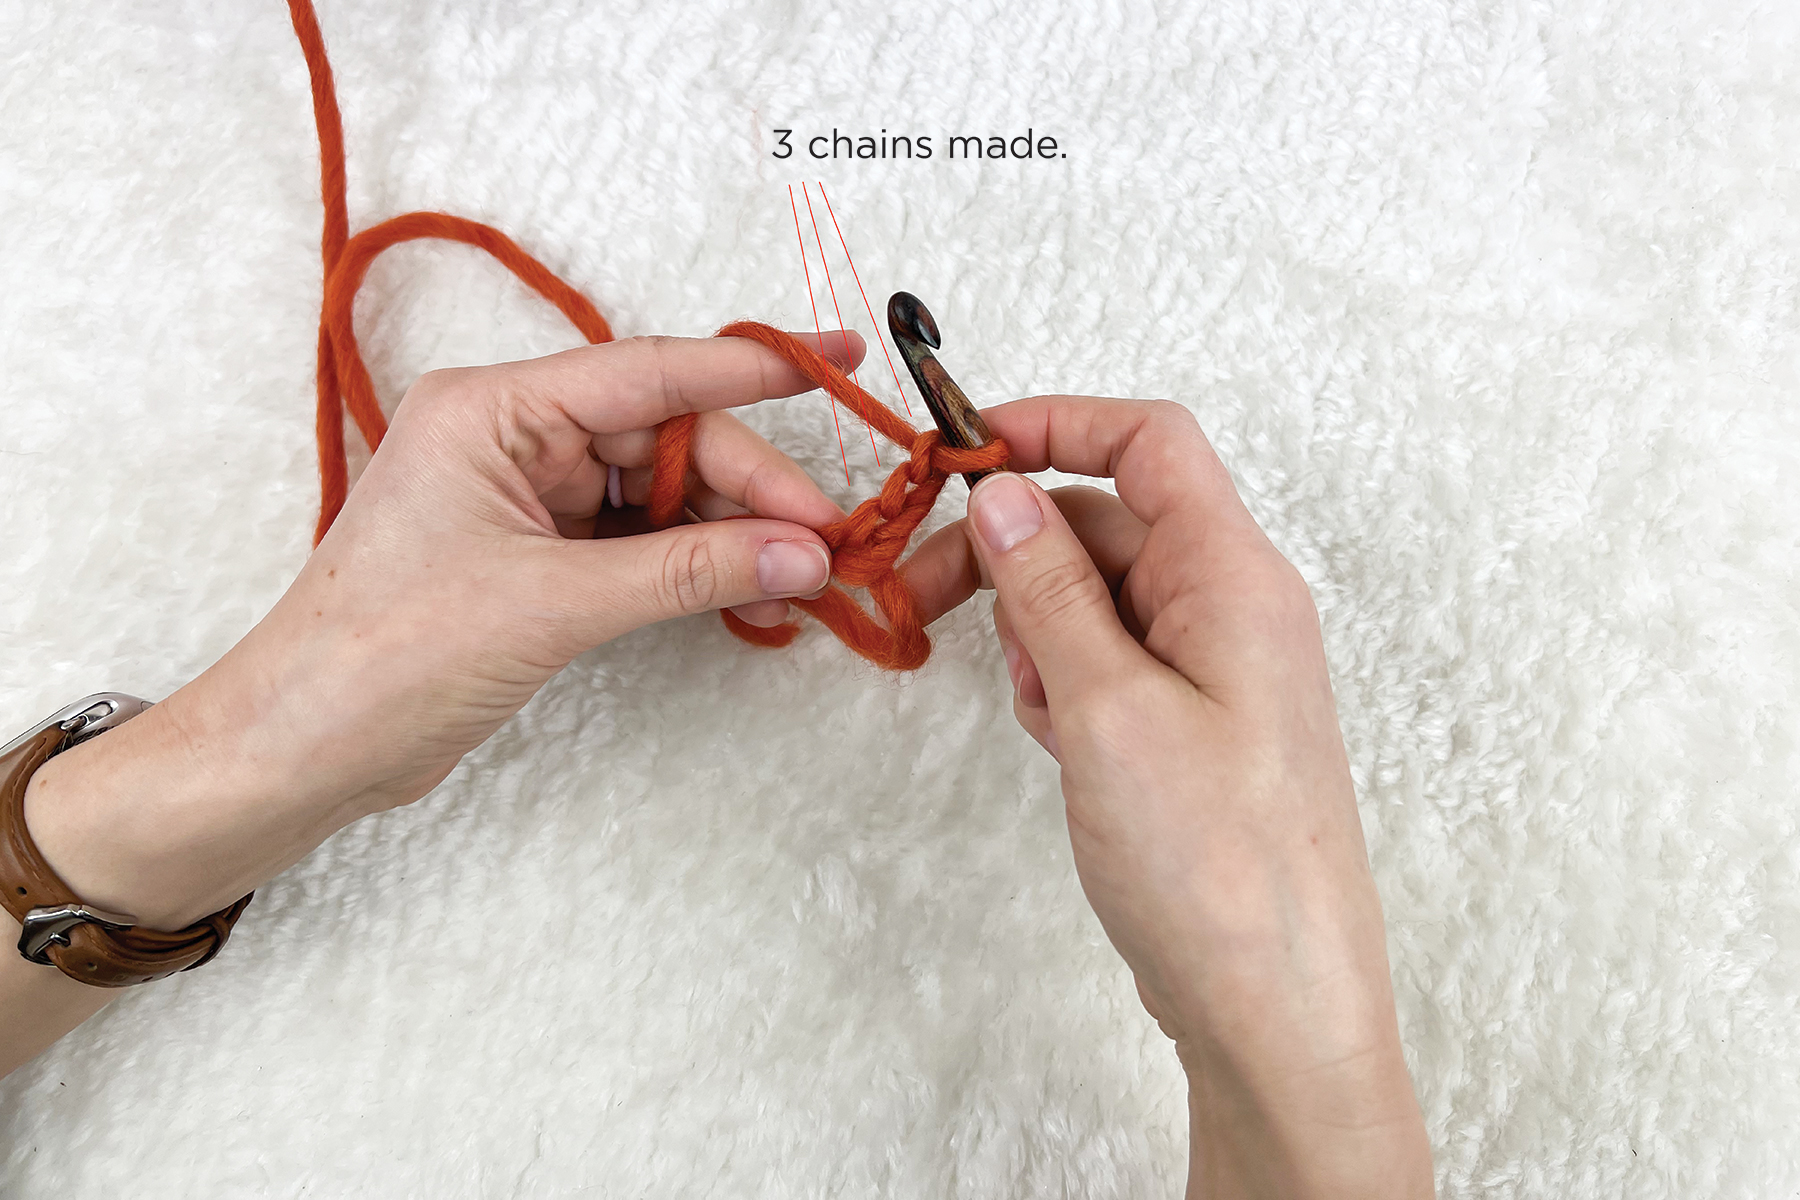
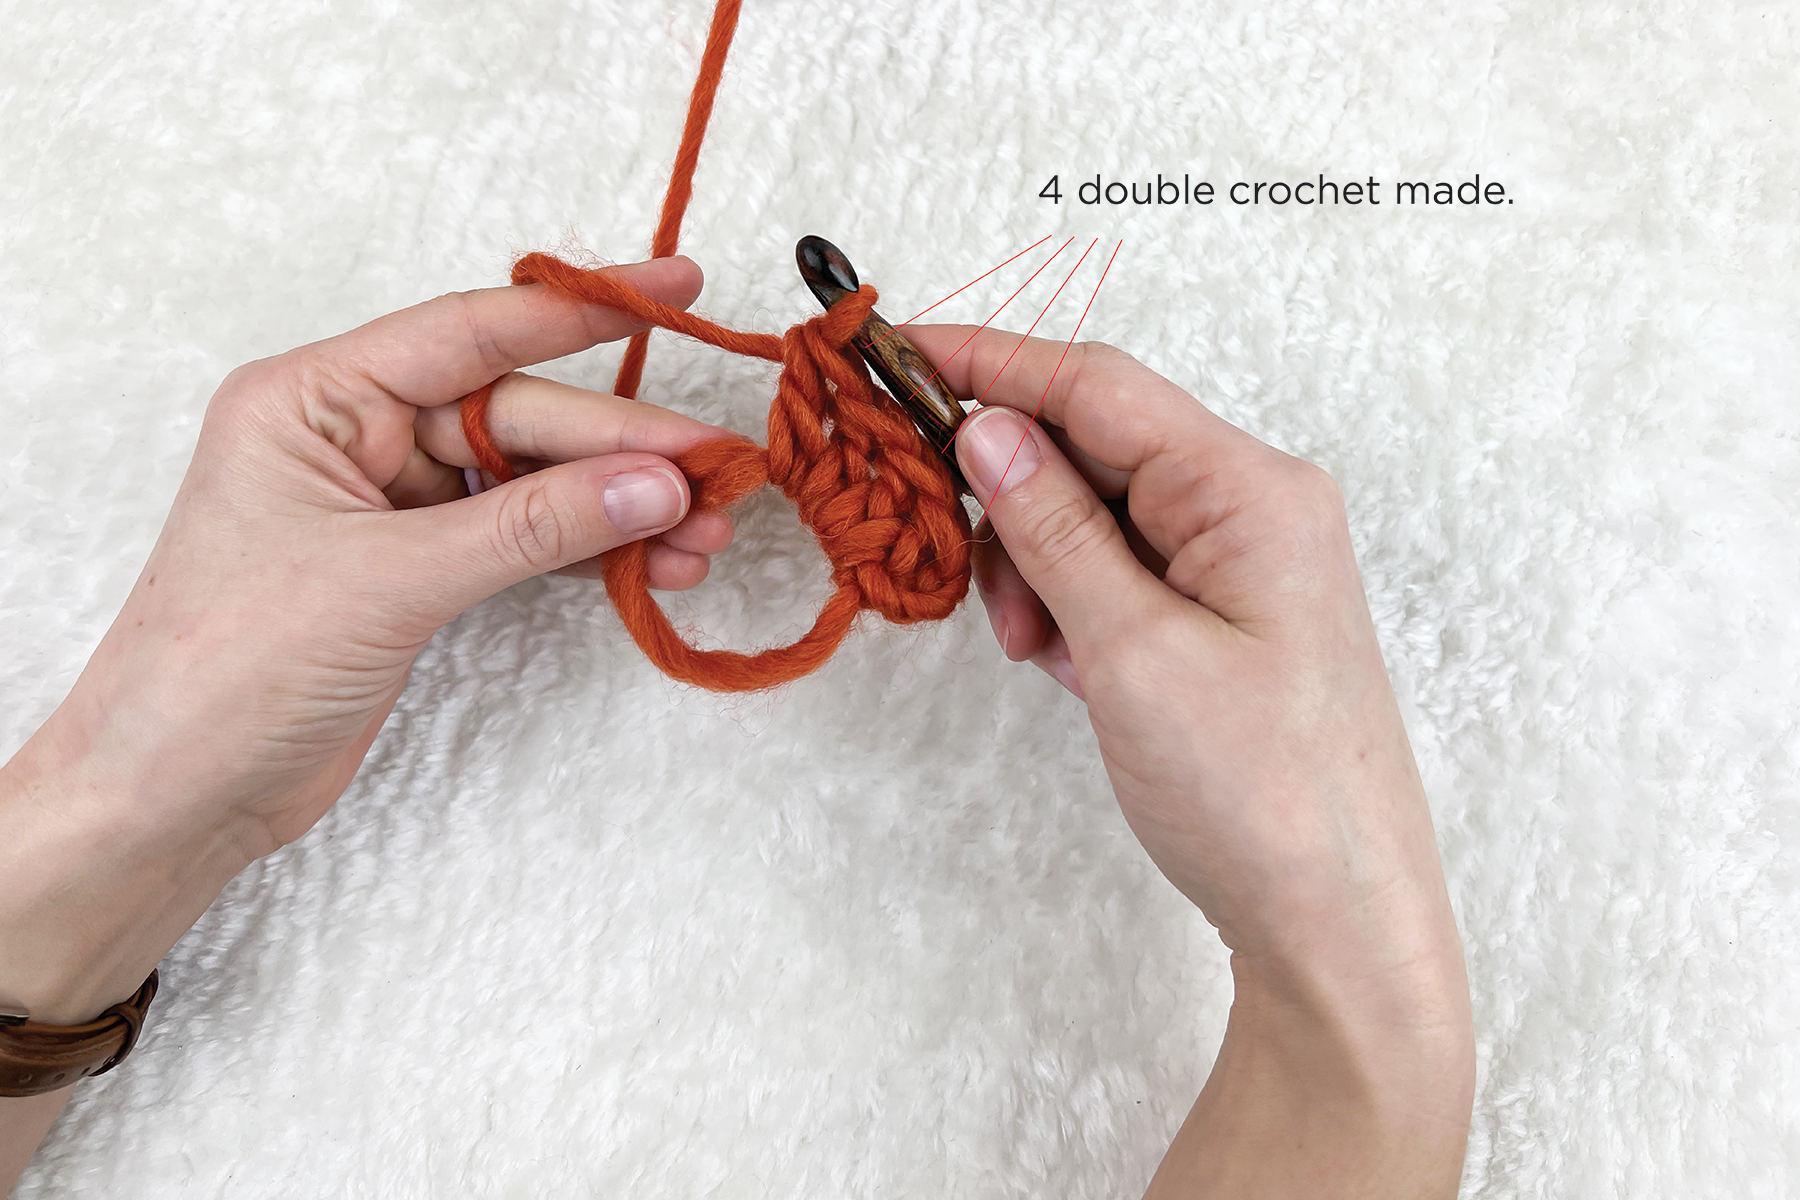
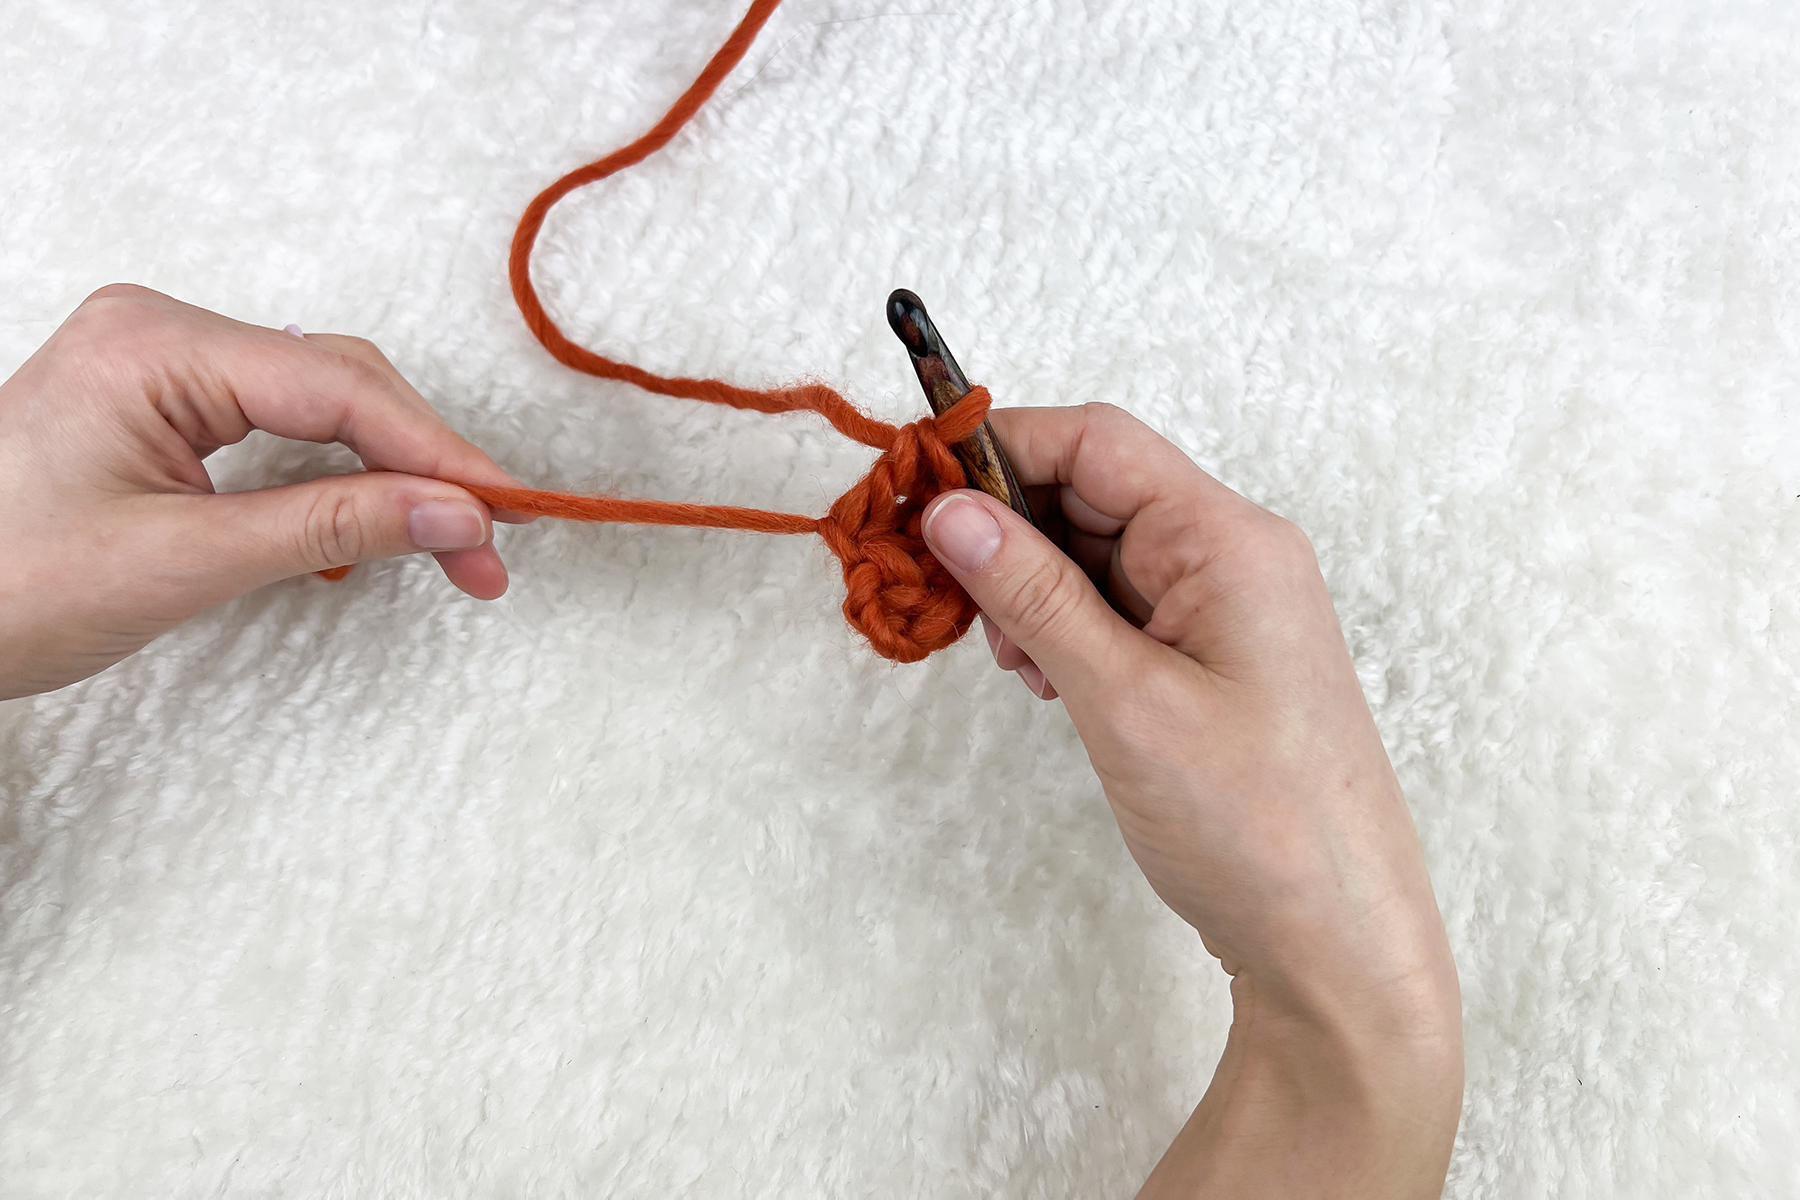
Step 5: Chain, then stitch into the middle of the circle. The pattern you are following will indicate how many chains, then stitches to create.
Here I chain 3, then double crochet 4 times into the loop to demonstrate the technique. But you can do this with any number of, or type of stitches!
Step 6: Close the circle.
Release your hold on the circle, and pinch the tail of the yarn.Pull the tail of the yarn until the circle is completely closed.
It’s as easy as that! From here, you continue following the pattern as normal, and will weave in the tail along with any other ends as a finishing step. I hope you find this tutorial helpful, and that you feel inspired to try a new project in the round!
That’s all for now, and Happy Stitching! Ashley Jane
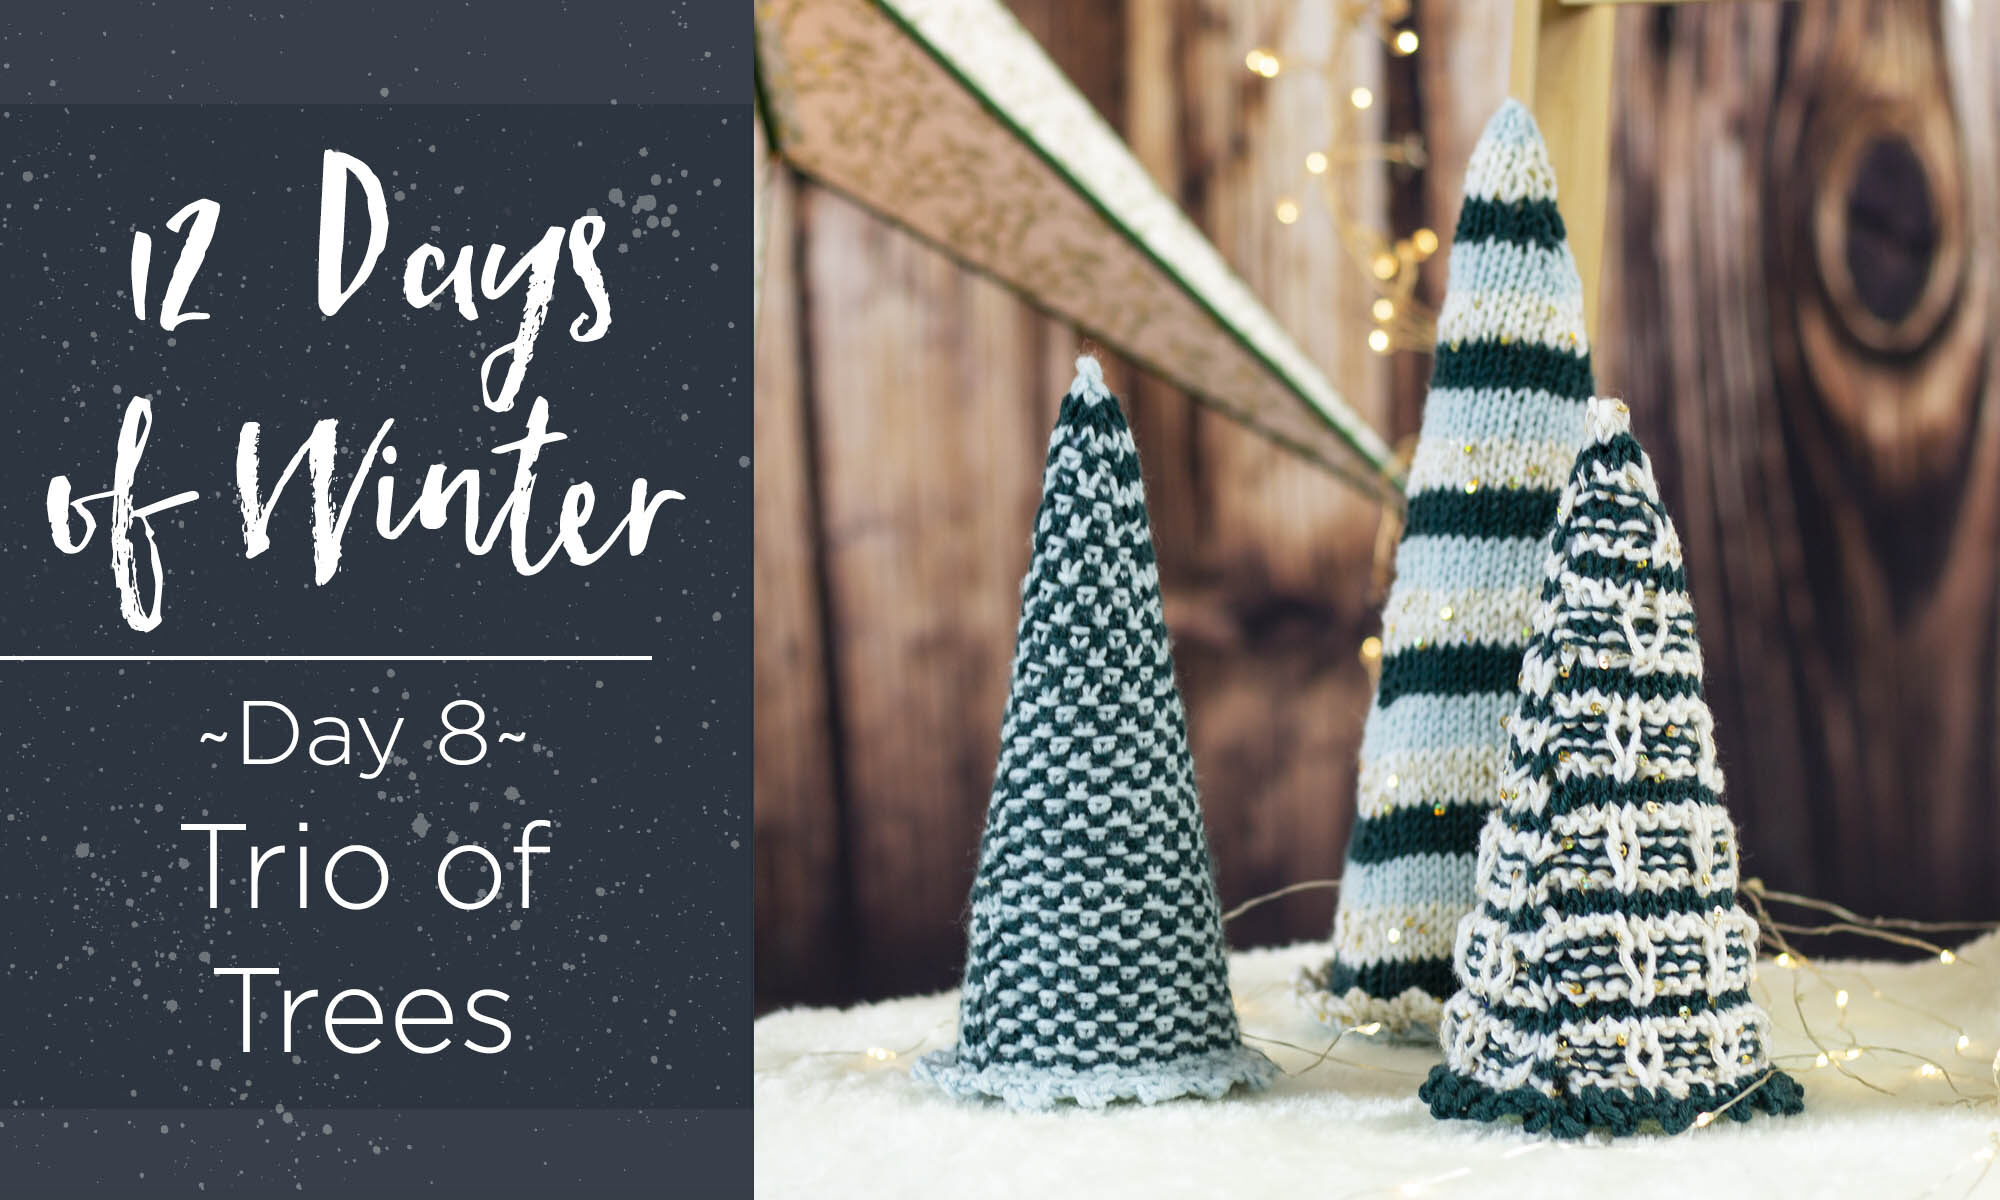
This is part 8 in a 12 part series highlighting designs from our 12 Days of Winter, series 5 Edition.
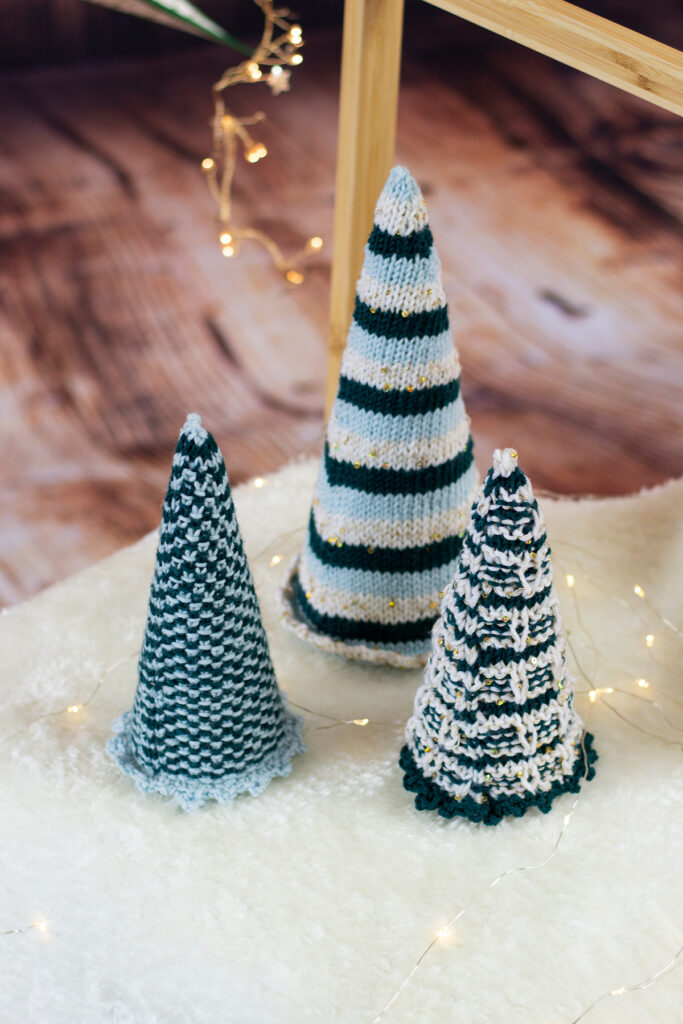
I love the winter season because of many things; seasonal drinks and items come back, joy seems to fill the air, and I always have fun shopping for holiday gifts! Another thing that I look forward to each season is winter-themed decorations! From driving by houses that shine brightly with different lights and figurines, to seeing what special and unique decorations each person sets up or creates, it’s clear to me that you can never go wrong with adding a little bit of spice and flair into your home with decorations for the season. Our Trio of Trees designed by Aubrey Busek is the perfect way to add seasonal décor to your home!
Trio of Trees
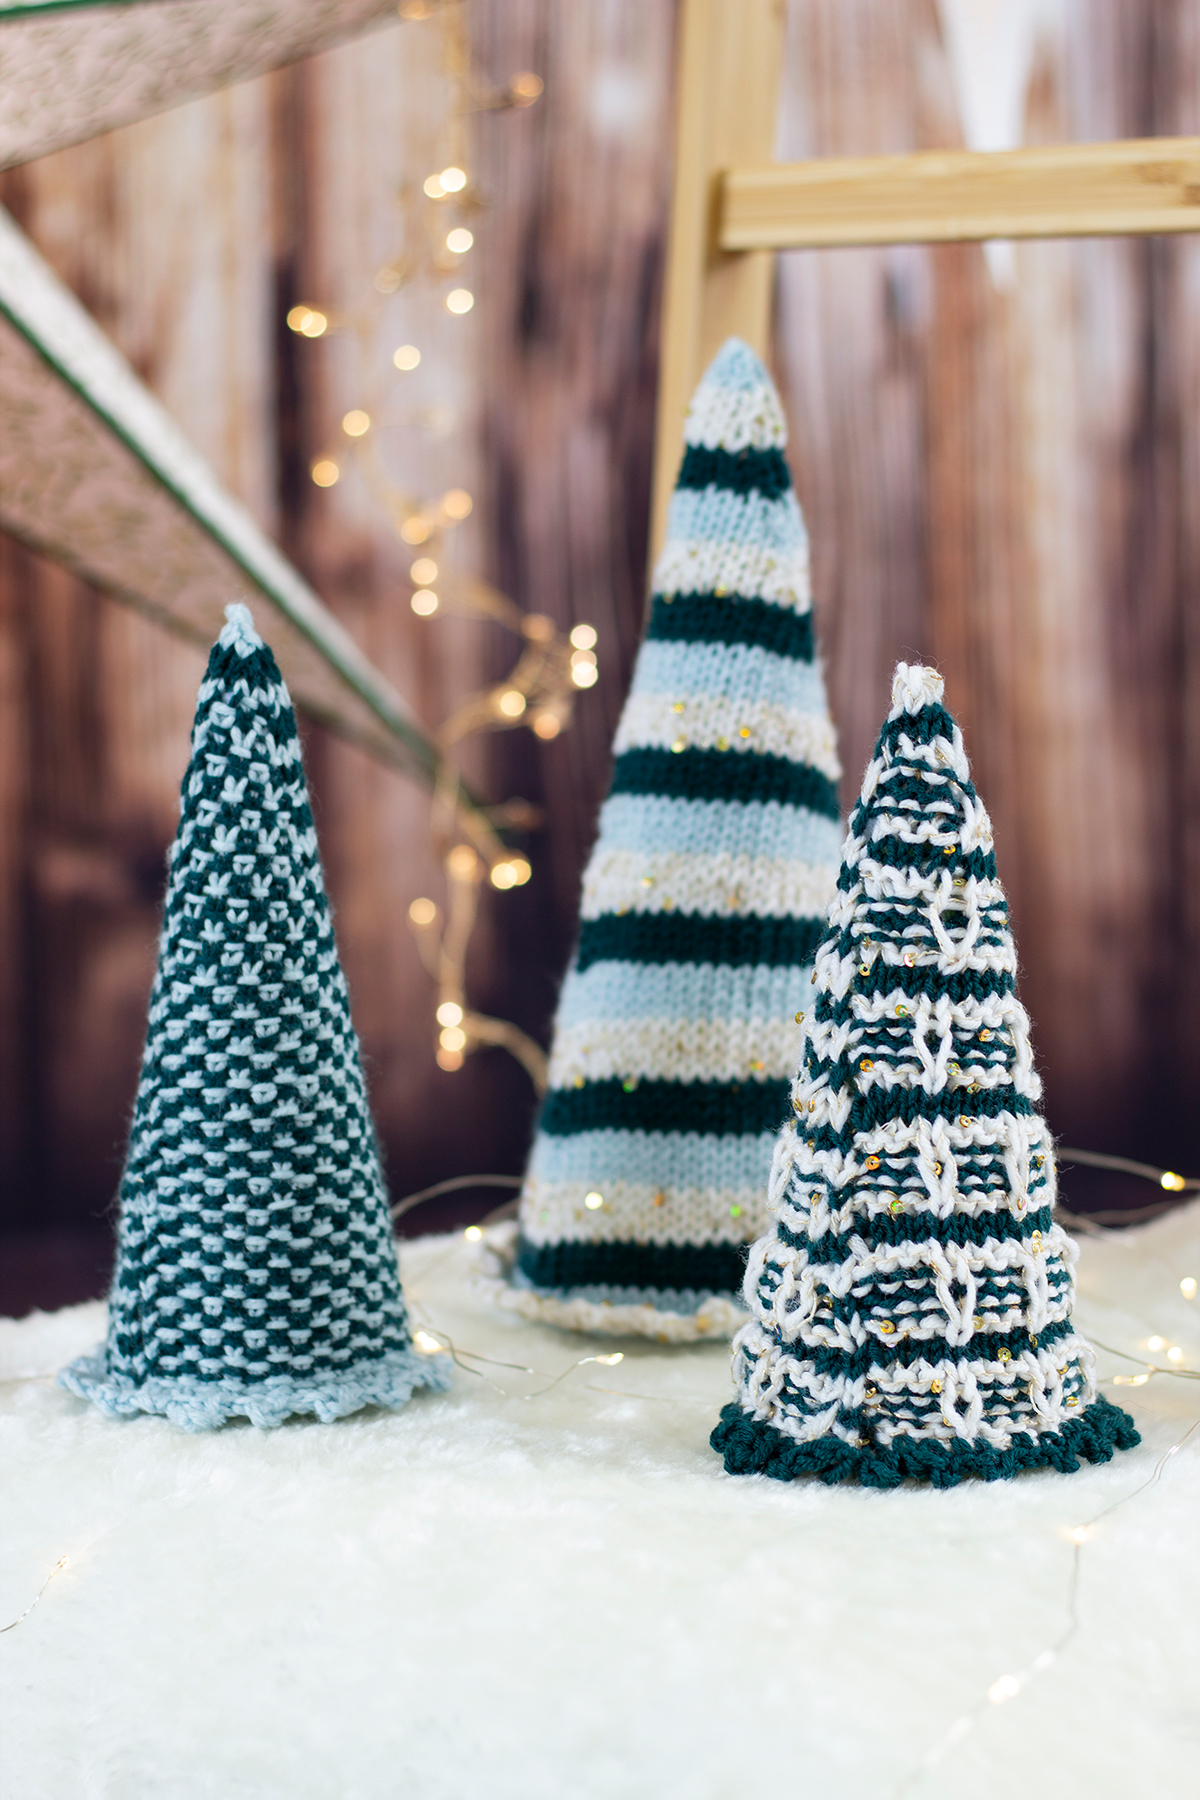
Let’s take a closer look: the Trio of Trees are made up of three elegant and timeless patterns that can be recycled year after year (which is such a huge plus!). The trio features a Linen Stitch Tree, a Striped Tree, and a Slipped Ornaments Tree. Each tree brings its own unique character to the table and can easily become a staple decoration in your home for the season. Featuring our Cotton Gold yarn as well as our Dona yarn, these two yarns held together and worked up create some magic to get you ready to jump into the winter season!
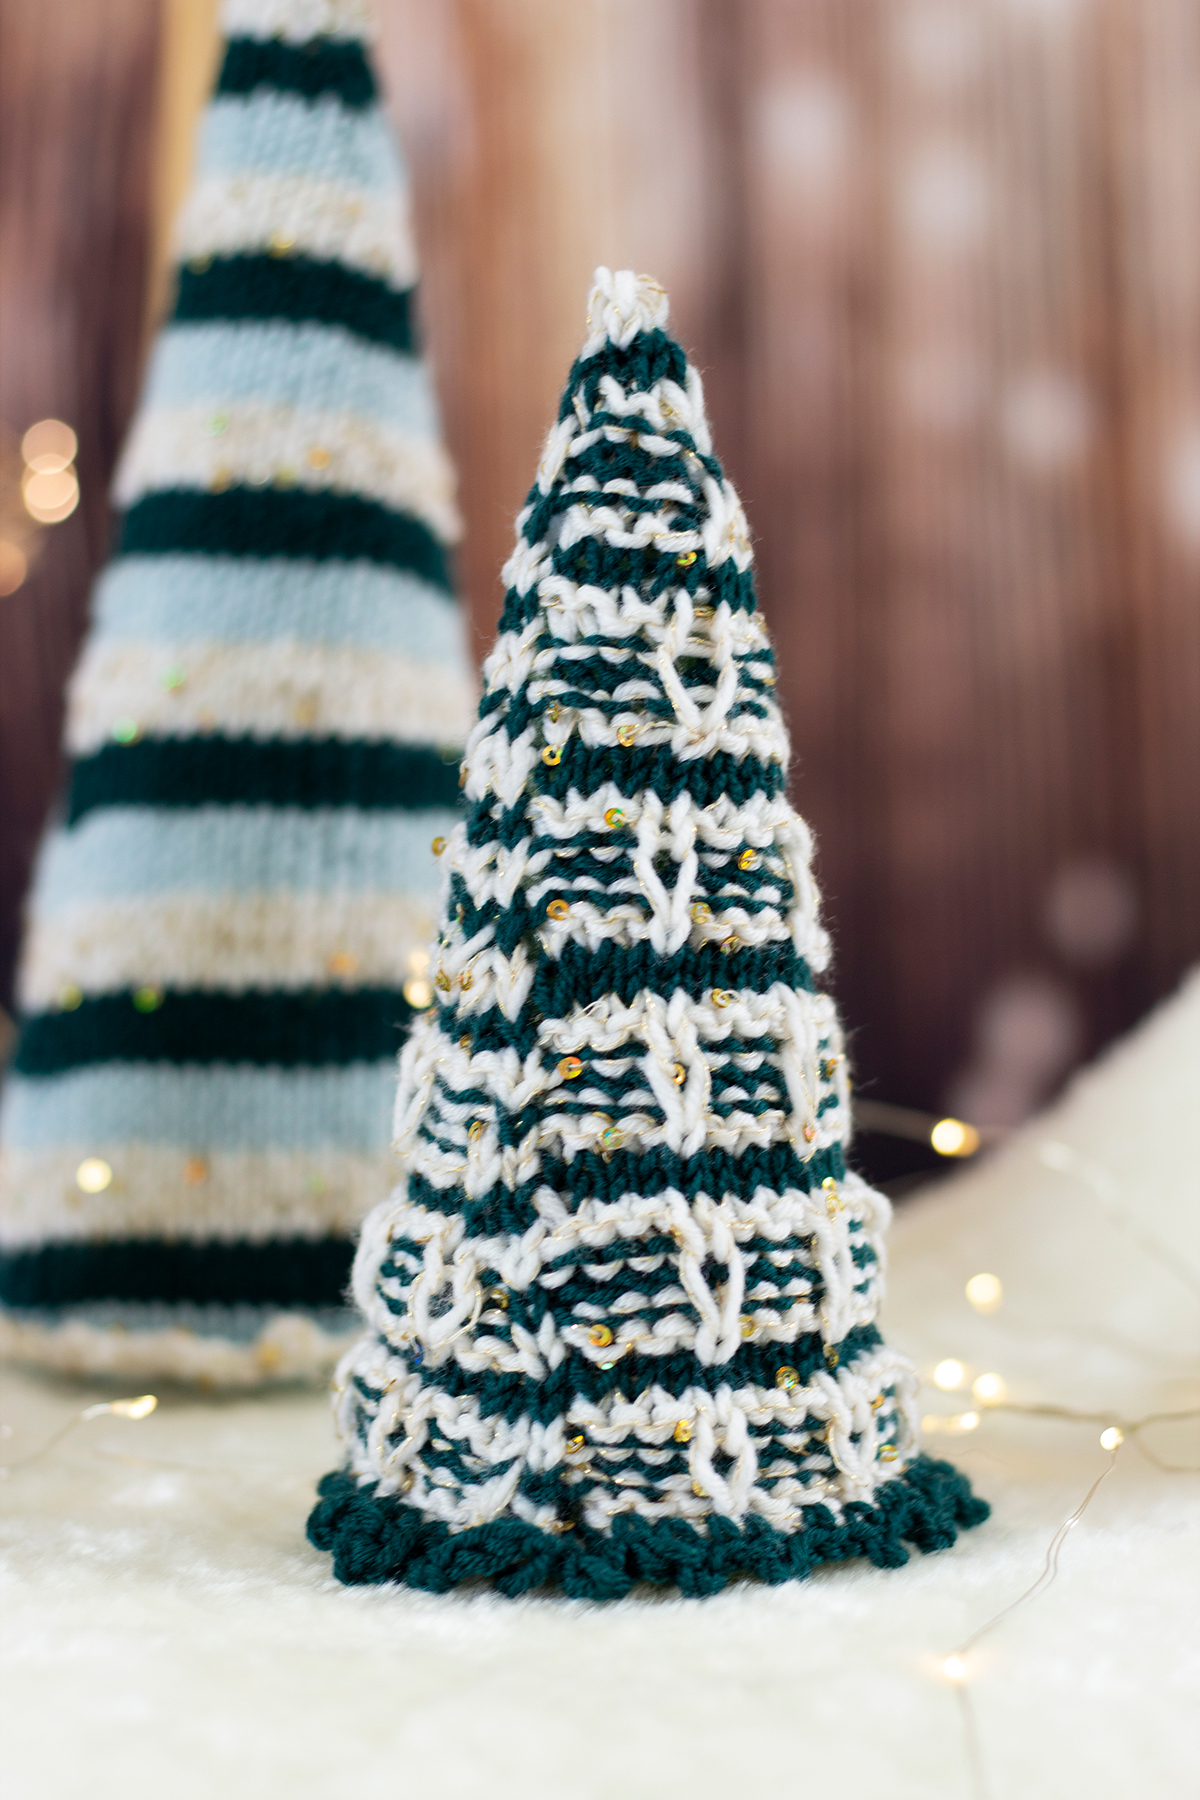
Slipped Ornament Tree
Each tree uses a different stitch pattern, which is fun because you are getting a “stitch sampler” with each tree you make! The Slipped Ornament Tree is my personal favorite, because it reminds me so much of a classic winter tree that we so often see during this time of the year. In this pattern, a special stitch called a Long Stitch is used. The yarn is wrapped twice around the needle, giving a “draped” effect throughout the tree. The delicate sequins strung through our Cotton Gold yarn creates a gorgeous shimmer that, when incorporated with the saturated colors of Dona, will have your guests do a double take and stop to admire this miniature forest in your home!
Linen Stitch Tree
You know those winter decorations that your family brings out year after year, no matter how “old” it gets? That is exactly what I think about when I see the Linen Stitch Tree. This specific tree instantly sends me back to sweet memories in the winter seasons spent with my family, decorating our home and getting ready for the upcoming events. The minimalist Linen Stitch tree offers a mix and match vibe to your holiday décor. You simply work knit stitches and slip stitches with yarn held in front to create a woven effect and provide texture to the tree.
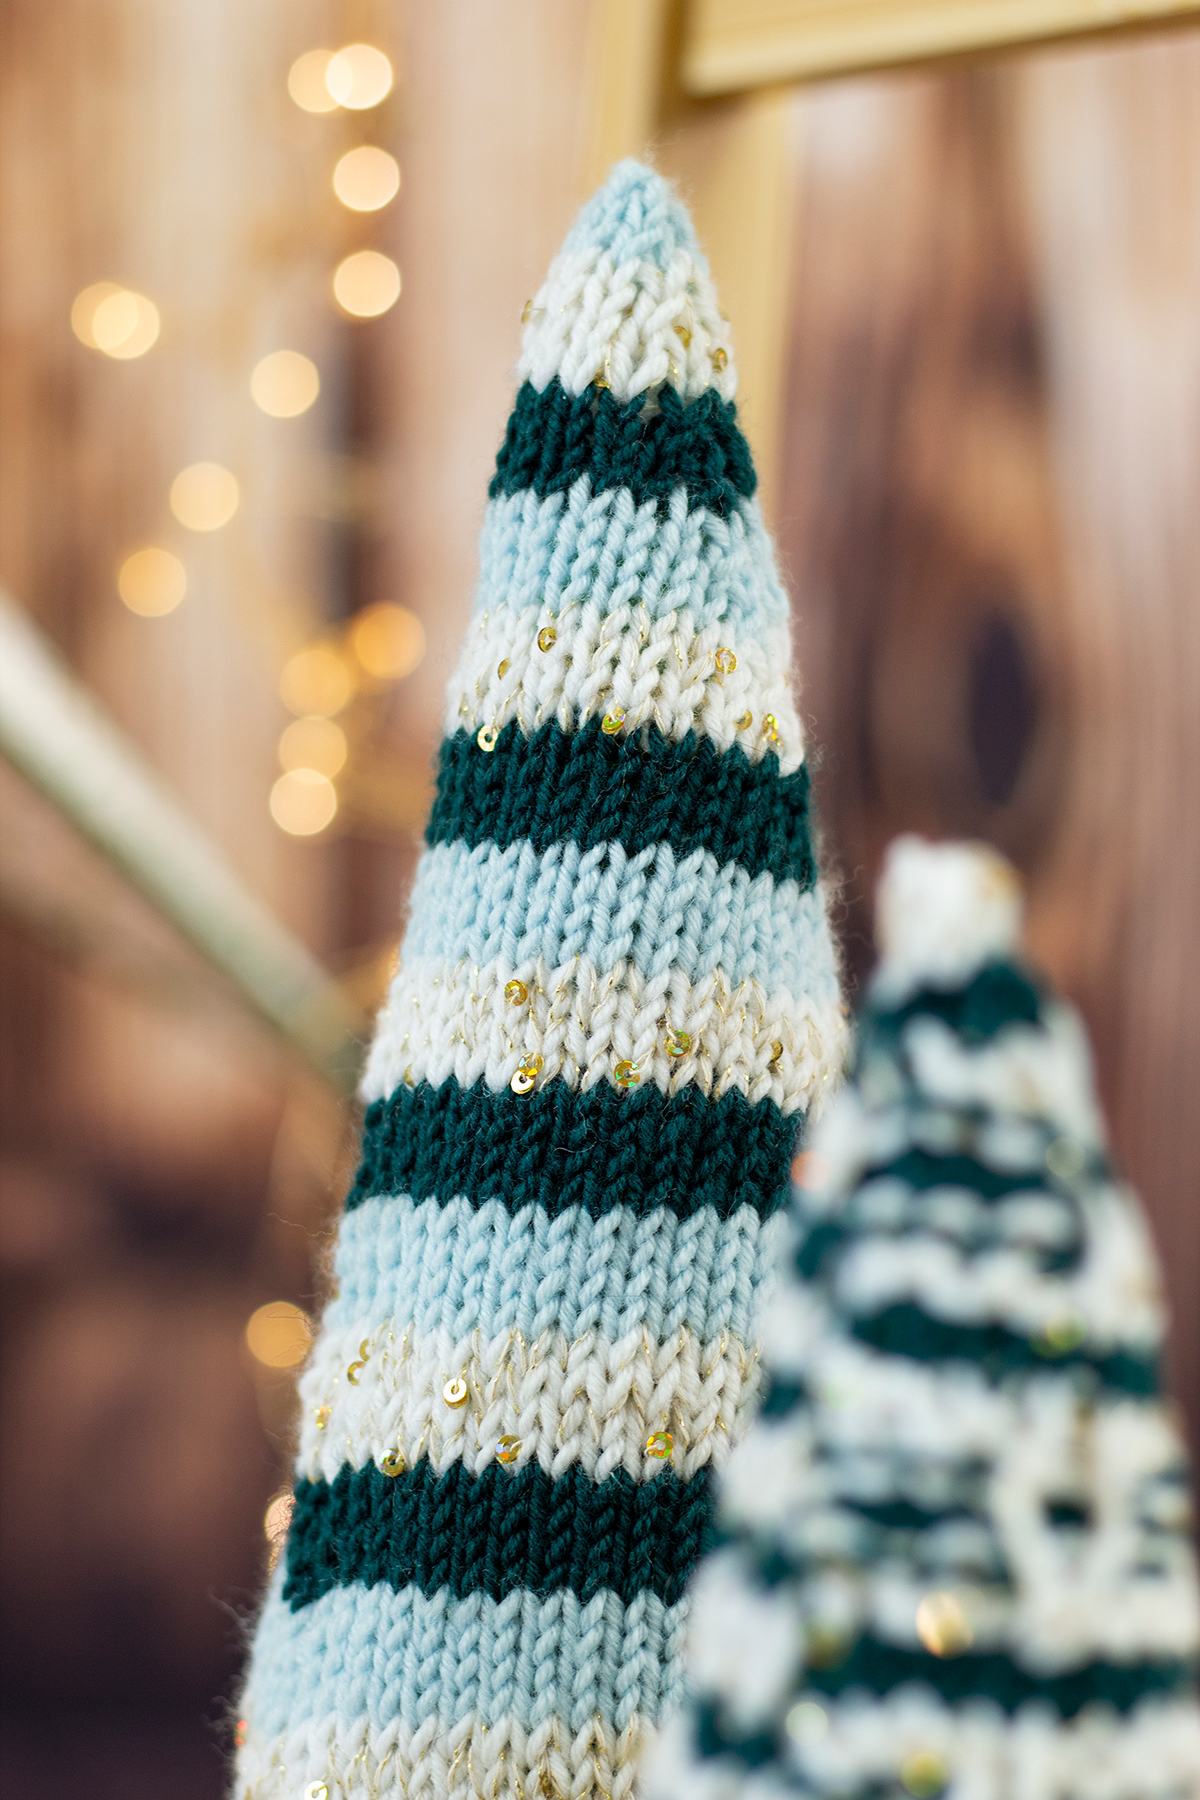
Striped Tree
Look at how it subtly glistens! The Striped Tree features a stockinette stitch pattern worked all the way up the body. A strand of each Dona and Cotton Gold are held together throughout the tree, and the Dona colors (Blue Hint, Balsam, Alabaster) are changed every four rows. The glimmer from Cotton Gold creates a dream-like aura of snow falling from the sky, which is fitting for the season! Although they are all effortless to make, the Striped Tree is the most minimalist pattern in my opinion because it is just stockinette stitch the whole way up! It is the perfect final addition to the Trio, because it adds the right amount of sophistication while still looking simple.
These trees are each knit in the round from the bottom up. A picot edge is picked up and worked after finishing to create ‘skirts’ on the bottom of each tree edge, and the tree tops are stuffed with poly-fill before finally placing around the Styrofoam bases. Remember to check your gauge! It is so important for accuracy and so it fits in the styrofoam cones properly. They are the perfect addition to your home for this winter season, and will be for years to come! These trees will make your friends, family, and guests feel welcomed in your home, in the holiday spirit.
Remember, these exclusive kits can be purchased at local yarn store retailers near you. Not in stock at your local shop? Ask them about drop shipping – order through them, and we ship to you! Each kit comes with the pattern, the yarn required to make it, a mini Universal Yarn project bag, and stitch marker. Use our store locator to find your nearest Universal Yarn retailer!
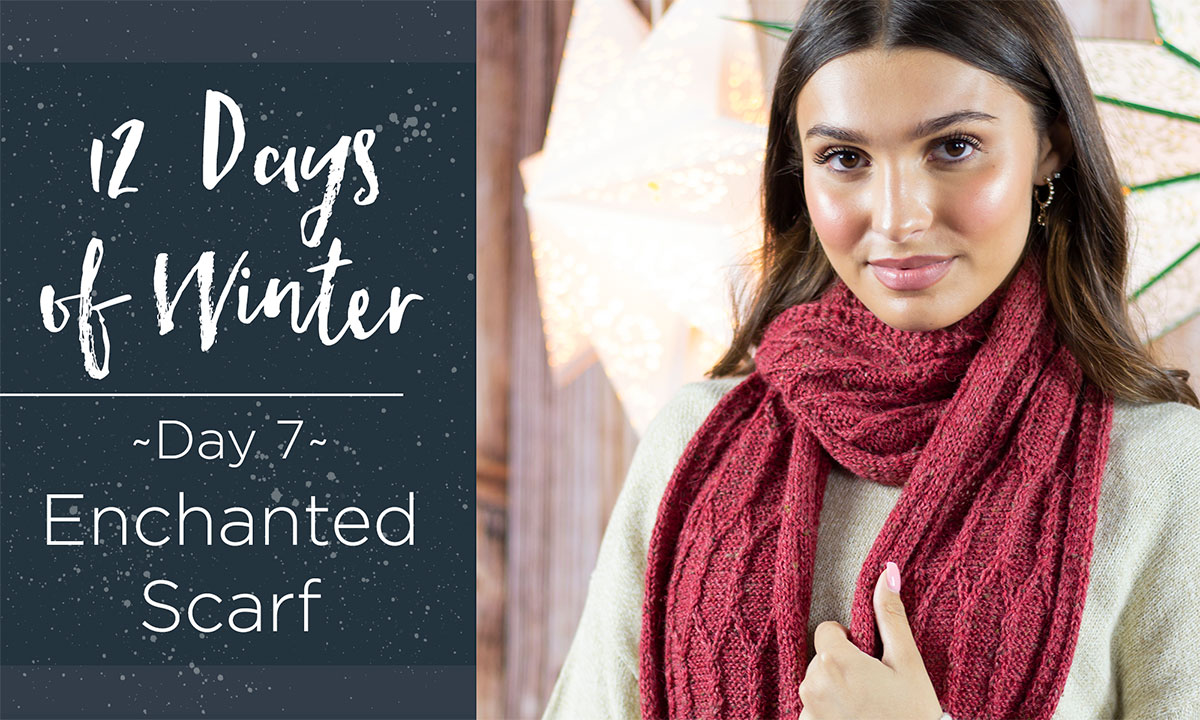
This is part 7 in a 12 part series highlighting designs from our 12 Days of Winter, series 5 Edition.
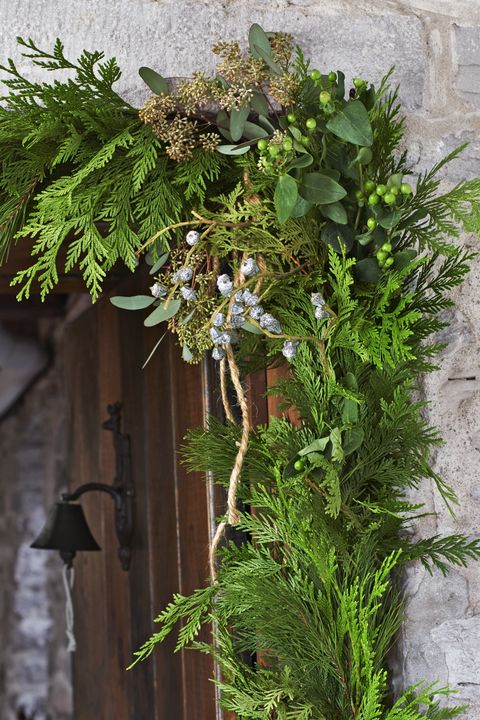
Glittering lights on trees and front porches, activities like ice skating, and delicious comfort foods are all special things about the winter season. Some might even call this time of year *enchanting*. I love driving around during December evenings and looking at holiday displays. Sipping hot cocoa and listening to holiday music while I look at decorations and ornamental garlands always makes me feel warm and fuzzy inside.
Image sourced from Country Living
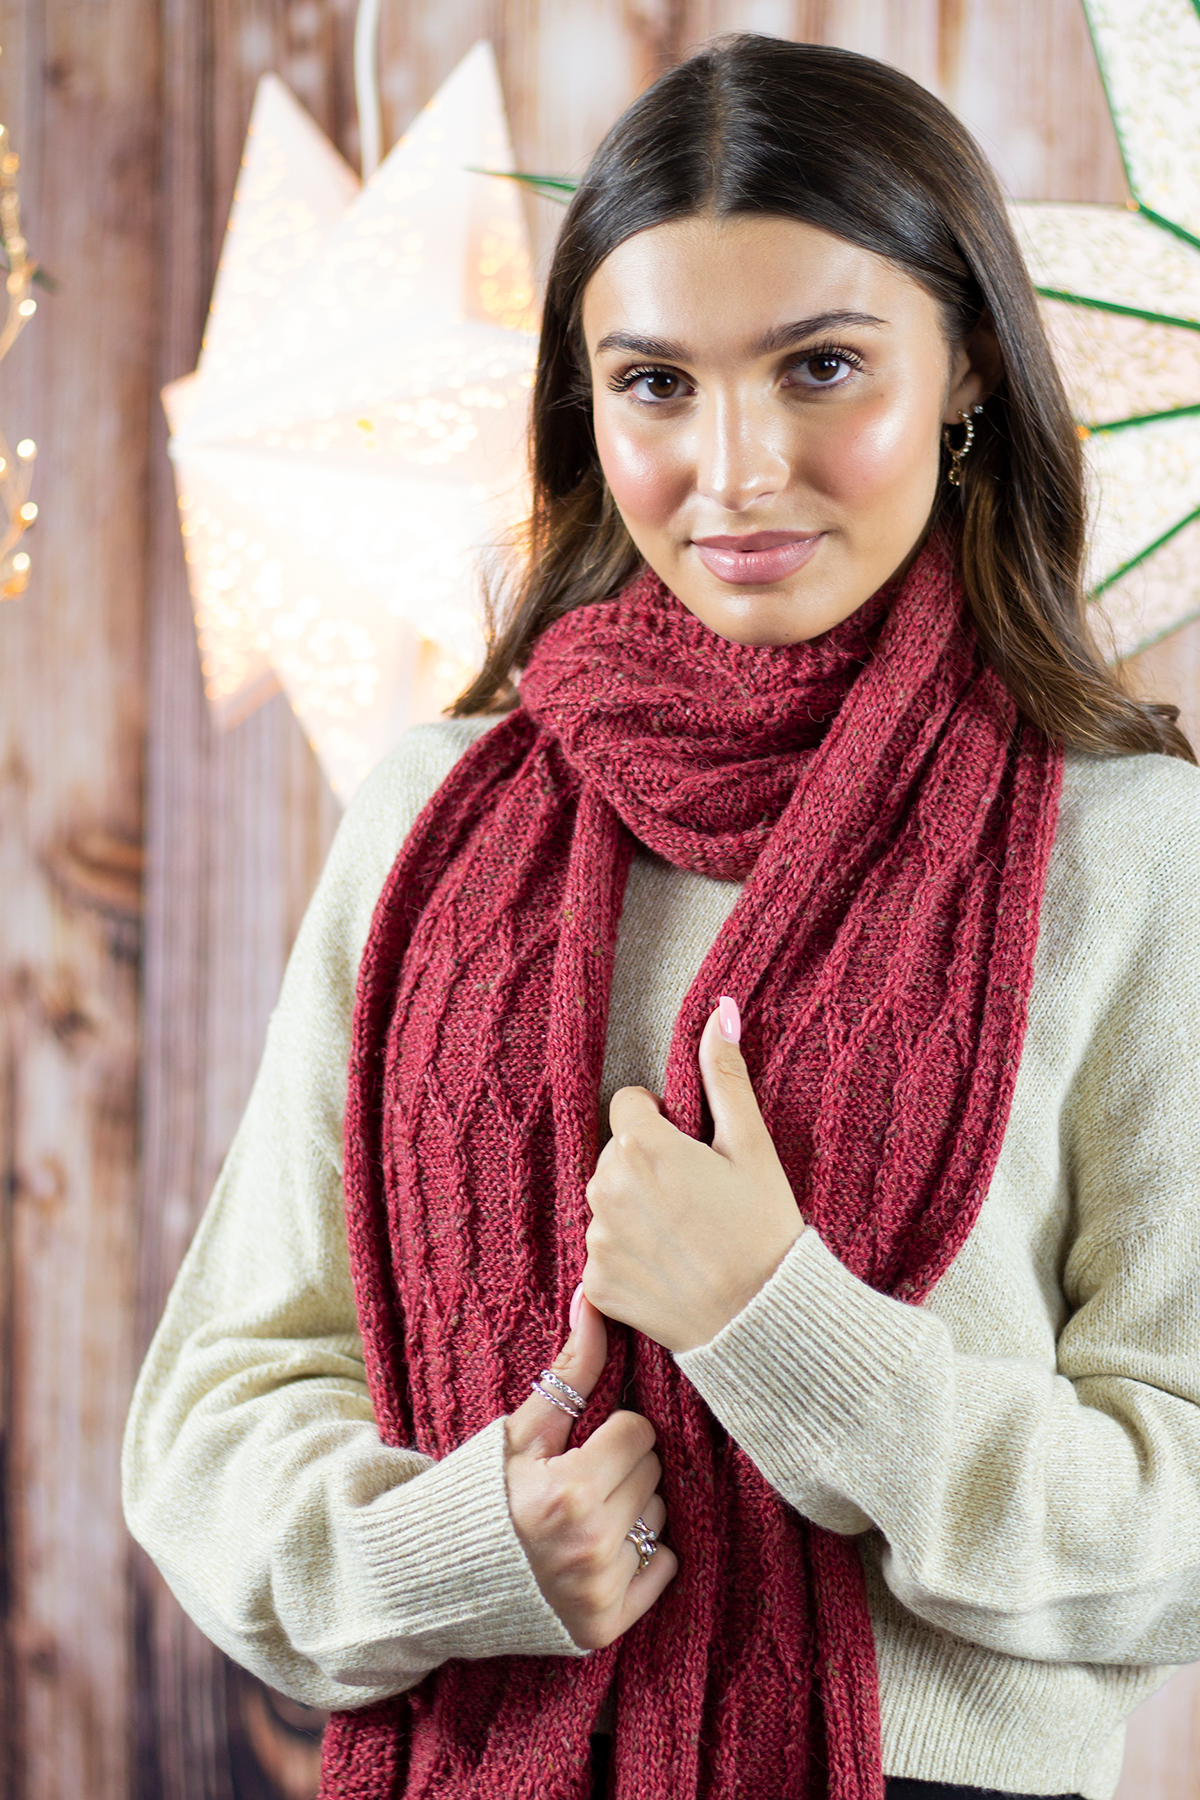
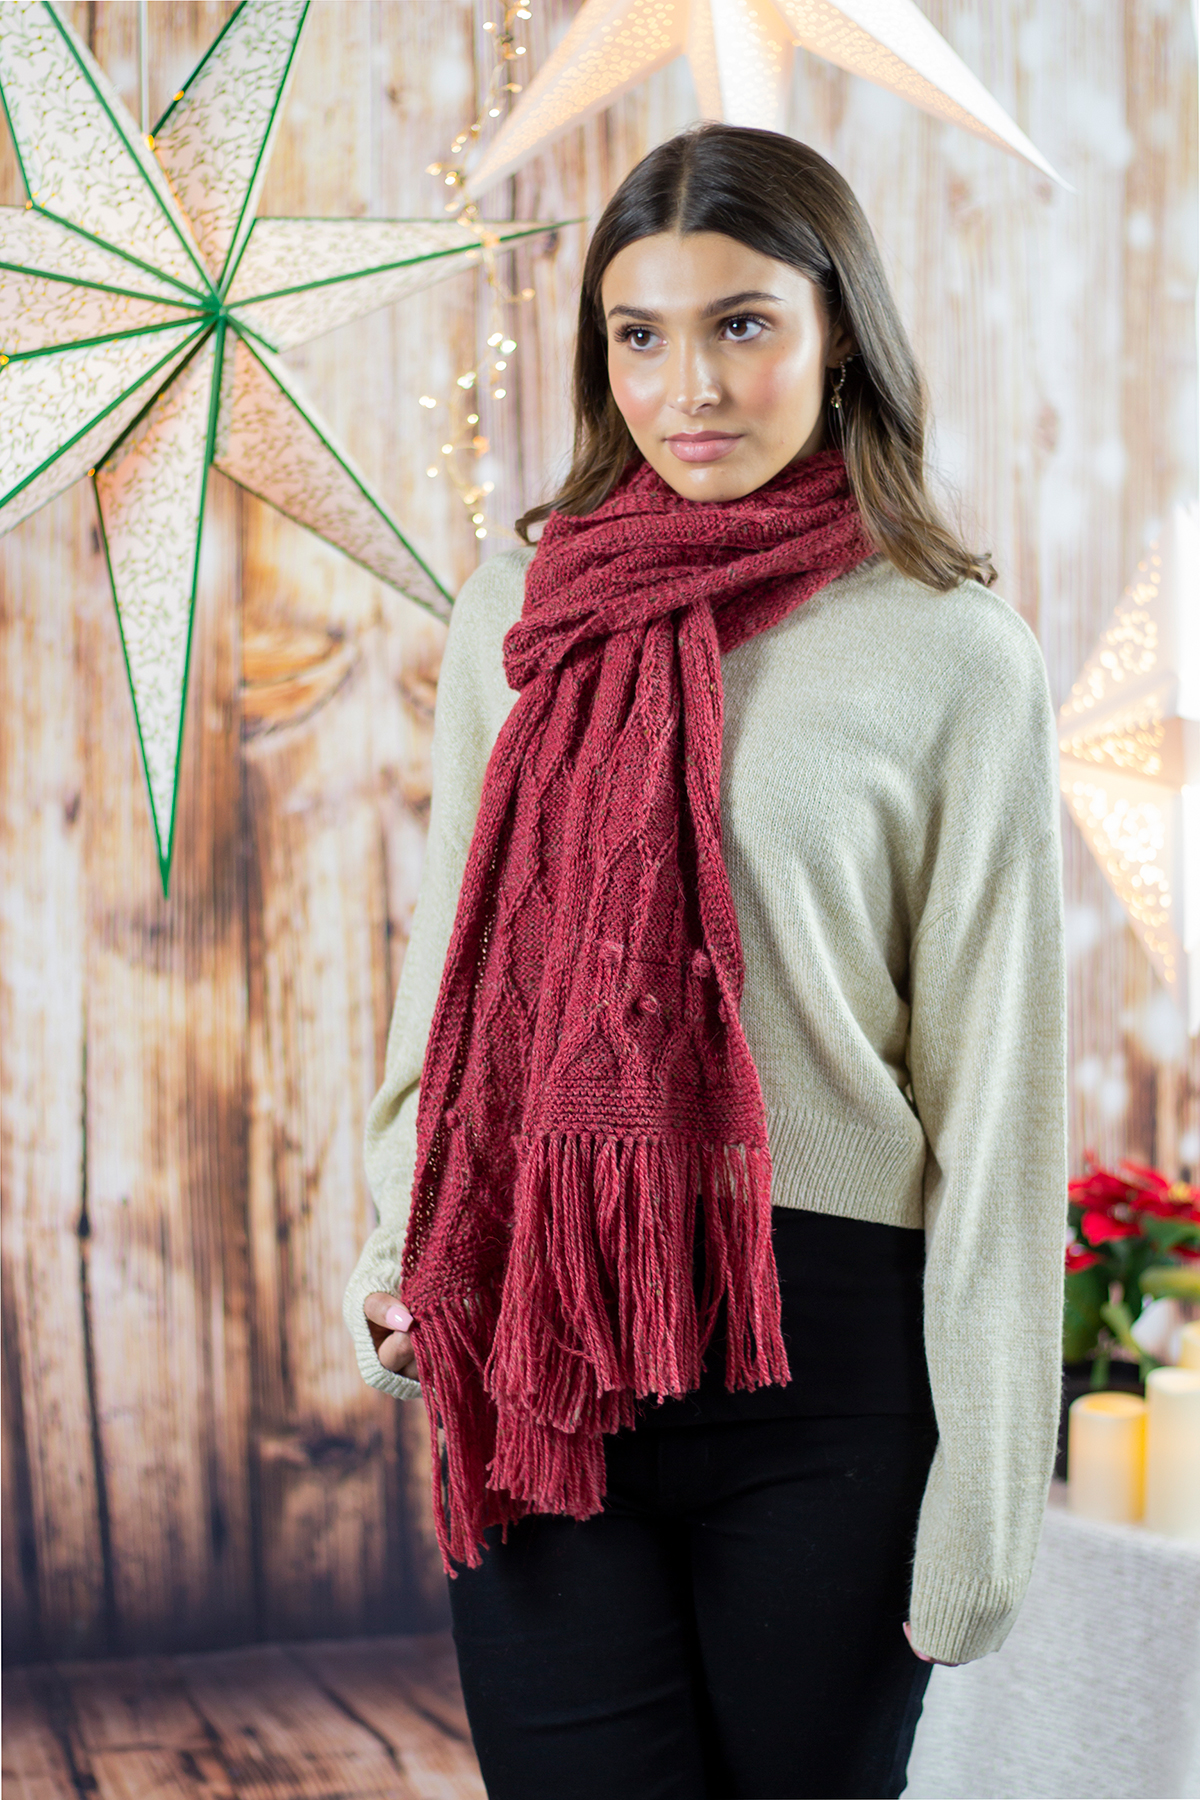
Garlands on banisters and front porches have always been some of my favorite decorations for the season. I have fond childhood memories of helping my Dad put ours up on the stairs and outside every year. Decorations like those served as my inspiration for the Enchanted Scarf, knit using Kingston Tweed.
Enchanted Scarf – knit using Kingston Tweed in color 115 Garnet
Techniques you’ll explore in this pattern are:
Knitting flat
Following multiple charts and stitch guides
Cables
Twisted stitches
Adding fringe
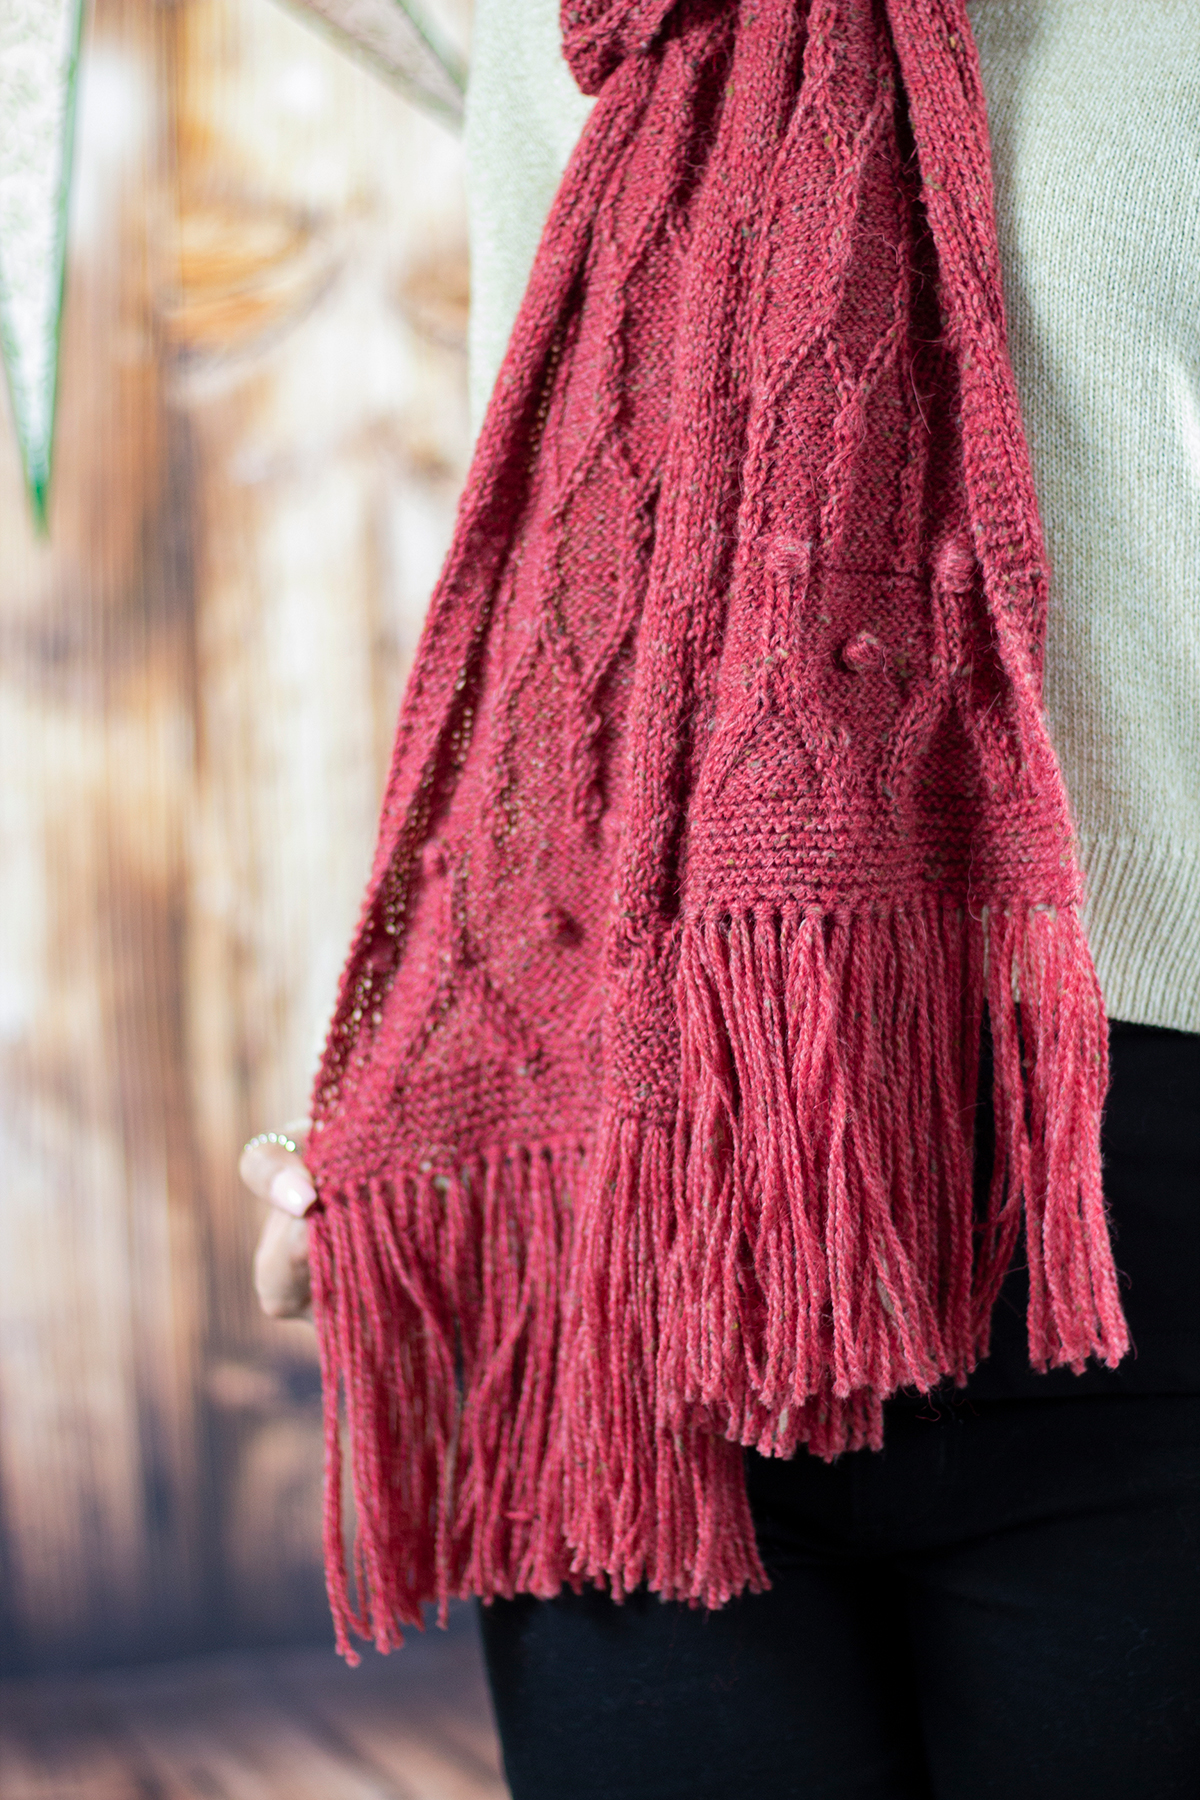
Kingston Tweed is a light weight (#3) weight blend of alpaca, wool, and viscose, which adds the tweedy nubs. This beautiful yarn makes a great choice for garments and accessories that you want to have an elegant, yet rustic look and feel. The color 115 Garnet is a lovely warm red shade that we released last year, and I knew was a perfect choice for the Enchanted Scarf.
First, a border of garter stitch provides a base for the scarf, then a cable and bobble pattern is worked, creating a texture that reminds me of garlands decorating a mantle or porch. This stitch pattern is reversed on the opposite end of the scarf to create a mirrored appearance. The ‘main body’ of the scarf is worked in a twisted lattice style stitch pattern. I absolutely love twisted stitches. They are delicate miniature cables, and add a sophistication to any stitch pattern. The lattice style pattern reminds me of strings of lights or popcorn on a tree, or lights decorating a house. You’ll work a matching garter border on the other end of the scarf before binding off.
Finally, fringe is added to both ends of the scarf. It reminds me of icicles, and honestly, I think all scarves are better with a bit of fringe. In addition to adding a little ‘Je ne sais quois’ to the scarf, it also shows off the yarn in it’s simple beauty. Kingston Tweed is a yarn with so much texture of its own, that something like fringe shows off all the little details in each strand.
Another textural knit element I love are bobbles! In addition to choosing them as part of this design, there are other patterns in our 12 Days of Winter collection that feature bobbles. They are a whimsical element that adds dimension to add to any pattern. Throughout the 12 Days of Winter blog posts, we like to offer tutorials, as well as tips and tricks for yarns and techniques featured in the kits. Today, I’d love to share with you all my tutorial for working bobbles in stockinette stitch. You can view the video here at this link, and watch below.
Bobble Tutorial by me
As I mention in the video, bobbles can be worked in a variety of different ways, so please refer to your pattern for the specific method used. Although the Enchanted Scarf is knit using Kingston Tweed, I opted to use Uptown DK for the tutorial. It is a smooth 100% anti-pilling acrylic yarn, and provided great visibility for the tutorial. I hope this video is helpful and enjoyable to you. Tell us in the comments: what is a knitting technique you’d like a tutorial made for?
Our exclusive 12 Days of Winter kits can be purchased at local yarn store retailers near you. Each kit comes with the pattern, the yarn required to make it, a mini Universal Yarn project bag, and stitch marker. Use our store locator to find your nearest Universal Yarn retailer! Kits not in stock at your local yarn store? Ask about drop shipping – order through them, and we ship to you!
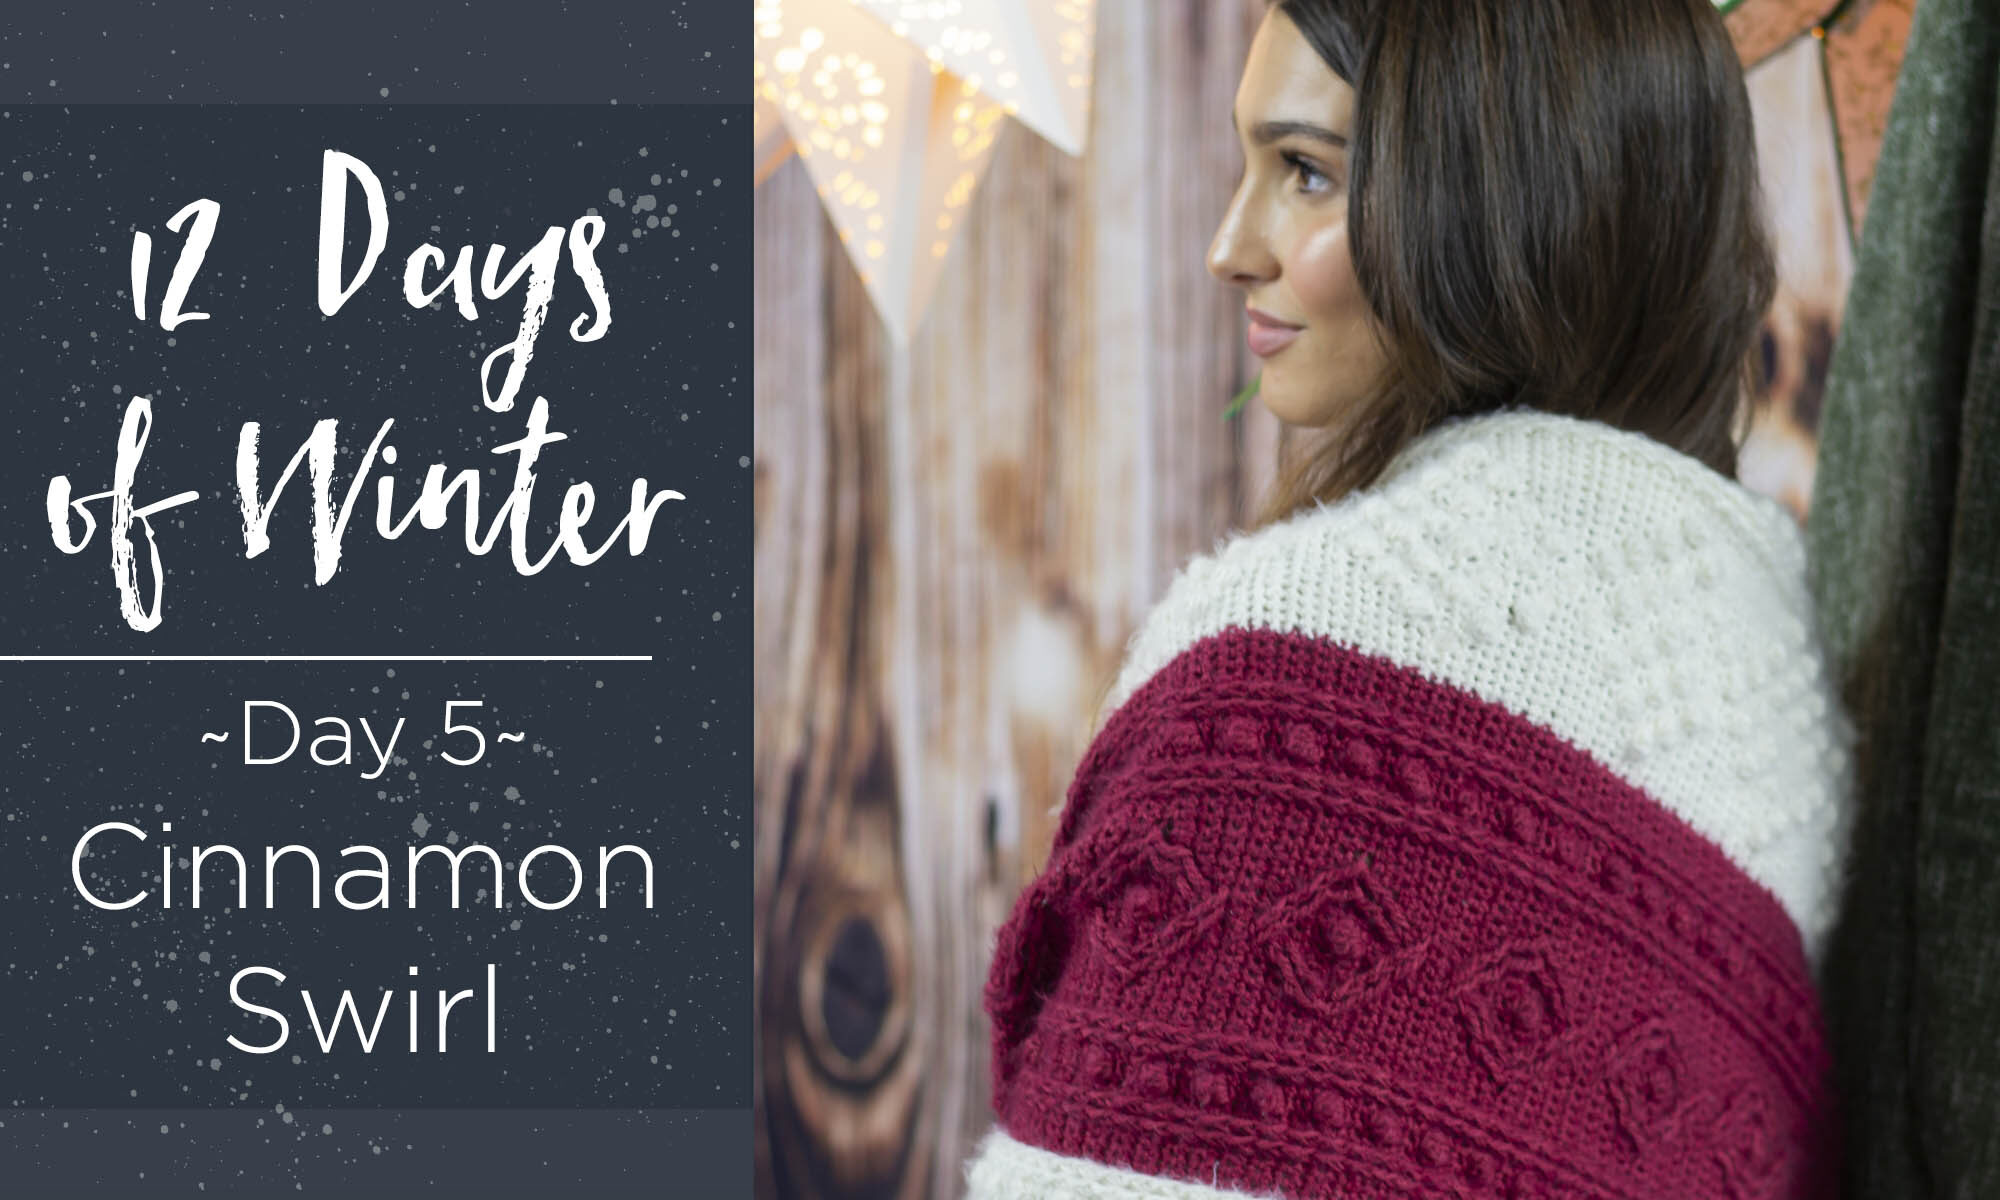
This is part 5 in a 12 part series highlighting designs from our 12 Days of Winter, series 5 Edition
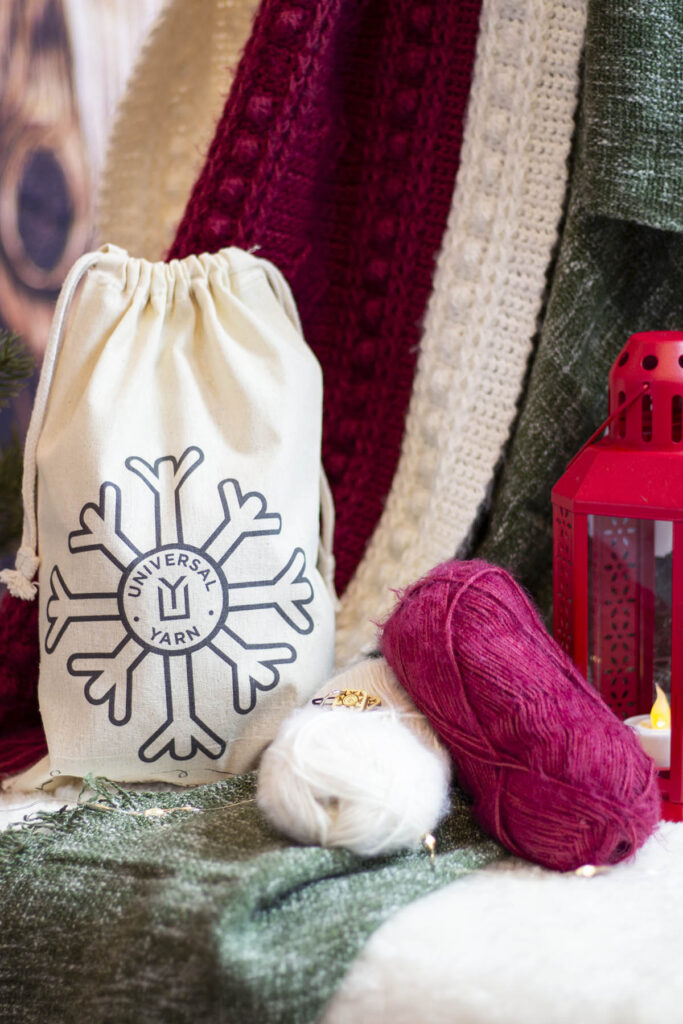
Hello there! I’m so thrilled to bring you our 5th day piece, the Cinnamon Swirl Stole. It’s made with ultra-soft Nymph, and is available in both a crochet version and a knit version , so it feels extra special. Nymph is a blend of Cotton and Polyamide and is genuinely one of the softest yarns I have worked with in a long time! The finished project feels cozy and luxurious – the perfect item to treat yourself. As an extra bonus each of these kits comes with a bonus project bag and stitch marker!
Nymph with bonus kit items – a project bag and stitch marker!
I had the opportunity to design this as a crochet piece first, serving as the inspiration for the knit kit. We will spend some time in this post talking about a special technique involved for crochet – how to join panels as you work.
Cinnamon Swirl, Crochet Version
Before we do that though, can we just take a moment to “Ooh!” and “Ahh!” over the knit companion to this piece!? It’s stunning! this knit version is all worked in one panel using an Intarsia technique for the colorwork, while the crochet version makes one panel at a time, but they attach as you go.
Cinnamon Swirl, Knit Version
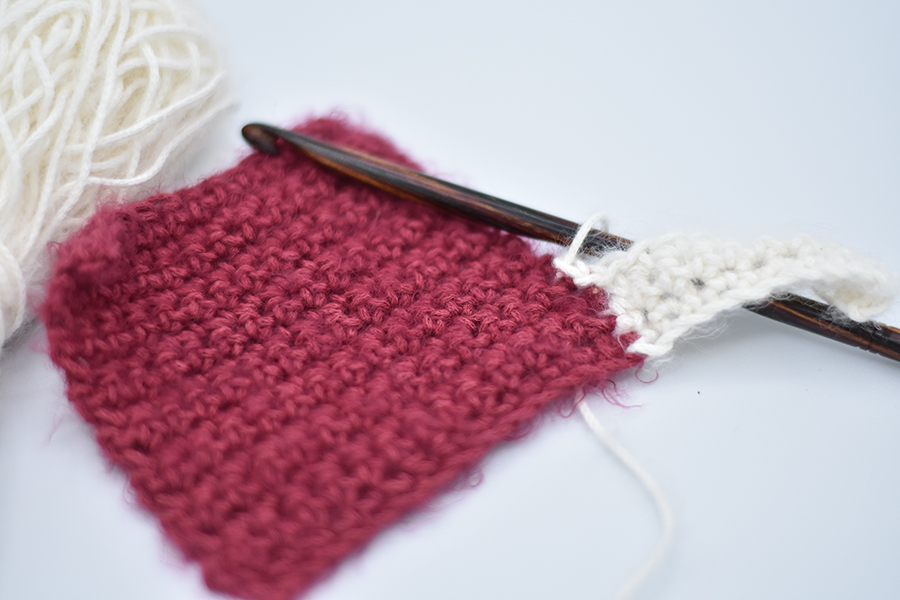
To accomplish the crochet join technique, you’ll execute what the pattern calls a “Slip Stitch Sequence” at the end of every other row. This will connect the new panel to the existing one with a practically invisible effect. It lets you achieve the same look as intarsia, while being able to focus on one set of pattern repeats at a time.
Cinnamon Swirl, Crochet Version
The pattern works from the bottom up, and you add new panels on the right hand side of existing ones. To do this, you join the new yarn at the bottom right corner of an existing panel, with the right side facing you, then chain the amount needed for the new one. you’ll turn the row like normal and work back towards the existing panel, then slip stitch to it to finish the row, and slip stitch one row up before turning to start the next row.
Swatch of the Panel Join from our tutorial
To make sure we don’t leave anybody hangin’ on this technique, we have recorded a tutorial for you! To follow along you’ll want to start out with a swatch of 15 sc sts x 16 rows, using an H/8 (5.0 mm) hook and the yarn Nymph. Have the second color handy along with your hook and press play. This will be a wonderful opportunity to try out this sequence before diving into the pattern.
Tutorial of the Panel Join “Slip Stitch Sequence”
I hope that this tutorial has been helpful to you, and I can’t wait to see how your beautiful Cinnamon Swirl Stoles turn out! Remember, these exclusive kits can be purchased at local yarn store retailers near you. Not in stock at your local shop? Ask them about drop shipping – order through them, and we ship to you! Each kit comes with the pattern, the yarn required to make it, a mini Universal Yarn project bag, and stitch marker. Use our store locator to find your nearest Universal Yarn retailer! Warmly, Ashley Jane McIntyre
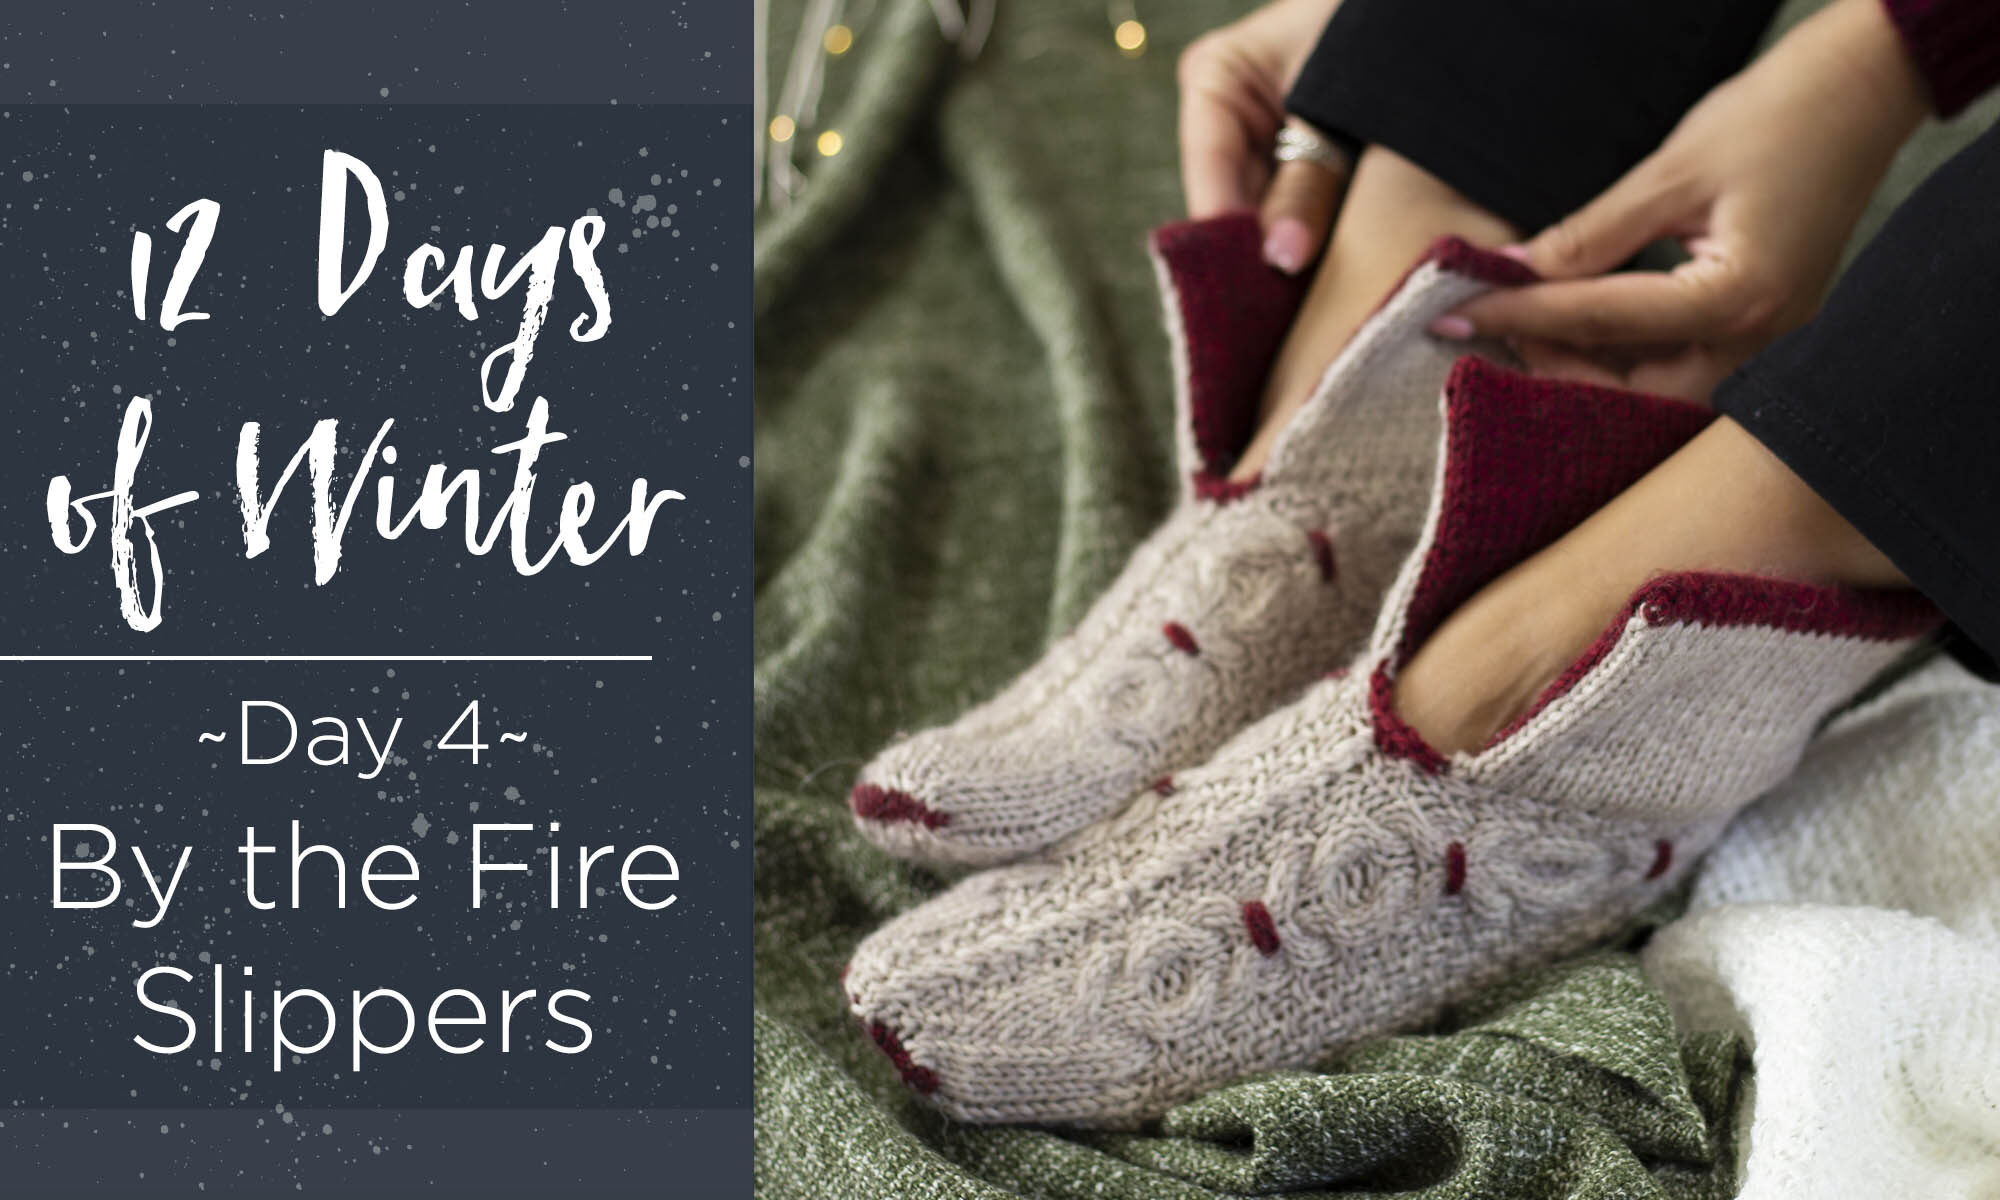
This is part 4 in a 12 part series highlighting designs from our 12 Days of Winter, series 5 Edition.
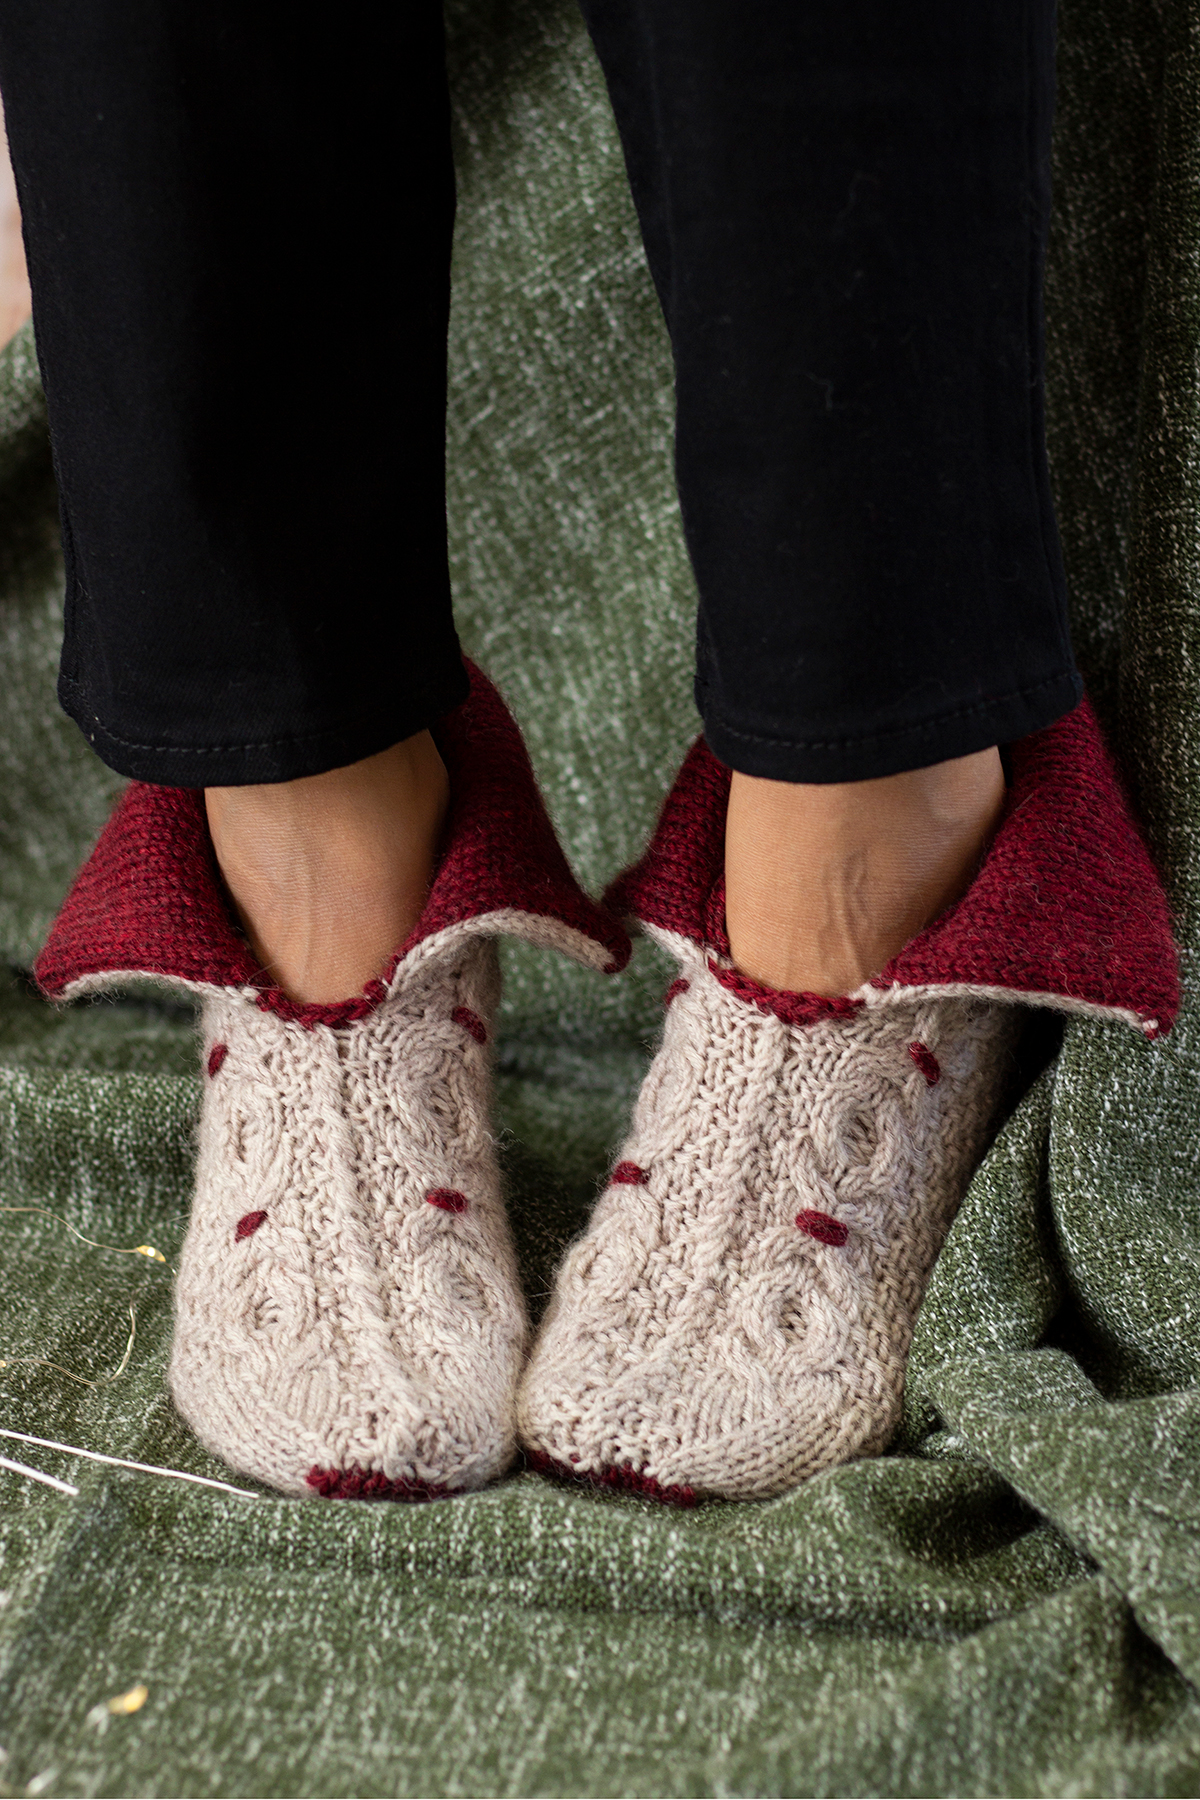
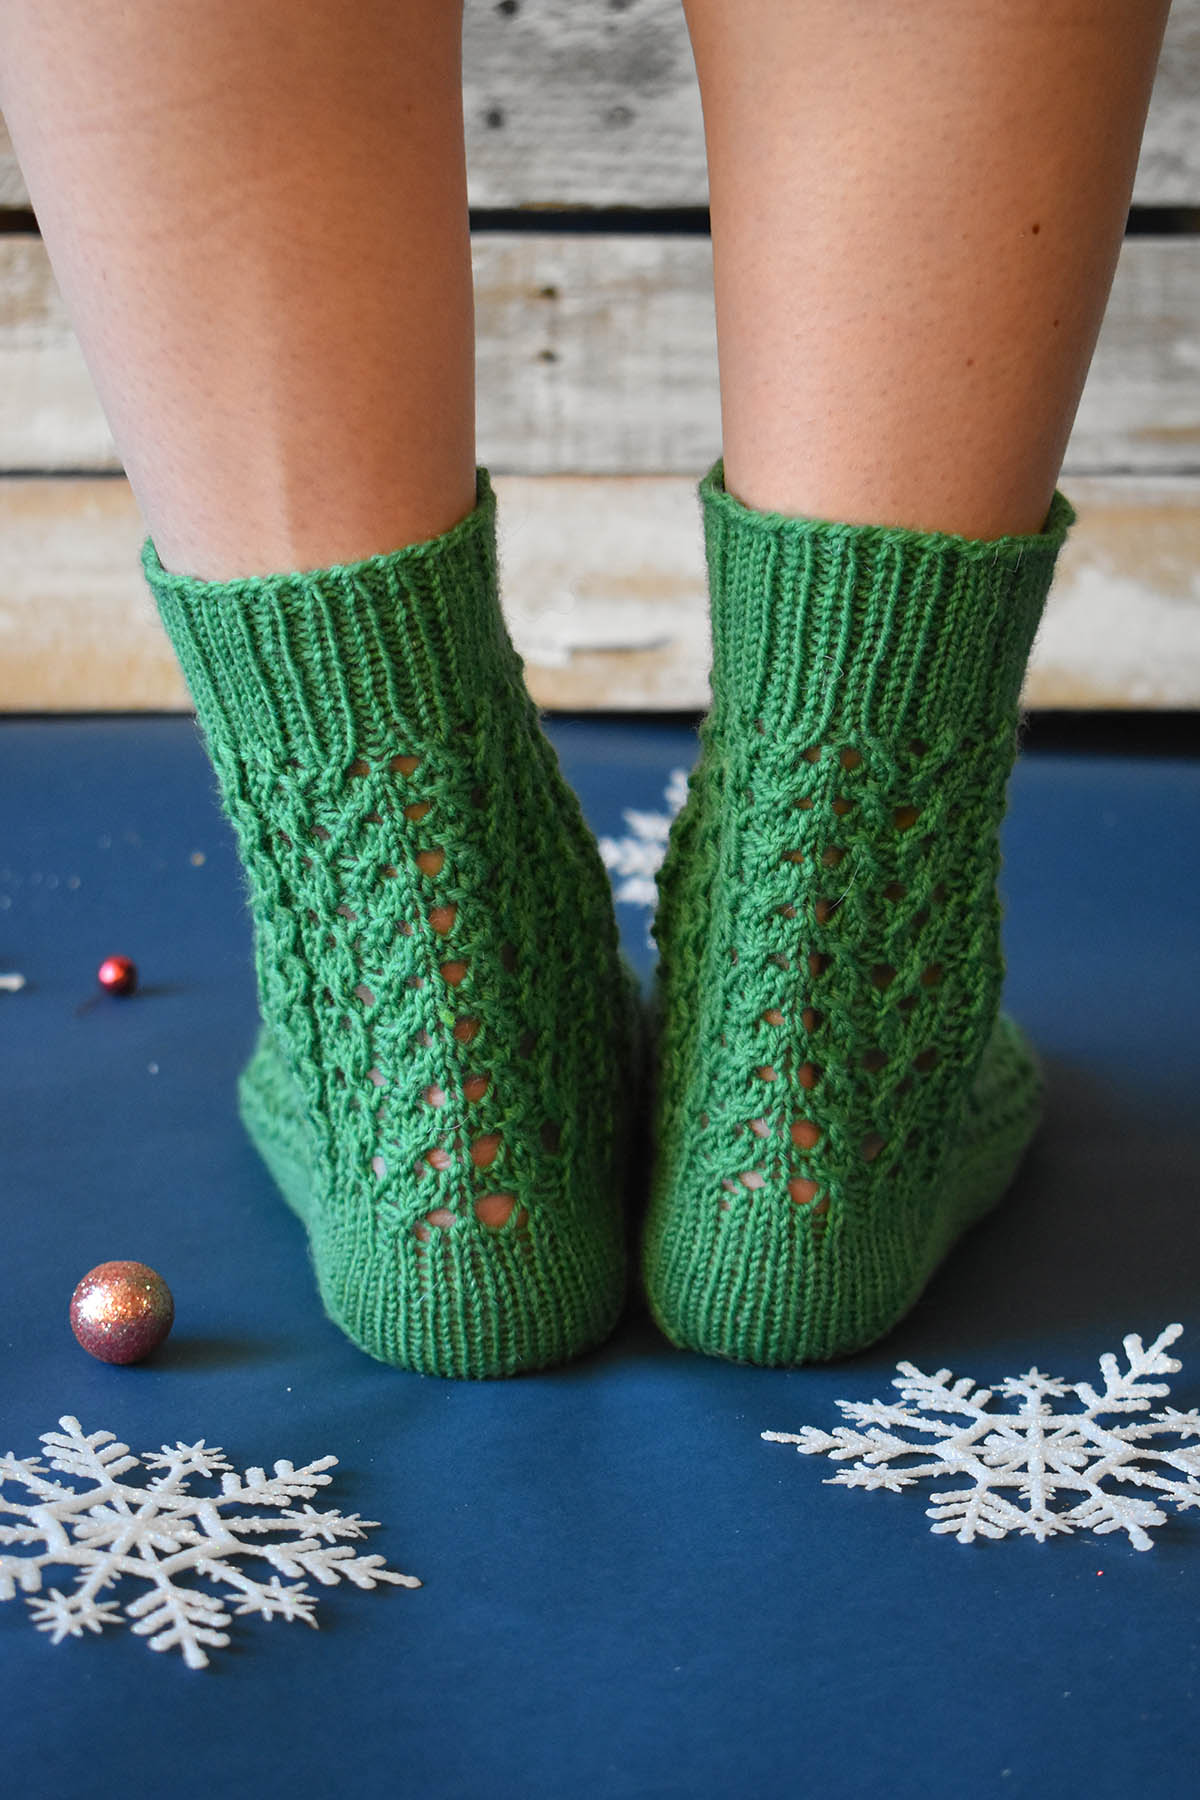
Happy Saturday! I hope your weekend is off to a great start, with a slow morning, warm cup of coffee, and of course, a yarny project! The 12 Days of Winter Kit Collection is one of my favorite design projects each year. We started it during my first year here at Universal Yarn, and I cannot believe we’re already in its fifth rendition! So far, we’ve created more than sixty wintry, giftable projects that are perfect for the holidays. Color me impressed! Each year, these collections are full of accessories, and some of my favorite contributions have been cozy socks. This year it’s no different – I’m simply smitten by my slipper sock design, the By the Fire Slippers.
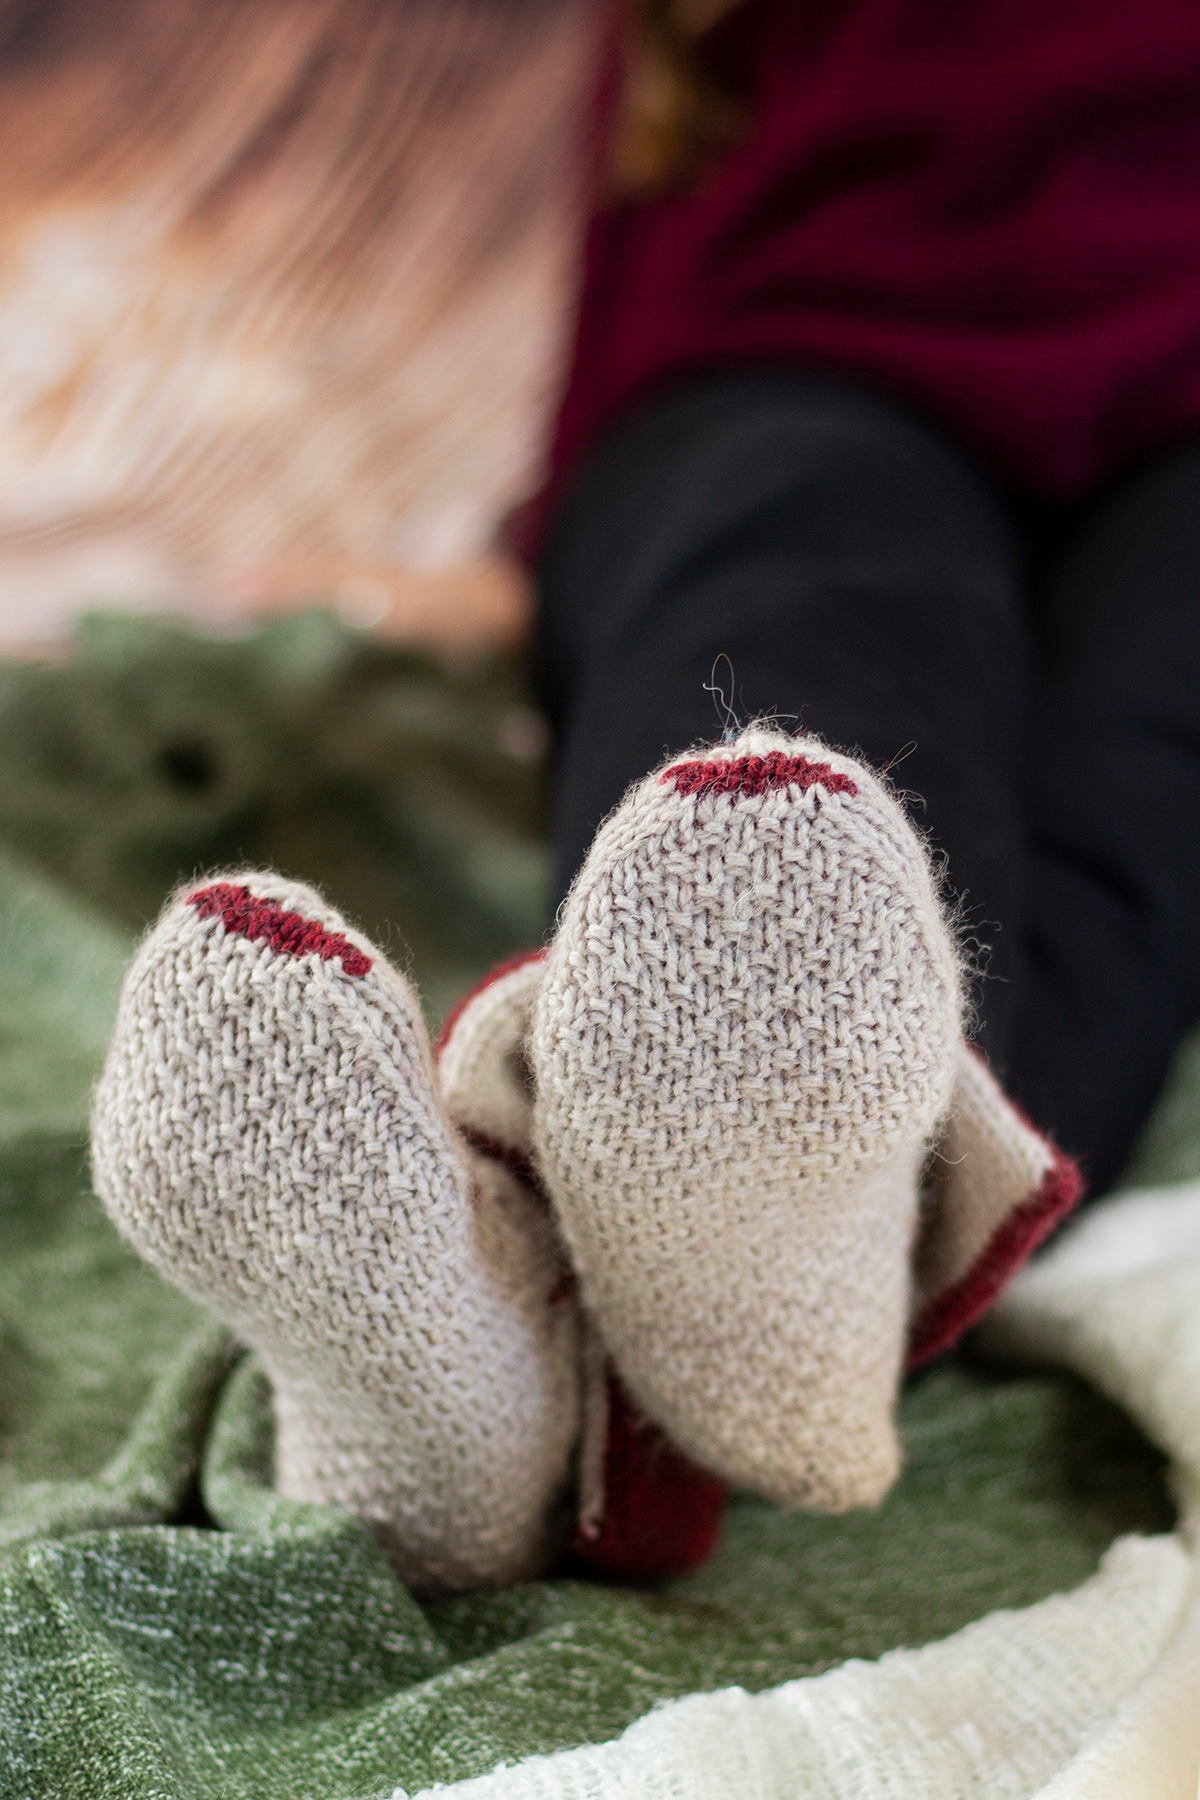
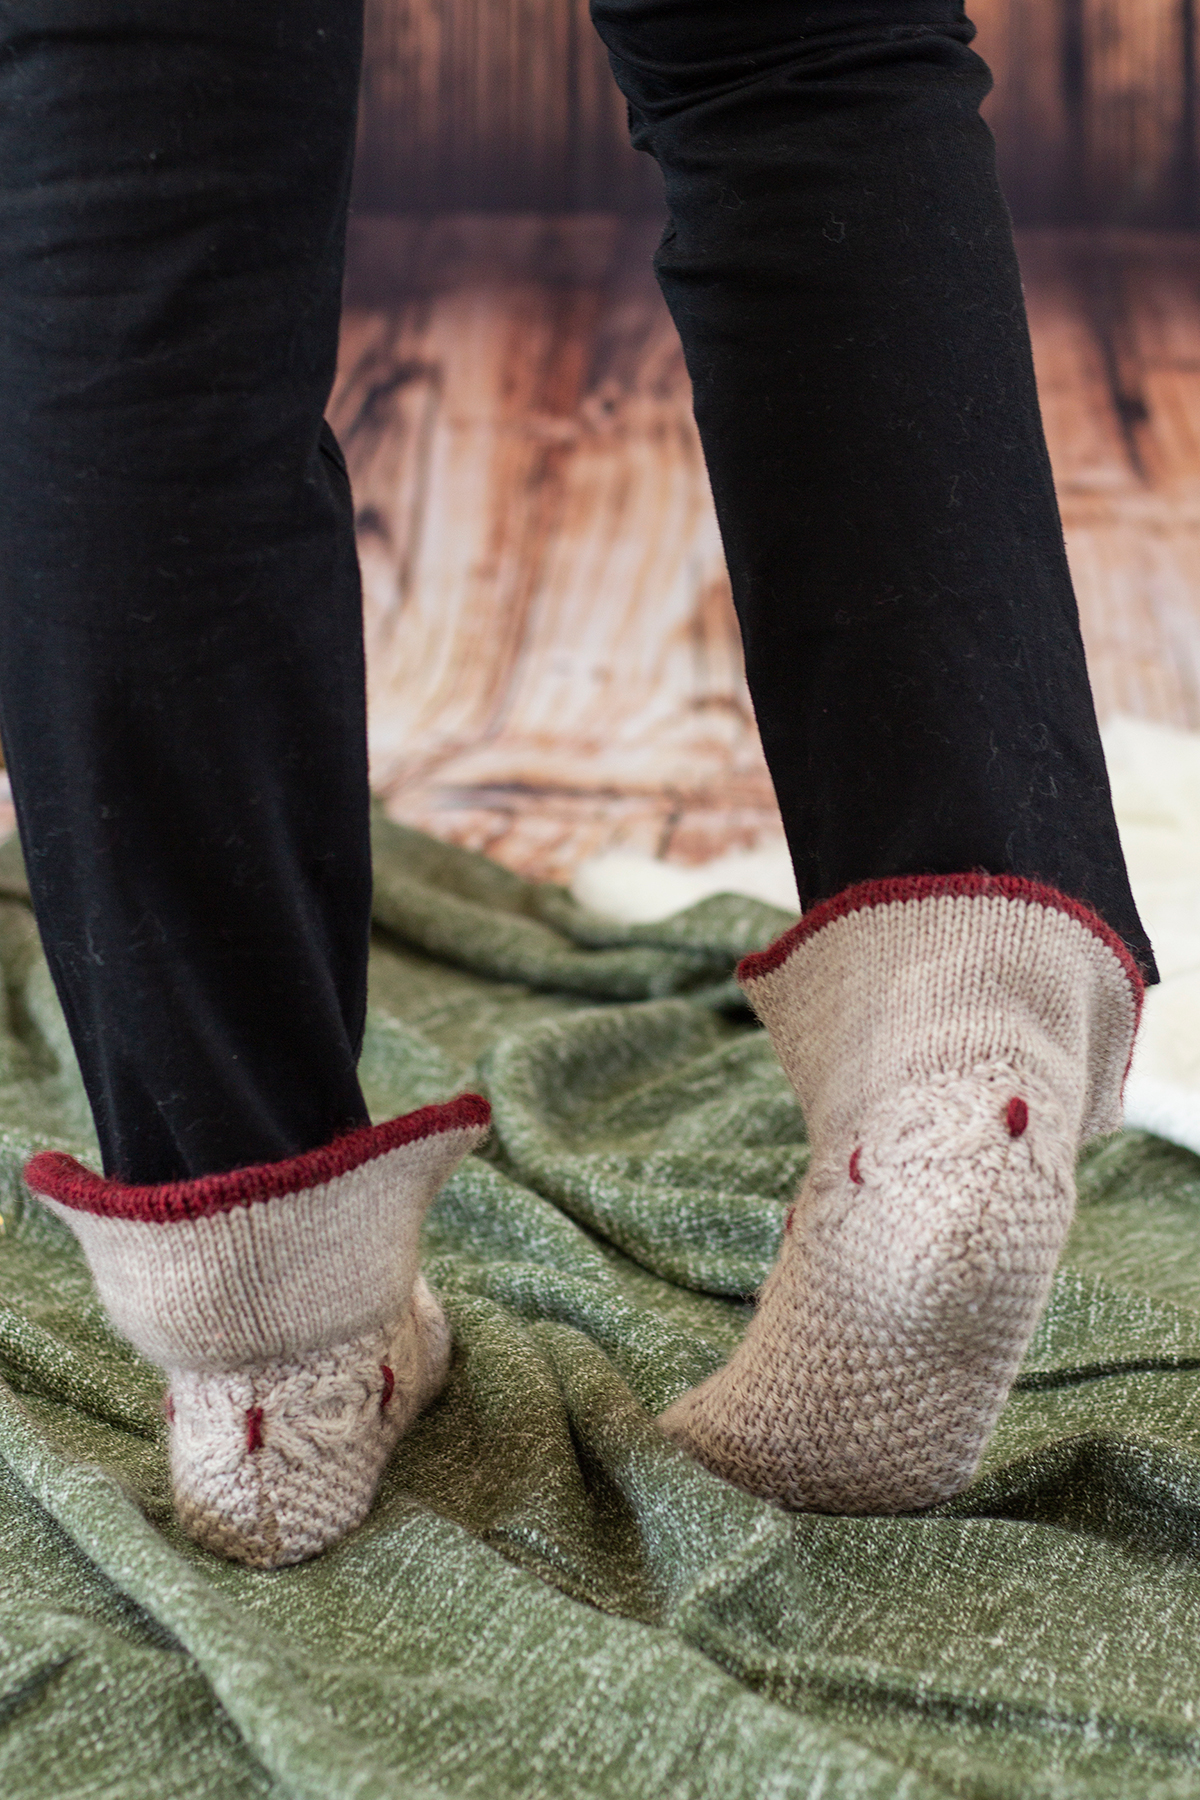
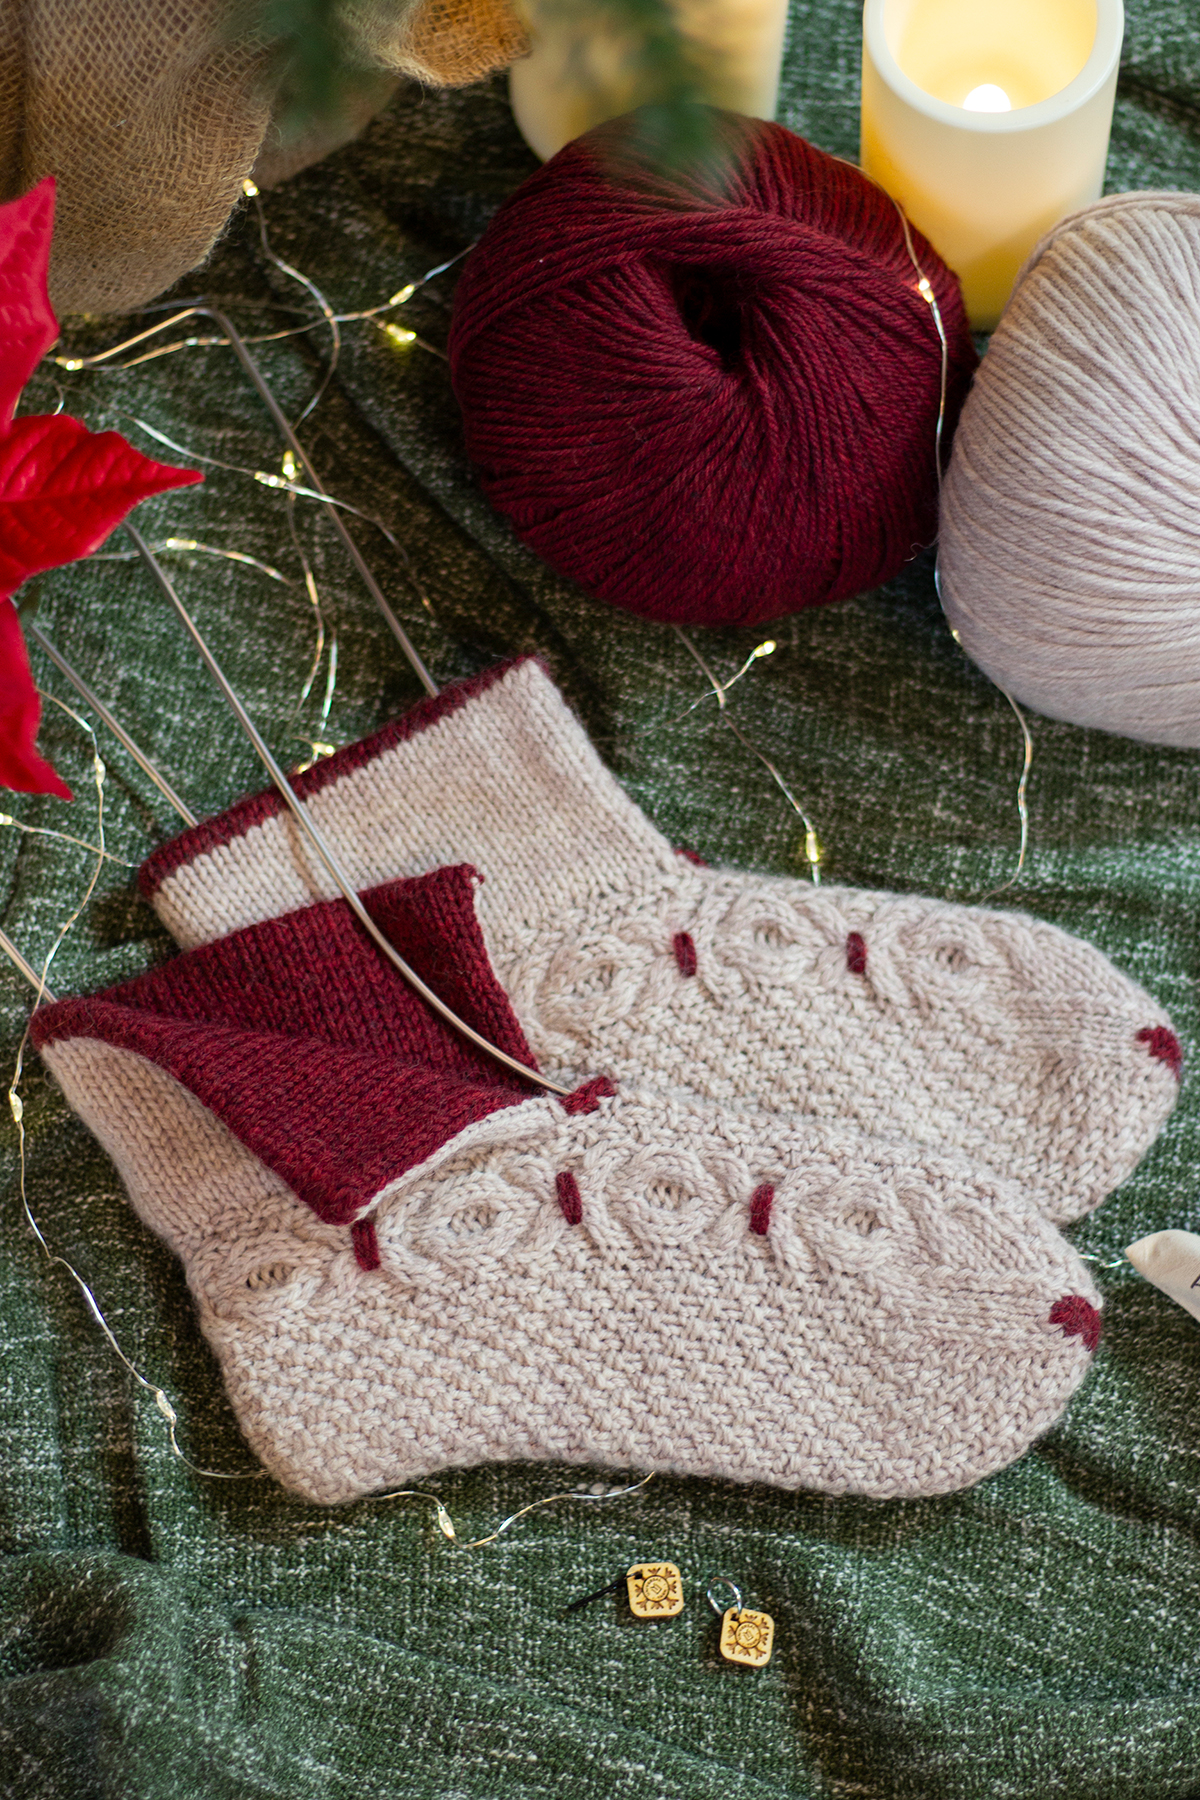
These slippers are a cozy dream! They feature rich textures in the form of cables, twisted stitches, moss stitch, and smocking. A contrast color is used to add thoughtful details including the graft at the toes, the smocking, and – my favorite part – the split, double-thick cuff.
The By the Fire Slippers are knit using Deluxe Worsted Superwash – a superb choice for thick and quick socks! This durable wool yarn will stand the test of time while keeping you warm and comfortable. Plus, because it’s a 100% superwash wool yarn, the slippers are a cinch to care for. And if we’re being honest, easy-care knits make the best gifts because sometimes those we love don’t always remember to handwash!
For this project, I chose the lovely neutral #748 Oatmeal Heather as the main color and paired it with beautiful, velvety red #751 Pomegranate Heather for the contrast color.
A sweet detail of the contrast color toe graft and the moss stitch across the bottom of the feet.
You’ll get to explore the following techniques while making these slippers:
knitting flat
knitting small circumferences in the round
cables
right and left twists
three-needle bind-off
picking up stitches
Kitchener Stitch
smocking
mattress stitch
The By the Fire Slippers have an engaging, but deceptively simple construction. They begin by casting on what will become the heel, and that piece is worked flat for the width of the ankle, then the piece is joined in the round for the foot. Decreases are worked for the toe, and then the live stitches are grafted together using Kitchener Stitch and the contrast color. The back of the heel is sewn closed, and then it’s time to work the cuff. To create the cuff, stitches are picked up around the opening for the foot and worked flat using the main color. At a certain length, the contrast color is joined and continued flat. Loops are picked up with a spare needle from the picked-up edge of the cuff, and then the piece is folded inward and closed with a three-needle bind-off. The mattress stitch is used to close the front edges of the cuff. Finally, you add the special contrast color smocking and a slip stitch crochet edging to the front for a perfectly polished pair of slippers! As a helpful treat, we’ve created a video on how to work mattress stitch, so you’ll be ready to conquer this wonderful pattern!
I hope you enjoyed the video and feel prepared to finish your own By the Fire Slippers! They’ll make such a great gift for yourself or a loved one. My husband has already requested a pair, so I’m sure I’ll be making them again. Do you plan to knit these slippers for a loved one? Tell us for whom in the comments!
Remember, these exclusive kits can be purchased at local yarn store retailers near you. Not in stock at your local shop? Ask them about drop shipping – order through them, and we ship to you! Each kit comes with the pattern, the yarn required to make it, a mini Universal Yarn project bag, and stitch marker. Use our store locator to find your nearest Universal Yarn retailer!
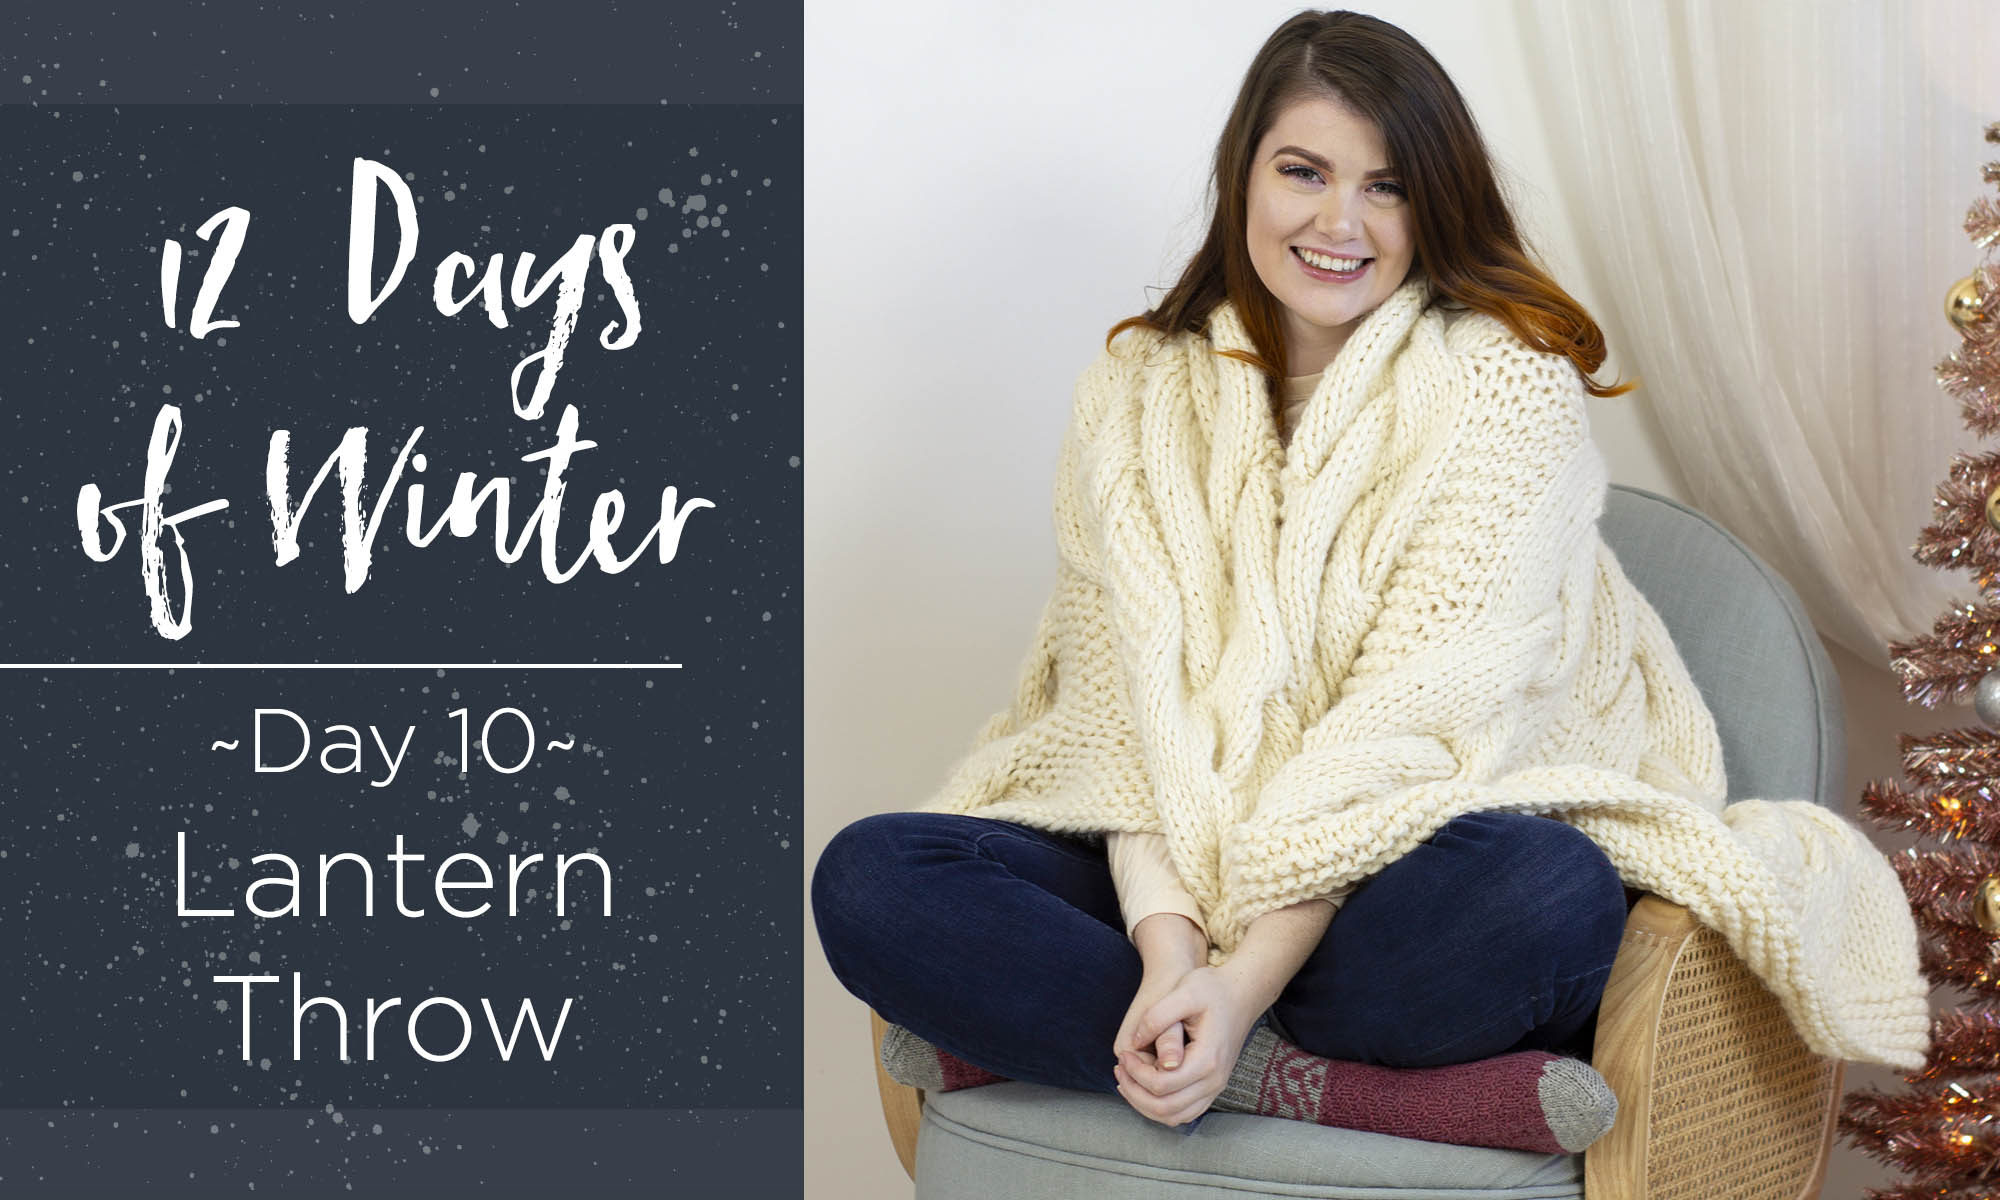
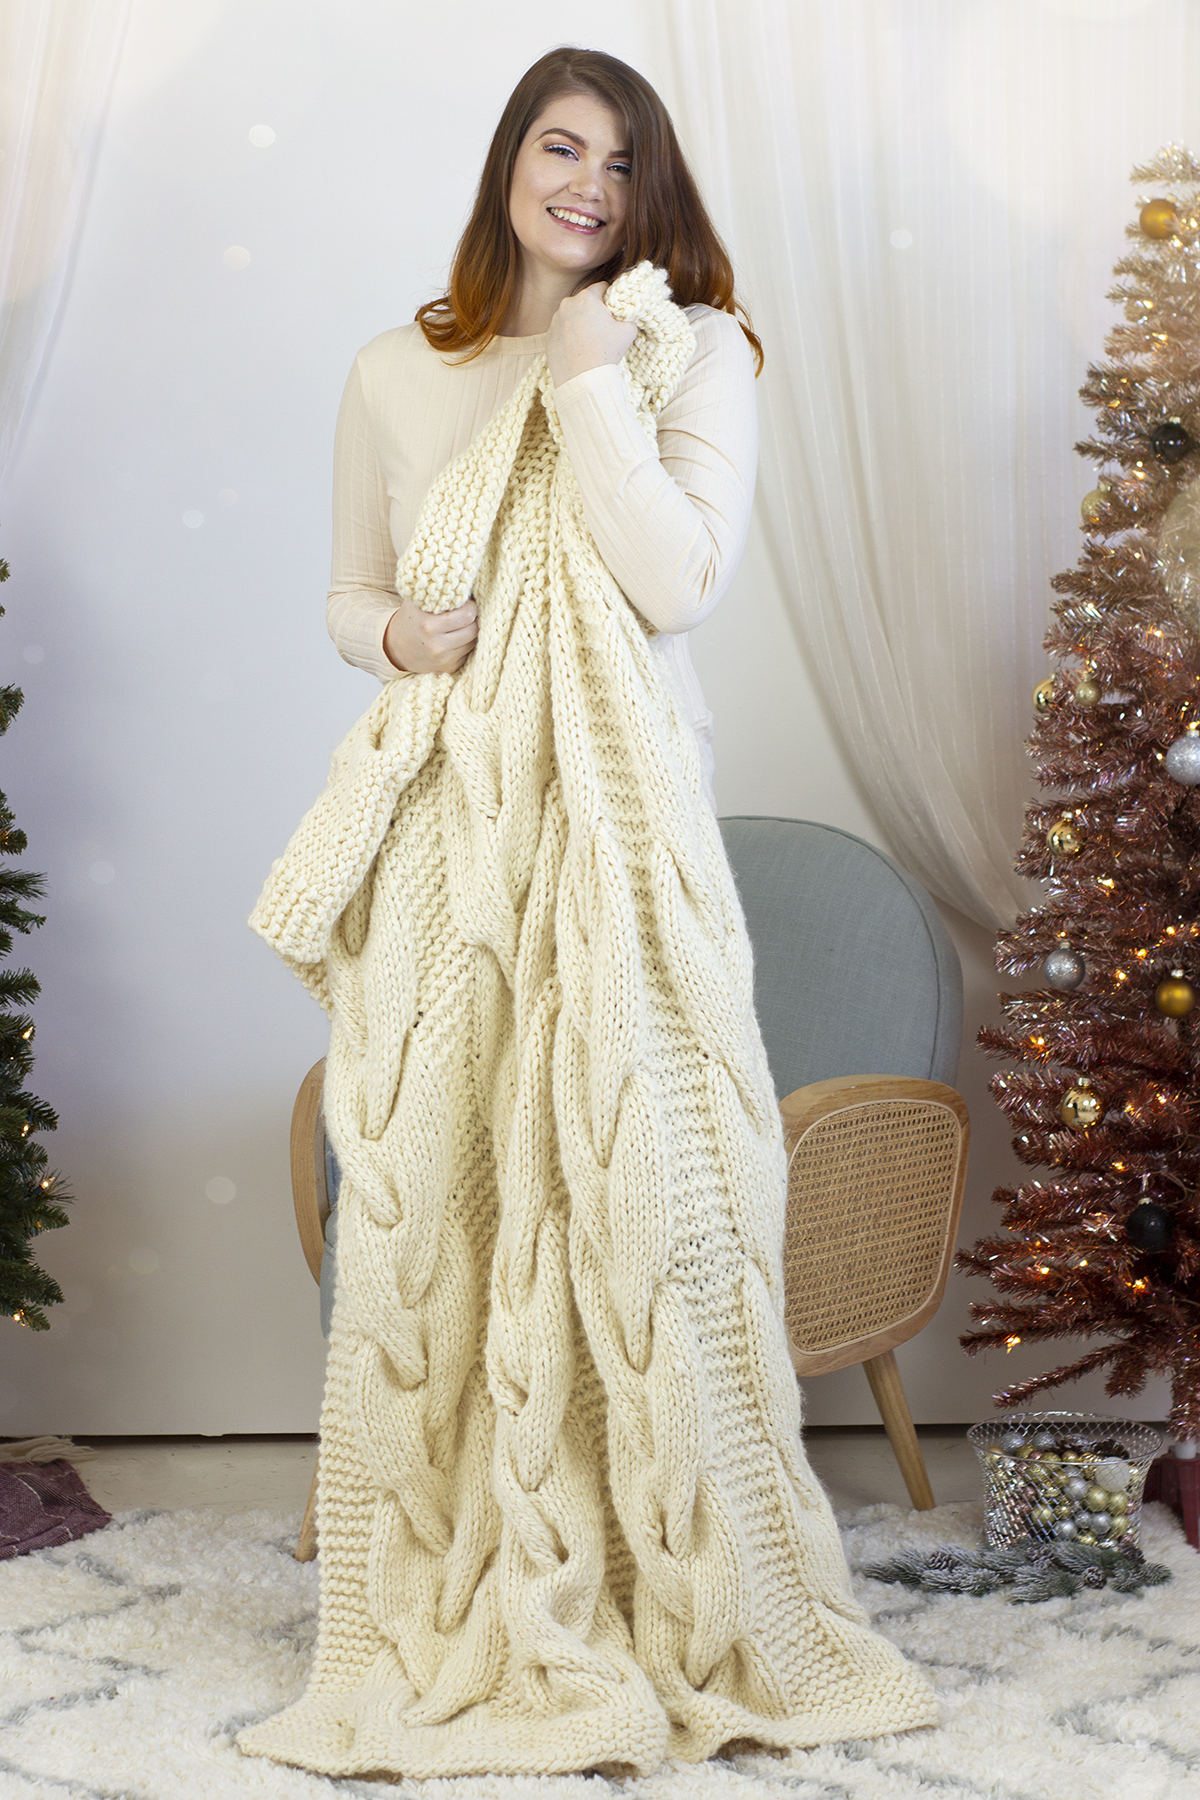
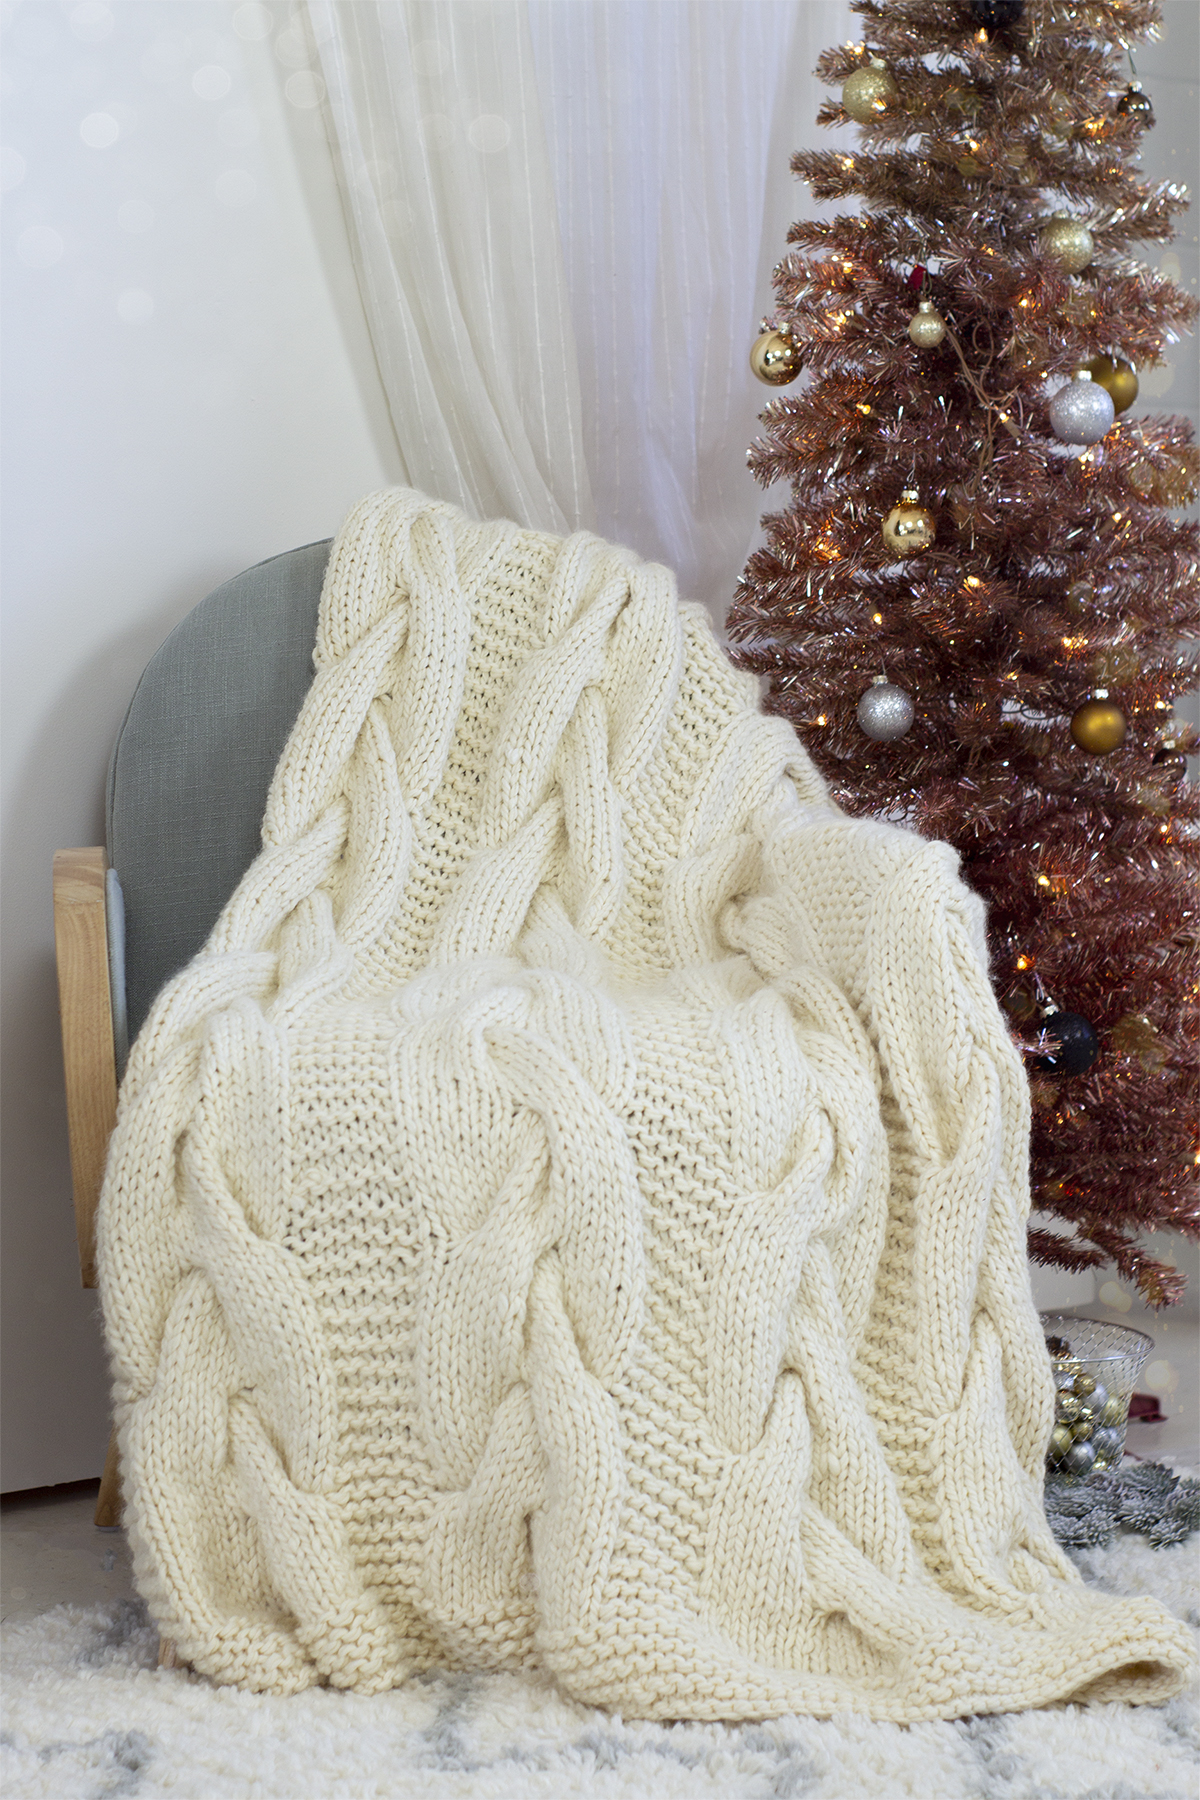
This is part 10 in a 12 part series highlighting designs from our 12 Days of Winter, Series 4 Edition.
It’s Day 10 of the 12 Days of Winter Kit Collection, Series 4! Today is all about a nice throw to keep you warm and cozy all winter long. Say hello to the Lantern Throw. If snuggling up under a thick blanket with a cup of cocoa and a good book sounds like the perfect winter evening, you won’t want to miss this plush project!
The generous size of this blanket is perfect for sharing and is sure to cover your toes.
Chunky projects seem to be all the rage, and it’s no wonder, because projects made with super-bulky yarn work up satisfyingly fast. That’s certainly the case with the Lantern Throw. Blanket projects, even when knitting with worsted weight yarn, can be a big undertaking with progress that feels somewhat slow. However, add in some nice, thick yarn and it’s as though you’ve hit fast-forward. That’s why I chose to use Be Wool for this design. I love just that you can get such a large blanket out of less yarn than it takes to make most sweaters.
Snuggle up to this cozy blanket – it’s irresistable!Be Wool is a super soft, bouncy blend of 60% acrylic and 40% wool. It’s perfect for homewares because it’s machine-washable and easy to care for. We suggest US Size 17 (12 mm) needles for this yarn in order to create a fabric that isn’t too dense and has just the right amount of drape without sacrificing structure.
Chunky braided cables add to the beauty of this otherwise simple design.
The Lantern Throw is decorated with oversized cables throughout. The specific type of cables are Braided Cables in a motif in which each cable mirrors another. If you haven’t knit braided cables before, or if you are completely new to cable knitting, fear not because I’ve got your back. I’ve created a thorough tutorial where I show you exactly how to knit the cables used in this pattern.
I hope you enjoyed that tutorial and that it gets you on the right track for knitting your own Lantern Throw. Remember, you can find the Lantern Throw and the rest of the 12 Days of Winter kits at your local yarn store. Click here to find a shop that carries our yarn near you.
This is part 4 in a 12 part series highlighting designs from our 12 Days of Winter, Series 4 Edition.
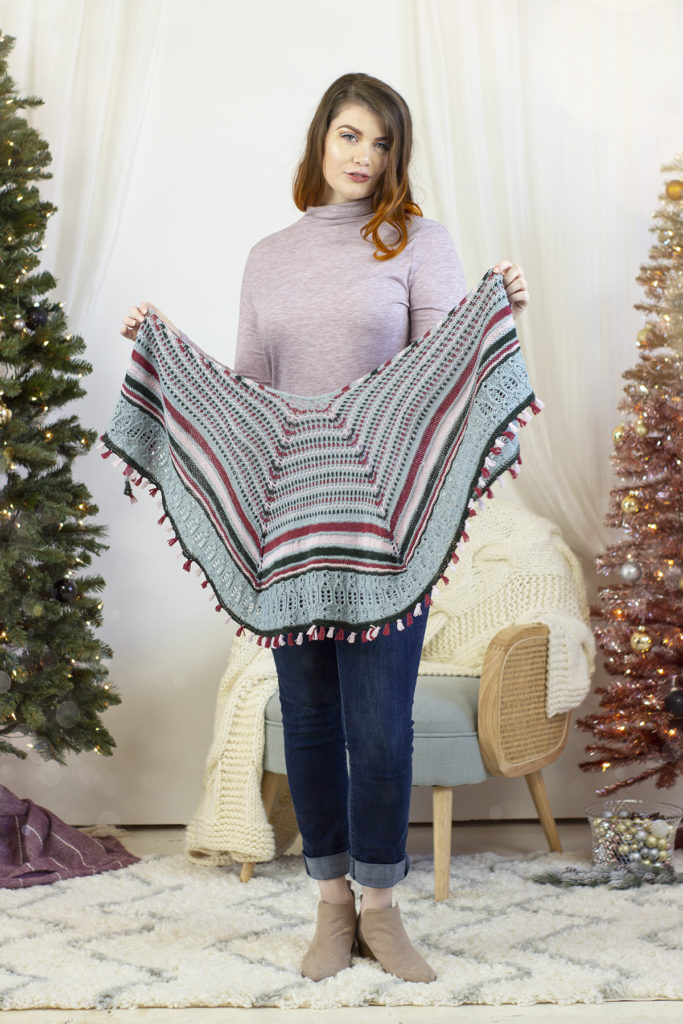
It’s Day 4 of the 12 Days of Winter Kit Collection! Today I’m excited to share a fun and festive design knit in luxurious and lightweight Bella Cash. Say hello to the Holiday Lights Shawl!
A sampling of stripes and textural stitches make this project an addictive knit!
If the name didn’t give it away, the shawl was inspired by strings of holiday lights that are so abundant during the season. I think festive lights are something we can all appreciate. Whenever I pass by a home brilliantly illuminated with thousands of little lights I feel such a childlike sense of awe and wonder. It just feels so magical to me!
The Holiday Lights Shawl features a semi-circular shape.
There are three elements that remind me of lights in this fun pattern. Slip stitches and texture to create the effect of dappled lights throughout the first section of the shawl. Following the first section of “lights,” addictive-to-knit stripes incorporate garter stitch for a graphic and bold effect.
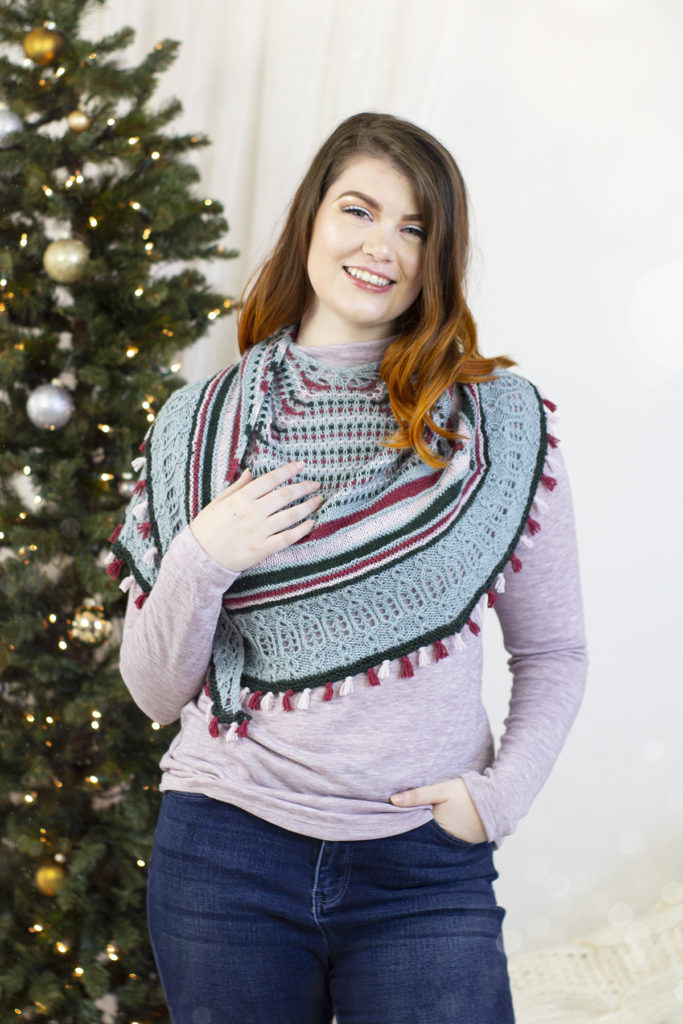
You can wear this shawl wrapped bandana-style around your neck. This is my favorite way to style shawls.
The second set of lights adorn the border of the shawl and use a touch of lace, twisted stitches, and one of my favorite decorative stitches: the lifted knot stitch. Before I move onto the final string of lights (can you guess what that might be?) I want to share a little tutorial for working the Lifted Knot Stitch (LKS).
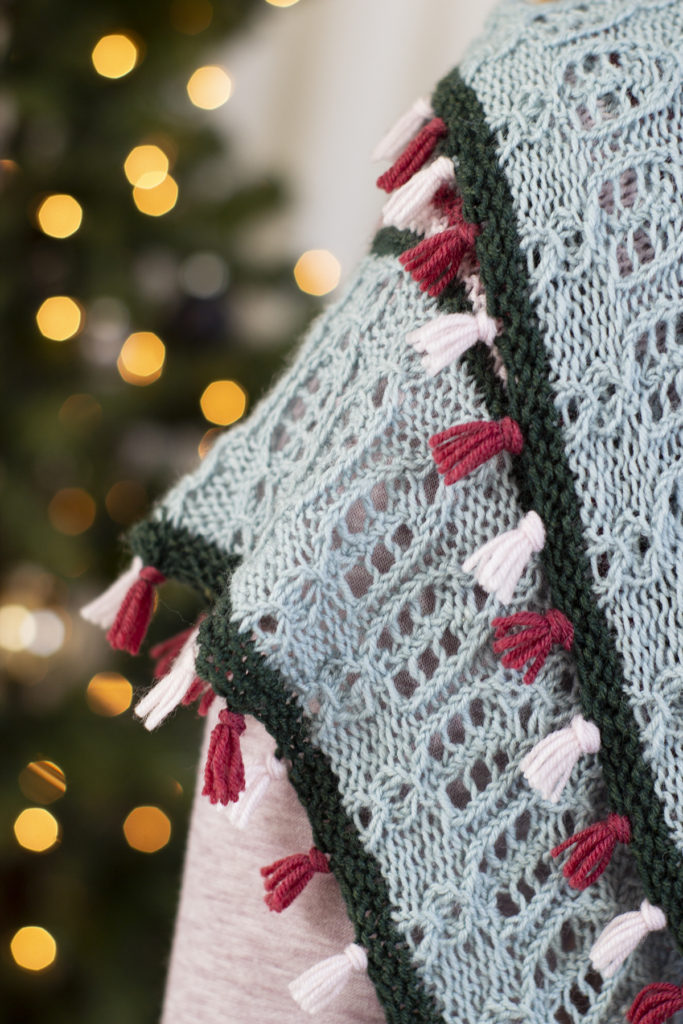
I hope you enjoyed the tutorial and that it makes things a bit easier as you knit. Now, the final touch: the mini fringe across the bottom edge. Soft and festive, the fringe reminds me of little gleams of lights during winter nights.
Peppermint-colored mini fringe decorates the bottom of the shawl.
Remember, you can find the Holiday Lights Kit and the rest of the 12 Days of Winter kits at your local yarn store. Click here to find a shop that carries our yarn near you. Happy knitting!
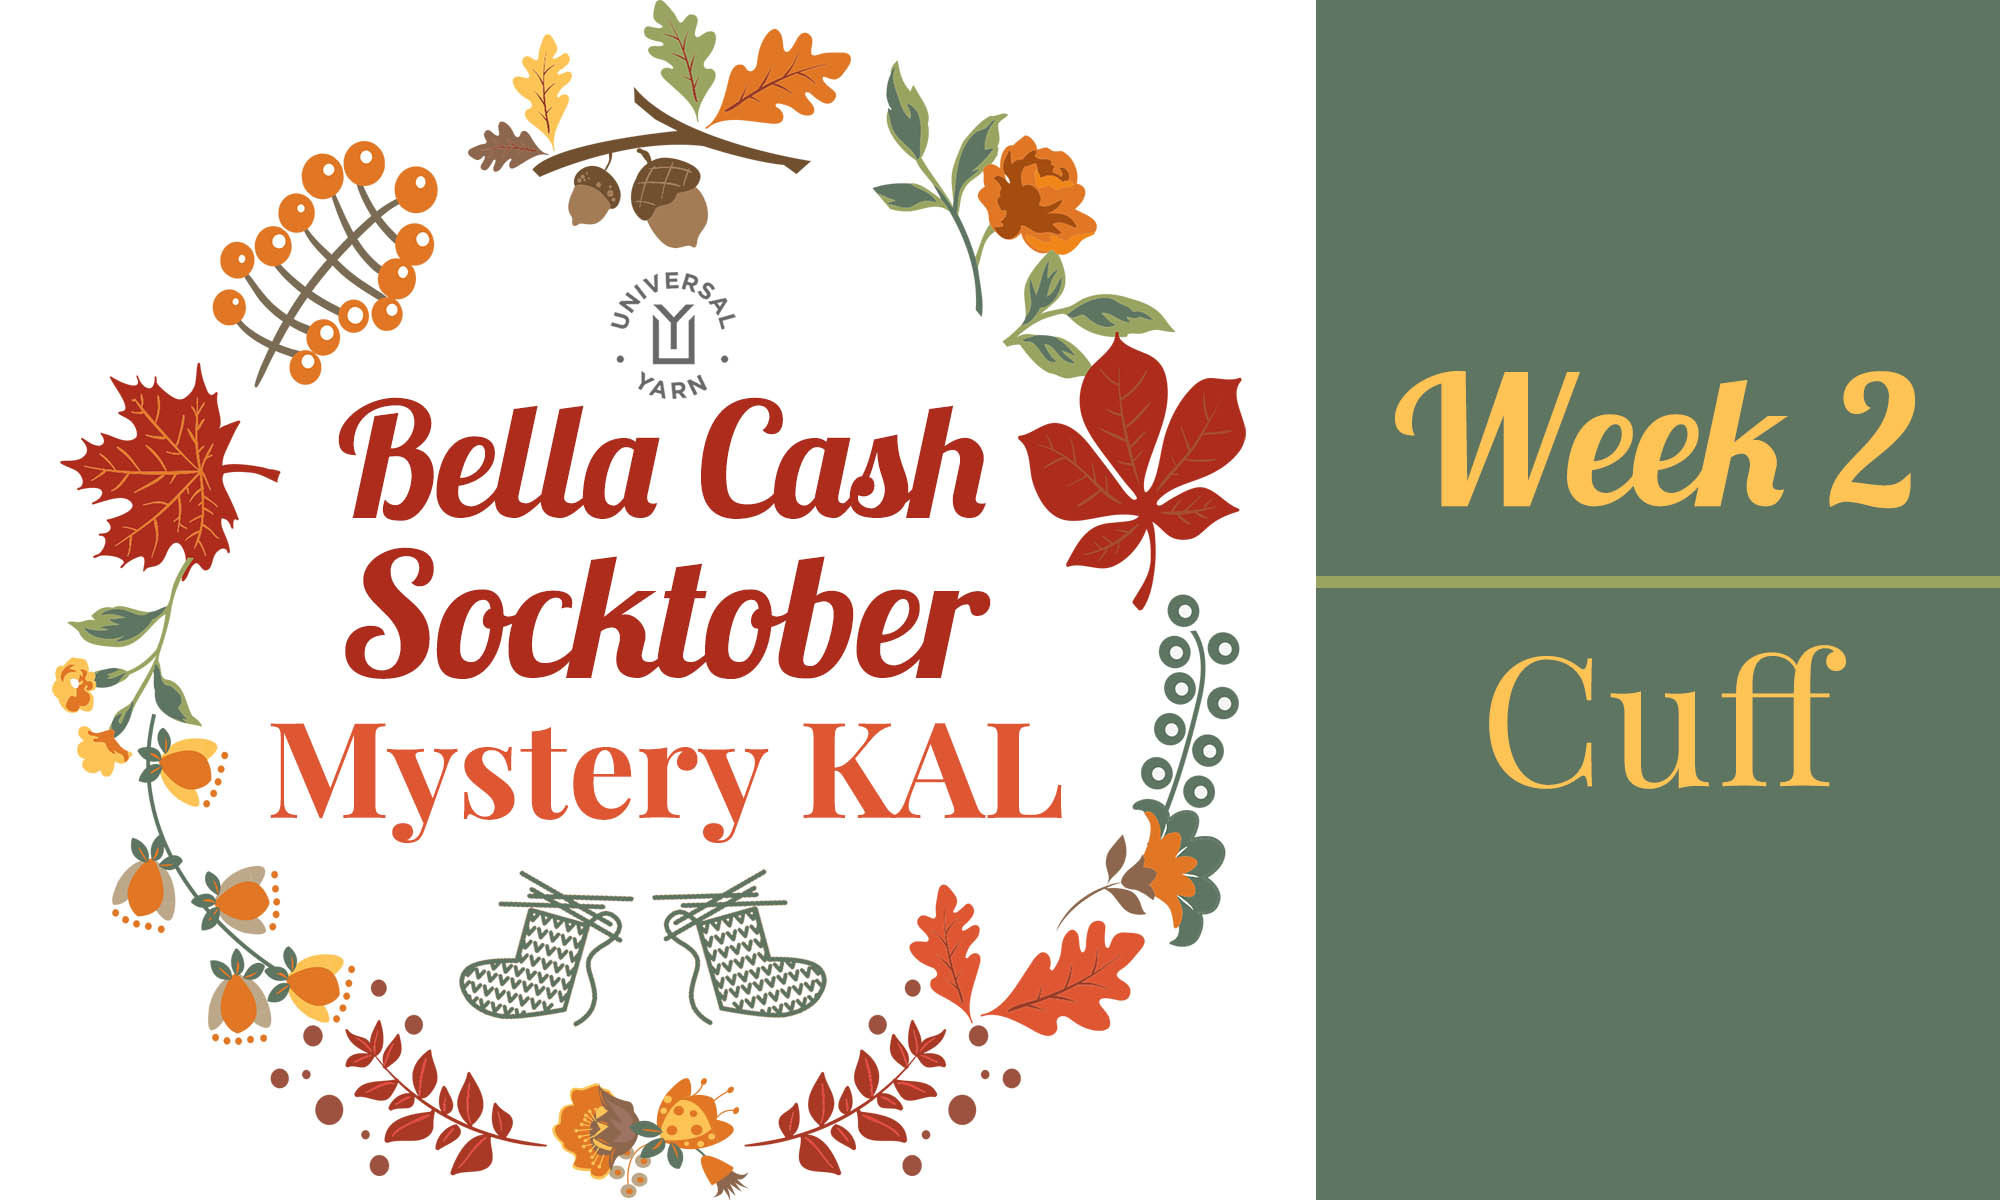
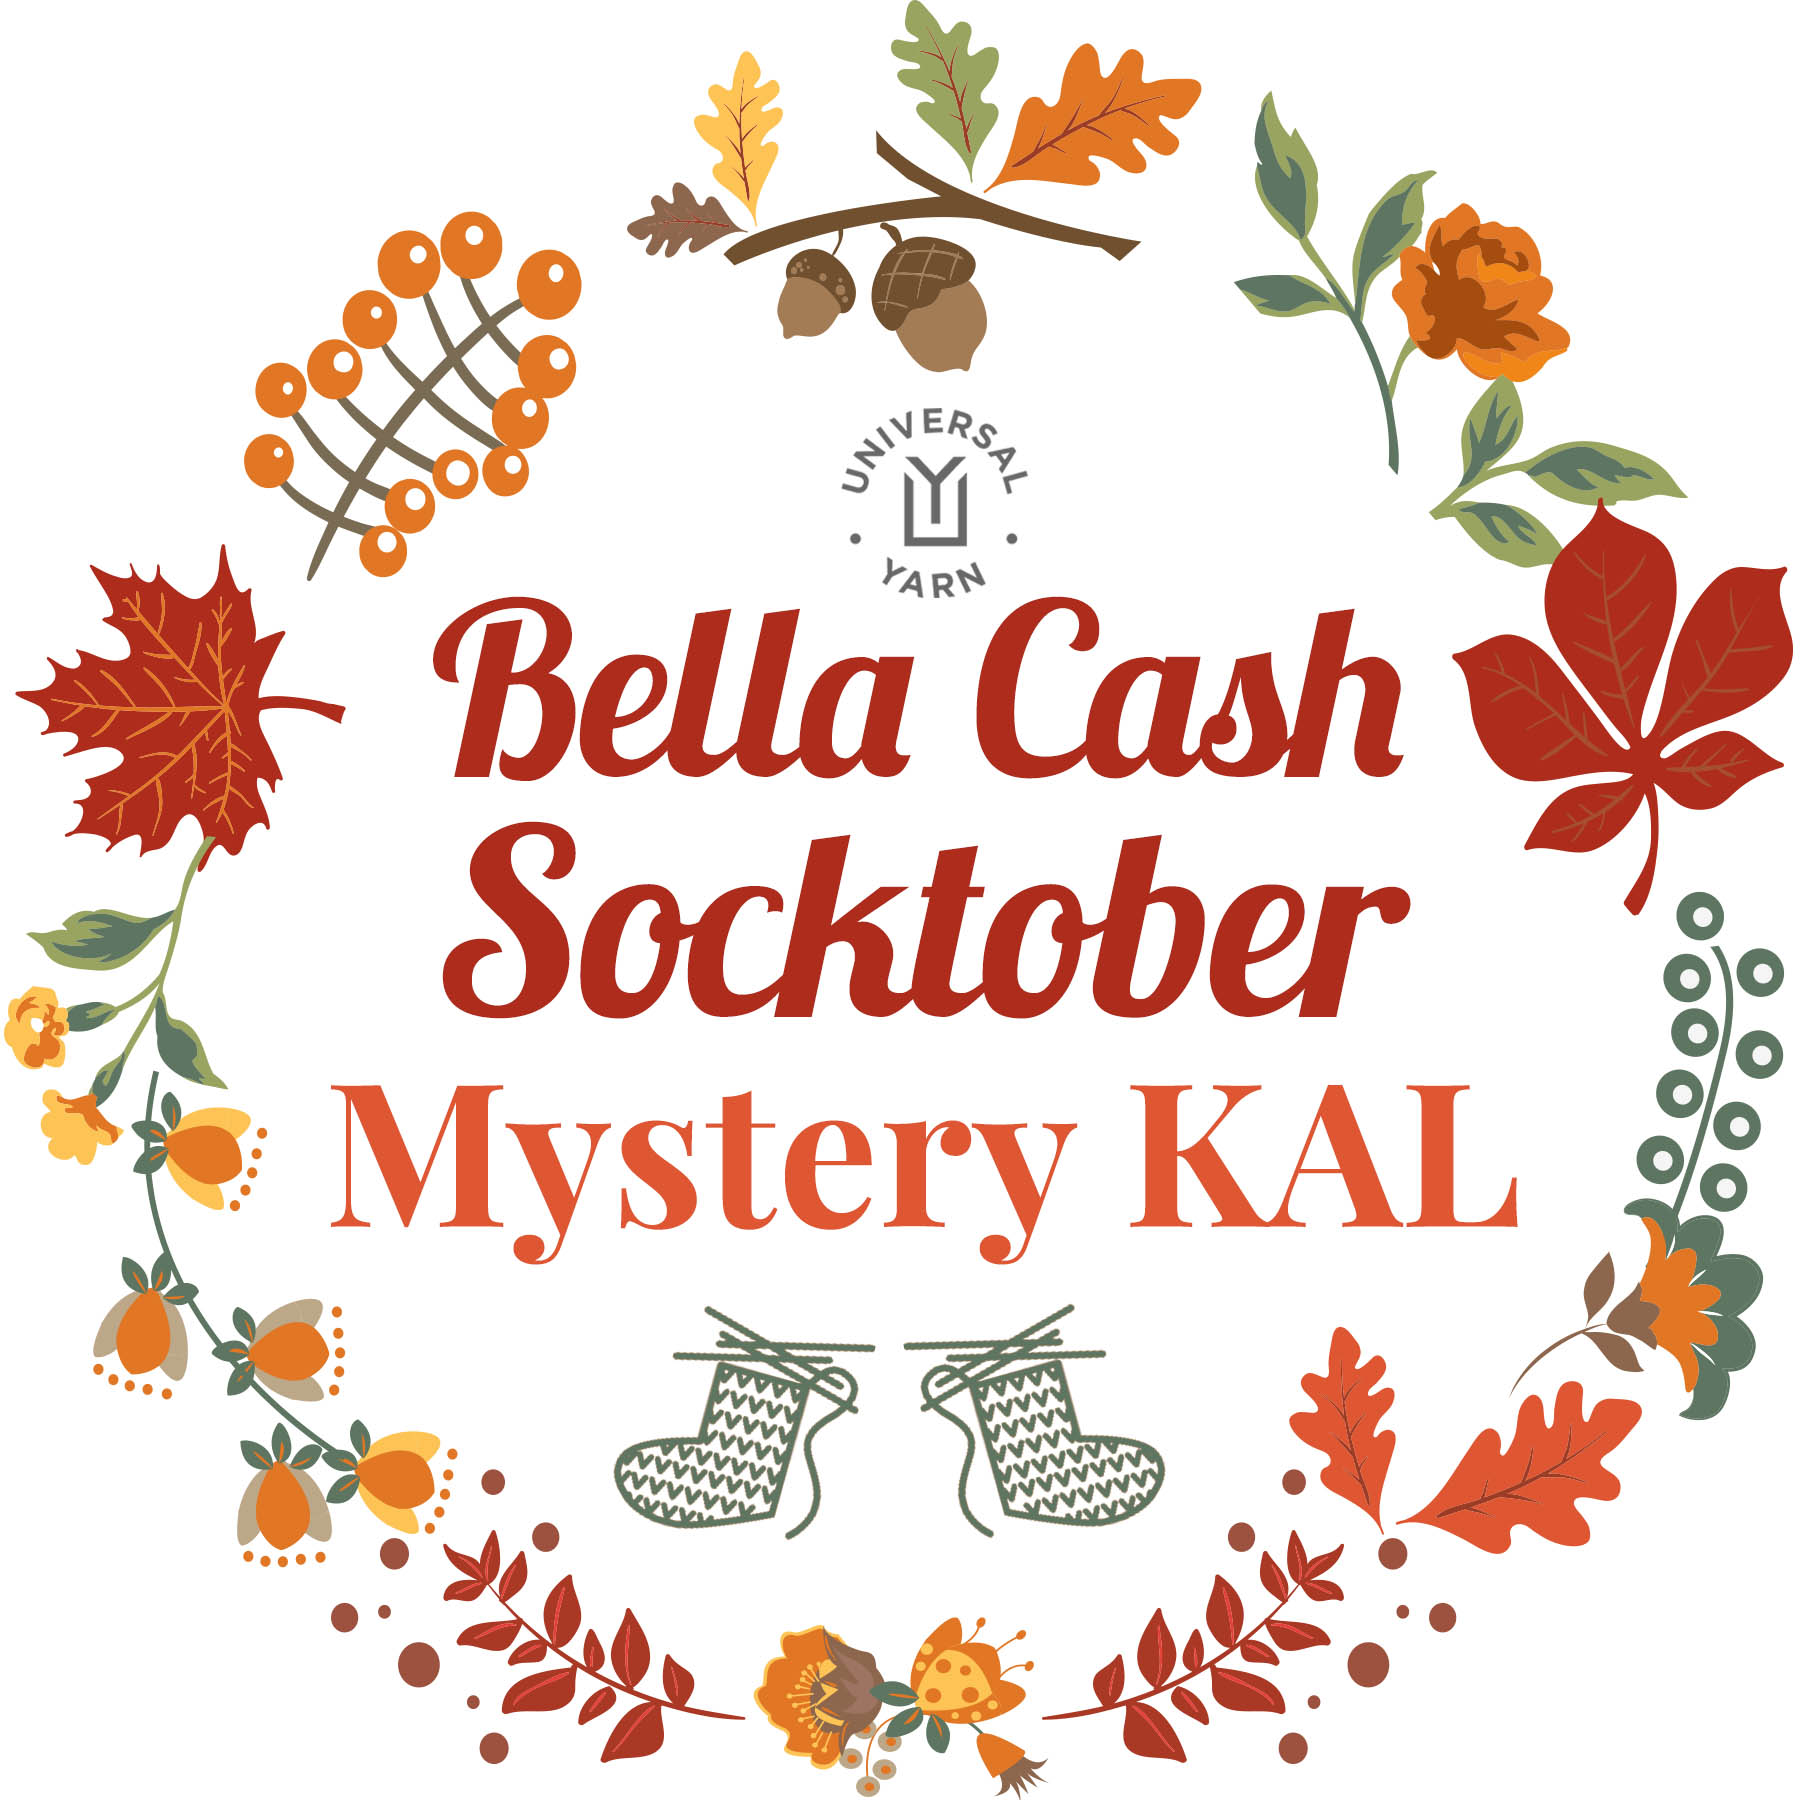
Welcome to Week 2 of the Bella Cash Socktober Mystery Knitalong! It has been a week since we shared about color choices and how to select your colors for the project. We hope you’ve selected your colors, received your Bella Cash yarn, and are ready to get to the best part: knitting!
Use this graphic on Ravelry and on social media to share about the knitalong.
Before we dive in, I just want to give a quick refresher about the knitalong, especially for those who might have missed my last post.
Each week in October I’ll be revealing a different portion of the pattern. The pattern is updated on our website every Wednesday and you can find it here (link).
This is a mystery knitalong, but if you don’t want to commit without seeing the socks first you can find spoiler images here (link).
If you join, we’d love for you to spread the love and share your progress on social media using the hashtag #UYSocktoberMKAL and tagging us on Instagram (link) and Facebook (link). Join in with chatter here on the blog and in our Ravelry forum (link).
Please add your project to Ravelry, too! You can find the Ravelry listing here (link). You can use the graphic above and on the Ravelry listing for your project page, too.
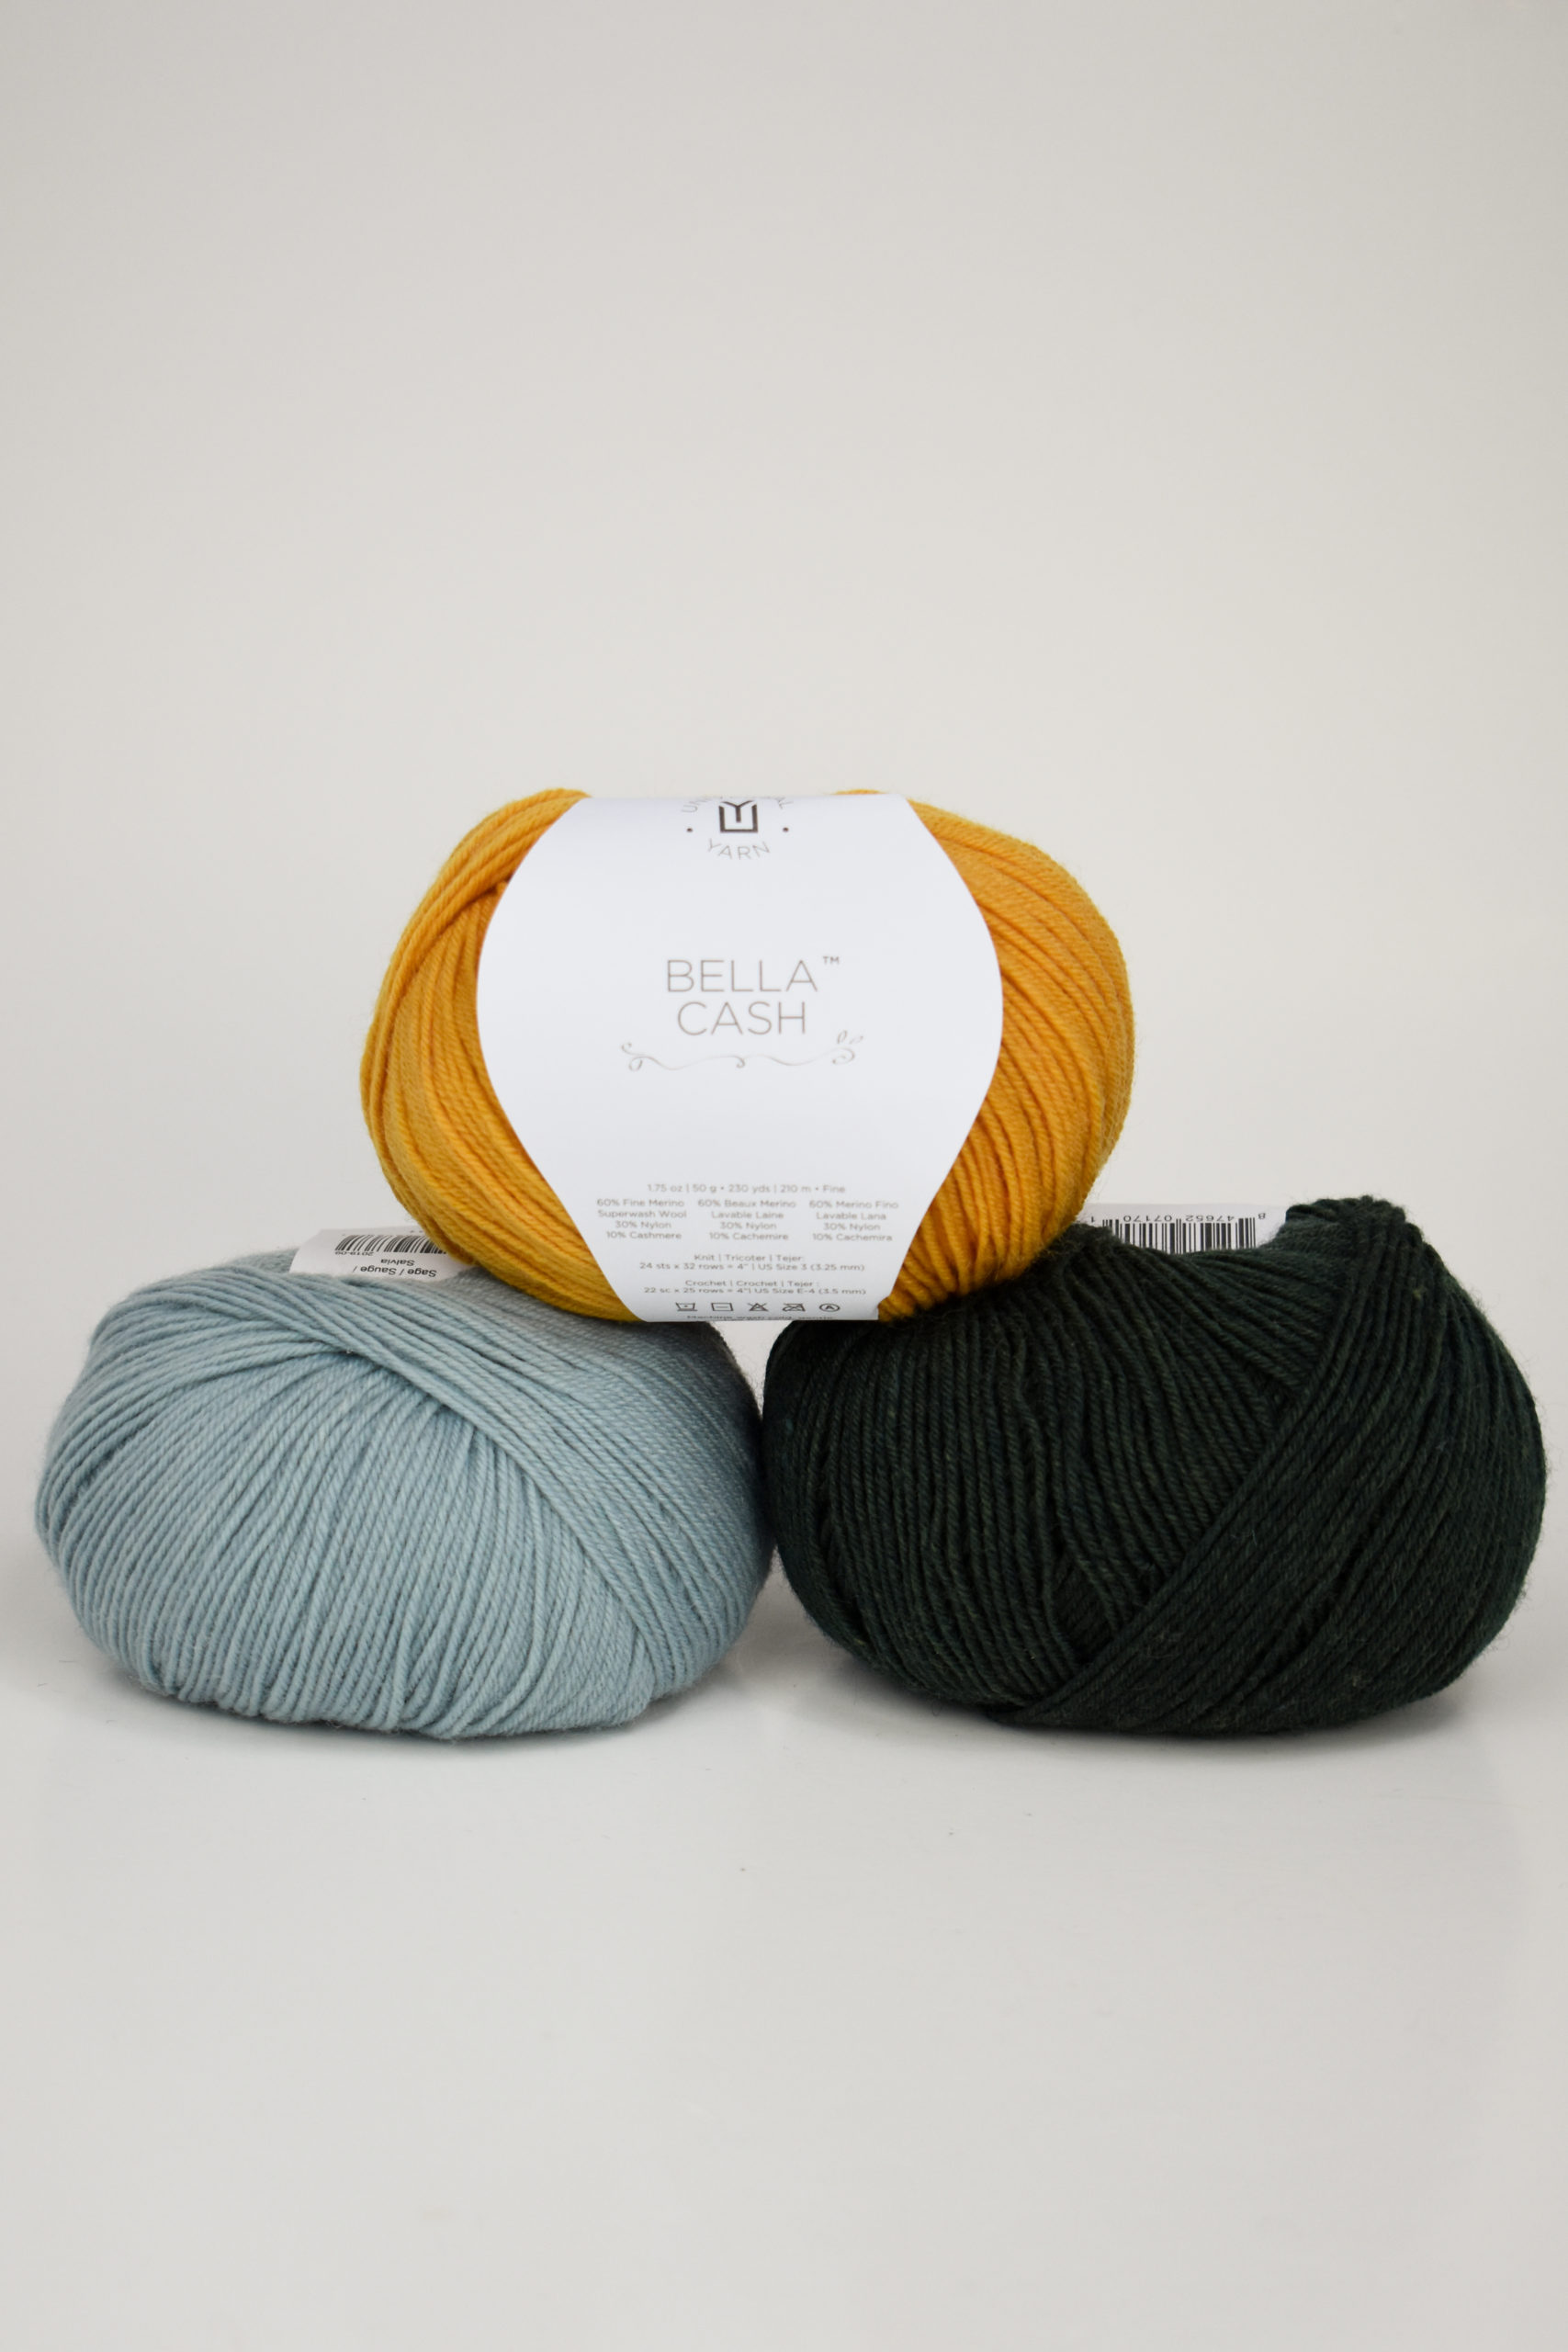
These are the suggested colors for the Sweet Dumplin’ Socks: #126 Forest (MC), #116 Sage (CC1), & #124 Mustard (CC2).
This week is exciting because it means you’re finally able to cast on your socks! It’s all about the cuffs. You’re sure to knock this portion out in no time at all. Without spoiling too much, I will say that the left and right socks in this pattern are the same. With that in mind, you may choose to start both of your socks this week. There are a couple ways to do this. One method would be knitting two-at-a-time (TAAT) socks – and you can find a great tutorial by Very Pink Knits for that method here (link). Personally, I’m not a fan of the method because I find it to be a bit fiddly and annoying to keep my yarn organized, but I know many knitters who swear by it. Another option is to knit them concurrently, but separately. Work the cuff for one sock, then set it aside and work the second sock cuff. You can either use two sets of needles for this method or place stitches on holders. Of course, you can absolutely knit these socks one at a time. That’s how I’ll be knitting my pair. The choice is yours!
Speaking of choices, knitters have many options for knitting small circumferences in the round. Many knitters are loyal and true to double-pointed needles. Some are fans of 9″ circular needles. Other knitters, myself included, love the Magic Loop method. It’s my go-to method whether I’m knitting socks, mitts, sleeves, or hats. If you haven’t tried the Magic Loop method, you’re in luck because I’ve created a tutorial to show you how to get started.
Learn how to knit small circumferences using the Magic Loop method.
I hope you enjoyed the tutorial and find it helpful. If you have any questions, don’t hesitate to reach out. Remember, you can share your progress on social media using the hashtag #UYSocktoberMKAL and tagging us on Instagram (link) and Facebook (link). Join in with chatter here on the blog and in our Ravelry forum (link).
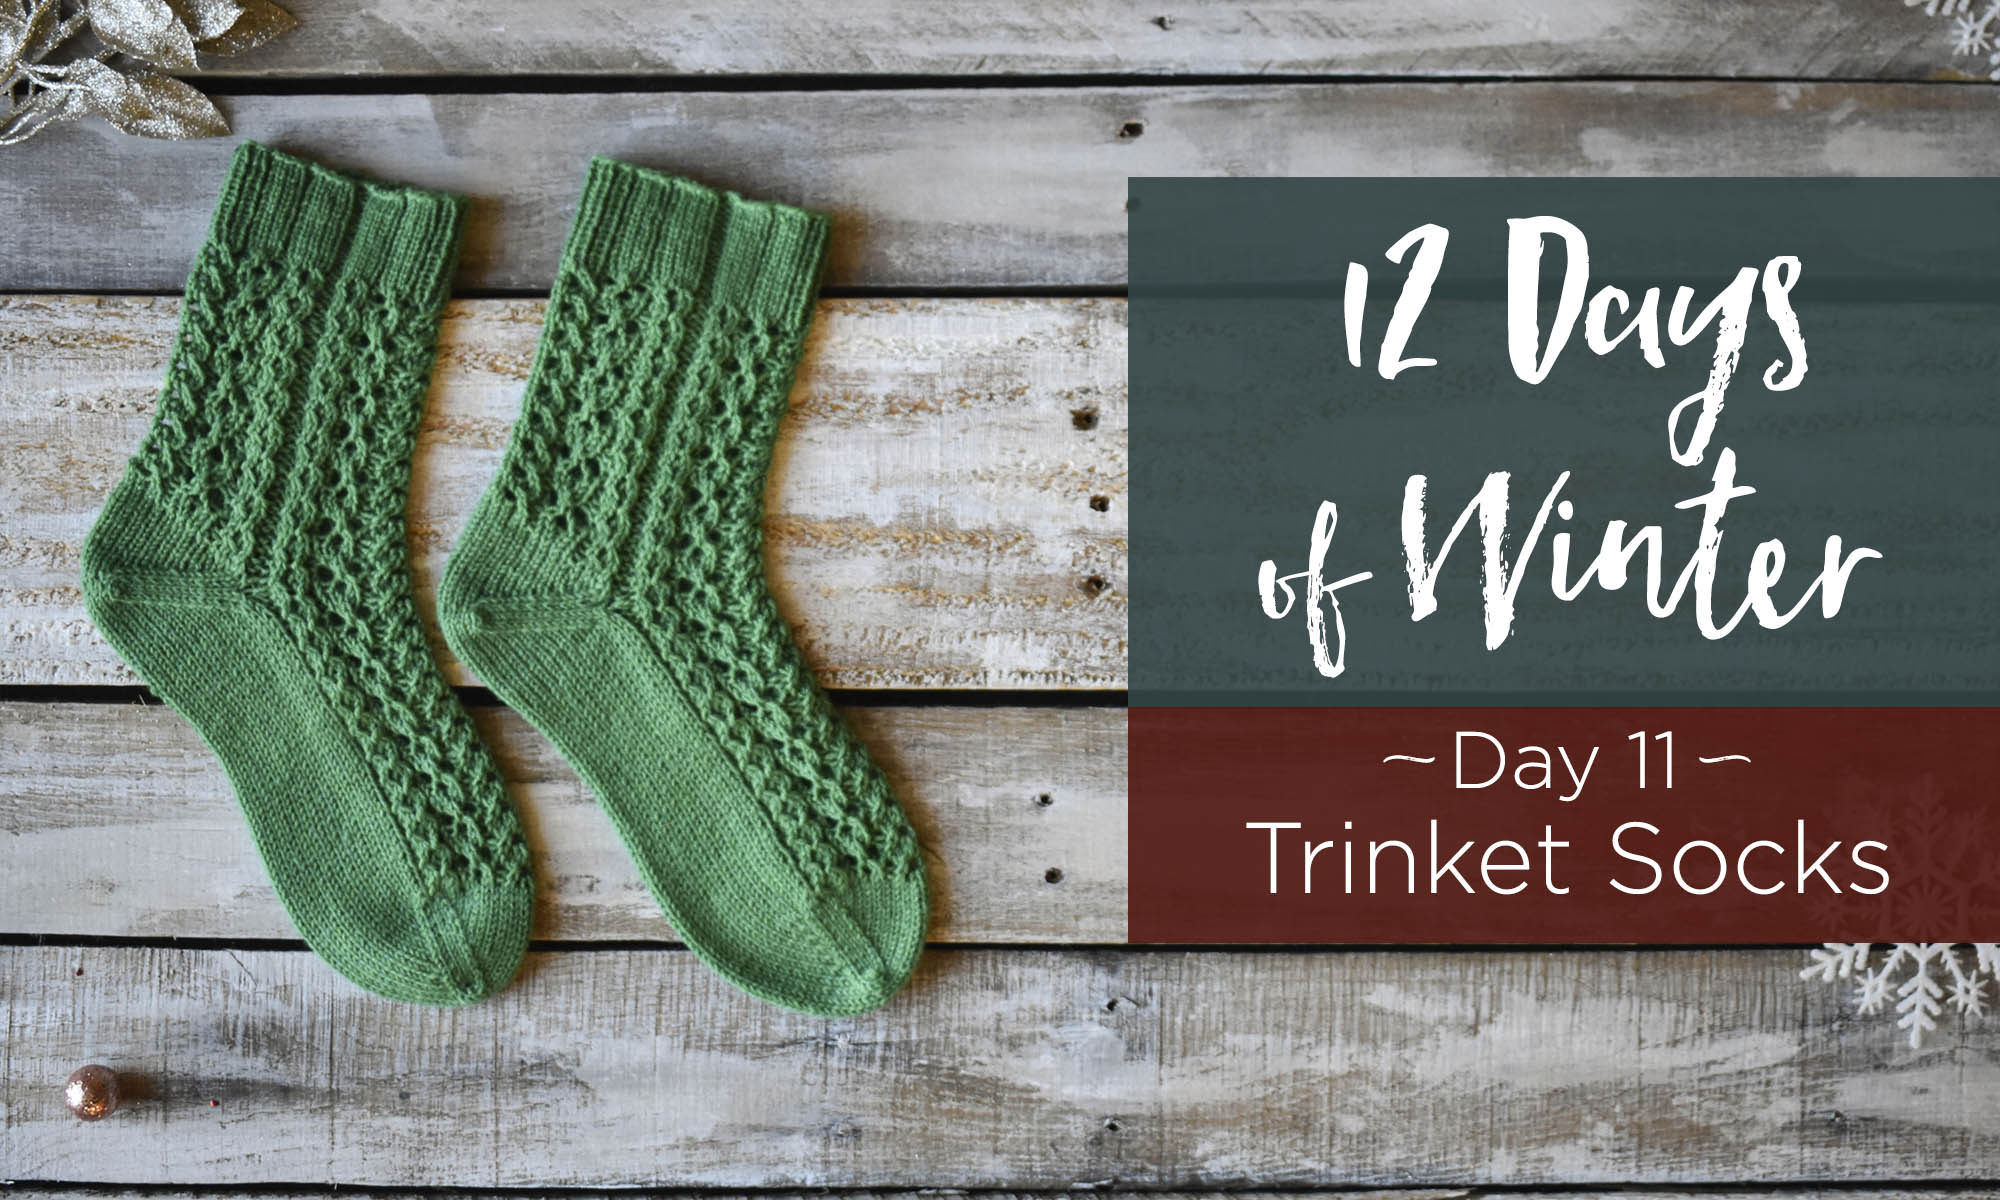
This is part 11 in a 12 part series highlighting designs from our 12 Days of Winter, Series 3 Edition.
It’s Day 11 in the 12 Days of Winter Kit Collection. We can’t believe how quickly time seems to be going. Before we dive into today’s kit and post, I’d like to take a moment to highlight that today is Small Business Saturday. We’re right in the midst of what is arguably the biggest shopping period of the year. As you gear up for the holiday season, don’t forget to support your local small businesses. For those of us who love all things yarny, it’s the perfect day to show some support to your local yarn stores. Without them, we wouldn’t be a business at all! Local yarn stores are front and center of the fiber community – offering a space to learn, socialize, and of course, purchase some yummy yarn.
And now, onto today’s kit (which you can find at your local yarn store).
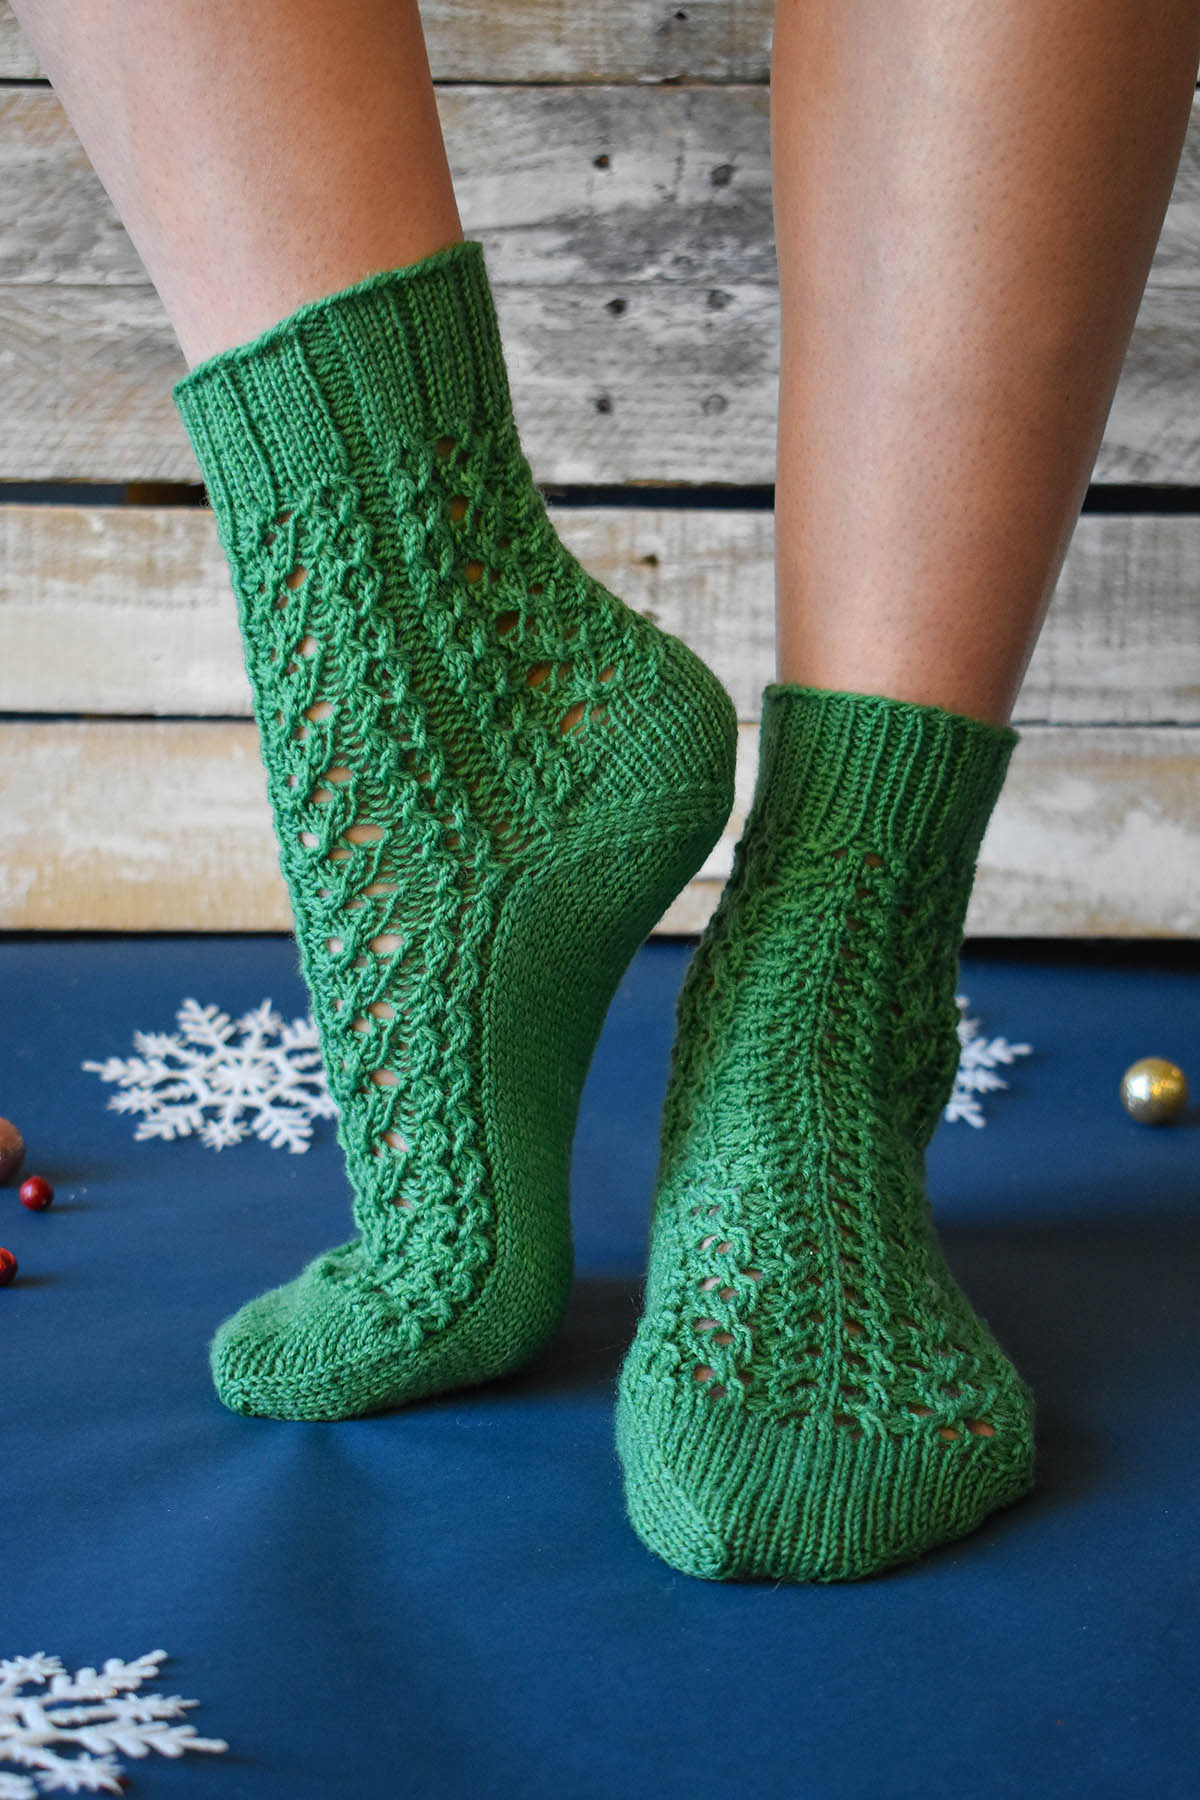
Today we’re excited to introduce the Trinket Socks, knit up in deliciously soft, yet strong, Bella Cash. This is a great all-around yarn, but here in the office, it has become a favorite for knitting socks. Thanks to the superwash merino, they’re machine-washable and easy to care for. Cashmere adds a touch of luxury, and nylon ensures these socks will be strong enough to last for ages. These socks feature a lace and twisted stitch pattern that is addictive to knit, and quick to work up.
Speaking of twisted stitches – we have a tutorial to share today. If you can recall from Day 7 of Winter (the Mountain Pines Cowl), we shared a tutorial on Right and Left Purl Twists. Today, we’ll be showing you how to knit a regular Right and Left Twist – no purling necessary. Note that for today’s tutorial, we’re using Deluxe Chunky so that it’s easier for you to see.
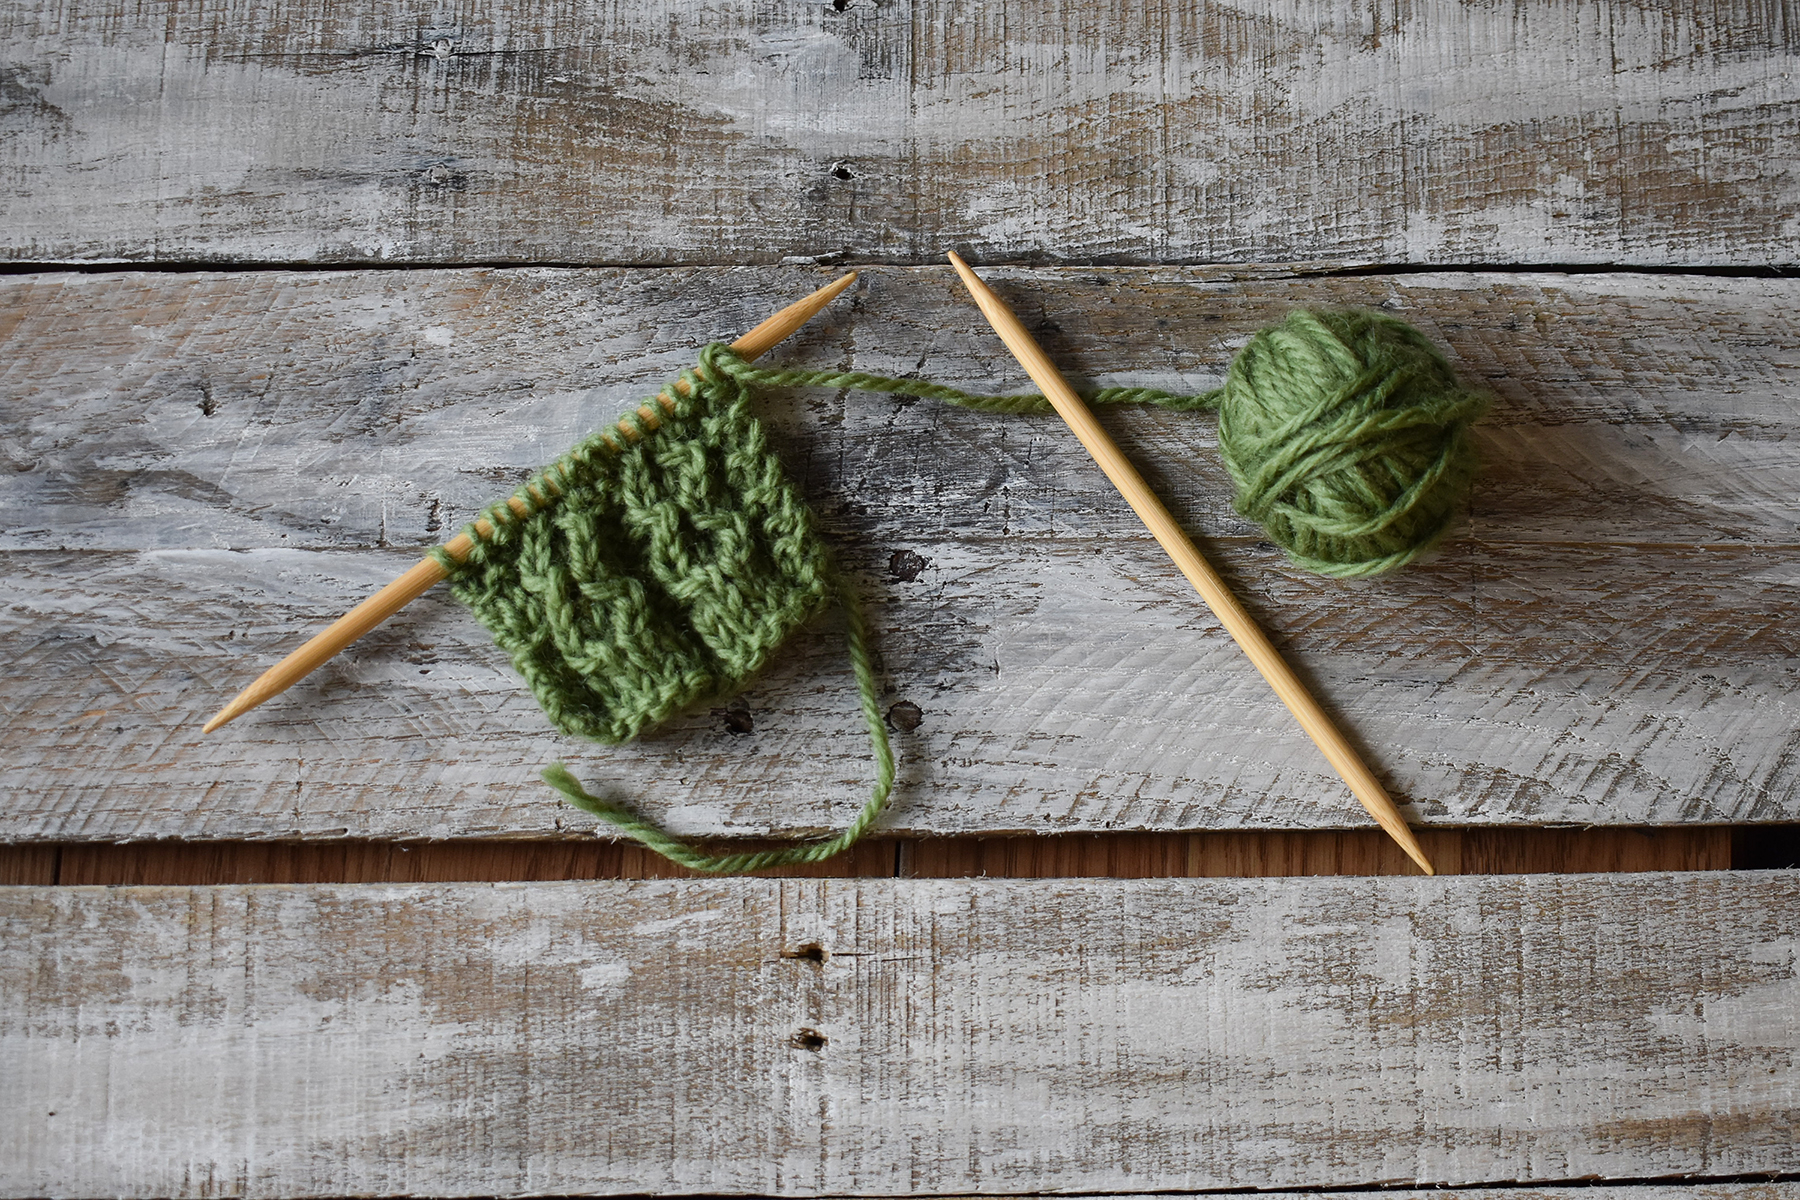
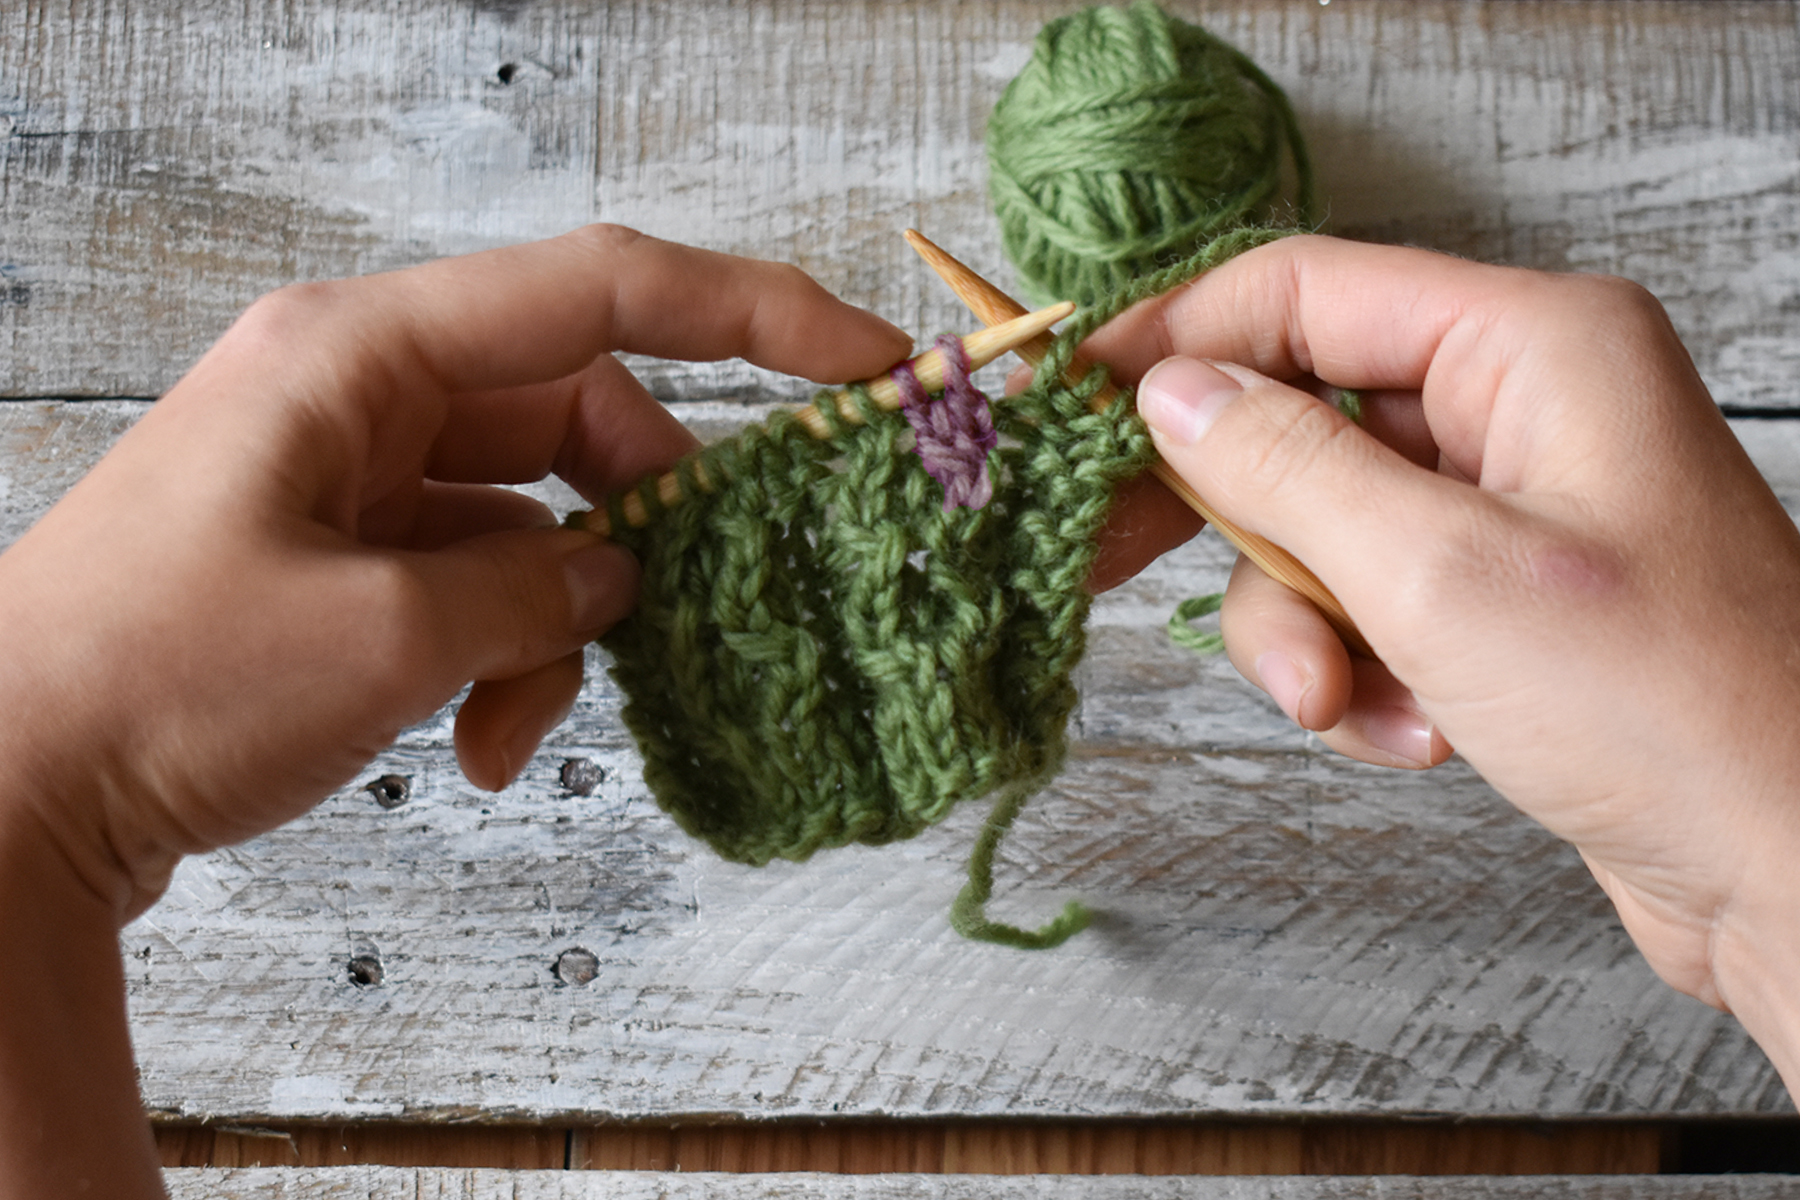
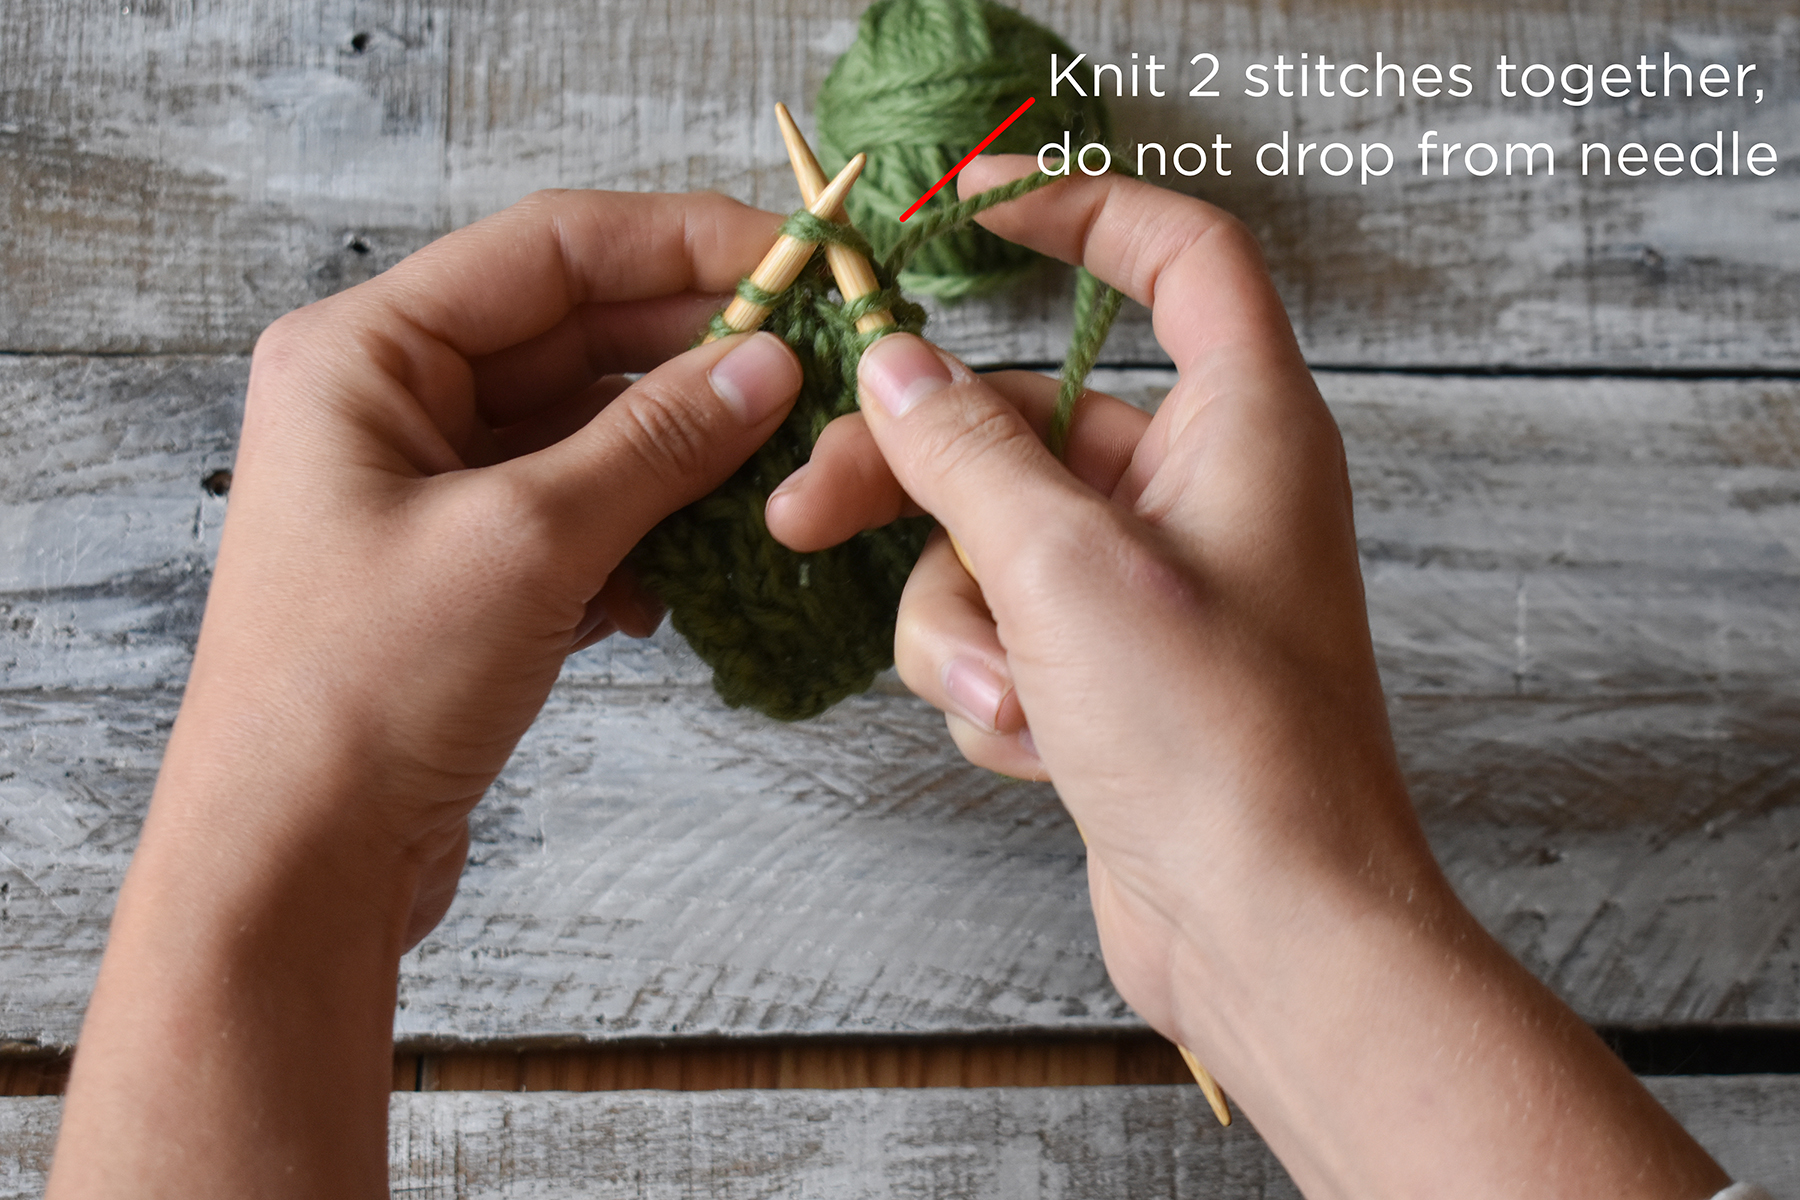
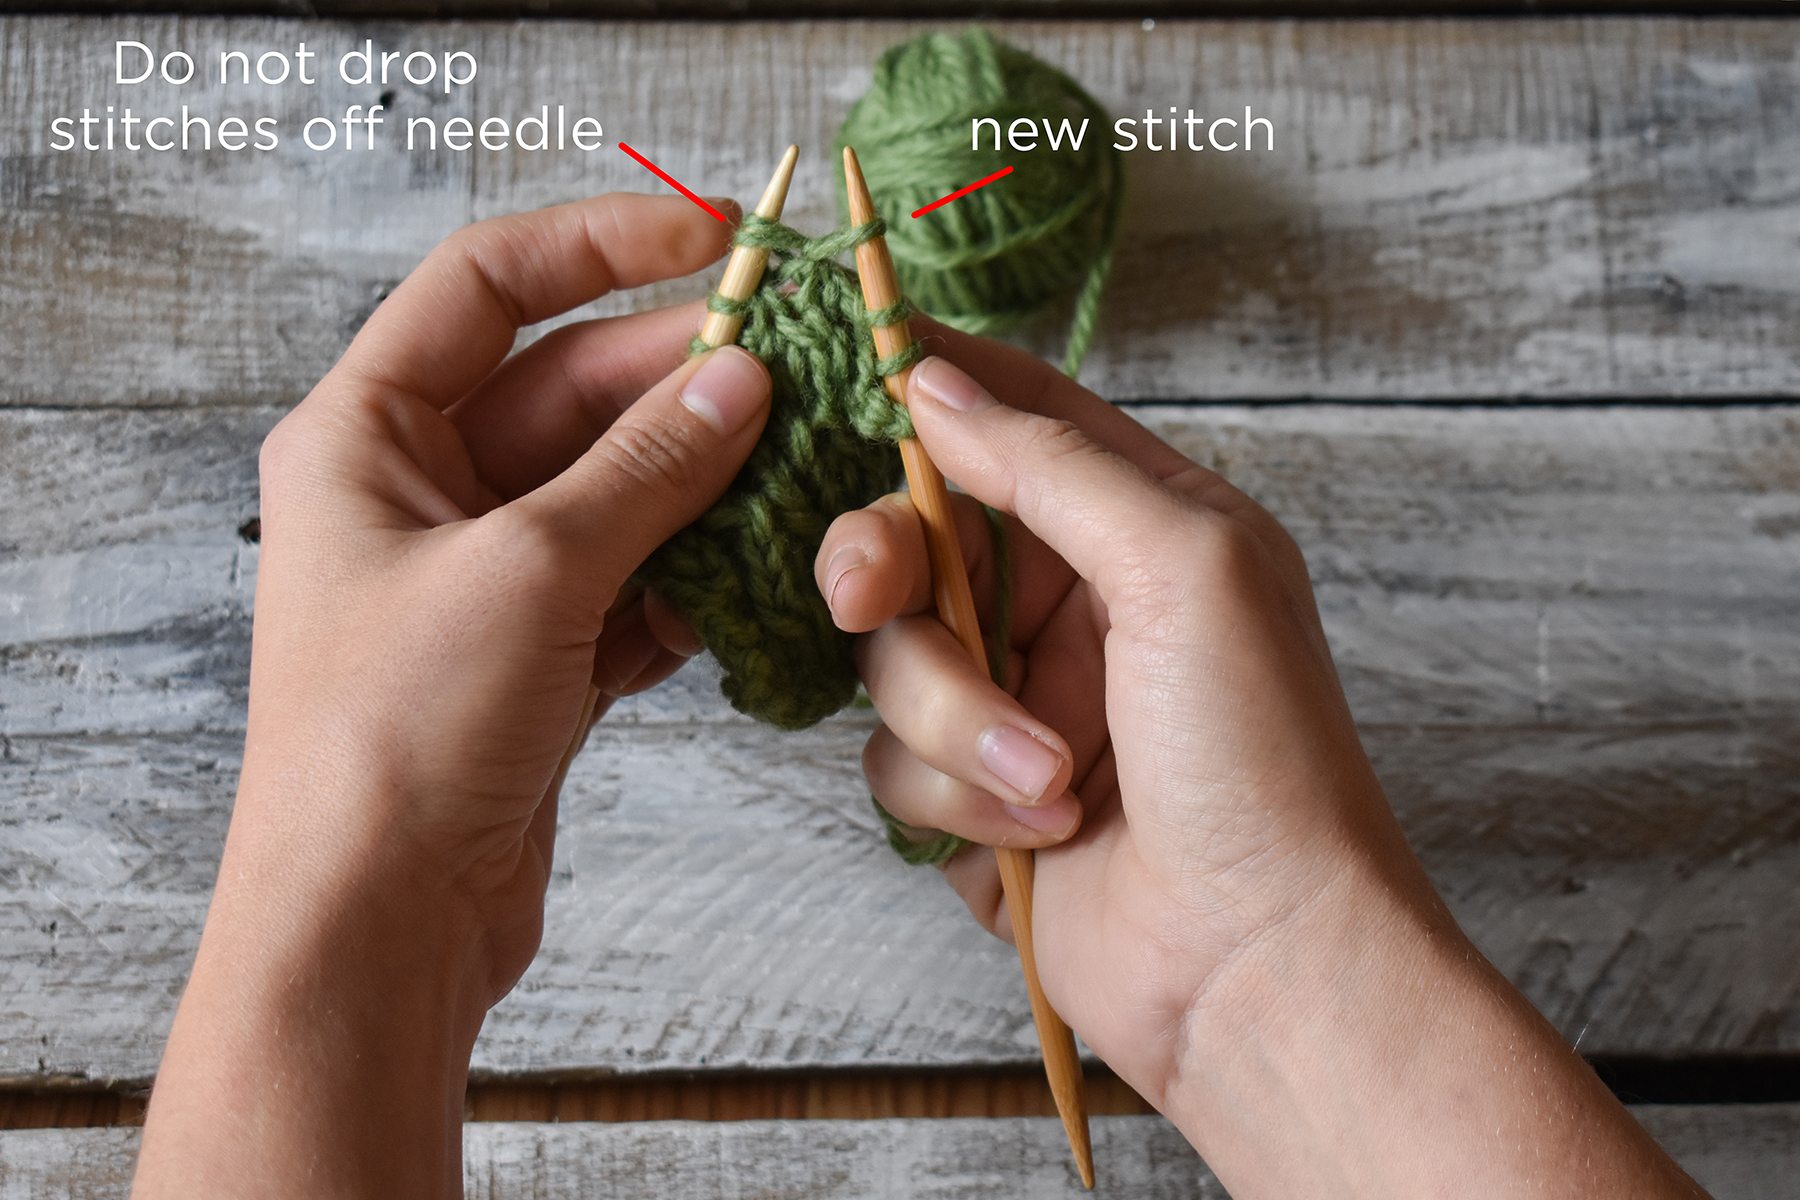
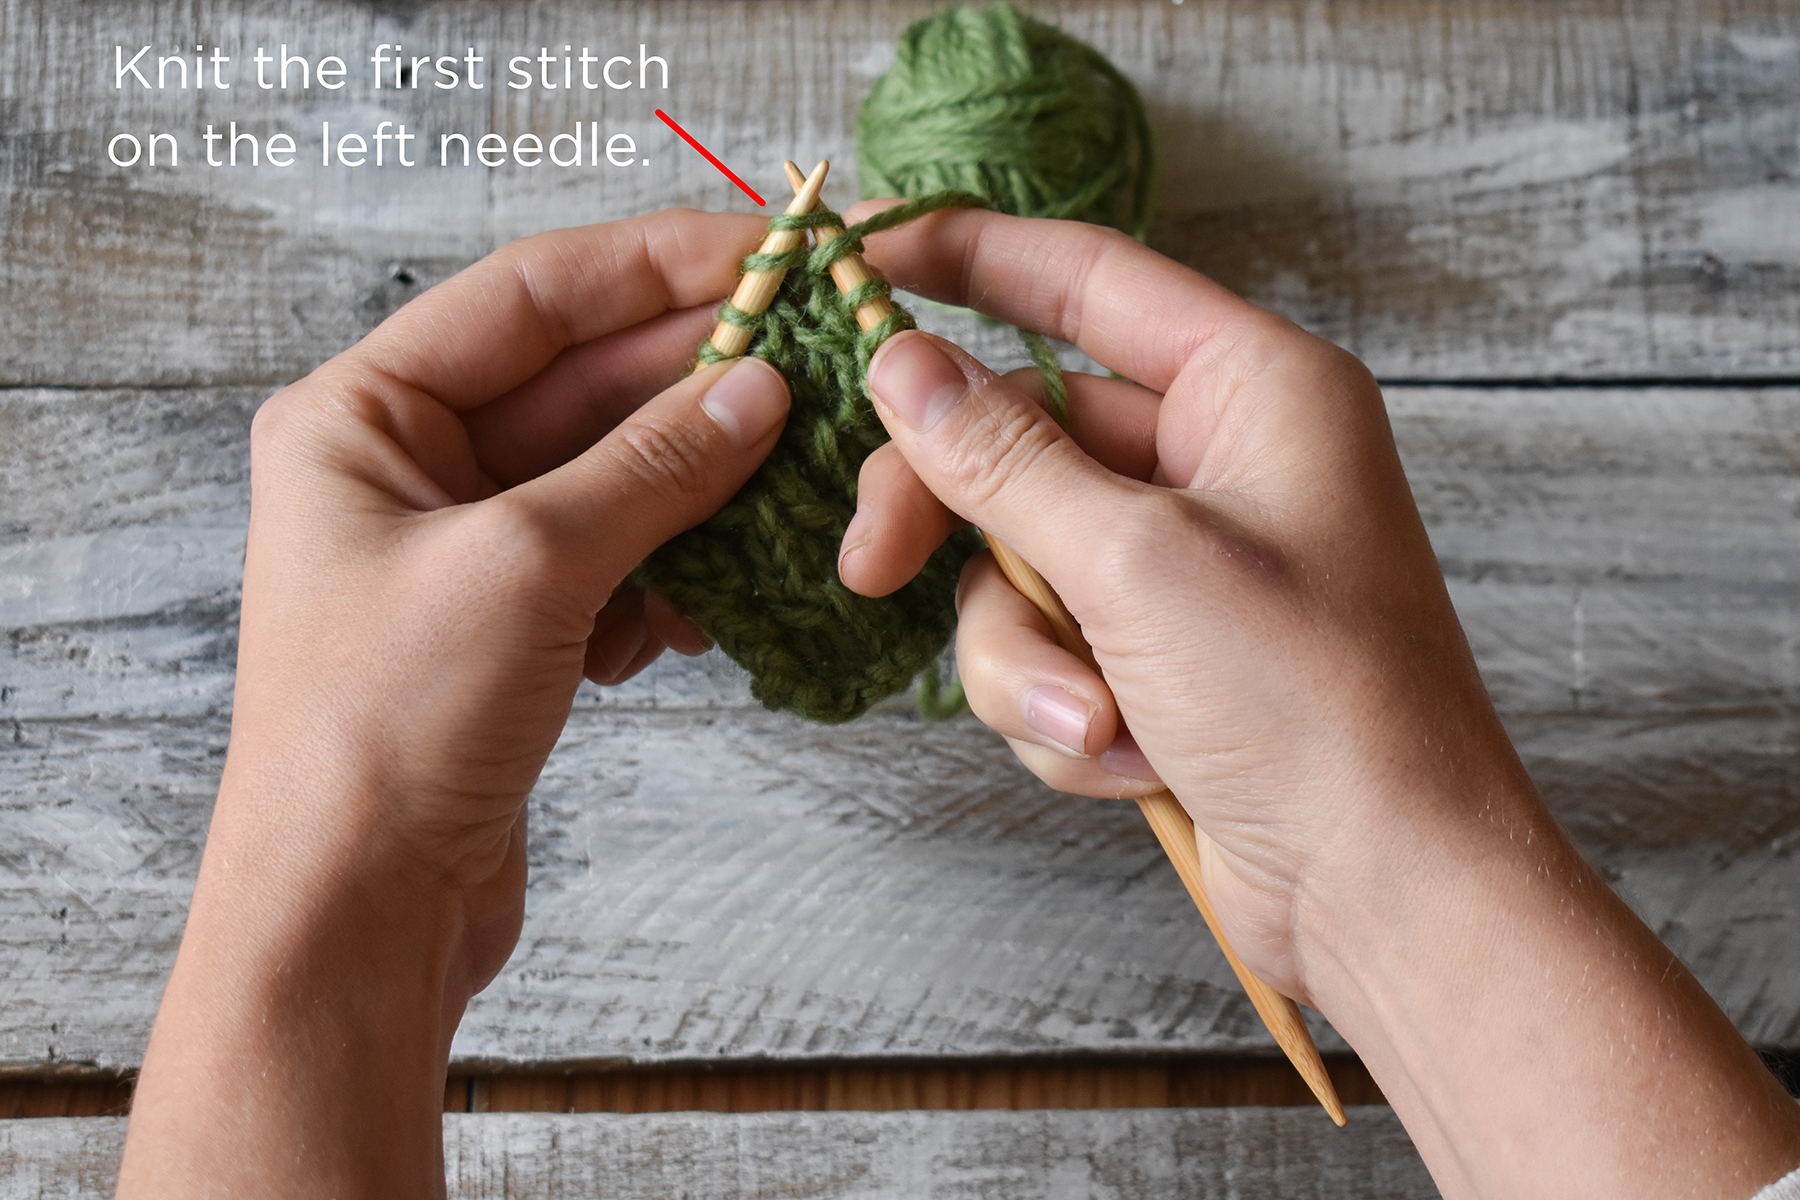
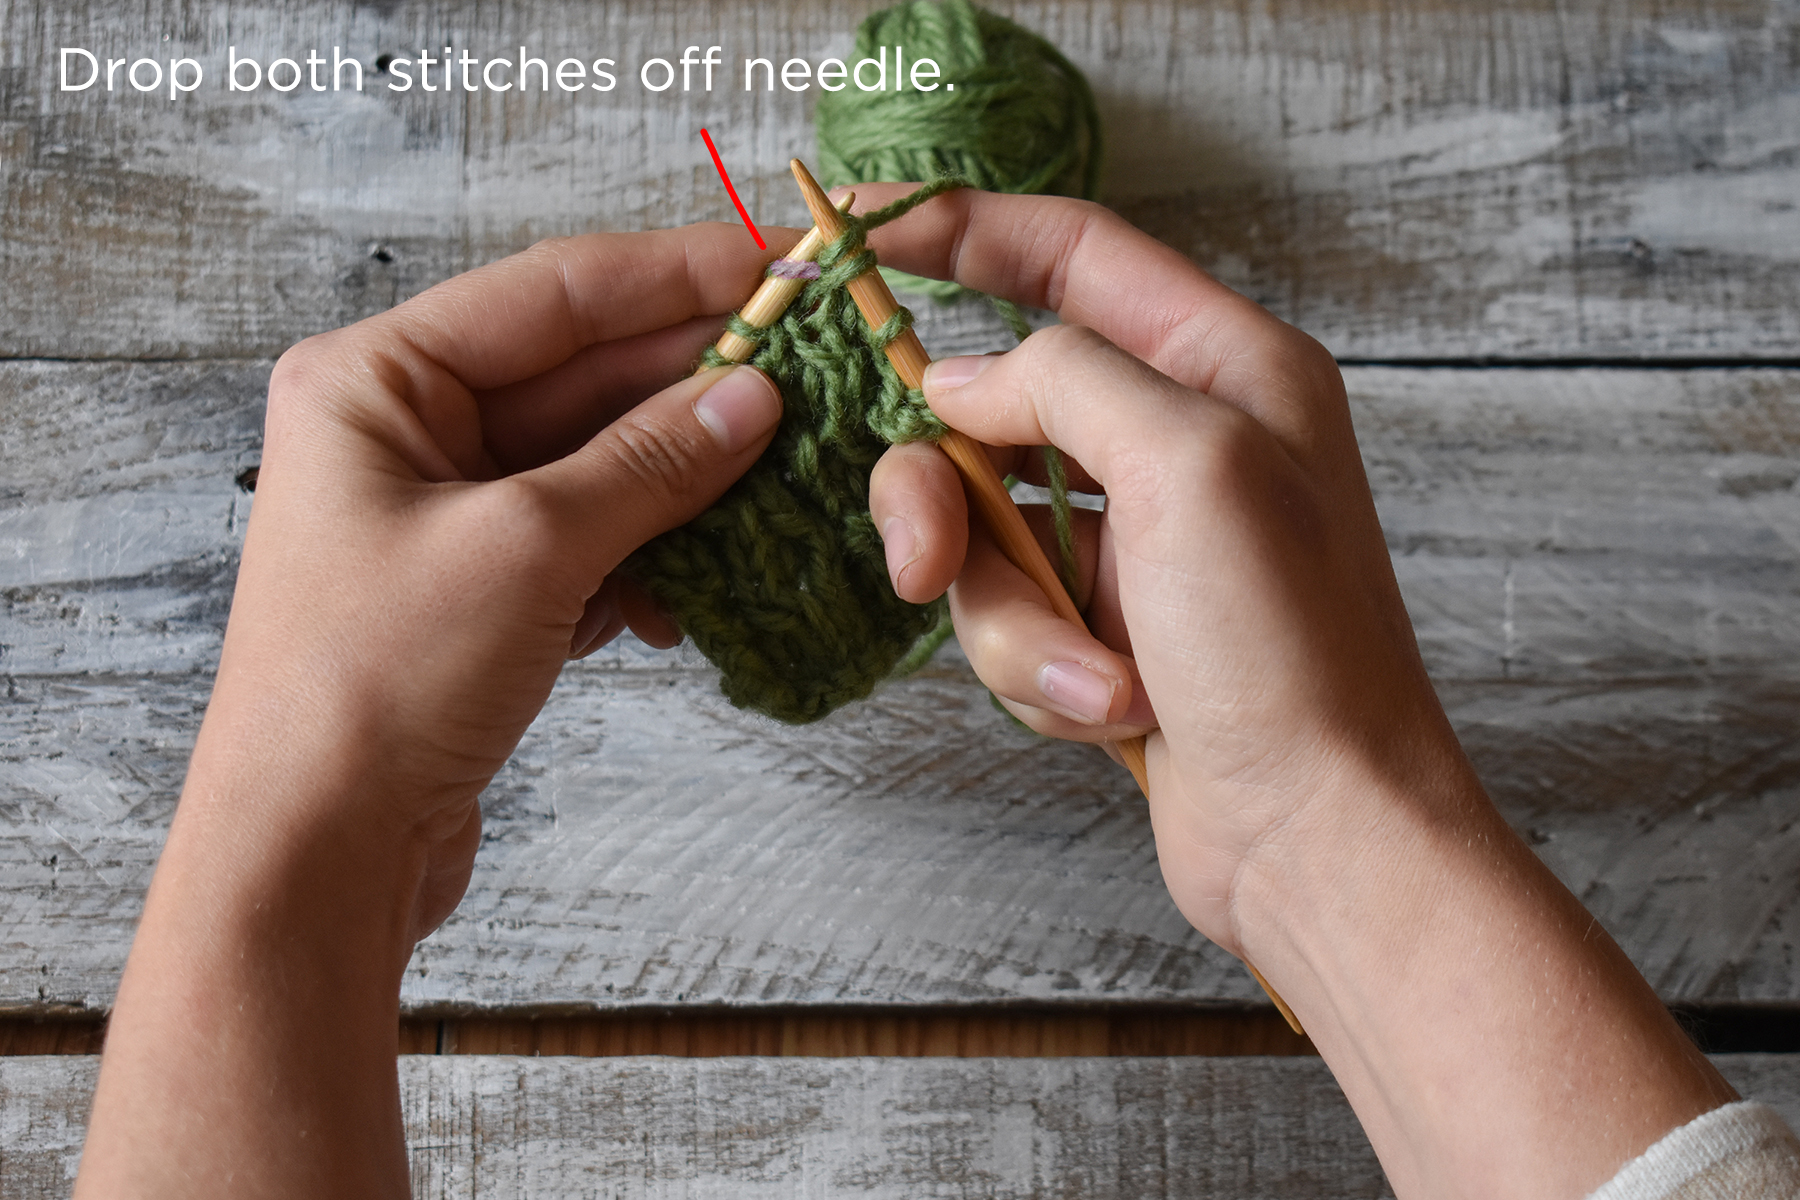
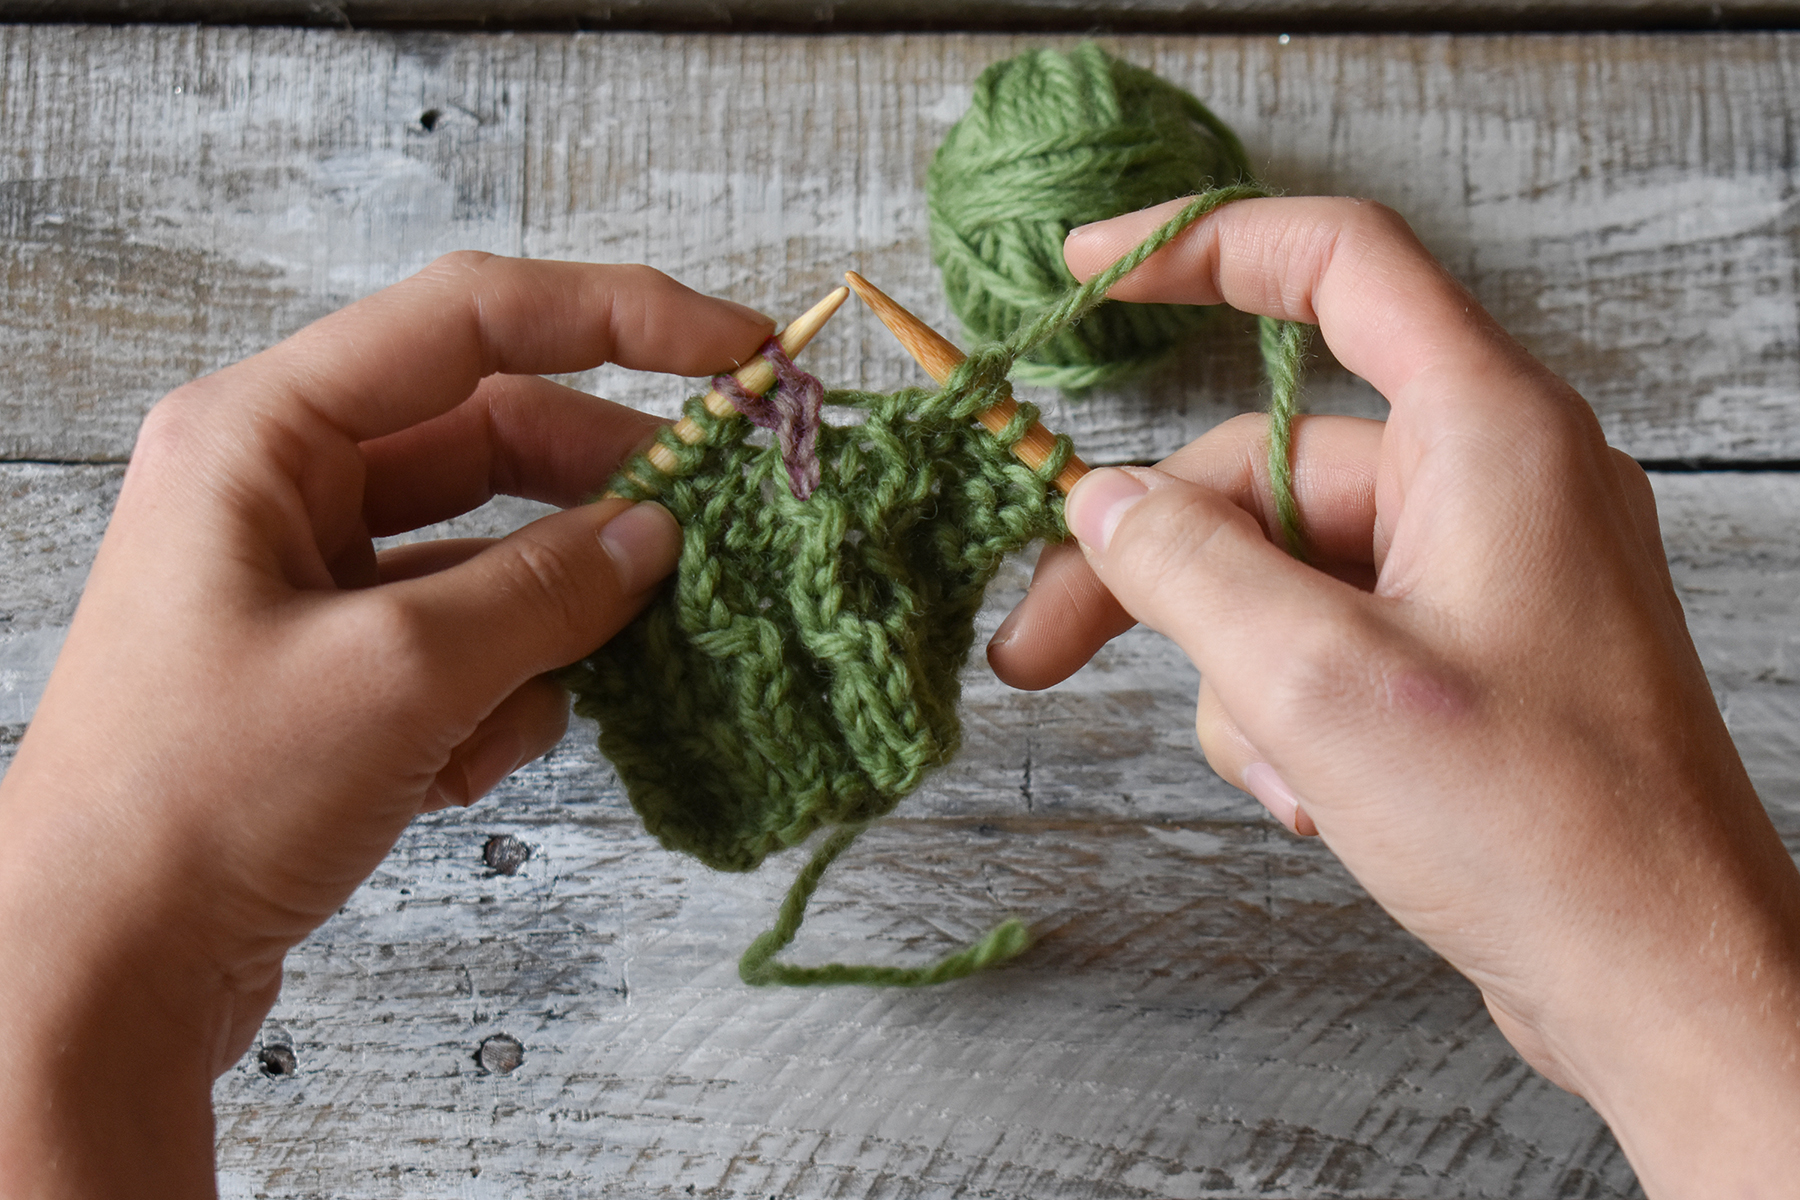
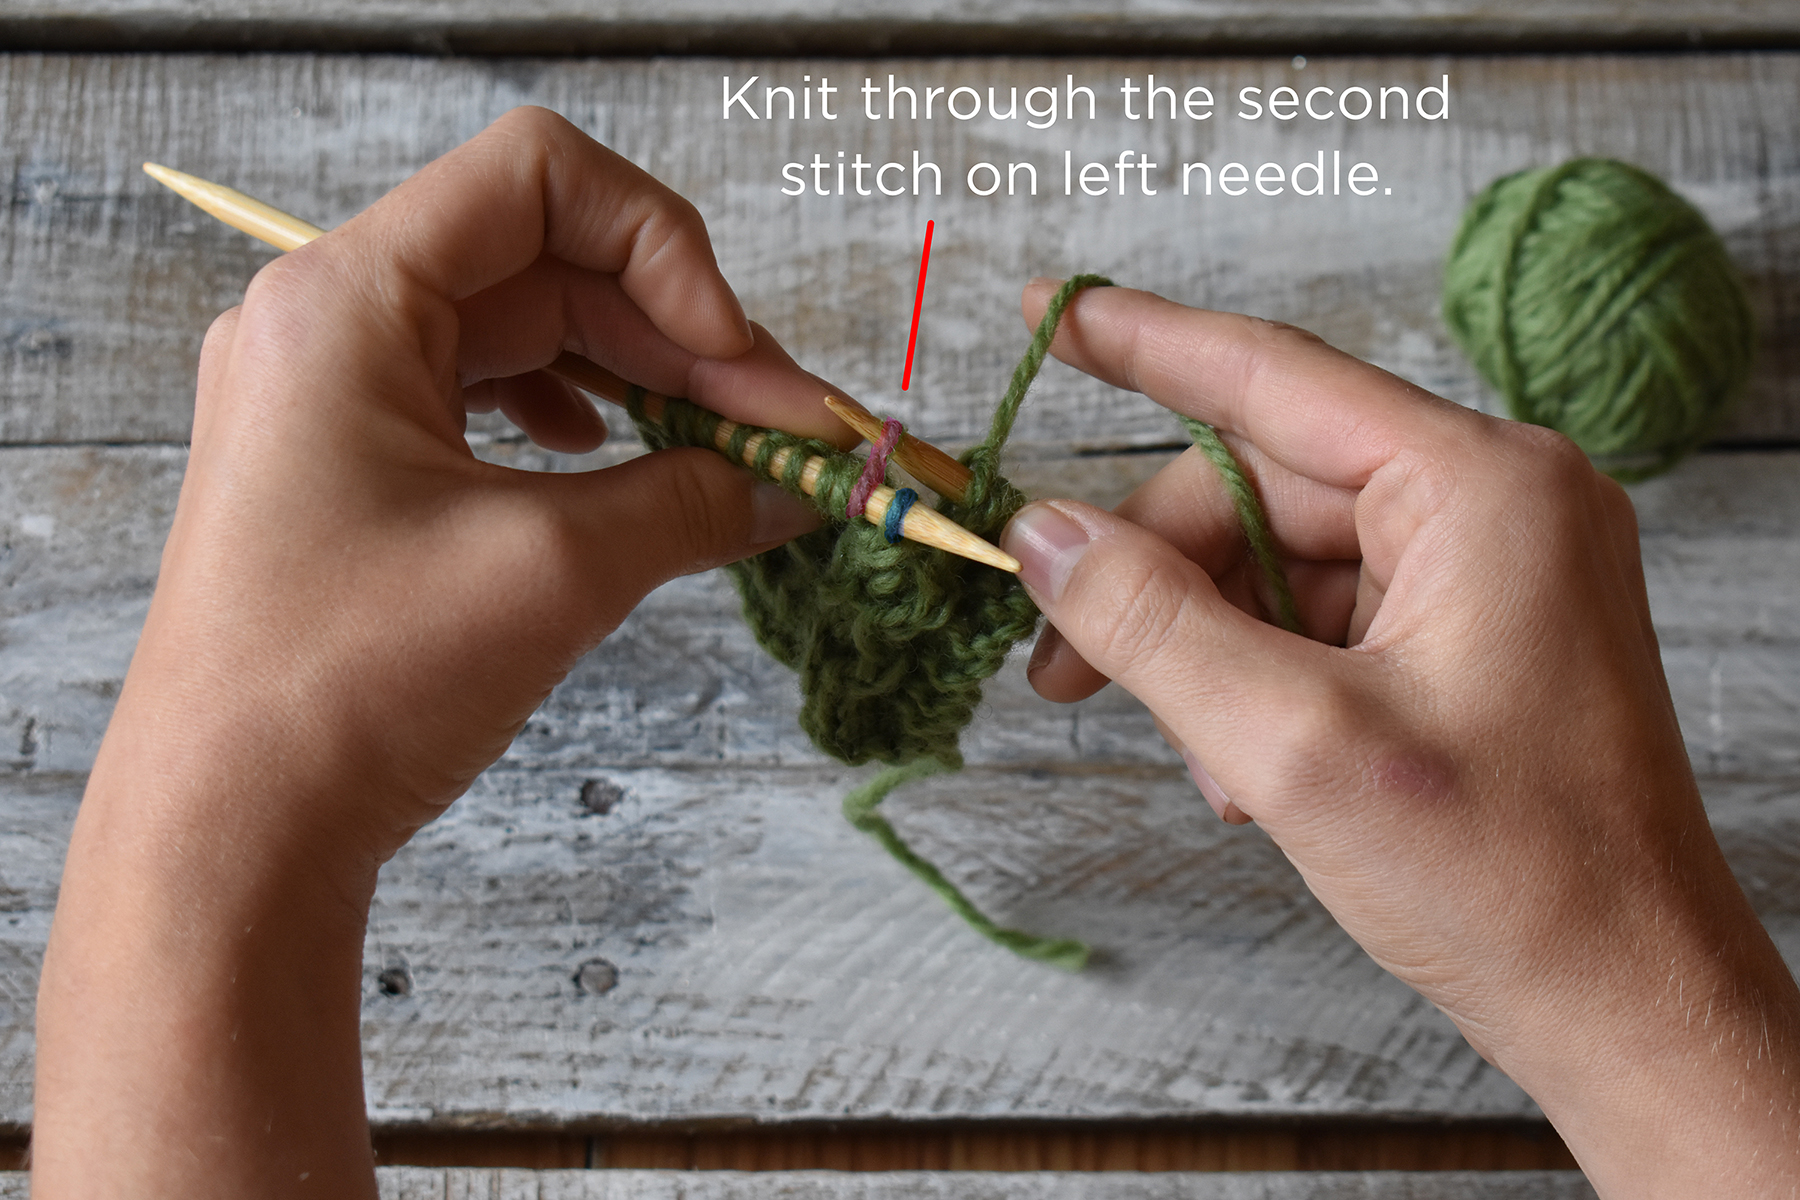
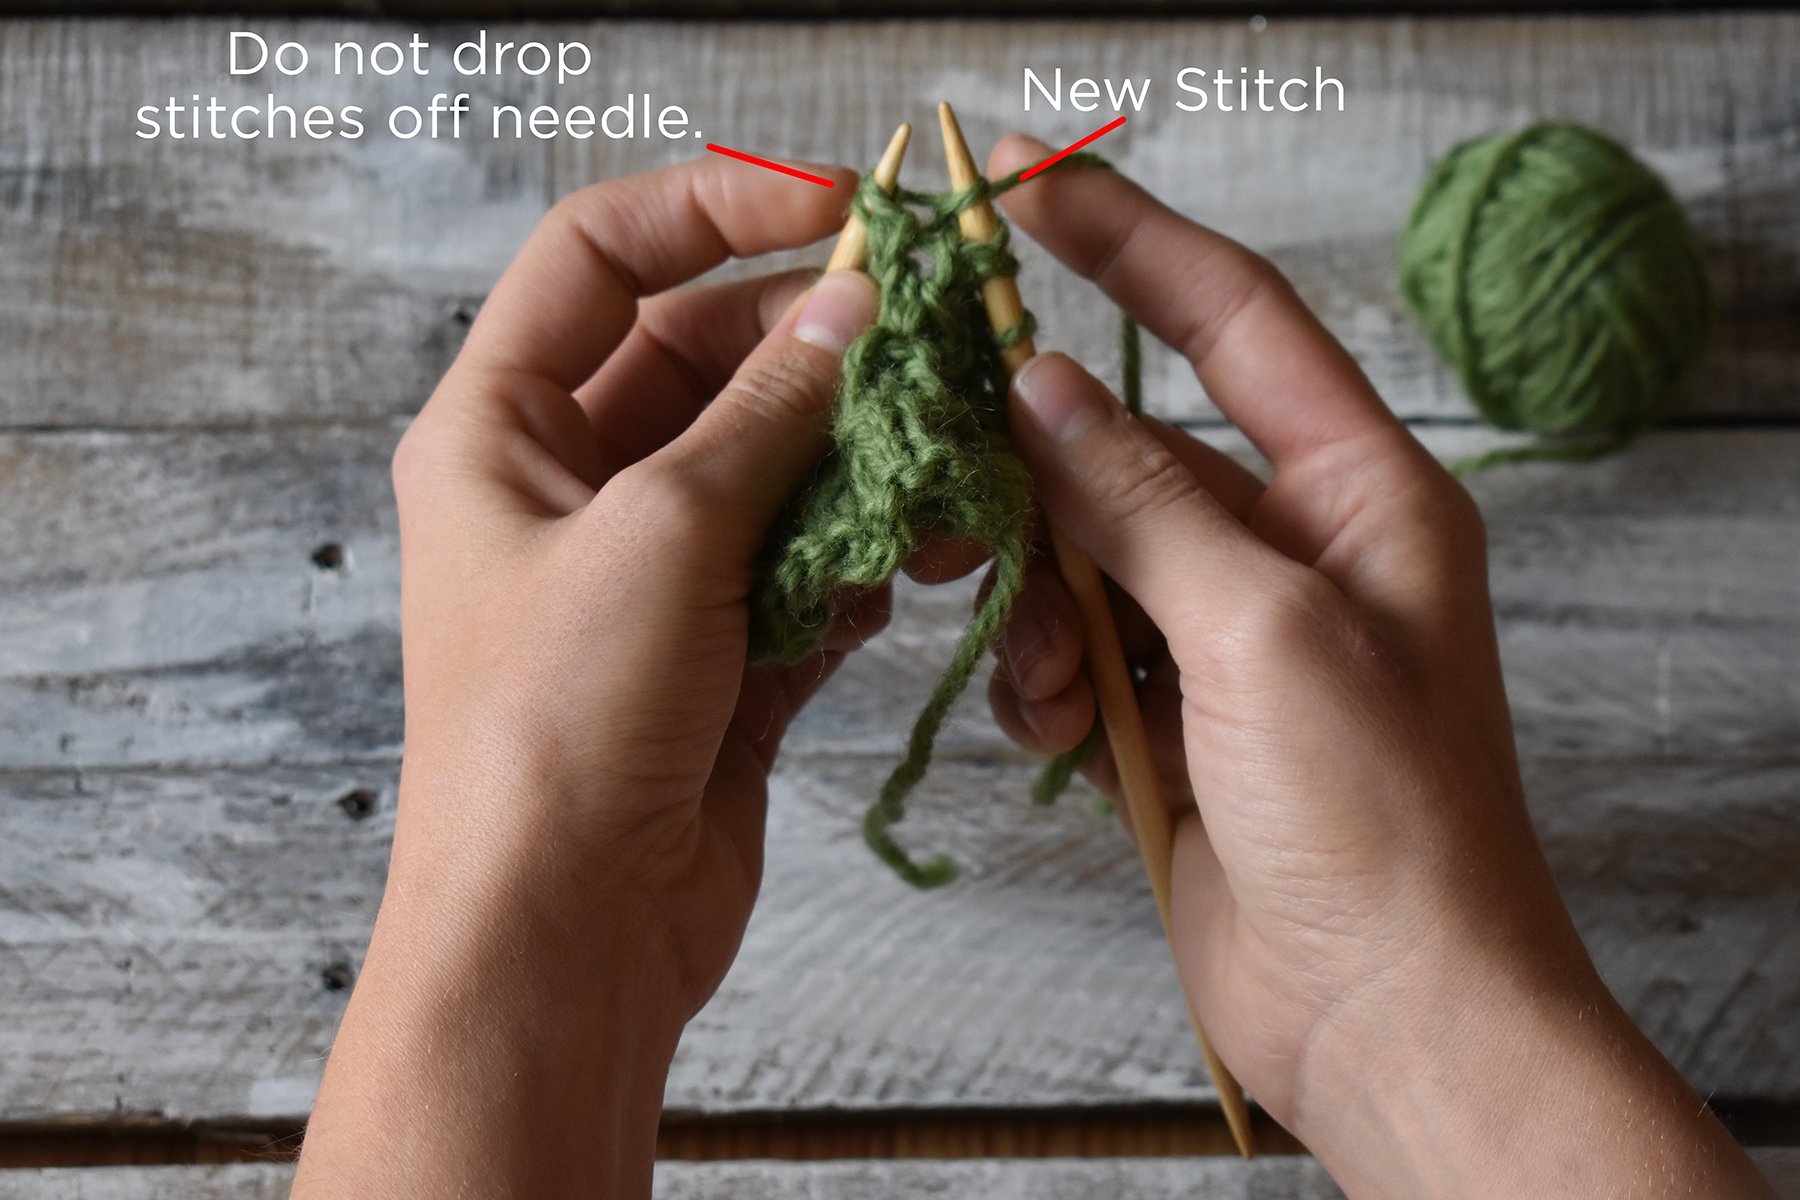
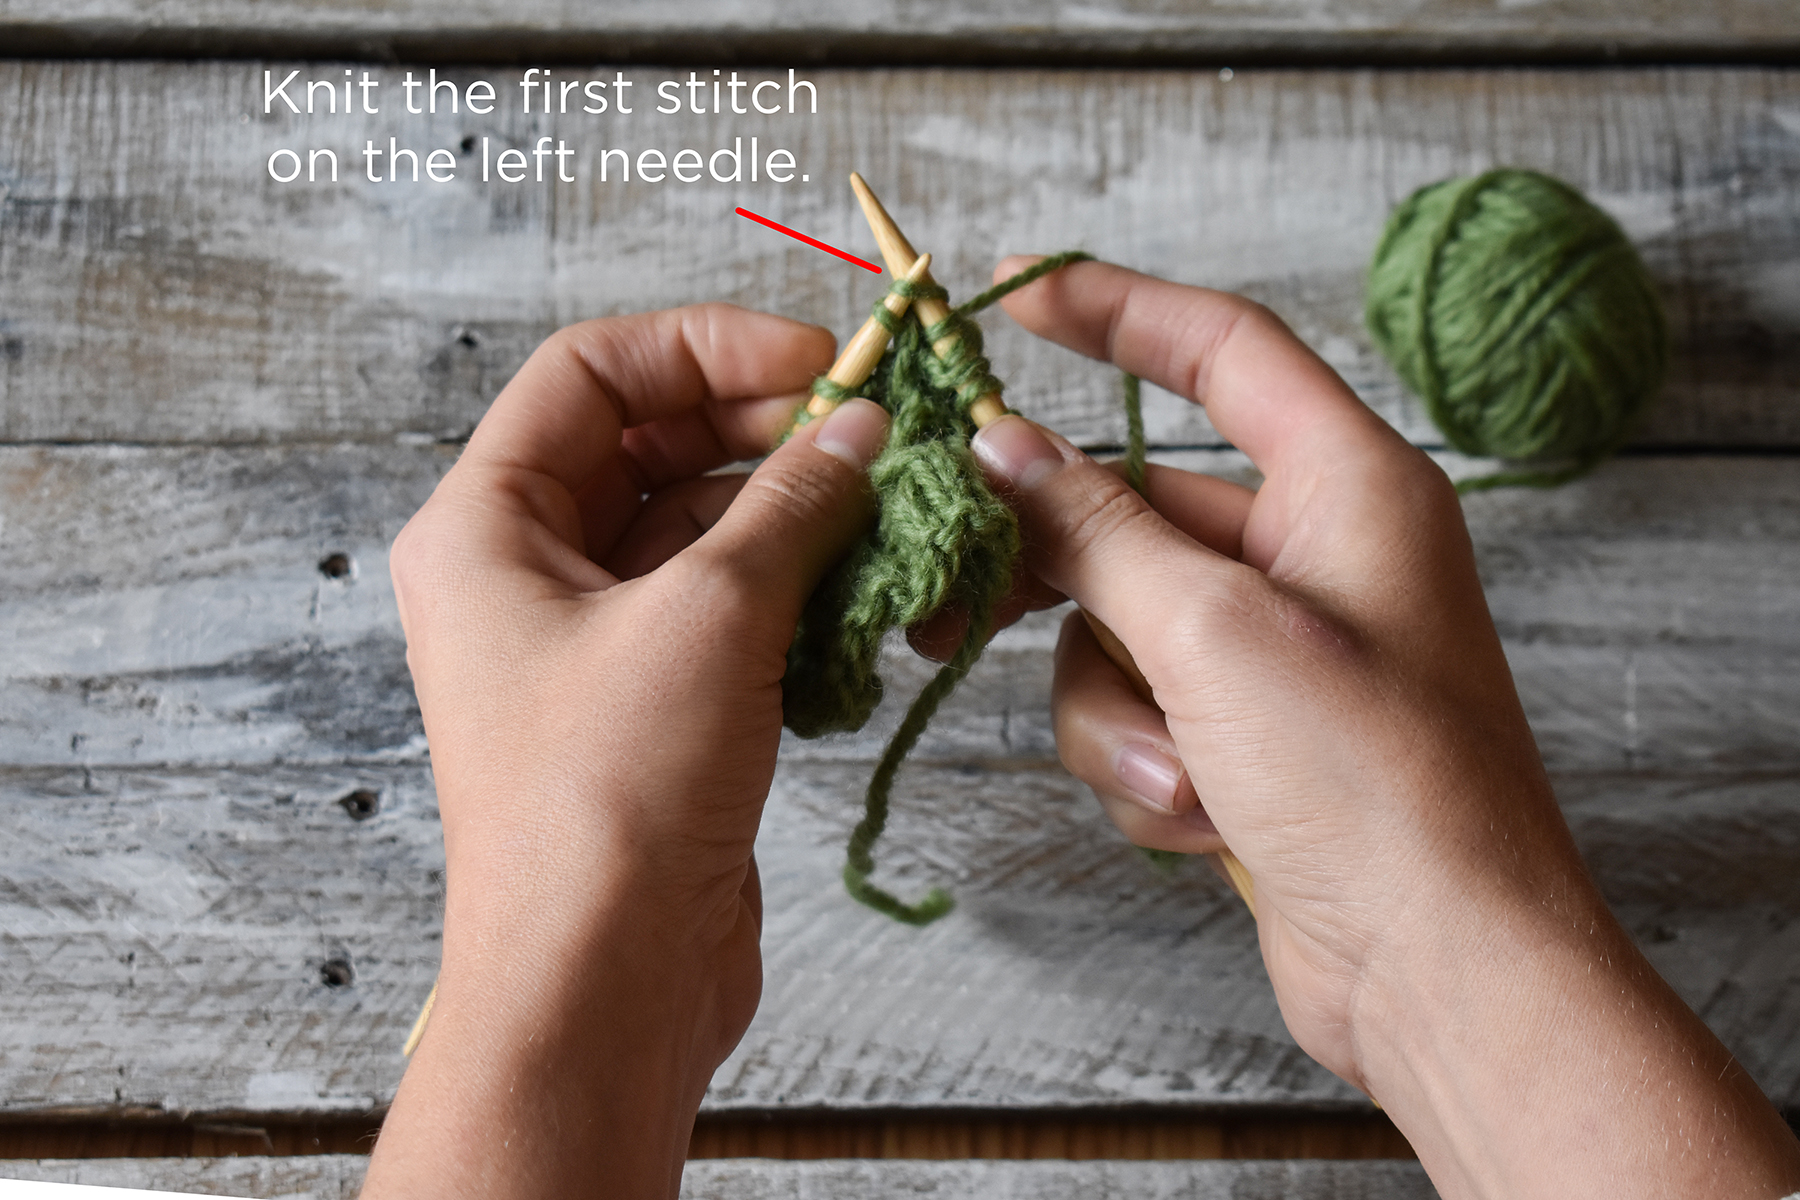
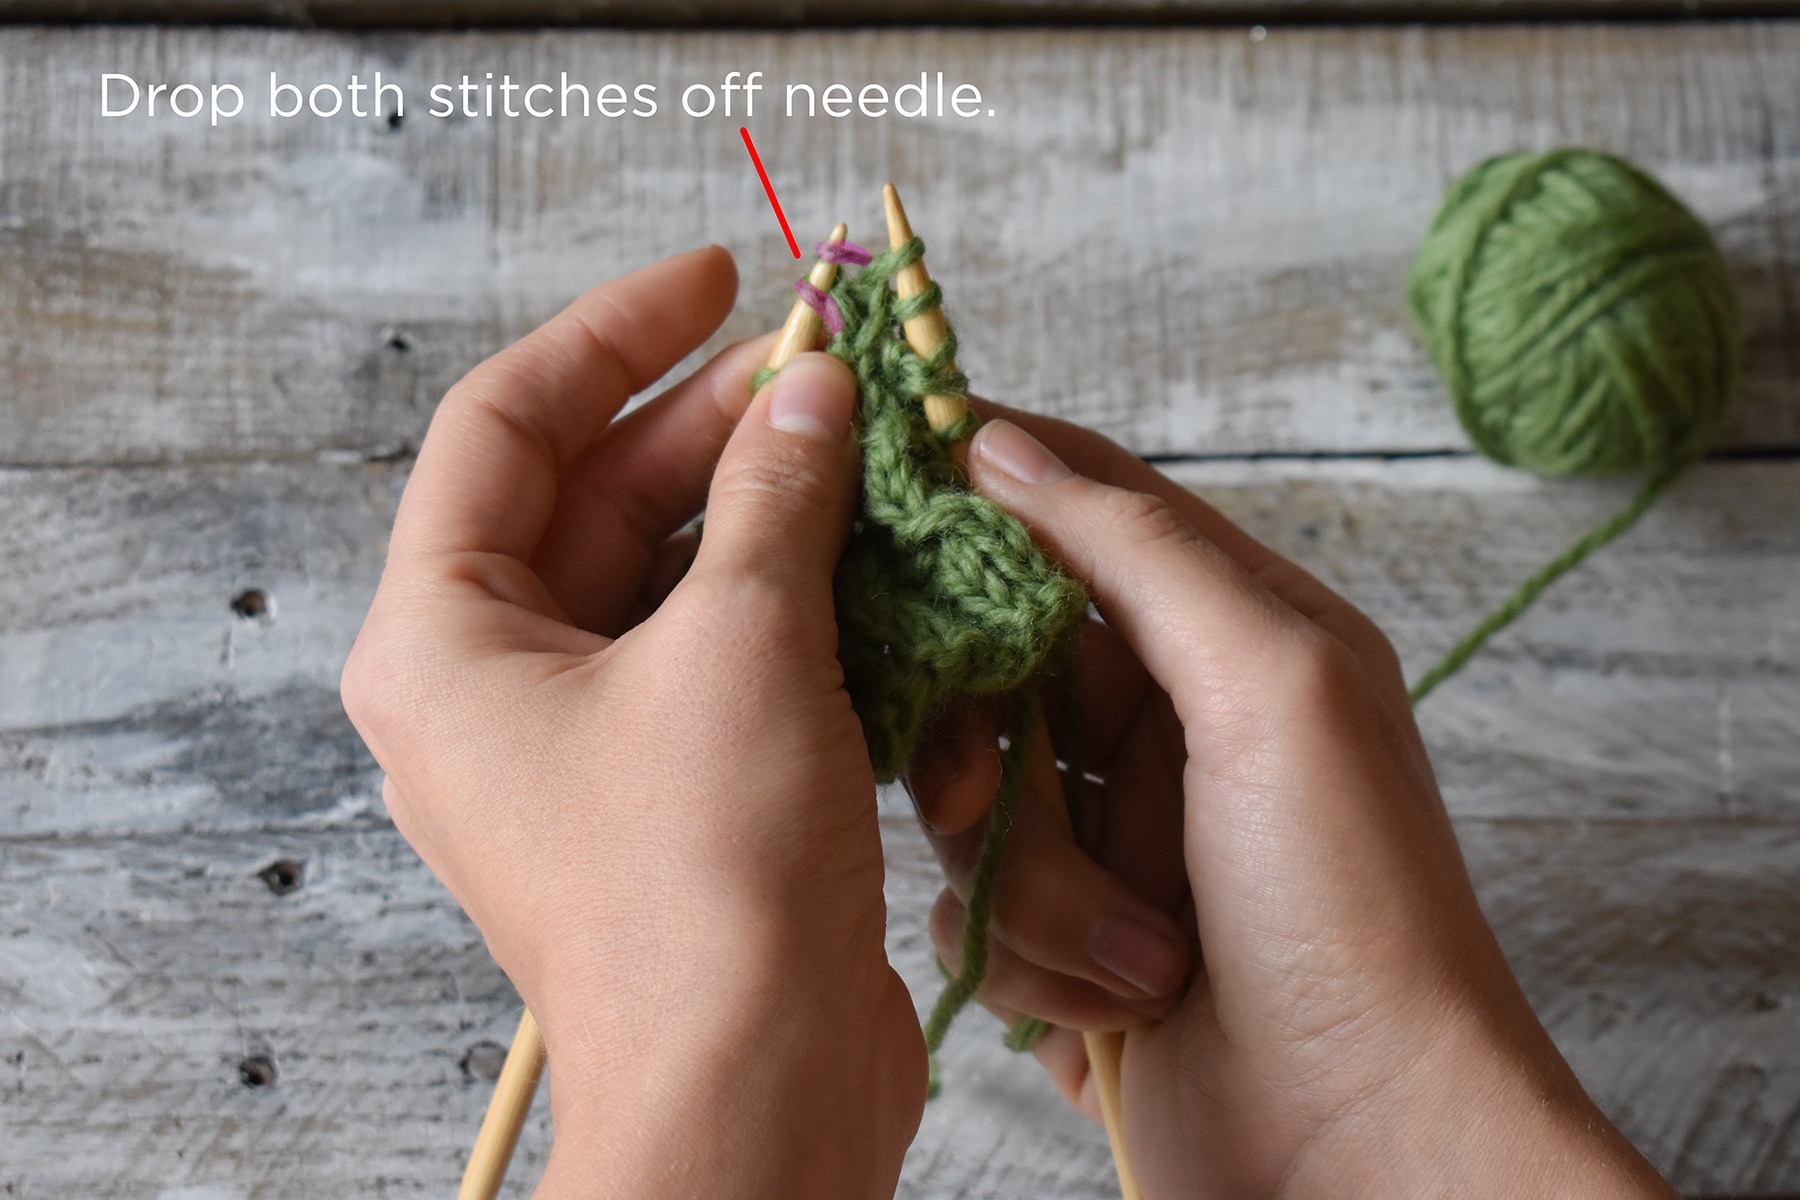
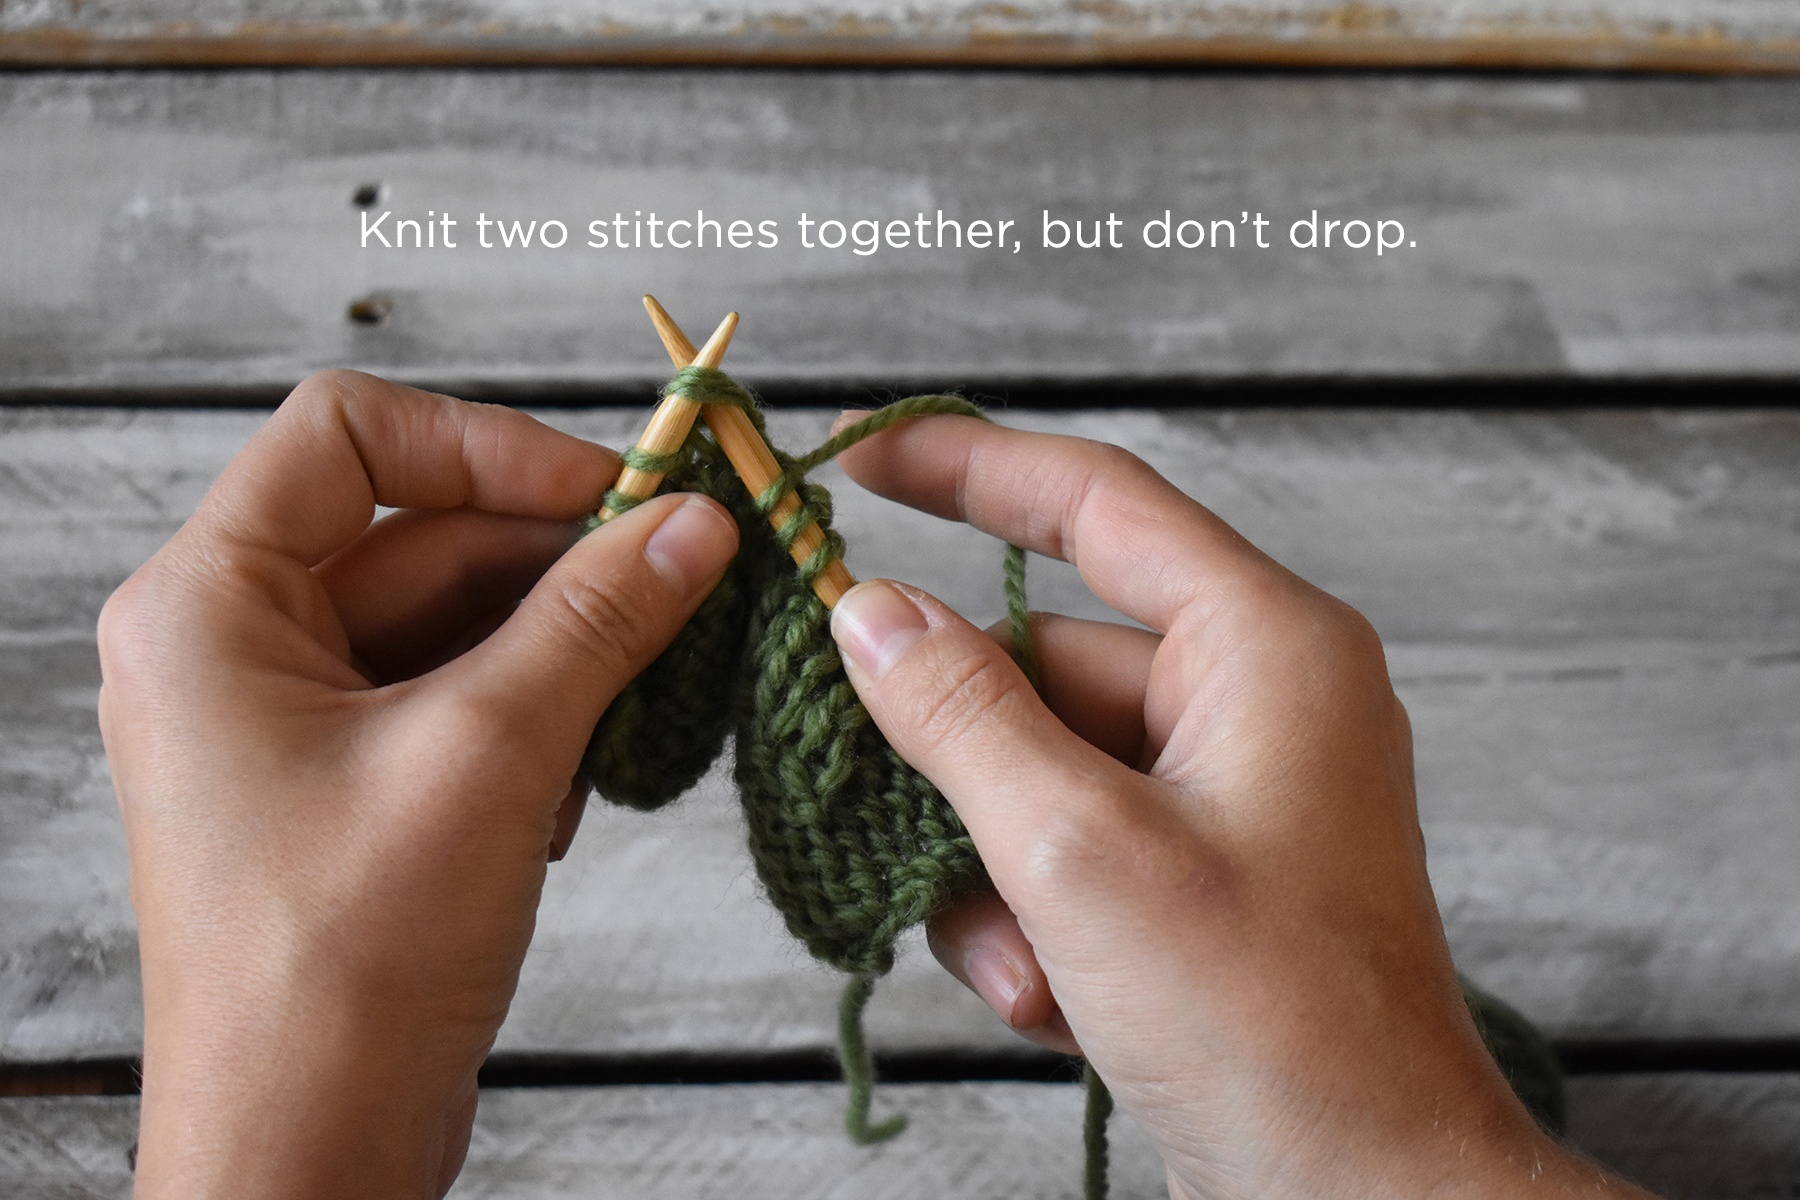
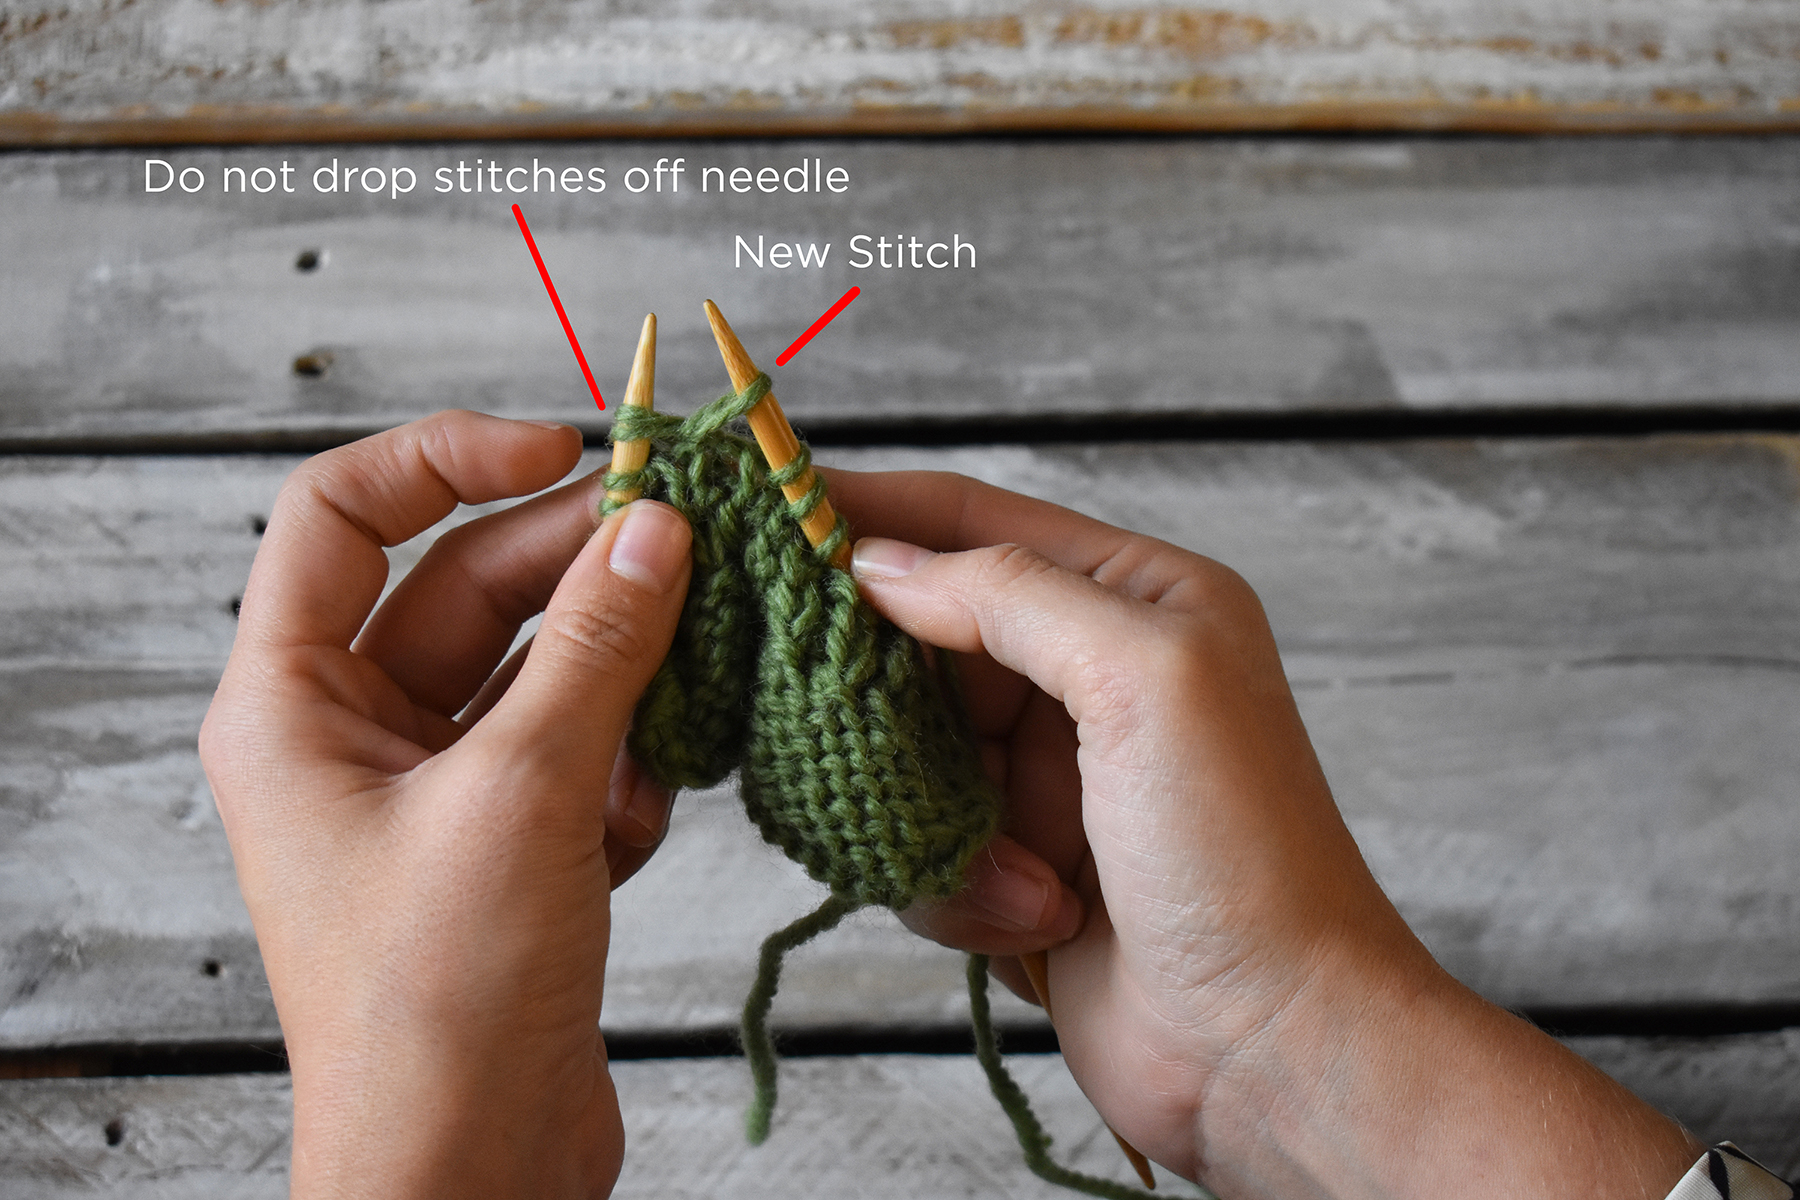
Right TwistStart by making a swatch. Swatches are not only crucial for getting the finished item you want but are also great for practicing new stitches. Work in your pattern until you’ve reached the two stitches you need to twist. I’ve highlighted these stitches in purple so it’s easier to see. We want to change the position of these two stitches by moving the left stitch over the top of the right stitch.Begin by knitting two stitches together, but do not drop the stitches from your needle. As you can see, the two stitches remain on the left needle, but there is now a new stitch on the right needle. Next, knit the first stitch on the left needle. Drop both of the stitches from the left needle. You now have completed the Right Twist, and have two new stitches on the right needle. Easy, right?Left TwistWork in your pattern until you’ve reached the two stitches you need to twist. I’ve highlighted these stitches in purple so it’s easier to see. We want to change the position of these two stitches by moving the right stitch over the top of the left stitch.The first step is to knit only the second stitch on the left needle. This stitch is highlighted in purple. As you can see, the first stitch on the left needle remains in place. After knitting the second stitch, do not drop the stitches off the left needle. Next, knit the first stitch on the left needle. Drop both of the stitches from the left needle. You now have completed the Left Twist, and have two new stitches on the right needle.Here is what each set of twisted stitches will look like. Notice that the Left Twist leans to the left, and the Right Twist leans to the right. In the Trinket Socks, Right Twists and Left Twists are alternated to create an undulating panel.
The Right and Left Twists are a great addition to your knitting toolbox. You’ll find that they’re quite fun to work, and they can really make a stitch pattern interesting. I hope you’ve found this tutorial to be useful.
Notice those panels of twisted stitches – pretty!
Remember, you can find the Trinket Socks kit, as well as the rest of the 12 Days of Winter Kits at your local yarn store. Happy knitting!
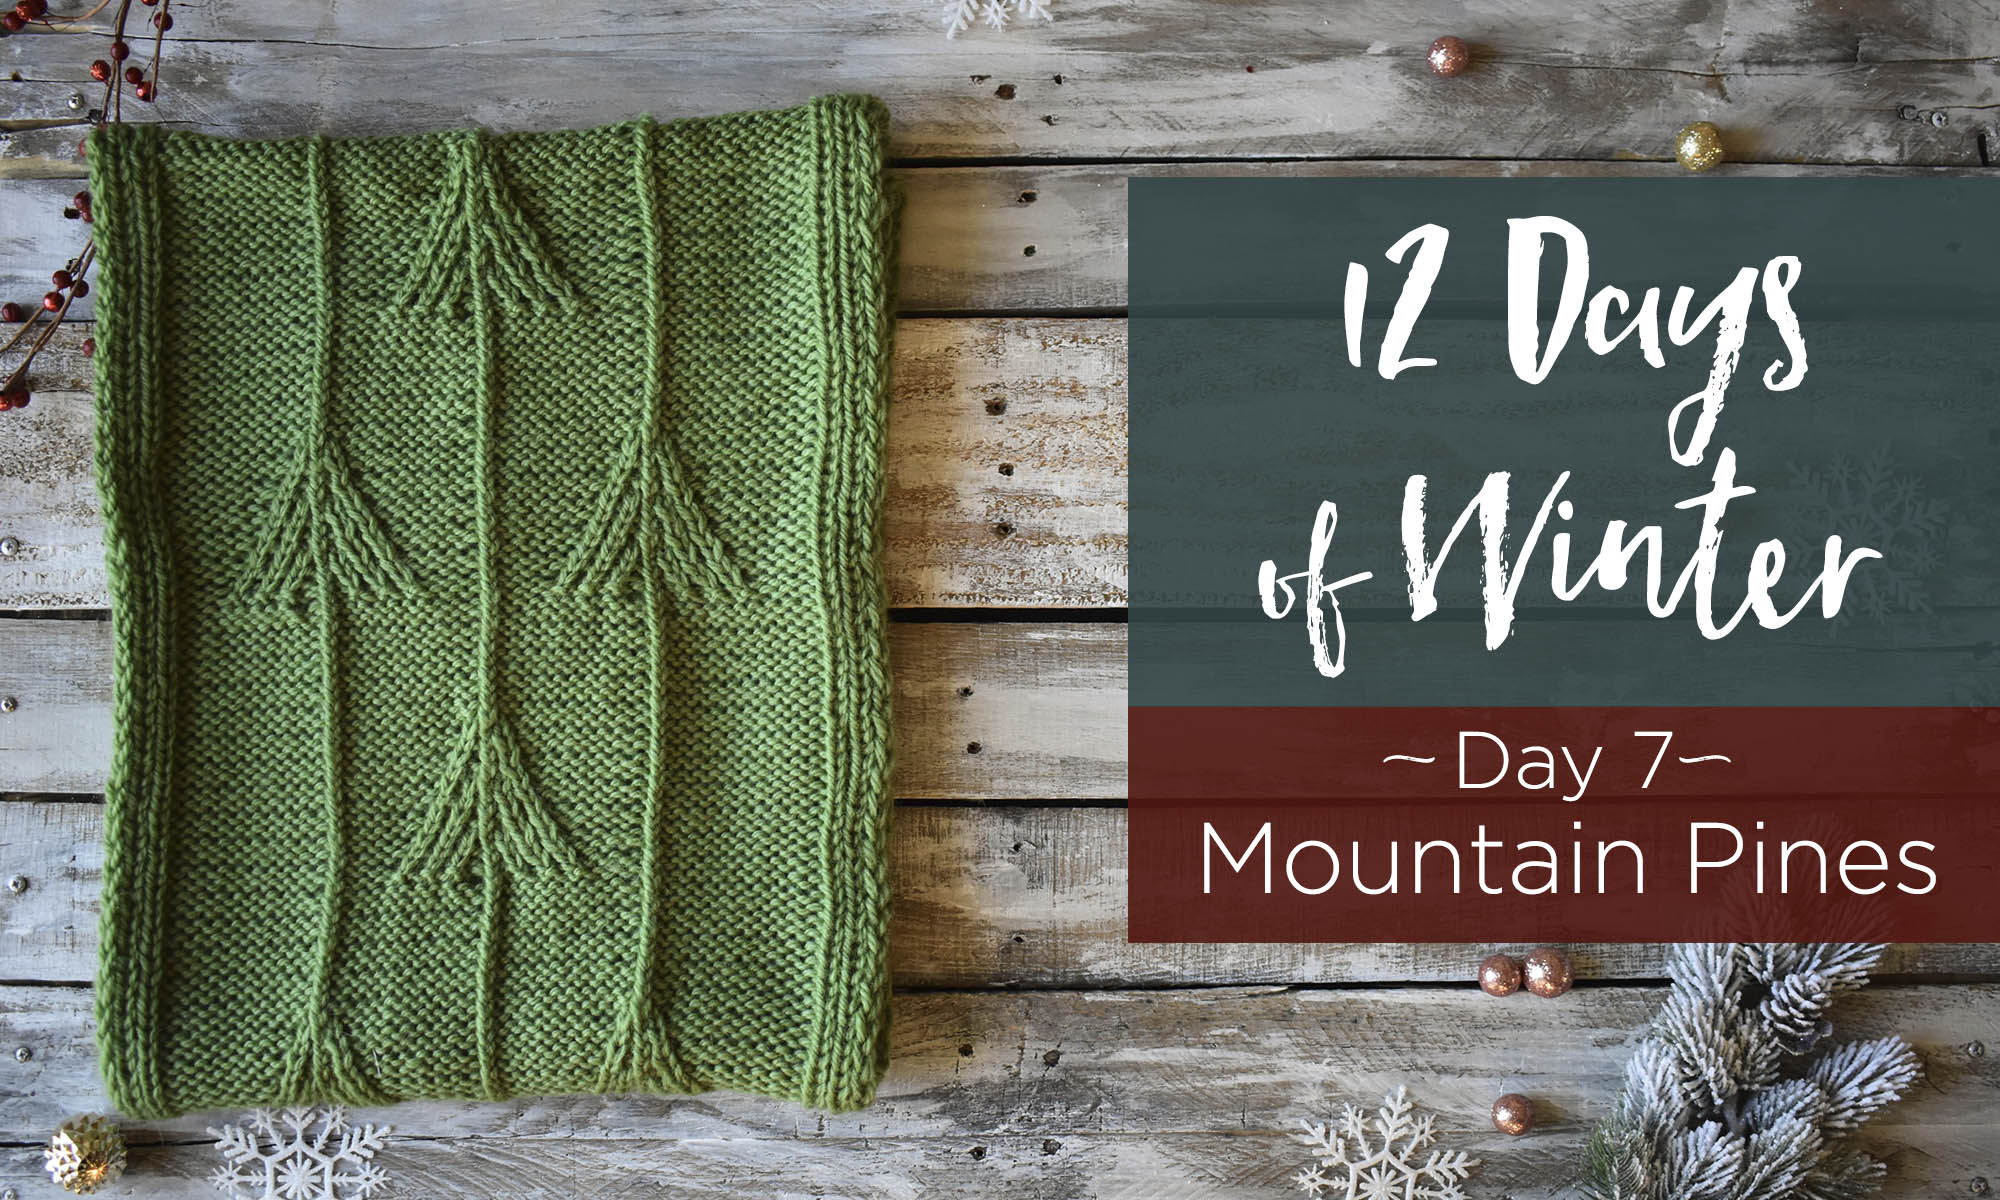
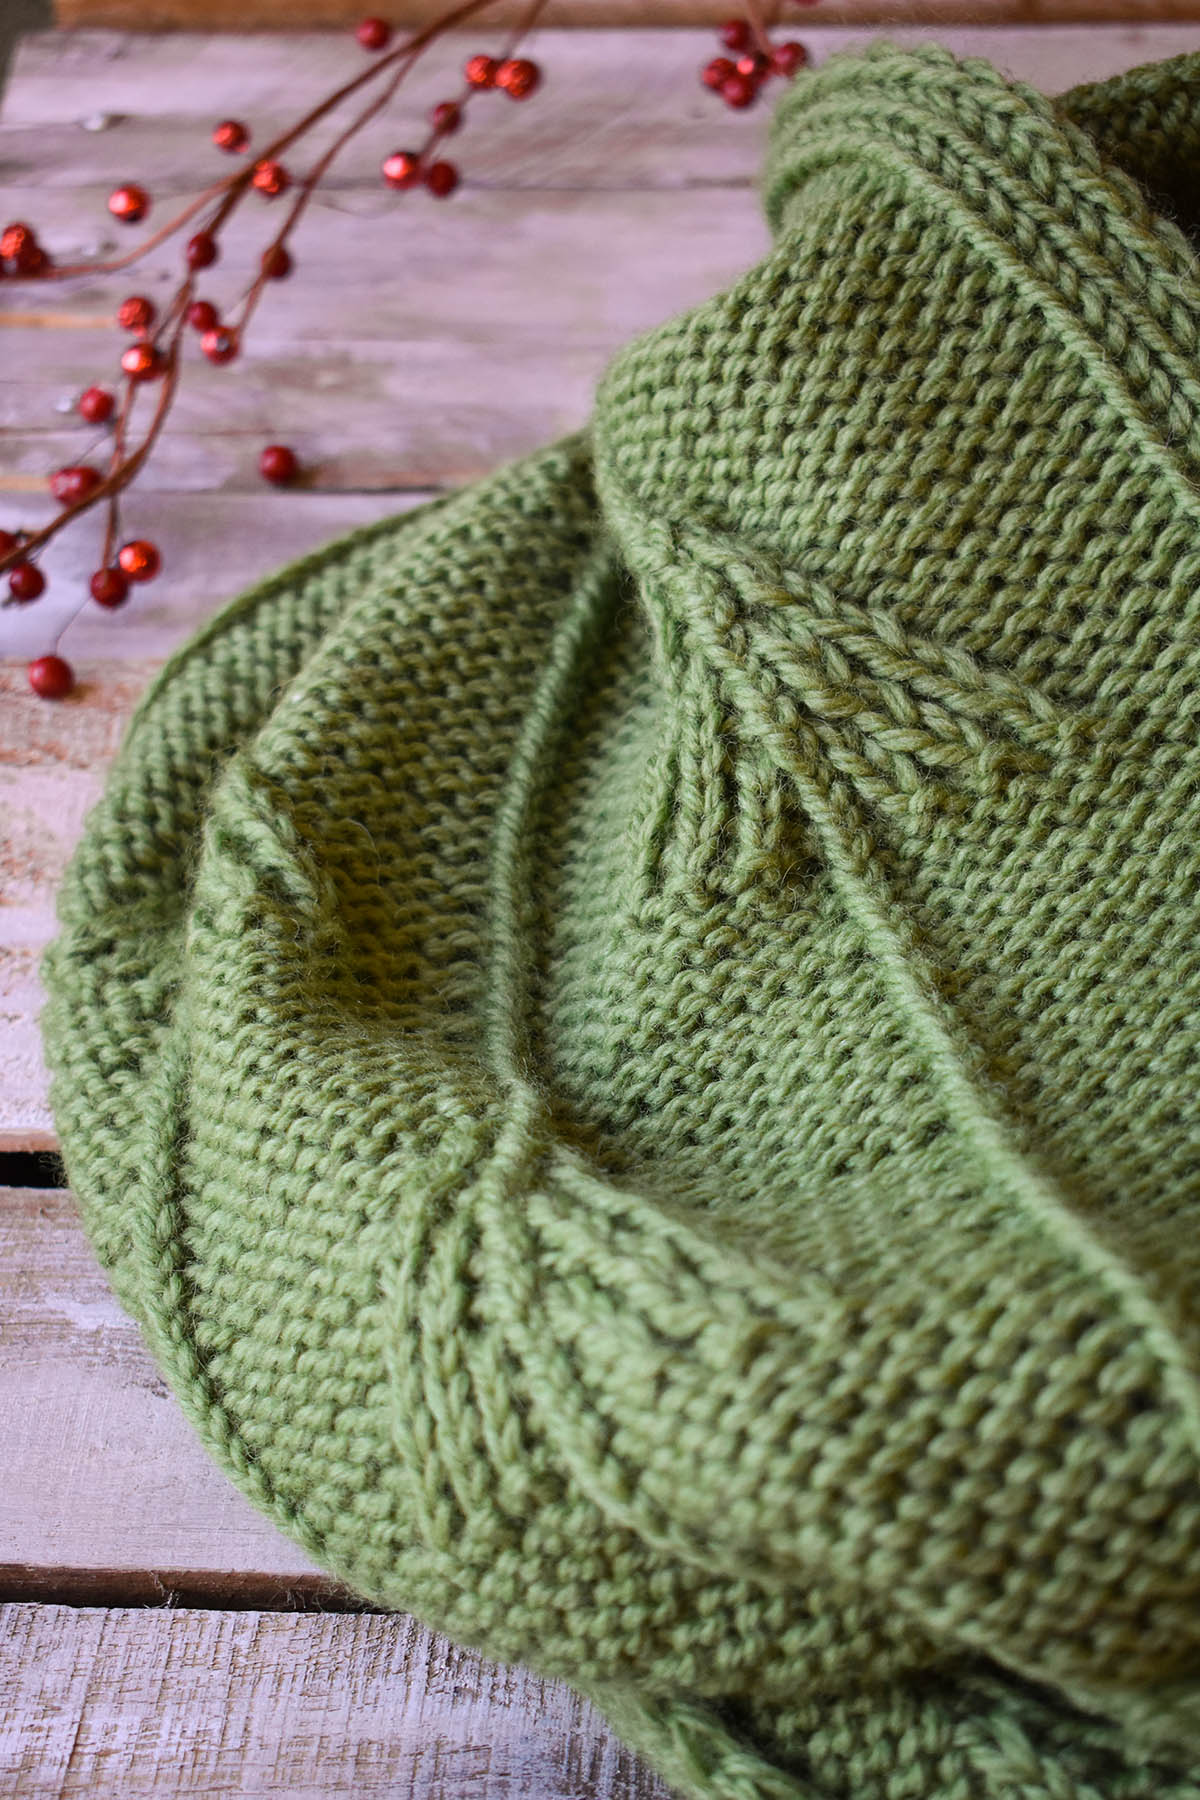
This is part 7 in a 12 part series highlighting designs from our 12 Days of Winter, Series 3 Edition.
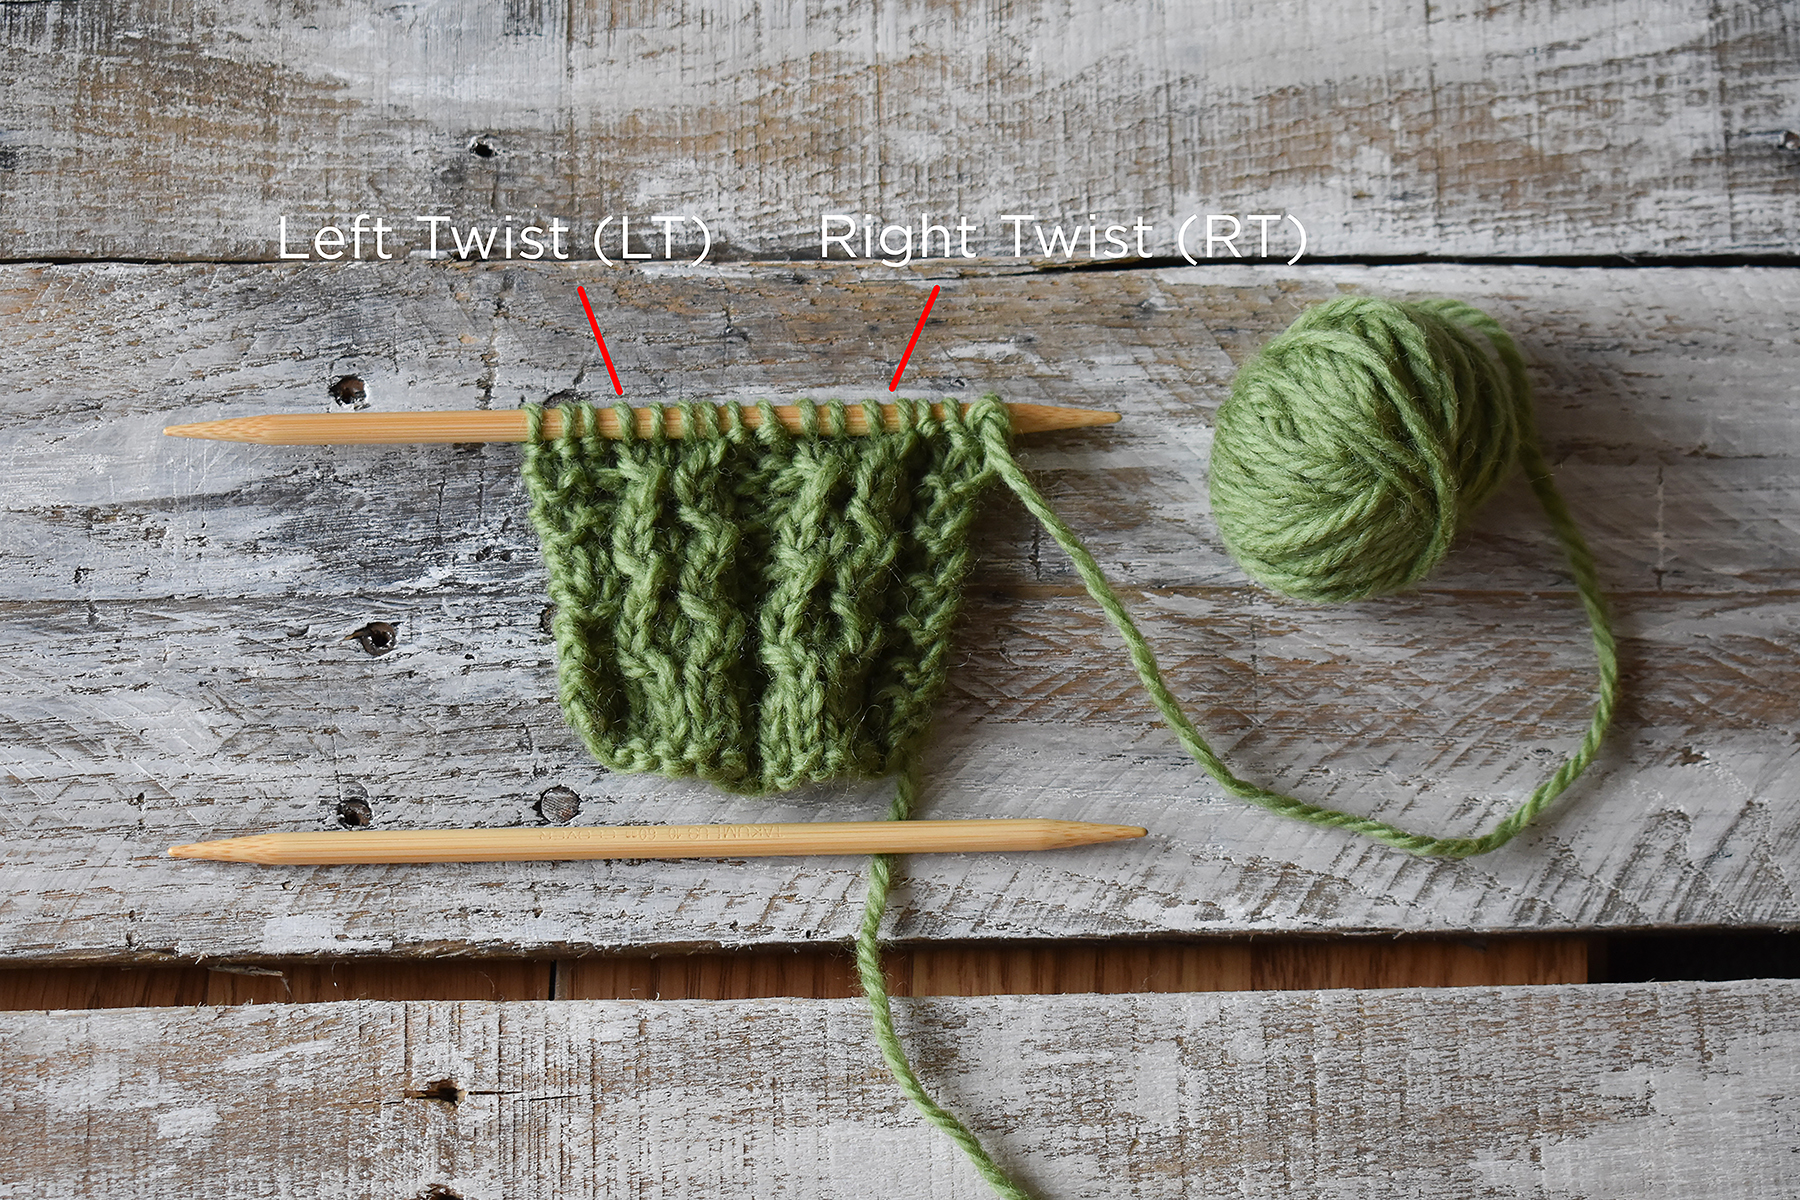
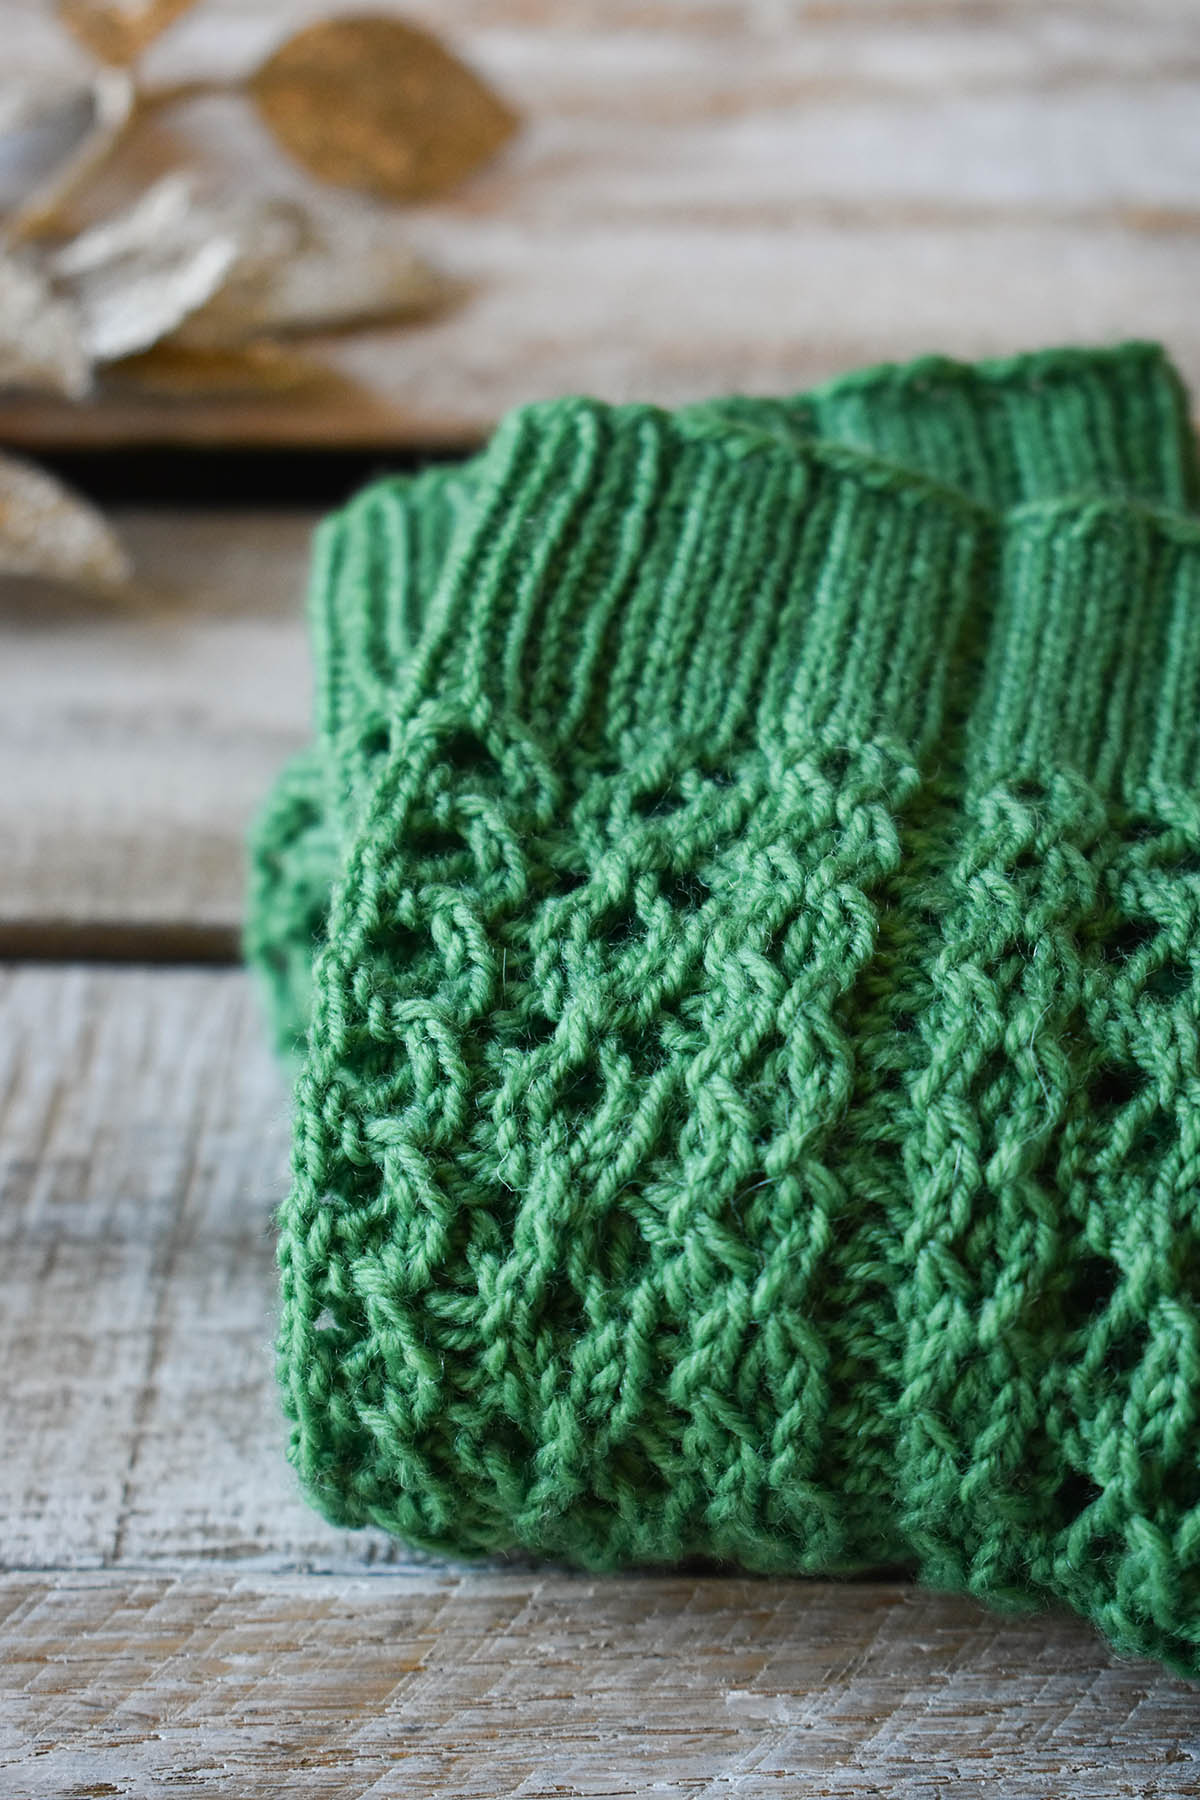
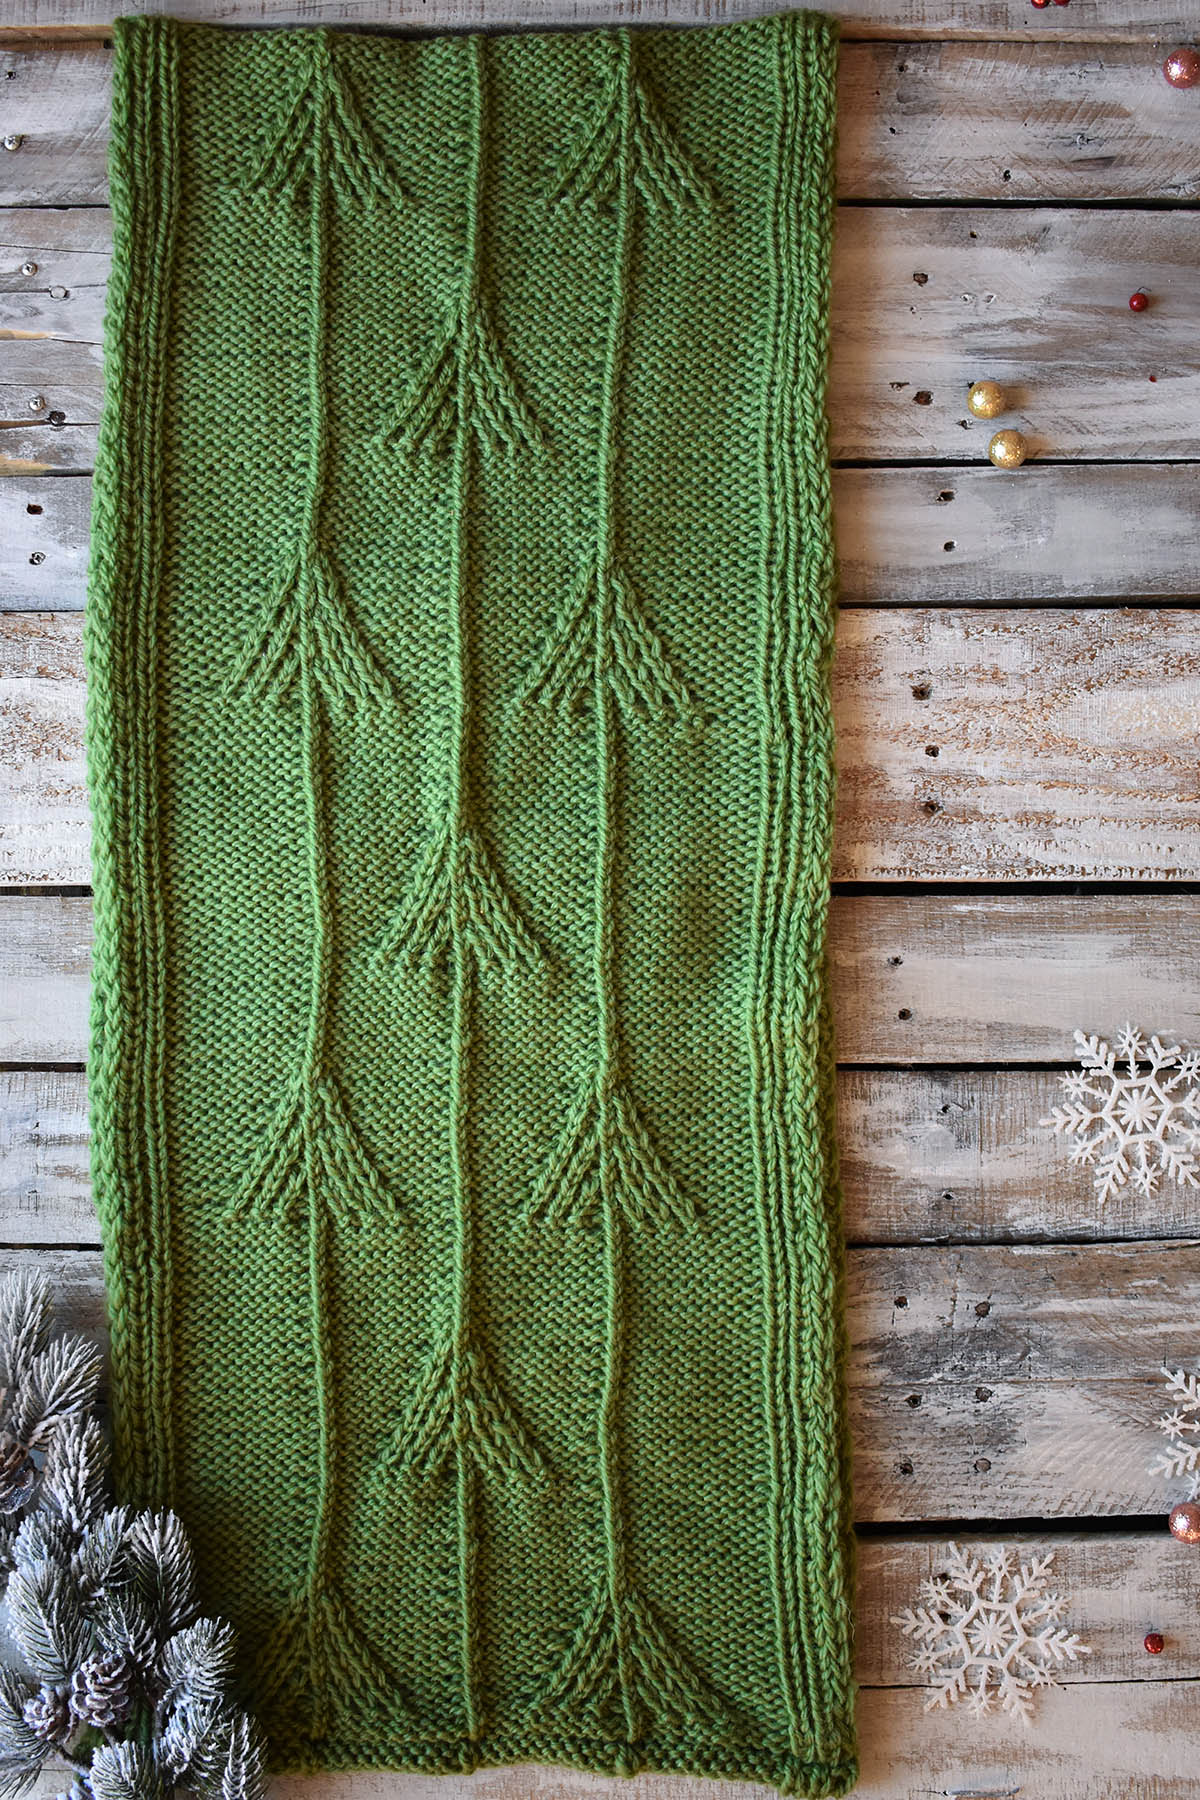
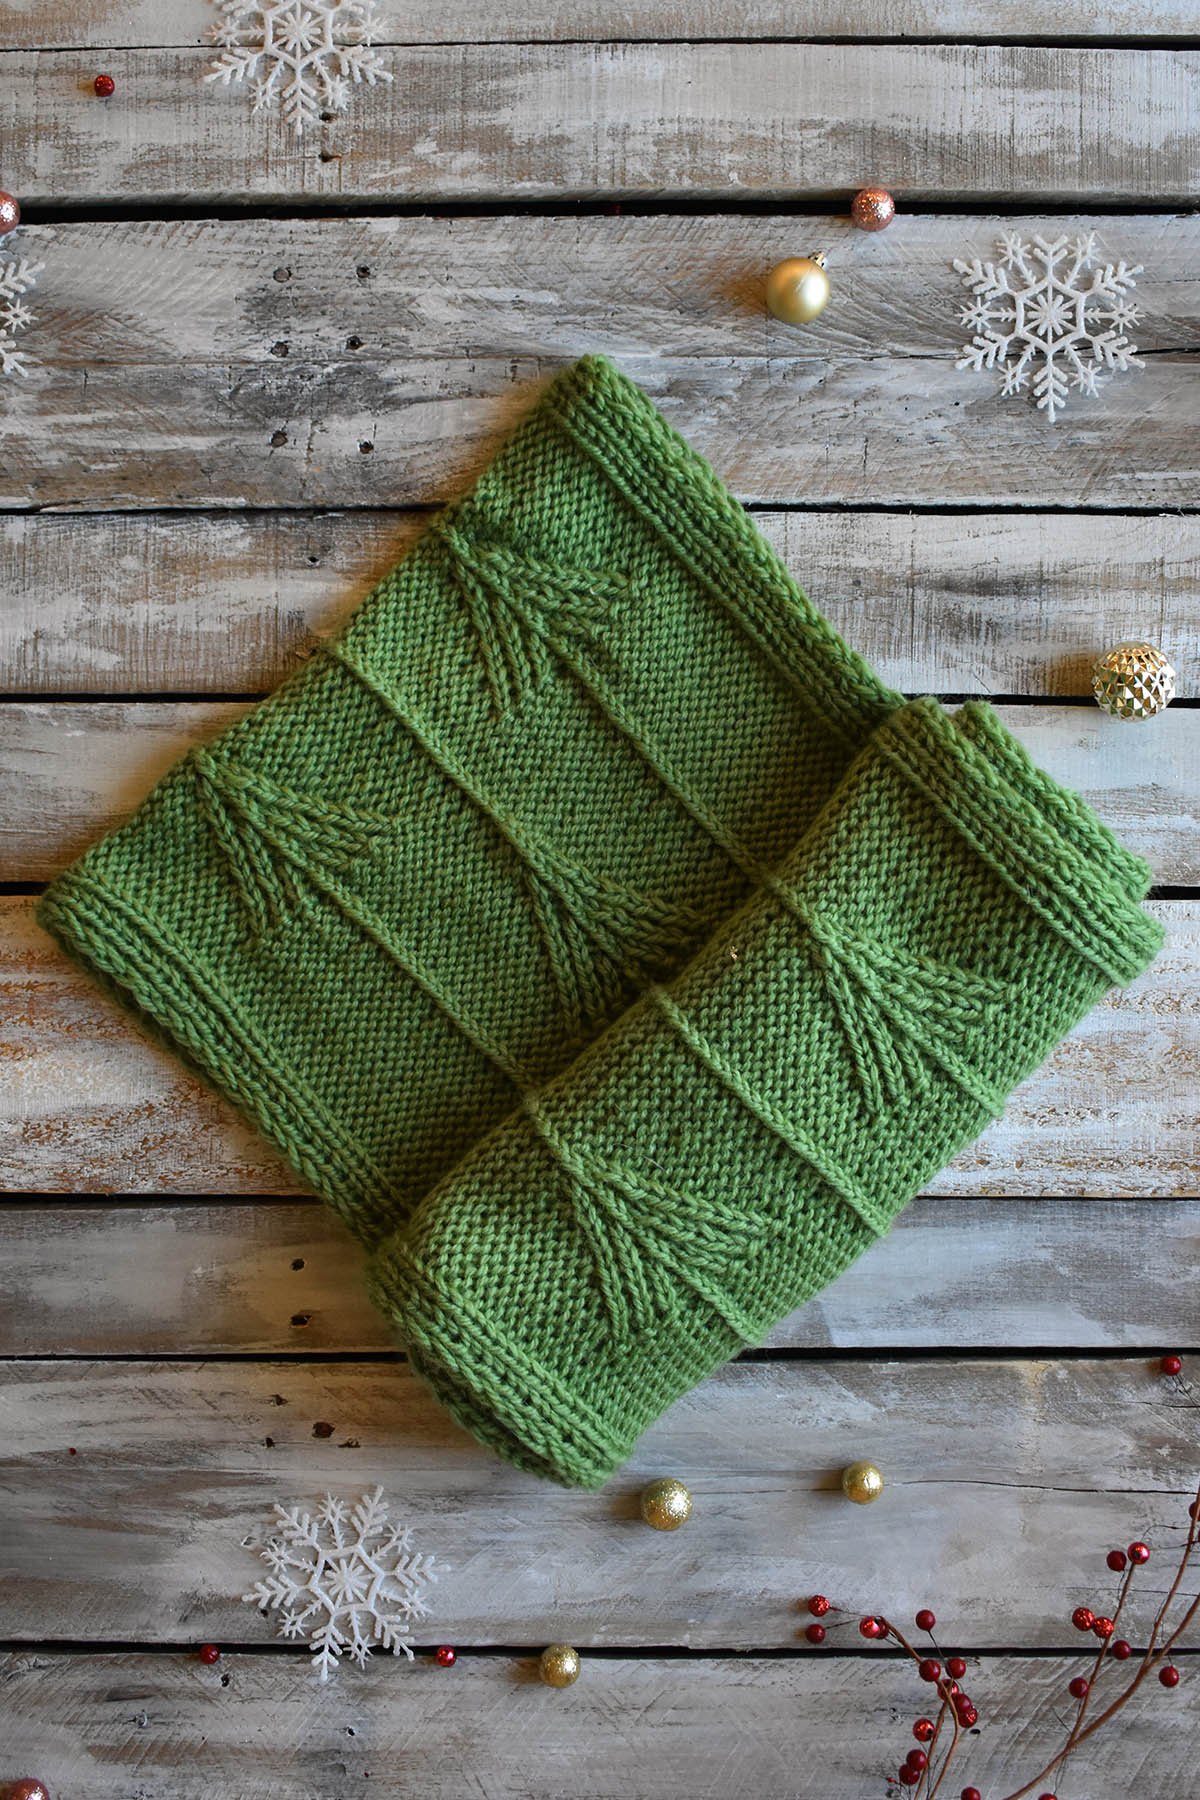
We’re a week into the 12 Days of Winter Kit Collection for 2019, and we hope you’re enjoying everything we’ve shared so far. Today we’re introducing an earthy green cowl that’s sure to hold your interest. Say Hello to the Mountain Pines Cowl, designed by Jennifer Sadler. This deliciously squishy cowl features twisted stitches that form the shapes of evergreen trees. Knit in soft, plump Deluxe Chunky, this is a fairly quick project that will keep you warm all winter long.
Jennifer, who is based in Asheville , North Carolina, got her inspiration from pine trees. Here is what she had to say:
“Here in the North Carolina mountains, pine trees are easily found – there are actually six different kinds of pine trees native to the state. I love how in the winter they stay green, adding a touch of color to an otherwise brown landscape, and when it snows, the branches let the snow pile up, creating a pillow of white on top of the green needles. The Mountain Pines Cowl pays homage to those green monster trees.
The pine tree motif is much simpler than it looks to knit. It uses twisted stitches, and no cable needle! Once you’ve experienced the ease of twisted stitches, you’ll want to incorporate them into your knitting as much as possible – they create a wonderful visual texture, with hardly any extra work.”
-Jennifer
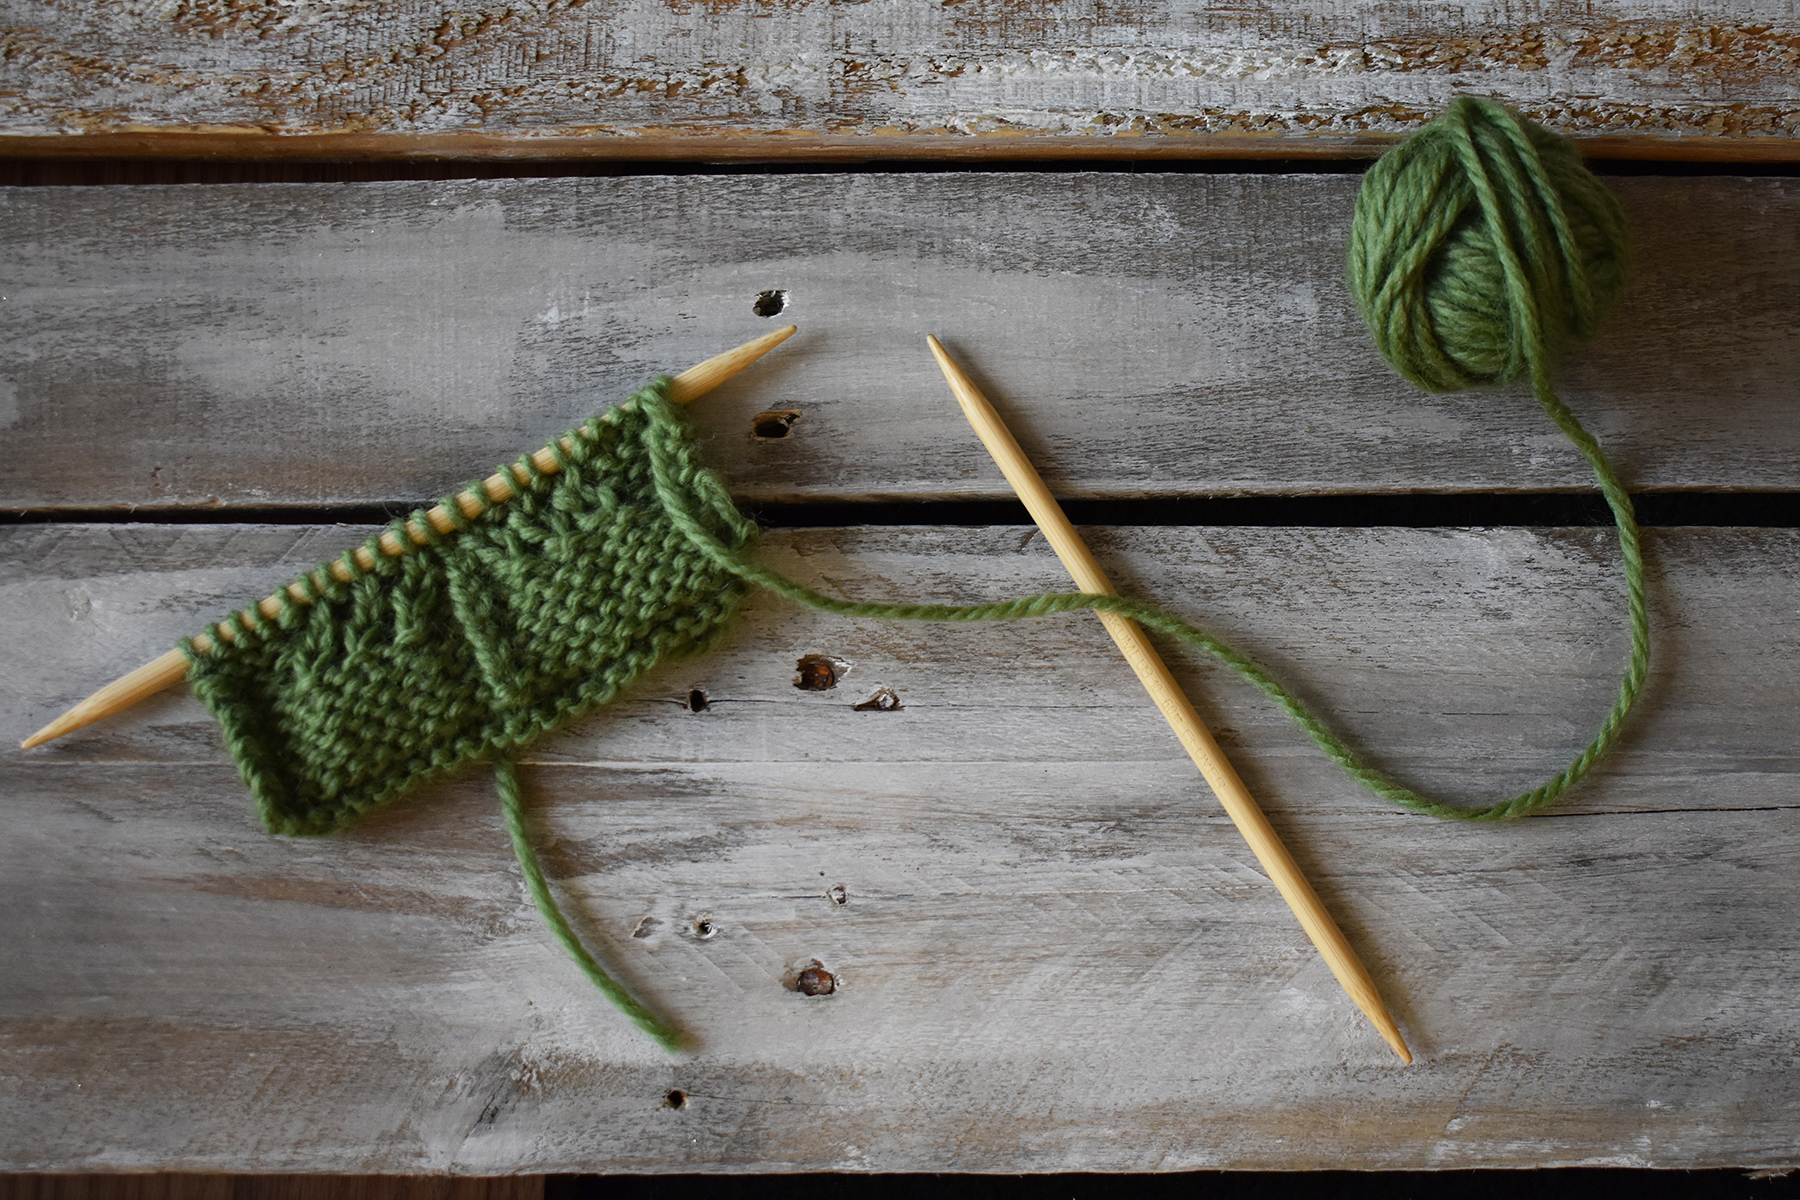
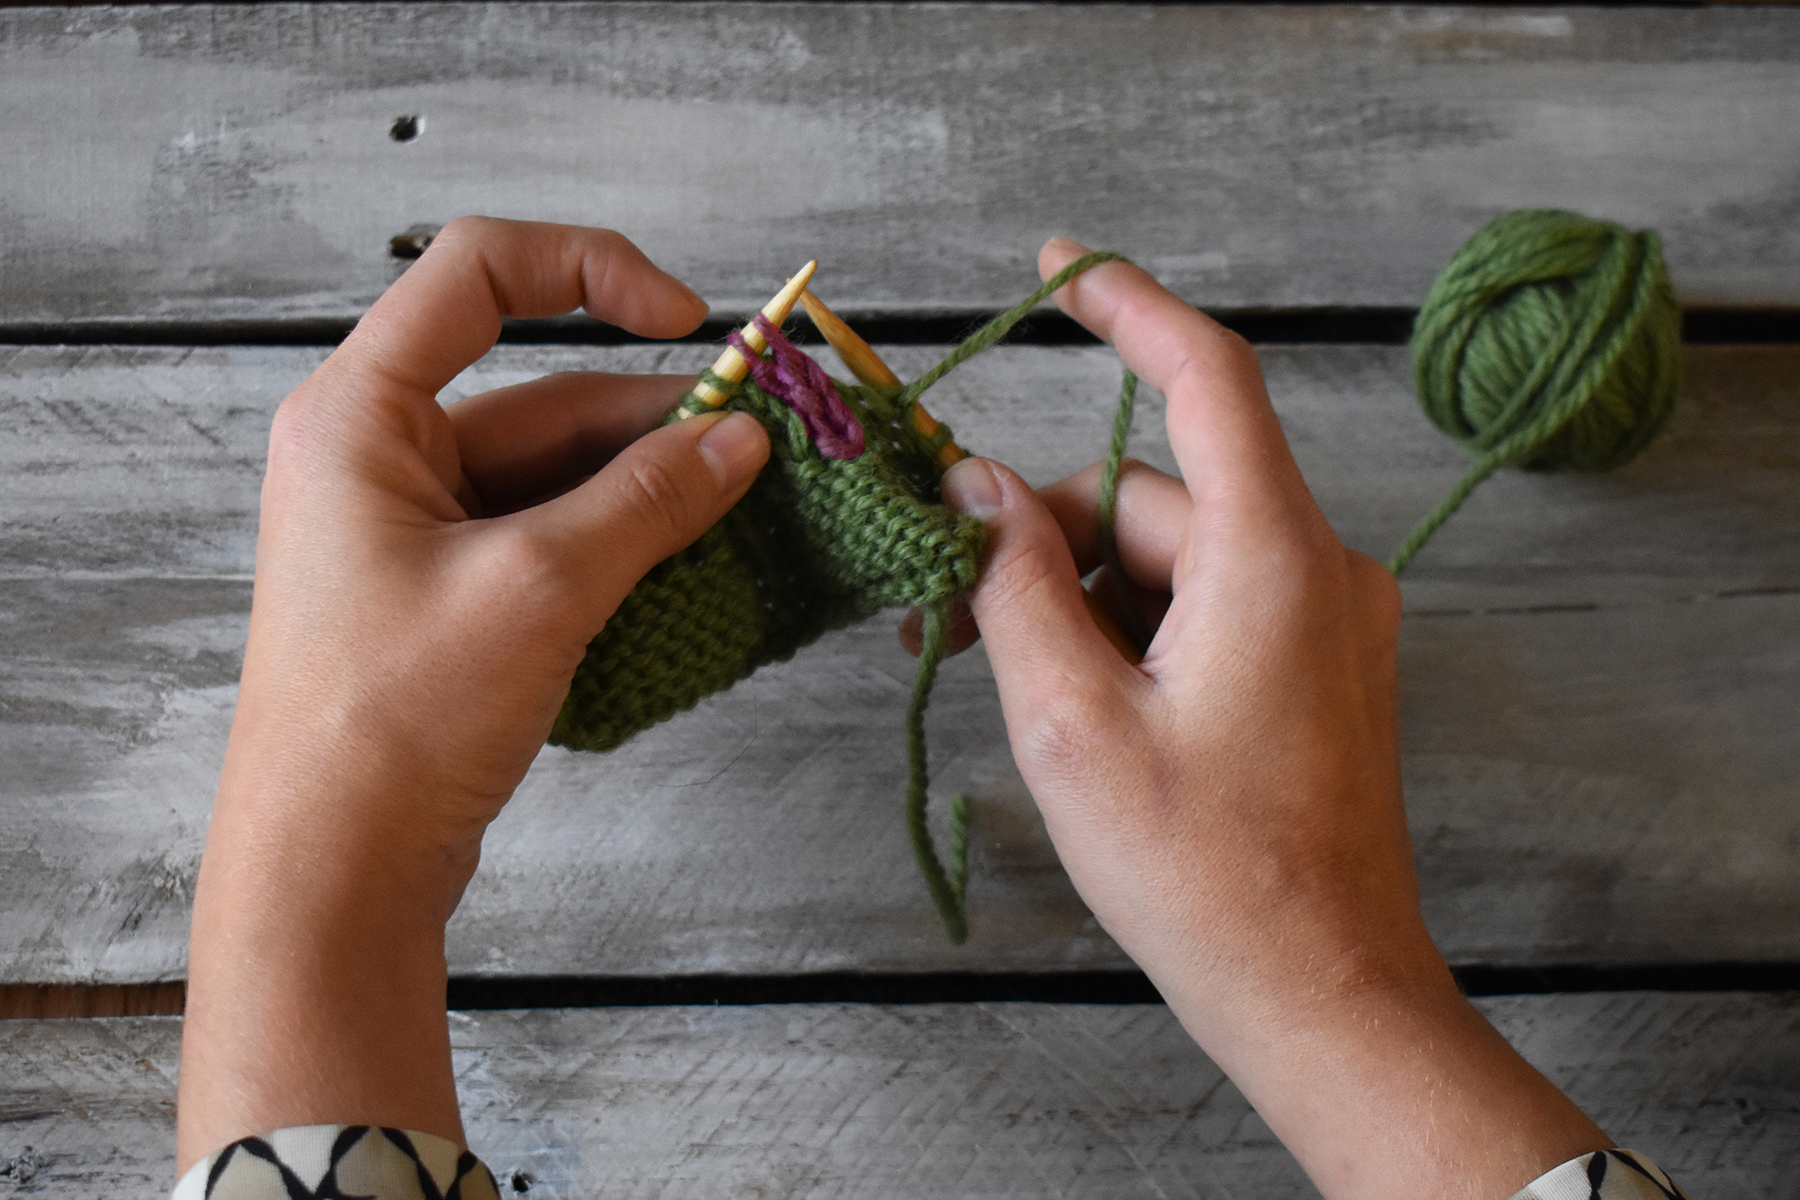
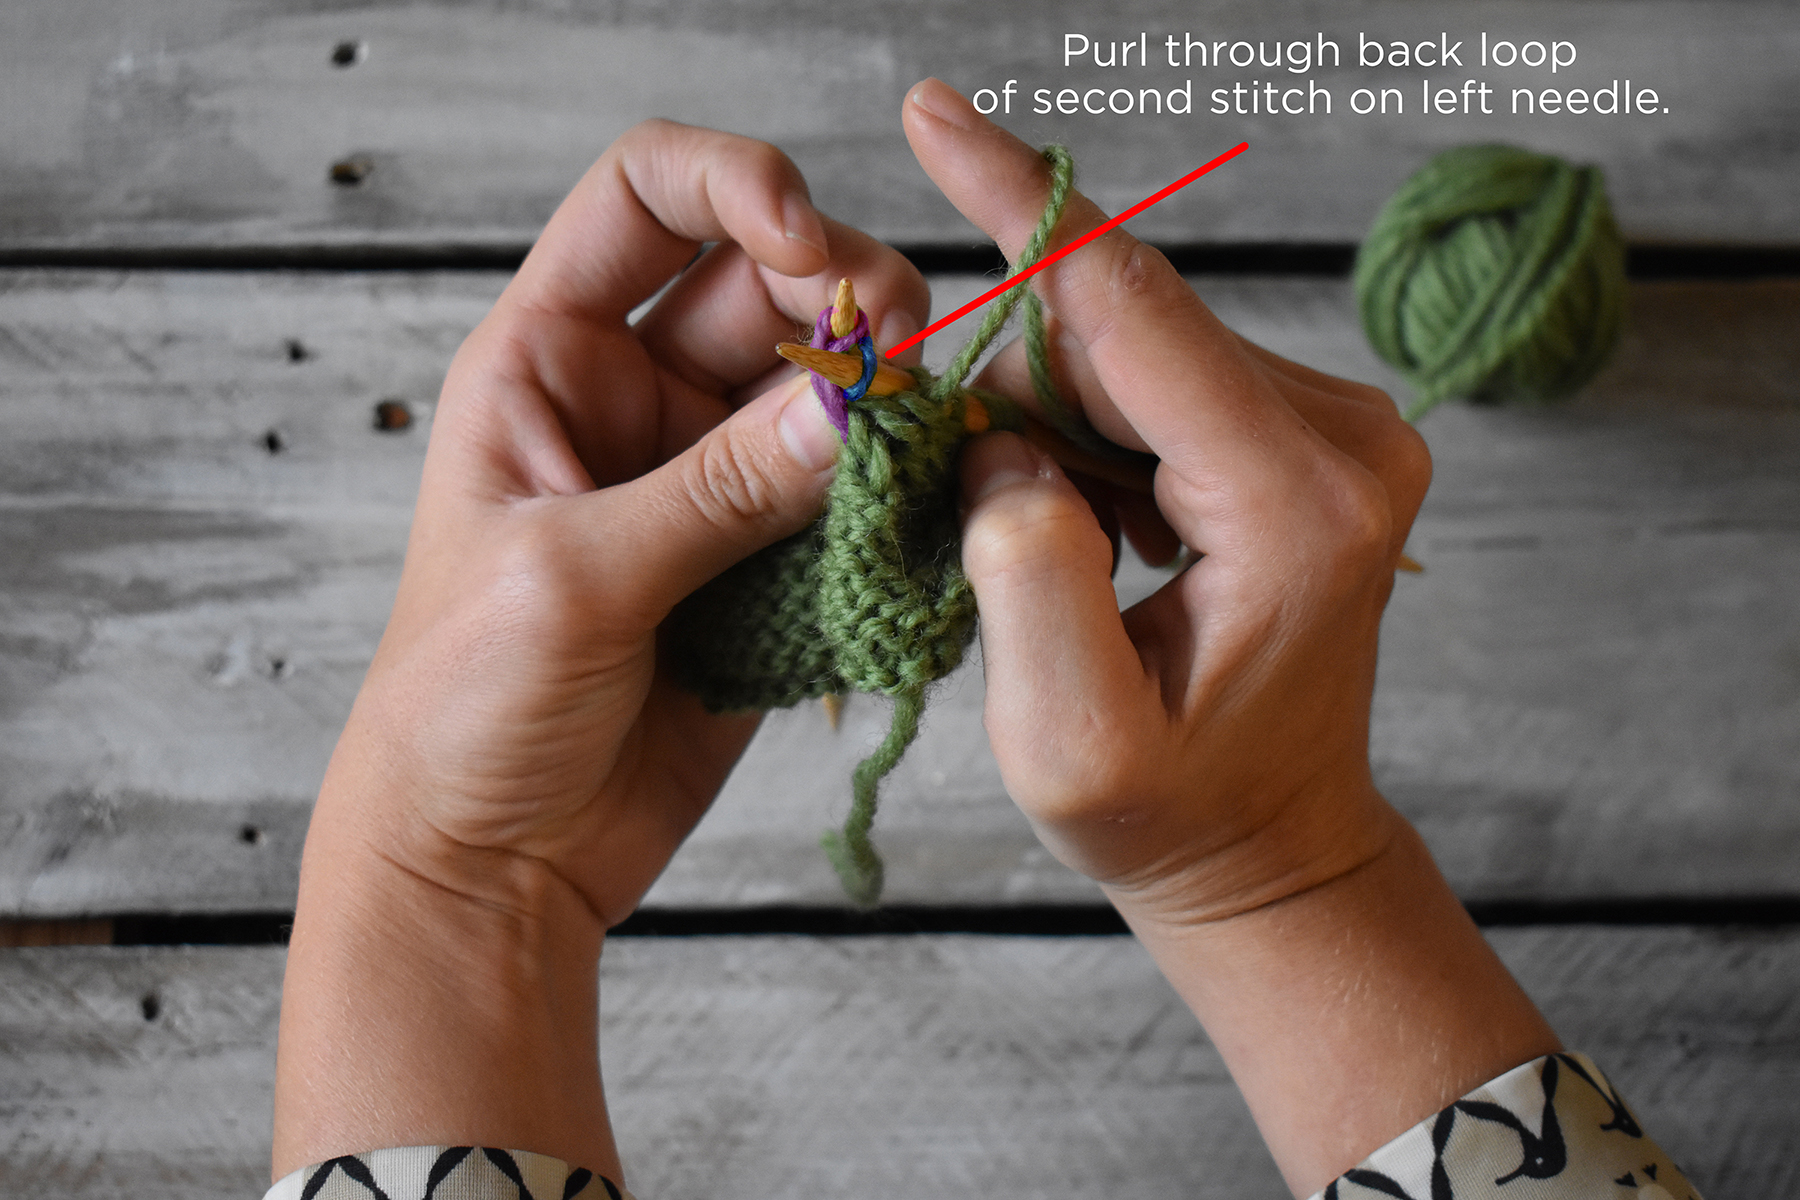
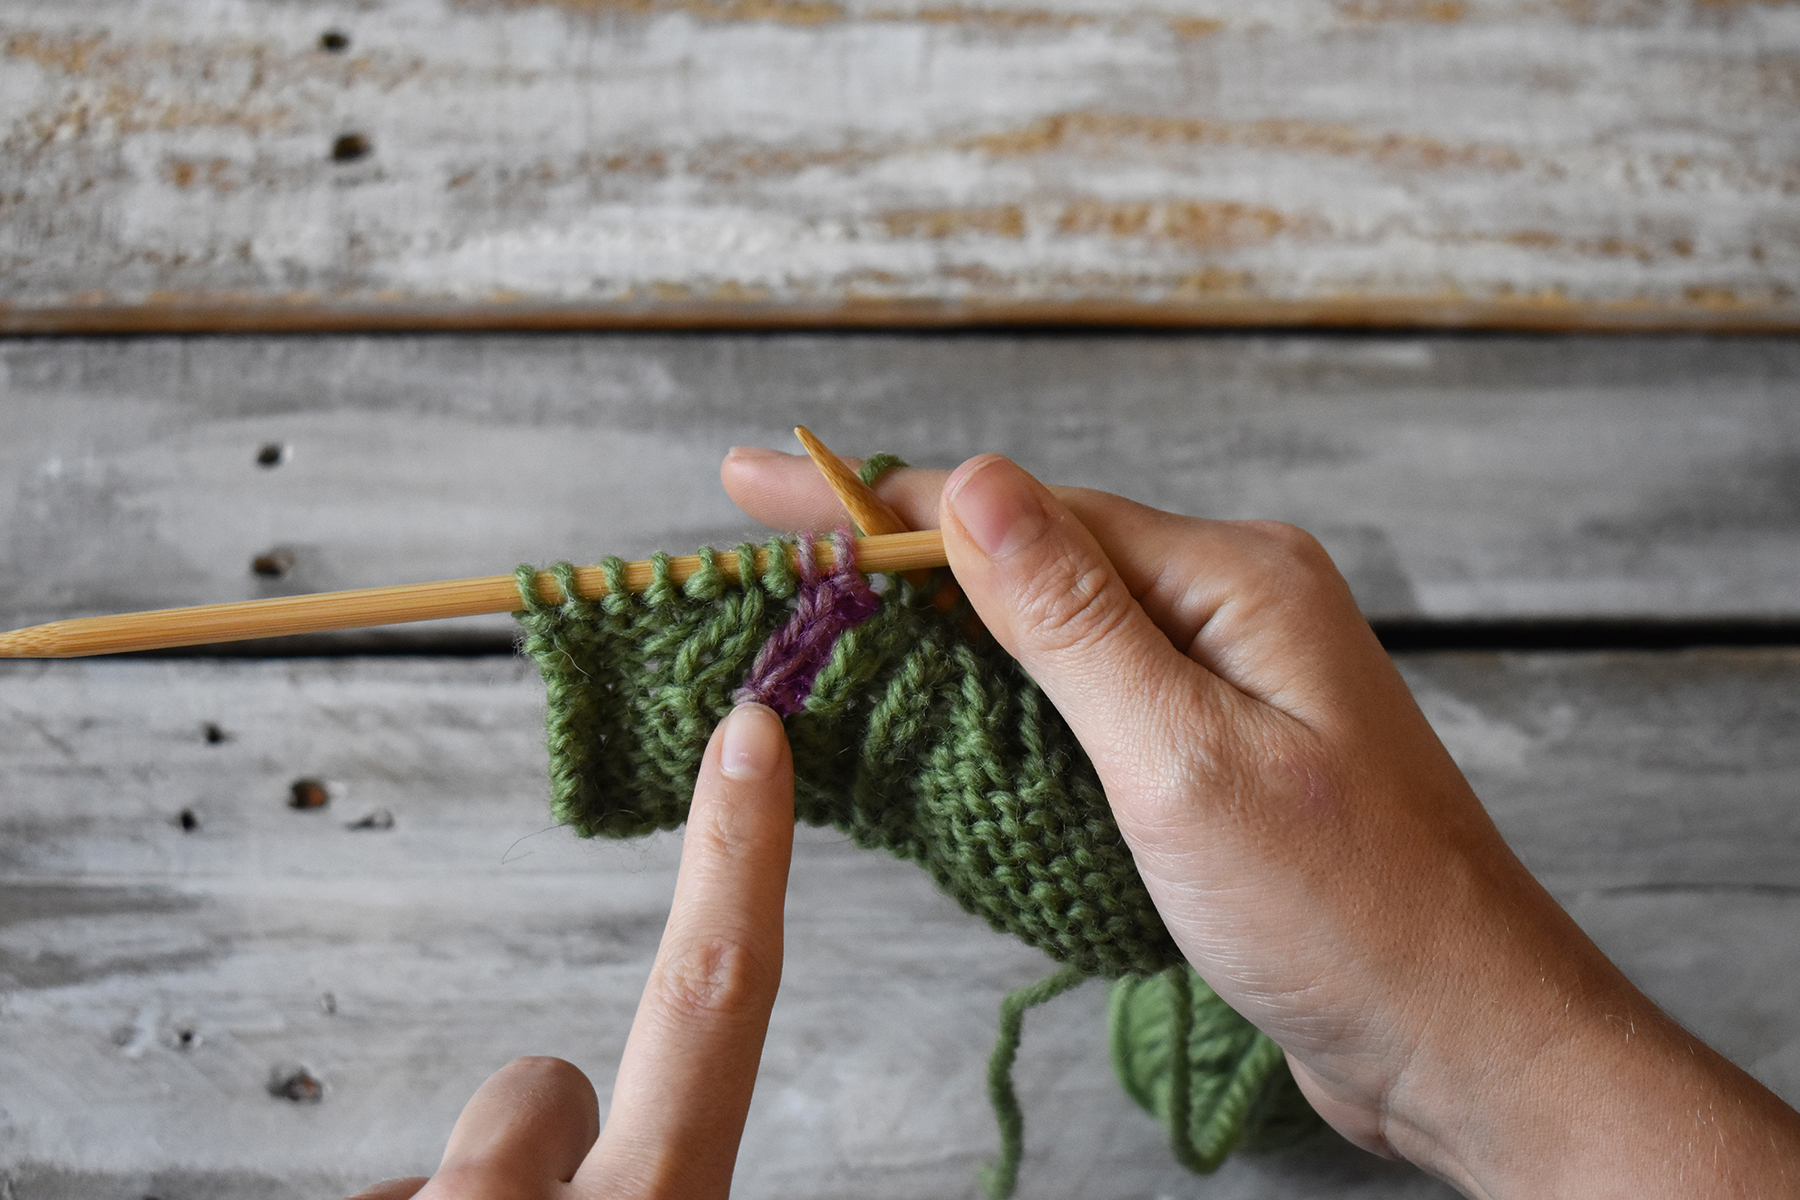
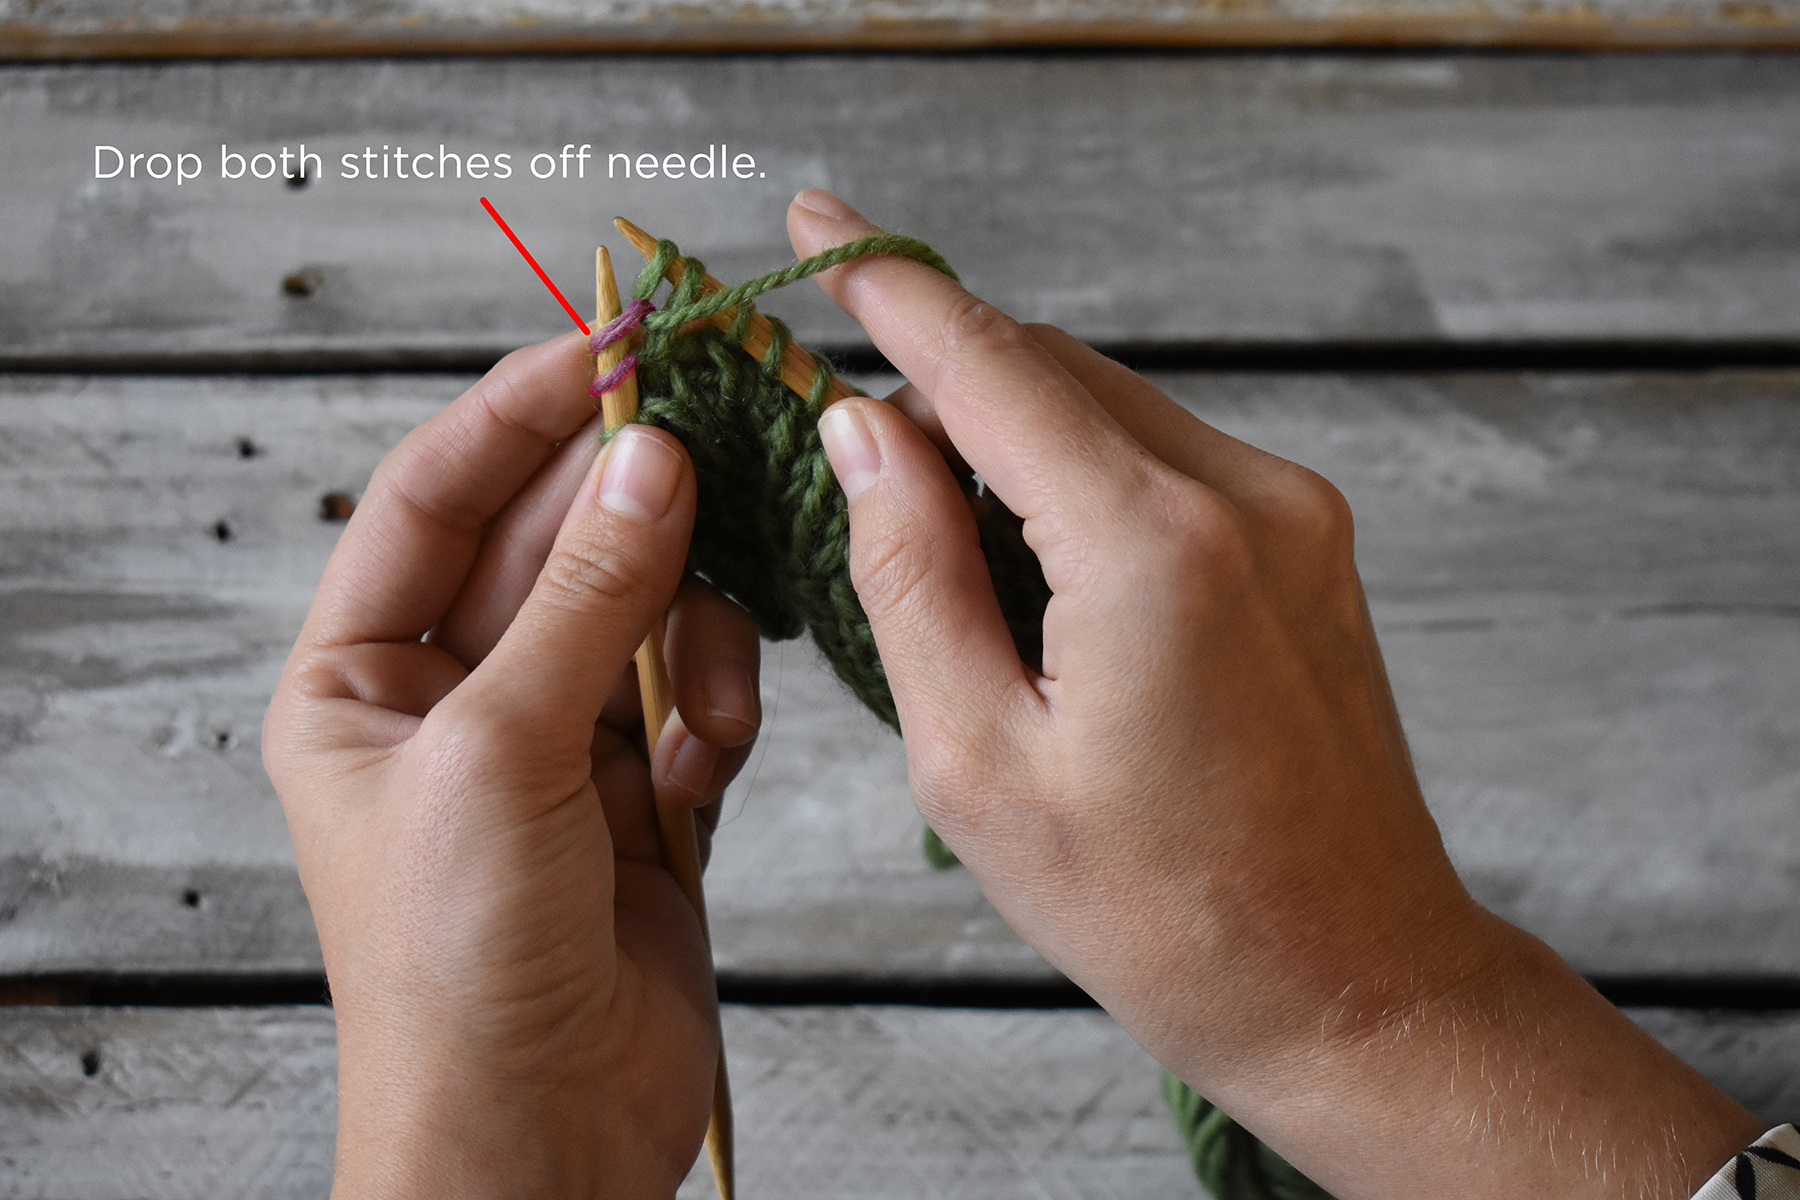
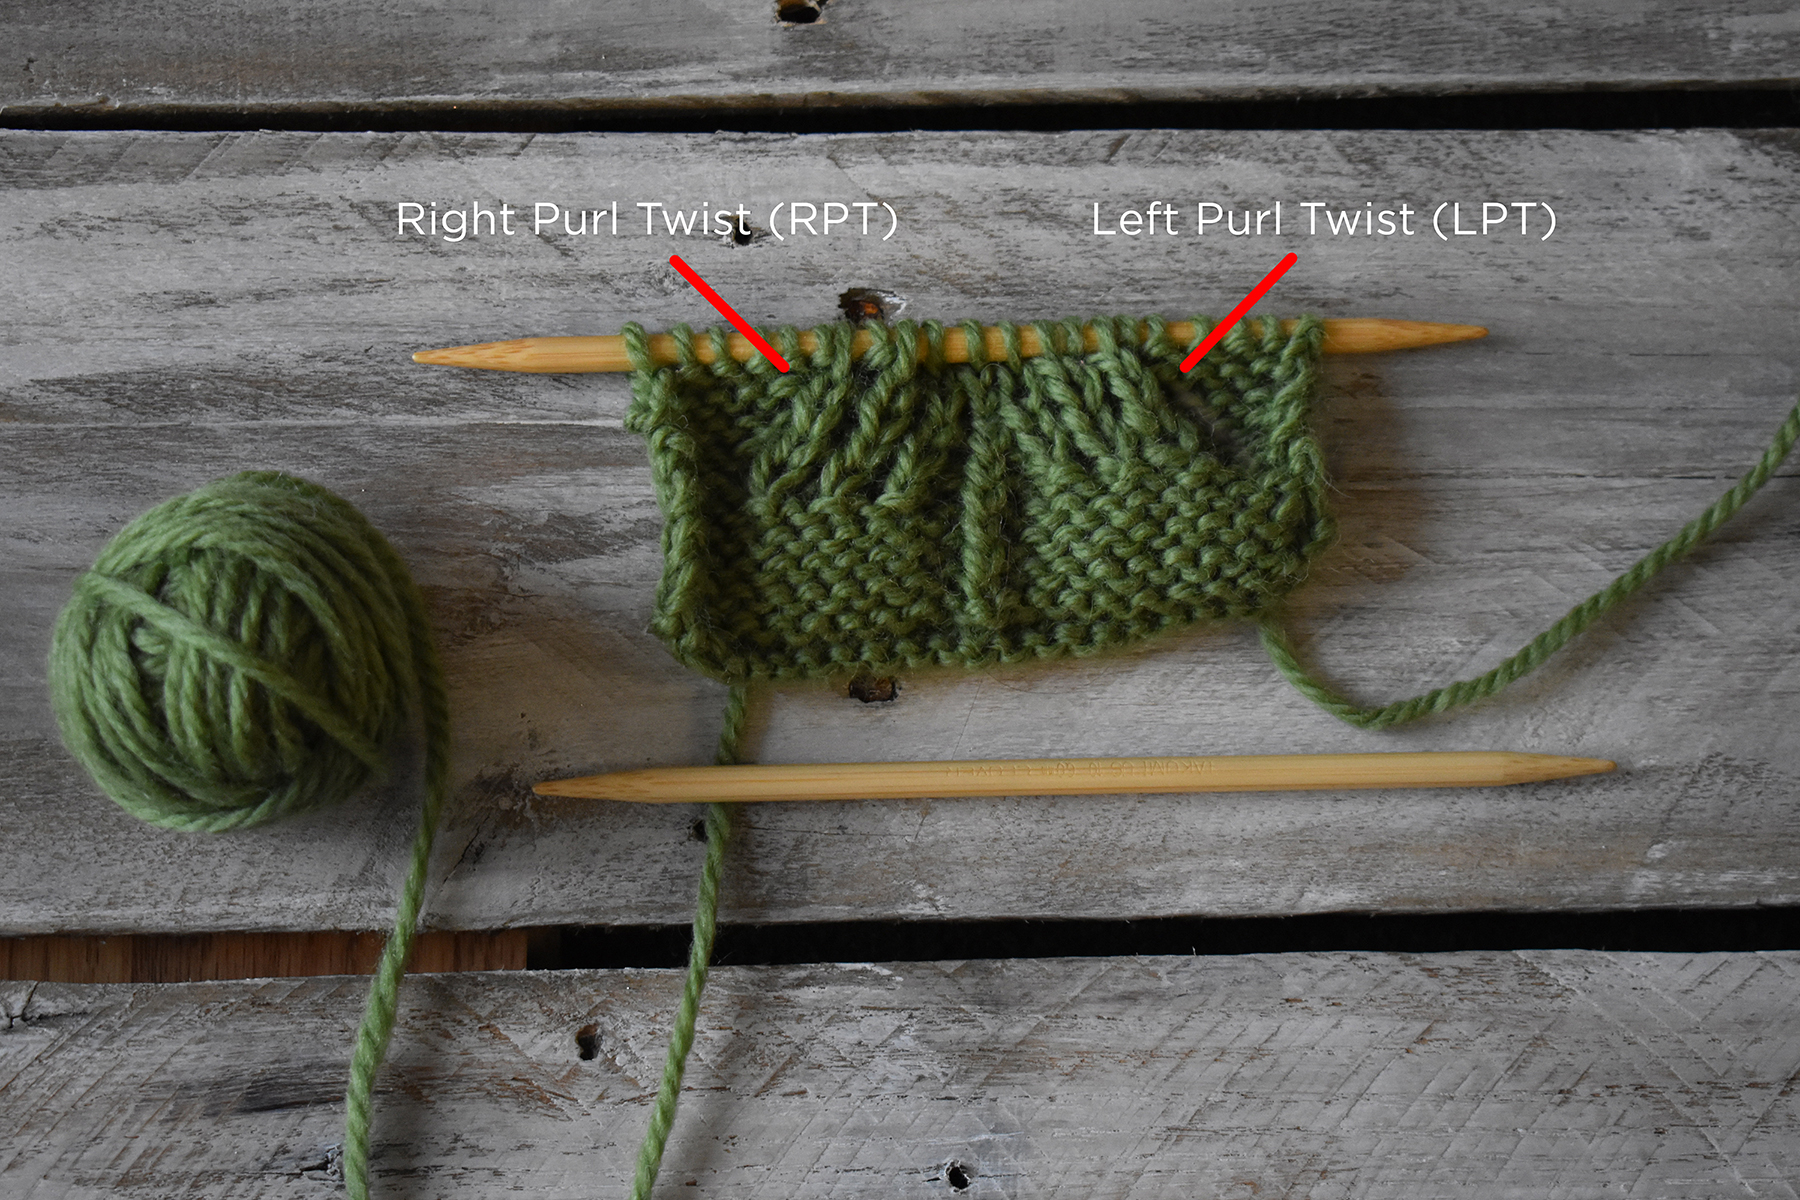
I couldn’t agree more with Jennifer – twisted stitches are a joy to work, especially when you get the hang of them. It eventually feels intuitive and you’ll be glad to have this skill in your toolbox. The Mountain Pines Cowl uses purl twists, so that’s what we’ll focus on in this tutorial. You’ll learn the Left Purl Twist (LPT) and the Right Purl Twist (RPT). The Left Purl Twist (LPT) leans to the left, and the Right Purl Twist (RPT) leans to the right. We’ll cover the LPT first, followed by the RPT.
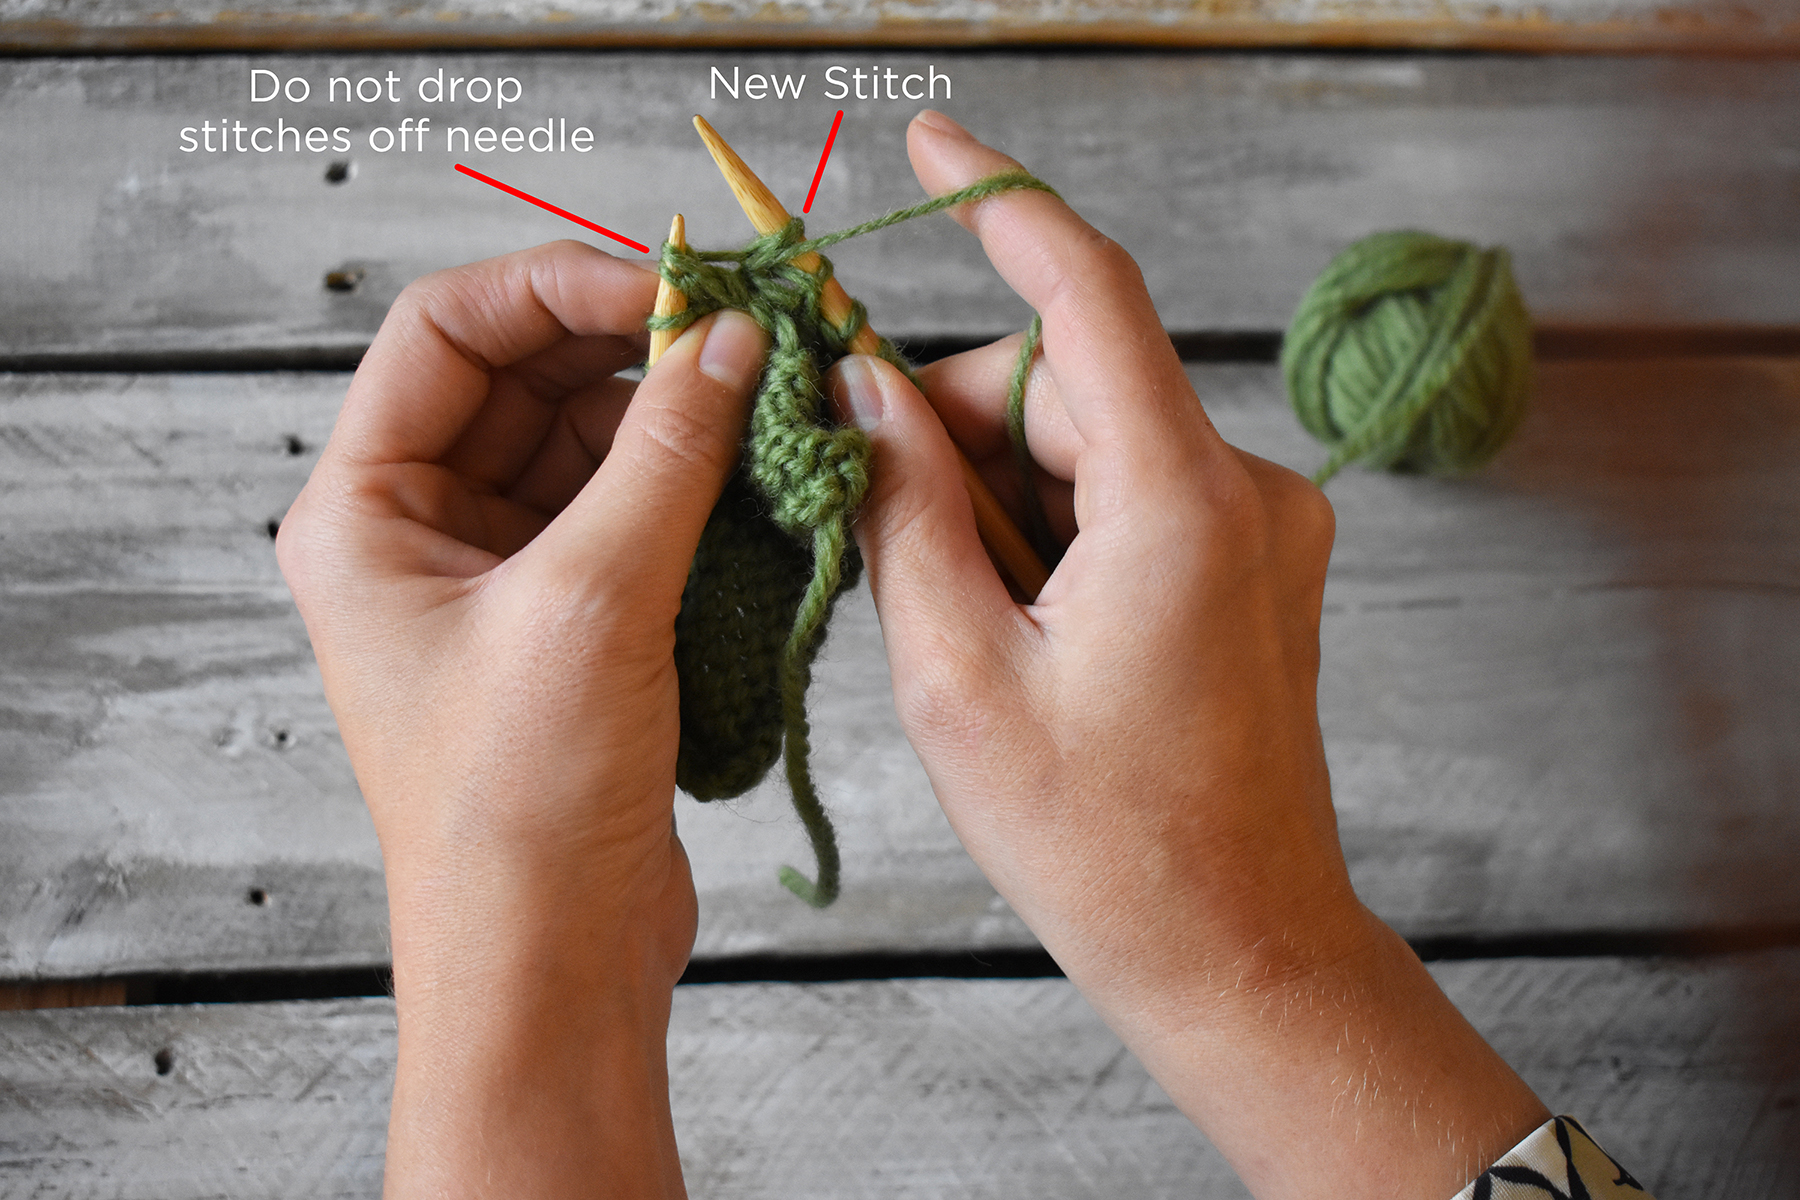
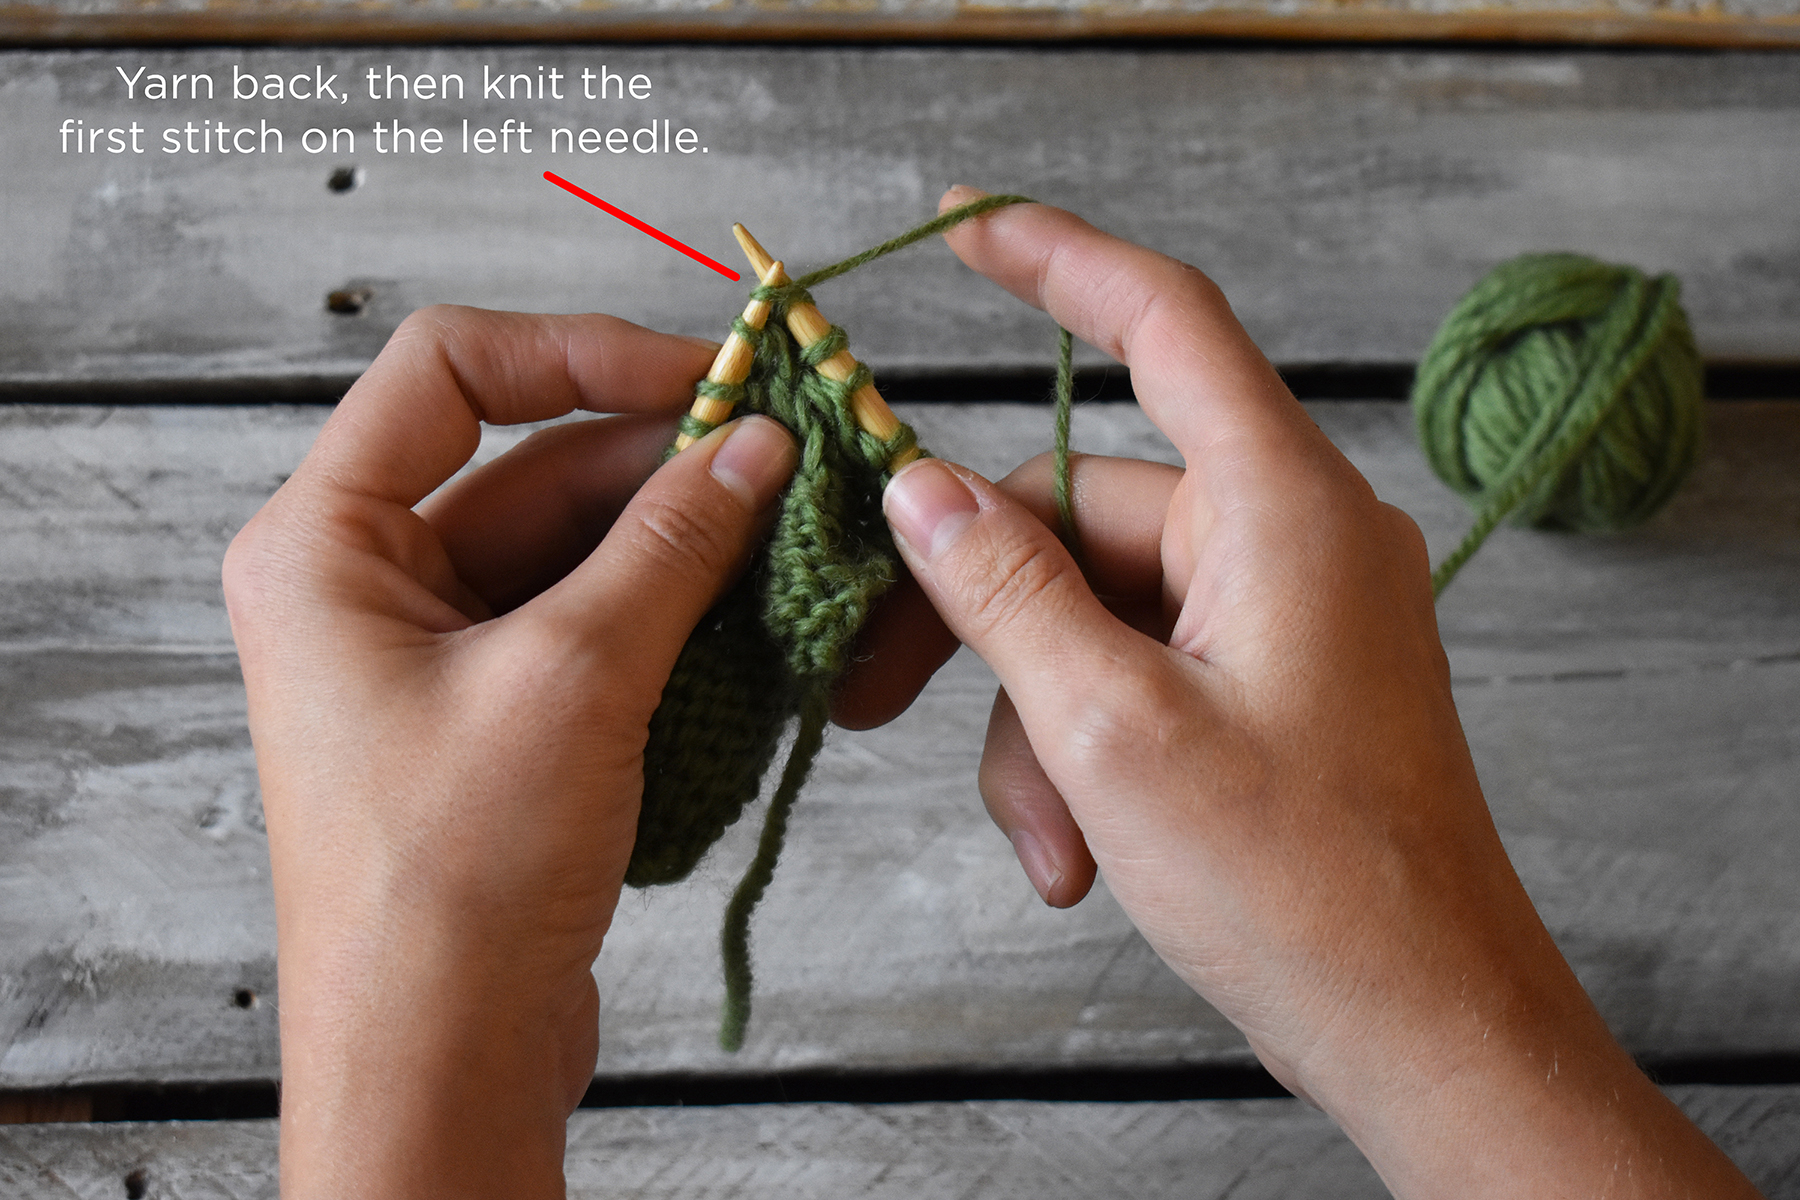
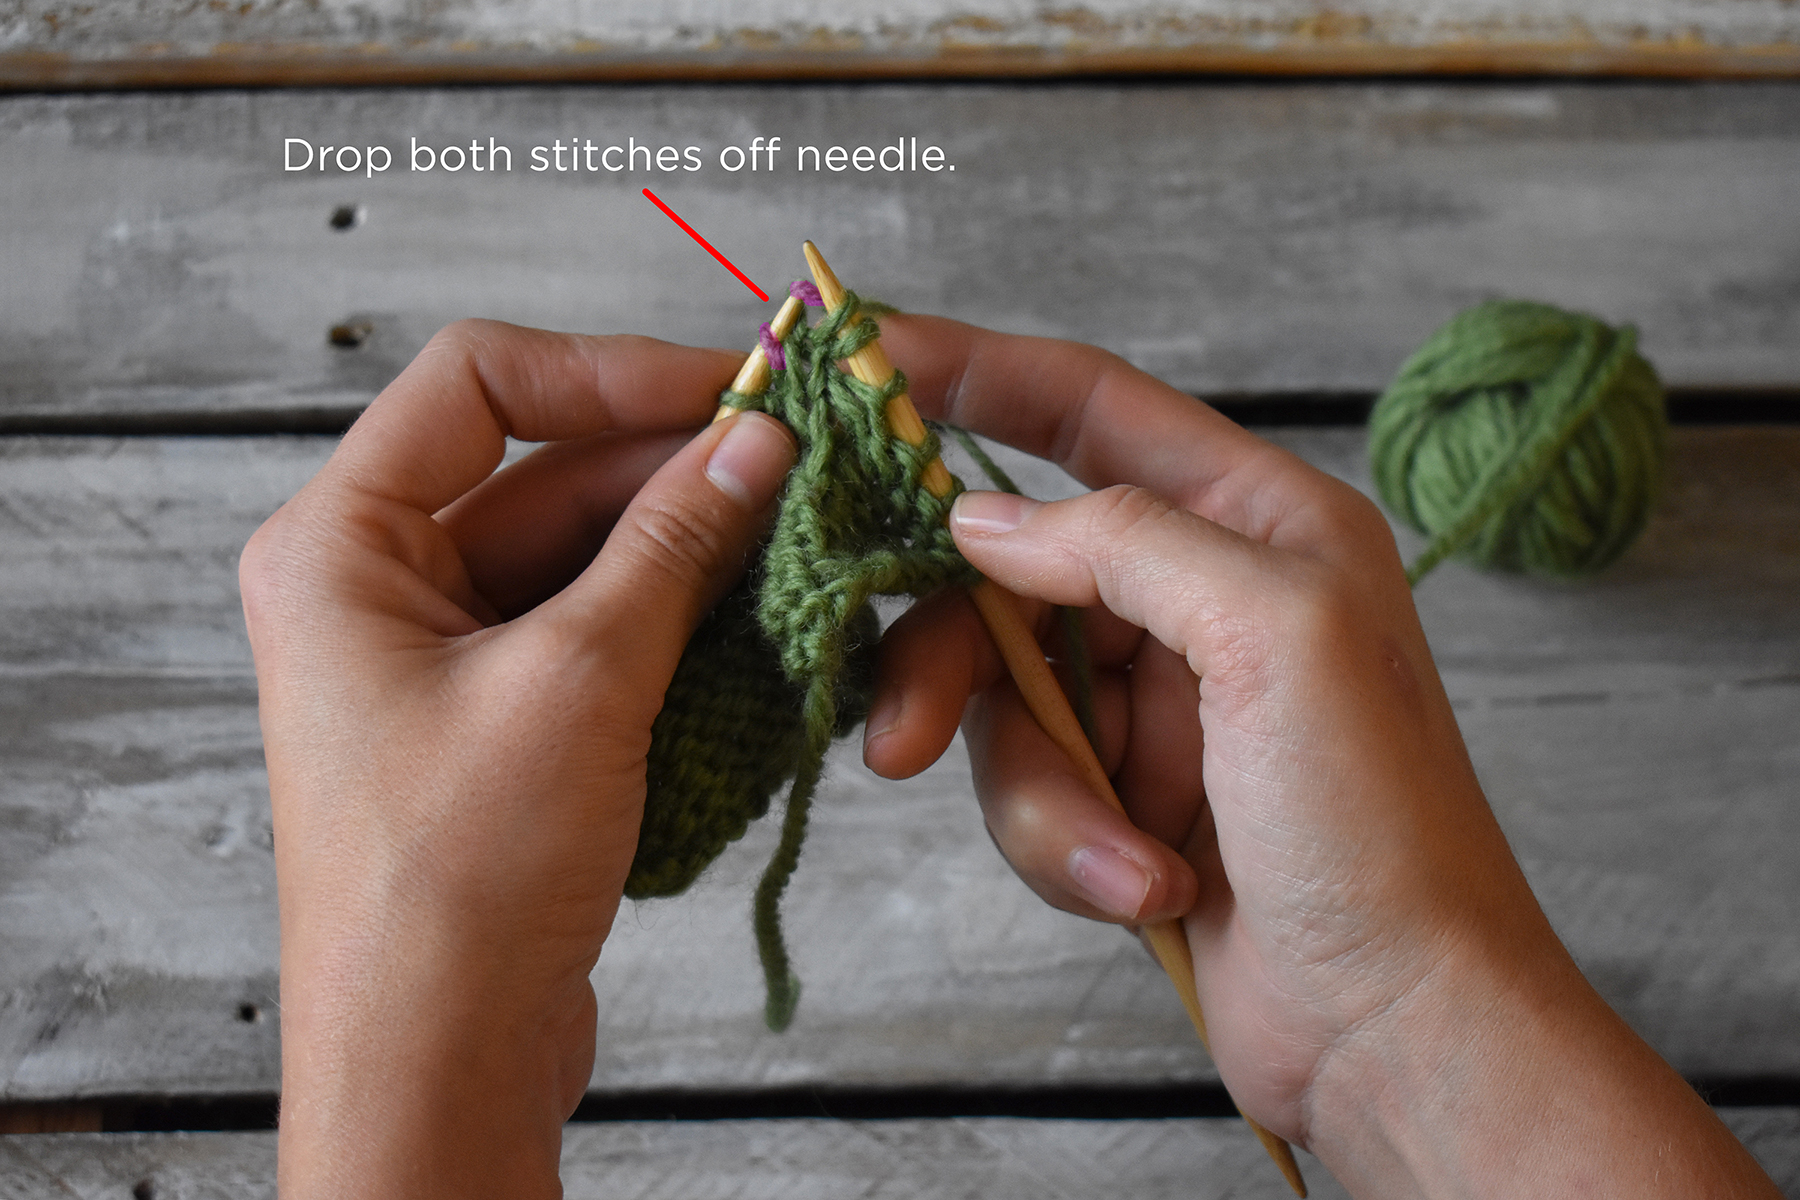
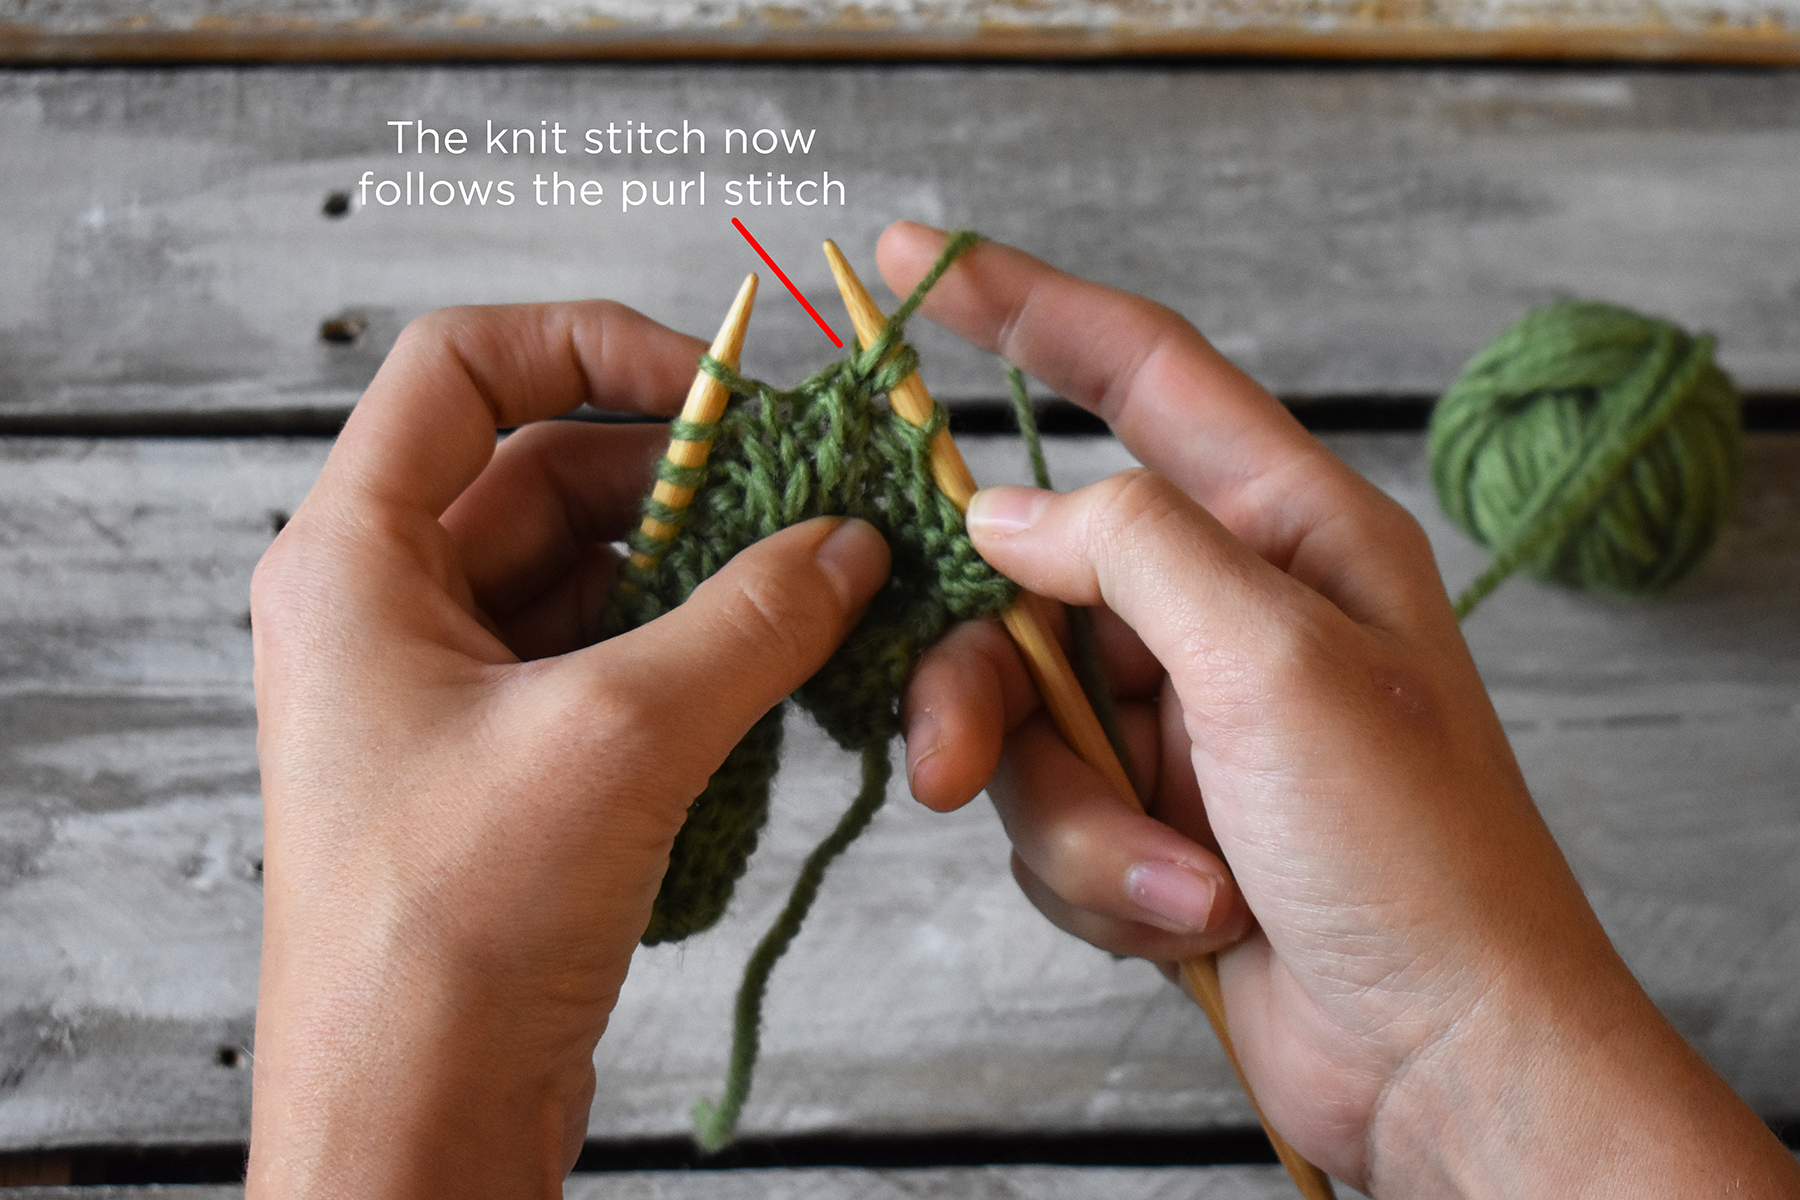
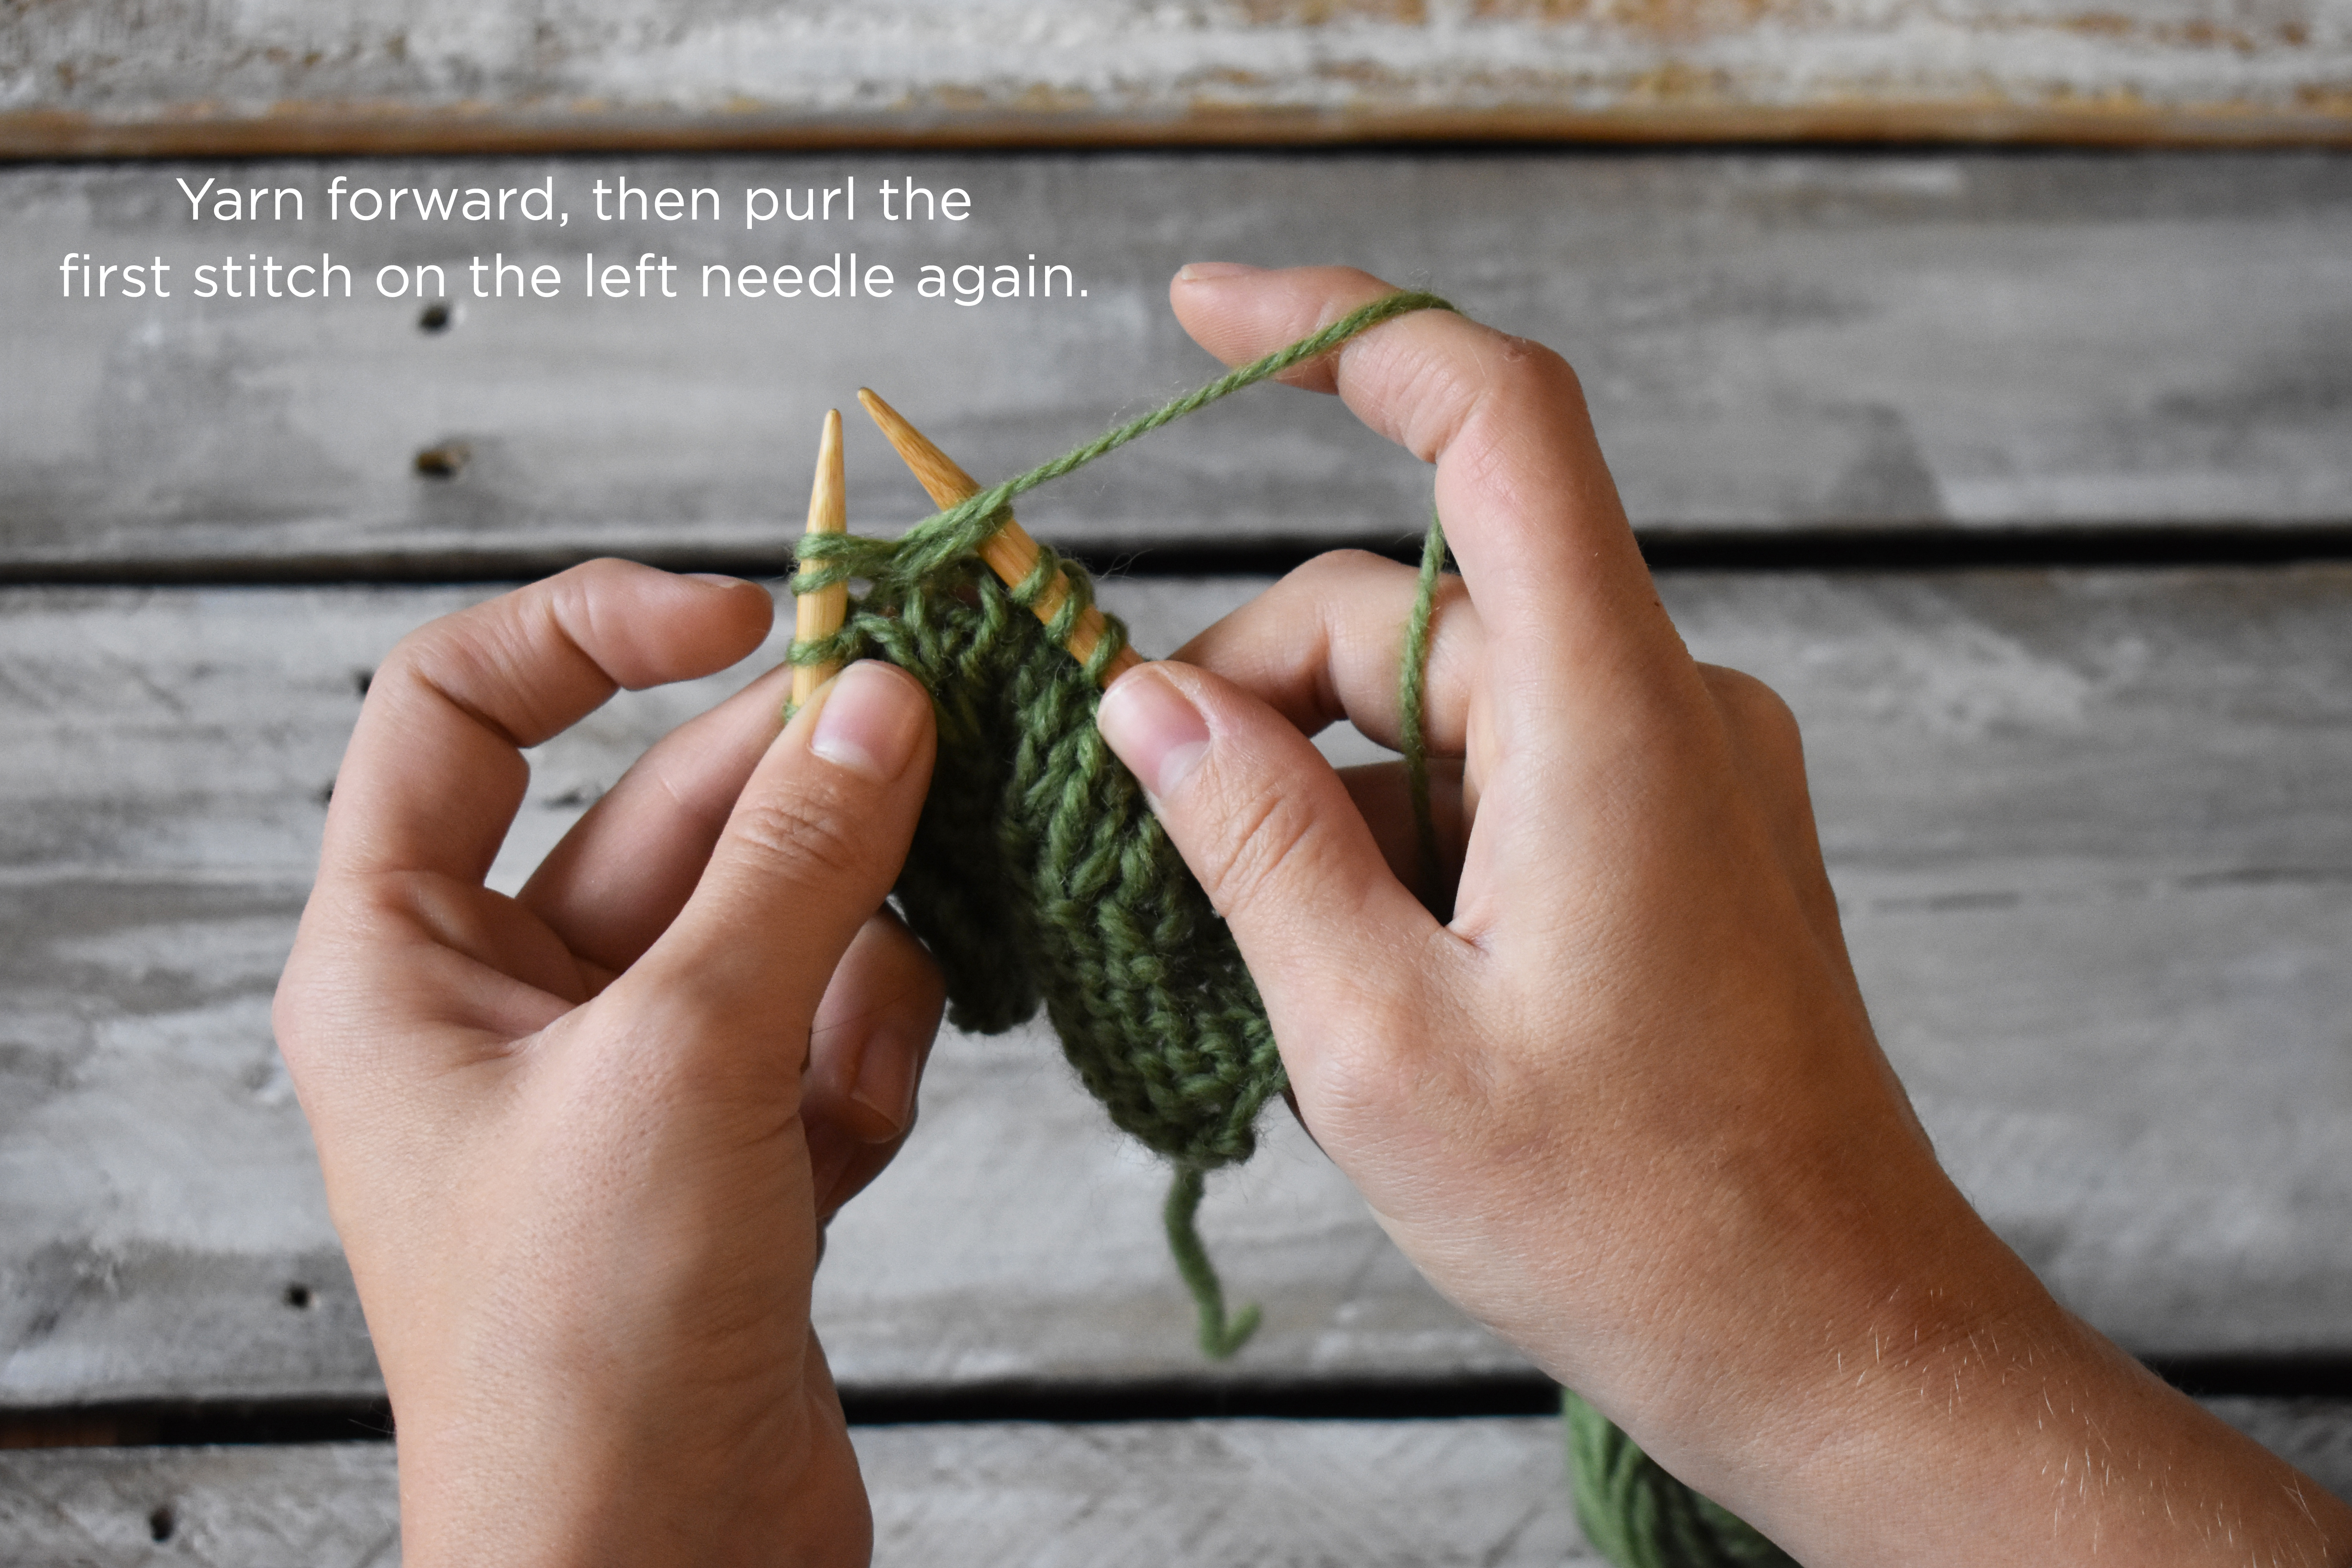
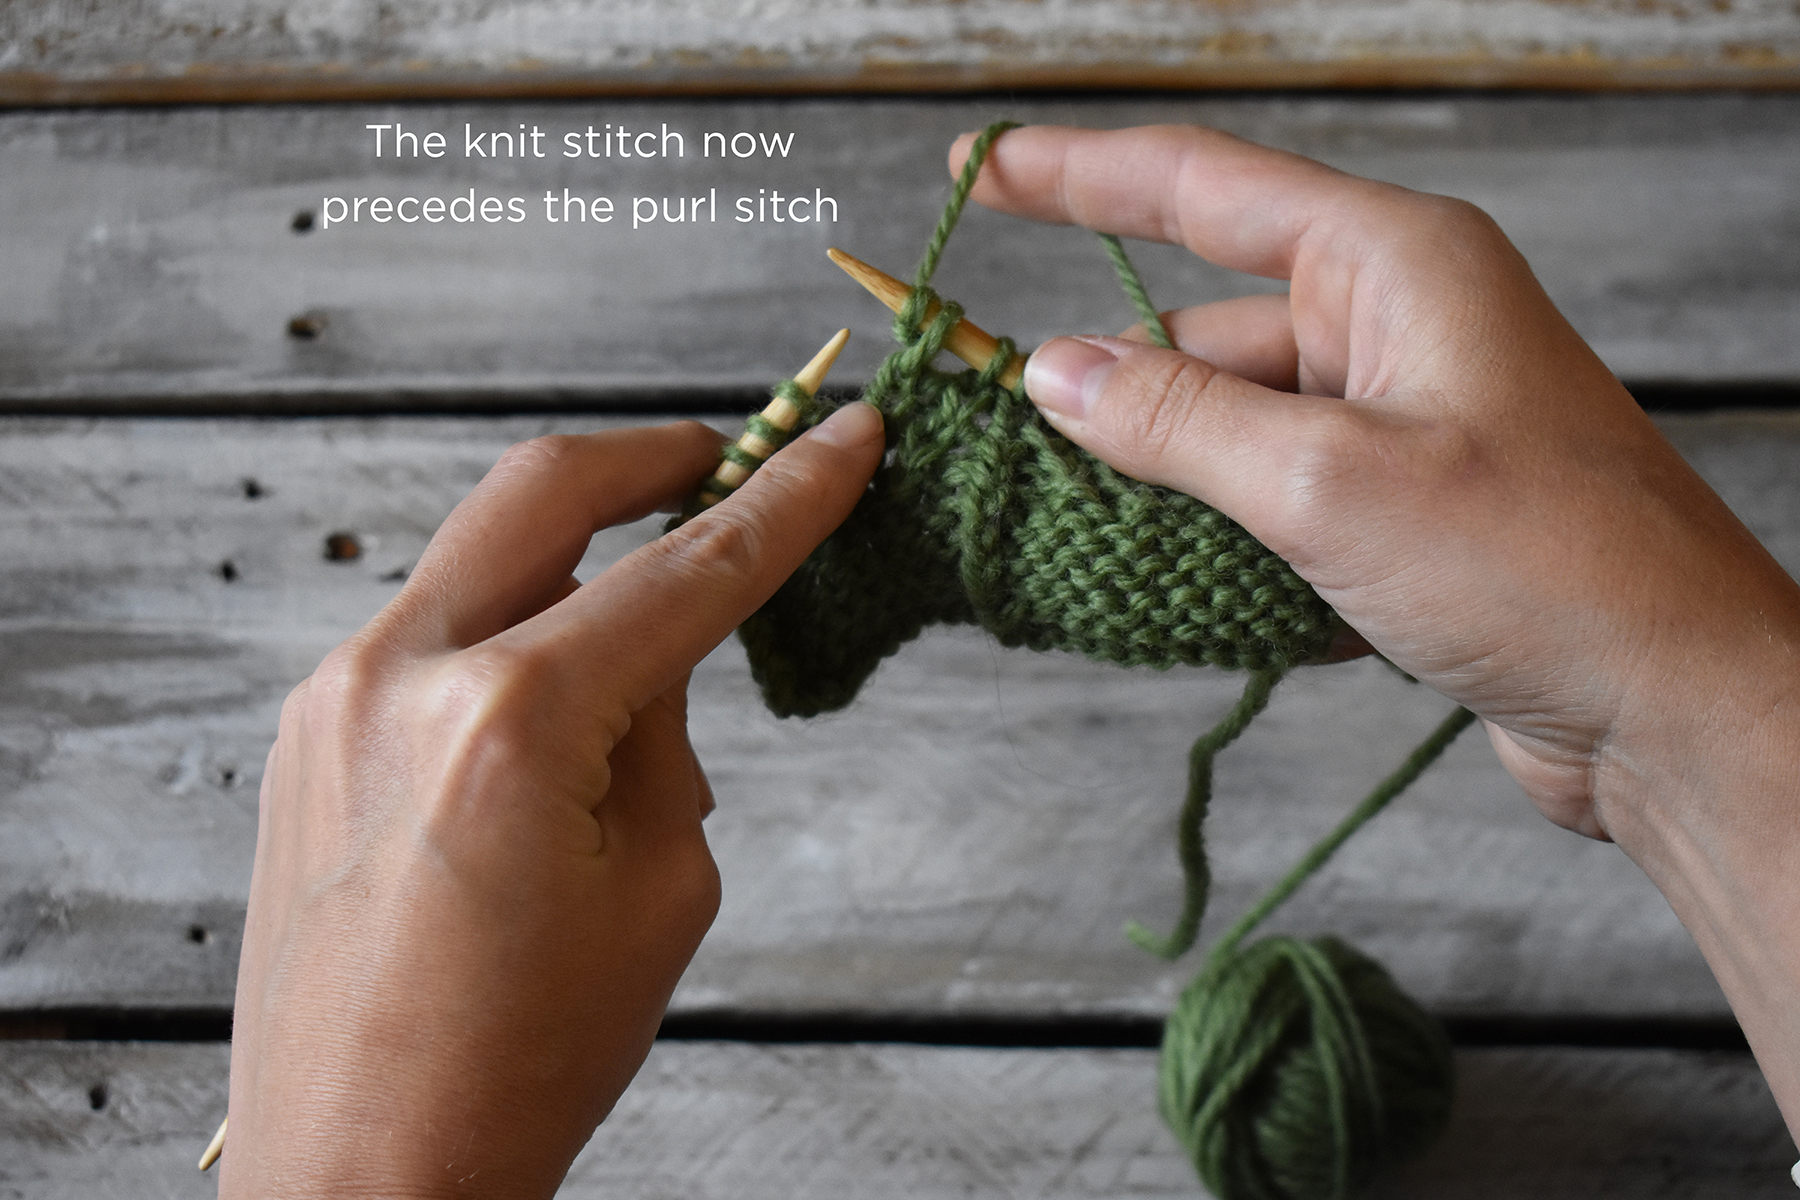
Left Purl Twist Start by making a swatch. Swatches are not only crucial for getting the finished item you want but are also great for practicing new stitches. Work in your pattern until you’ve reached the two stitches you need to twist. I’ve highlighted these stitches in purple so it’s easier to see. As you can see we have a knit stitch and a purl stitch on the left-hand needle. We want to change their positioning by moving the knit stitch over the top of the purl stitch.Admittedly, the LPT is just a bit more complex than the RPT. It might feel a little fiddly until you get the hang of it. Remember the order of the stitches from the previous photo? The order of the stitches from right to left was Knit, Purl. For the LPT, the first step is to purl the second stitch on the left needle through the back loop. This stitch is highlighted in blue. As you can see, the first (knit) stitch on the left needle remains in place. After you purl the second stitch through the back loop, do not drop the first and second stitches off the left needle. Next, move your yarn to the back of the work and knit the first stitch on the left needle. Now you can drop both the first and second stitches on the left needle. These stitches are highlighted in purple. After you drop them, you’ve completed the LPT. Notice how the stitches have changed position, and the knit stitch now leans to the left, over top of the purl stitch. Well done, now on to the RPT!Right Purl TwistWork in your pattern until you’ve reached the two stitches you need to twist. I’ve highlighted these stitches in purple so it’s easier to see. Here we have a purl stitch that precedes a knit stitch. We want to change the position of these stitches, so that the knit stitch leans to the left, over the purl stitch. Begin by knitting two stitches together, but do not drop the stitches from your needle. As you can see, the two stitches remain on the left needle, but there is now a new stitch on the right needle. Bring your yarn to the front, then purl the first stitch on the left needle. Now you can drop the two stitches on the left needle – I’ve highlighted them in purple so it’s easier for you to see. And that’s it – you’ve completed your RPT. Notice how the knit stitch now precedes the purl stitch.
I hope you find this tutorial helpful, and I hope that it drums up excitement for you to start knitting this lovely cowl. Like Jennifer, I’m a big fan of coniferous trees, so this design sings to me!
Remember, you can find the 12 Days of Winter Kits at your local yarn shop. Happy crafting!