New years bring a lot of good things with them. Things like resolutions, new knitting projects, and of course: Pantone’s Color of the Year.
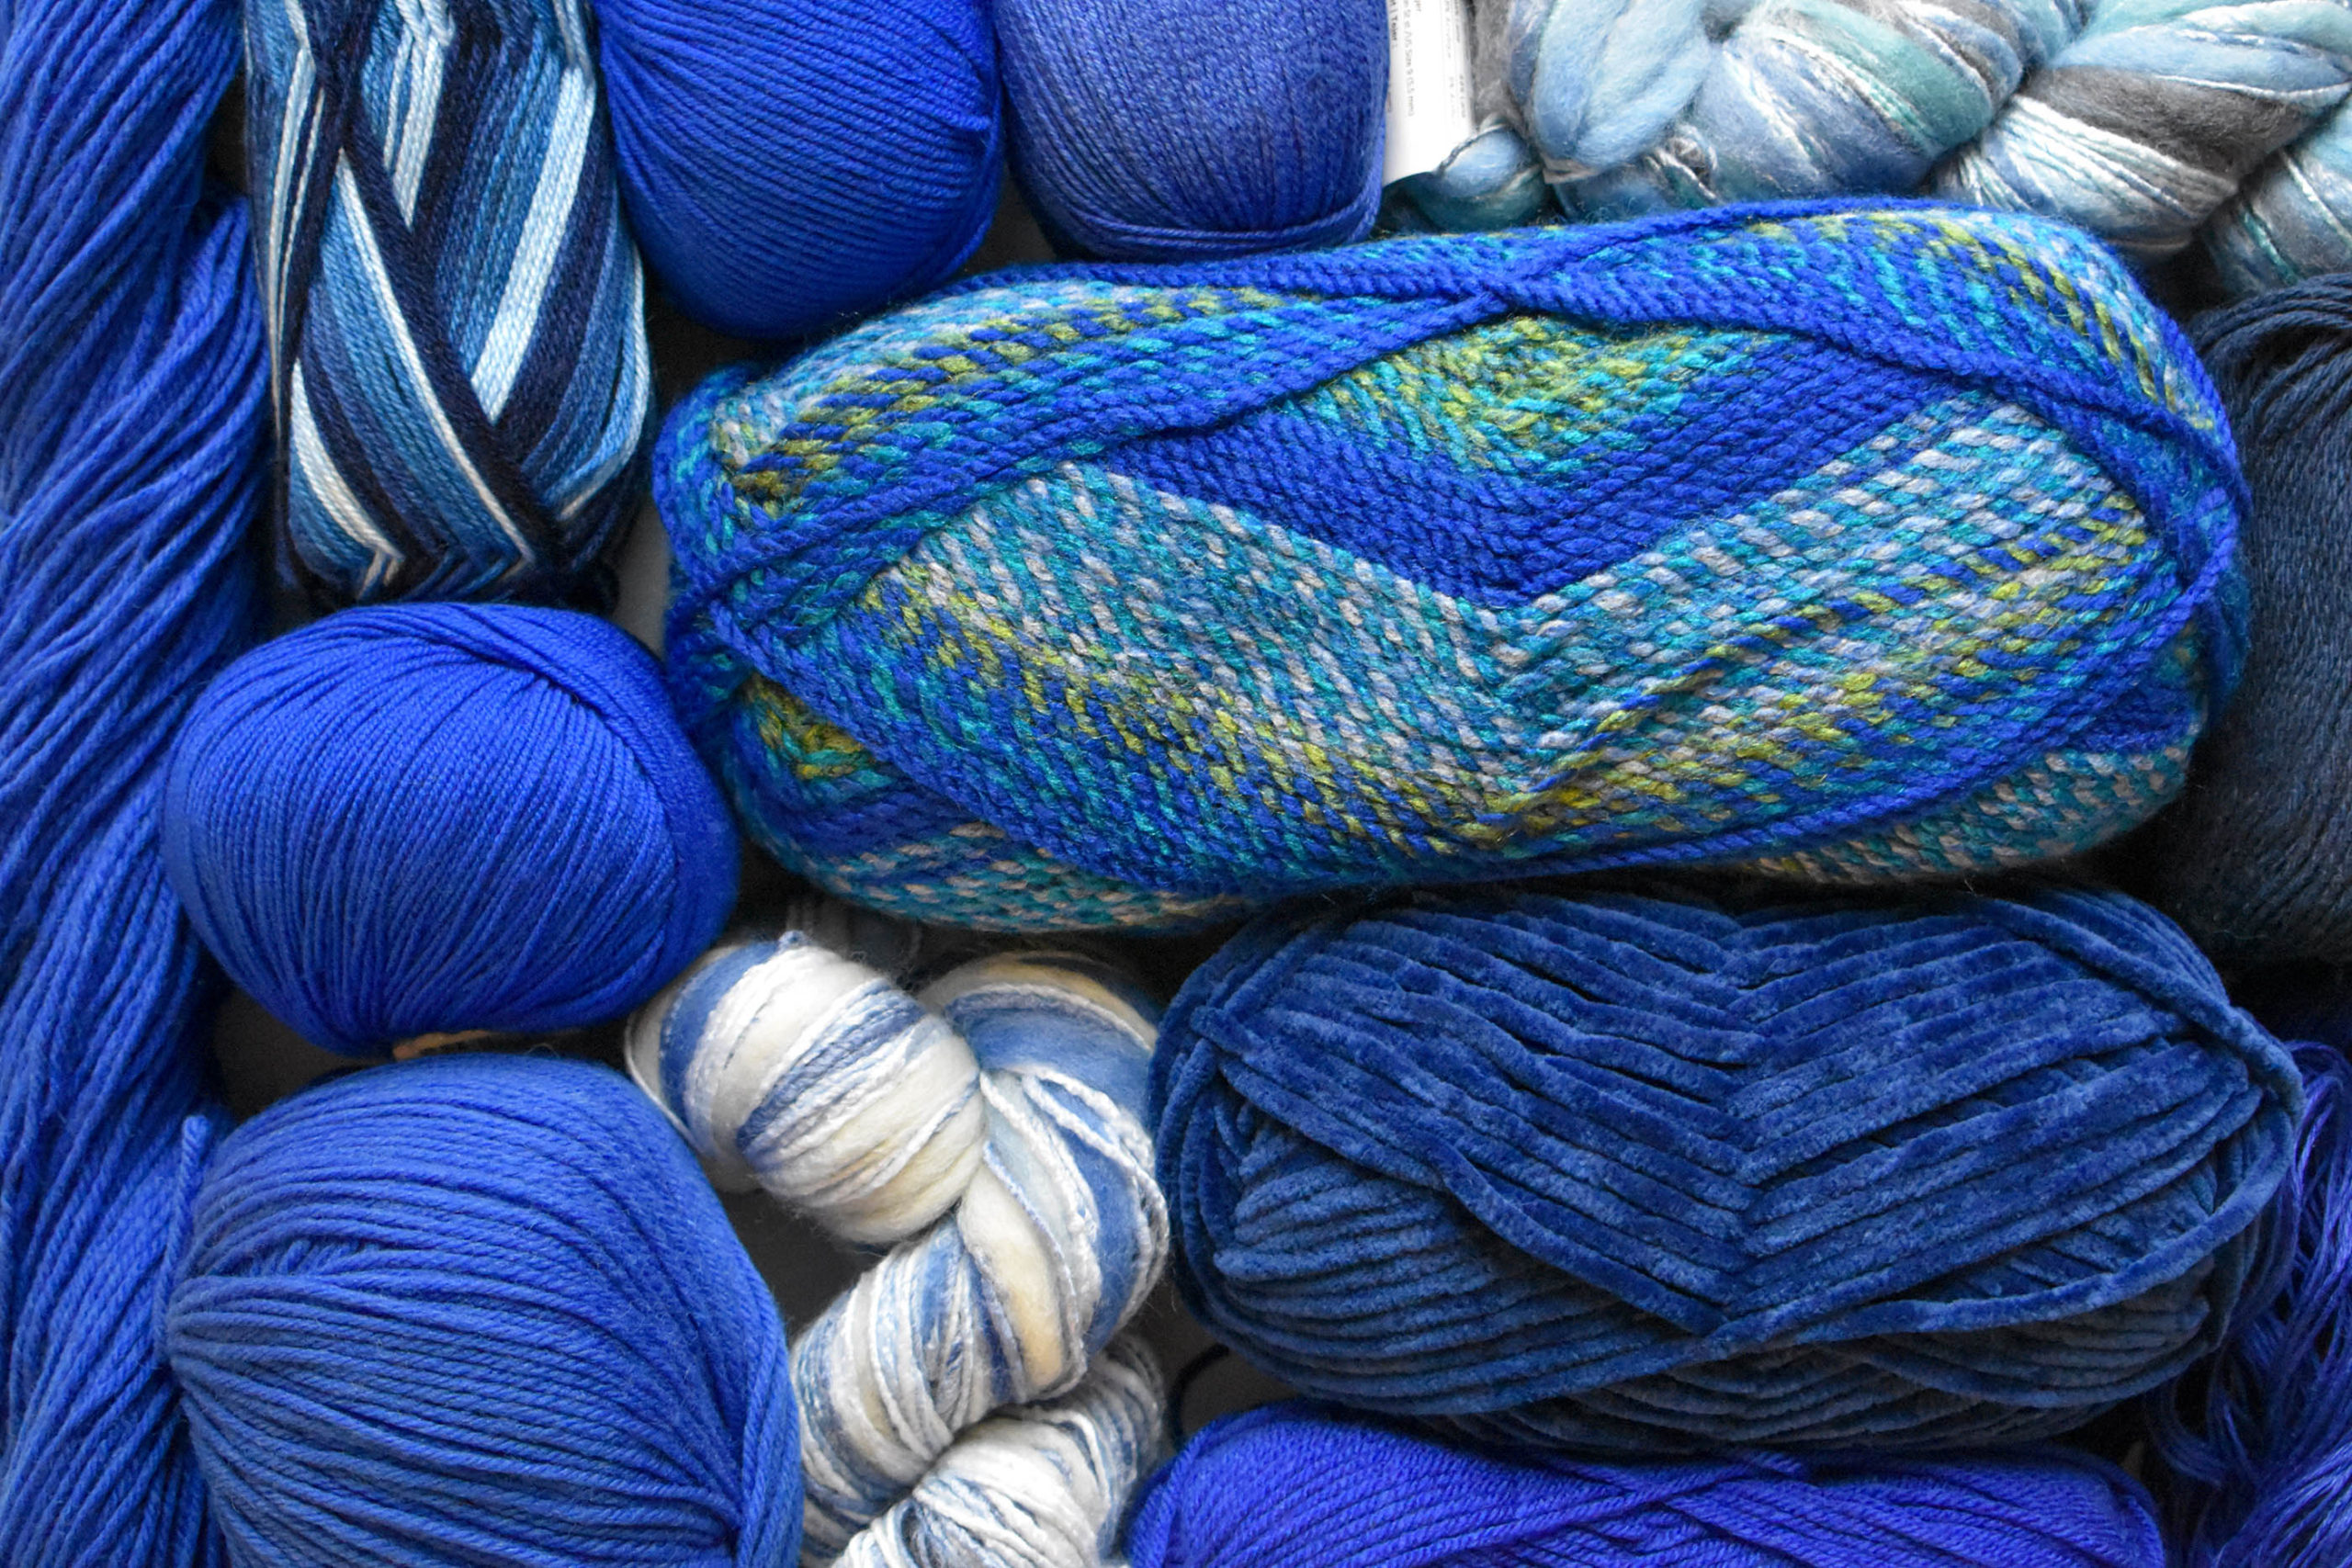
Pantone researches trends in media, fashion, culture, entertainment, art, and more to forecast what color will be best for the coming year. This color decision will then trickle into products created in many industries like fashion, interiors, and yes, yarn! What is the color of the year, you ask? Well, it is 19-4052 – Classic Blue!
“Instilling calm, confidence, and connection, this enduring blue hue highlights our desire for a dependable and stable foundation on which to build as we cross the threshold into a new era. ” – Pantone.com
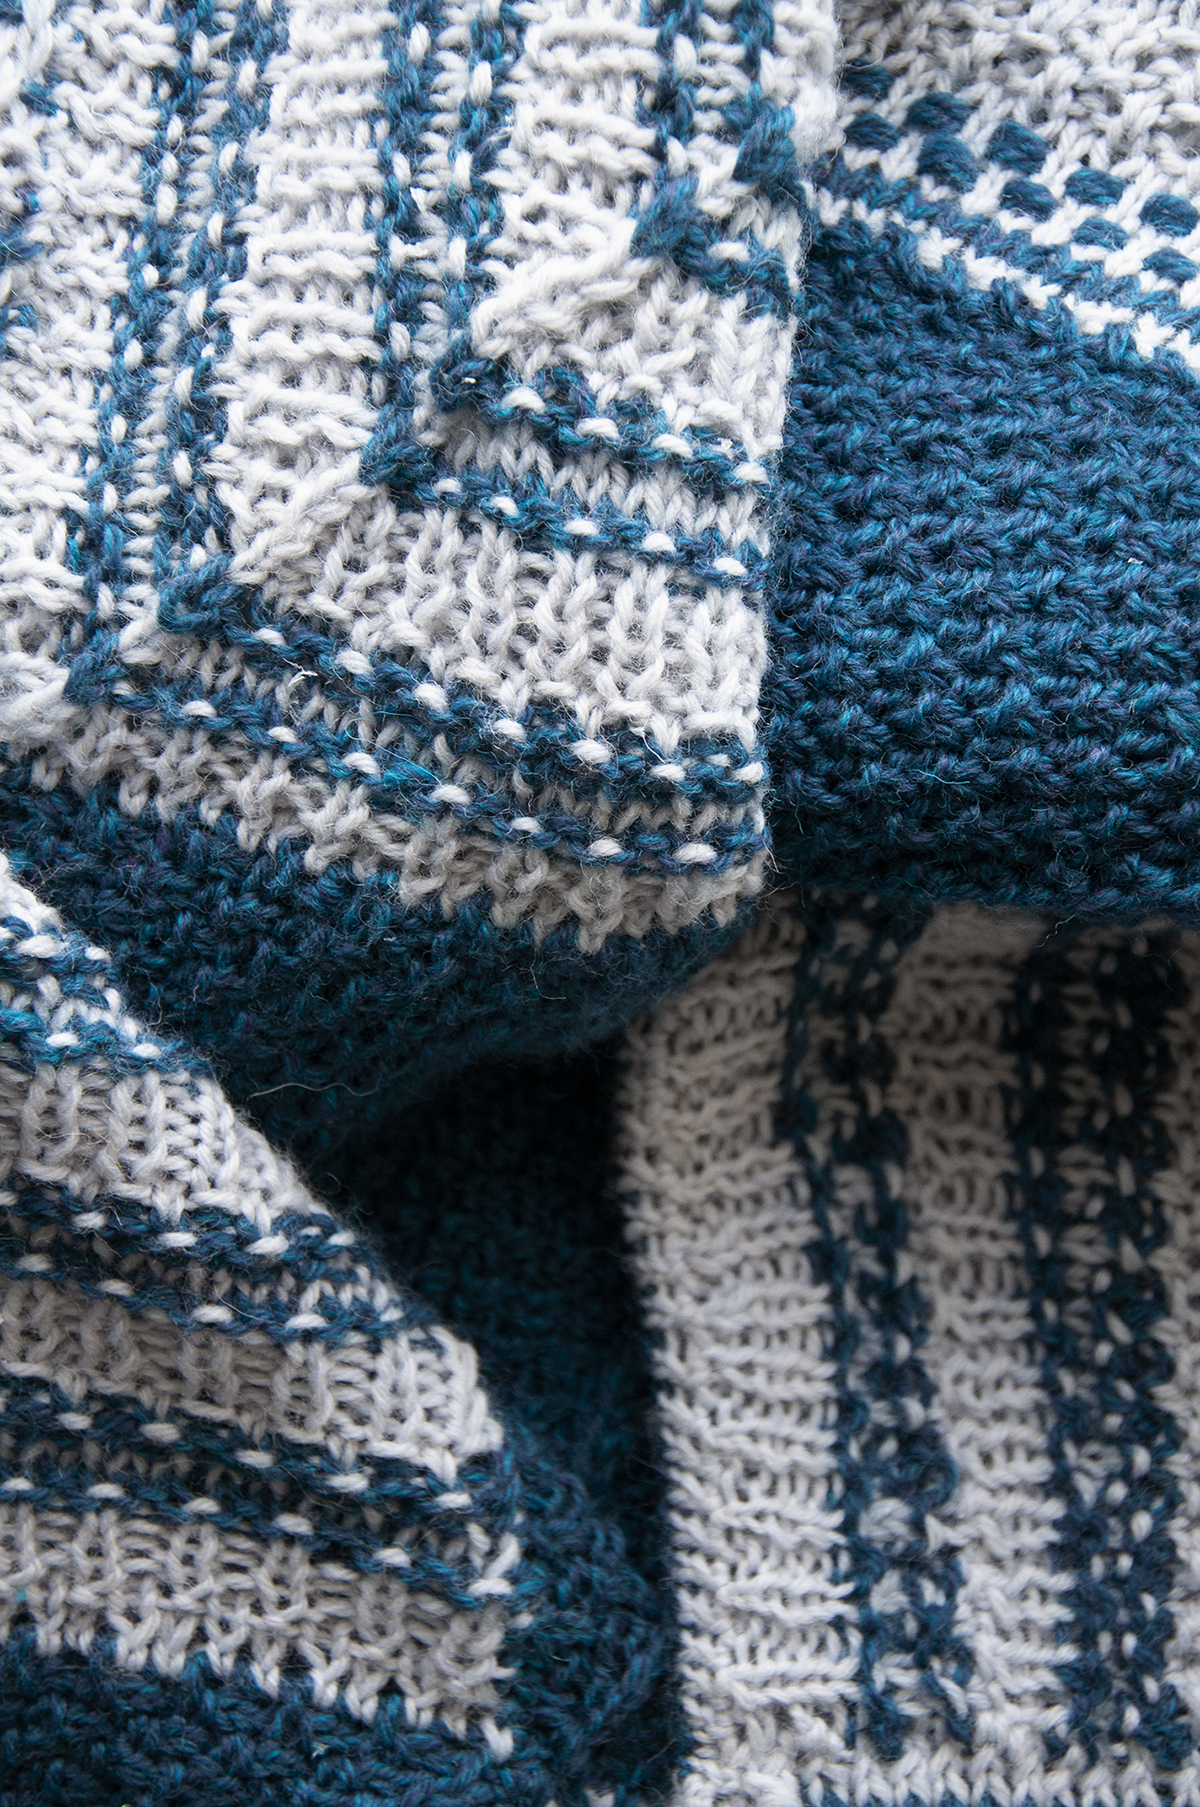
With a lot of things in nature being blue, and it’s inherent quality as a calming color, blue appeals to everyone. The shade chosen, Classic Blue, is a strong foundation color that is suggestive of the sky at dusk. As you can see with the yarns above, we have an abundance of blue to choose from in our yarn offerings, and plenty that mix blue with other stunning shades.
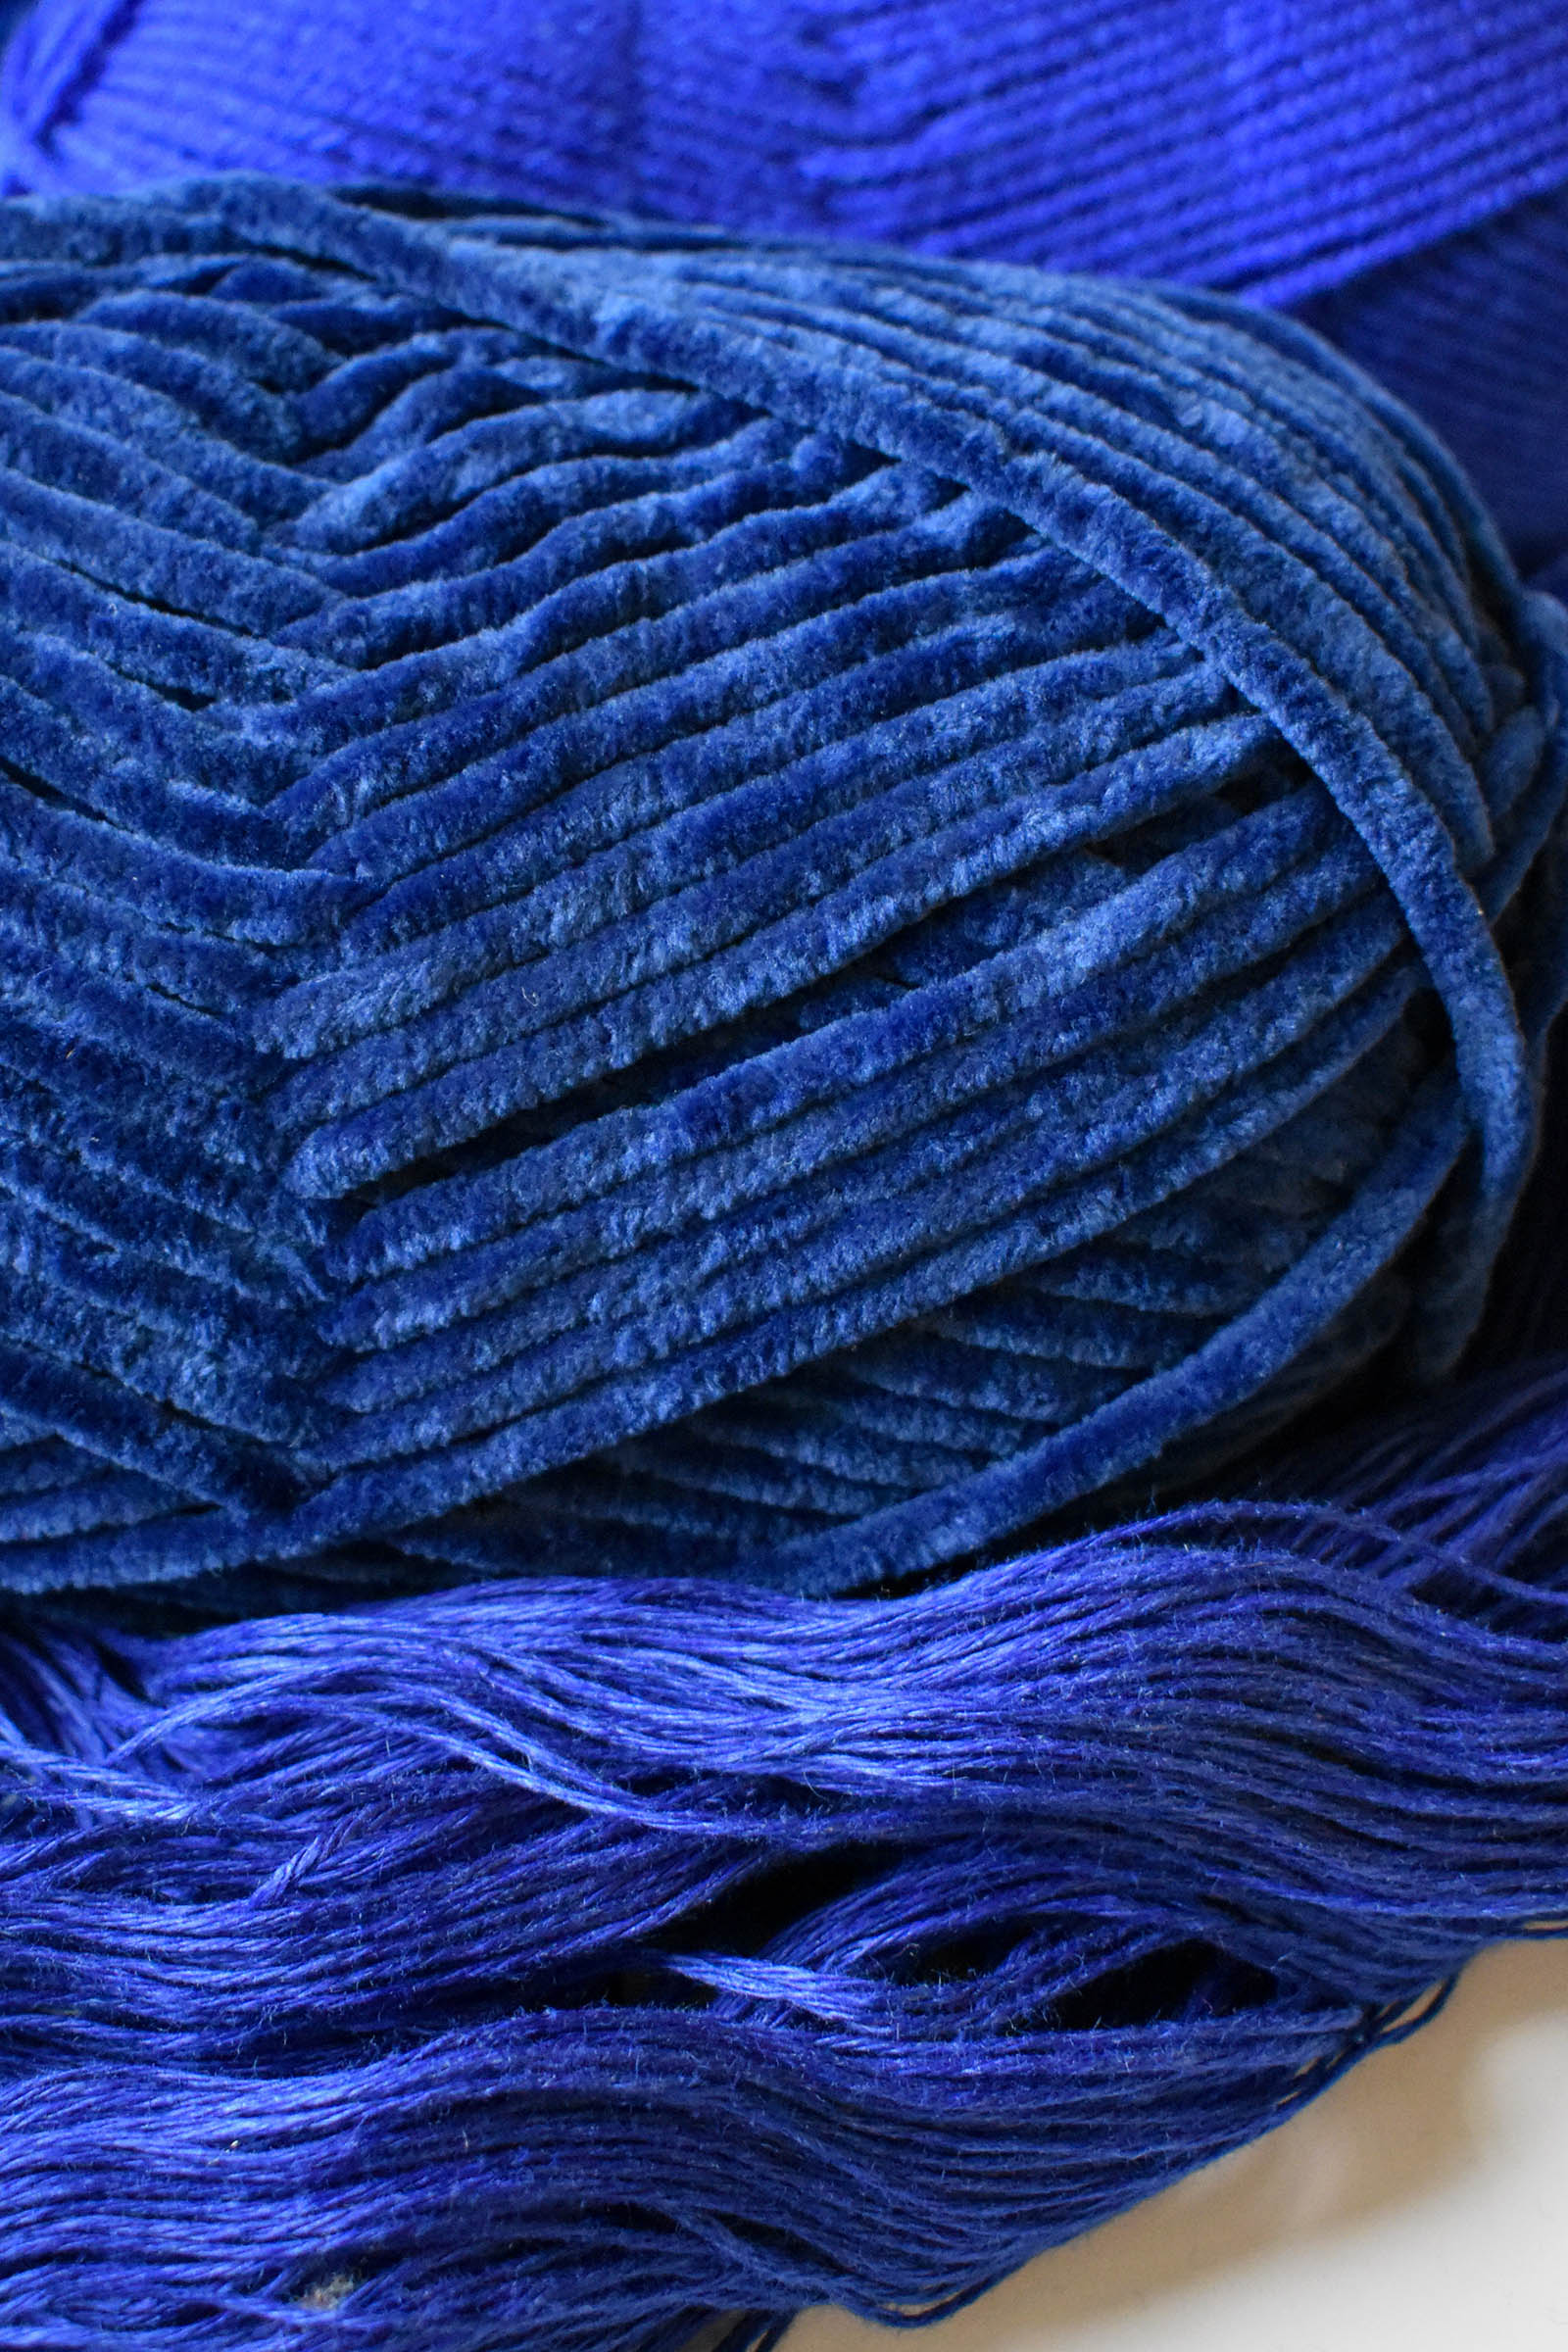
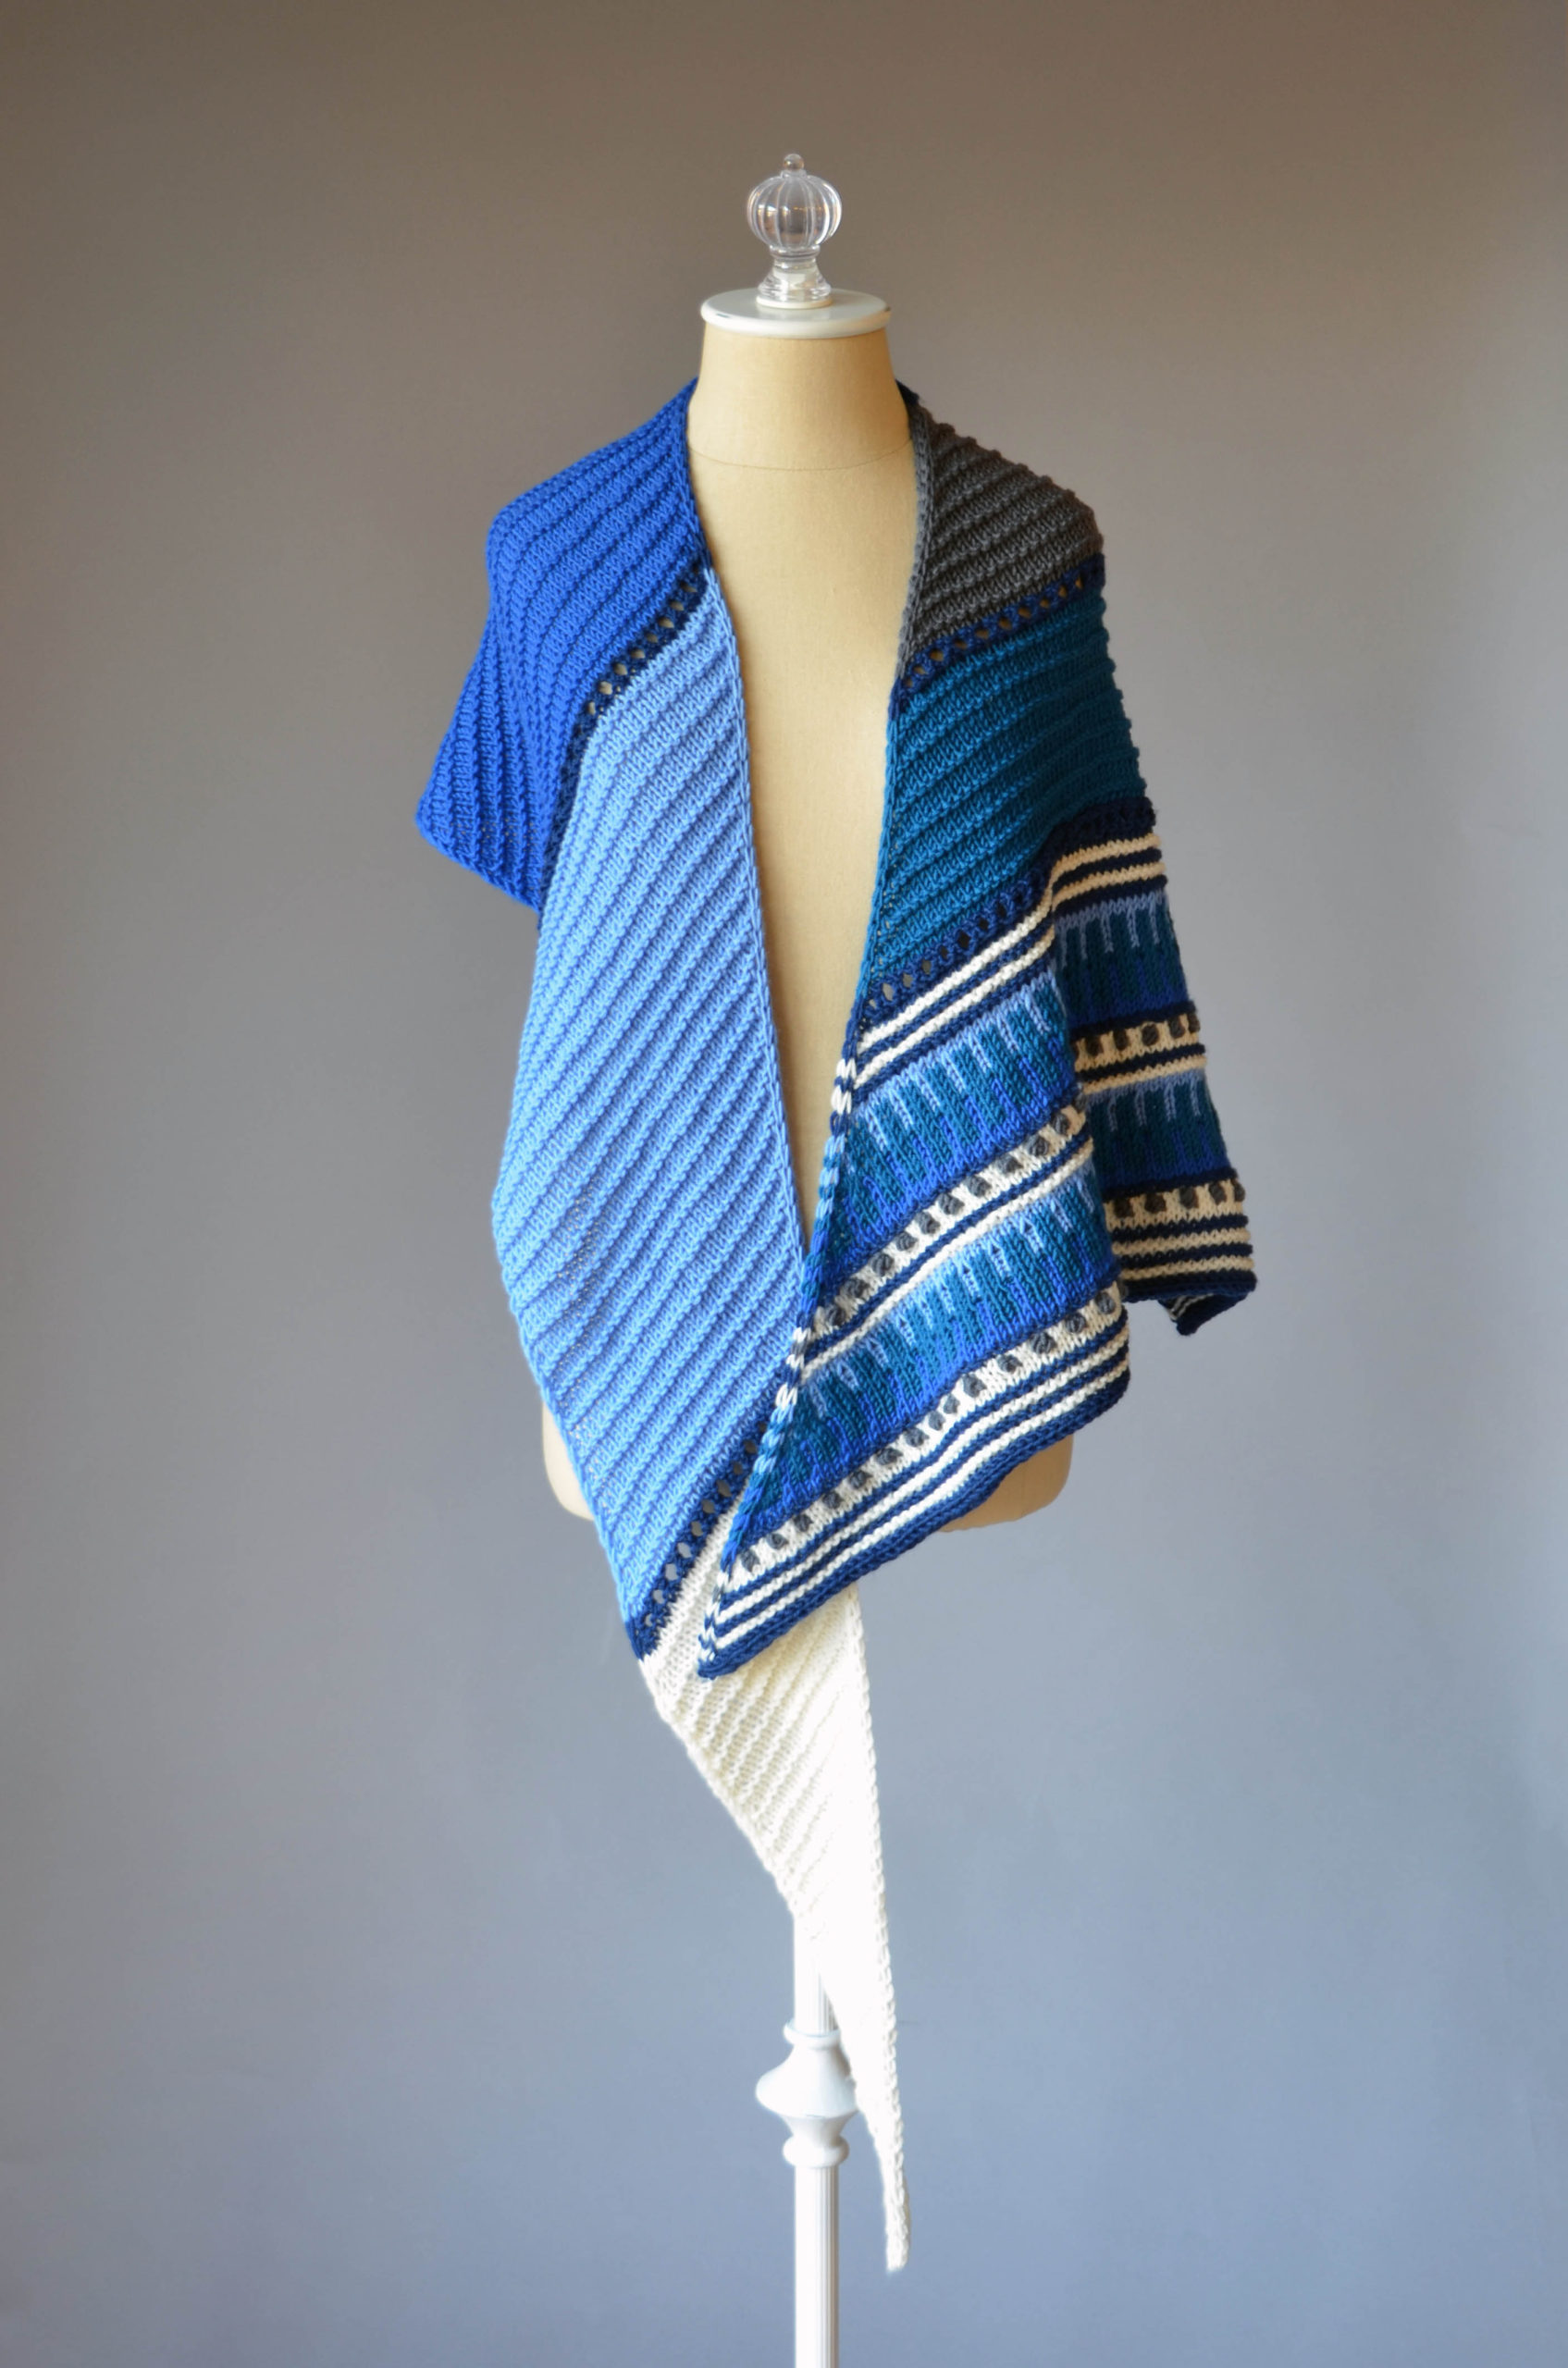
Some of our yarns that offer this rich blue shade are Bella Chenille in Indigo, and Fibra Natura Flax in Fierce Blue. Blue yarn for all seasons!Dona and Donnina, which are both 100% extrafine superwash merino wool yarn, offer great stitch definition have some fabulous blue shades. Below we’ve featured a couple of the patterns available in our Dona Color Kit – Blues.
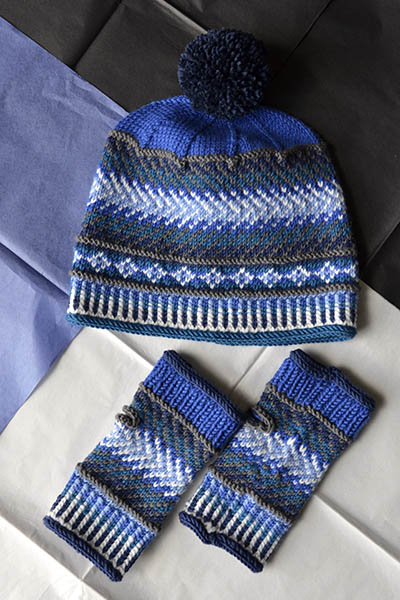
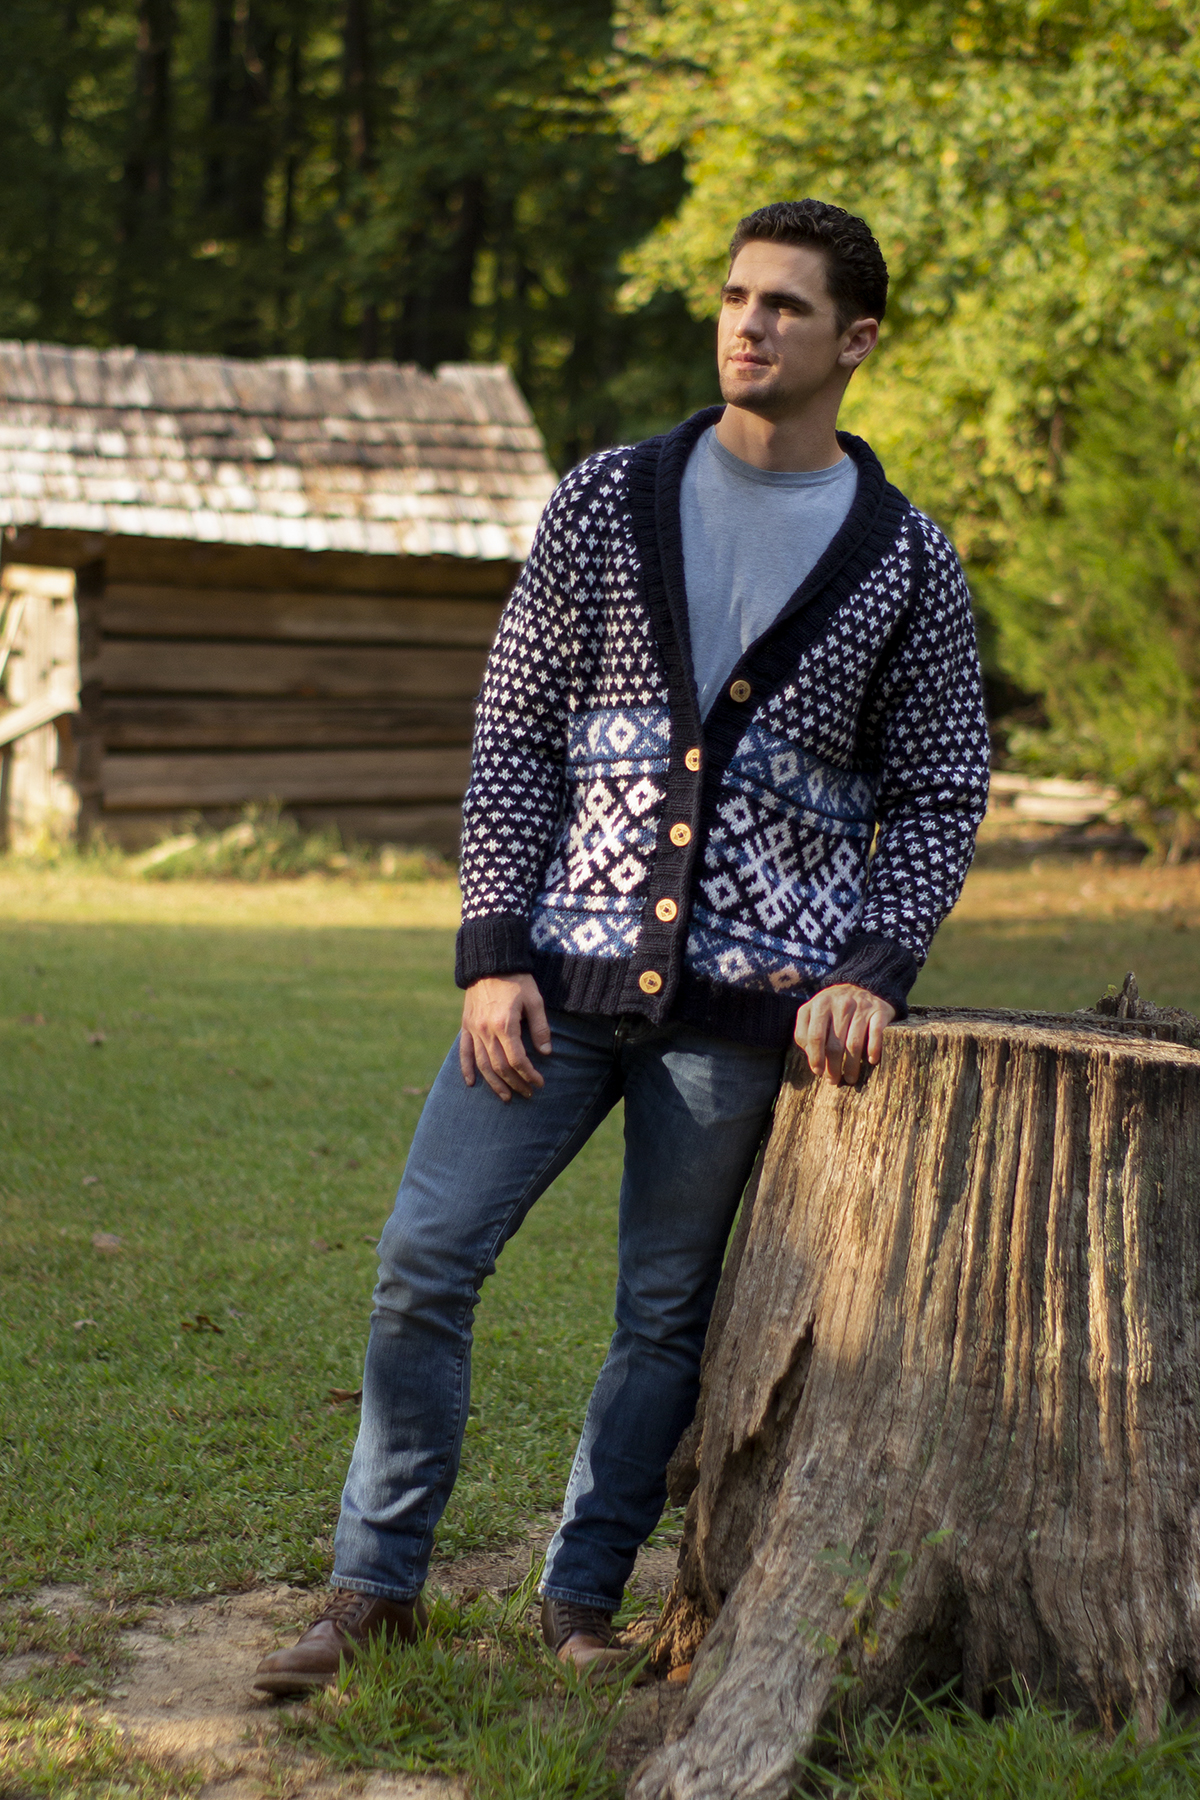
The Color Shift Hat and Mittens from our Dona Kit in Blues The Staccato Shawl from our Dona Color Kit in Blues Deluxe Worsted and Deluxe Chunky are great staple yarns to stock up on for future projects throughout the year. Colbalt is the blue shade available that best matches the Pantone Classic Blue. The Switcback Cardigan (below) from our Deluxe Men Collection features gorgeous blue colorwork!
The Switchback Cardigan from our Deluxe Men Collection using Deluxe Worsted Major , Bamboo Bloom, and Uptown DK Colors are all yarns that have beautiful multi-colored blue shades. Any pattern you knit or crochet with these yarns is sure to be rich with color and texture.
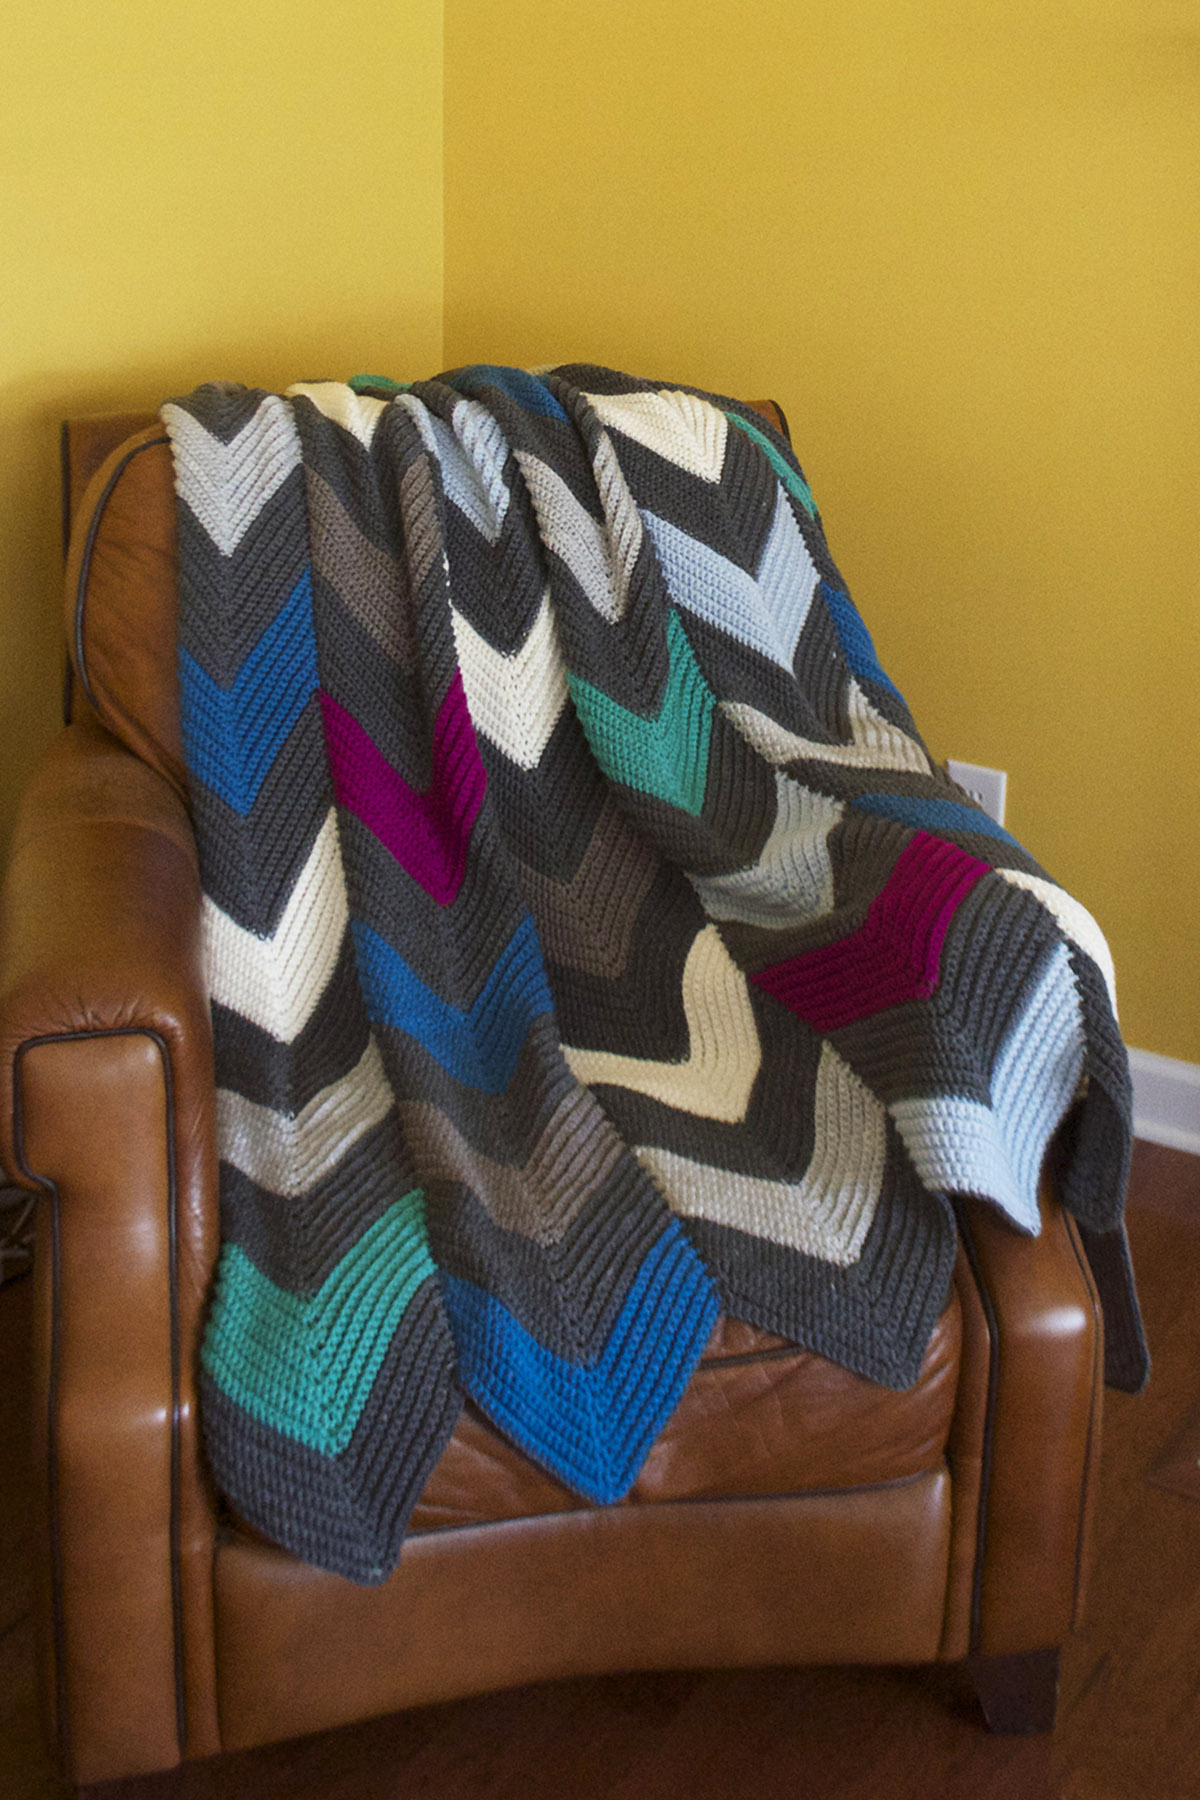
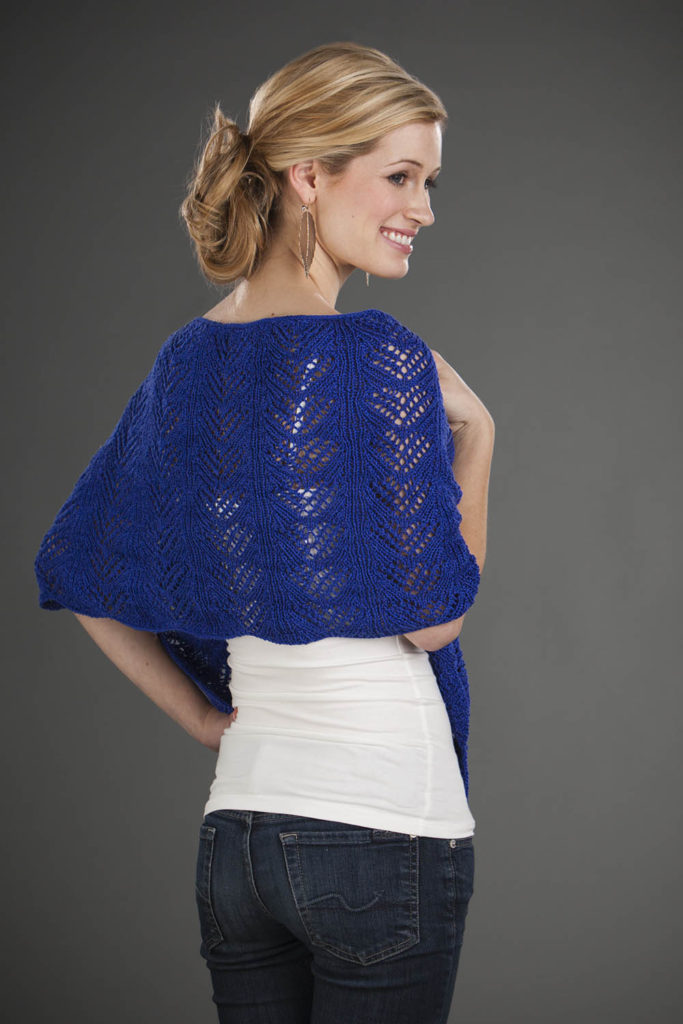
Flying V crochet blanket using Uptown Worsted Luxor, our new mercerized Egyptian cotton yarn, is perfect for lightweight knit and crochet projects and comes in a wide array of colors including Royal Blue. Knit the Navona Wrap shown below and add a Color of the Year accessory to your closet!
The Navona Wrap in Luxor 105-02 Royal Blue
These are just some of the patterns we’ve designed that feature the Classic Blue shade. Remember, you can knit any pattern in any color you want! We hope you are just as excited as we are about the color of the year for 2020 and are ready to fill your stash with blue yarn. Happy knitting!
Blue yarn for everyone!
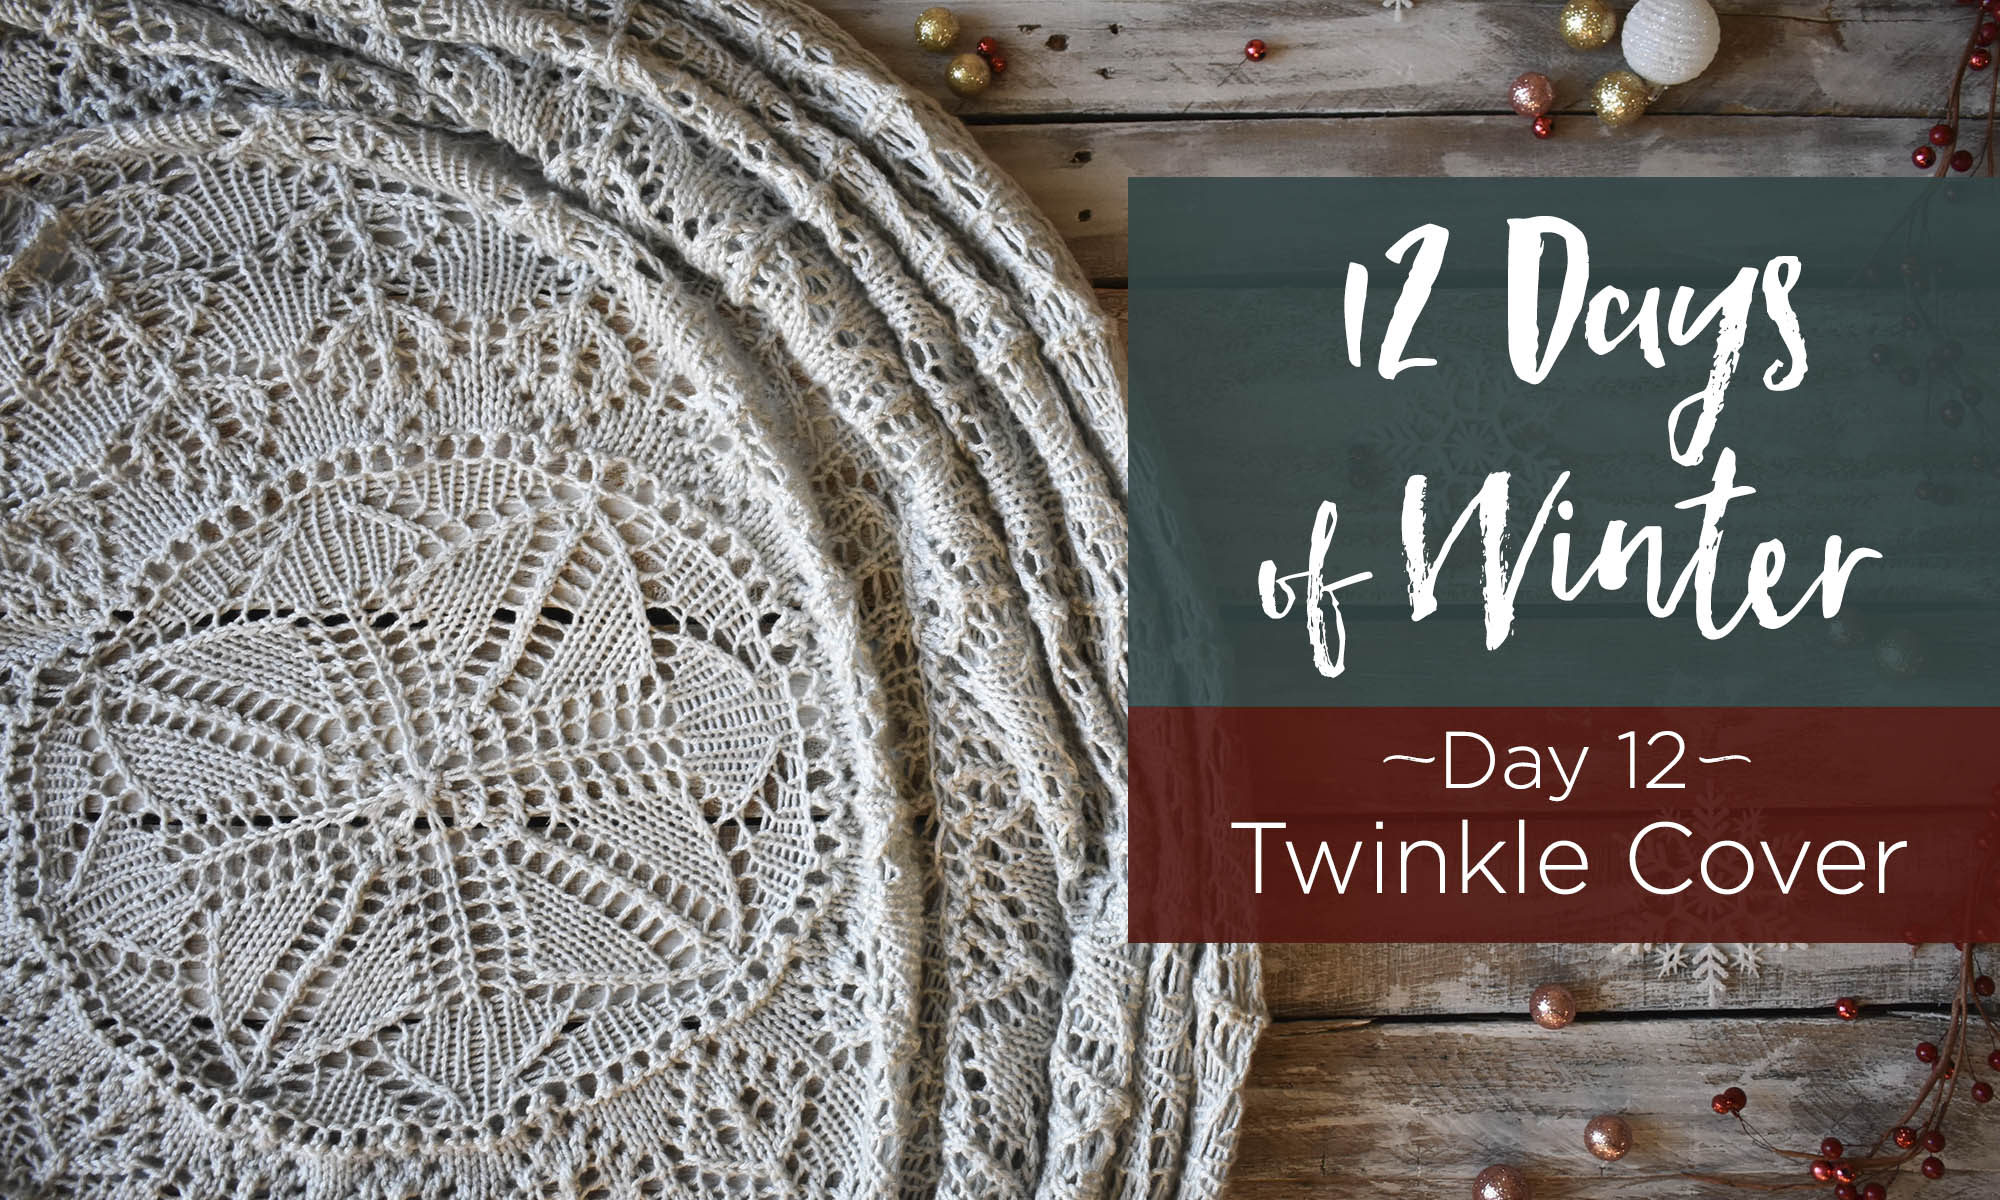
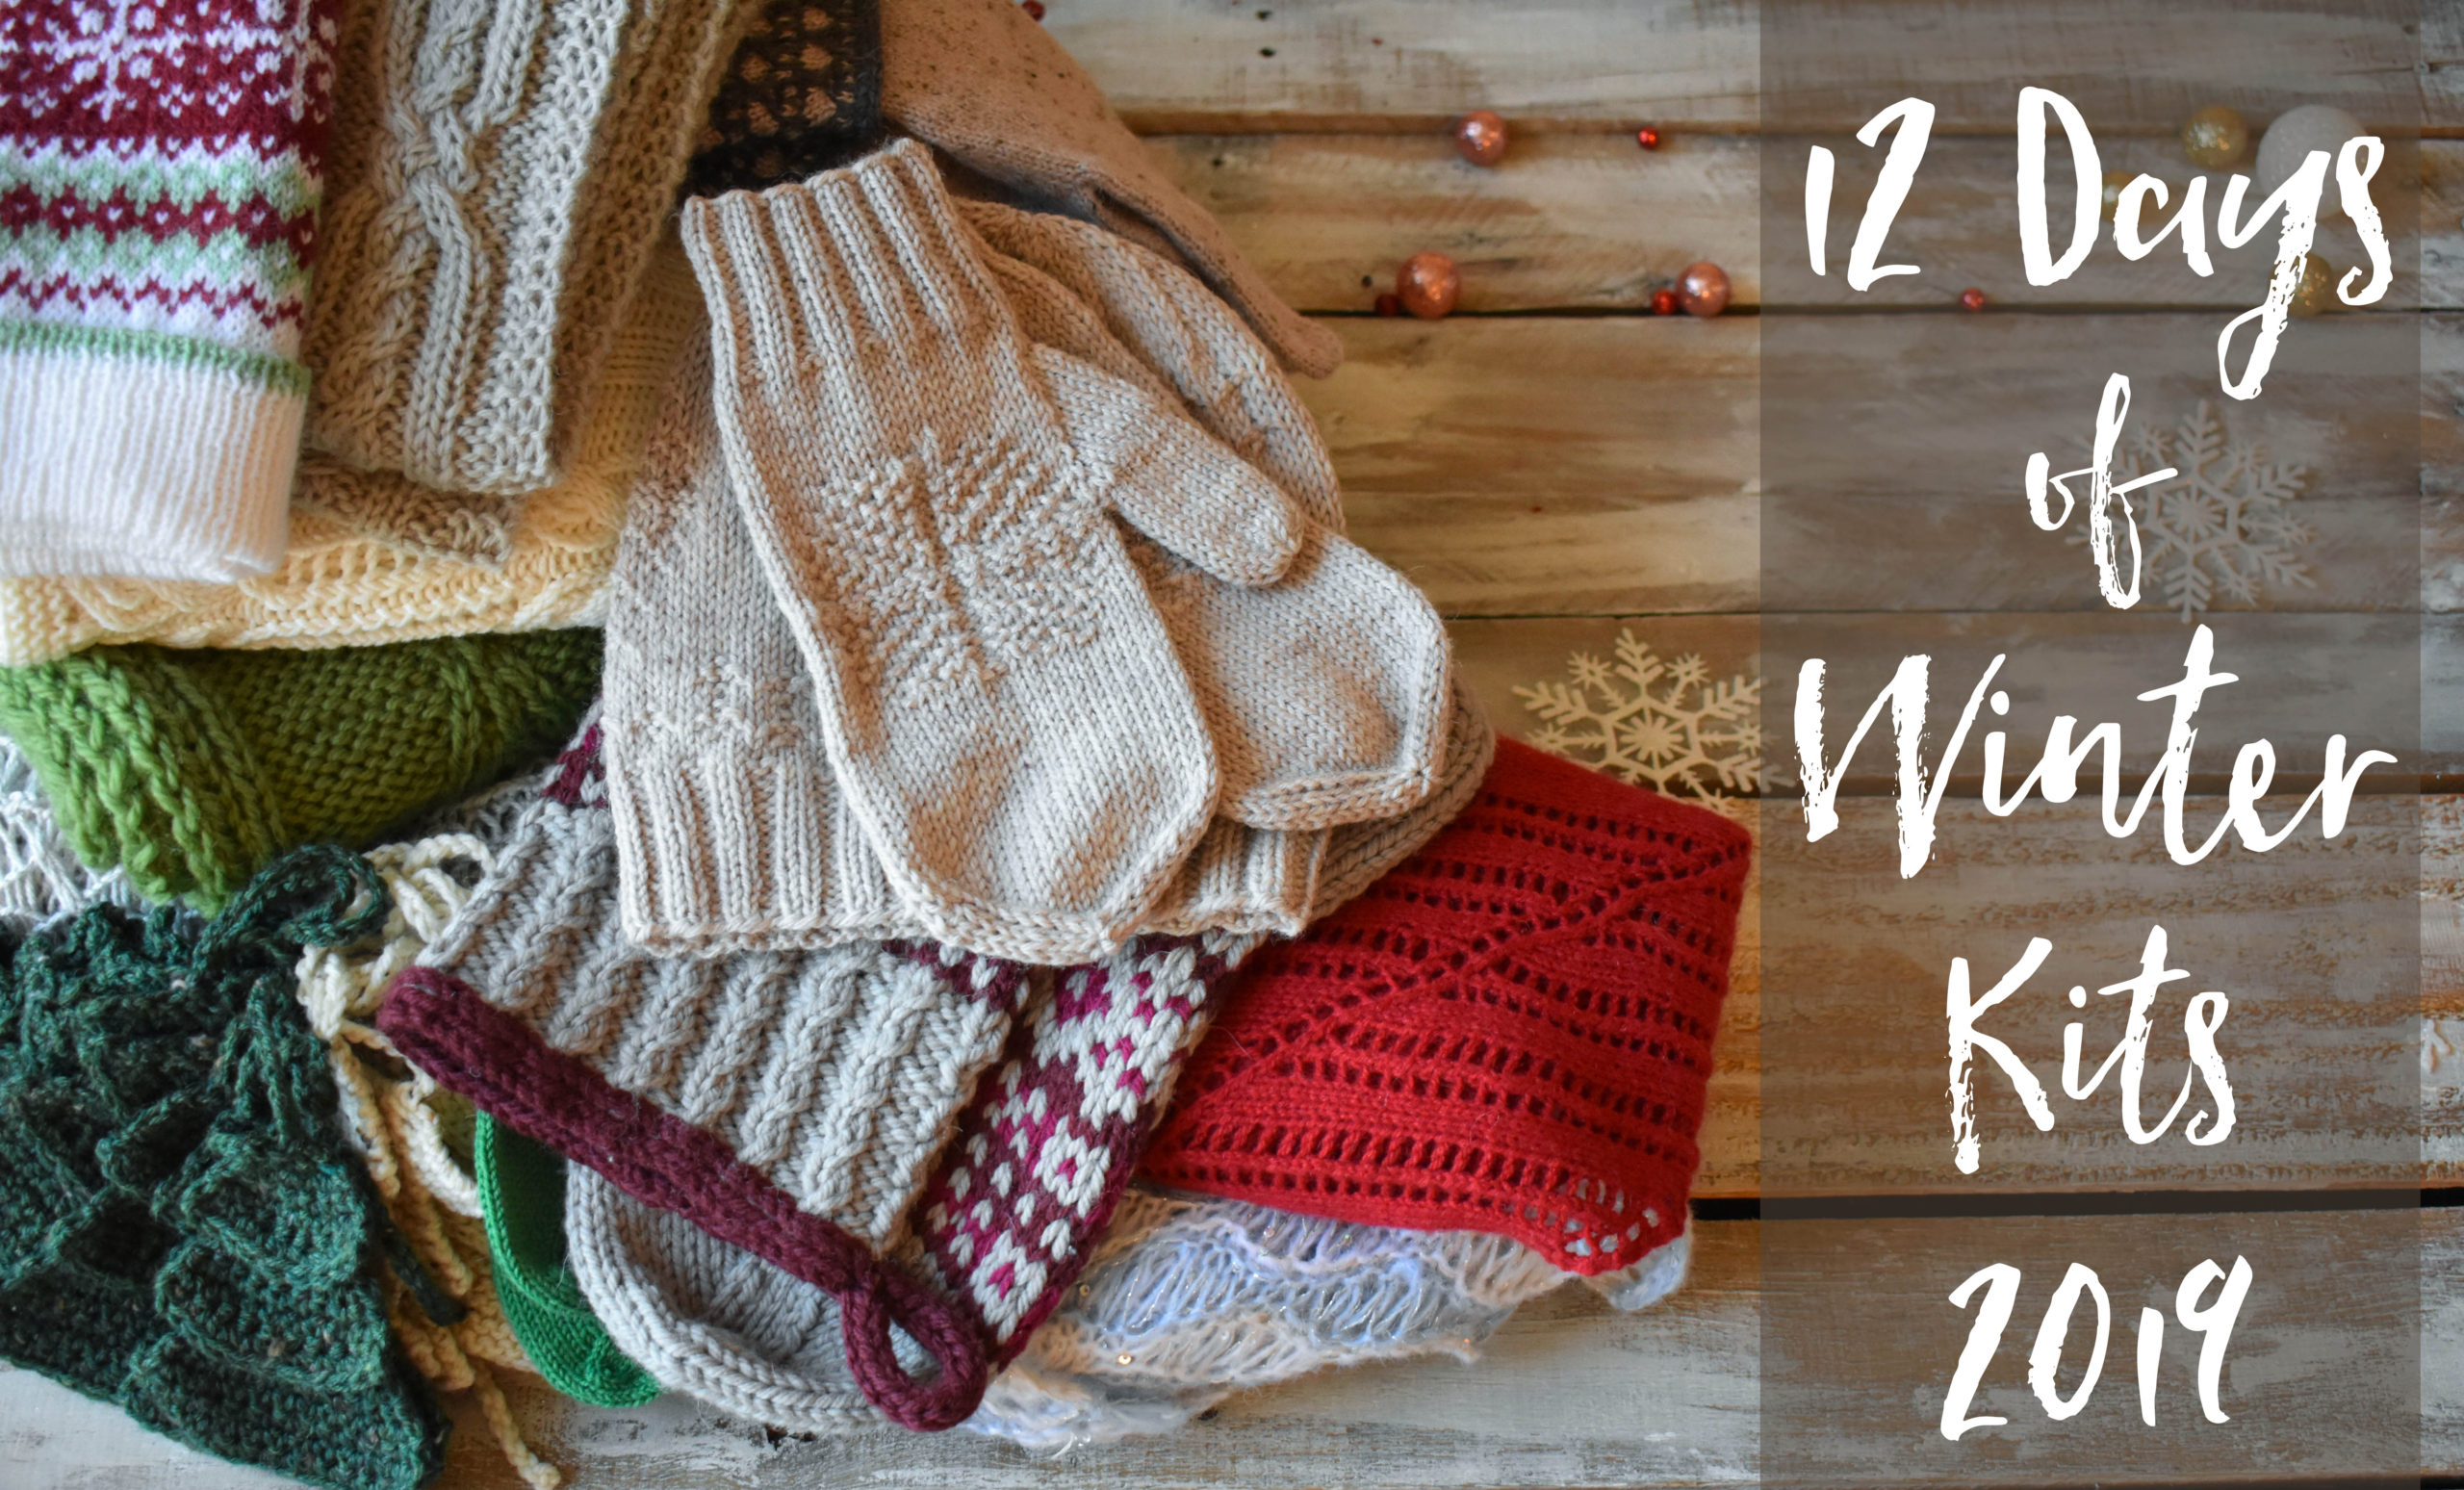
This is part 12 in a 12 part series highlighting designs from our 12 Days of Winter, Series 3 Edition.
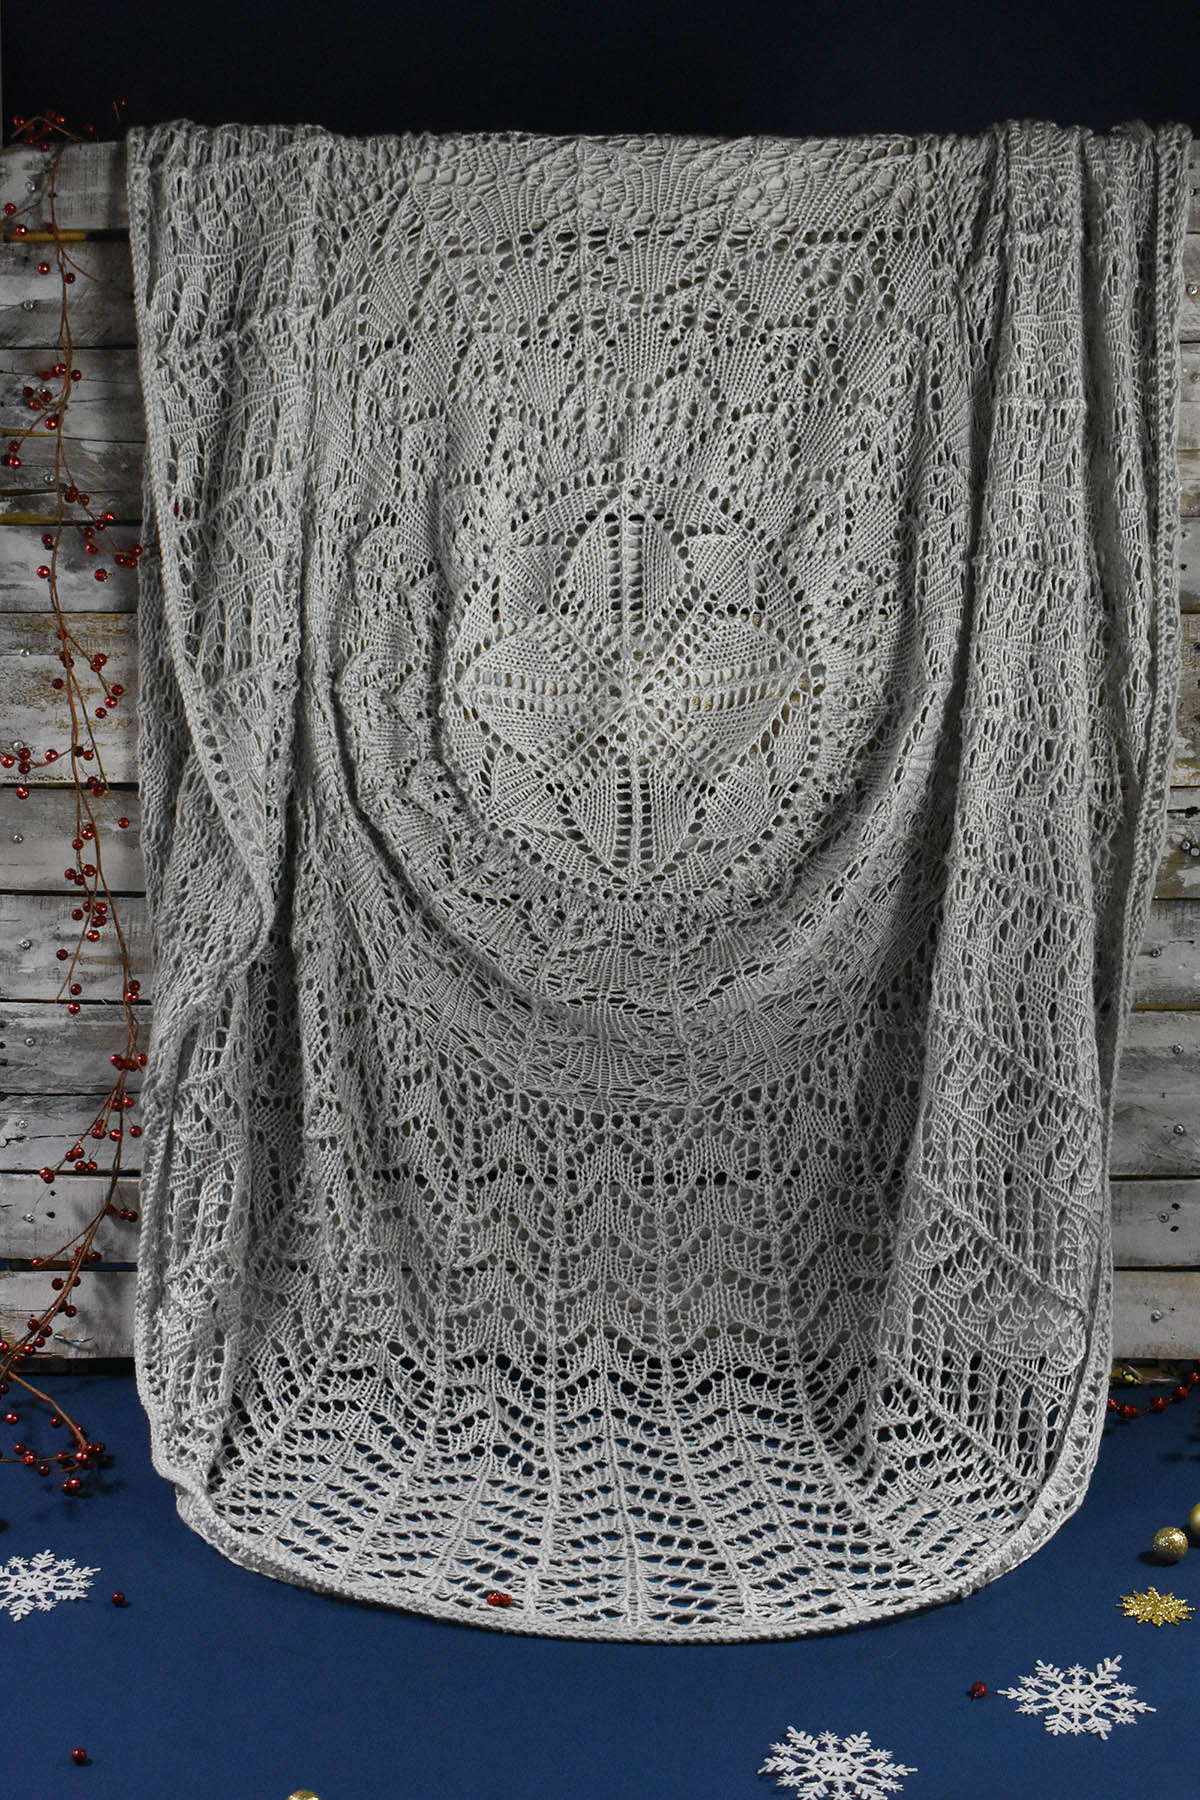
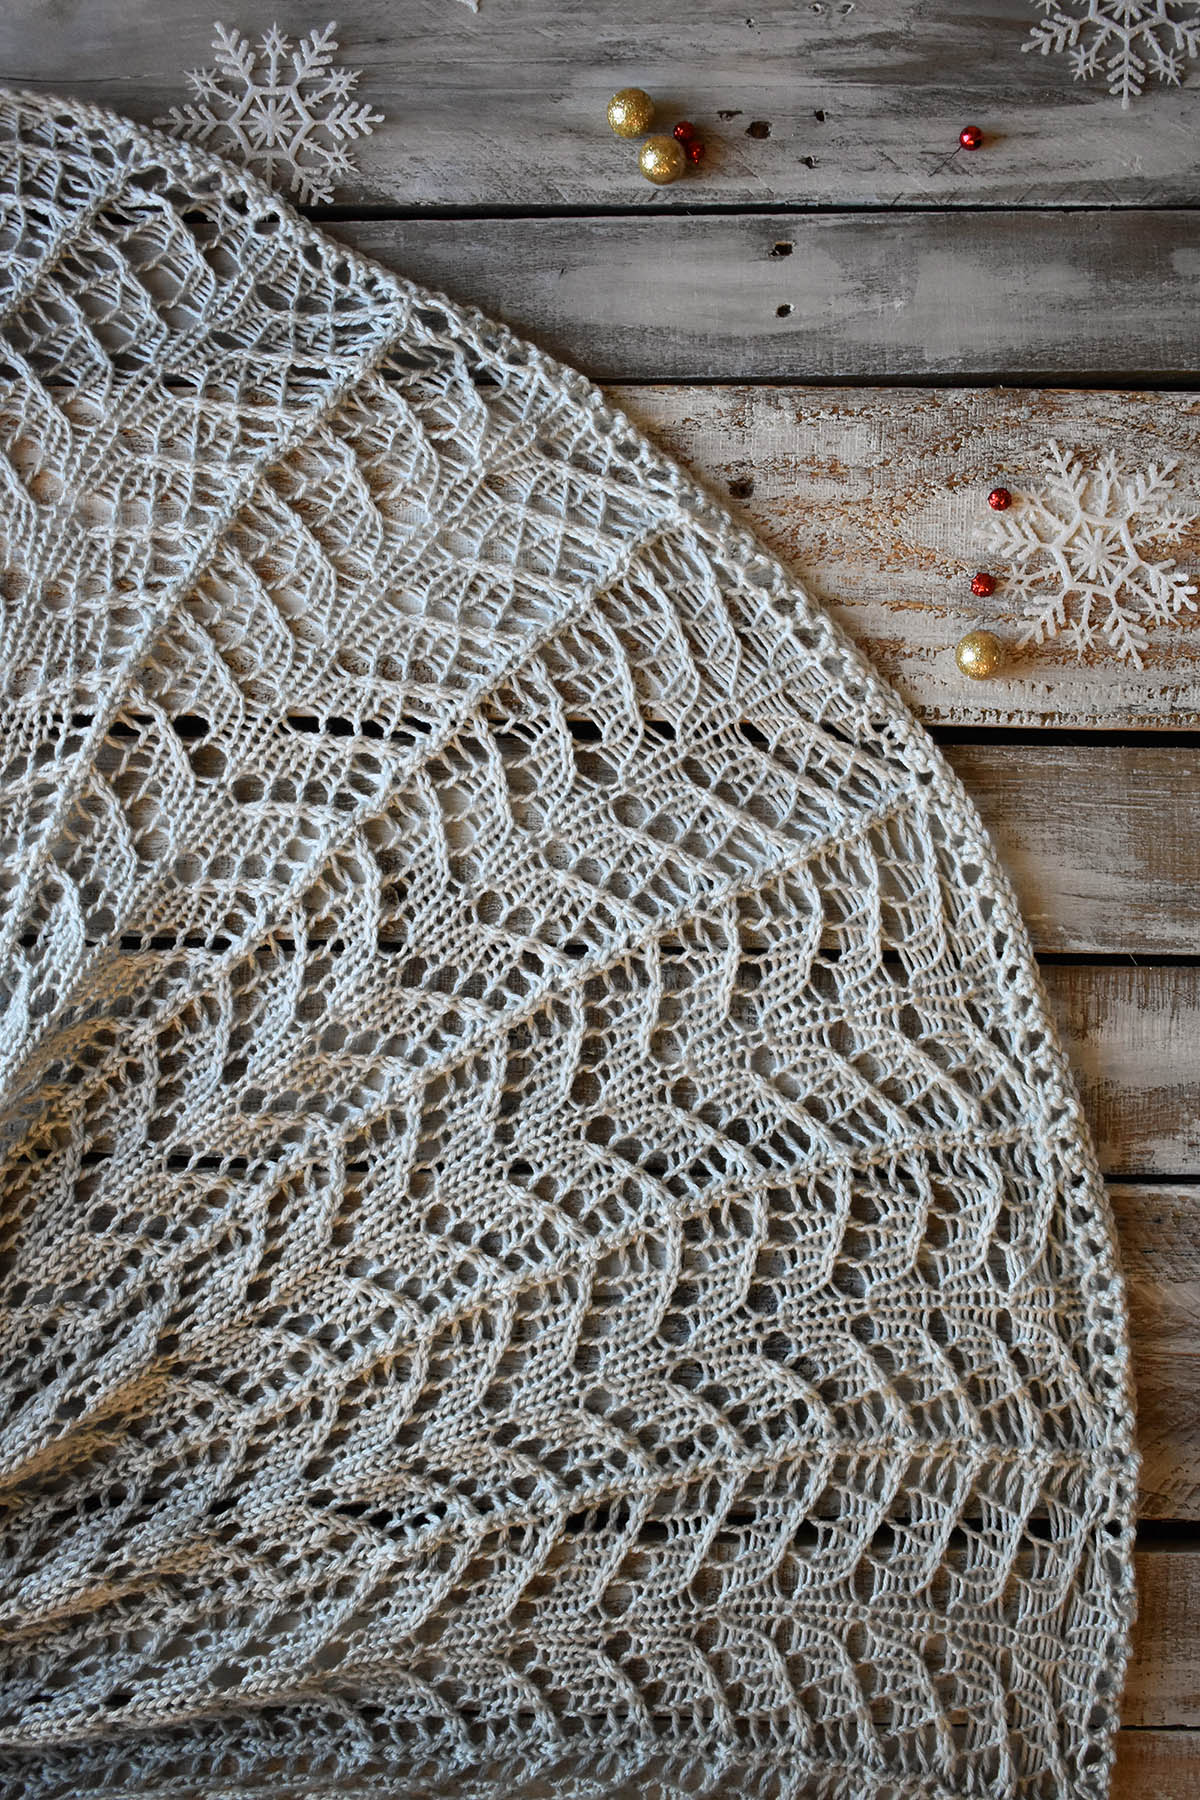
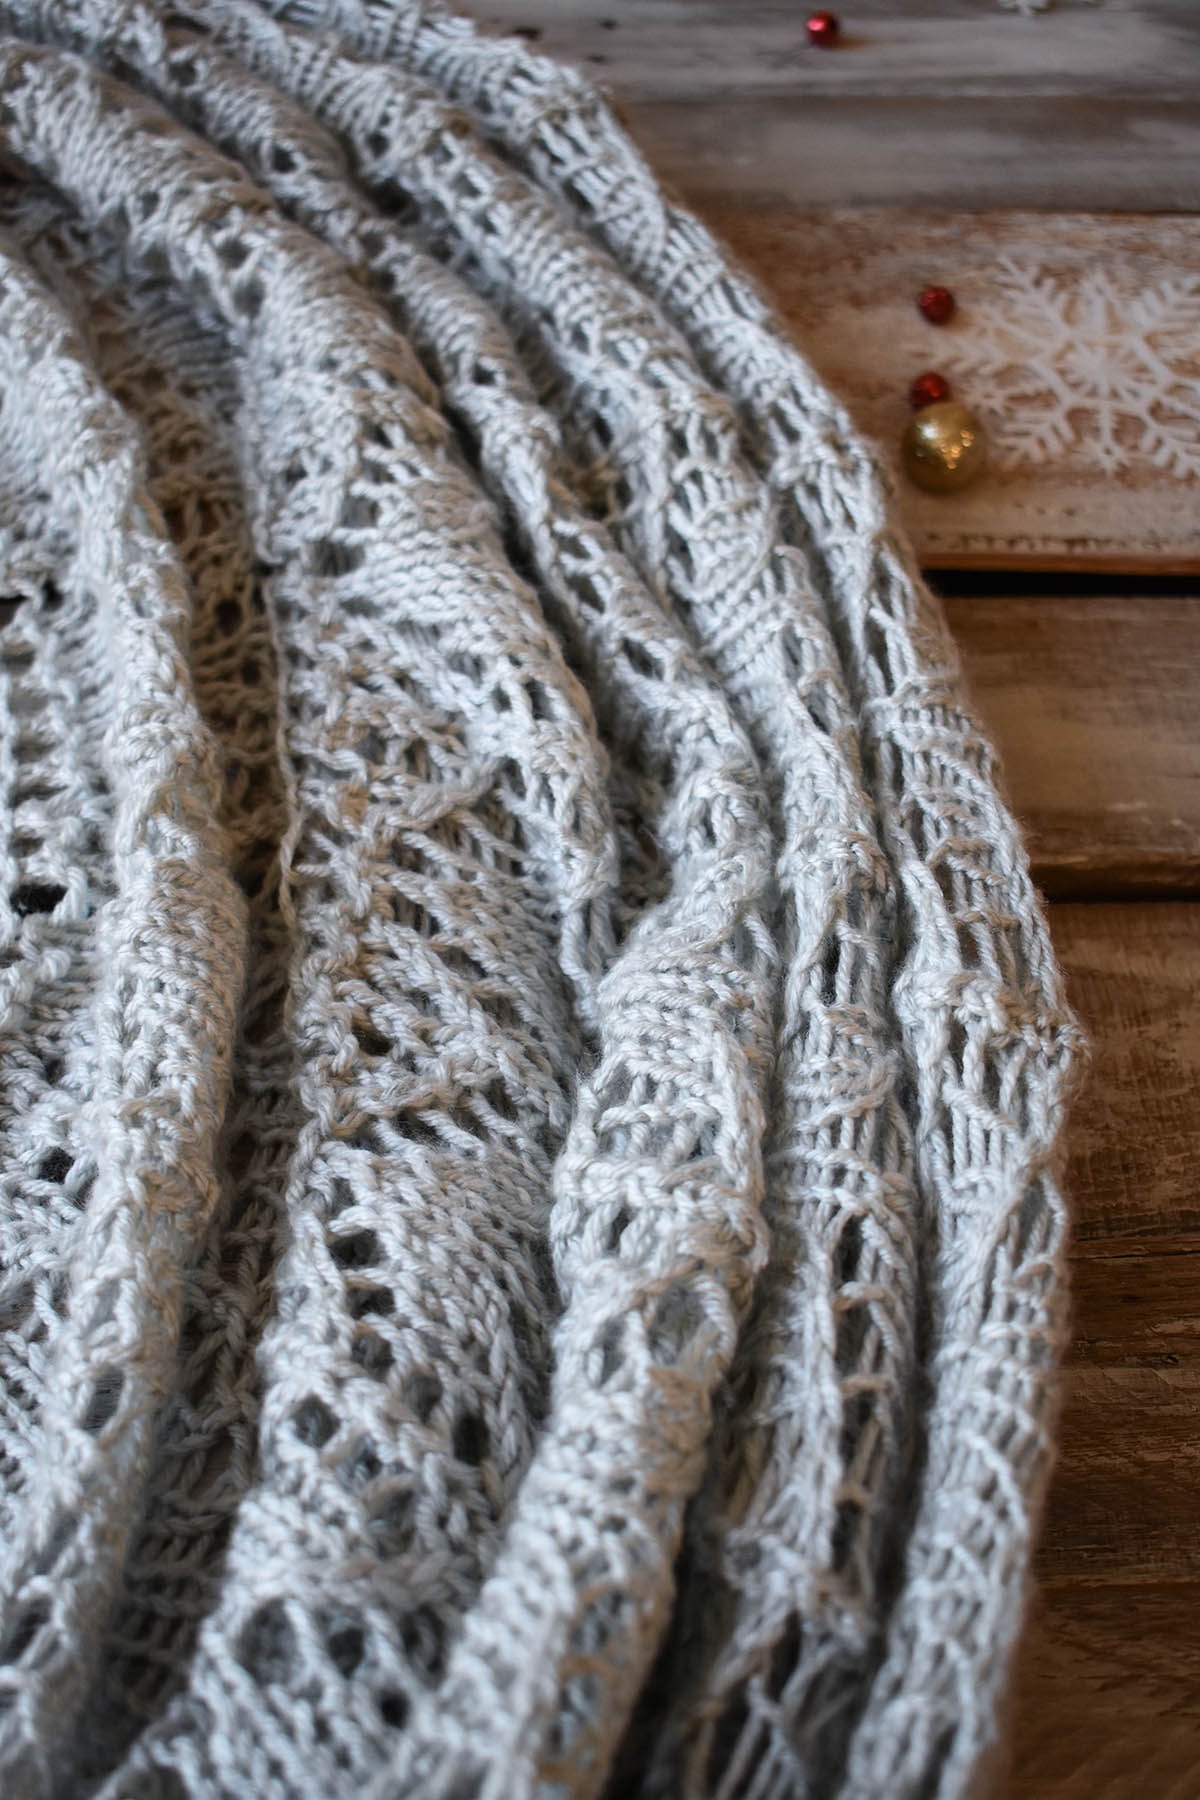
We can hardly believe it, but it’s the final day of the 12 Days of Winter Kit Collection. For Day 12, we’re wrapping things up with the Twinkle Cover, knit using ever-popular Uptown Worsted.
The Twinkle cover features a lovely all-over lace pattern. This circular blanket is created using pi-shawl construction, made popular by the queen of knitting, Elizabeth Zimmermann. Pi-construction begins at the center, then, at regular distances, you simply double the stitch count. The best part? There are just a couple of increase rounds in this whole blanket. The most concentration is required at the beginning of the pattern. After the central increases are complete, the outer rings both feature easy-to-memorize lace motifs.
We have to admit – blocking this blanket will take some effort, but the pattern guides you through the process with some tips and tricks. Steam-blocking is suggested, which might sound risky considering this is an acrylic blanket, but it ensures that you’ll never need to block again. In this case, “killing” the acrylic is a good thing.
Ultimately, this is a project that’s sure to get compliments when you have visitors. It would make a stunning gift, too. We hope you love it.
Thank you so much for joining us for the third 12 Days of Winter Kit Collection. This year we’ve curated a collection of everything from accessories for your head, hands, and heart to beautiful home decor items. There is a mix of projects from beginner to advanced. We so enjoy bringing this collection to life each year and hope you enjoy the kits just as much. Remember, you can find all of the 12 Days of Winter Kit Collection at your local yarn store. Here’s to a crafty, fun-filled winter spent with your loved ones!
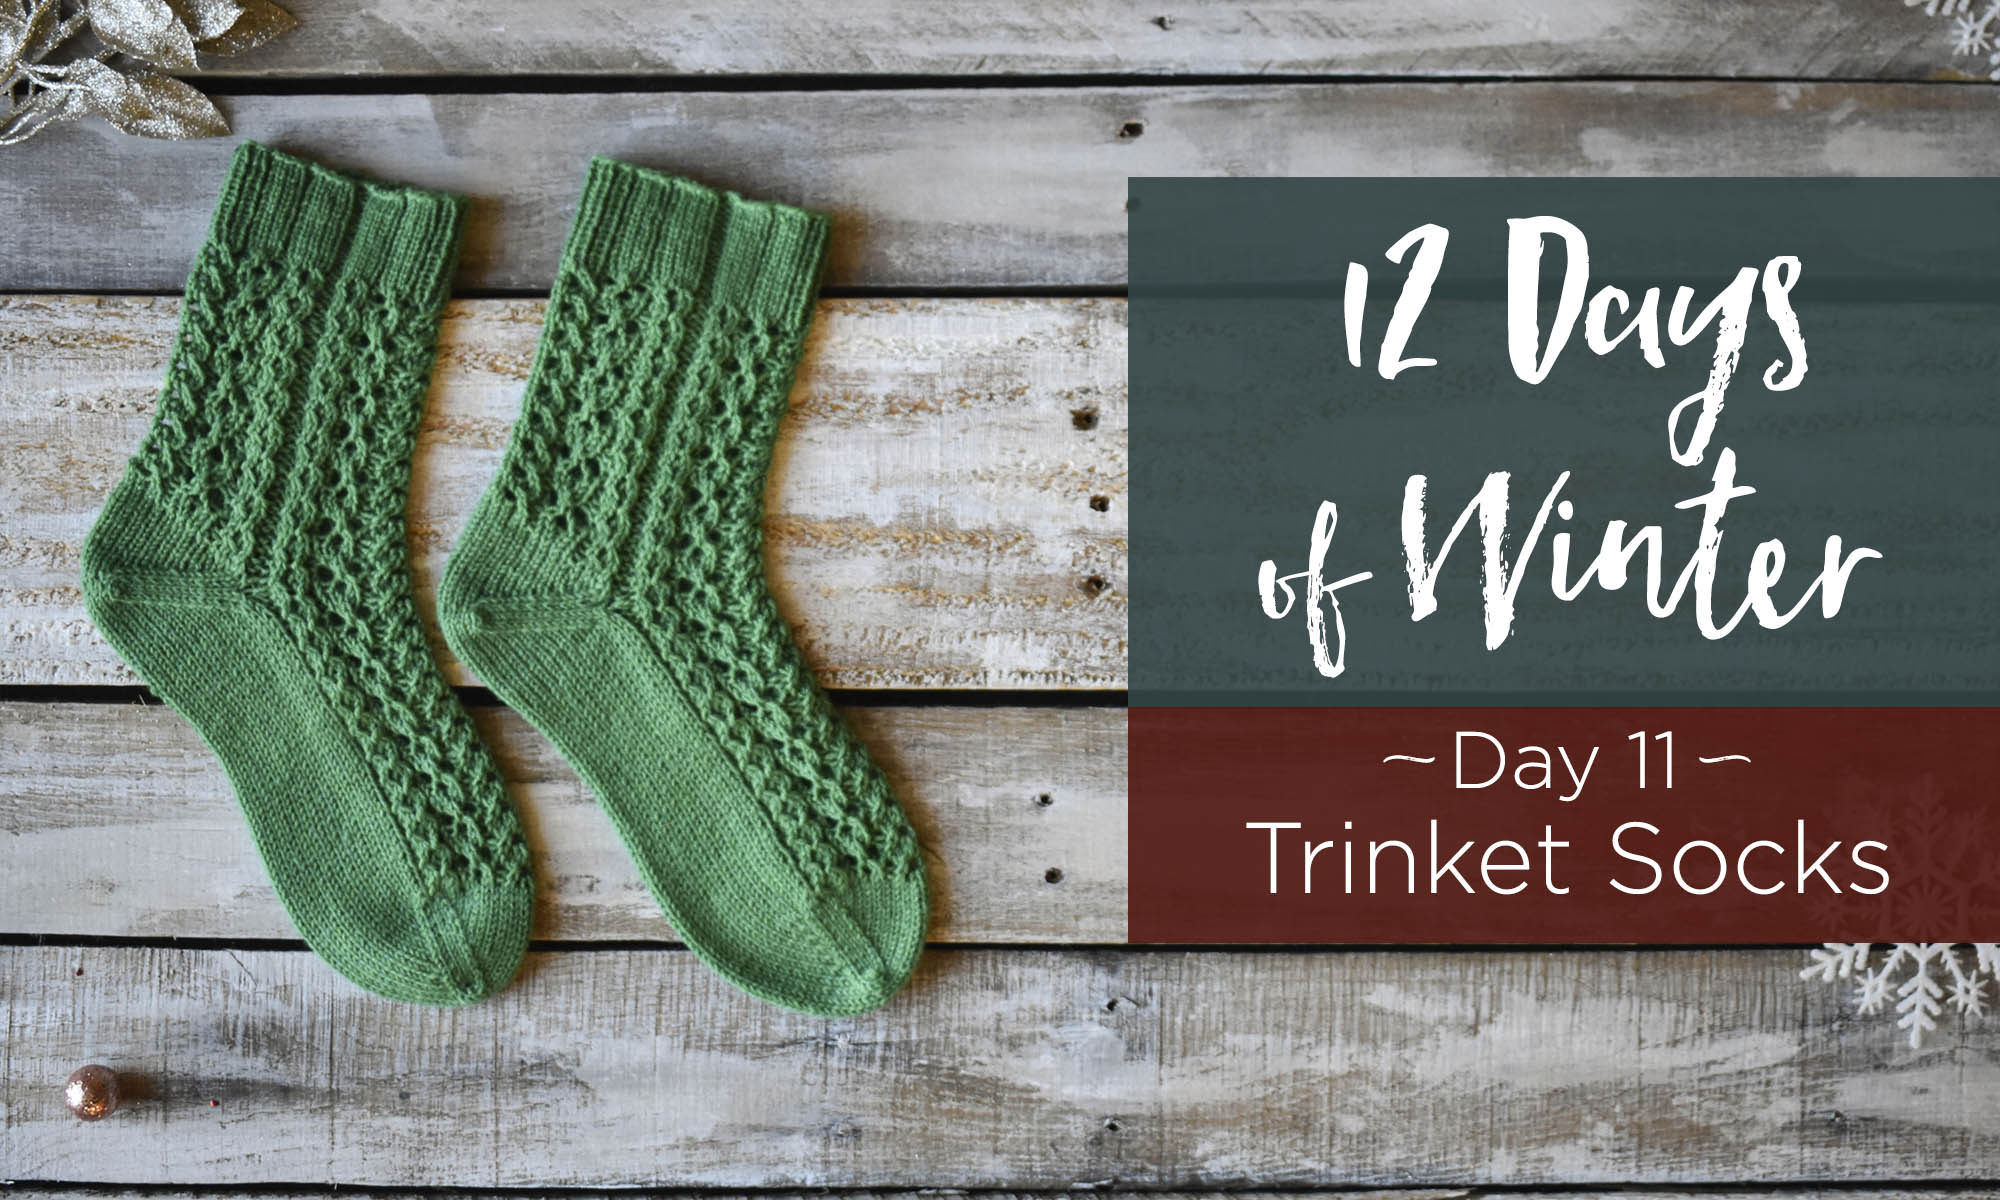
This is part 11 in a 12 part series highlighting designs from our 12 Days of Winter, Series 3 Edition.
It’s Day 11 in the 12 Days of Winter Kit Collection. We can’t believe how quickly time seems to be going. Before we dive into today’s kit and post, I’d like to take a moment to highlight that today is Small Business Saturday. We’re right in the midst of what is arguably the biggest shopping period of the year. As you gear up for the holiday season, don’t forget to support your local small businesses. For those of us who love all things yarny, it’s the perfect day to show some support to your local yarn stores. Without them, we wouldn’t be a business at all! Local yarn stores are front and center of the fiber community – offering a space to learn, socialize, and of course, purchase some yummy yarn.
And now, onto today’s kit (which you can find at your local yarn store).
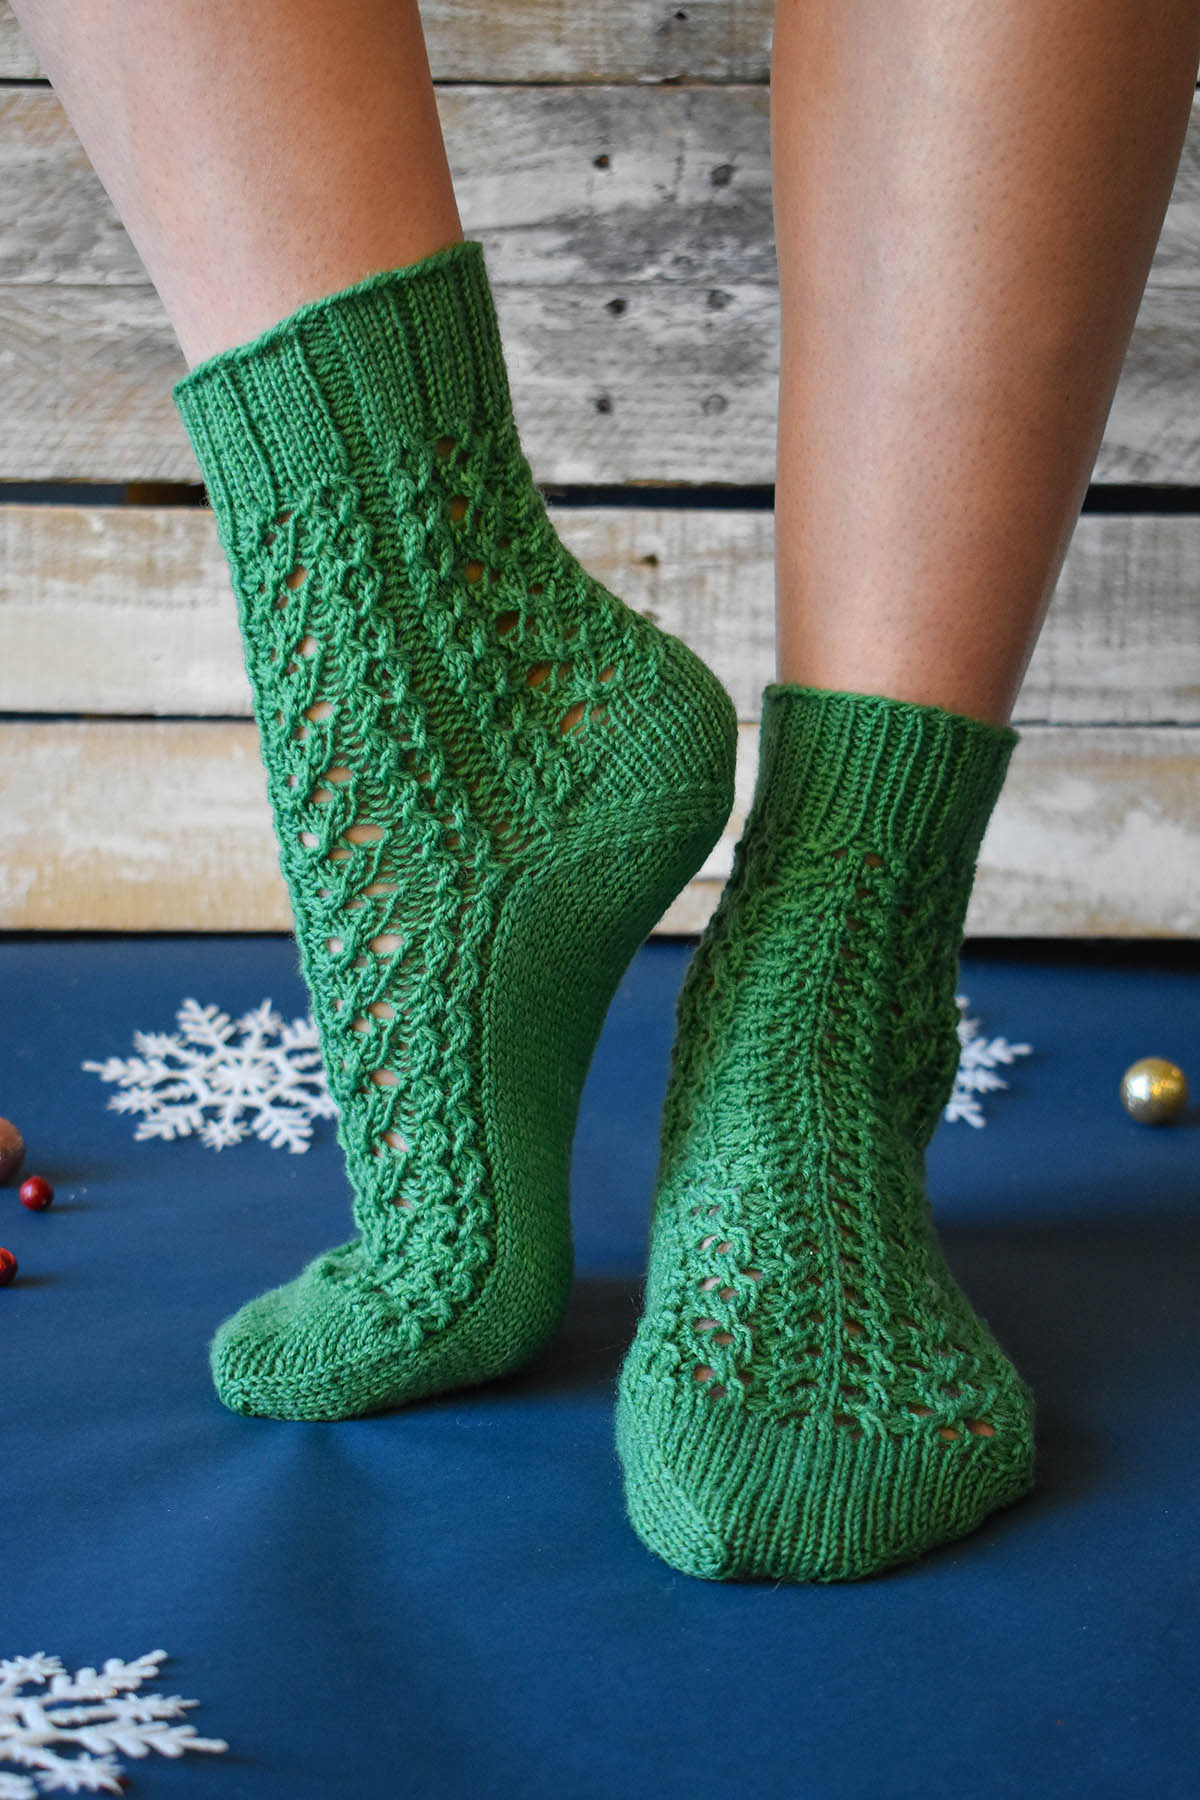
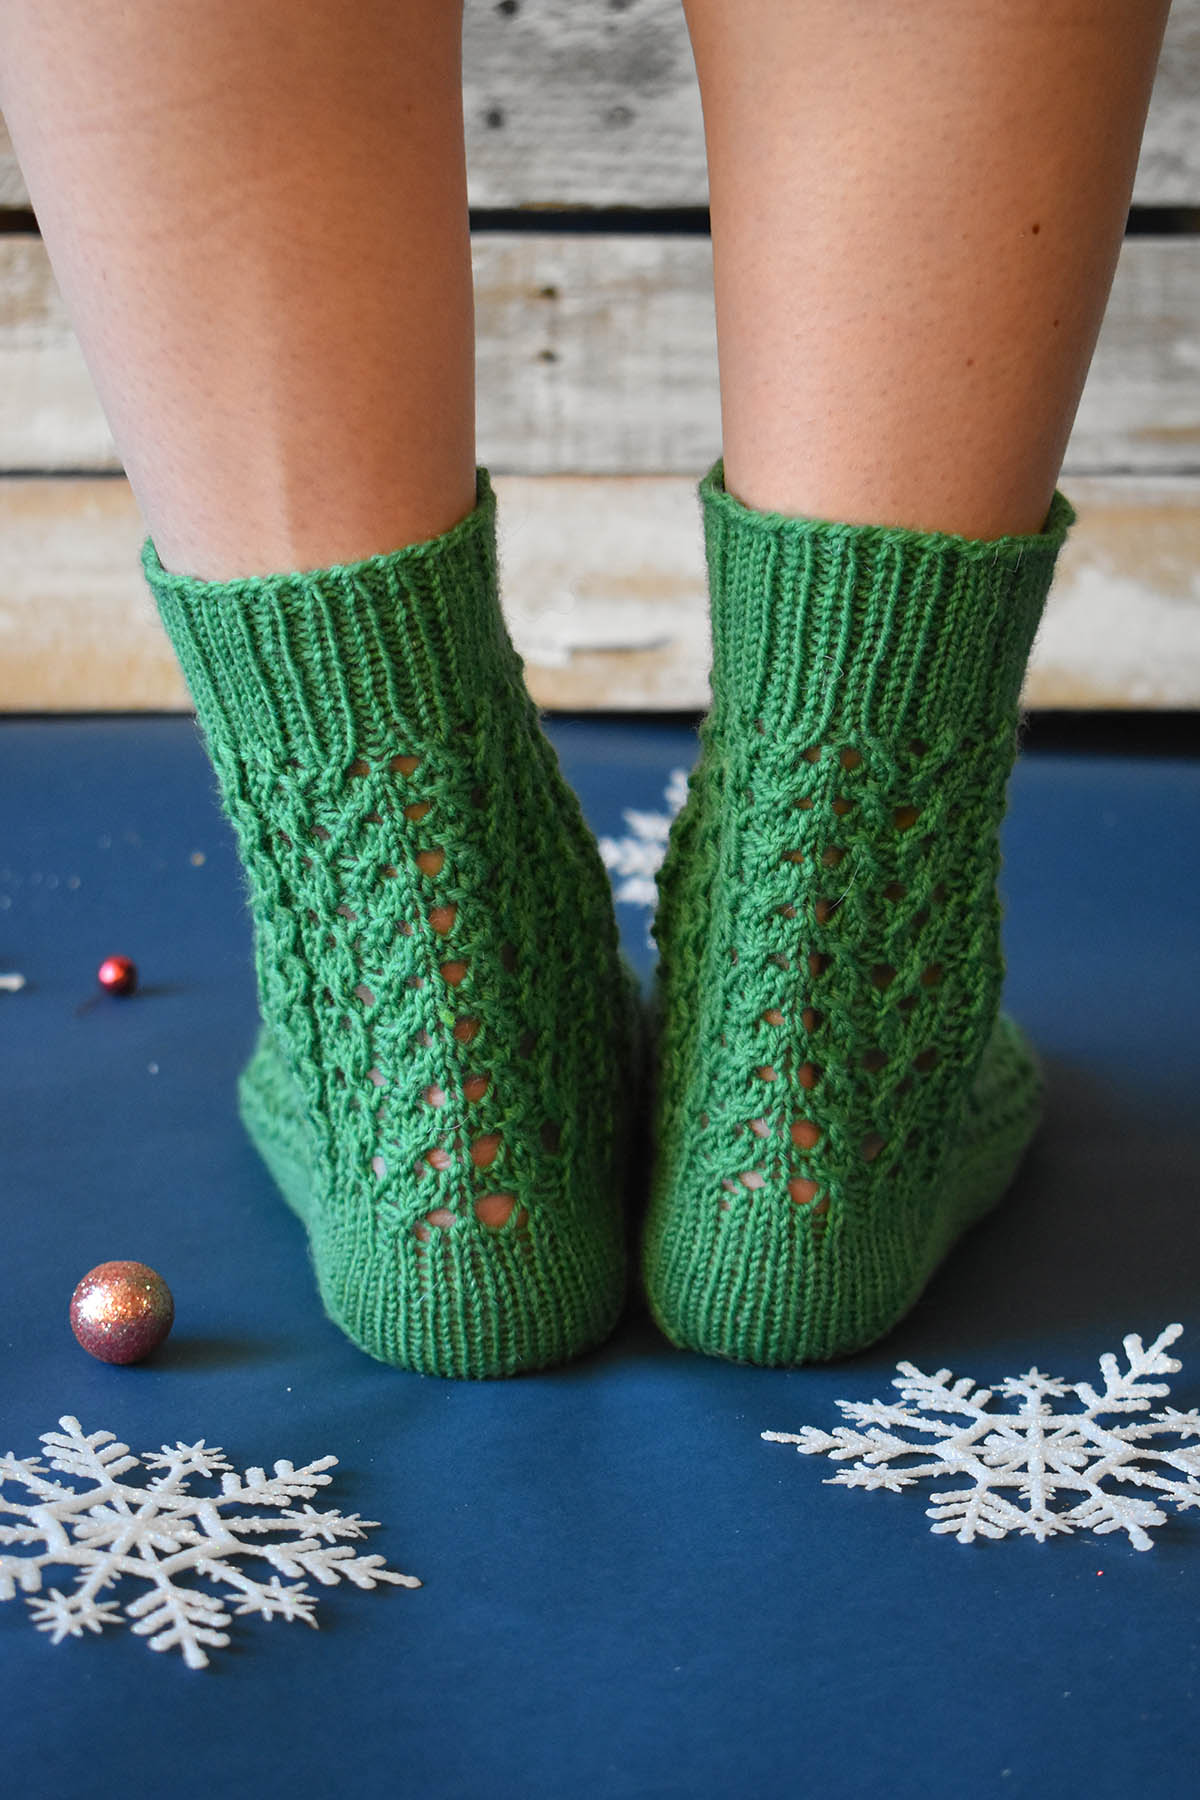
Today we’re excited to introduce the Trinket Socks, knit up in deliciously soft, yet strong, Bella Cash. This is a great all-around yarn, but here in the office, it has become a favorite for knitting socks. Thanks to the superwash merino, they’re machine-washable and easy to care for. Cashmere adds a touch of luxury, and nylon ensures these socks will be strong enough to last for ages. These socks feature a lace and twisted stitch pattern that is addictive to knit, and quick to work up.
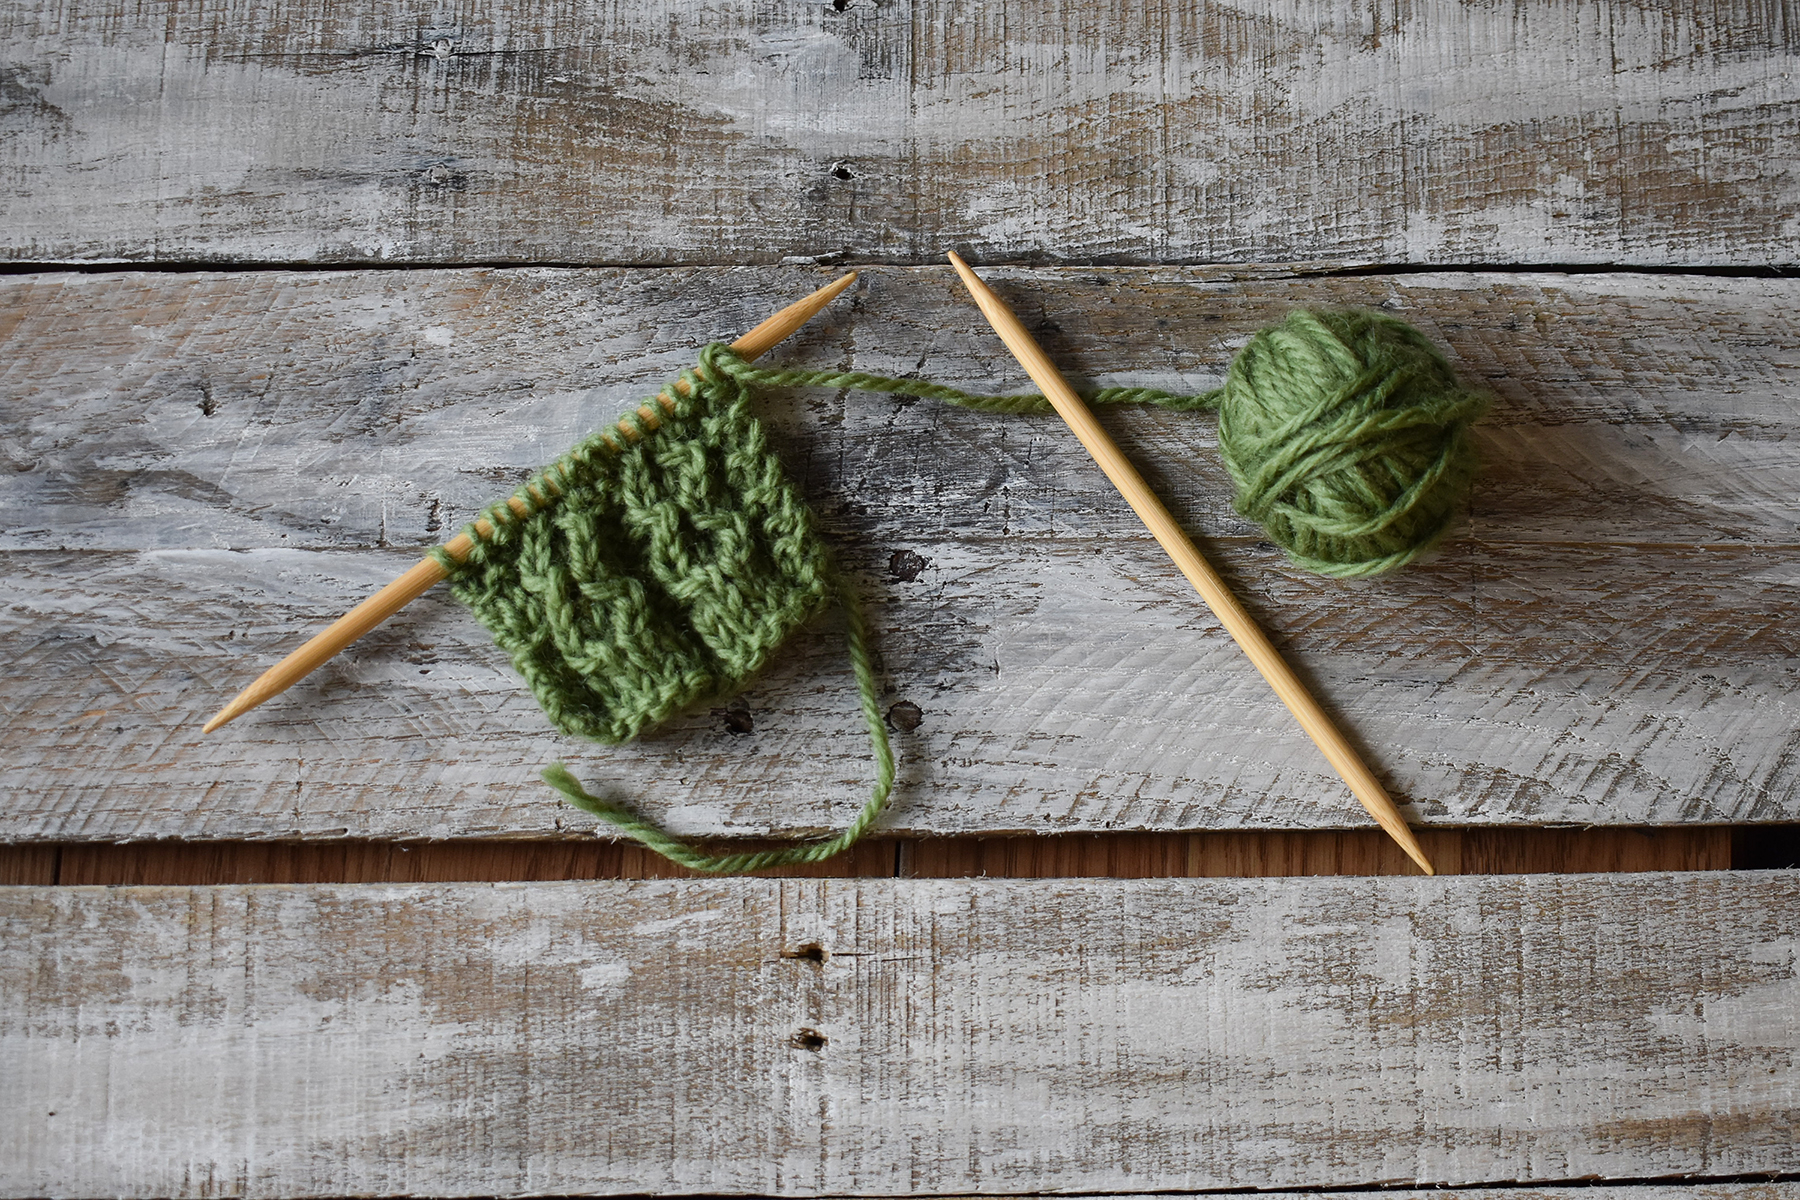
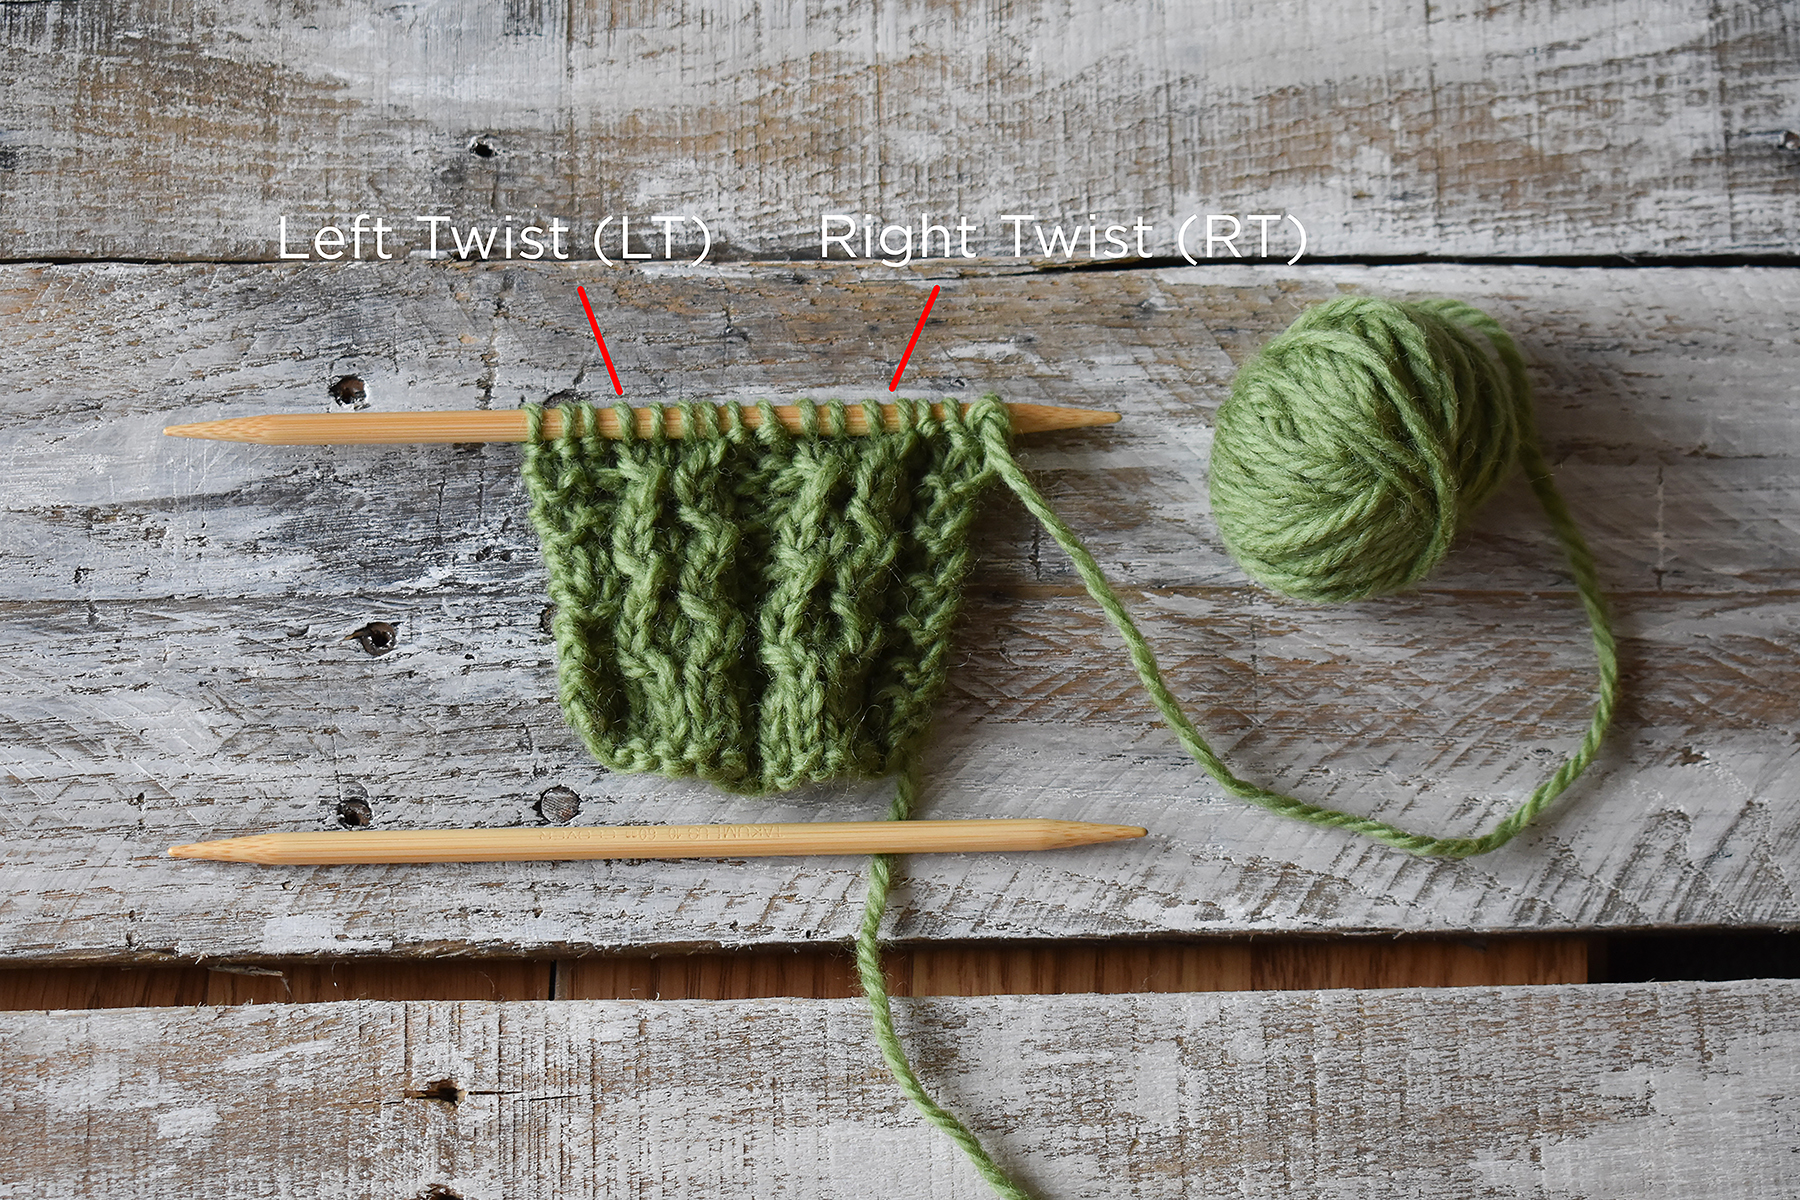
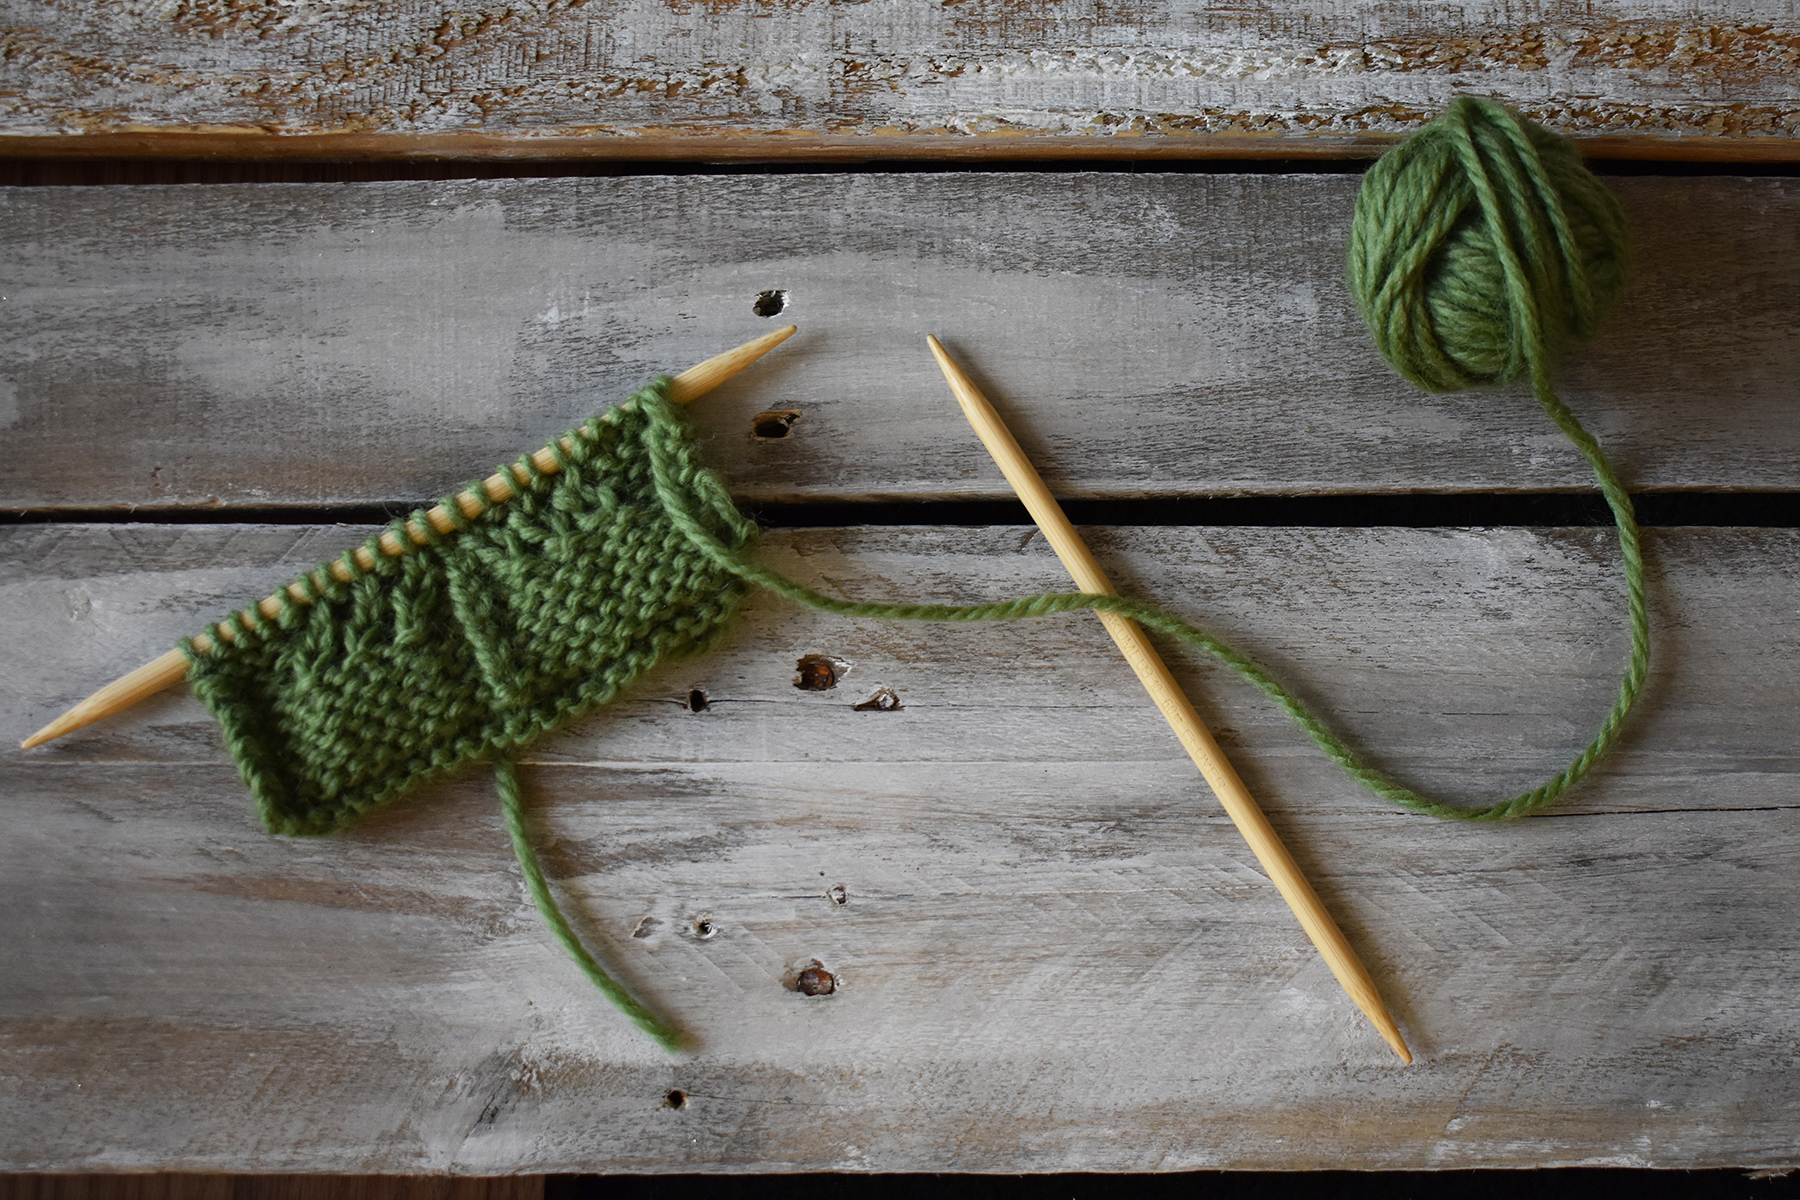
Speaking of twisted stitches – we have a tutorial to share today. If you can recall from Day 7 of Winter (the Mountain Pines Cowl), we shared a tutorial on Right and Left Purl Twists. Today, we’ll be showing you how to knit a regular Right and Left Twist – no purling necessary. Note that for today’s tutorial, we’re using Deluxe Chunky so that it’s easier for you to see.
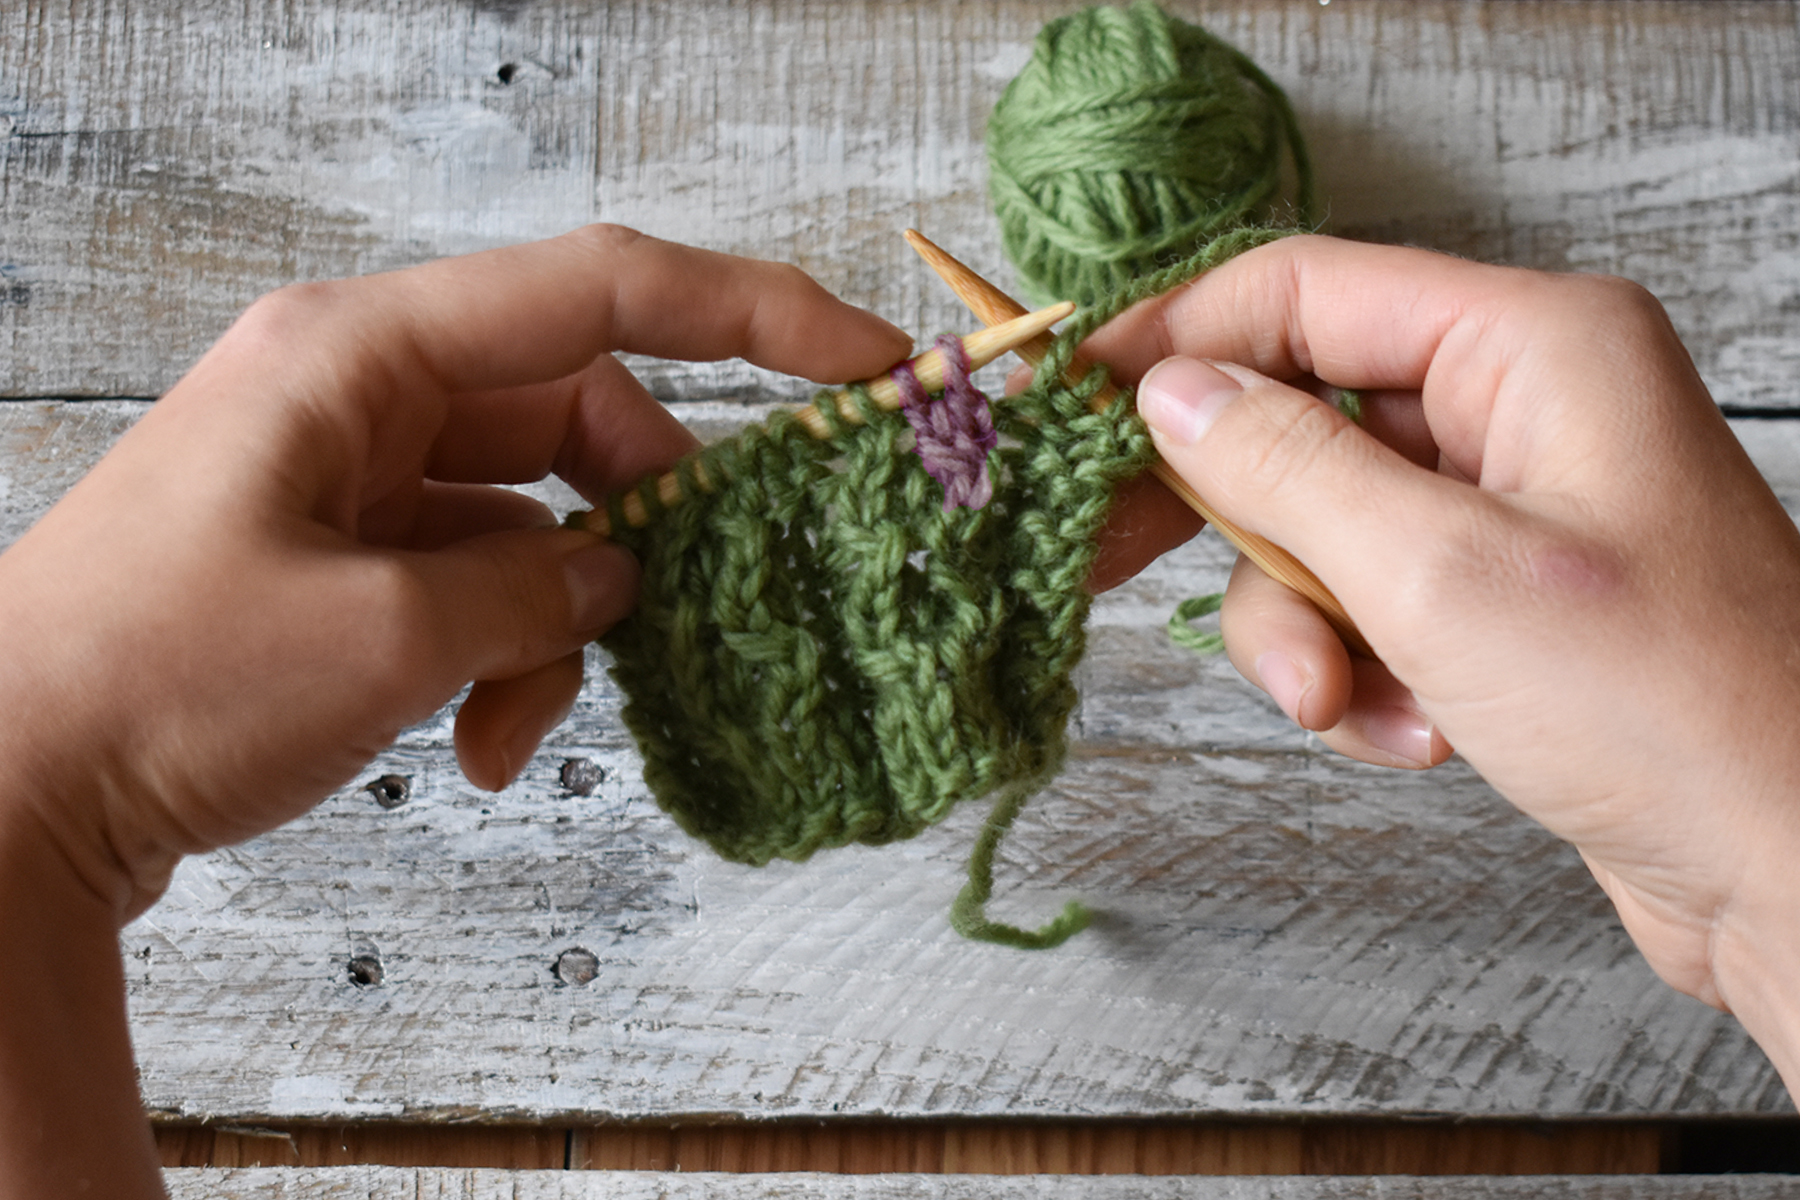
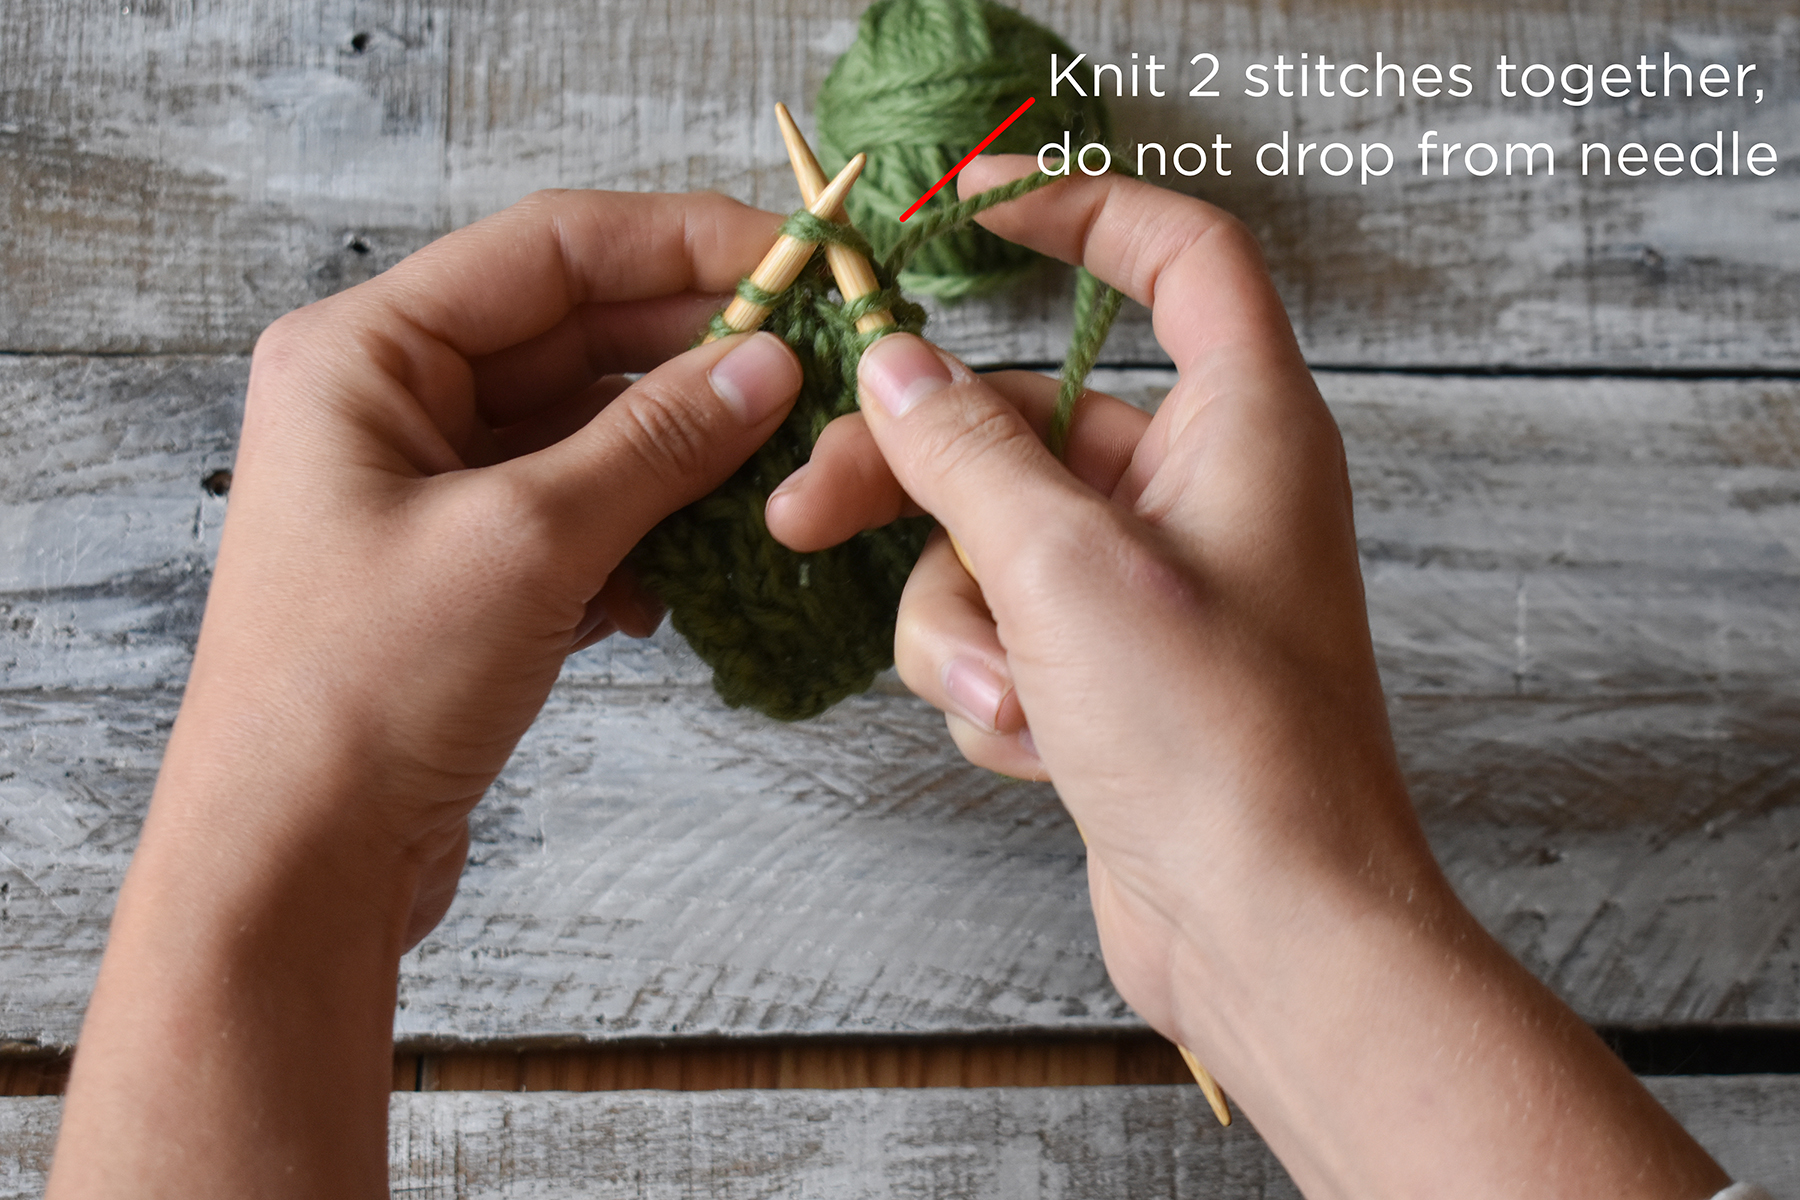
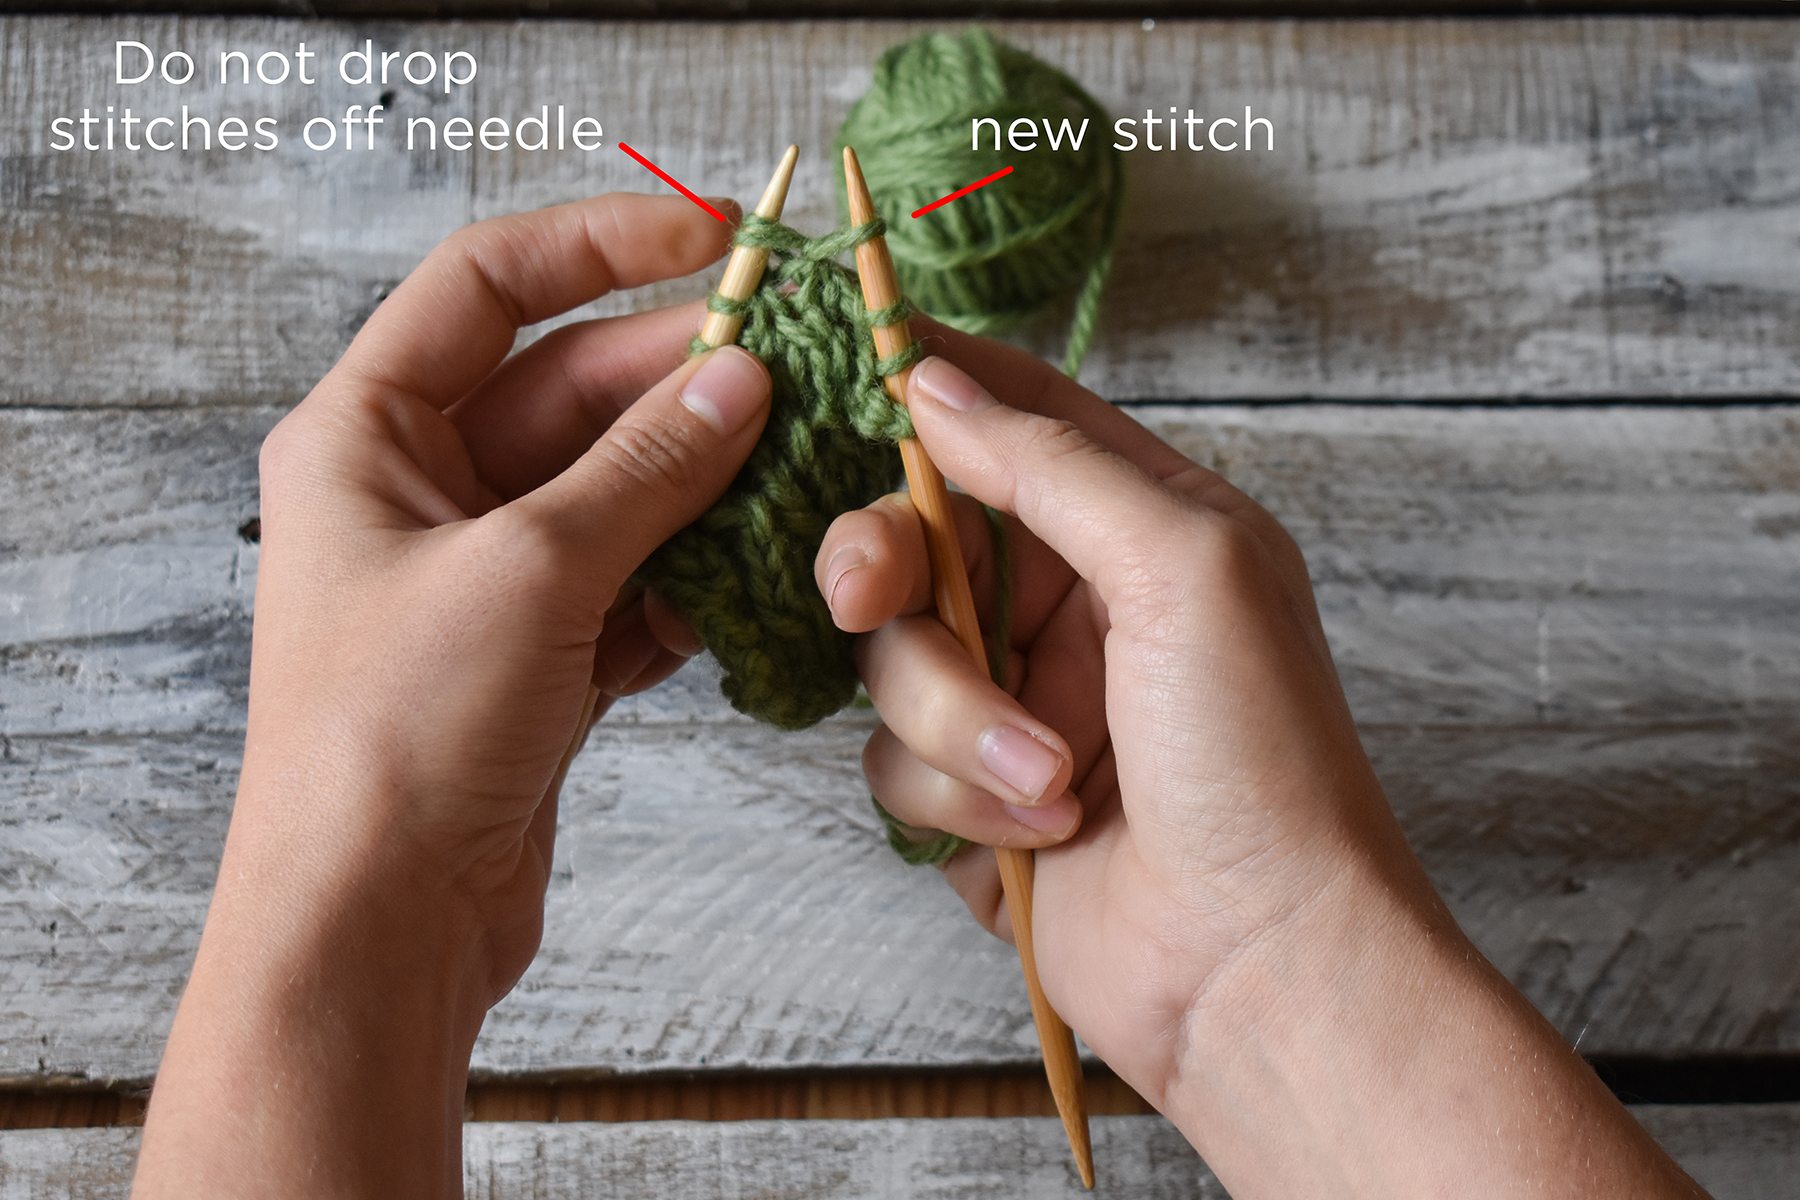
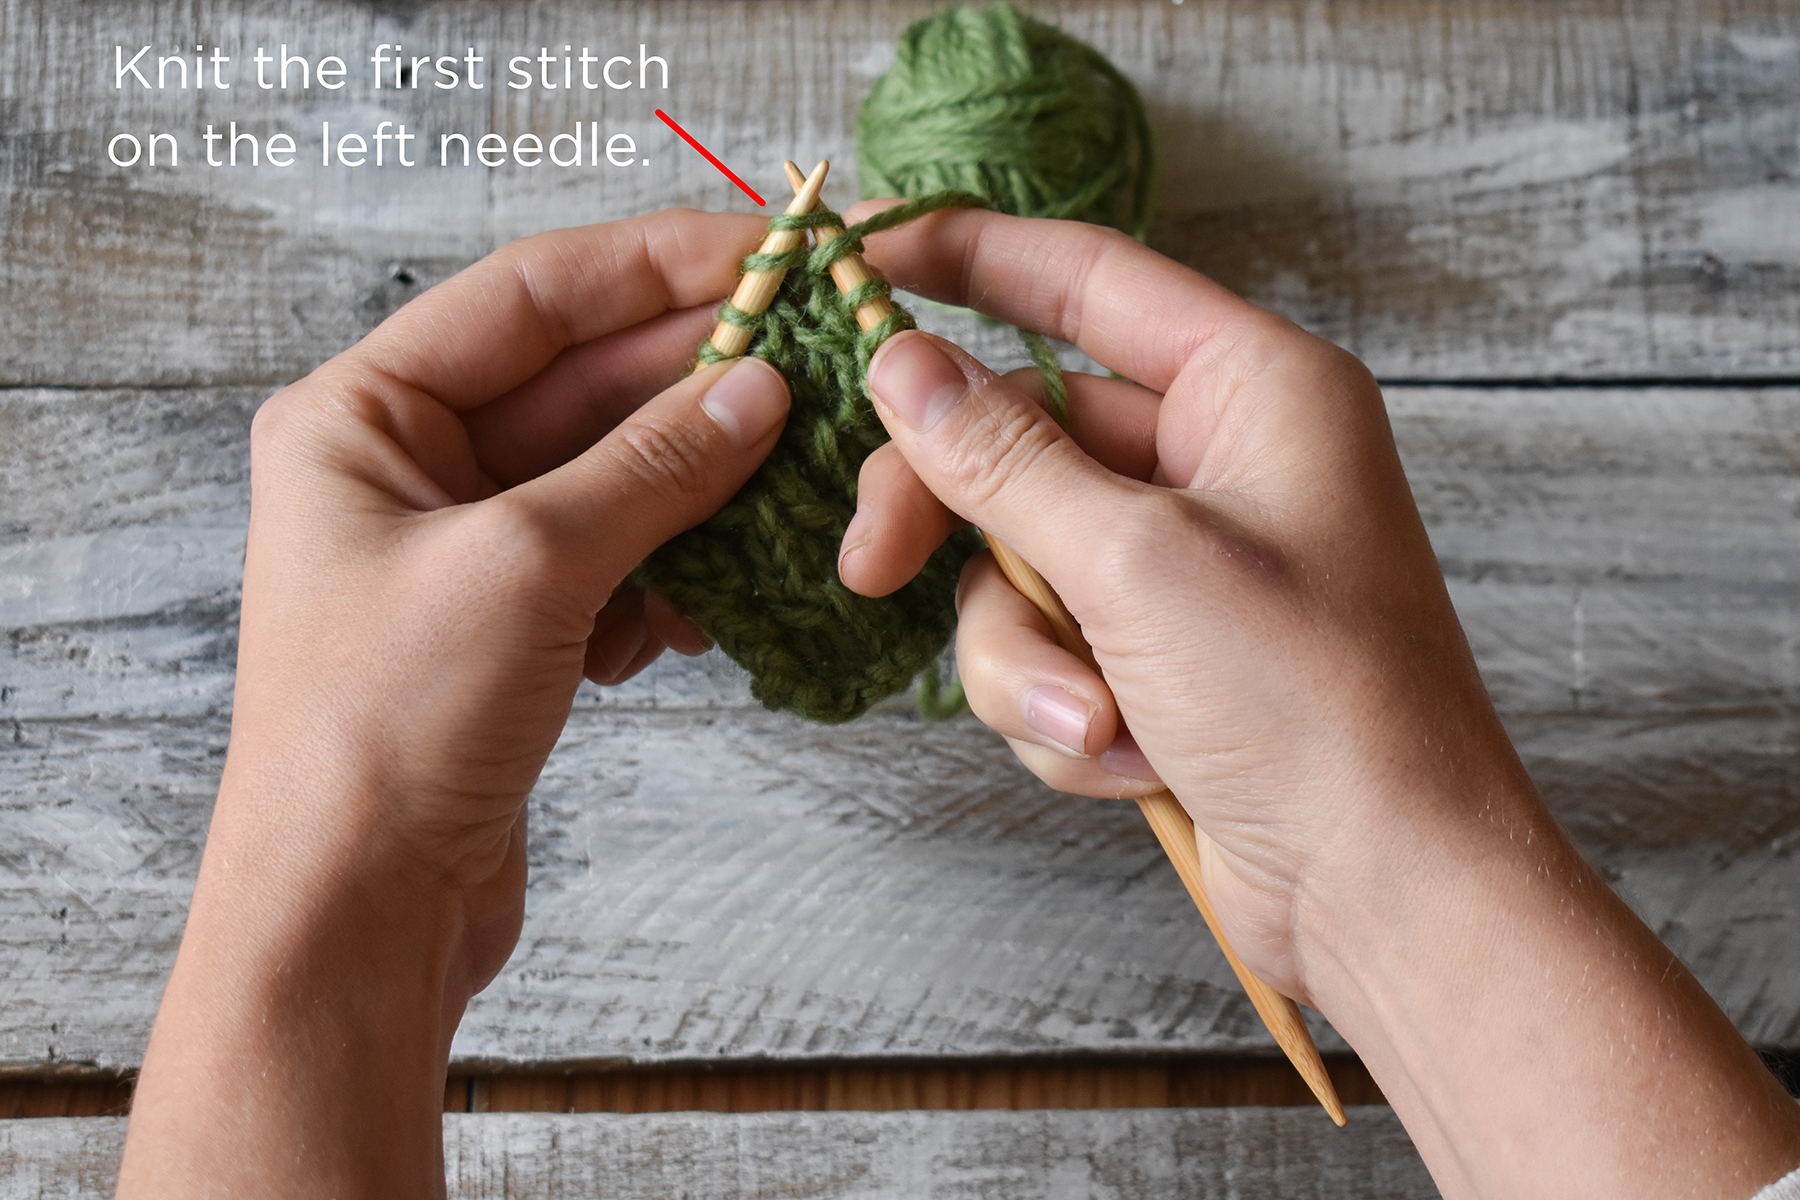
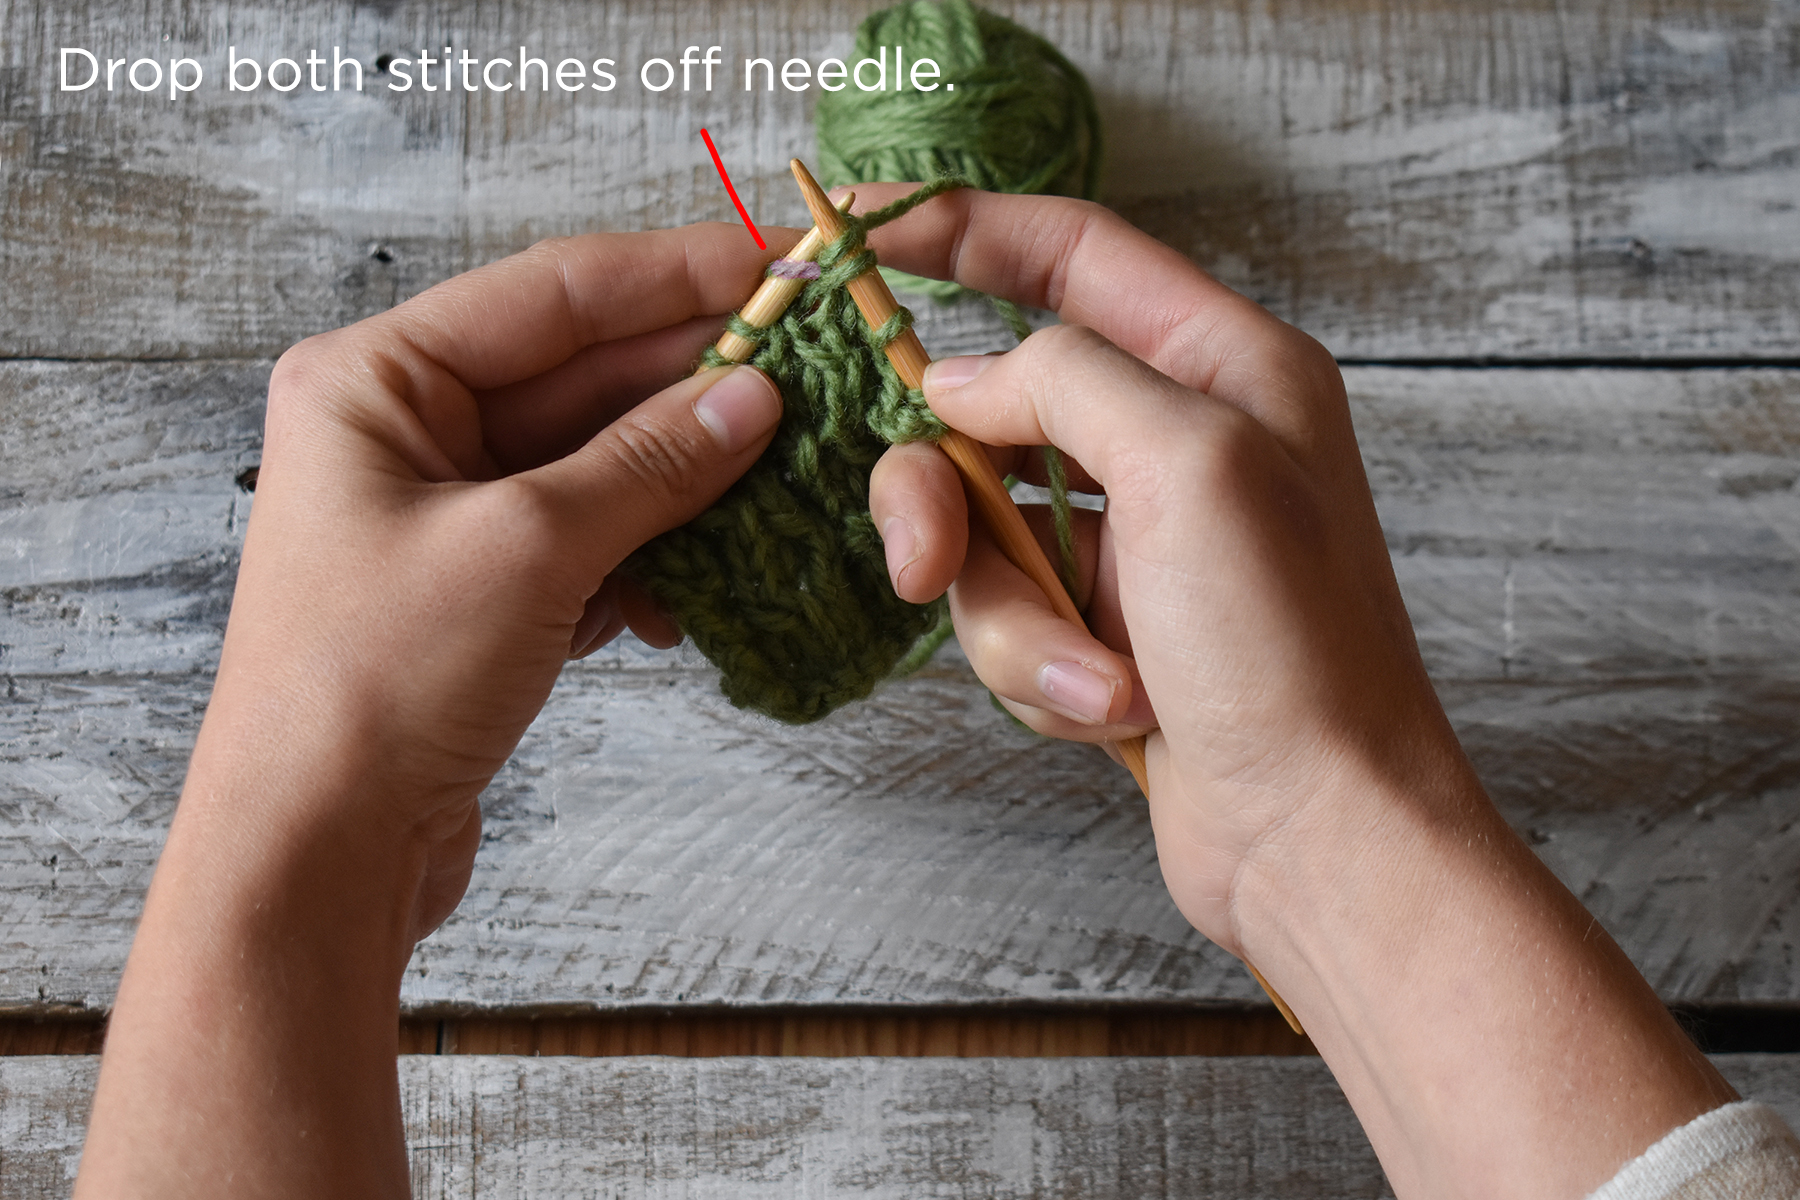
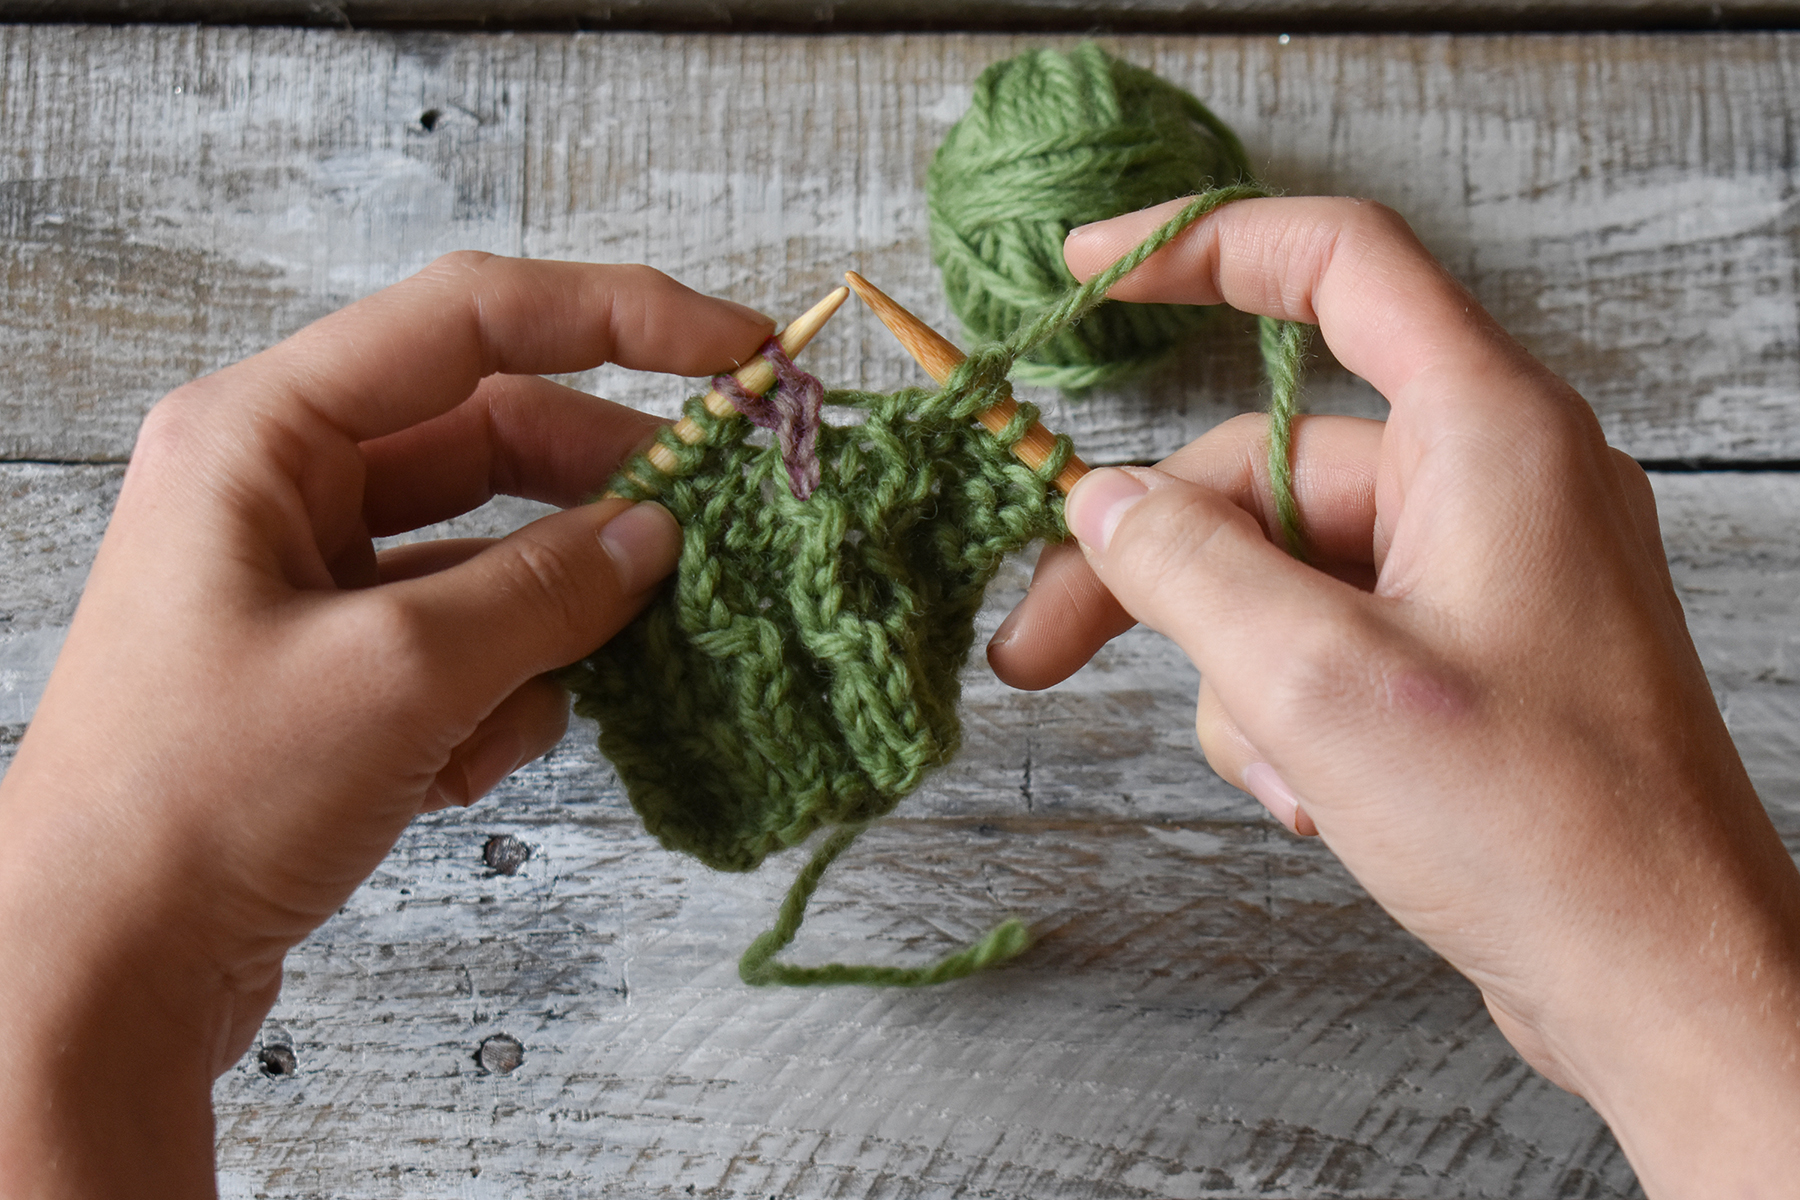
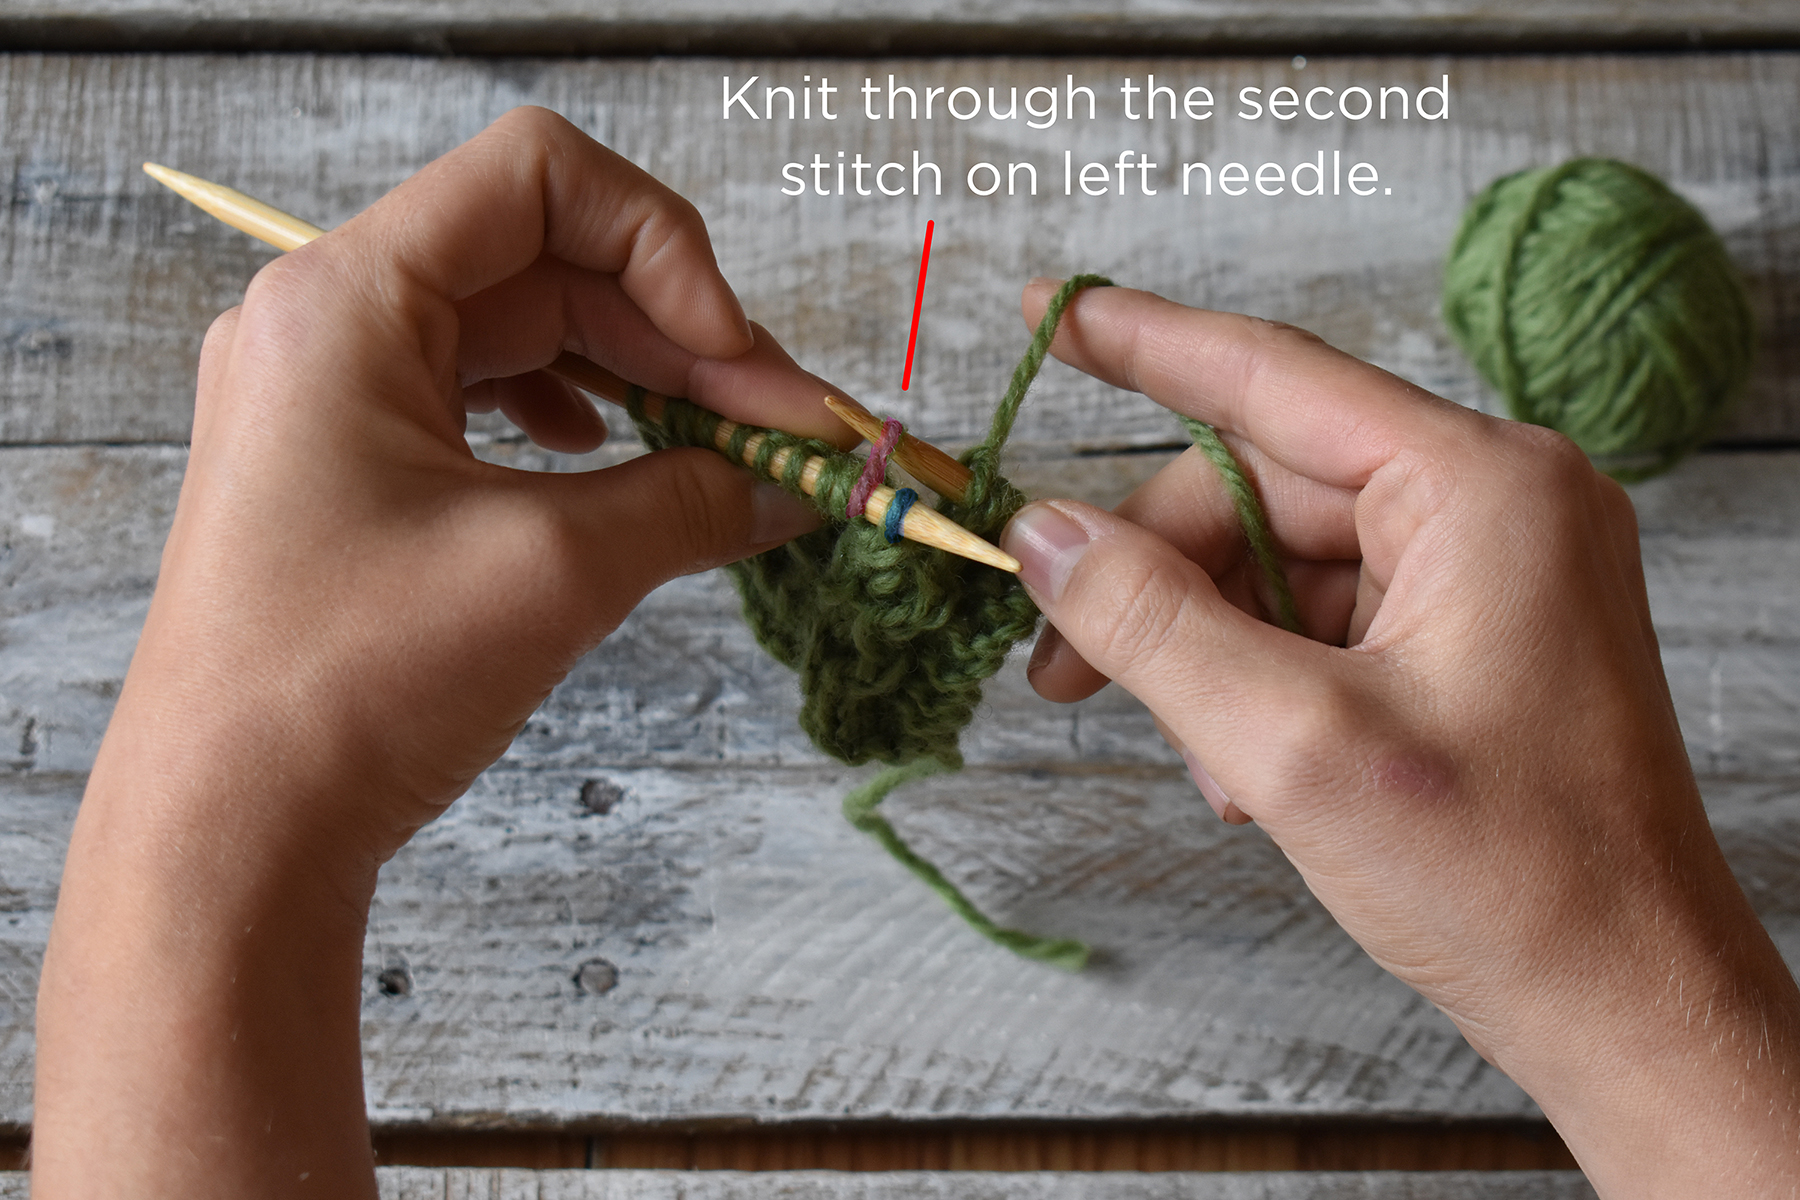
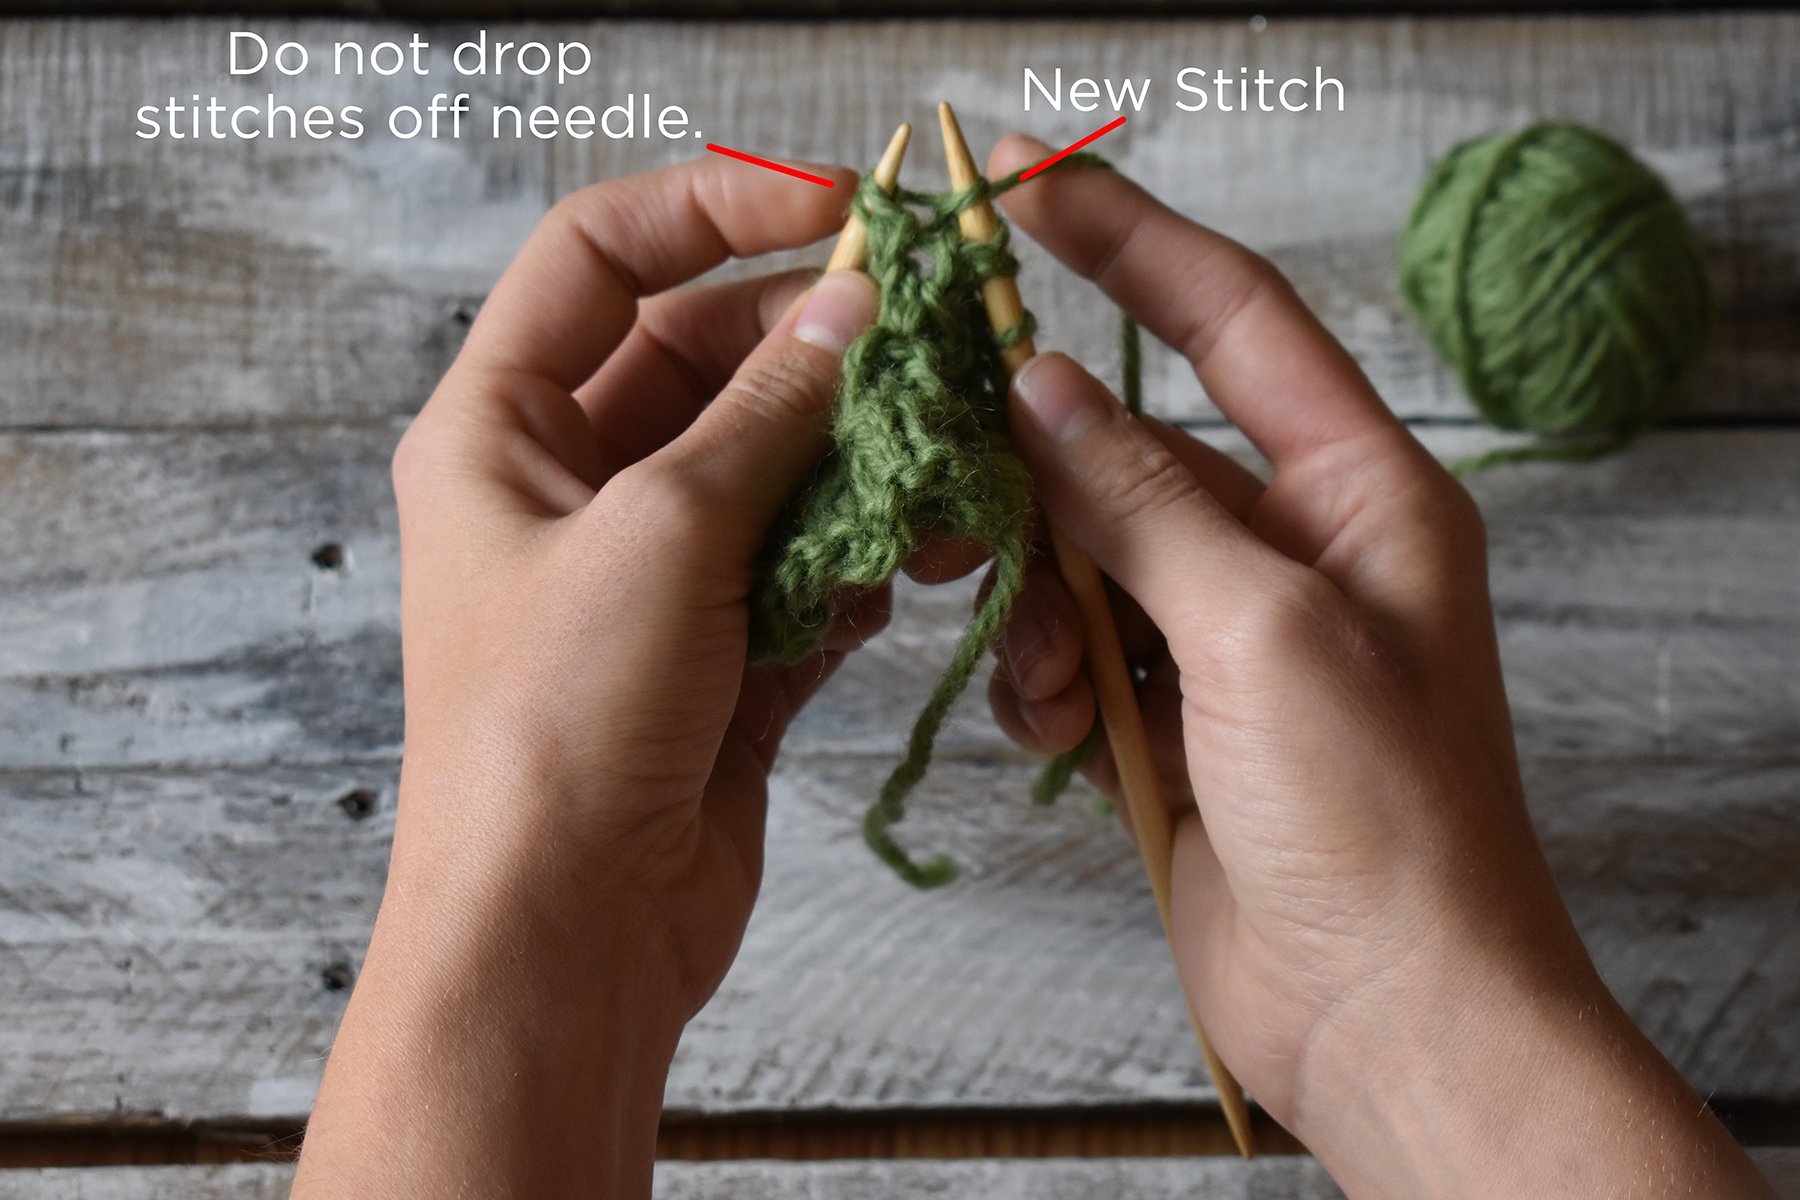
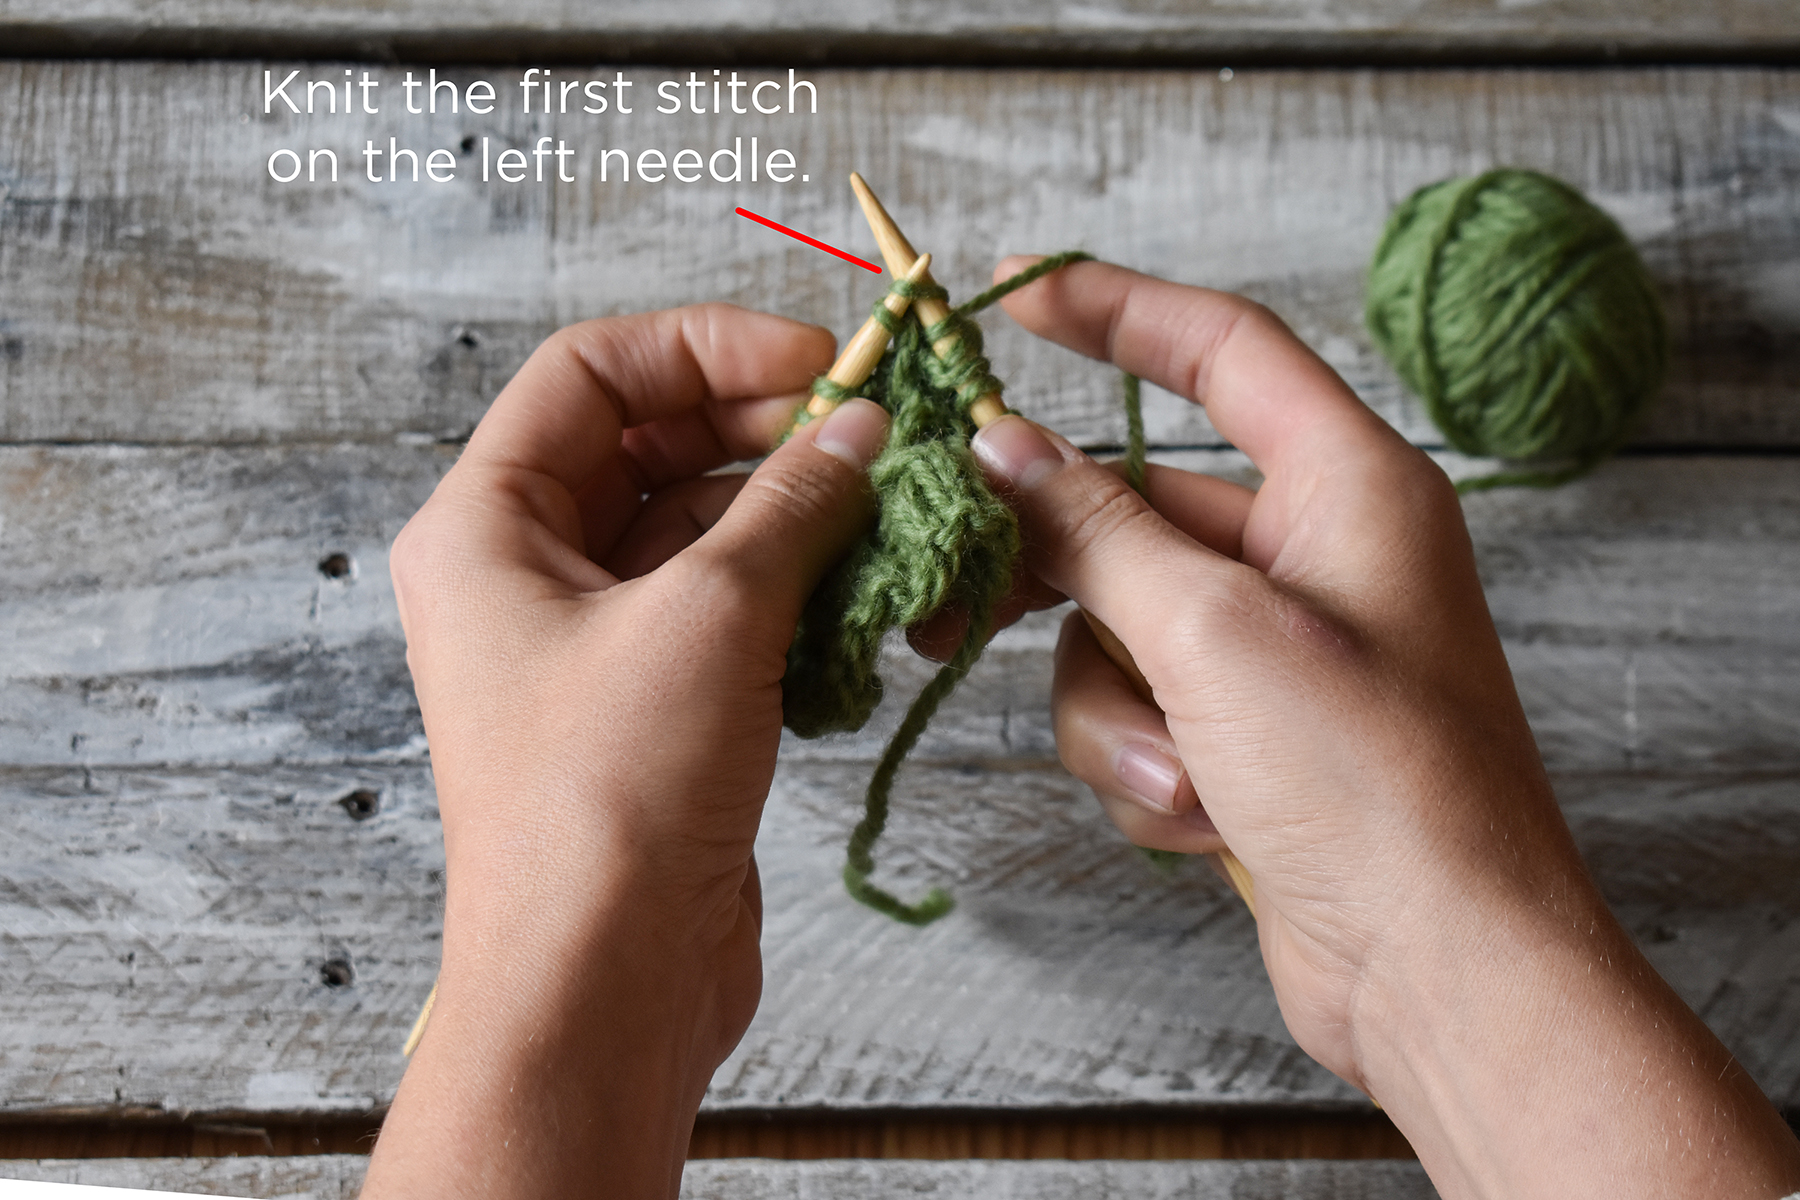
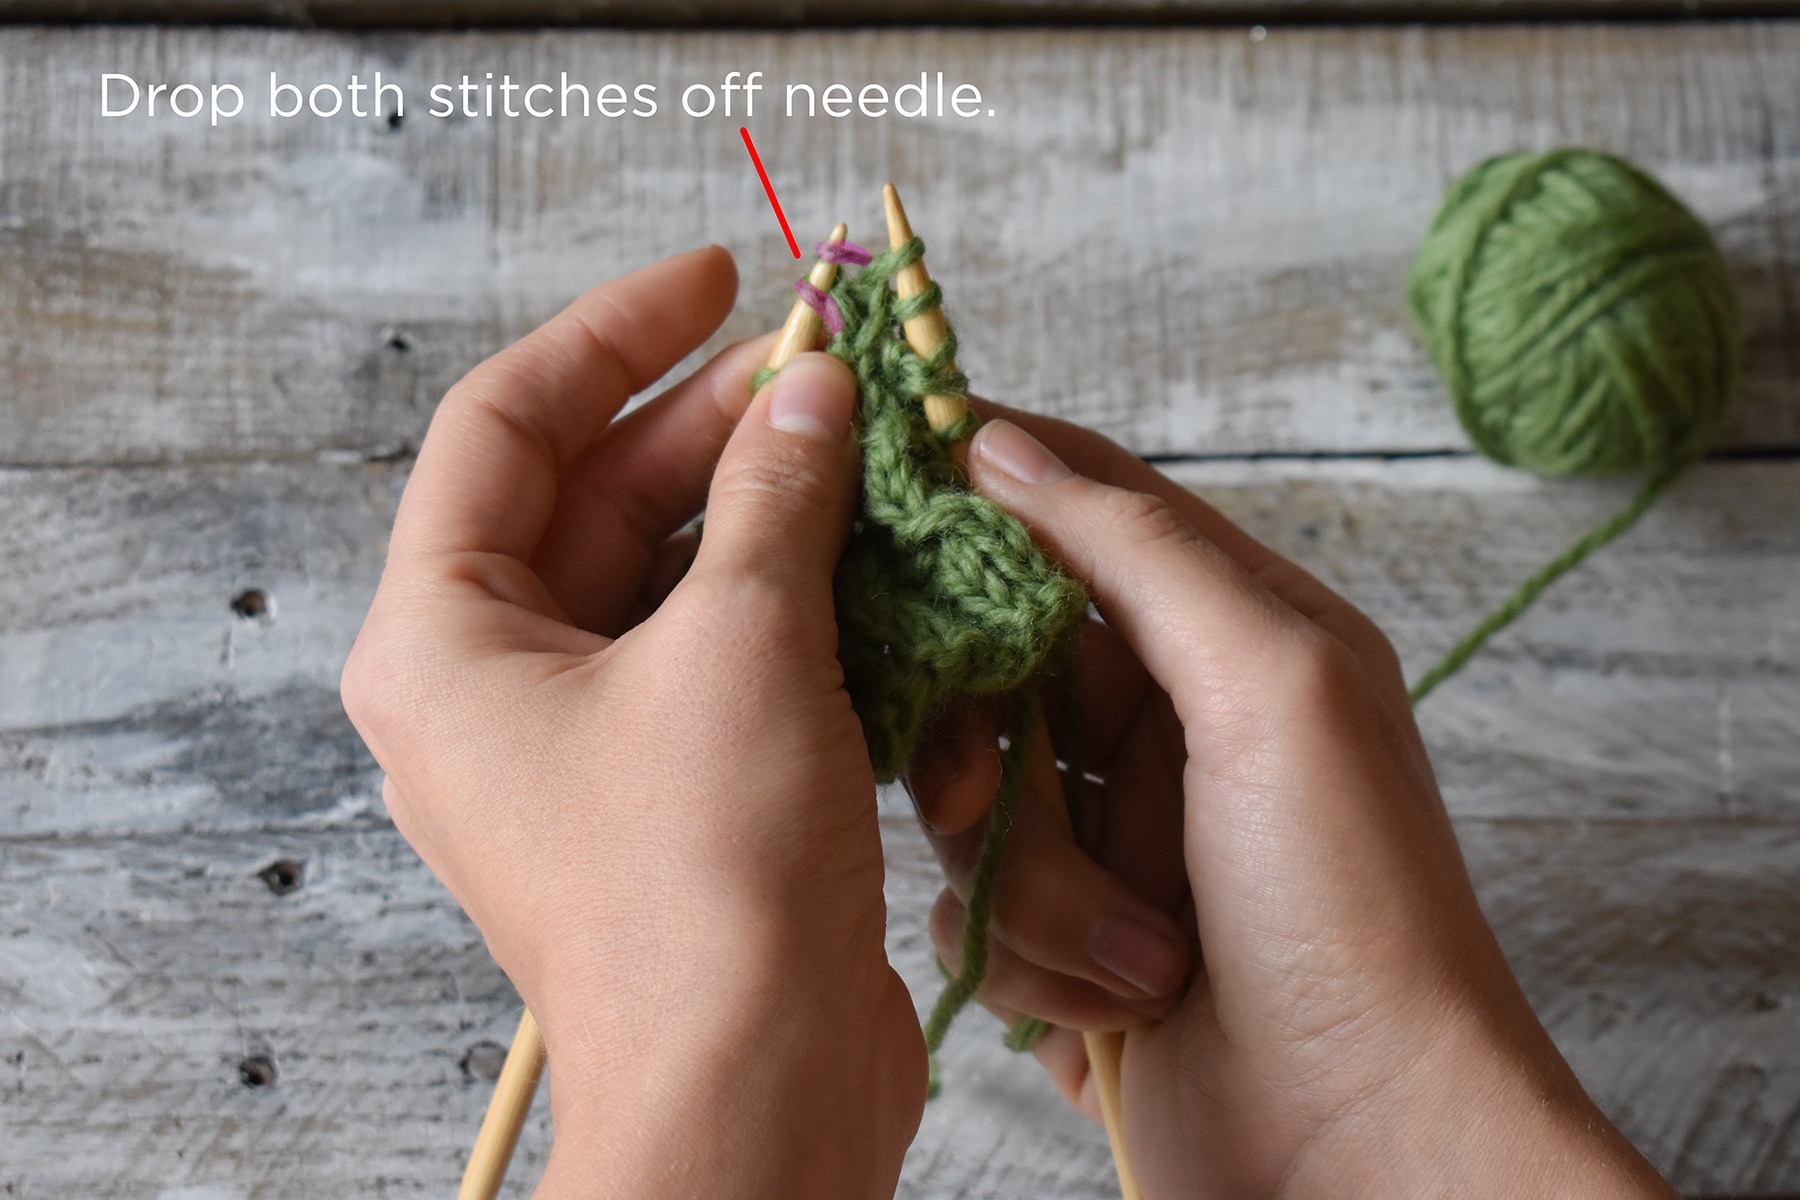
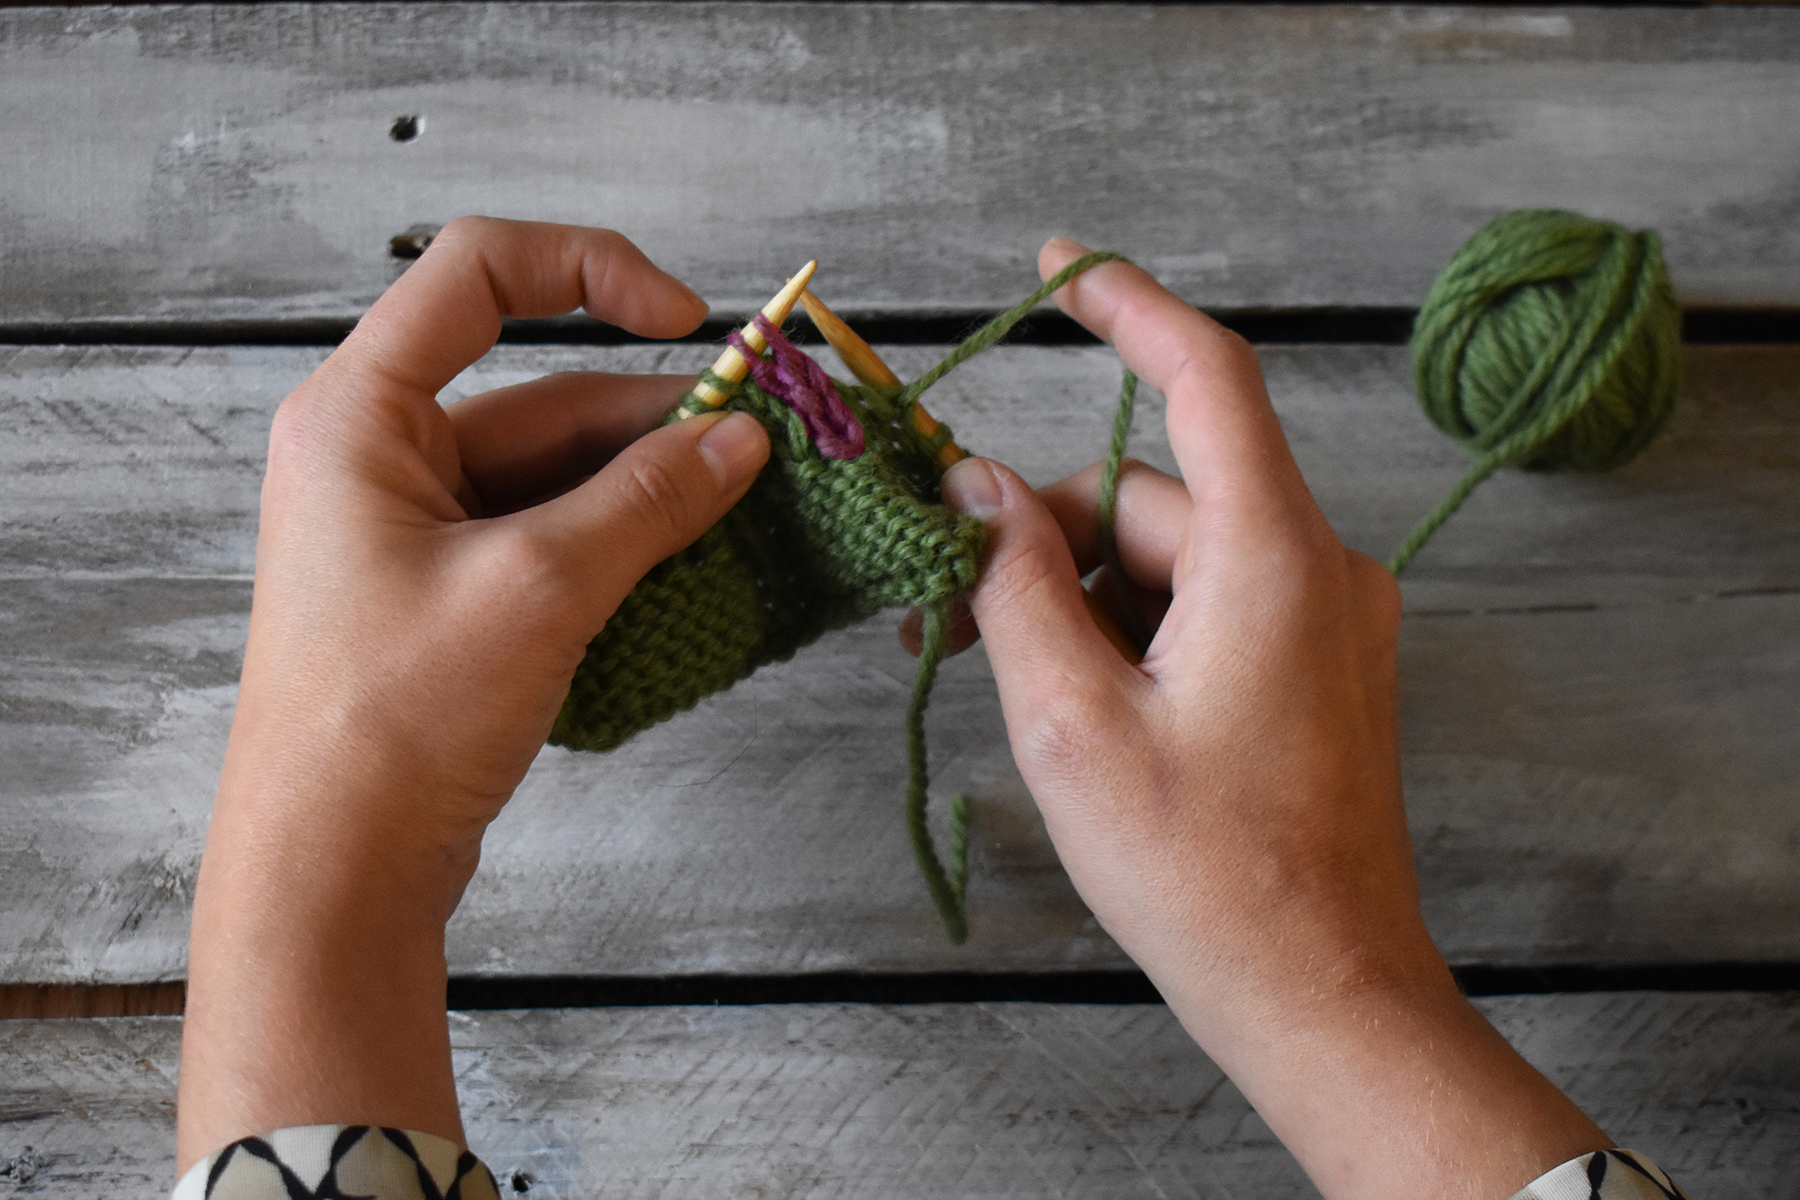
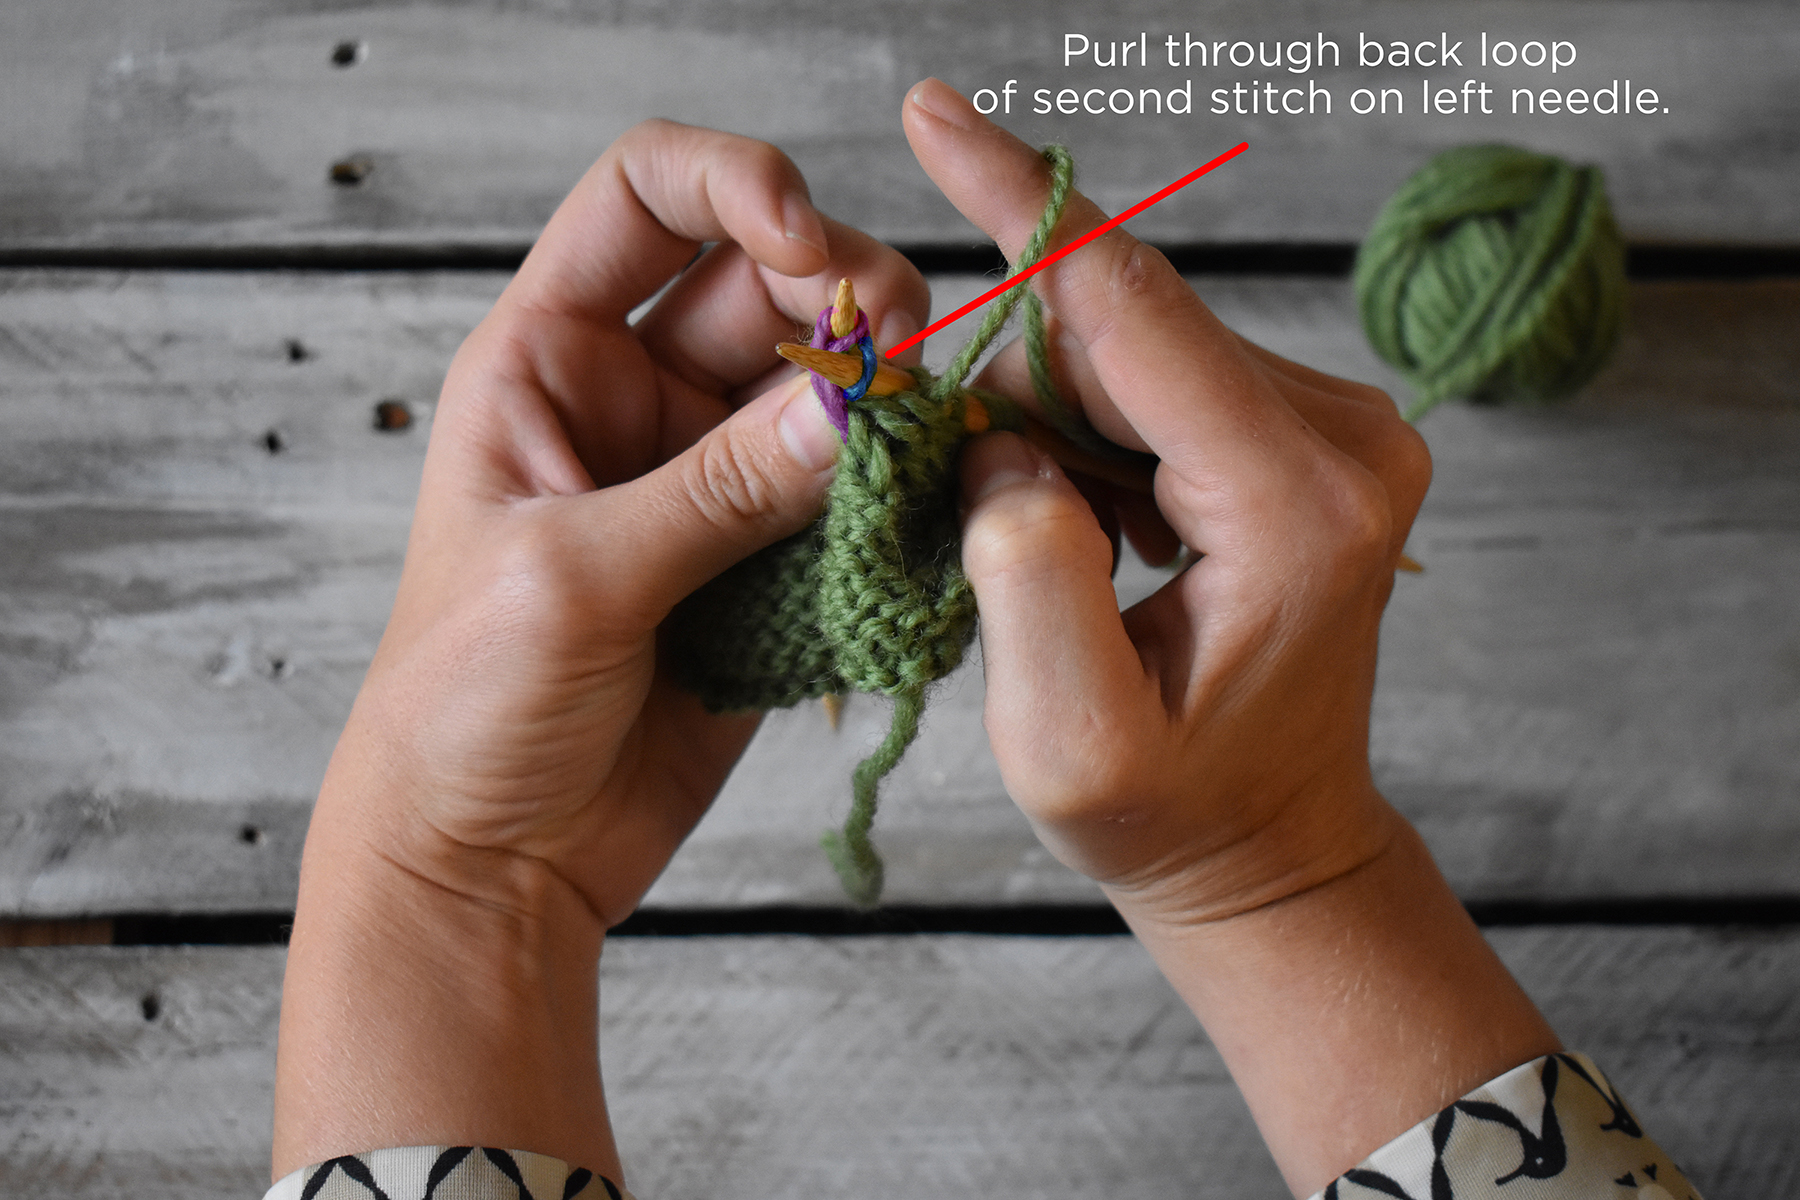
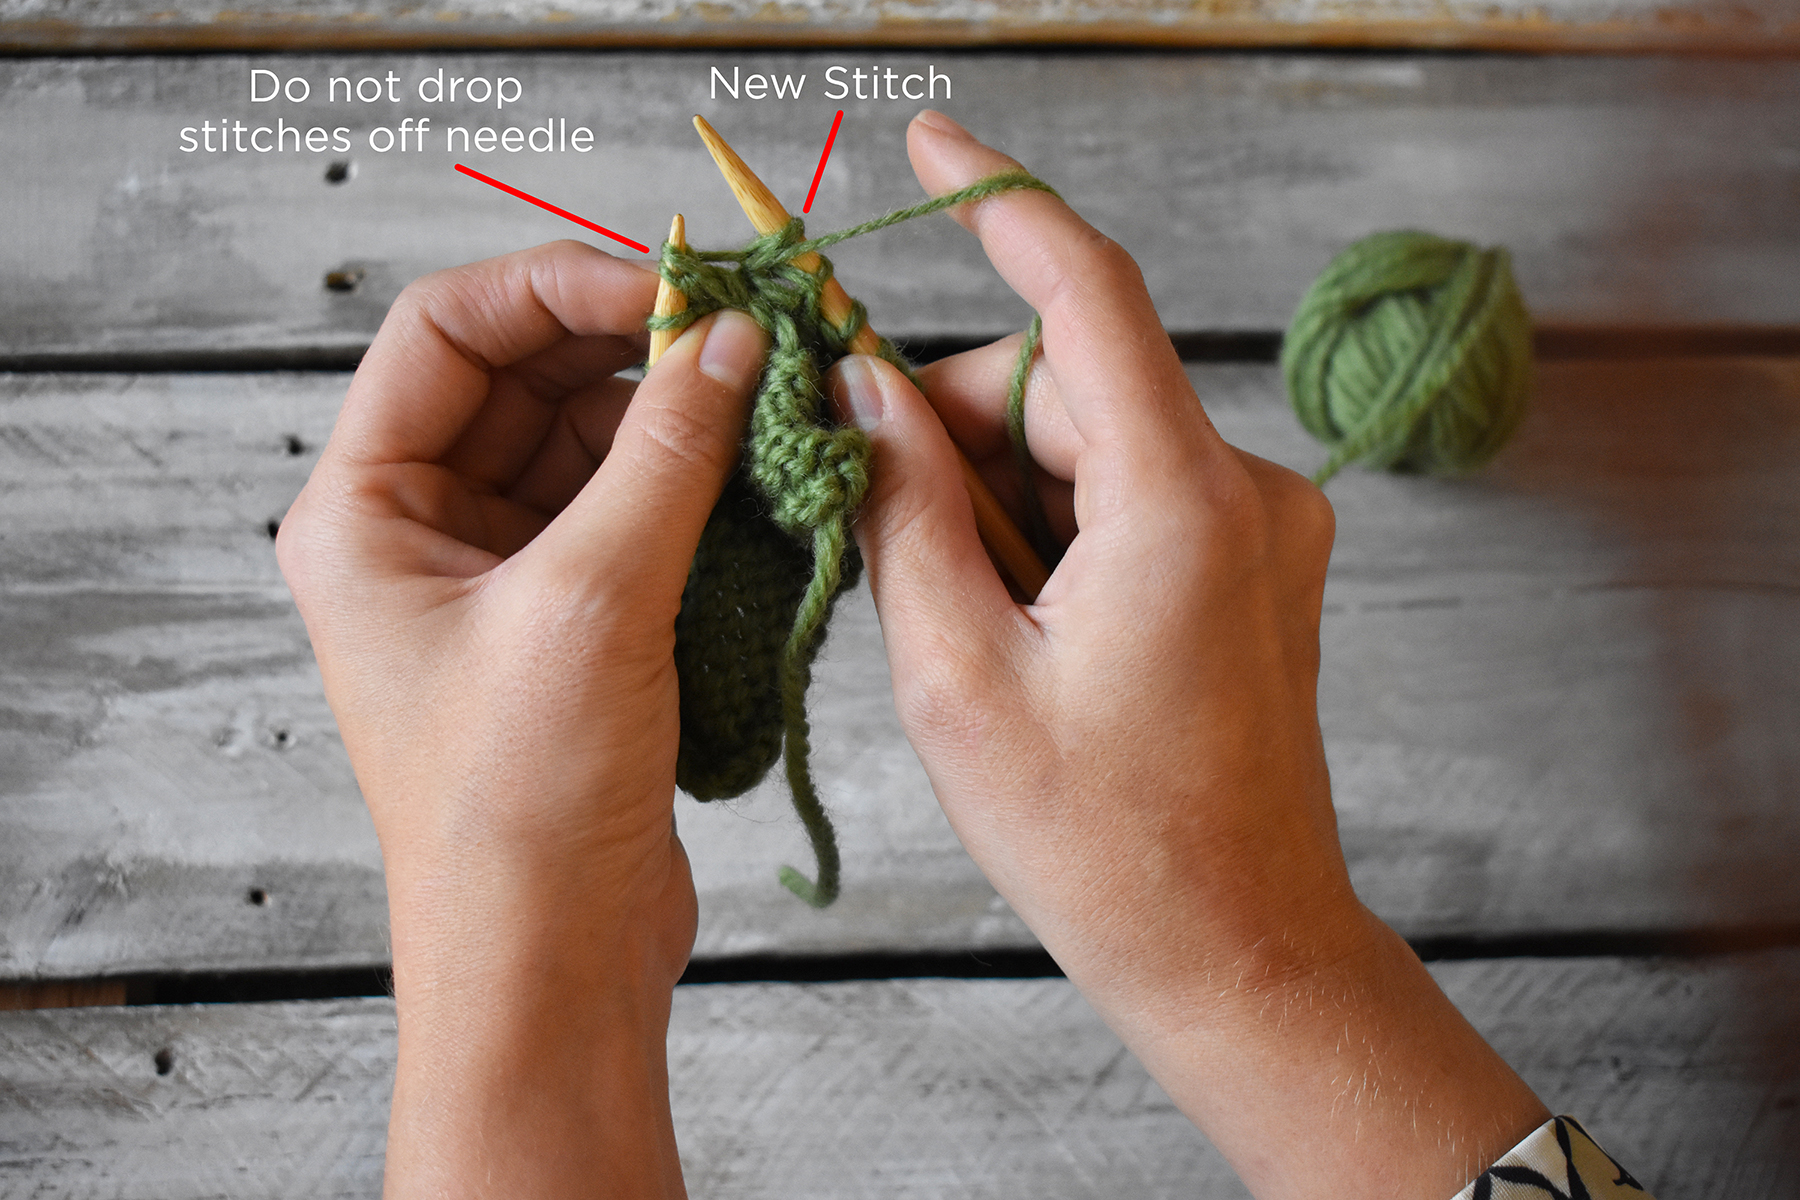
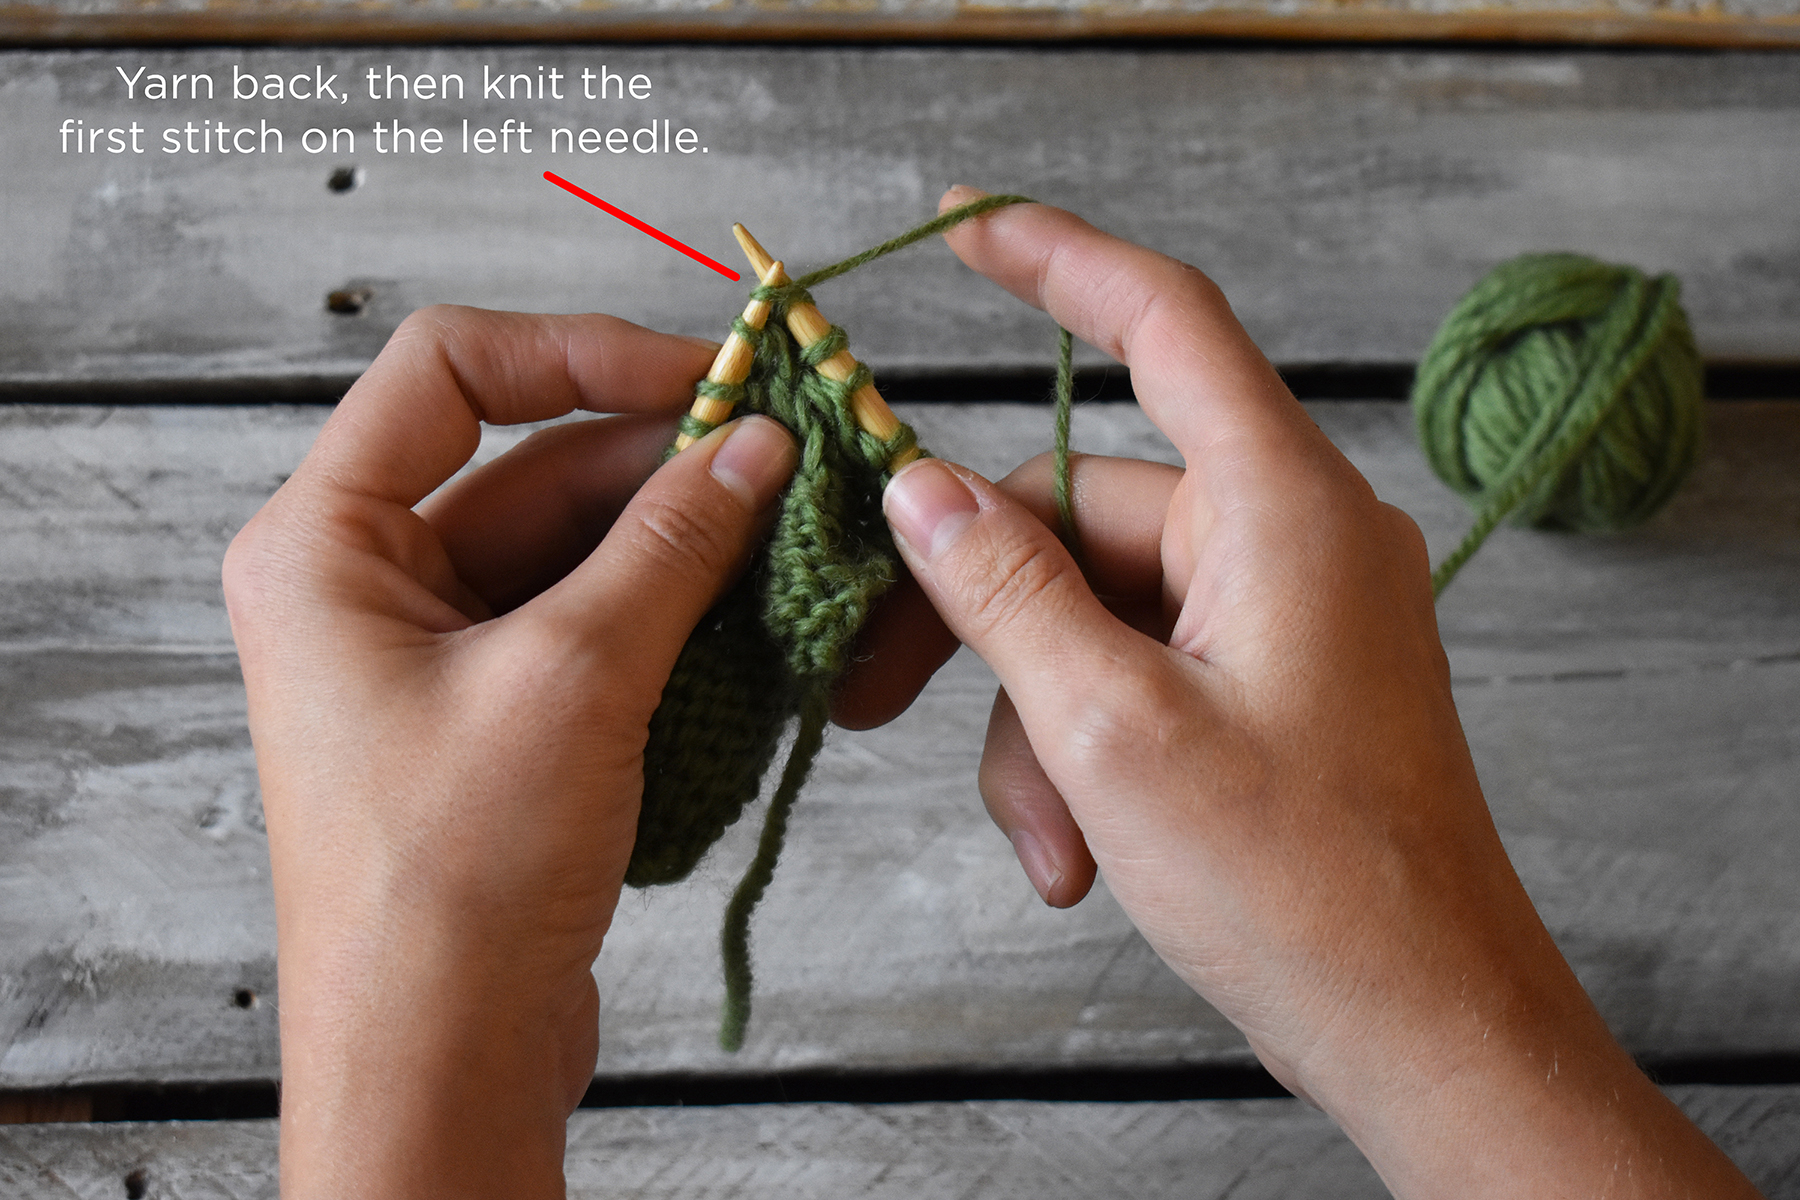
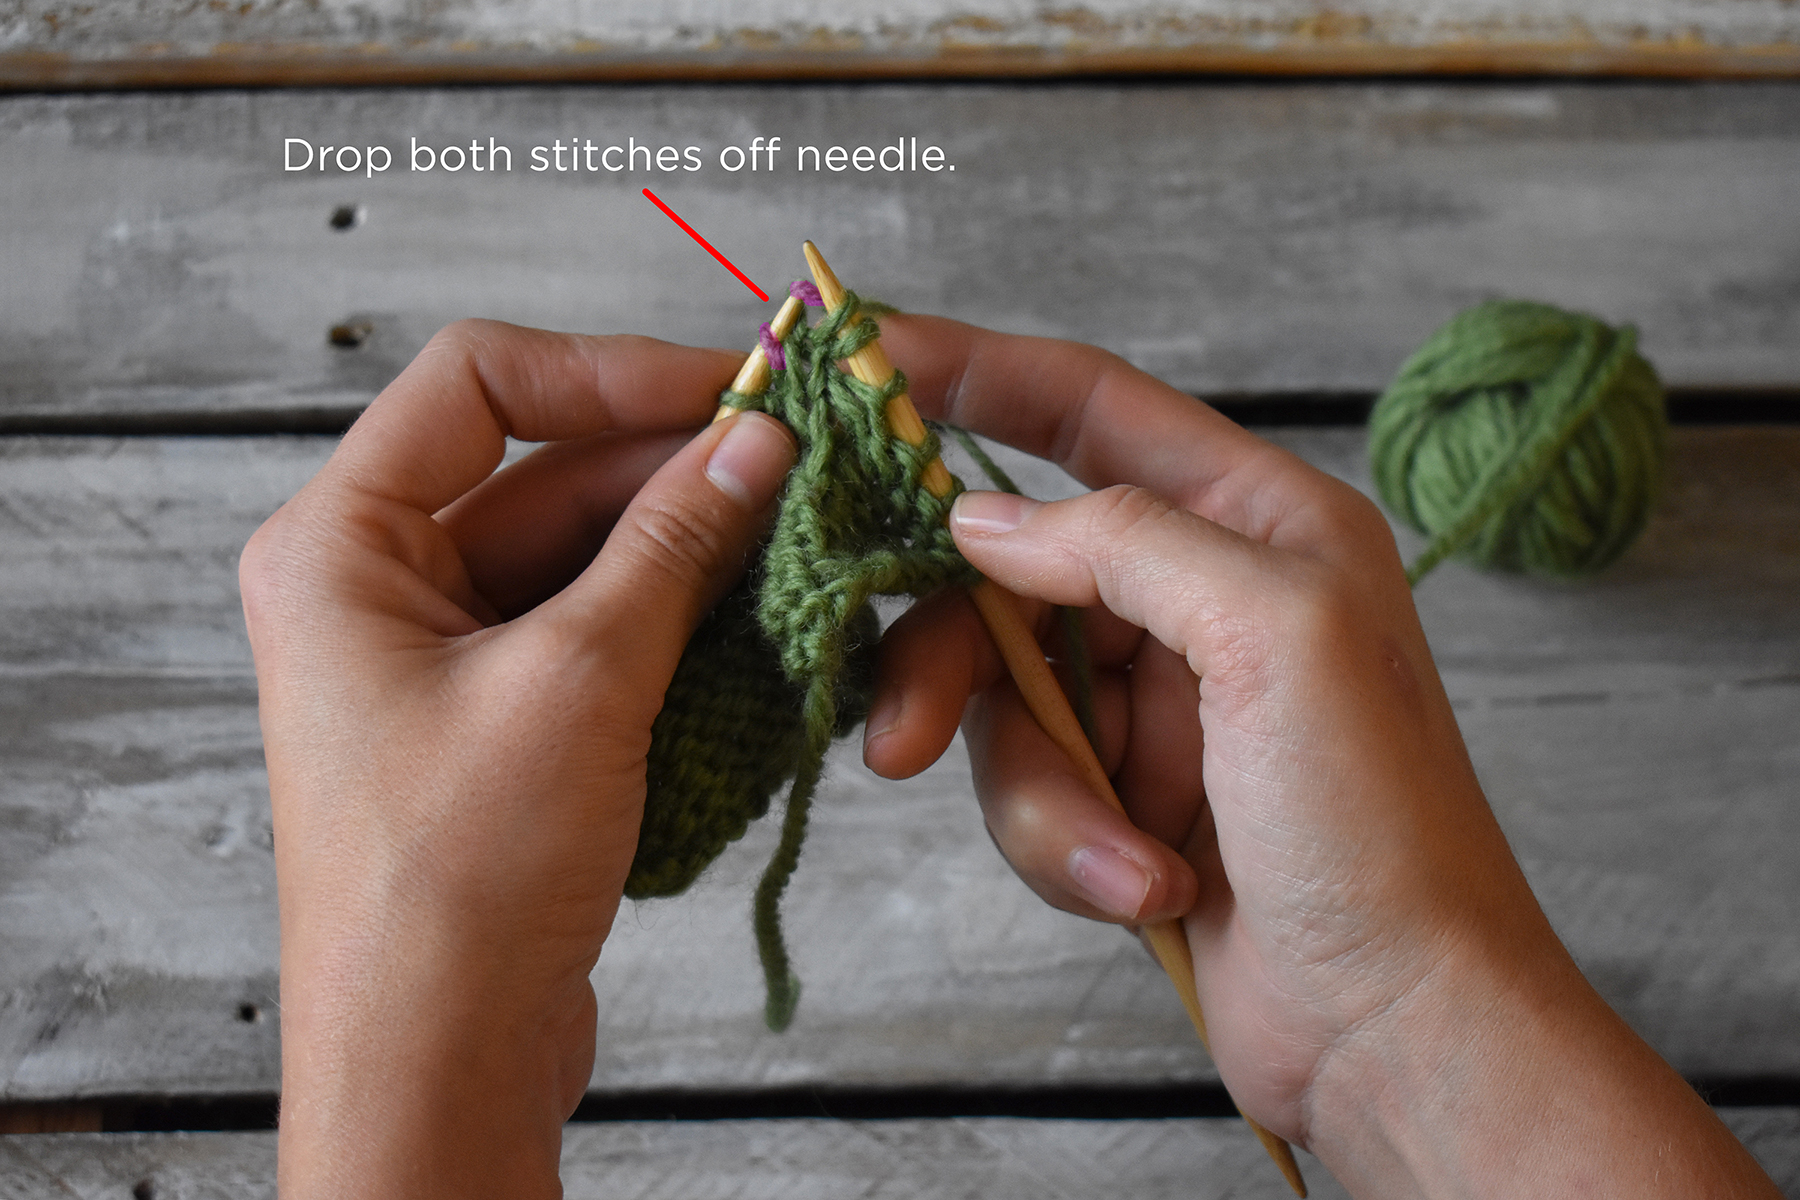
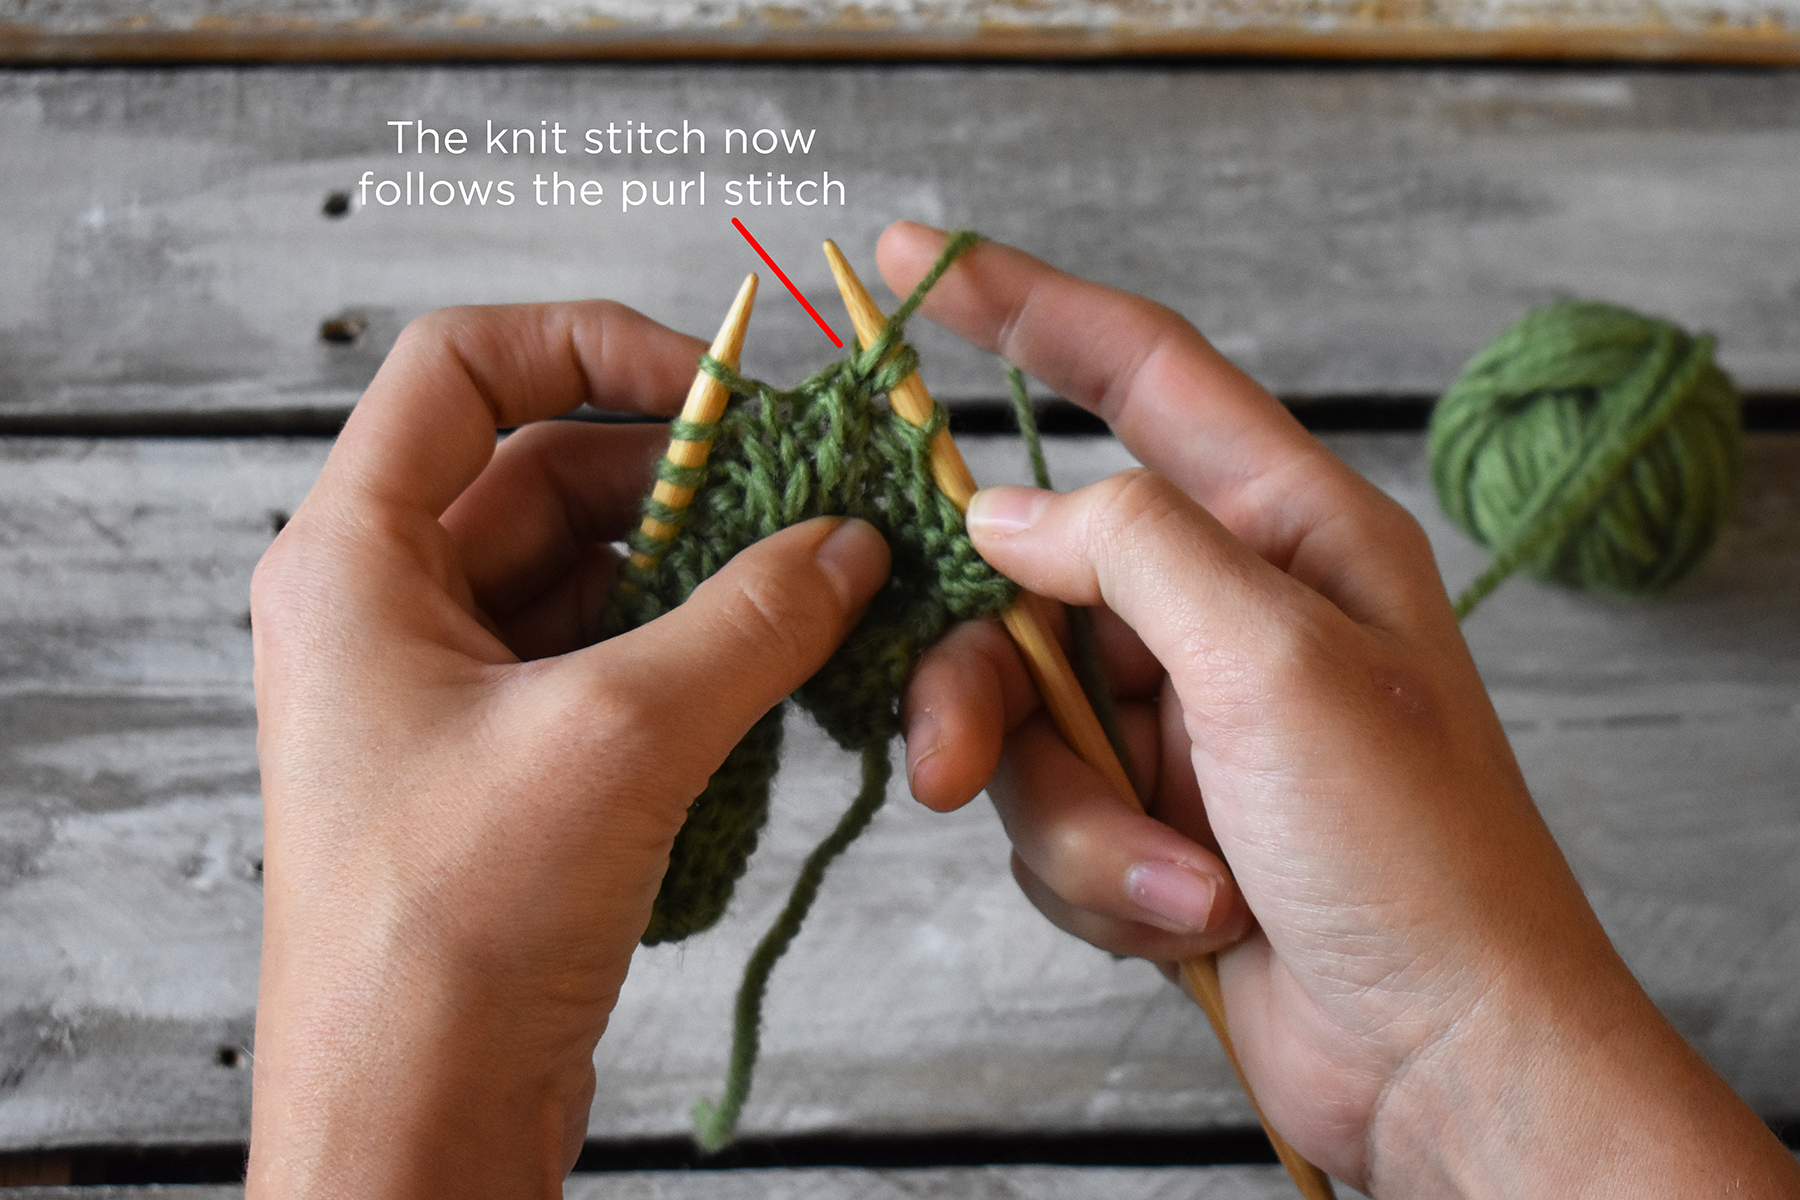
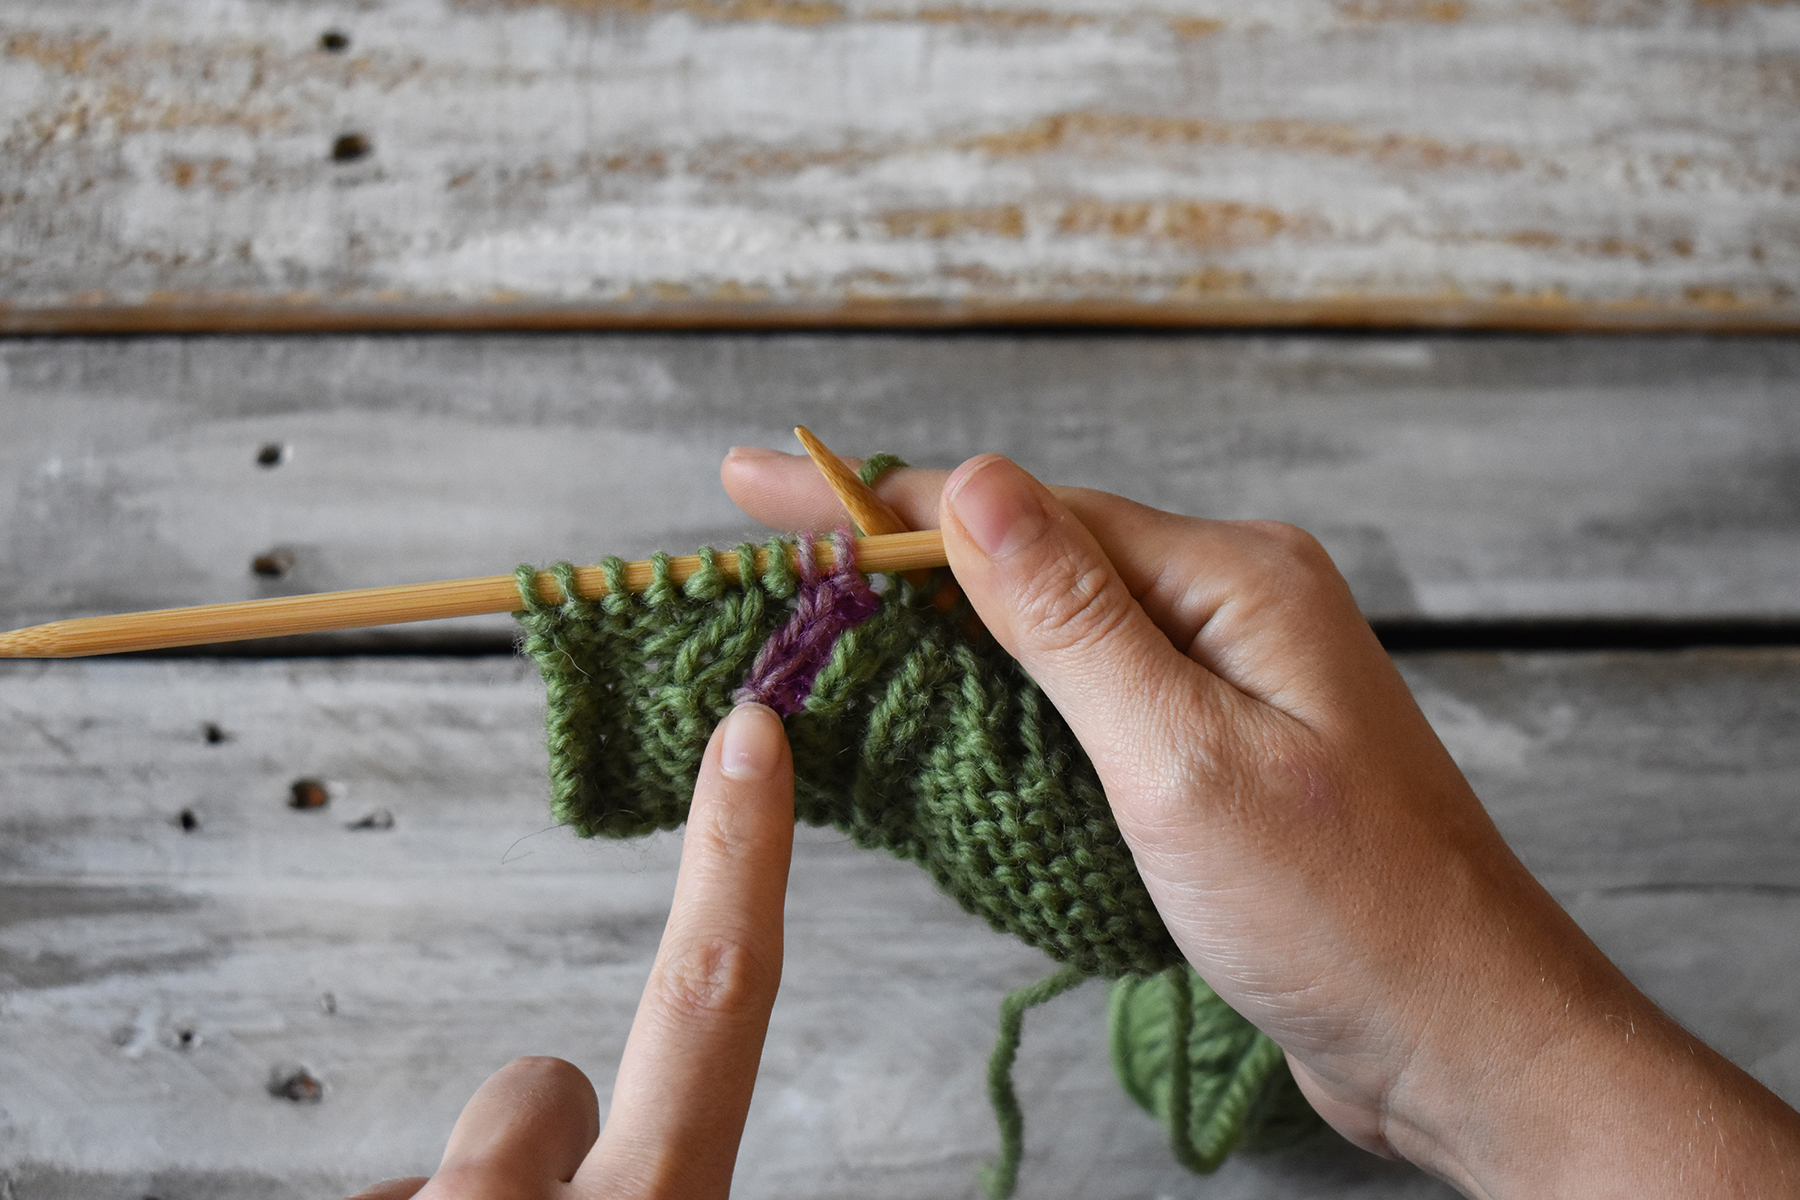
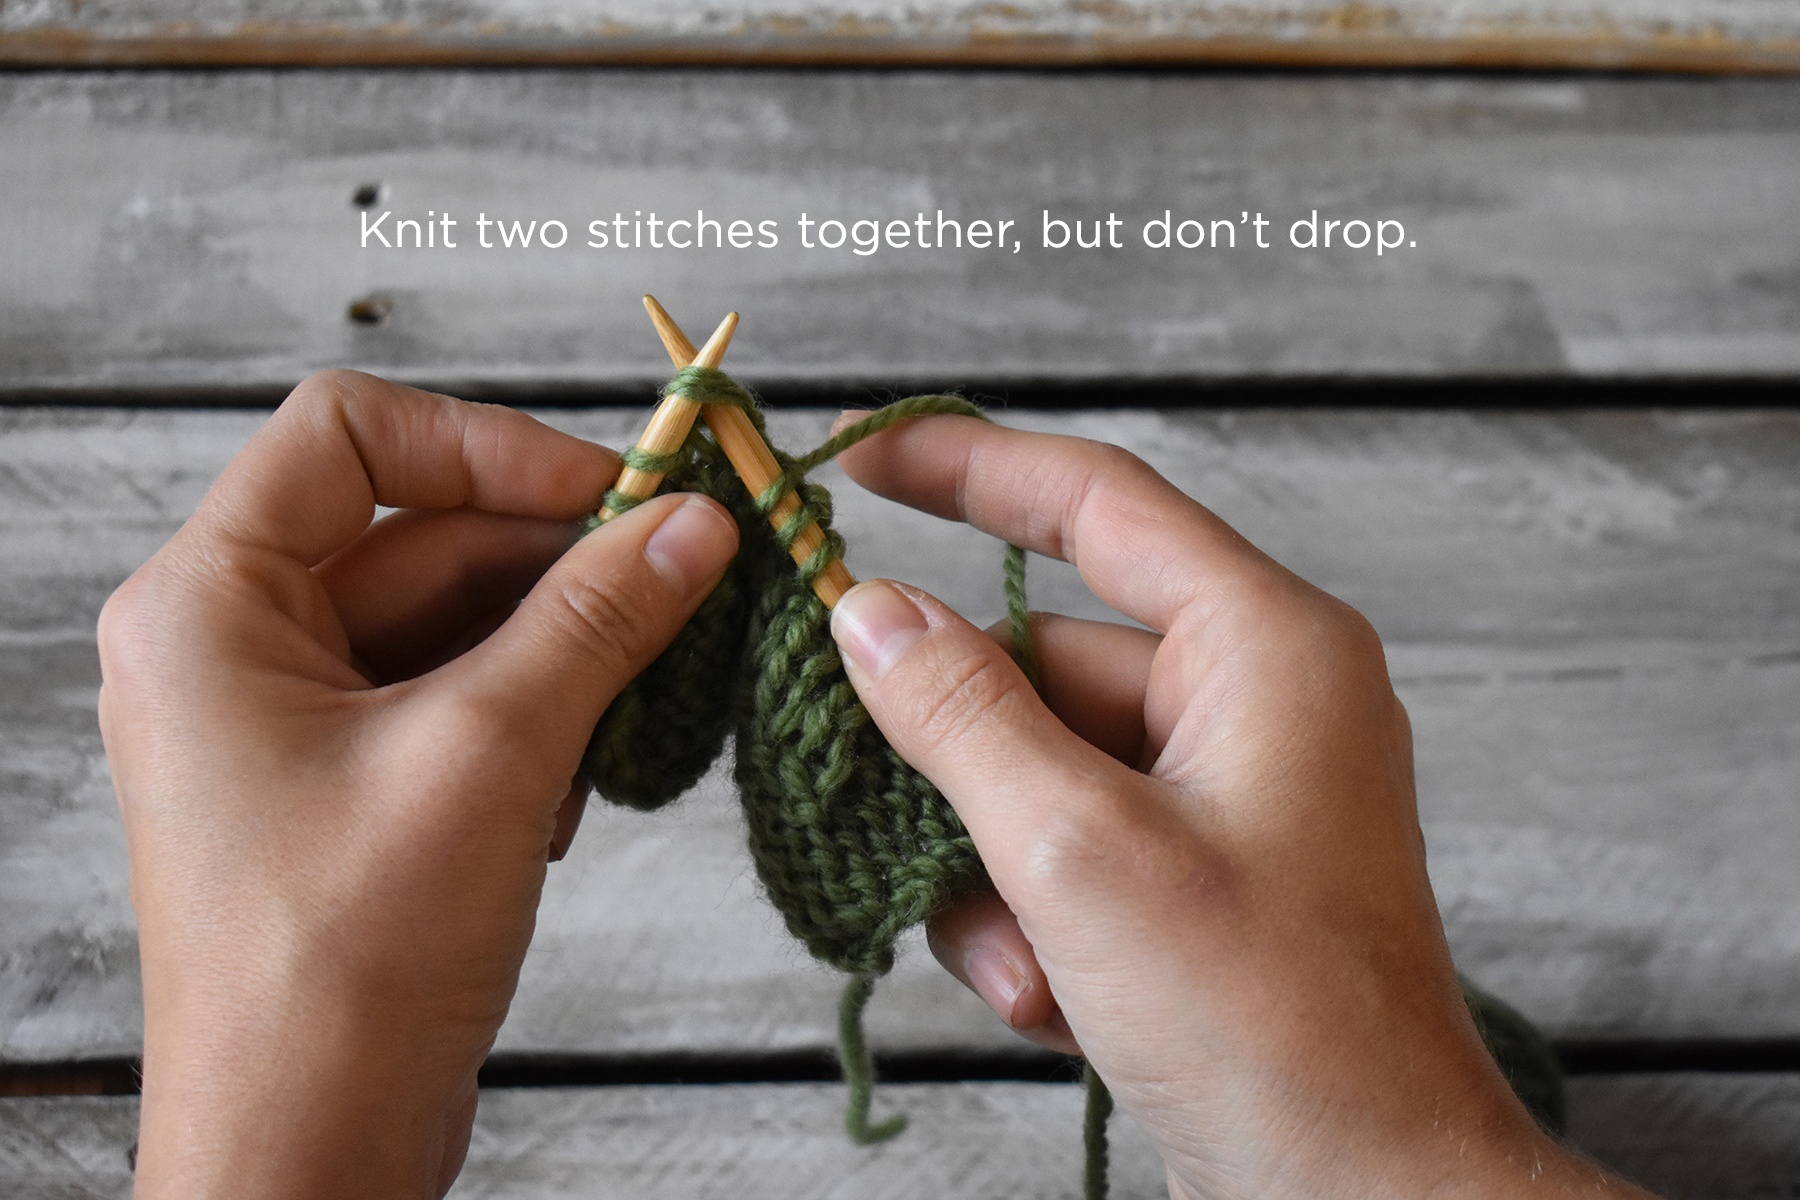
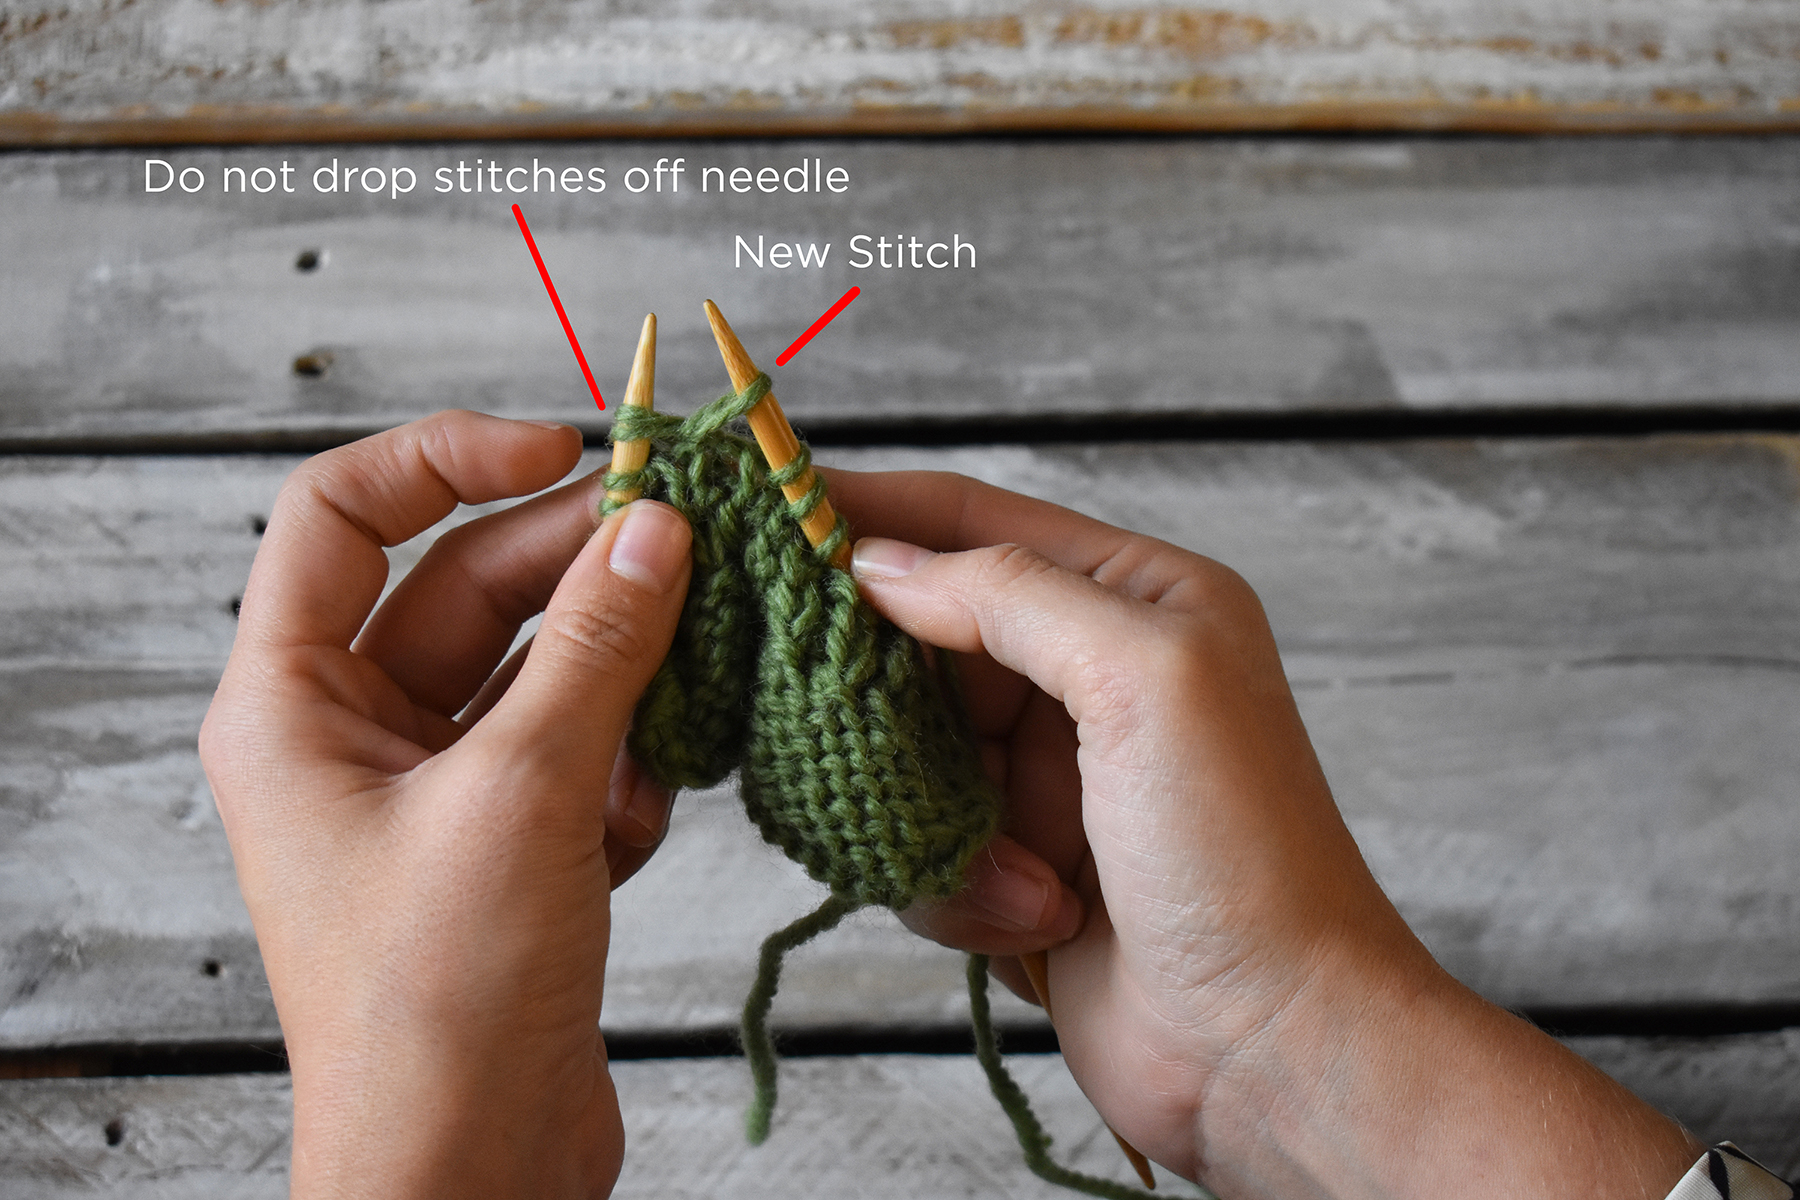
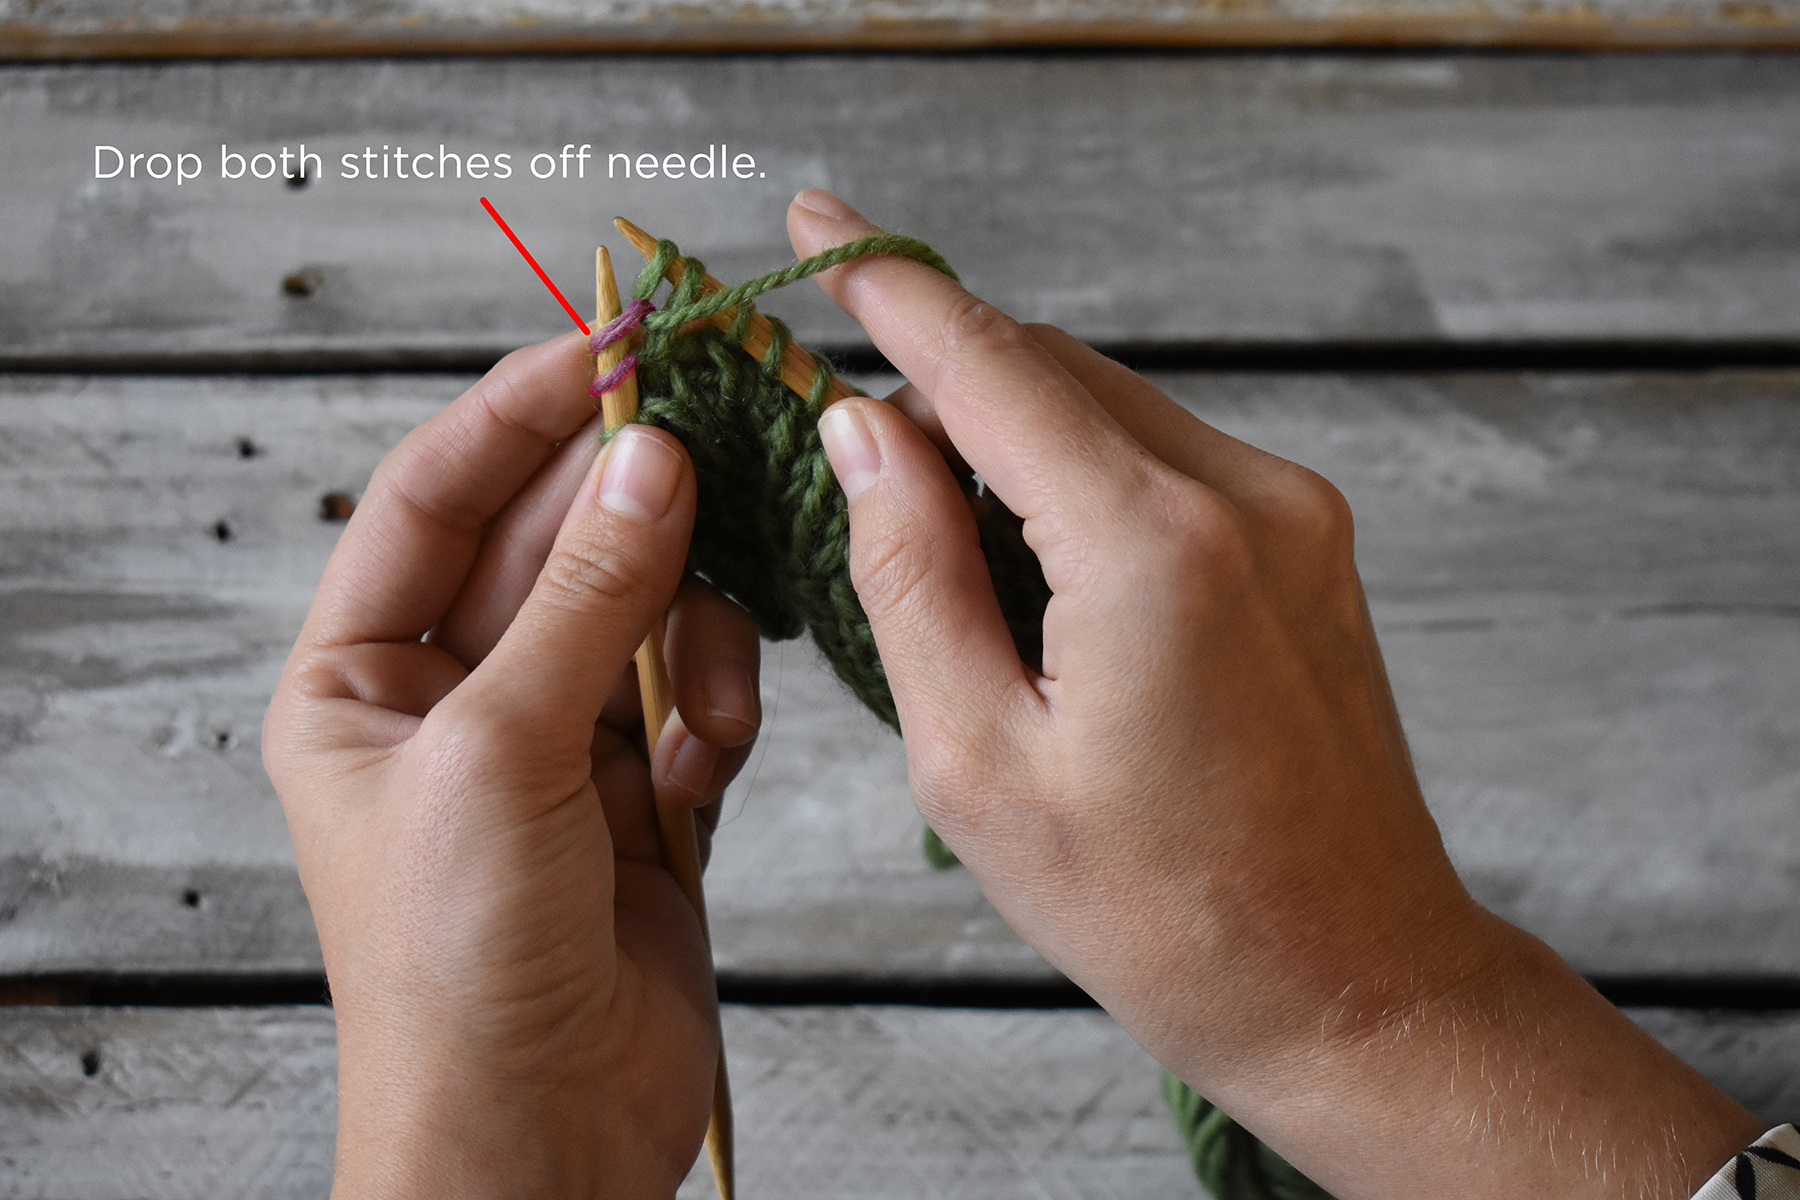
Right TwistStart by making a swatch. Swatches are not only crucial for getting the finished item you want but are also great for practicing new stitches. Work in your pattern until you’ve reached the two stitches you need to twist. I’ve highlighted these stitches in purple so it’s easier to see. We want to change the position of these two stitches by moving the left stitch over the top of the right stitch.Begin by knitting two stitches together, but do not drop the stitches from your needle. As you can see, the two stitches remain on the left needle, but there is now a new stitch on the right needle. Next, knit the first stitch on the left needle. Drop both of the stitches from the left needle. You now have completed the Right Twist, and have two new stitches on the right needle. Easy, right?Left TwistWork in your pattern until you’ve reached the two stitches you need to twist. I’ve highlighted these stitches in purple so it’s easier to see. We want to change the position of these two stitches by moving the right stitch over the top of the left stitch.The first step is to knit only the second stitch on the left needle. This stitch is highlighted in purple. As you can see, the first stitch on the left needle remains in place. After knitting the second stitch, do not drop the stitches off the left needle. Next, knit the first stitch on the left needle. Drop both of the stitches from the left needle. You now have completed the Left Twist, and have two new stitches on the right needle.Here is what each set of twisted stitches will look like. Notice that the Left Twist leans to the left, and the Right Twist leans to the right. In the Trinket Socks, Right Twists and Left Twists are alternated to create an undulating panel.
The Right and Left Twists are a great addition to your knitting toolbox. You’ll find that they’re quite fun to work, and they can really make a stitch pattern interesting. I hope you’ve found this tutorial to be useful.
Notice those panels of twisted stitches – pretty!
Remember, you can find the Trinket Socks kit, as well as the rest of the 12 Days of Winter Kits at your local yarn store. Happy knitting!
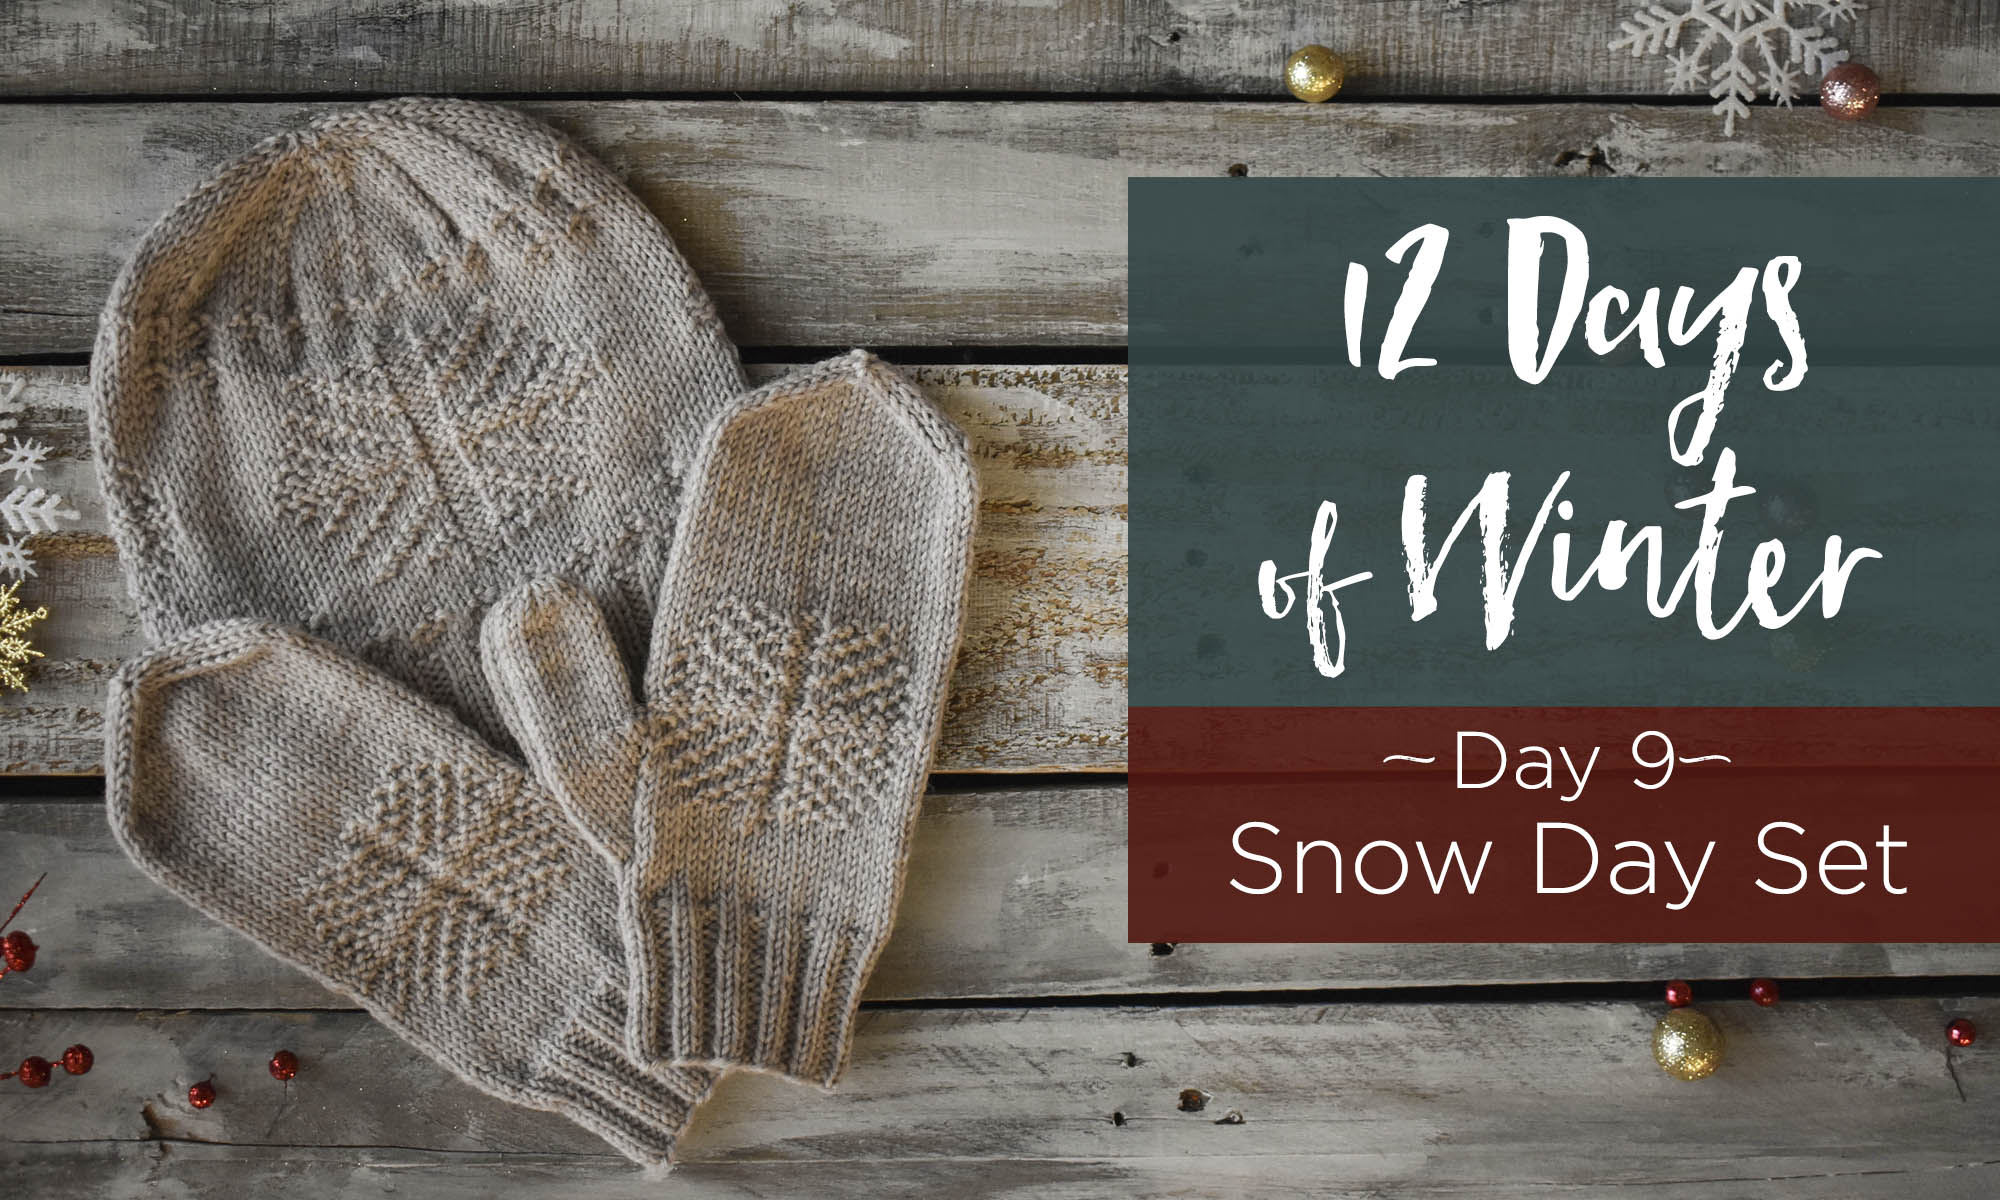
This is part 9 in a 12 part series highlighting designs from our 12 Days of Winter, Series 3 Edition.
It’s Day 9 of Winter in the 12 Days of Winter Kit Collection. In today’s guest post, we welcome the next addition to the kit collection and enjoy a recipe for homemade marshmallows!
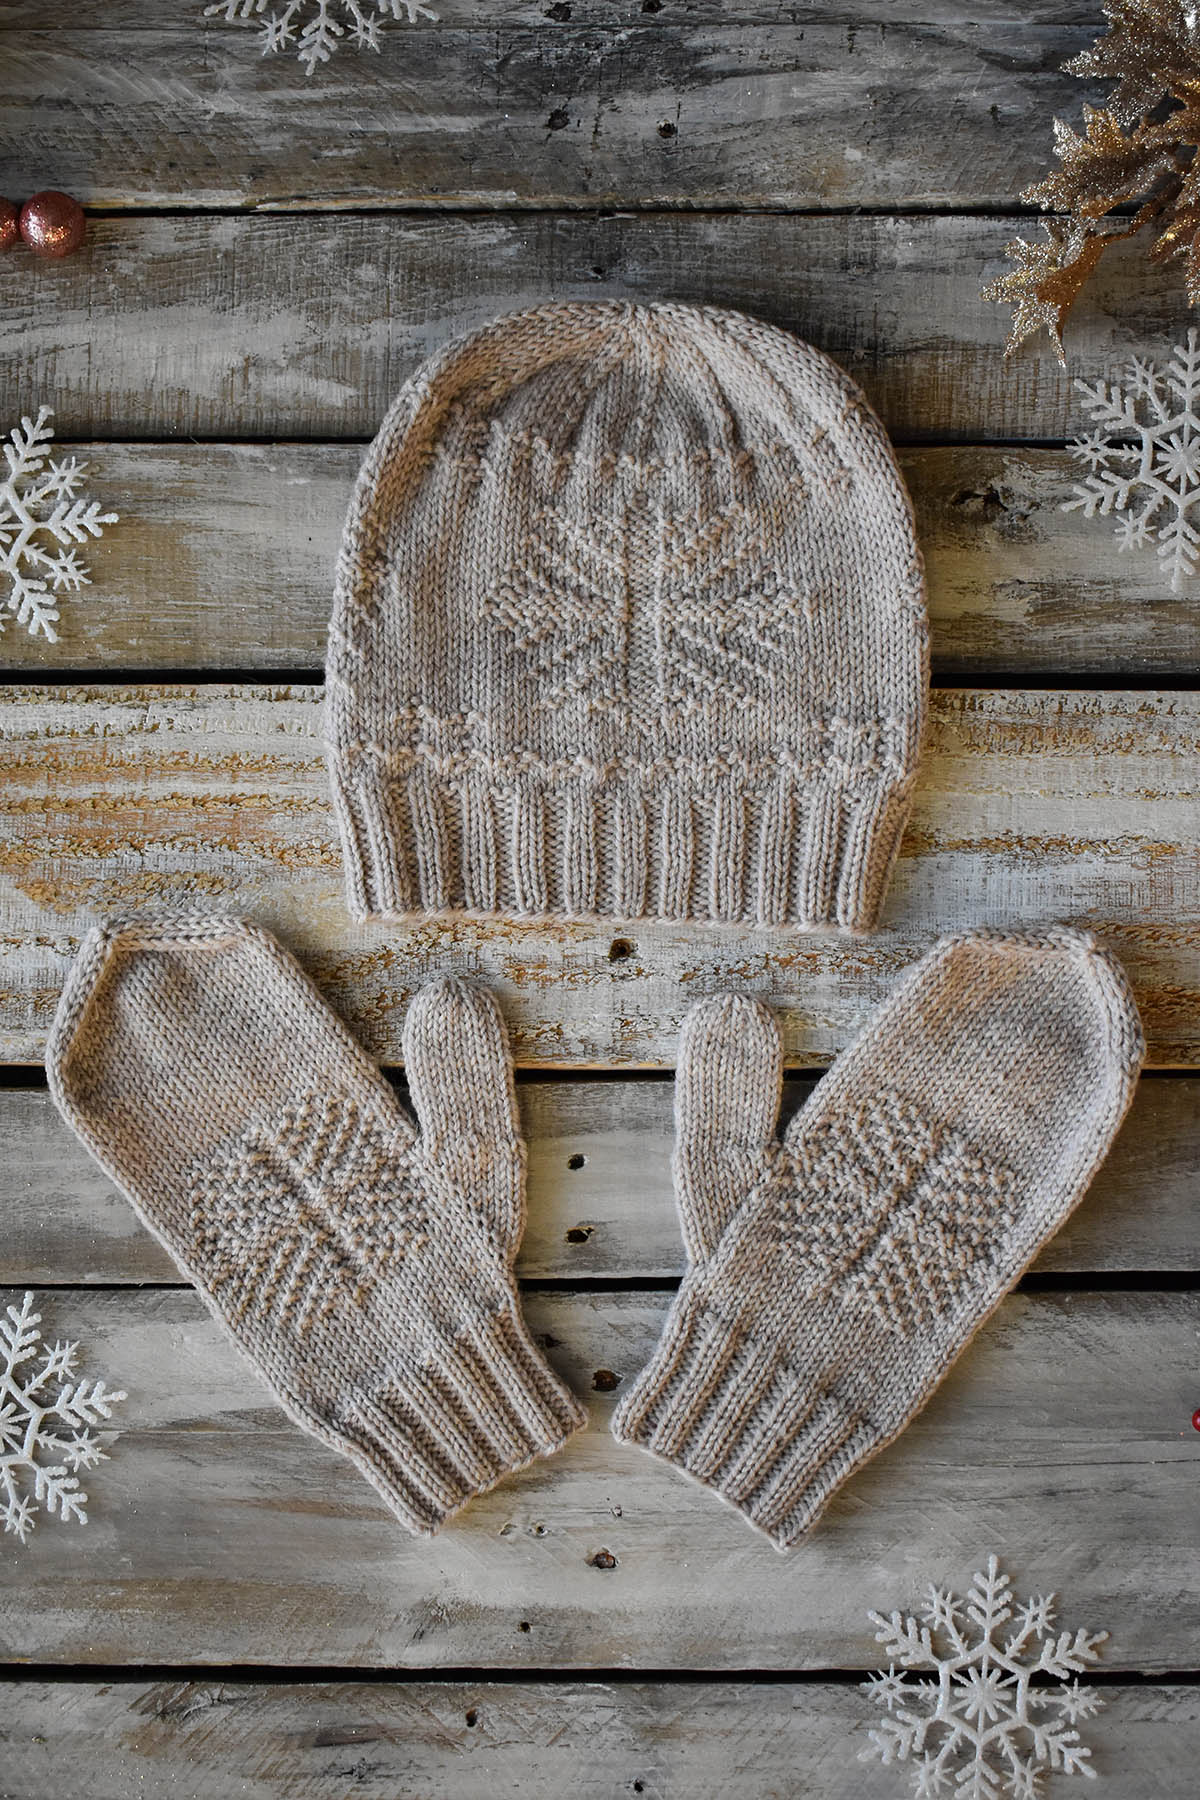
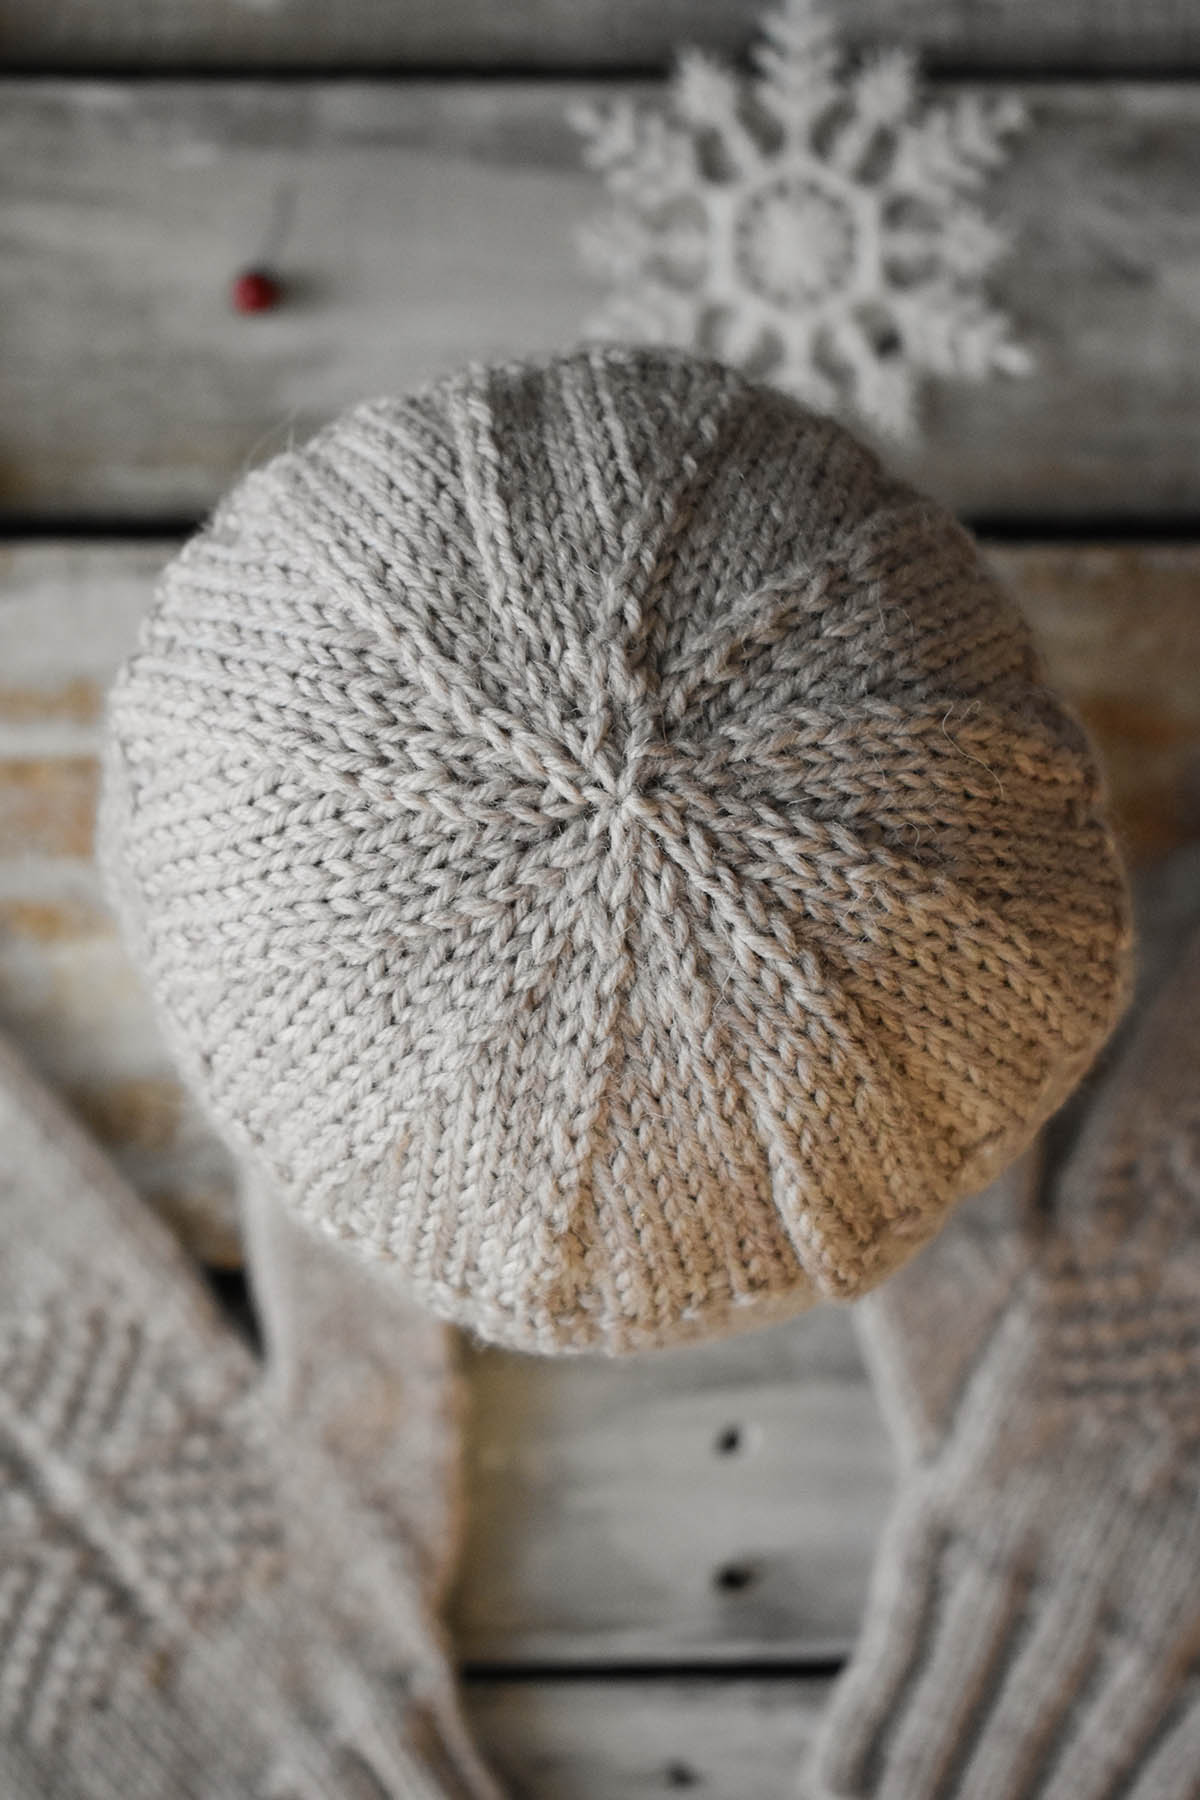
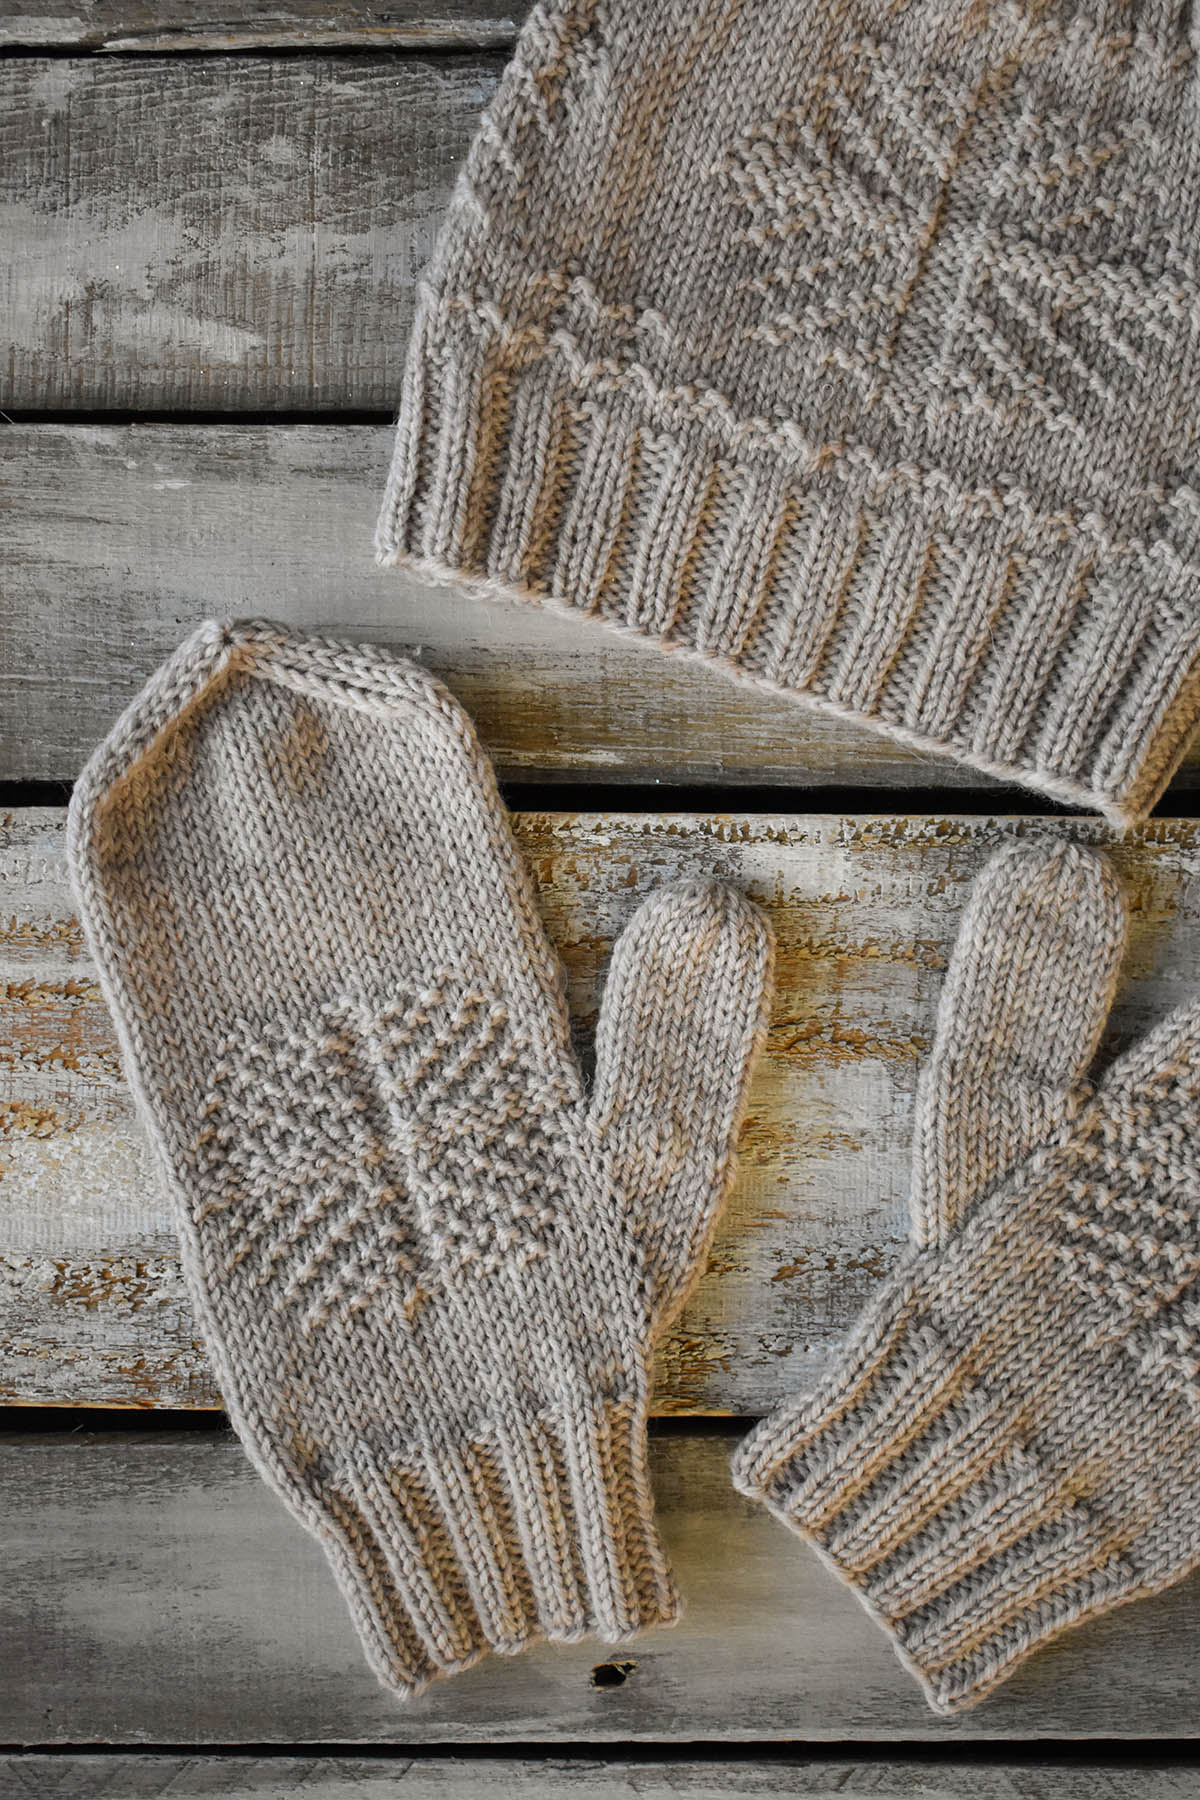
Today, the Snow Day Hat and Mittens, designed by Jennifer Sadler. This cozy accessory set is knit up in warm and woolly Deluxe DK Superwash. This yarn has great stitch definition, making it perfect for the knit-purl snowflake motifs in the hat and mittens. The light, Oatmeal Heather color also helps those stitches to stand out and gives this set a sophisticated feel.
When we asked Jennifer to share her inspiration for the design, she also wanted to include a recipe. Who are we to say no to that offer? Here is what she had to say:
“Snow days are one of my favorite things in the world. Where I live, everything shuts down, and you’re guaranteed a cozy day at home. I designed this hat and mitten set to reflect my love for snow and have a quick project to whip up the moment the snow appears in the forecast. And who wouldn’t love wearing a trio of faux-flakes while playing in real snowflakes?
When I’m ready to warm up inside by the fire, I absolutely love having a hot cup of cocoa with homemade marshmallows on top. As intimidating as they may sound, they are pretty simple to make and are infinite times better than their store-bought counterparts. I’m sharing my favorite recipe with you below, so you can whip up some of your own for your next snow day (or just a regular Tuesday, no judgment here!)
Homemade Marshmallows Ingredients: 2 ½ tablespoons unflavored gelatin 1 cup light corn syrup 1 ½ cups granulated sugar 2 tablespoons vanilla extract (peppermint extract is also a yummy option!) ¼ teaspoon salt Confectioners’ sugar, for dusting
Directions:
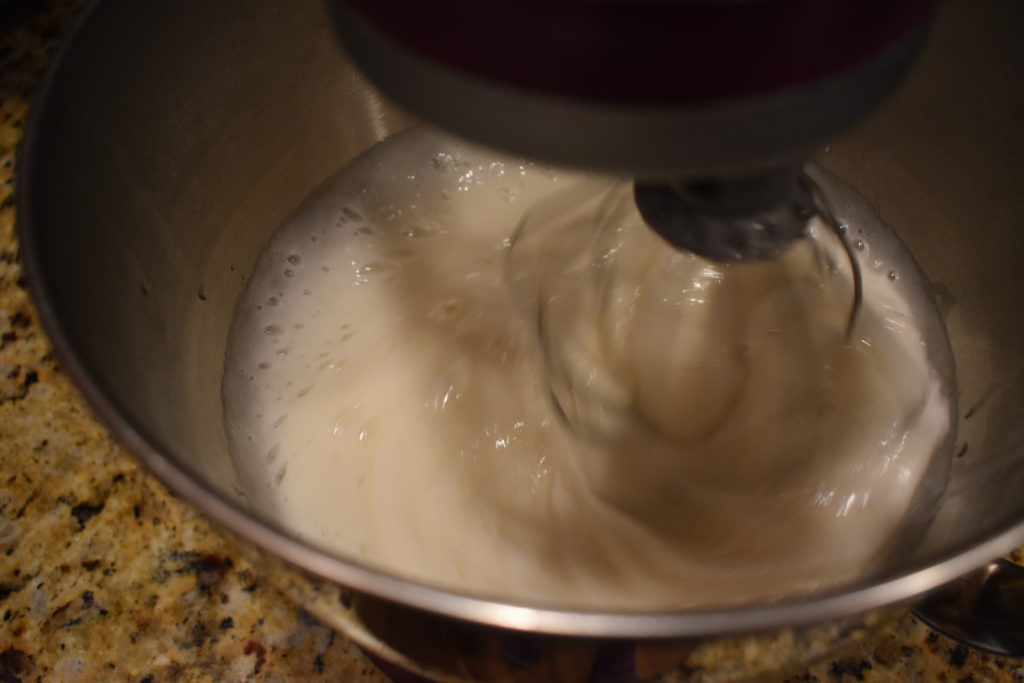
Combine gelatin and ½ cup cold water in the bowl of an electric mixer with whisk attachment. Let stand for 30 minutes.
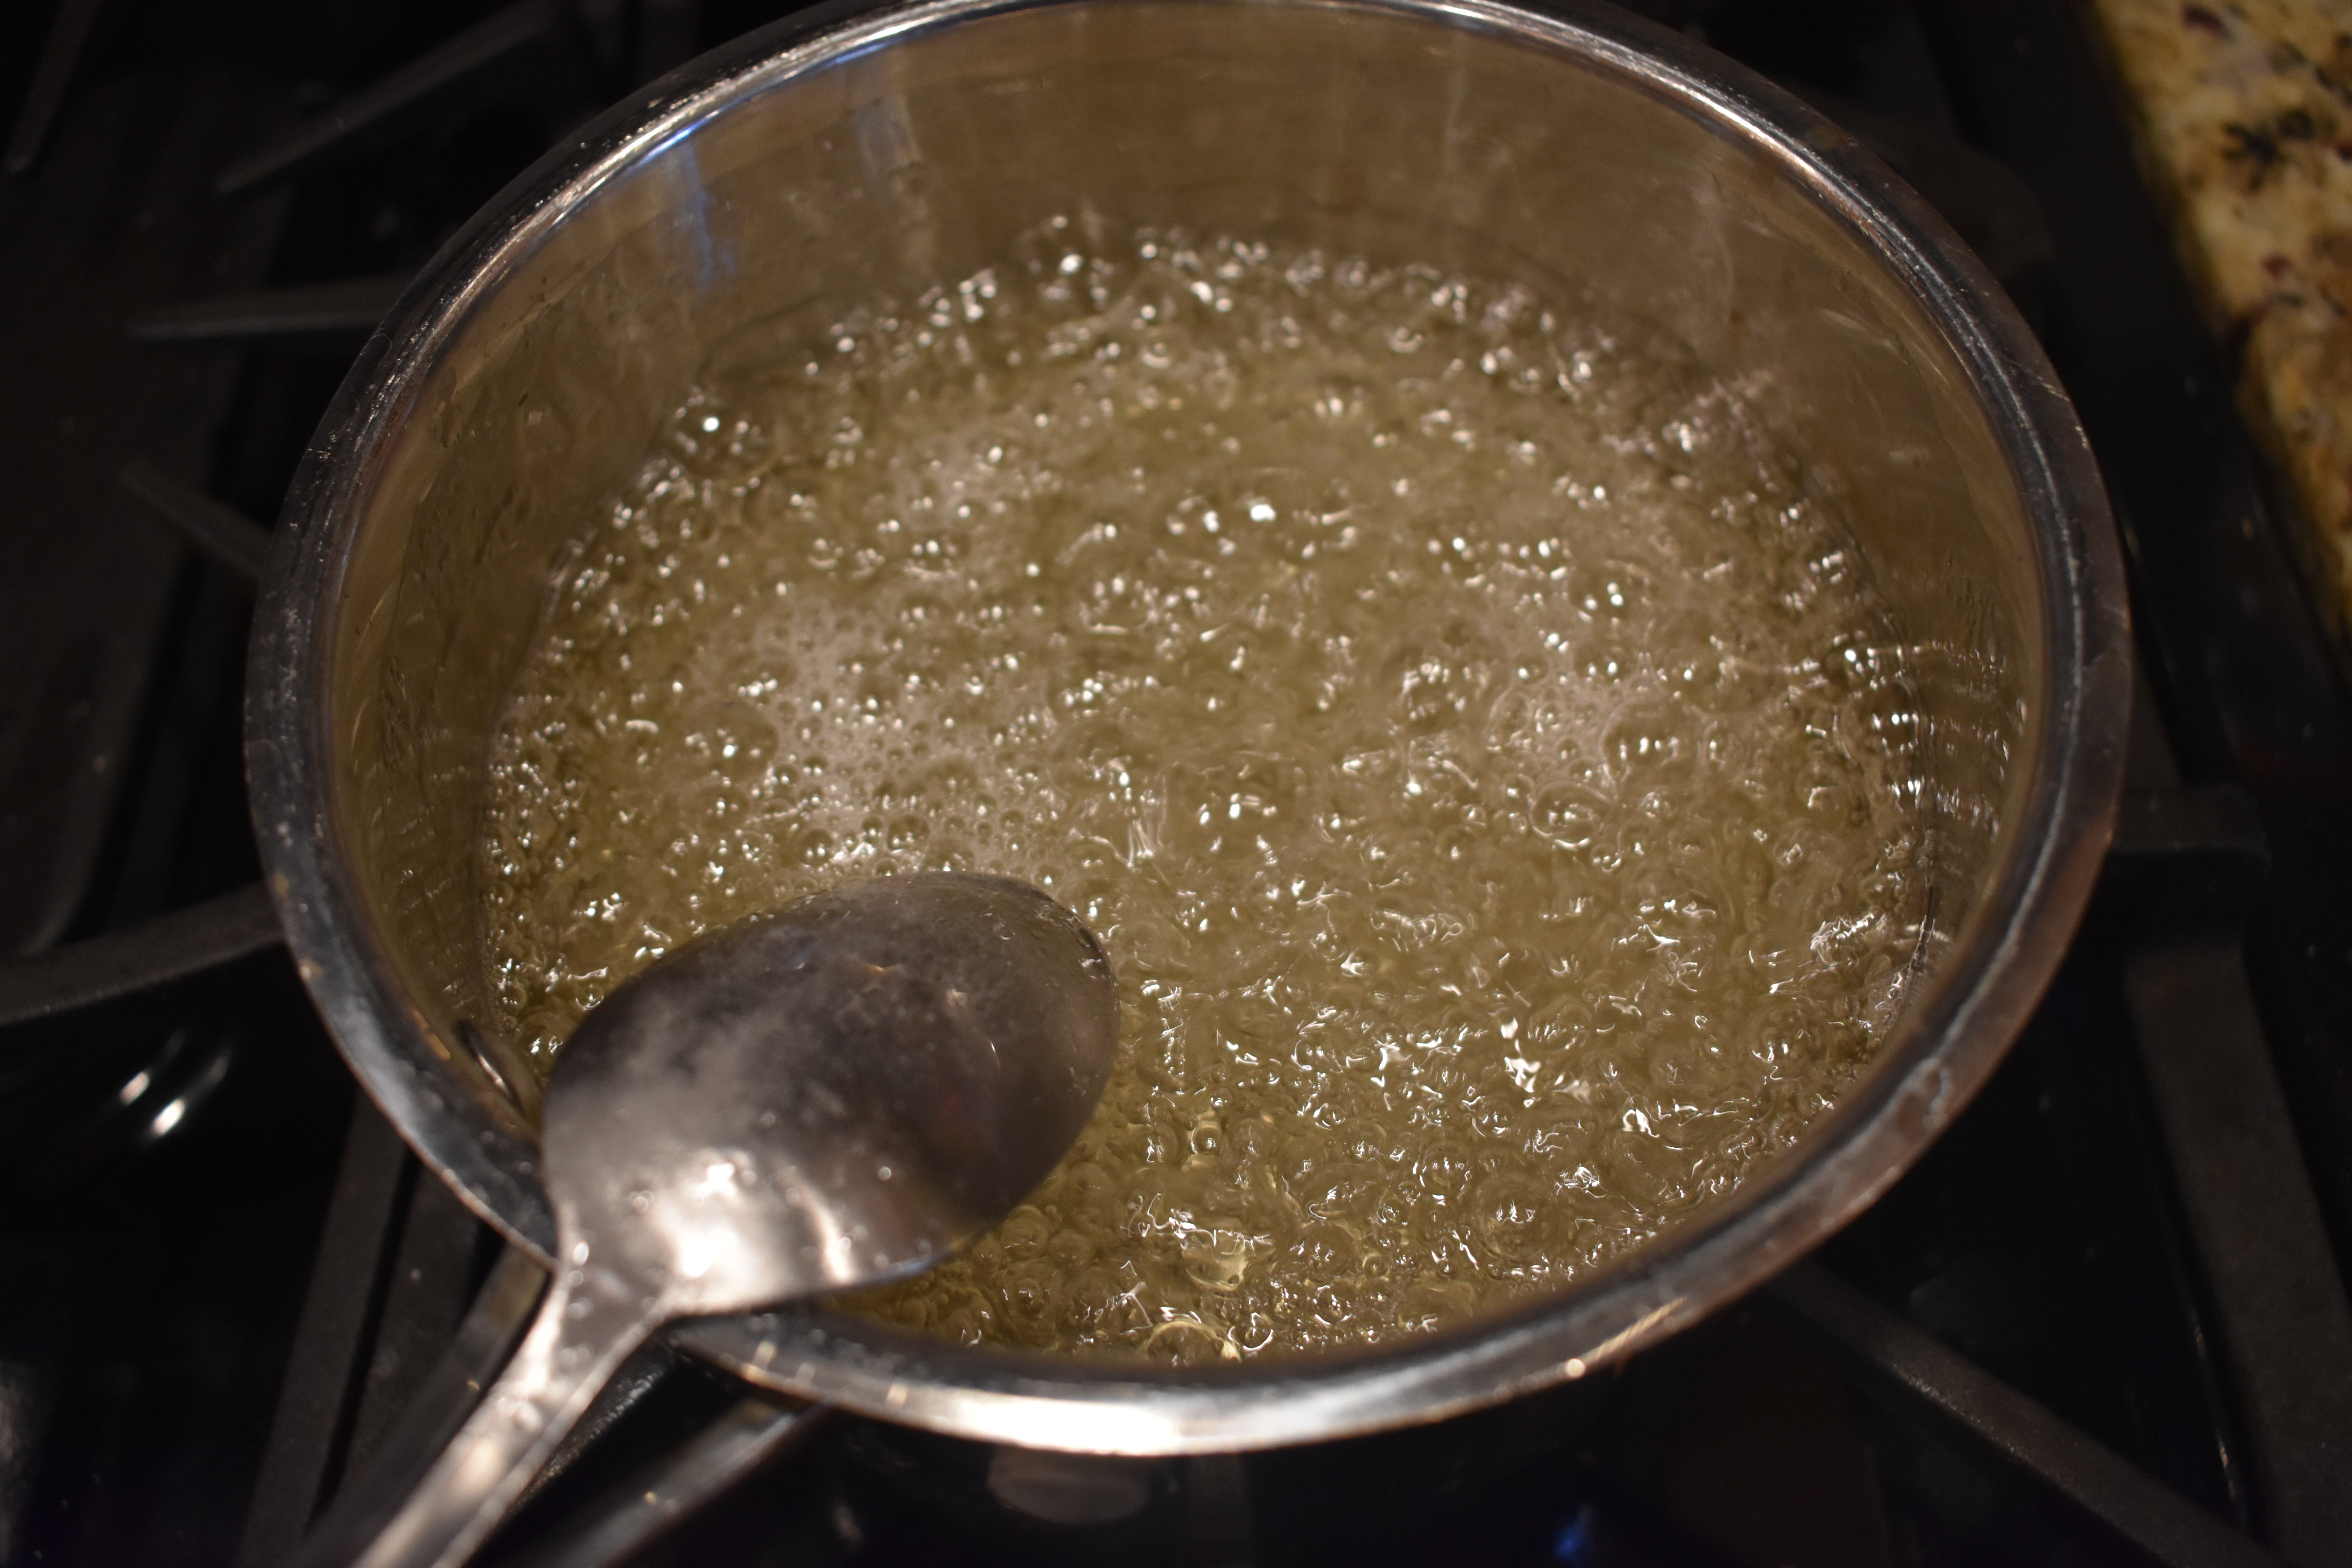
2. Combine granulated sugar, corn syrup, salt, and ½ cup water in a small heavy saucepan; place over low heat and stir until sugar has dissolved.
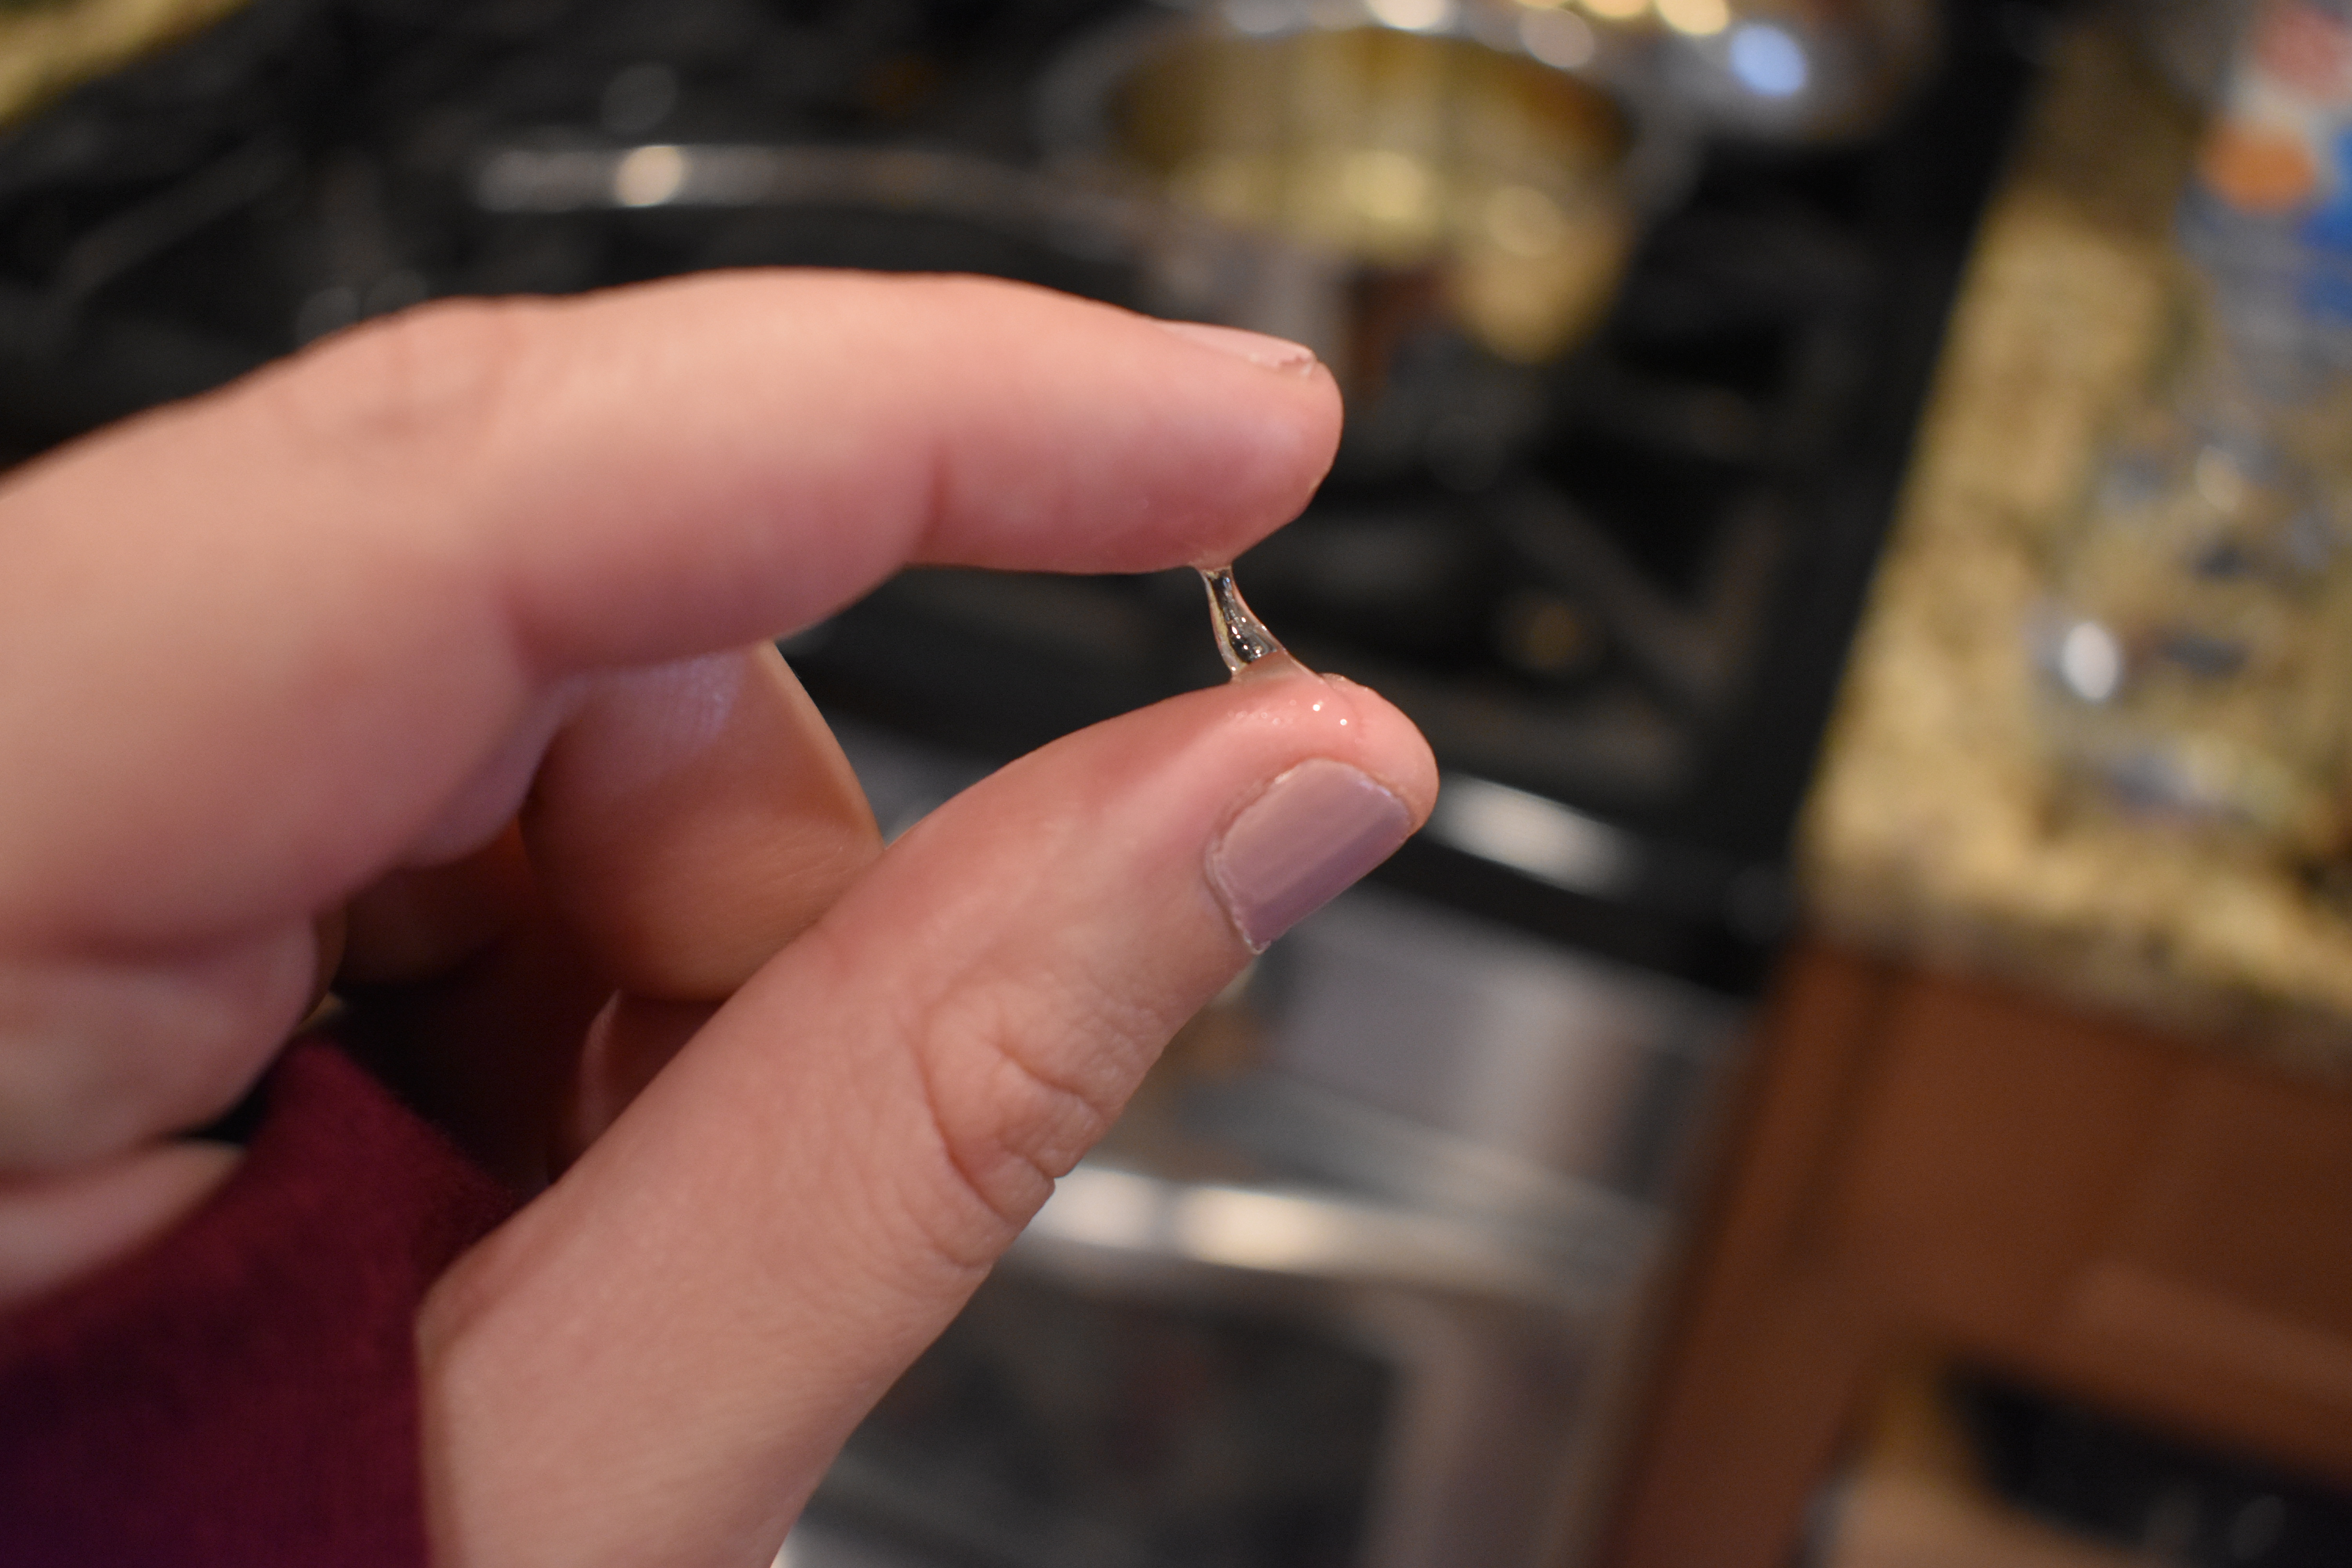
3. Clip on a candy thermometer; raise to high heat. Cook syrup without stirring until it reaches 244 degrees F (firm-ball stage). Immediately remove pan from heat. Tip: if you don’t have a candy thermometer, you can test the syrup by placing a few drops in a glass of cool water. Scoop the drops of syrup out of the water and test with your fingers. The drops should be firm, but pliable. This is firm-ball stage.Testing the syrup by placing a few drops in a glass of cool water and scoop them out with a spoon. Firm, but pliable.
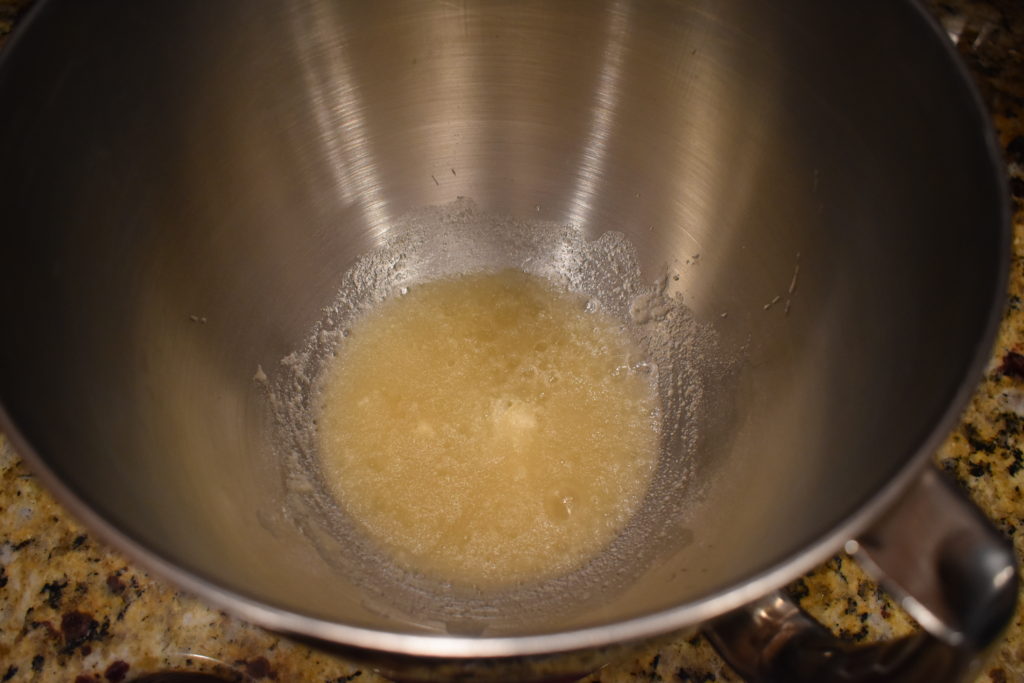
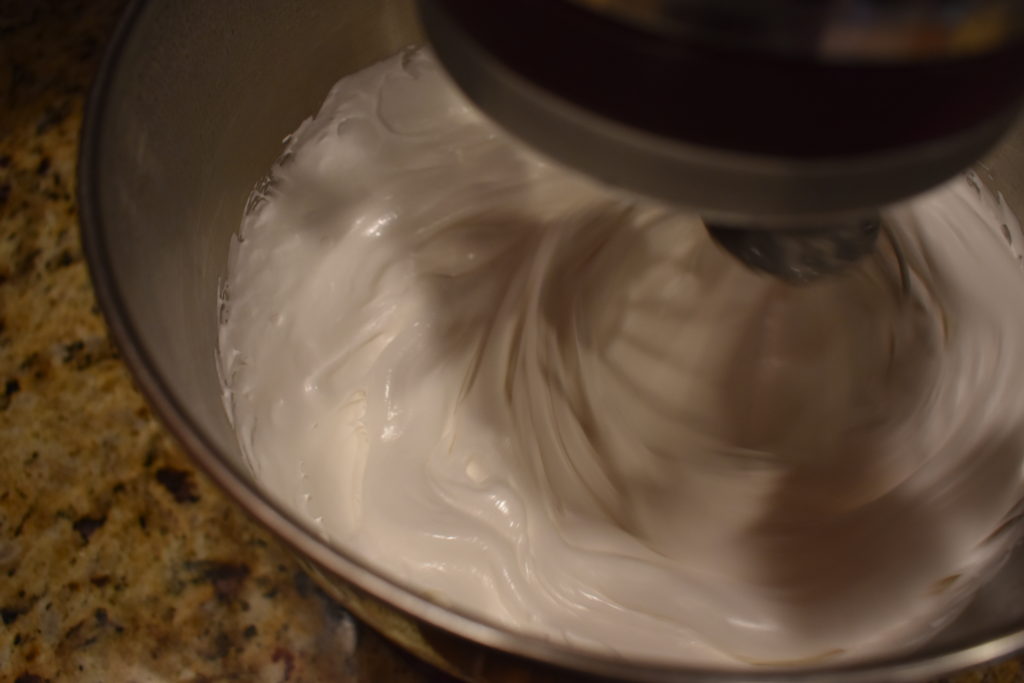
4. With mixer on low speed, slowly and carefully pour the syrup into the softened gelatin. Increase speed to high. Beat until mixture is very thick and white and has almost tripled in volume, about 15 minutes. Add vanilla; beat to incorporate.
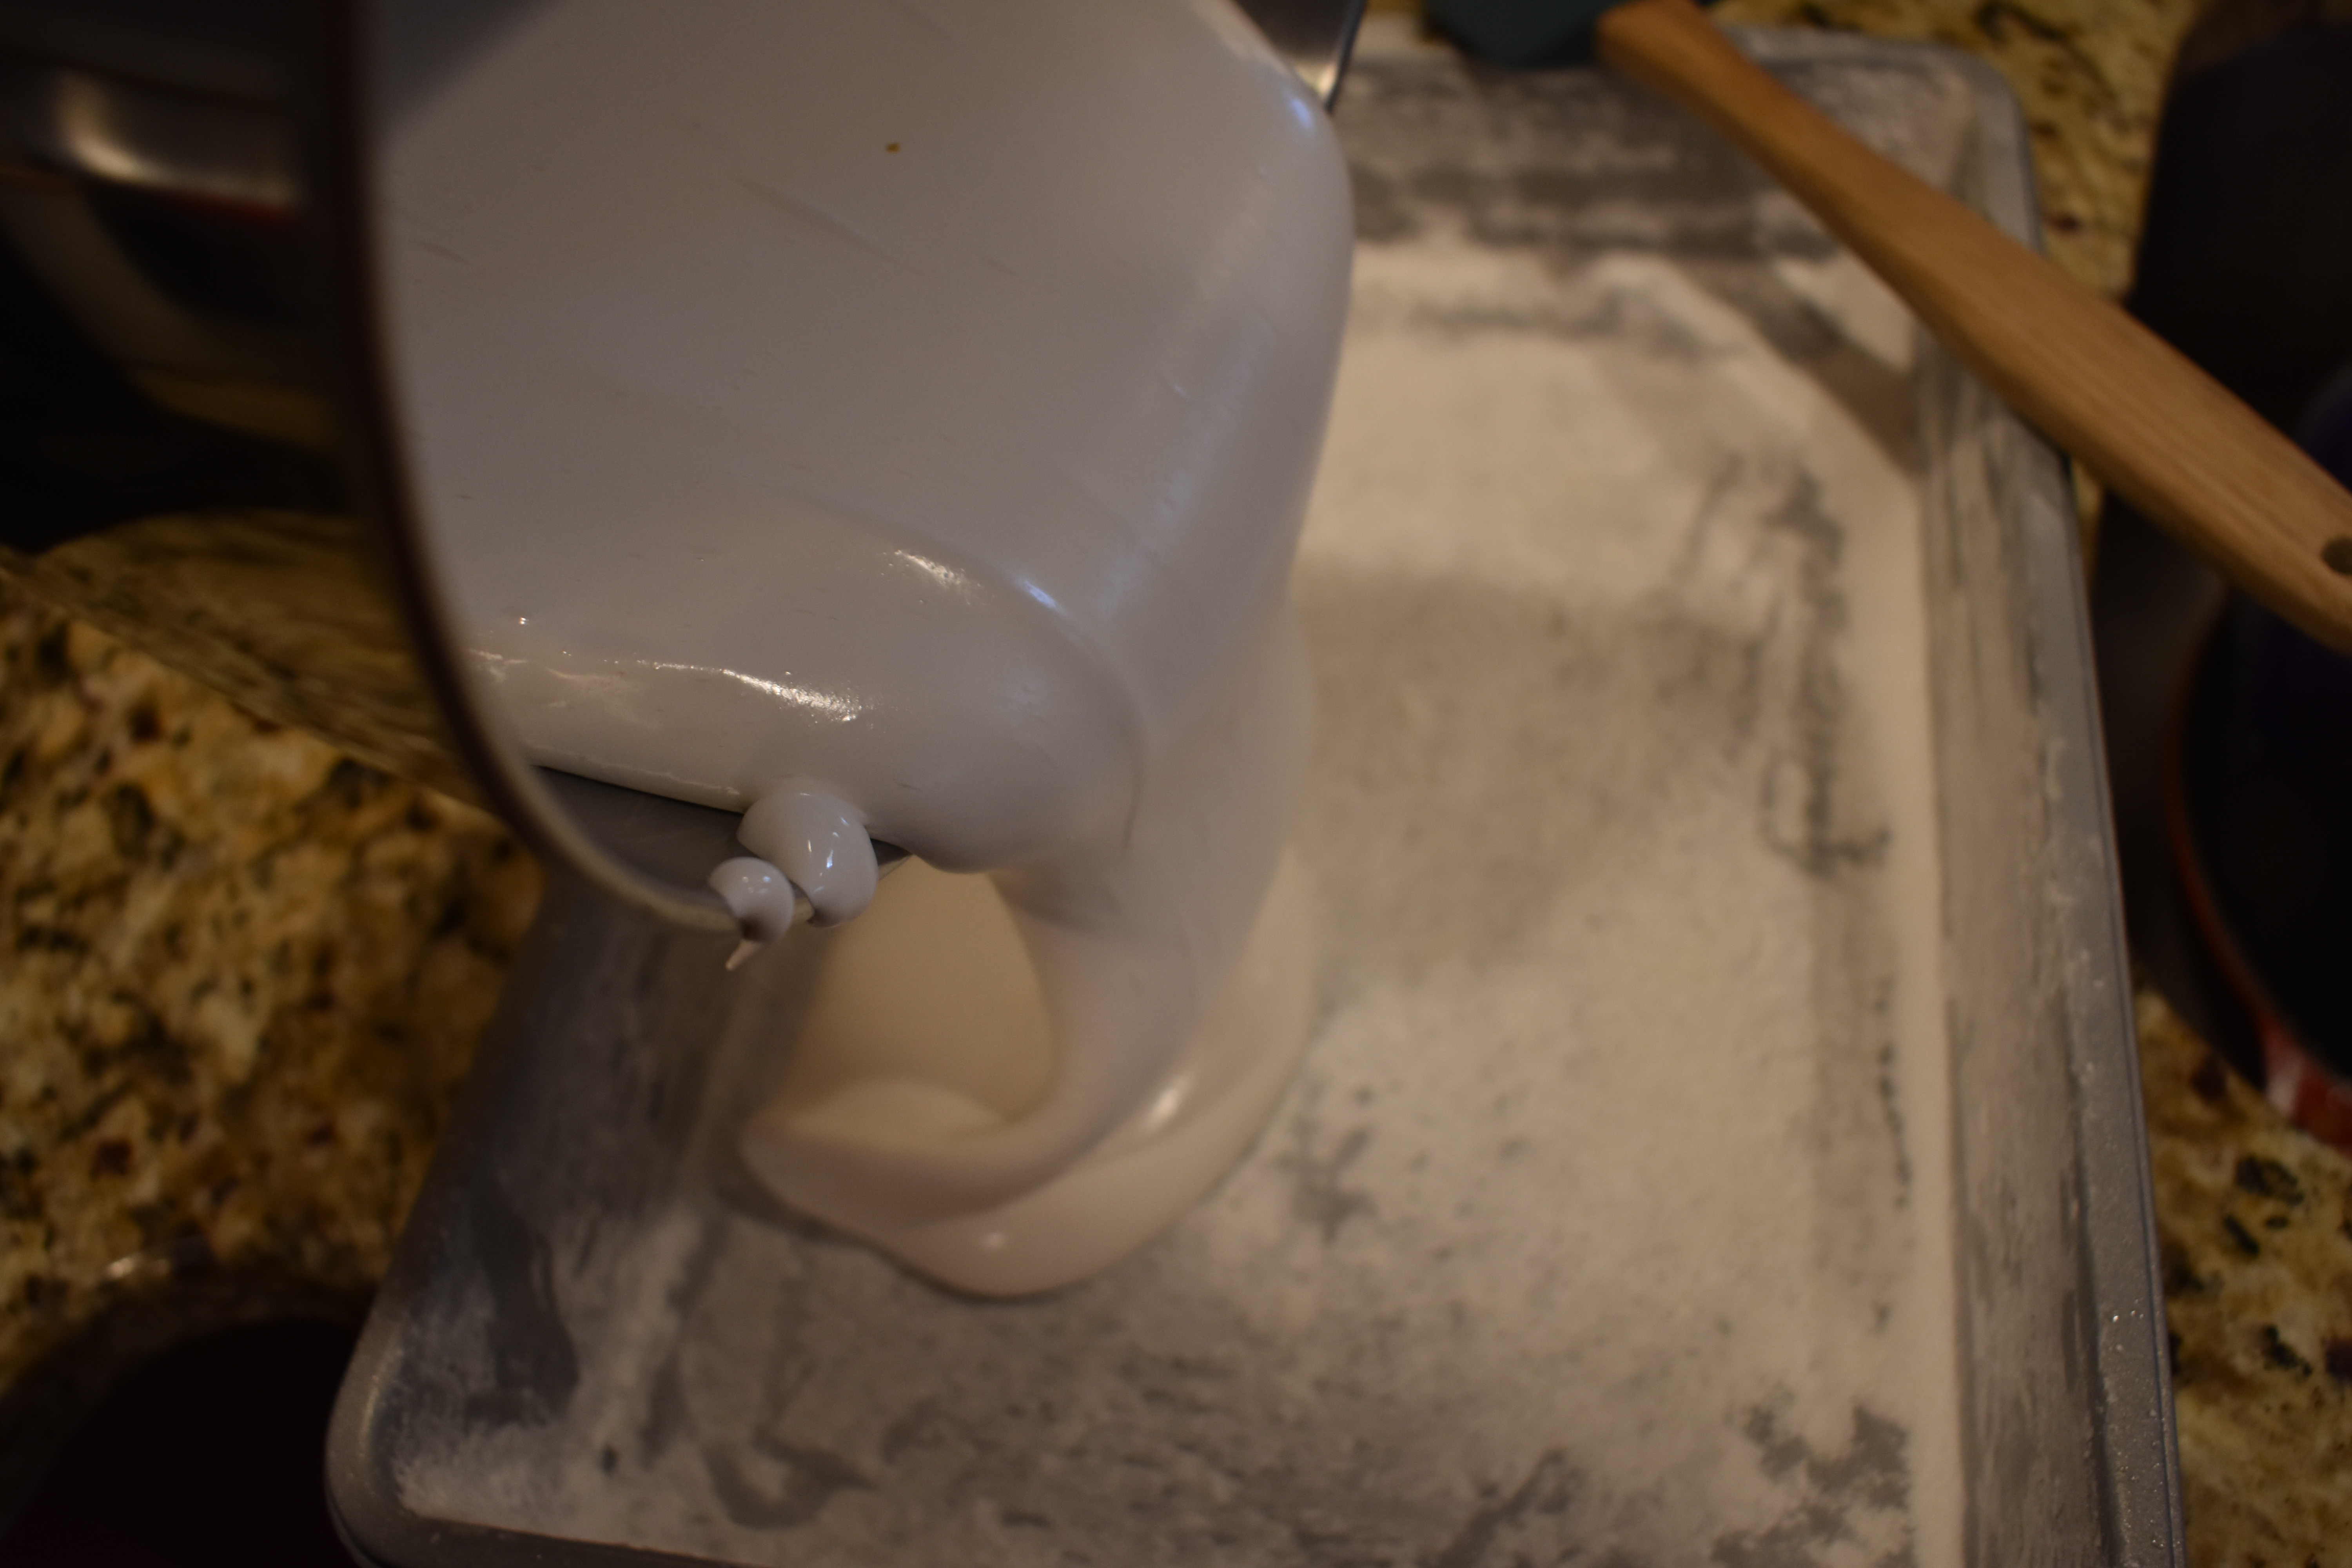
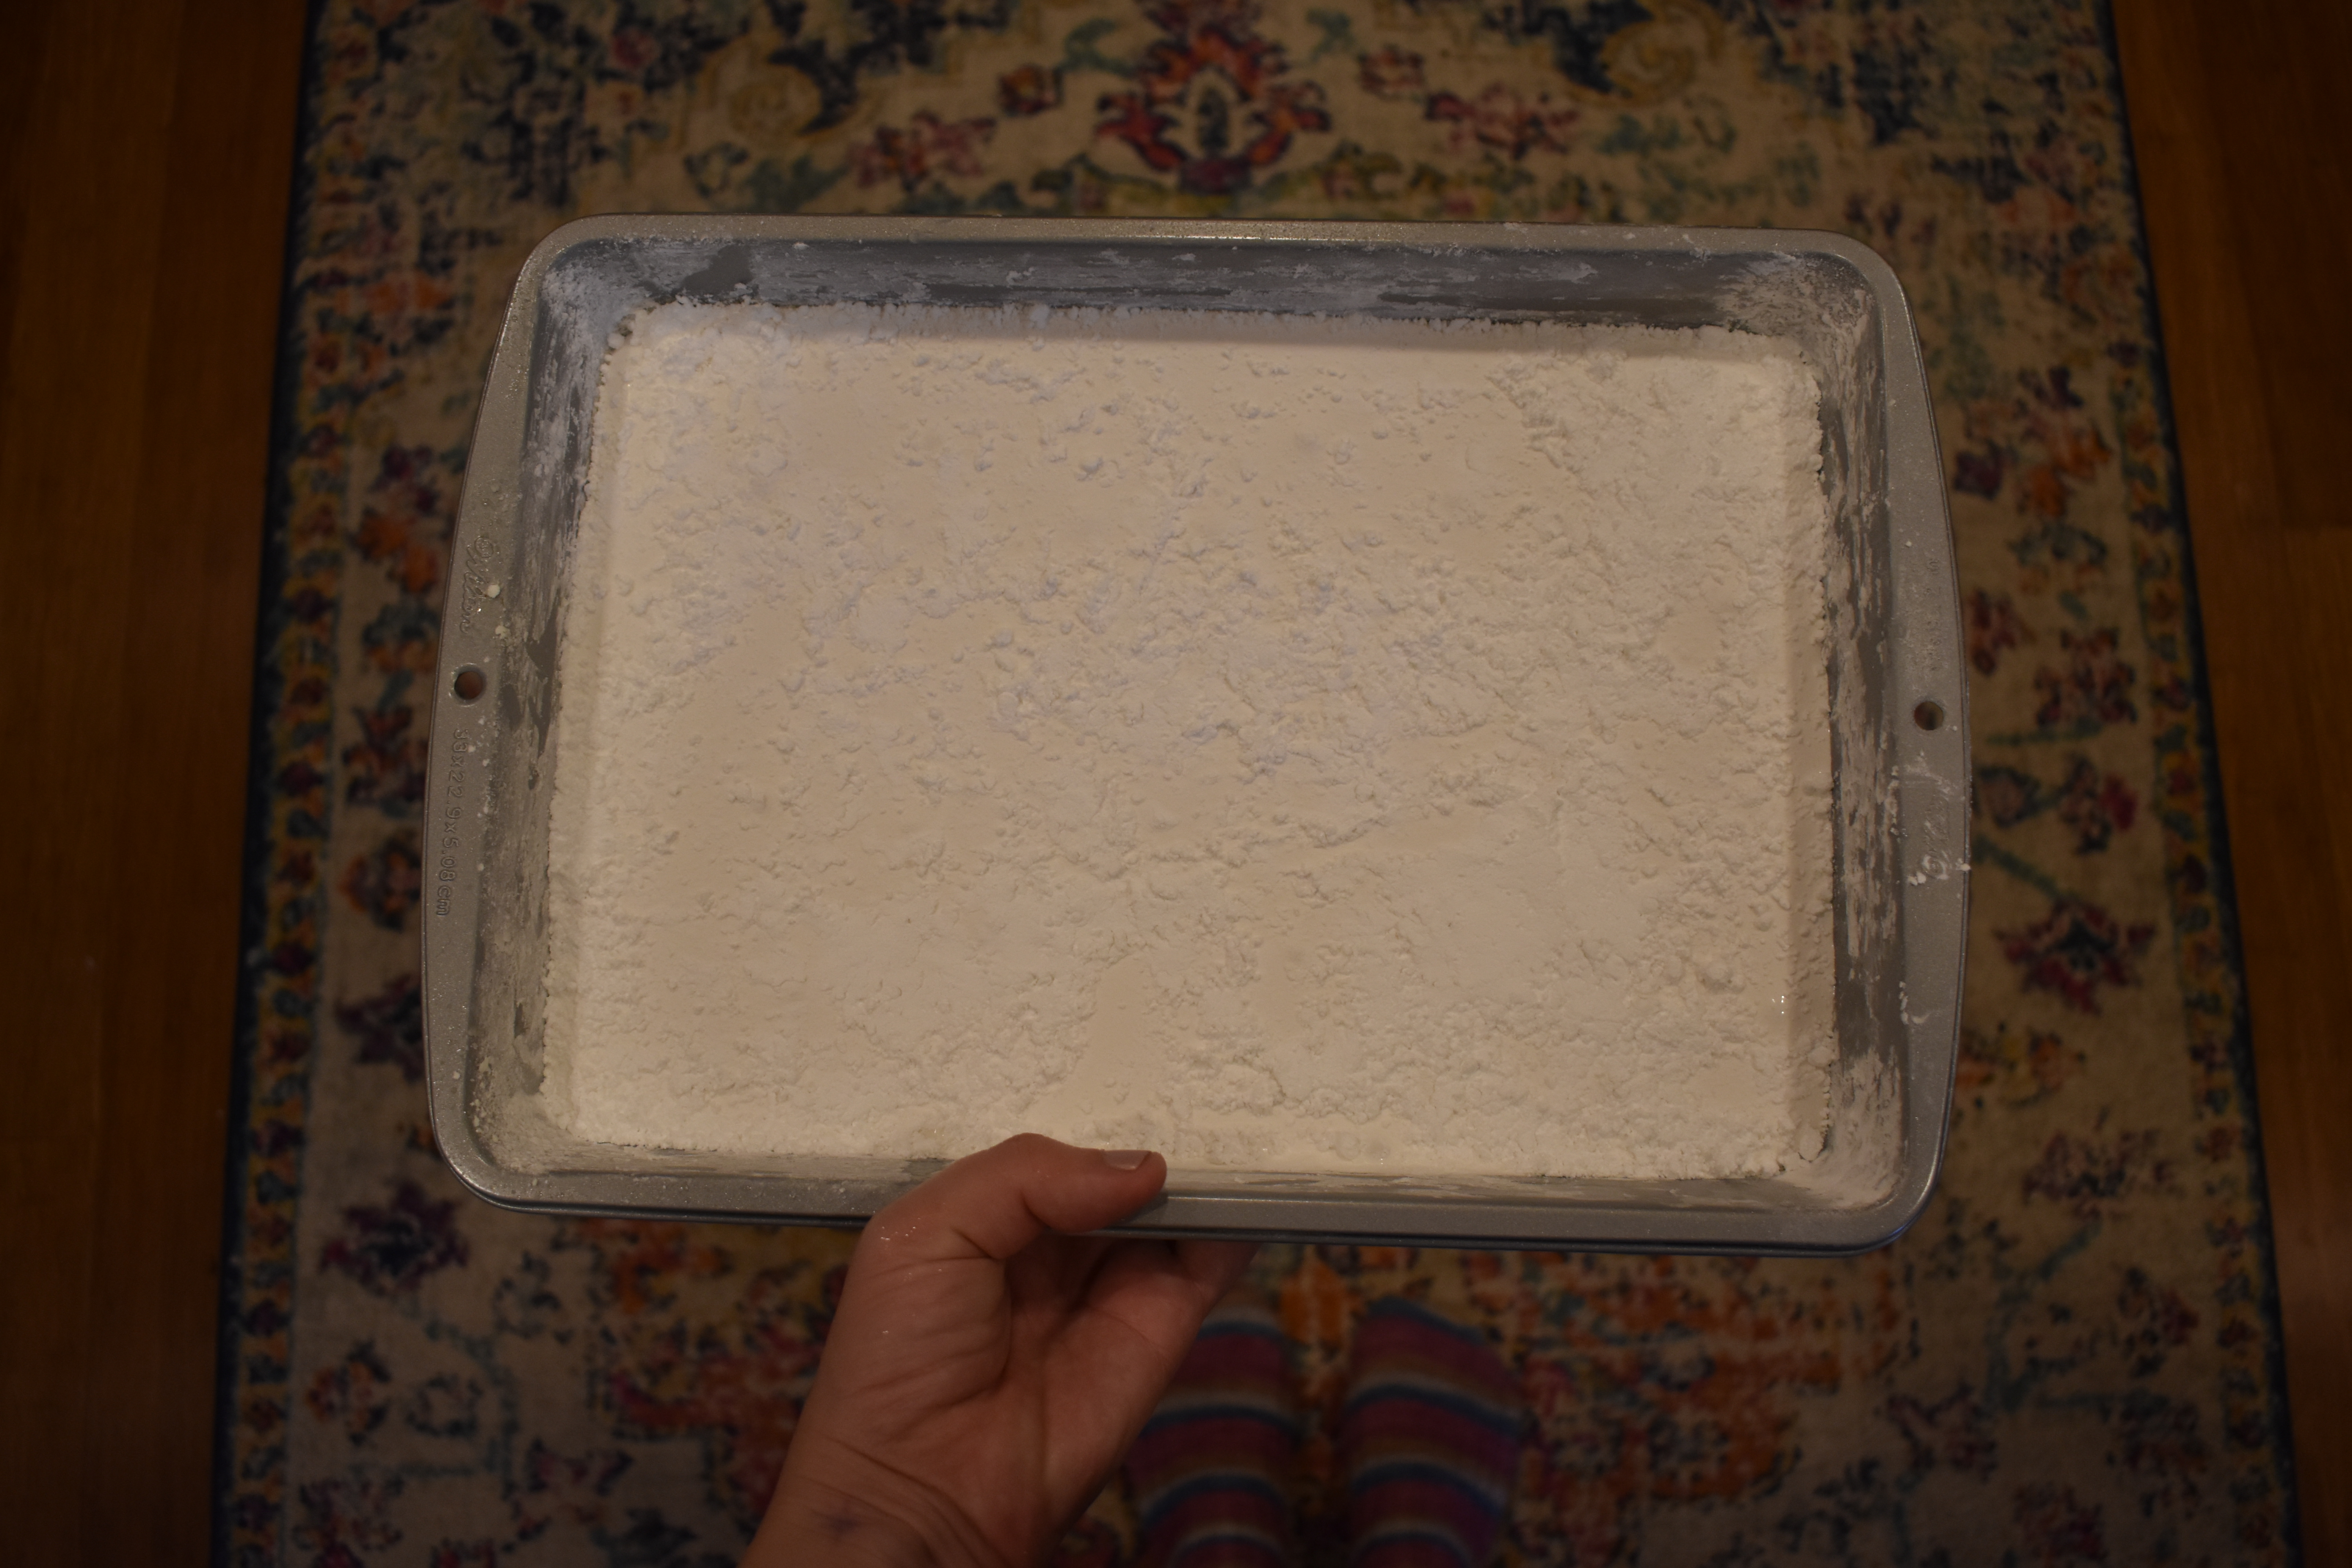
5. Generously dust an 8×12 baking pan with confectioners’ sugar. Pour marshmallow mixture into the pan. Dust top with confectioners’ sugar; wet your hands and pat it to smooth. Dust with more confectioners’ sugar and let stand overnight, uncovered, to dry out.
6. Turn out onto a cutting board. Cut marshmallows with a dry hot knife into 1 ½ inch squares, and dust with more confectioners’ sugar. Alternatively, dust small cookie cutters with confectioners’ sugar, and cut marshmallows with the cutters.
7. Enjoy!”
-Jennifer
We simply cannot wait to try out this delicious recipe. It’s the perfect complement to last year’s recipe for spiced hot cocoa. Remember, you can find the 12 Days of Winter Kits at your local yarn shop.
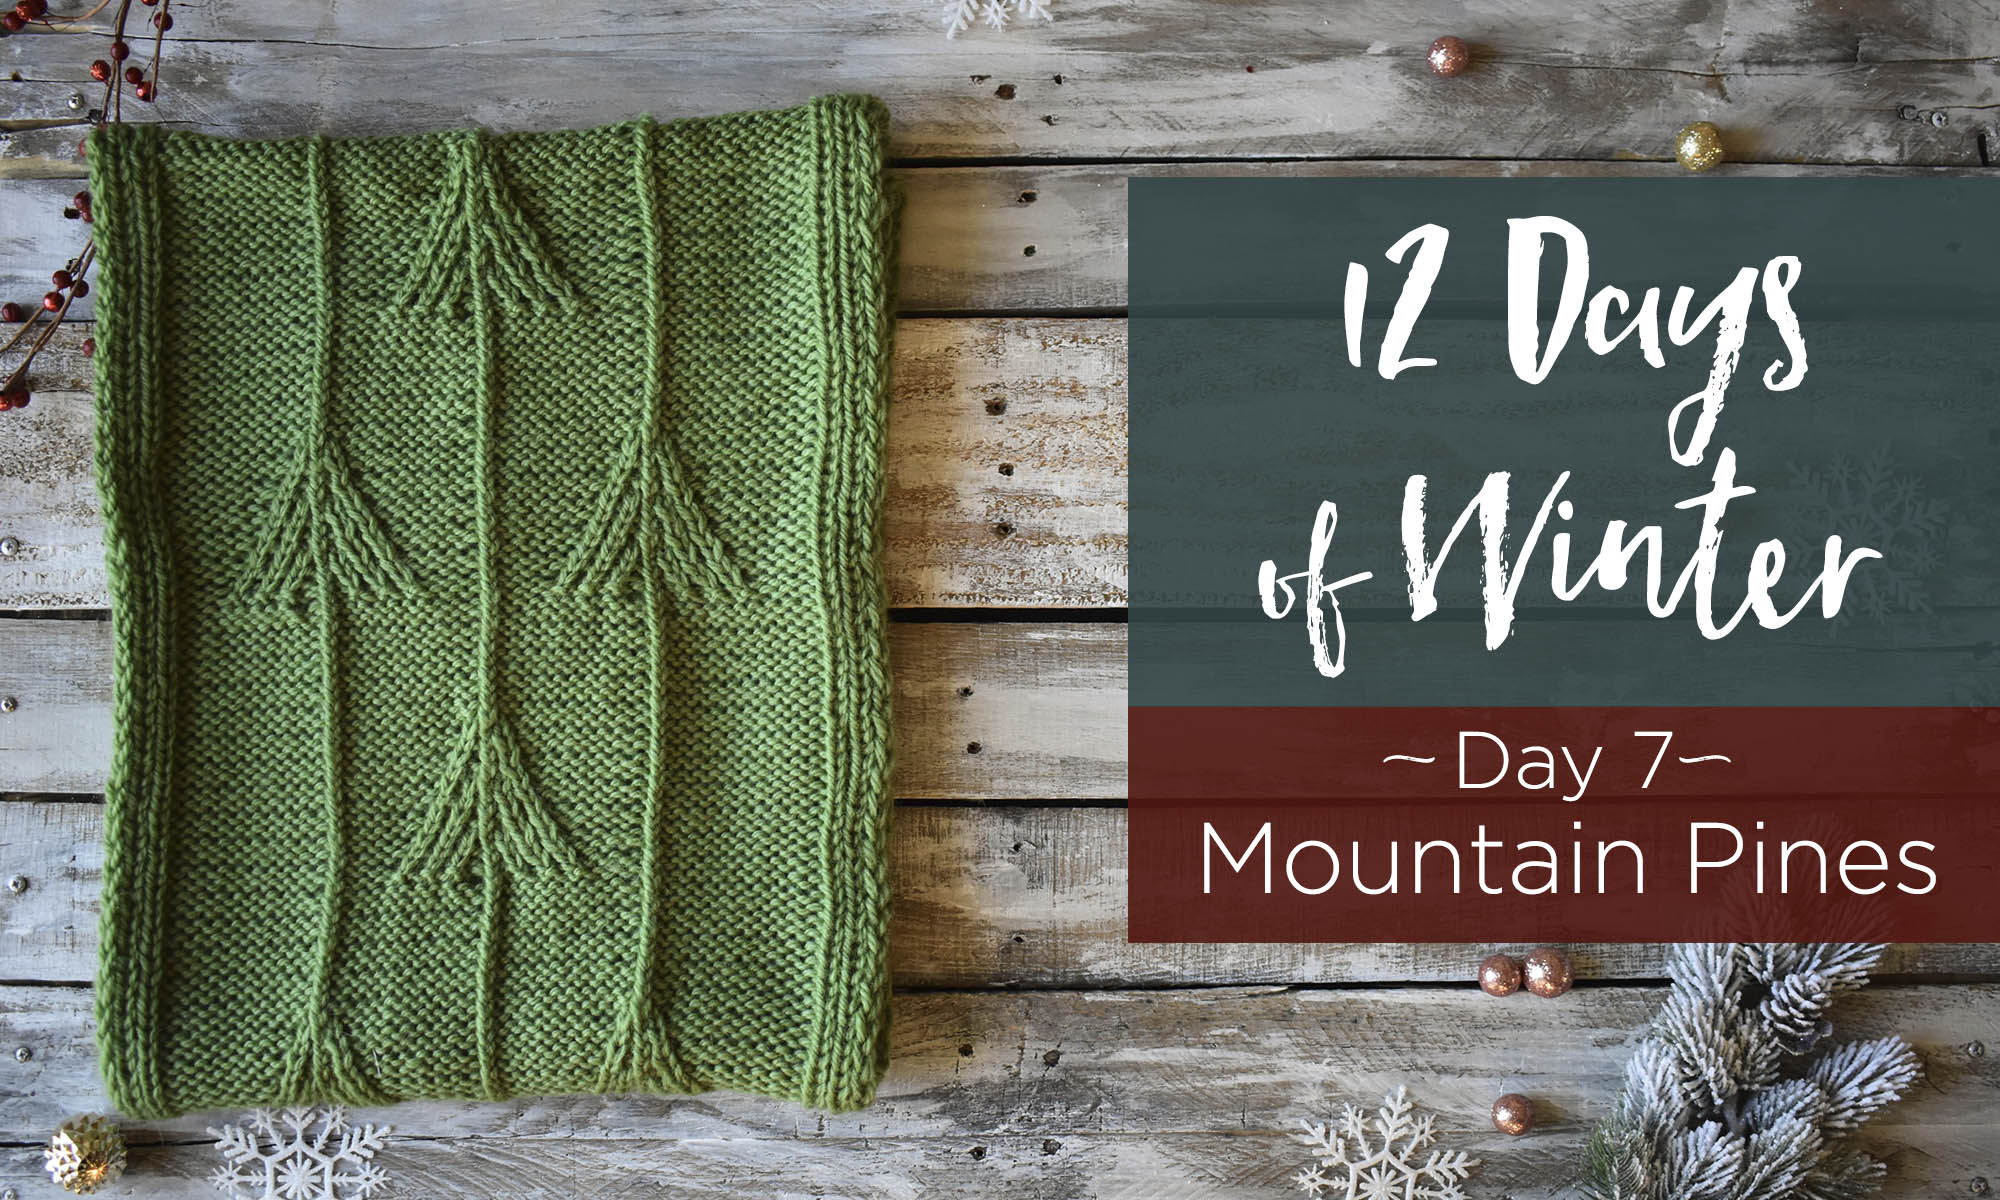
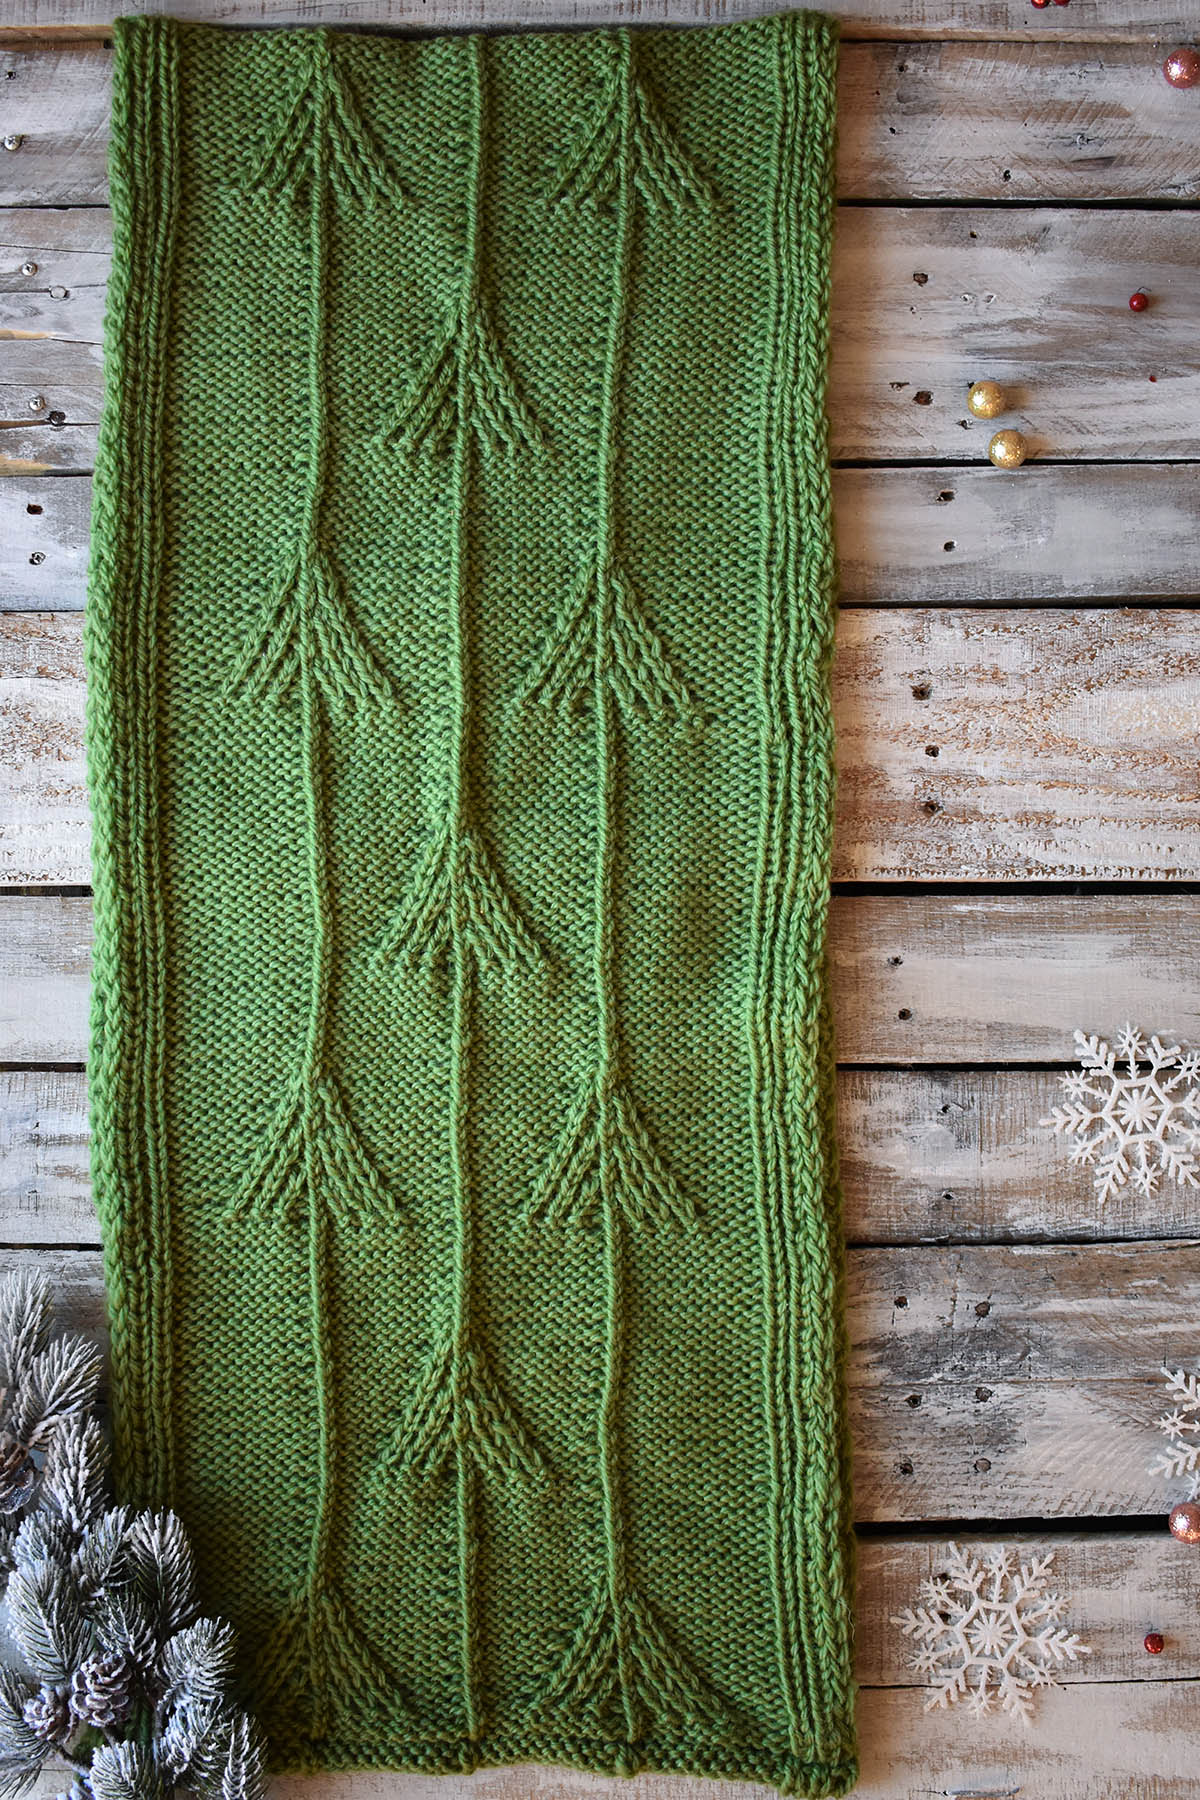
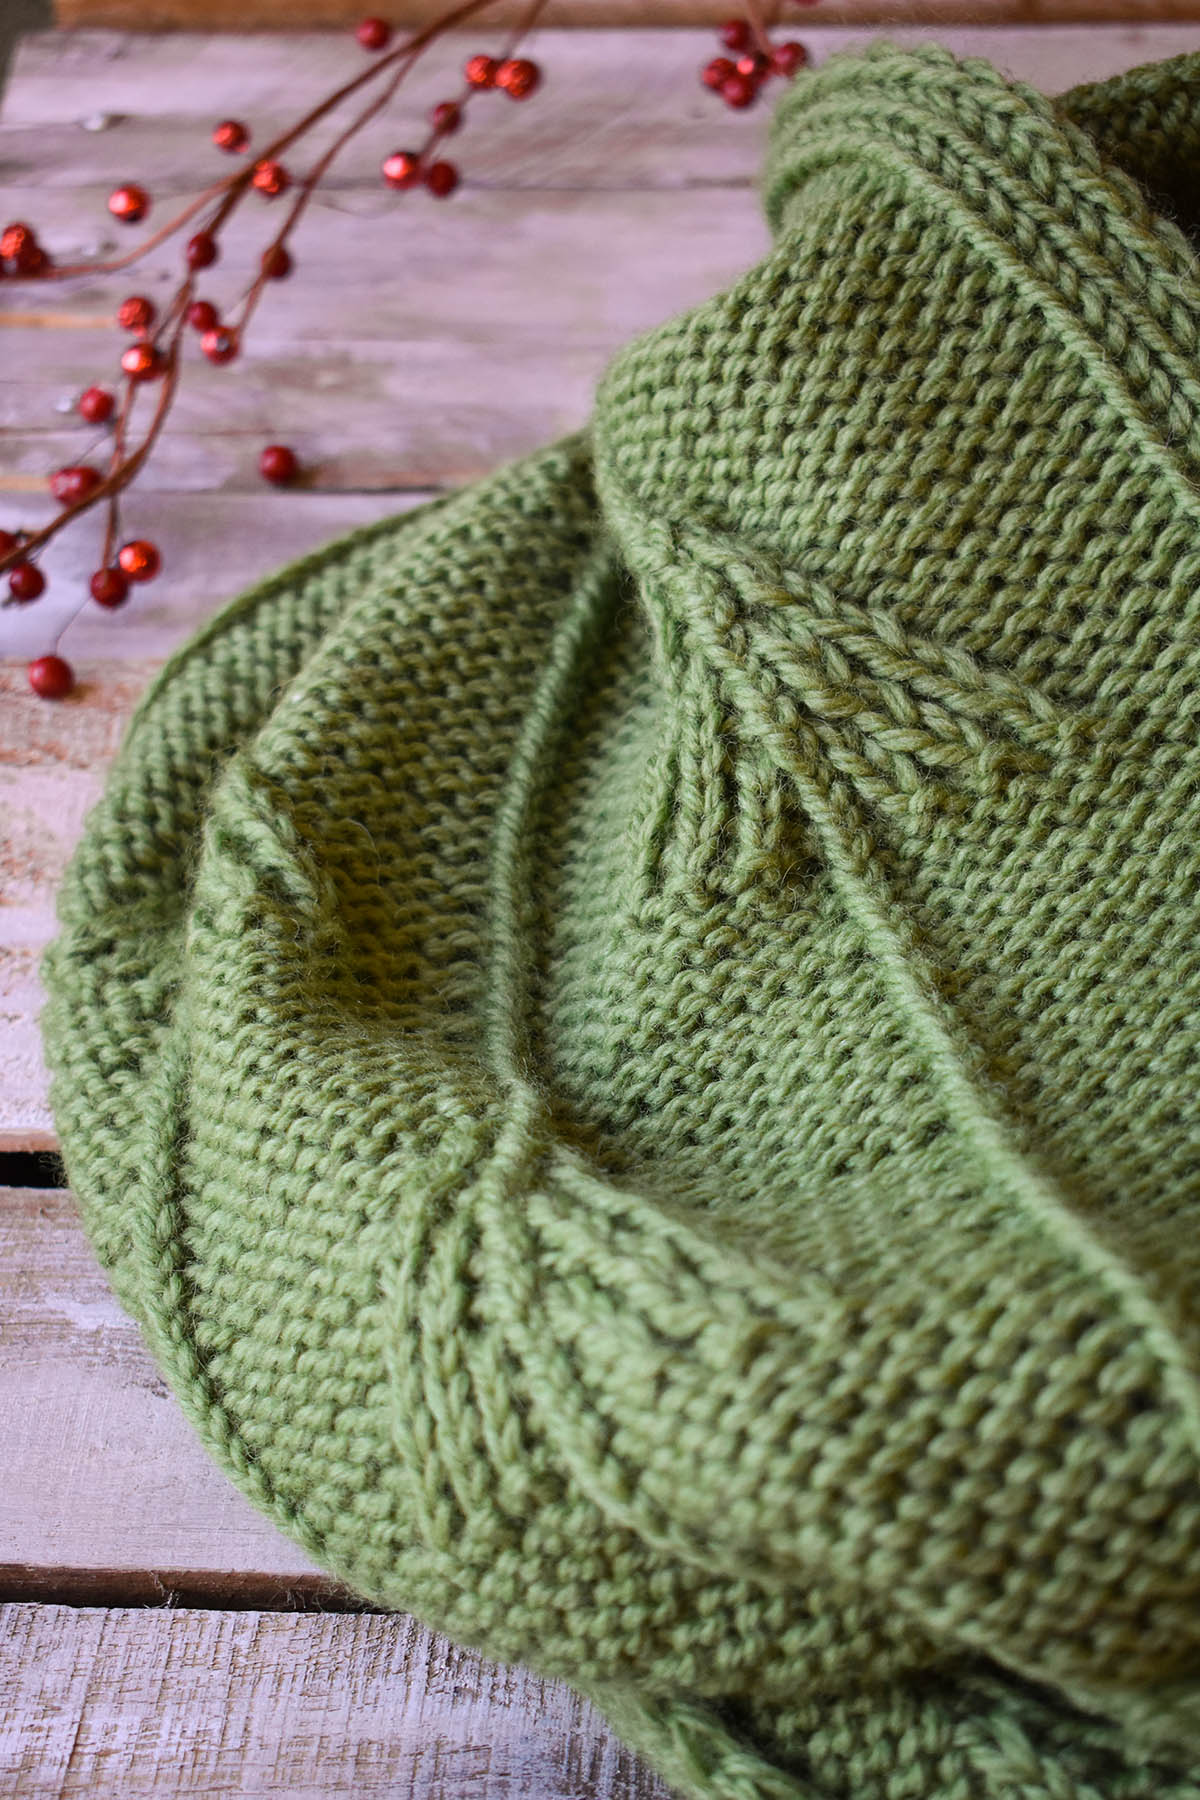
This is part 7 in a 12 part series highlighting designs from our 12 Days of Winter, Series 3 Edition.
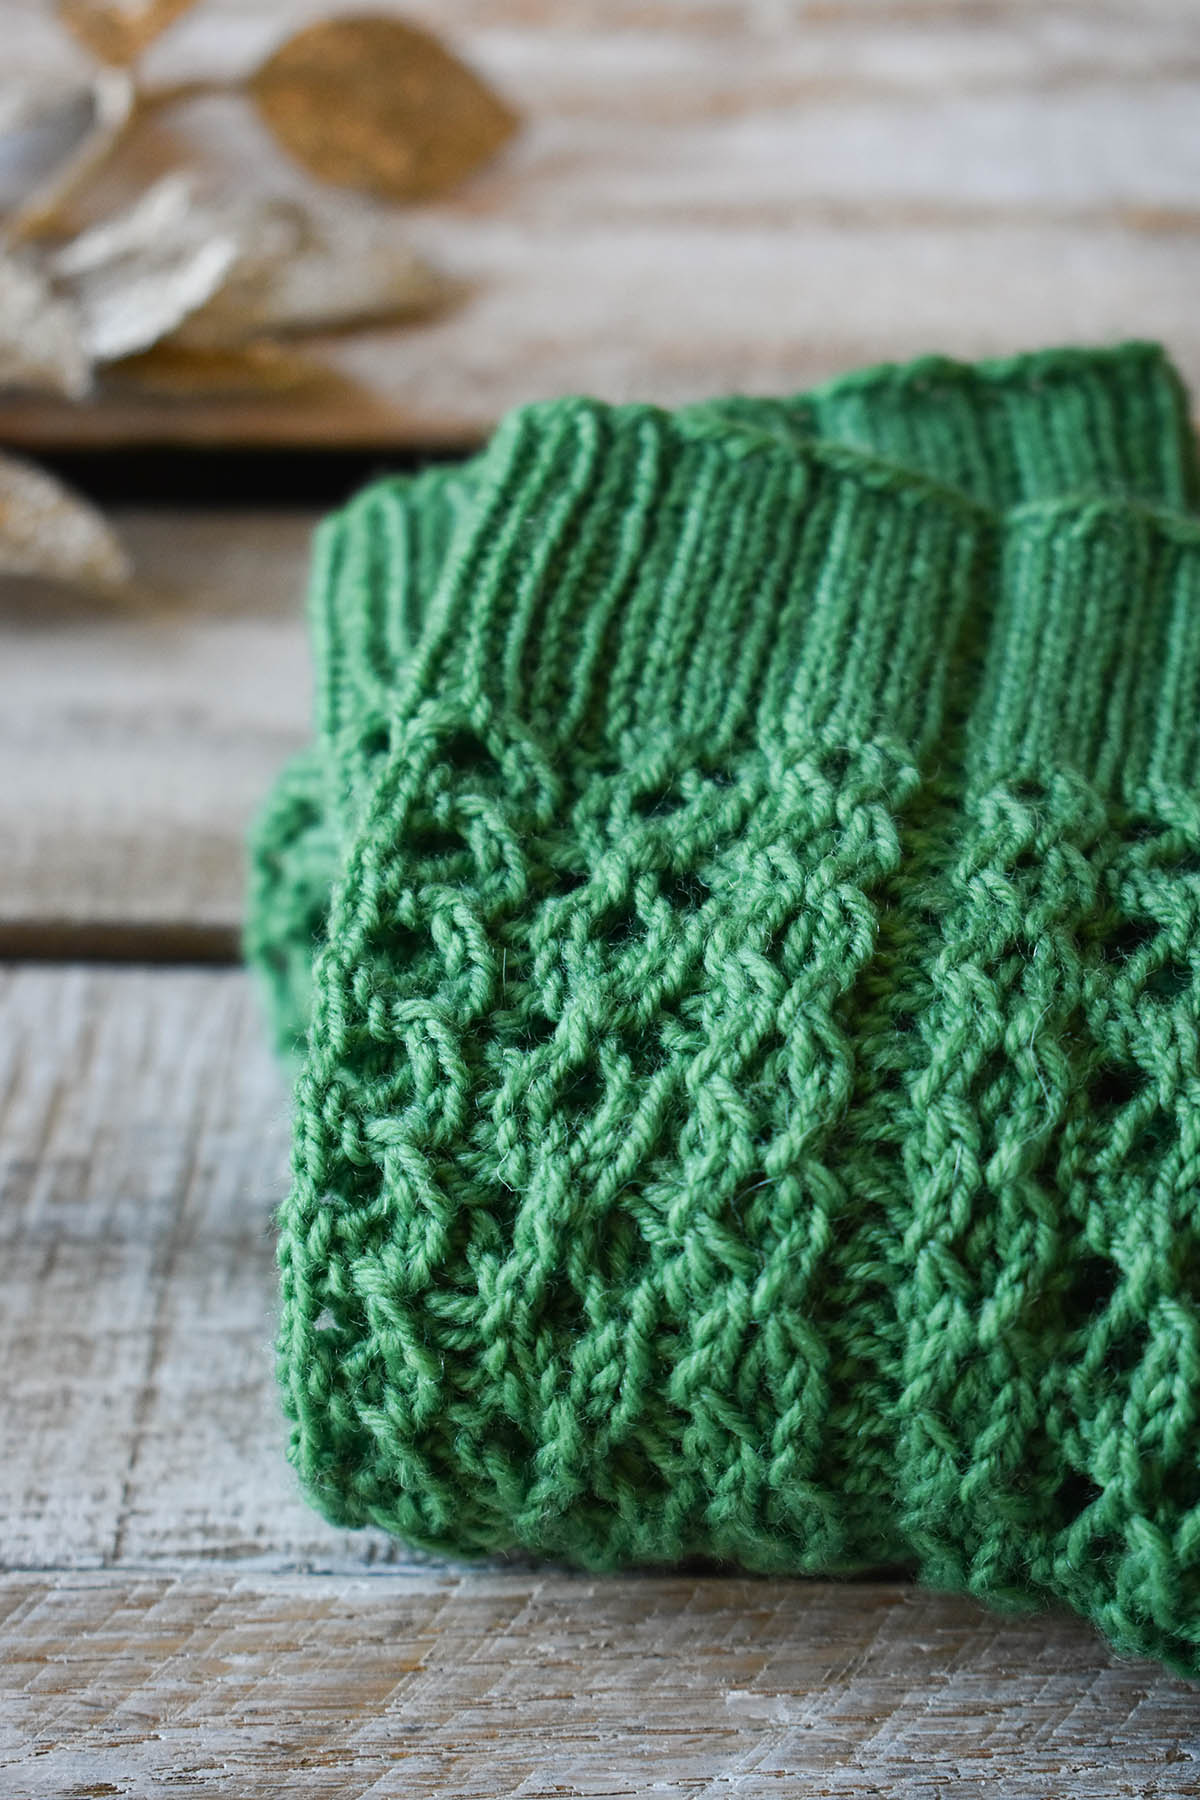
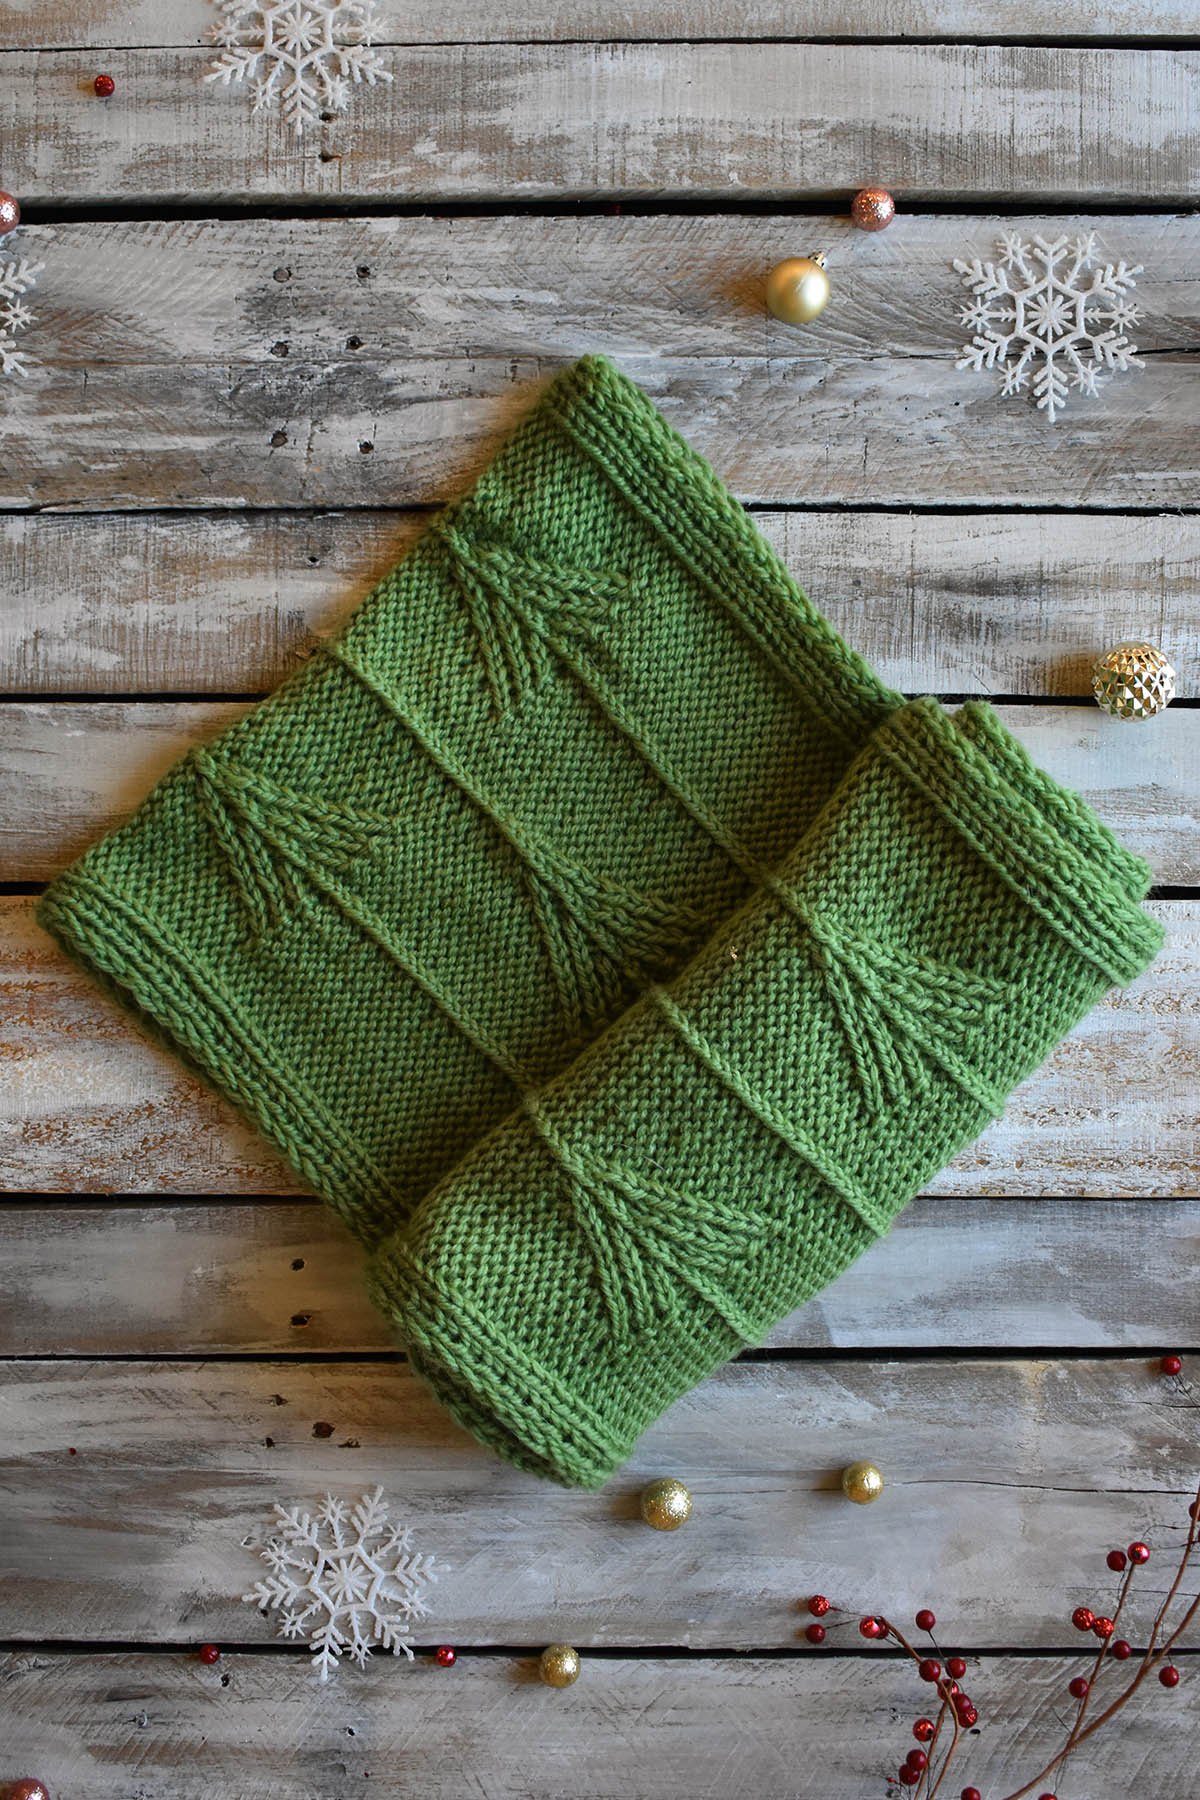
We’re a week into the 12 Days of Winter Kit Collection for 2019, and we hope you’re enjoying everything we’ve shared so far. Today we’re introducing an earthy green cowl that’s sure to hold your interest. Say Hello to the Mountain Pines Cowl, designed by Jennifer Sadler. This deliciously squishy cowl features twisted stitches that form the shapes of evergreen trees. Knit in soft, plump Deluxe Chunky, this is a fairly quick project that will keep you warm all winter long.
Jennifer, who is based in Asheville , North Carolina, got her inspiration from pine trees. Here is what she had to say:
“Here in the North Carolina mountains, pine trees are easily found – there are actually six different kinds of pine trees native to the state. I love how in the winter they stay green, adding a touch of color to an otherwise brown landscape, and when it snows, the branches let the snow pile up, creating a pillow of white on top of the green needles. The Mountain Pines Cowl pays homage to those green monster trees.
The pine tree motif is much simpler than it looks to knit. It uses twisted stitches, and no cable needle! Once you’ve experienced the ease of twisted stitches, you’ll want to incorporate them into your knitting as much as possible – they create a wonderful visual texture, with hardly any extra work.”
-Jennifer
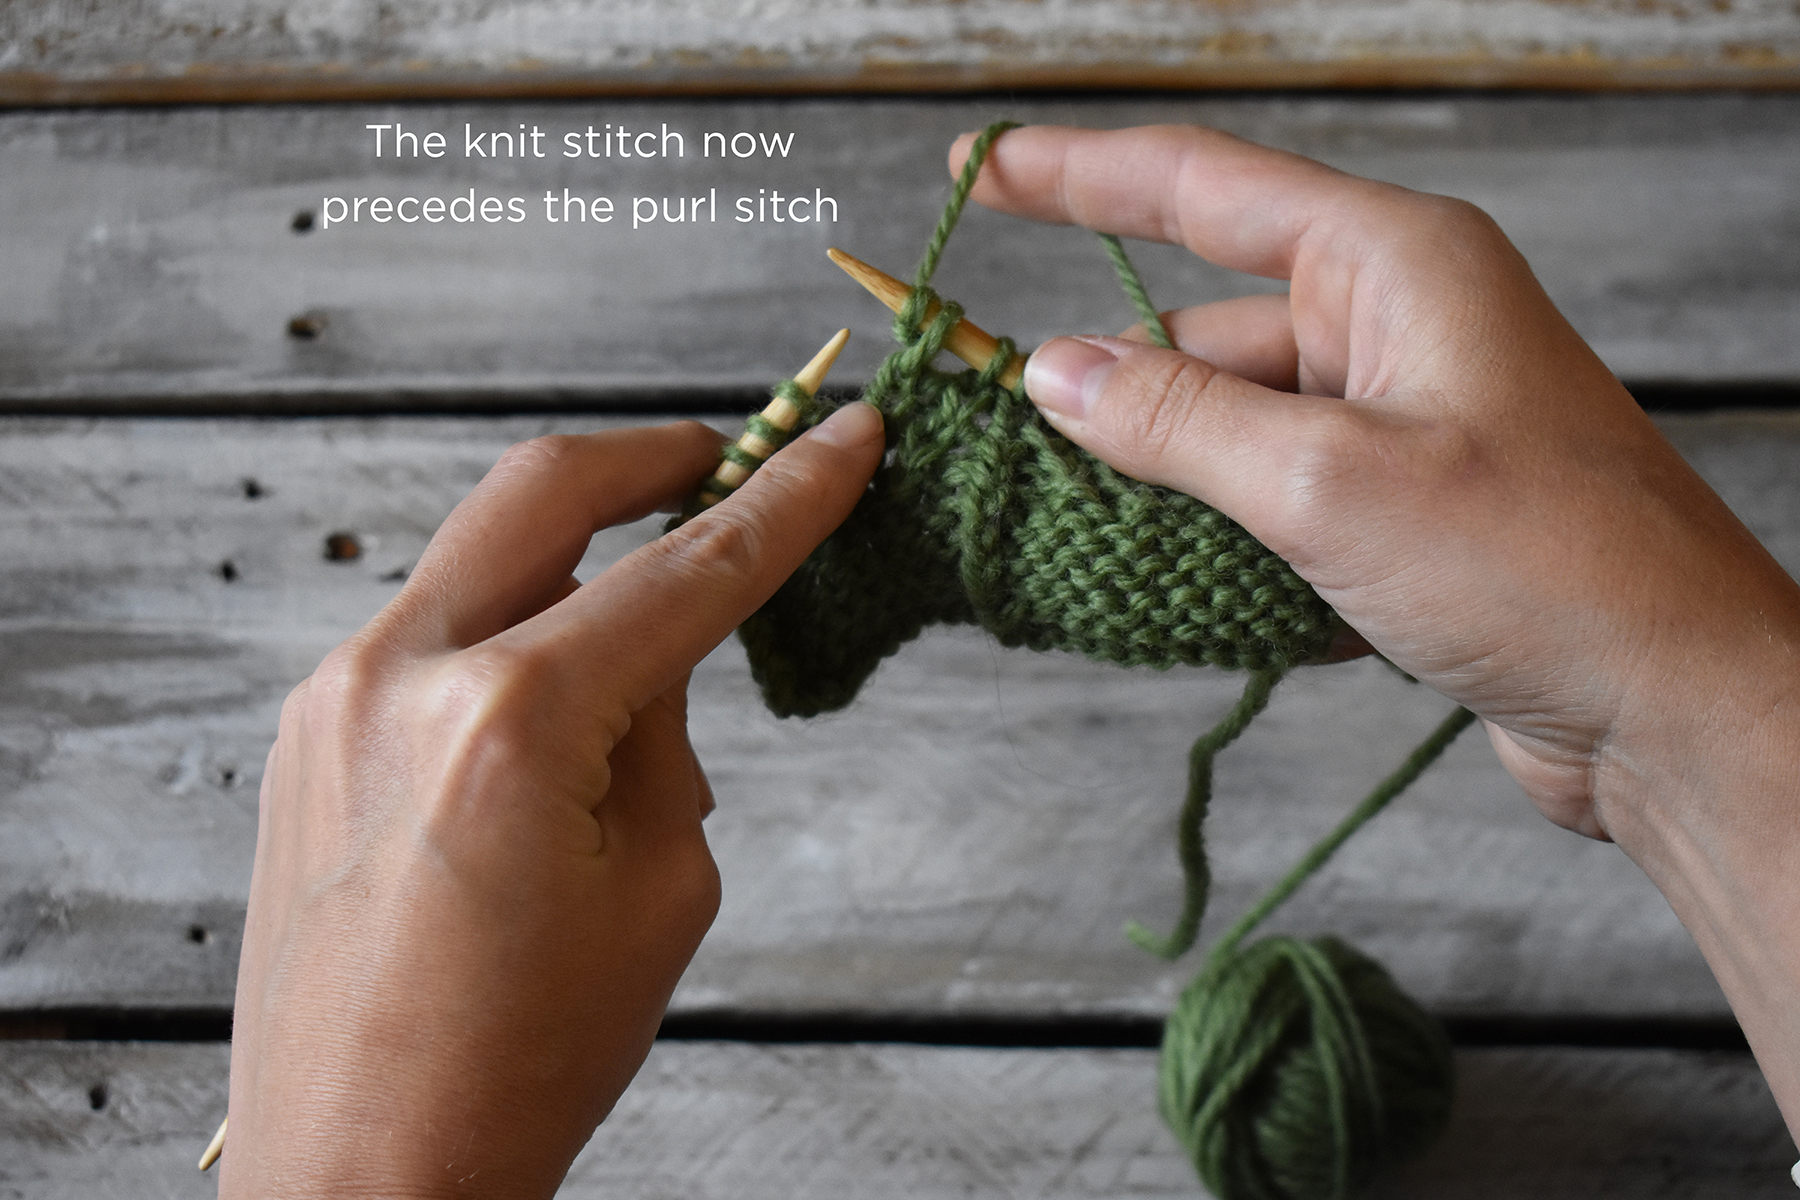
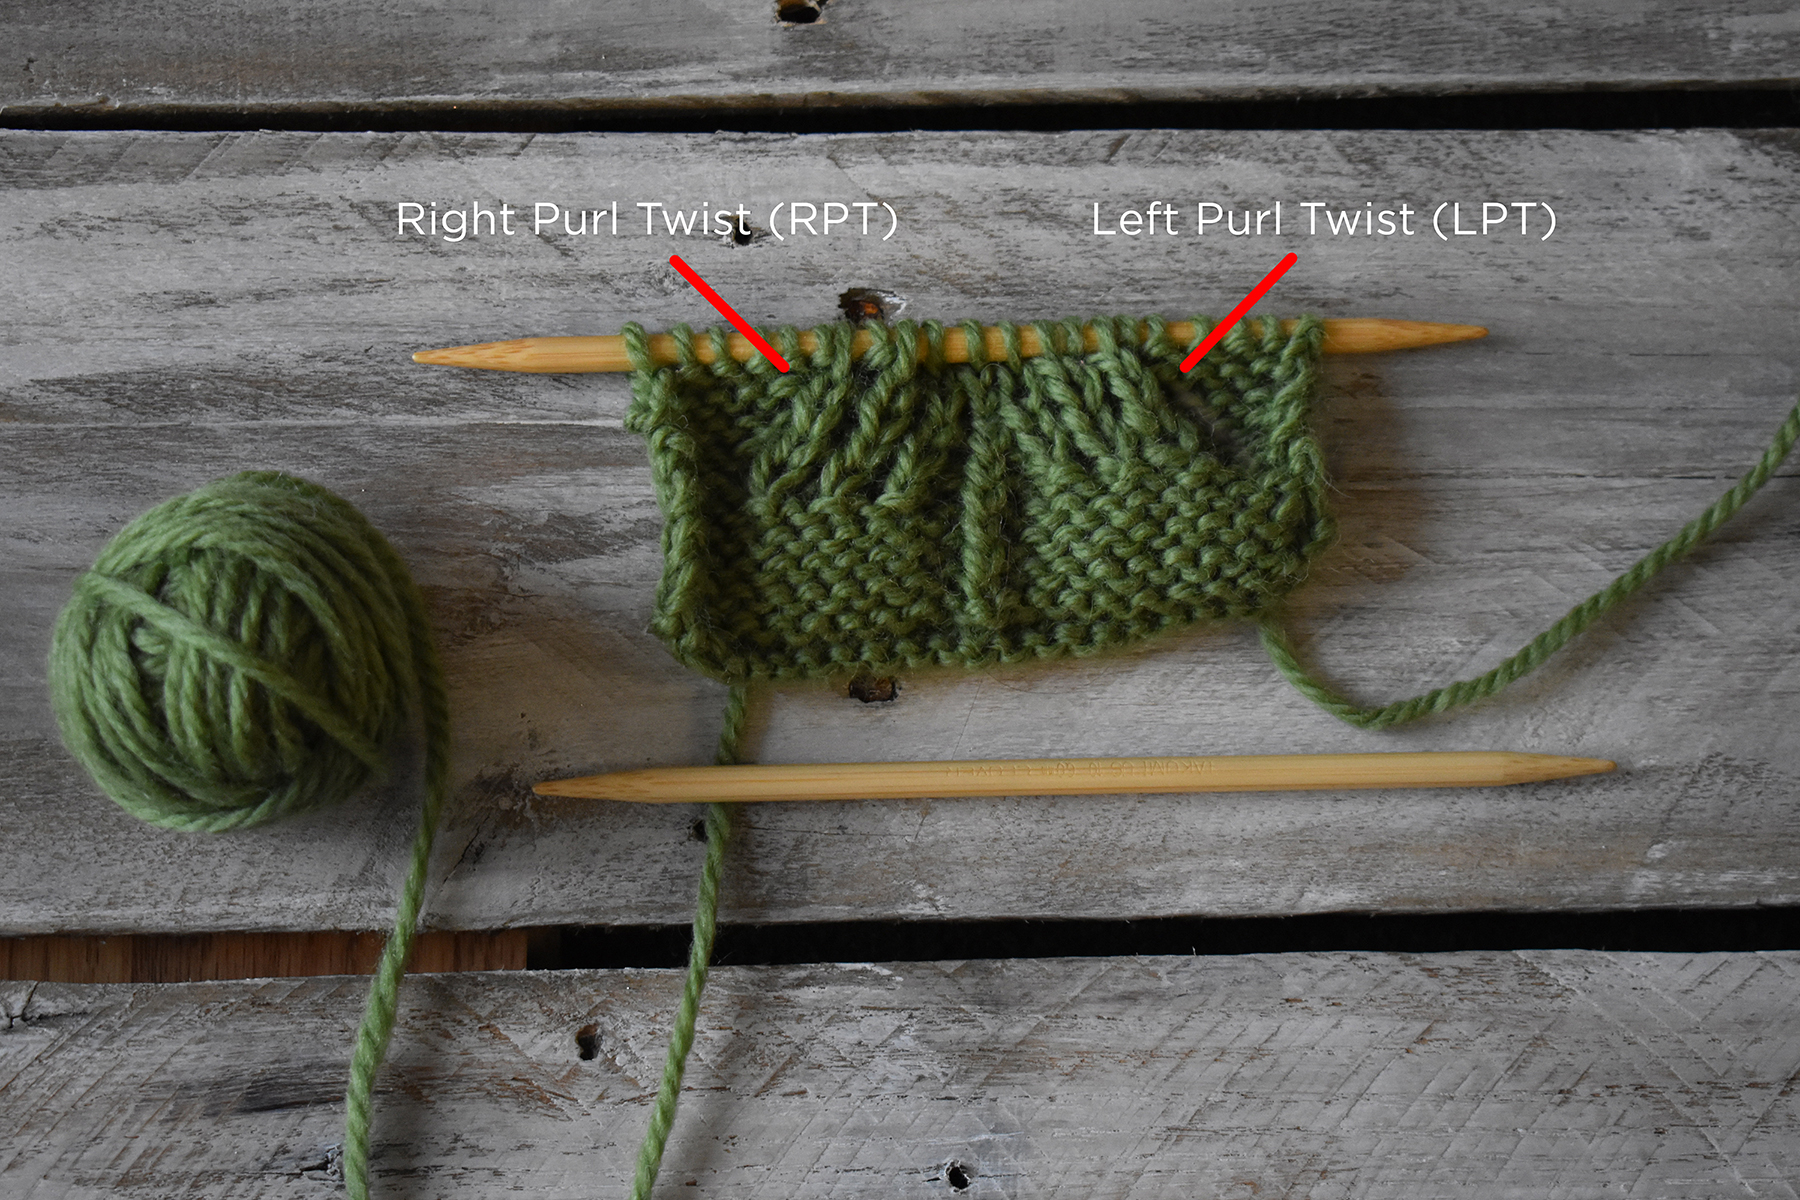
I couldn’t agree more with Jennifer – twisted stitches are a joy to work, especially when you get the hang of them. It eventually feels intuitive and you’ll be glad to have this skill in your toolbox. The Mountain Pines Cowl uses purl twists, so that’s what we’ll focus on in this tutorial. You’ll learn the Left Purl Twist (LPT) and the Right Purl Twist (RPT). The Left Purl Twist (LPT) leans to the left, and the Right Purl Twist (RPT) leans to the right. We’ll cover the LPT first, followed by the RPT.
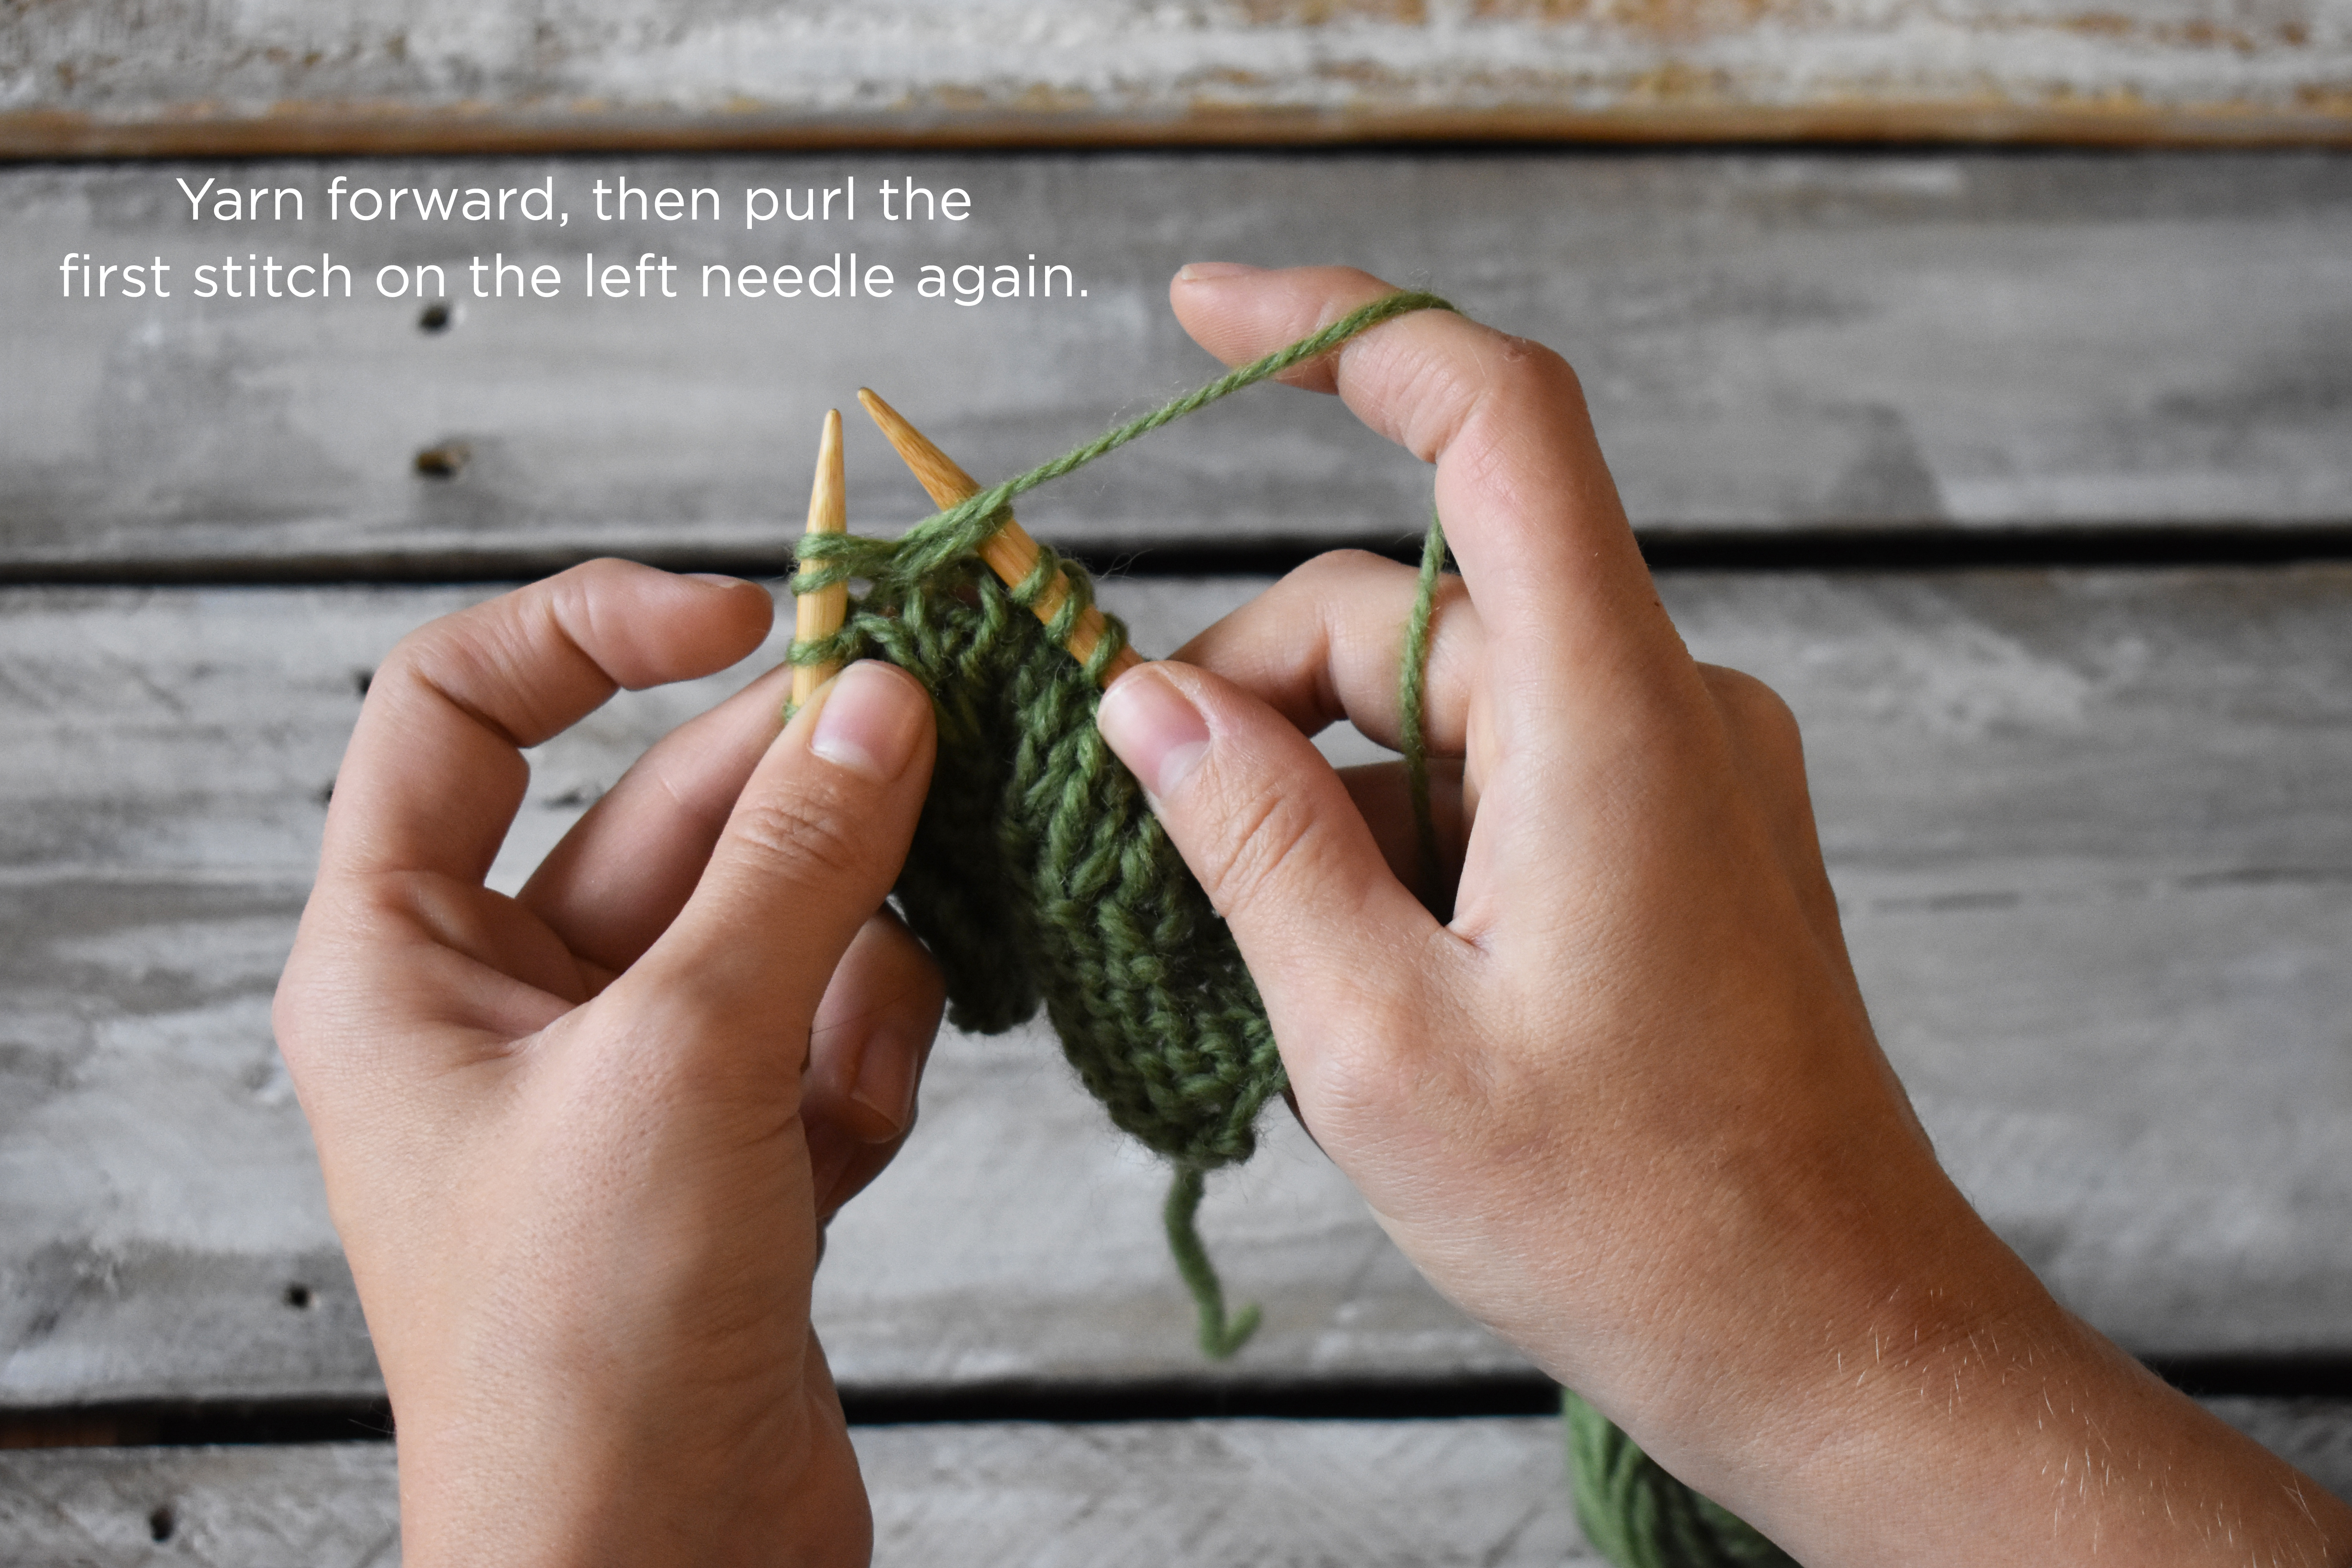
Left Purl Twist Start by making a swatch. Swatches are not only crucial for getting the finished item you want but are also great for practicing new stitches. Work in your pattern until you’ve reached the two stitches you need to twist. I’ve highlighted these stitches in purple so it’s easier to see. As you can see we have a knit stitch and a purl stitch on the left-hand needle. We want to change their positioning by moving the knit stitch over the top of the purl stitch.Admittedly, the LPT is just a bit more complex than the RPT. It might feel a little fiddly until you get the hang of it. Remember the order of the stitches from the previous photo? The order of the stitches from right to left was Knit, Purl. For the LPT, the first step is to purl the second stitch on the left needle through the back loop. This stitch is highlighted in blue. As you can see, the first (knit) stitch on the left needle remains in place. After you purl the second stitch through the back loop, do not drop the first and second stitches off the left needle. Next, move your yarn to the back of the work and knit the first stitch on the left needle. Now you can drop both the first and second stitches on the left needle. These stitches are highlighted in purple. After you drop them, you’ve completed the LPT. Notice how the stitches have changed position, and the knit stitch now leans to the left, over top of the purl stitch. Well done, now on to the RPT!Right Purl TwistWork in your pattern until you’ve reached the two stitches you need to twist. I’ve highlighted these stitches in purple so it’s easier to see. Here we have a purl stitch that precedes a knit stitch. We want to change the position of these stitches, so that the knit stitch leans to the left, over the purl stitch. Begin by knitting two stitches together, but do not drop the stitches from your needle. As you can see, the two stitches remain on the left needle, but there is now a new stitch on the right needle. Bring your yarn to the front, then purl the first stitch on the left needle. Now you can drop the two stitches on the left needle – I’ve highlighted them in purple so it’s easier for you to see. And that’s it – you’ve completed your RPT. Notice how the knit stitch now precedes the purl stitch.
I hope you find this tutorial helpful, and I hope that it drums up excitement for you to start knitting this lovely cowl. Like Jennifer, I’m a big fan of coniferous trees, so this design sings to me!
Remember, you can find the 12 Days of Winter Kits at your local yarn shop. Happy crafting!
This is part 4 in a 12 part series highlighting designs from our 12 Days of Winter, Series 3 Edition.
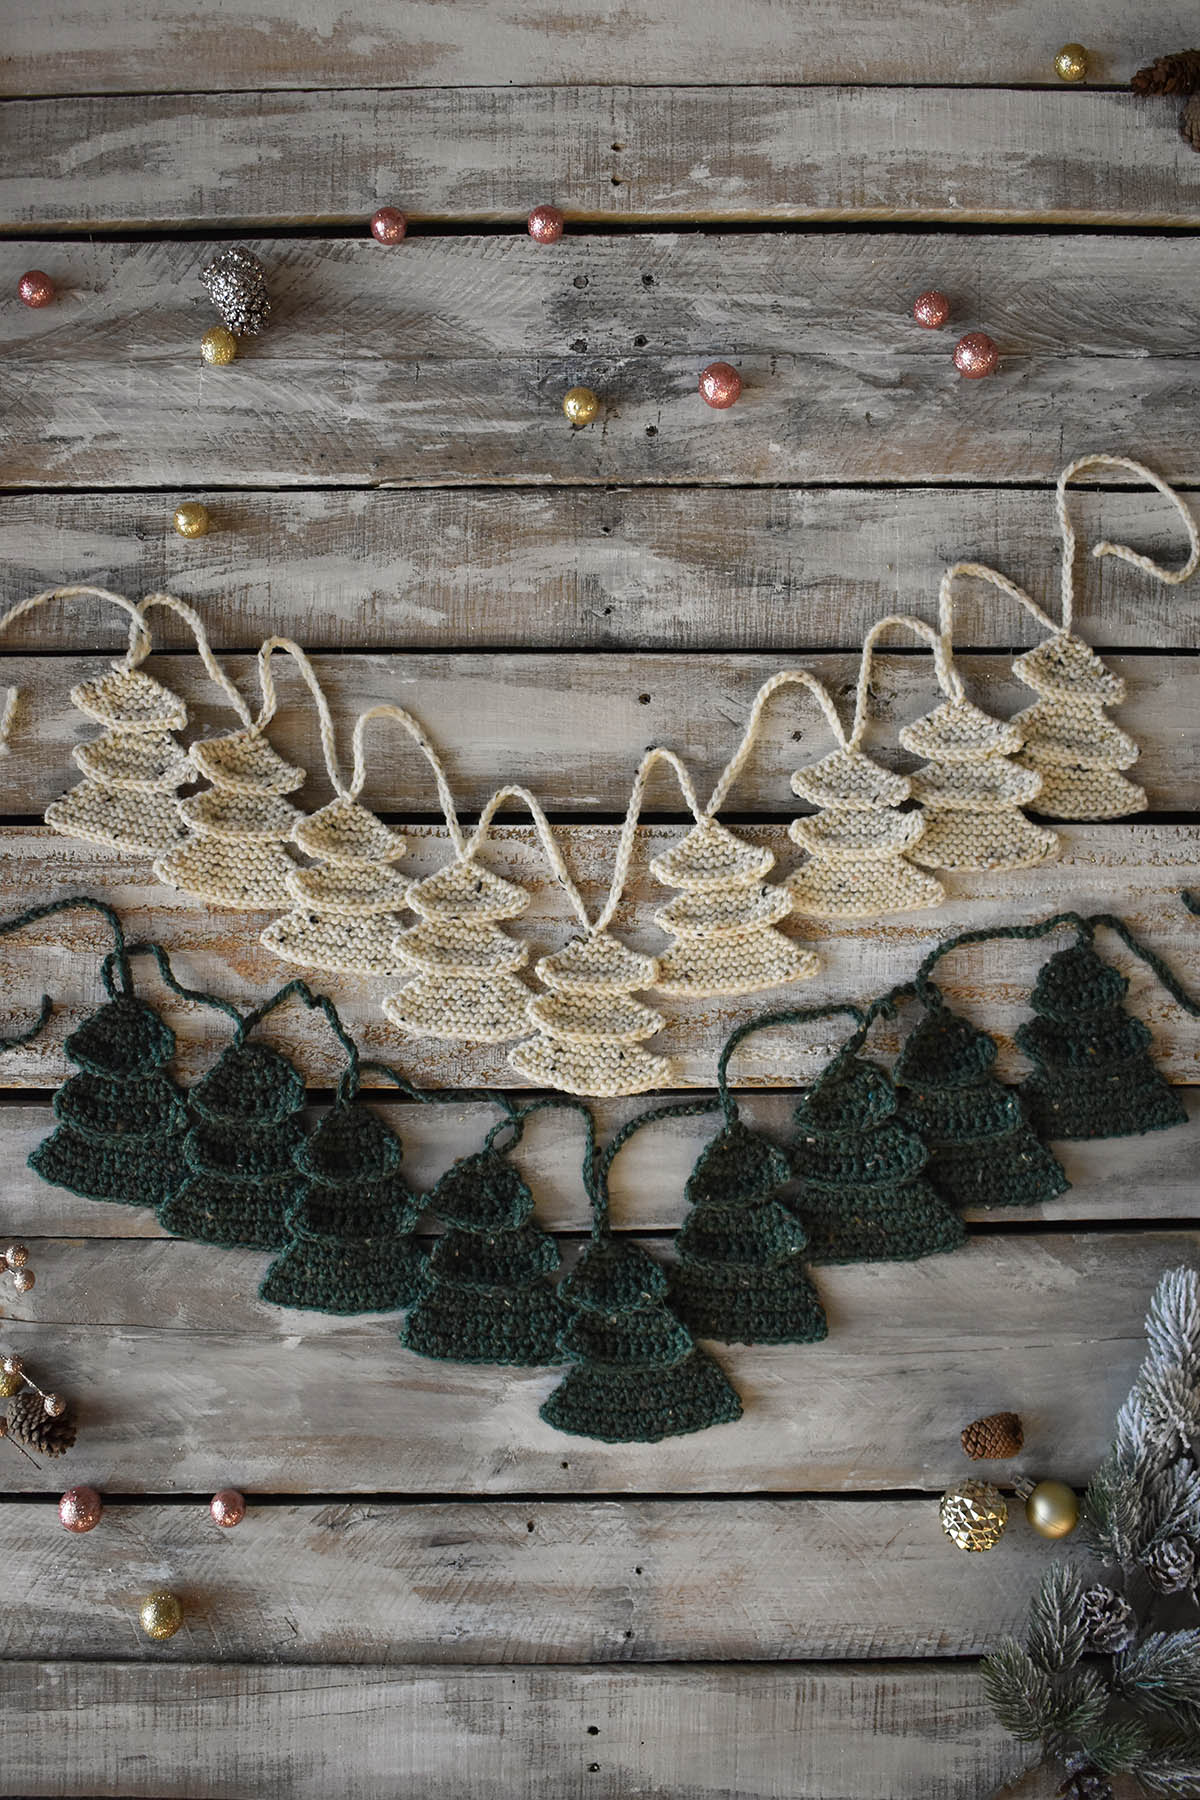
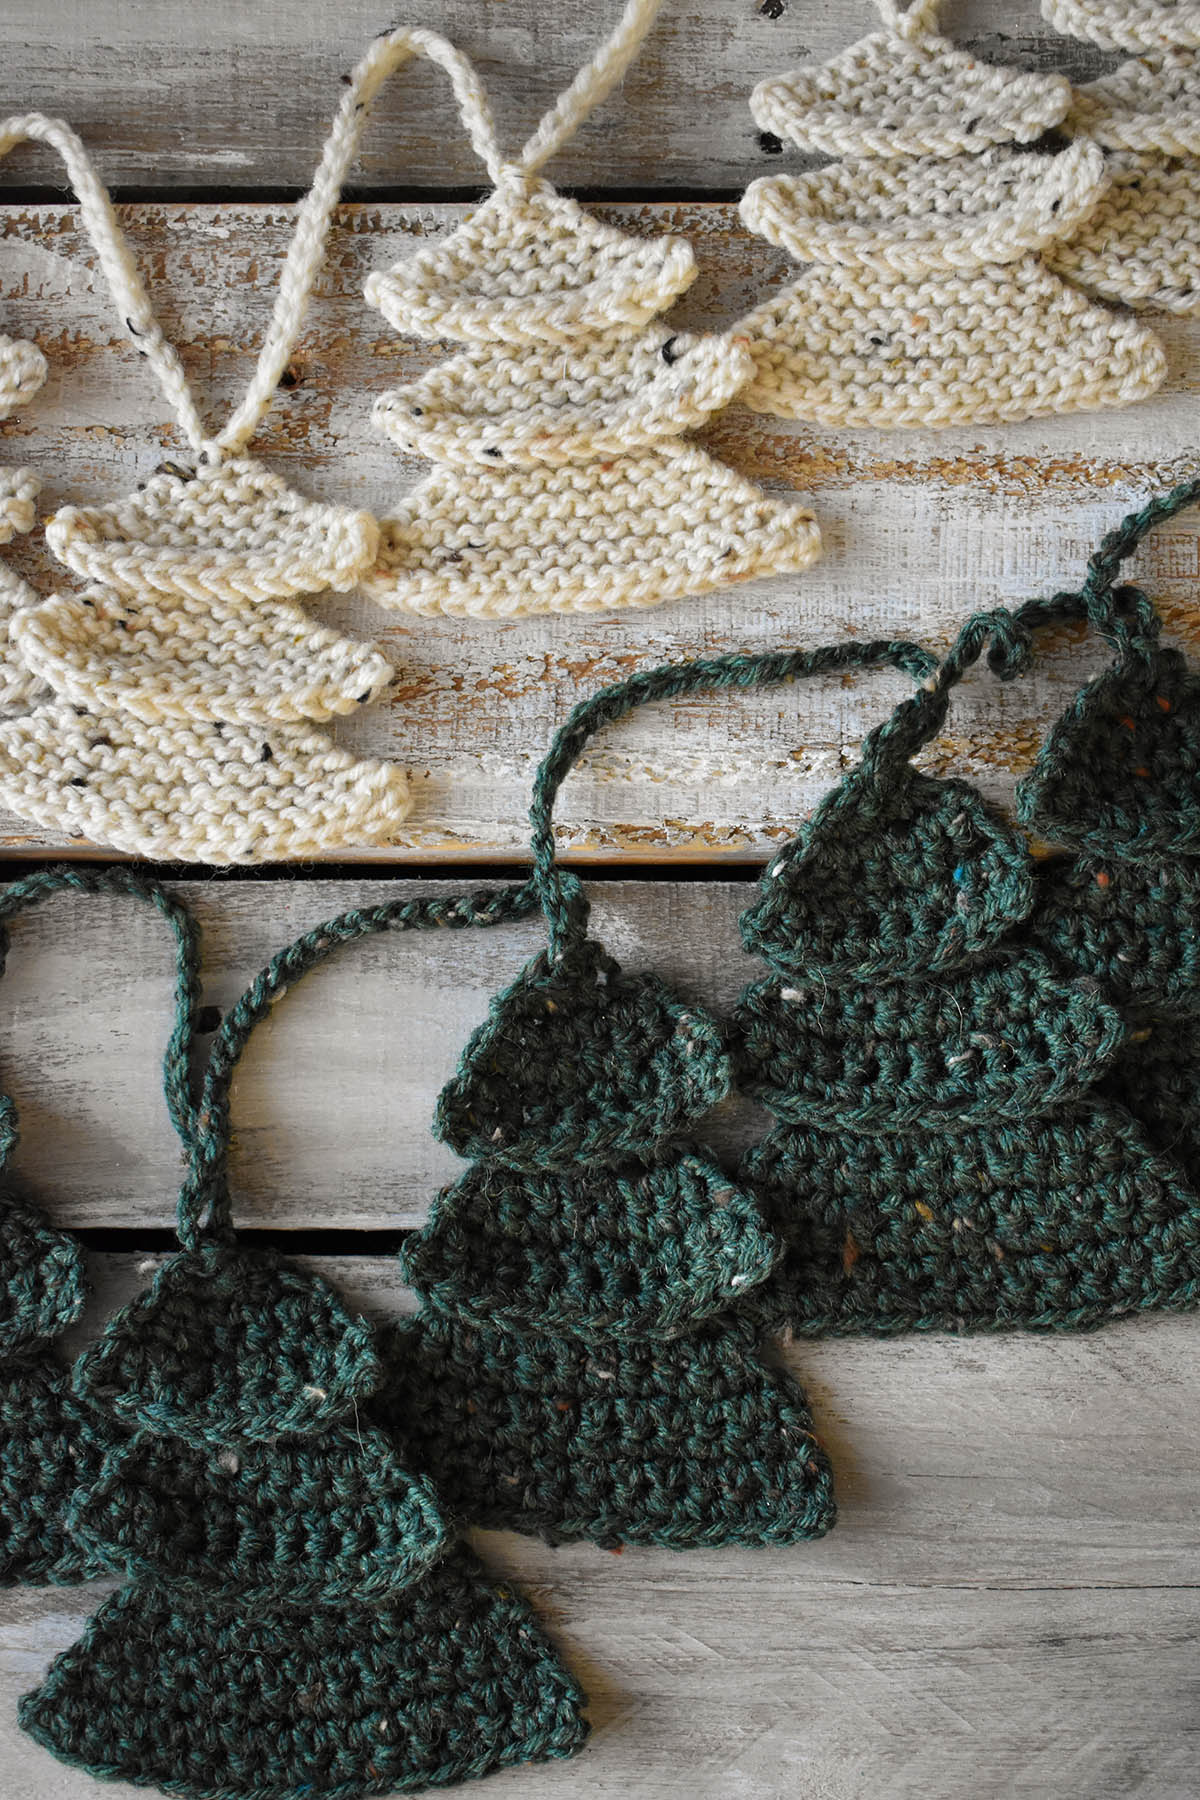
It’s Day 4 of our 12 Days of Winter Kit Collection. Today we’re excited to share the Forest Garland, designed by the amazing Edie Eckman. It’s the perfect diy-decor for your home this holiday season. The best part? This kit includes both a knit and crochet pattern – each worked up in beautiful Deluxe Worsted Tweed Superwash.
The design is equal parts elegant and whimsical. Simple design paired with neutral, but earthy colors make for a decoration that looks as great in a minimalist home as it would in a home with loads of decorations. We love how the tweedy nubs in Deluxe Worsted Tweed Superwash nod both to nature and to ornaments that adorn Christmas trees.
On top is the knit version of the trees, on the bottom is the crochet version.
Whether you knit, crochet, or dabble in both, crafting these little trees is downright addictive. They’re also super beginner-friendly. They’re simple and offer skill-building opportunities. Because they’re small and you make nine trees for each garland, they offer plenty of time to practice techniques if they are new to you.
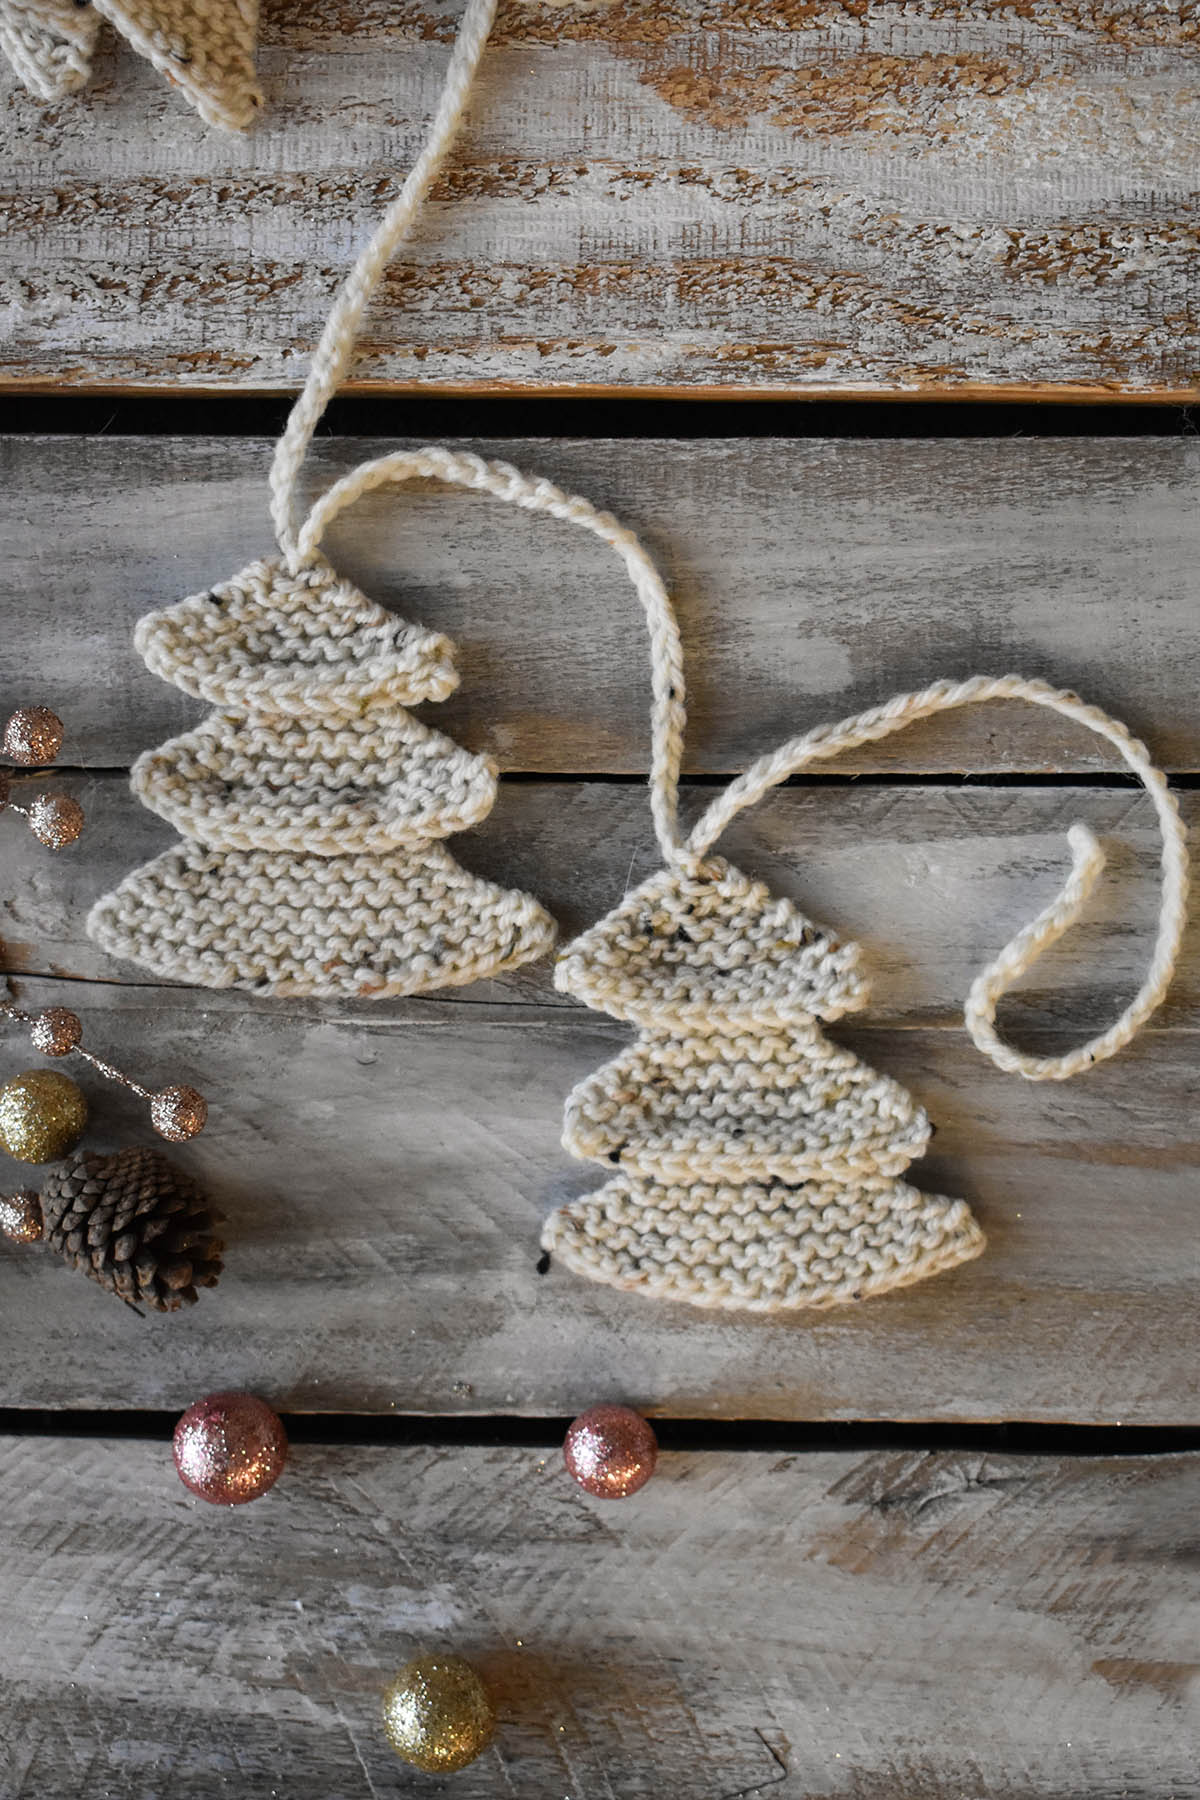
The knit version of the Forest Garland, worked up using Deluxe Worsted Tweed Superwash in the Porcelain colorway.
The knit version is comprised of garter stitch, the most basic stitch and it is the first stitch knitters learn. New knitters will learn to increase stitches by knitting into the front and back of a stitch, which creates the shape of each tier. They’ll also learn how to pick up stitches, which is the joining method for each tier. More experienced knitters will enjoy the relaxation and speed of this project.
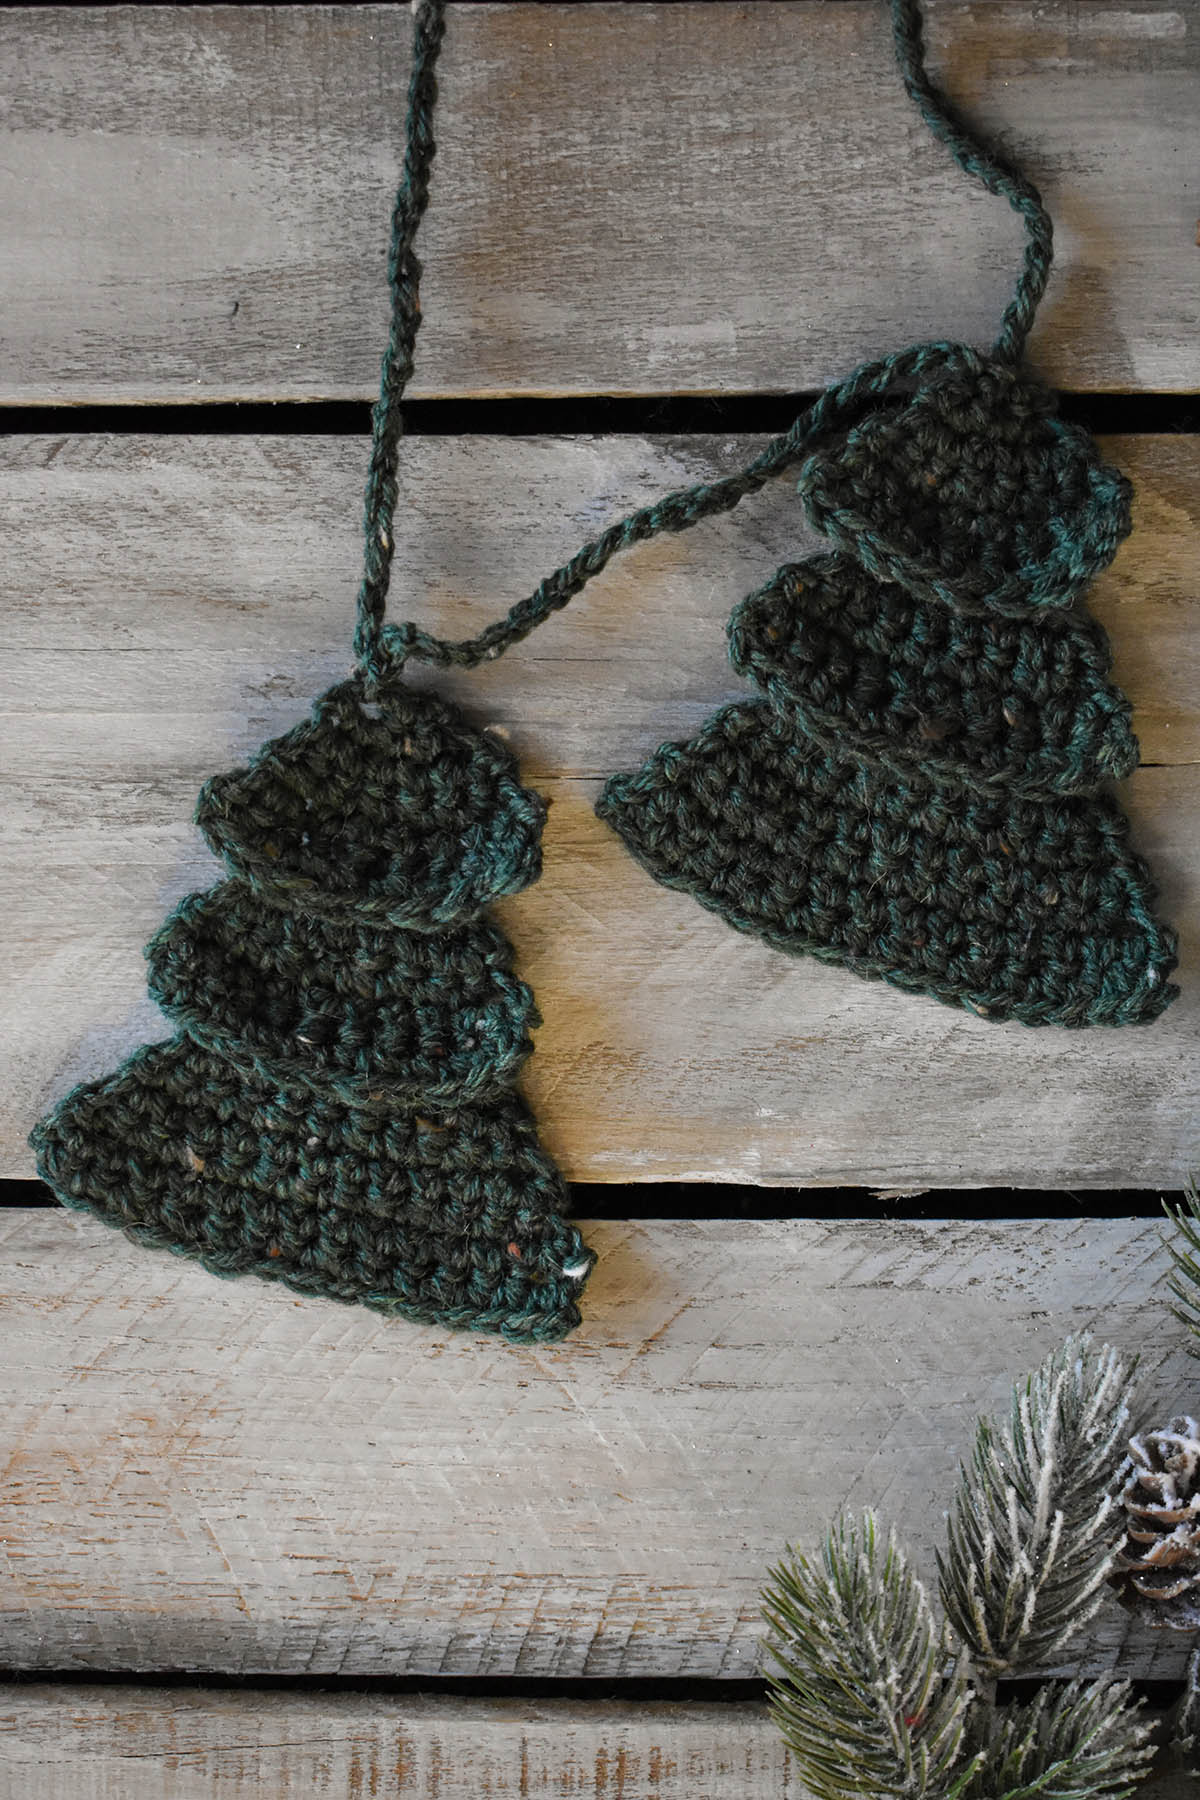
The crochet version of the Forest Garland, worked up using Deluxe Worsted Tweed Superwash in the Pine colorway (how fitting for little pine trees!).
Personally, I’m still fairly new to crochet and plan to make this version for myself. Just like the knit version, the crochet version uses one of the first stitches new crocheters learn: single crochet. Skills to indulge in include increasing and using front post single crochet to pick up stitches to create each tier. As with the knit version, experienced crocheters will zip right through these little pines.
Because each tree doesn’t take up a lot of yarn, you can easily adjust the length of the garland by creating more than nine trees. We also think it could be fun to alternate the snowy white trees with the traditional evergreen version. Whatever you choose, we’re certain that you’ll love this project. Remember, you can find the 12 Days of Winter Kits at your local yarn shop. Happy making!
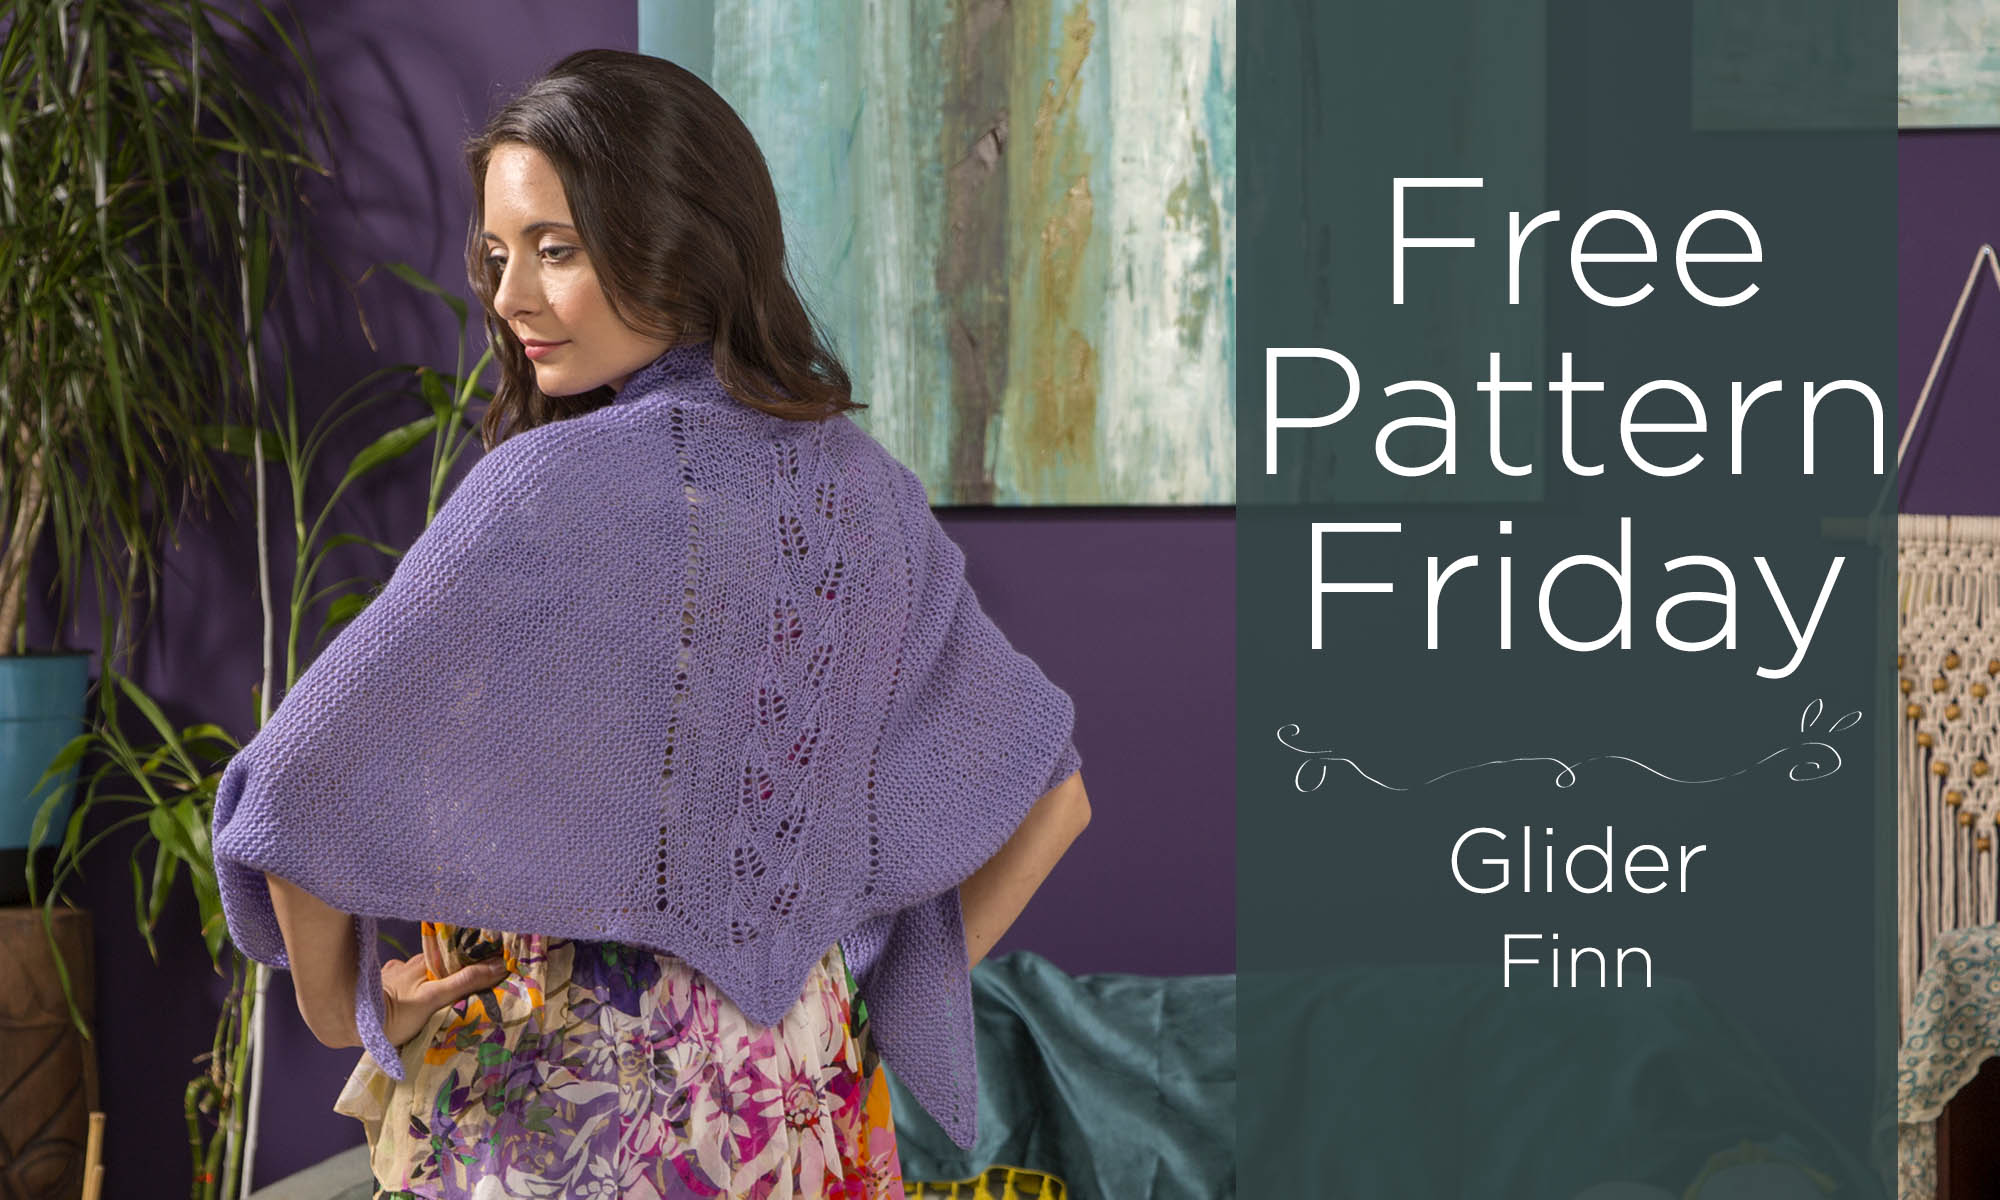
It’s Free Pattern Friday!
Today, the Glider Shawl in Finn (pattern link here). Perfect for a breezy day or a night out, this shawl adds warmth without the bulk. Originally part of the Vibrance in Lace collection from last Fall, we’ve decided to set this lovely pattern free.
Finn, a yarn featuring a blend of superwash merino, alpaca, and acrylic, is the perfect match for this pattern. It is soft to touch, with a subtle halo thanks to the alpaca. I don’t know about you, but something about halo-y yarn and lace makes my heart sing.
Knit from the bottom up, beginning with the tip, the shawl’s original shape adds decorative interest to any outfit. The lace panel in the back adds a delicate and feminine touch, while the rest of the shawl is worked in simple, soothing garter stitch. Draped around your shoulders or worn bandana-style, the Glider Shawl is sure to become a multi-season favorite.
We hope you have a relaxing weekend filled yarn-y goodness. Happy Crafting!
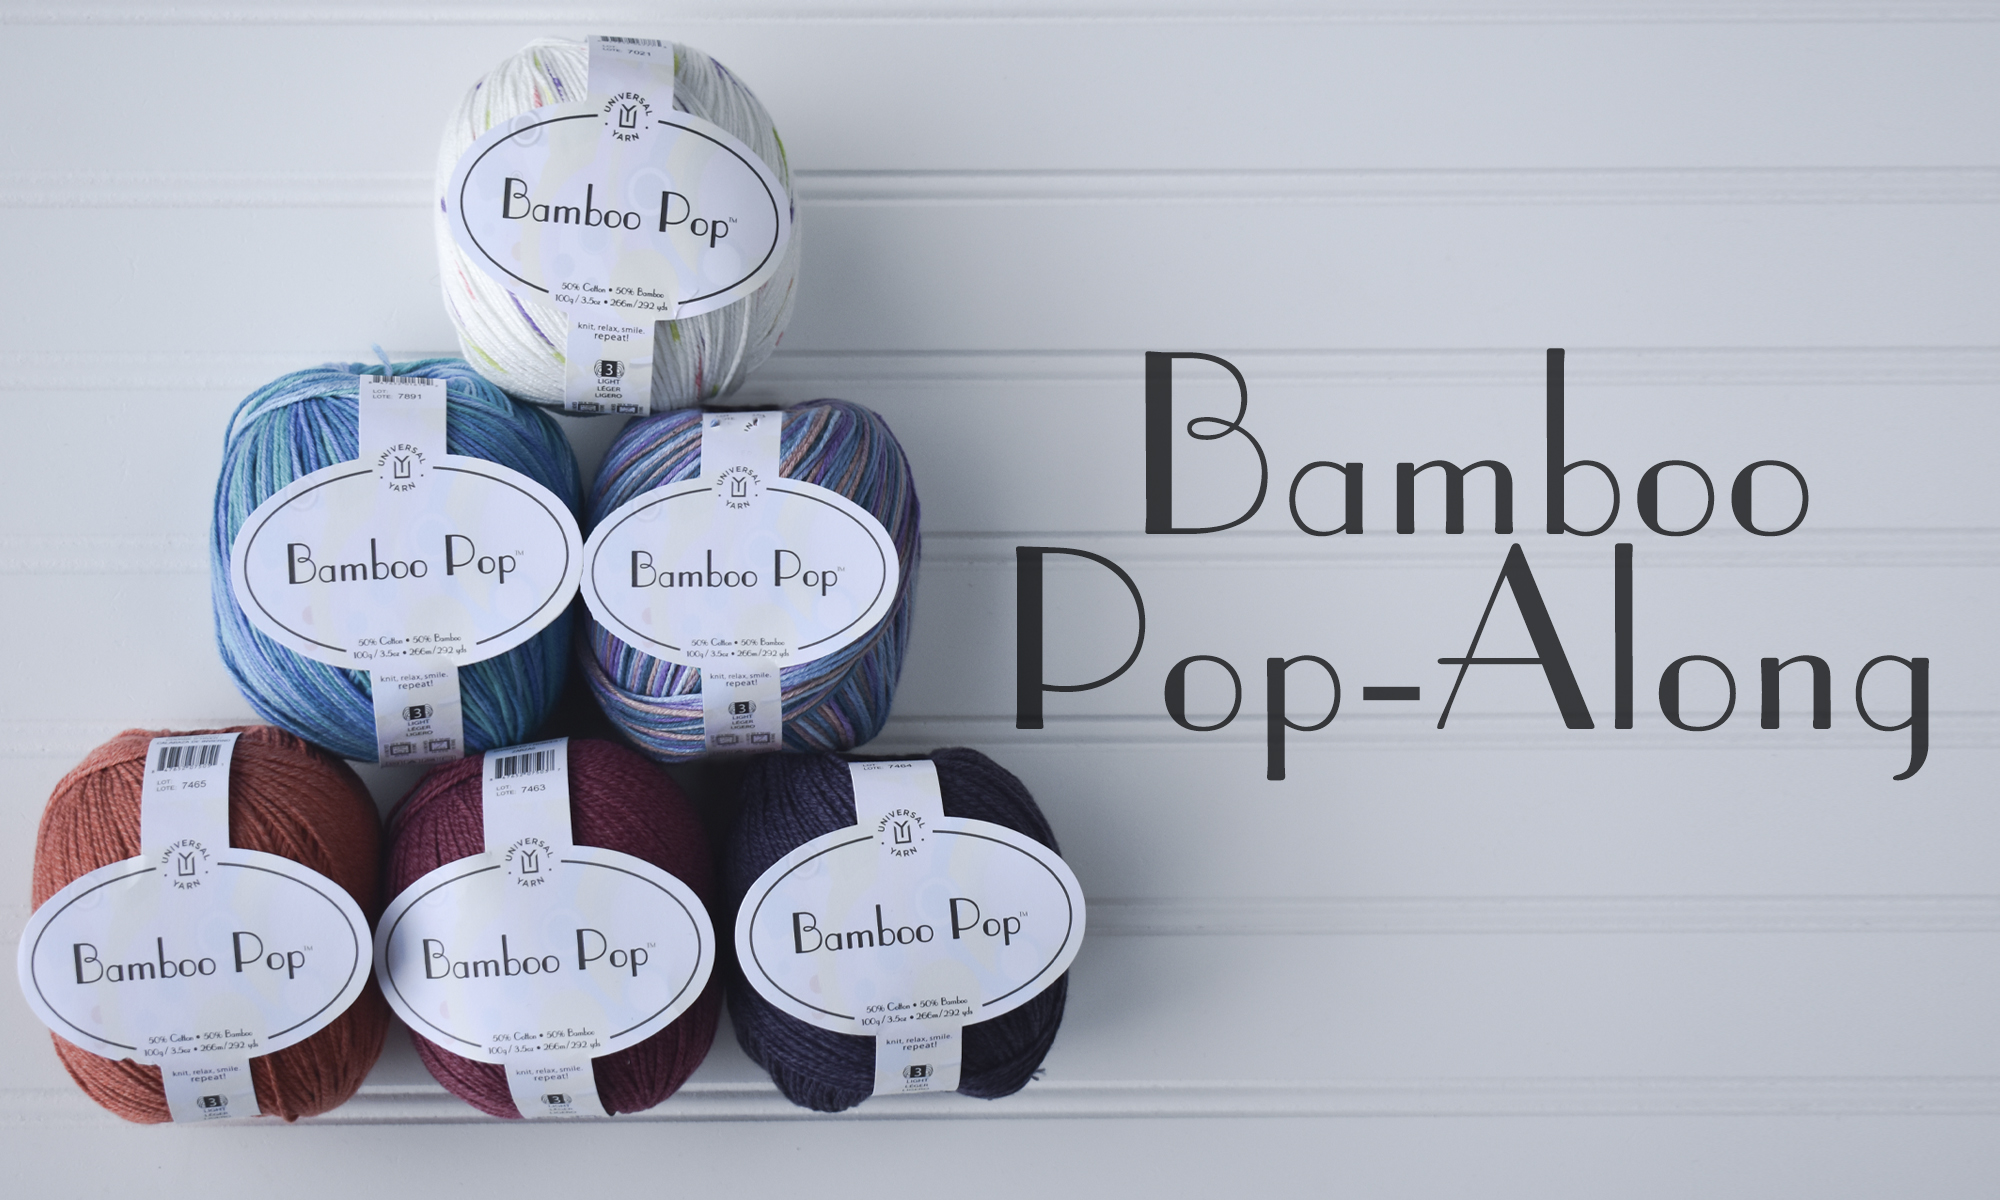
North Carolina has been enjoying some really lovely weather. It has been a teaser that has everyone at the office itching to cast on a spring project that will be ready to wear as soon as things start to warm up! We’ve specifically been looking to Bamboo Pop, one of our best-selling yarns. It’s lightweight and perfect for any project you could think of. So grab your needles, your hooks, your patterns, and join us for our Bamboo Pop-Along!
The Cora Crop, designed by Rachel Brockman, can easily be modified if you prefer a longer sweater.
This is a chance for you to knit, crochet, or weave anything you’d like using Bamboo Pop! We’re welcoming everyone – if you’re making something using Bamboo Pop, we want to see it! You have from February 6, 2019 until March 20, 2019to complete your projects.
Oh, and there will be prizes! You could win five balls of Bamboo Pop in the color of your choice! To be eligible for a prize please share photos of your finished projects in the Universal Yarn Ravelry Group (link). Only finished projects using Bamboo Pop will be entered to win. You can find the thread here (link). We cannot wait to see what projects you create!
The idea started just yesterday. I decided that I wanted to make a project in time for Stitches West, held in Santa Clara from February 21st-24th. When I told Amy I wanted to knit the Cora Crop she decided she wanted to join me. And just like that, the idea for a Bamboo Pop-Along was born!
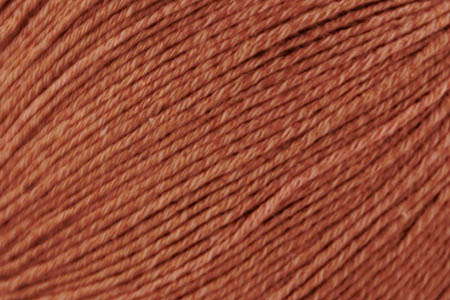
Amy and I are knitting the Cora Crop. As a person who loves warm, autumnal tones, I’ve chosen to knit mine using 129 Winter Squash. It’s a dusty orange that I simply cannot resist.
Bamboo Pop 129 Winter Squash
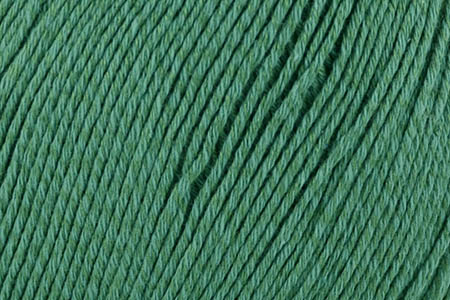
Amy chose 117 Emerald for her tee. When asked why she said “I’ve always loved green. It’s my favorite color next to…black. It just makes me happy. Plus, my eyes are green/sometimes hazel, so I think wearing green brings out my eyes?” It definitely brings out your eyes, Amy!
Bamboo Pop 117 Emerald
If you want to join in, but aren’t sure Cora Crop is right for you, don’t worry! Like I said earlier, all sorts of yarny-projects are welcome. Perhaps you need some additional pattern inspiration? How about Amy Gunderson’s Right Turn Shawl? We love this graphic shawl and it’s a great project for playing with color. We know some of our customers have even hosted their own knit-along for this pattern. You can see all of the patterns we have using Bamboo Pop here (link).
The Right Turn Shawl, designed by Amy Gunderson, is a customer favorite that combines two solid colors of Bamboo Pop with Bamboo Pop Dots.
Are you active on social media? Use the hashtags #bamboopopalong, #bamboopop, & #universalyarn on social media so we can see your beautiful work. We’ll be sharing more about our progress, too.
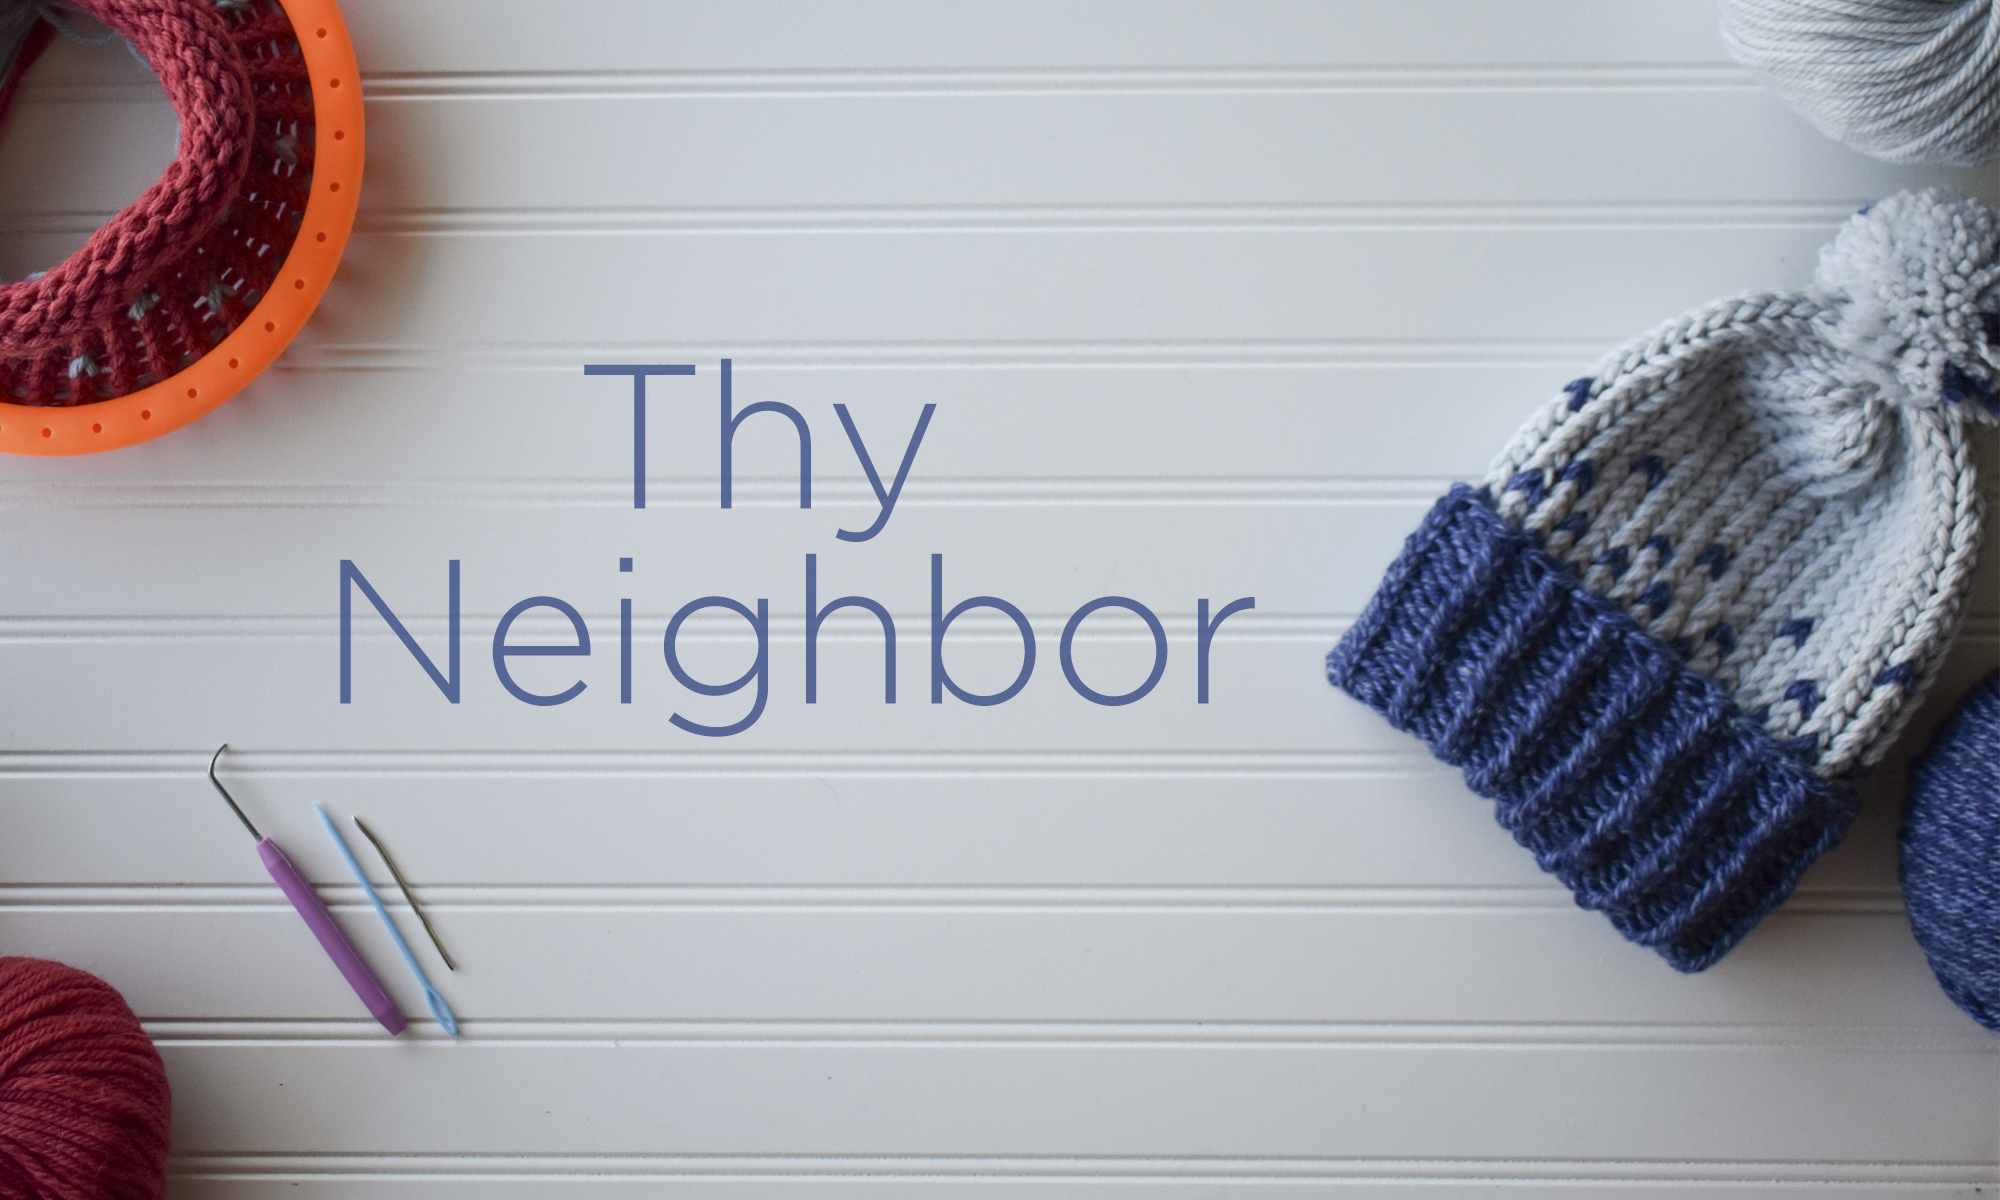
Giving back: it’s something everyone seems to think more about this time of year, and something we could all probably think about a bit more. That’s why we have created the new pattern, Thy Neighbor (pattern link).
Thy Neighbor – A pattern to benefit the Refugee Support Services center in Charlotte.
We recently began donating some of our time and resources to the RSS: Refugee Support Services here in Charlotte, the city Universal Yarn calls home. This organization is doing amazing things, and we want to support them in every way we can.
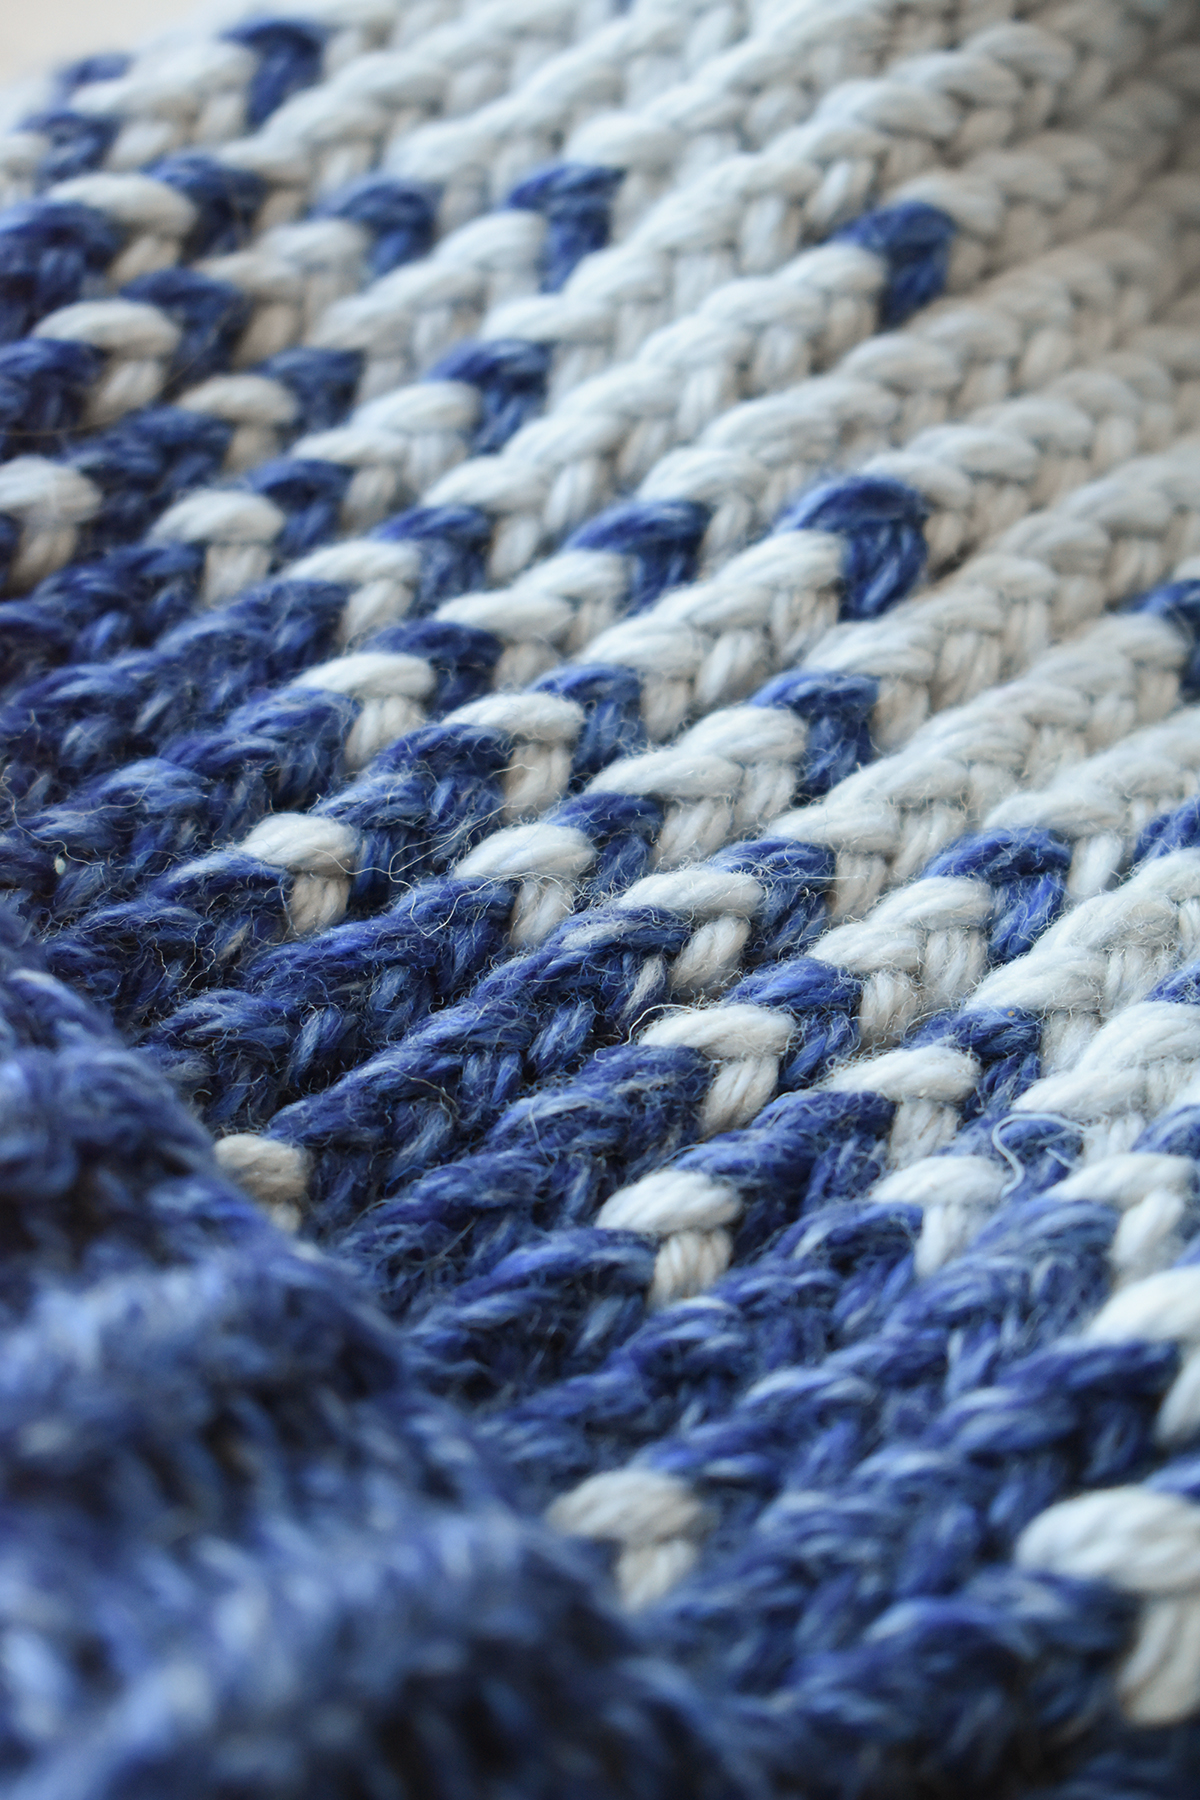
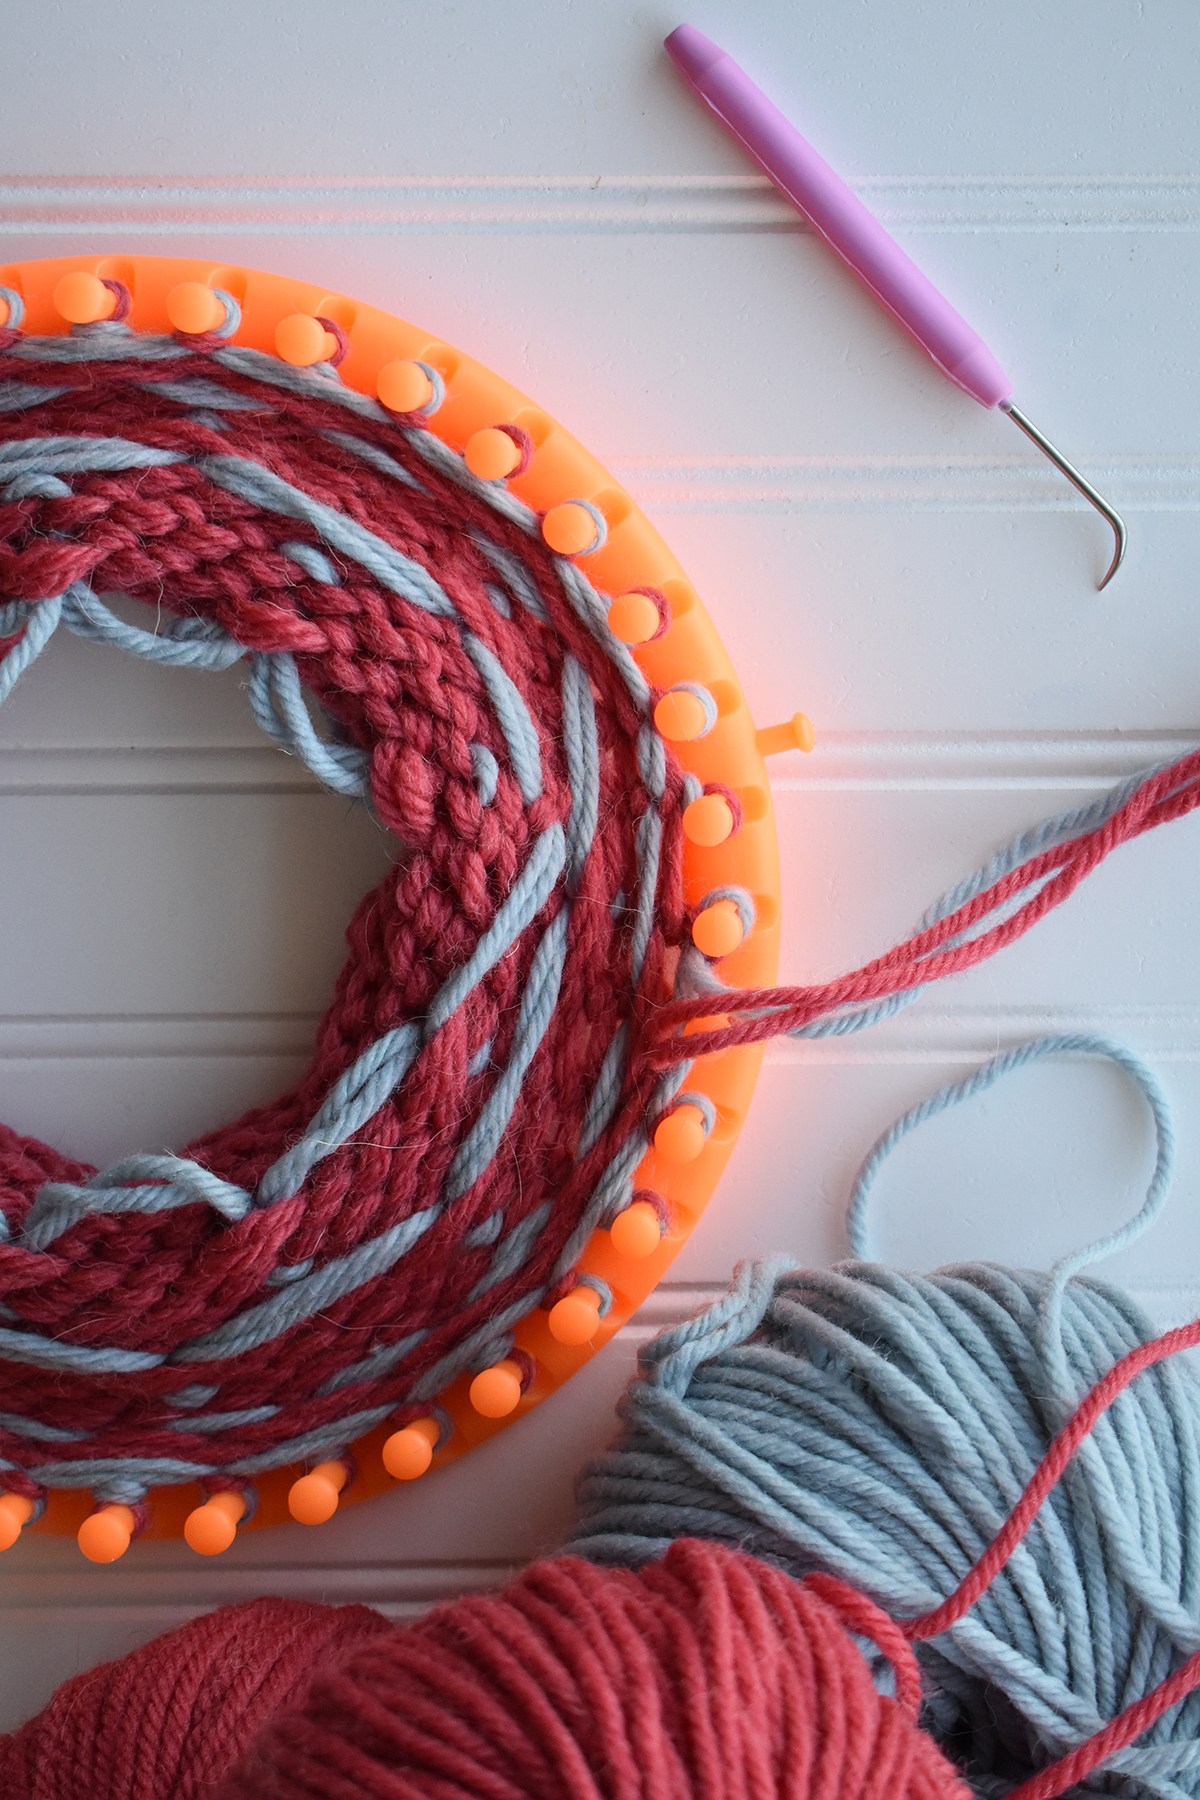
Stranded colorwork has an interesting effect when worked with a loom because of the twisted stitches.
Each Thursday, a group of wonderful women and volunteers meet at the center for English lessons, knitting, community-building, and to take advantage of the many resources the facility has to offer.
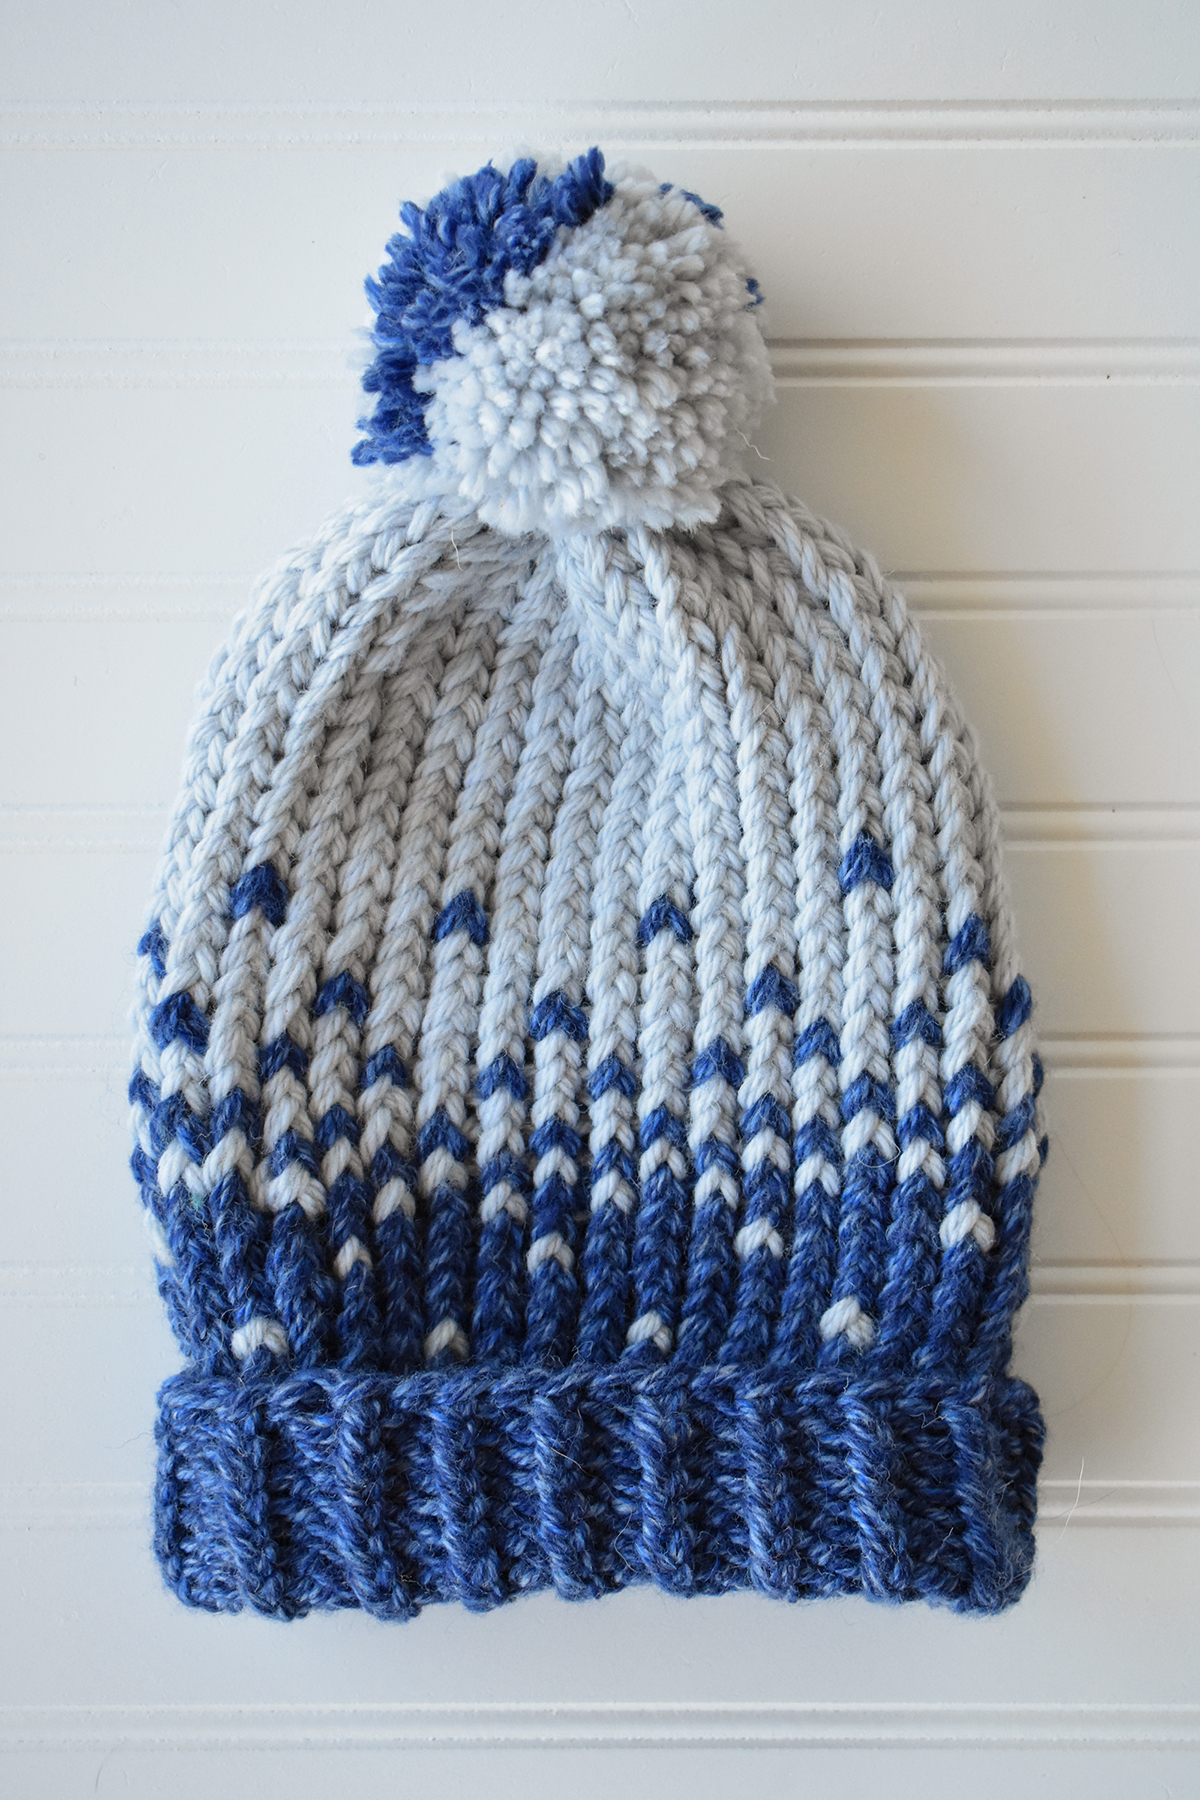
My in-progress Thy Neighbor hat, worked on a loom with Deluxe Bulky Superwash. Colors shown are 901 Rosy Mauve & 932 Icy Grey.
Many of the women make hats on round knitting looms. Loom knitting is really accessible. Anyone can pick it up in just a few minutes, which might be why it’s a popular knitting method at the center. Although we had never knit using looms before, we wanted to meet participants where they are. So we got some looms to practice and will now contribute our own knowledge of knitting. Volunteers at the center help the women distribute their handcrafted goods to earn extra income and develop financial literacy. As a way to give back and support their efforts, we designed this Fair Isle hat. We’ll be teaching the participants this technique to spice up their loom-knitting activities. All proceeds from the sale of this pattern will be donated back to RSS.
As I said before, we want to do as much as we can for this organization. It brought us so much joy to sit in a room filled with the chatter of people from all over the world, offering a helping hand, and exchanging kindness with one another. It’s truly special. When you purchase Thy Neighbor, 100% of the proceeds will be donated to RSS. Financial contributions to the organization help make their peer support, educational, legal, and social programs possible. We sincerely hope you’ll join us in helping, and encourage you to explore the RSS website (link) to deepen your understanding of their work.
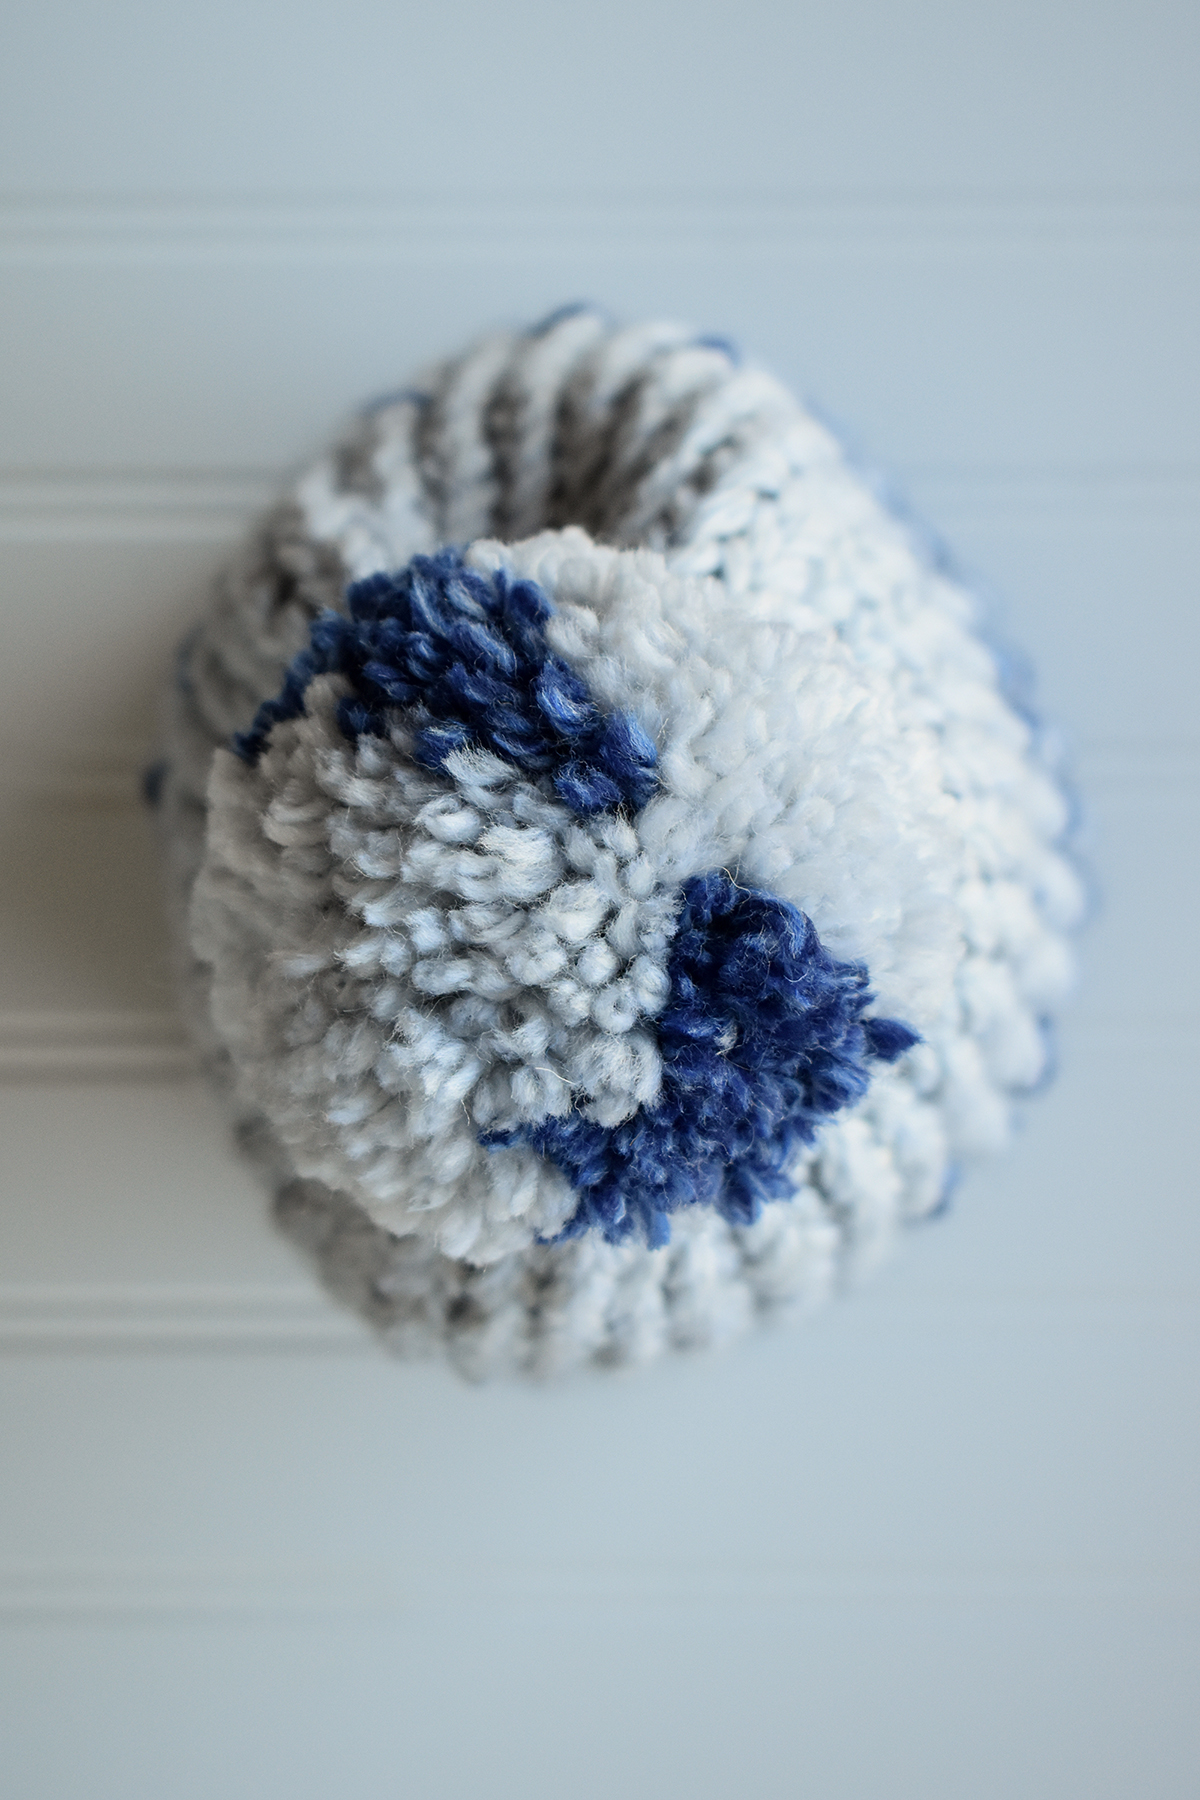
Topped with a multi-color pom-pom! This pattern really is so much fun!
Thank you so much for joining us in our support of RSS! We hope you have a wonderful week!
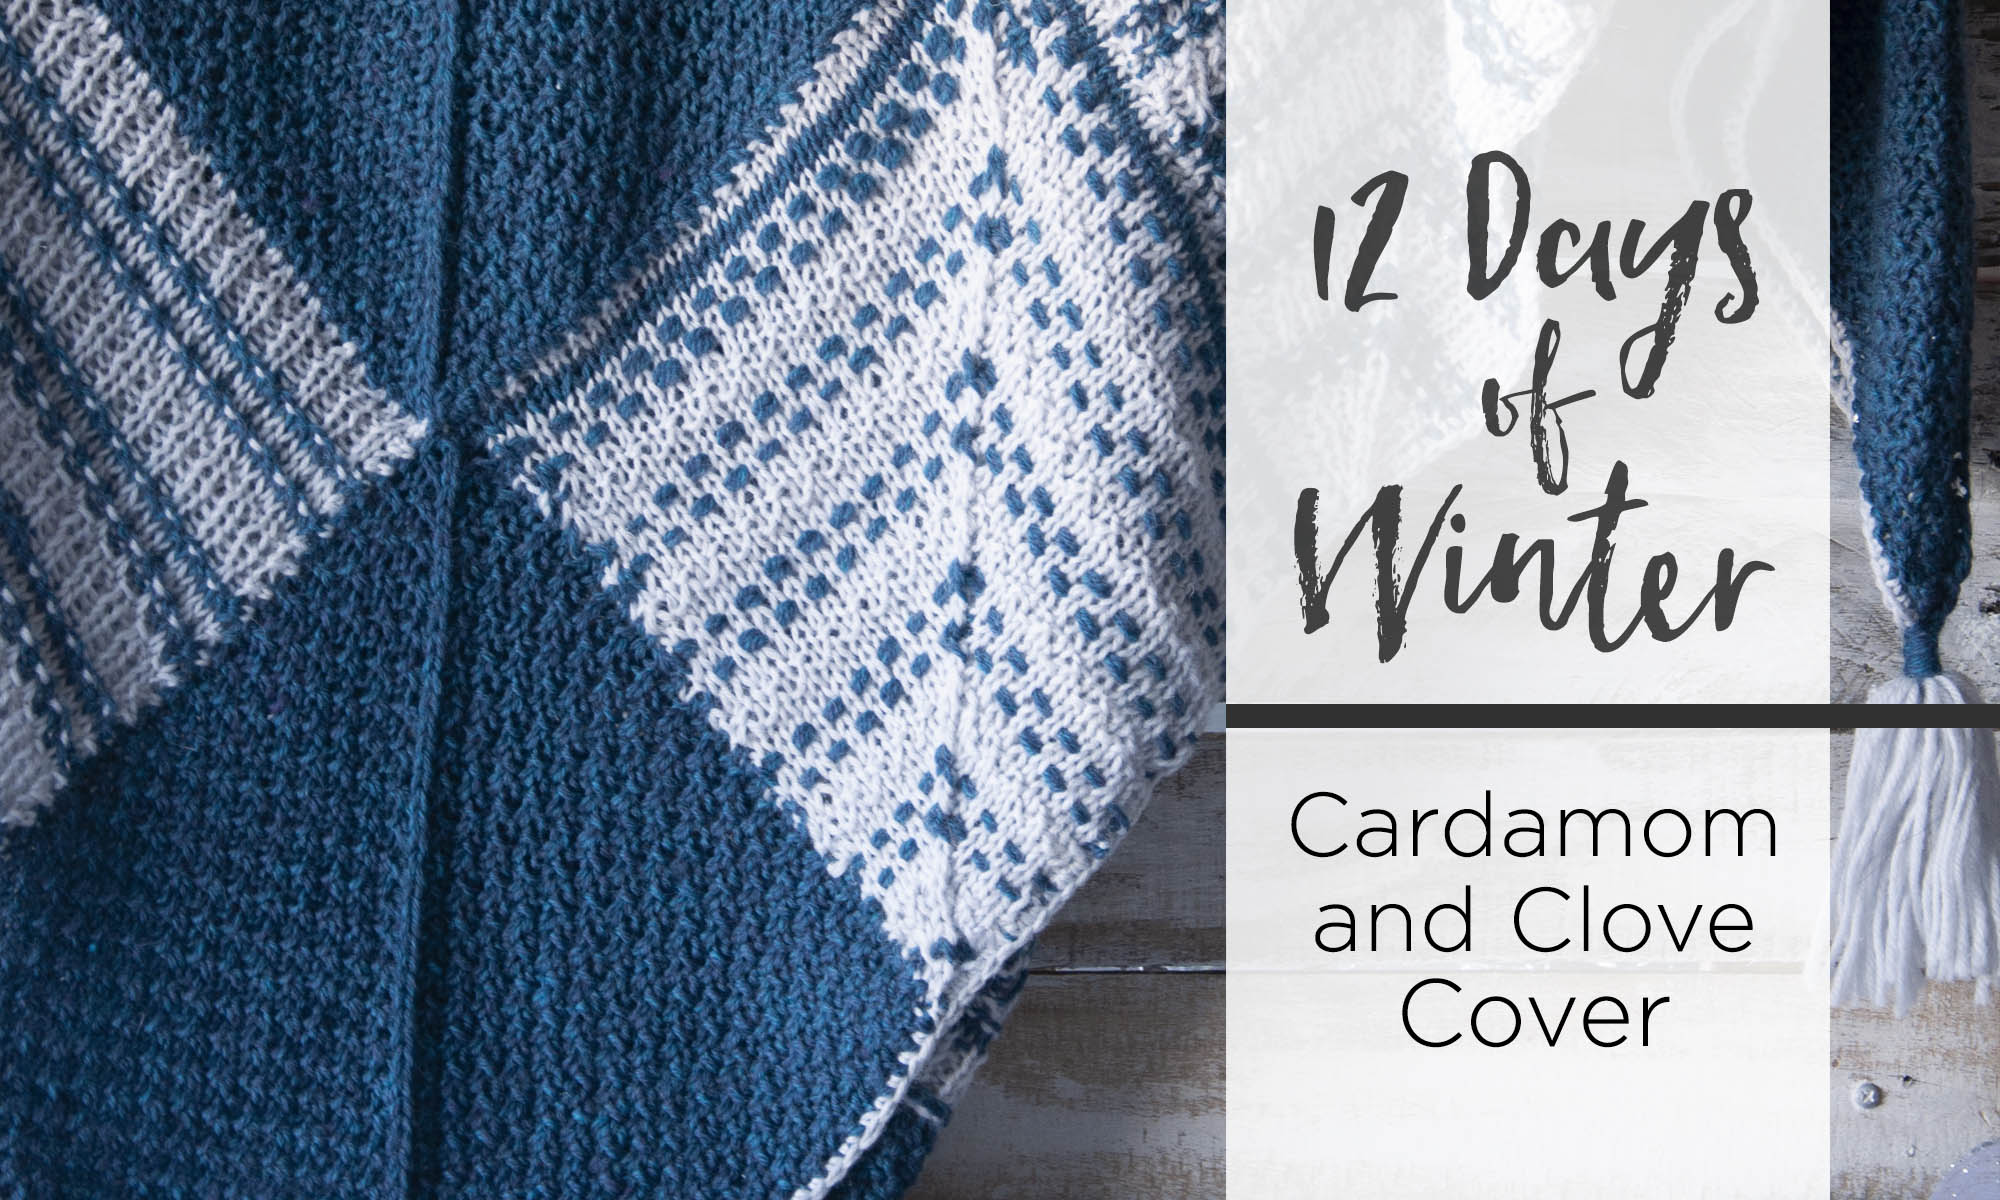
This is part 10 in a 12 part series highlighting designs from our 12 Days of Winter, Series 2 Edition.
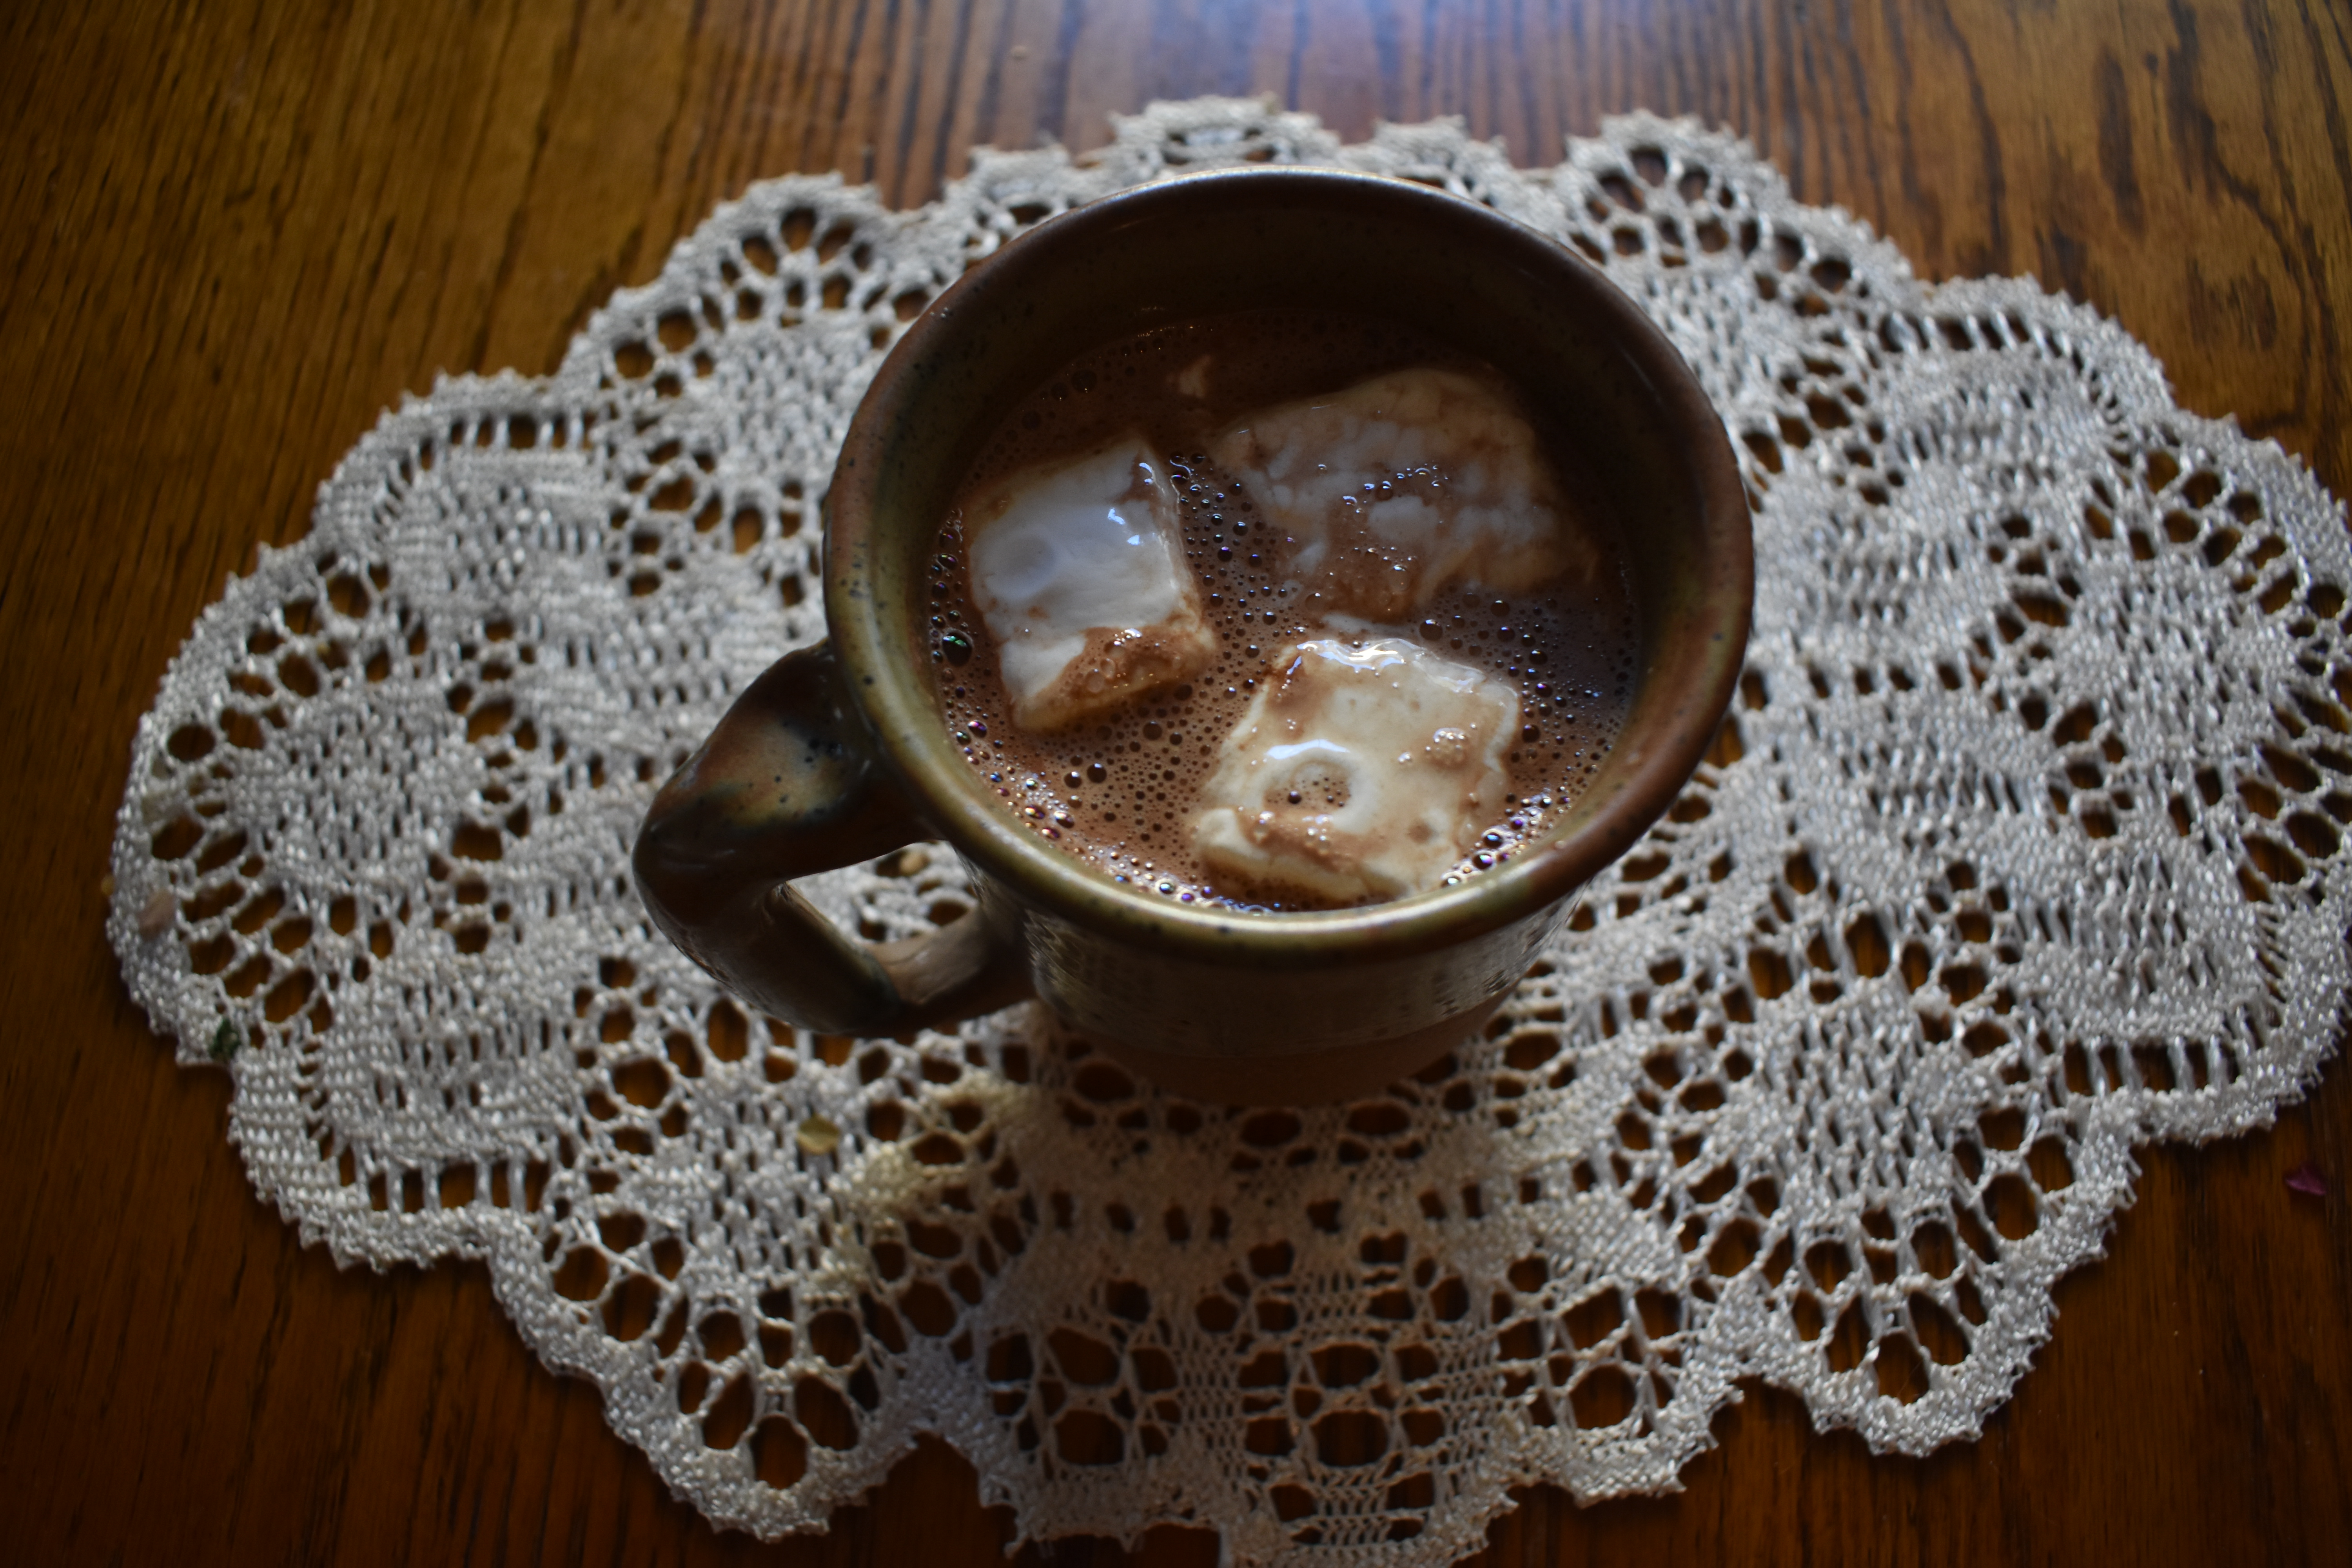
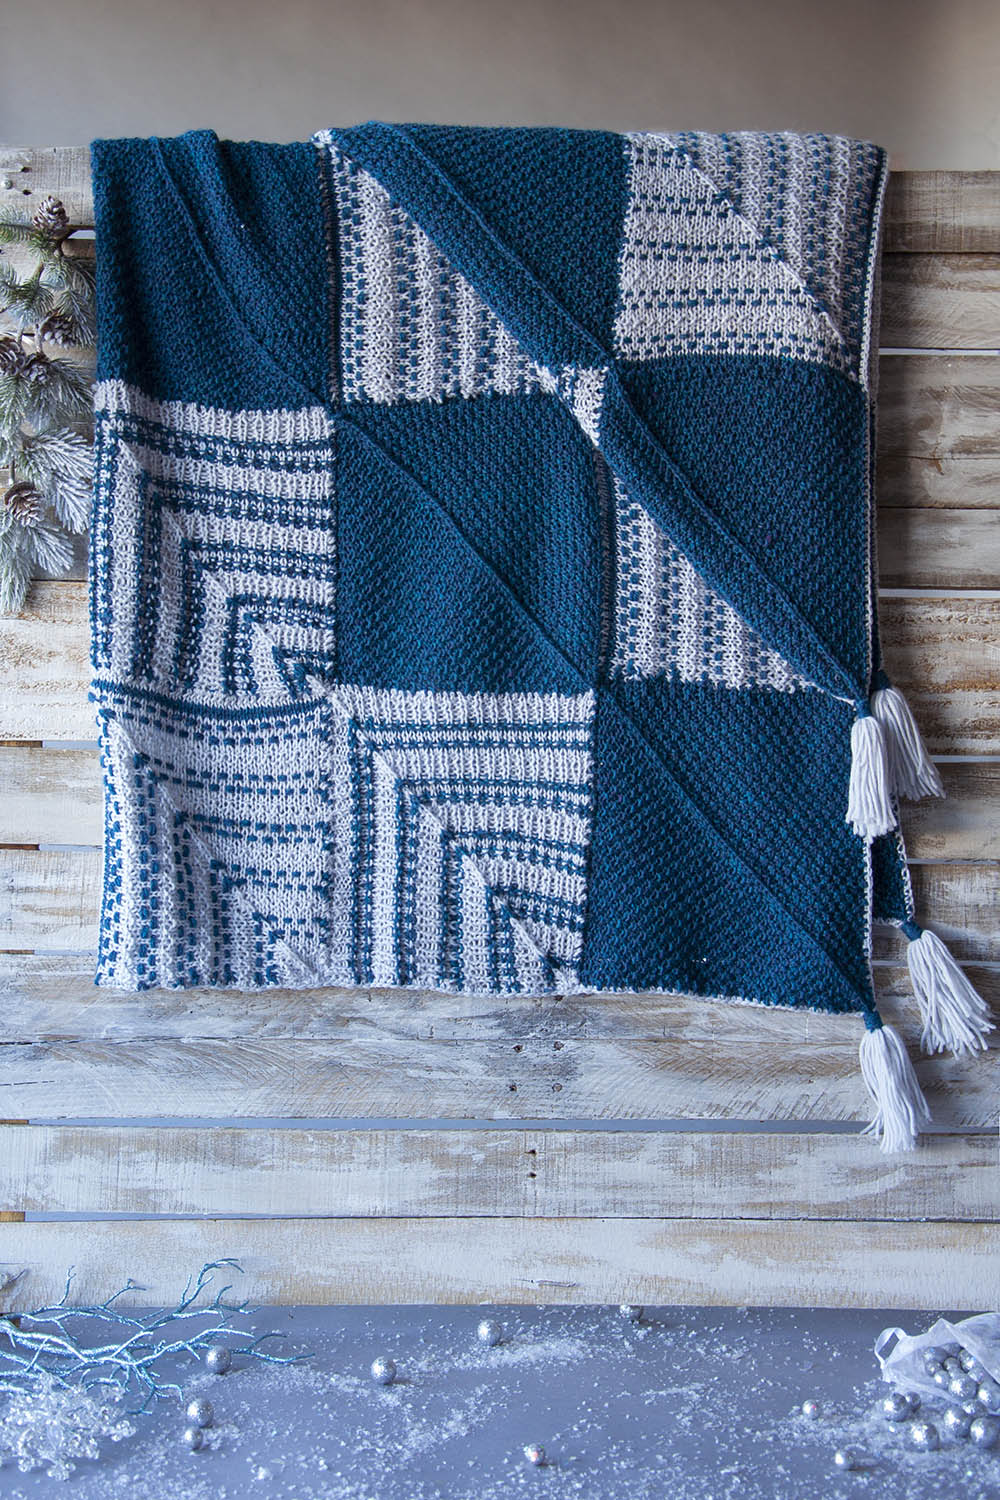
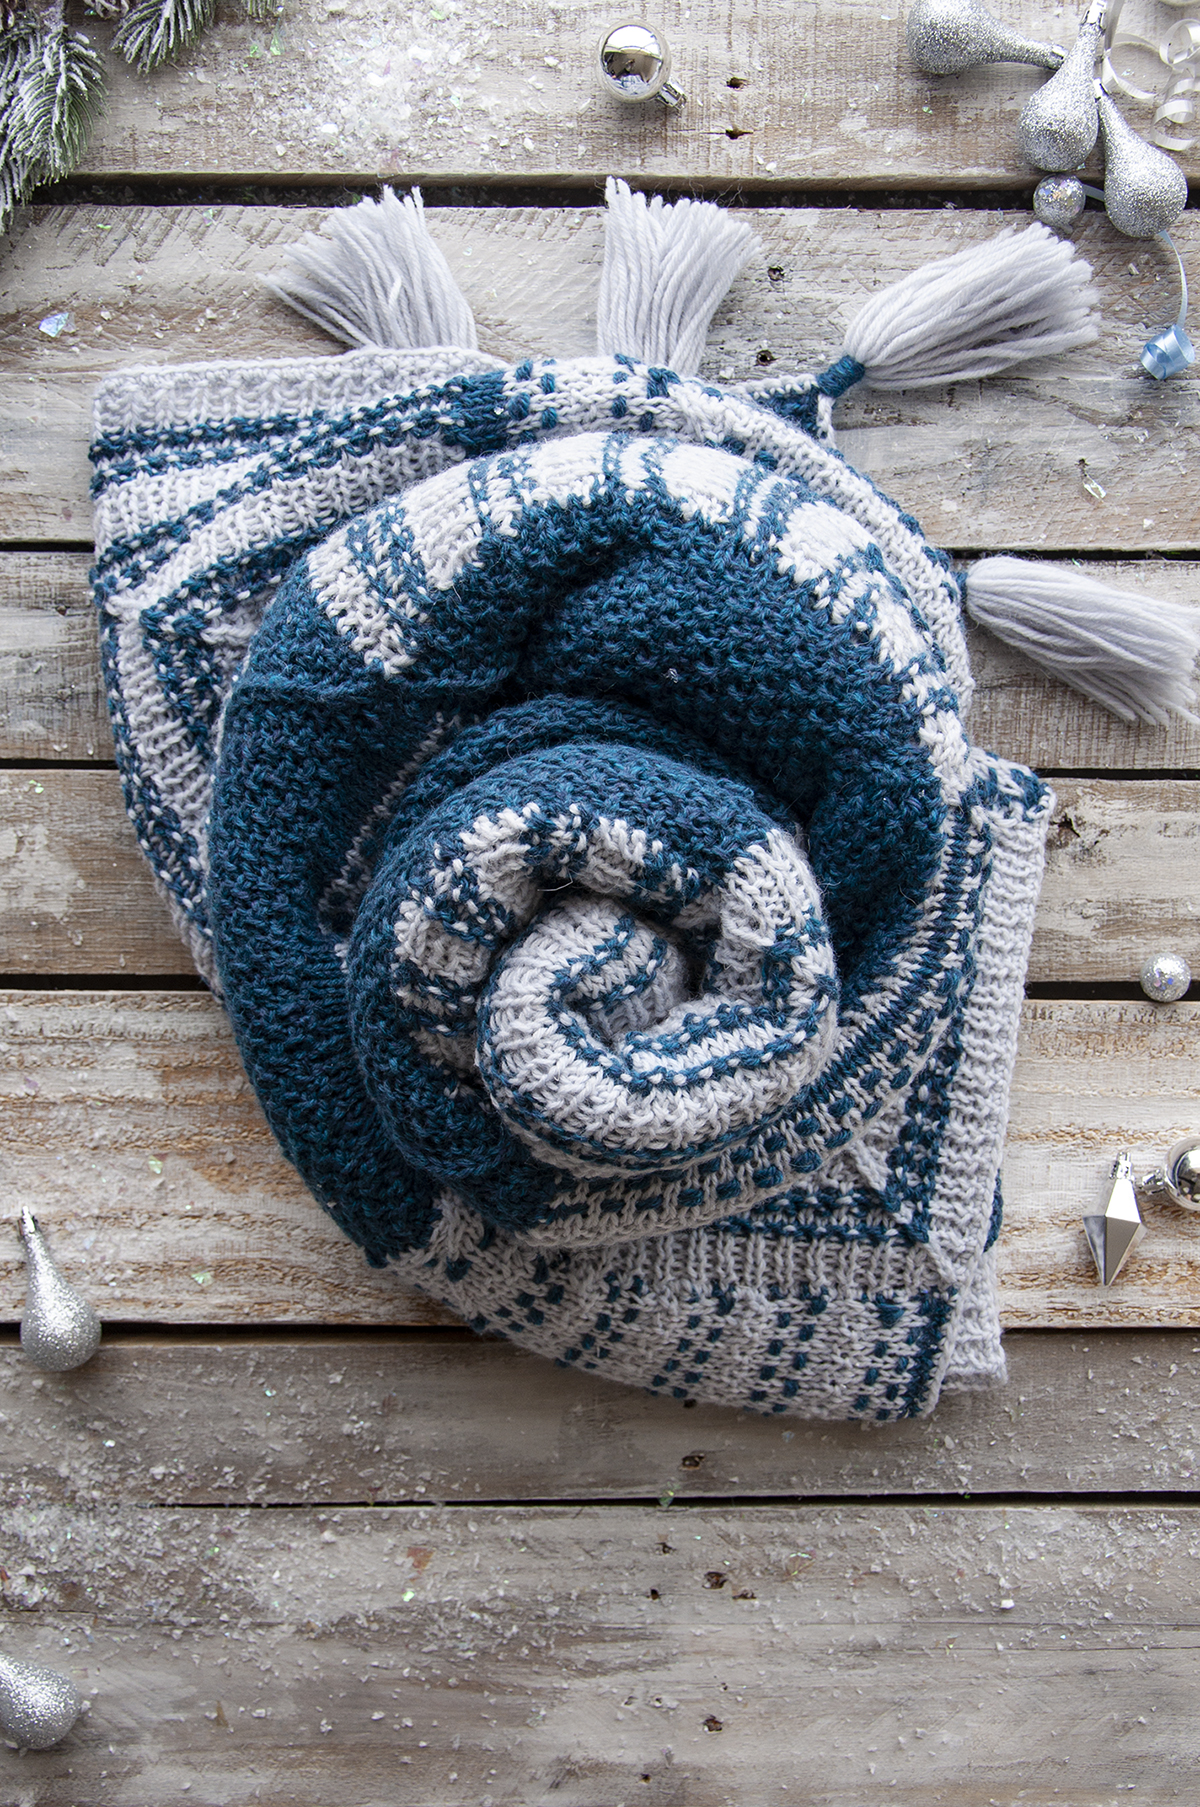
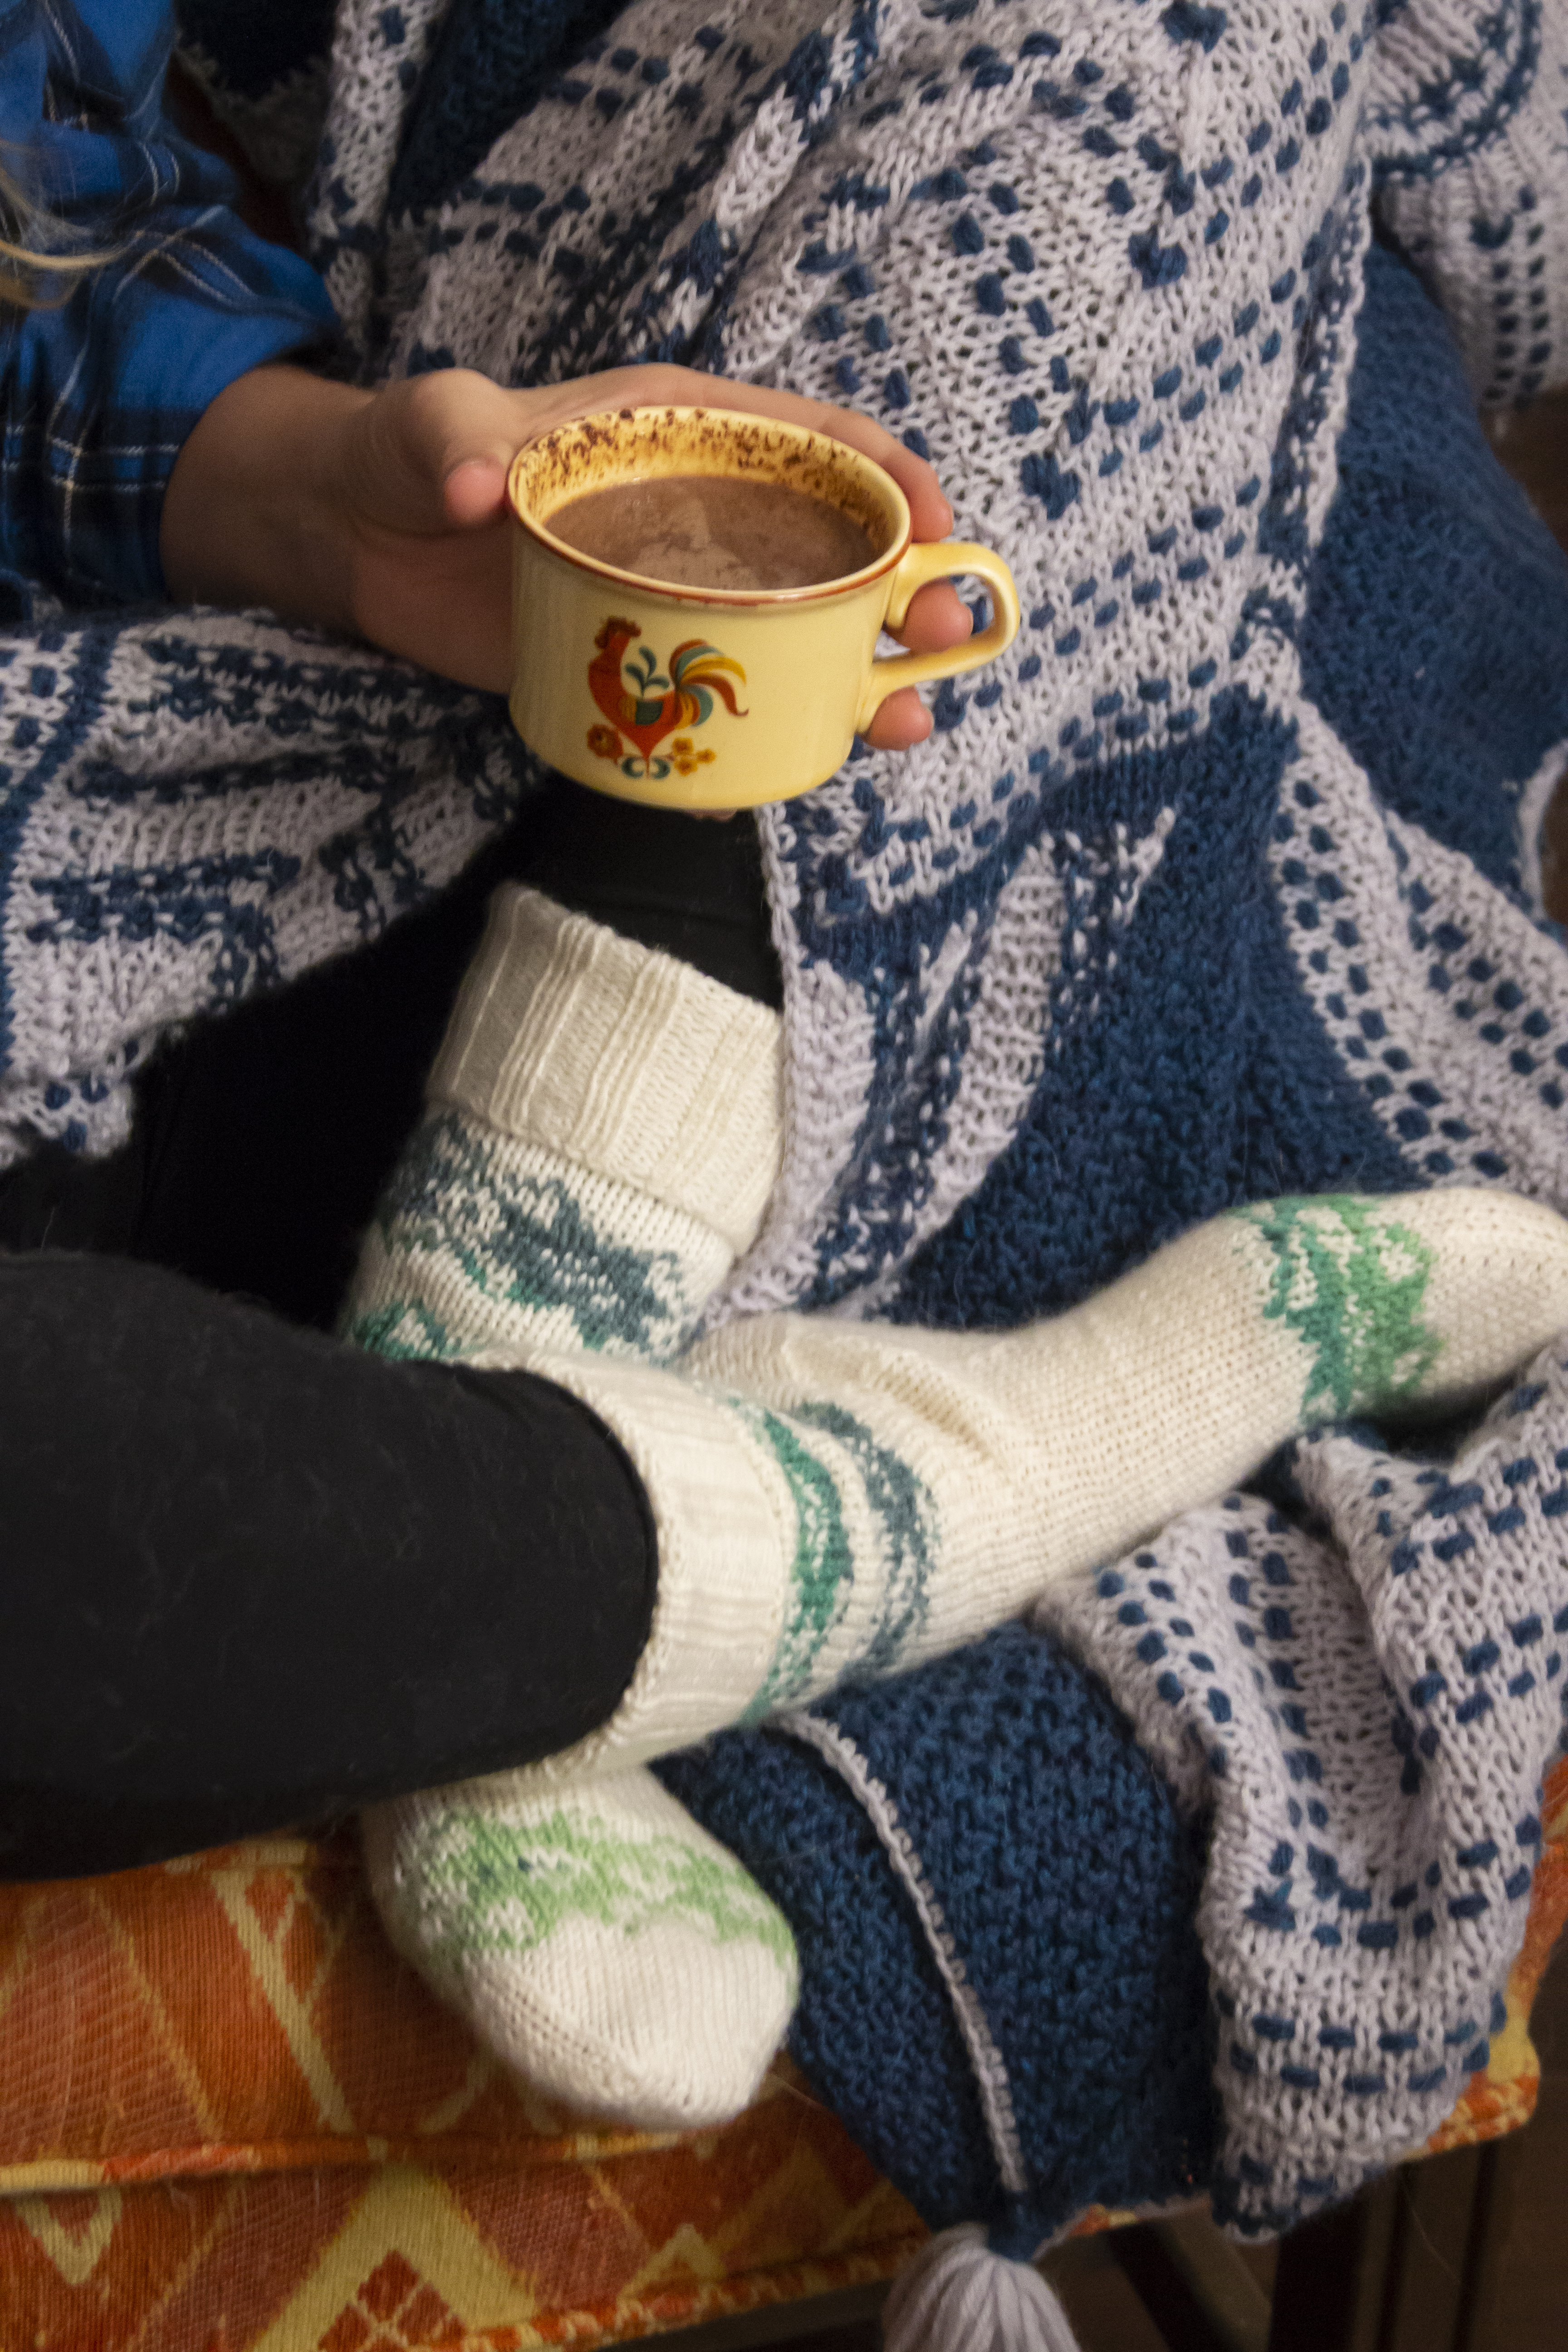
Today I’m happy to introduce the Cardamom and Clove Cover – an ultra-cozy wool blanket that’s perfect to wrap around your shoulders while drinking a warm and wintry beverage!
I grew up in a place where it actually snows (when I say “actually” I mean unlike the meager, quick-to-melt amounts that we receive here in Charlotte, NC). To this day I find there is a lot of magic to snow days, and that was especially true when I was a child.
Living in a rural area, just by the border of a state park, snow days first meant shoveling the driveway followed by playing in the snow-covered woods for hours and hours. I rarely came inside until the tips of my hair were completely frozen and my feet couldn’t hand the cold anymore. Then, I’d make my way back home. While my siblings and I pulled off the six million layers we wore to stay warm, my mom prepared hot cocoa.
What’s nicer than enjoying a warm beverage with a cozy blanket on your lap after spending hours in the cold? So, to accompany this design reveal I thought it would be fitting to share a perfectly spiced hot cocoa with a touch of cardamom and clove. This recipe isn’t overly sweet, but it is very rich.
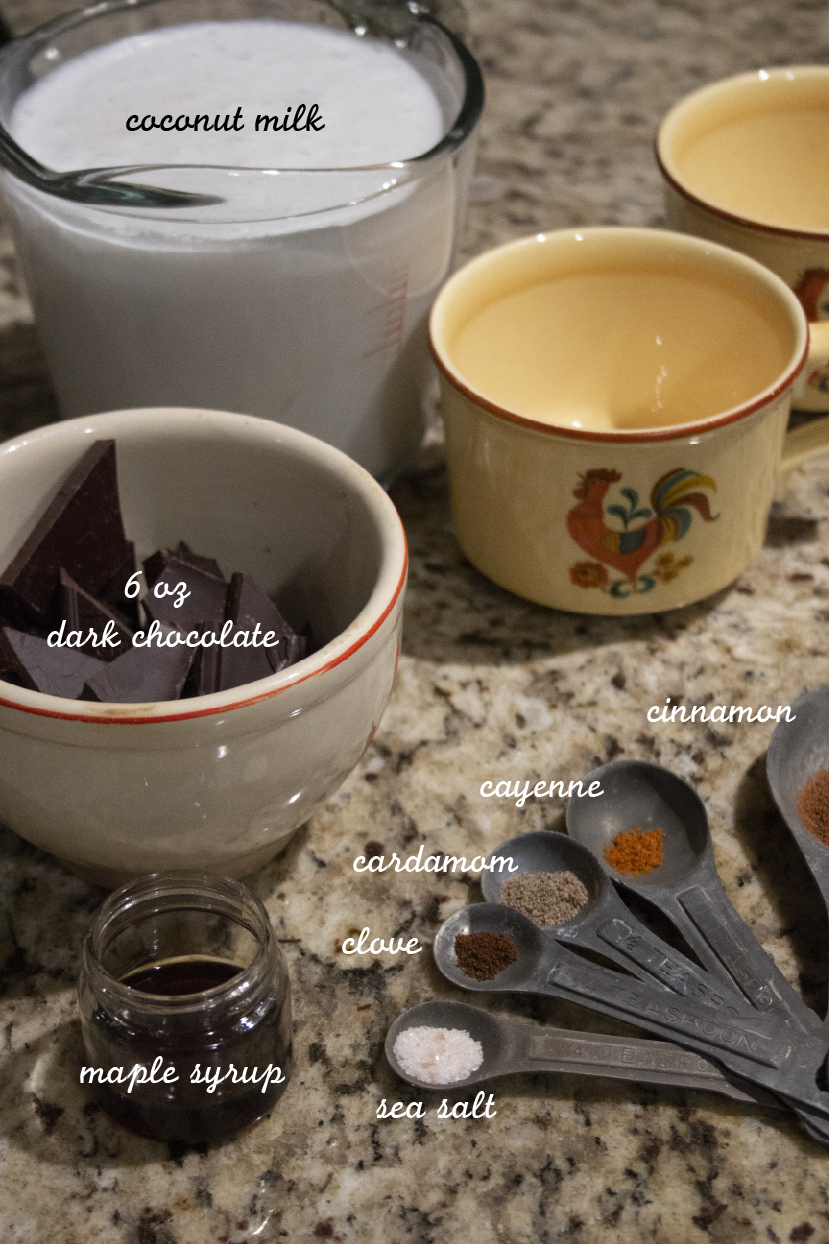
Ingredients – serves four
12 Days of Winter Kit Collection – Cardamom and Clove Cover Kit
6 oz very dark chocolate (I used 90% cocao)
4 cups of coconut milk (or your milk of choice)
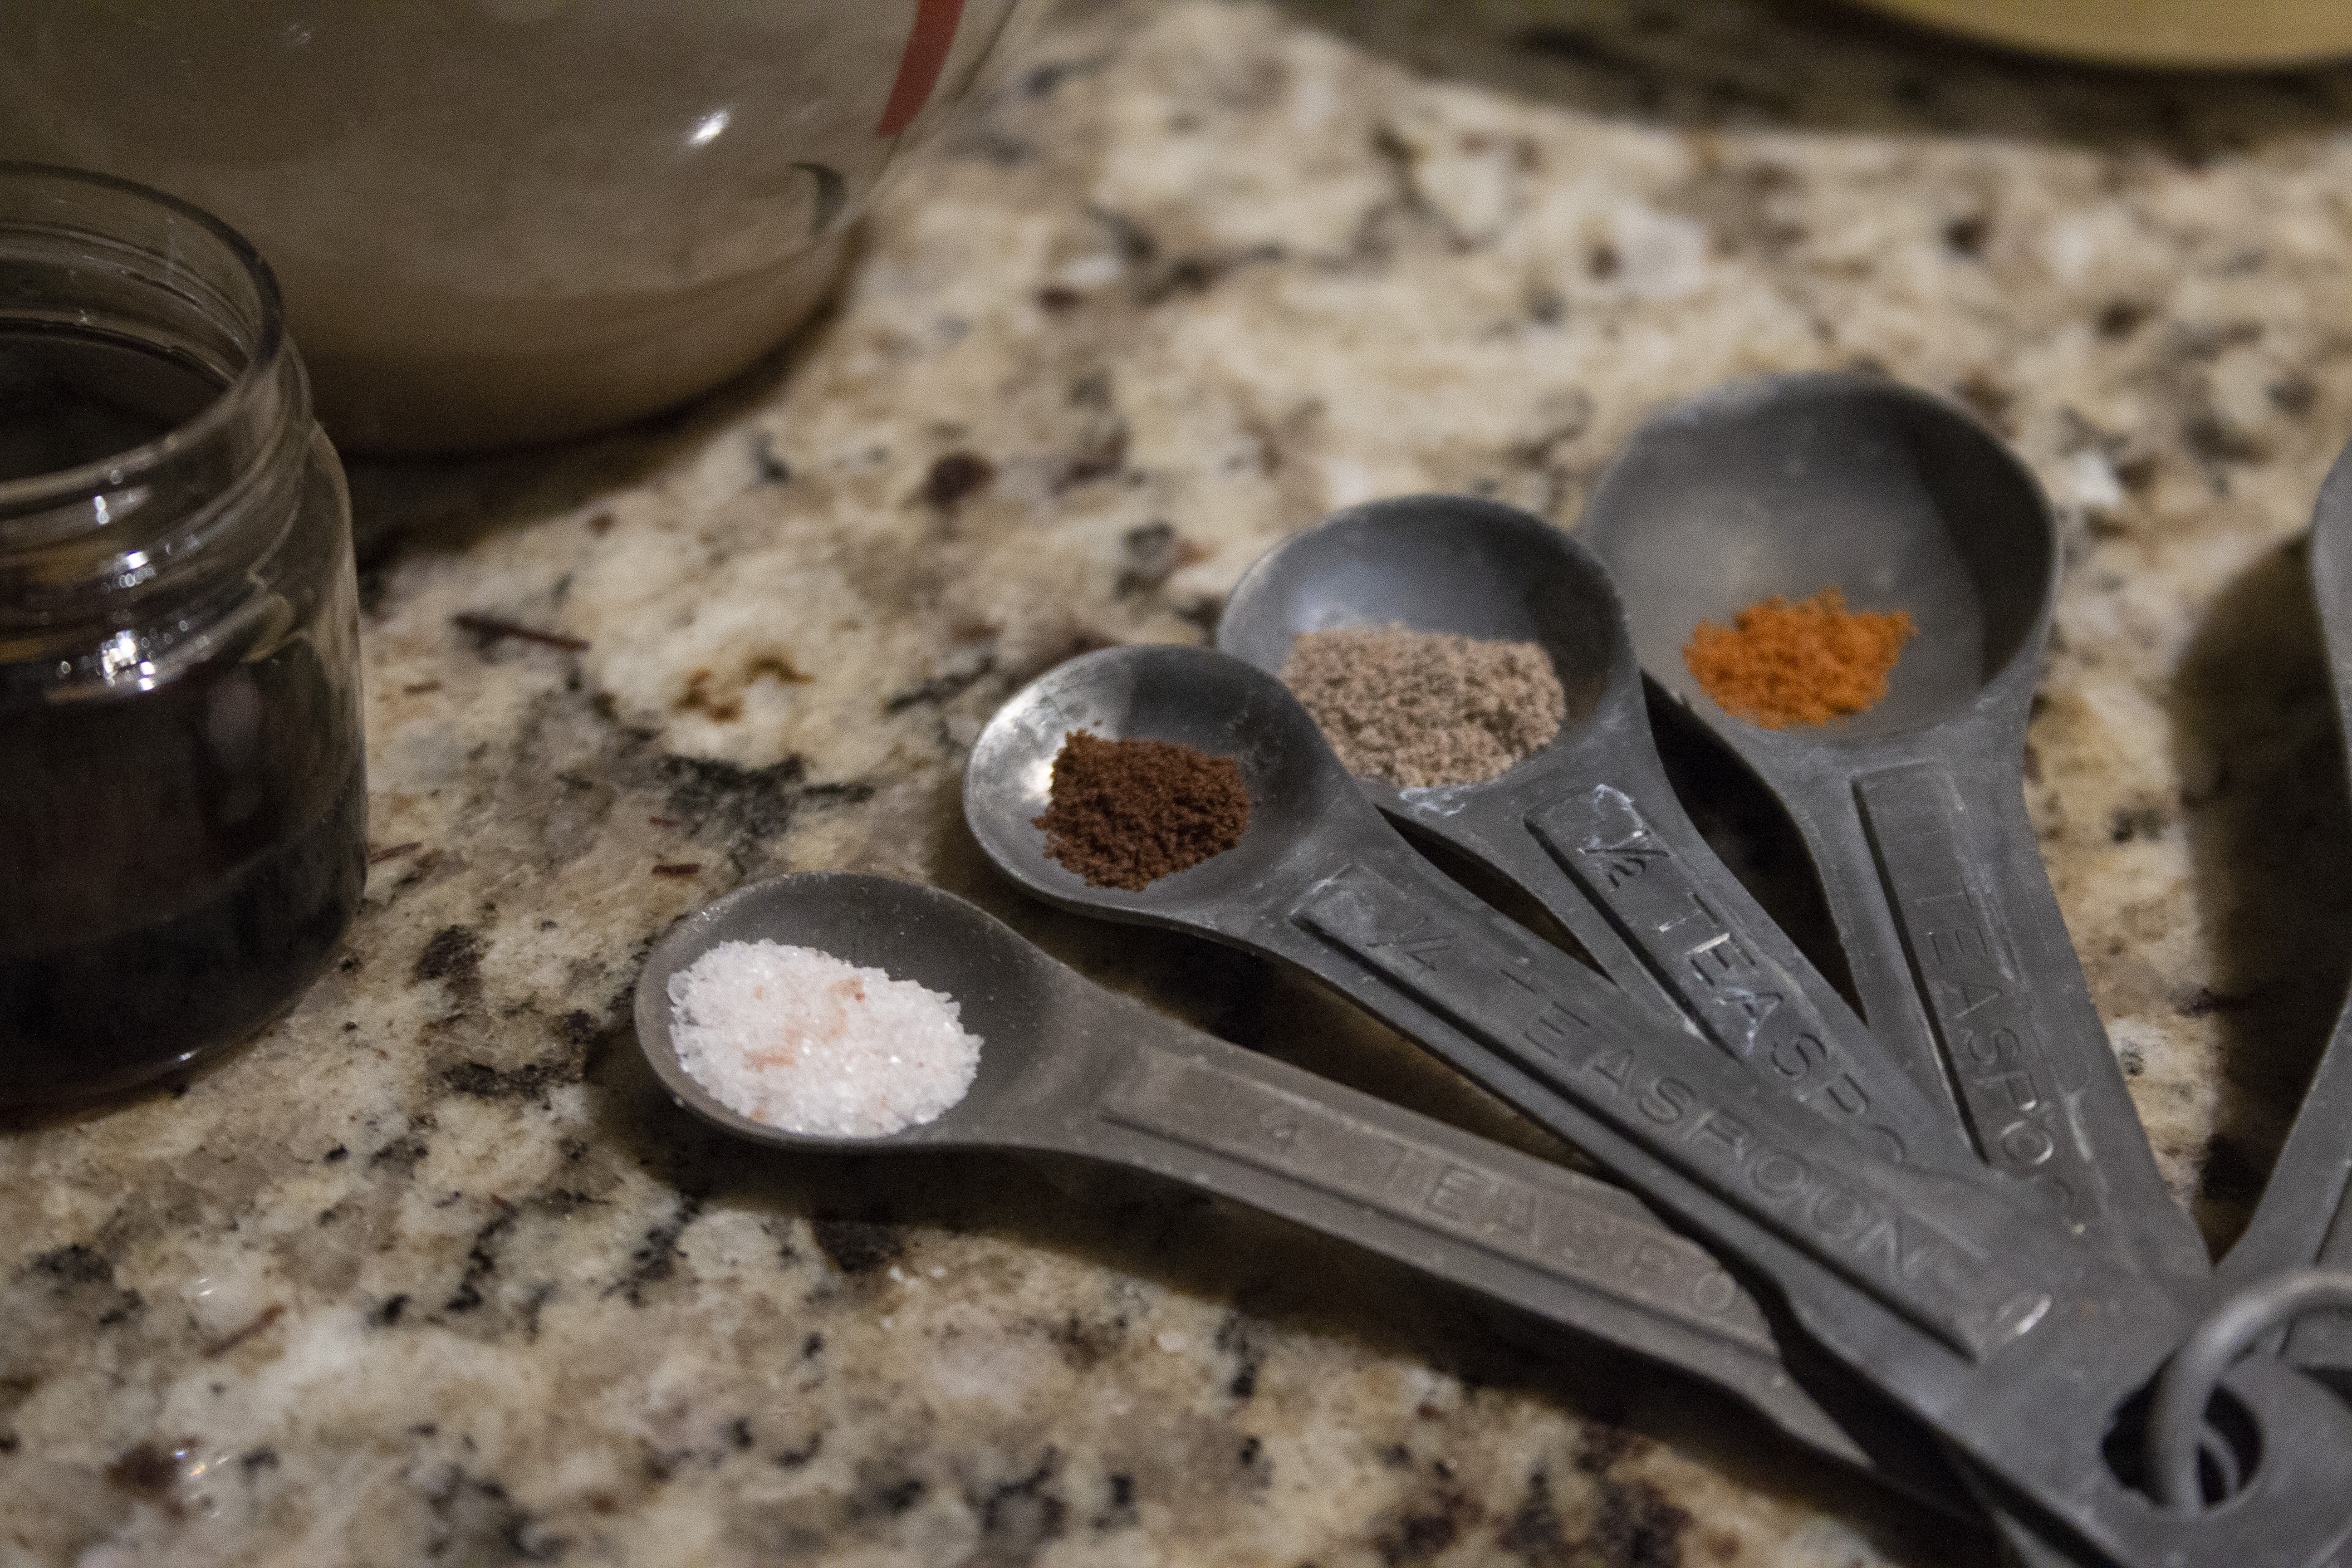
1 pinch cayenne
1 pinch ground cloves
1/4 tsp cardamom
1/2 tsp cinnamon
1/4 tsp freshly ground sea salt
1 Tbsp maple syrup
First – knit, knit, knit! How are you going to cuddle up and drink hot chocolate under your blanket if you haven’t knit it?! Okay – I admit, hot chocolate is just as good for knitting this kit, so you don’t need to complete this step first!
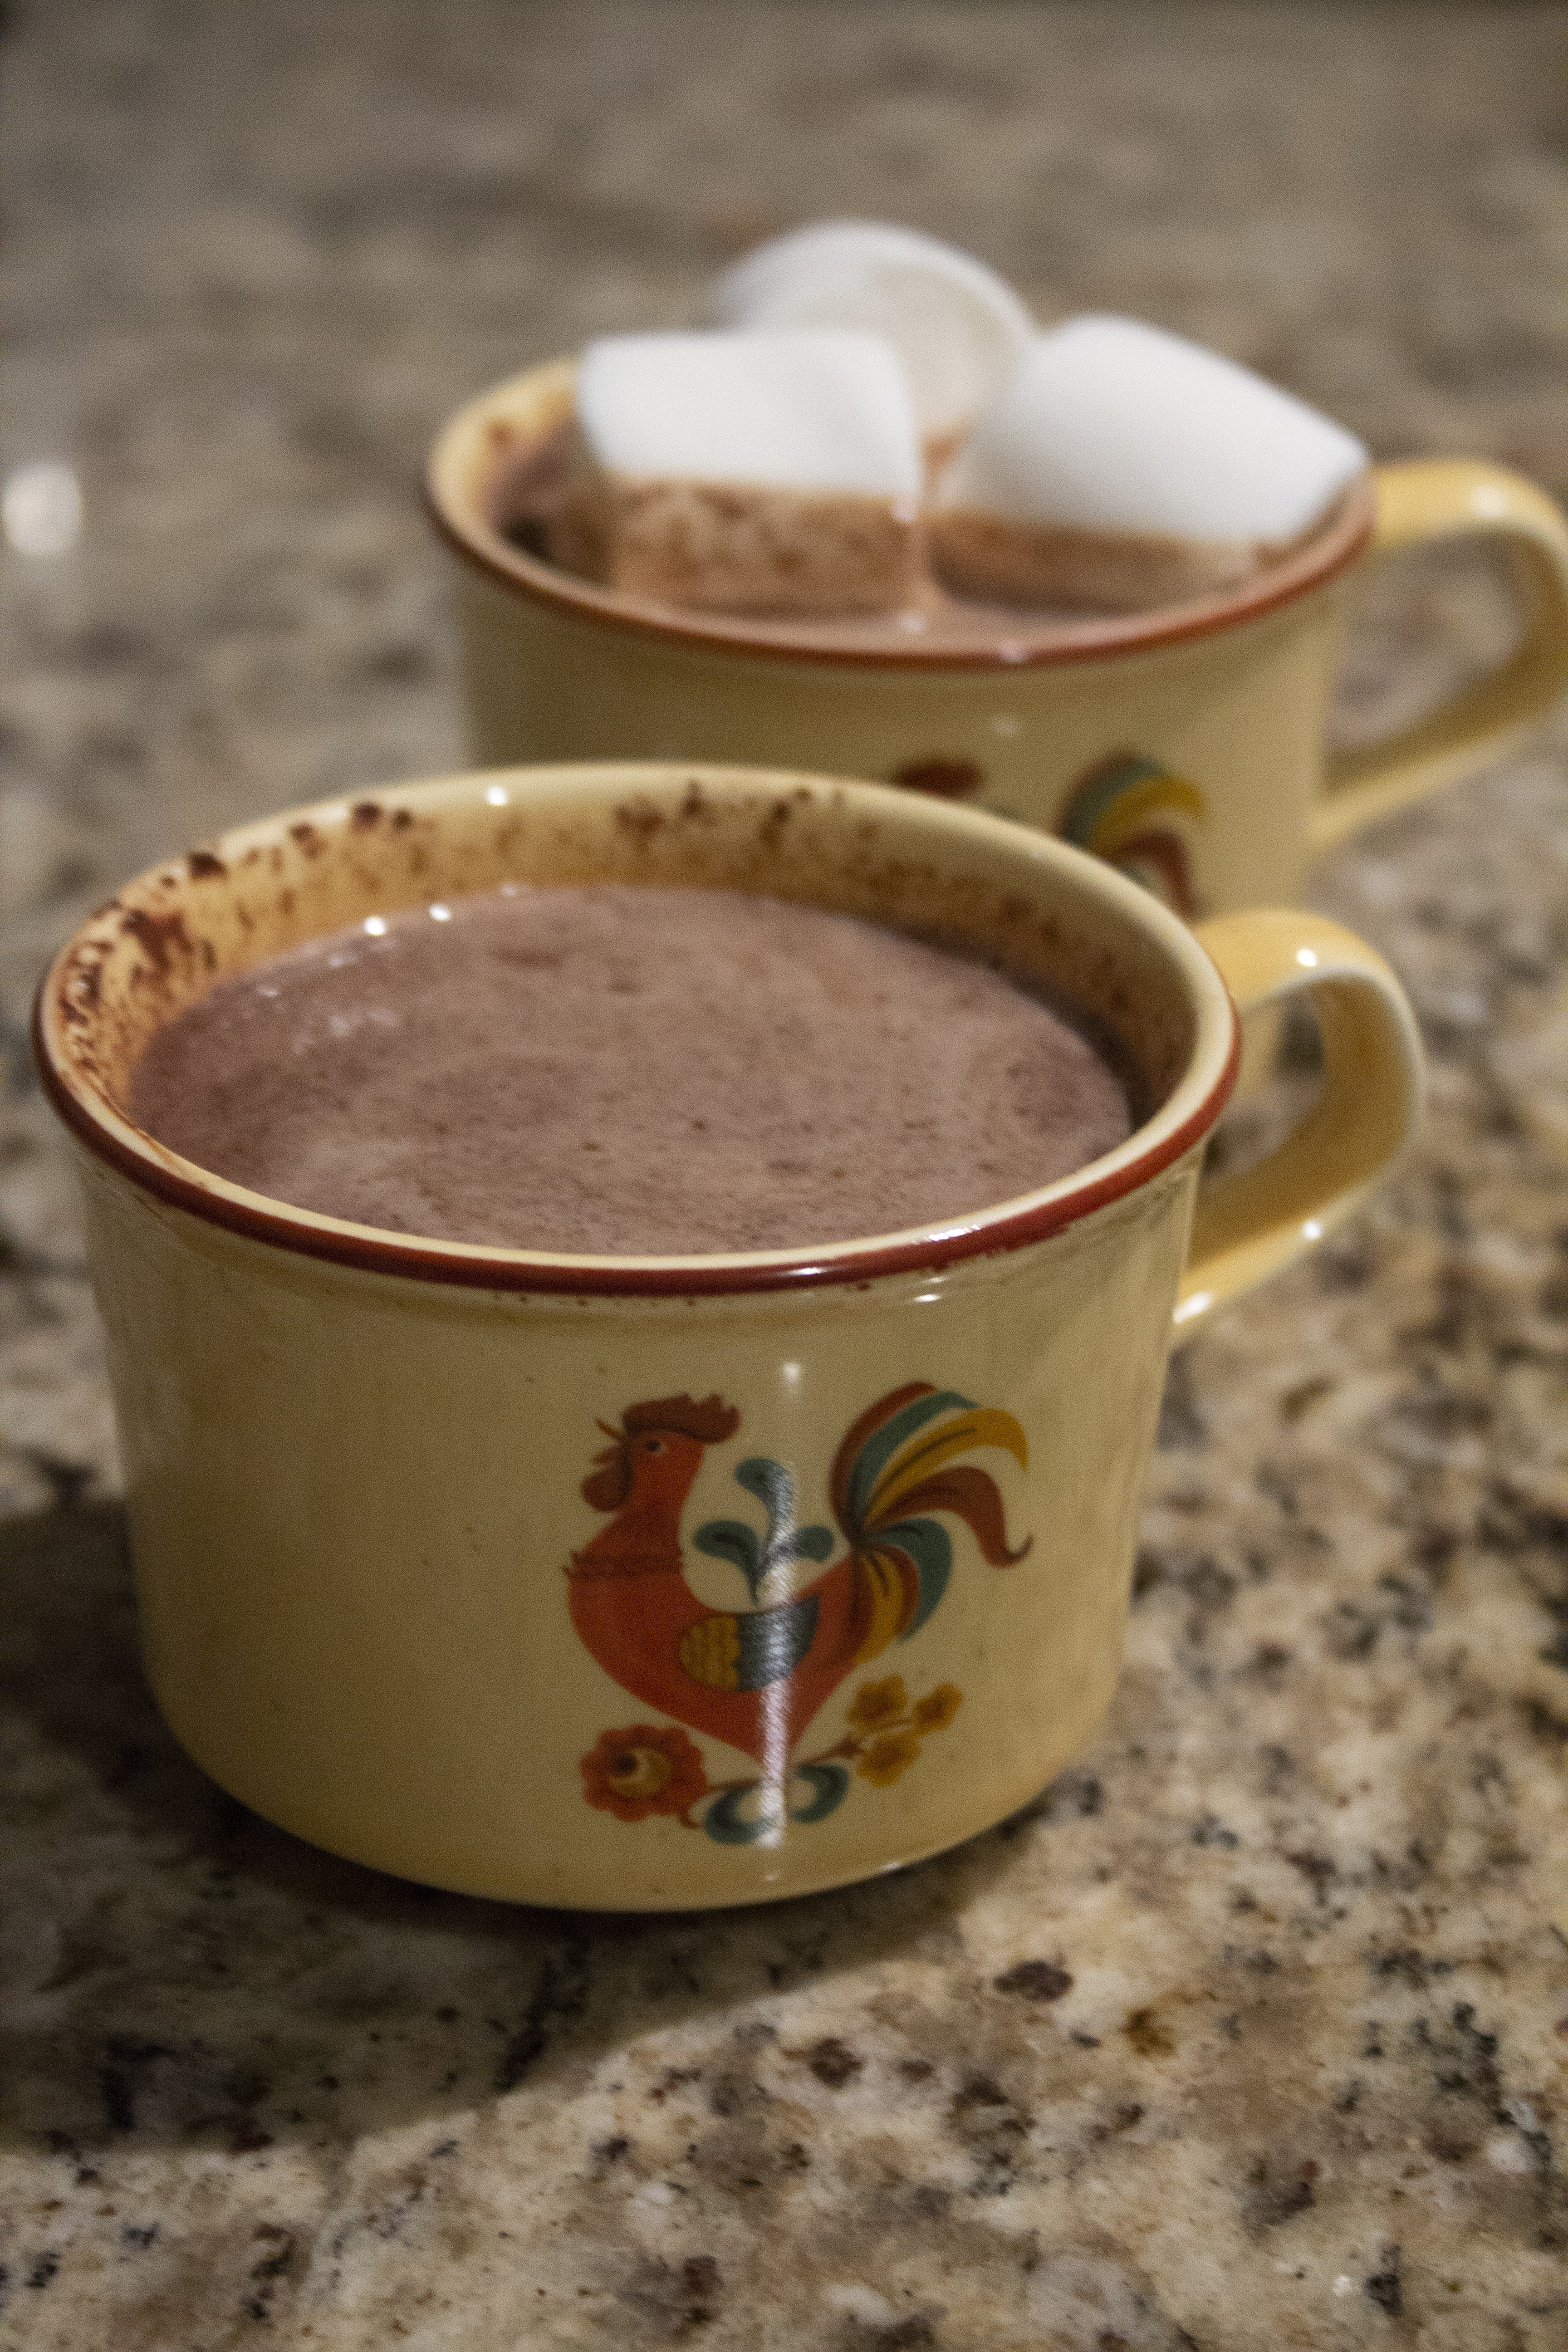
Pour the milk into a saucepan. Set the stove to low heat. Add the chopped chocolate and stir, slowly bringing the temperature to medium. When the chocolate is melted add the cayenne, cloves, cardamom, cinnamon, sea salt, and maple syrup. Stir, sip, and adjust spices and sweetener to taste.
Add marshmallows – or don’t, it’s up to you! It’s a pretty basic recipe that can be adapted however you’d like. I encourage you to have fun. Heck – add some nutmeg in there if you’re feeling really crazy!
Never enough knits – the Mistletoes and Cardamom and Clove Cover are perfect companions for hot chocolate.
Worried about spilling your cocoa on your beautiful blanket? Don’t! The Cardamom and Clove Cover Kit uses Deluxe Worsted Superwash, so it’s incredibly easy to care for.
Remember, you can find the 12 Days of Winter Series 2 patterns on Ravelry.