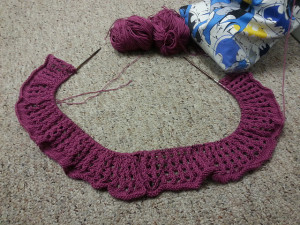
We have a couple of knitters here in the office working both front and back pieces at the same time. Here is Jen’s piece in progress:
If you look closely, you can see that she has two balls of yarn attached, and two distinct pieces of knitting. If you’ve cast on for your Rocked already, it’s too late to go this route. But it’s an interesting concept for other projects that have identical pieces, such as sleeves. To get started, cast on for the first piece onto your needle. Drop the current yarn. With a new ball of yarn, cast on for the second piece right behind the first set of cast on stitches. Simply work back and forth across both pieces using the appropriate ball of yarn for each piece.
I will sometimes knit both of my sleeves on the same needle. I find it is easier to keep track of increases, decreases, and other patterning this way. Other times, I find it a hassle to have multiple strands of yarn hanging from my knitting. But like many things in knitting, it’s nice to have options, right?
One problem I’ve run into before with working two pieces on the same needle is that I might accidentally turn and work the wrong side without first working the right side of the second piece. To solve this problem, I simply tie a piece of yarn between the two pieces so I don’t accidentally turn at the wrong place.
If you’ve read ahead in the pattern (or are maybe already to this point), you’ll see that during the neck shaping you are instructed to work both sides at the same time. This is a similar process to working two at a time sleeves, or two at a time anything else.
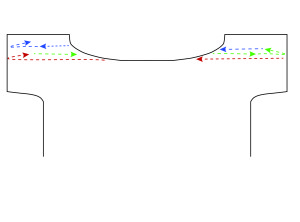
The above image demonstrates how the neck shaping works. Consider the red line row 1. This row reads like this:
Next row (RS): Work in patt over next 55 (61, 65, 71, 75) sts, attach new ball of yarn and bind off center 28 sts, work in patt over rem 55 (61, 65, 71, 75) sts.
The green line above would be row 2. Though not expressly written out, it would read like this:
Row 2 (WS): Work in patt over Right Shoulder sts to end. Bind off 6 sts at beg of Left Shoulder, work in patt to end.
And the blue line would be row 3, and would read like this:
Row 3: Work in patt over Left Shoulder sts to end. Bind off 6 sts at beg of Right Shoulder, work in patt to end.
Make sense? Though I don’t always like to work large pieces at the same time, when working neck shaping I do find it helpful to employ the two-at-a-time method. But you know what, if you prefer to work one side at a time, you’re more than welcome to do so!
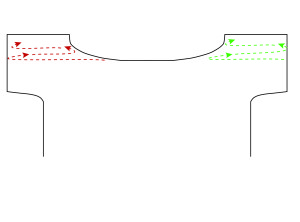
Here’s a graphic to represent how working each side separately would look:
The green line represents the Left Shoulder. Here is how that section would start off it were written out in rows:
Row 1 (RS): Work in patt over next 55 (61, 65, 71, 75) sts, turn. Place rem sts on holder.
Row 2 (WS): Bind off 6 sts, work in patt to end.
Row 3: Work in patt to end.
Row 4: Bind off 5 sts, work in patt to end.
And so forth. After the Left Shoulder is finished, the Right Shoulder would begin like this:
Bind off center 28 sts, work in patt to end.
If you’re not at the neck shaping section yet, that’s okay! Just remember Sandi’s wise sentiment from the other day: it’s not a race!


One Reply to “rocked knitalong – two at a time”
Comments are closed.