Rocked Knitalong – Button Tab Finishing

Today we’re wrapping up the Rocked knitalong with the final piece of the puzzle, the buttons and button tabs.  Just two simple pieces of knitted stockinette and a couple of buttons take this mesh shirt from “okay” to a really finished looking garment.

Although the instructions call for a cast-on of 8 stitches for the button tabs, I went with 10 stitches since my Garden 5 is a little finer than the Cotton True Sport.

Rocked button tab before blog


(I love how Heather photographed my tabs and buttons into a smiley face!)

You know that thing that drives us crazy about stockinette stitch, the way it rolls? This top is all about taking advantage of that fact, especially with the button tabs. Because the stockinette naturally rolls to the inside along the side of the piece, our button tabs look like an i-cord or tube.

To attach each button tab, I sewed one end inside the sleeve at the pick-up line for the sleeve, and centered right on the shoulder seam.

Rocked button tab interior_crop blog


I could have tacked the other end of the button tab to the outside of the shirt, but instead I just pinned it in place so that the edge just touched the sleeve pick-up line. I then layered a button on top of the tab and sewed it on, through all layers. It’s as easy as that! The button holds the outer portion of the tab in place.

Rocked button tab both sleeves blog

Although I opted for a fairly boring button choice, I really like the idea of contrasting buttons on this shirt. A pop of red on a white Rocked, or chartreuse green on a gray version – there are many possibilities. Have fun with it!

Rocked finished blog

Thanks to everyone who has been knitting along with us. I know there are lots of you still working on your Rocked tops. Don’t forget about our Ravelry group dedicated to the knitalong. I’ll be popping in here and there to see how you’re doing. And if you have a question, ask!


rocked knitalong – picking up stitches

We talked about seaming our Rocked the other day, so now it’s time to cover picking up stitches for the sleeves and neckline. The end is near! But if you’re going at a more leisurely pace, then this post will be waiting here for you when you’re ready to tackle this particular section of Rocked.

Here in our office knitalong, we’re in all stages of completion. As we all know, hand knitting is not a fast thing. We all have other things to do in our lives and may not be able to spend as much attention as we’d like on our projects. But that makes us treasure them even more once we finish them. I know I do.

Let’s first talk about determining the rate of picking up stitches off of your piece. And before that, let’s clarify what it means to “pick up stitches” vs “picking up and knitting stitches”. What we are doing here is picking up and knitting stitches. This means we are using our needles to pull our working yarn through our piece of knitting (the seamed Rocked) in order to work edgings. This is different than simply picking up stitches, which would not involve extra yarn. Picking up stitches just means to take your needle and place stitches on it, the stitches from the piece itself with no extra yarn. There are sometimes patterns that call for this technique and it is different than picking up and knitting.

Rocked seaming 1 blog

Let’s talk about the neckline first. The pattern tells us to pick up and knit 72 sts along both the front and back neck edges.  We want to be sure to pick up these stitches evenly spaced, otherwise the neckline might pucker in a section where too many or too few stitches are picked up in relation to the surrounding areas.

I like to use my very favorite knitting tool, the mighty safety pin. Removable stitch markers work great, too. First, place a safety pin in the dead center of the neckline. Use a measuring tape if you need to, or count pattern repeats to be sure you’re in the center. Then, place a safety pin between the center pin and the shoulder on each side of center – you now have 4 sections of equal length along one side of your neckline. From here, you could start picking up and knitting. You know you need to have 72 stitches total on the one side, so you would pick up and knit 18 stitches in each of the 4 sections (72 / 4). Or, if the sections feel too large and you’re struggling to pick up and knit evenly in them, halve them with more safety pins so you have 8 sections and pick up and knit 9 stitches in each of these smaller sections.

The safety pin method is one I almost always use with a curved edge such as a neckline. But when picking up and knitting stitches from a straight vertical edge, along the side of a piece, I can usually just do a little math and figure out my rate without the need for markers.

For example, let’s take a look at the smallest size sleeve instruction. It says to pick up and knit 72 stitches along the side of the sleeve.  If my stockinette stitch and row gauges match the pattern, then I have 5.25 stitches and 7.25 rows per inch. Knowing this is important, because it means I want to be picking up about 5.25 stitches for every 7.25 rows along the side of the sleeve. But that is not helpful, because how in the heck do you pick up 5.25 stitches?!  You could throw in the towel and use the safety pin method – I personally will do this for vertical edges sometimes, too. Or, you could do a little math.

Divide the number of rows per inch into the number of stitches per inch, so: 5.25 / 7.25 = .724, or about 72%. If I were to pick up and knit 3 stitches for every 4 rows, this would be 75% which is just a little too much. If I were to pick up and knit 2 stitches for every 3 rows, this would be 66% which would be not quite enough. So my game plan would be to do this: alternate between the two, and pick up and knit 3 stitches, skip a row, pick up and knit 2 stitches, skip a row, and so on.

If your gauge doesn’t quite match the pattern, that’s okay. Simply pop your personal numbers into the equation and you’ll have your answer. You’ll want to note that if your stitch count is different than the pattern, you will be picking up and knitting a different number of stitches from both the sleeve and neckline. To calculate the stitches you need, simply measure the edge and take that number of inches x your stitches per inch.

Here is a short video showing how to pick up and knit from the side of the sleeve.

And here is my Rocked after doing both sleeves and the neck edging.

Rocked pick up and knit C blog Rocked pick up and knit E blog Rocked pick up and knit A blog

We’ll be back in a few days to attach the sleeve tabs and buttons. See you then!


Rocked Knitalong – seaming

I finished up the second side of my Rocked over the weekend – man, that felt good!

Rocked two halves A blog

You’ll notice those long ends hanging off the finished pieces. When I know I’m going to be seaming, I like to leave generous tails both when casting on and binding off. It means I have less ends to weave in which makes me very happy.

Rocked two halves B blog

Here she is all pinned up the dressform. The end is so near! But first, I’ve got some seams to sew. My go-to method for seaming is almost always good ol’ reliable mattress stitch. If you joined us for the afghan knitalong last year, you may have already read our post on mattress stitch. It is a way to produce an even, sturdy seam. Here’s that video again:

But mattress stitch is not your only option. You could also try the crochet slip stitch seam:

Or you could hold the pieces right sides together and whipstitch, although I find it difficult to produce a nice looking seam this way.

In the Rocked pattern, you are instructed to sew the shoulder seams first. Then, pick up and knit stitches for the sleeves, and then sew the side and sleeve seams. Personally, I’m going go ahead and sew all my seams first so I can knit my sleeves in the round. This will require the use of double pointed needles or a long circular needle in order to employ the magic loop method. If you prefer knitting your sleeves flat, then I would advise following the pattern instructions. But it’s nice to have options, right?

Regardless of how you sew your seams, an important next step is to steam them. This will help to even out any unevenness with the seam, and will smooth them down helping the garment to drape better. I like to take my iron, hold it a few inches from the seam, and shoot steam at it. I then take my hand and help to press it down and relax.

I’ll be back in a couple of days to talk about picking up stitches off of your Rocked to work the neckline and sleeves. Wherever you’re at with your piece, I hope you’re enjoying it!


rocked knitalong – two at a time

We have a couple of knitters here in the office working both front and back pieces at the same time. Here is Jen’s piece in progress:

Jen'sRocked

If you look closely, you can see that she has two balls of yarn attached, and two distinct pieces of knitting. If you’ve cast on for your Rocked already, it’s too late to go this route. But it’s an interesting concept for other projects that have identical pieces, such as sleeves. To get started, cast on for the first piece onto your needle. Drop the current yarn. With a new ball of yarn, cast on for the second piece right behind the first set of cast on stitches. Simply work back and forth across both pieces using the appropriate ball of yarn for each piece.

I will sometimes knit both of my sleeves on the  same needle. I find it is easier to keep track of increases, decreases, and other patterning this way.  Other times, I find it a hassle to have multiple strands of yarn hanging from my knitting. But like many things in knitting, it’s nice to have options, right?

One problem I’ve run into before with working two pieces on the same needle is that I might accidentally turn and work the wrong side without first working the right side of the second piece. To solve this problem, I simply tie a piece of yarn between the two pieces so I don’t accidentally turn at the wrong place.

If you’ve read ahead in the pattern (or are maybe already to this point), you’ll see that during the neck shaping you are instructed to work both sides at the same time. This is a similar process to working two at a time sleeves, or two at a time anything else.

Rocked_twoatatimesleeves


The above image demonstrates how the neck shaping works. Consider the red line row 1. This row reads like this:

Next row (RS): Work in patt over next 55 (61, 65, 71, 75) sts, attach new ball of yarn and bind off center 28 sts, work in patt over rem 55 (61, 65, 71, 75) sts.

The green line above would be row 2. Though not expressly written out, it would read like this:

Row 2 (WS): Work in patt over Right Shoulder sts to end. Bind off 6 sts at beg of Left Shoulder, work in patt to end.

And the blue line would be row 3, and would read like this:

Row 3: Work in patt over Left Shoulder sts to end. Bind off 6 sts at beg of Right Shoulder, work in patt to end.

Make sense? Though I don’t always like to work large pieces at the same time, when working neck shaping I do find it helpful to employ the two-at-a-time method. But you know what, if you prefer to work one side at a time, you’re more than welcome to do so!

Here’s a graphic to represent how working each side separately would look:

Rocked_oneatatimesleeves

The green line represents the Left Shoulder. Here is how that section would start off it were written out in rows:

Row 1 (RS): Work in patt over next 55 (61, 65, 71, 75) sts, turn. Place rem sts on holder.

Row 2 (WS): Bind off 6 sts, work in patt to end.

Row 3: Work in patt to end.

Row 4: Bind off 5 sts, work in patt to end.

And so forth. After the Left Shoulder is finished, the Right Shoulder would begin like this:

Bind off center 28 sts, work in patt to end.

If you’re not at the neck shaping section yet, that’s okay! Just remember Sandi’s wise sentiment from the other day: it’s not a race!


Rocked Knitalong – If this was a race, I’d be losing.

Once again, I hand the blog over to Sandi Rosner for an update on her Rocked:

It’s been two weeks since our official cast-on date for the Rocked Knit A Long, and my progress has been dismal.

Rocked progress_Sandi

Now, I’m not a slow knitter, and I’ve not run into any issues with this pattern. But like most recreational pursuits, knitting for myself is quickly put aside when work demands get heavy. In addition to being Creative Director for Premier Yarns, I’m working on finishing a book. My knitting and crochet time has been pretty scarce, and when I do sit down with my needles or my hook, it is usually to make something that is needed for a photo shoot or for the book.

I know Amy has written about casting on for the sleeves, but I’m not even close to that point, and to tell the truth, I was feeling pretty bad about it. The internal browbeating went something like this: “Why did I even sign up for this KAL? I should have known I had too much work to do and wouldn’t be able to keep up. I should be setting an example, and here I am looking like a slacker. I’ll never have time to finish this piece.” Sound familiar?

Well, I’ve decided to let go of expectations. The truth is, this is not a race. There is no prize for finishing fast, and no punishment for being a slowpoke. I really do want to wear this top, and I’ll finish it when I finish it – if not in time for this summer, then for next.

I’ve also developed a strategy to turn my Rocked from a burden that induces shame every time I look at it to a pleasure that I look forward to knitting. With the warmer weather of late Spring, some of us here in the office have been getting together after work on Fridays. We choose a place with outdoor seating and have a glass of wine to cap off the week. My Rocked will be the project I take along to knit on those occasions. Nothing like pleasant associations to make a project go faster, right?

So, how is everybody else doing? Are you zipping right along, have you stalled along the way, or are you somewhere in between?

Rocked Knitalong – casting on for sleeves

Last blog post, I talked about how to maintain stitches in pattern during the sleeve shaping section. But what I didn’t cover was how to cast on at the beginning of rows. Raveler skcfoto asked over in our Rocked knitalong Ravelry group if we could post a video of casting on. I’m glad she asked – we’re happy to do so!

Below is a video showing the knitted cast on. This is a cast on that can be used to begin a project or to cast on at the beginning of a row on an existing piece of knitting, such as Rocked. Instead of the knitted cast on, the backward loop method could also be used. But I find working into the knitted cast on to be much easier to do than backward loop, plus, it provides a more stable edge.

Rocked Knitalong, increasing in pattern

I have seen the terror in the eyes of knitter when they read these words, “increase in pattern.” Or “decrease in pattern”, or “maintain stitches in pattern”, or any other number of similar phrases. What does this mean, “in pattern”???

I hope to demystify this for you, at least as far as you need to know for the Rocked top. And the main body pattern in Rocked is actually a really good pattern to learn this concept on. The stitch repeat is only 4 stitches wide x 4 rows high, so it’s reasonably easy to “read” your work.

Here is how the text for the “Increase for Sleeves” section reads:

Cast on 2 sts at beg of next 6 rows, cast on 10 sts at beg of next 2 rows. While it doesn’t expressly say so, the pattern is telling you to also maintain stitches in pattern when casting on.

I’ll try to go about this a couple of ways. For anyone who understands what it means to “maintain in pattern” or just wants to jump right in, I have made a chart for the sleeve increases:


Rows 1-8 of the chart show the increases. After that point, because we have increased a multiple of 4 stitches on each side, the number of stitches for a full pattern repeat, we will simply continue to follow Rows 1-4 of the Mesh pattern.

To try and break it down, let’s look at just the right side portion of the increase chart.

SleeveIncreaseChart_2


For our first 2-stitch cast on, we will then have to work back across those stitches on RS row 1. Although after having cast-on 2 stitches we could fit in part of a pattern repeat, it’s not usually a good idea to do so directly onto cast on stitches. K2tog and ssk are tough to do over cast on stitches, and it’s just not worth it to do it here. Plus, we will be seaming this area later and we want it to be stable.

On the following WS row, take a look at those last stitches that were cast on. Try to visualize them as part of a full pattern repeat. If you shift your eyes 4 stitches to the left on the chart, you can see that you will do the same thing over the new 2 stitches as you would have done on the previous repeat.

SleeveIncreaseChart3


Now, just for the sake of further trying to understand increasing in pattern, here is a different way I could have worked the chart:

SleeveIncreaseChart4


The chart on the right is the way I’ve done it above. The chart on the left shows how we could work the stitches if we really wanted to start incorporating the pattern in as soon as possible. Sometimes we do want to do this in the case of, say, a delicate lace shawl where every stitch shows and counts. It’s also important to remember that if you’re doing lace like we are here, only work a decrease if there are enough stitches for a corresponding increase, and vice versa.

Another simpler way of incorporating new stitches into your pattern without having to follow charts or use your intuition is to place markers. Try placing a marker between every pattern repeat where those vertical red lines of the pattern repeat box sit. Or, at least add markers to the couple of pattern repeats each side of your piece. If you have enough stitches on the sides of your markers for a pattern repeat, do it! If not, just work the stitches in stockinette stitch.

Here’s my Rocked after working a couple of pattern repeats past the sleeve cast on:

Rocked sleeve 2 beginning blog

Rocked piece with sleeve beginning blog


rocked knitalong – working into a double yo

Rocked Knitalong Graphic

As I was knitting along on my Rocked, I was working a lace pattern row with its double yarnovers. When I reached the next (WS) row and was working the [k1, p1] into each double yarnover (yo), it occurred to me that this could make for a good video.

When there is a double yo on your needle, it can be confusing just how to knit or purl into it. If this is your first time dealing with double yarnovers, give this video a try. I hope it helps!


Rocked Knitalong – ready, set, cast on!

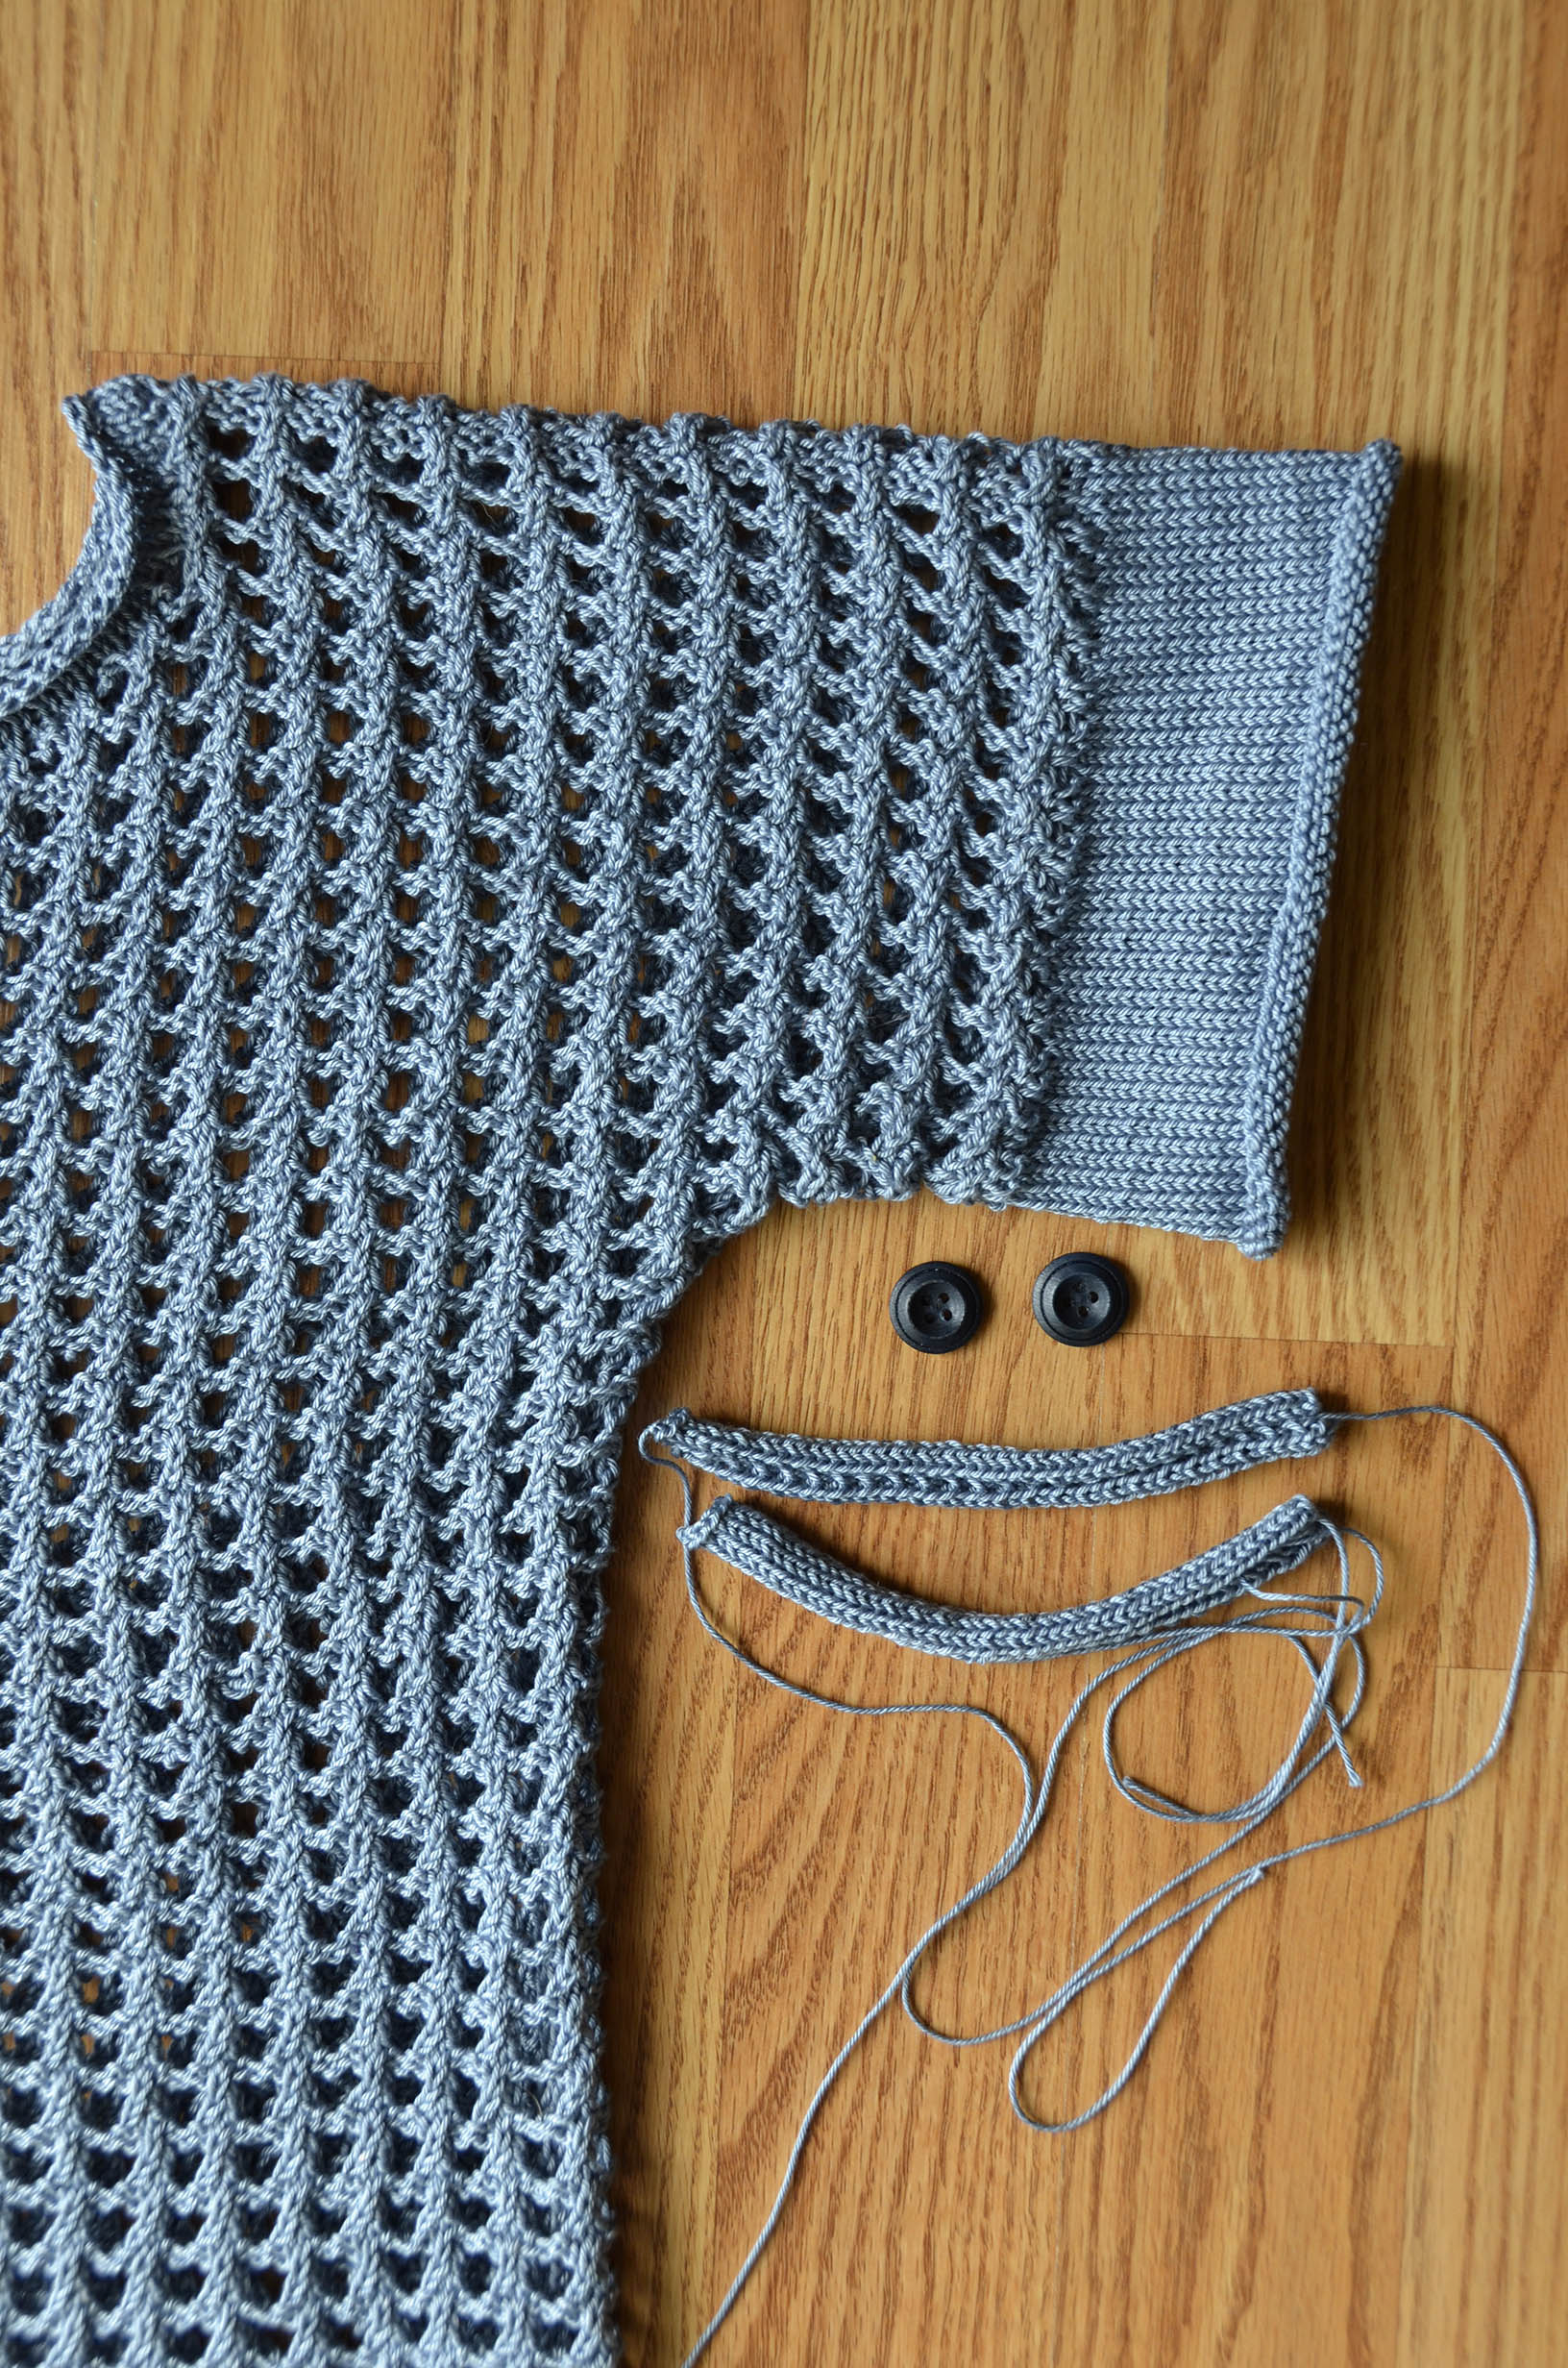
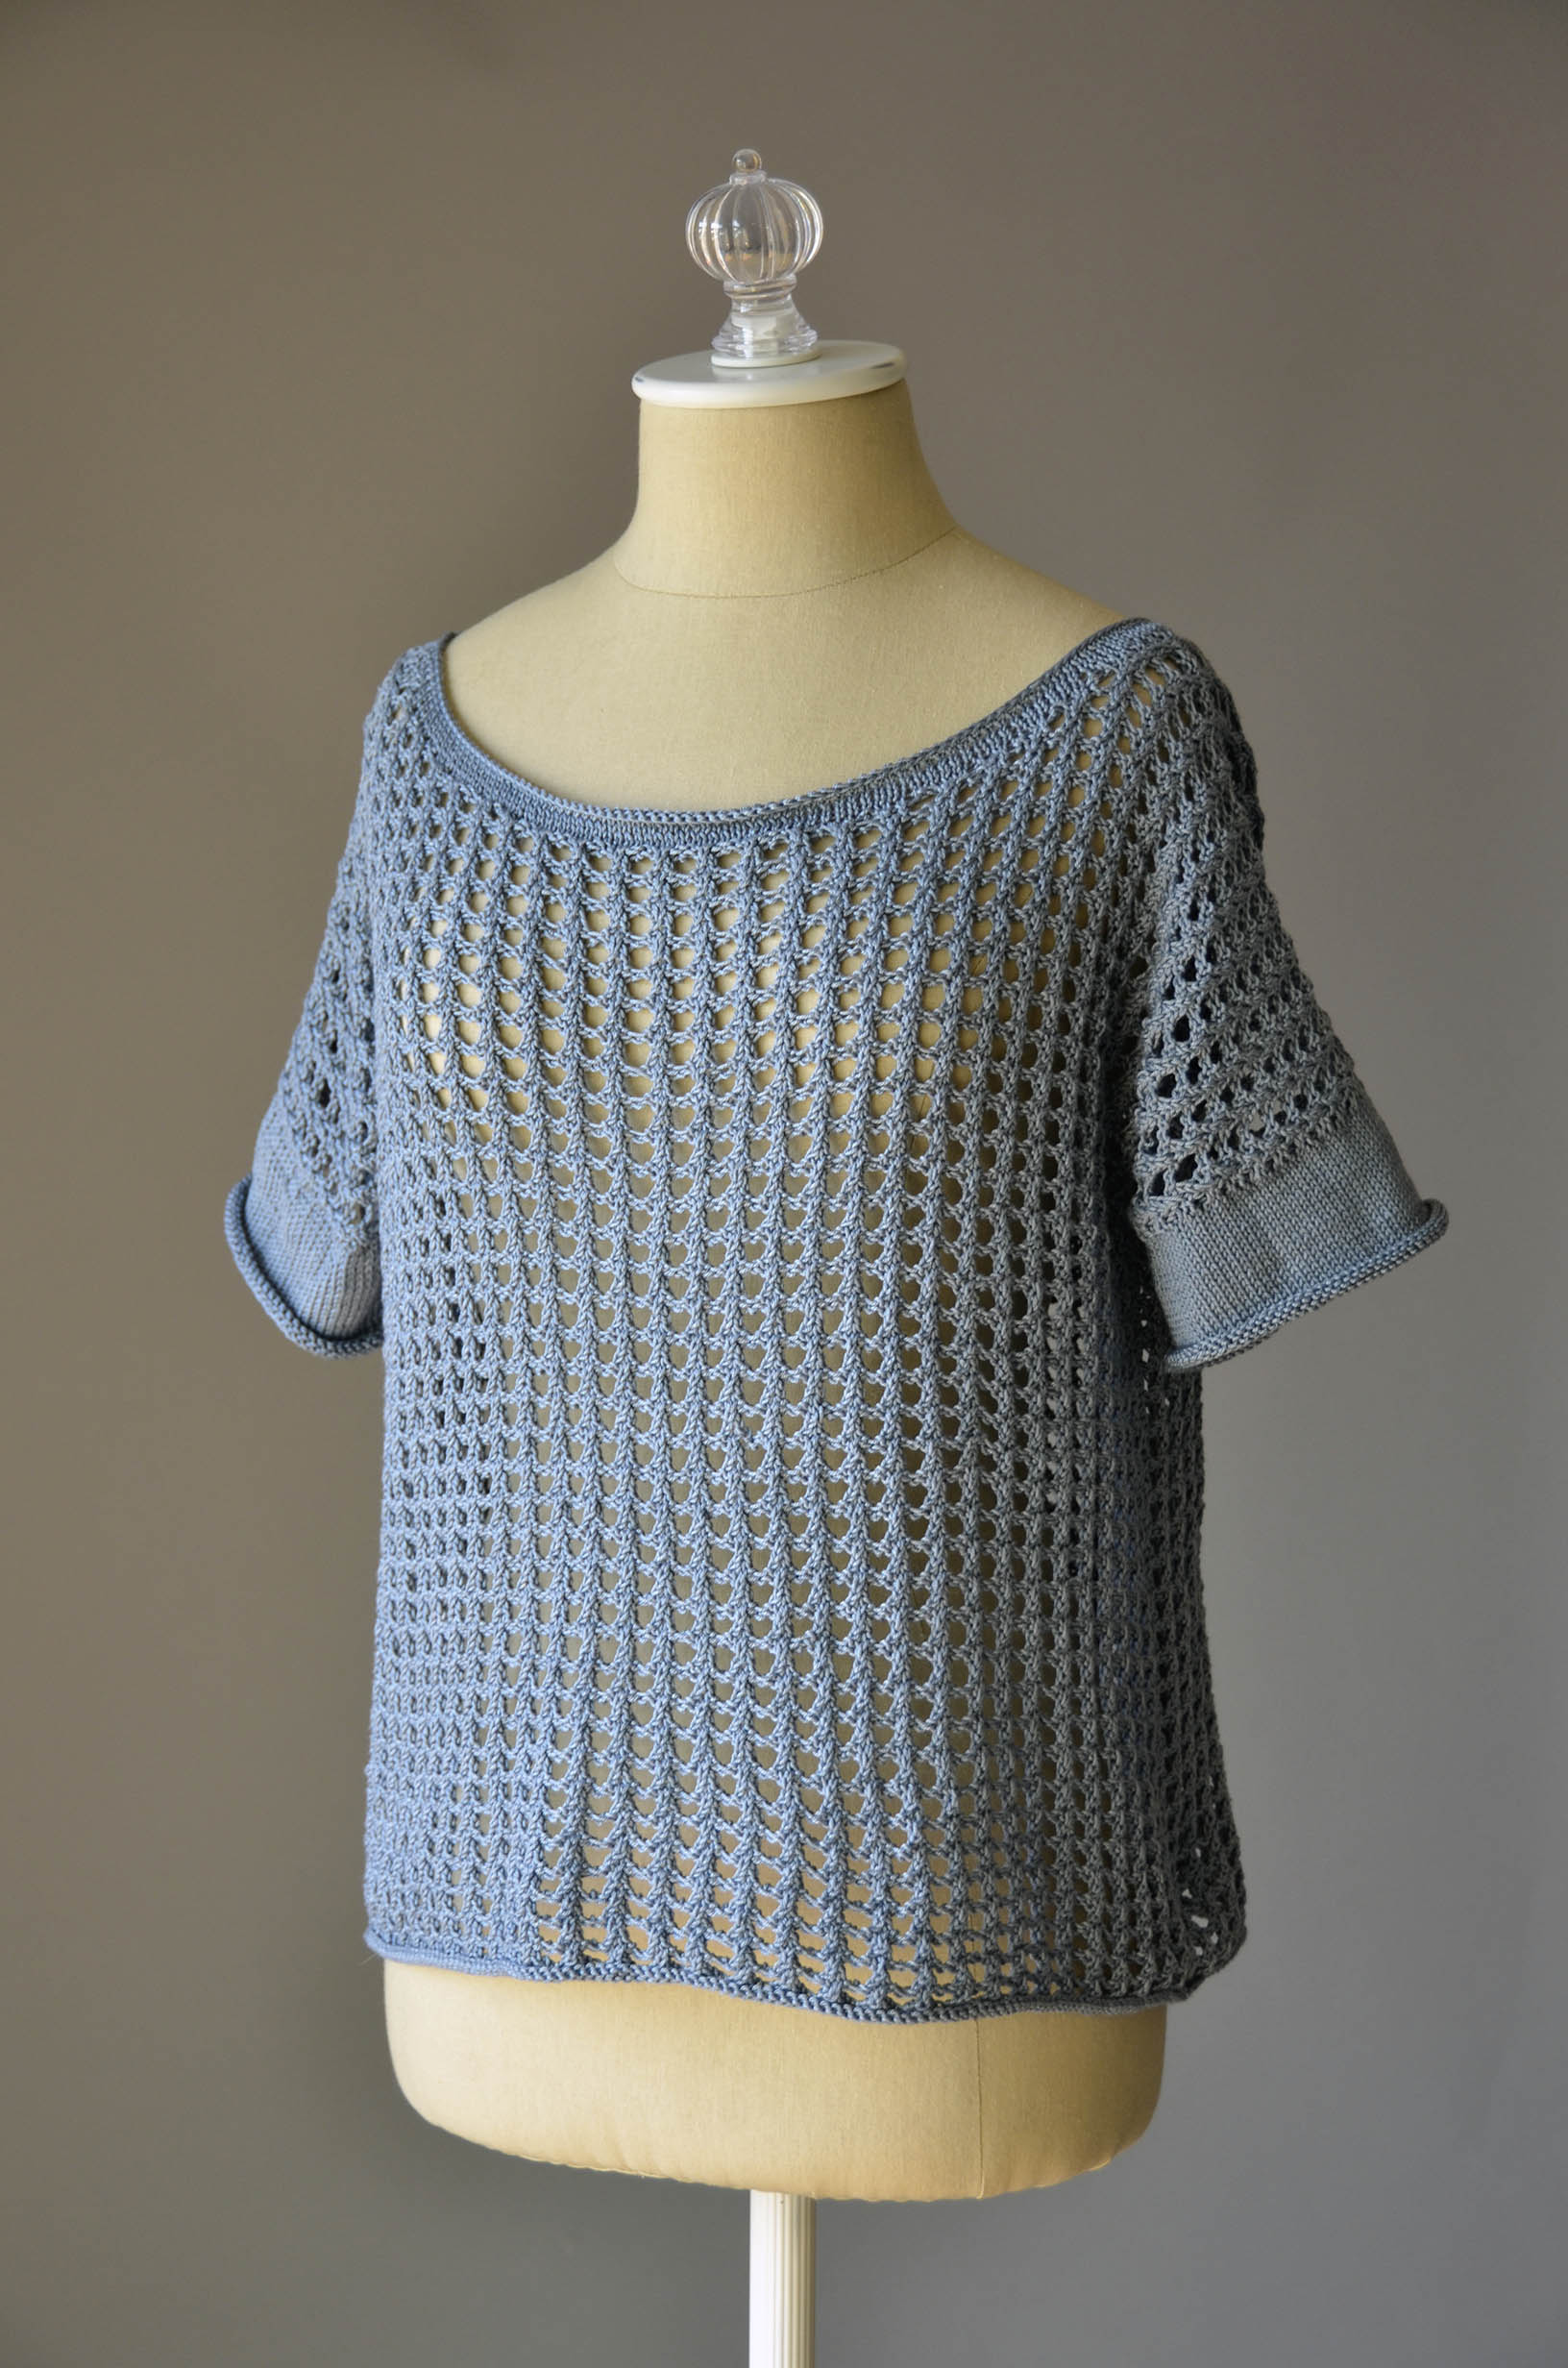
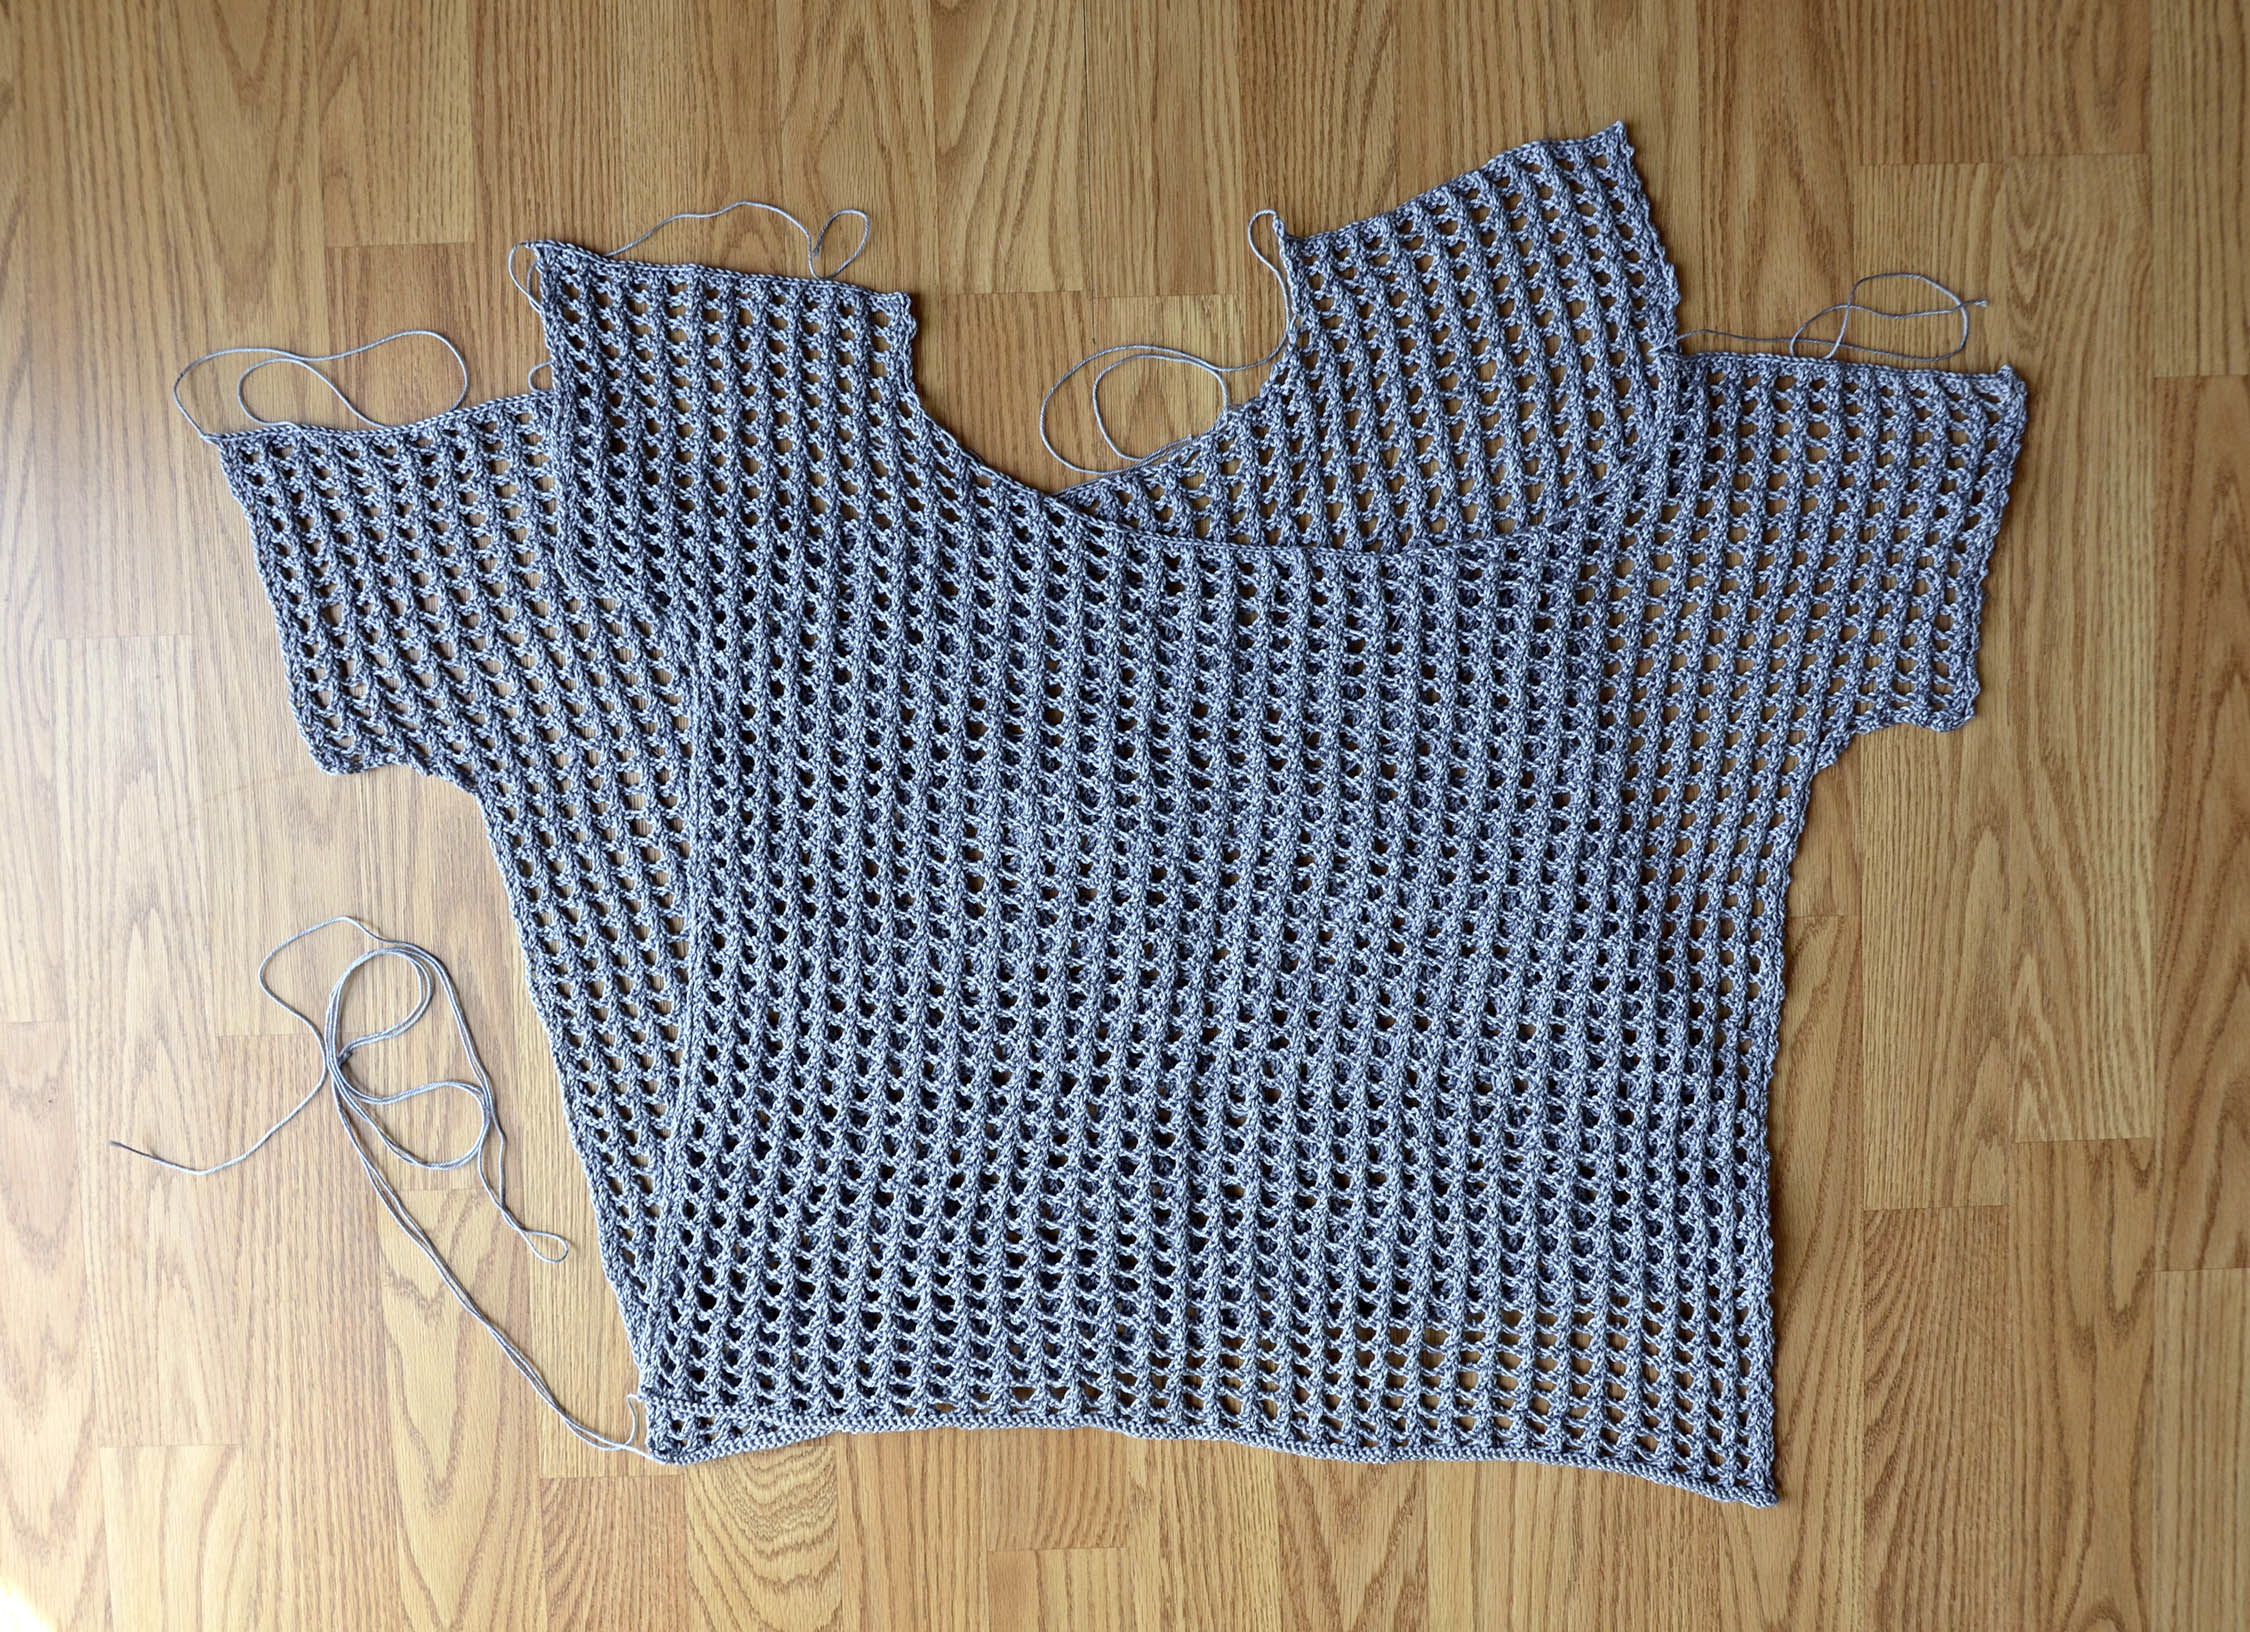
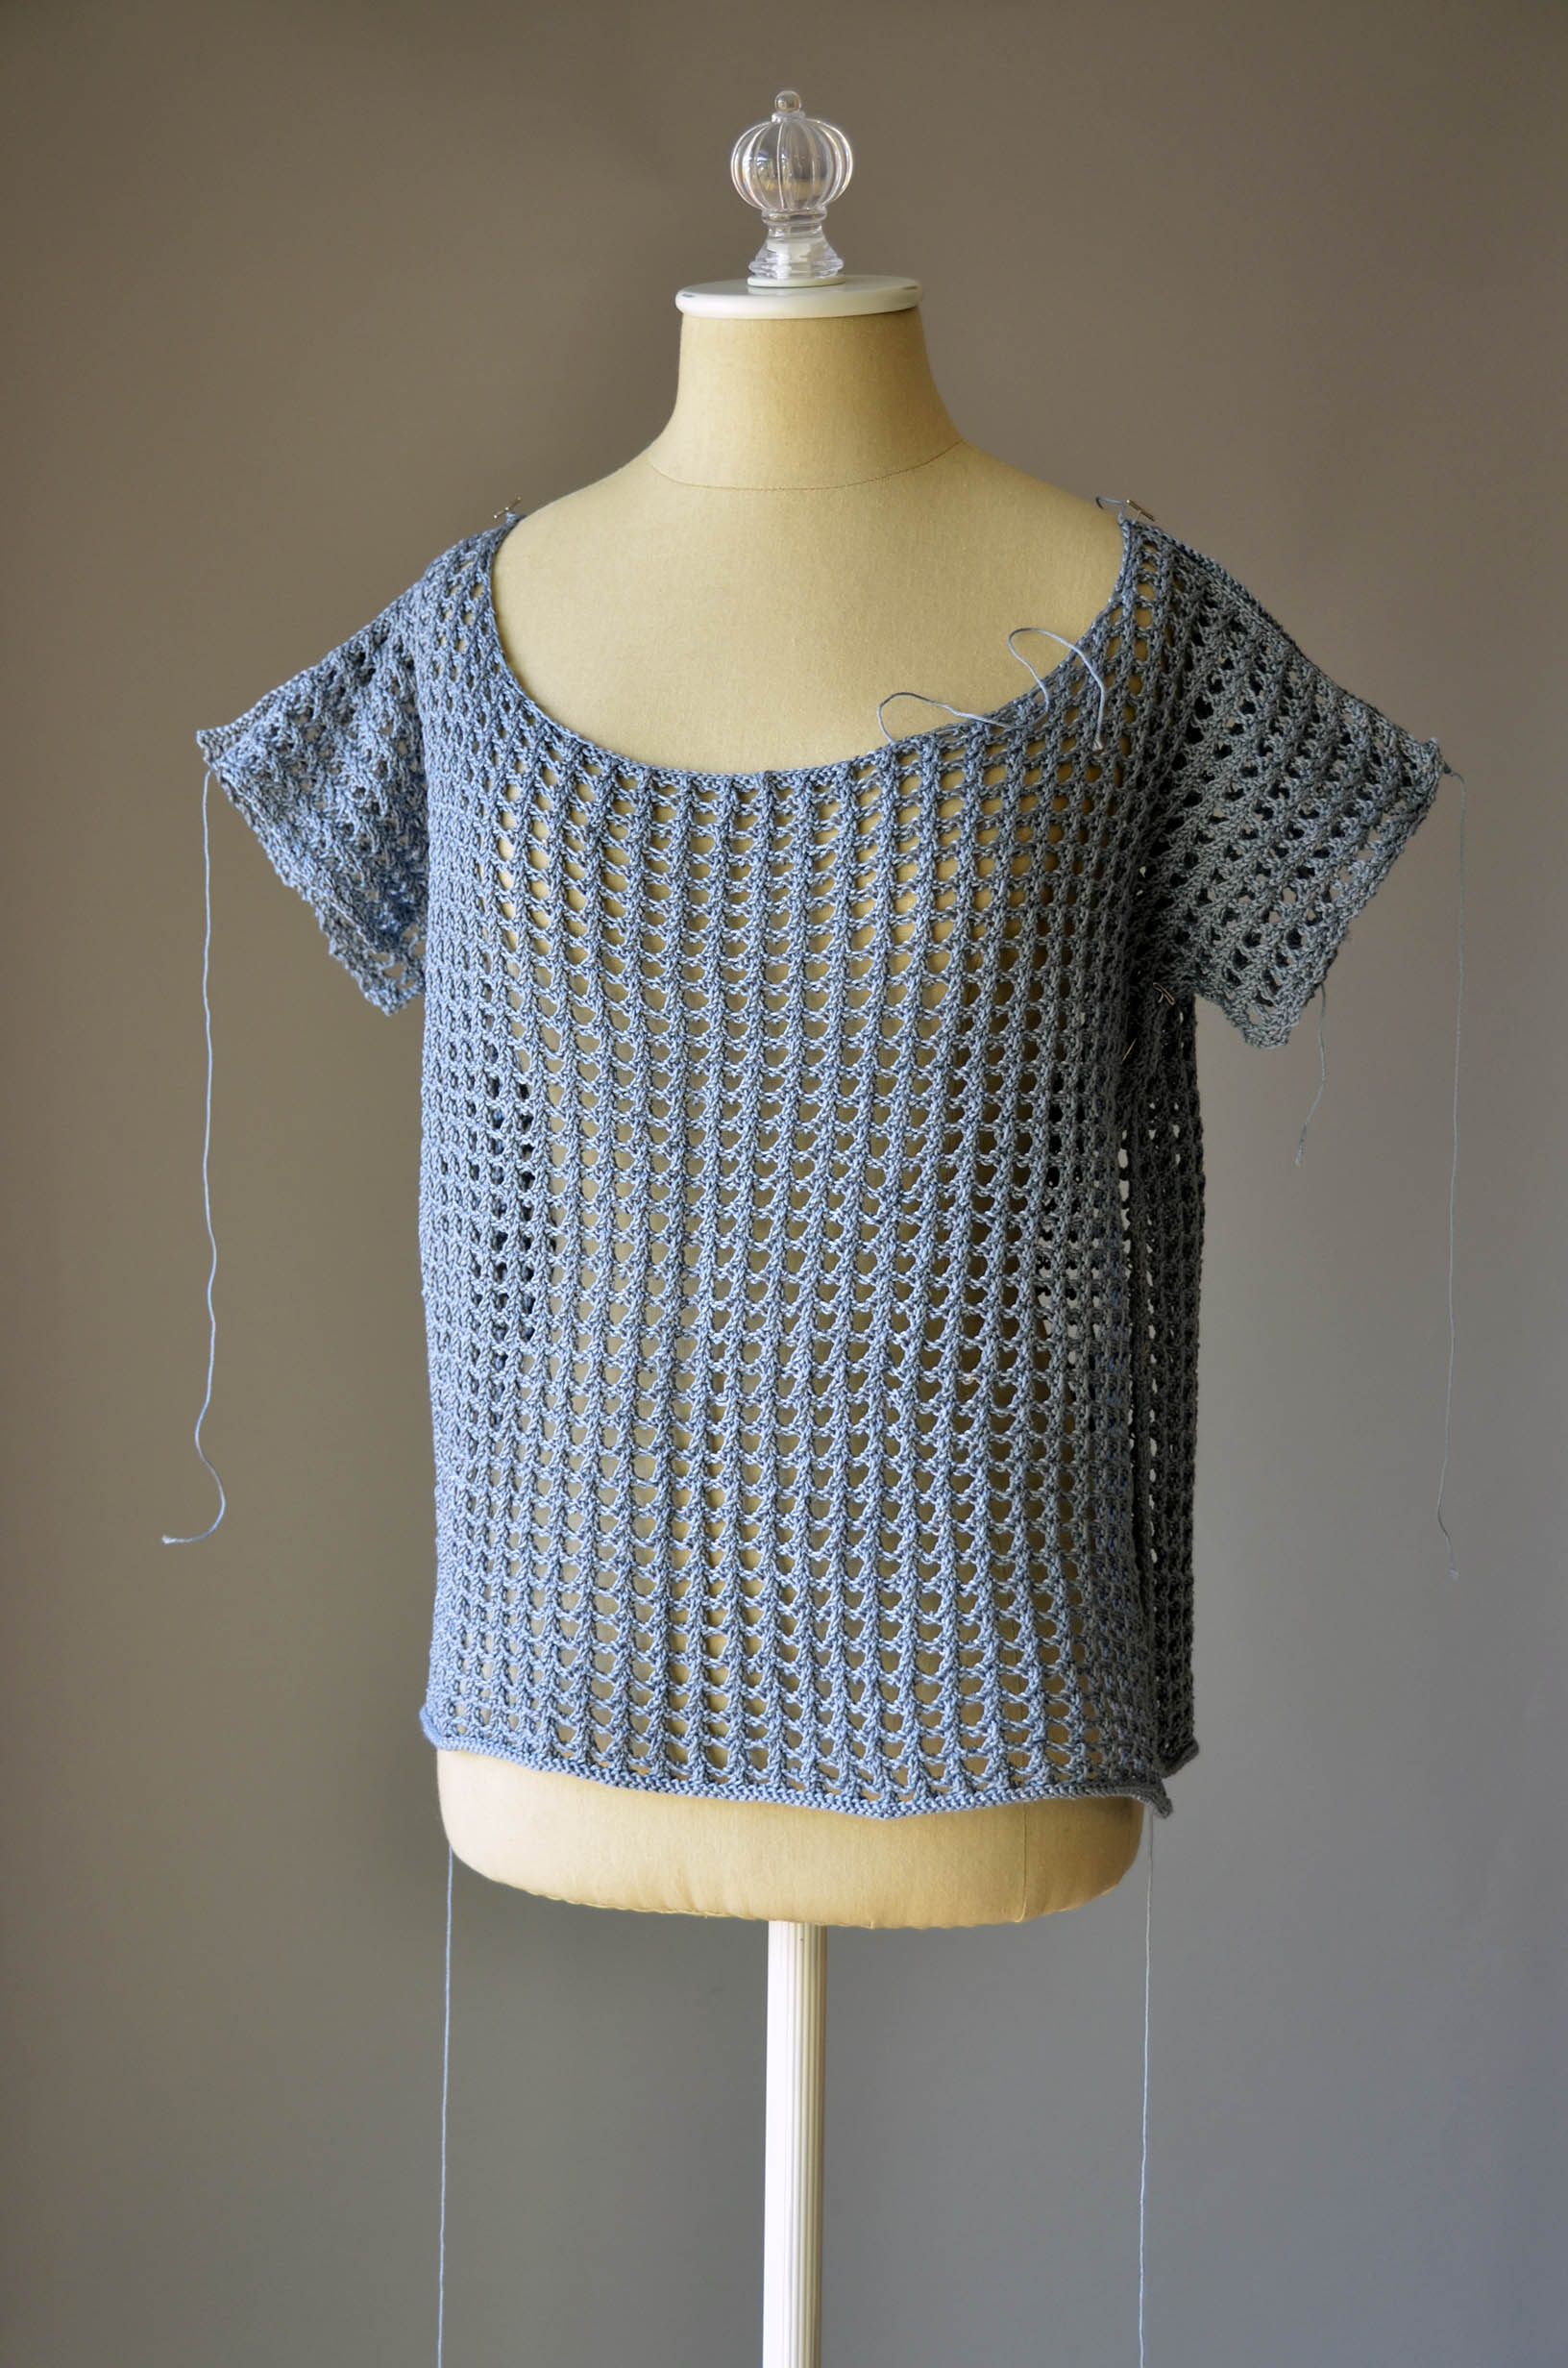
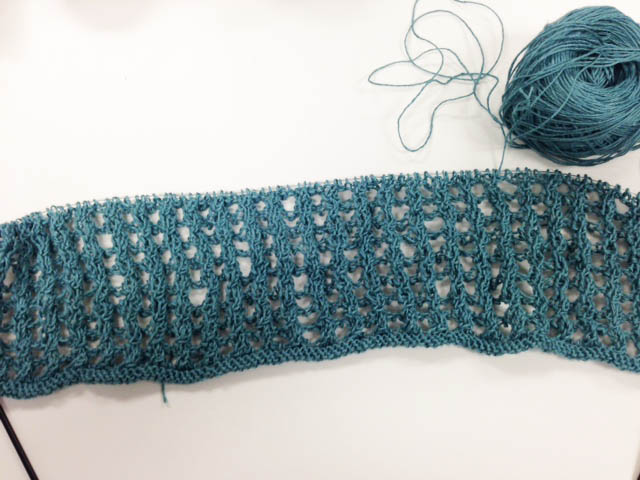
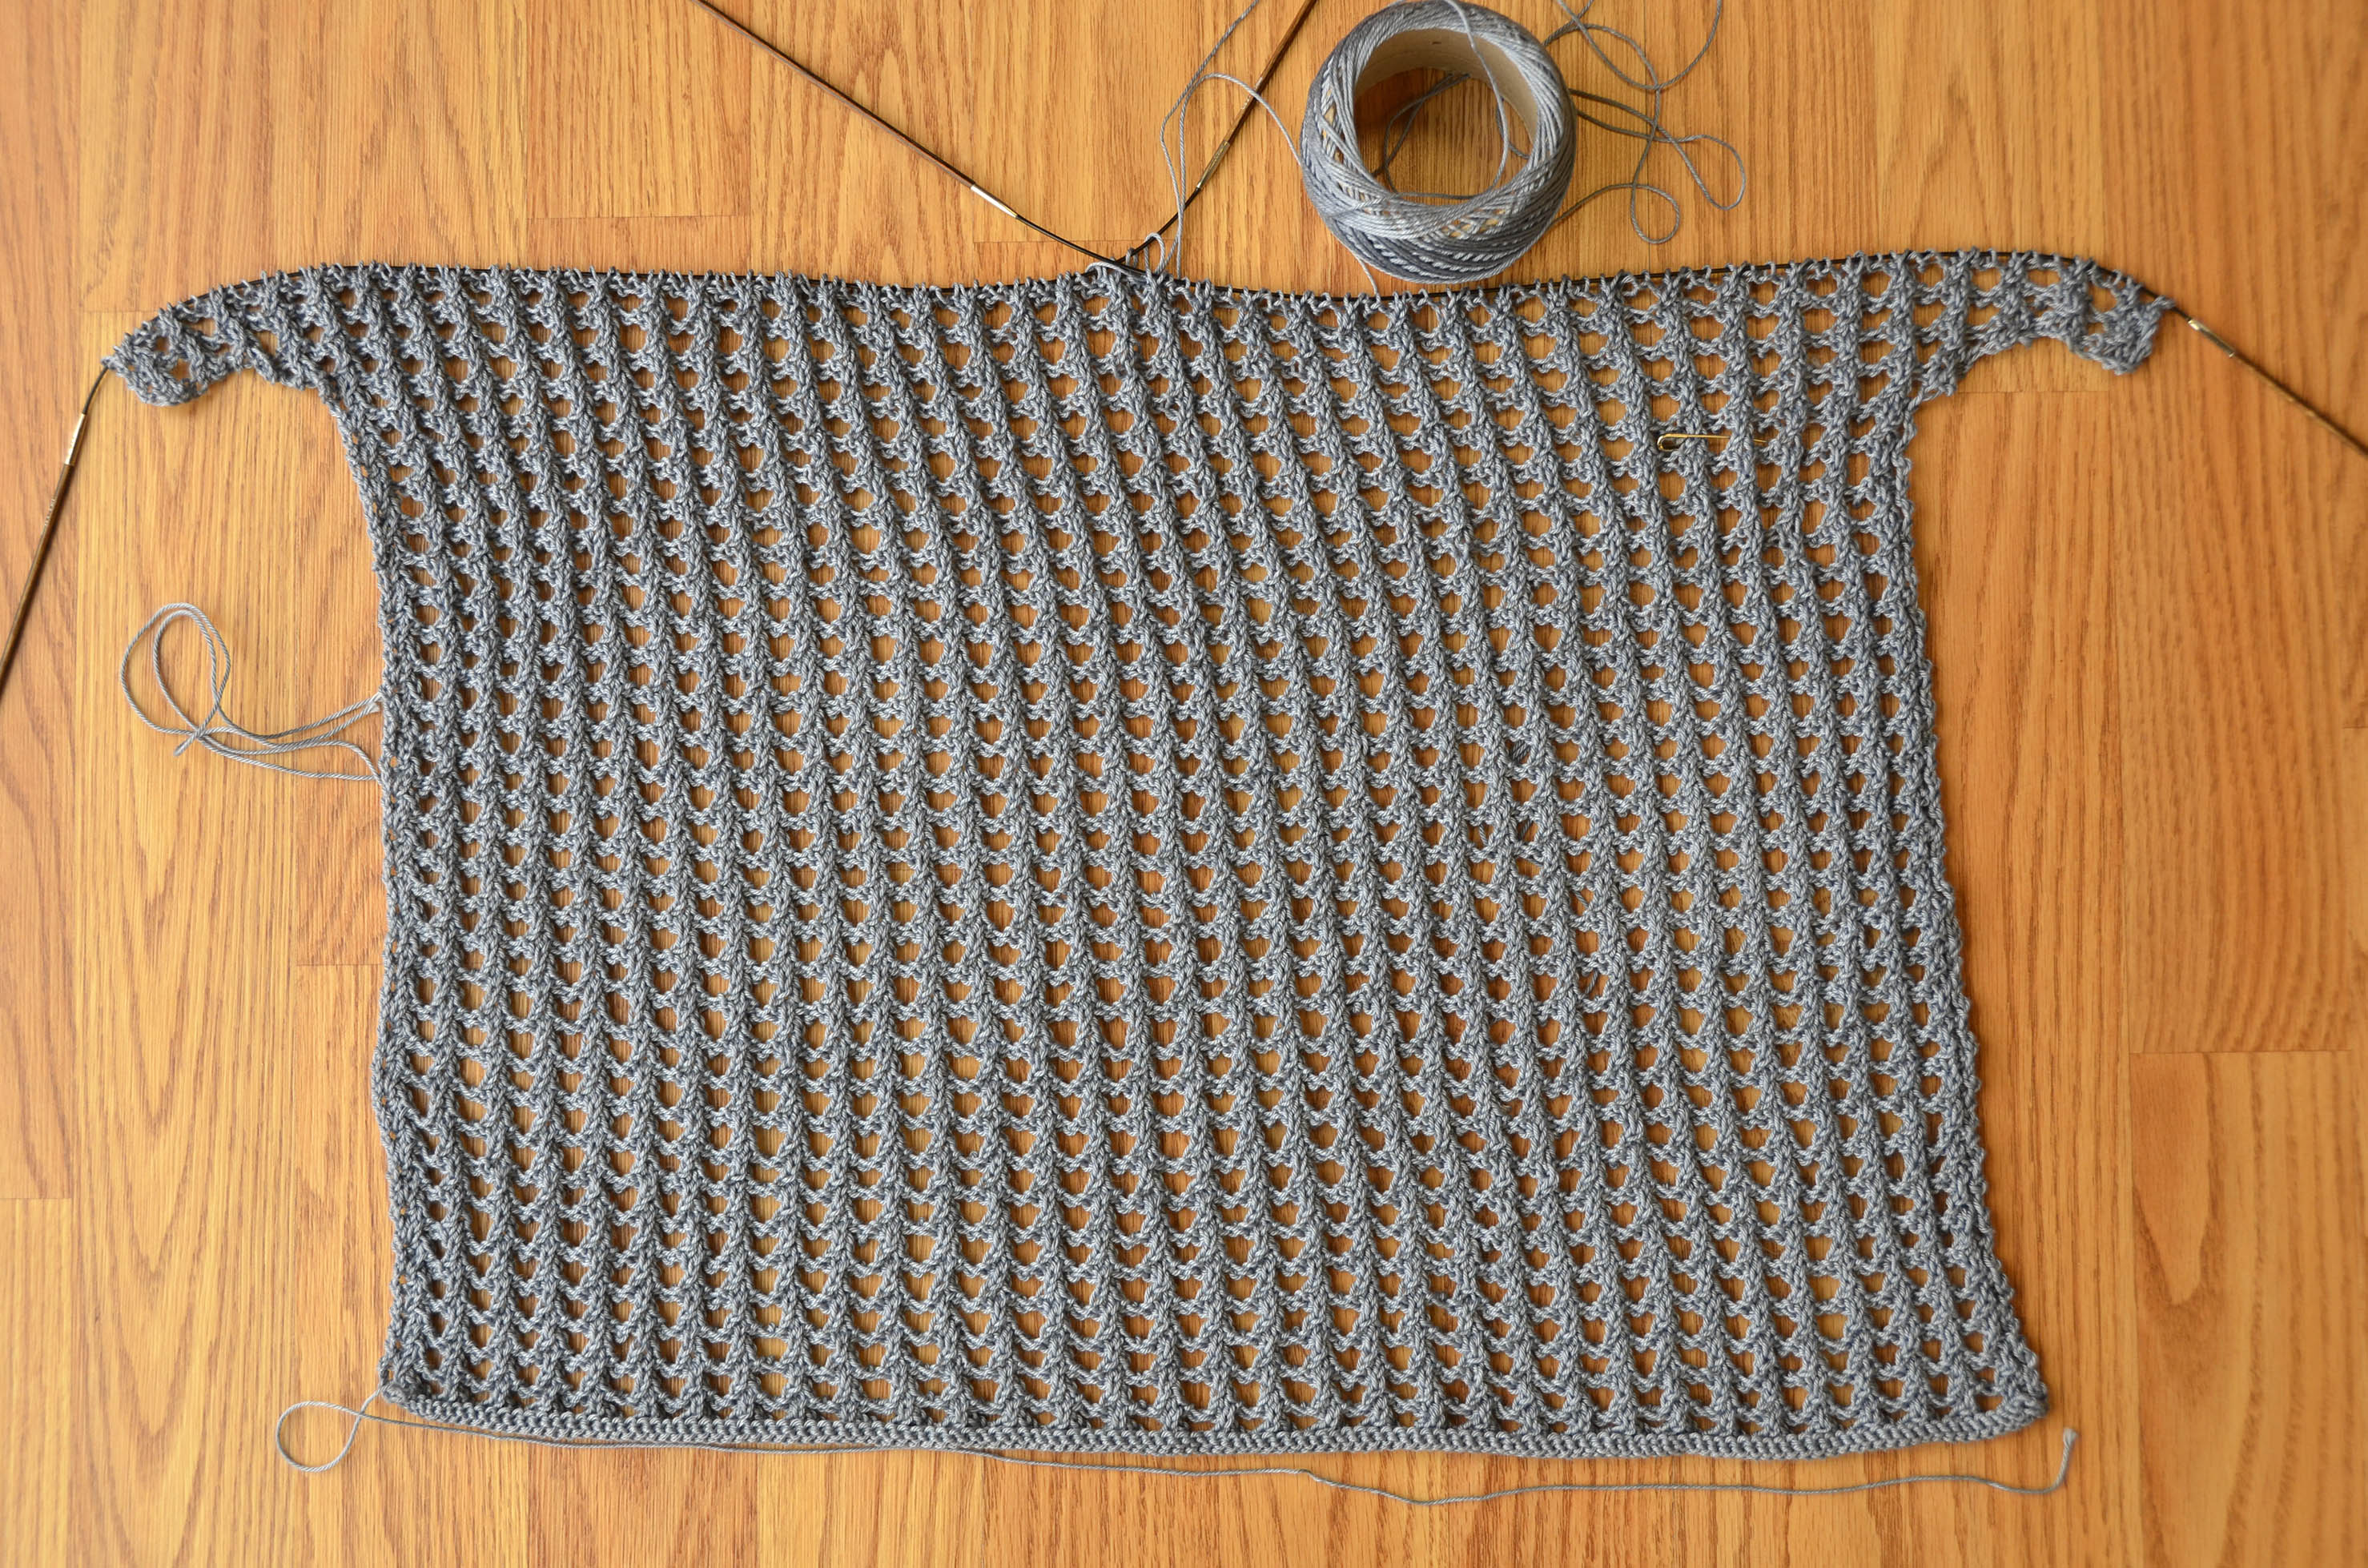
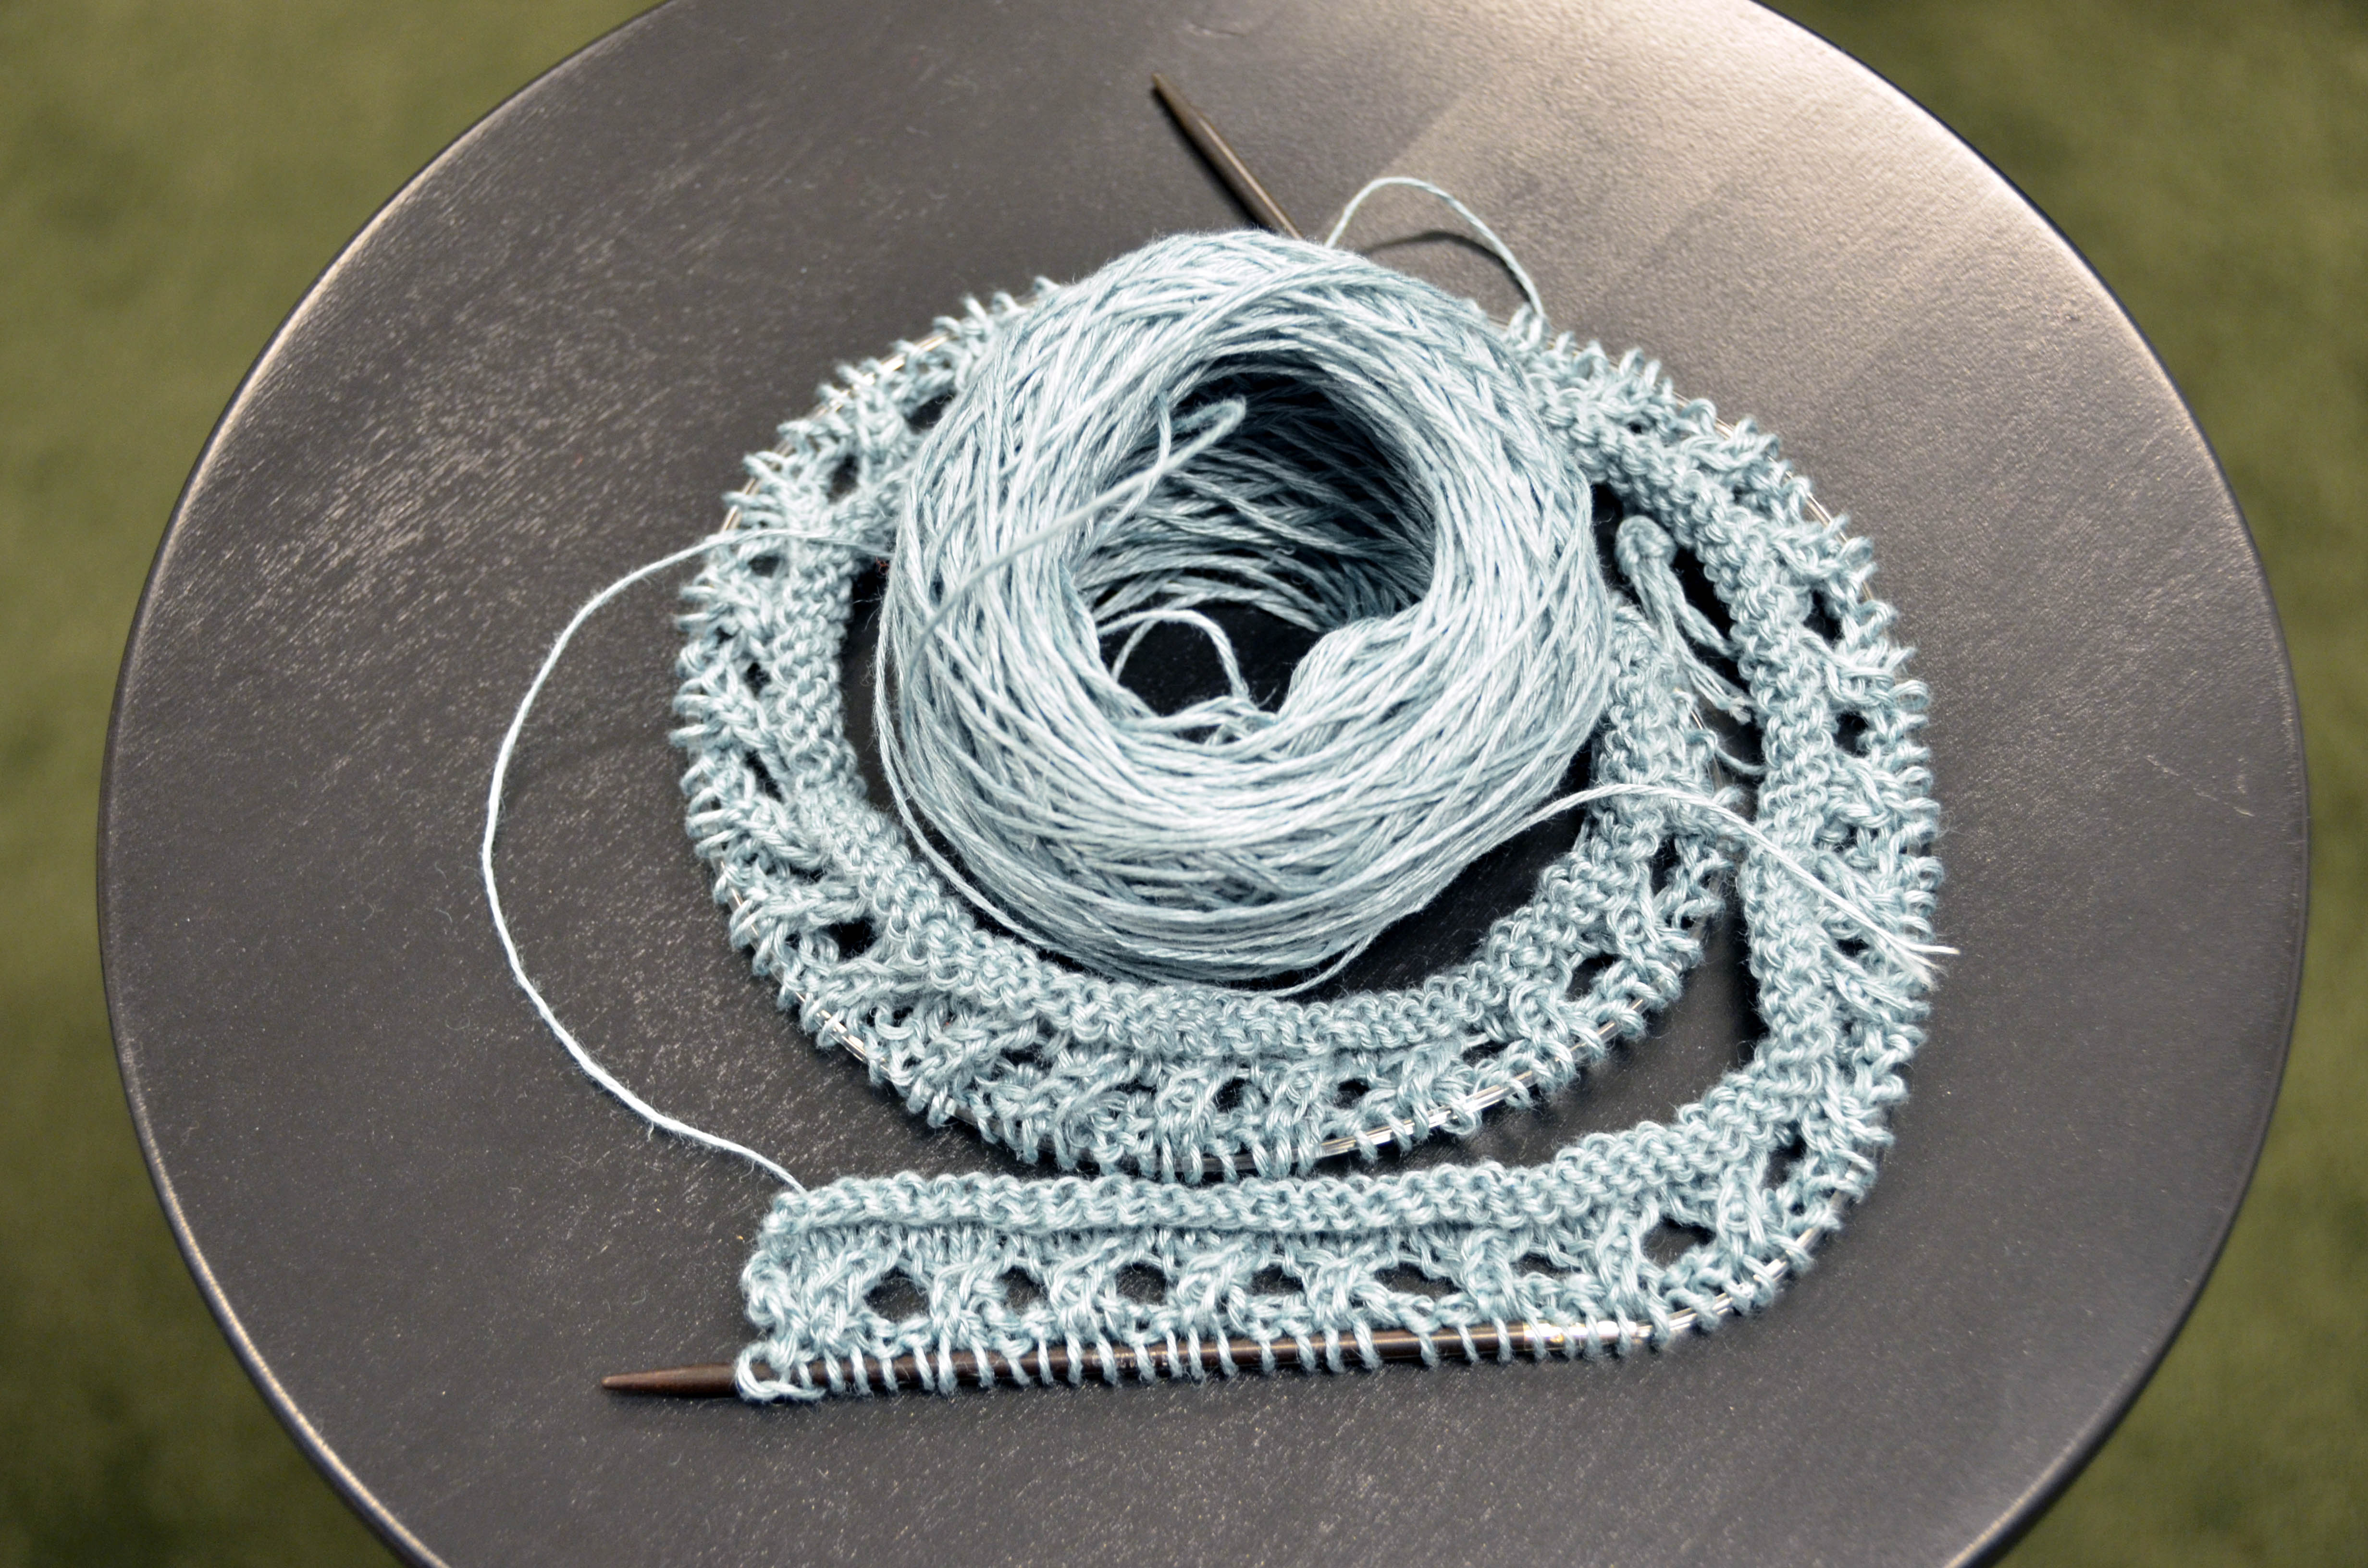
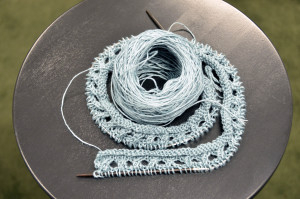
Are you ready to cast on for your Rocked yet? I have a confession to make – I just couldn’t wait until our official kick-off date and cast on over the weekend. I’ve made it through almost my first ball of Garden 5 and am about 5″ into my piece.

Amy Garden 5 section 1 hi-res

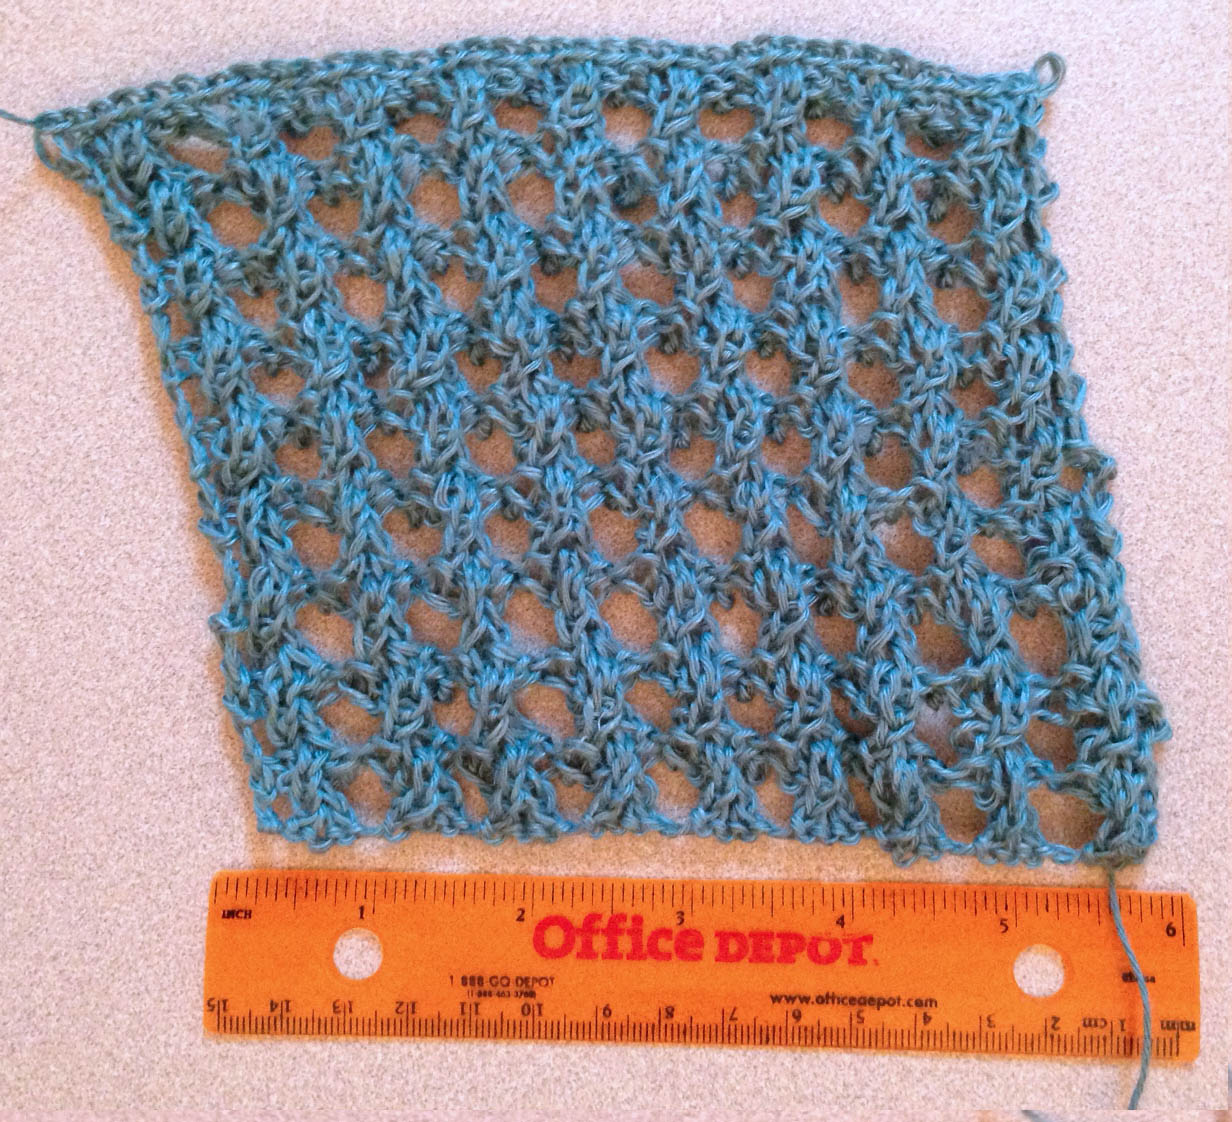
But actually I’m more than 5″ in, because my work thus far is UNBLOCKED. If I refer back to my blocked swatch, I can see that 8 repeats of the pattern (32 rows) = 4″. Currently, I have 12 repeats done of the pattern, which should block out to 6″. So, yay! I’m further along than I thought.

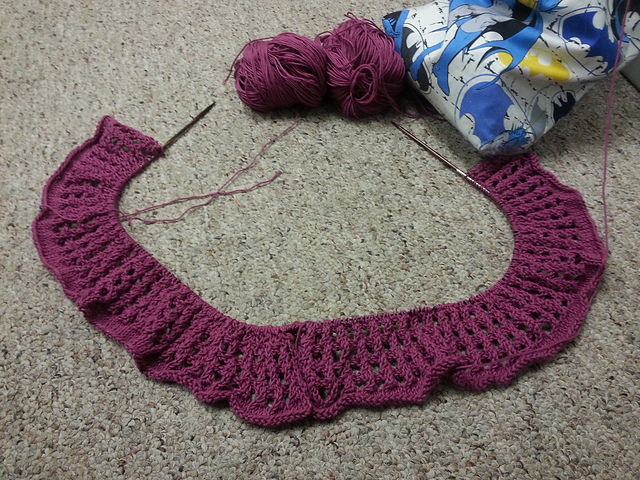
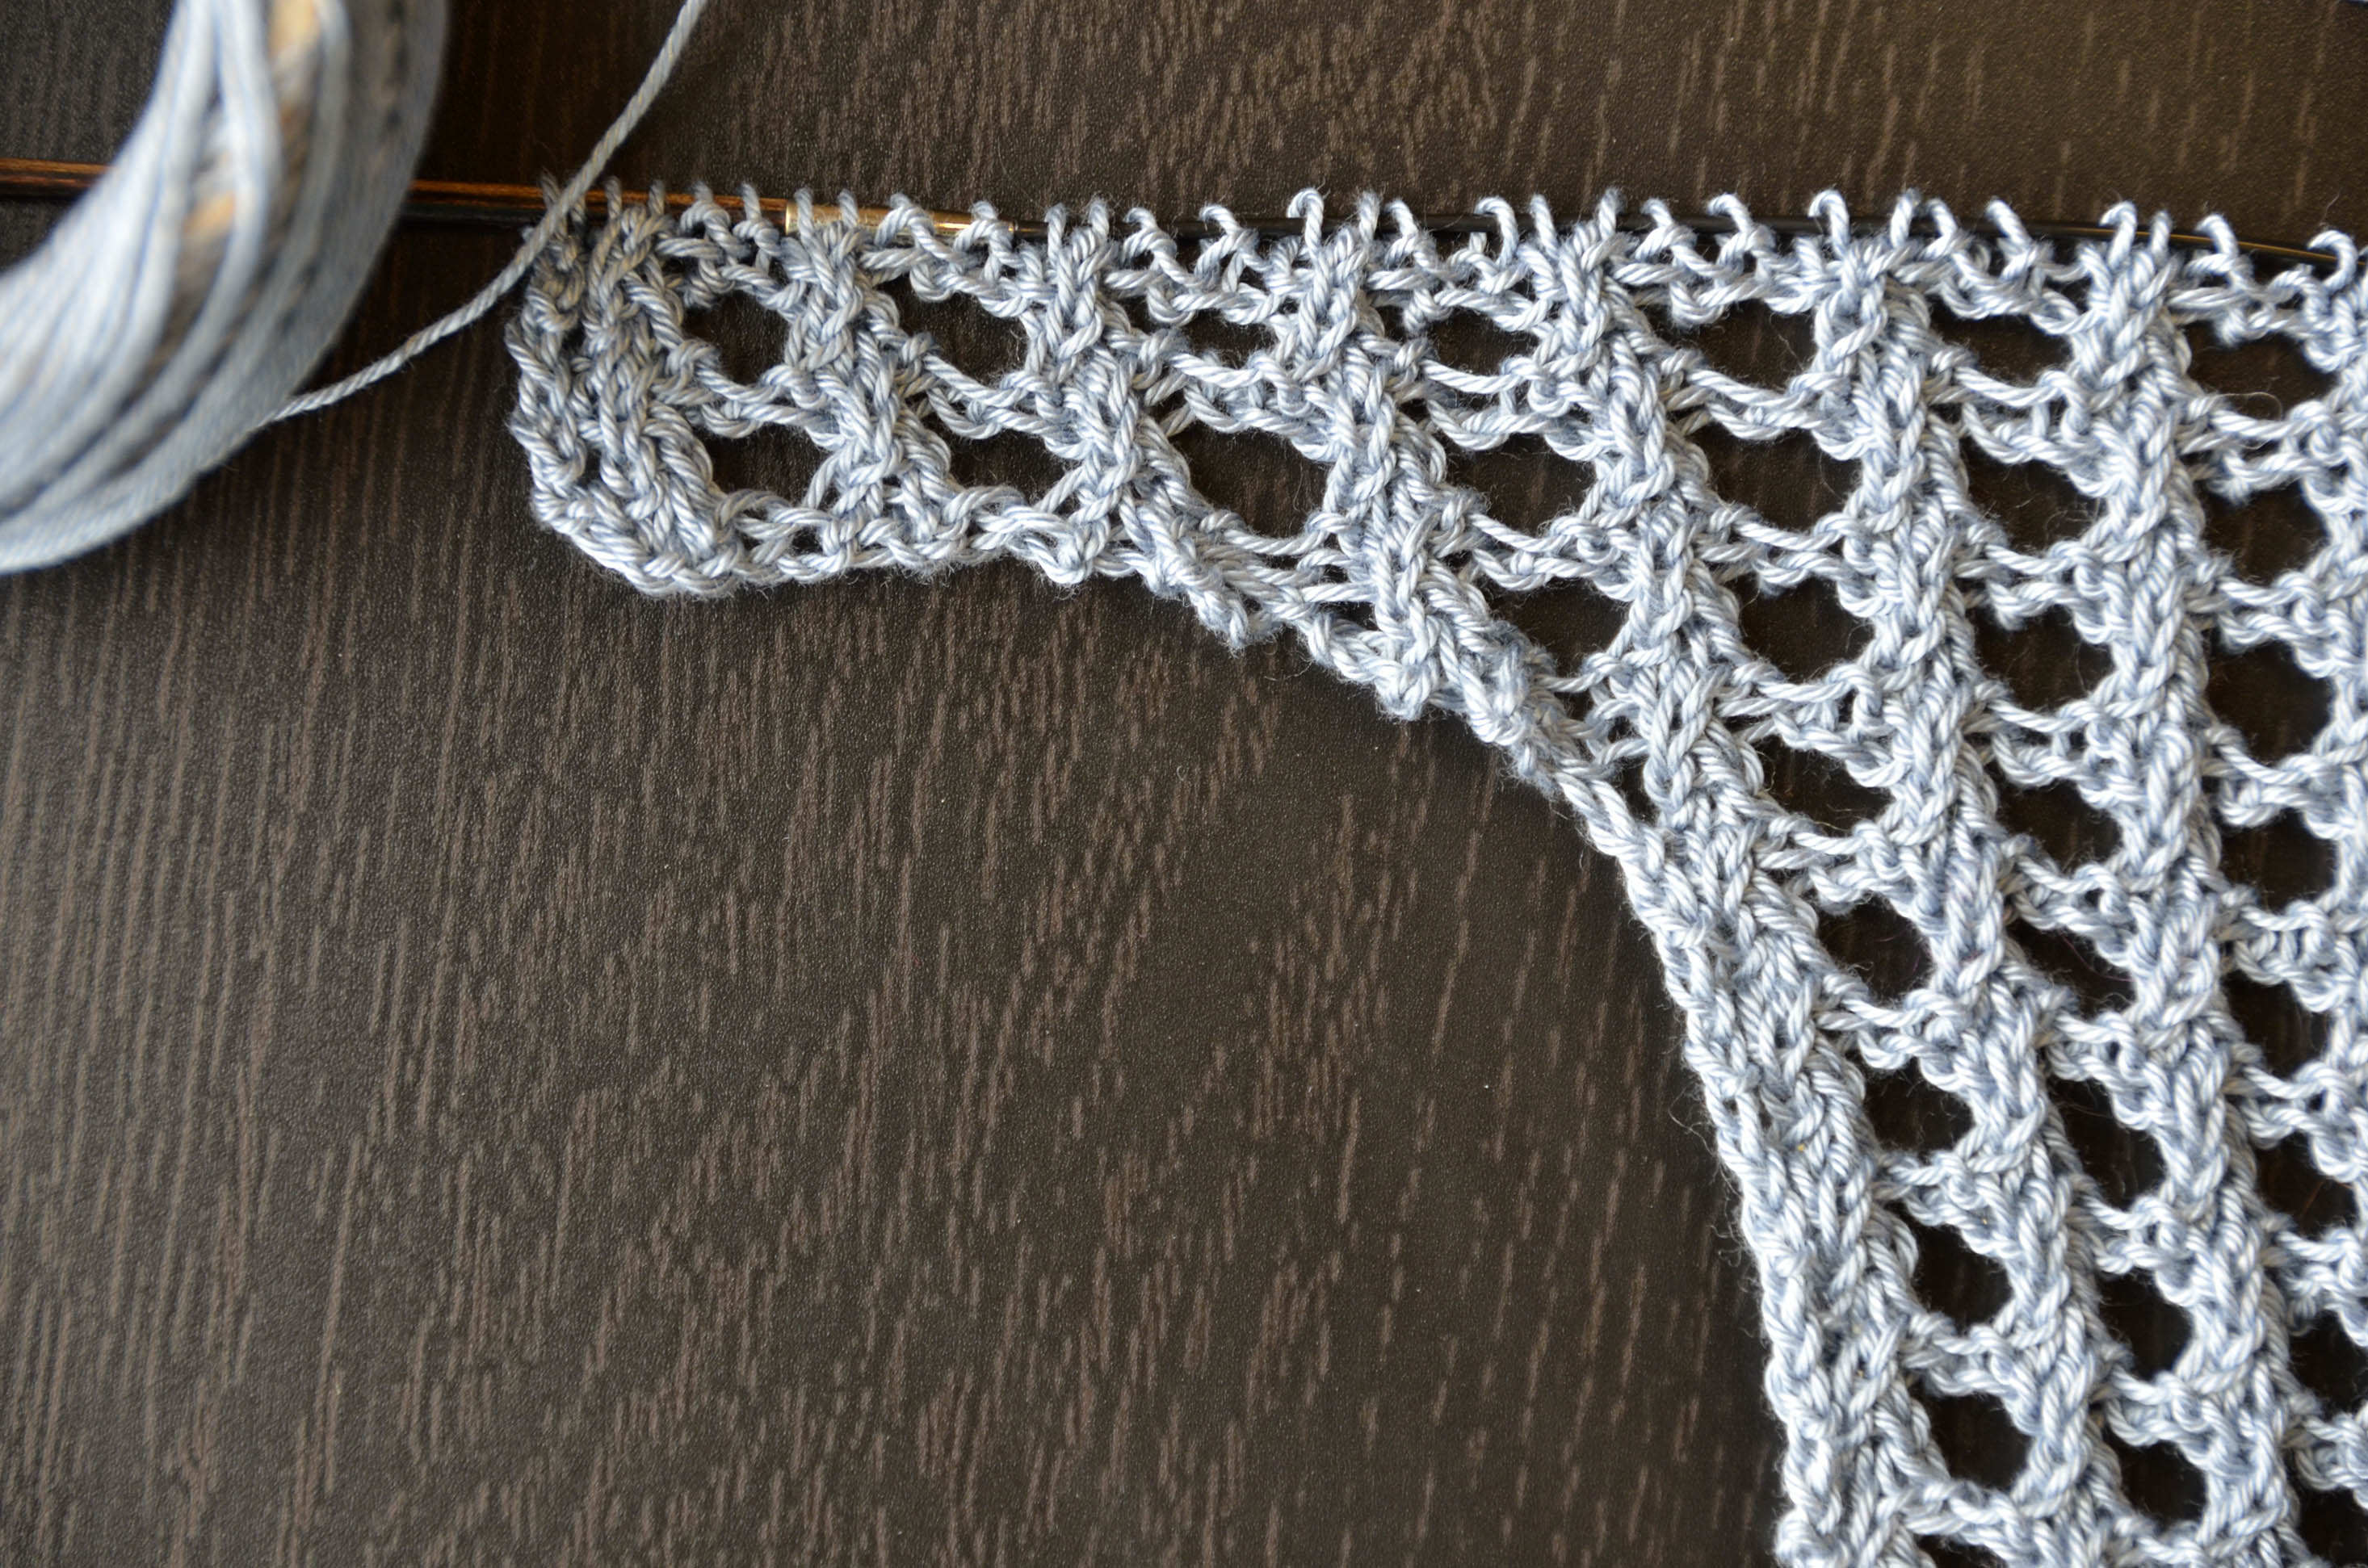
Sandi cast on using Flax and has finished her first pattern repeat.

Sandi Flax section 1 hi-res

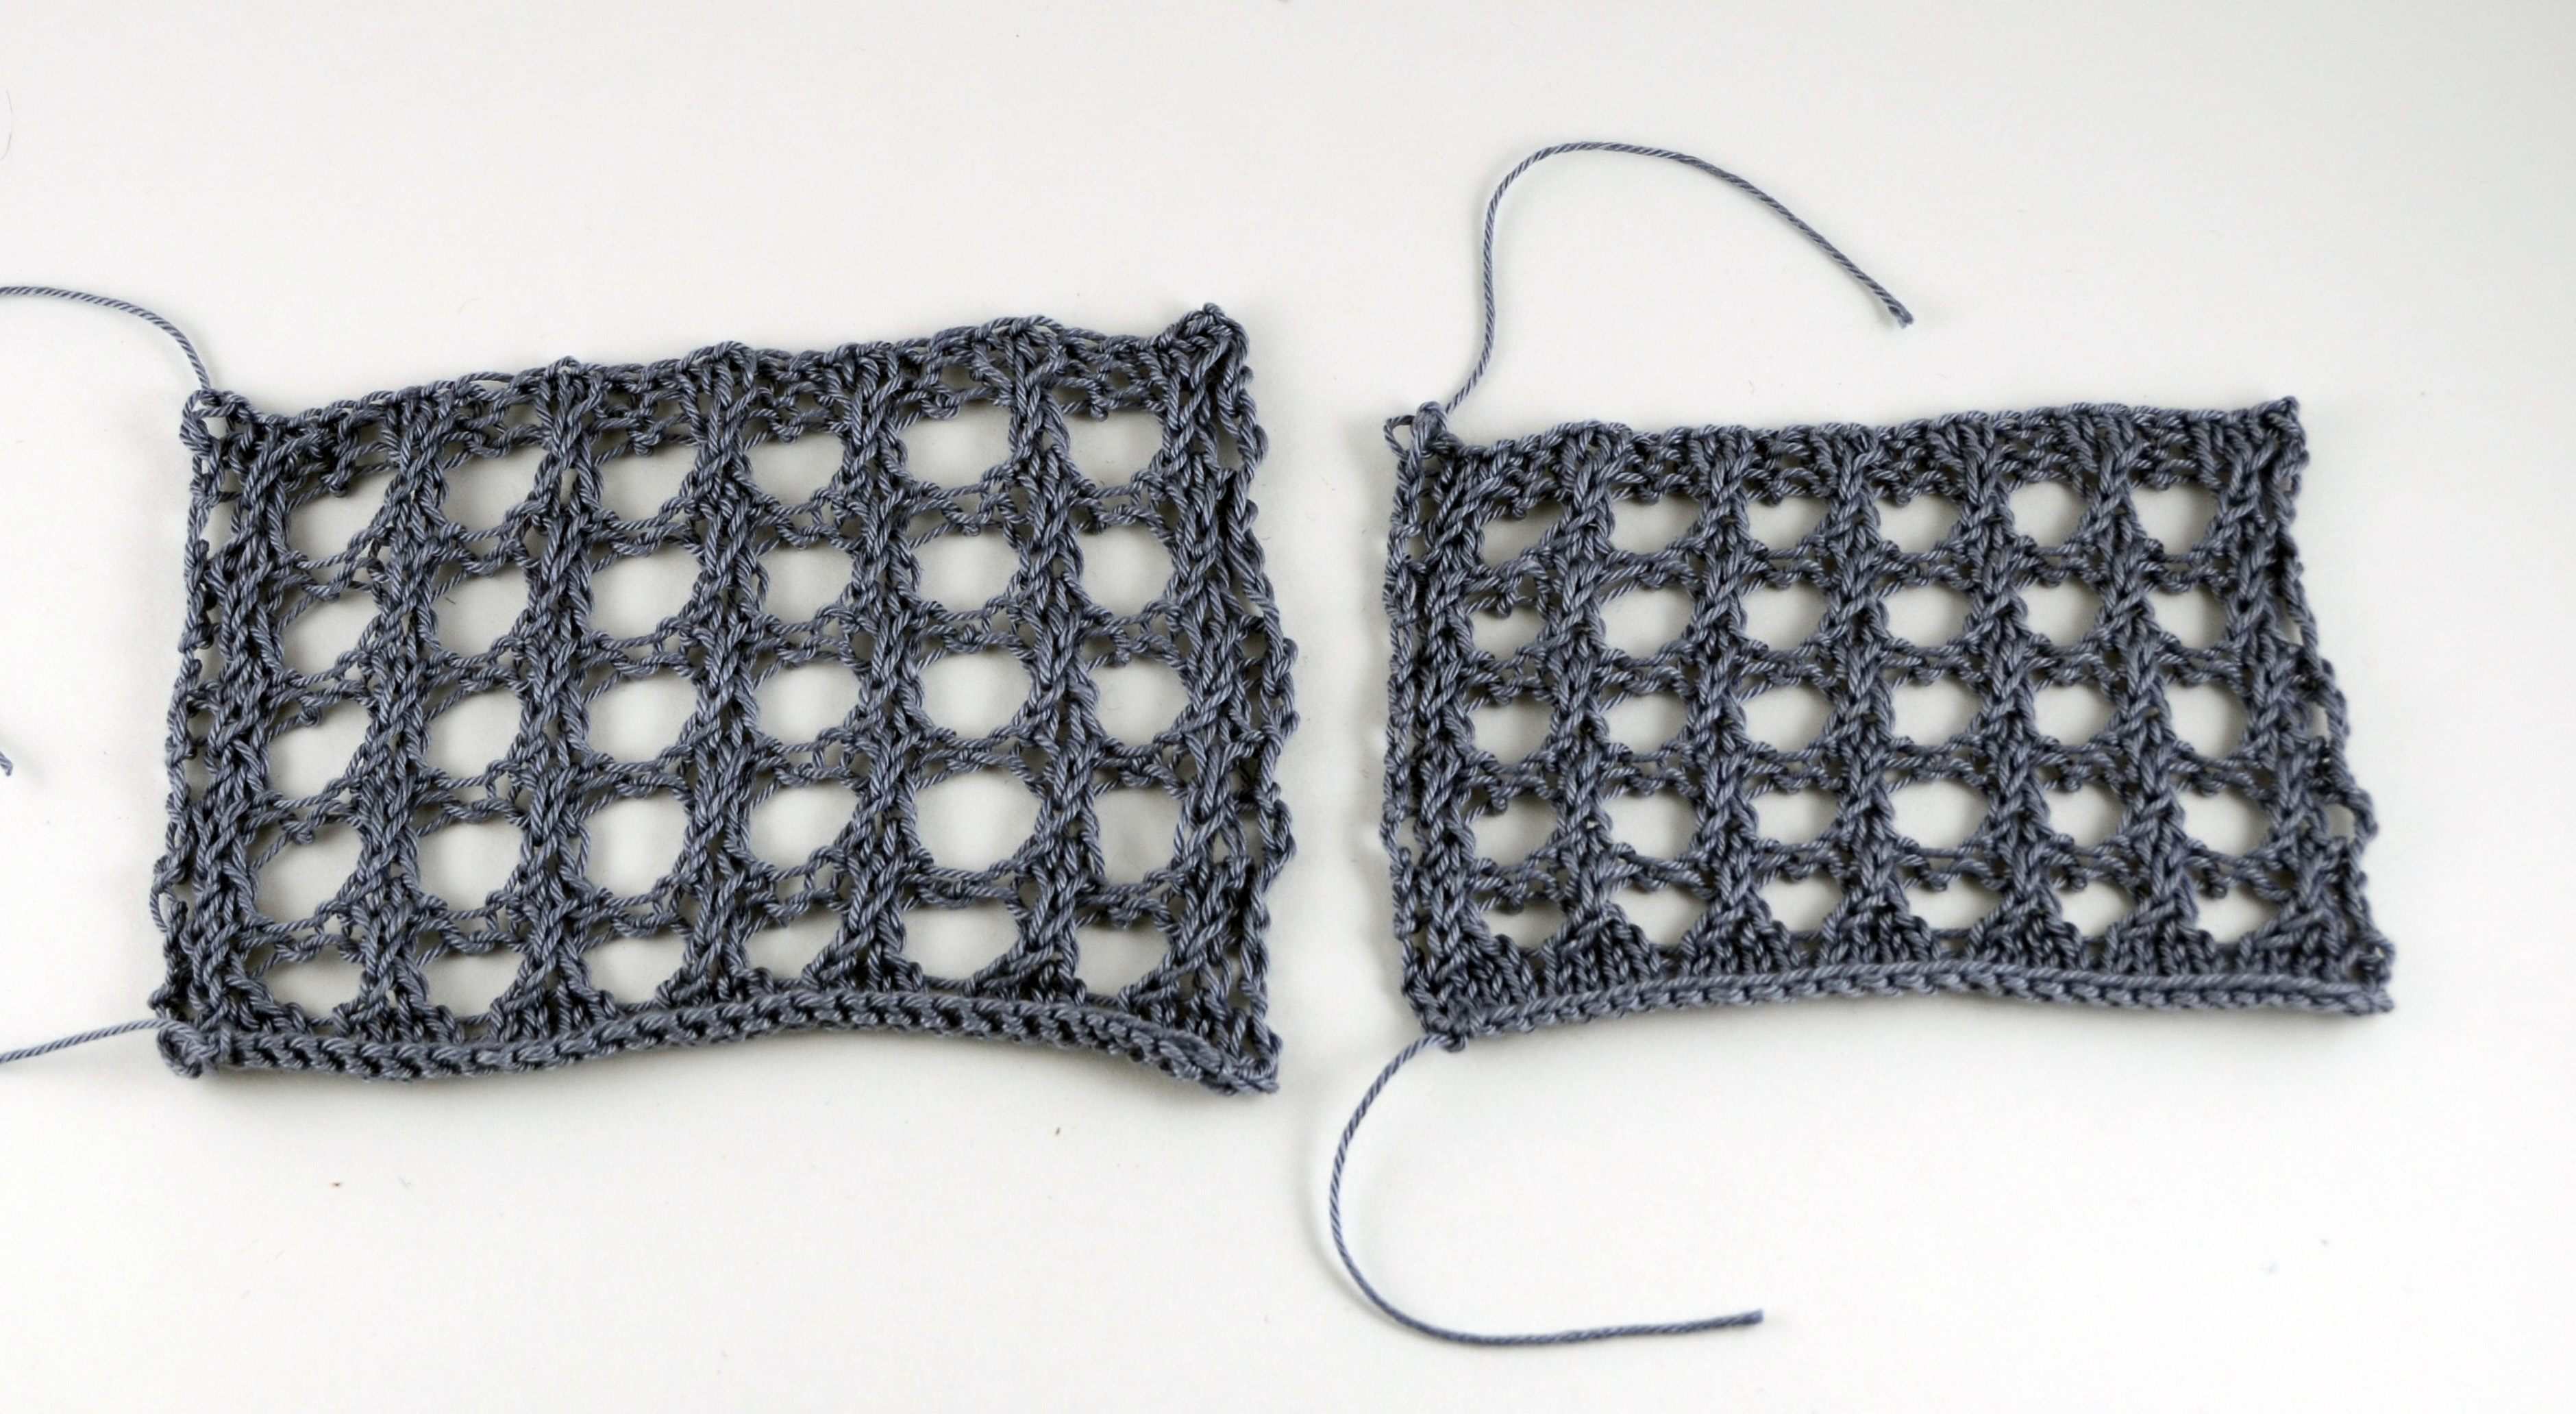
If you’ll remember after her swatch post, she ended up with a gauge of 22 sts x 32 rows/4″. Compare that with my gauge of 26 sts x 32 rows = 4″. My yarn and needle size (Garden 5 & US Size 2) are smaller than hers (Flax & US Size 5), yet our row gauge is the same. I find that fascinating!

Heather has opted to go for Bamboo Pop in her Rocked. Heather is unselfishly knitting this for her teenage daughter – lucky girl!

Heather Bamboo Pop swatch hi-res


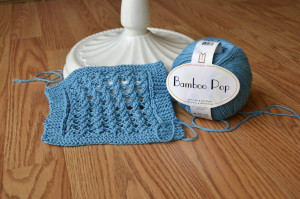
Heather swatched in color 107 Ocean and got the gauge listed in the pattern on US Size 4’s. I was surprised by this, because Bamboo Pop is just a bit heavier than Cotton True Sport. But again, everyone’s gauge is unique!

And now, let’s talk a little more about the gauge swatch. I’ve been knitting for several years and have done a bazillion gauge swatches. Okay, maybe not quite that many, but I’ve done lots. Being an experienced knitter, I sometimes overlook things that I assume everyone, even newer or less experienced knitters know. Case in point: the gauge swatch.

Yonca (as in the lovely lady in this week’s IRL) came to me last week and told me her gauge swatch was not working out. Yonca is a very smart woman and is not new to knitting, but is somewhat new to swatching. There it is, I’ve outed Yonca as a typical non-swatcher. (Sorry Yonca!) But apparently she’s listened to my harping long enough that she decided to take the plunge this time and buckled down. But she ran into a snag with her swatch.

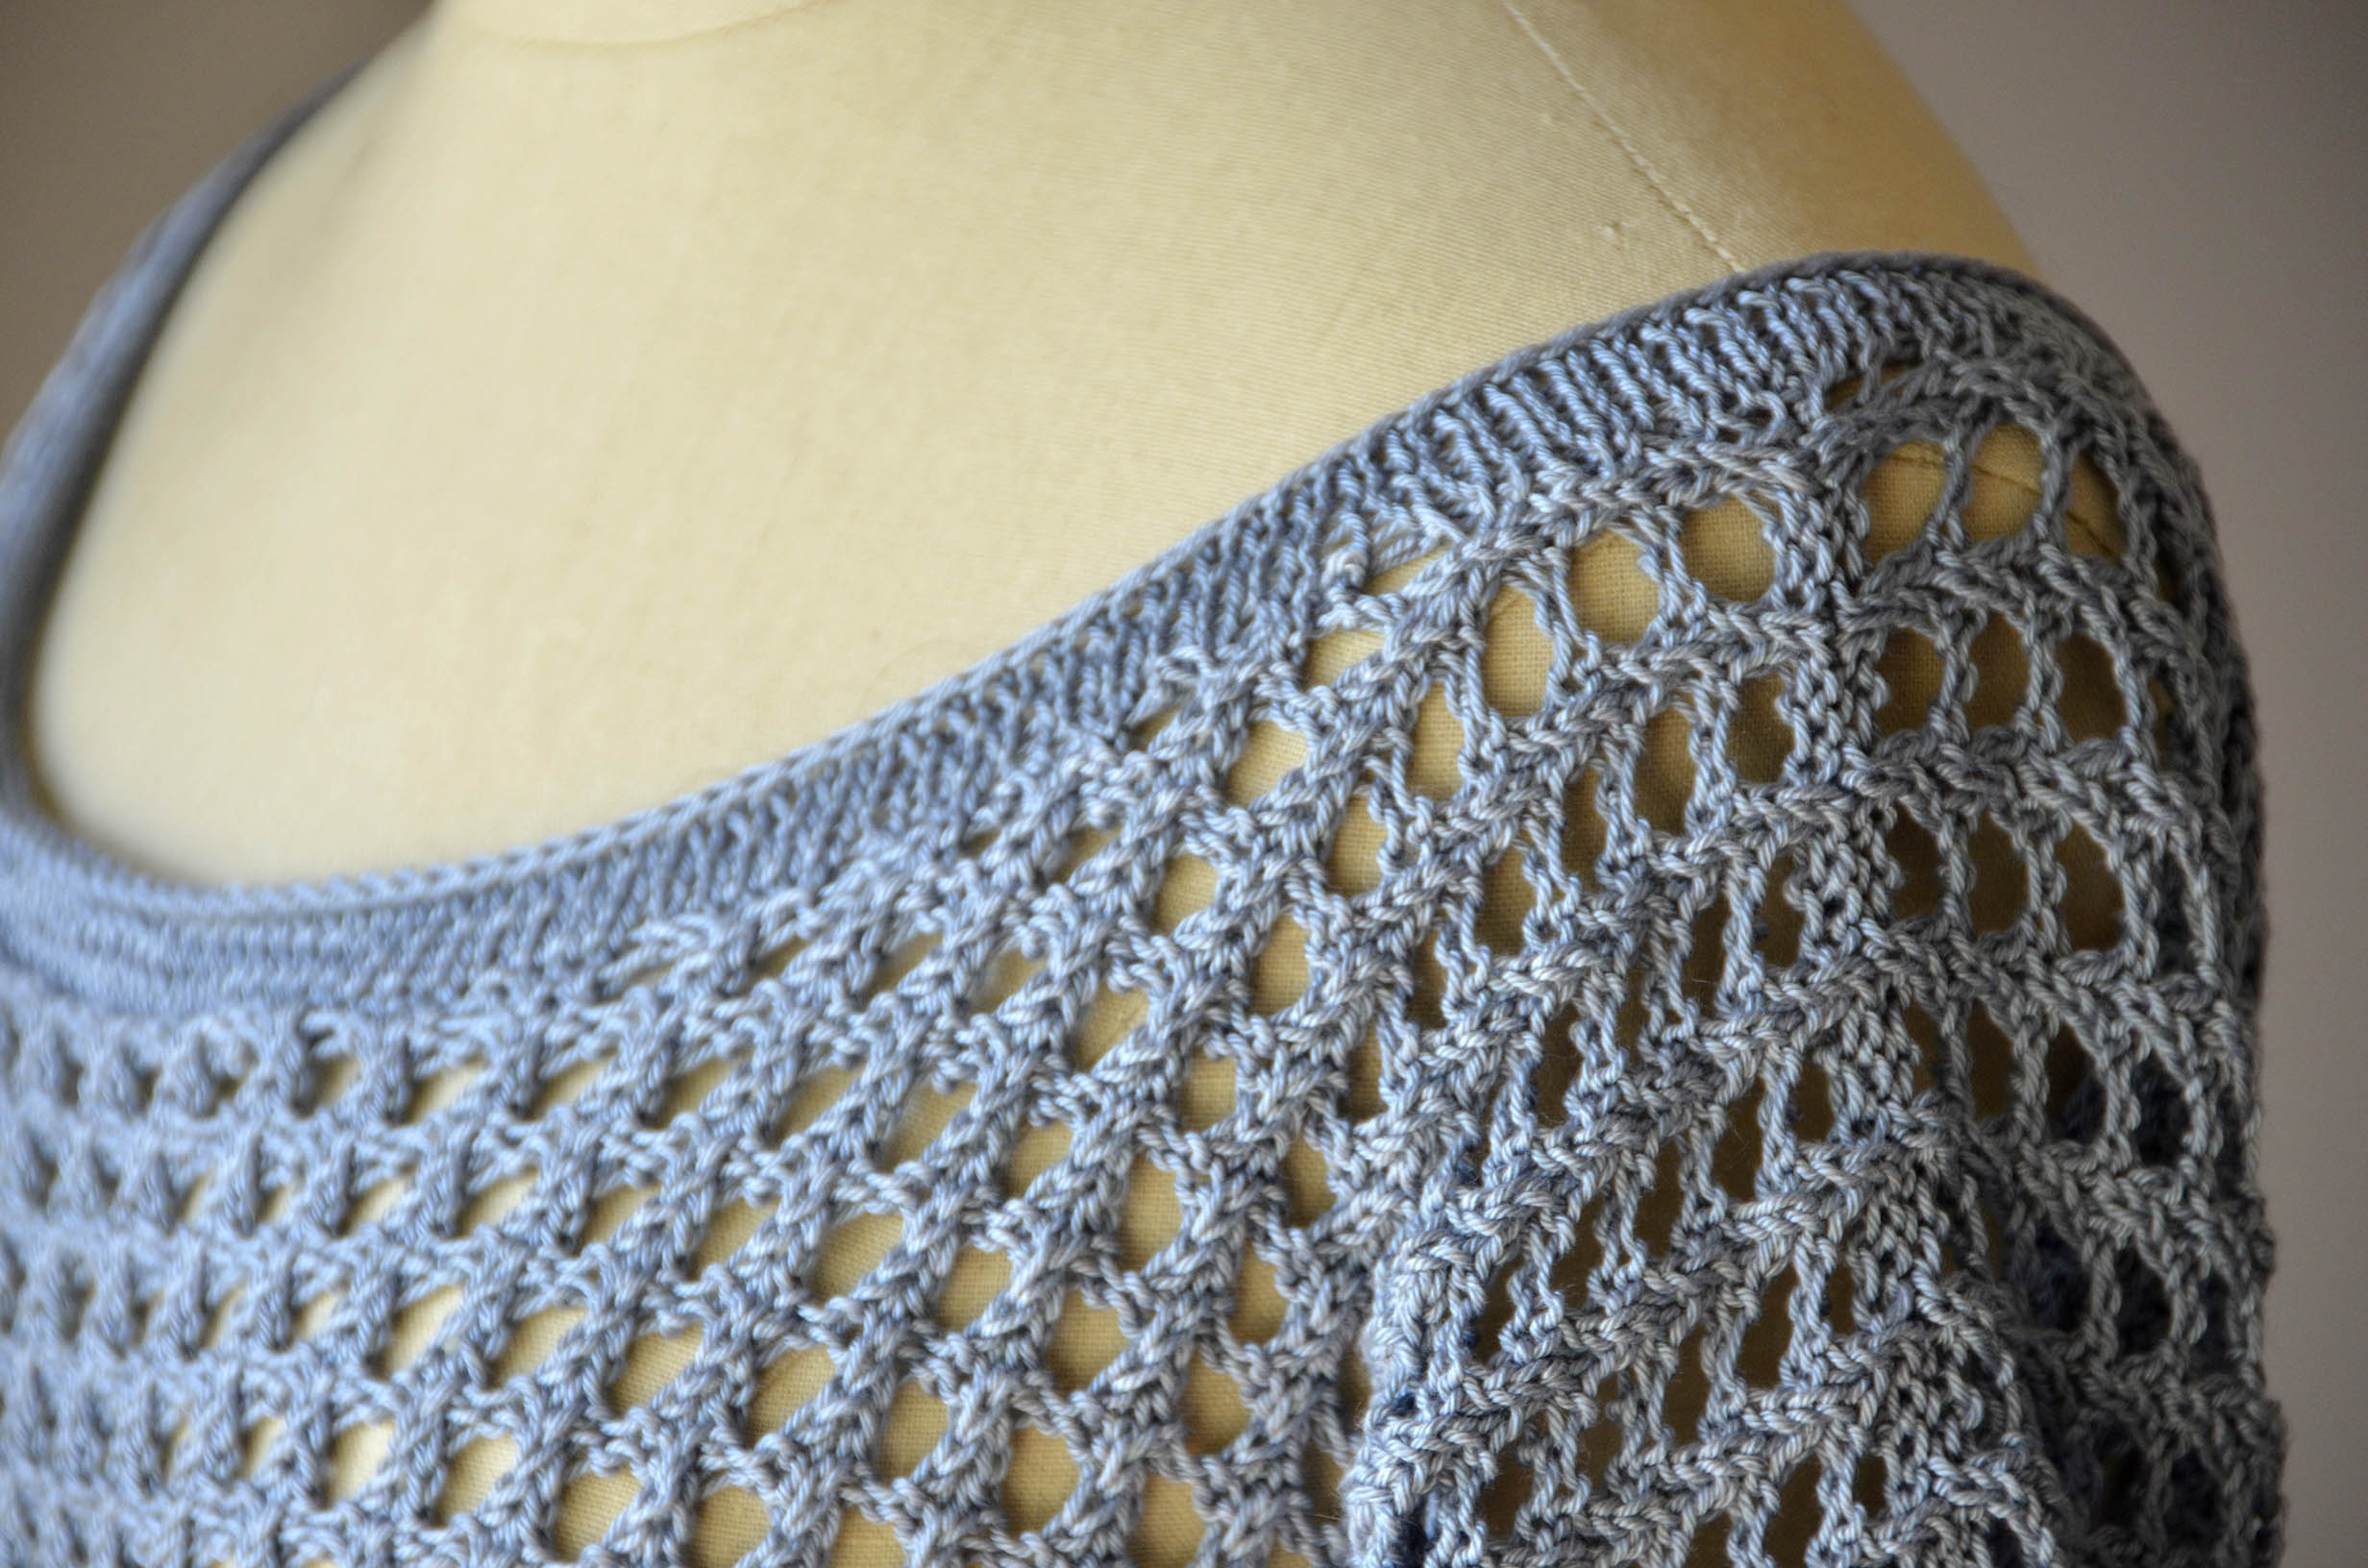
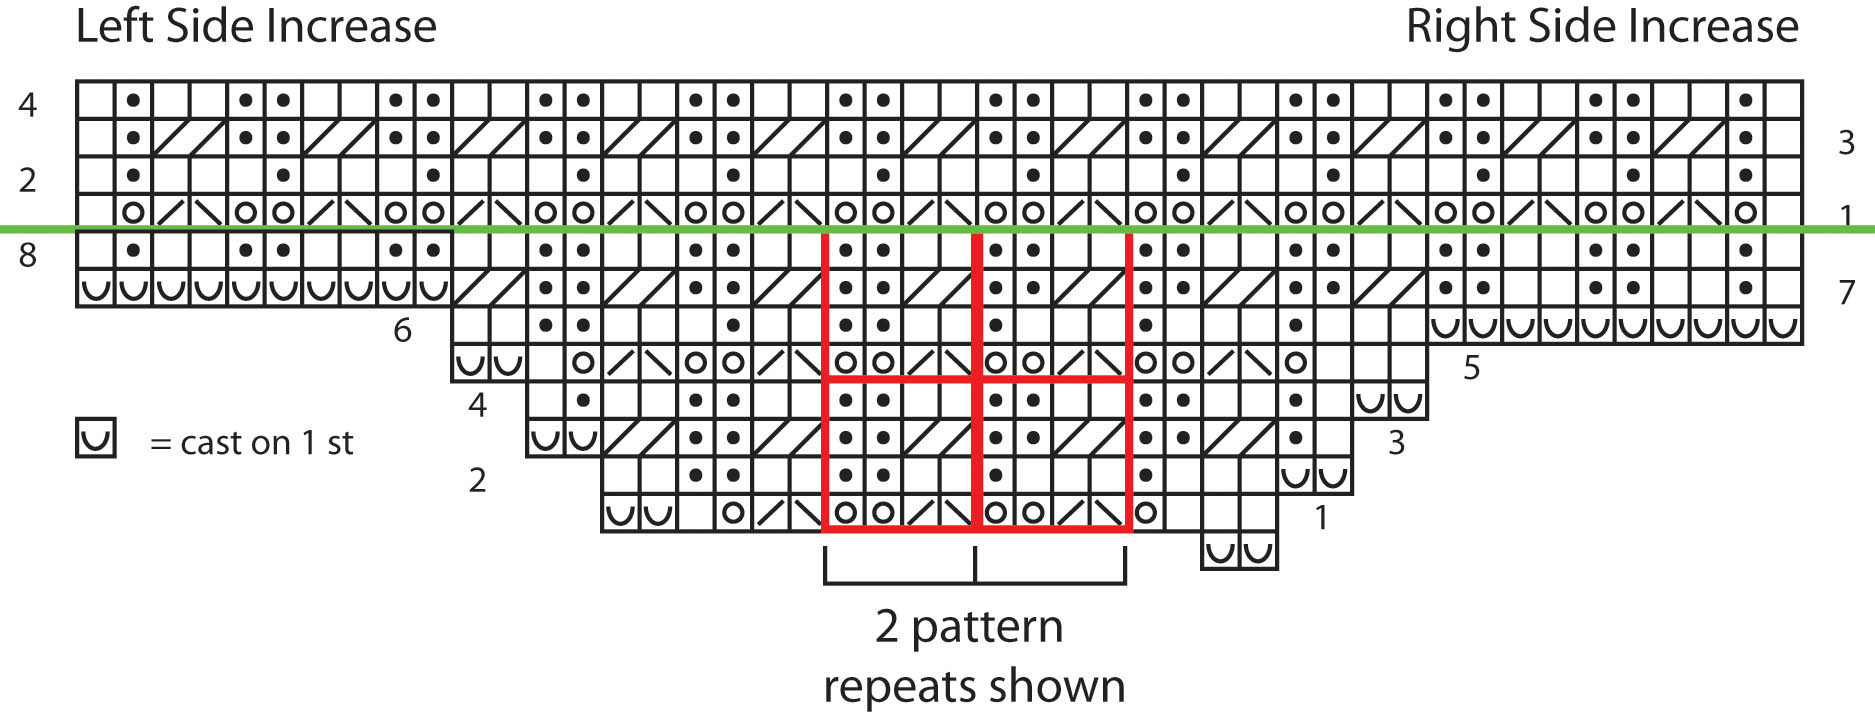
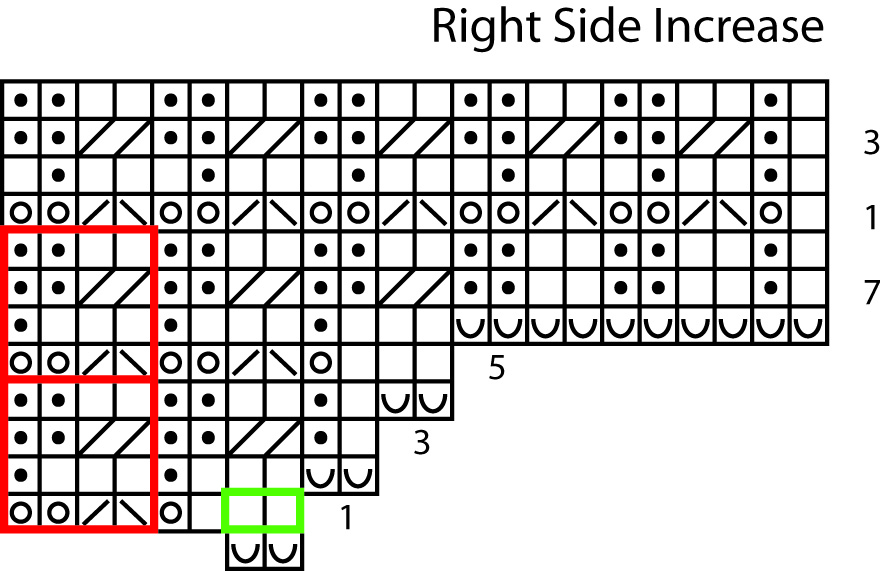
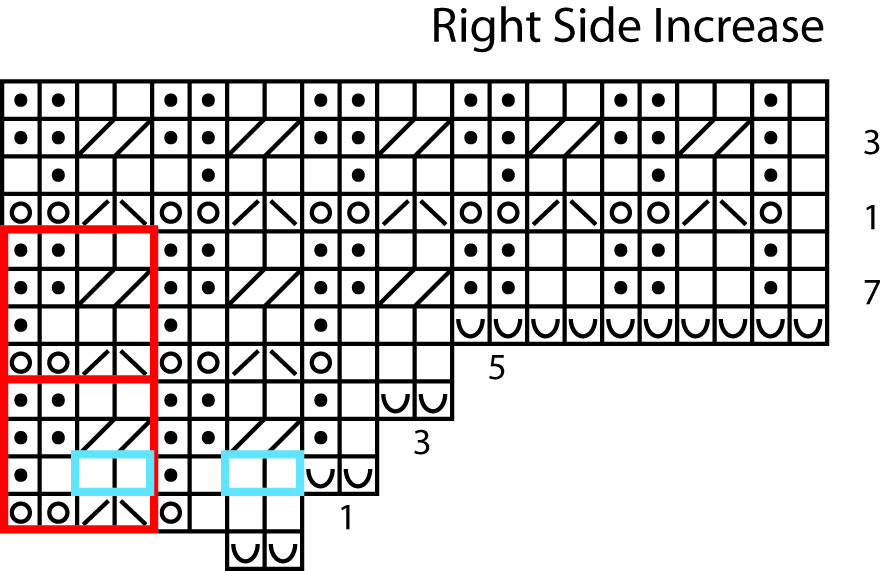
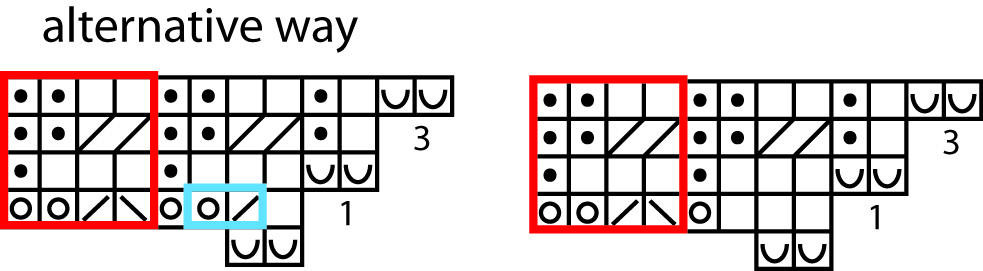
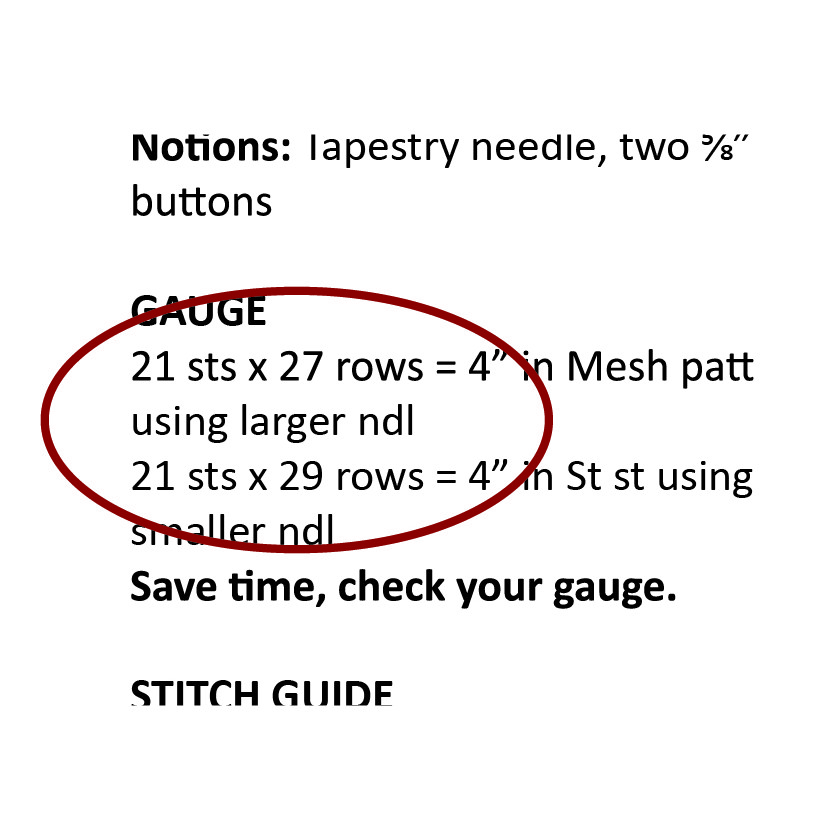
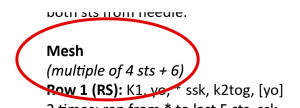
In the Rocked pattern, the gauge is listed at 21 sts x 27 rows = 4″ in the Mesh pattern. It is standard practice to list gauge in a pattern over 4″ (or 10 cm).

gaugeimage1


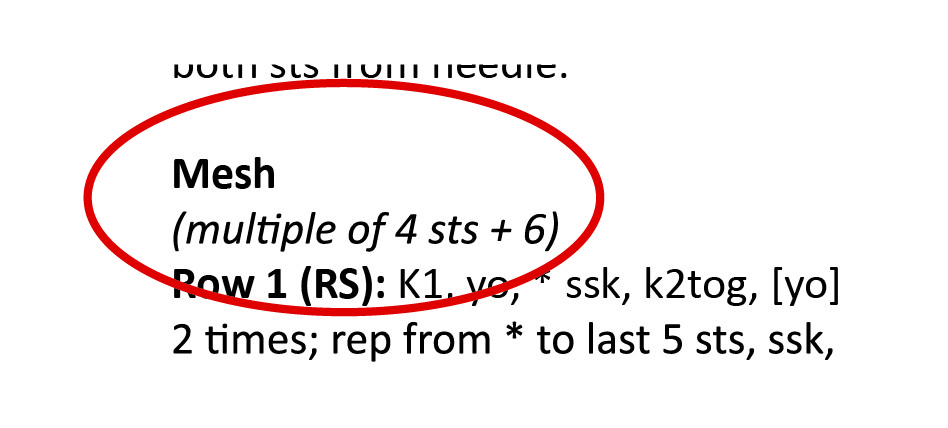
Most stitch patterns require a certain number of stitches in order for them to work out. In the case of the Mesh pattern, you need a multiple of 4 stitches plus 6.

GaugeImage_2


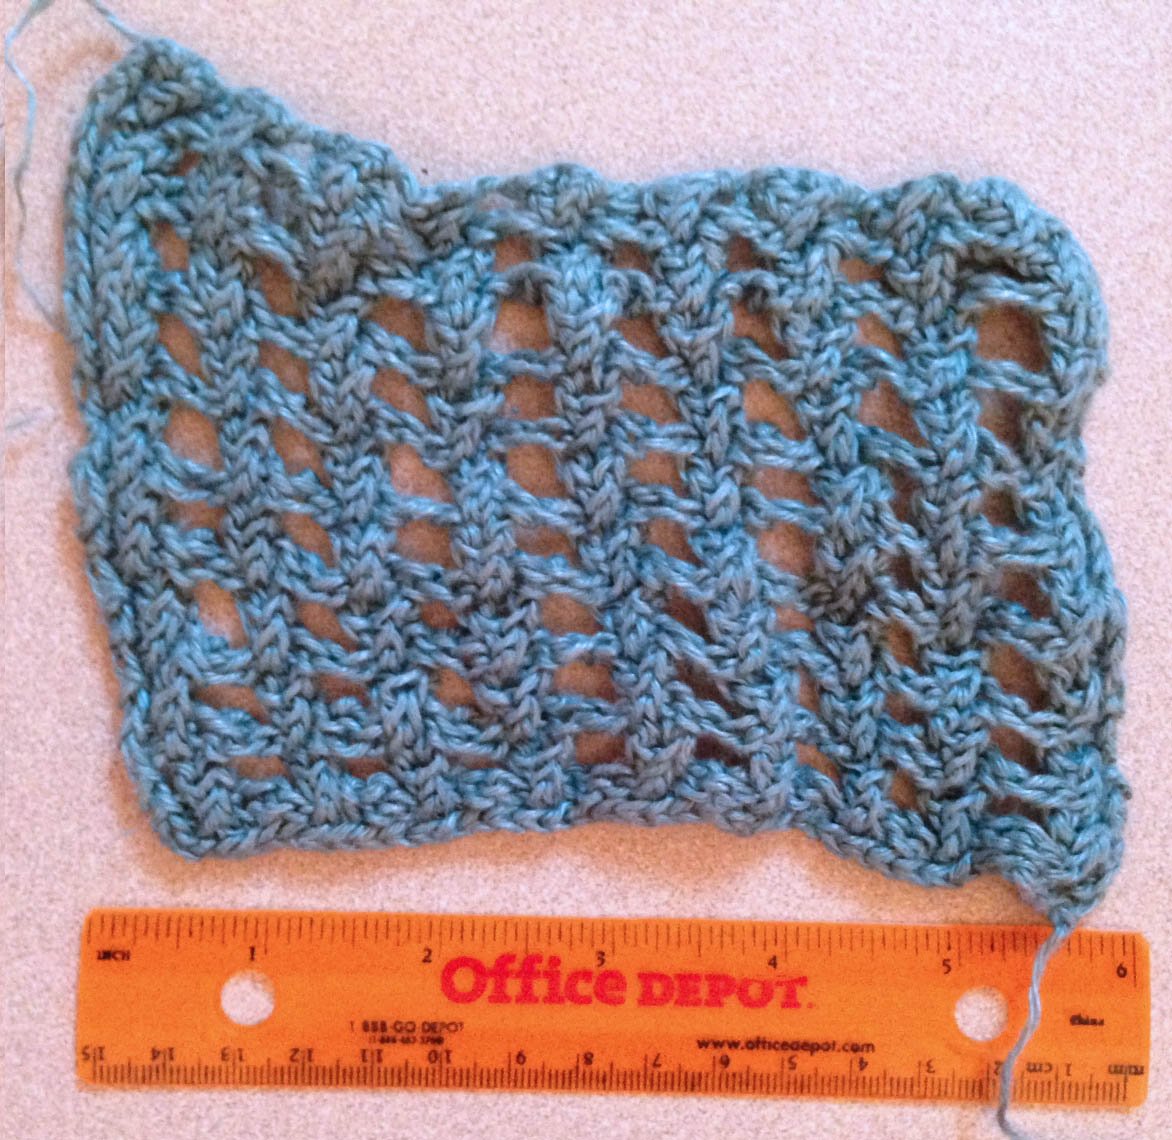
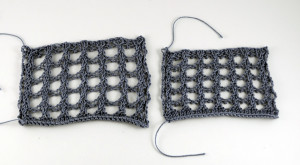
If you look at the cast-on numbers for each size in the pattern, you will see that they are all multiples of 4 stitches plus 6. This means, multiple a number by 4, add 6, and you will have a number of stitches that works with the pattern. For example, for my gauge swatch I cast on 30 stitches, which is (4×6)+6. Sandi’s gauge swatch consisted of 38 stitches (4×8)+6.

Yonca, however, thought that the gauge listed in the pattern (21 sts x 27 rows) meant that she should cast on 21 stitches for her swatch. It is easy to see why she may have thought that! I forget sometimes the things that are second nature to me now are not necessarily common knowledge for all knitters. When Yonca started working the Mesh pattern over her 21 stitches, it did not work out because 21 is not a multiple of 4 stitches plus 6.

So let me break down the gauge swatch once and for all:

Before beginning most projects, particularly a garment (that needs to fit!), it is very important to know your gauge, or # of stitches/rows per inch. Knitting is pure math. Well, it’s also a lot of other pretty things. But math is what makes things a certain size.

In order to figure out what your actual gauge is, you must do a gauge swatch. To choose a needle size, try starting with the recommended needle for your pattern and/or yarn. It’s a good idea to cast on enough stitches for around 6″. You want to be able to measure in the middle of the swatch avoiding the edges. If you are swatching in stockinette stitch, then any number of stitches will do, as long as your swatch is big enough to get a good idea of your gauge. When swatching in pattern, you must cast on the appropriate number of stitches relative to that pattern, as described above.

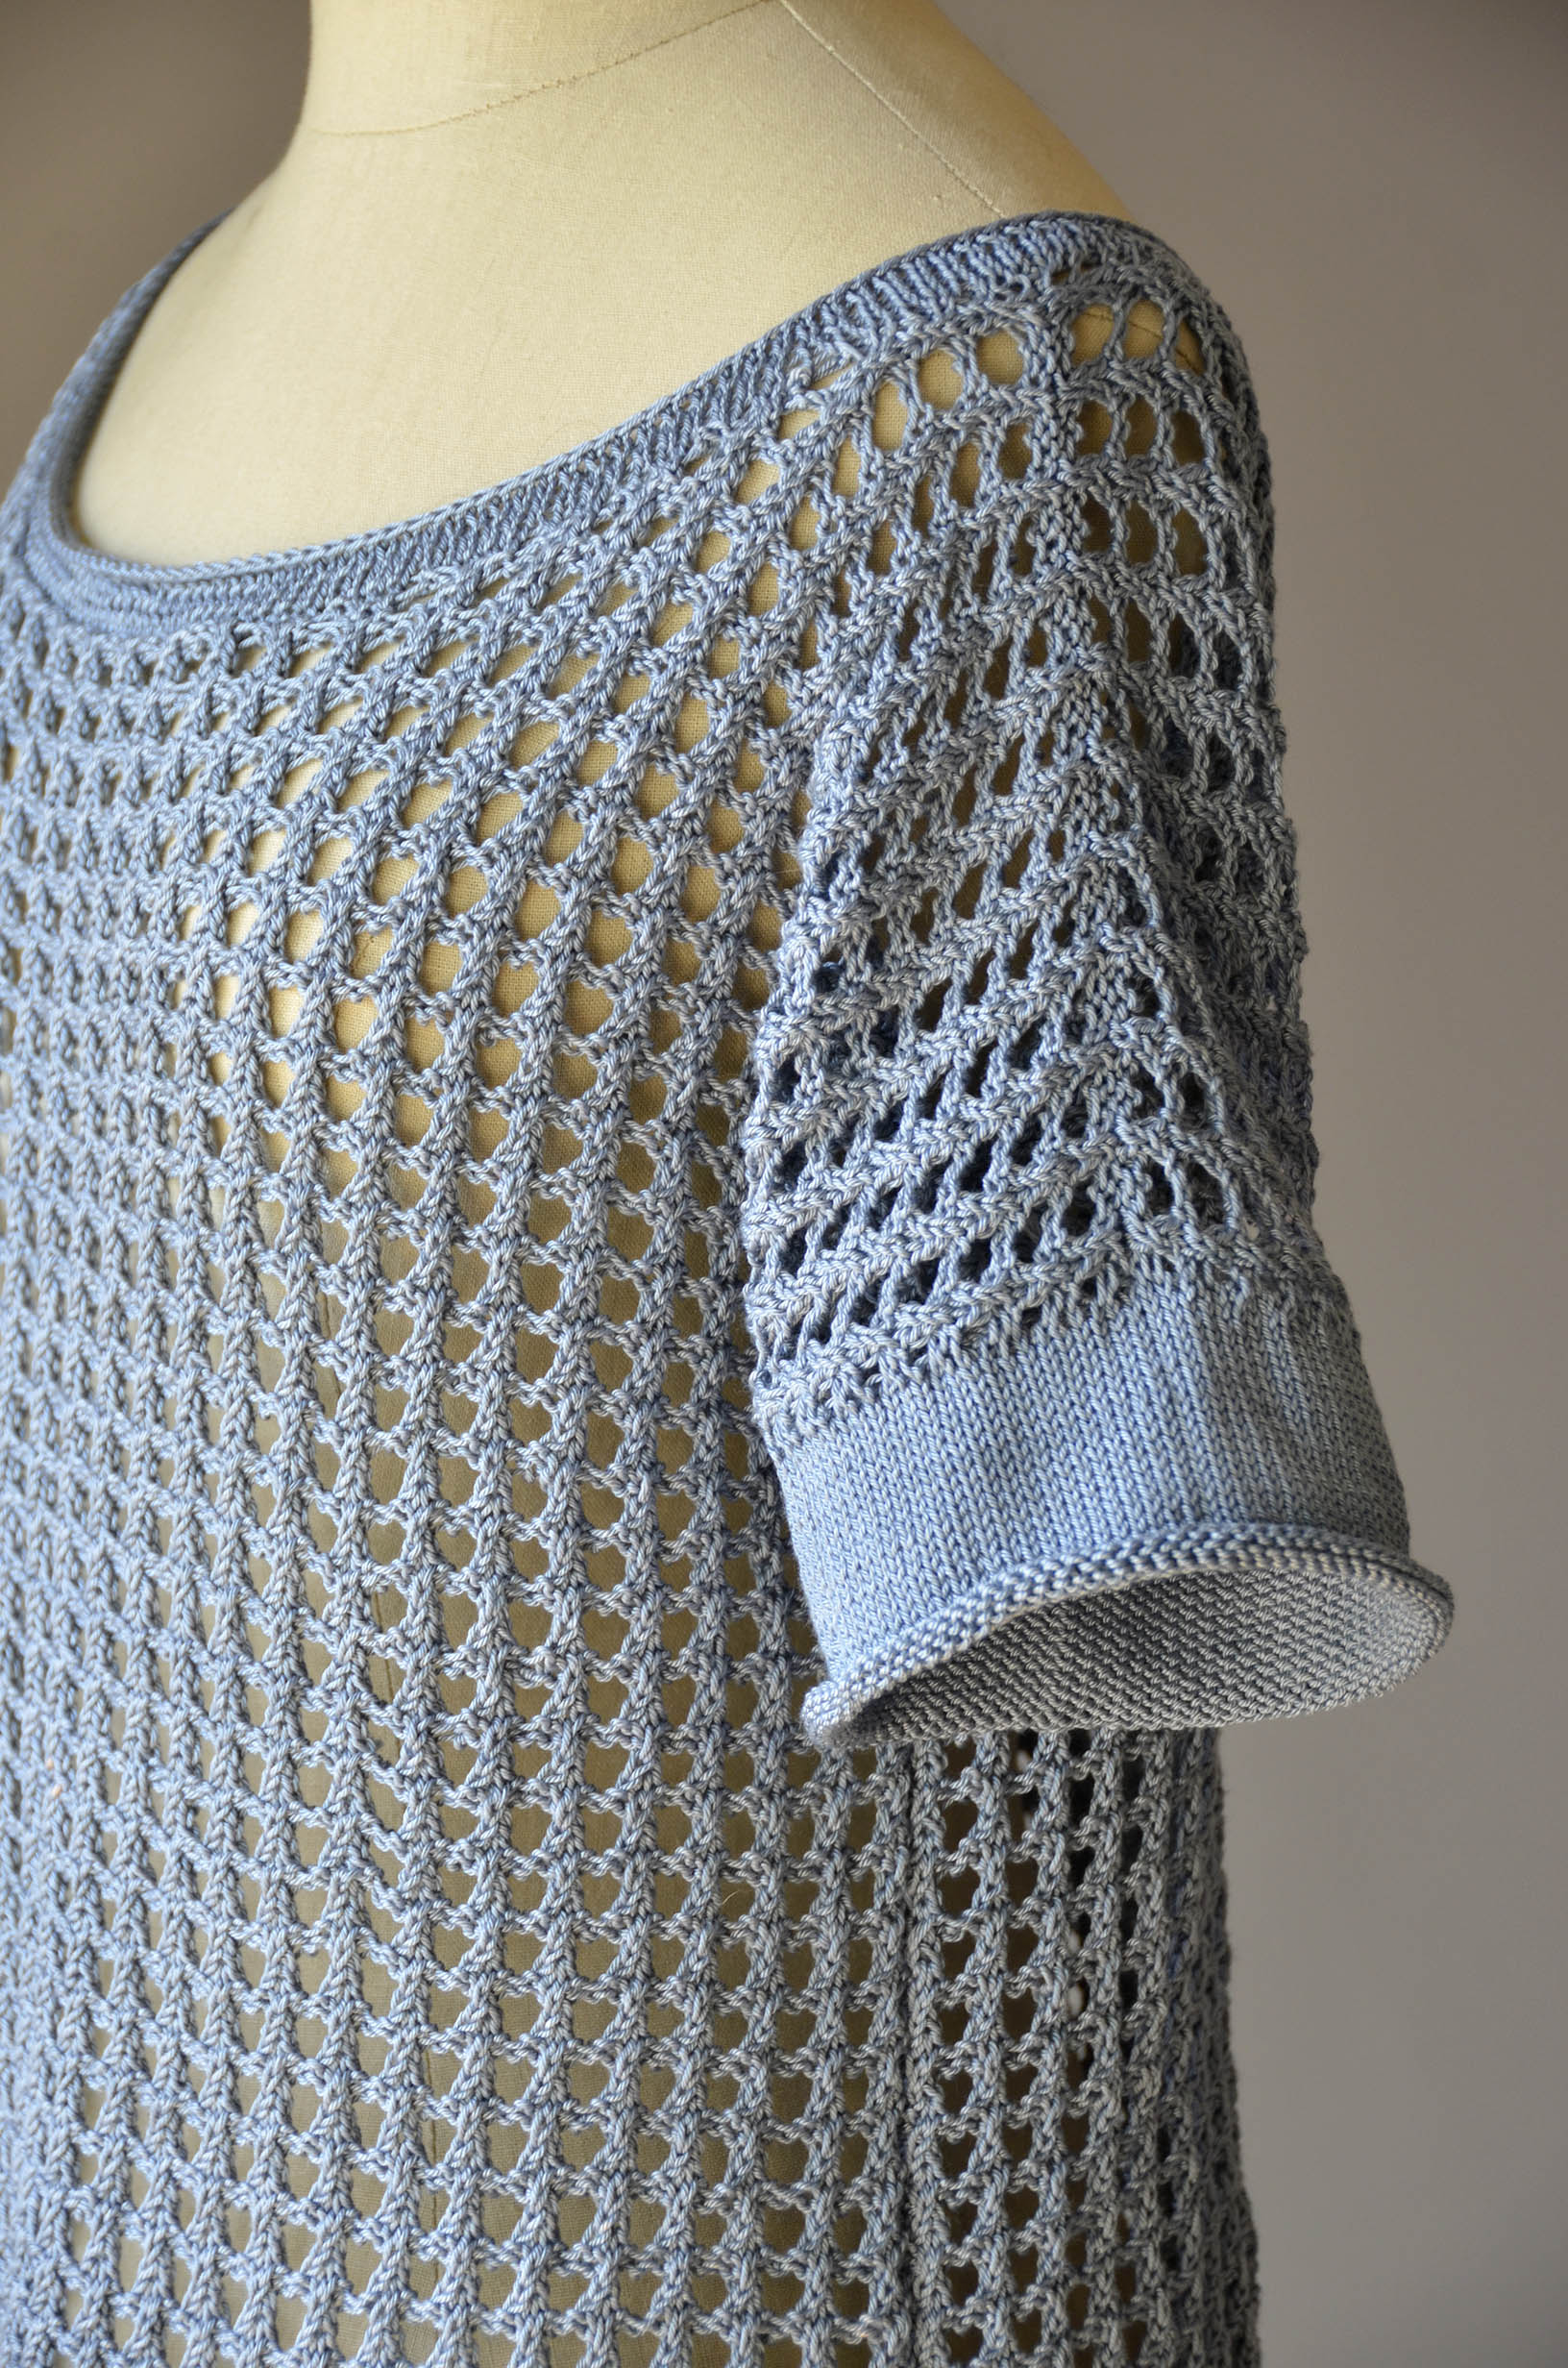
For my swatches, I cast on with a smaller needle size than the needle used in the pattern stitch. Because Rocked begins with a stockinette stitch rolled hem using a smaller needle, I wanted to test my stockinette gauge at the same time as the Mesh gauge. I followed the hem pattern as written, switched to my larger needle, and then continued in pattern.

Garden5_swatch_2

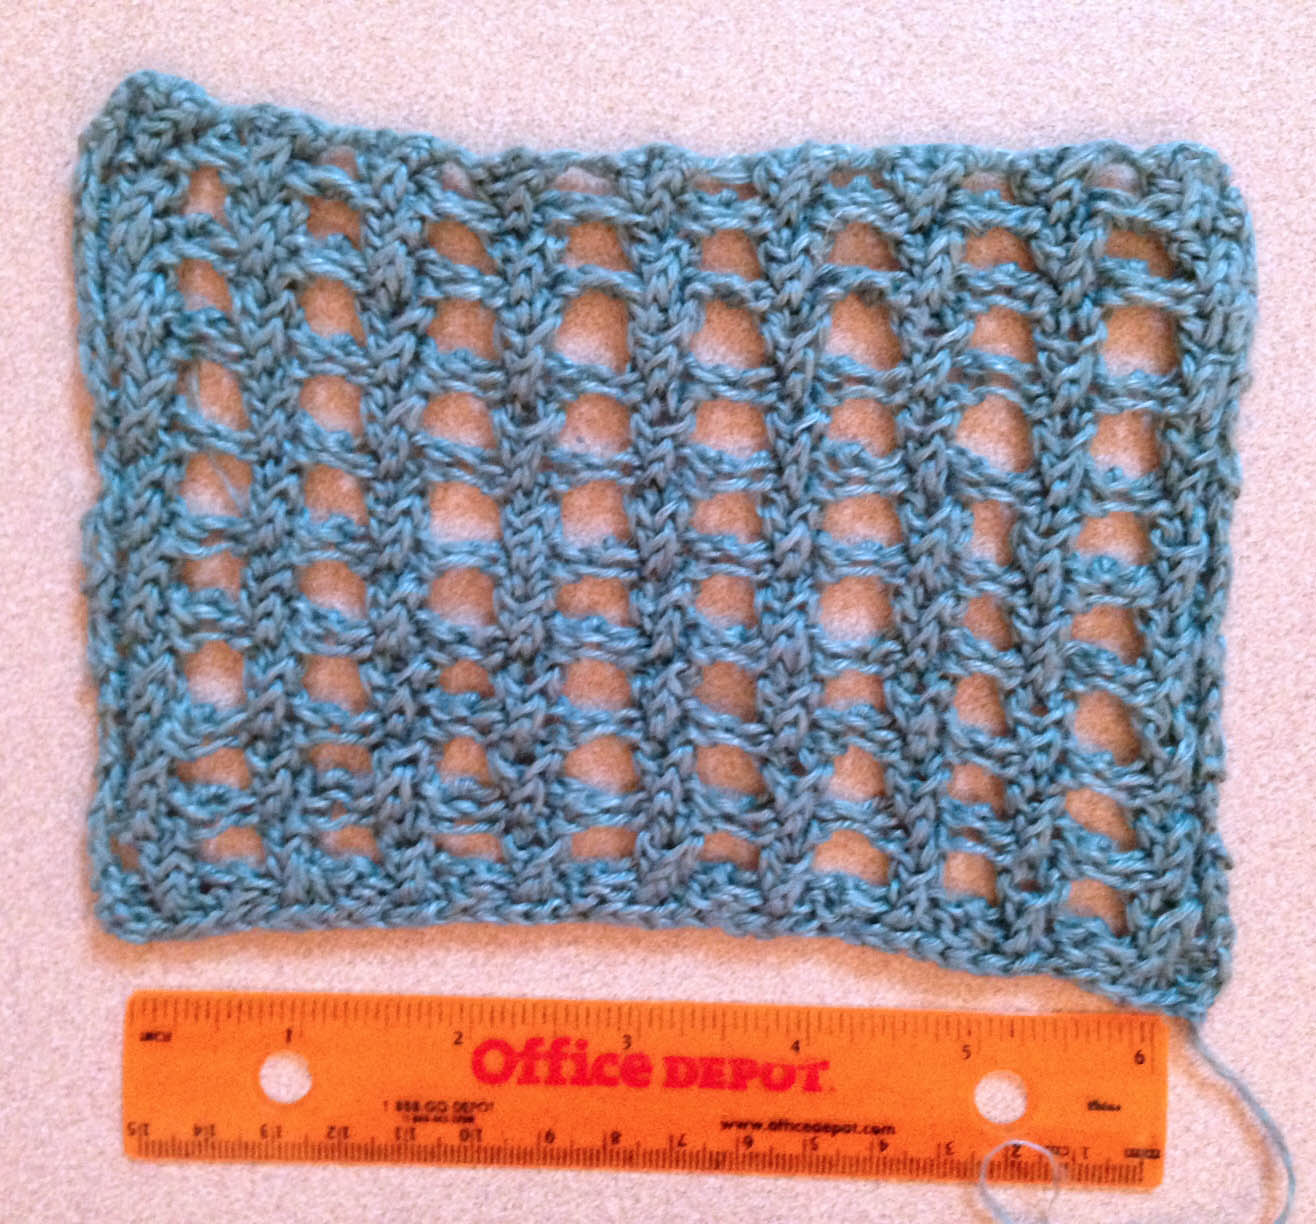
After I bound off my swatch, I wet-blocked both and pinned them on a blocking board. I plan on hand washing my finished top, so this is how I blocked my swatches also. After the swatches dried, I unpinned them and then measured.

Have any more questions about swatching or anything else? Leave your question in the comments section or join us on Ravelry! I’ll be  back here on the blog over the next month discussing other aspects of our knitalong.

Rocked Knitalong – another view on swatching

Today, I have the pleasure of handing over the proverbial mic to Sandi Rosner, the creative director for our sister company, Premier Yarns. Sandi elected to participate in our knitalong using Flax.

From Sandi:

I’m thrilled at the opportunity to participate in this knit-a-long! I’m happy to have the chance to knit something for myself, and this versatile summer top is just the thing.

I’ve chosen to use Fibra Natura Flax for my Rocked. Why? Linen. I’ve recently moved from the mild, arid climate of Northern California to the steamy heat of North Carolina. With its lightweight absorbency and easy care, linen is a big part of my survival strategy as the dog days of summer loom. I asked Amy to choose a color for me, and she picked this lovely blue gray called Mineral. Over jeans and a tank, or a black cotton skirt and a cami, this top will be in heavy rotation all summer long.

I cast on 38 sts with size 5 US/3.75 mm needles, and went straight into the Mesh pattern stitch. I worked 9 repeats of the 4 row pattern and bound off.

flax swatch 1

The first thing you’ll notice is that this swatch has a distinct bias to the left. Since the stitch pattern involves a Right Twist every 4 rows, this isn’t really surprising. That little maneuver is consistently pulling the fabric in the same direction causing the whole piece to slant. If this hold true through blocking, then the side seams of my top will want to twist around my body – not something I’m willing to try to pass off as a design feature. But I’m going to withhold judgement until after blocking.

I chose a rather unconventional blocking method – I threw my swatch in the washer and dryer with a load of laundry. Since I intend to machine wash and dry my finished top, I wanted to see 1) how the fabric transforms, and 2) how much shrinkage to expect.

flax swatch 2

My swatch came out of the wash looking like a sad, rumpled little thing. What you can’t see is how much softer and more supple the fabric became. Flax can feel a little stiff and wiry in the knitting, but it softens up nicely in the wash.

You can also see that the bias problem was not entirely resolved by the wash. On to Step 2, a gentle steaming.

I took the swatch to my ironing board and applied a healthy shot of steam, without letting the iron actually touch the fabric – I didn’t want to flatten the texture. The steam relaxes the fibers and makes the piece malleable. I used my fingers to gently nudge, push and pull the piece into shape, then let it cool.

flax swatch 3

As you can see, the piece straightened out nicely. The fabric is smooth, with good stitch definition, and the bias is nearly gone. This will do.

My gauge came out at 22 sts and 32 rows = 4” in Mesh pattern. Not quite a match for the gauge called for in the pattern, but I like the fabric, and I’m willing to do the pattern modifications required to make it work.

Unlike the lovely model you see in the pattern photographs, I’m well past middle age. My body tells a tale of motherhood, gravity and many fine meals. I’d like 4-5” of ease for this top, so I’m going to aim for the largest size. I know I need a multiple of 4 sts + 6 for the pattern repeat, so I’m going to cast on 150 sts. This should give me a finished bust measurement of 53 ¾”.

For this style, I prefer my tops long enough to hang past the curve of my belly. Looking at the schematic, I can see that I want to add length in two places. I’ll add 2” before I begin the sleeve shaping. I also want the sleeves to fit loosely around my upper arms. I’ll add another 2” between the sleeve shaping and the neck shaping, making the sleeves 4” bigger around. With a total of 4” added length, and the bigger sleeves, this top will be both comfortable and flattering on my less-than-model-perfect body.

Hmm…I’d better ask Amy to set aside a couple more skeins in this lovely color, just in case.