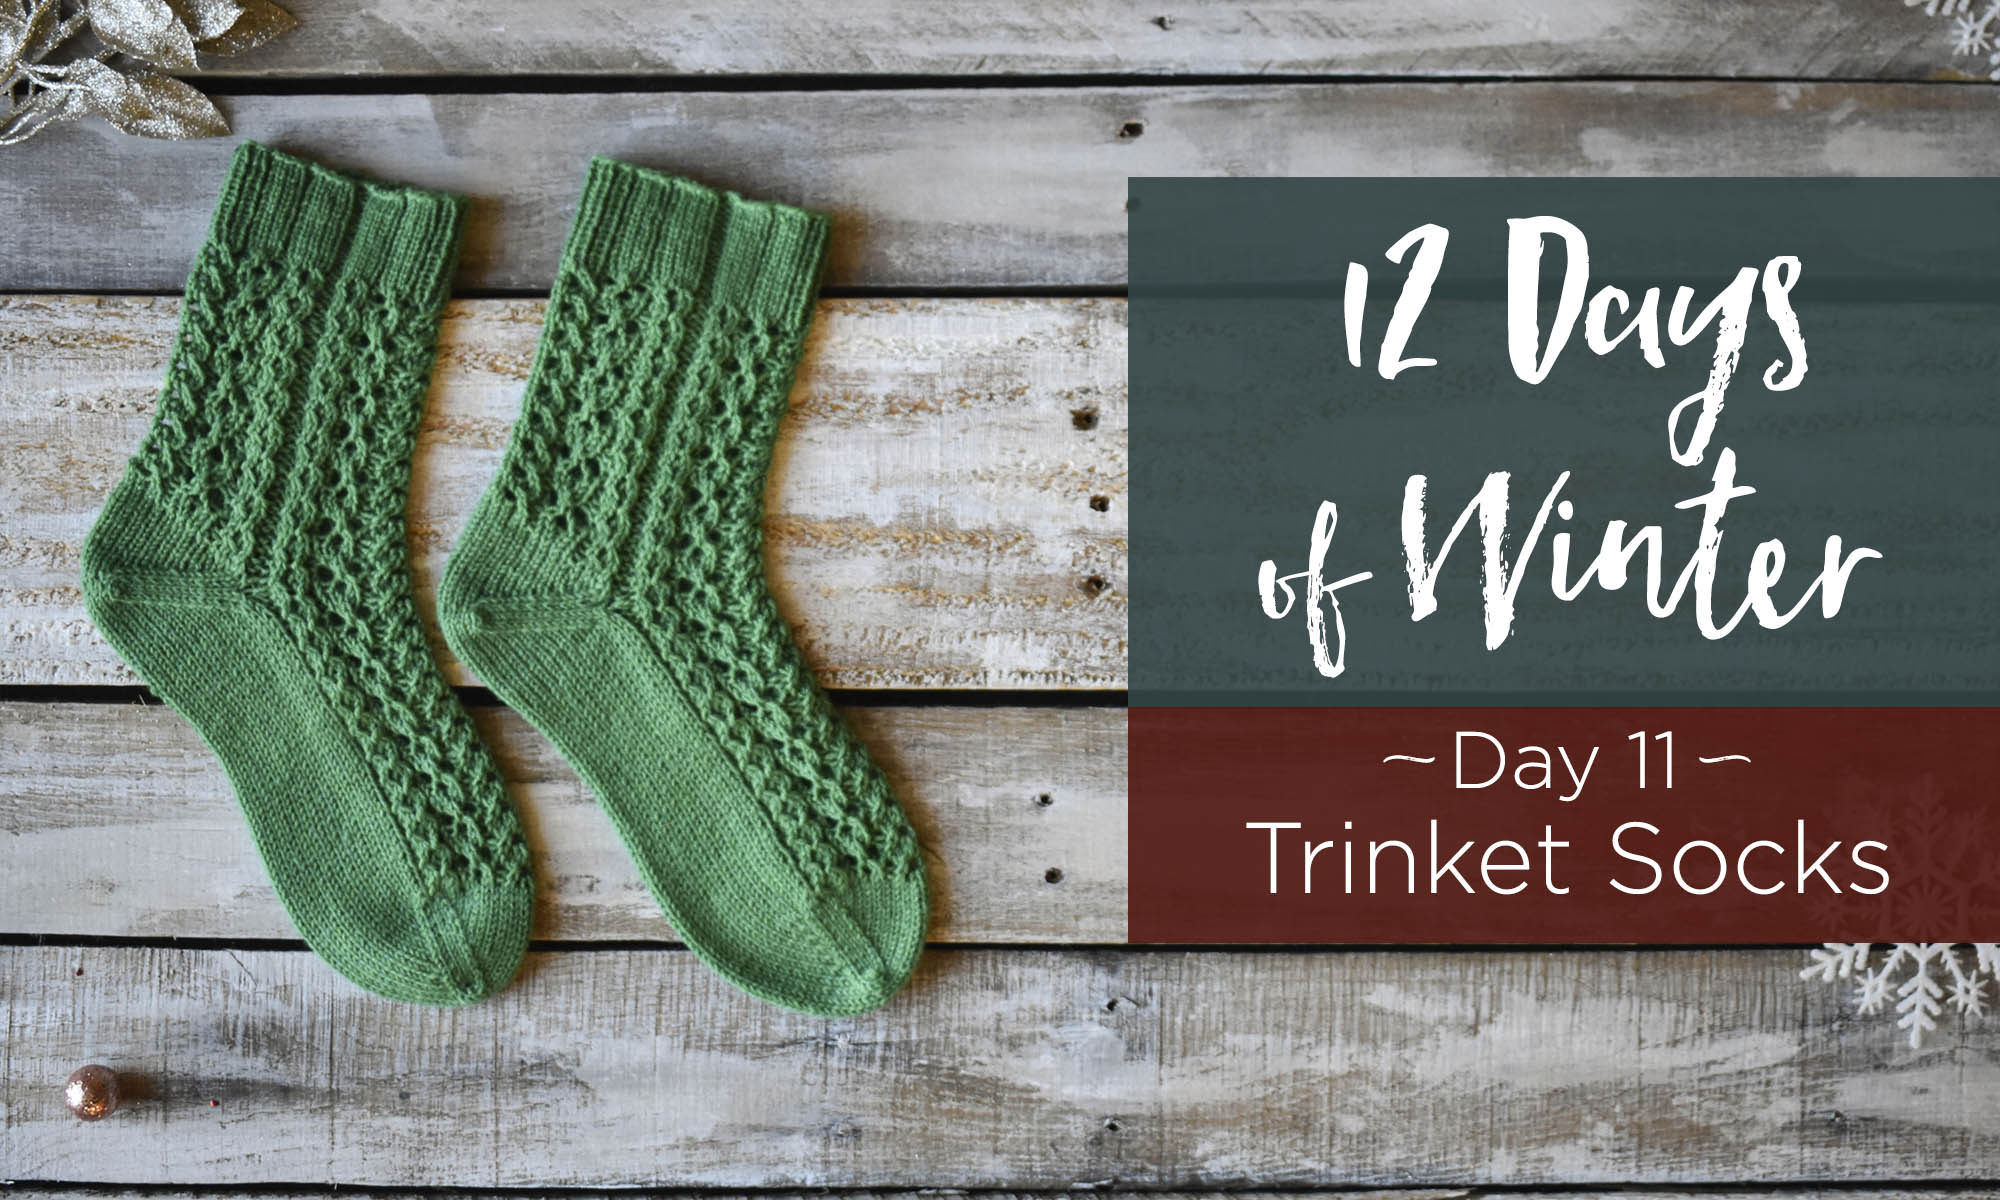
This is part 11 in a 12 part series highlighting designs from our 12 Days of Winter, Series 3 Edition.
It’s Day 11 in the 12 Days of Winter Kit Collection. We can’t believe how quickly time seems to be going. Before we dive into today’s kit and post, I’d like to take a moment to highlight that today is Small Business Saturday. We’re right in the midst of what is arguably the biggest shopping period of the year. As you gear up for the holiday season, don’t forget to support your local small businesses. For those of us who love all things yarny, it’s the perfect day to show some support to your local yarn stores. Without them, we wouldn’t be a business at all! Local yarn stores are front and center of the fiber community – offering a space to learn, socialize, and of course, purchase some yummy yarn.
And now, onto today’s kit (which you can find at your local yarn store).
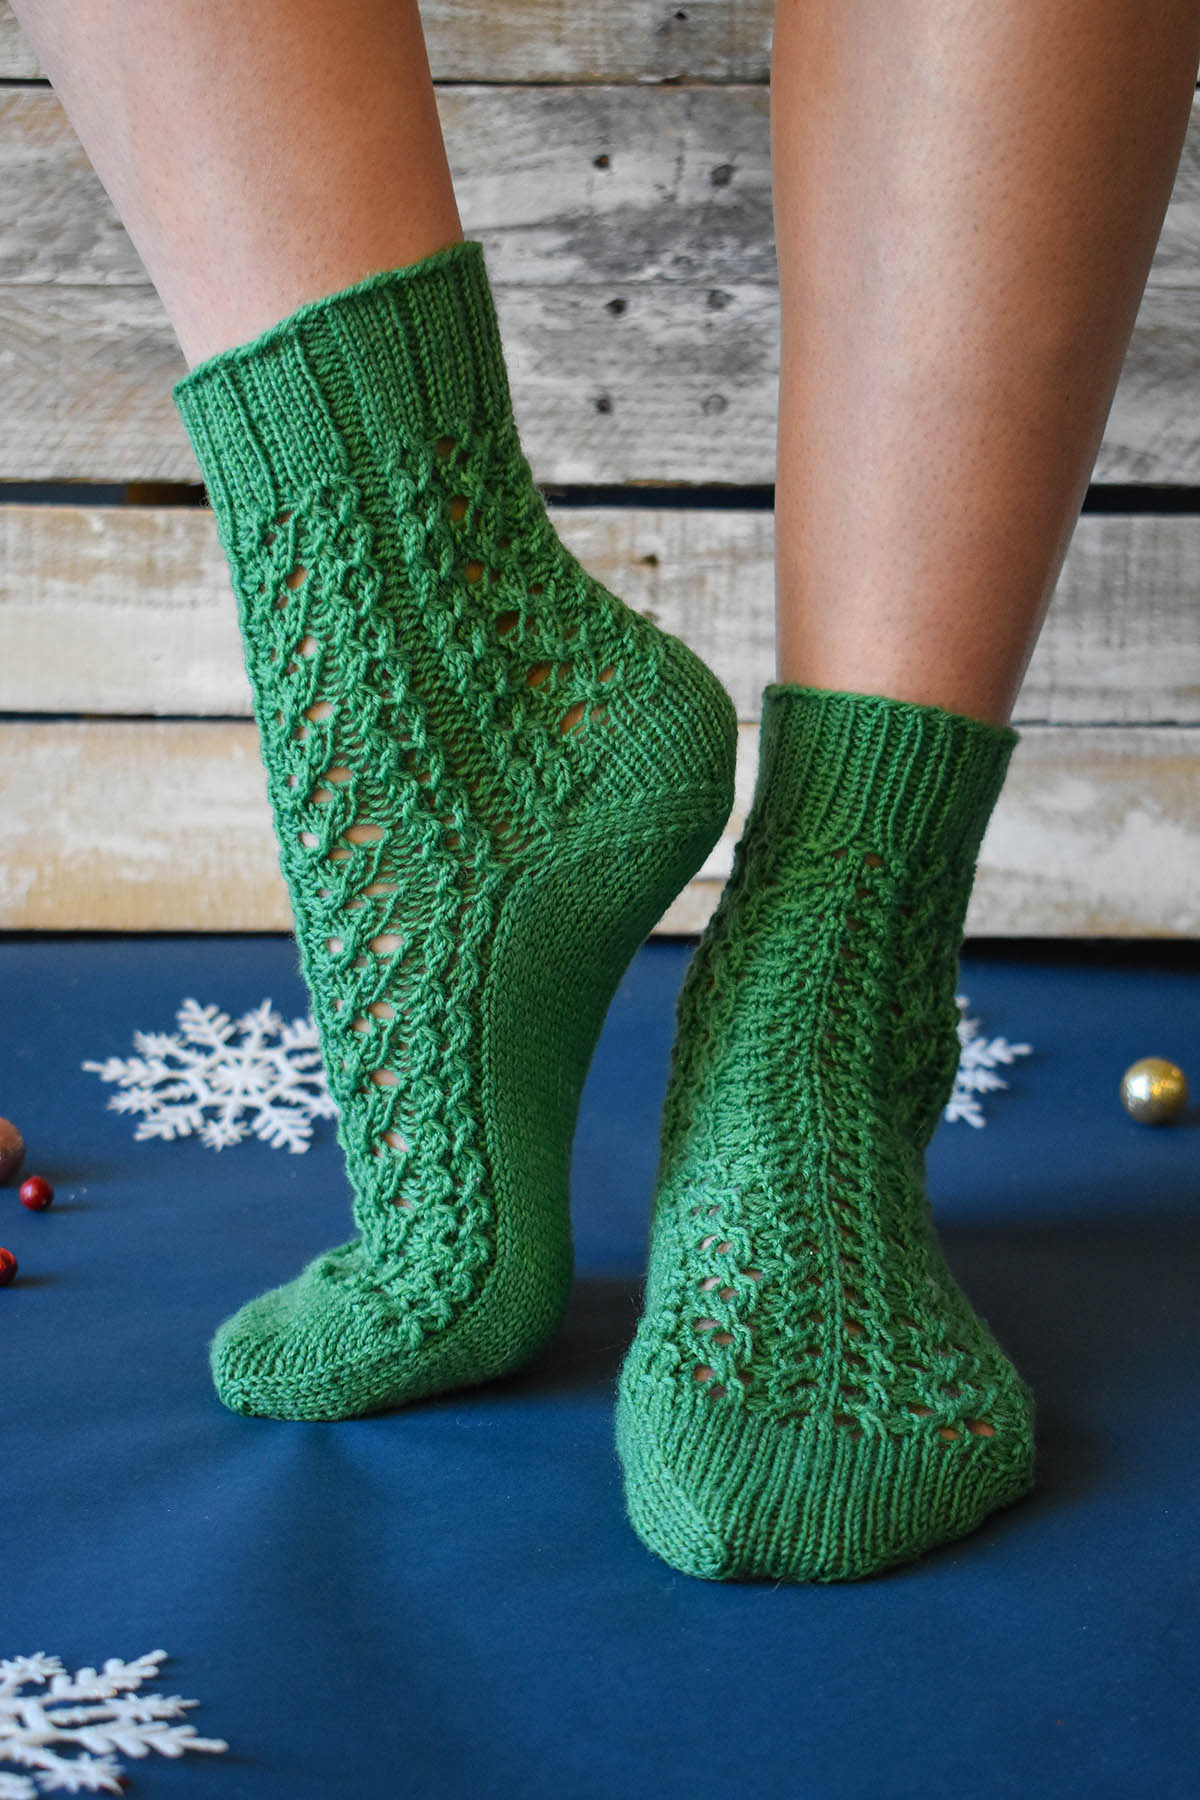
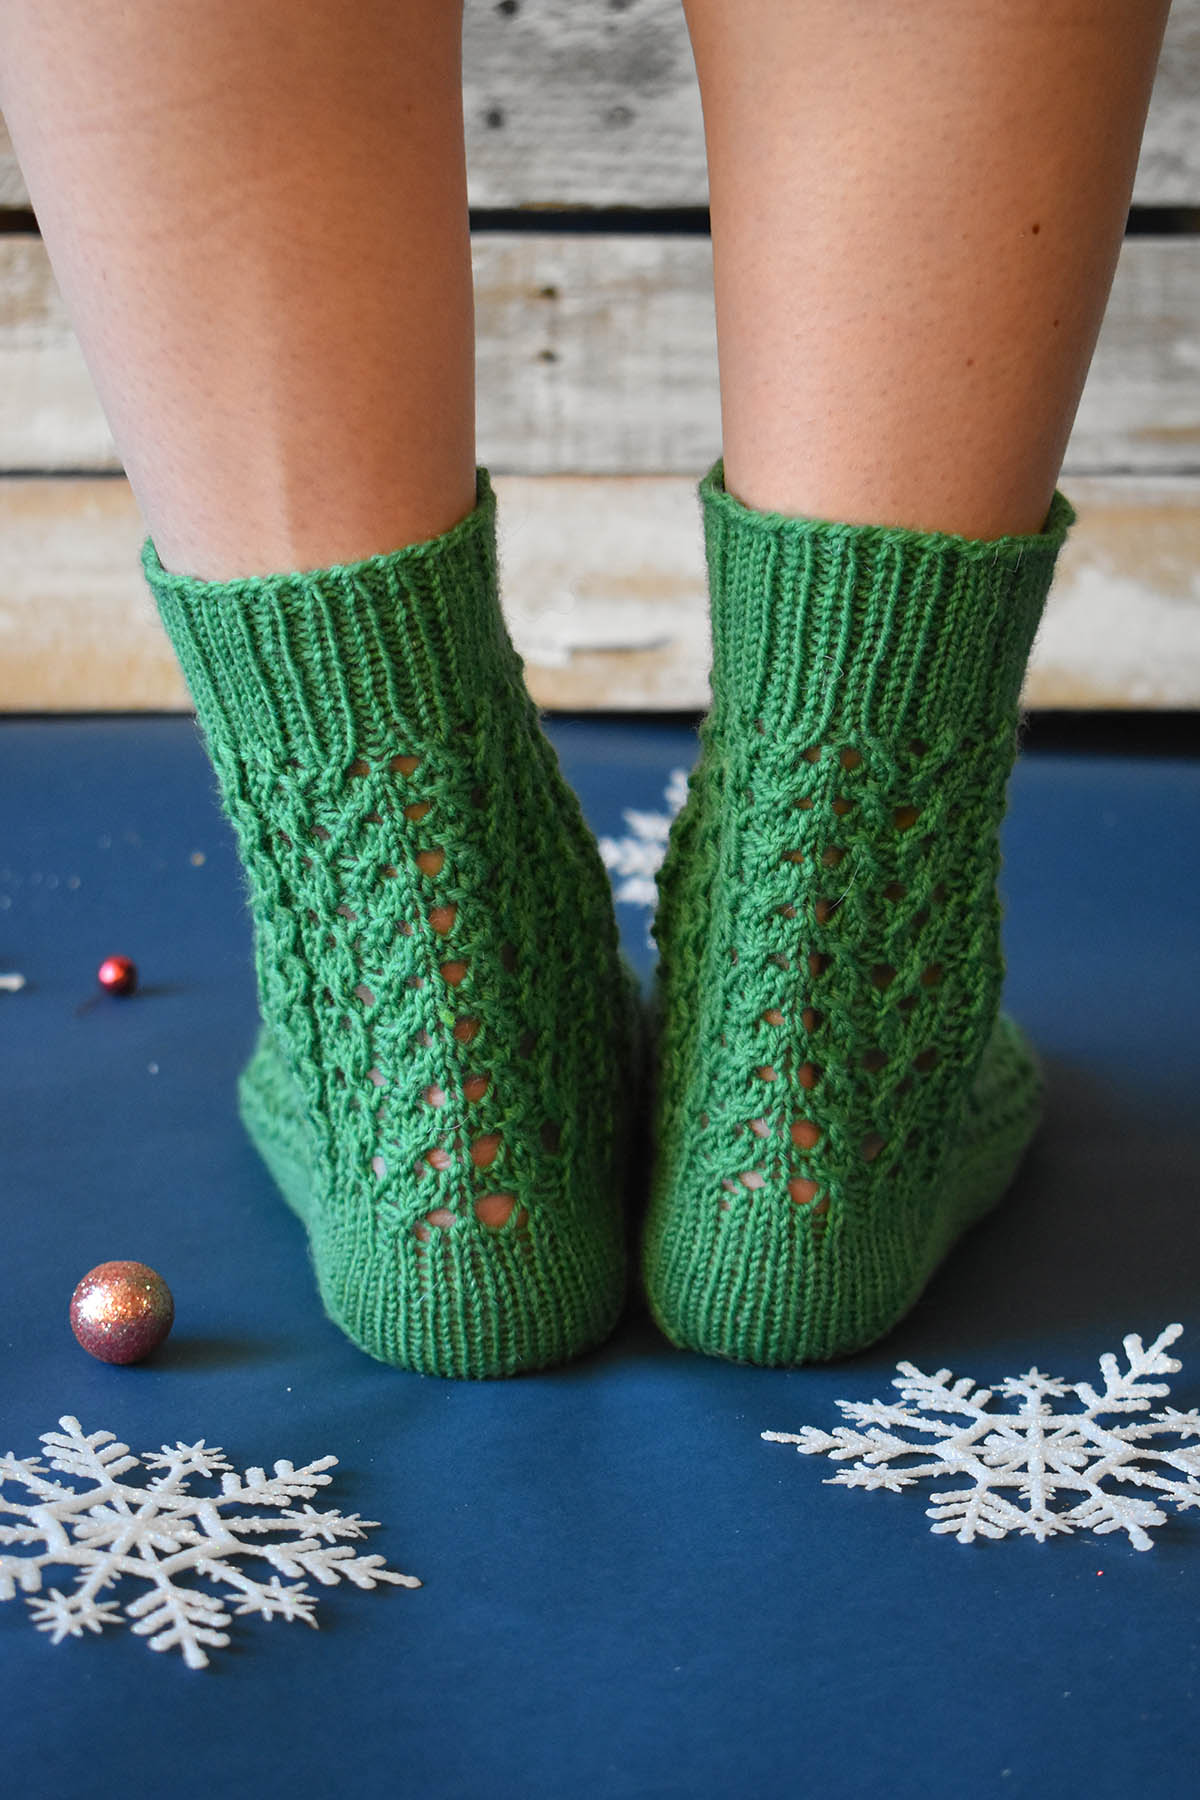
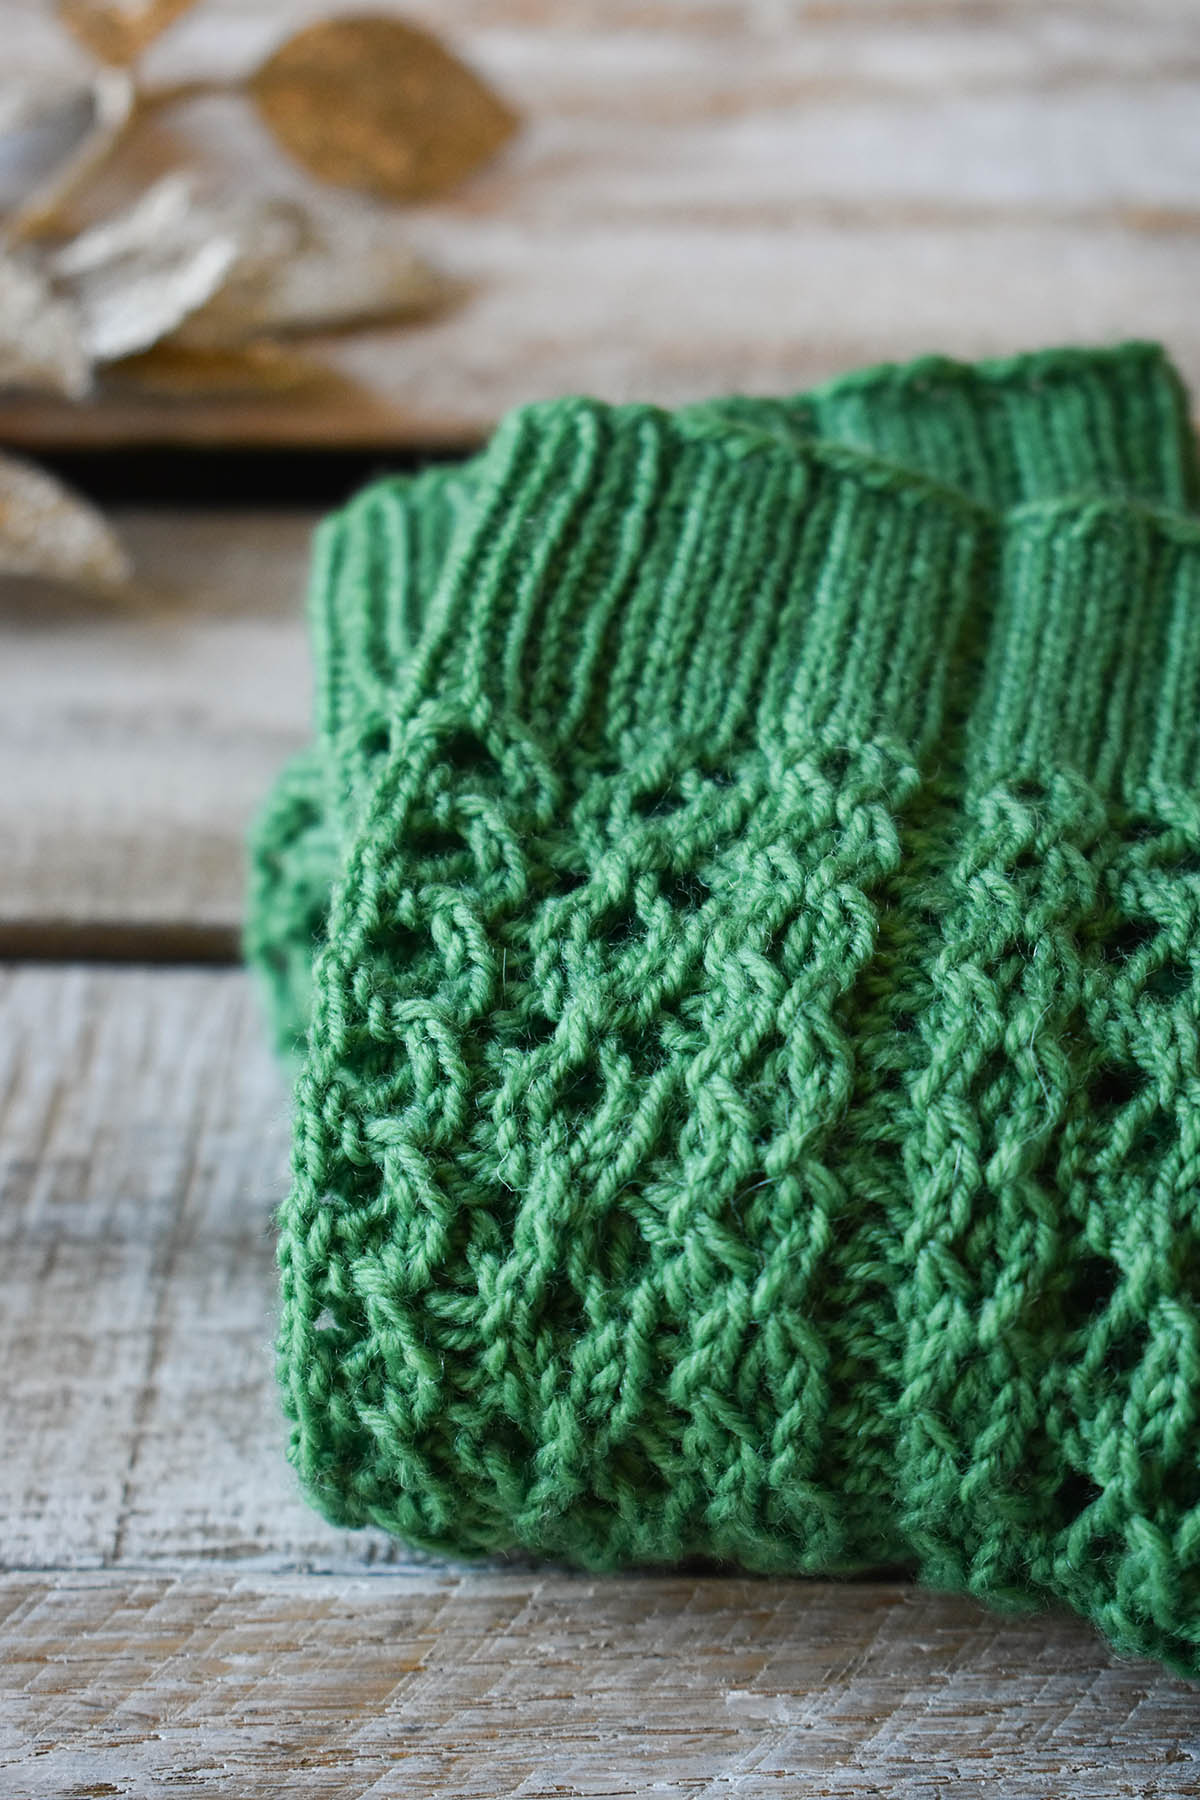
Today we’re excited to introduce the Trinket Socks, knit up in deliciously soft, yet strong, Bella Cash. This is a great all-around yarn, but here in the office, it has become a favorite for knitting socks. Thanks to the superwash merino, they’re machine-washable and easy to care for. Cashmere adds a touch of luxury, and nylon ensures these socks will be strong enough to last for ages. These socks feature a lace and twisted stitch pattern that is addictive to knit, and quick to work up.
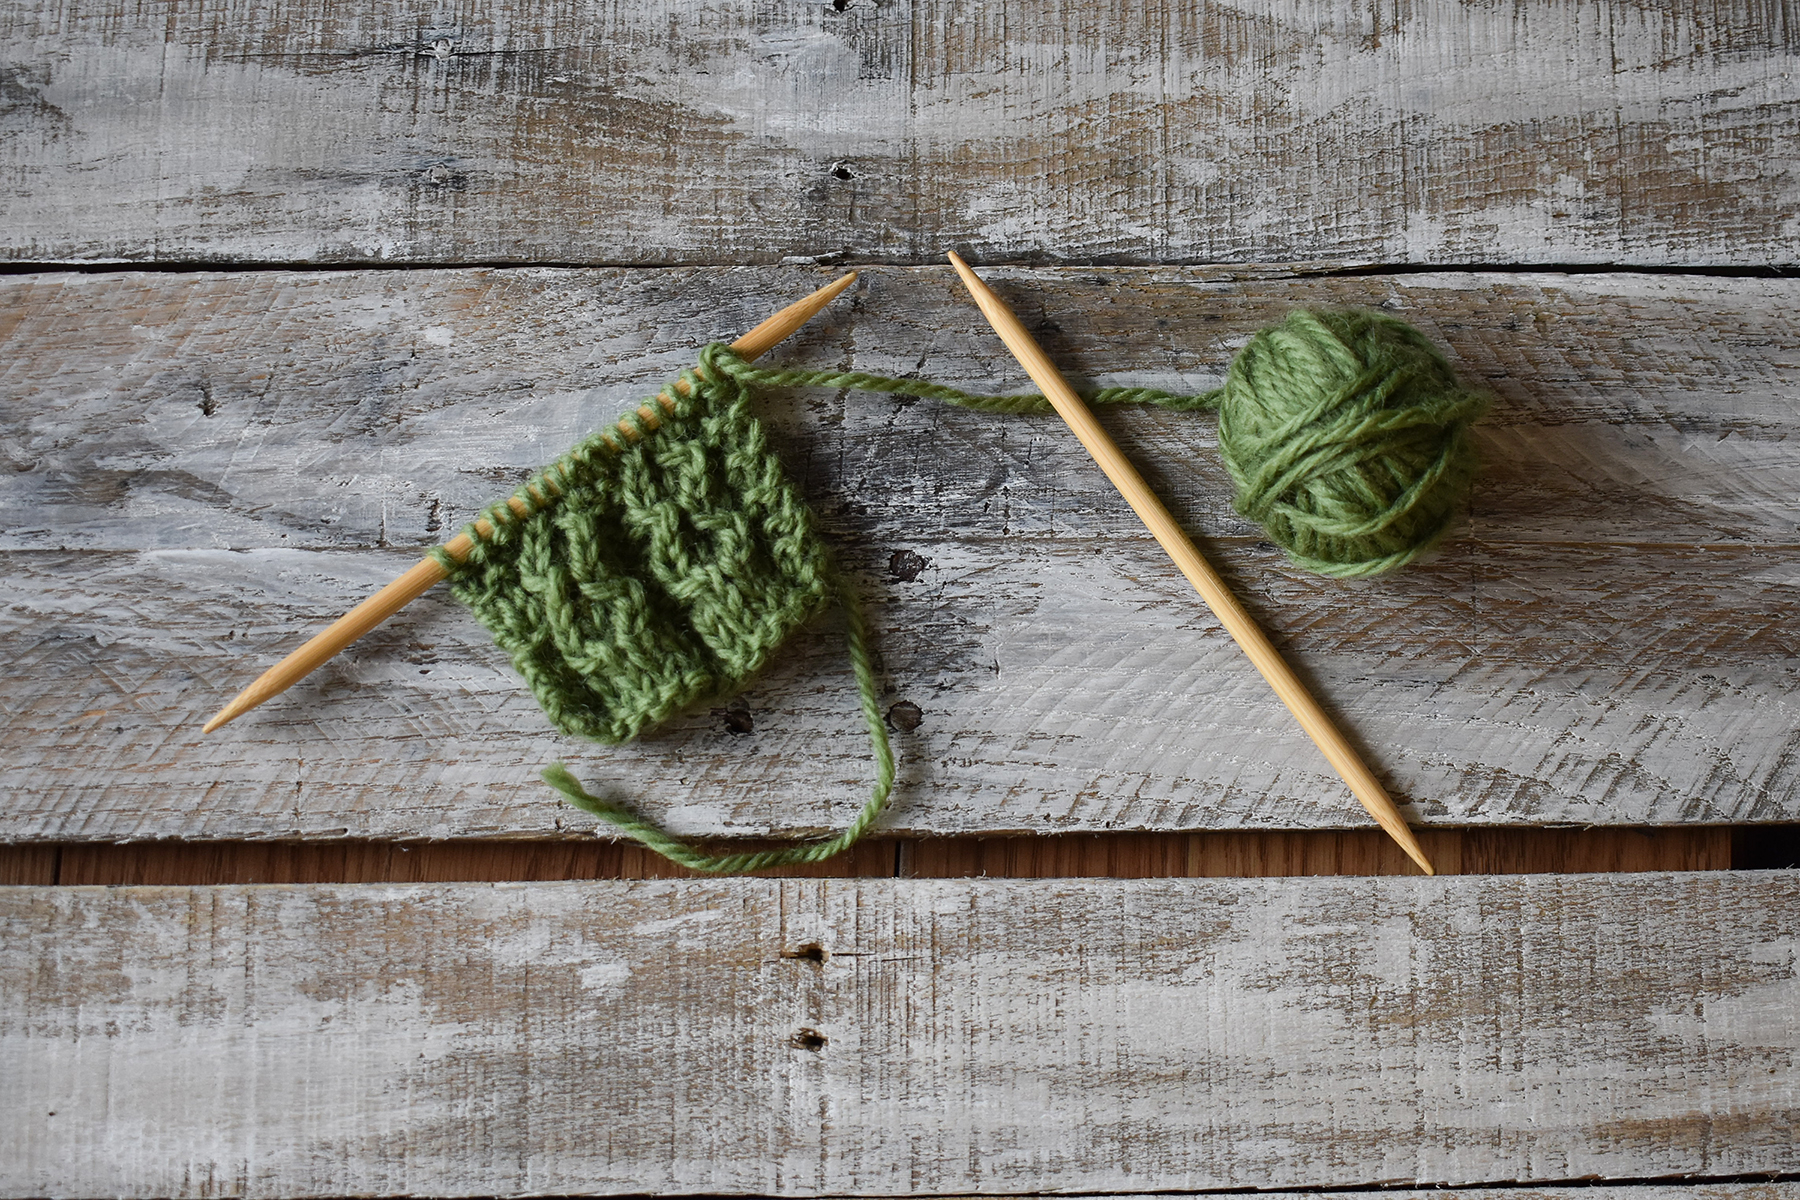
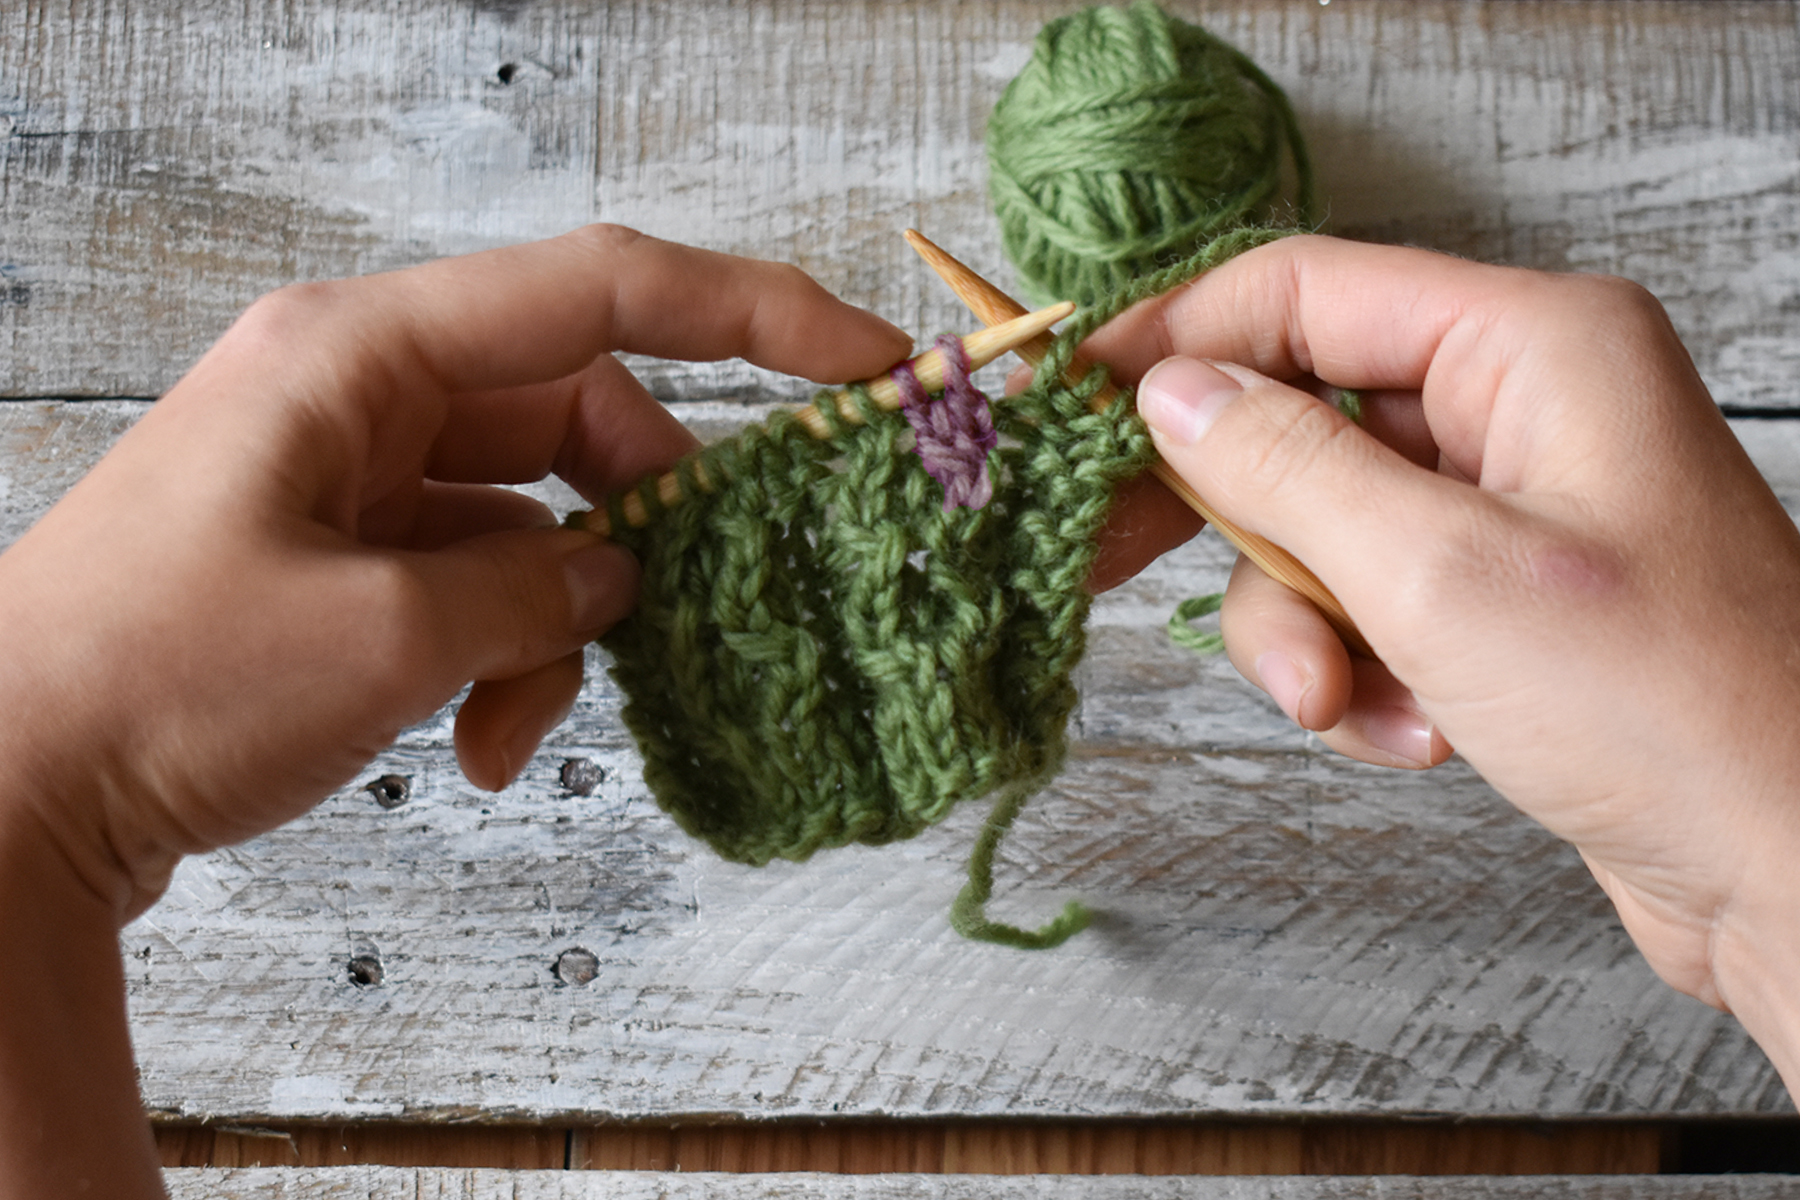
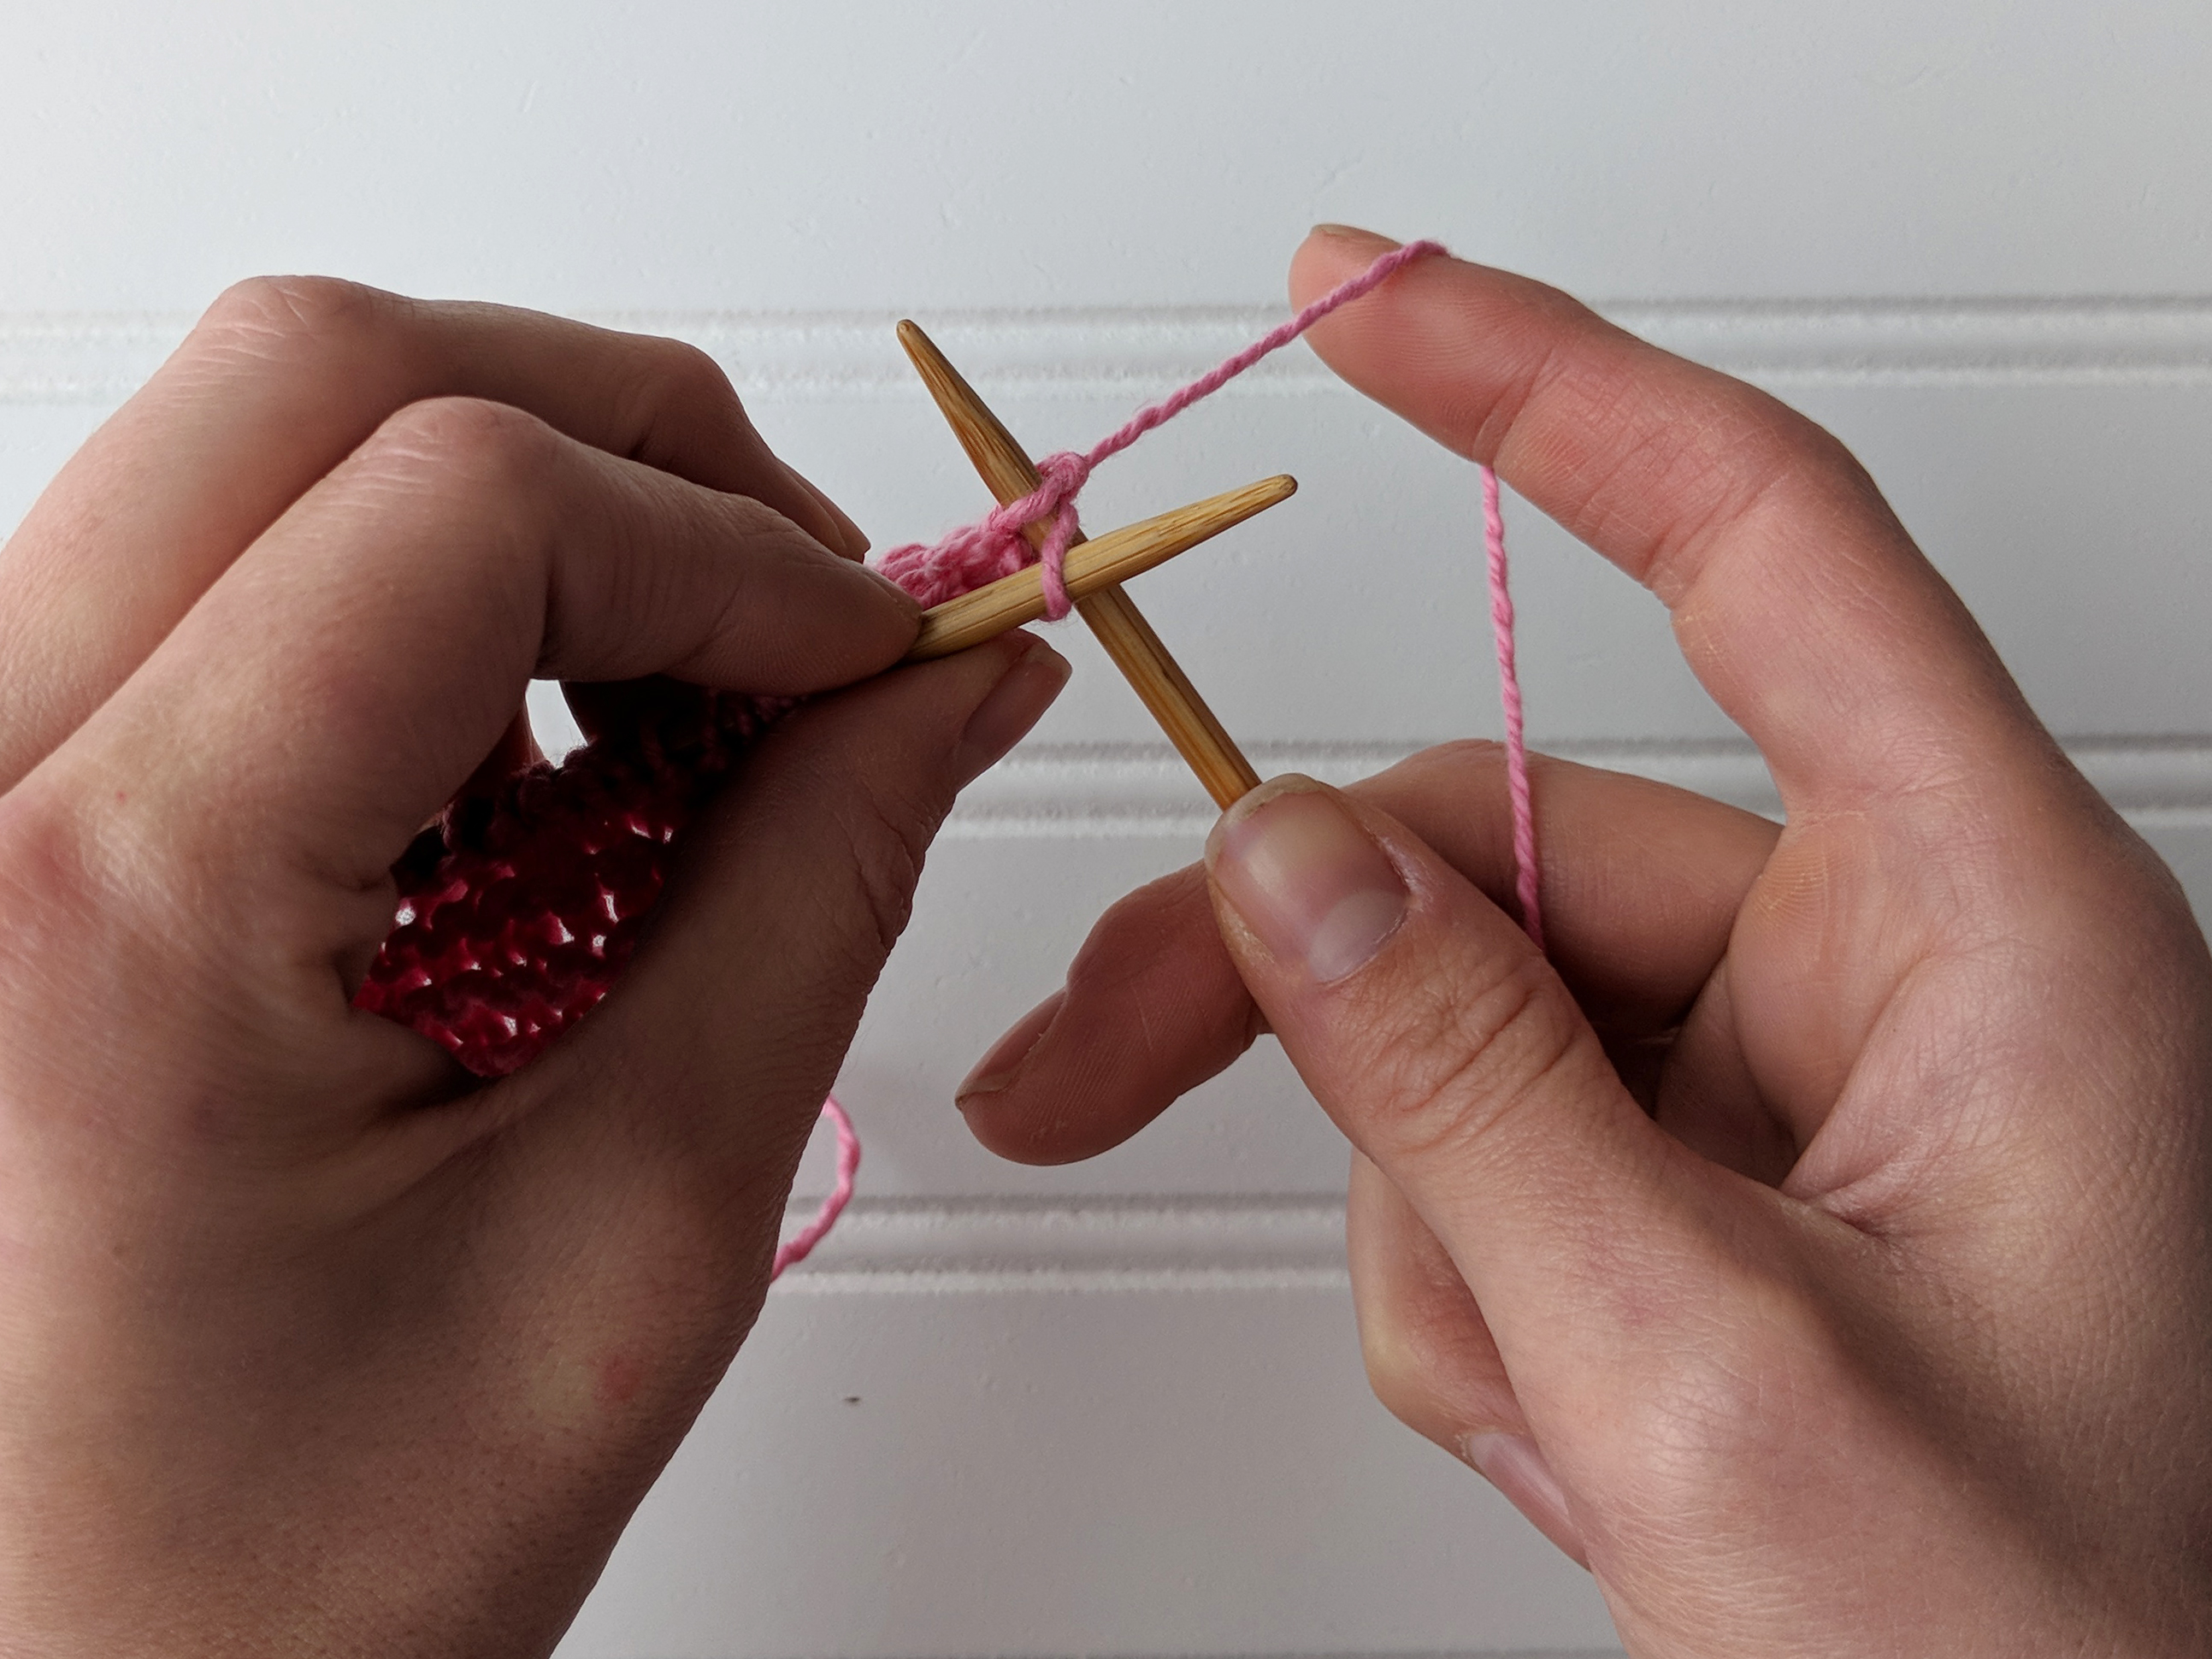
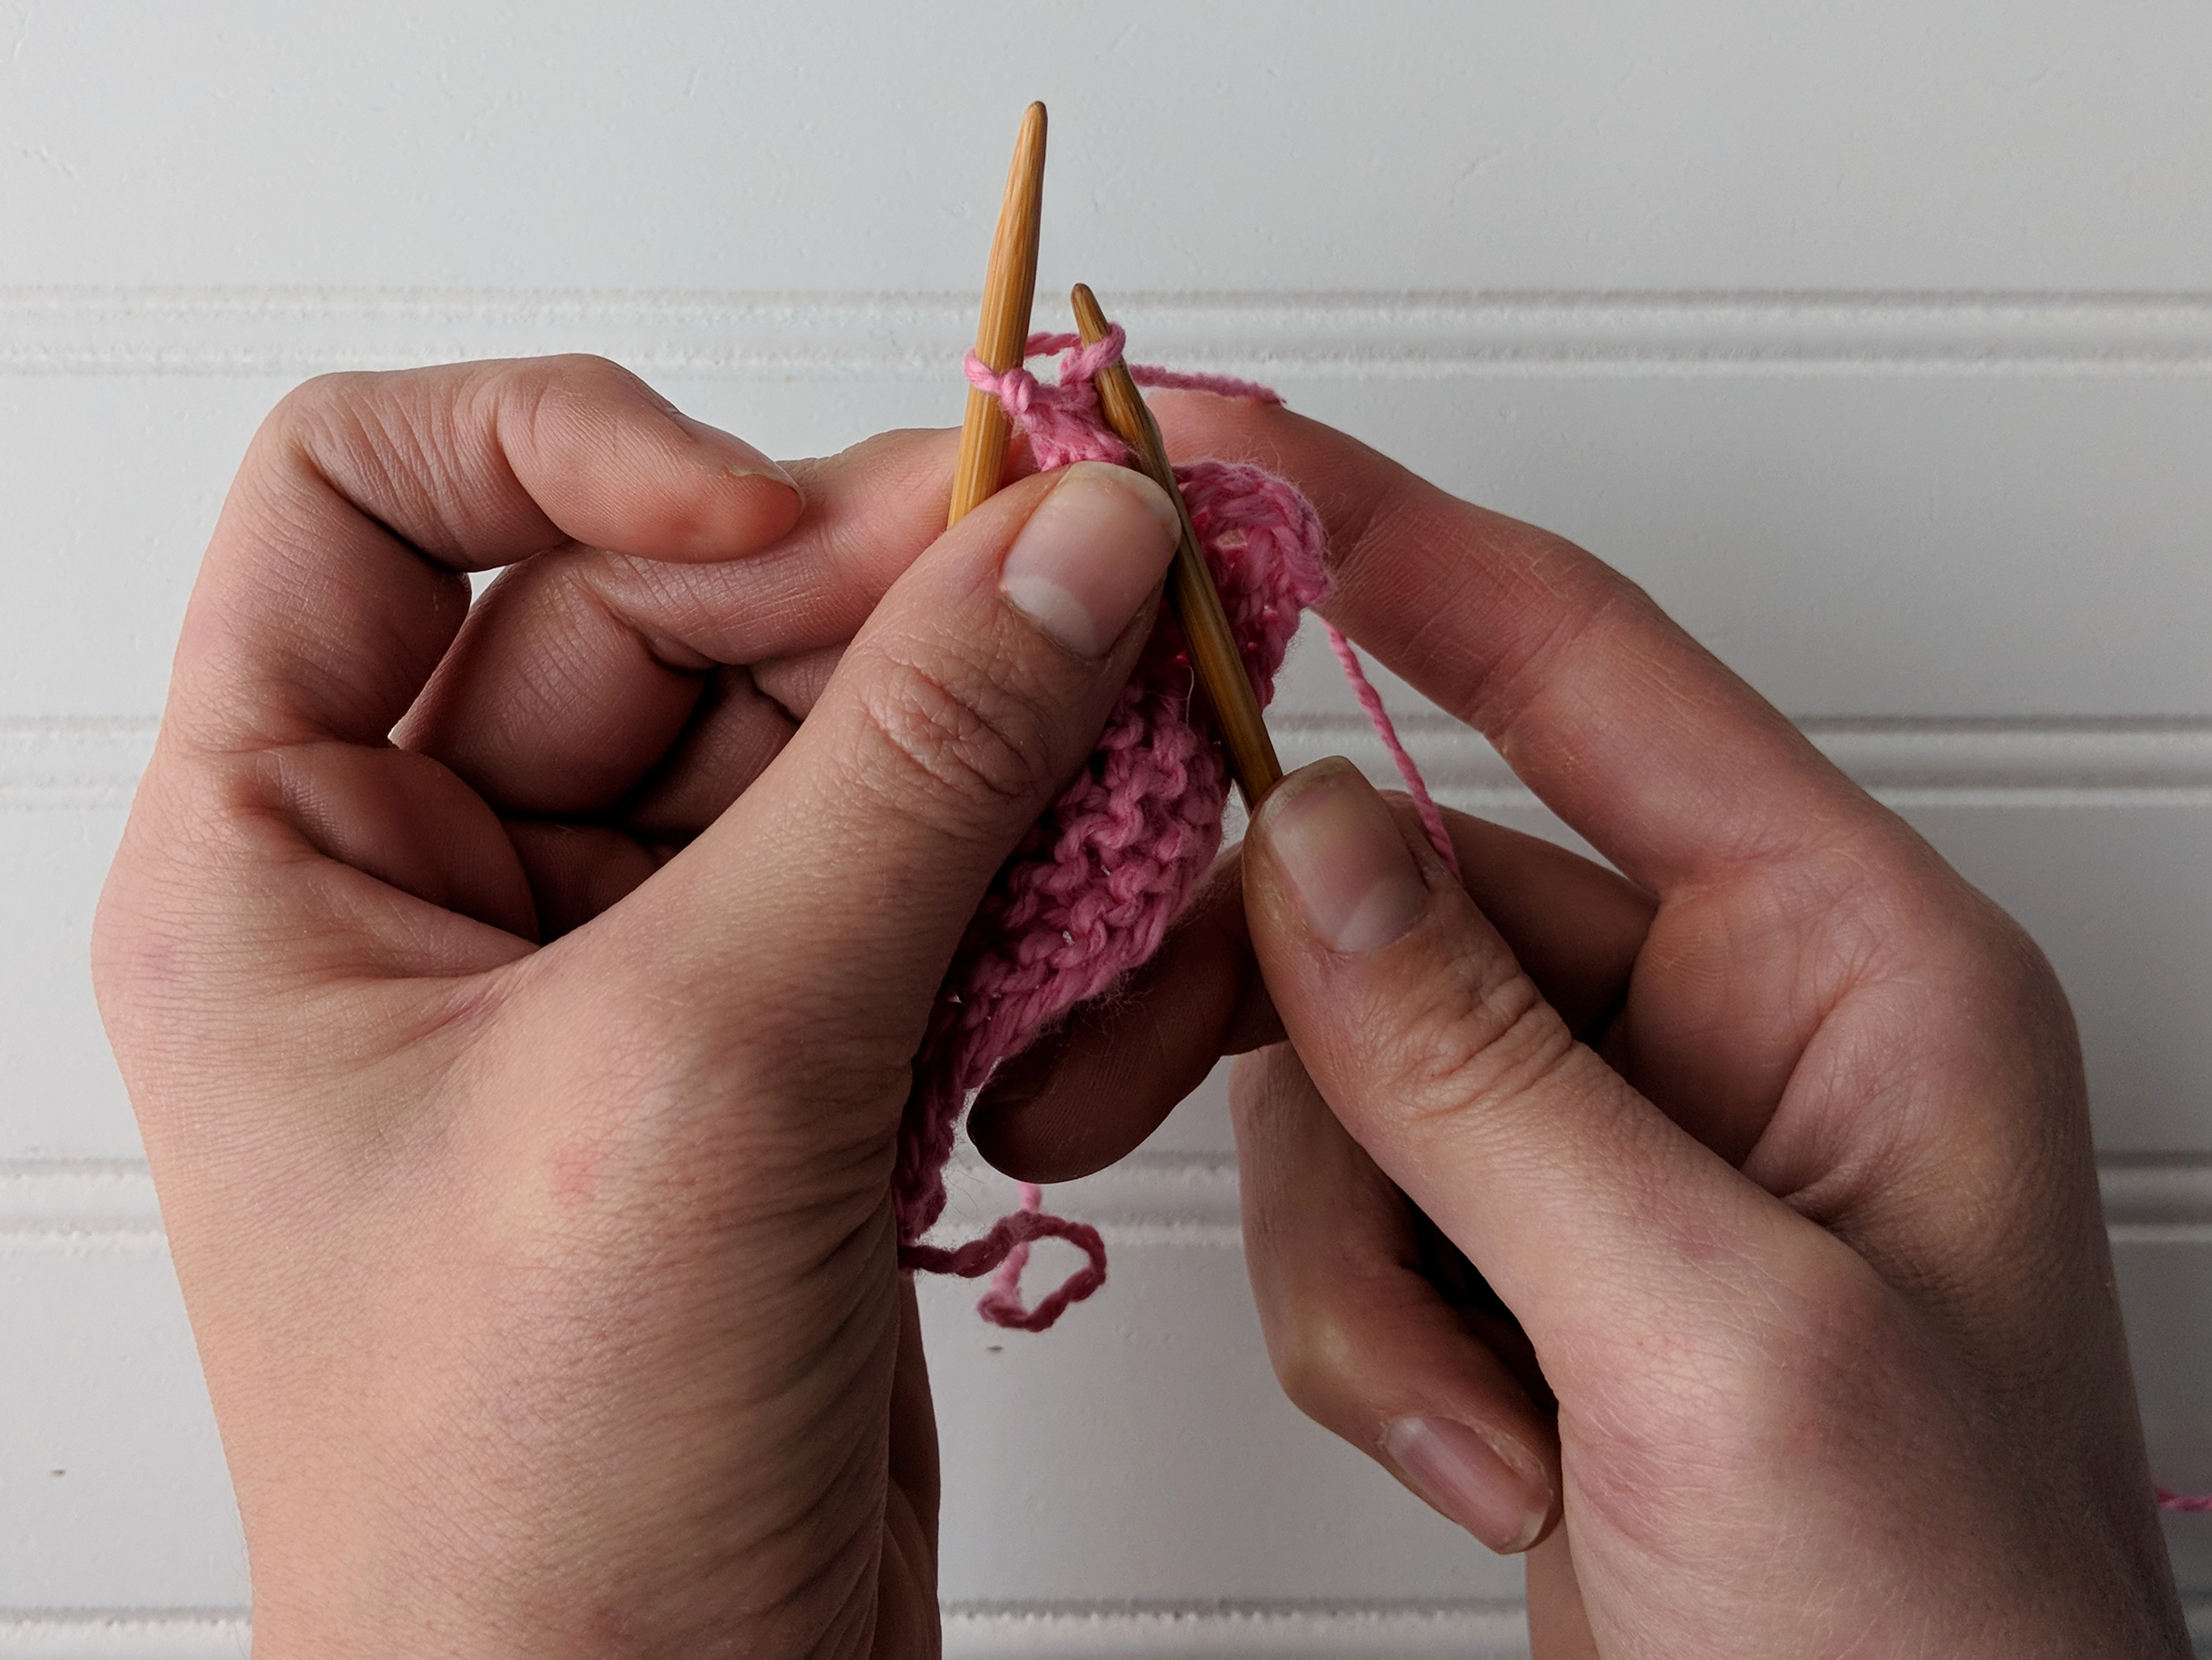
Speaking of twisted stitches – we have a tutorial to share today. If you can recall from Day 7 of Winter (the Mountain Pines Cowl), we shared a tutorial on Right and Left Purl Twists. Today, we’ll be showing you how to knit a regular Right and Left Twist – no purling necessary. Note that for today’s tutorial, we’re using Deluxe Chunky so that it’s easier for you to see.
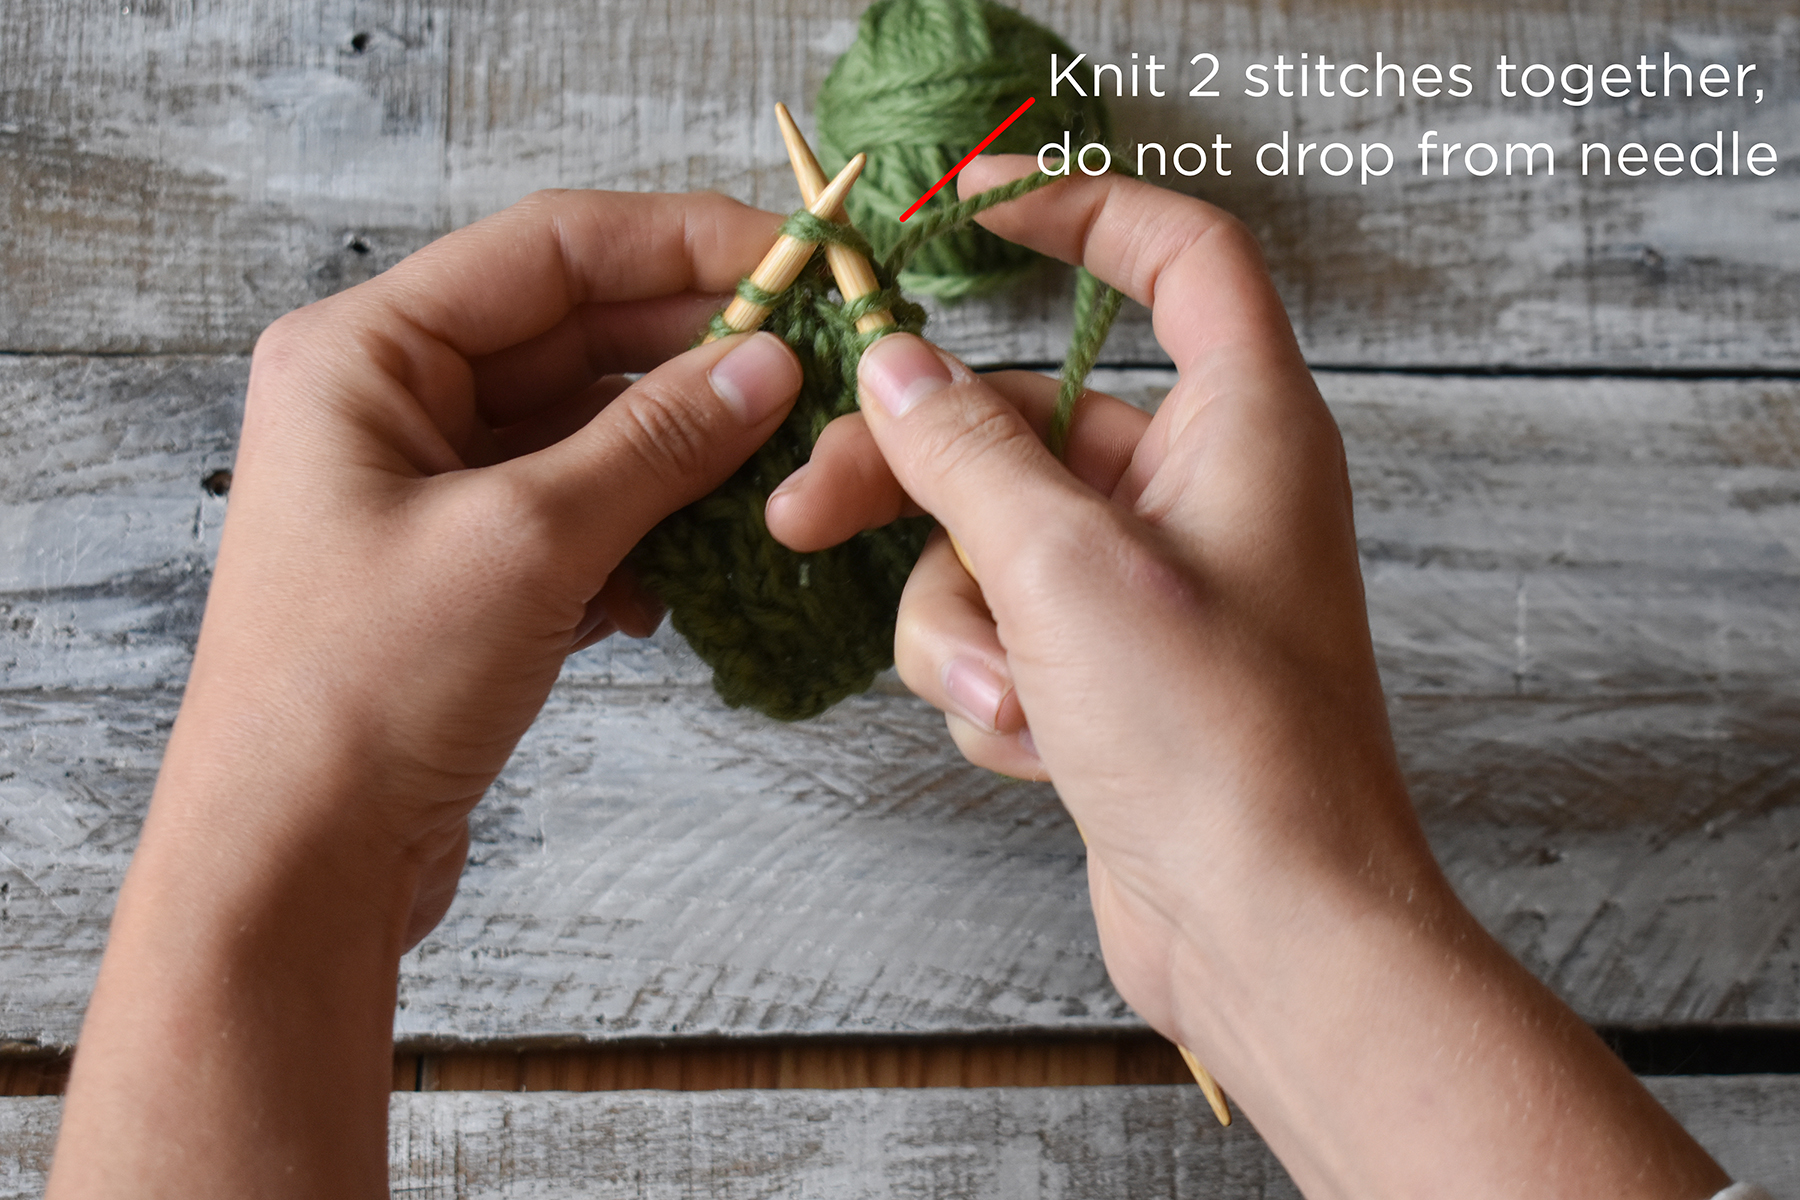
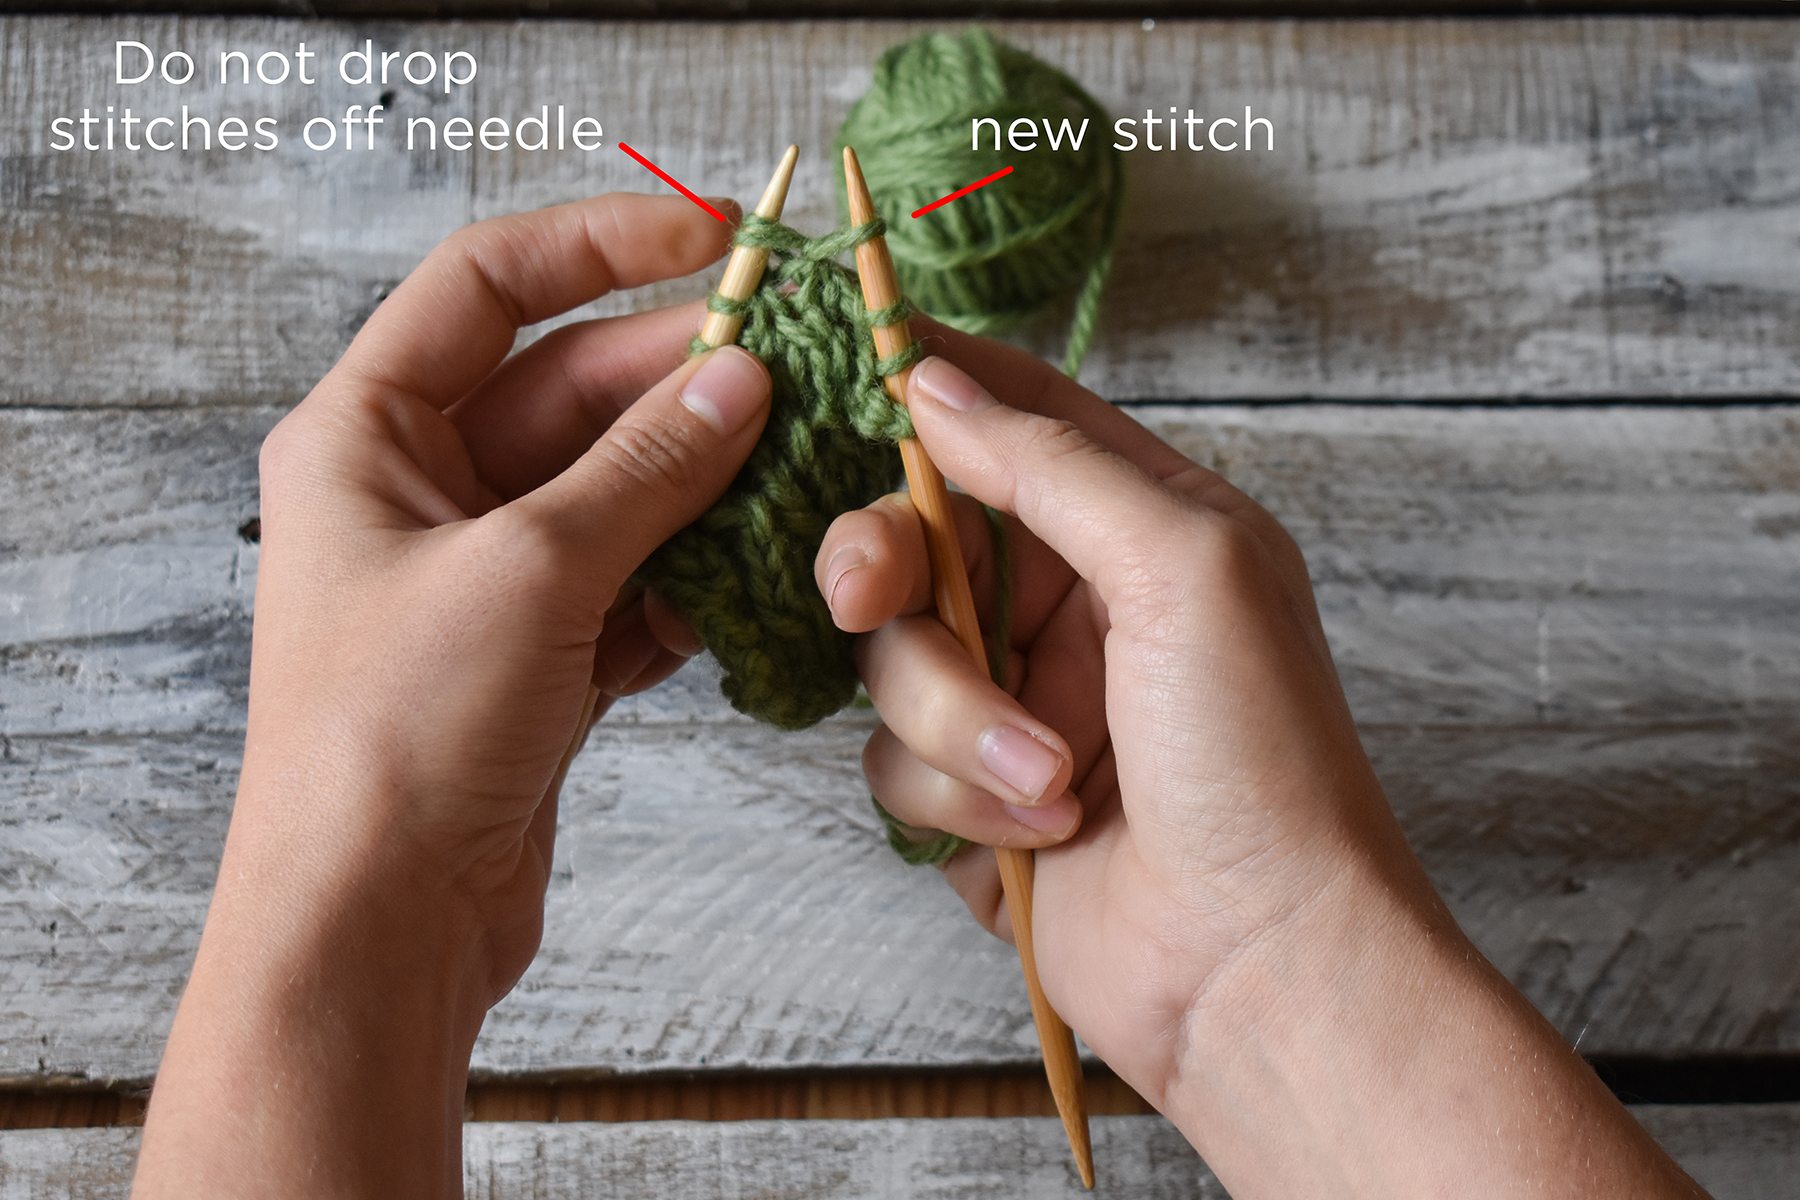
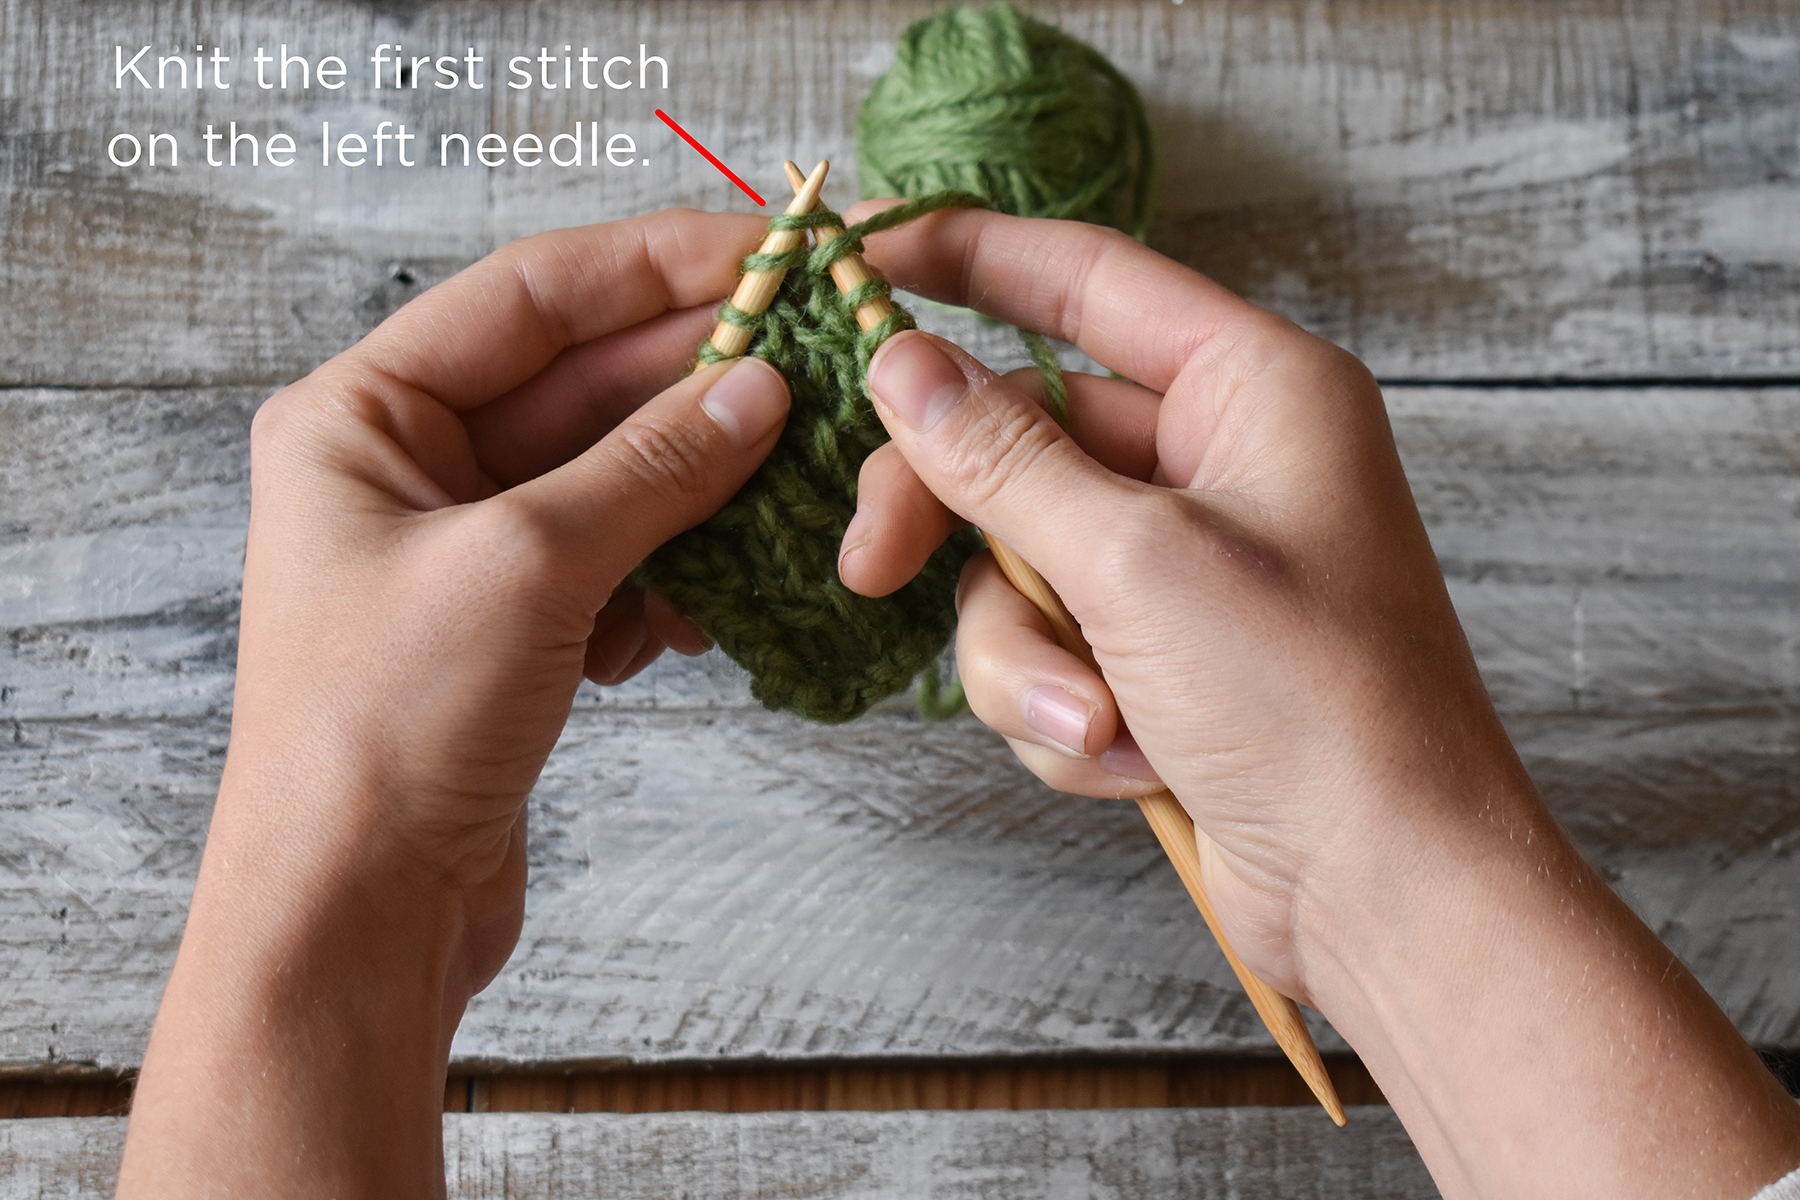
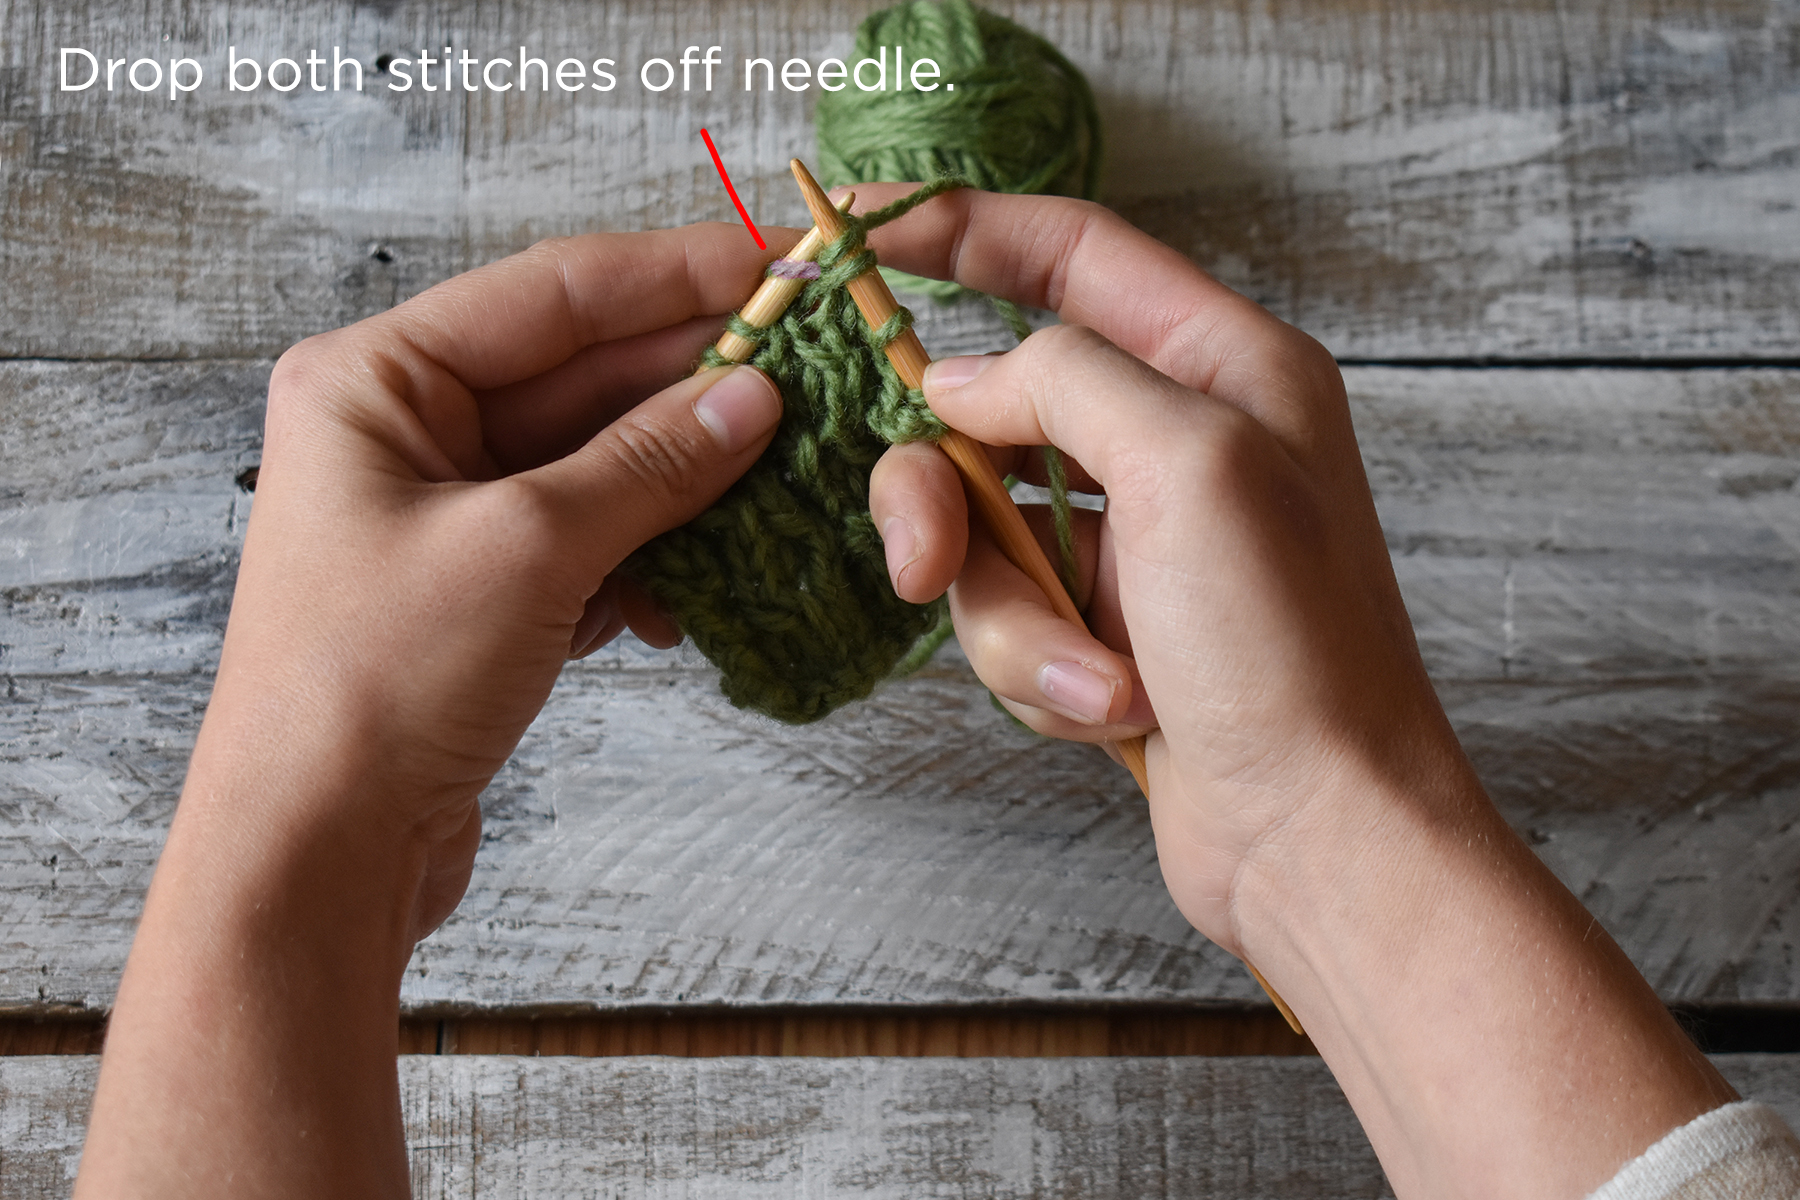
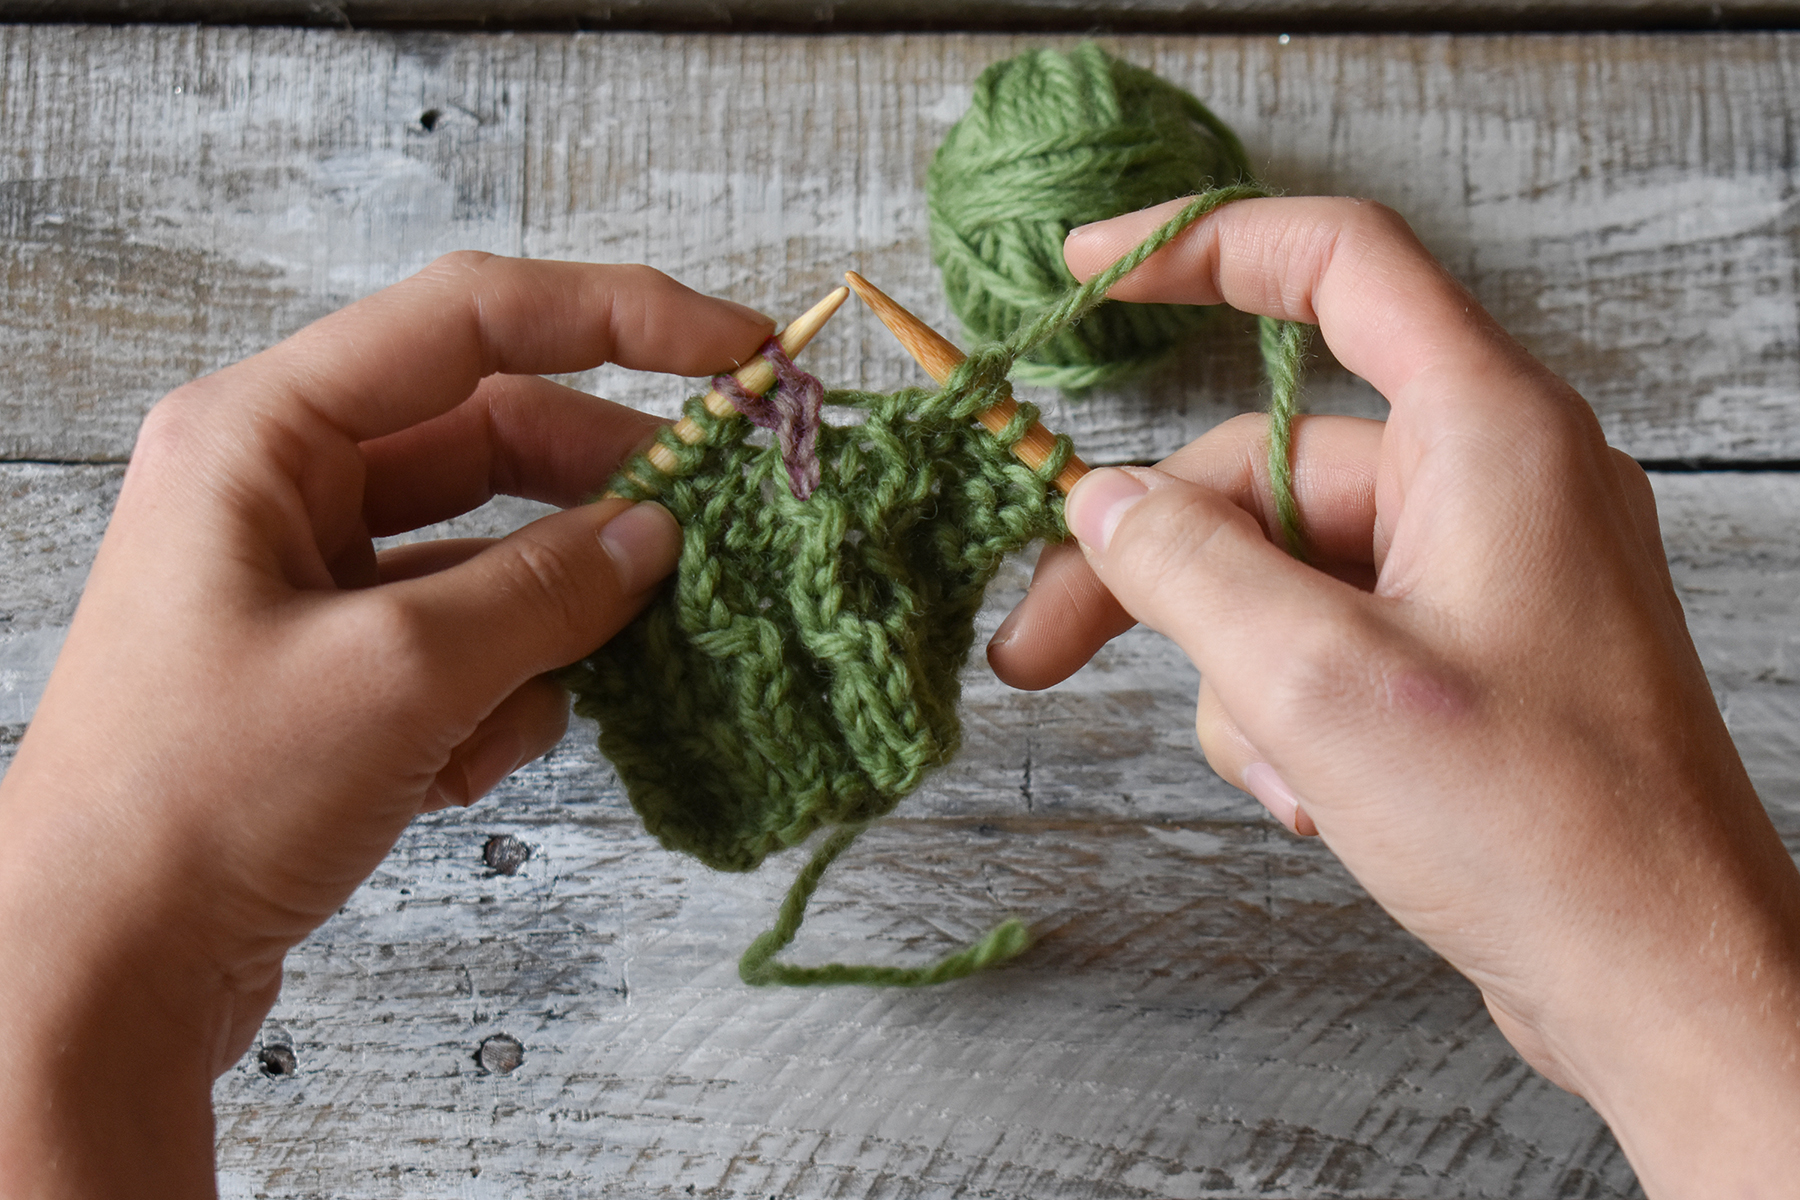
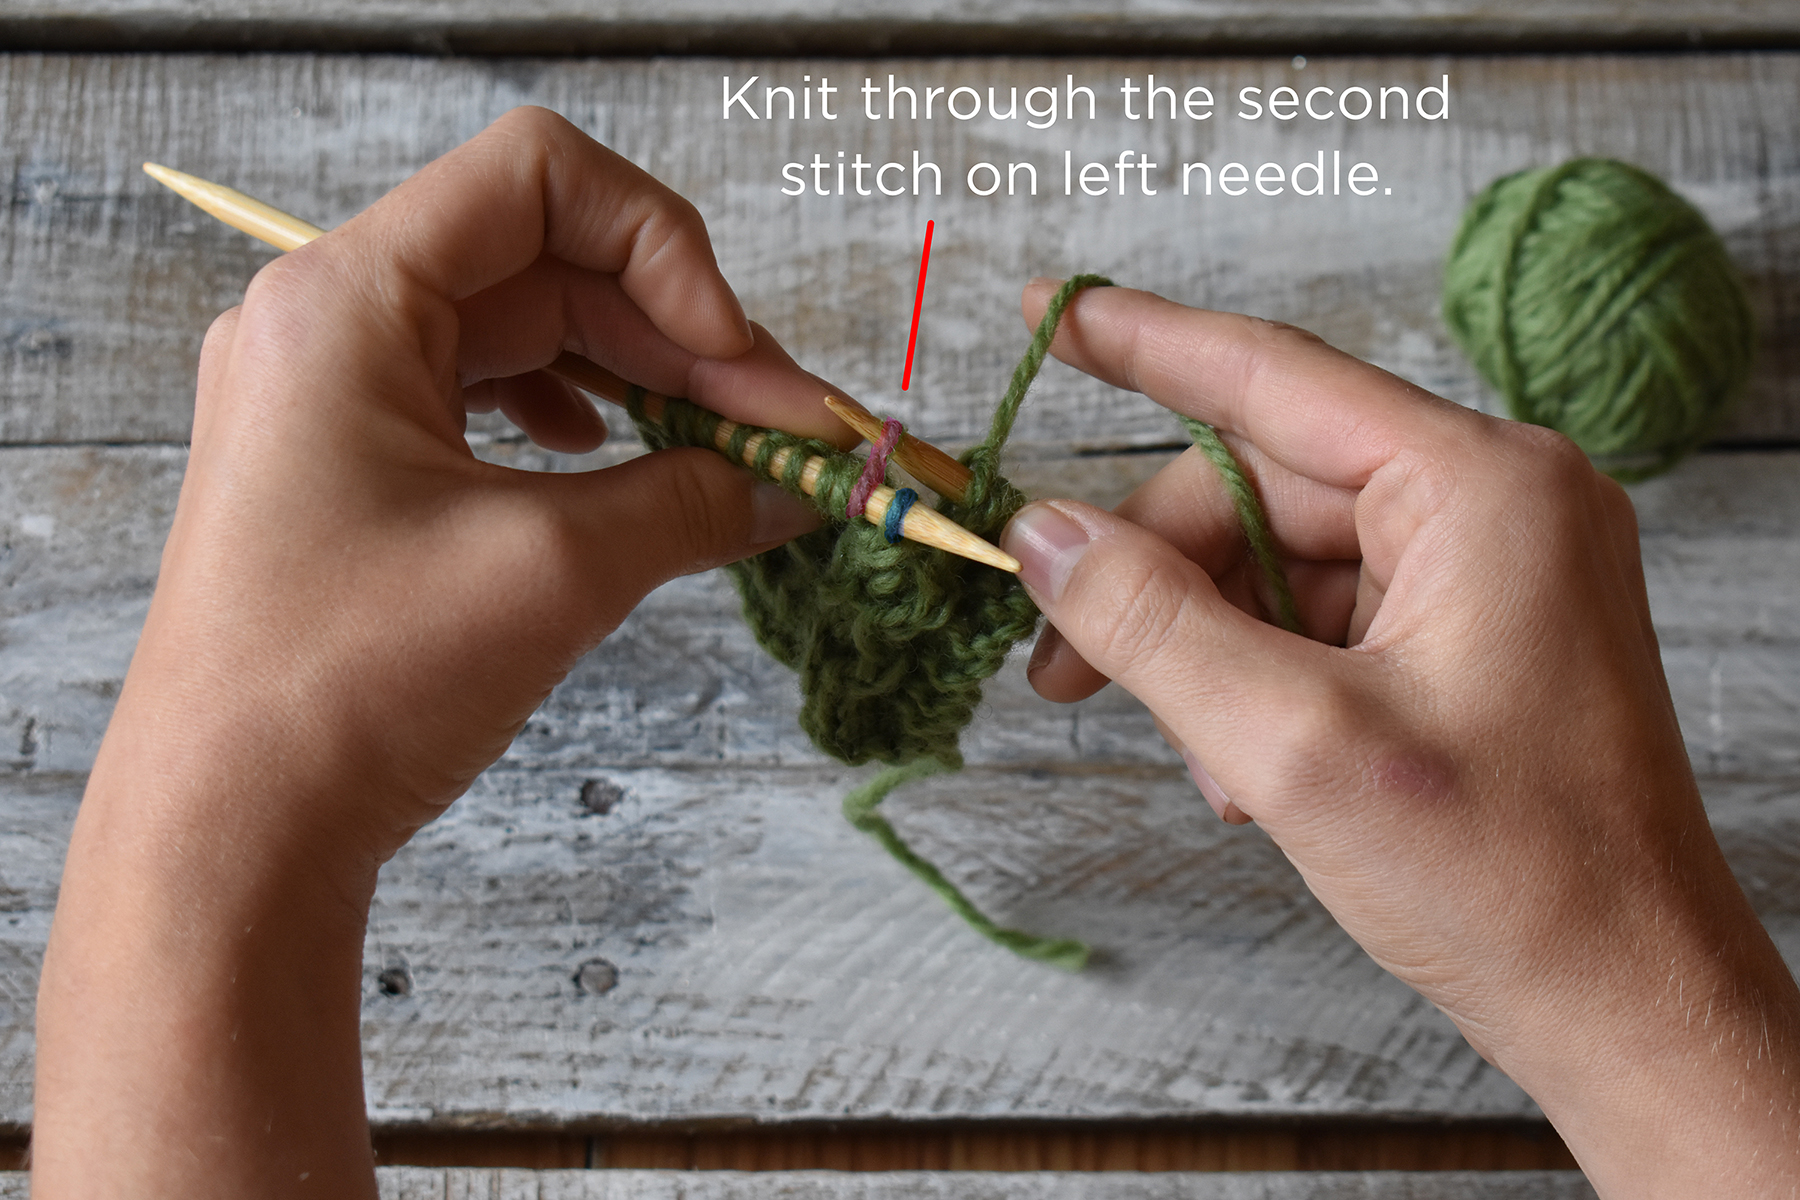
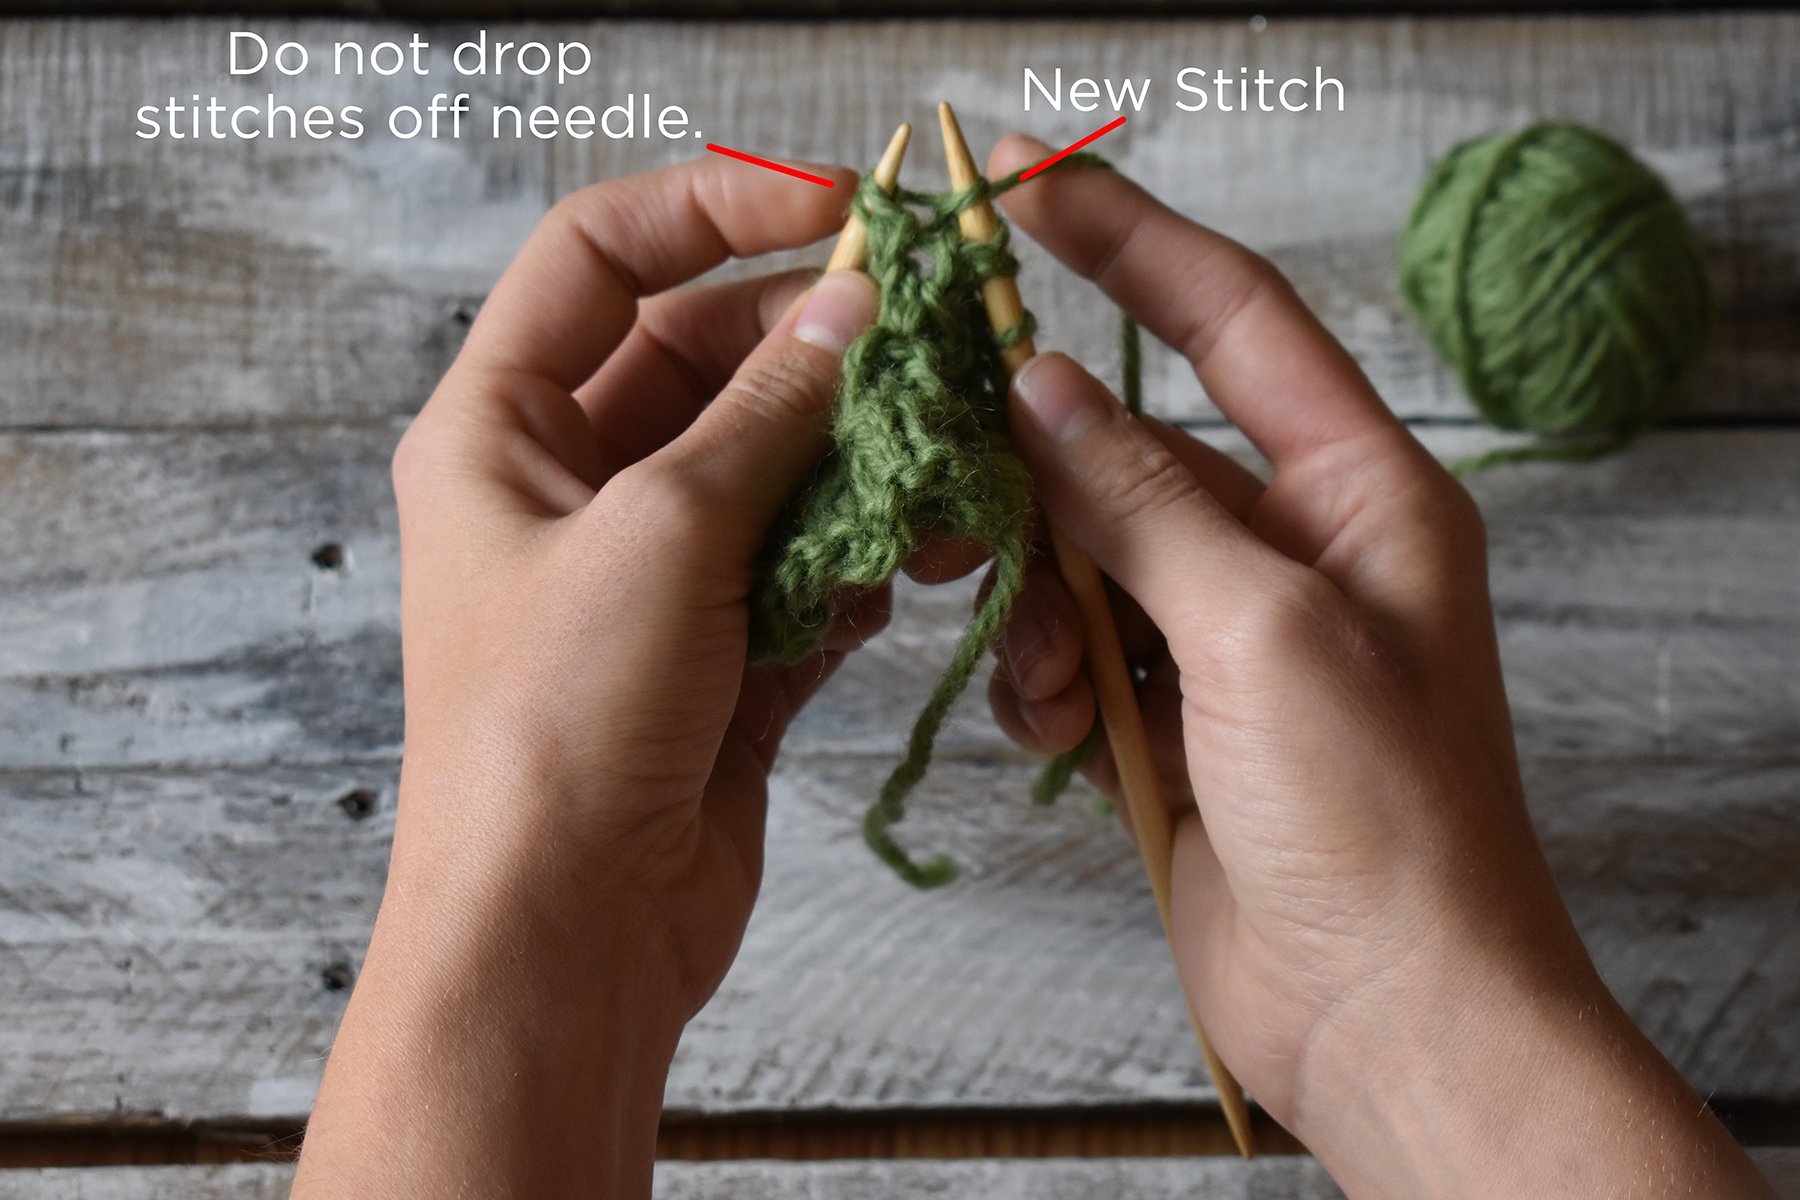
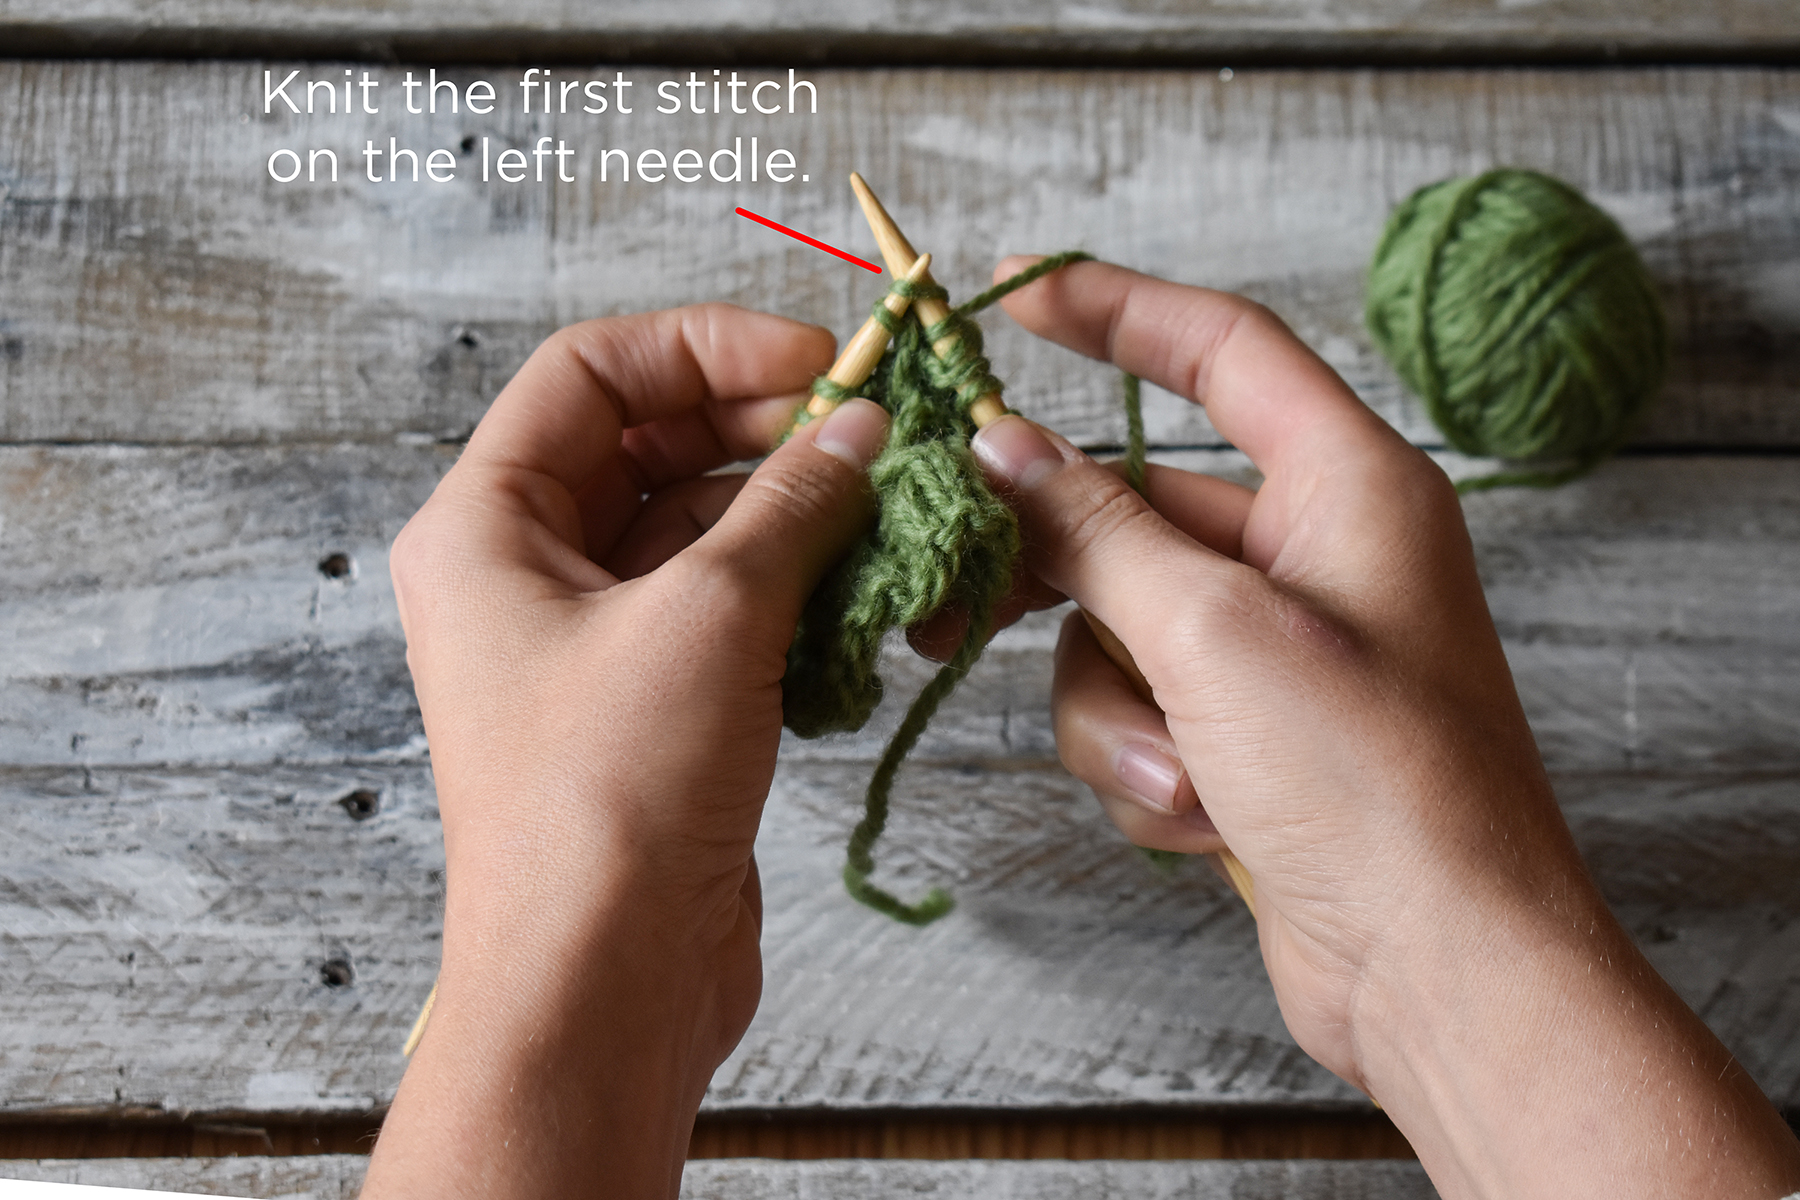
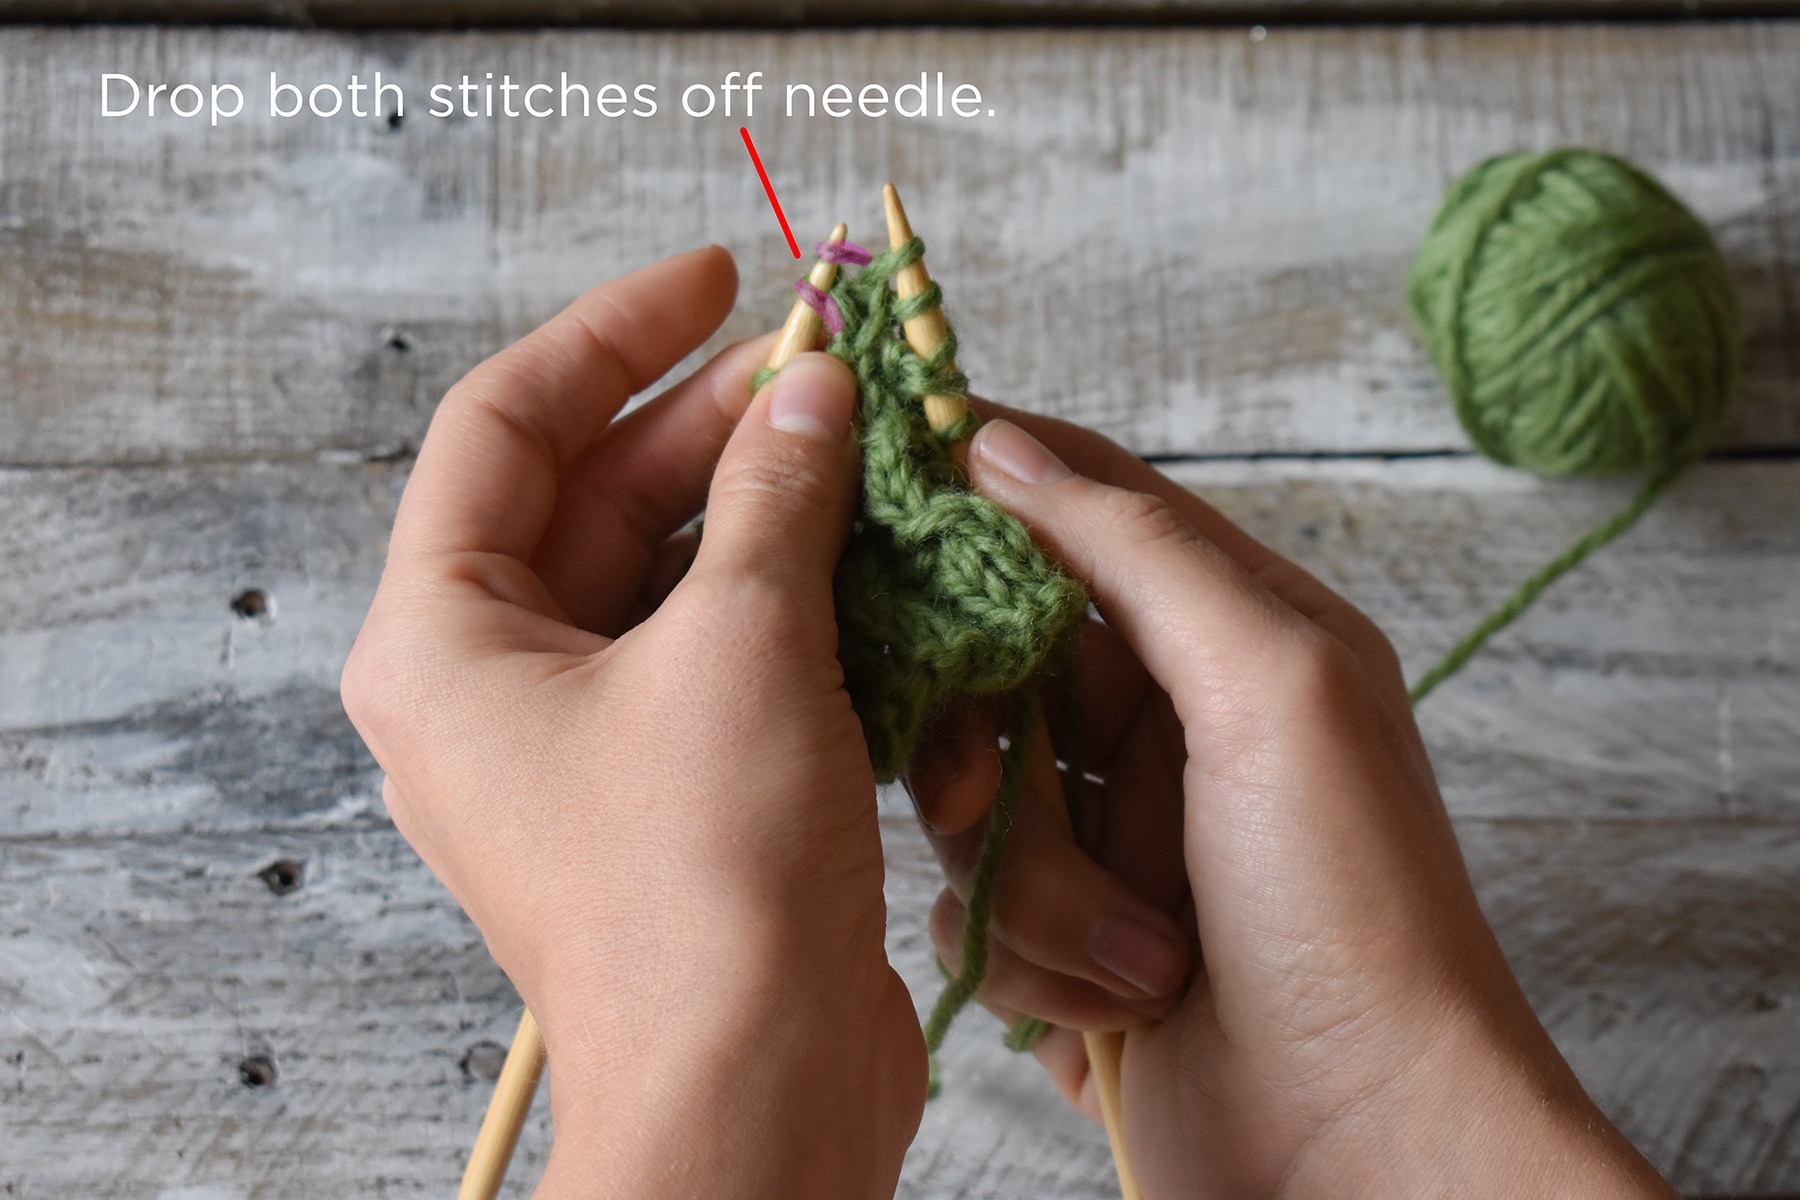
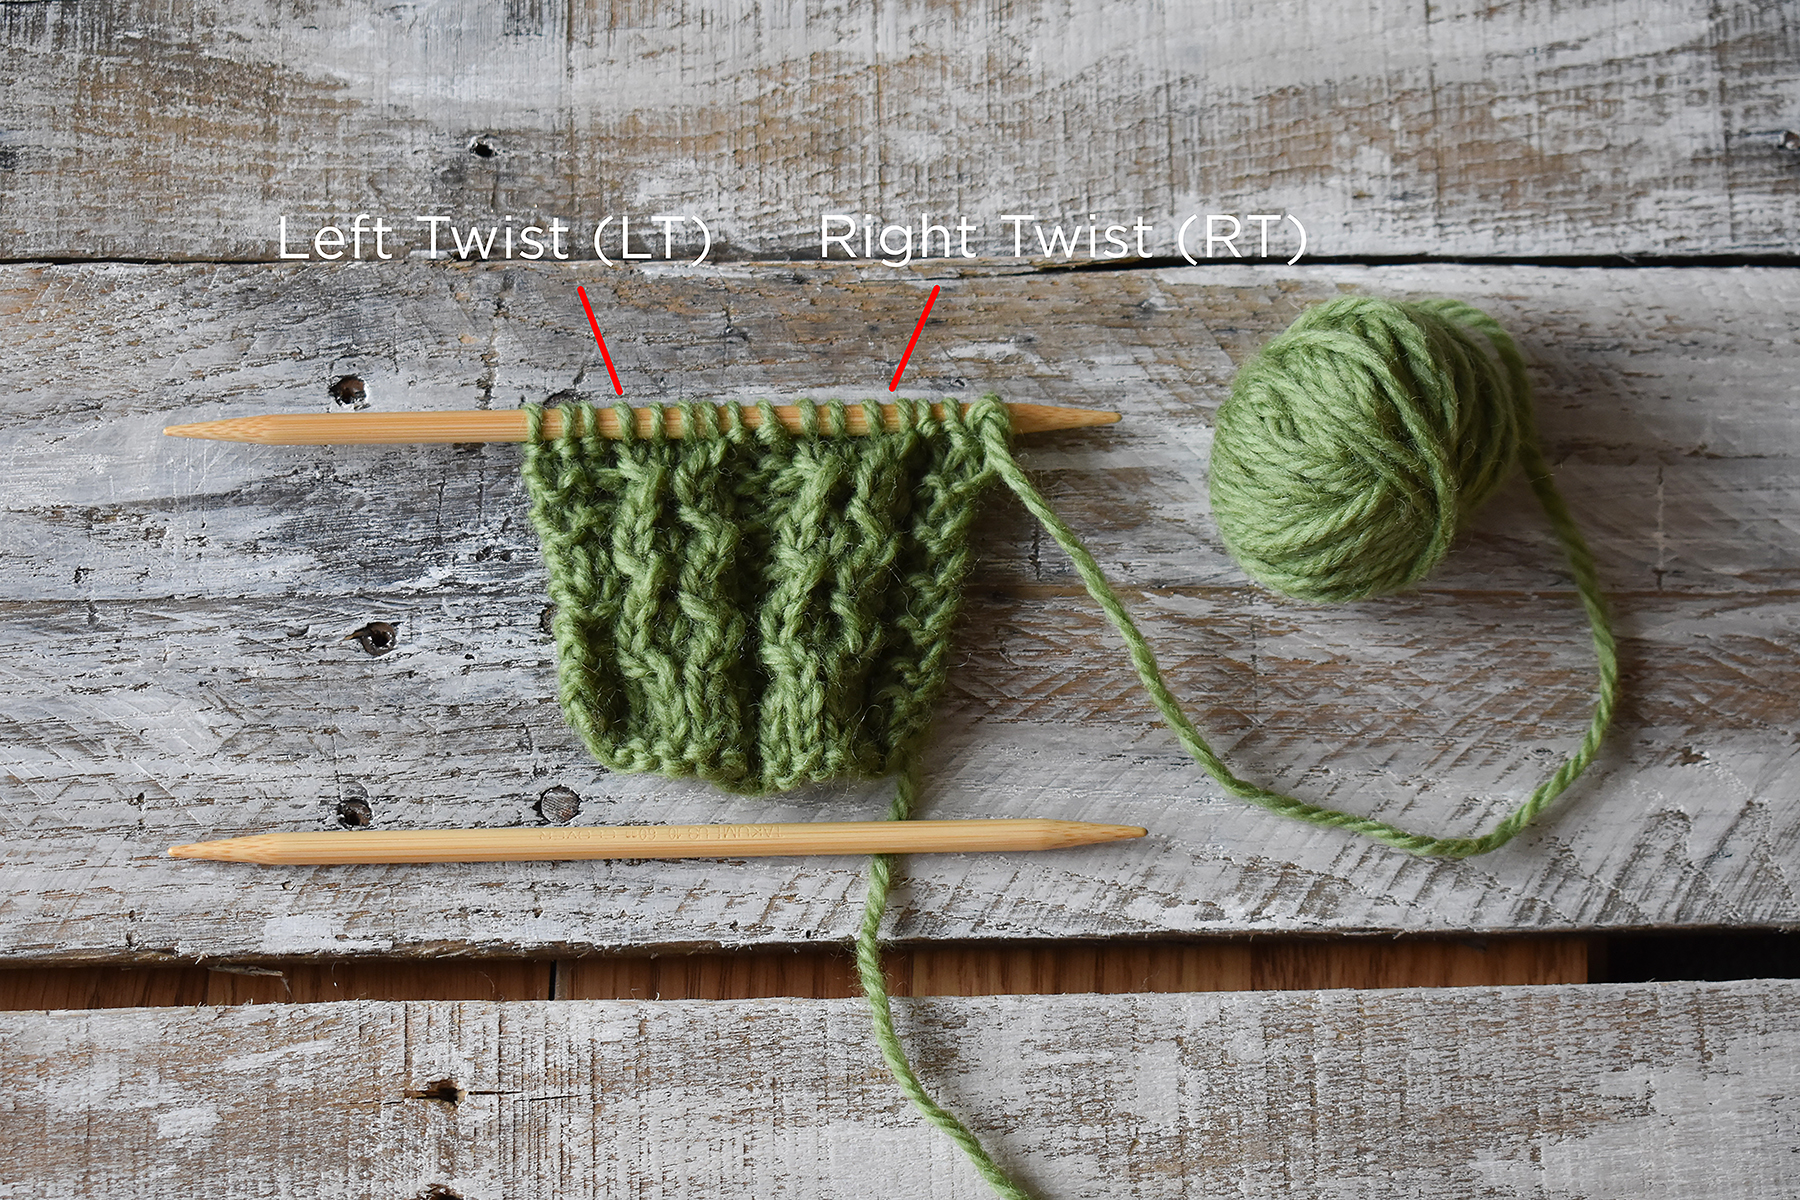
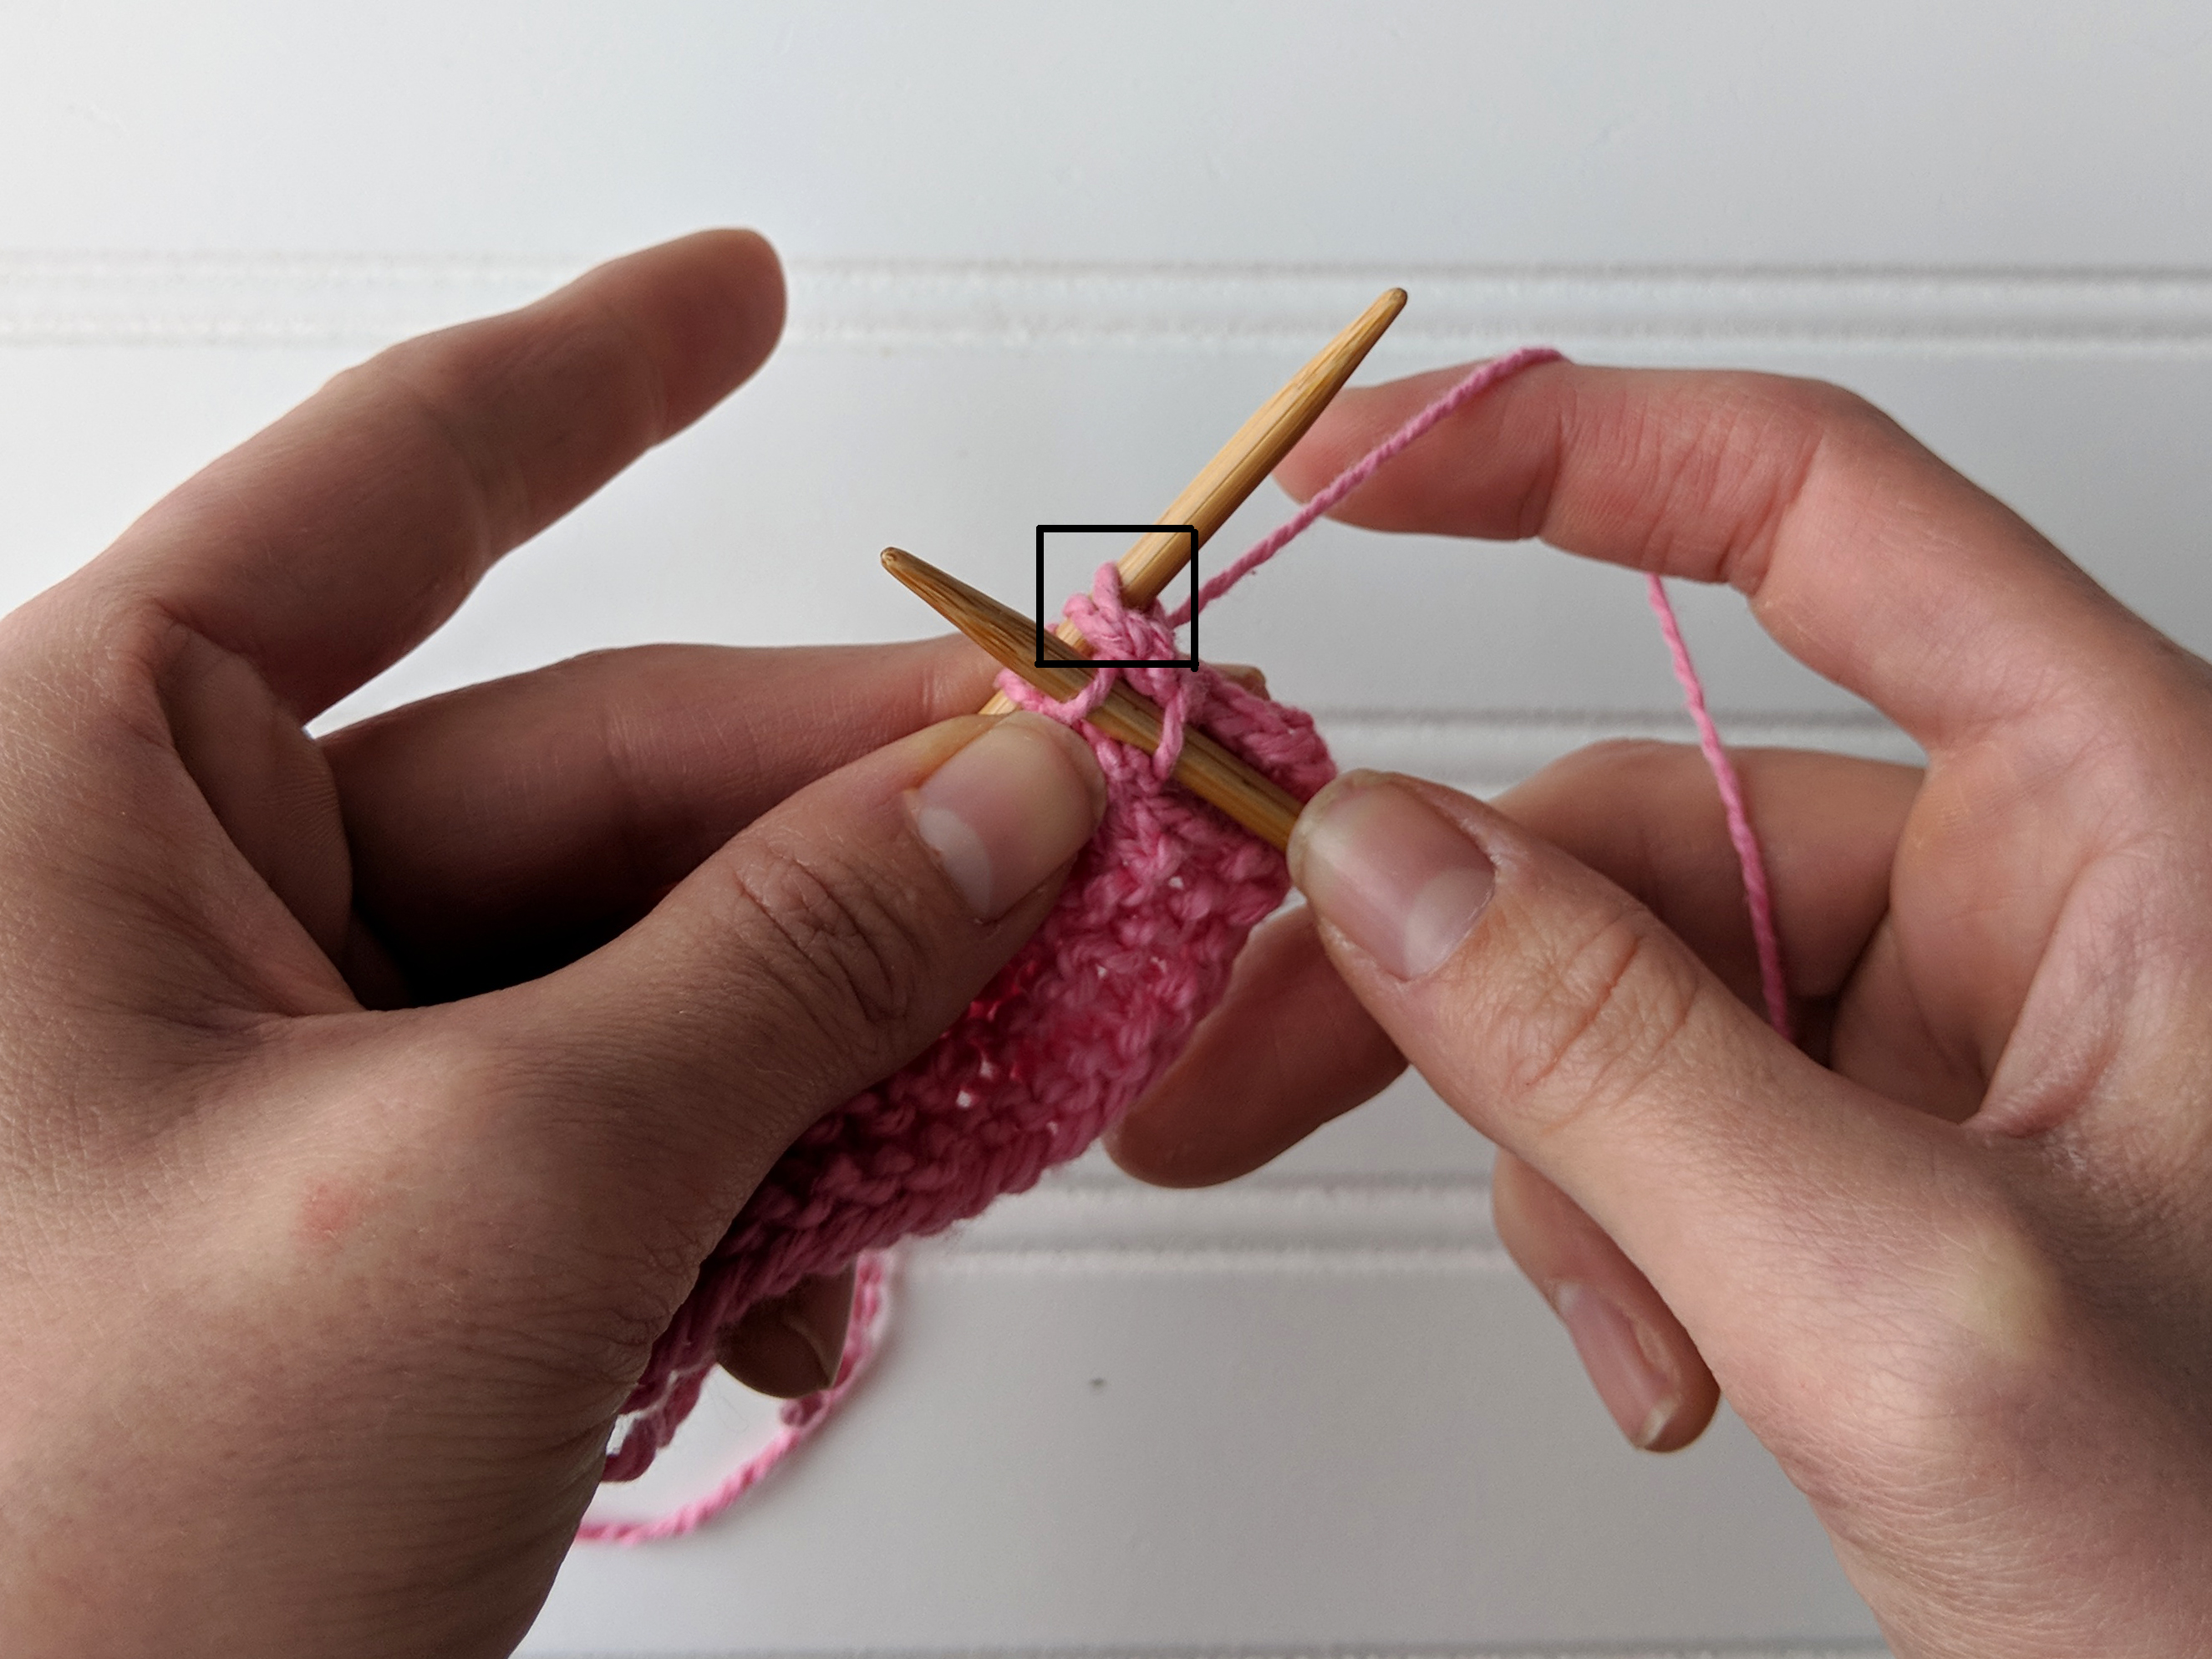
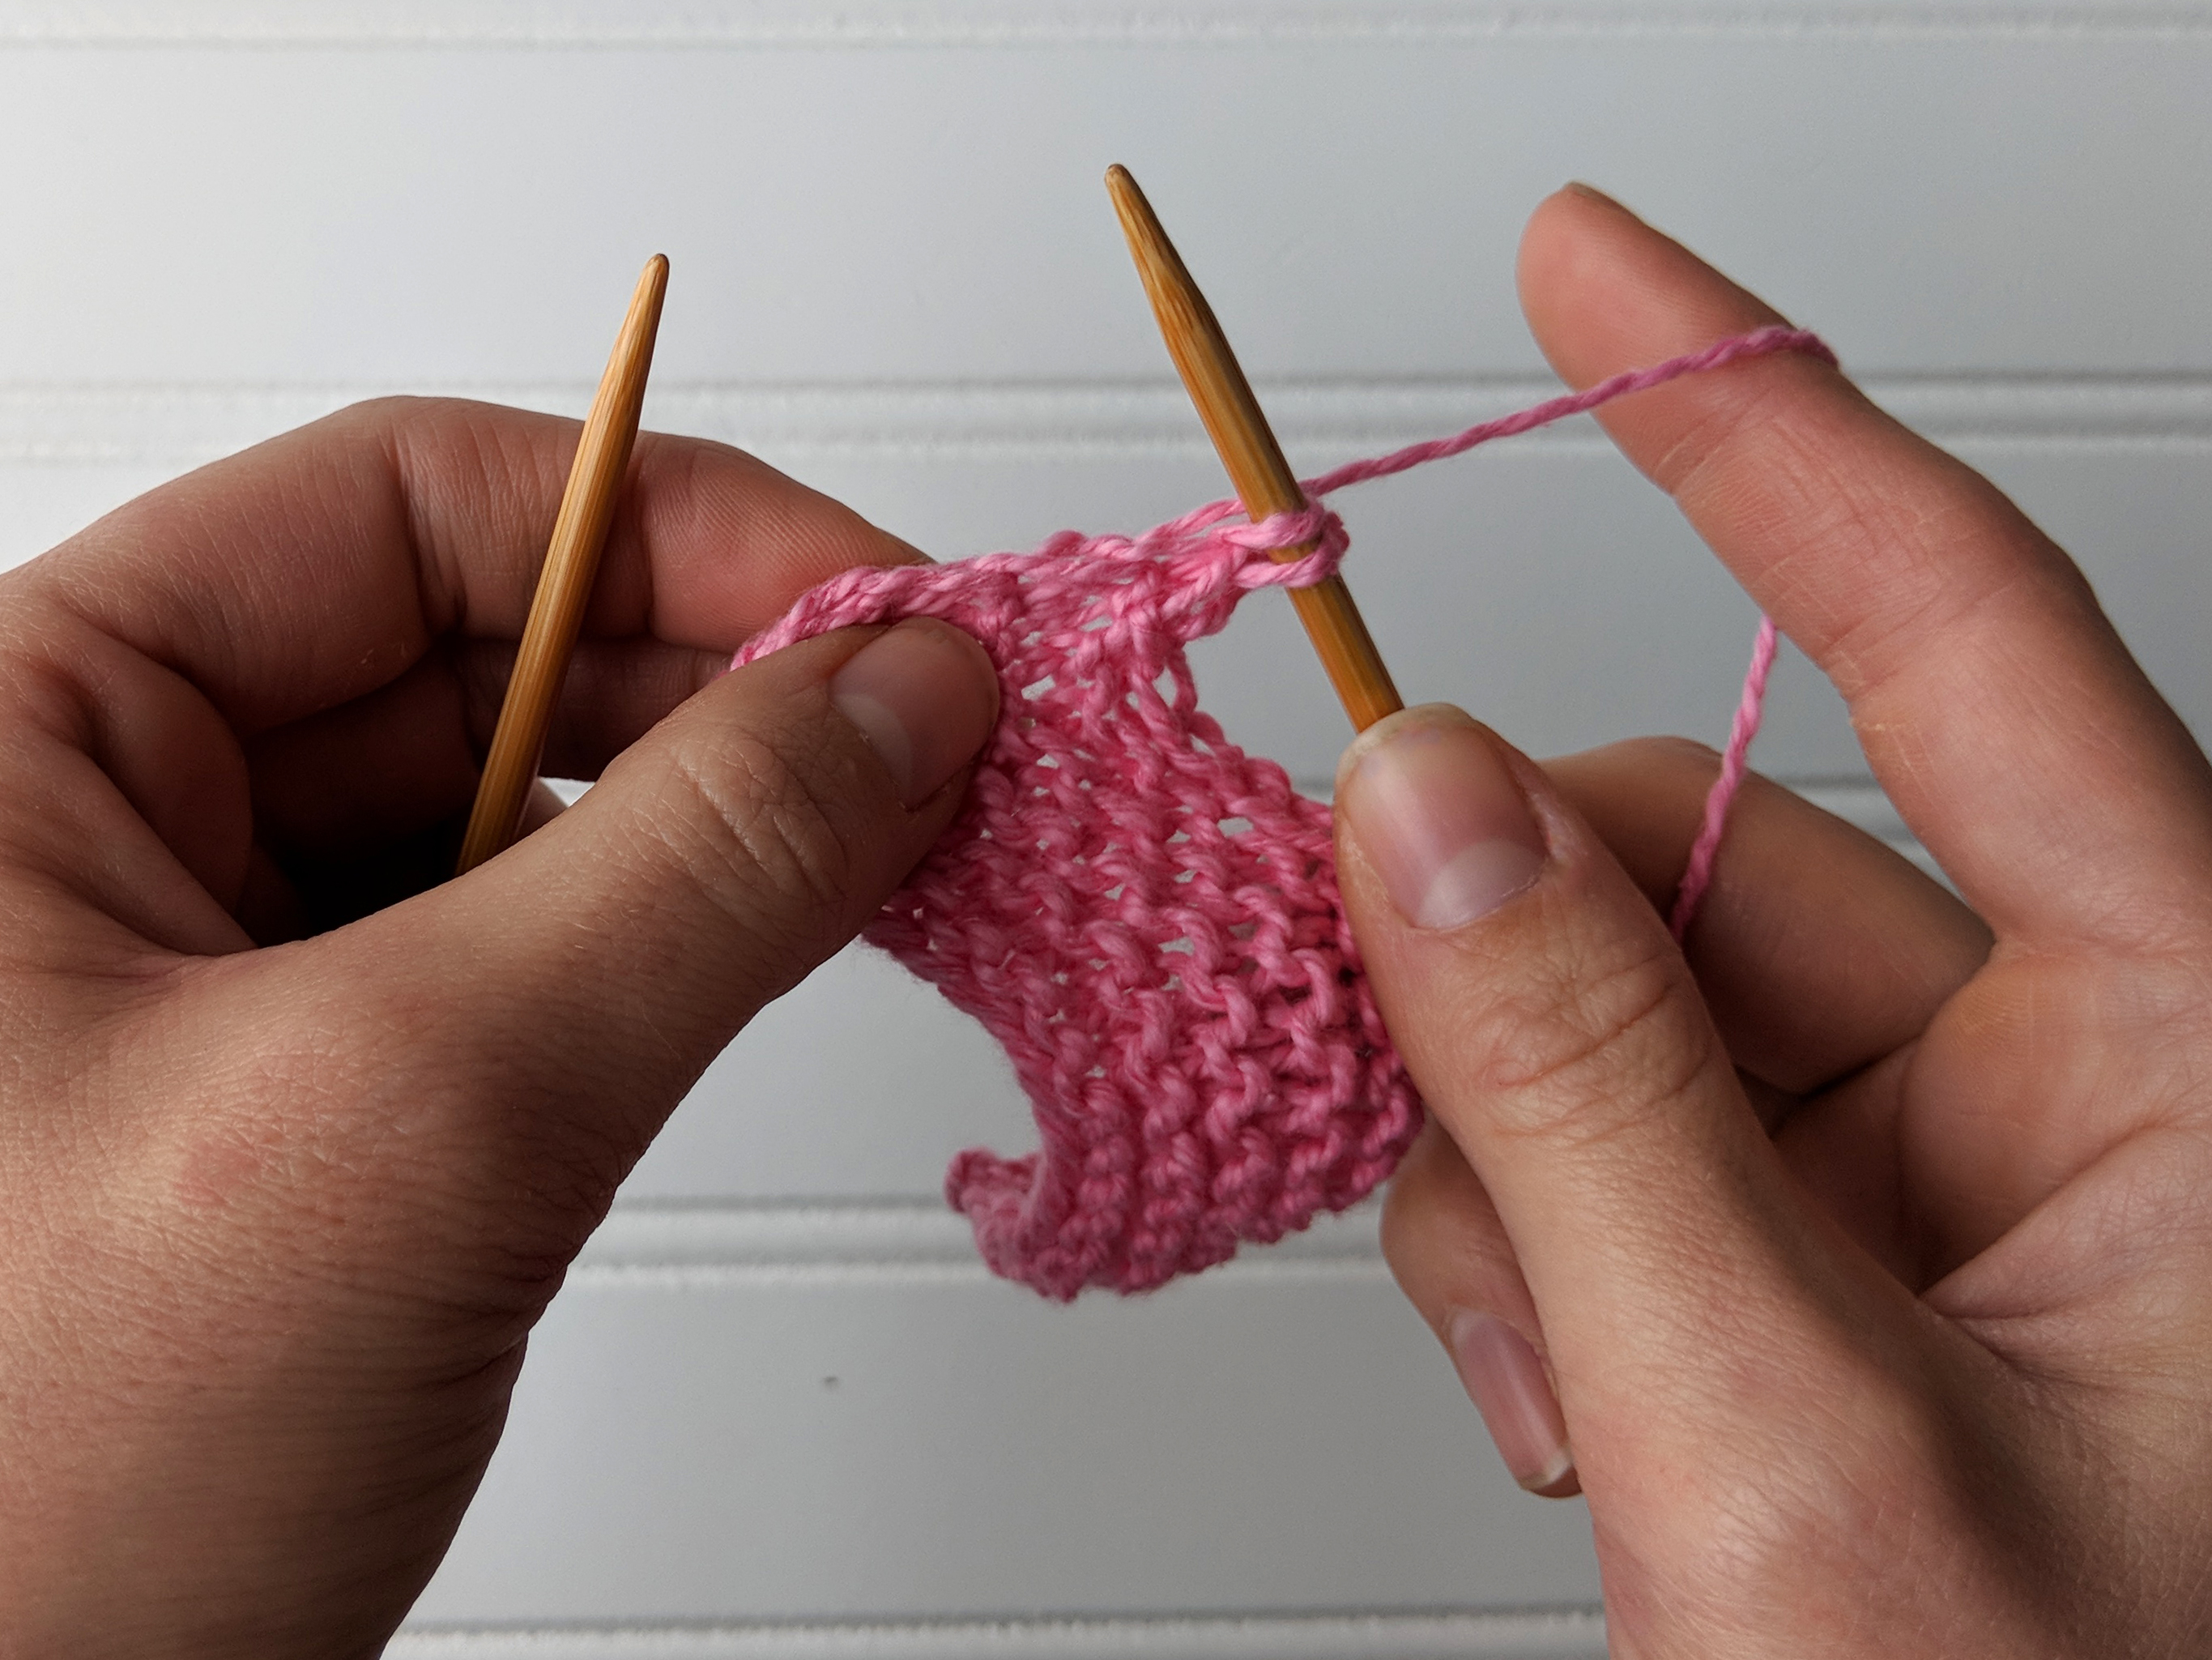
Right TwistStart by making a swatch. Swatches are not only crucial for getting the finished item you want but are also great for practicing new stitches. Work in your pattern until you’ve reached the two stitches you need to twist. I’ve highlighted these stitches in purple so it’s easier to see. We want to change the position of these two stitches by moving the left stitch over the top of the right stitch.Begin by knitting two stitches together, but do not drop the stitches from your needle. As you can see, the two stitches remain on the left needle, but there is now a new stitch on the right needle. Next, knit the first stitch on the left needle. Drop both of the stitches from the left needle. You now have completed the Right Twist, and have two new stitches on the right needle. Easy, right?Left TwistWork in your pattern until you’ve reached the two stitches you need to twist. I’ve highlighted these stitches in purple so it’s easier to see. We want to change the position of these two stitches by moving the right stitch over the top of the left stitch.The first step is to knit only the second stitch on the left needle. This stitch is highlighted in purple. As you can see, the first stitch on the left needle remains in place. After knitting the second stitch, do not drop the stitches off the left needle. Next, knit the first stitch on the left needle. Drop both of the stitches from the left needle. You now have completed the Left Twist, and have two new stitches on the right needle.Here is what each set of twisted stitches will look like. Notice that the Left Twist leans to the left, and the Right Twist leans to the right. In the Trinket Socks, Right Twists and Left Twists are alternated to create an undulating panel.
The Right and Left Twists are a great addition to your knitting toolbox. You’ll find that they’re quite fun to work, and they can really make a stitch pattern interesting. I hope you’ve found this tutorial to be useful.
Notice those panels of twisted stitches – pretty!
Remember, you can find the Trinket Socks kit, as well as the rest of the 12 Days of Winter Kits at your local yarn store. Happy knitting!
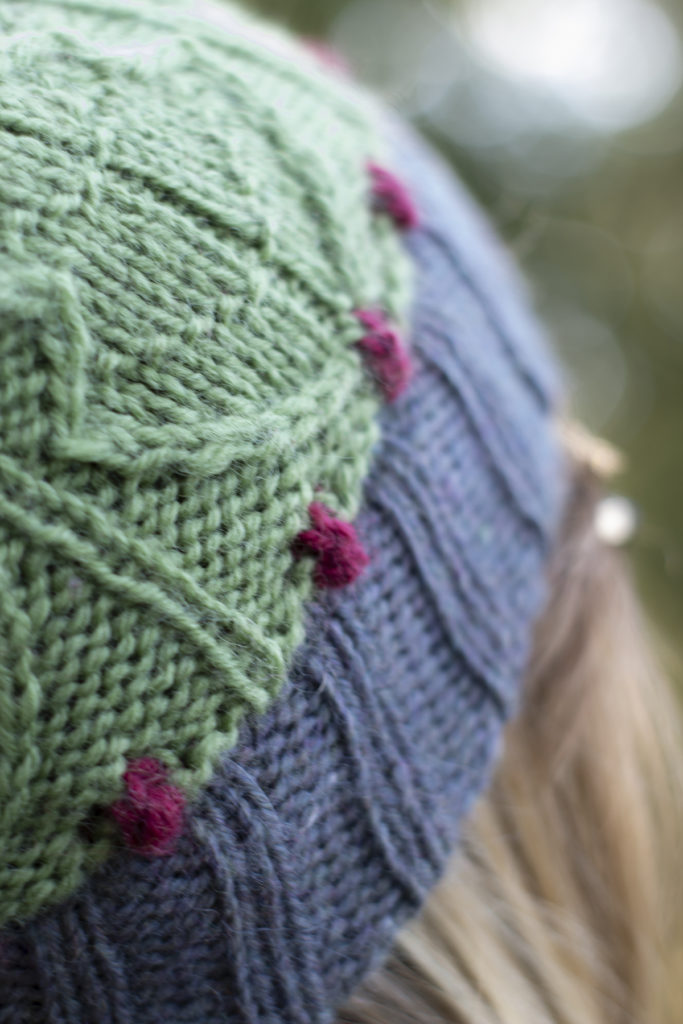
Seasons Greetings from the Universal Yarn Team! Today, we’re pleased to share a special free pattern with you for the Christmas season: the Carolina Holly hat (pattern link)! Holly – like poinsettias, mistletoe, and ivy – conjures images of the holidays. The spiky plant is evergreen and beautiful, and it was the inspiration for the Carolina Holly hat.
Playing with pine cones, as one does.
This free pattern is a load of fun to knit. It takes three skeins of Deluxe Worsted – and that’s enough to make two hats. Of our line of yarns, Deluxe Worsted might just be my favorite. It’s excellent for every type of project, creates long-wearing fabric, and perfectly balances softness with the crunch of pure wool that I love. Plus, there are so many colors to choose from. For this hat I chose Sangria, City Turf, and Slate, but there are so many shades of red, green, and grey in the palette. I encourage you to find the combination that leaves you feeling inspired! Prefer superwash wool? You’re in luck – our machine-washable Deluxe Worsted Superwash would work perfectly as a substitute.
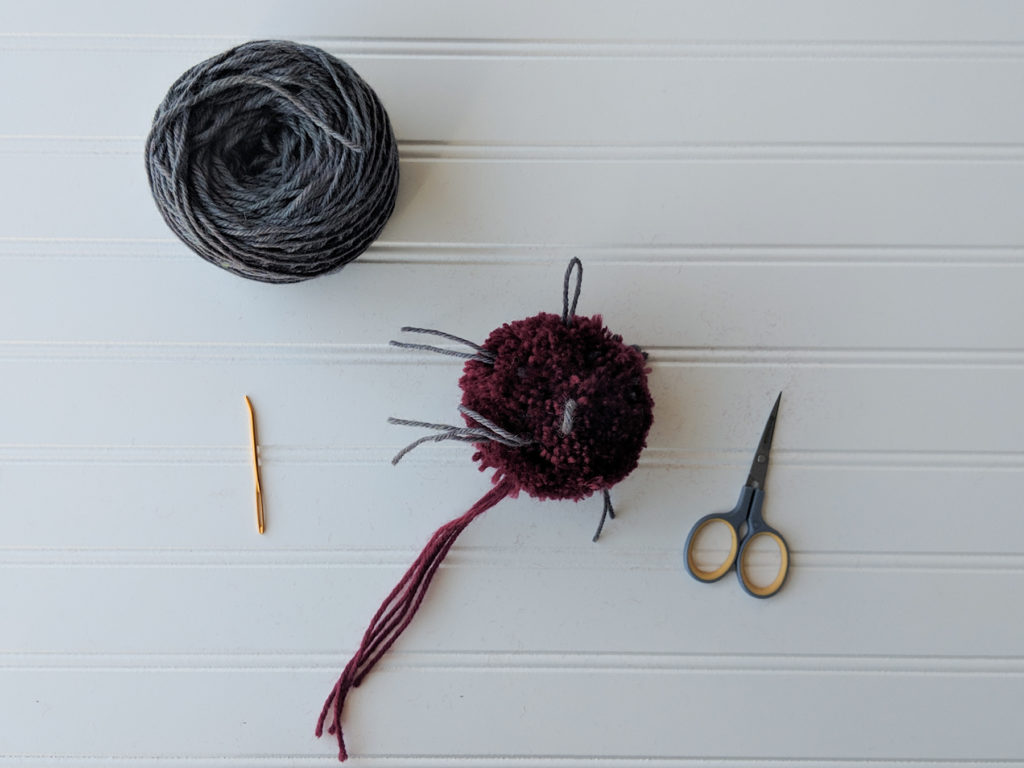
Baby Bobbles!
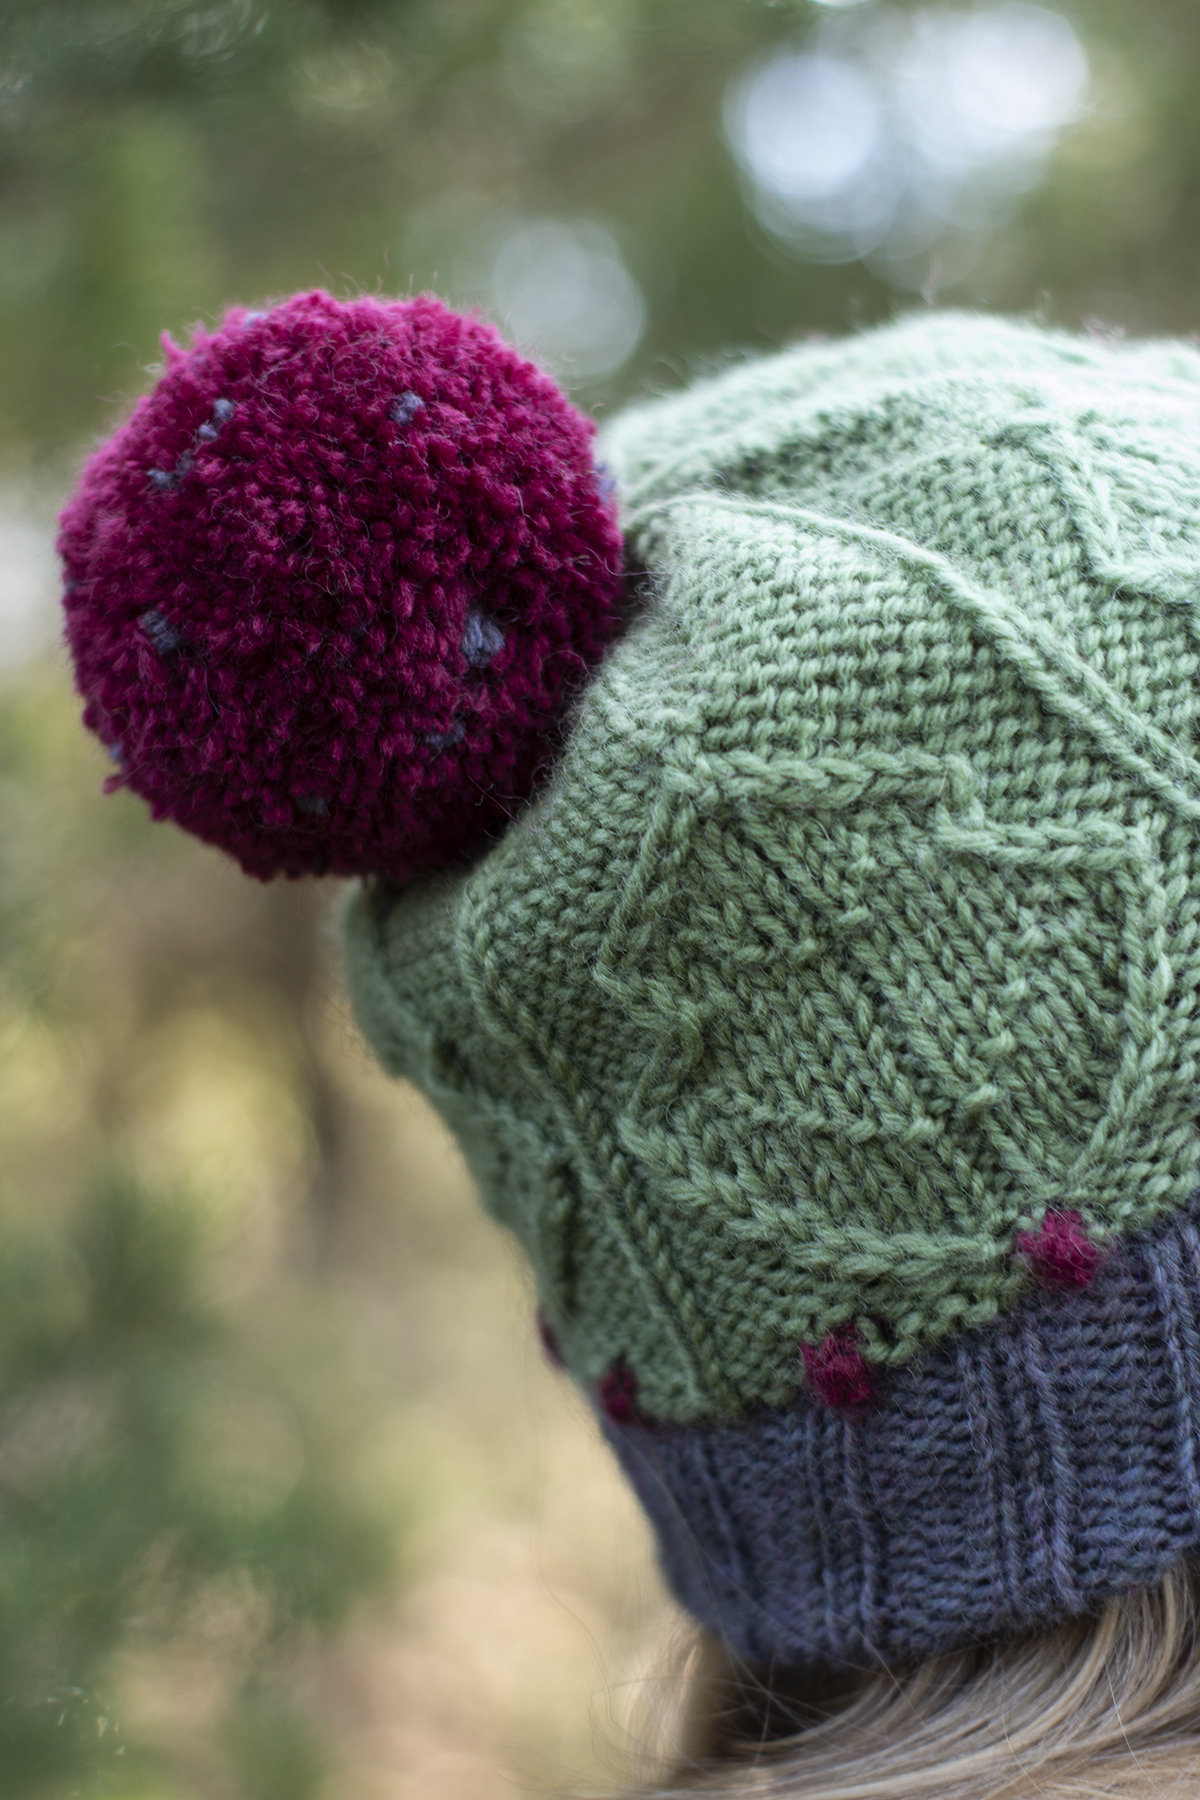
I wanted to give this hat some special touches. A double-thick brim ensures a warm and comfortable fit. A row of mini-bobbles knit in a rich red create little holly berries, and a large red pom-pom balances out the pop of red. Finally, to incorporate the grey used in the brim, the same color is used to add speckles to the pom-pom. The speckled pom-pom idea was not my own. I was inspired by designer Kiyomi Burgin, who has used this technique in her own work. You can find her post on speckled pom-poms here (link).
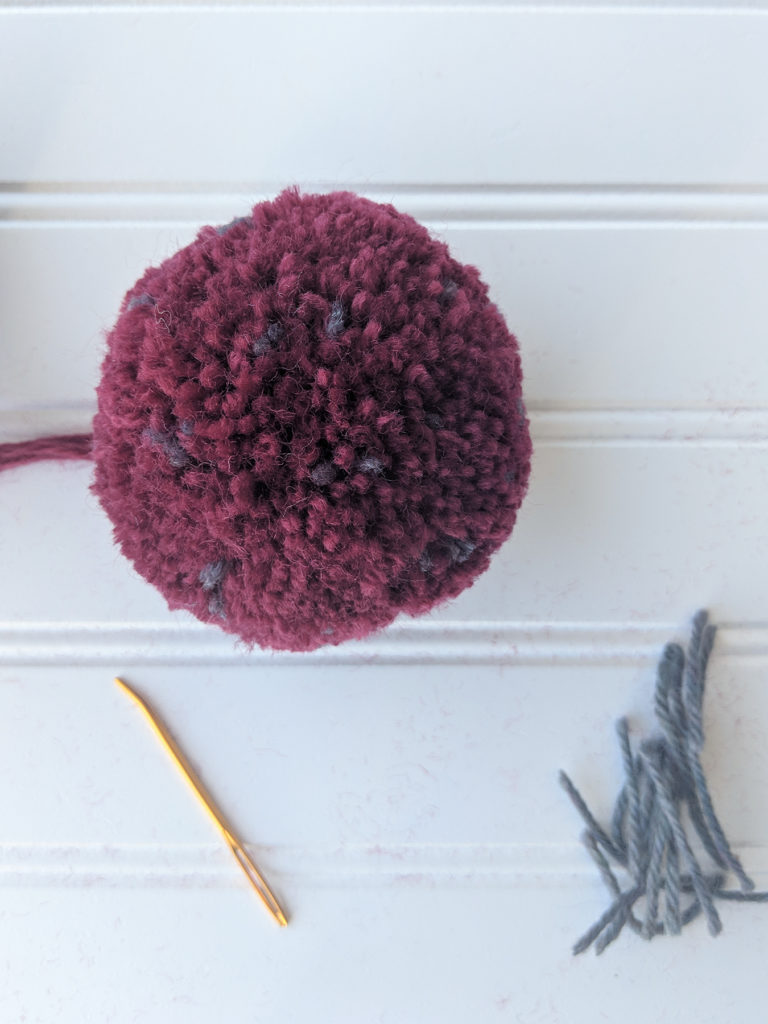
Subtle grey speckles in a big, poufy pom-pom – what’s not to love?
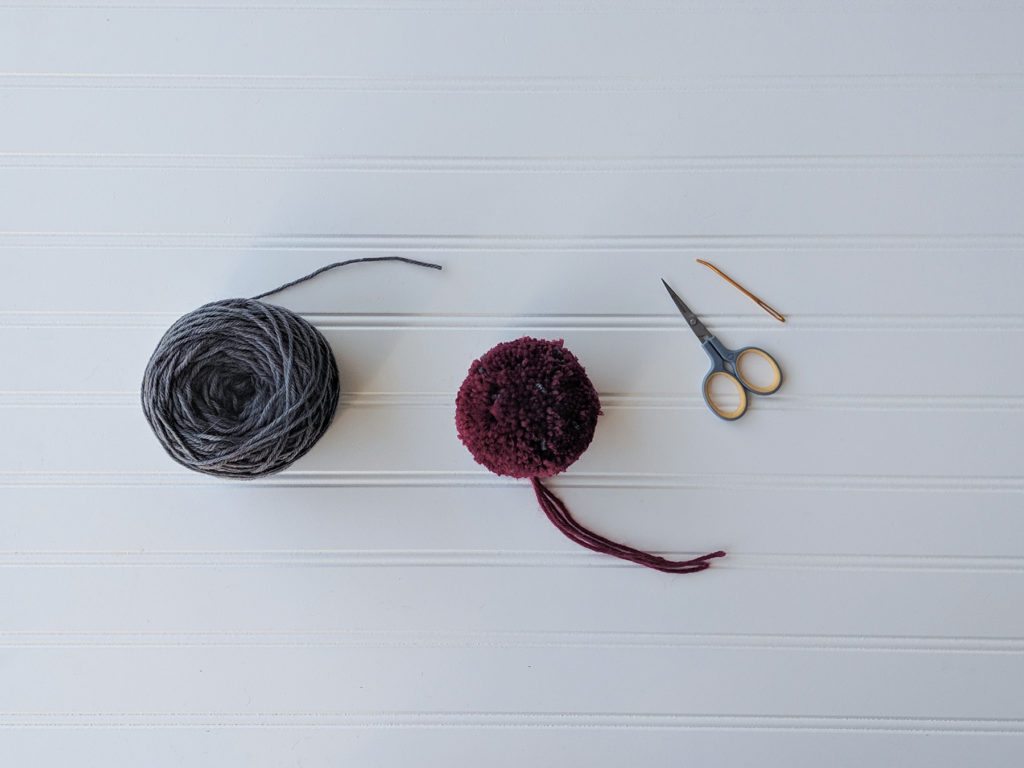
For your convenience, I’ve also created a tutorial. I hope you find it to be helpful! You’ll need to make your pom-pom before starting. If you haven’t done this before, don’t worry! You can find Amy’s tutorial on how to make pom-poms here (link).
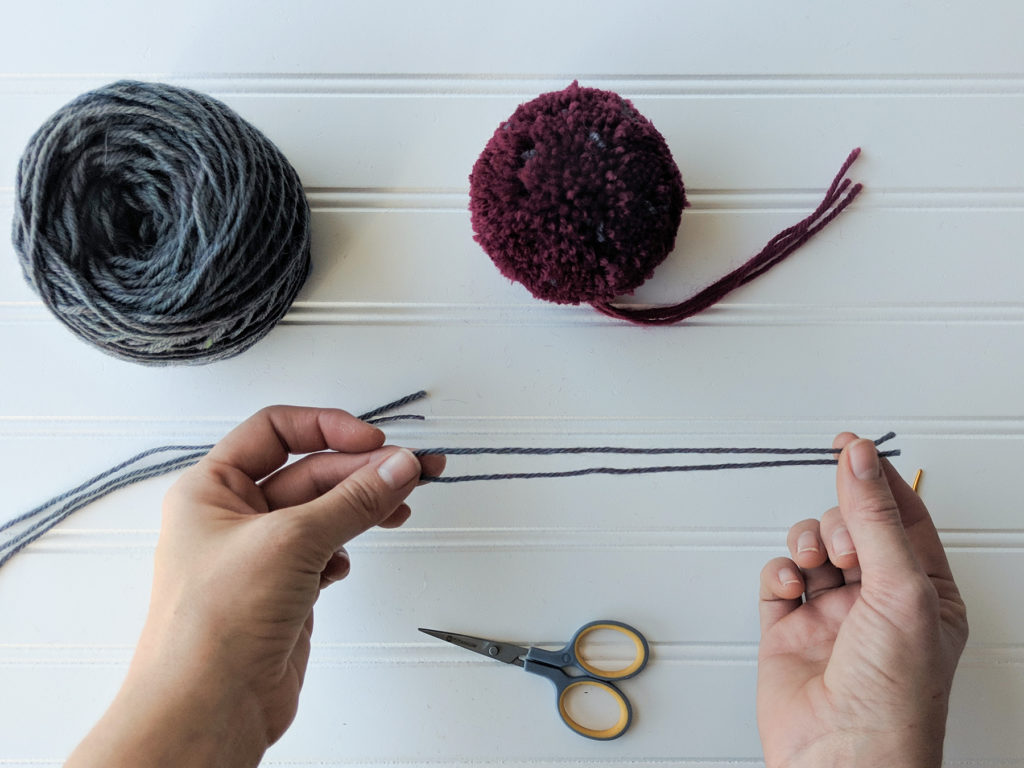
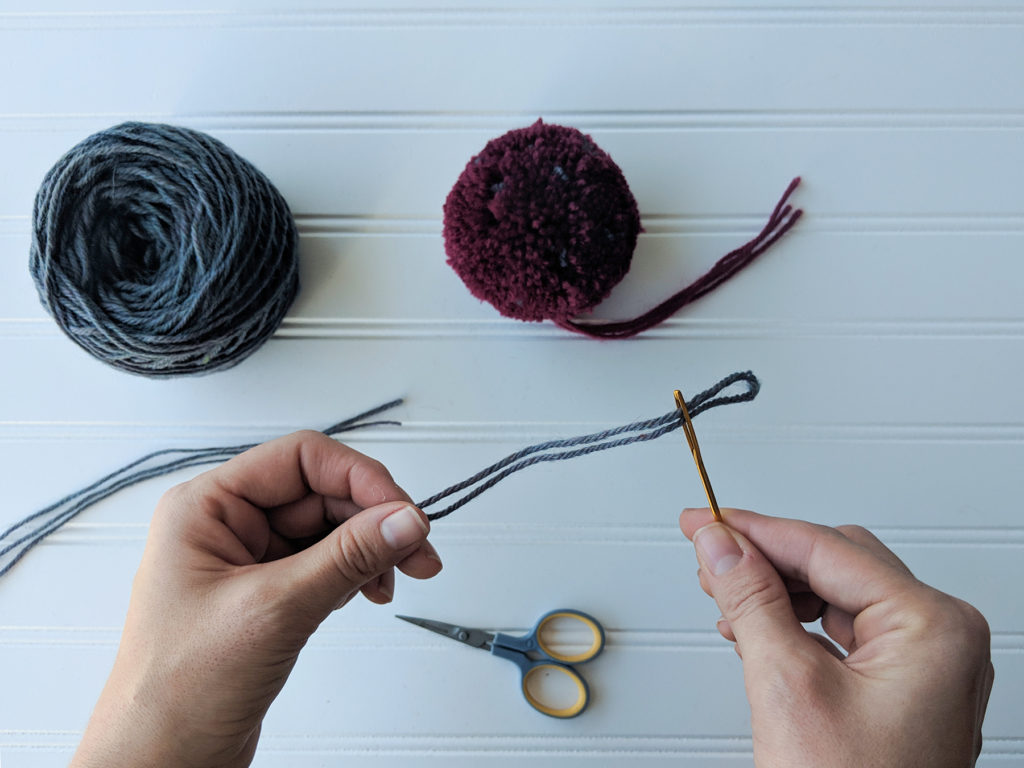
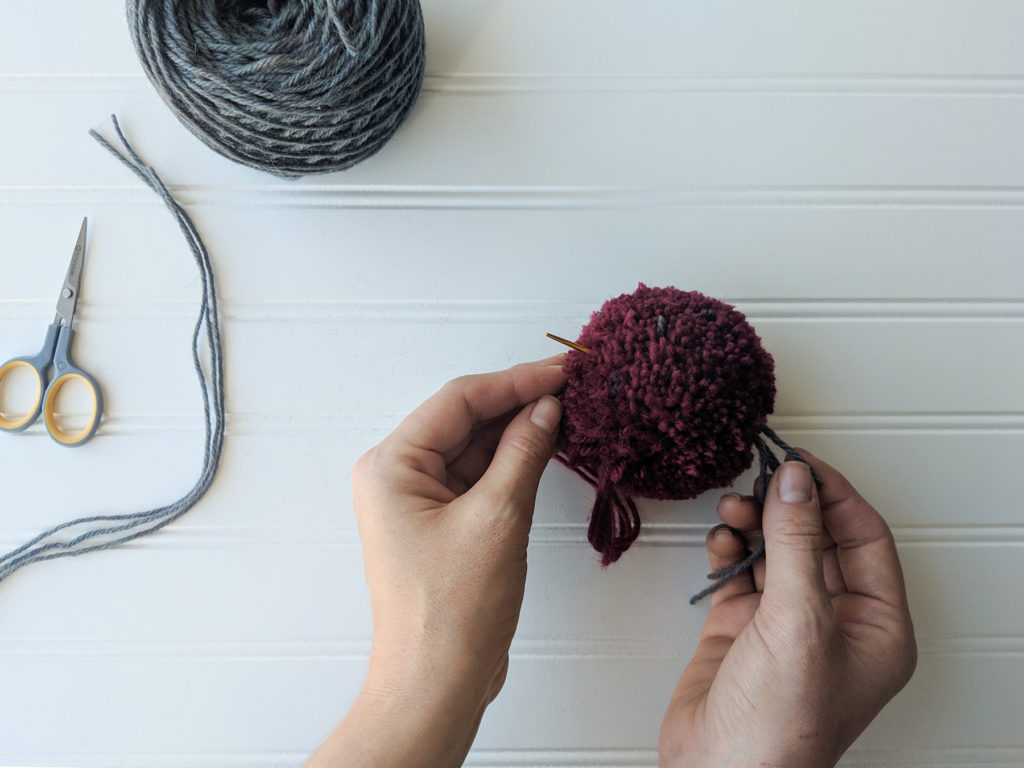
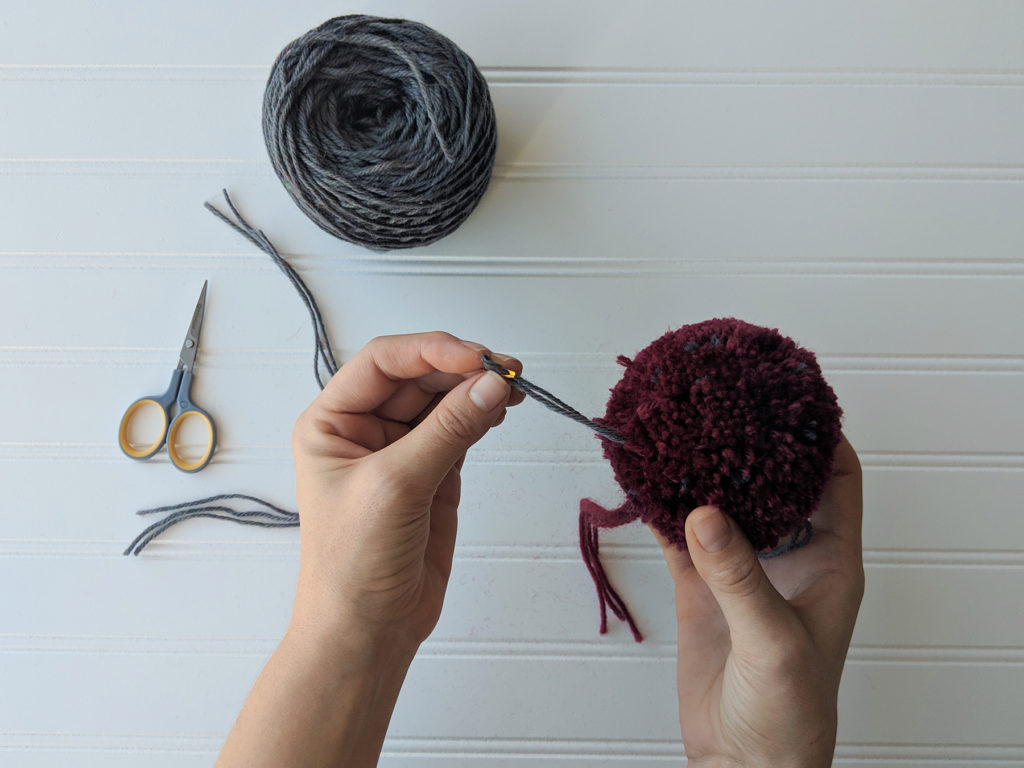
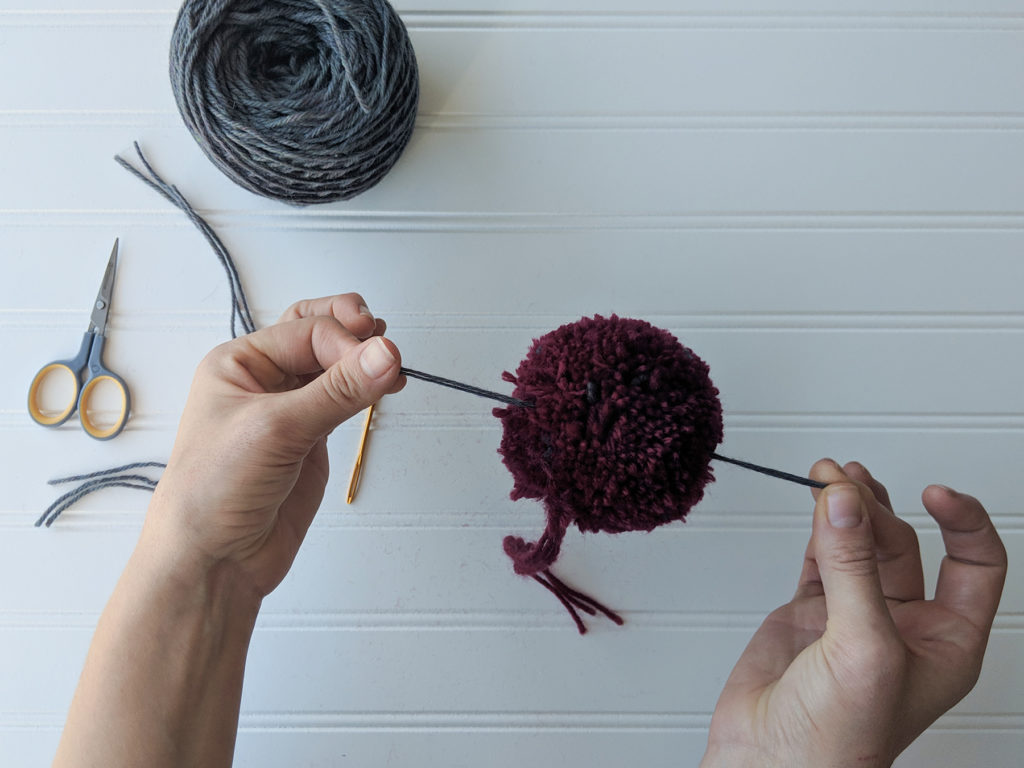
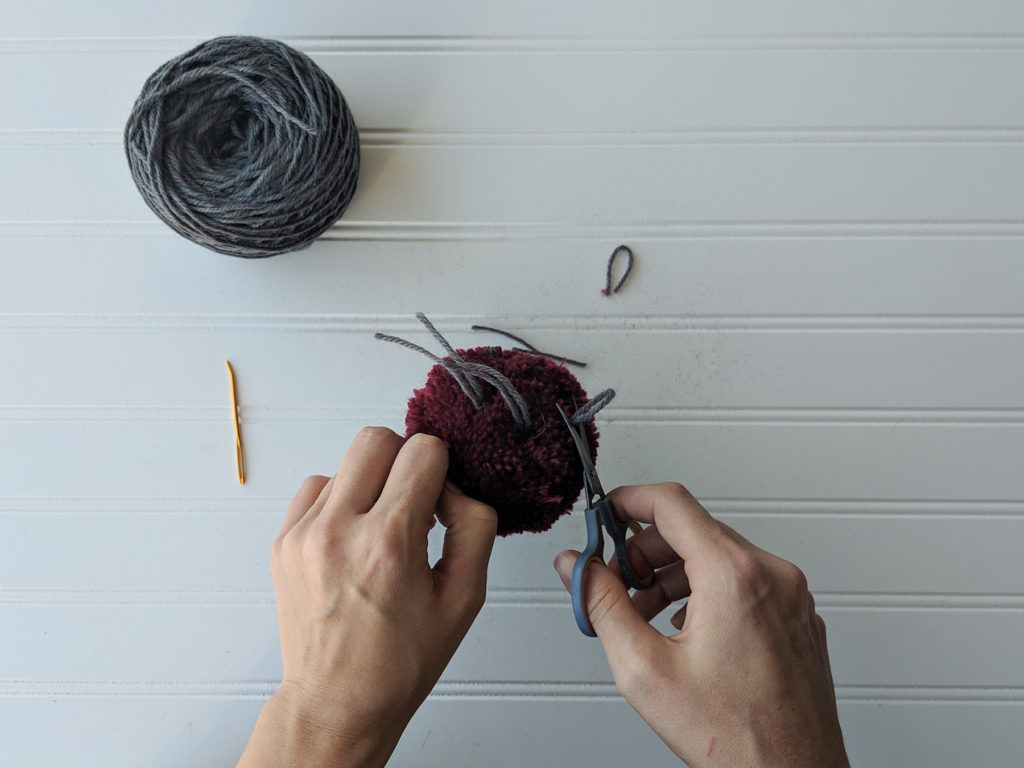
To get started you’ll need a pom-pom, scissors, tapestry needle, and contrast color yarn. Step 1: Cut your contrast color yarn into lengths of approximately 12″. In the pattern I’ve directed you to cut 15 pieces. Fold each piece in half. Step 2: Keeping the strand of yarn folded, thread the tapestry needle.Step 3: Insert the tapestry needle through the center of the pom-pom. Step 4: Pull one end of the strand through the pom-pom, but be sure to secure the other end.Step 5: You should be able to hold each end of the strand as shown. Repeat Steps 1-5 until you’ve used each of the strands you cut. If desired, add more! When you finish you’ll have a medusa-looking pom-pom. Give your pom-pom a trim so that the contrast color ends are flush with the rest of the pom-pom. Finished! Now you can secure your pom-pom to the hat.
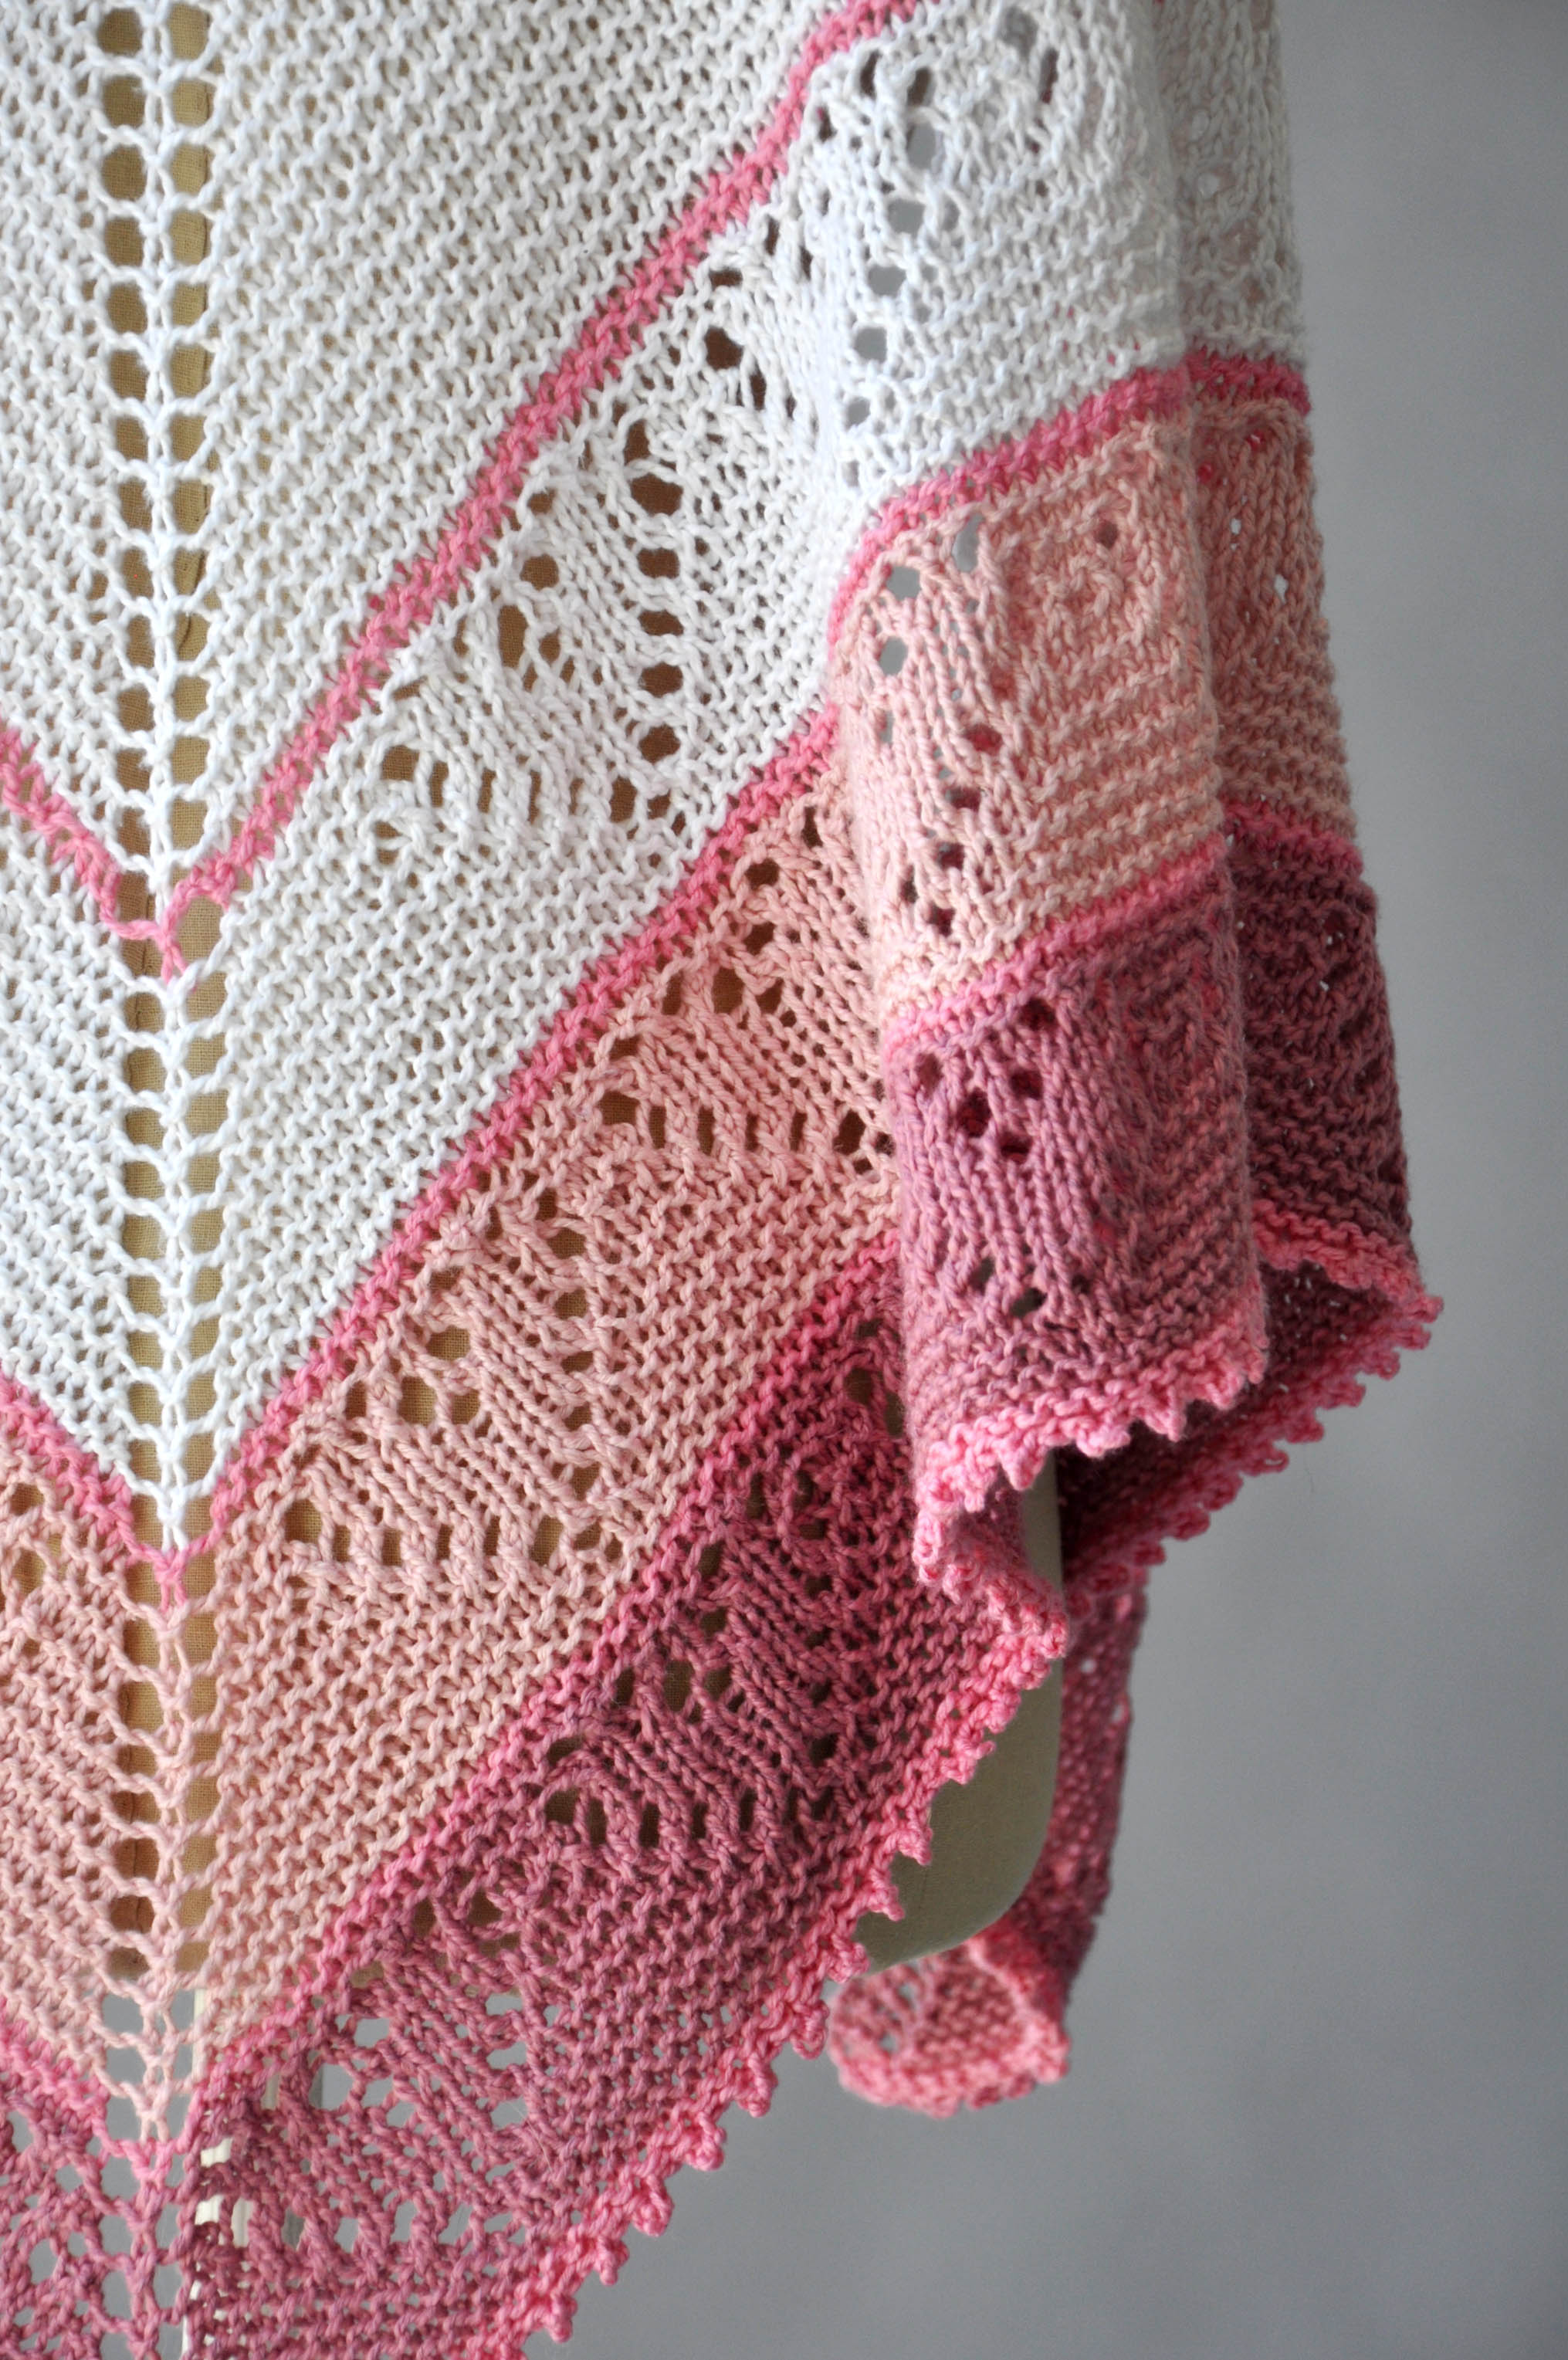
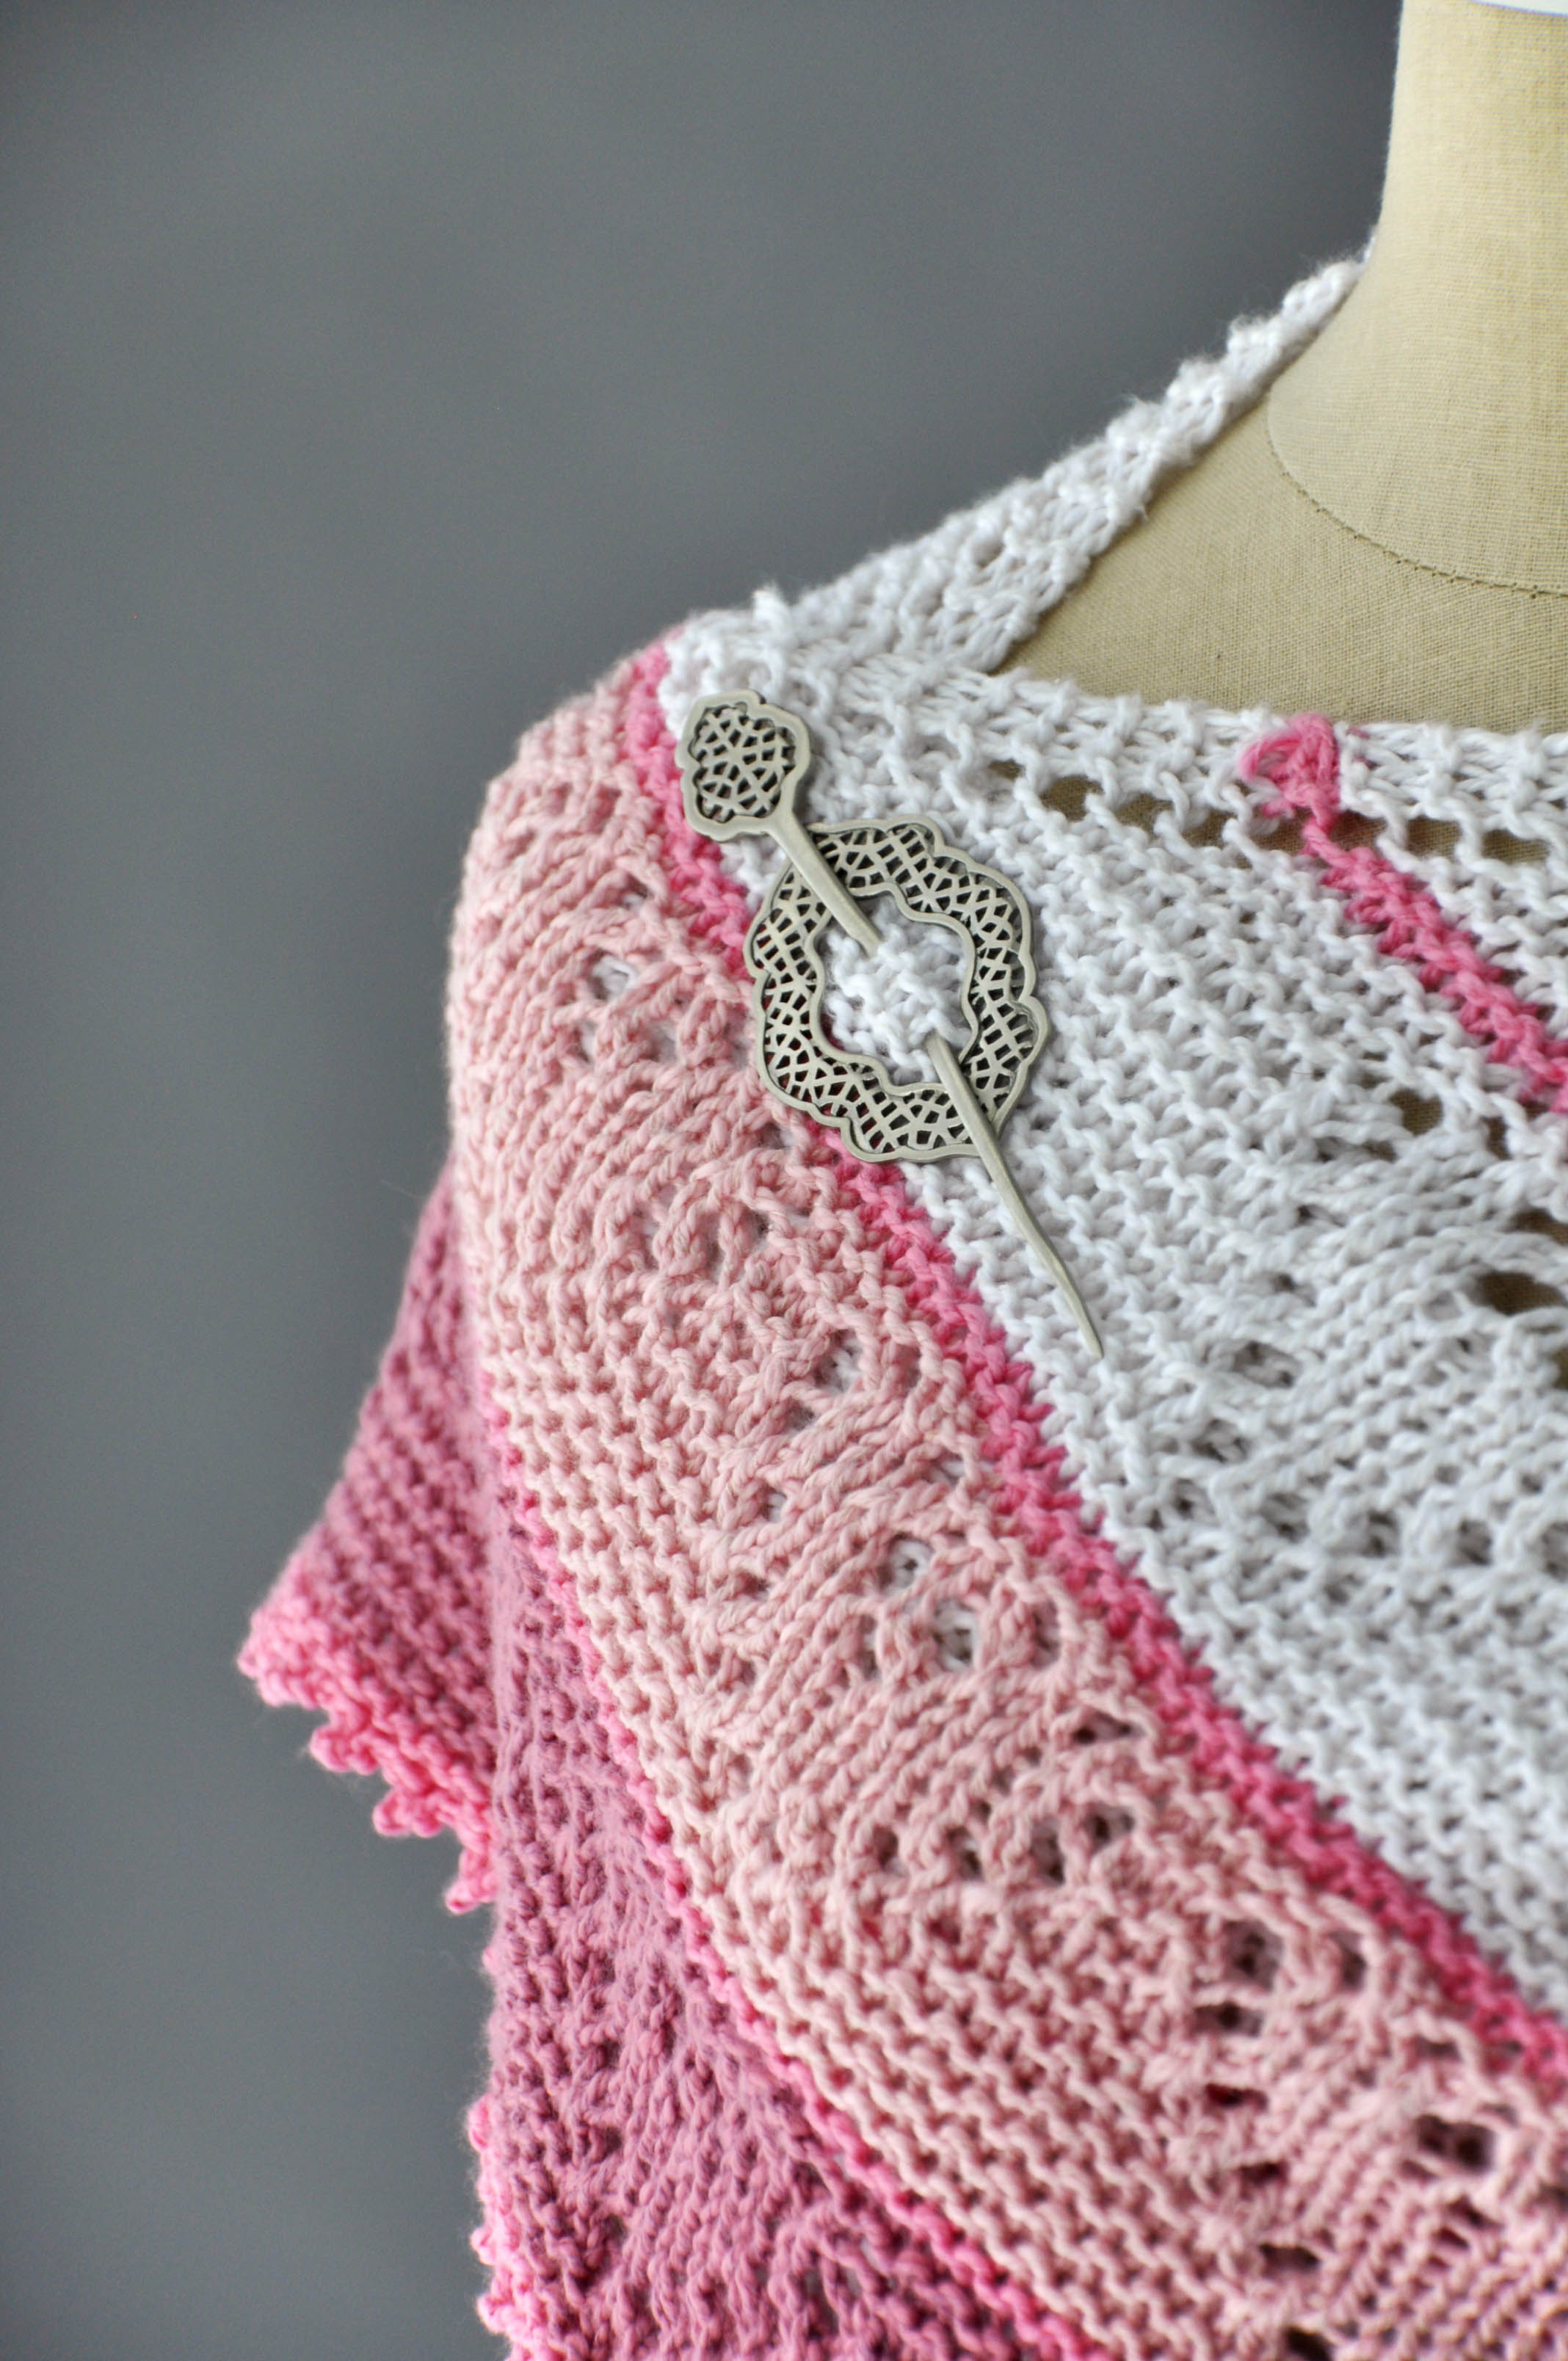
Whether you love it or hate it, Valentine’s Day will be here in about a week. What better way to prepare than by knitting yourself (or someone else who is sweet) a shawl? We’ve got you covered – to celebrate Valentine’s Day, we’re offering the Be Mine Shawl for free!
You could ask anyone in the office and they would probably tell you that I have an unrelenting sweet tooth. It is just so difficult for me to turn down sugary sweet snacks. What does this have to do with our Valentine’s freebie? Well, the inspiration for the Be Mine Shawl came from conversation heart candies. (In case you were wondering, I prefer the white, wintergreen flavored hearts.)
Be Mine is a triangular shawl comprised mostly of garter stitch. It is knit in Fibra Natura Papyrus, a yarn with a luxurious blend of cotton and silk. This yarn is velvety soft and creates a beautifully drapey fabric.
After working the body of the shawl, three bold stripes featuring a lace heart motif are worked to create a lovely border. Small, brightly colored stripes break up the lace sections. Finally, the shawl is finished with a delicate crochet-picot edging. (By the way, back in December Amy posted a tutorial on a Crochet Picot Edging here, but please note that instead of entirely skipping a stitch between picots as directed in the tutorial, you will instead work a slip stitch in the stitch between picots.)
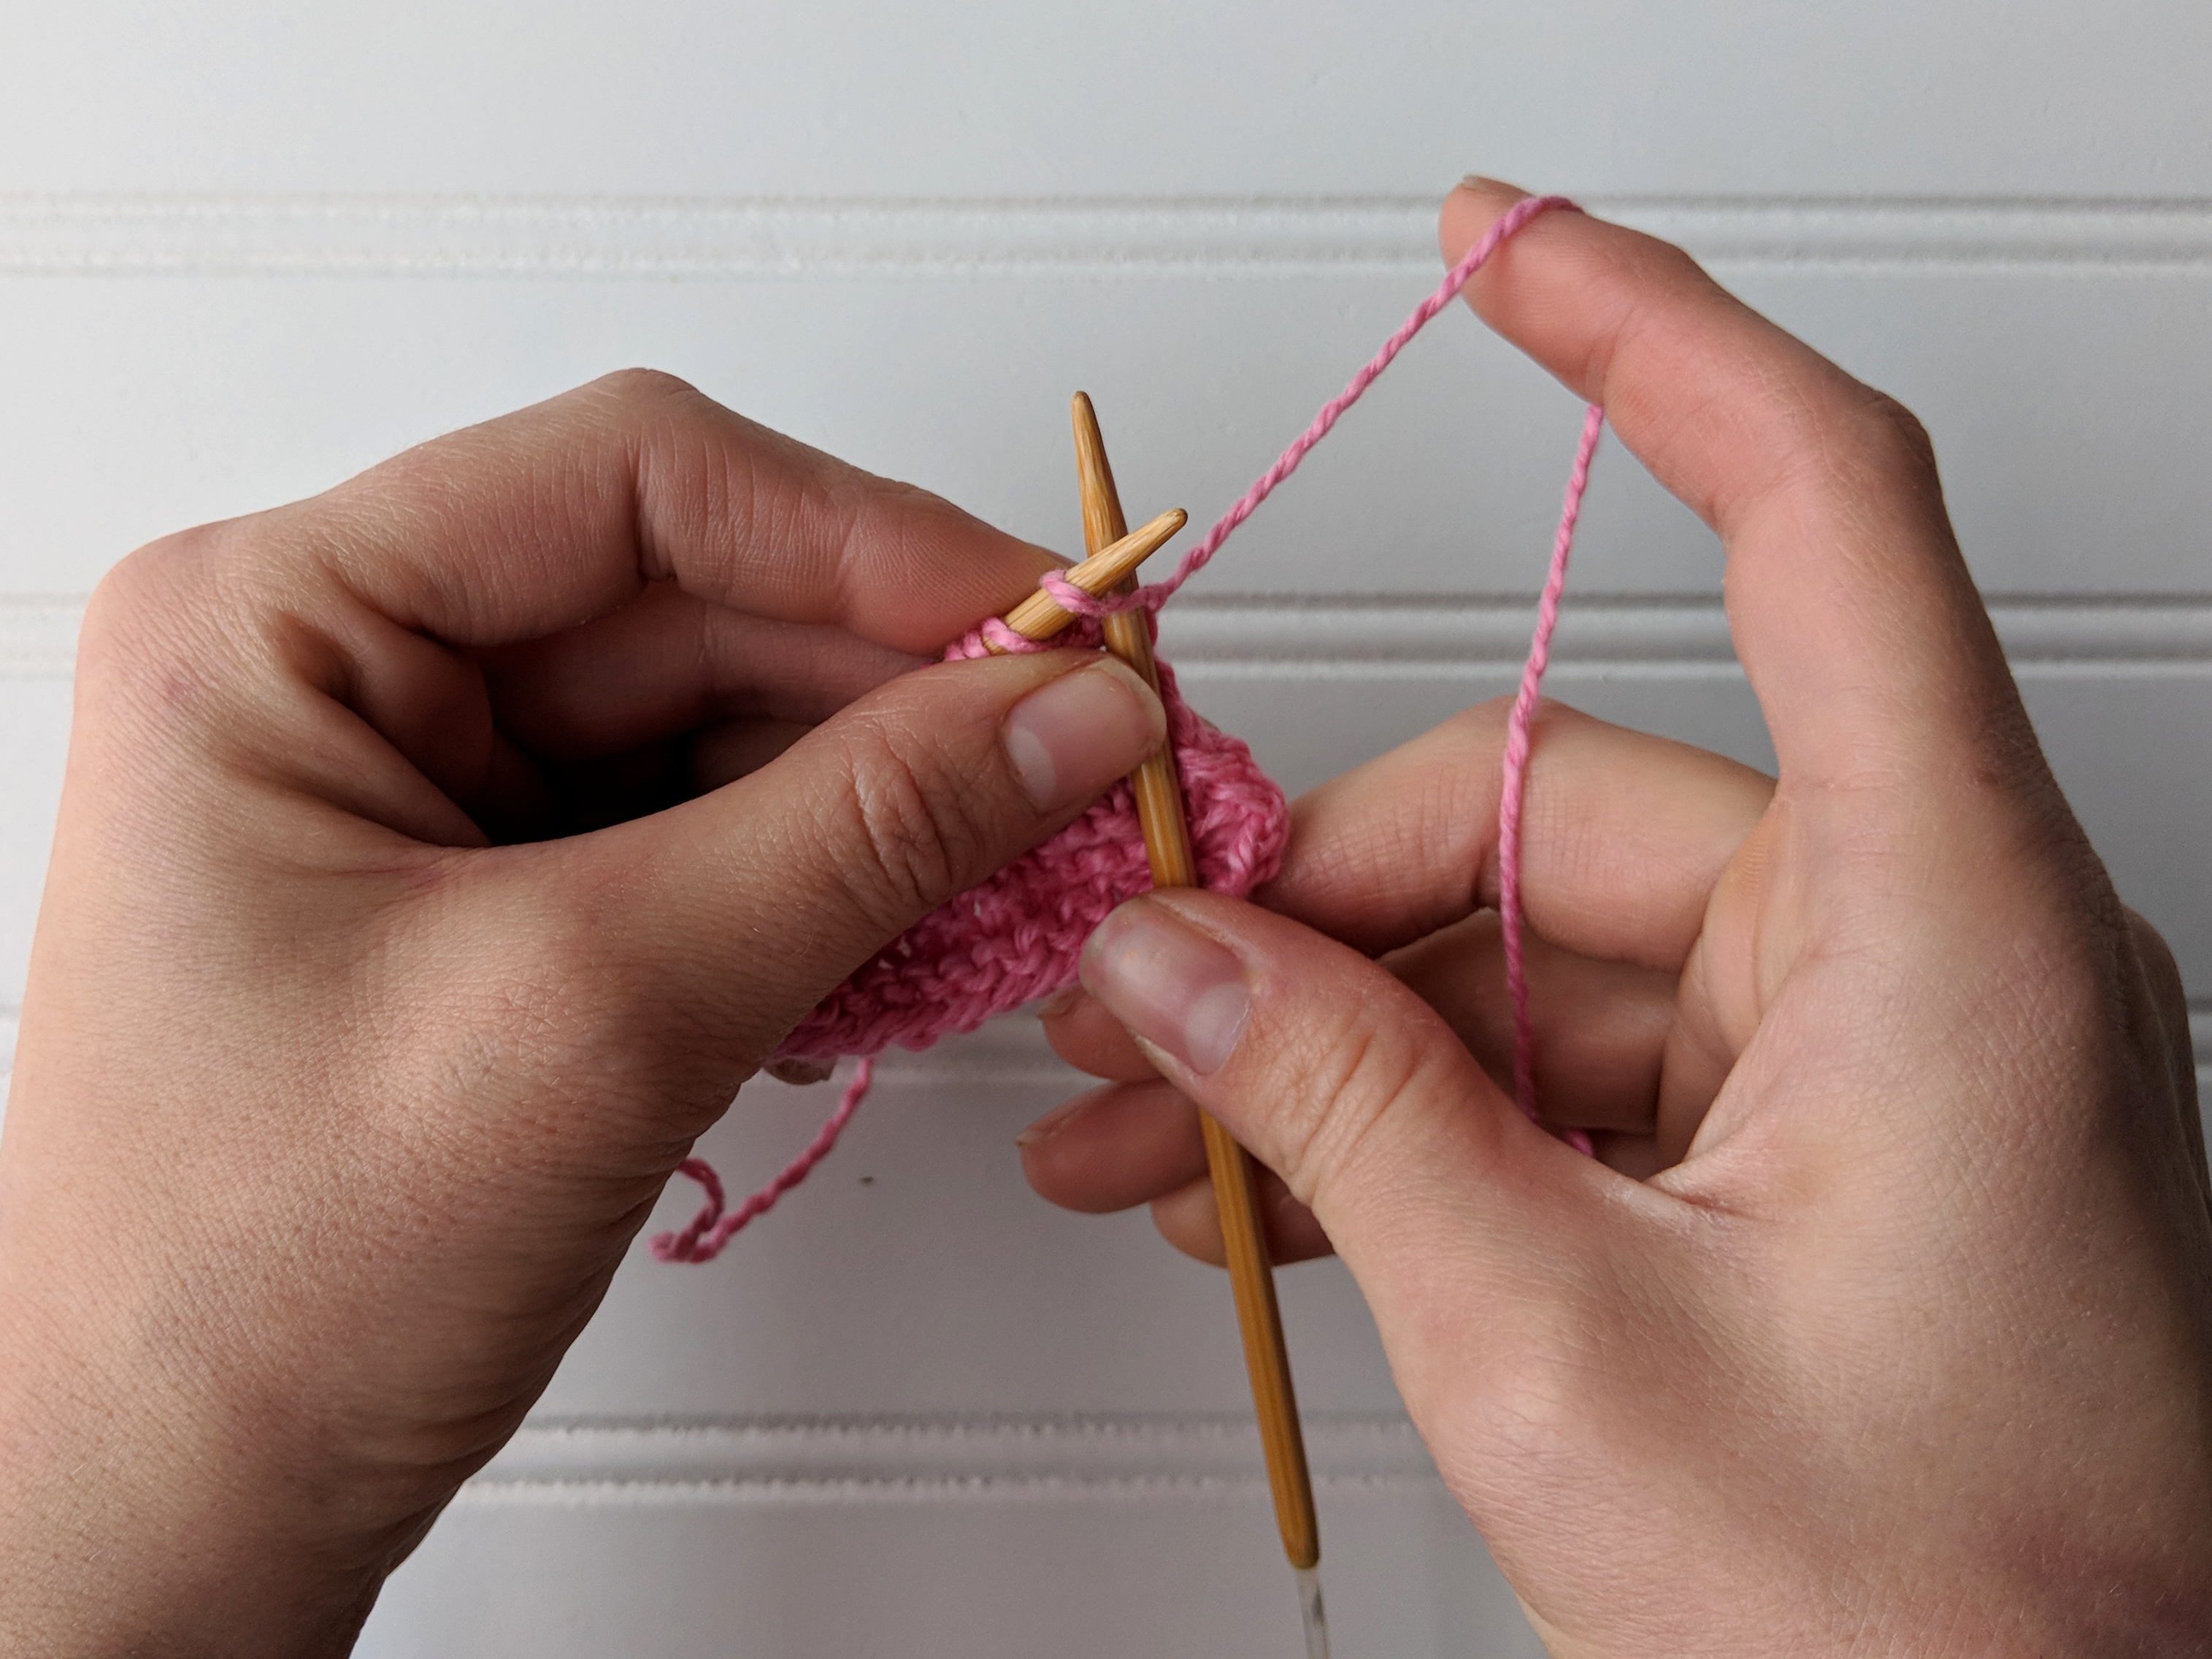
Because Be Mine uses garter stitch, it’s nice to have a beautiful, elastic bind off. As a bit of a tight knitter, I like to use the Suspended Bind-off whenever I want a neat, elastic edge. I highly recommend this technique for this shawl design, and I call for it in the pattern. The method is nearly as simple as your standard bind off. It really just involves holding onto a stitch just a moment longer. If that sounds confusing, don’t worry, because I’ll show you exactly what I mean.
Begin as you would when using a standard bind off by knitting the first two stitches.
Step 1: Slip the first stitch you knit onto the left-hand handle.
Step 2: Do not drop this stitch. Instead, pass this stitch over the second stitch on the right-hand needle as you normally would when binding off, except keep that first stitch “suspended” on your left-hand needle.
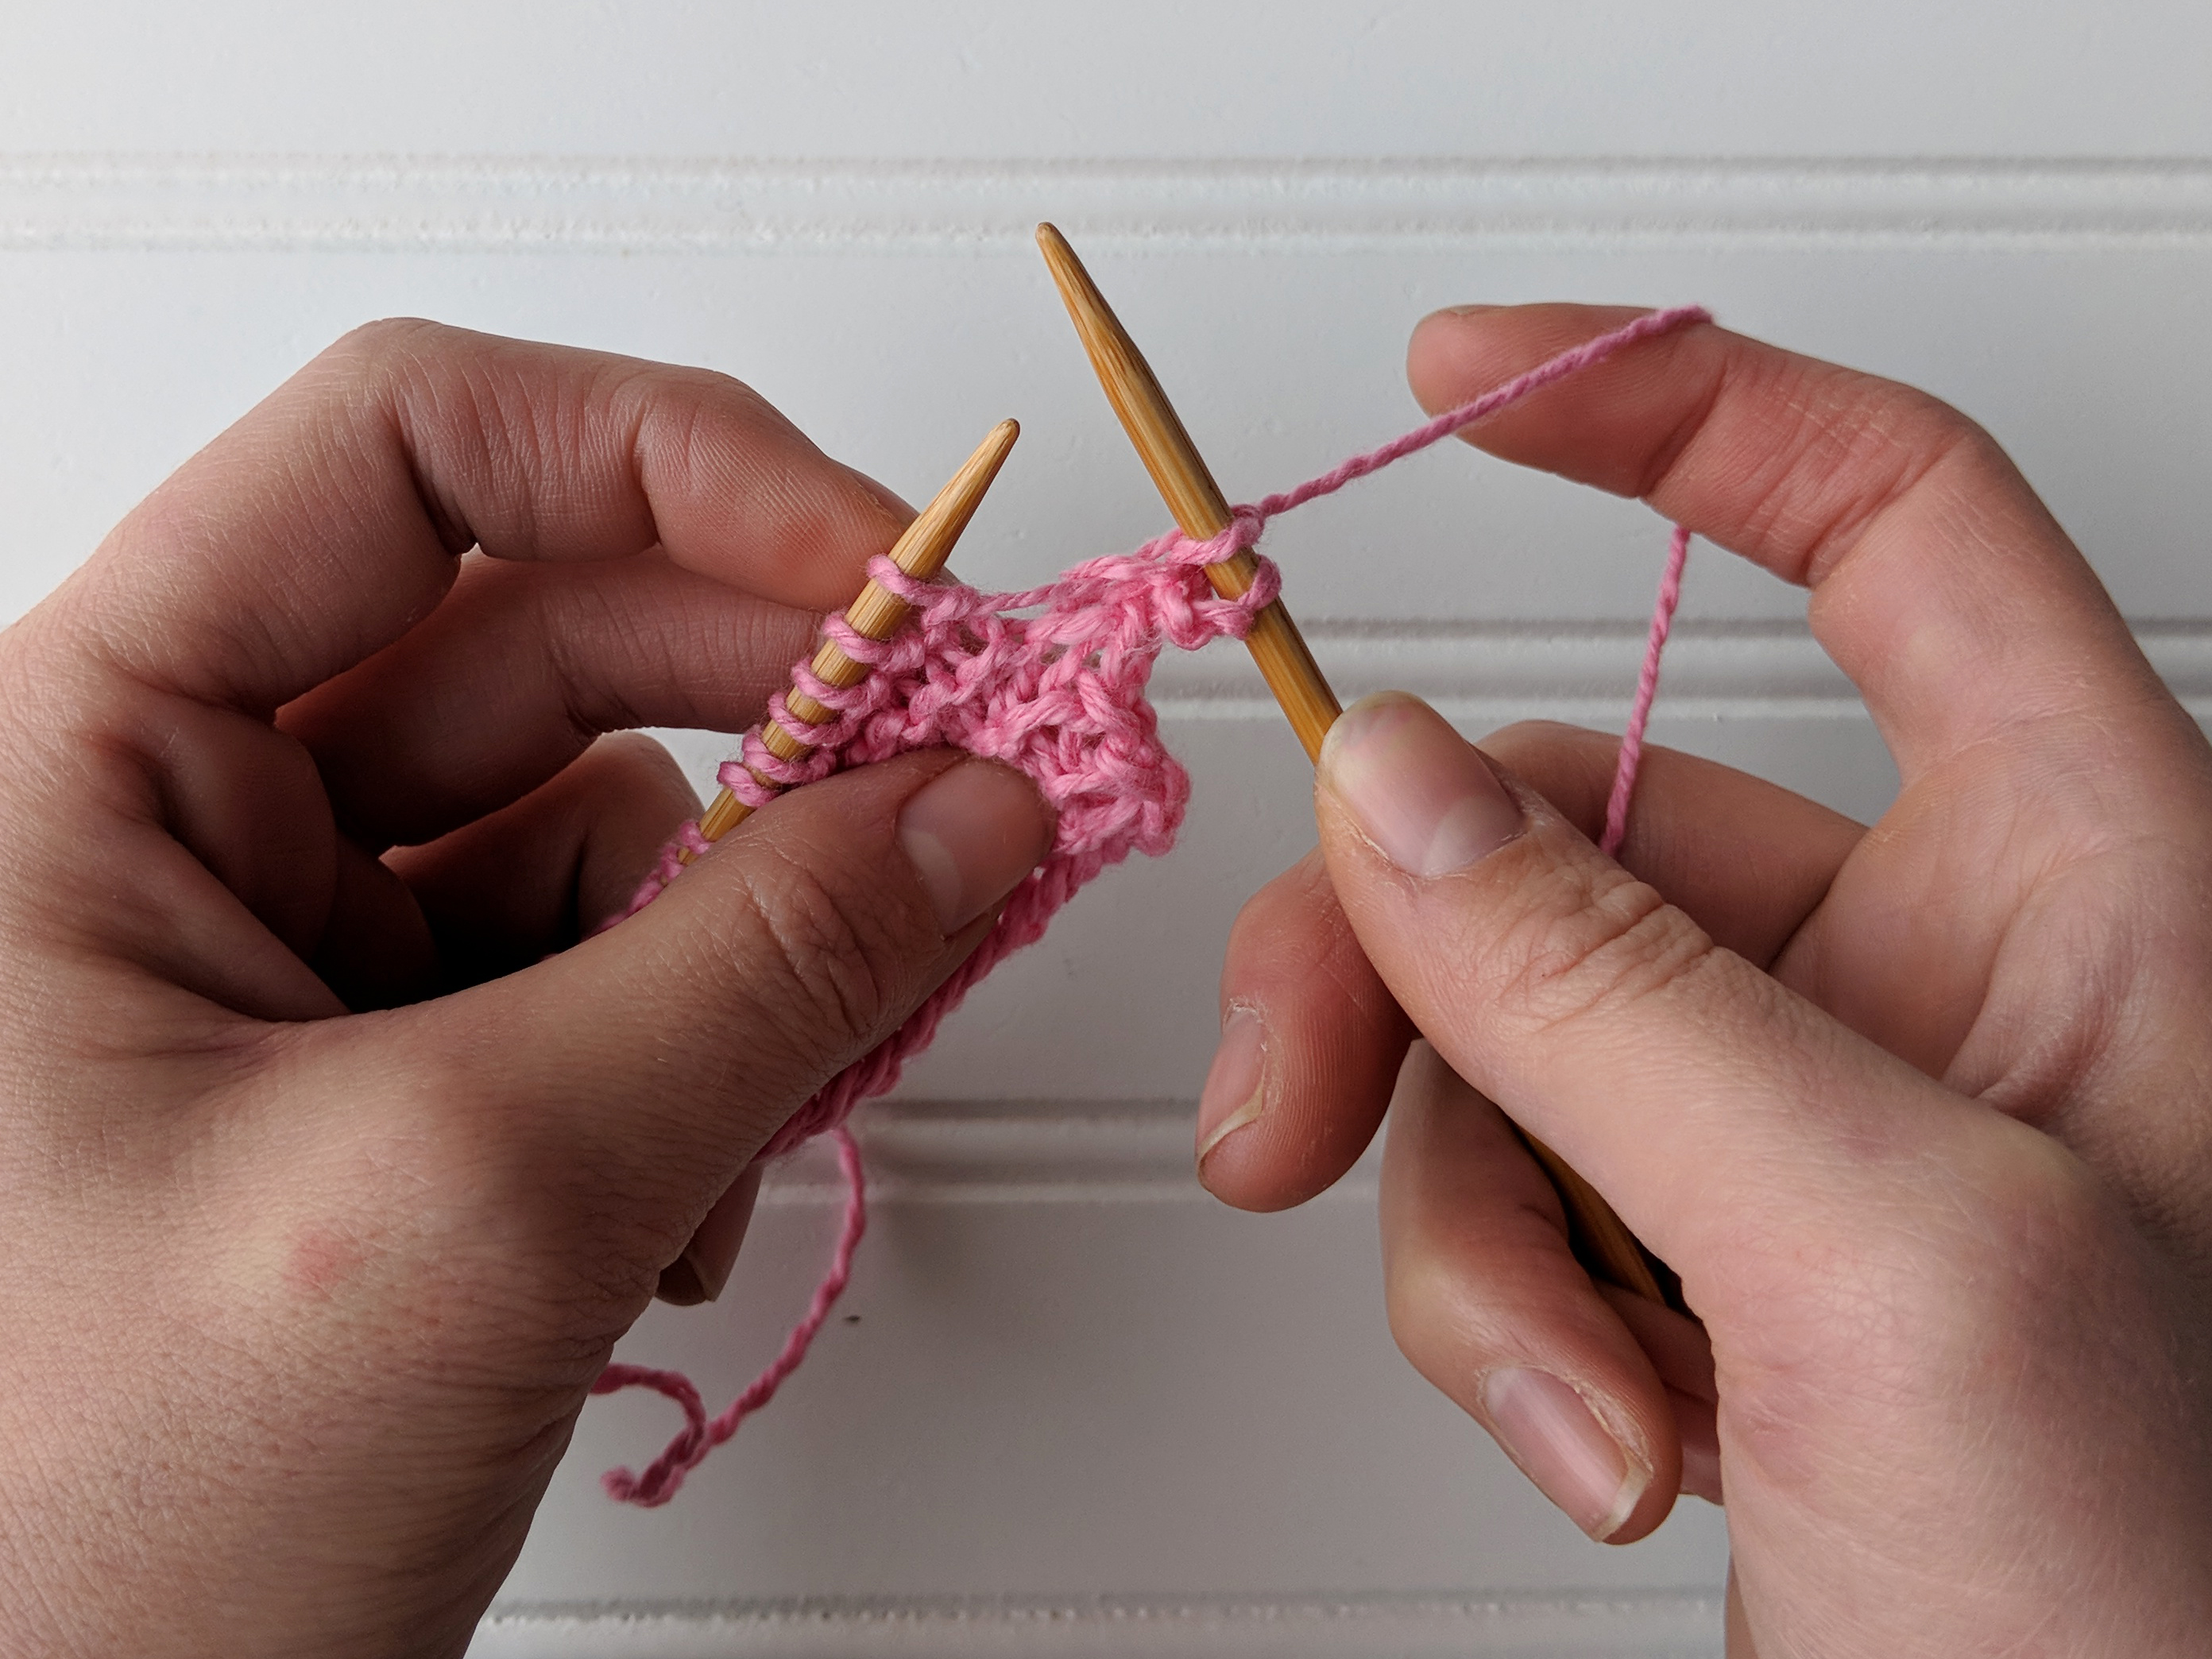
Step 3: Next, knit the second stitch on the left-hand needle (note: leave the stitch from the previous step suspended).
Step 4: Now you will slide the stitch you’ve just knit into and the suspended stitch (outlined above) off of the left-hand needle.
Repeat Steps 1-4 until you have two stitches remaining on your right-hand needles. Finish by binding off these stitches as usual.
Ta-da! You now have a neat, elastic bound-off edge.
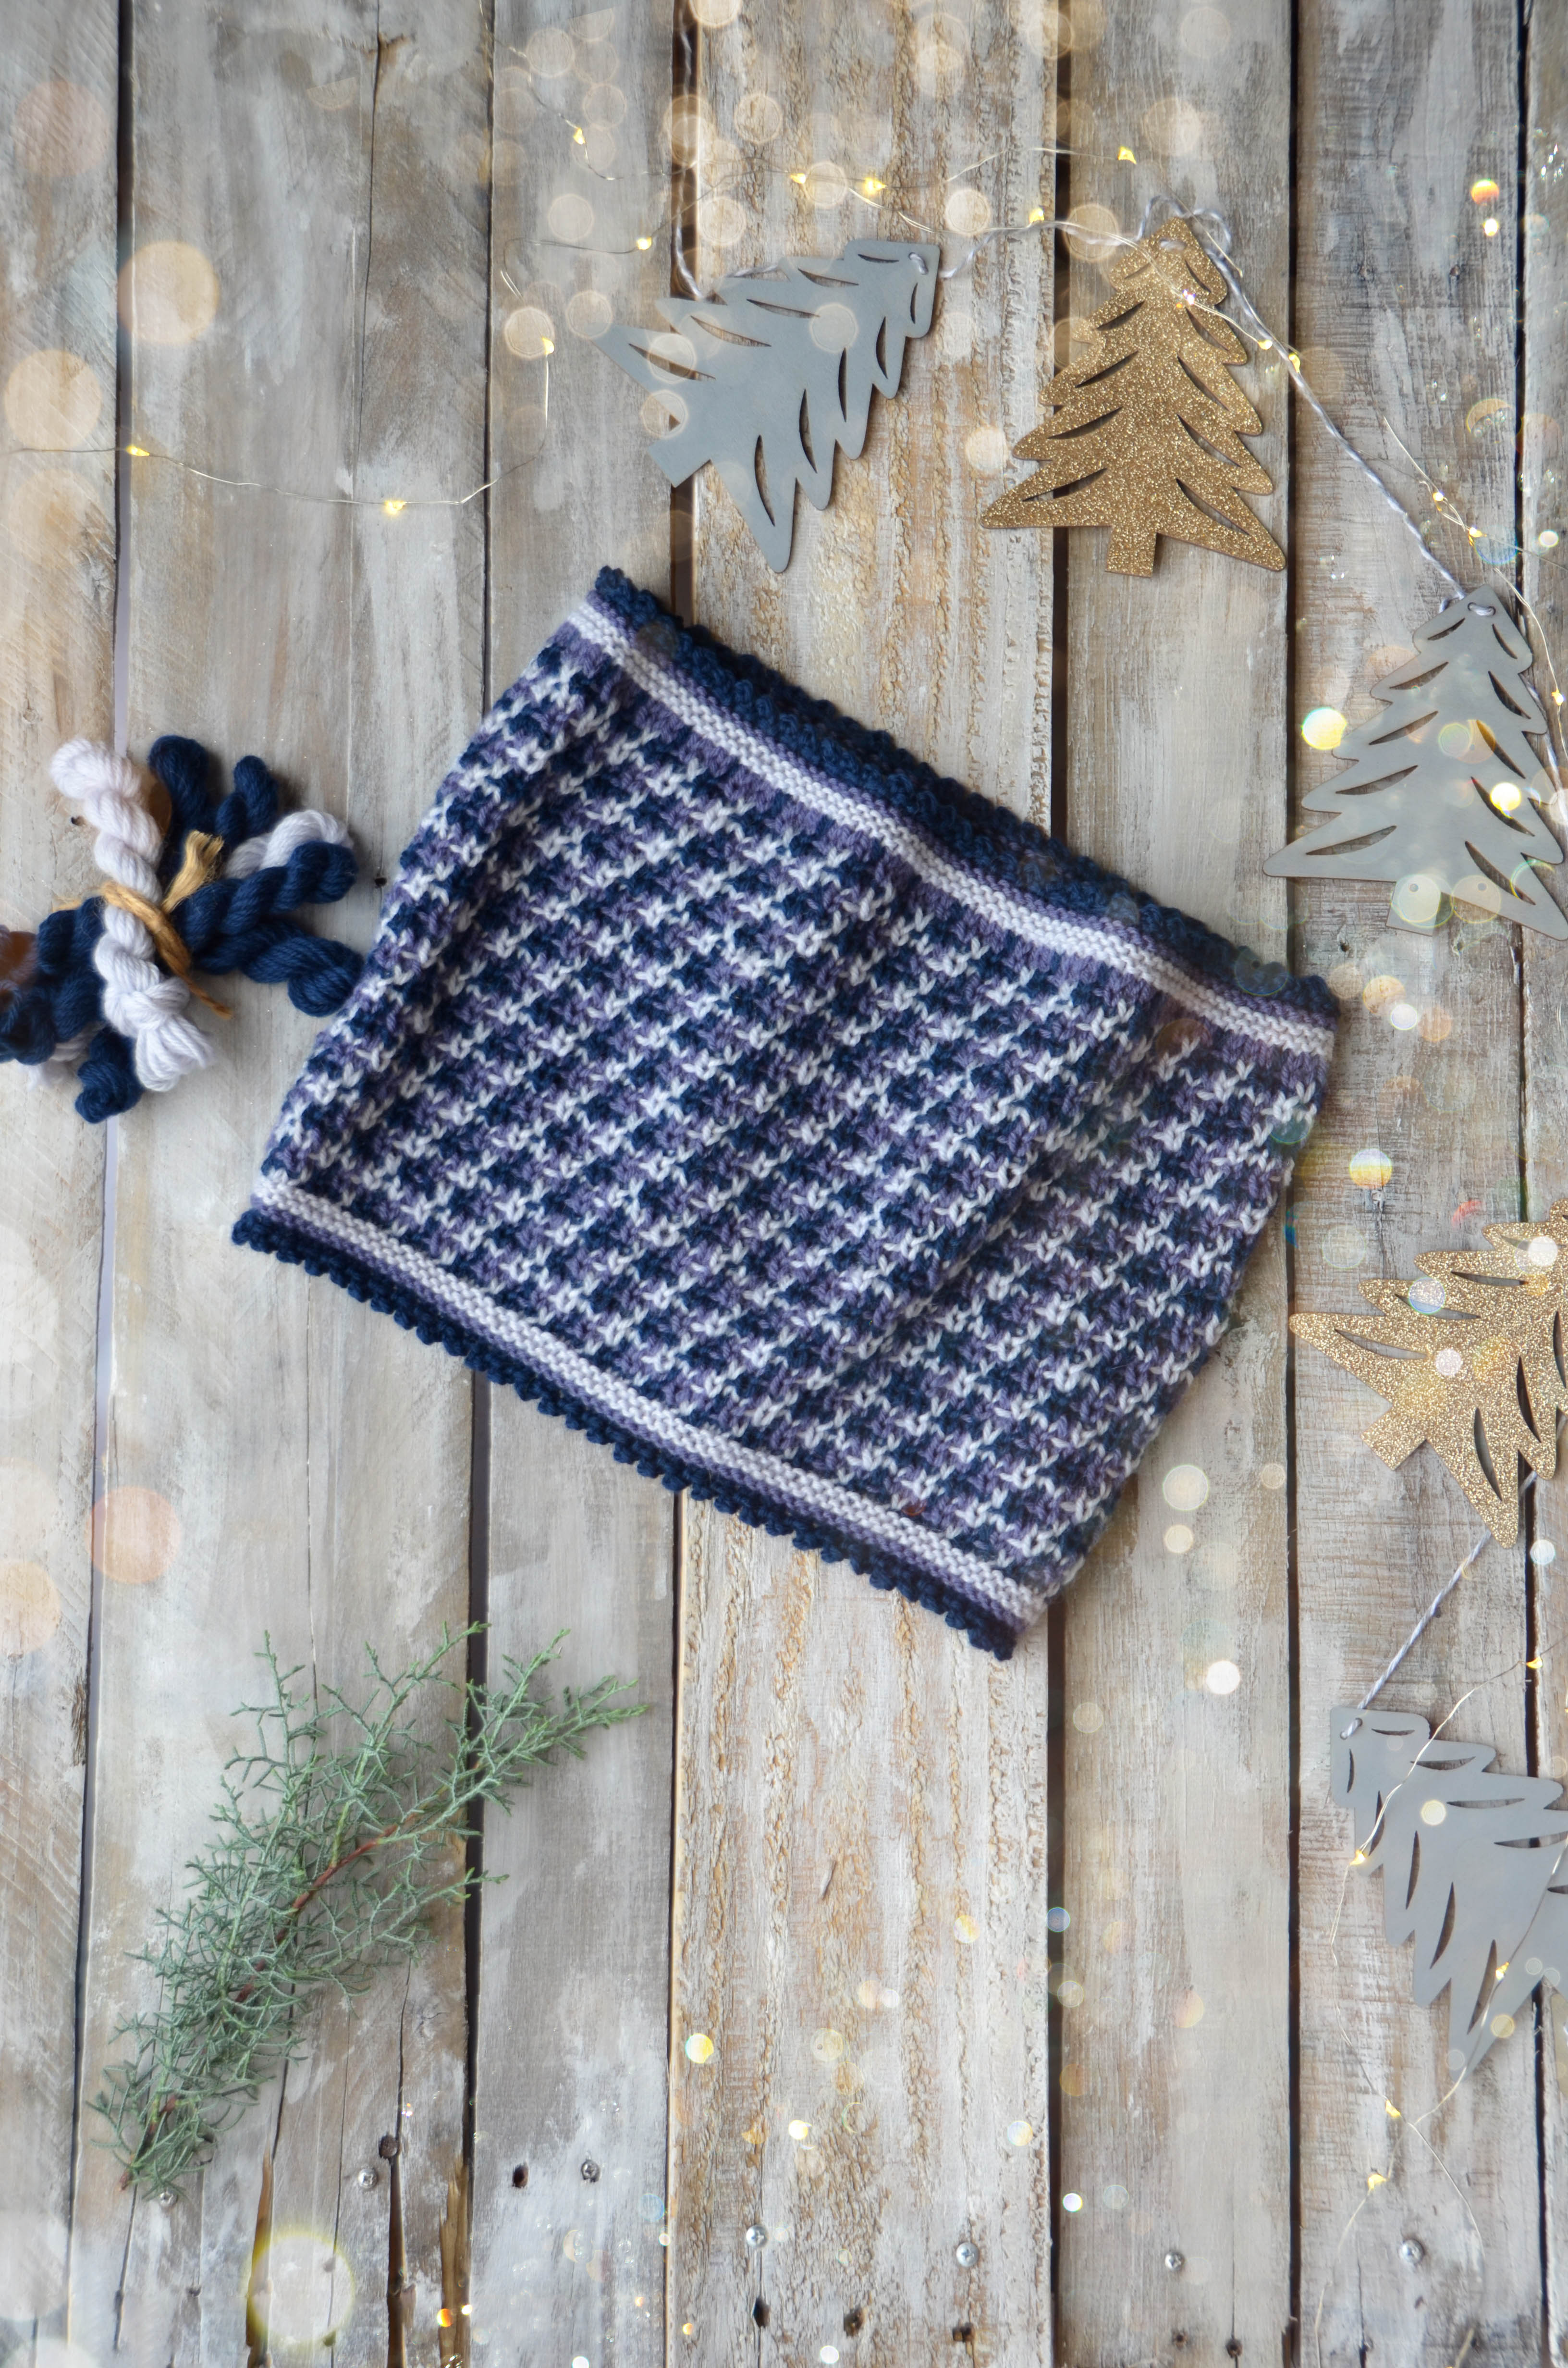
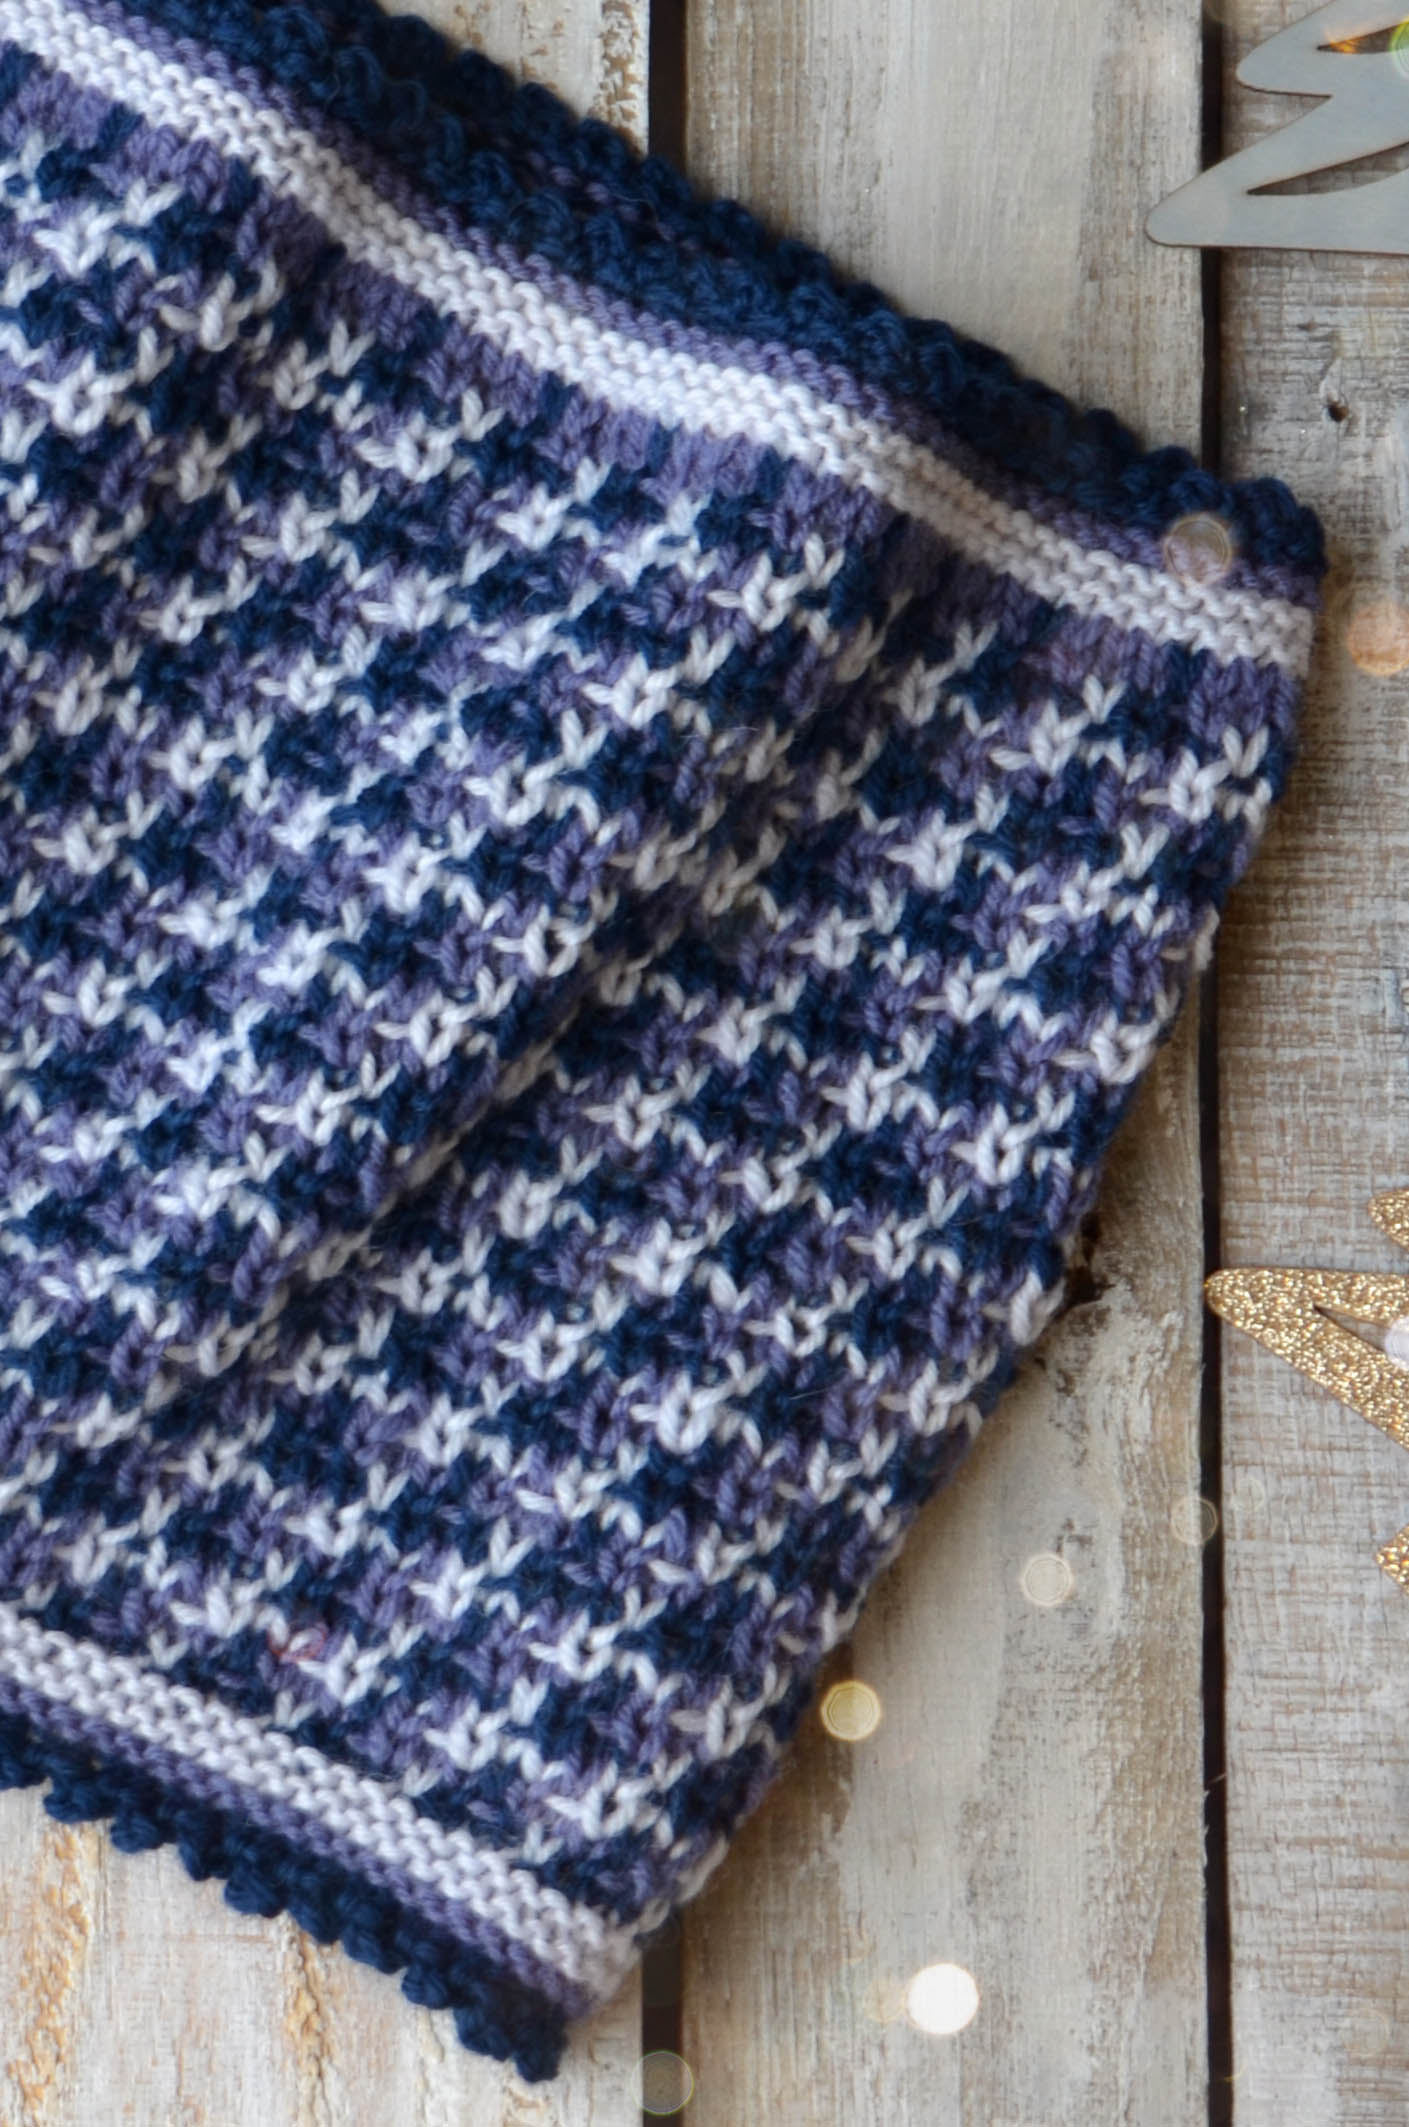
The pattern is written for the smaller size as shown, and also a large size, long enough to wrap around your neck twice. The yarn included in the kit is enough to knit either two small cowls, or one large. So – bonus!
The main body of the cowl is super-duper simple. The complex looking color pattern is just slipped stitches. Colors are changed every two rounds, and only one color is used per round. It hits that sweet spot of knitting where the pattern is just a bit more than stockinette – enough to keep you interested – but easy enough that you can work on it anywhere.
My favorite detail of this cowl is the picot edging along both edges. This could have been done with a knitted picot bind-off, but I chose to use a crochet picot instead. For me, it’s just less fiddly than doing its knit counterpart. Let’s learn how to do it!
If you need a little closer view on any of the following images, just click on it and it will open in a new browser window.
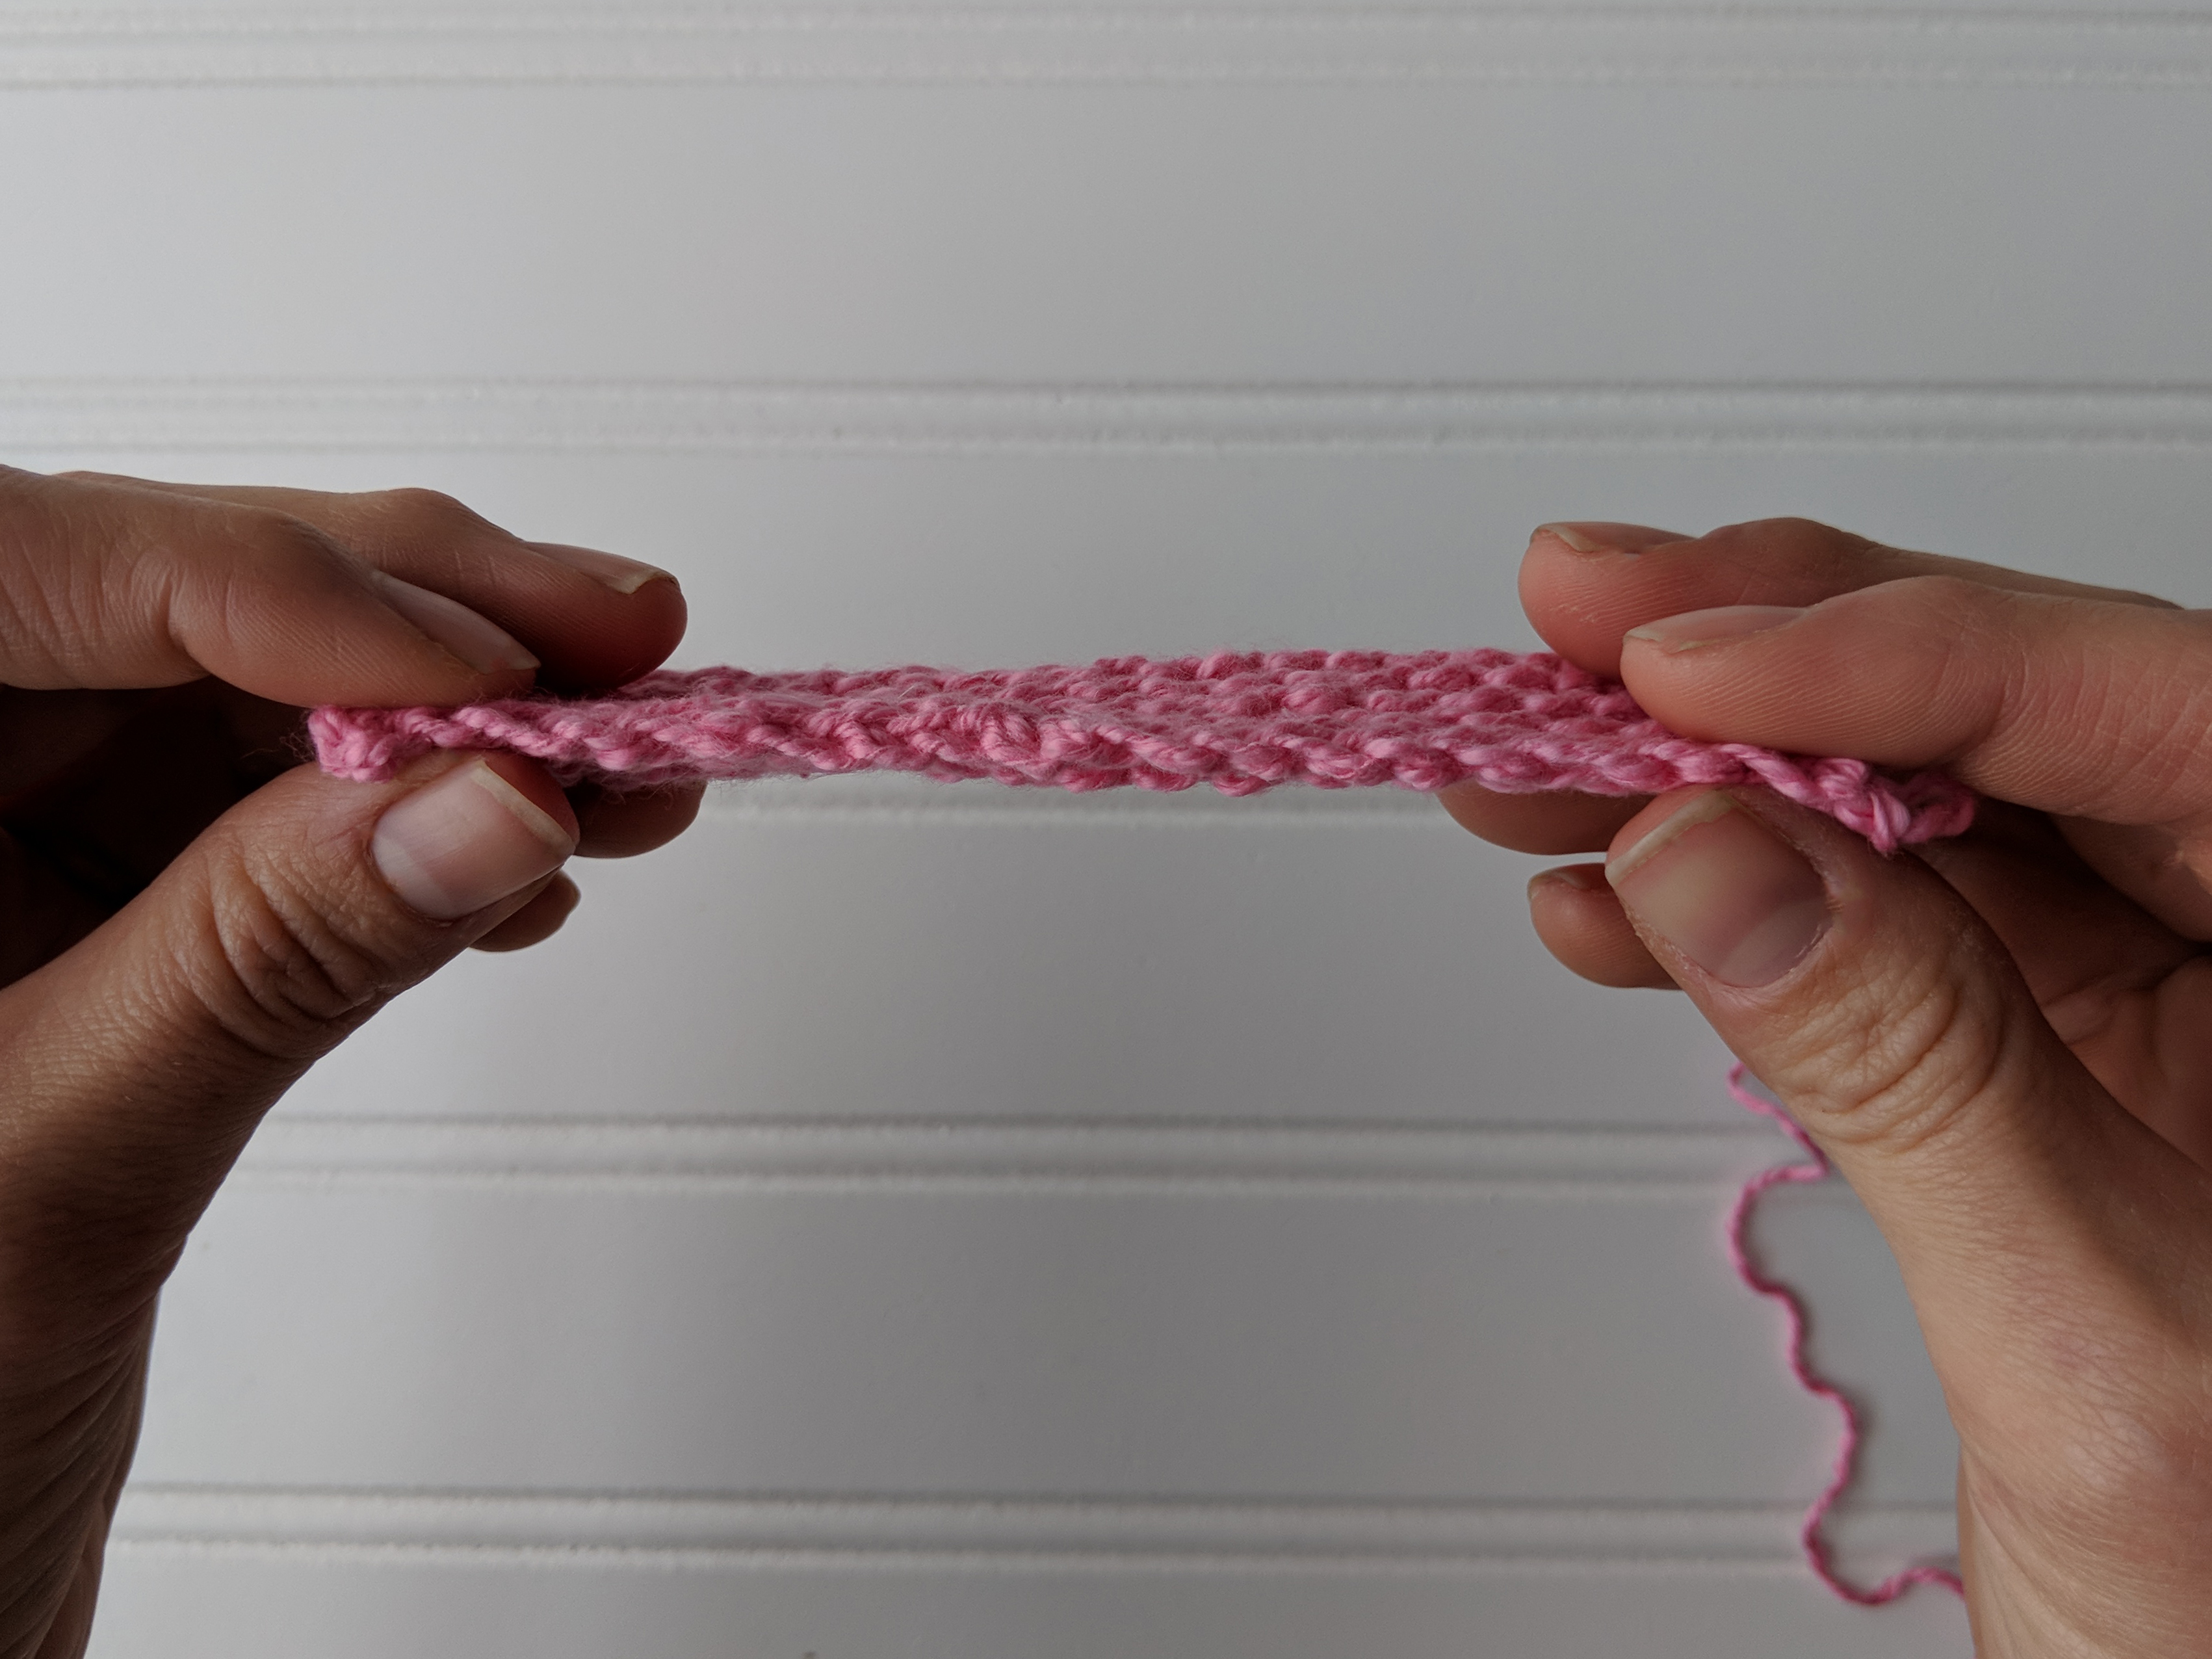
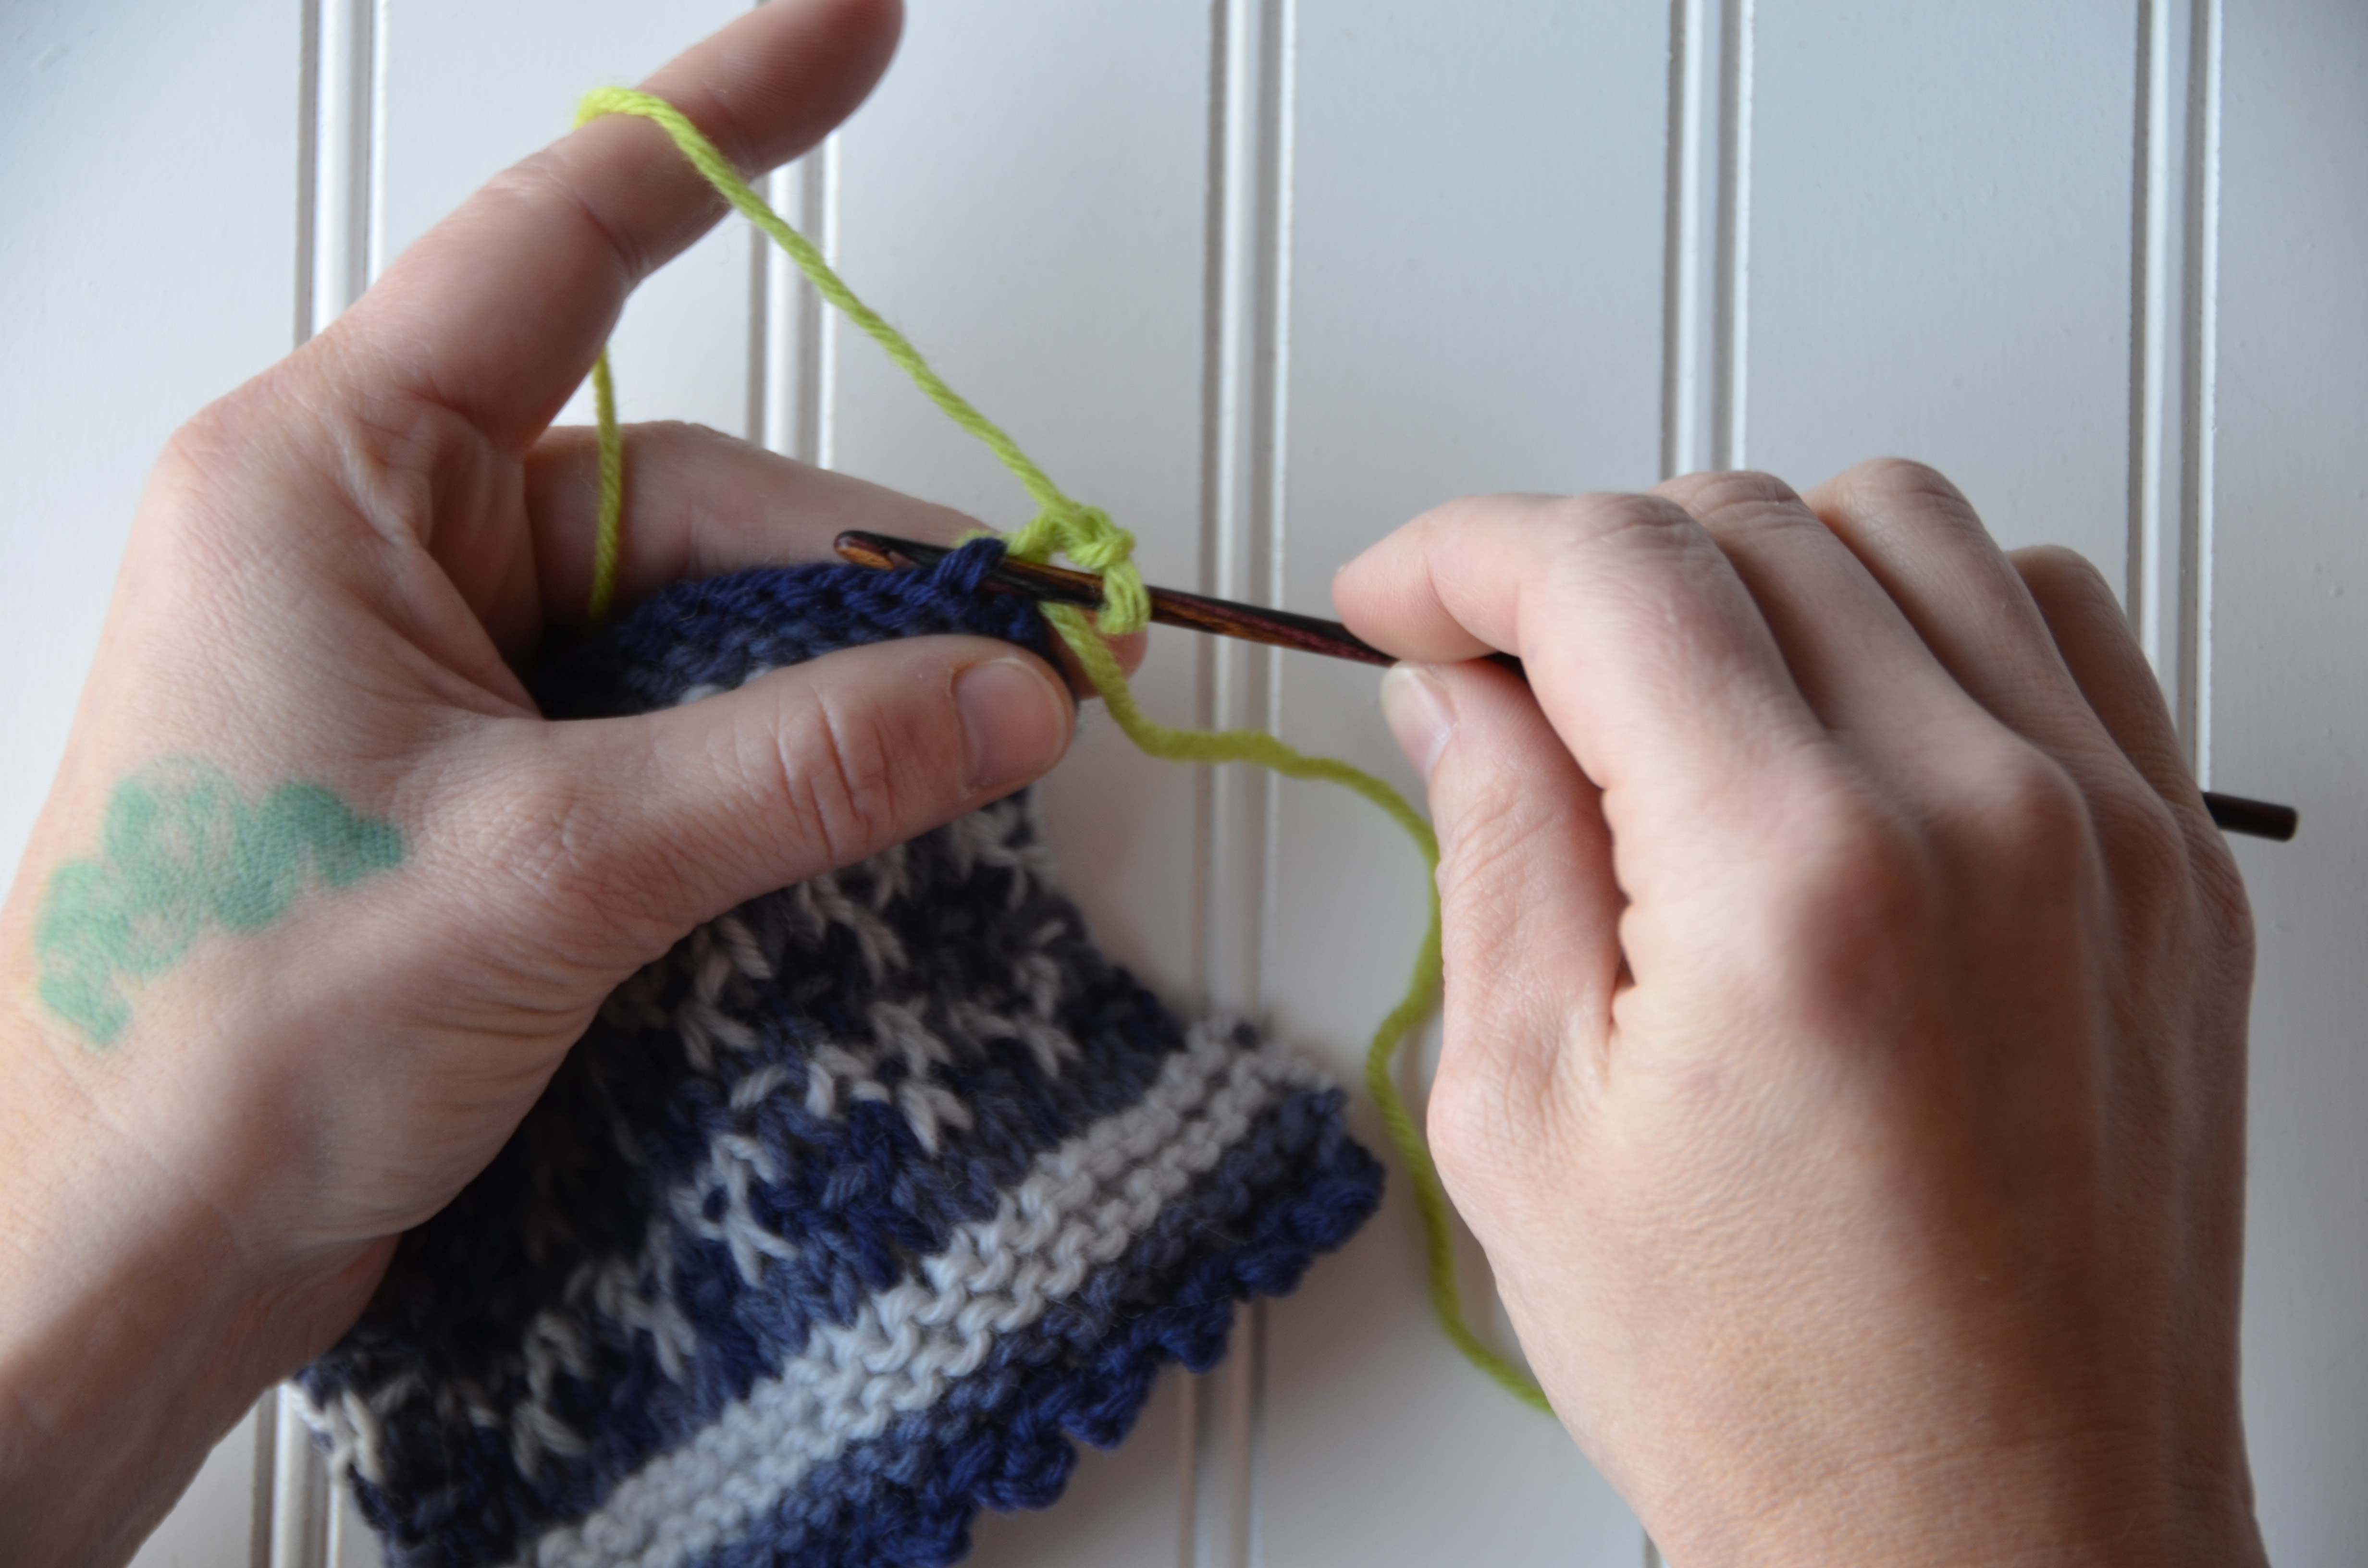
In my swatch, you can see that I’ve already done the picot edging along the lower edge. I’m going to be using a contrast color for the top edge so it’s easier for you to see.
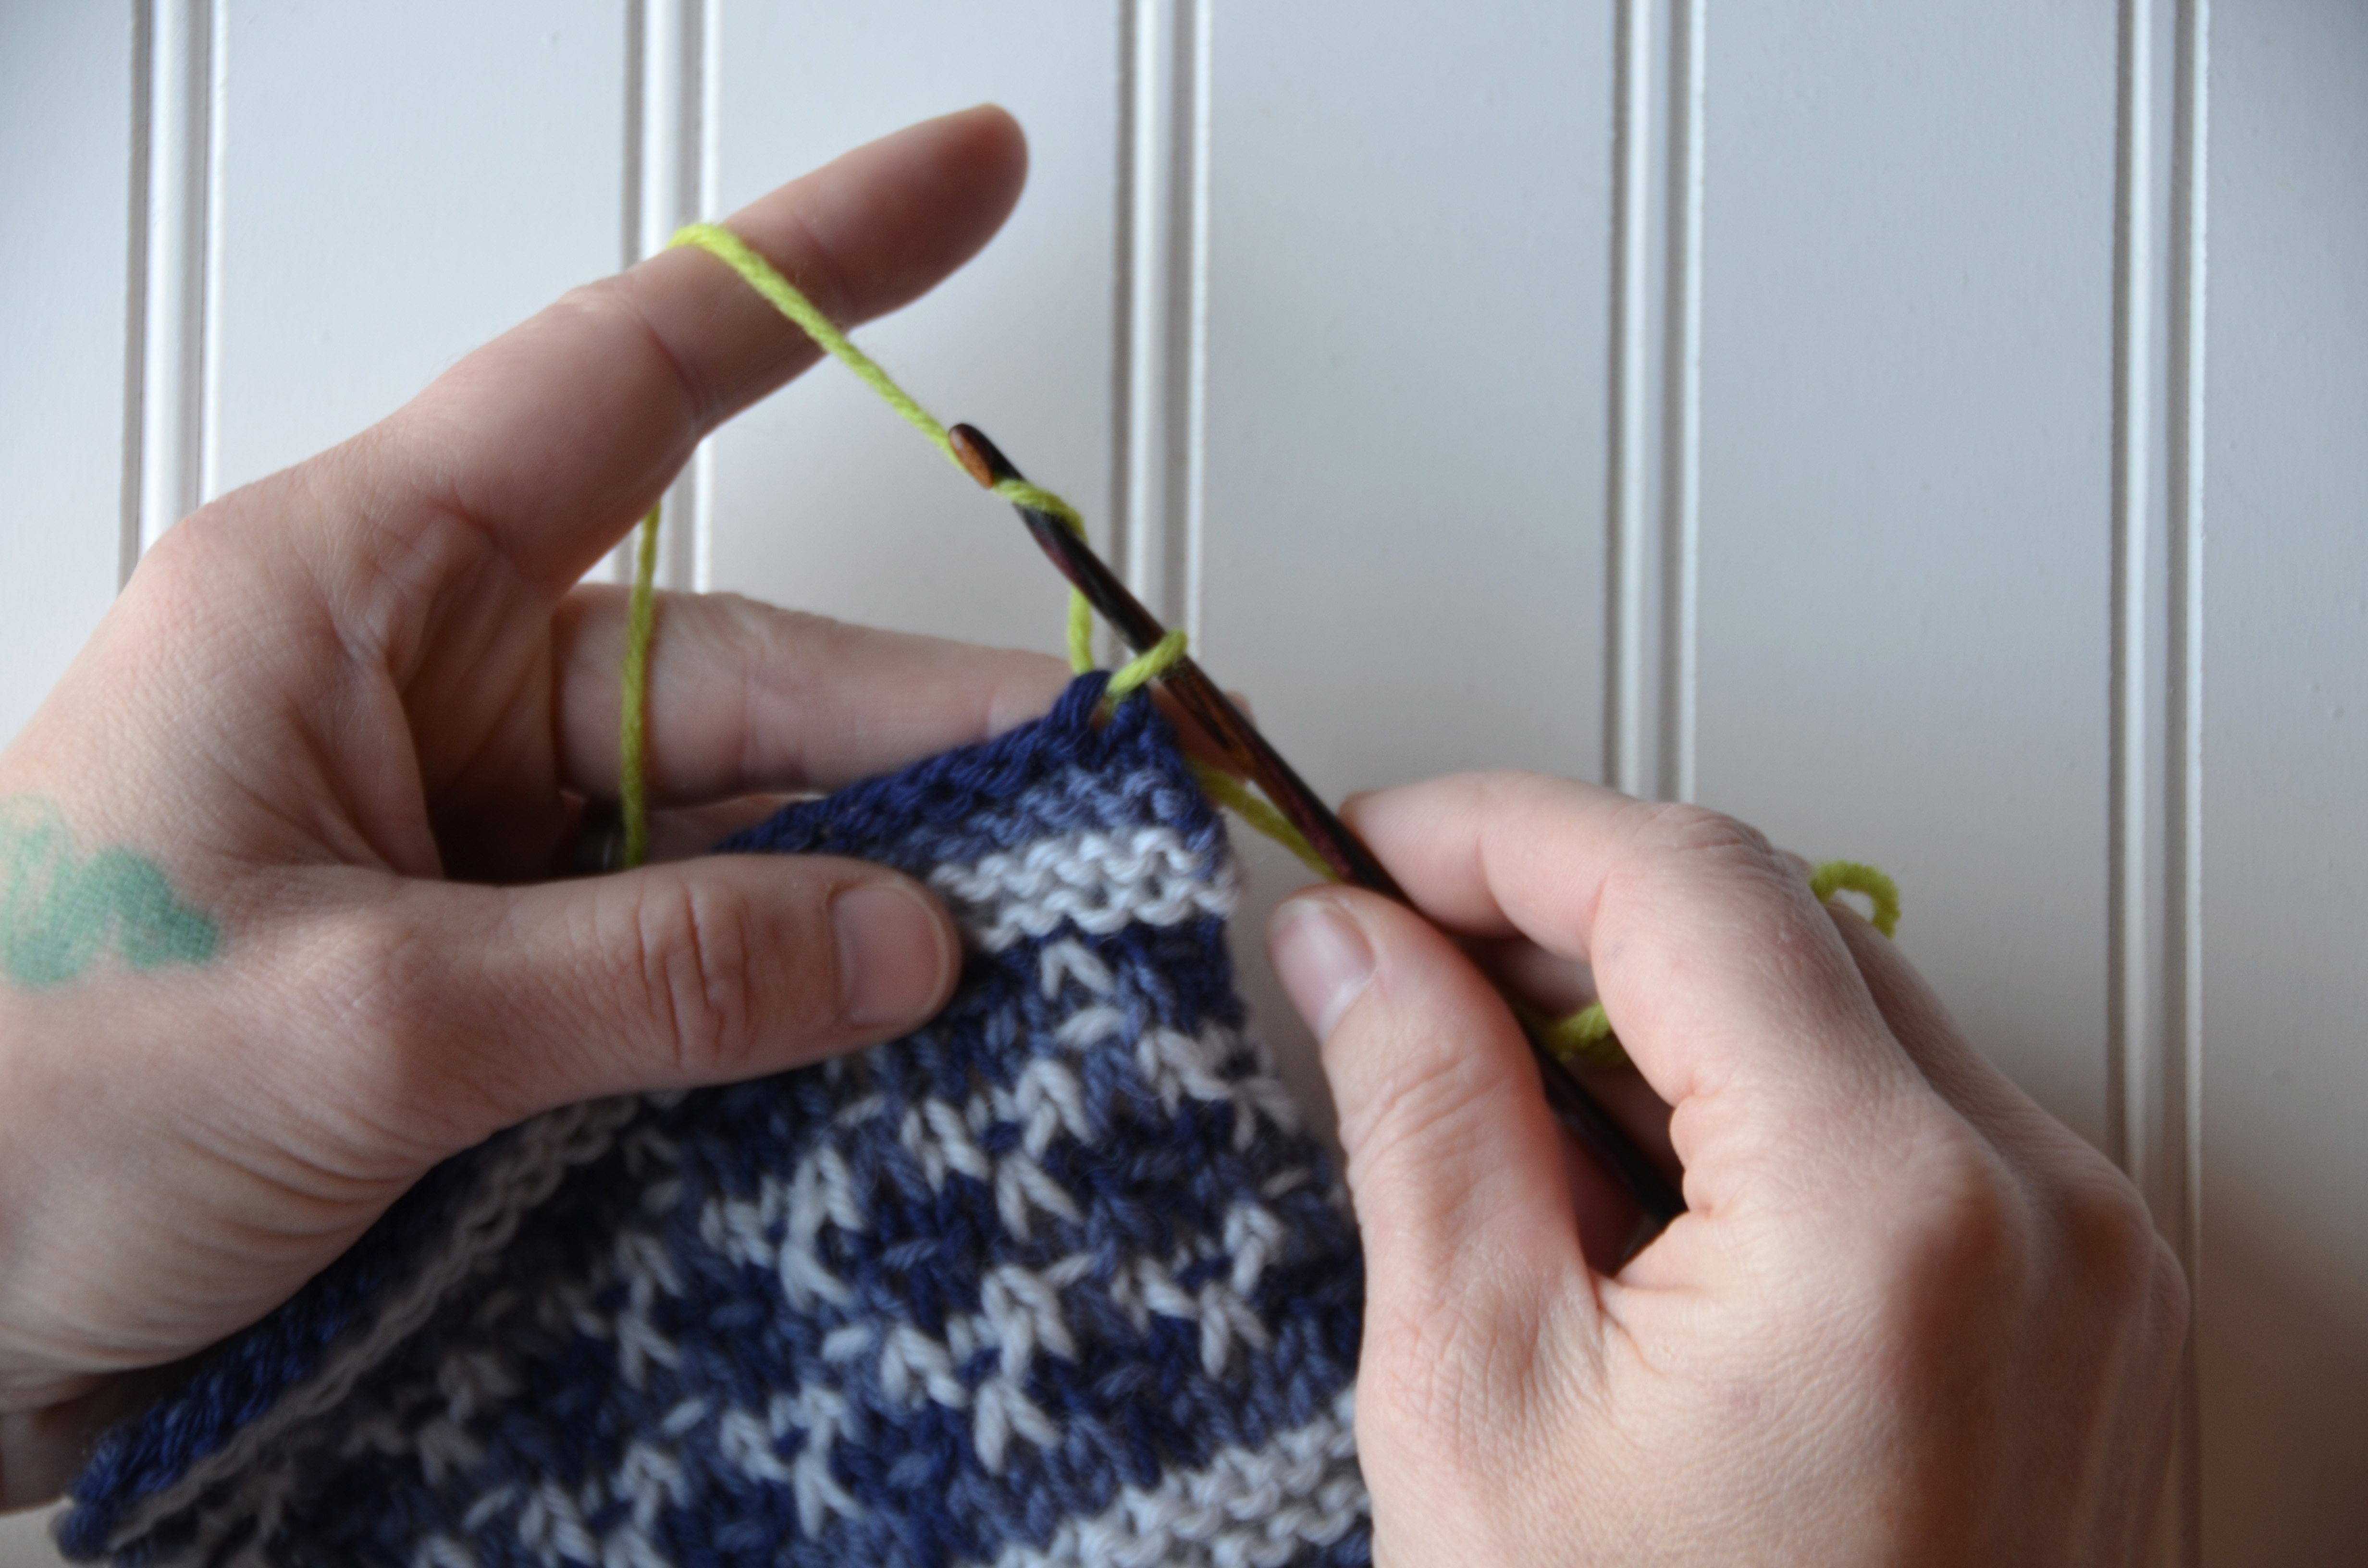
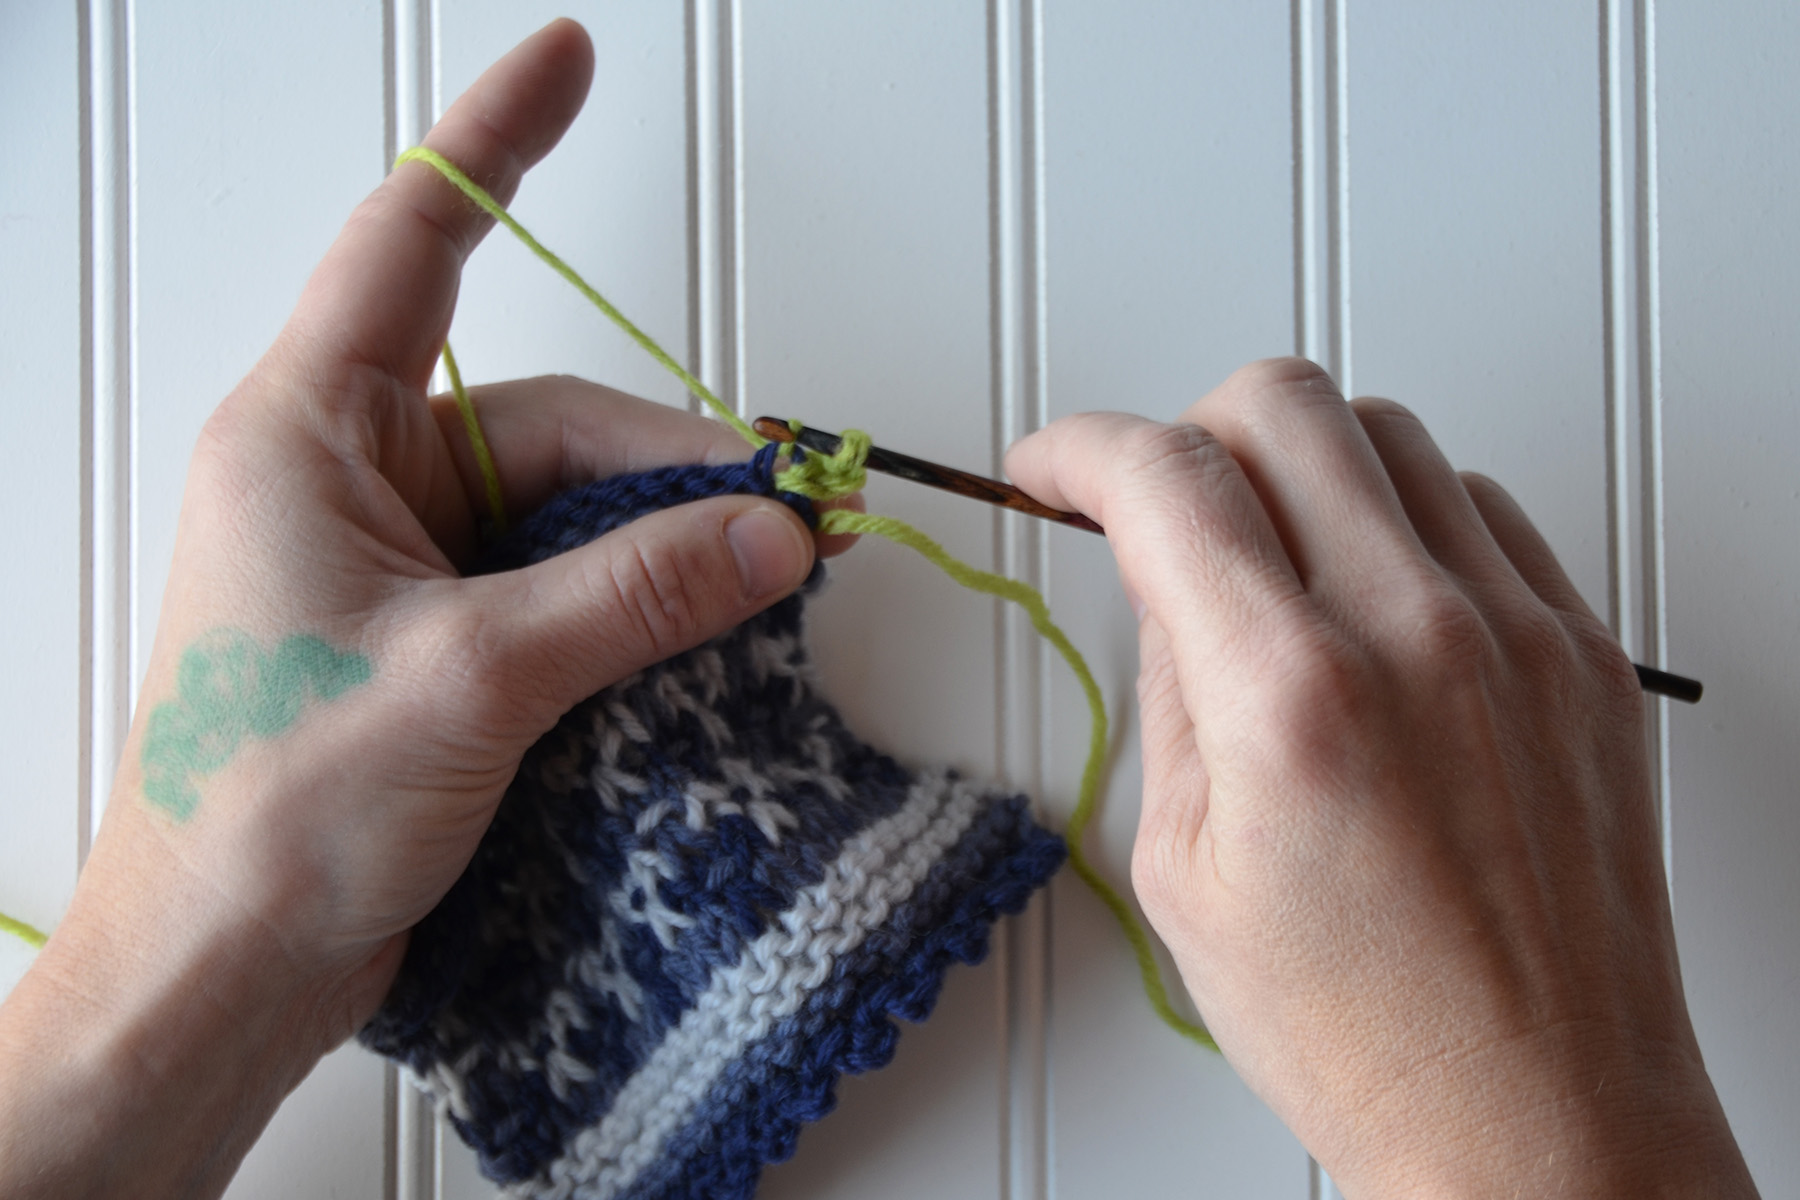
Begin by pulling up a loop onto your hook. Be sure to work through both loops of the knit stitch from the cowl as you do this.
Step 1: Chain 3. To make a chain, first yarn over as shown.
To complete the chain, pull the yarn over through the loop already on your hook.
All 3 chains complete.
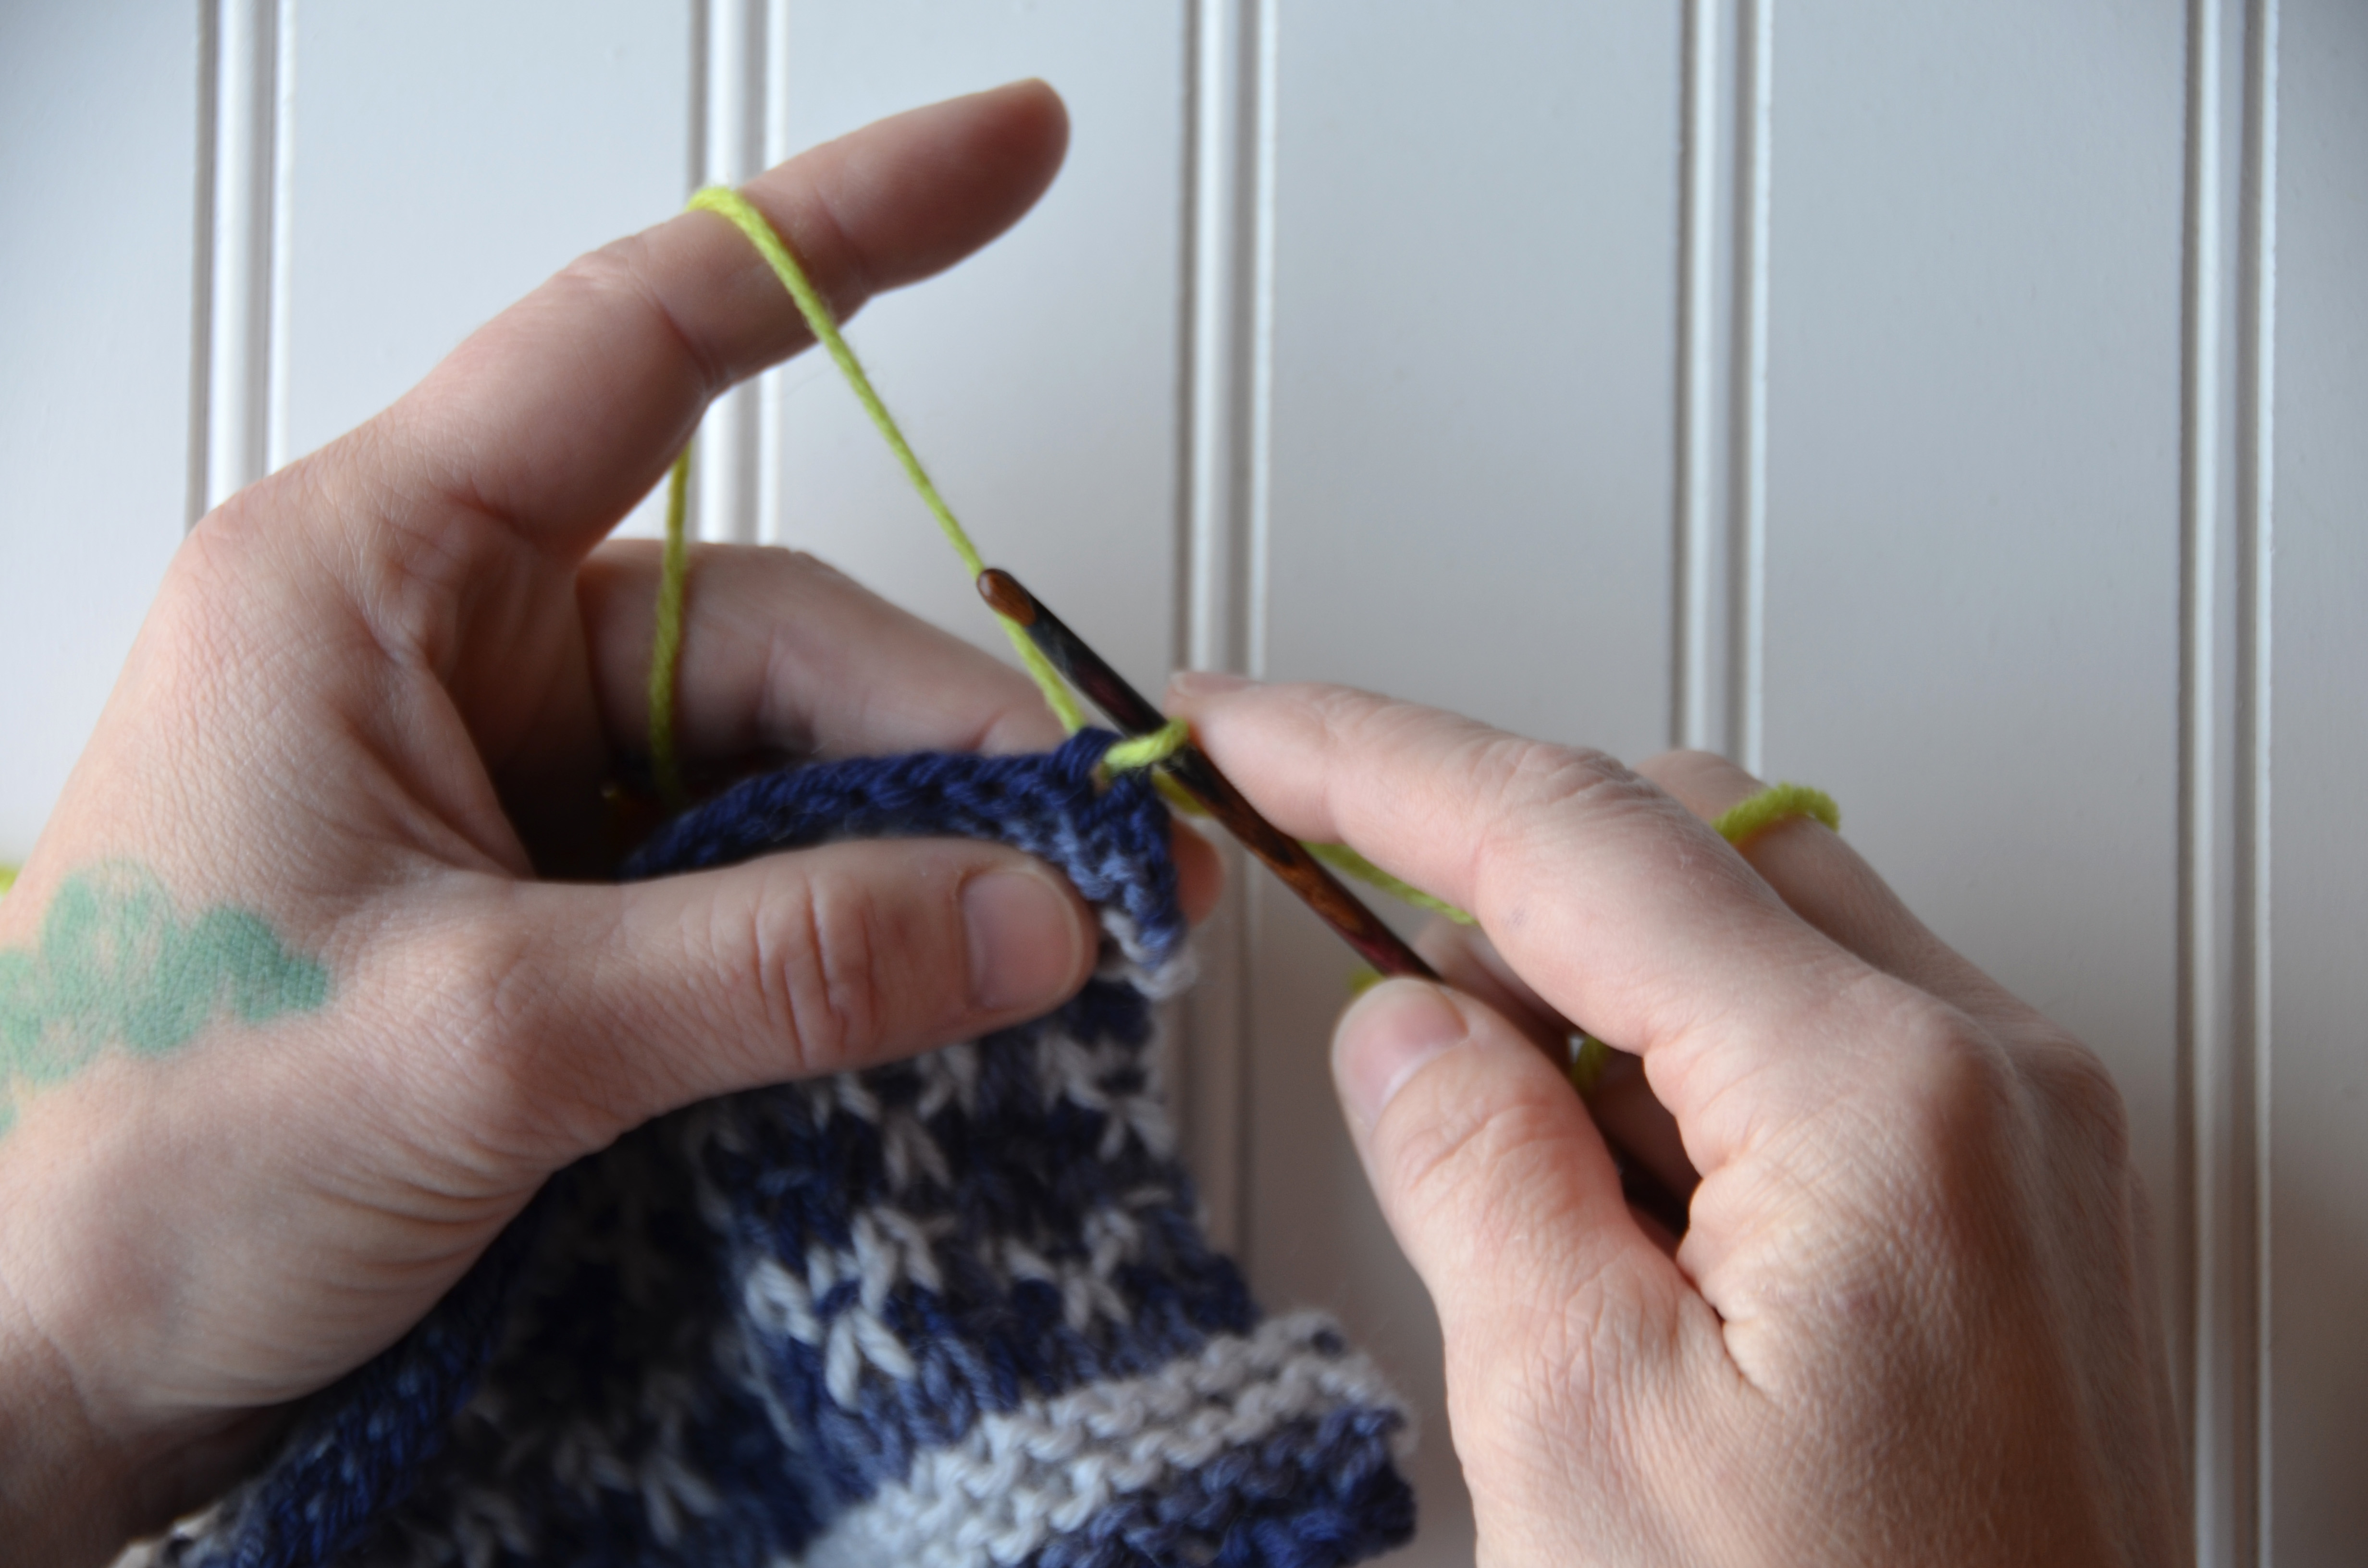
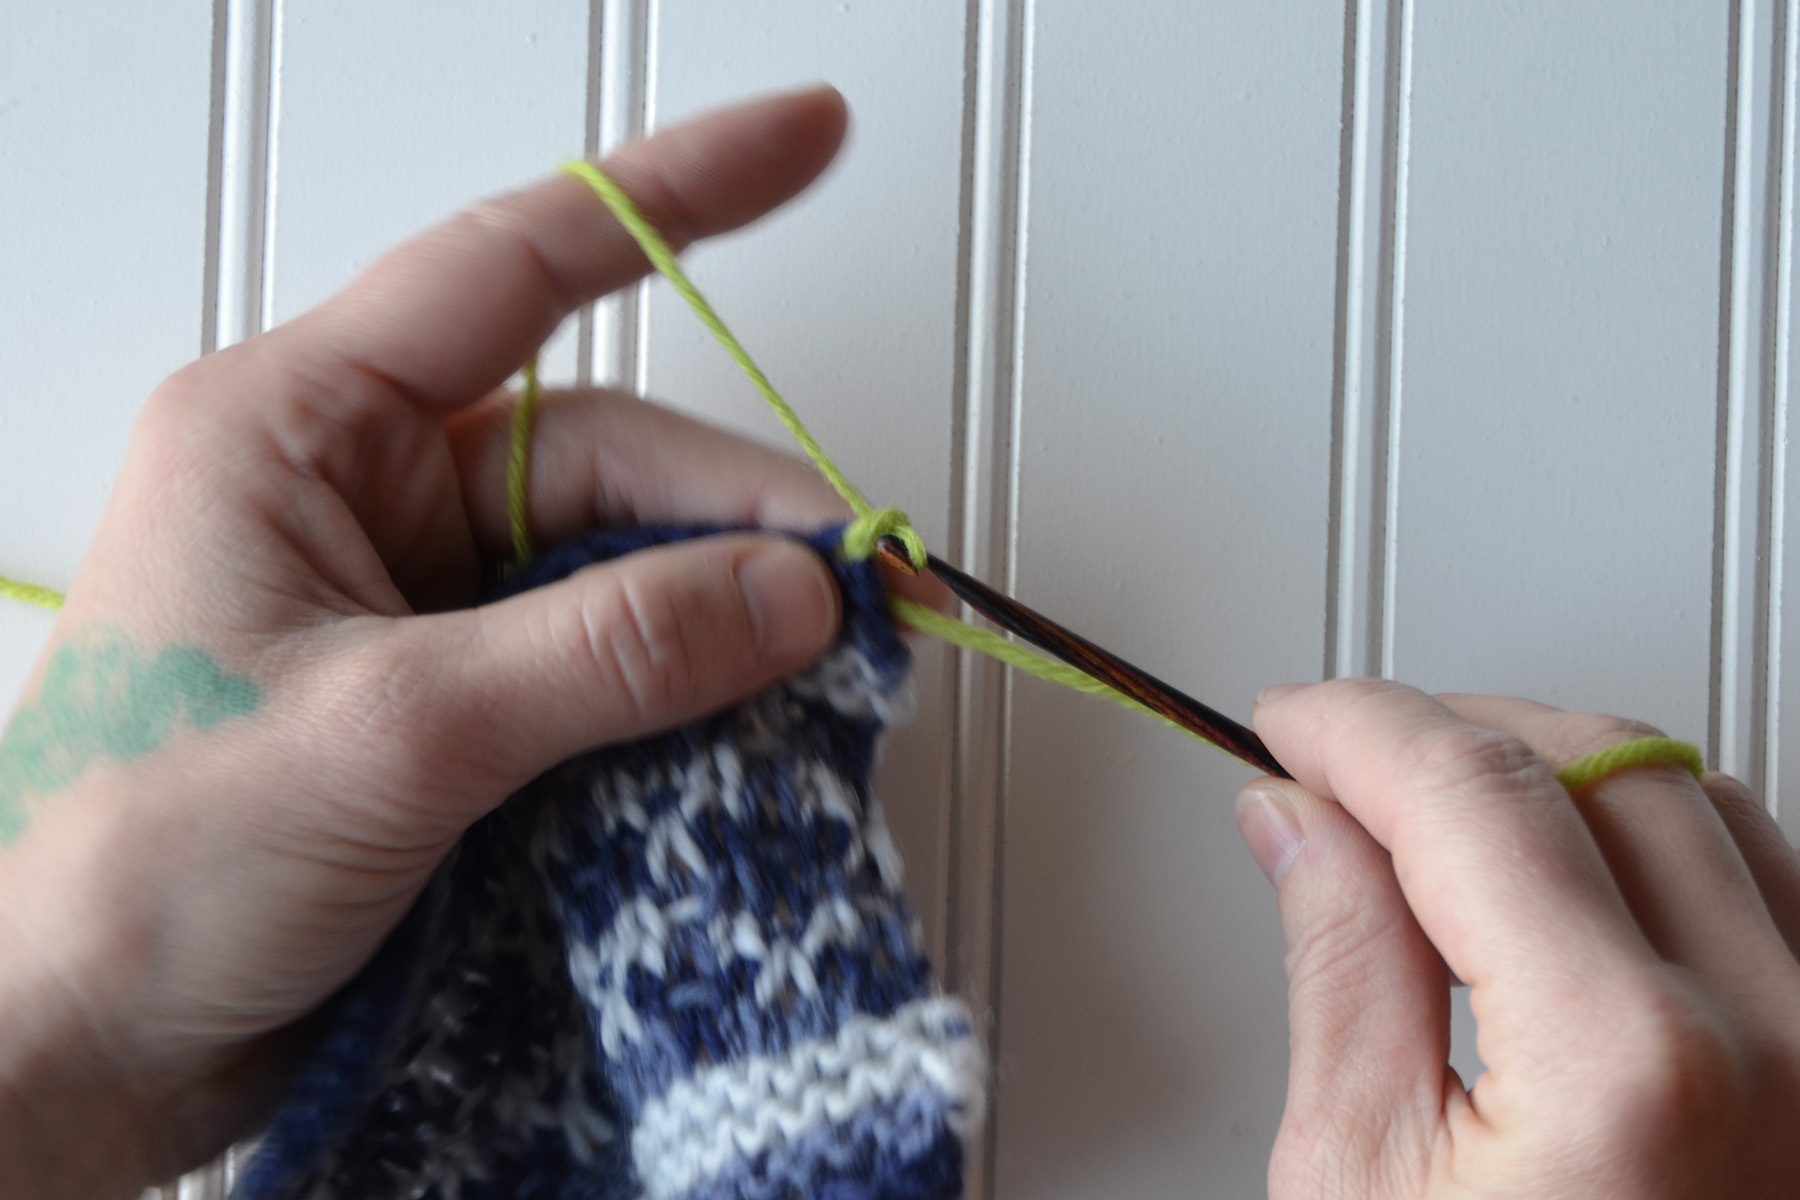
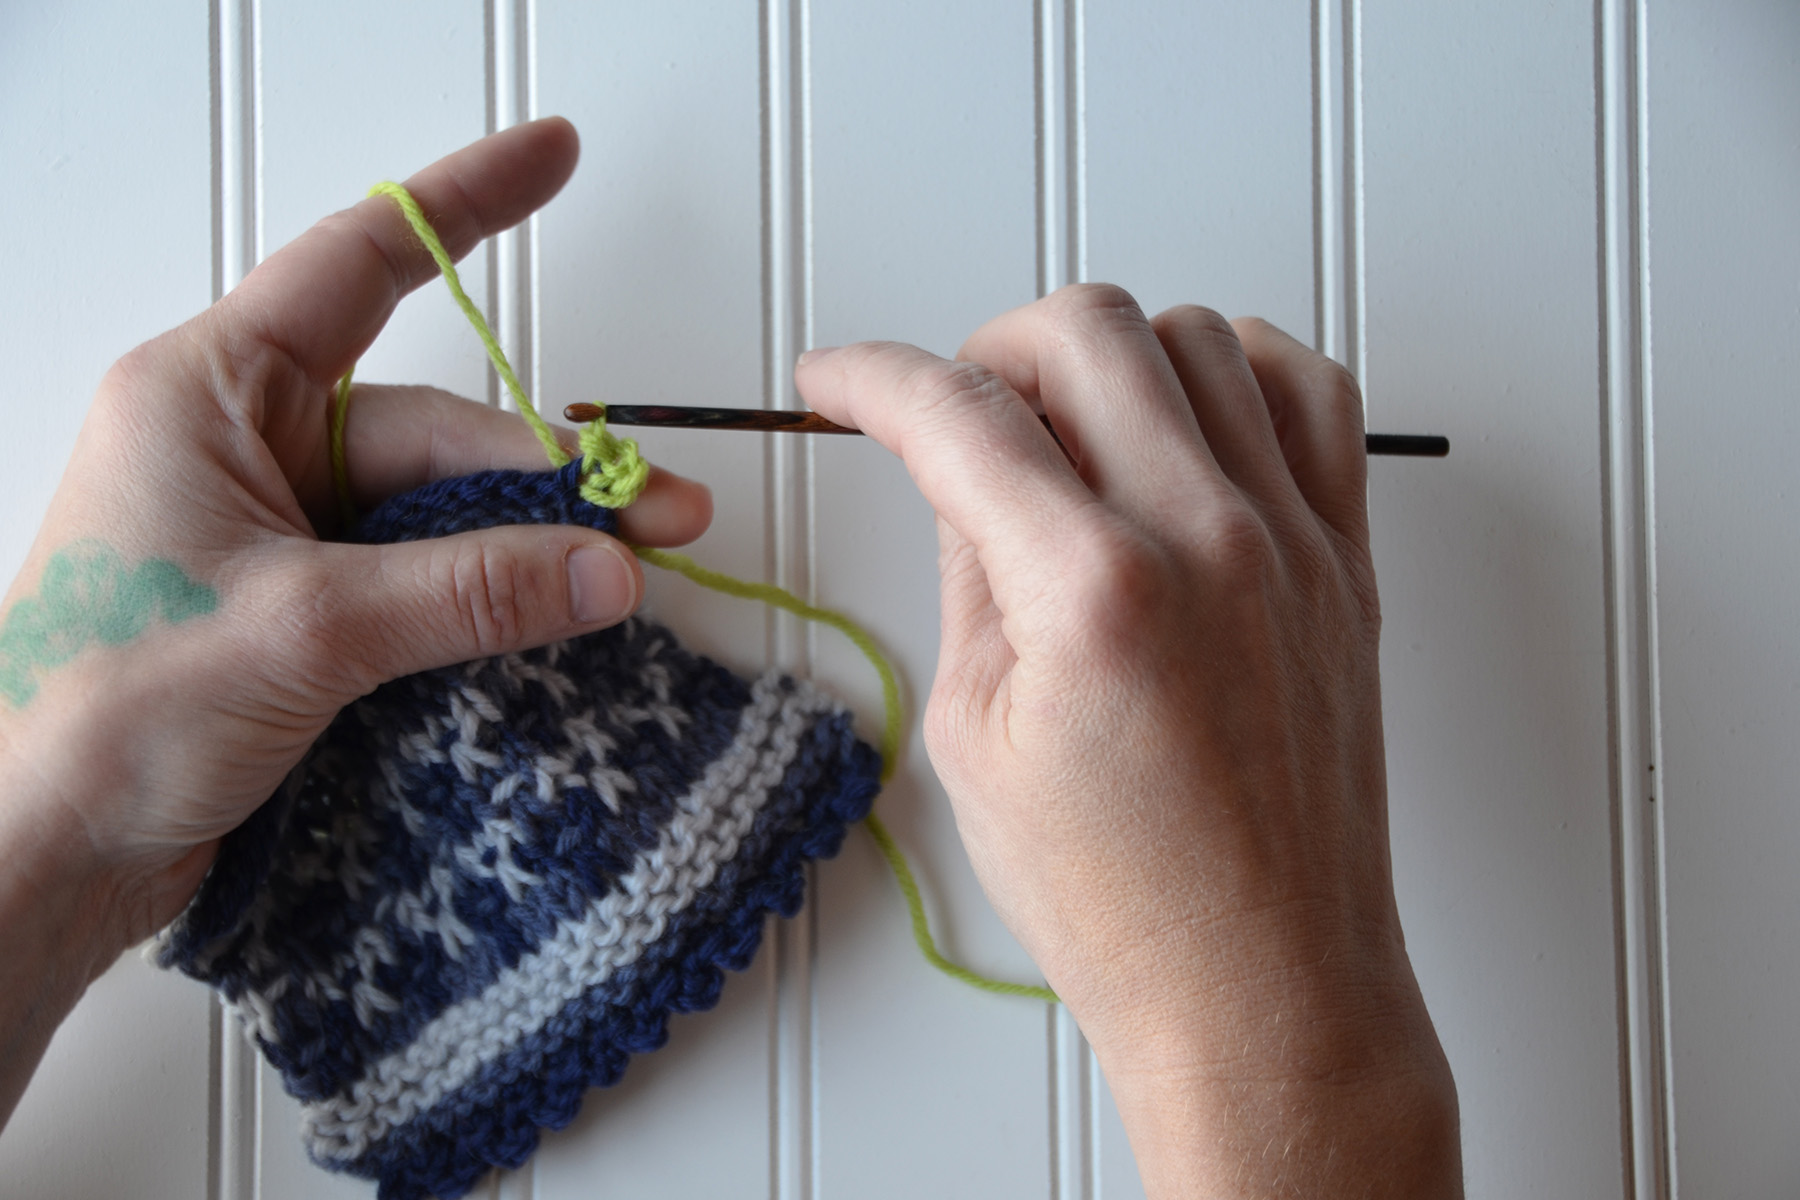
Step 2: Slip stitch into the same knit stitch from the cowl body. To do this, first insert your hook into the stitch, going underneath the same two loops again.
Yarn over and pull through the knit stitch.
Then pull this second loop through the first loop on the hook to complete the slip stitch.
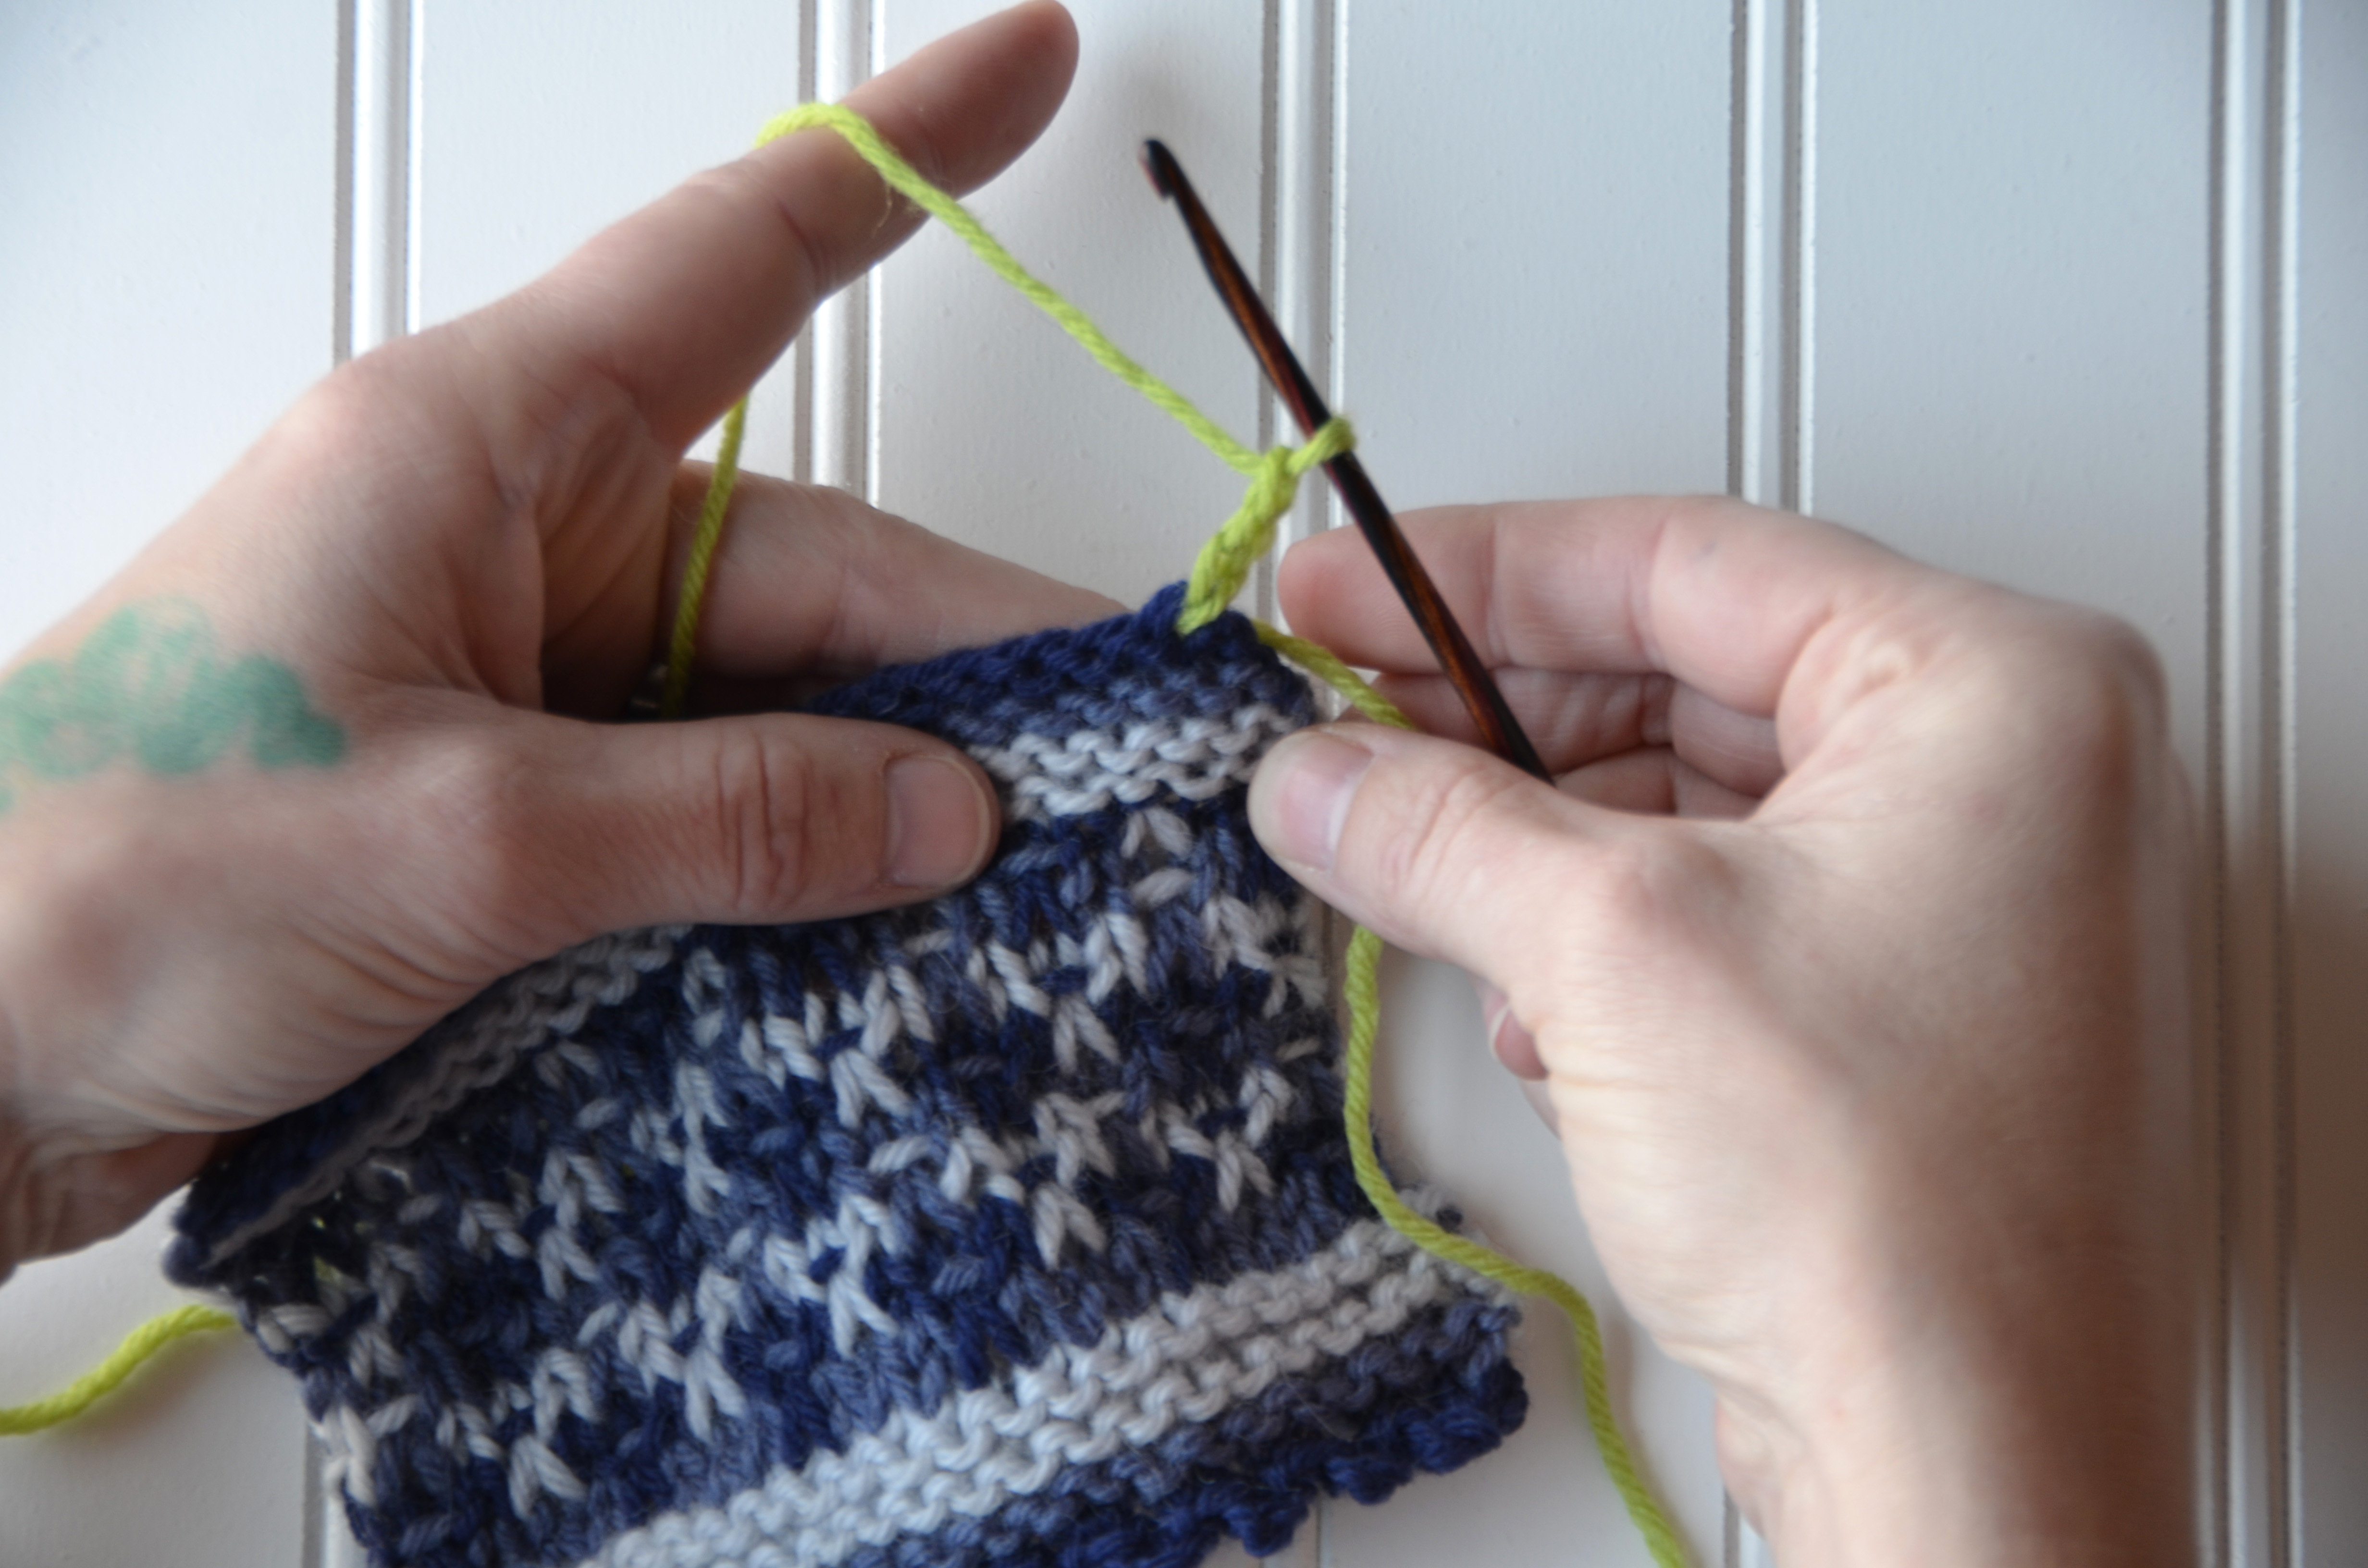
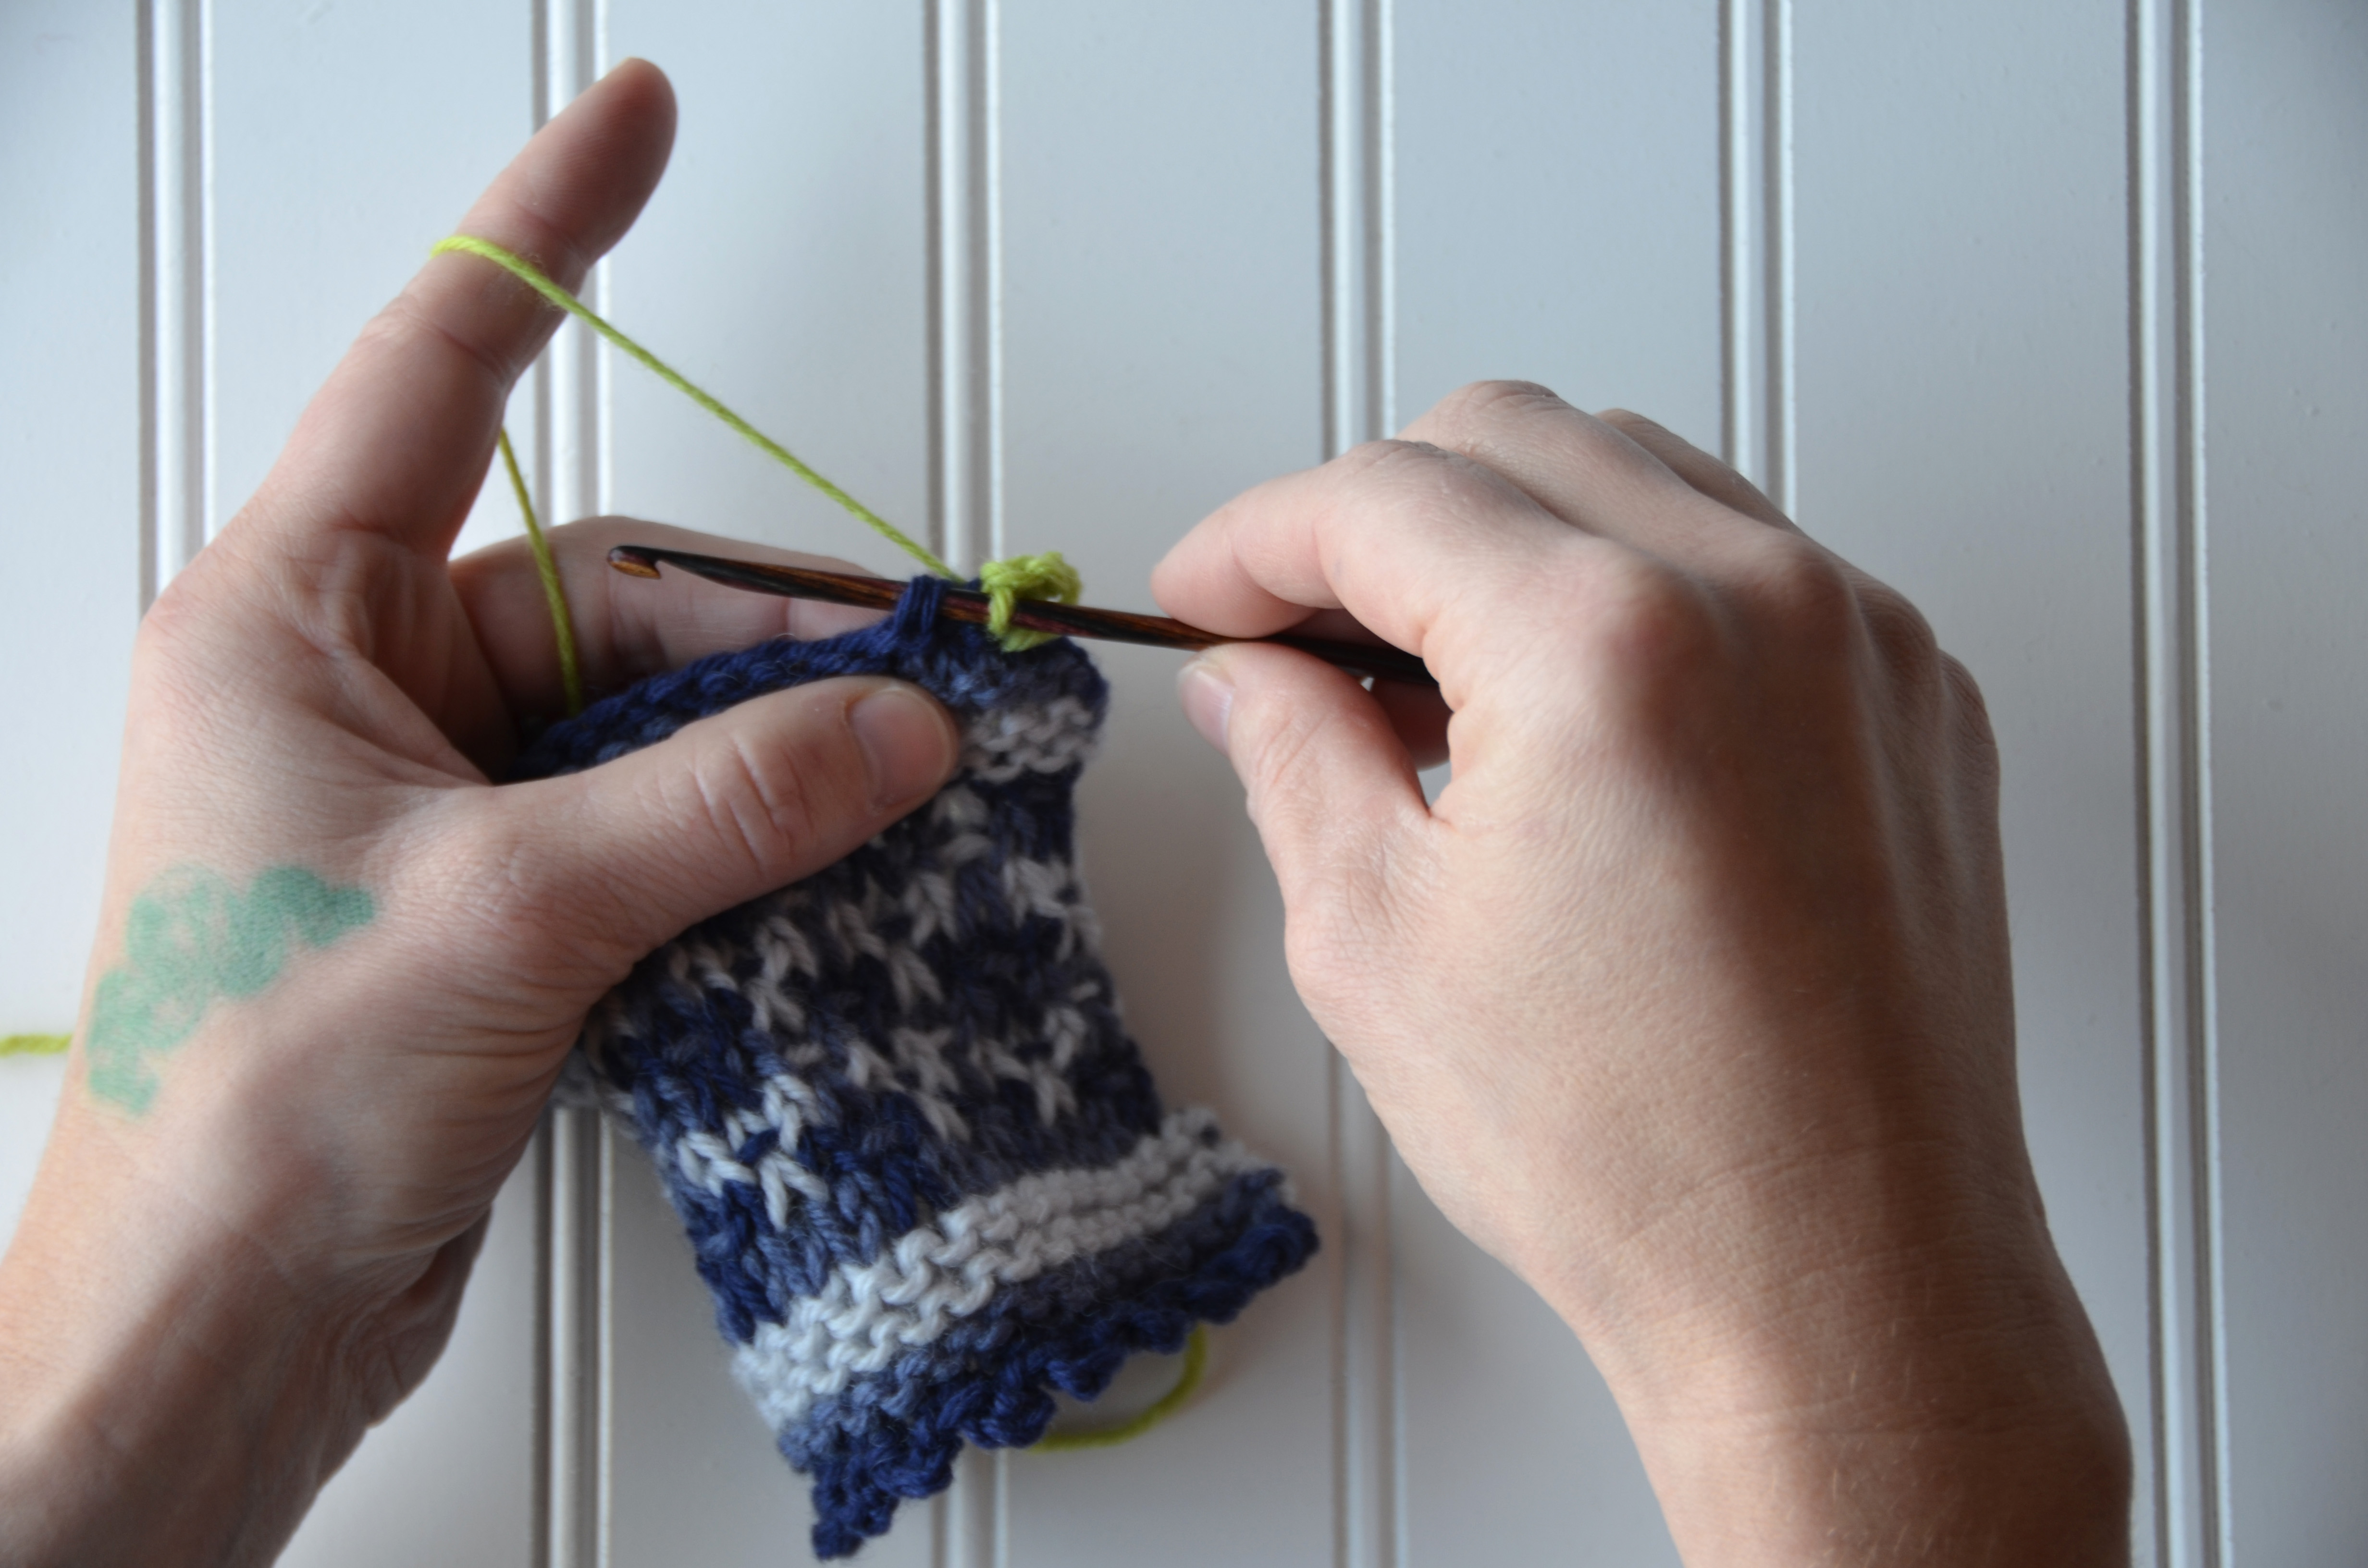
Step 3: Skip the next knit stitch from the cowl body, and slip stitch into the next knit stitch.
Repeat Steps 1-3 for the edging. So you’re going to be working [slip stitch, chain 3, slip stitch] into every other stitch along both edges of the cowl. No big deal, right?
Here’s my swatch after a few more little picots.
Again, you can find the kit for this cowl on our website here (link). Here’s to learning new things!