Flash Pattern Friday – Middlefield

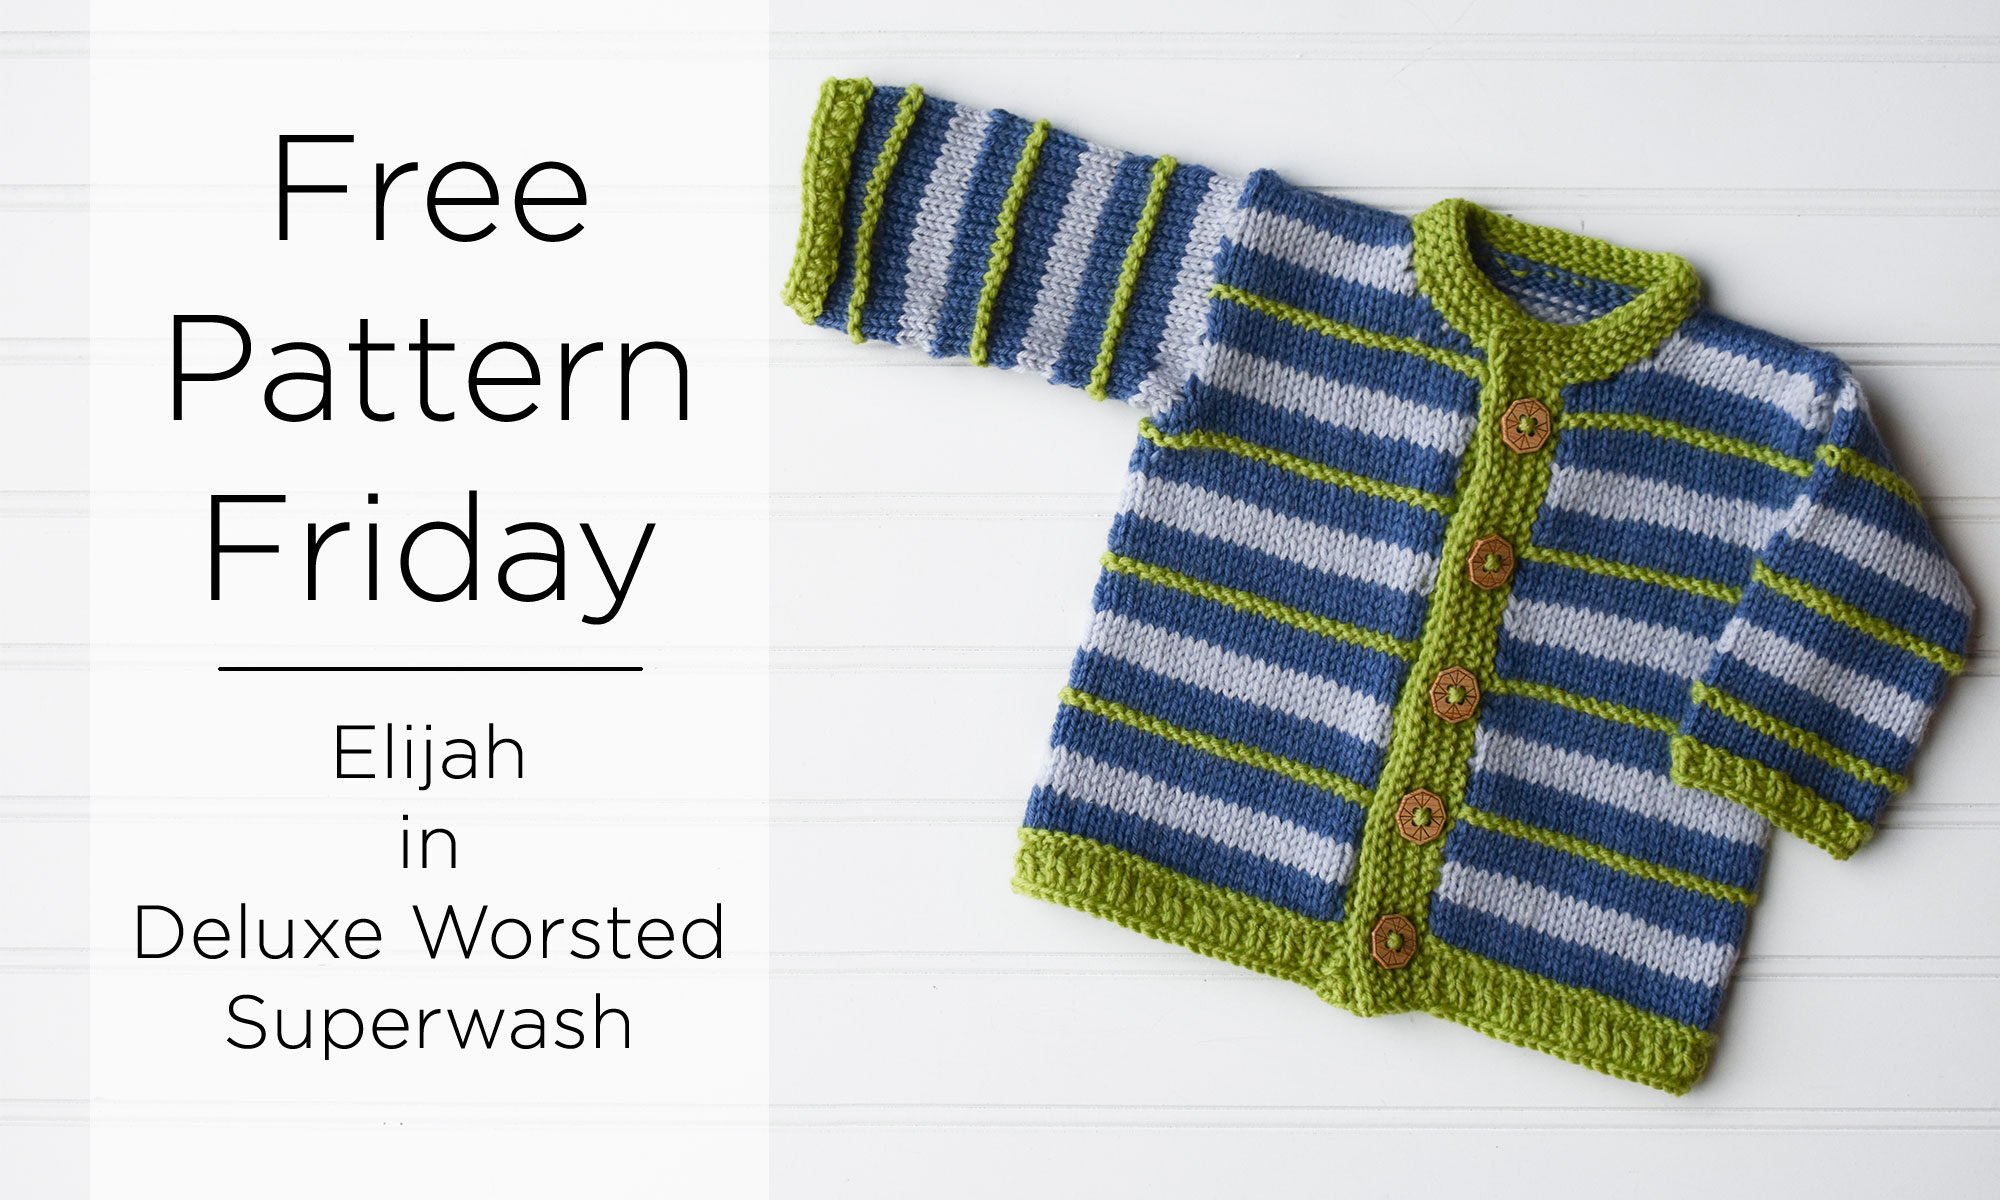
Our first Flash Pattern Friday of 2023 is finally here! This weekend only, grab a free copy of this gorgeous knitting pattern!

Middlefield is the perfect layering piece for the coldest days of winter

On the last Friday of every month, we take a beautiful paid pattern and make it free for the weekend! Today, we’re making the Middlefield (Ravelry link) free to you, a timeless cabled design in our Deluxe Bulky Superwash yarn.

This piece can be worn with the cabel panels horizontal or vertical, whichever you prefer!

Middlefield was first published in 2017 as part of the Ethereal Knits ebook. This collection features seven garments and accessories that are perfect multi-season options for your wardrobe. However, Middlefield is a great challenge for those looking to grow their knitting skillset. This knitted poncho has cabled panels that can be worn horizontally or vertically, depending on your preference. The two sides are identical rectangles, knit sideways and then seamed together to complete this garment. While this outwear piece uses the color 930 Steel Cut Oats, there are plenty of options for those looking to go a different direction.

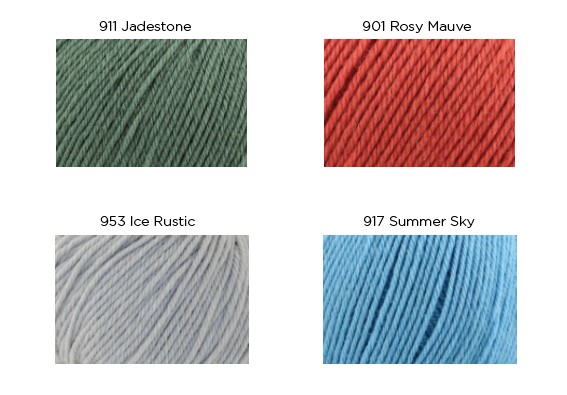
Here are some alternative color options that I would like to suggest. Jadestone brings a beautiful earthy tone that would be perfect for springtime (warm weather, we miss you). Pantone just released their 2023 Color Of The Year, Viva Magenta, and Rosy Mauve would make a great choice if you want to go that route. While winter is still here, Ice Rustic and Summer Sky present two frosty colors that would match the season perfectly. No matter what shade sparks your creativity, I know you will find inspiration from our 50+ color options in Deluxe Bulky Superwash.

This poncho will keep you warm year-round thanks to the 100% superwash wool and bulky yarn weight of Deluxe Bulky Superwash!

To get Middlefield for free, head to Ravelry and click “buy it now” or “add to cart” after searching for this pattern. When you reach the checkout, enter the code “FLASH” to get this pattern for free. Not a Ravelry user? Email us at pattern@universalyarn.com by Sunday, January 29th, and we will take care of you when we return to the office next week.

This graphic will help guide you through the checkout process to get Middlefield for free

We hope that you enjoy this limited-time free pattern, and make sure to shop Deluxe Bulky Superwash this weekend to save 20% off, no code necessary (1/27 – 1/29).

Thanks for stopping by! -Robert

Free Pattern Friday – Elijah

A childrens sweater in blue and green colors is laying flat with one arm outstretched for display next to a caption that says "Free Pattern Friday. Elijah in Deluxe Worsted Superwash"

Happy Friday, friends! Our newest free pattern is a sweet, small piece designed with little ones in mind. This week, we bring you the Elijah cardigan made with Deluxe Worsted Superwash!

Elijah cardigan in Deluxe Worsted Superwash colors 709 Lime Tree, 718 Dusty Blue, and 760 Indigo.

Deluxe Worsted Superwash is a wonderful yarn for a child’s garment. It’s made of 100% superwash wool, so you can machine wash it in cold water, and even tumble dry it on a low setting. It comes in 67 different colors, so there are endless combinations you can create to express the perfect palette for a budding personality. This pattern calls for (1) skein each of #709 Lime Tree, #718 Dusty Blue, and #760 Indigo for all sizes. You could opt for more rosy hues, something adventurous, or even go off pattern and get multiple colors to rainbow your way through each striped section! No matter what you choose, this cardigan will be a treasured gift for someone else, or a little one of your own.

Another detail that adds room for whimsy, quirk, polished-ness or pizazz is buttons! We love getting to add a touch of personality to top off any project with a good button. For this sample, we used the Prism buttons by Katrinkles, which kind of resemble a compass. It’s a touch of adventure that reminds us of those magical moments where kids will play outside imagining that they are explorers trekking through trees and bushes to fantasized lands.

Elijah cardigan, featuring Prism Buttons by Katrinkles

This easy-rated pattern is worked from the bottom-up in one piece using a subtly textured stripe-sequence. The body is worked flat, then the fronts and back are separated at the armholes and worked separately. The shoulders are joined using the three-needle method, then the sleeves are picked up and worked in the round. The button bands and neck edging are picked up and worked flat to wrap the whole thing up. The pattern has schematics to help guide you through the assembly. This is a great project if you’re looking to try a garment for the first time, or want a quick make between other complex pieces, and have a little one in your life to celebrate.

Elijah cardigan, in Deluxe Worsted Superwash is ready for wearing!

We can’t wait to see your version of the Elijah cardigan! Be sure to share it with us on social media. Follow & tag us on Instagram at @Universal_Yarn and use the hashtag #UniversalYarn, or find and follow us on TikTok or Facebook at @UniversalYarn.

That’s all for now, happy stitching friends!

Free Pattern Friday – Classic Cap

Happy Friday everyone! Our newest pattern is not only perfect for the weather outside, but it can be whipped up in a matter of hours. Yes, please! This week’s free pattern is the Classic Cap, knit using Posh Alpaca.

Robert is wearing the Classic Cap shown with the brim folded up; an on-trend styling option.

The Classic Cap is all the things you need for a knit ‘palette cleanser’. Soothing stitch work and a simple, clean silhouette make this pattern perfect for all skill levels. You can work one up in between big projects, or cast it on for your first-ever knit hat – any reason to knit is a good one!

Our Managing Director, Yonca Ozbelli, originally made this hat as a gift request from her daughter Talya, and then made 4 more of them in the span of two weeks! So as you can see, you’ll get this project done in no time, and probably get asked for a few more from your friends or family as well.

Posh Alpaca in 101 Birch, 105 Cinder, and 107 Sparrow

Posh Alpaca is a luxuriously soft, single-ply roving style yarn that is spun in Italy. This blend of wool, acrylic, and superfine alpaca looks beautiful in all types of stitch patterns, both simple and textural. Posh Alpaca has a sophisticated look and feel that makes it a great choice for unisex projects like the Classic Cap.

The Classic Cap can be worn with the brim down for a slouchy look

We chose color 101 Birch for the first sample (pictured above), but the mature color palette in this yarn offers options from soft neutrals to saturated jewel tones. Yonca ended up making a couple more Classic Caps in colors 108 Velveteen and 109 Mulled Wine that are pictured below. I love the way these juicy colors elevate a simple beanie!

The Classic Cap in 108 Velveteen (left) and 109 Mulled Wine (Right)

Since I know you’re ready to cast on, here’s some more information about the Classic Cap pattern. It is sized from Baby – Adult Large (shown in Adult Small/Medium), and features a Twisted Rib brim, Stockinette stitch body, and spiral crown shaping. I love the look of a twisted rib brim on a hat. It adds a polished element to the finished project that elevates an otherwise simple pattern.

Crown shaping on the Classic Cap

Don’t fret if you’re an absolute beginner. Although Twisted Rib may seem complex, it is quite easy to work once you get the hang of knitting and purling into the back loops. If you want to make sure the brim is able to be worn folded up or down, be sure to work Twisted Rib, not Half Twisted Rib so that the brim is fully reversible. With the rest of the hat worked in soothing Stockinette stitch and simple decreases, this is a perfect project to work on while hanging out with friends, or watching your favorite show. This pattern does feature different crown shaping instructions for each size, so just be mindful that you are working the instructions indicated for your chosen size.

Sometimes the simple things in life are the best things. The Classic Cap is an accessory you can sport with any outfit, or make it and gift it to someone special in your life. Either way, I’m sure it will become a well-worn hat in no time at all!

You can download the Classic Cap pattern, knit using Posh Alpaca at this link. Shop our luxuriously soft Posh Alpaca yarn here.

Happy Crafting,

Aubrey

Free Pattern Friday – Cobbled Cowl

Happy Free Pattern Friday! Today we bring you the Cobbled Cowl (pattern link). This simple accessory works up quickly and has a lovely texture featuring a hazy halo of fibers from the yarn, Nymph.

Cobbled Cowl made with Nymph in color 110 Lichen.

Nymph is an irresistibly soft DK weight yarn with a cotton chainette construction and nylon fibers blown through, creating an ethereal effect. It comes in 50 g balls, is made of 84% cotton and 16% polyamide, and is machine washable for easy care. The palette is soft, yet earthy, with a hue to please everyone. To make way for new products, we are saying farewell to Nymph, so be sure to grab it while you can at a deep discount!

Rozetti Yarns, Nymph.

The cowl is worked flat from the bottom-up then seamed. The texture is a basic crochet stitch pattern called the Cobbled Stitch, which inspired name for the piece. It’s created by alternating single crochet (sc) and double triple crochet (dtr) across one row, then just single crochet for the next row. The soothing repetition, and no-brainer construction makes it accessible for beginners, and fun for experienced crafters wanting a Netflix-and-stitch project.

Close up view of the cobbled stitch texture featured in the Cobbled Cowl.

I hope you love this weeks Free Pattern Friday! Of course, I know that not all readers of this blog crochet, but don’t fret! There are plenty of knit patterns using this beautiful Nymph yarn. The Rosette Cowl is another freebie featuring a simple stitch repeat, or you can kick of 2023 with a larger project, like the January Sweater. Whatever you choose, be sure to share it with us – we love seeing your projects! Follow & tag us on Instagram at @Universal_Yarn and use the hashtag #UniversalYarn, or find and follow us on TikTok or Facebook at @UniversalYarn.

That’s all for now, Happy Stitching!
Ashley Jane

Tutorial – Magic Circle

Sample Swatches of crochet stitches lay in an arrangement next to three crochet hooks. The heading "AJ's Crochet Corner, Tips and Tricks" is present.

Crocheting into a magic circle makes evenly placing your starting stitches a snap! This technique offers a way to place as many stitches as you need into a perfectly circular shape with the tug of some yarn.

Using a magic circle takes away the guesswork involved with a different method of creating a circular base, where you create a chain, then slip stitch to form a ring. Because this other method with a starting chain has a fixed circumference, it may leave a gap in the center if you make it too big, or be impossible to work into if it’s too small. With the magic circle being adjustable, these sizing problems while starting a project magically disappear!

One thing that can be a bit tricky is that not everyone calls this method a “magic circle” as seen in the Paradise Pouch. When getting started with a pattern, you may also read “adjustable ring,” as seen in the Cotton Candy Swirl, or a blend of both called a “magic ring.” It can also be called a loop, as in “magic loop” or “adjustable loop.” Lastly, you may see it represented visually in a chart, denoted by a swirled shape before any stitches start, like in the Spice Market Shawl. Now that you know what to look for, let’s take a look at how to do it! There are just 6 simple steps to do to create a magic circle.

Step 1: Create the circle.

Create an initial loop by laying flat, if it helps, or held in your hand. Place the tail behind the working yarn, and pointed to the left.
Pinch yarn where it overlaps to hold the loop in place while you work.

Step 2: Insert hook.

Reach your crochet hook into the loop.

Step 3: Yarn over.

It may feel strange to tension the yarn while pinching the circle. You may try holding it as seen above or switch to holding the circle with your thumb and middle finger to tension with your pointer finger. I have a habit of starting like this then switching my grip when I begin chaining and stitching as normal (as shown, beginning in step 5).

Step 4: Pull through.

Pull the working yarn through the loop with your crochet hook.

Step 5: Chain, then stitch into the middle of the circle. The pattern you are following will indicate how many chains, then stitches to create.

Here I chain 3, then double crochet 4 times into the loop to demonstrate the technique. But you can do this with any number of, or type of stitches!

Step 6: Close the circle.

Release your hold on the circle, and pinch the tail of the yarn.
Pull the tail of the yarn until the circle is completely closed.

It’s as easy as that! From here, you continue following the pattern as normal, and will weave in the tail along with any other ends as a finishing step. I hope you find this tutorial helpful, and that you feel inspired to try a new project in the round!

That’s all for now, and Happy Stitching!
Ashley Jane