This is part 3 in a 12 part series highlighting designs from our 12 Days of Winter, Series 3 Edition.
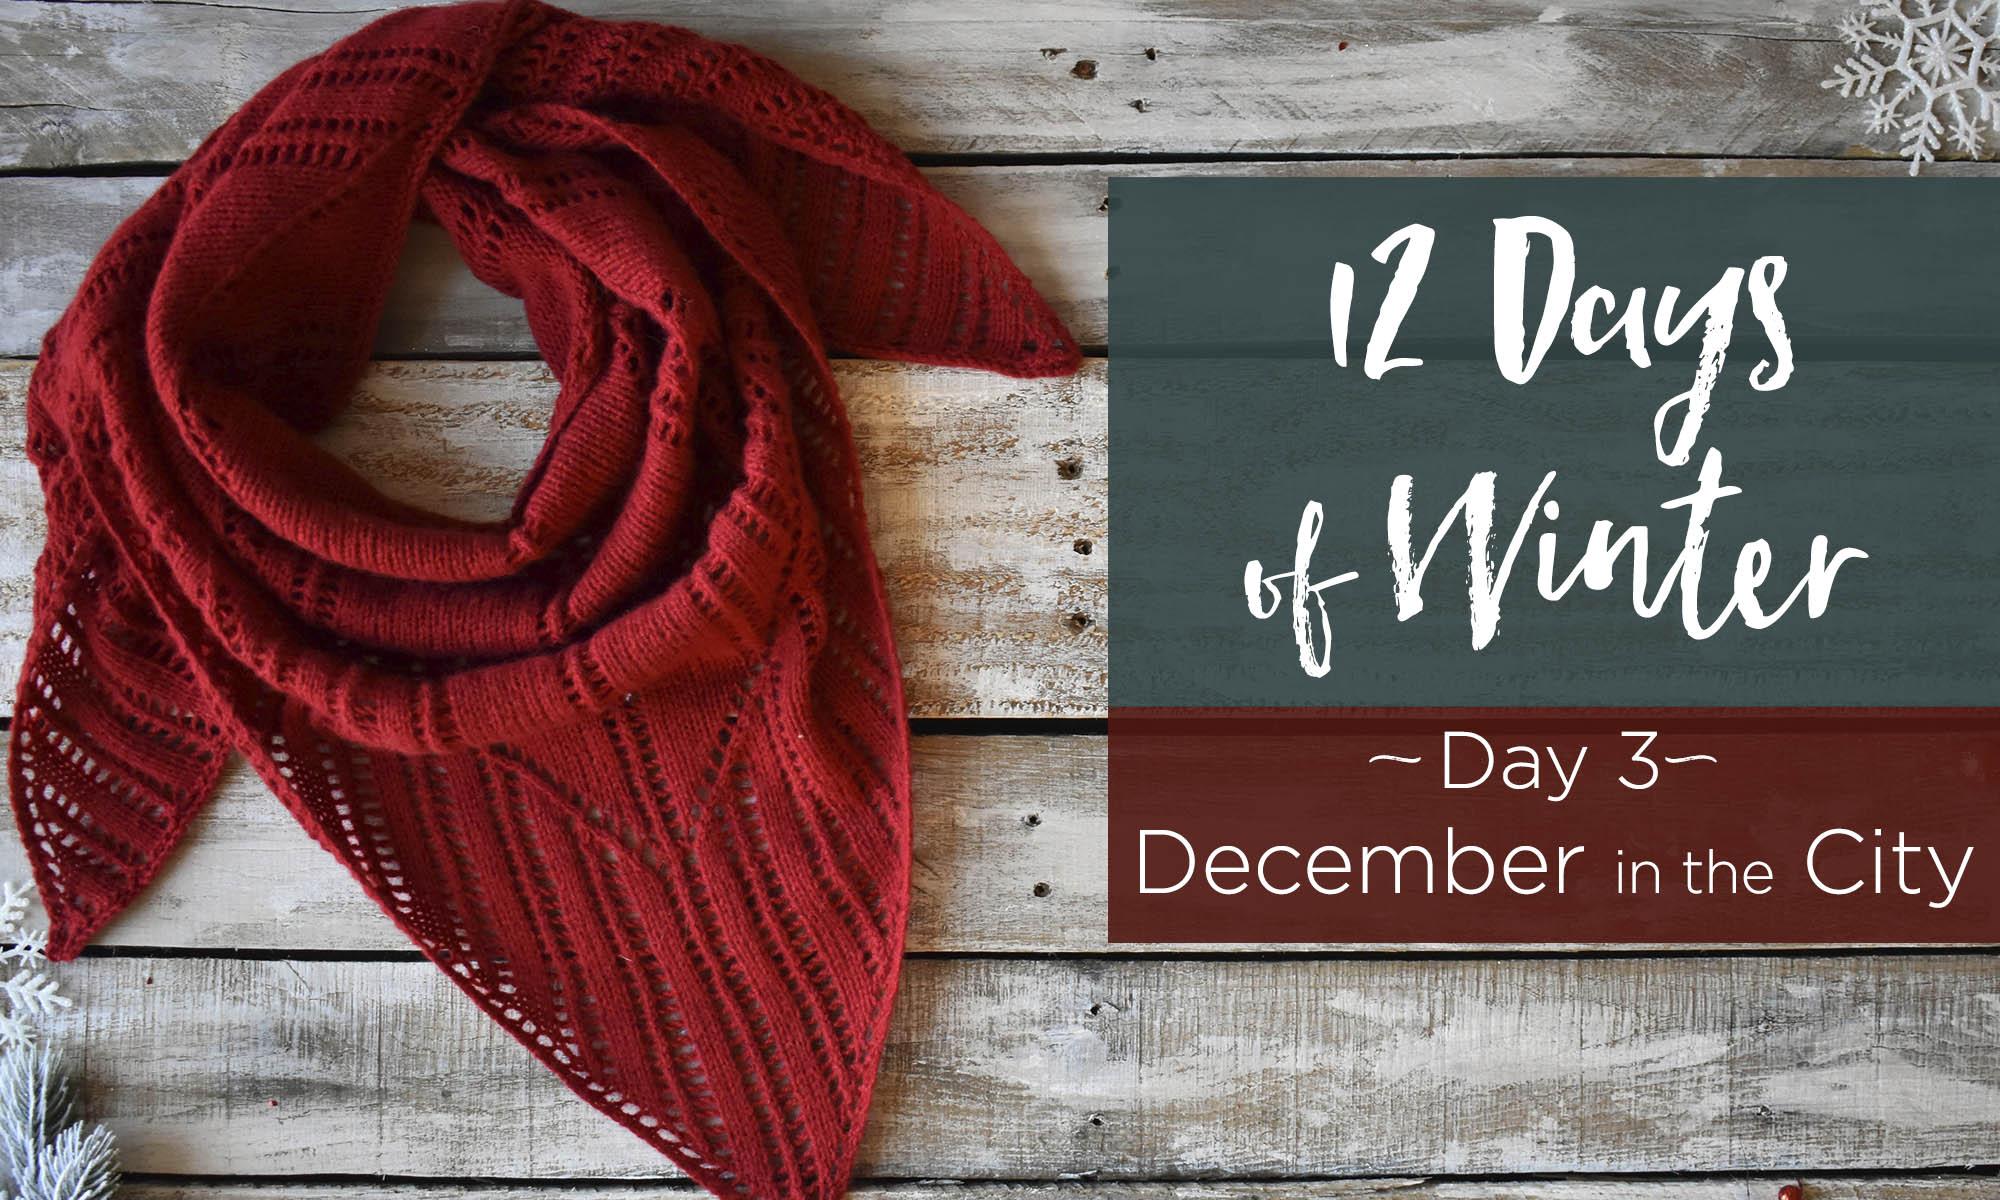
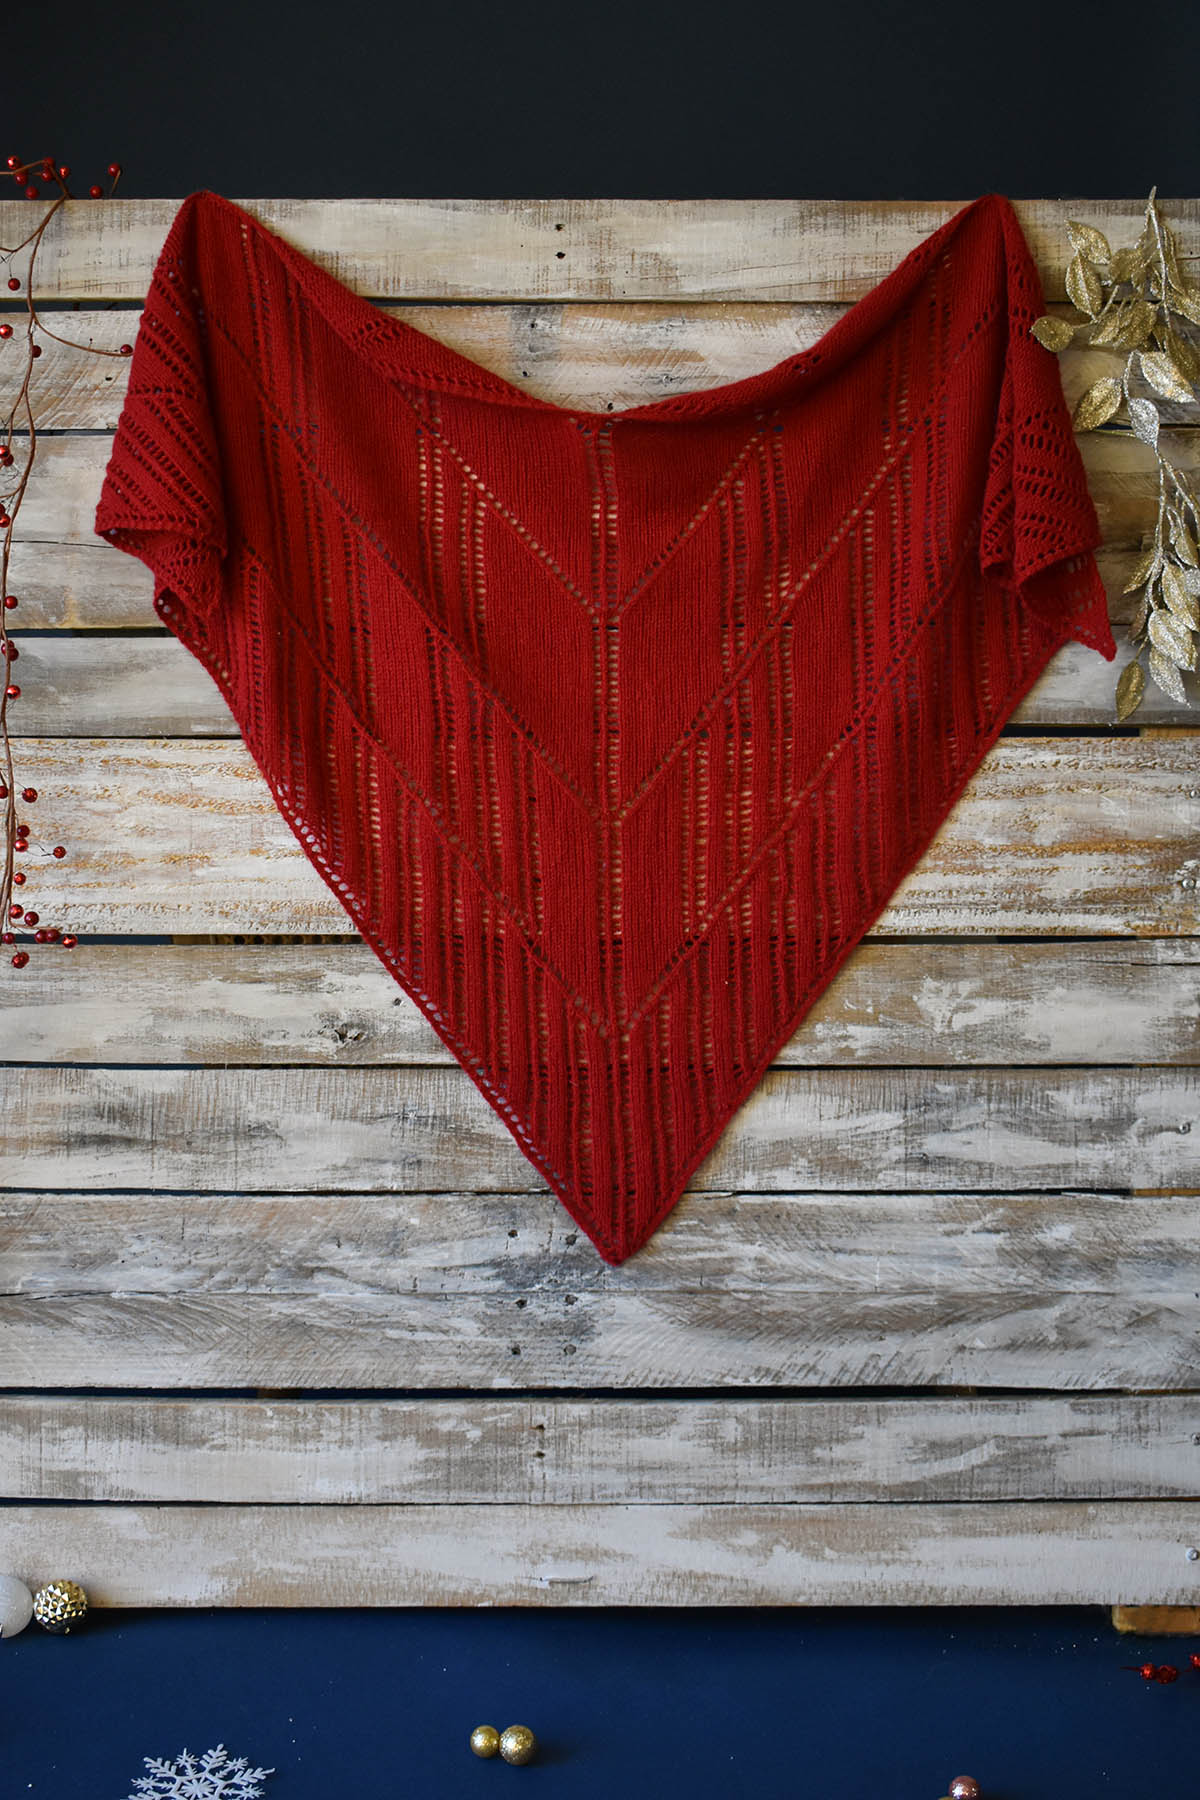
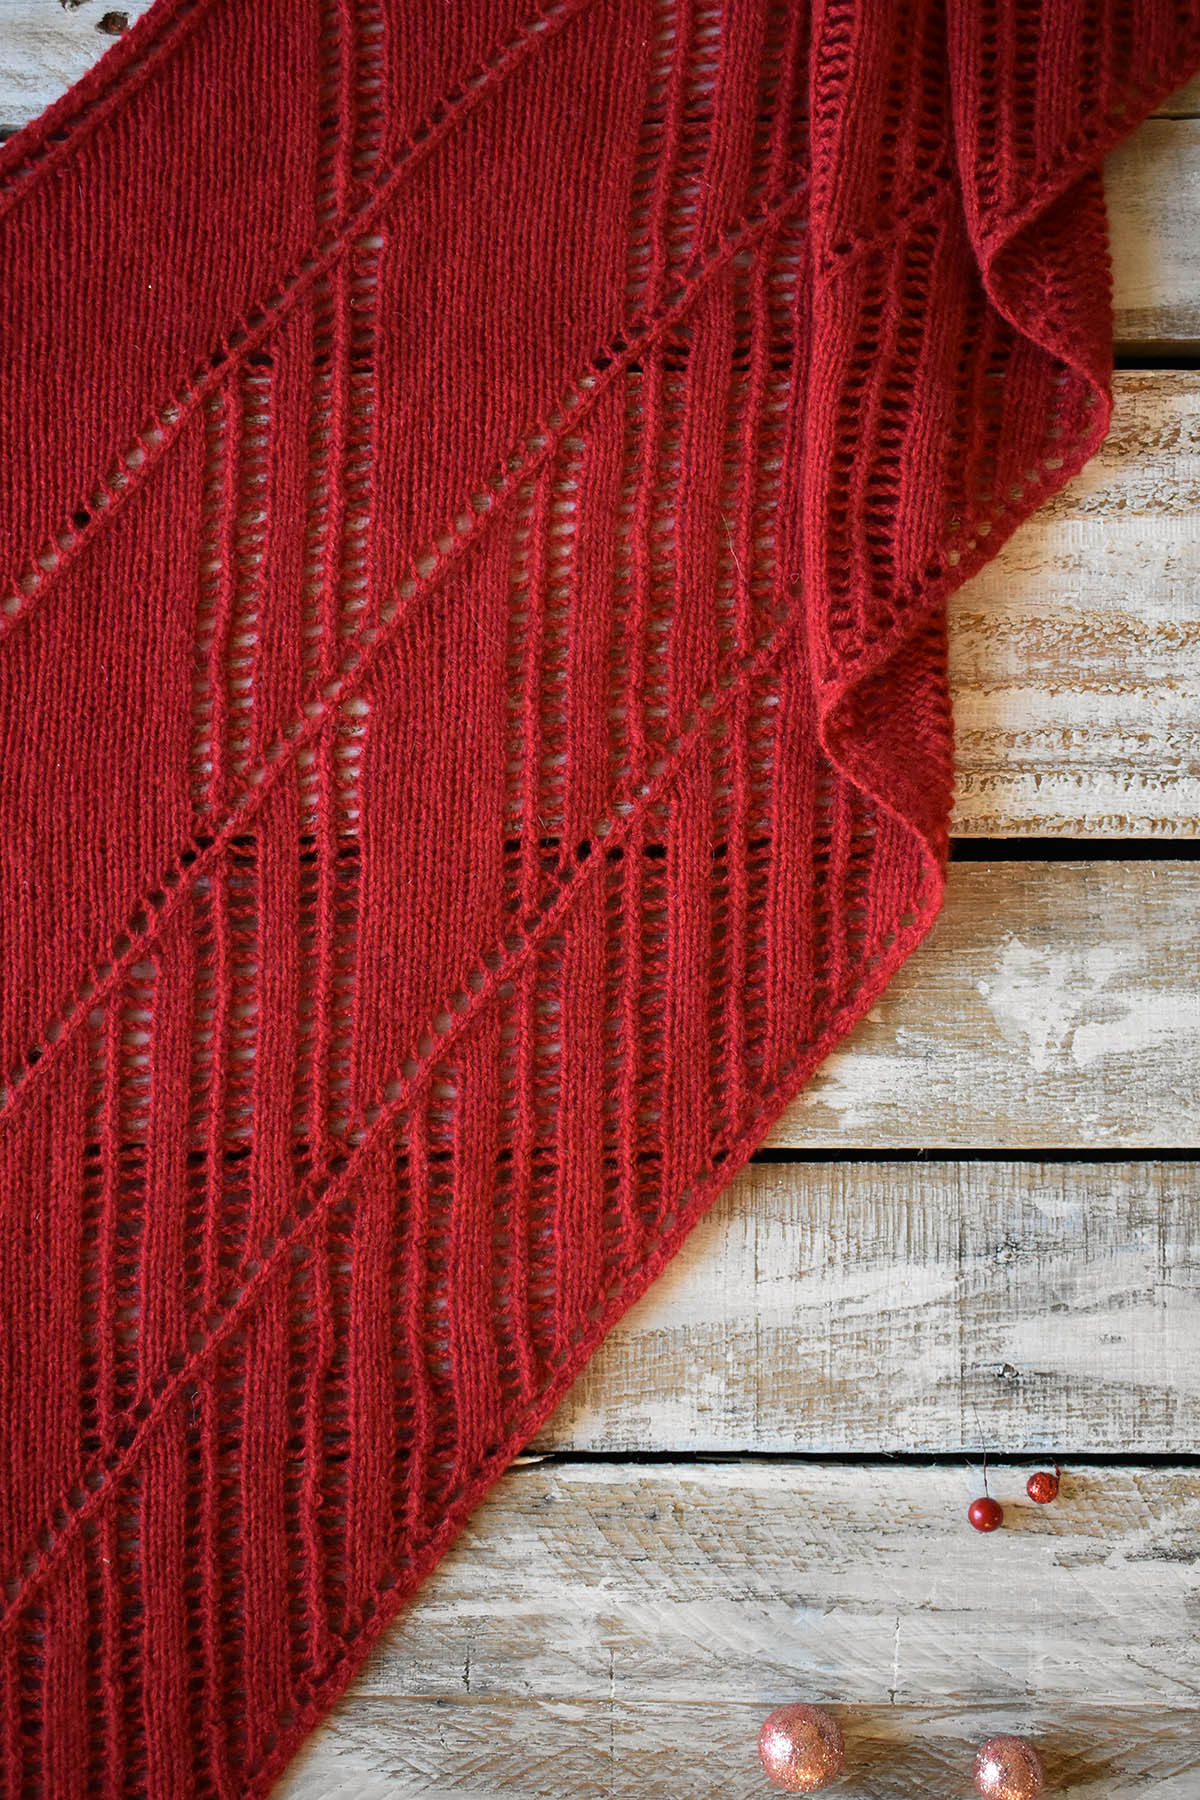
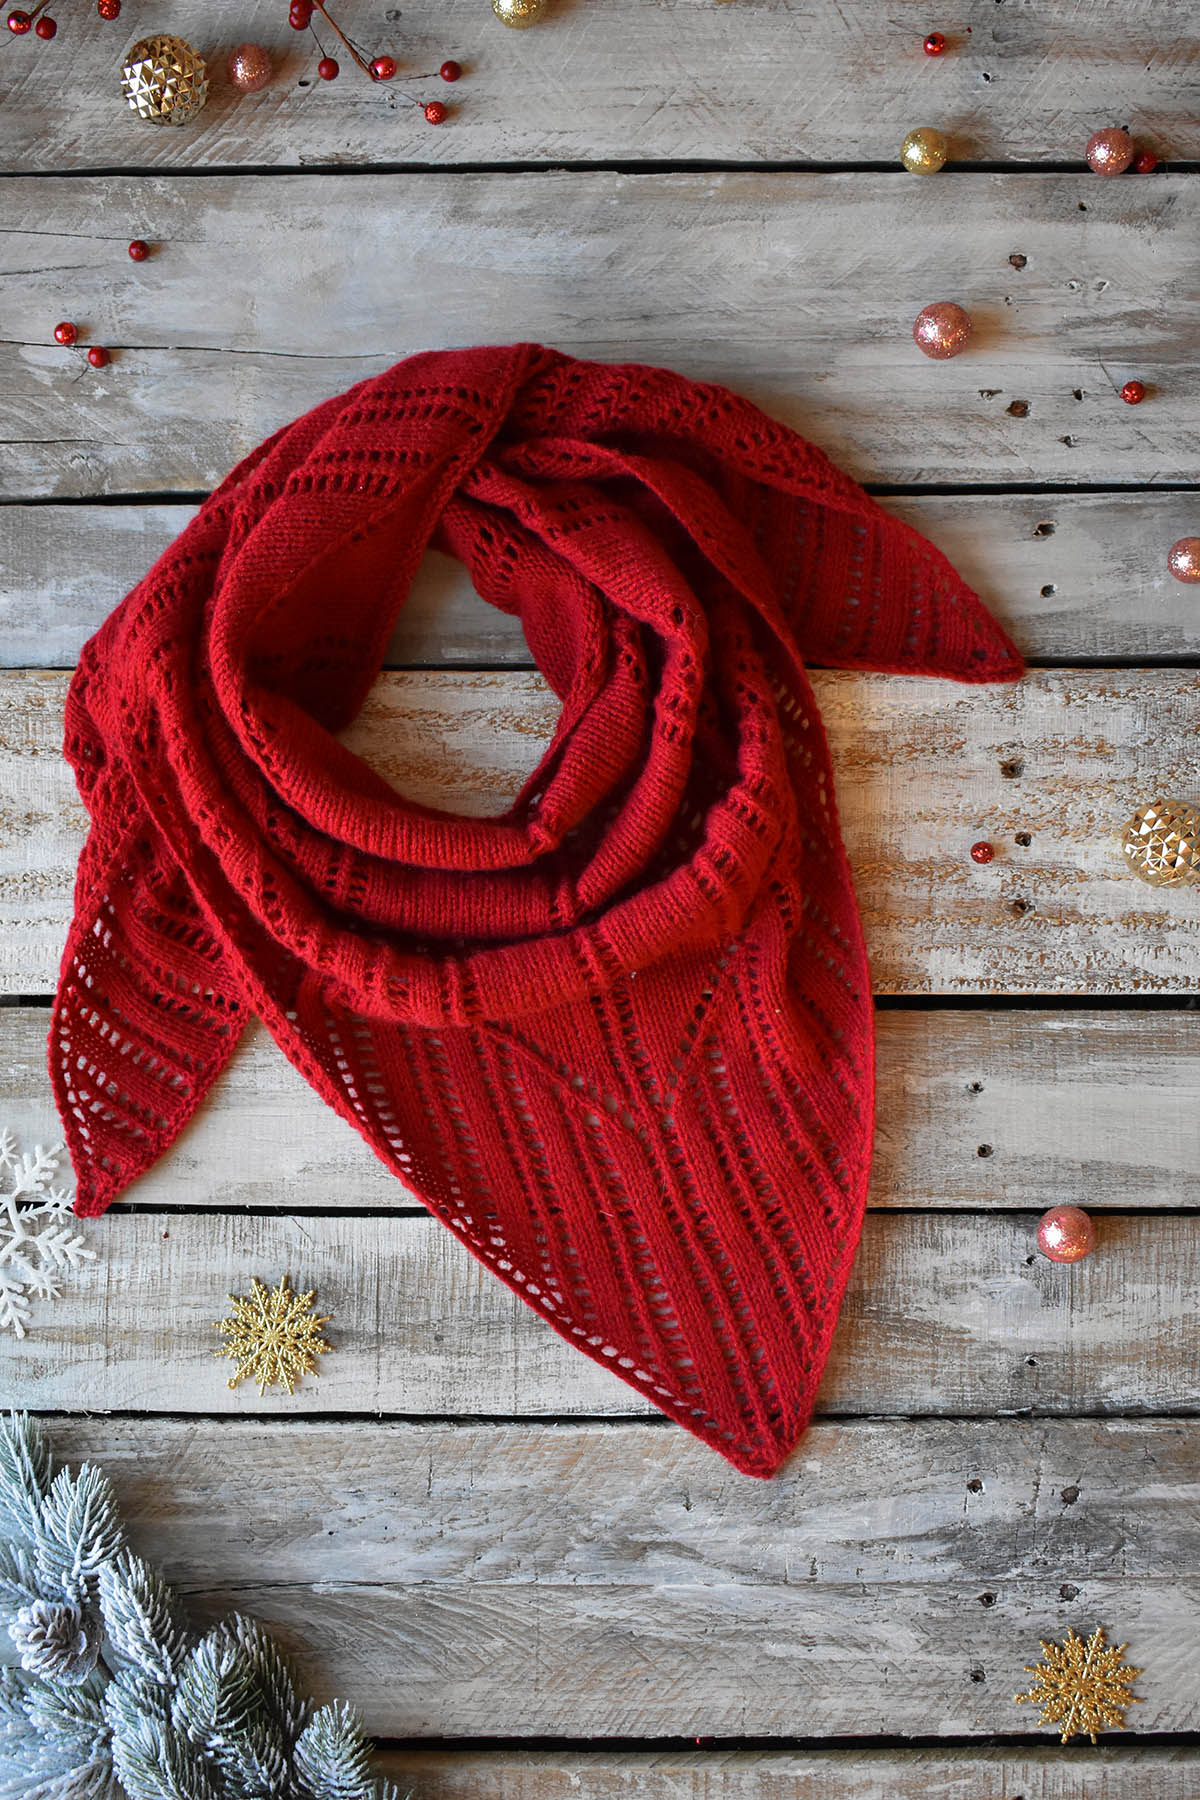
It’s already Day 3 of the 12 Days of Winter Kit Collection, and I couldn’t be more excited to share this lovely shawl with you. Say hello to December in the City – a luxe shawl in dreamy Cashmere Lusso, designed by Adrienne Larsen. We love the lace columns and geometry of this shawl, and we wanted to pick Adrienne’s brain. We asked her to share a bit about her inspiration for this design, so she kindly obliged. Here is what she had to say:
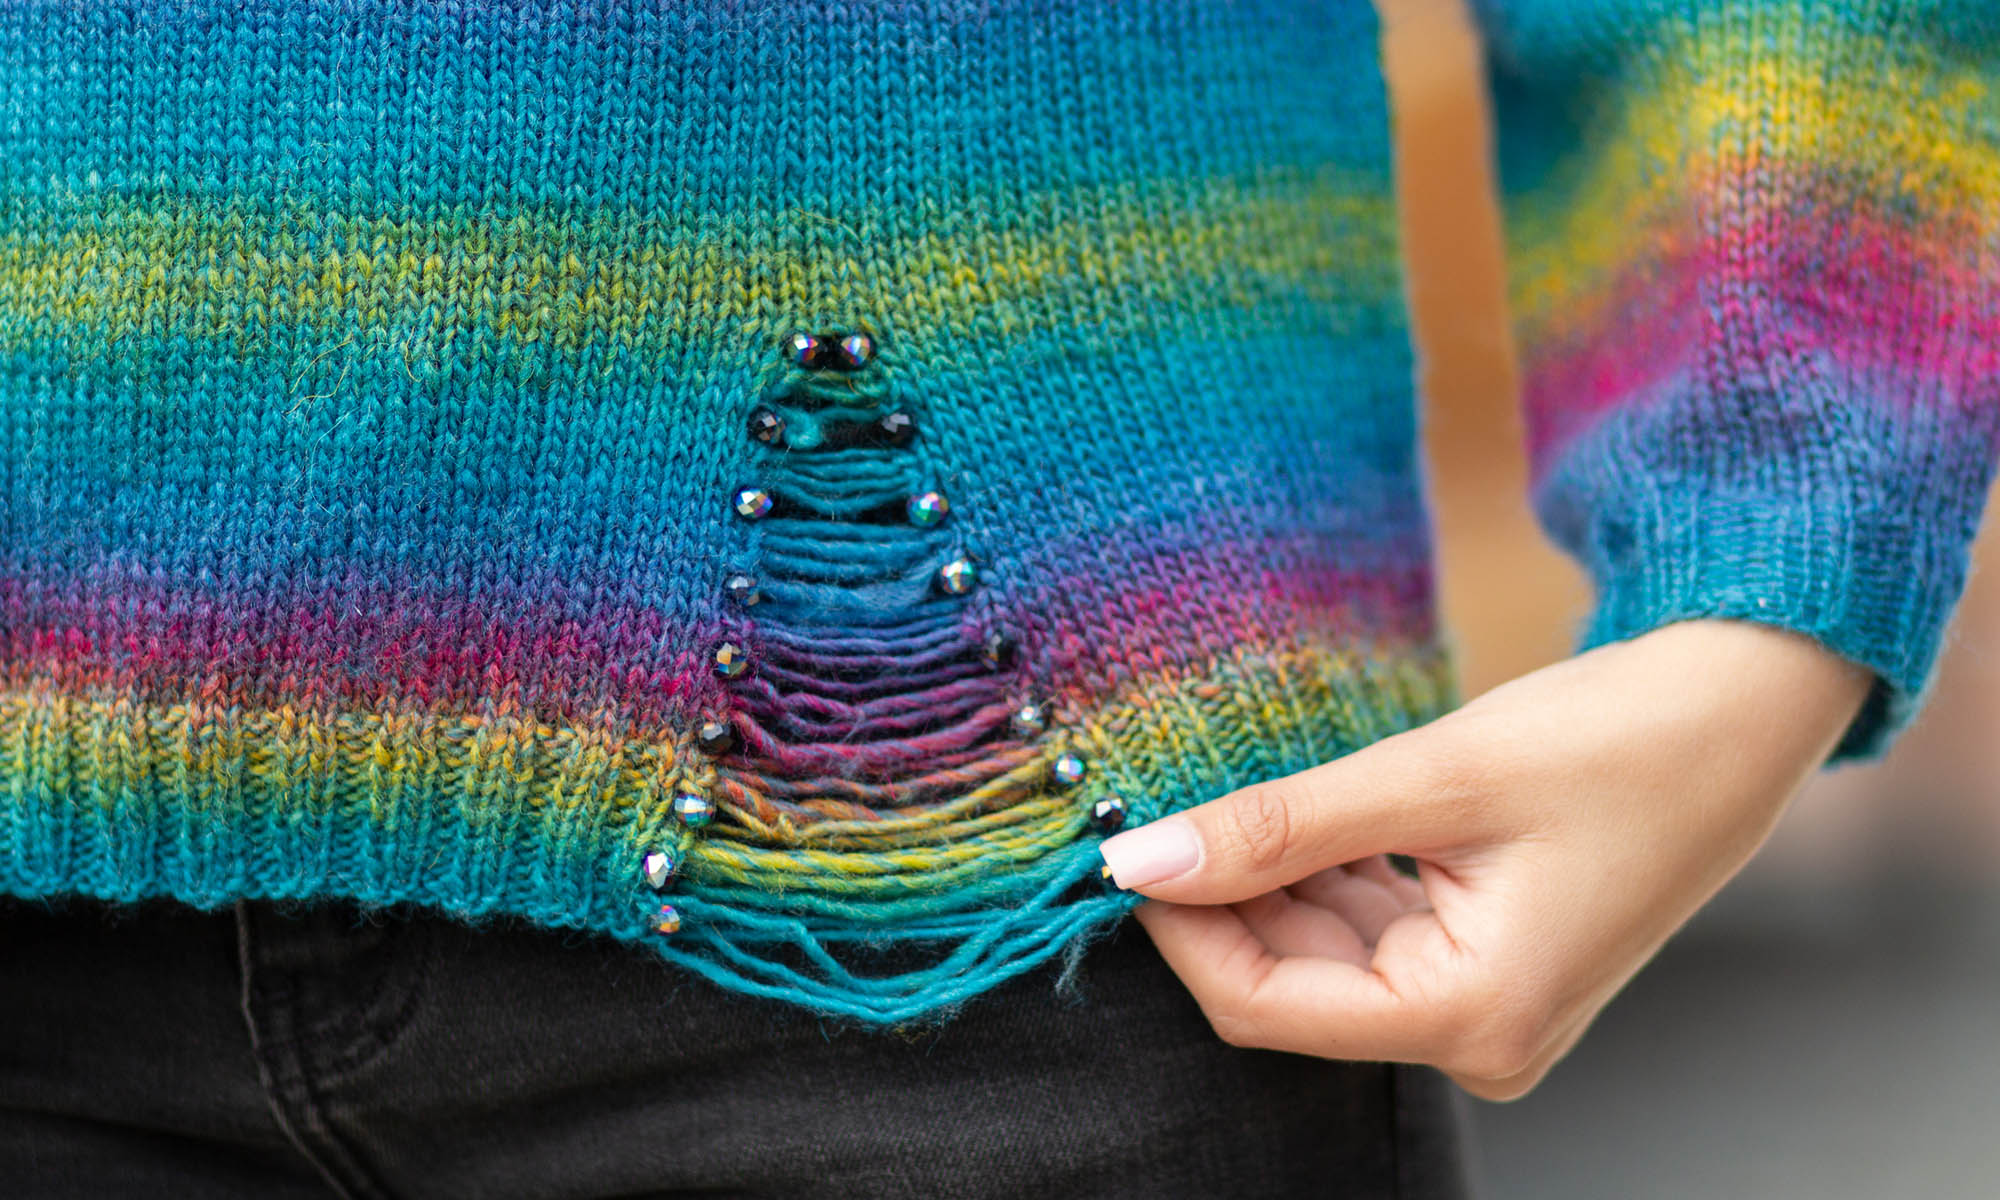
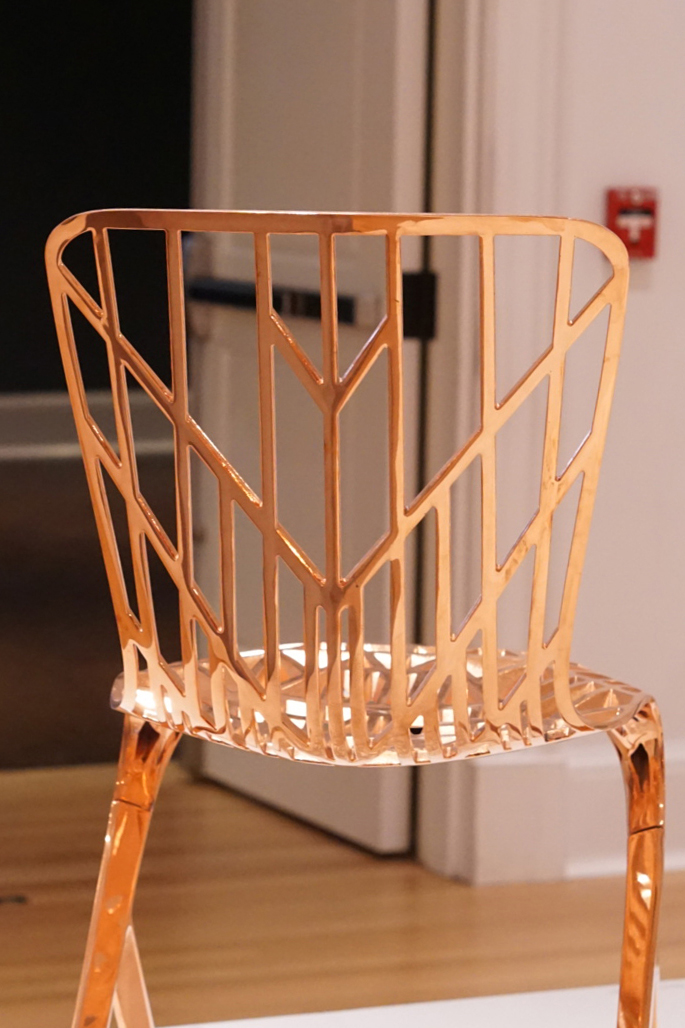
“This design has been a long time in the making. It all starts in May of 2017 when I went on an EPIC road trip with my sister. We covered 25 states in 14 days! We saw so much, and I visited a lot of states I’d never been on before. I ate so much ice cream in so many places (surprisingly, the best was vegan ice cream in Austin)!
It was such a whirlwind that I don’t even remember what state I was in when this chair at a museum struck my fancy. (It’s very Adrienne to remember the ice cream flavors in Austin – Cinnamon Toast Crunch & Horchata – but not this). I loved the combination of the vertical lines and interrupted diagonals.
I wrote a lace pattern with it in mind in my hotel room that night. Since that time, that lace pattern has tried to be both a tank top and a pullover, but it didn’t work out. It wasn’t until two years later that I realized that it was a shawl.
You never know when inspiration will strike, so never give up on a good idea!”
-Adrienne
We loved hearing about Adrienne’s inspiration for this shawl and can absolutely see the resemblance. This shawl is a magical addition to the 12 Days of Winter Kit Collection. As a reminder, you can find the 12 Days of Winter Kits at your local yarn shop.
This is part 2 in a 12 part series highlighting designs from our 12 Days of Winter, Series 3 Edition.
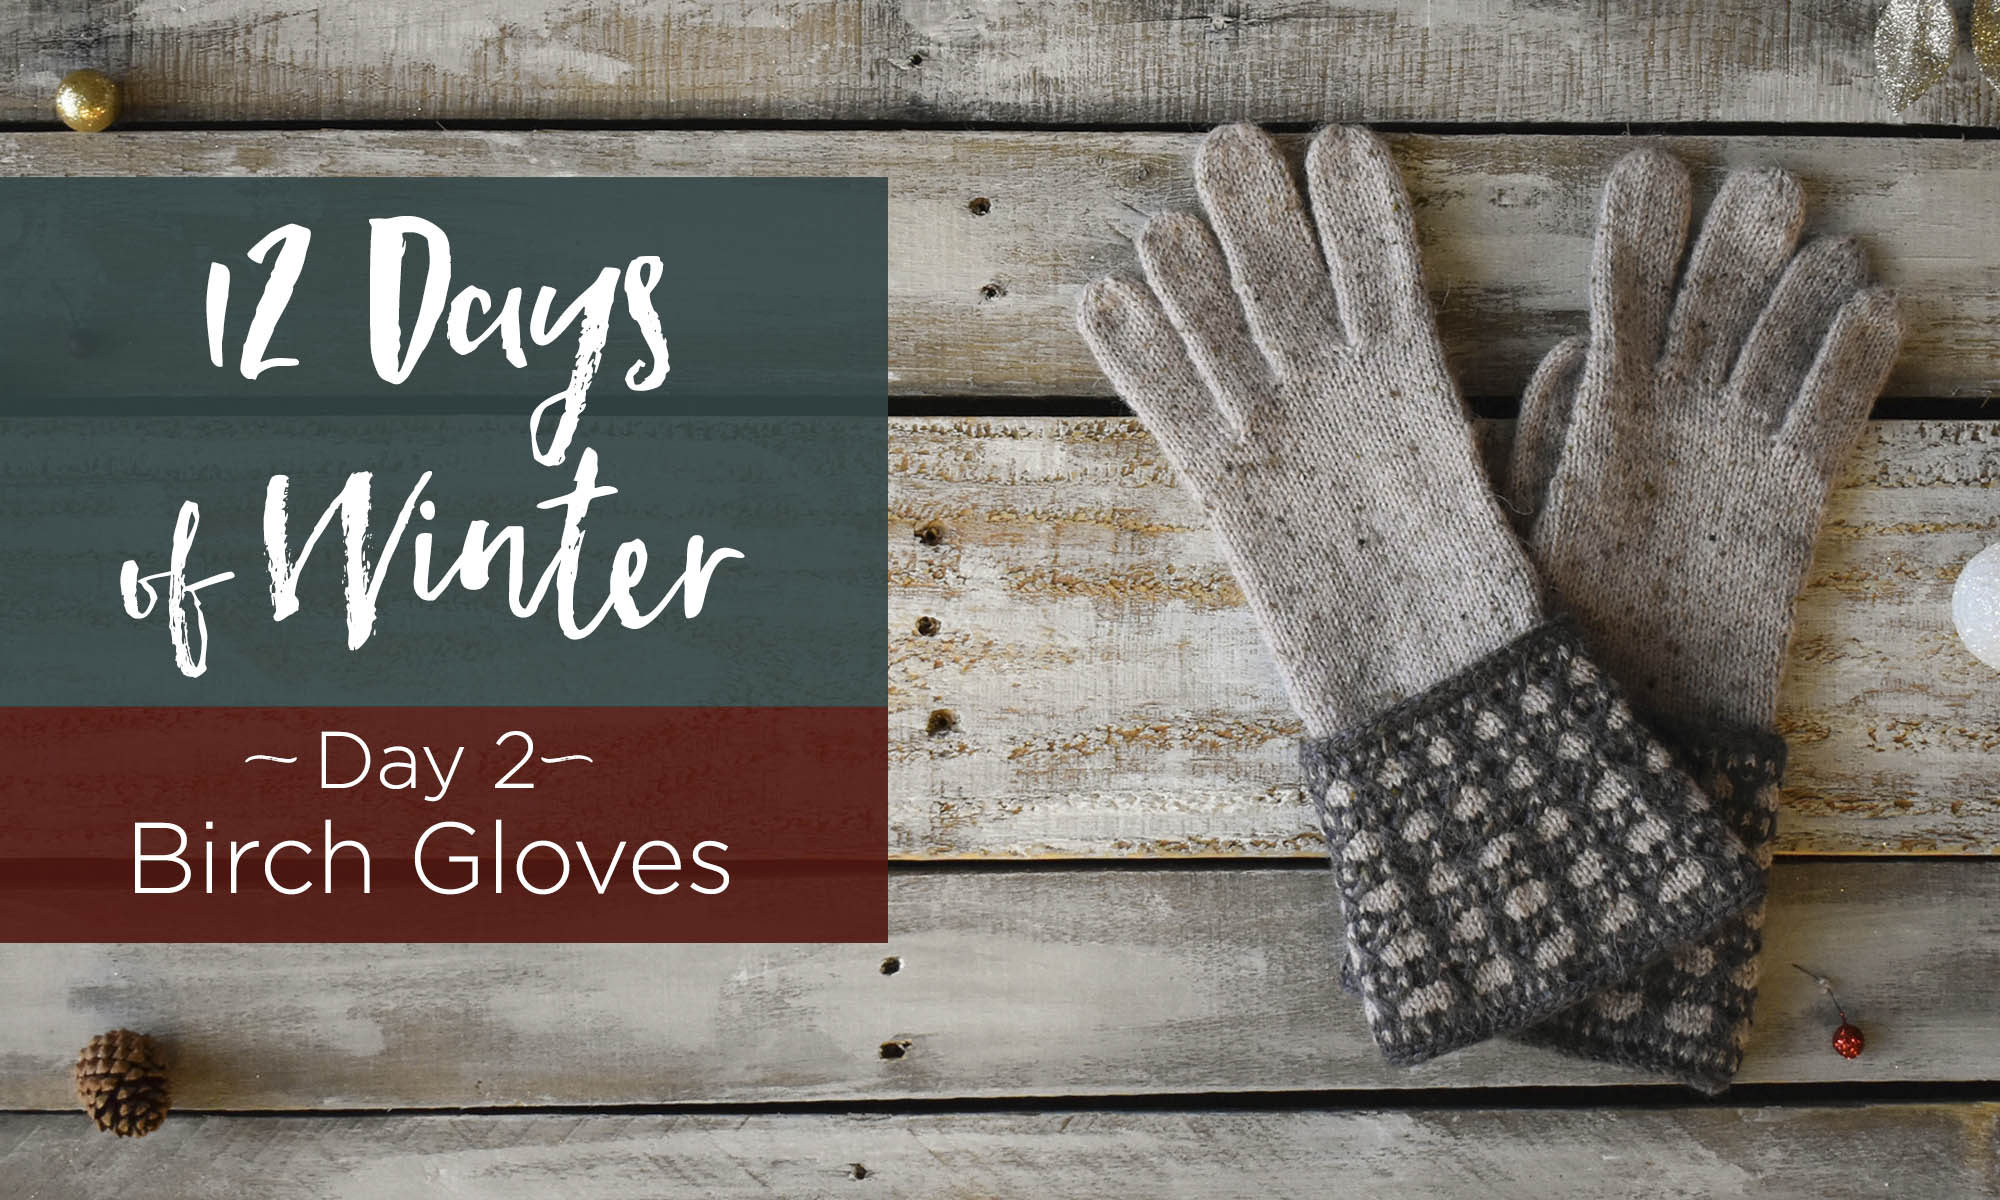
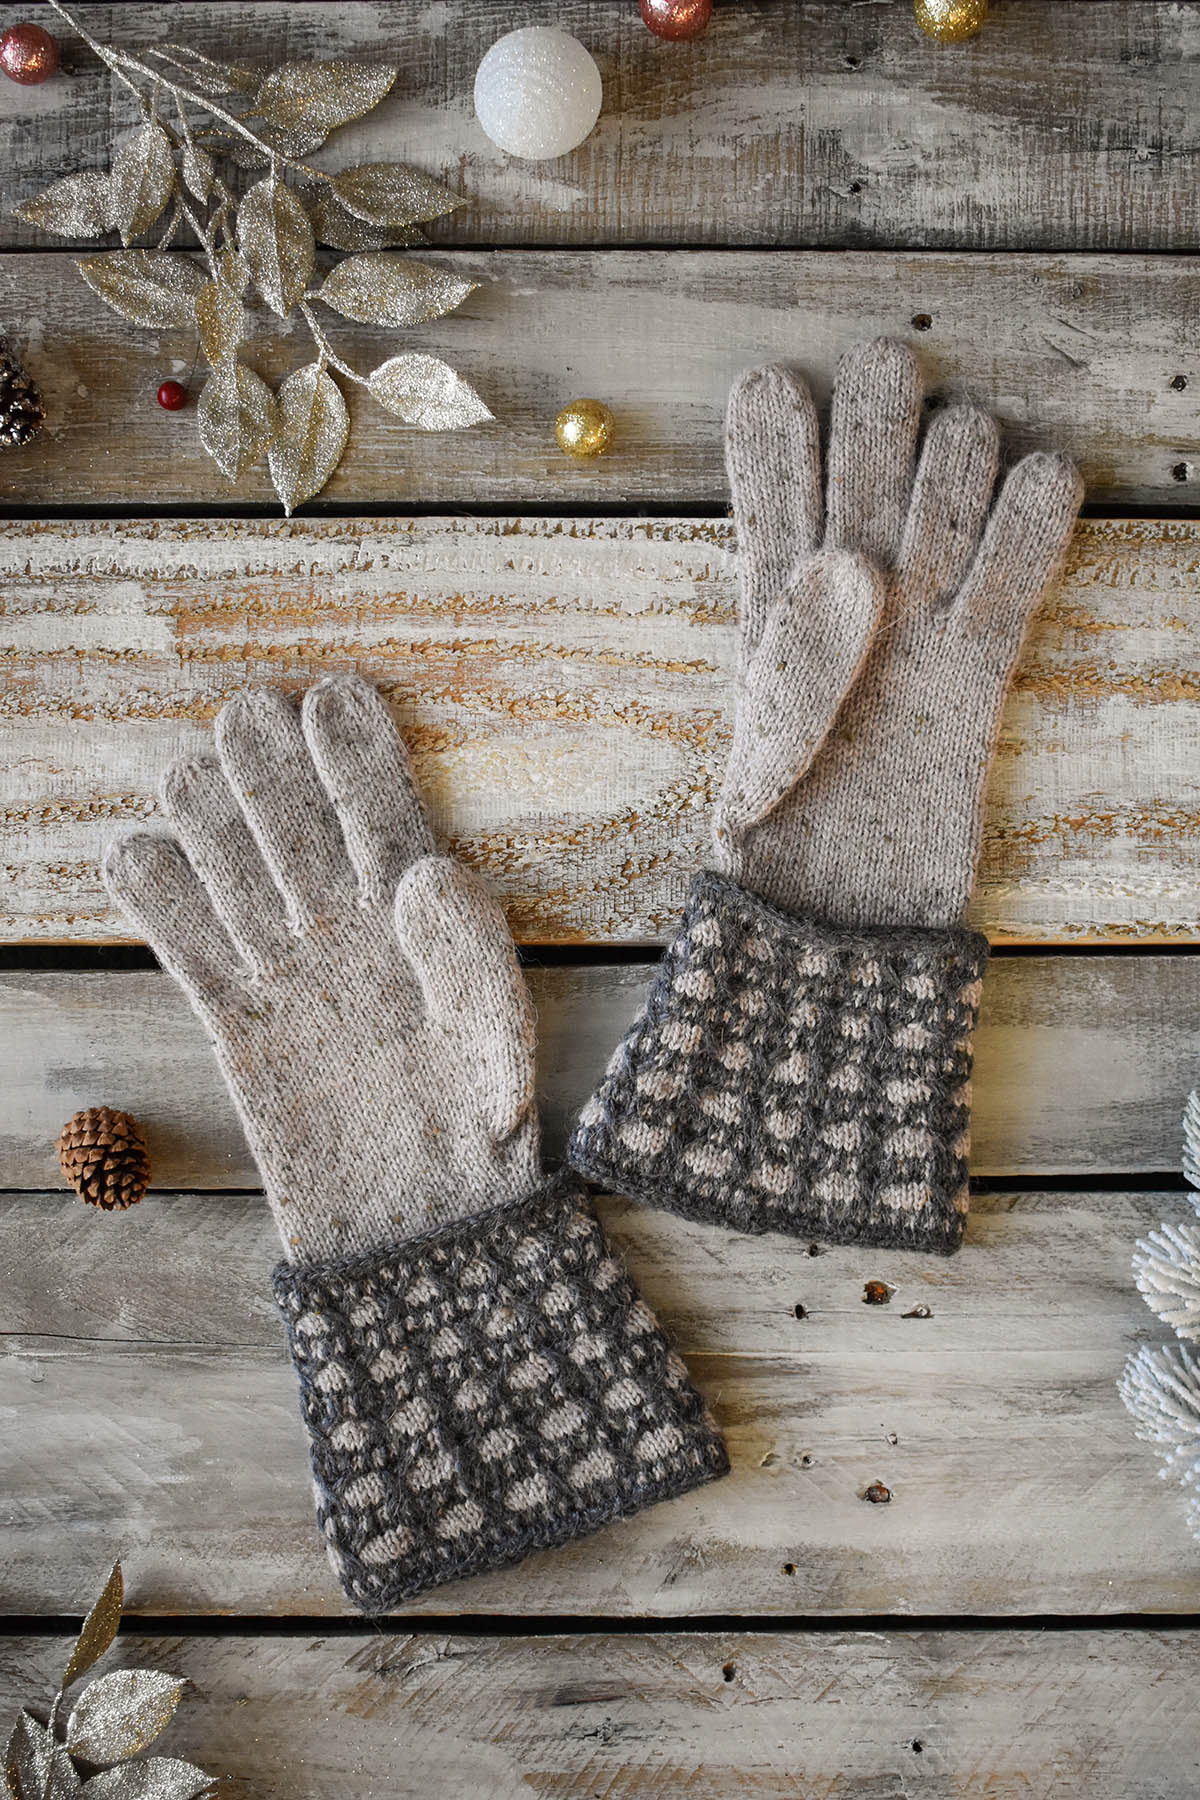
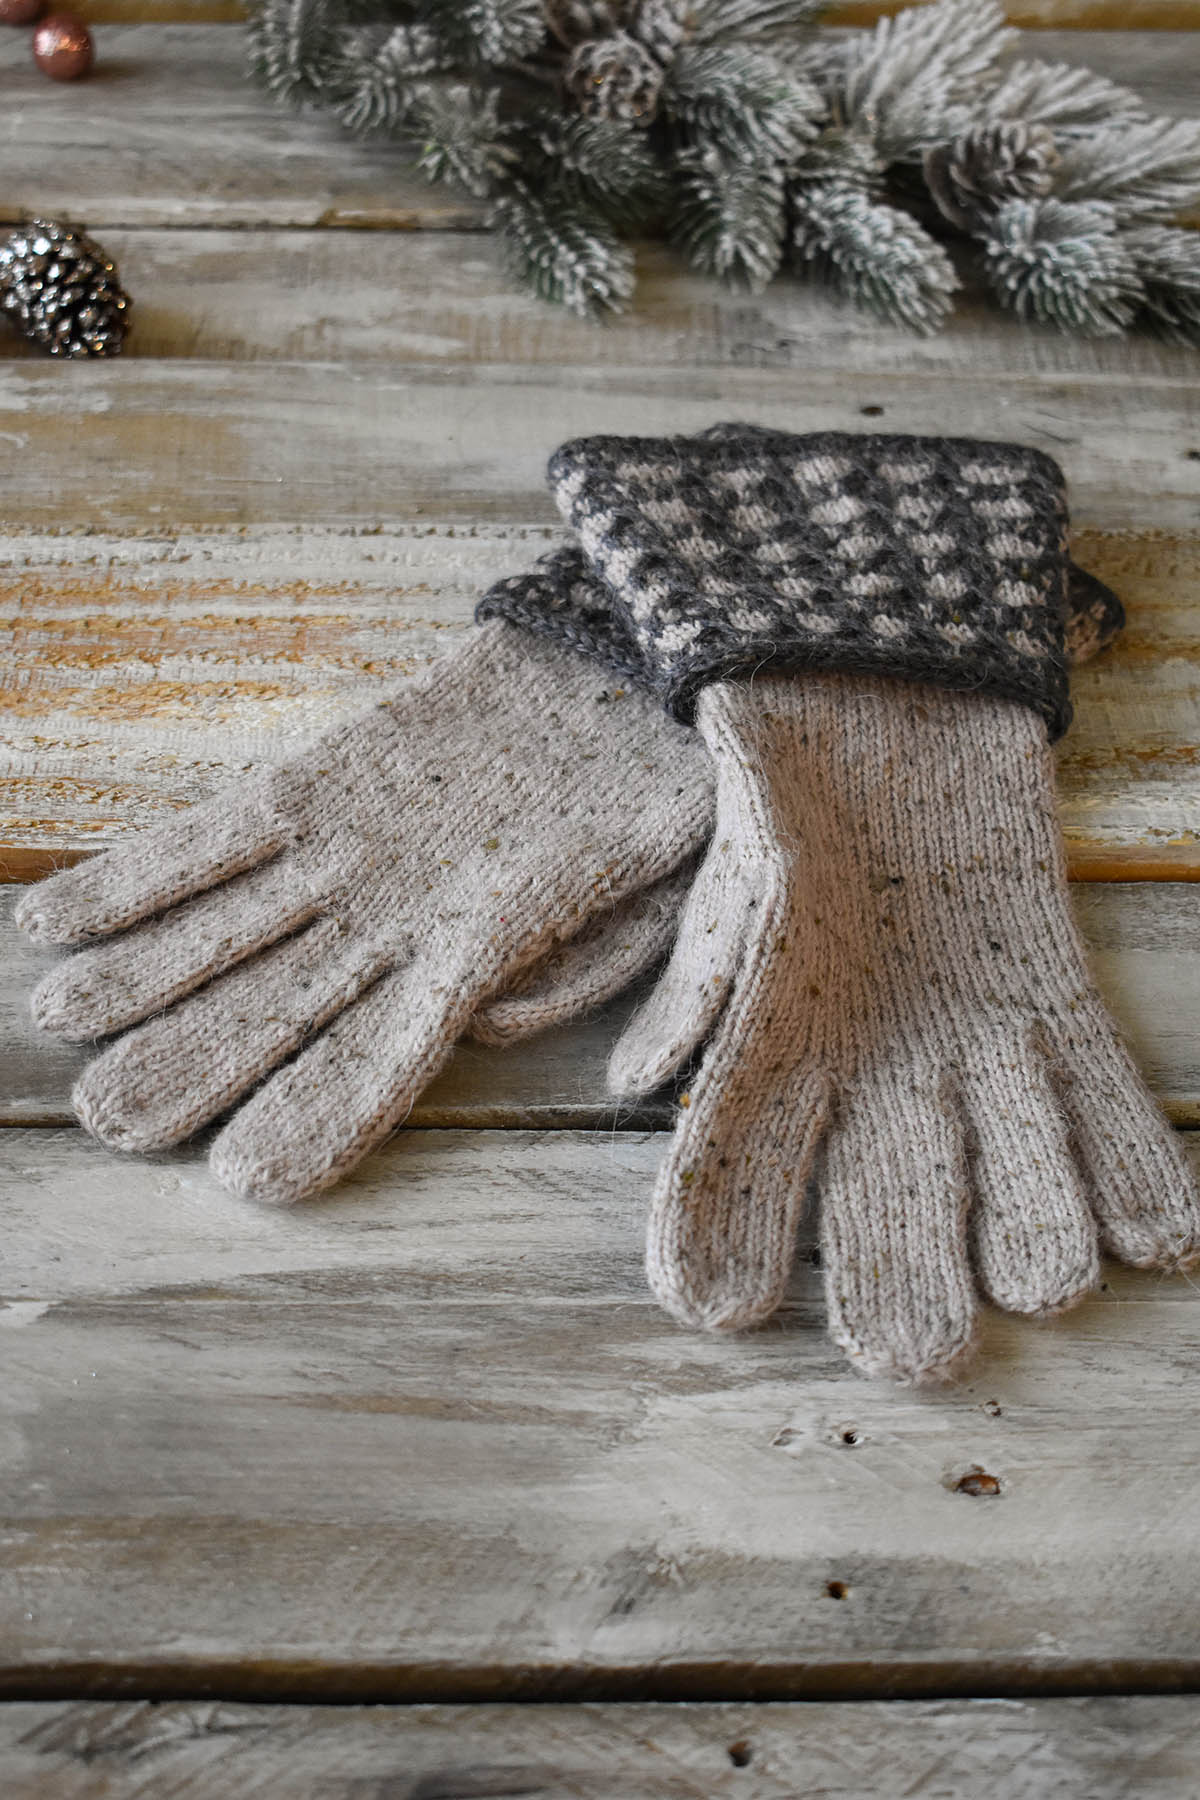
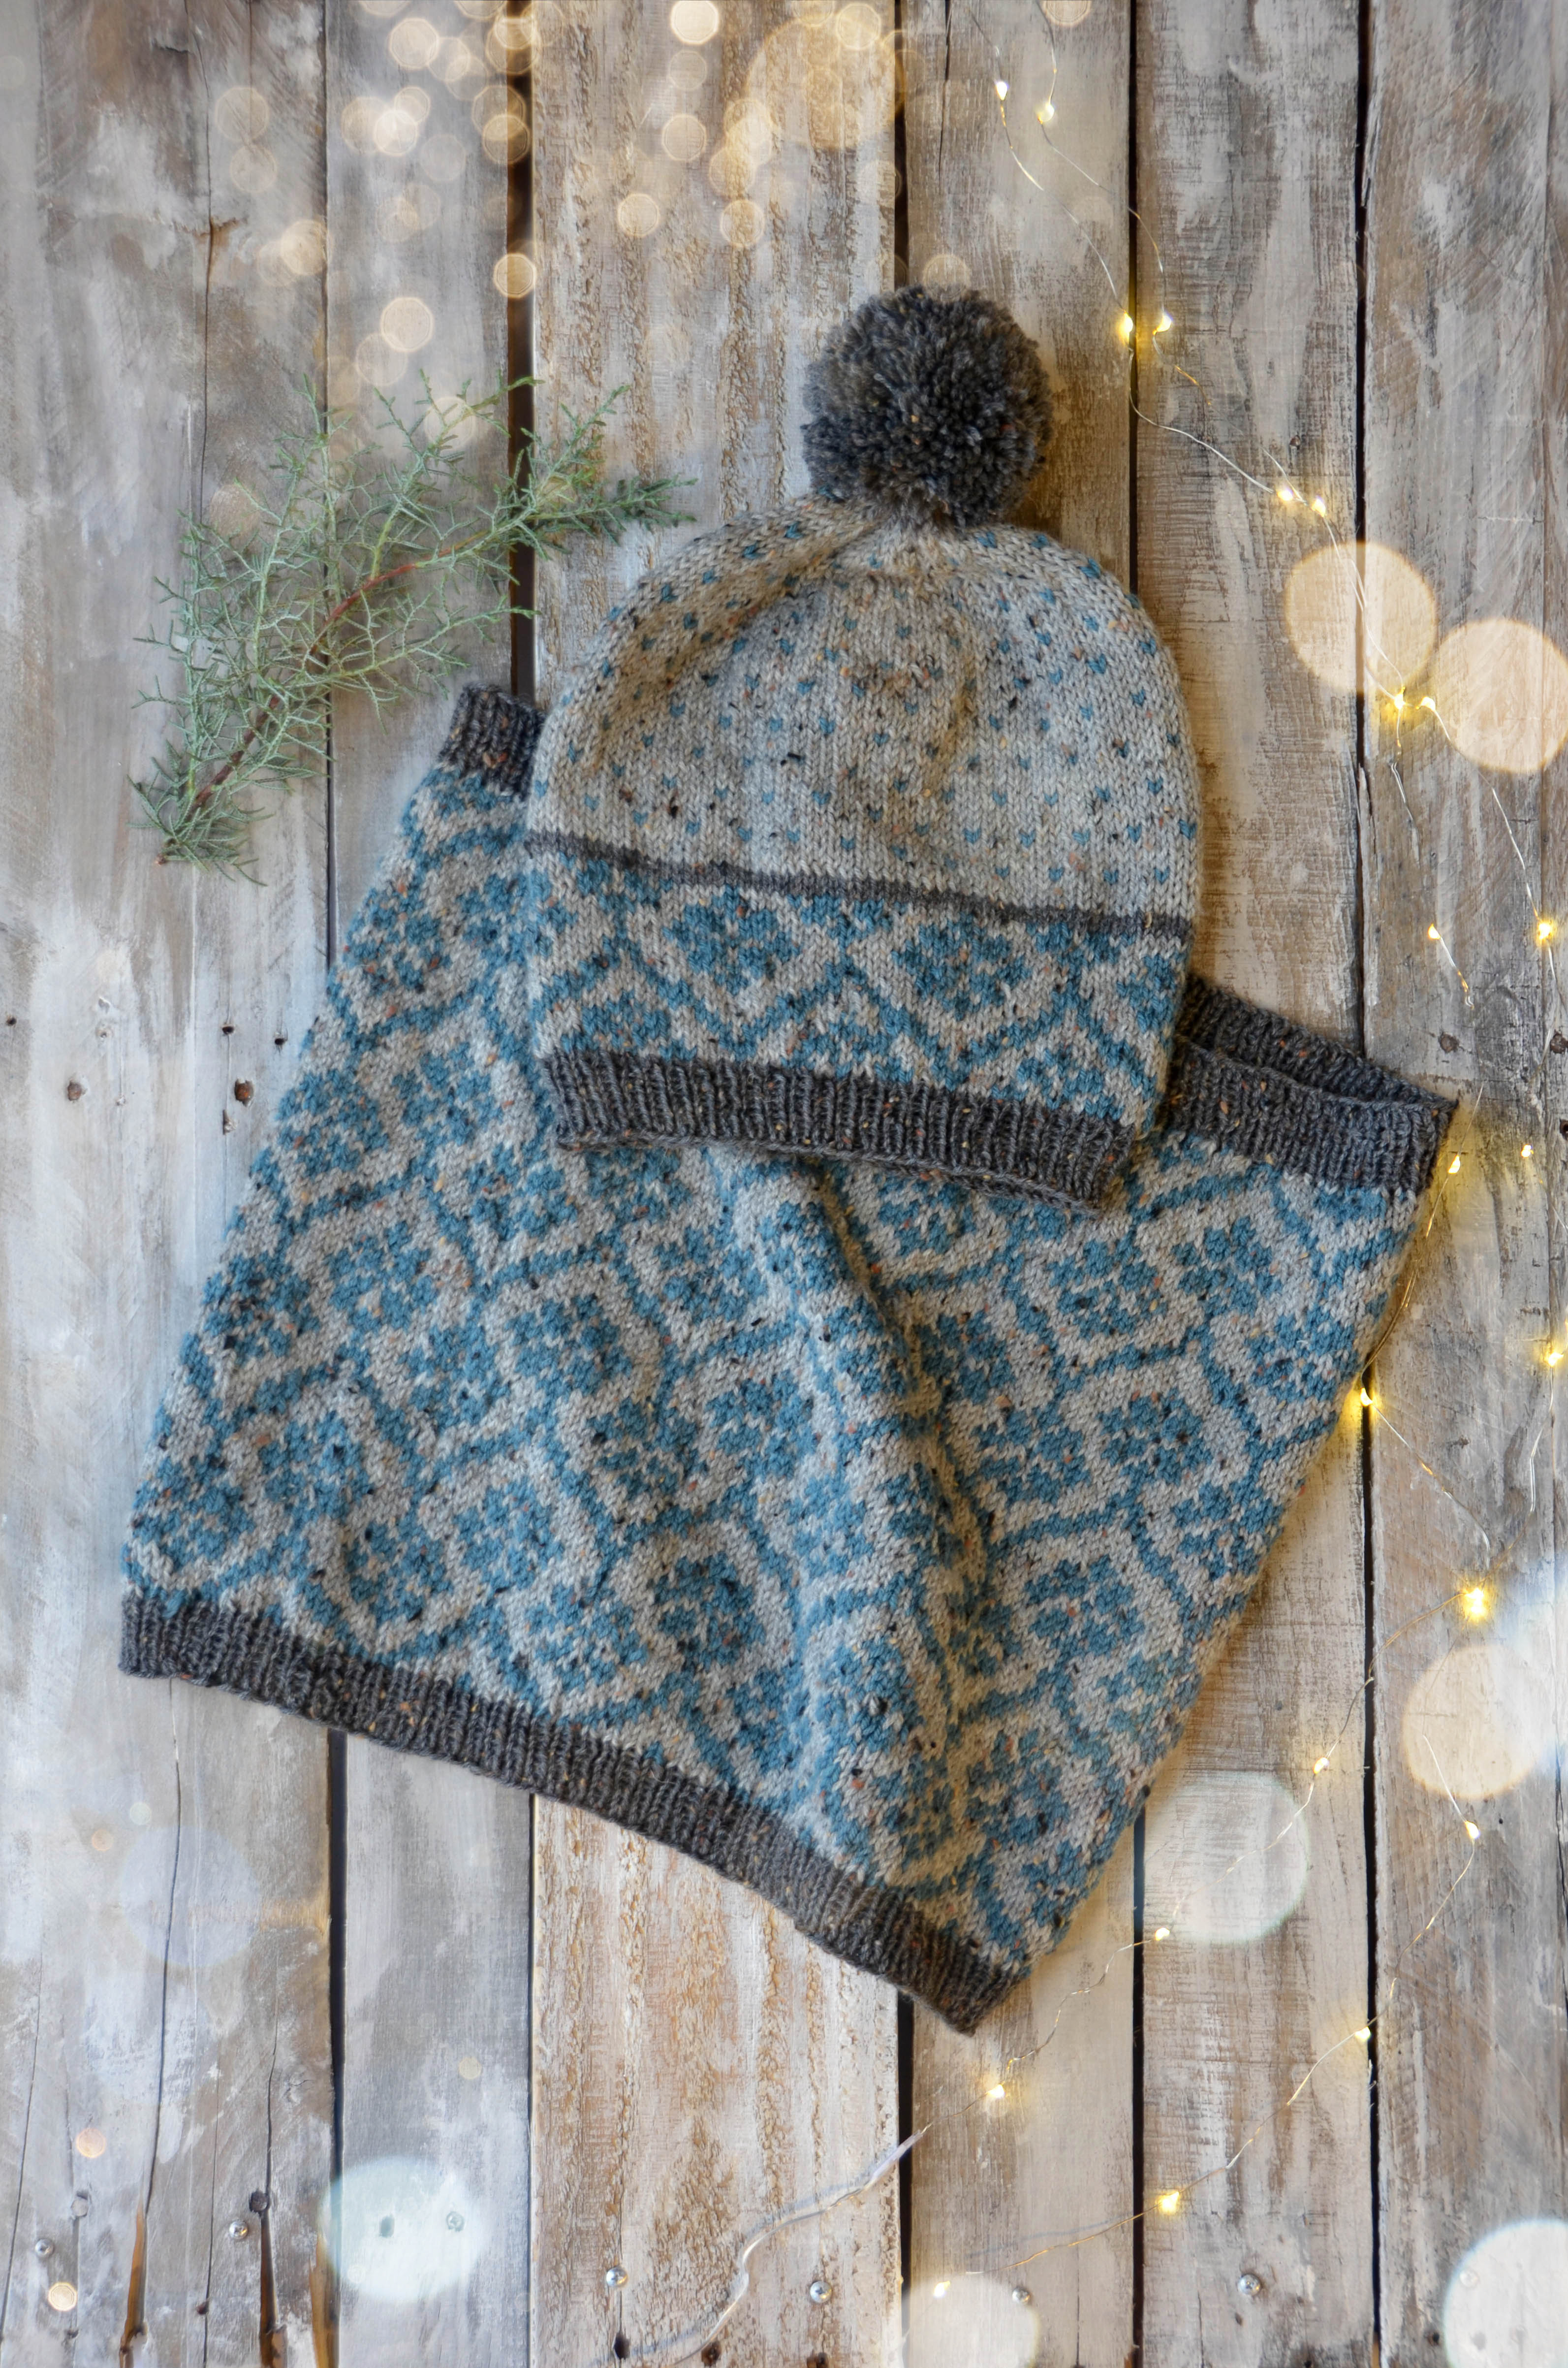
Happy Day 2 of the 12 Days of Winter Kit Collection! We know you are all eager to see what we’ve whipped up for the second day of the series, and we are thrilled to share with you – the Birch Gloves. Everyone needs a pair of elegant long gloves in their wardrobe, and hand-knitting them means these are perfect for yourself or made up as a gift for a loved one. Designed by Adrienne Larsen, the Birch Gloves are guaranteed to be cherished for seasons to come!
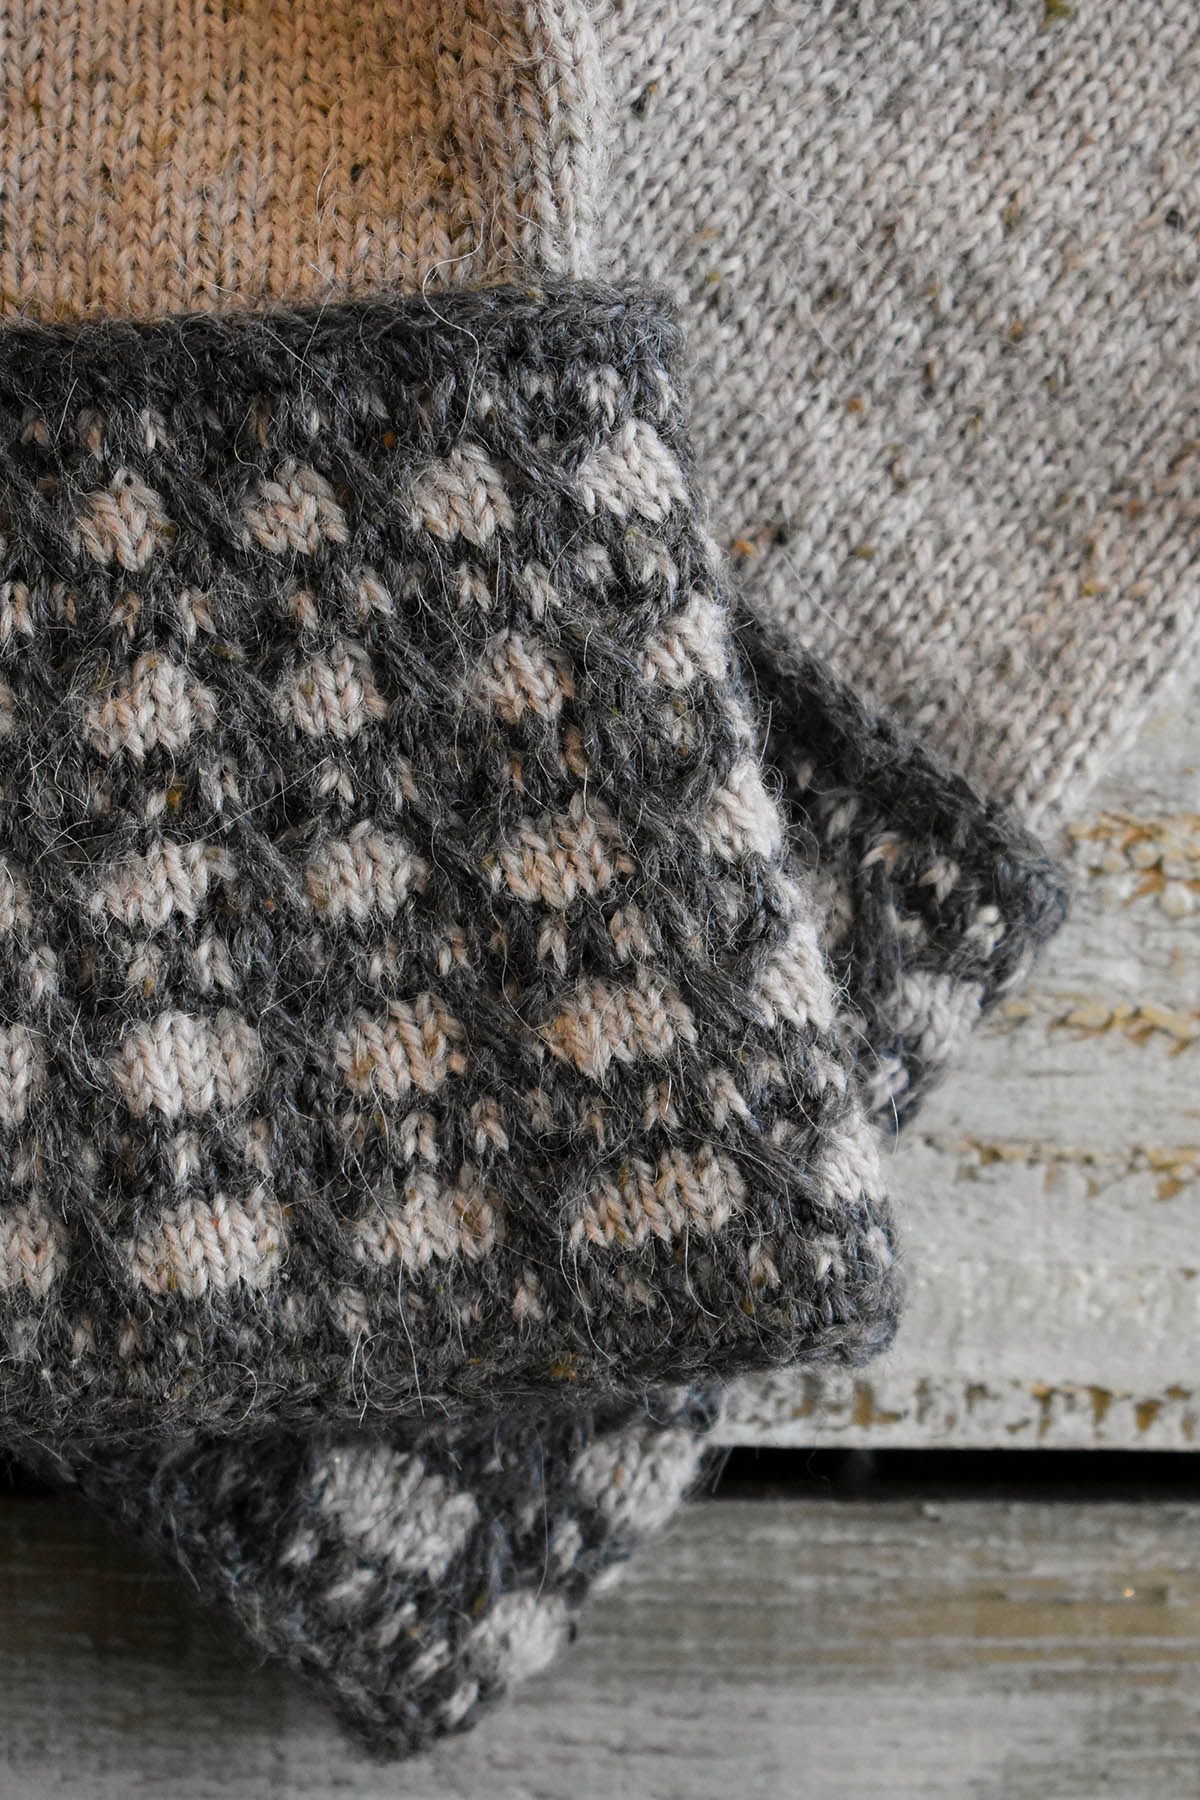
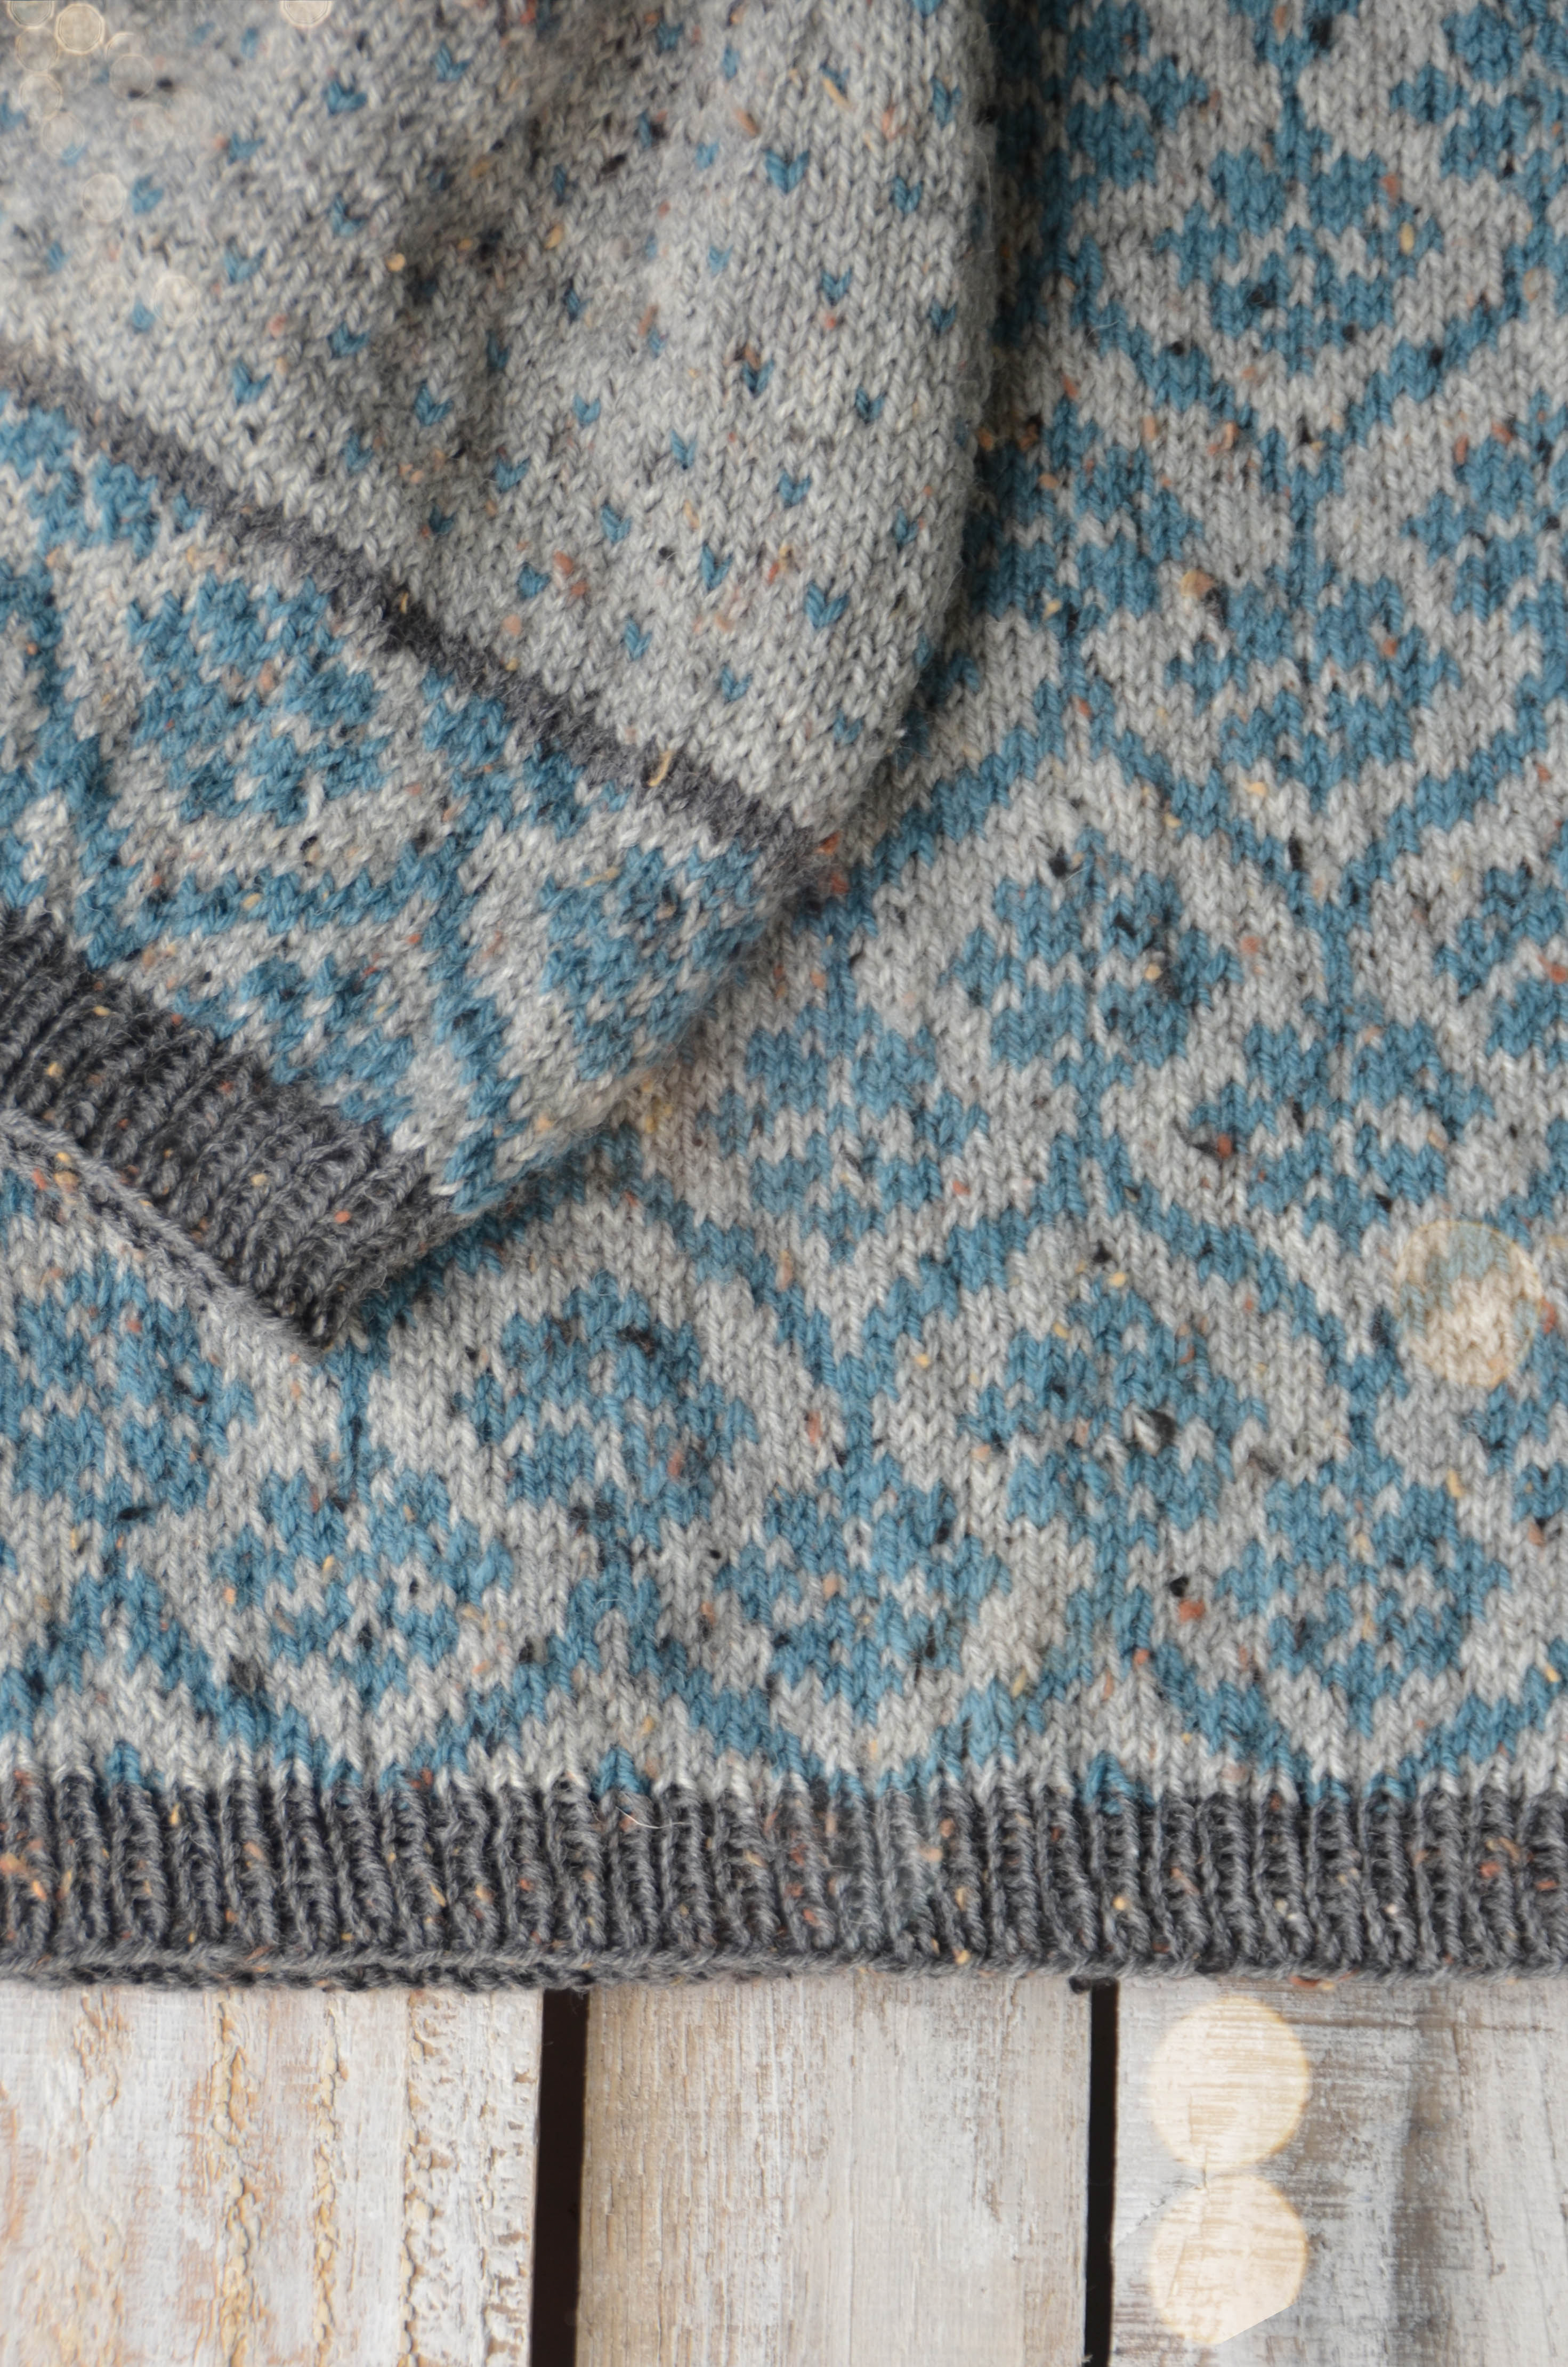
Knit in our Kingston Tweed yarn, this project features two different colors; 102 Calcite and 112 Basalt. These gloves are a gauntlet style with a flared cuff that gives a refined appearance to any outfit. Wool and alpaca fibers are blended into the yarn, meaning the Birch Gloves will also keep your fingers warm and toasty – maybe while out at a holiday market or off to see the Nutcracker ballet! The neutral colors of the yarn for this project are also certain to pair well with any sweater you choose.
The Birch Gloves feature cables and a slip stitch colorwork pattern for the cuffs, and the beautiful Kingston Tweed yarn is on serious display for the hands and fingers in stockinette stitch. Knitting the cuff and glove separately, you seam them together with an I-cord edge that adds a tidy finish. Both the cuffs and glove are knit in the round, working from the bottom up. Construction-wise, this is sure to be a fun project to take on and maybe a new method of knitting gloves to learn!
Whether you choose to knit the Birch Gloves for yourself or as a gift for someone special, these are guaranteed to be loved by everyone around. We hope you are inspired to kick back with a mug of warm Cider or Gløgg , turn on your favorite holiday film, and get to knitting these stunning gloves! You can pick up your 12 Days of Winter Kits including the Birch Gloves Kit at your local yarn shop.
This is part 1 in a 12 part series highlighting designs from our 12 Days of Winter, Series 3 Edition.
It’s that time again – the holidays are just around the corner. Unbelievably, we’re just over halfway through November. For most of us, that means we’re knee-deep in crafty gift-making for loved ones. Here at Universal Yarn headquarters, we’ve been working hard to keep the 12 Days of Winter tradition alive with a beautiful third installment. We’re so excited to share these projects with you. Whether you are looking for a gift for a special yarn-loving person in your life, or for the perfect gift to make, we’ve got you covered.
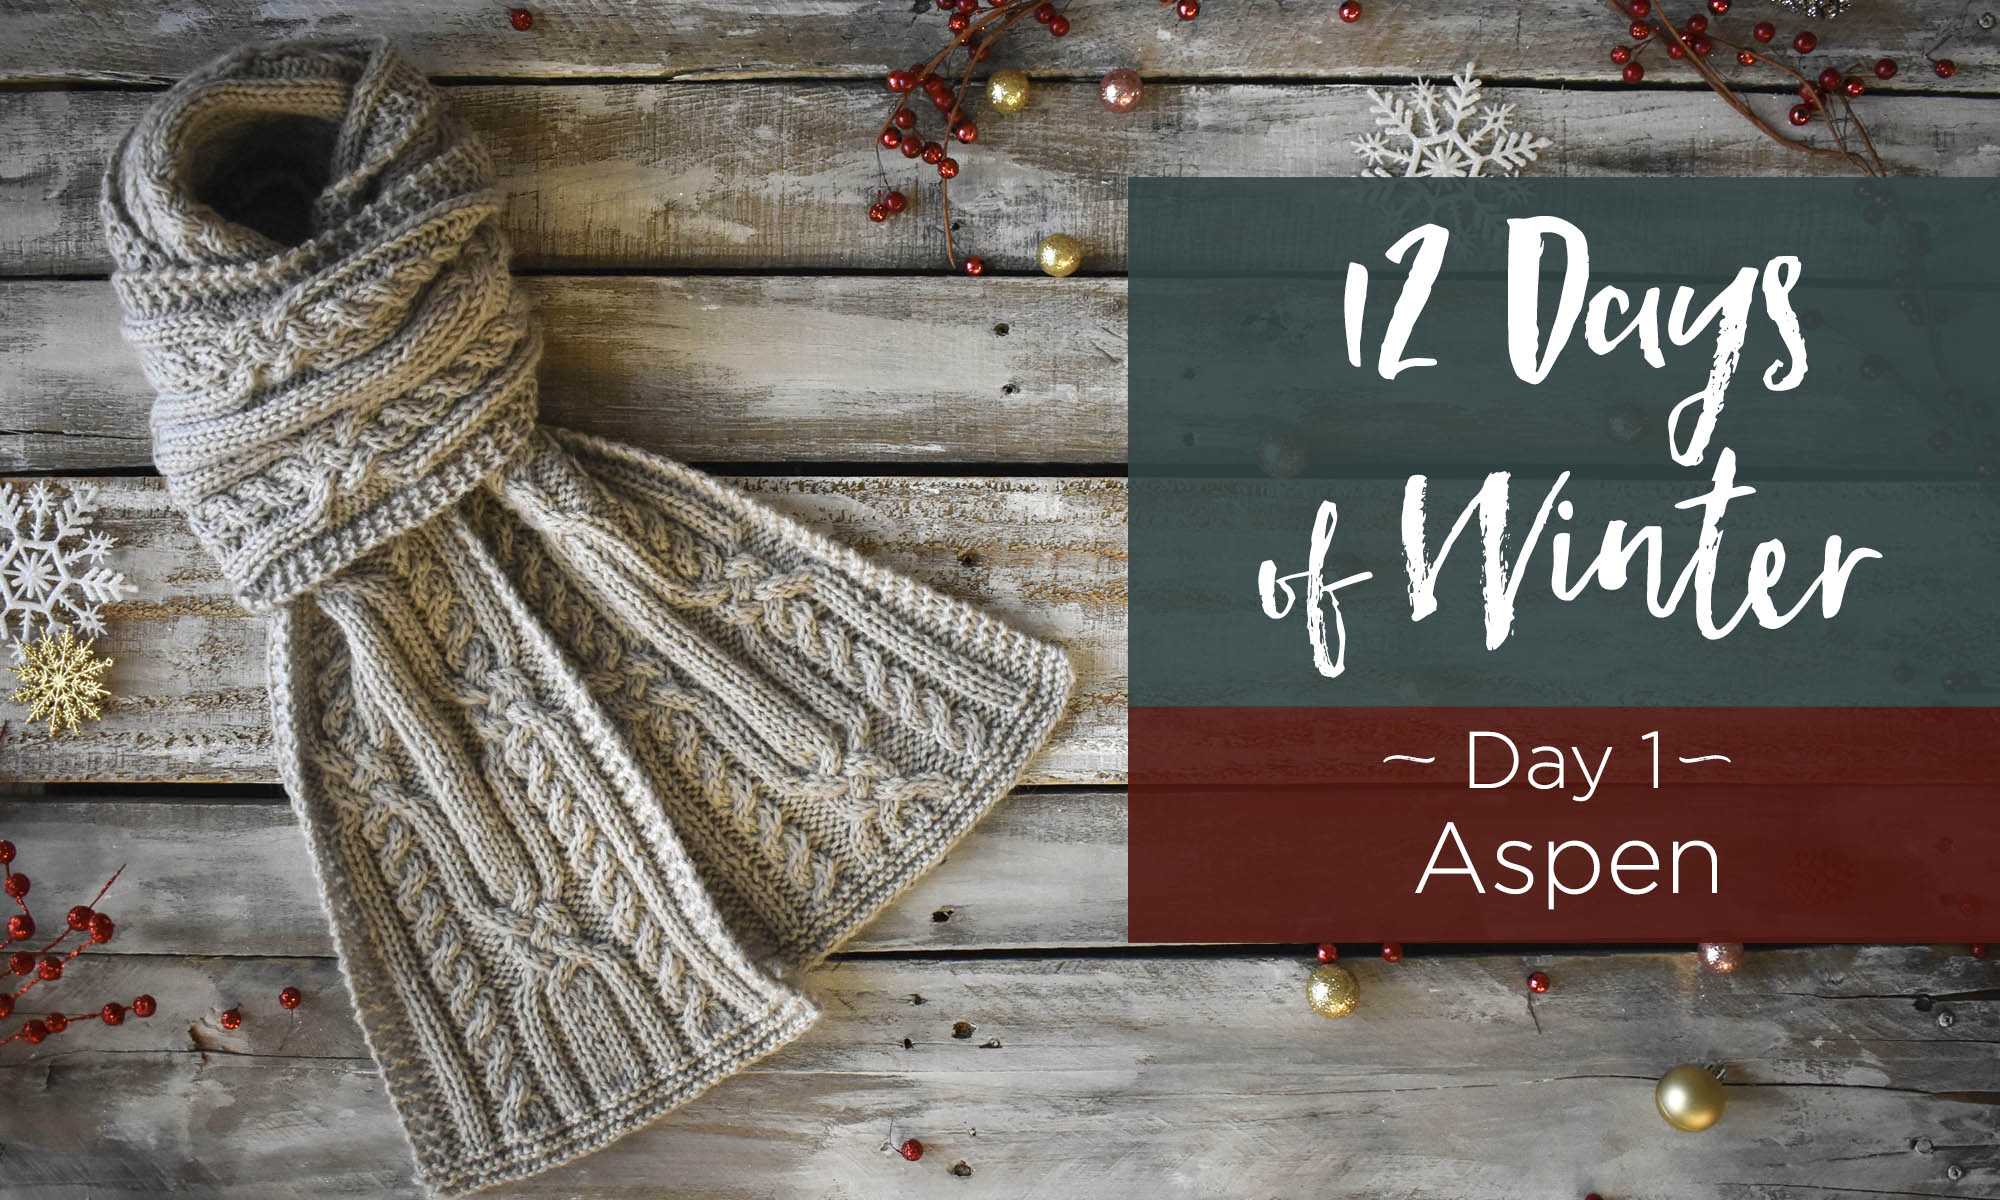
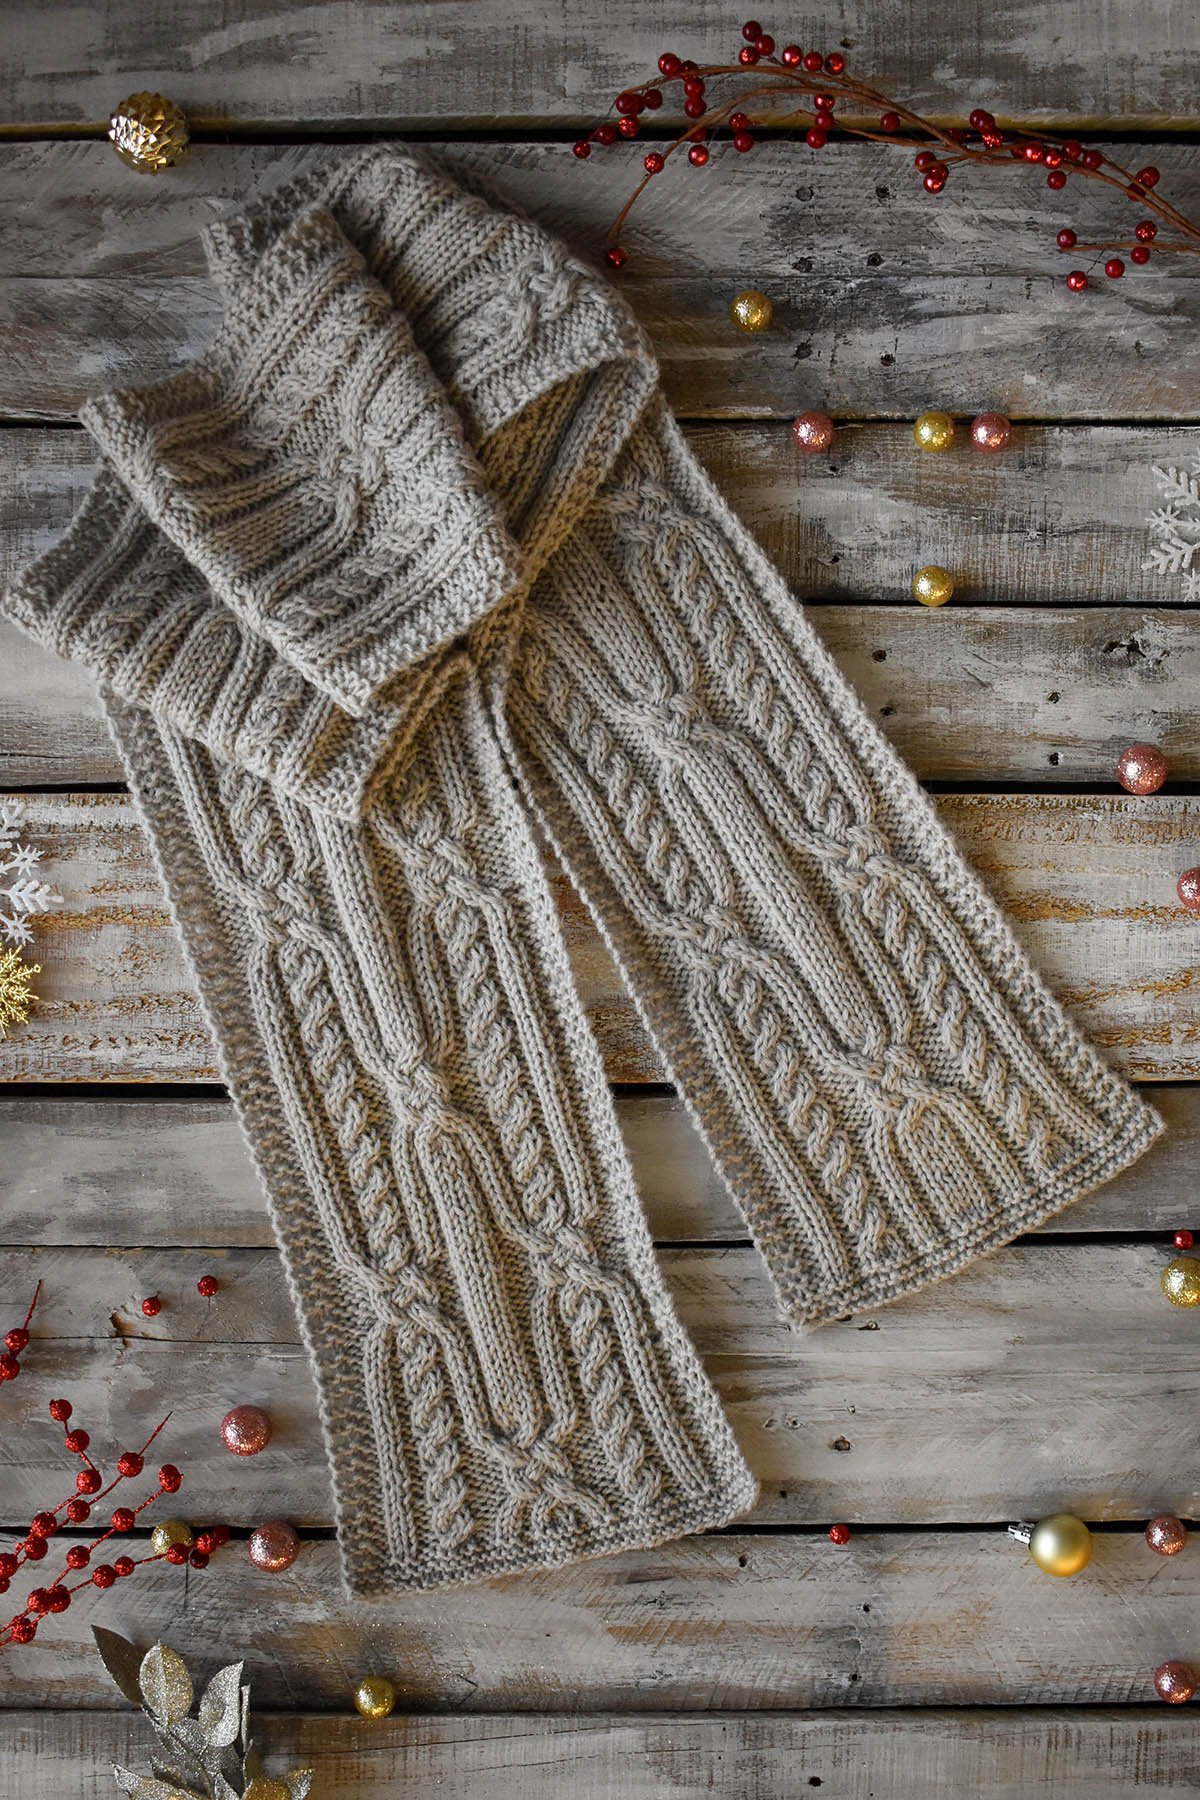
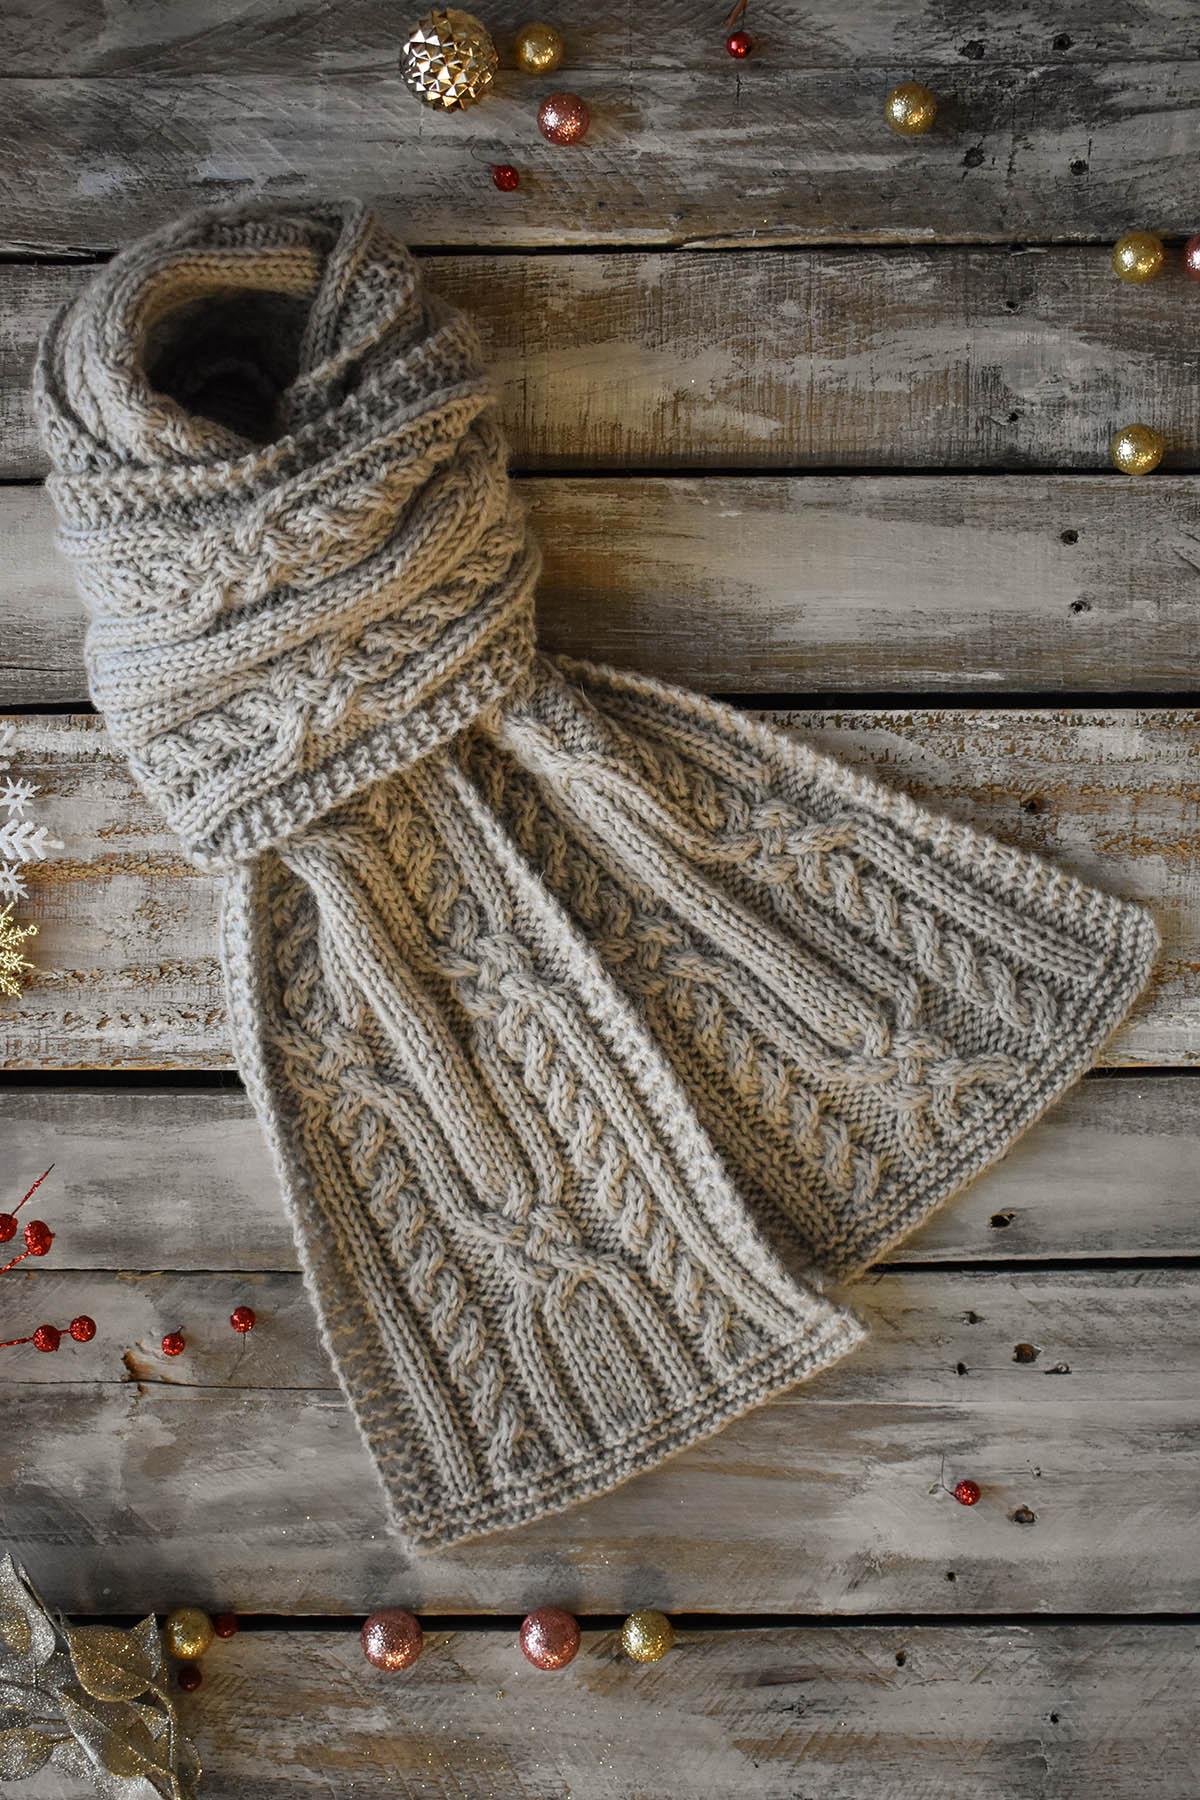
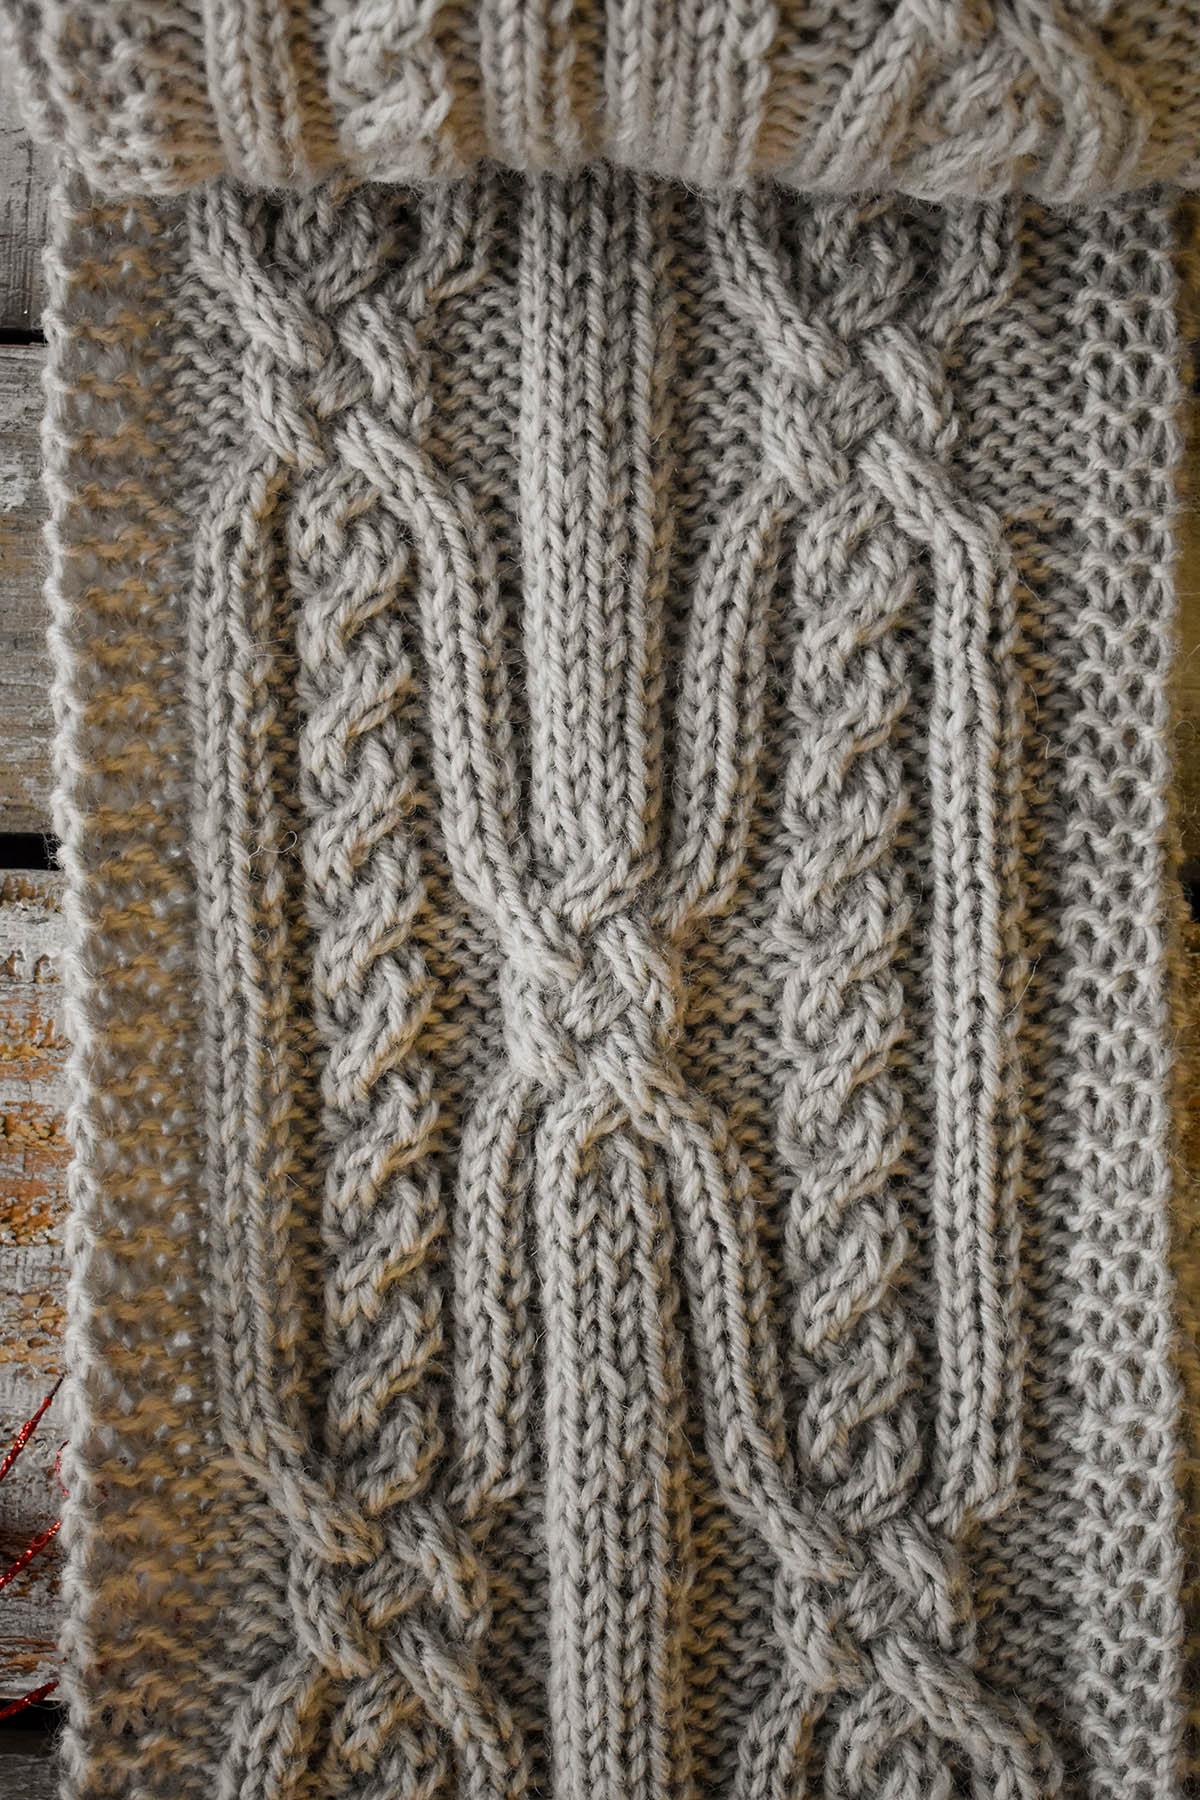
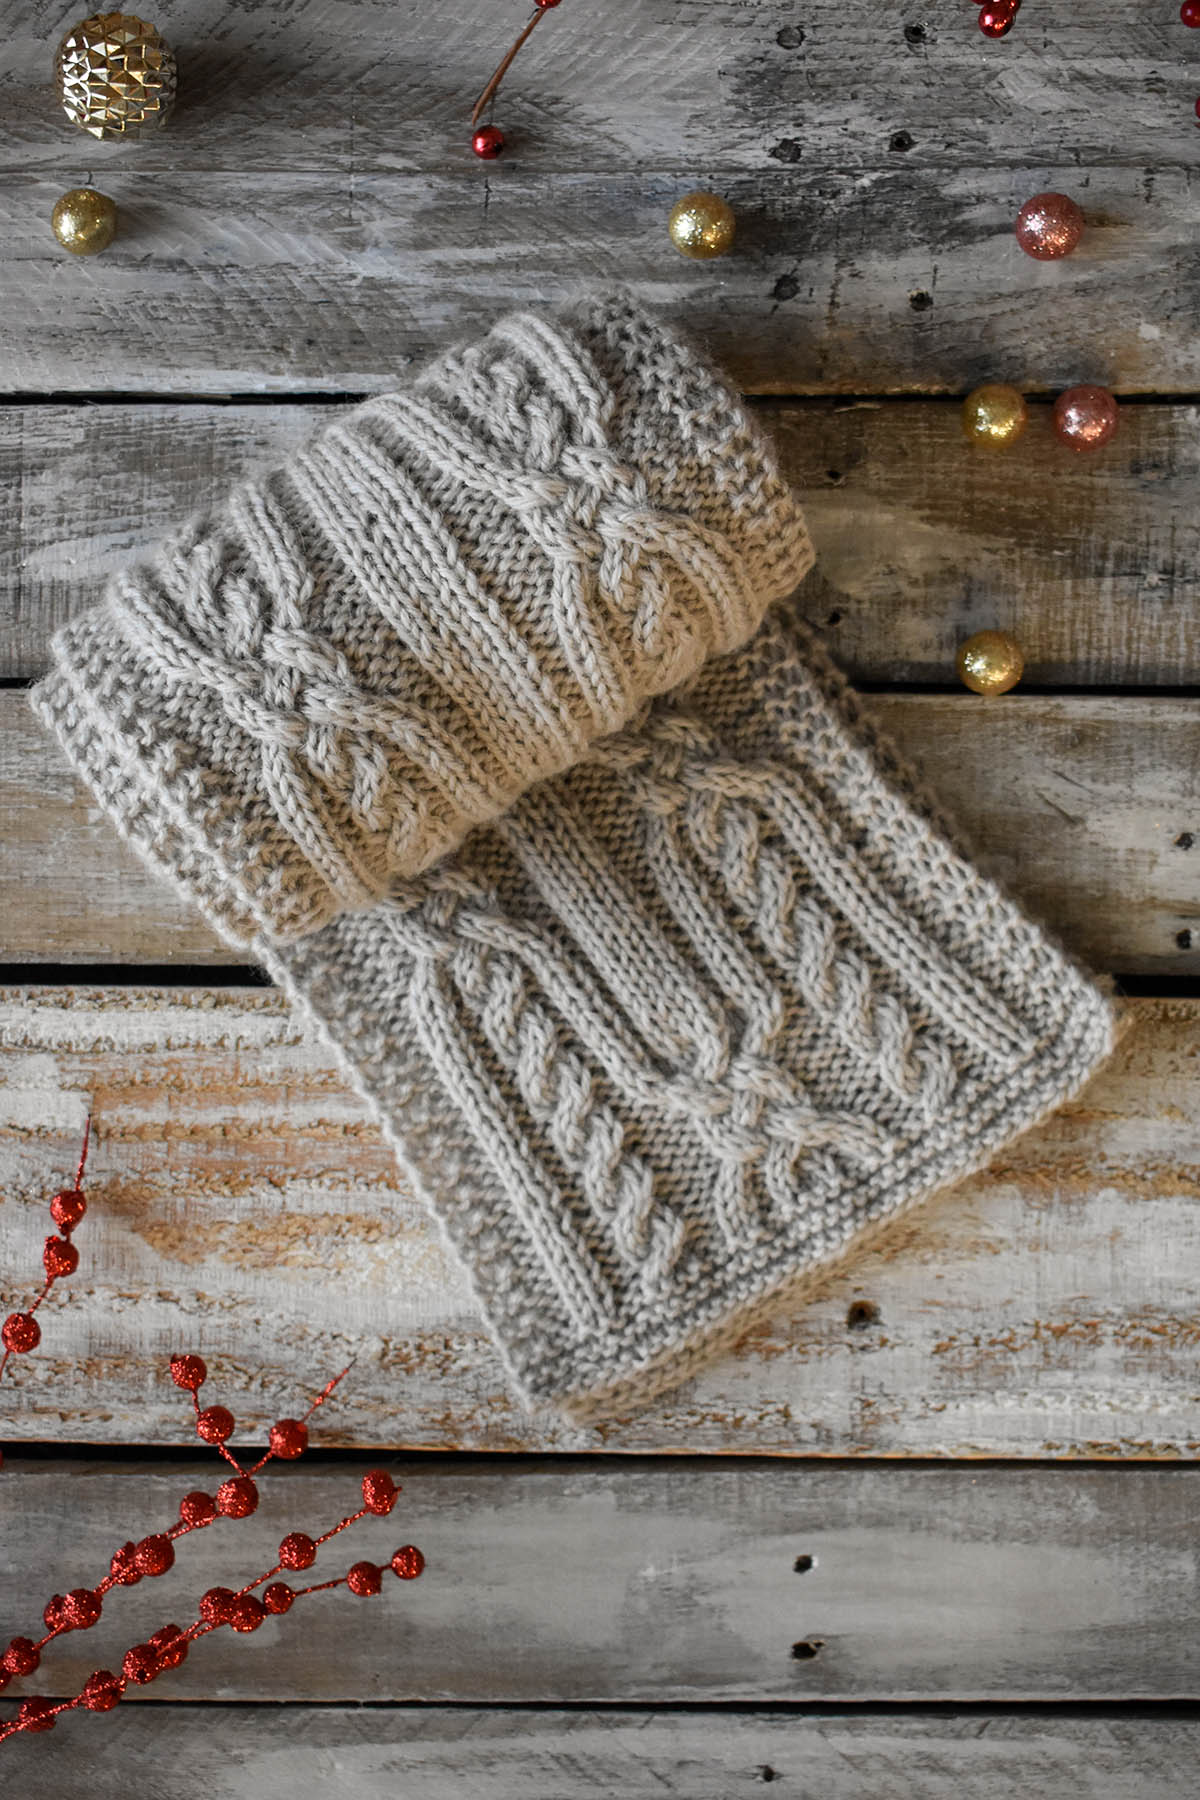
This year we’re kicking off the collection with a scarf designed by the talented Adrienne Larsen. Aspen is one of those perfect, squishy scarves that’s just the right length. It’s beautiful – any worthy recipient would be thrilled to wrap this around their neck.
The elaborate cable motif is simpler to work than one might expect, and by the time the scarf is complete, you’ll likely have it memorized. Inspired by quaking aspen trees, each cable in this scarf grows out of another. The result is an interlocking pattern that is sure to turn heads.
Knit up in Deluxe Worsted, a 100% wool yarn, we’ve selected a neutral color that allows the stitchwork to shine. It’s perfect for men and women alike and is sure to work well with any item in your winter-weather wardrobe. Surprisingly, this pattern takes just two skeins, which are included in the kit along with the pattern. Surely you can finish this one in time for the holidays.
We hope you’ll love the Aspen scarf as much as we do, and that you’re equally excited for the other patterns we have coming. Remember, you can find the 12 Days of Winter Kits at your local yarn shop.
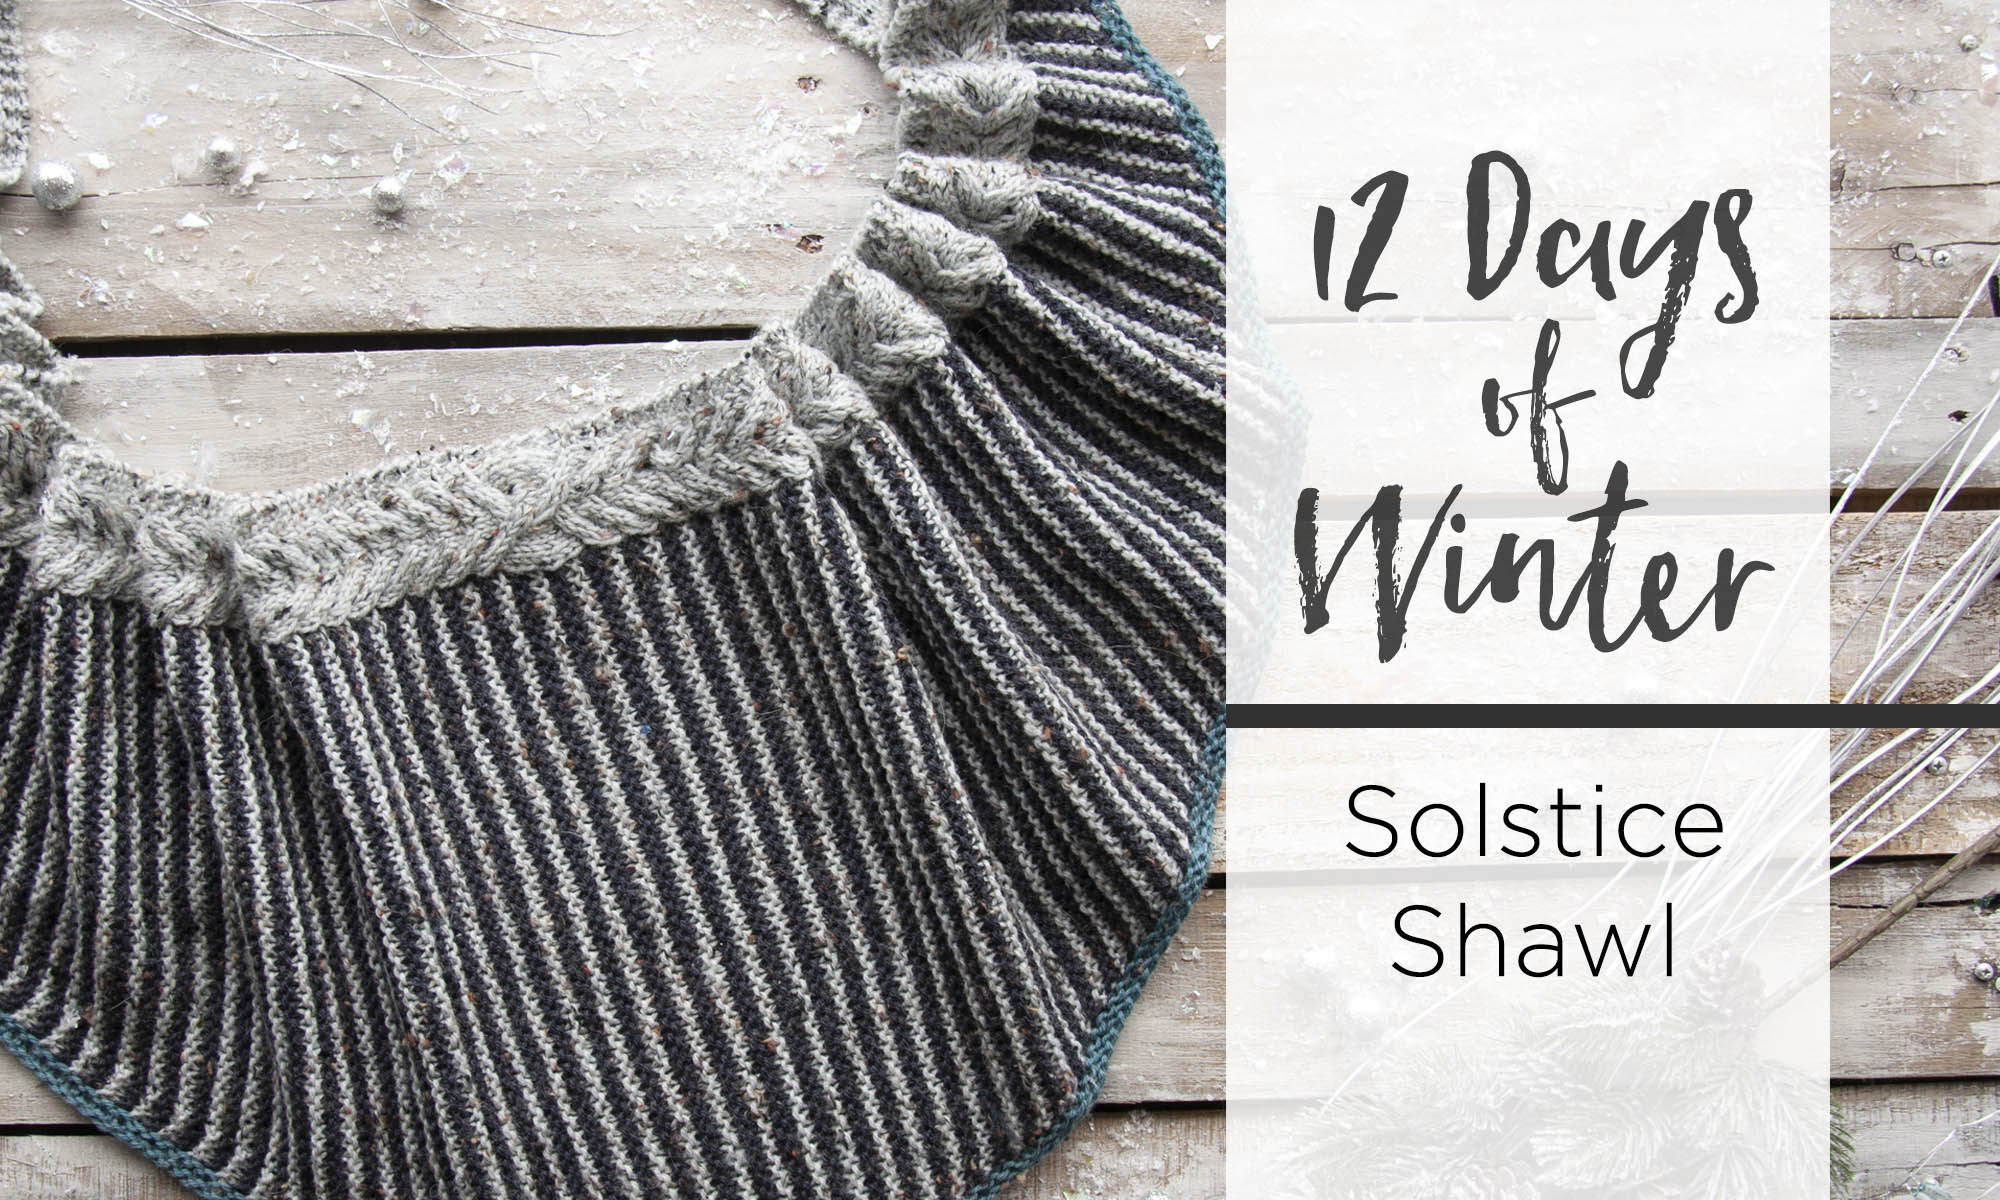
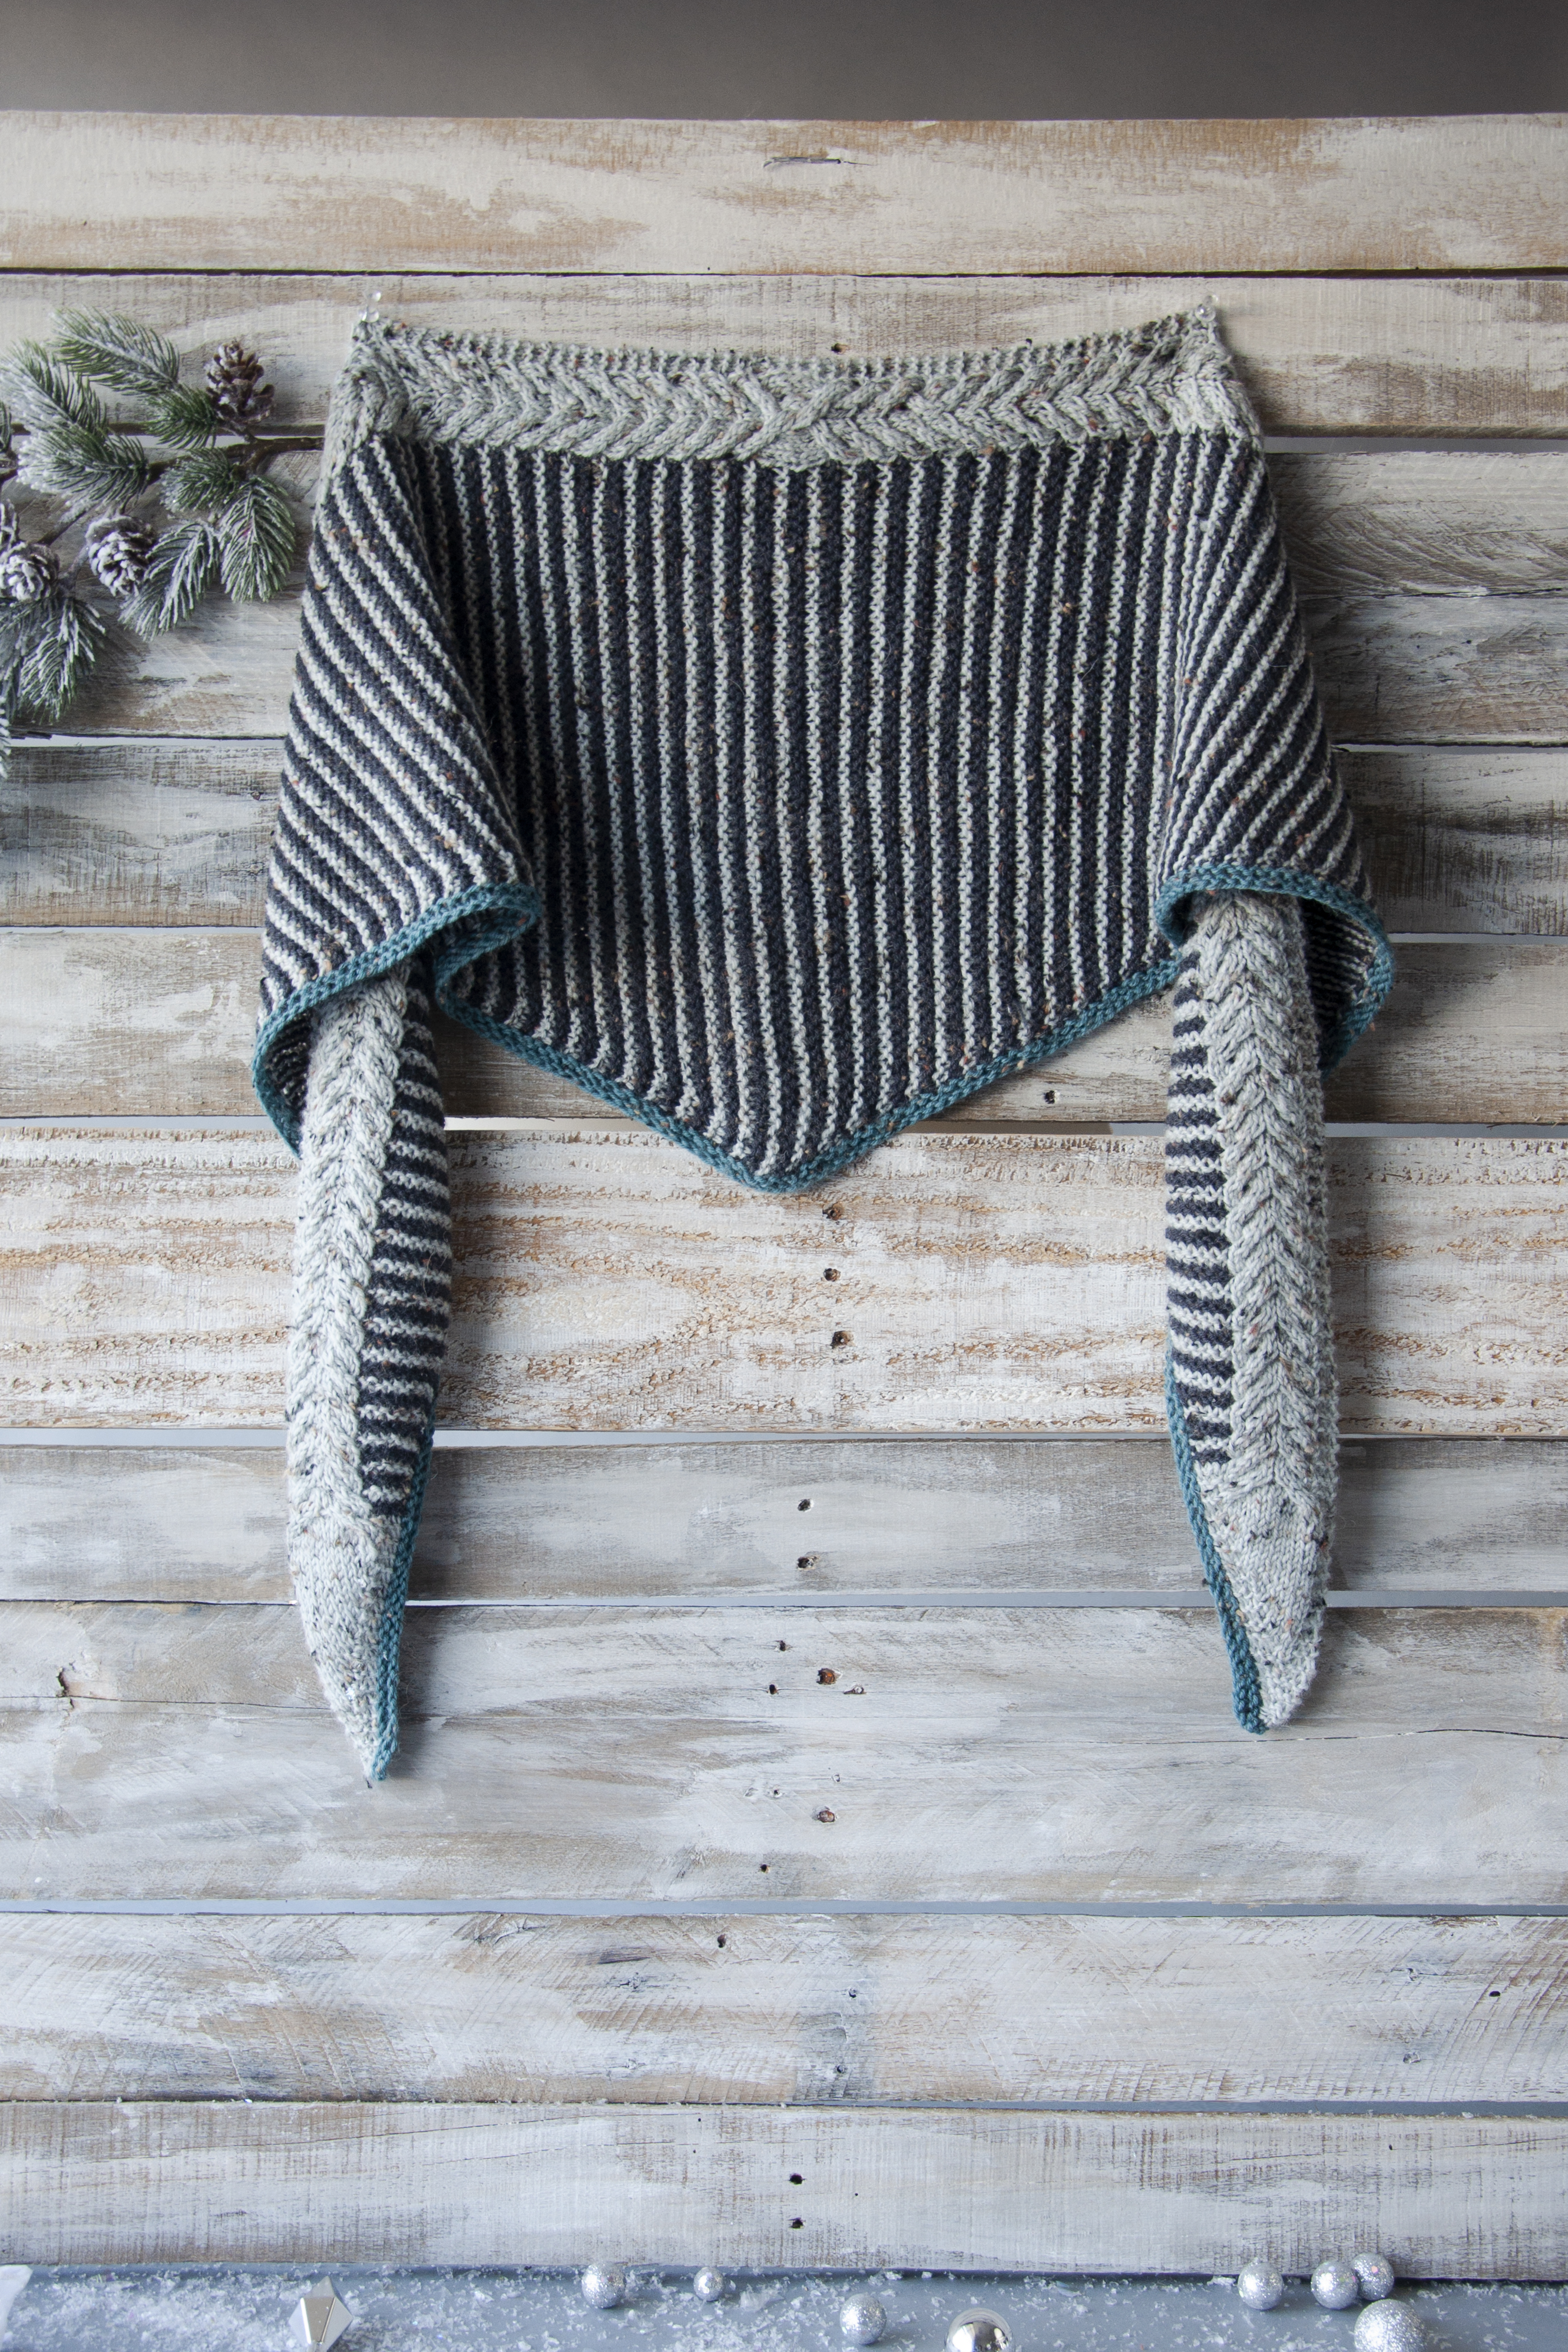
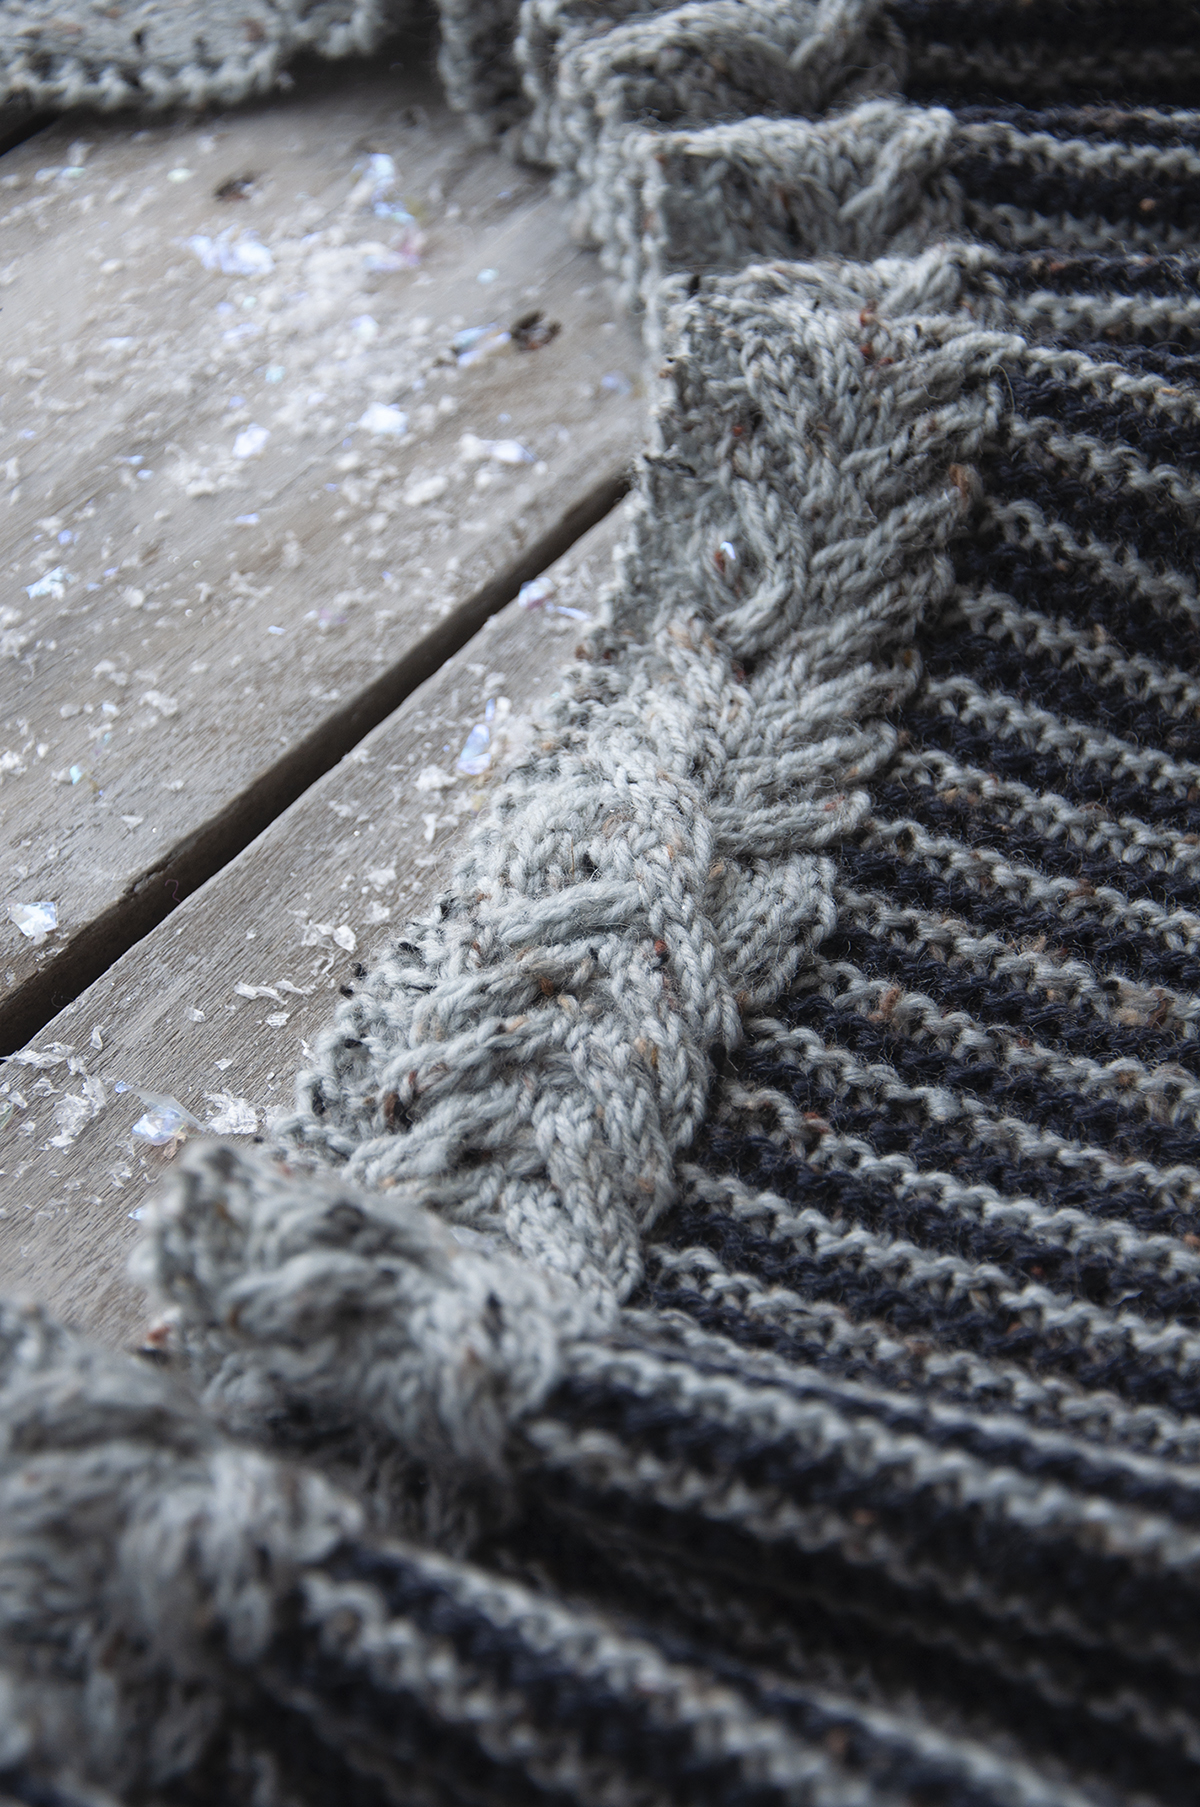
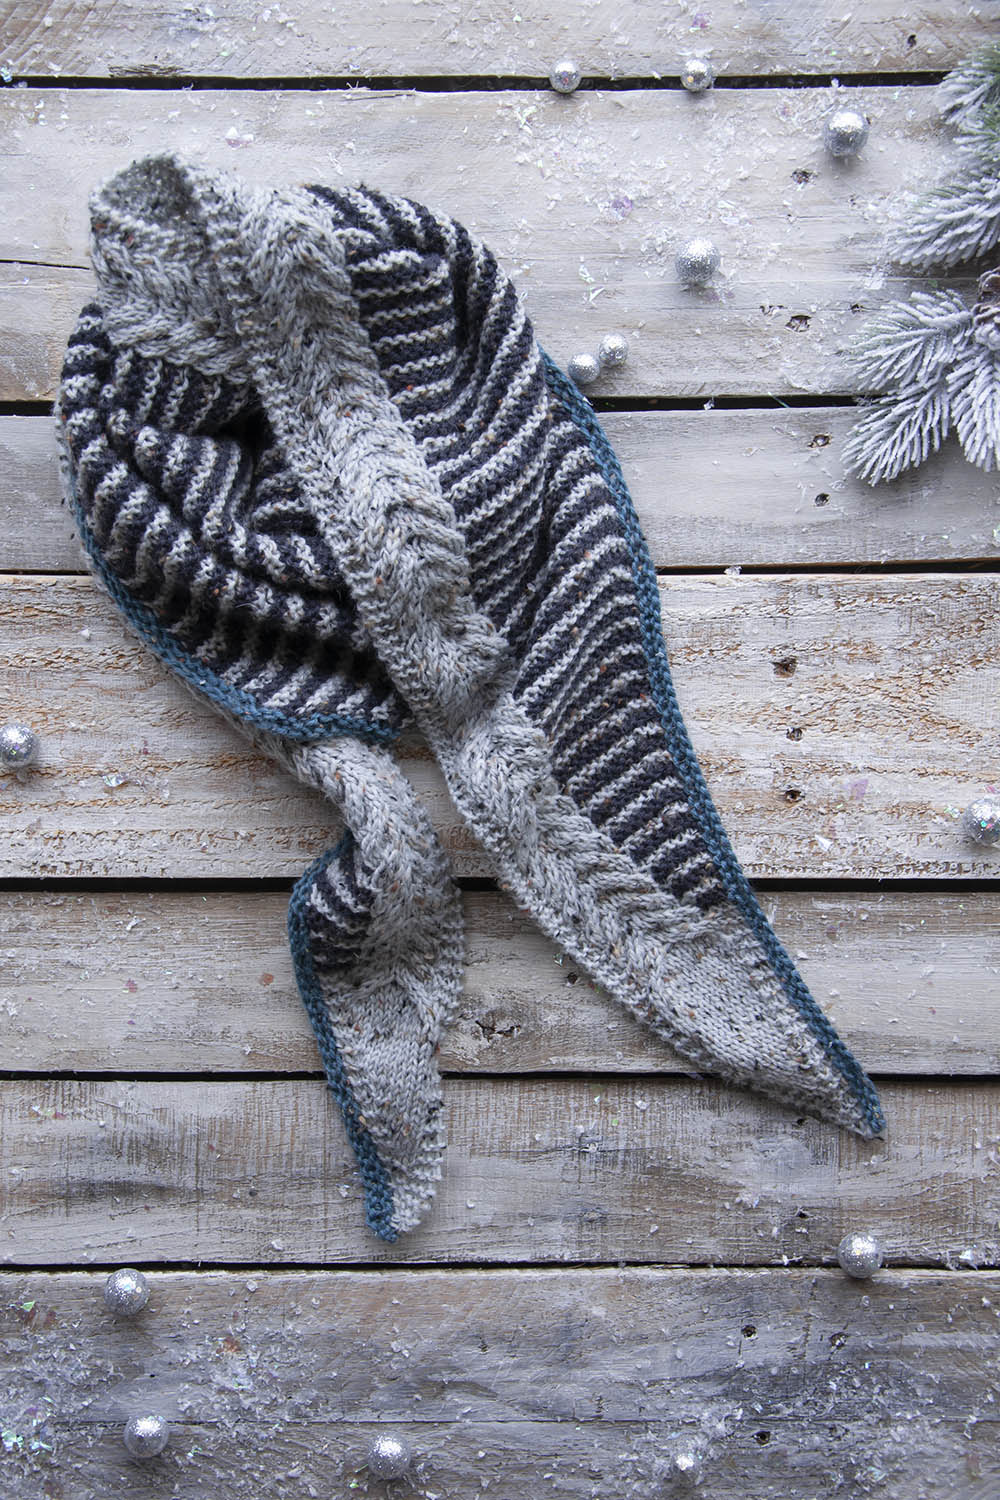
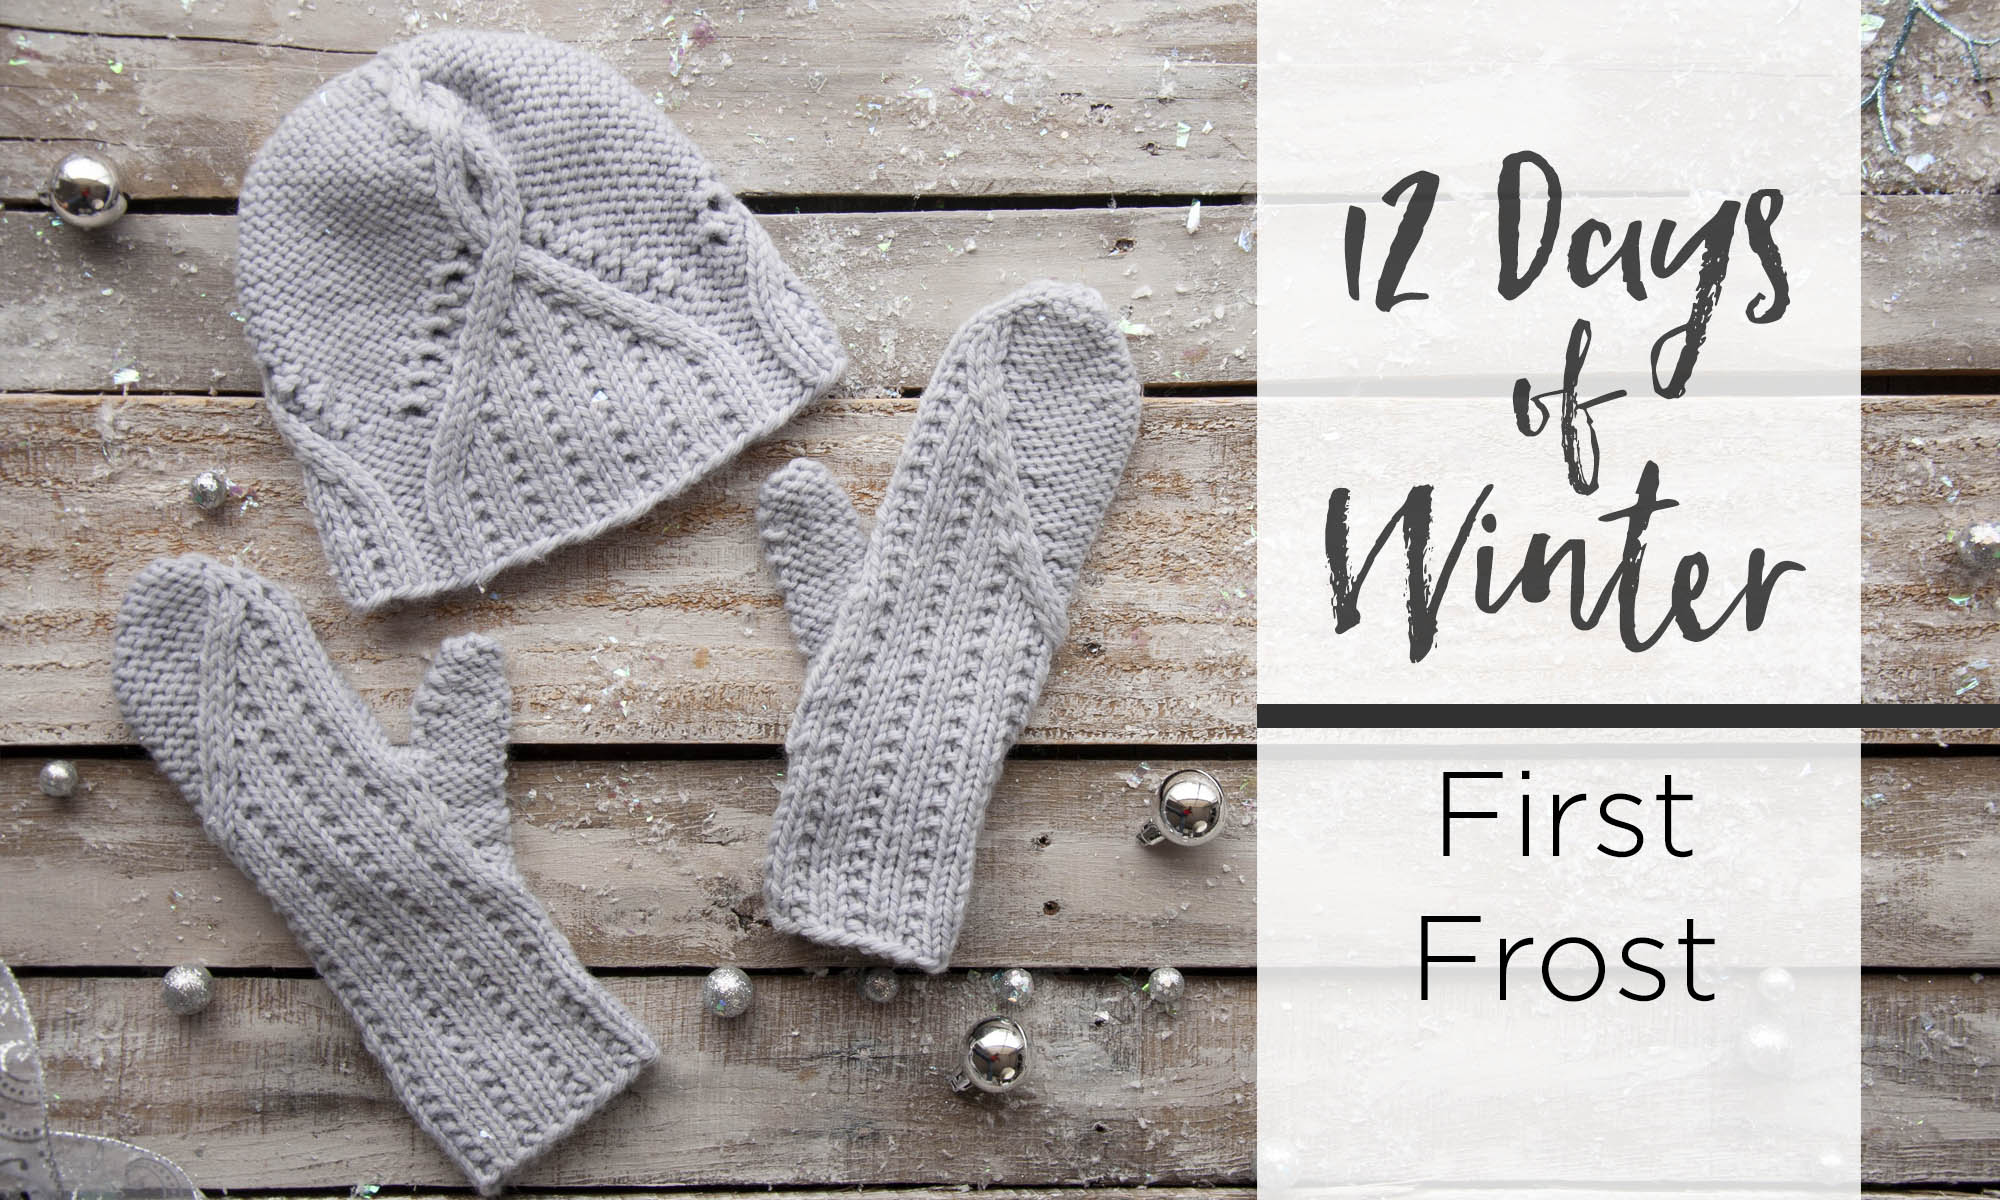
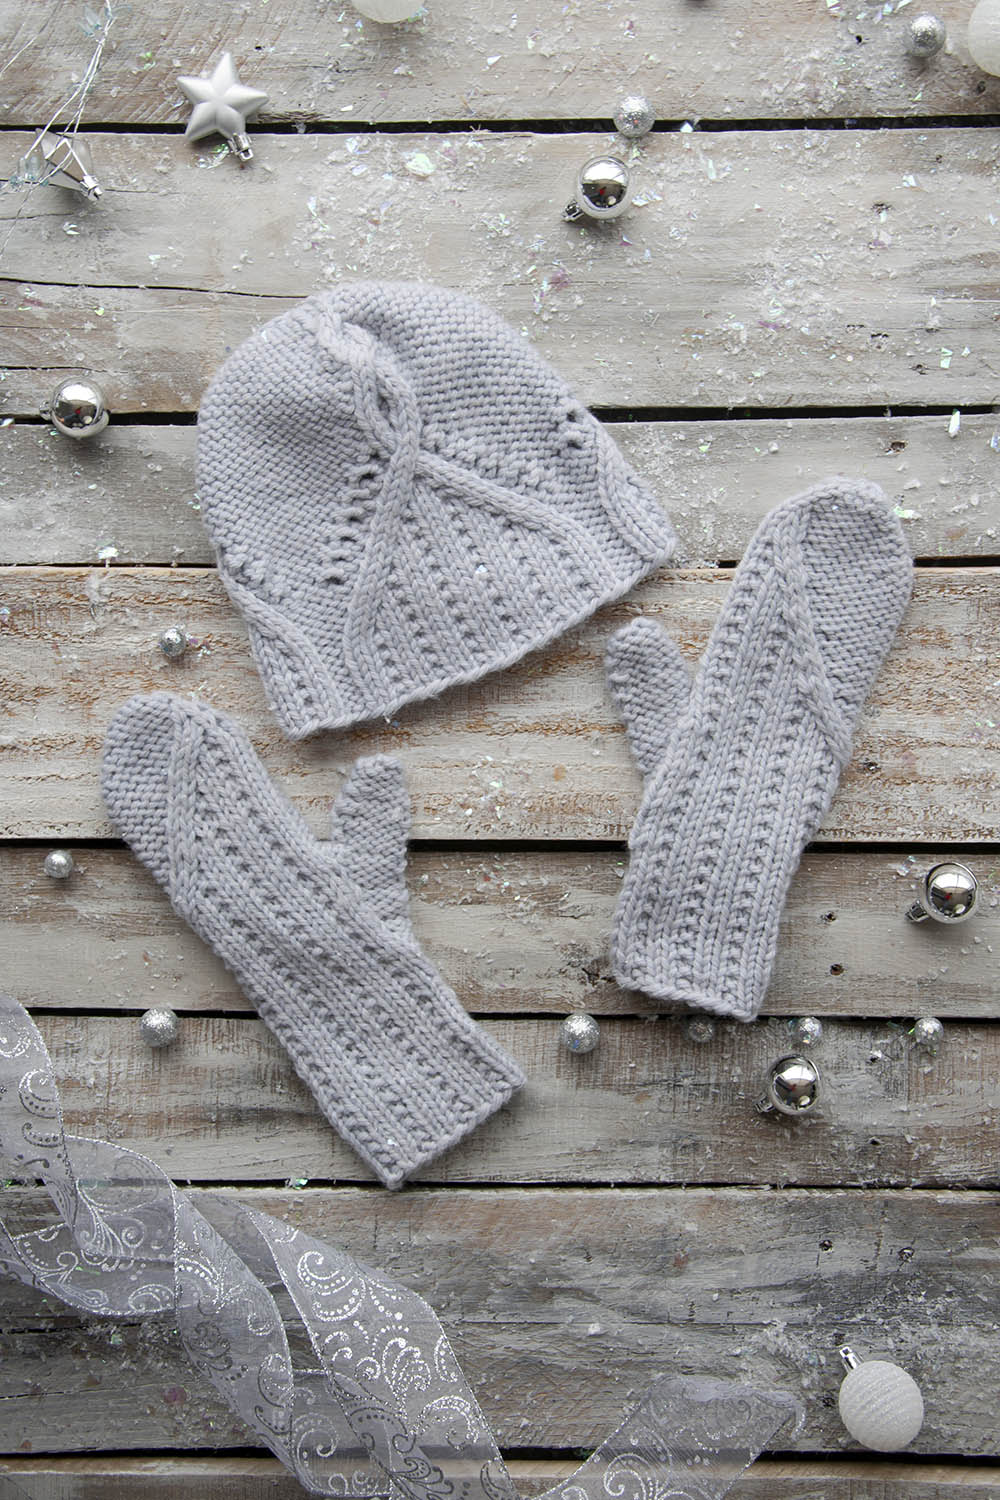
This is part 12 in a 12 part series highlighting designs from our 12 Days of Winter, Series 2 Edition.
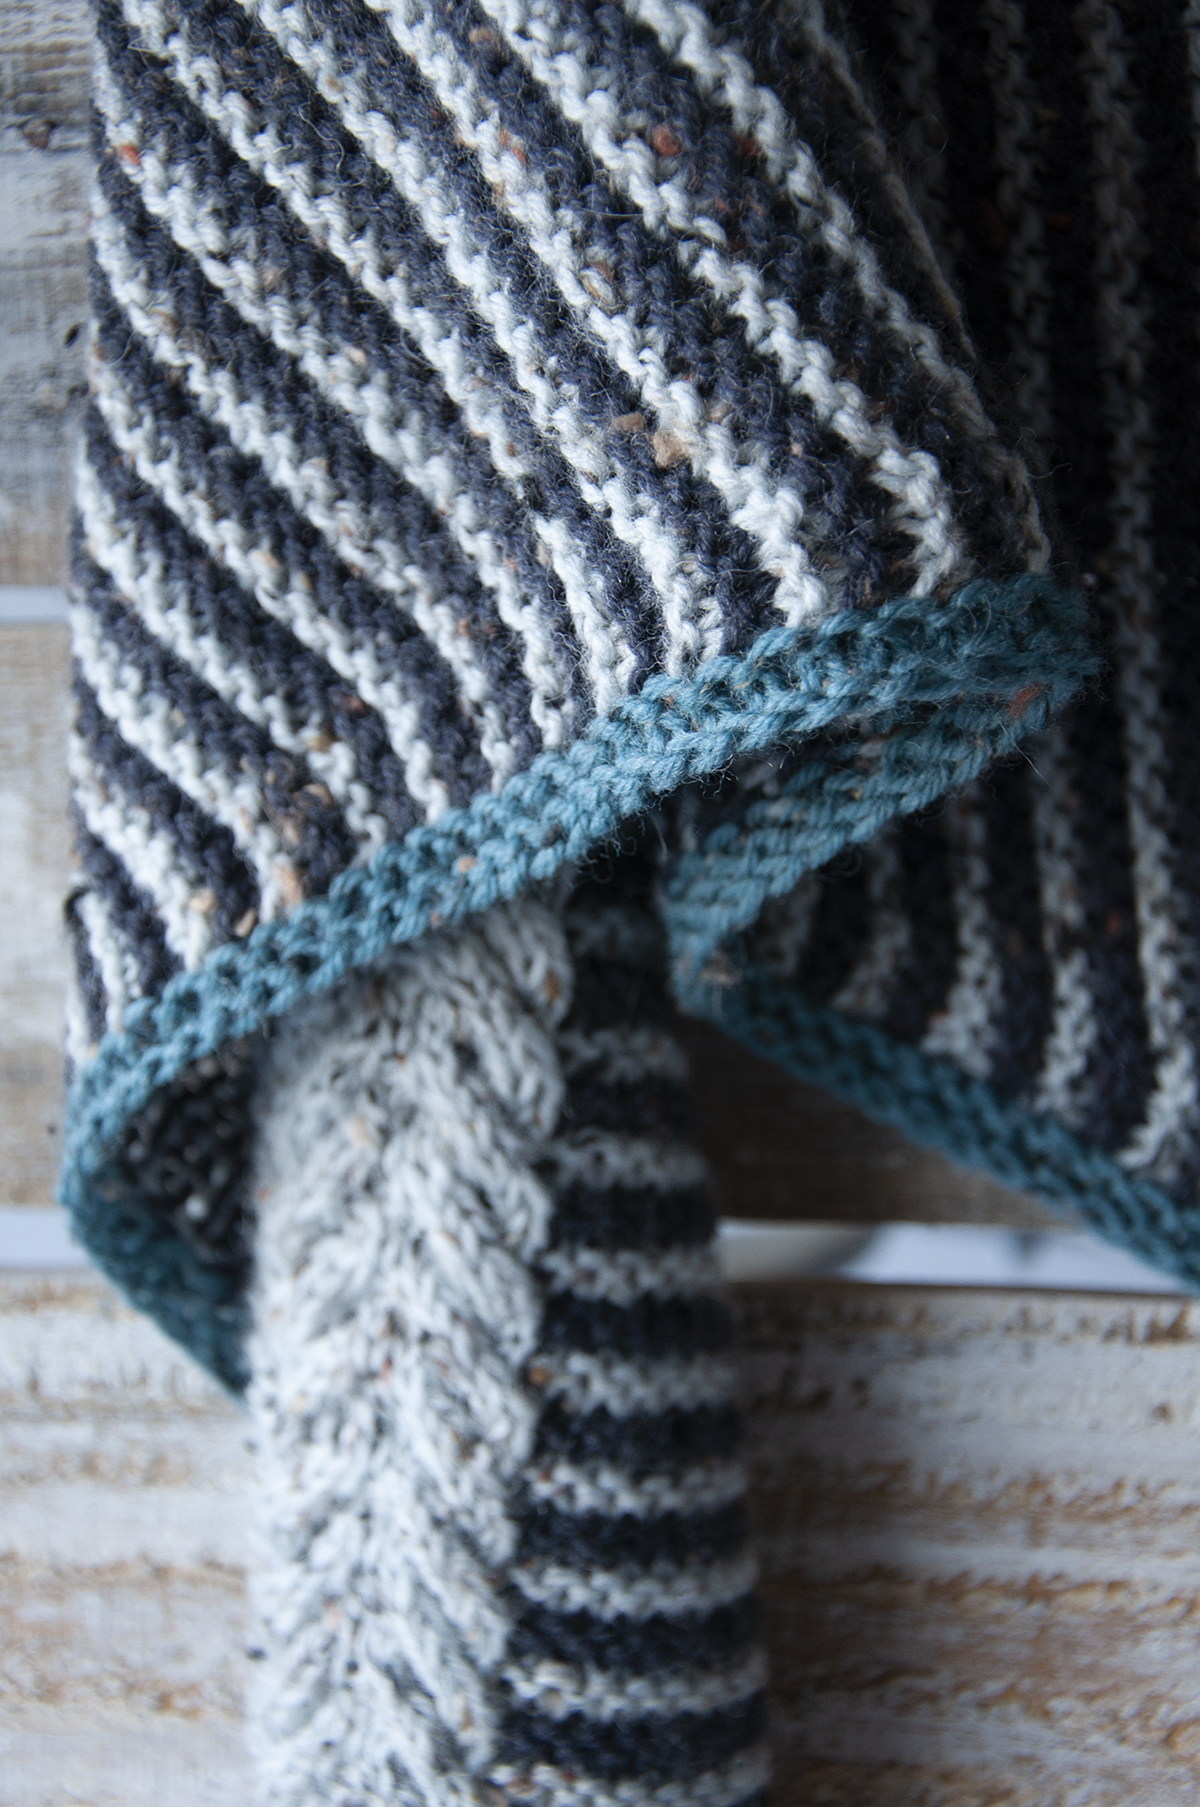
Day 12 – can you believe it? Today we reveal the final installment of the Universal Yarn 12 Days of Winter Kit Collections – Series 2! Say hello to the Solstice Shawl.
Can I be honest? I am really proud of this design – in my opinion, it’s one of my best designs and I sincerely hope you love it.
This isn’t a very complicated design, but what I feel proud of is the balance of simplicity and intricacy in the piece. This shawl combines cables, stripes, and intarsia. It is worked from tip to tip, starting and finishing with the same number of stitches (just two!). Finally, it’s finished with a very simple contrast color border.
Part of what makes this project special is the yarn used: Deluxe DK Tweed Superwash. I love this yarn. It’s rustic and the tweedy nubs add interest to every type of pattern – from simple garter to cables, lace, and stranded colorwork. (If you need convincing, just take a look at the recent collection in this yarn, Rustic & Refined).
I’m keeping this post short and sweet, but before I sign off, thank you’s are in order! Like last year we had a really wonderful time putting this collection together. It is a team effort, for sure. So thanks to everyone on our team for putting in so much hard work! And thank you so much for supporting our company, your local yarn shops, and for following our posts for this collection. We appreciate it so much!
Remember, you can find the 12 Days of Winter Kit patterns on Ravelry.
Ah, knitting. I love everything about it. However, some techniques sing to me more than others. Cables are one of those techniques. I can never get enough. If I can squeeze them in, I do. They don’t have to be complicated – but they can be. Either way, I love them. I want to knit cables as often as I want to eat Kit Kats or Reeses’ Peanut Butter Cups – all the time!
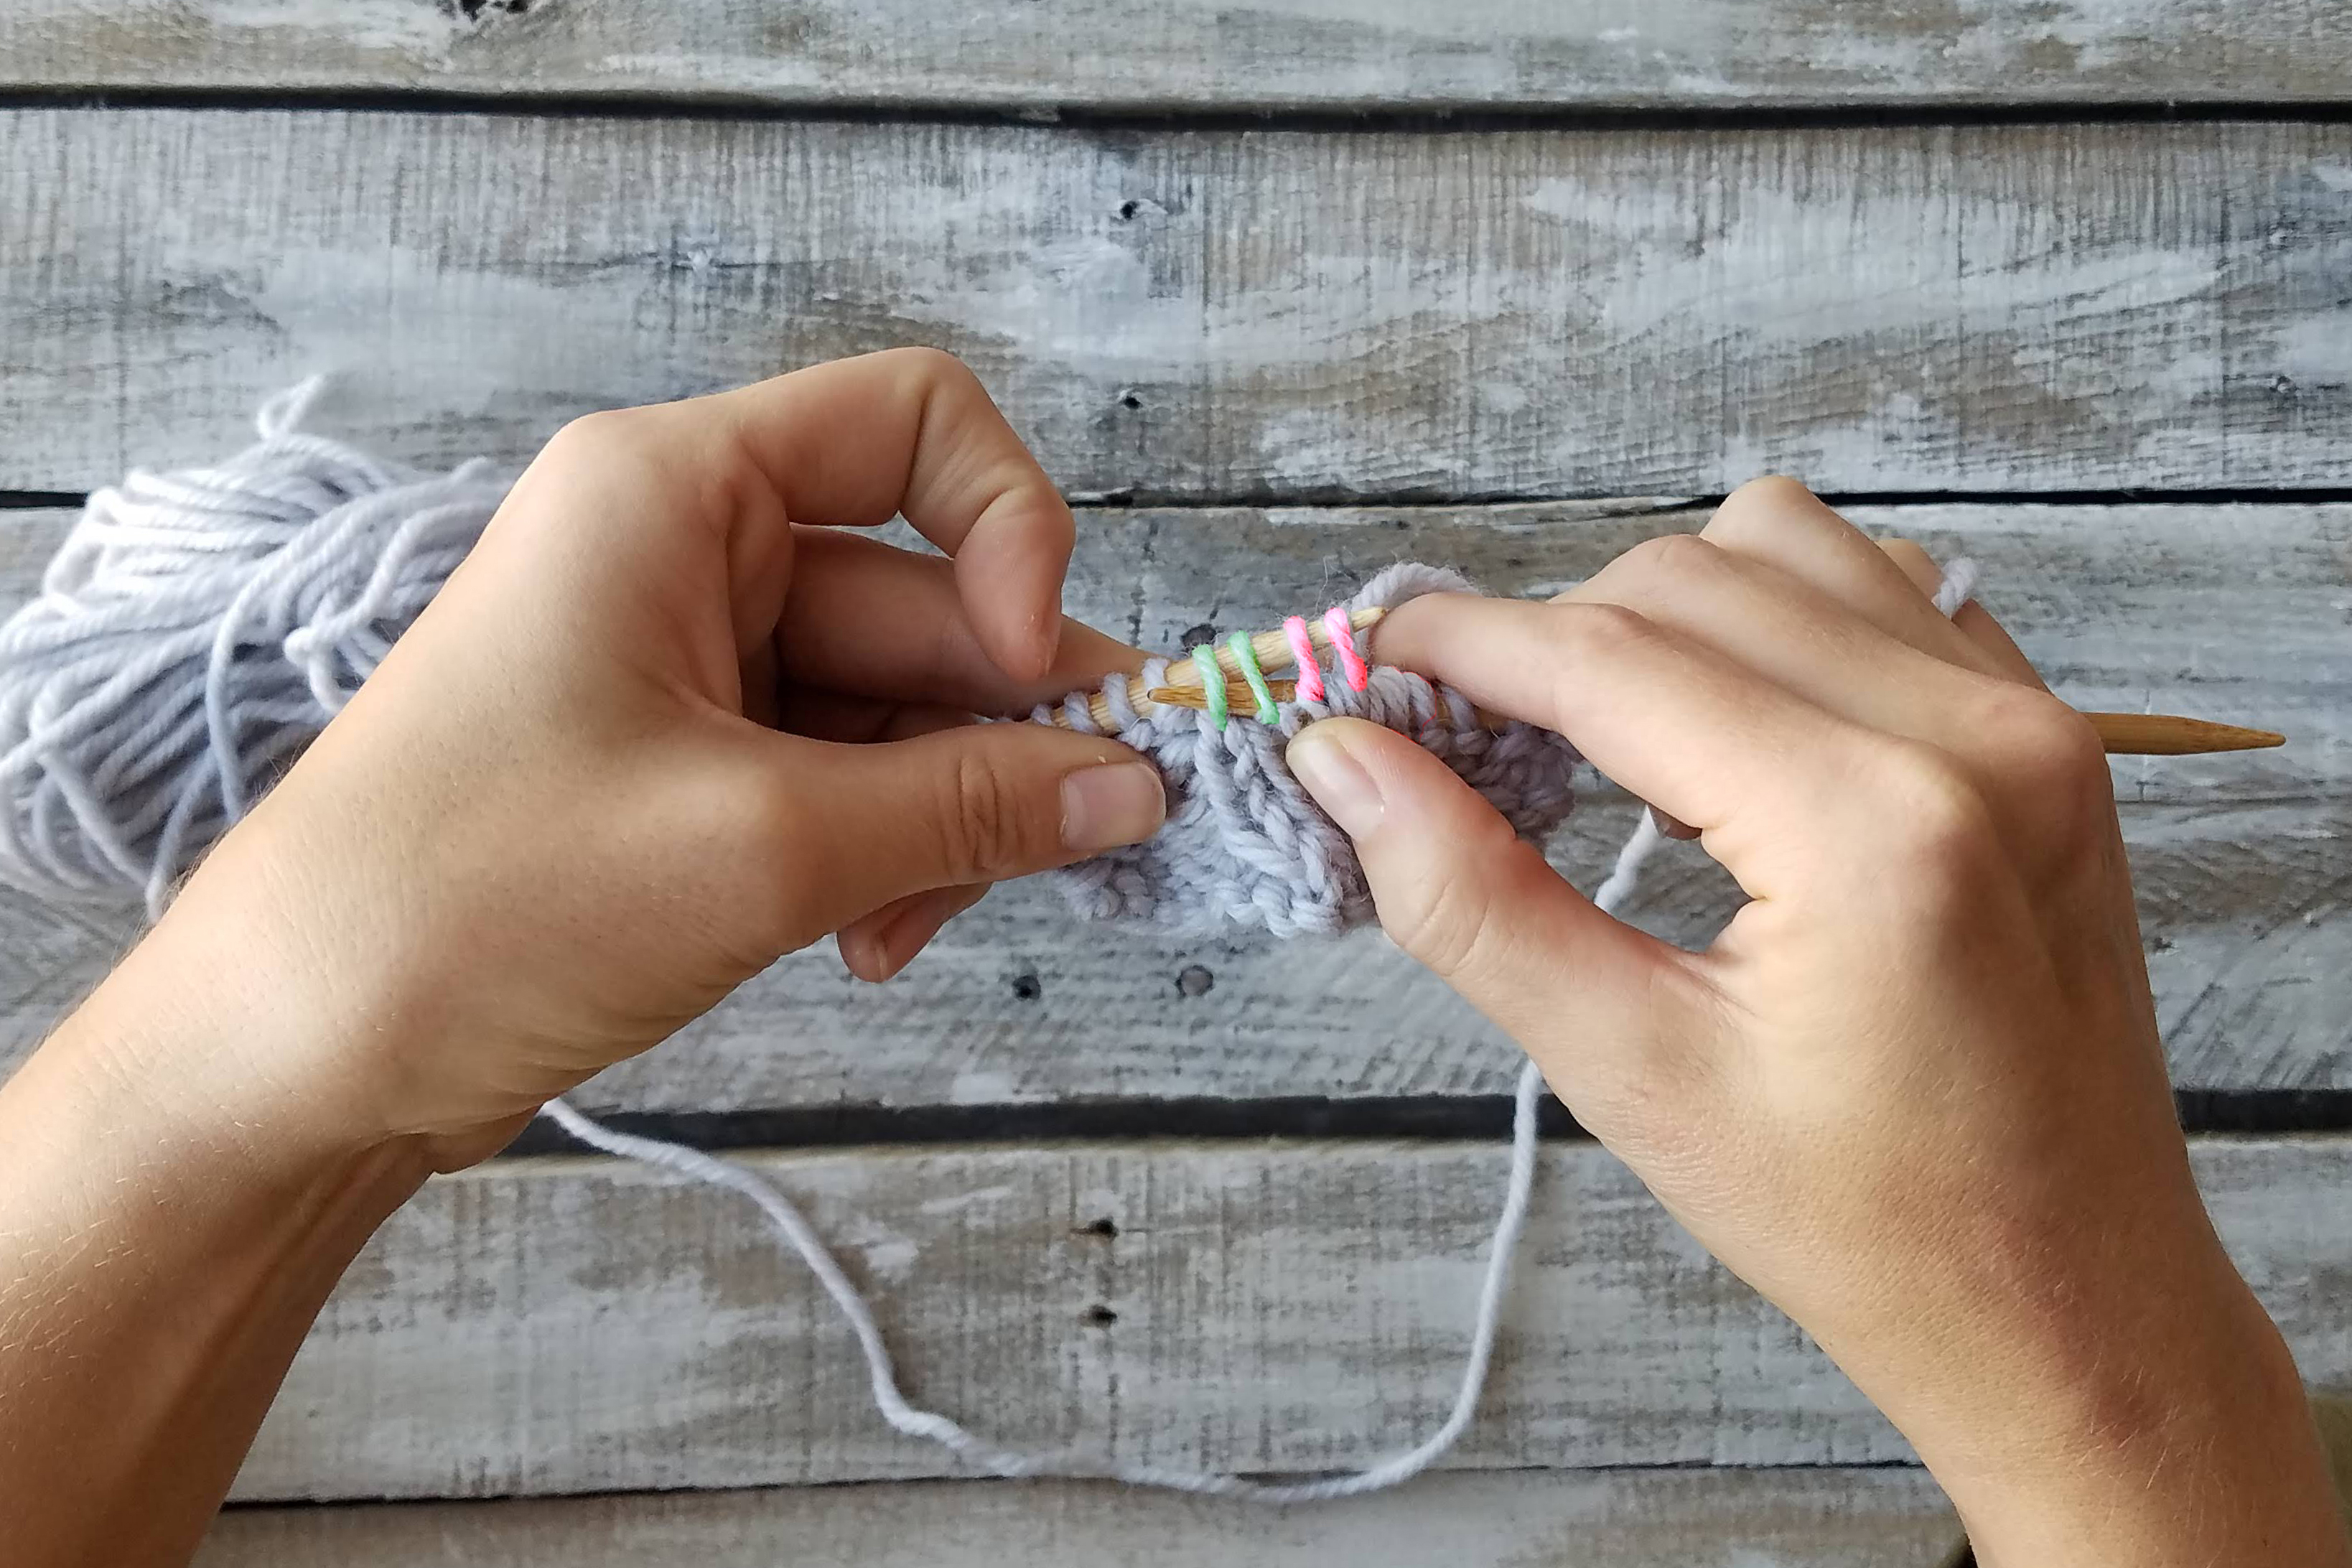
I actually really like using cable needles, but I occasionally lose them. The crevices on my sofa are likely home to several. So what do you do when you don’t have a cable needle or spare DPN handy? Do you find another project? NO! Of course not! You simply cable without a cable needle. I’m going to show you how with a quick tutorial!
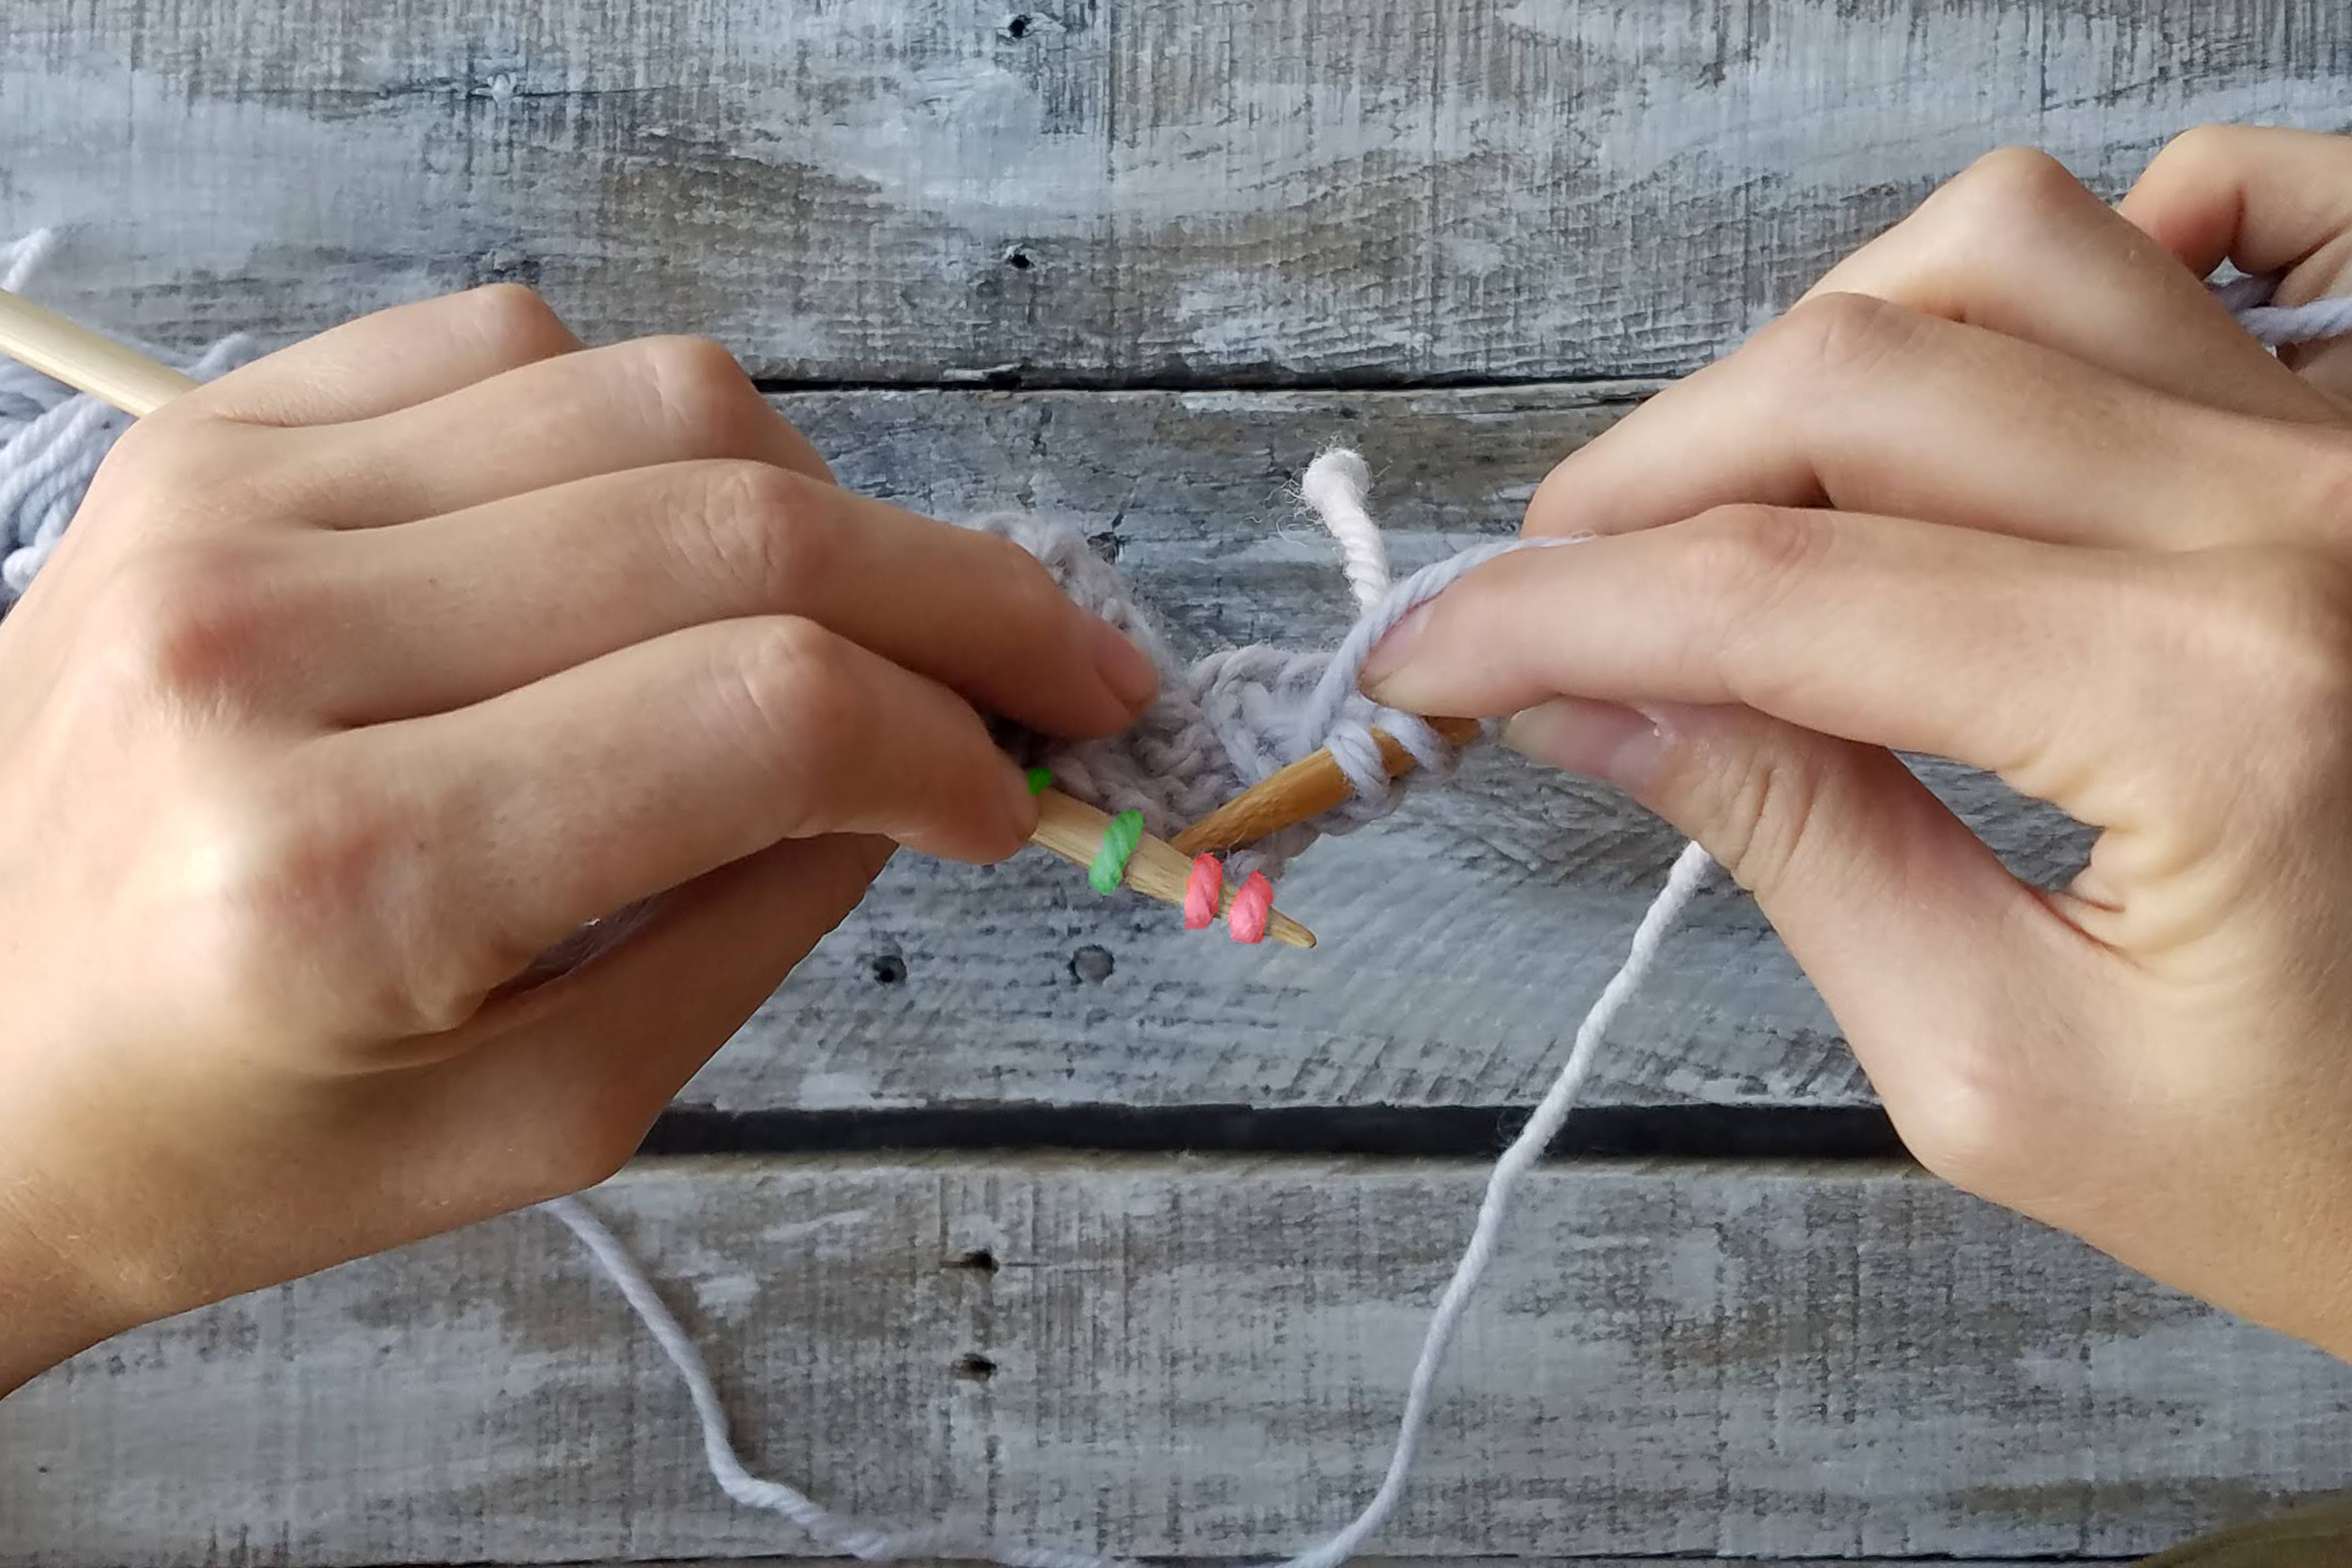
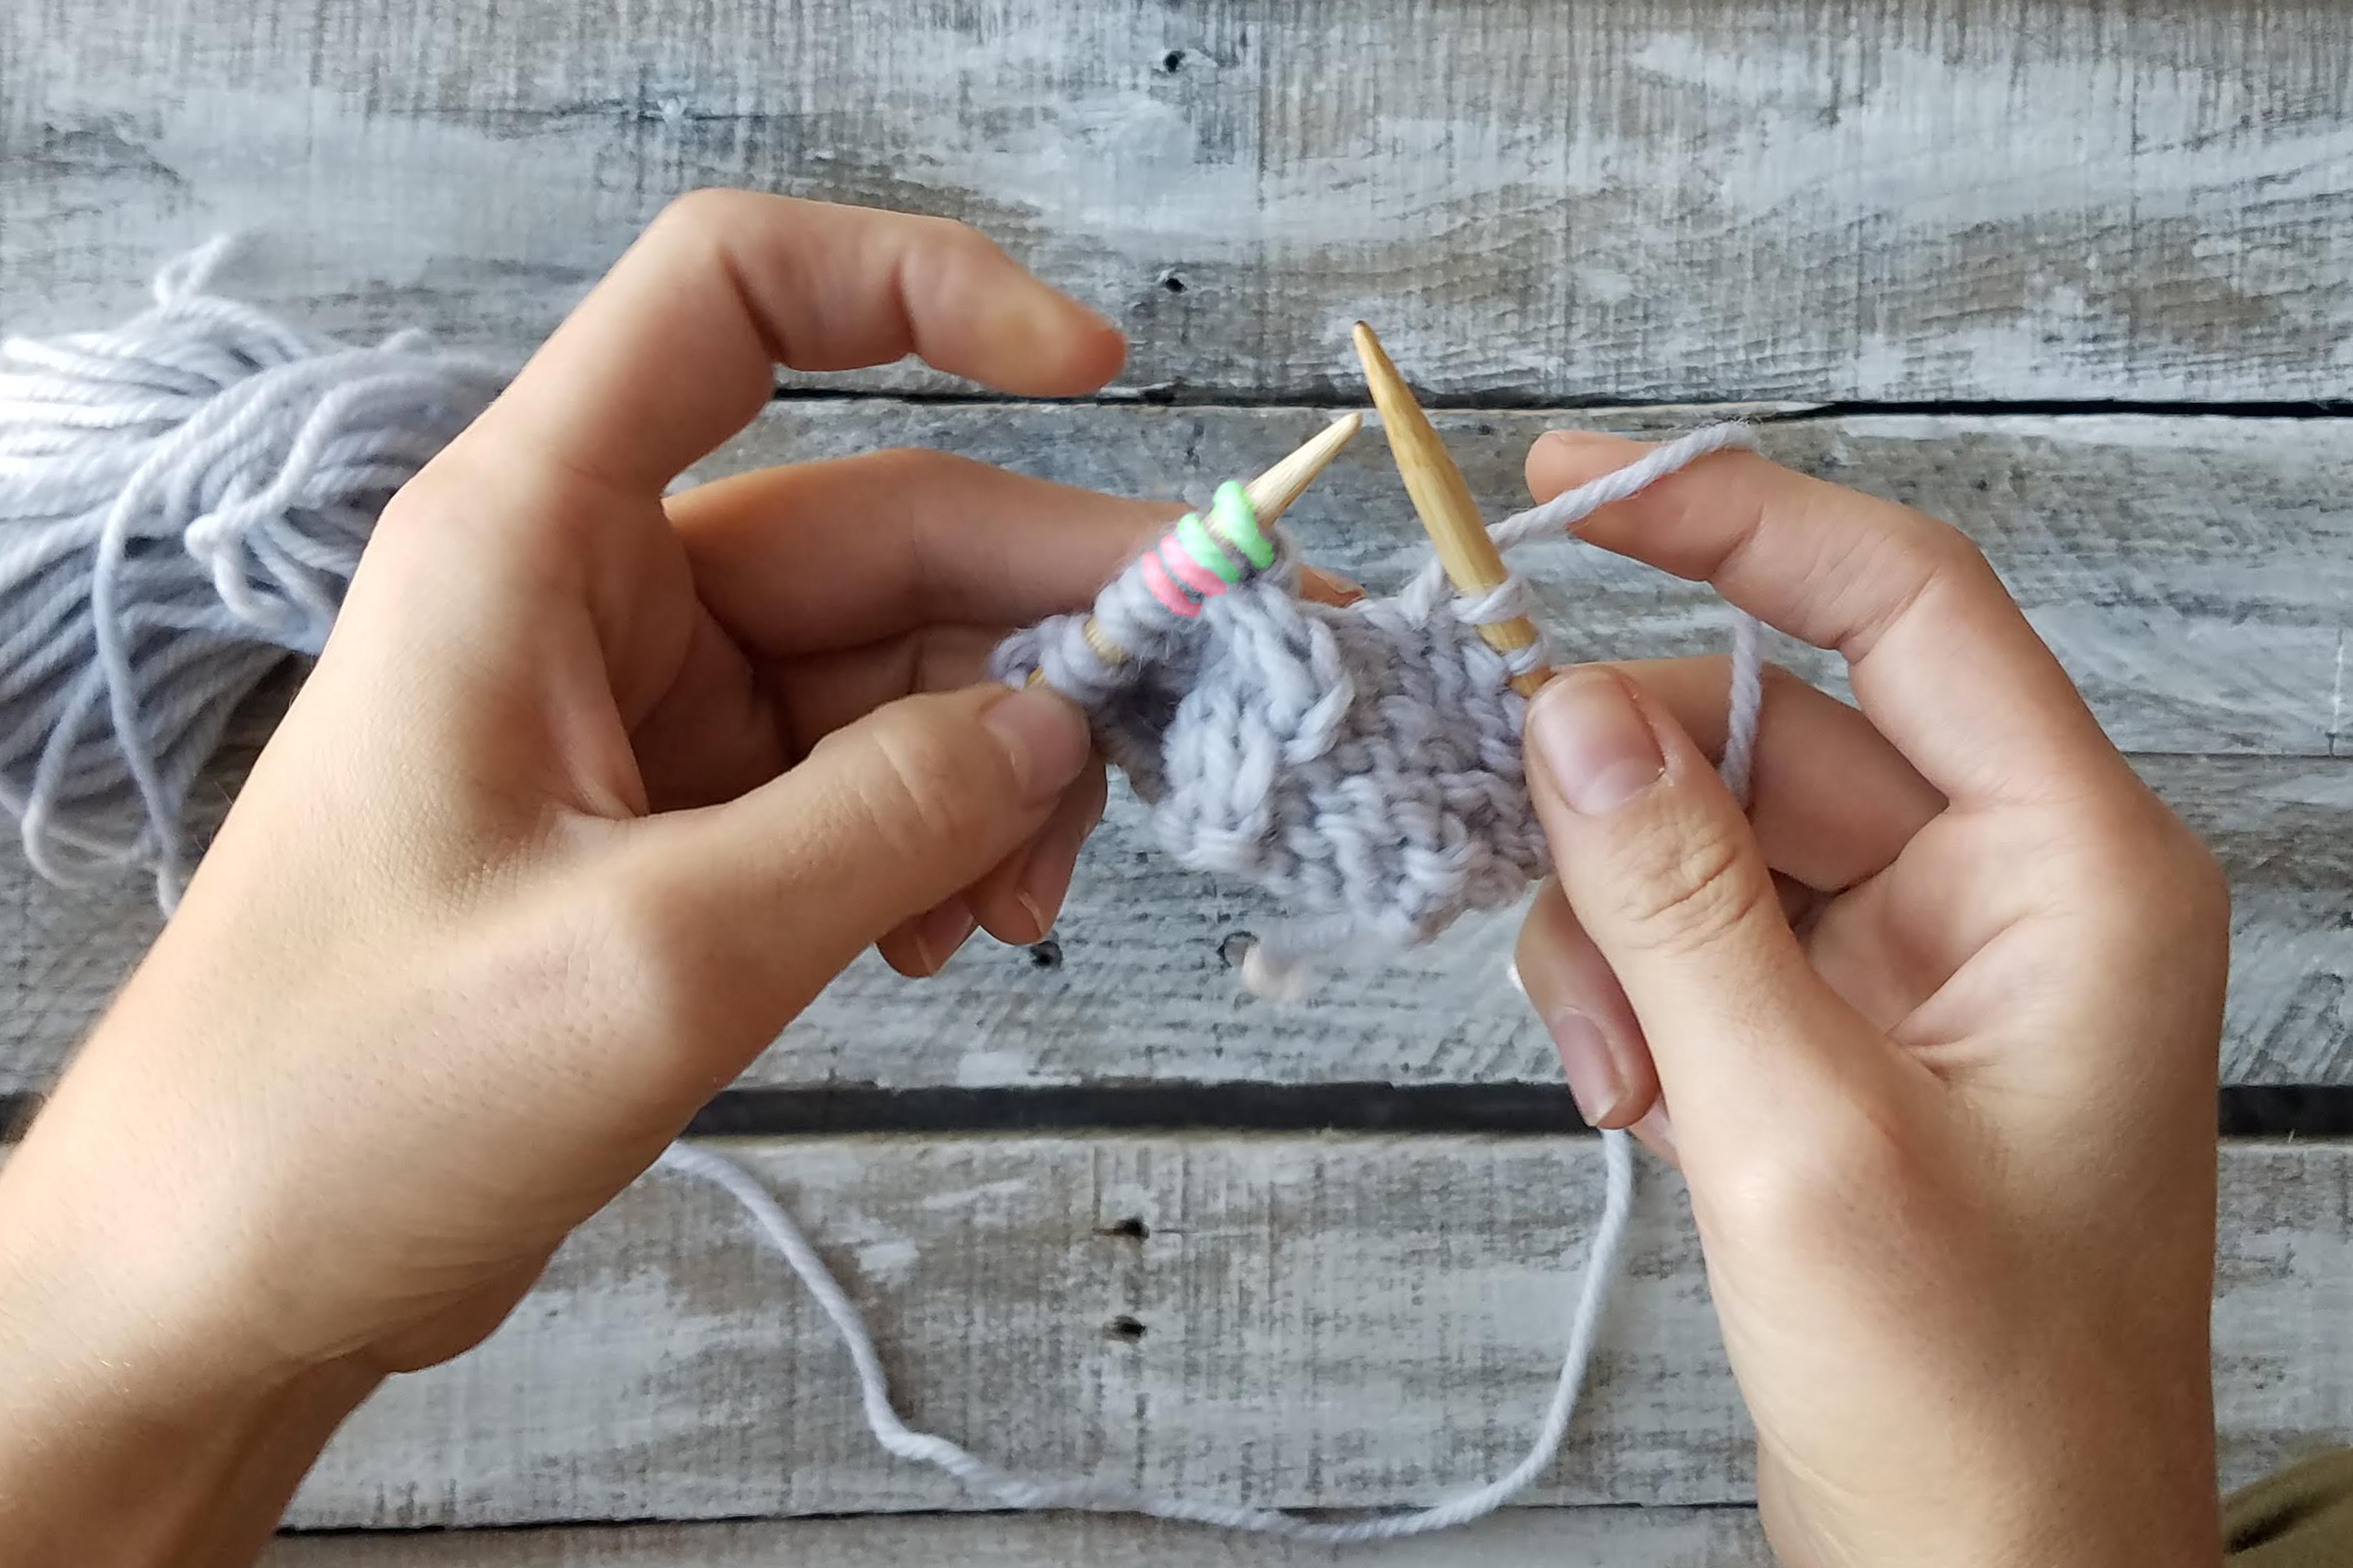
Stitches ready for their next twist.
Cabling without a cable needle is just a matter of rearranging your stitches. I’ve highlighted the stitches we’ll be working with using red and green. In this instance, I am going to cross my stitches to the left.
Going behind the first two stitches (red) on the left-hand needle, slip the third and fourth (green) stitches to the right-hand needle. The first two stitches will be in FRONT of the work. If you were working this as a right cross, the red stitches would be in the BACK of your work, and you would slip the green stitches purlwise from the front.
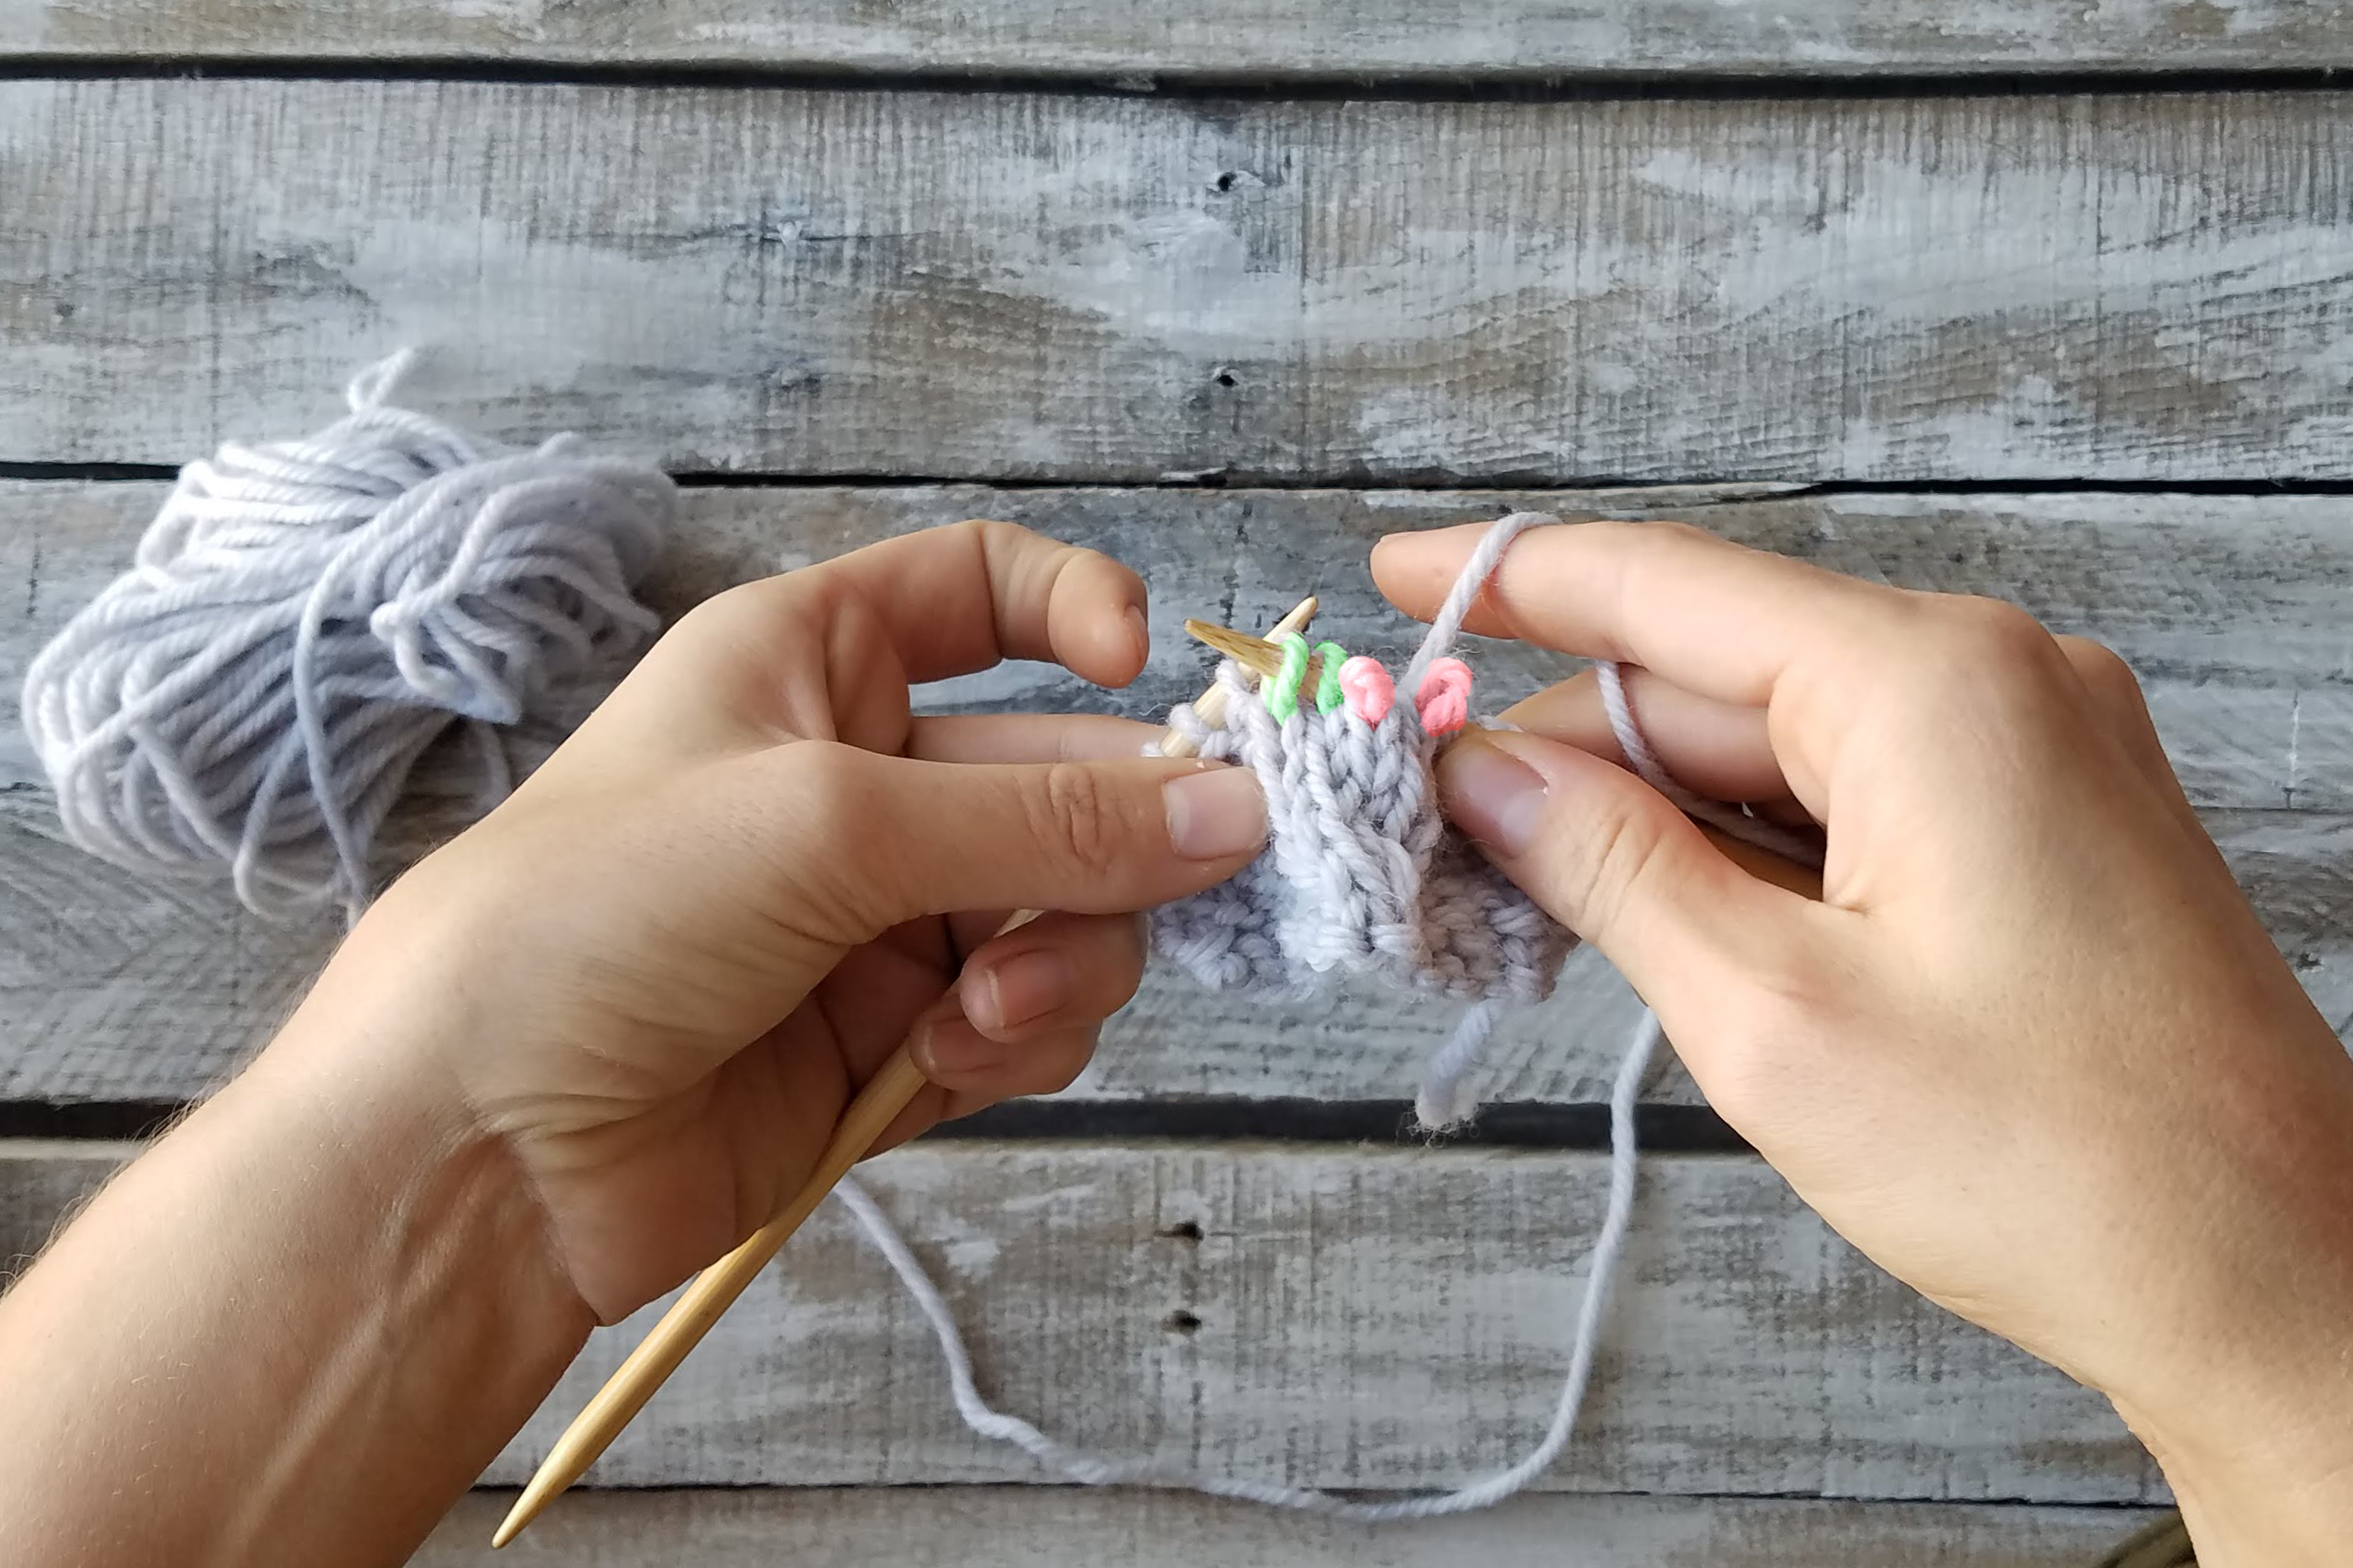
Alternate view – slipping the green stitches purlwise to the right-hand needle.
Don’t be afraid!
If the above photo scares you, just take a deep breath. It’s really not that scary! When you slip the green stitches, the red stitches will fall off your needle. That is okay – that’s what you want!
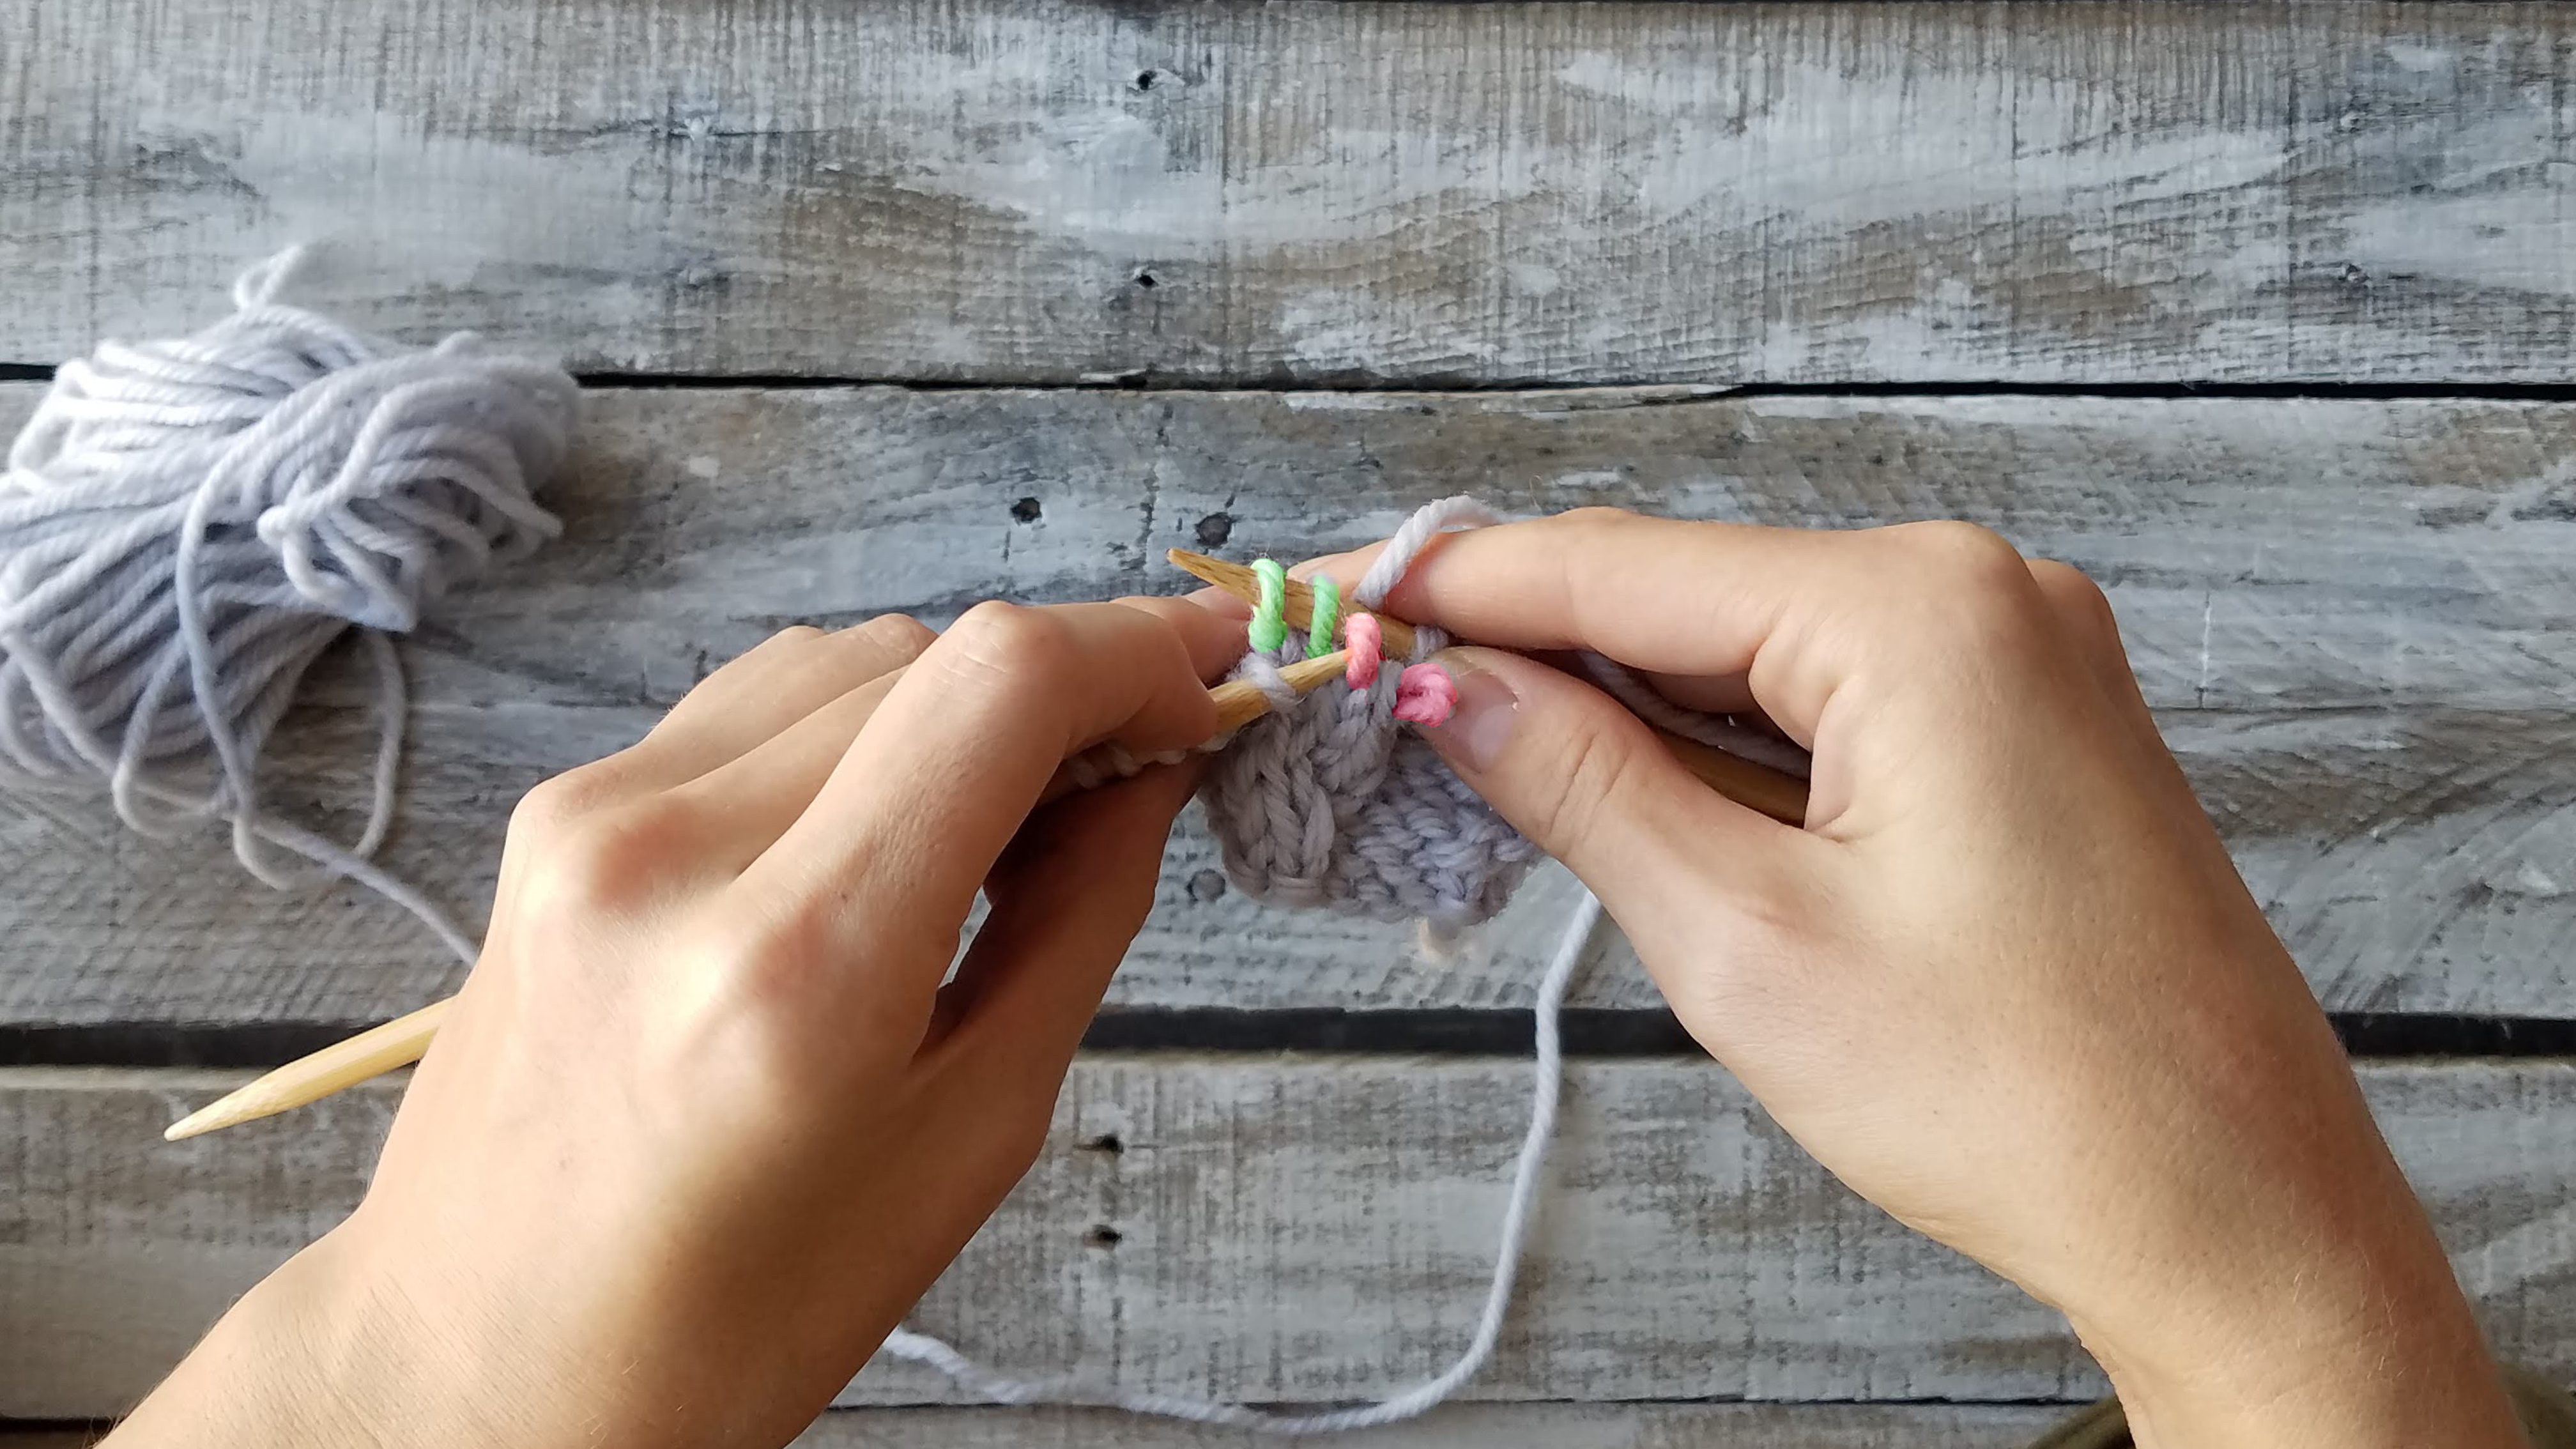
Scoop the stitches back up with the left-hand needle.
Carefully scoop the red stitches up with your left-hand needle. Breathe a sigh of relief – your stitches are safe again. Notice, we are simply re-arranging the stitches. * If you were working this as a RIGHT cross, the red stitches would be in the back of your work.
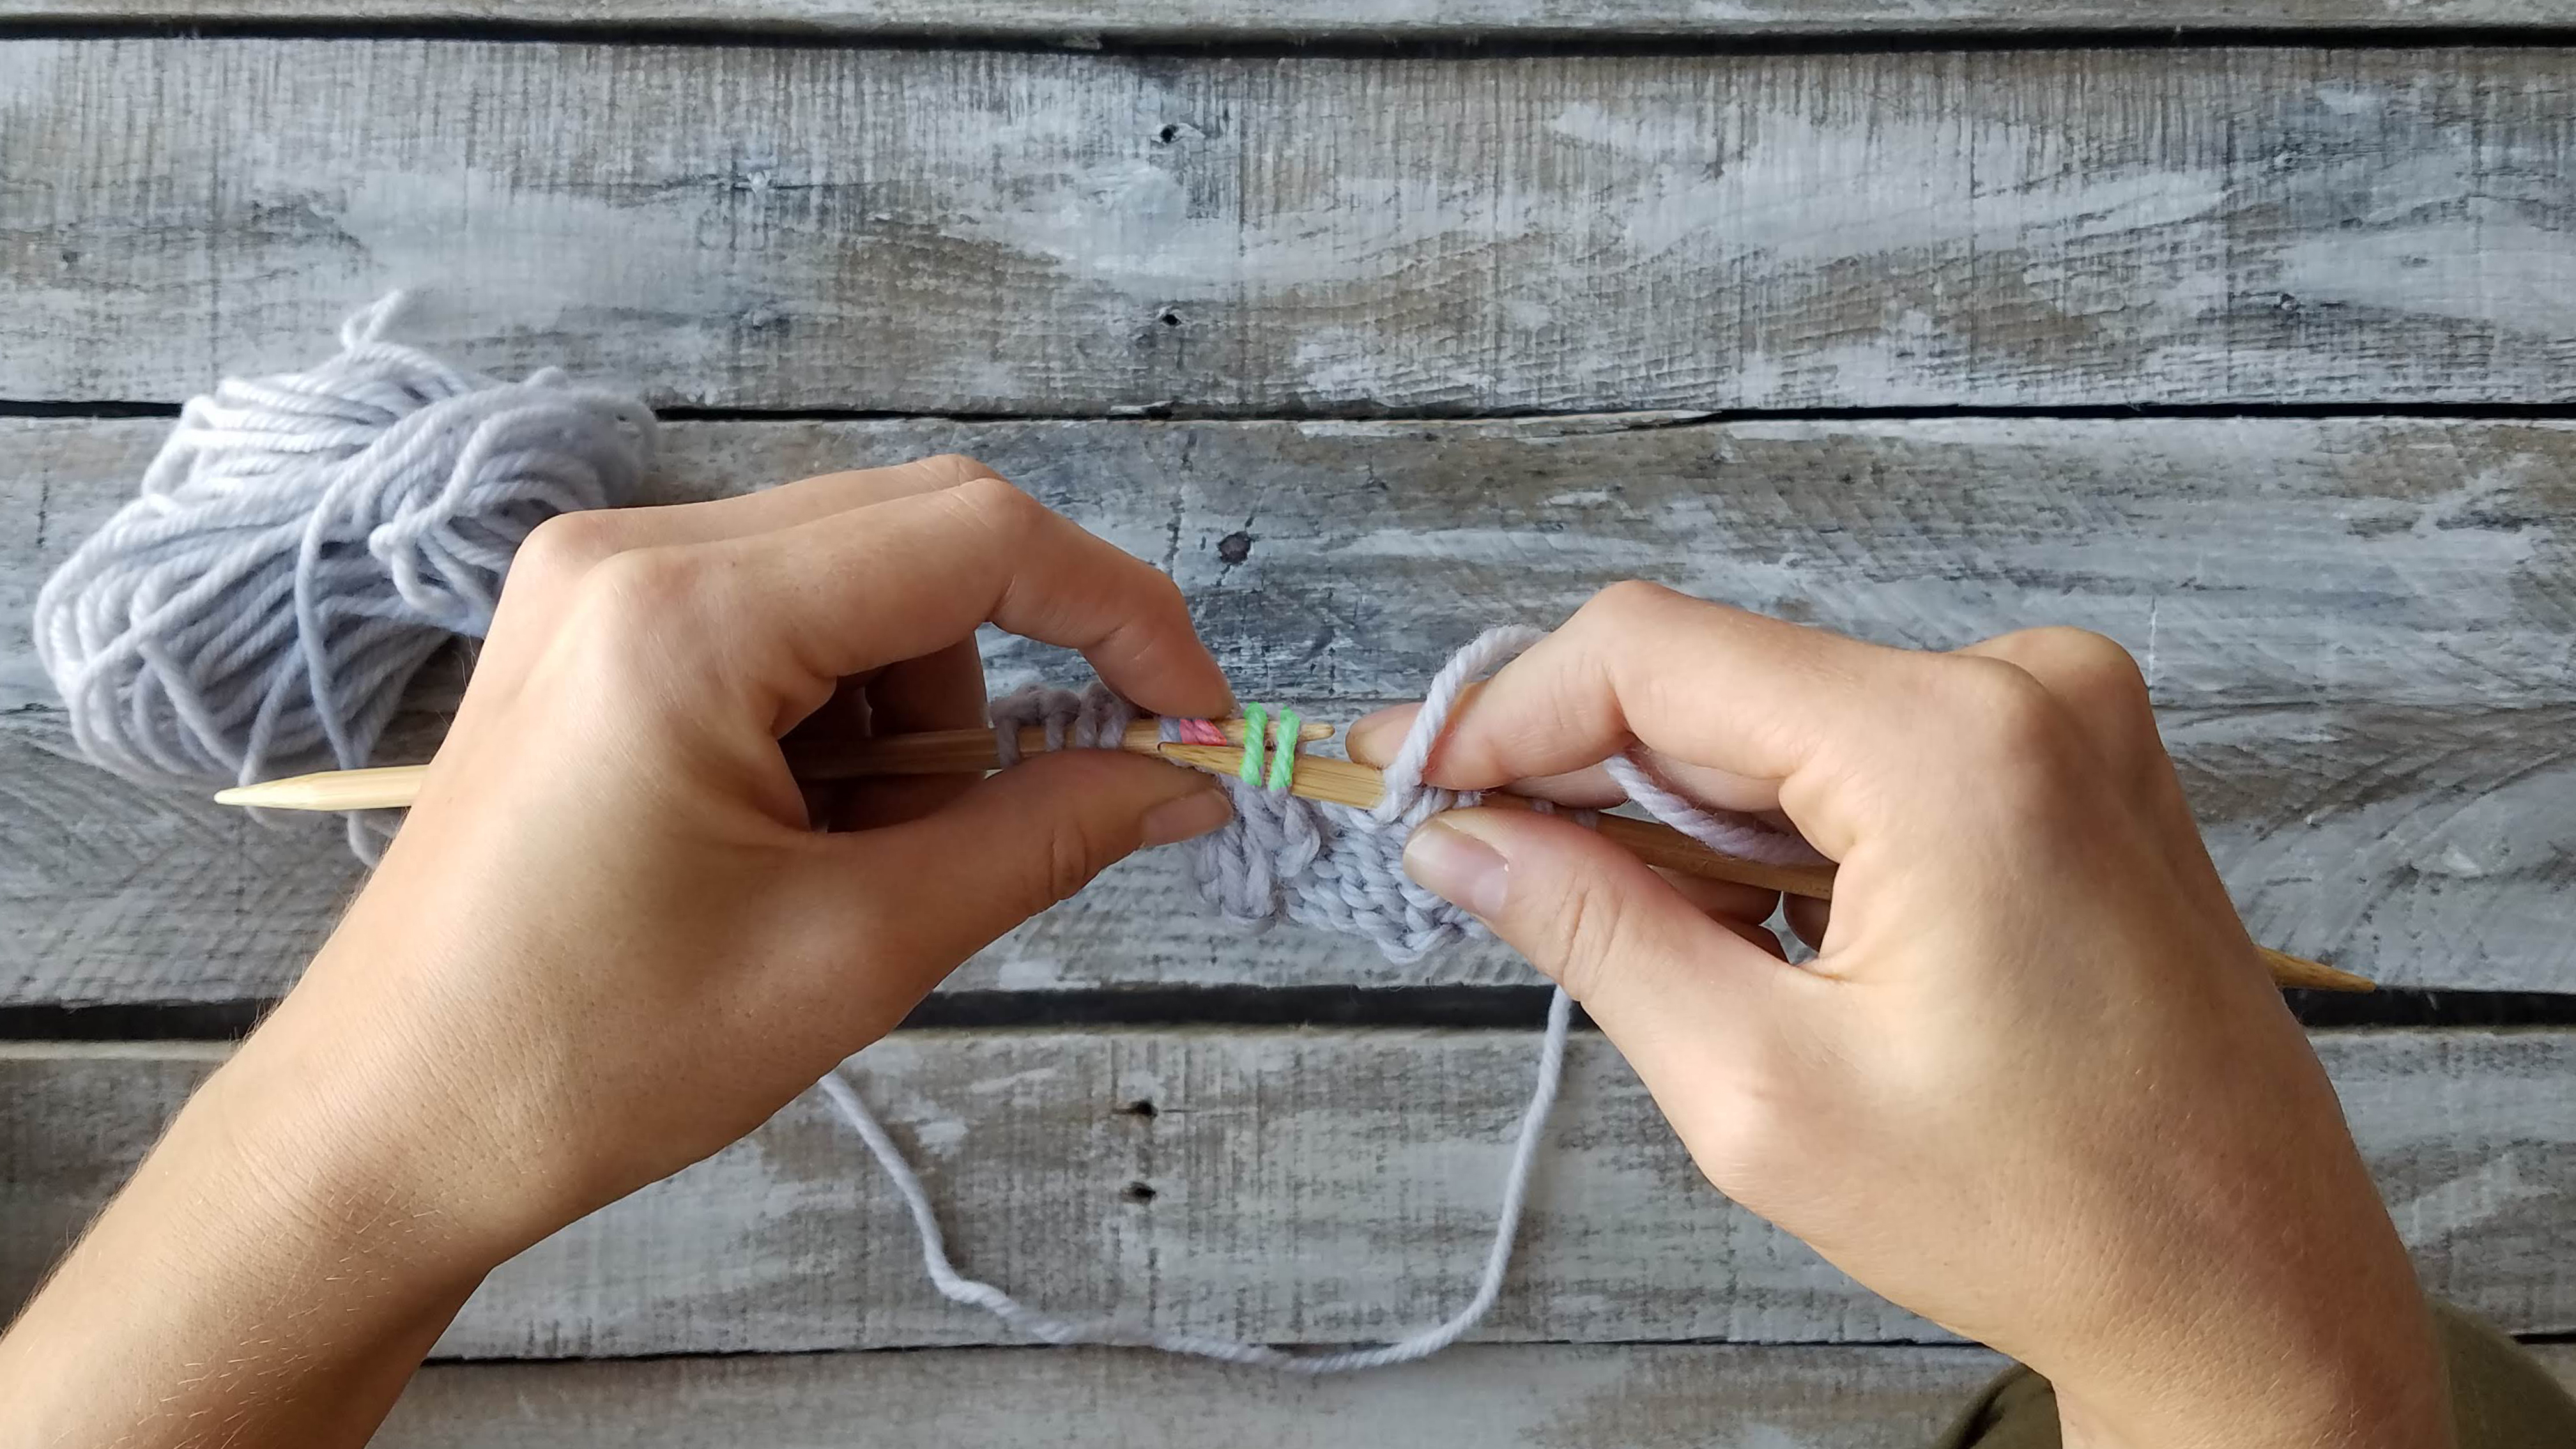
Continue to re-arrange your stitches by slipping the green stitches from the right-hand needle back to the left-hand needle.
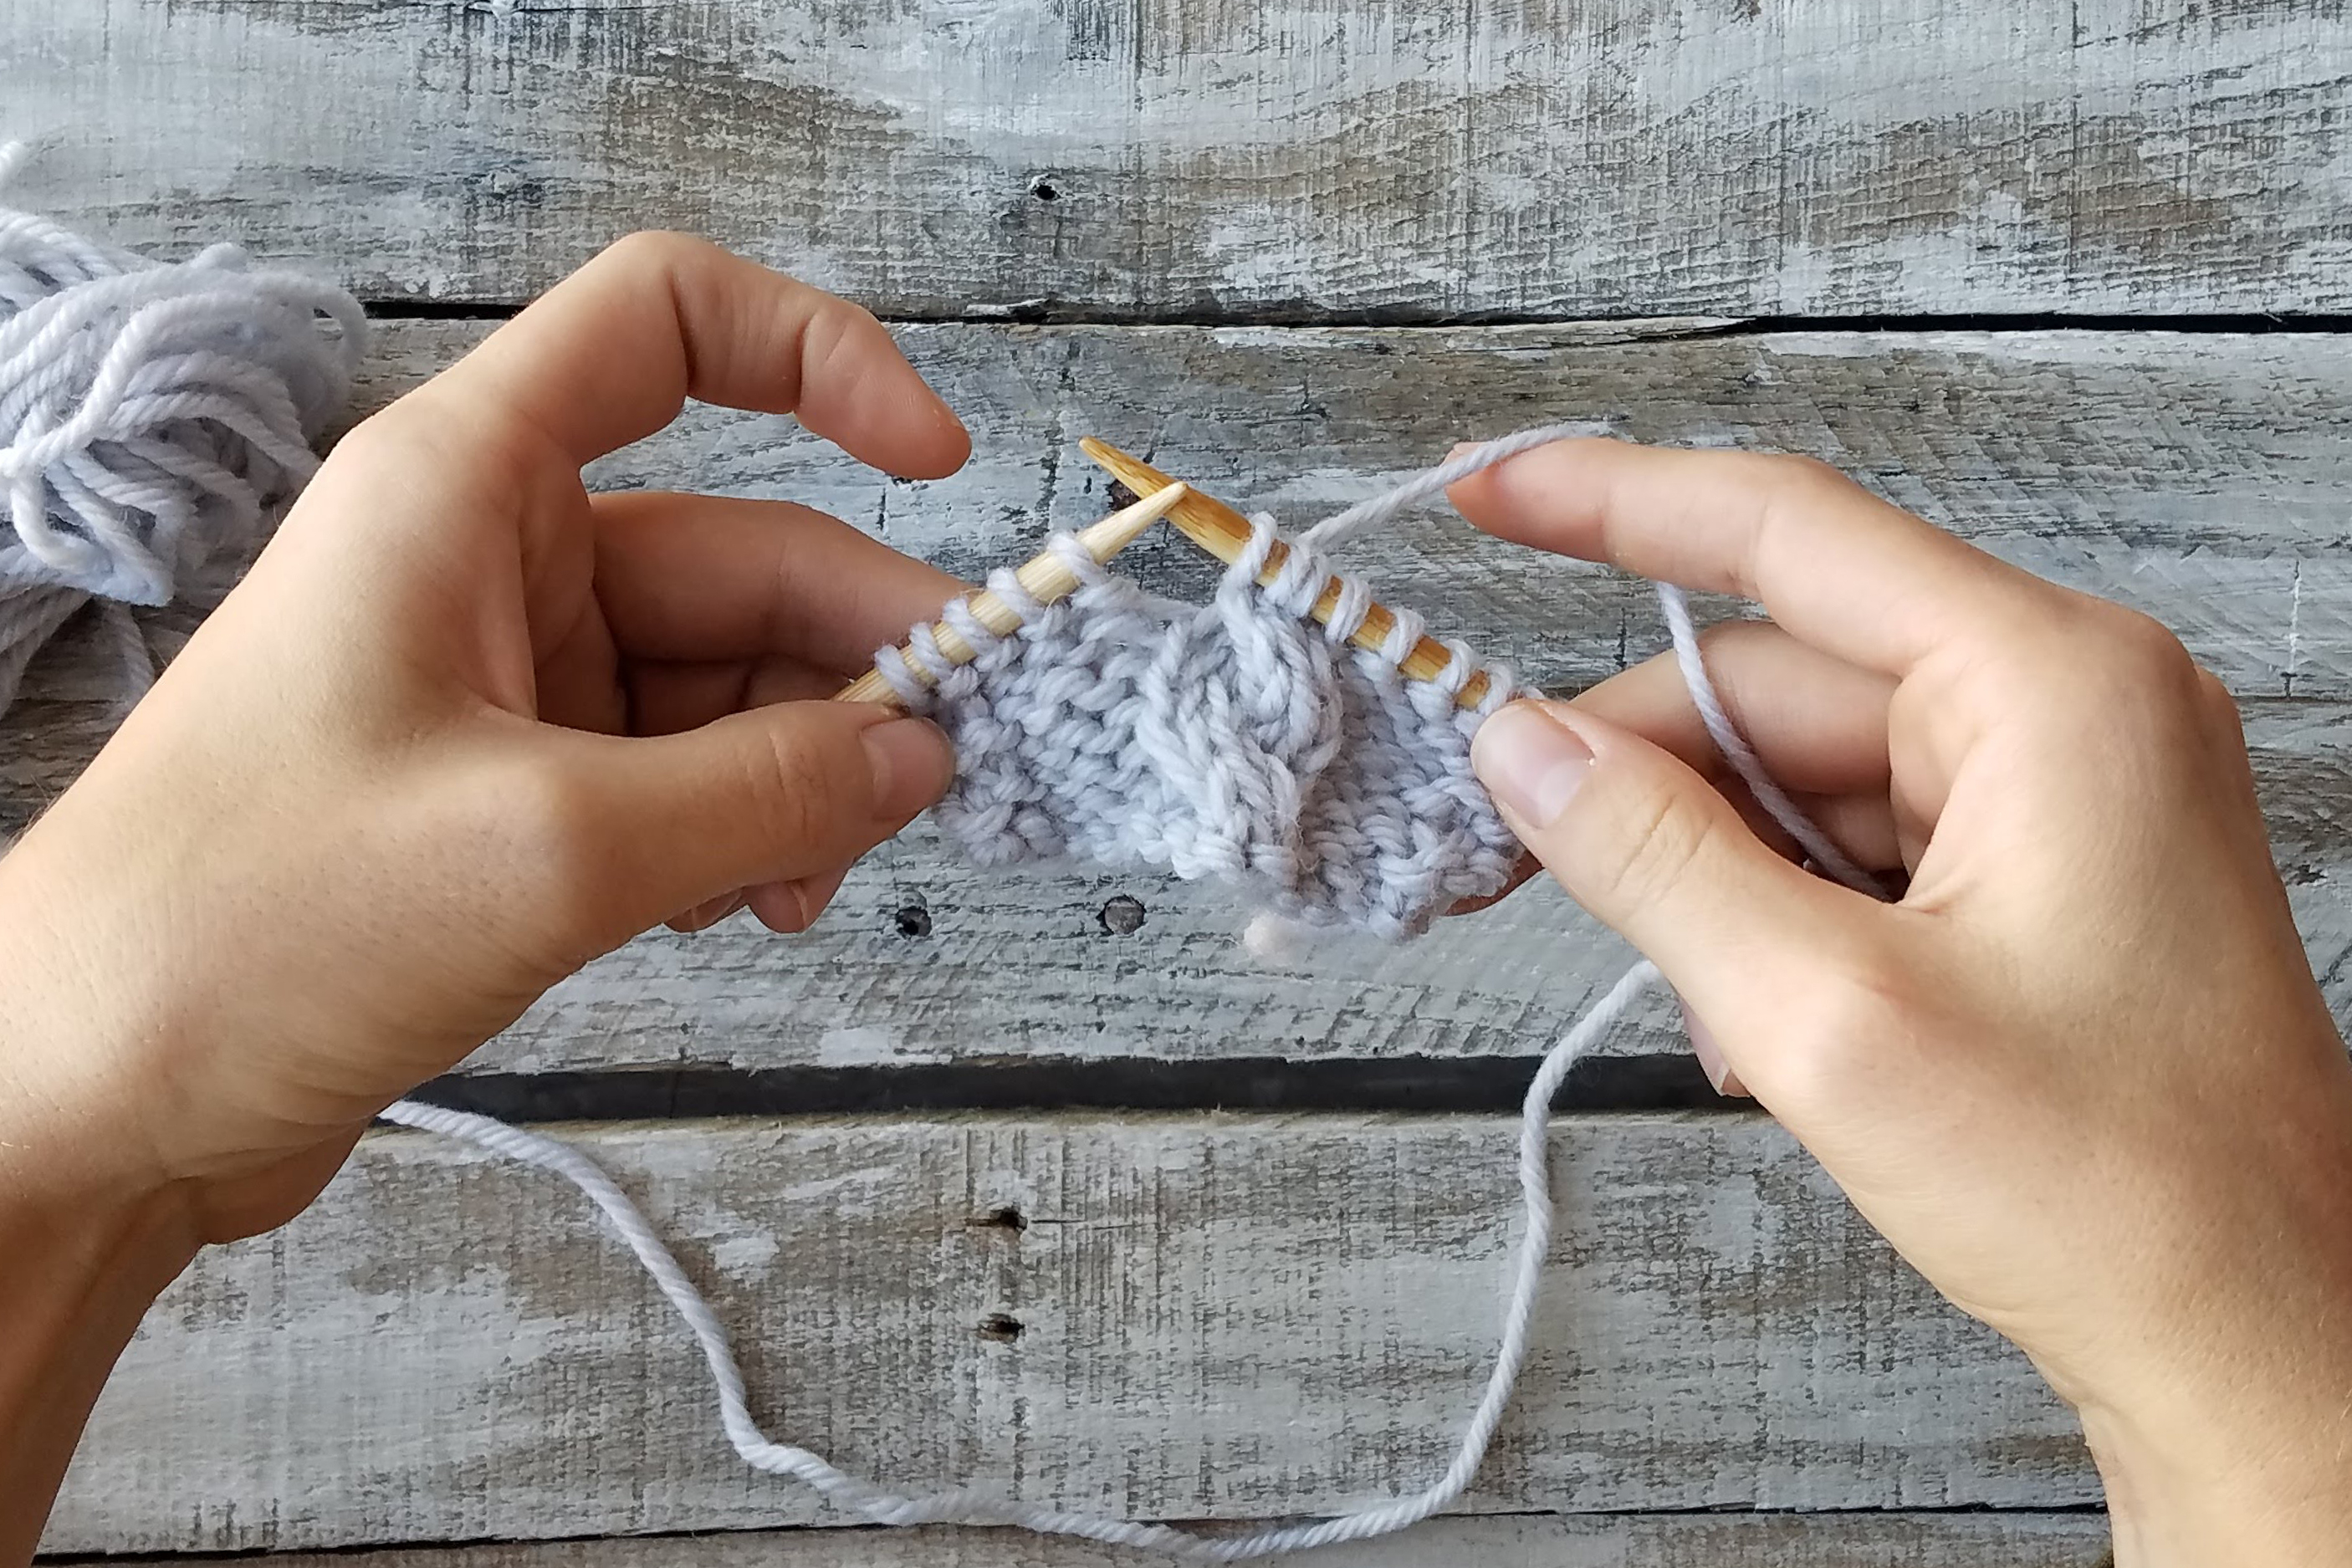
You’ve rearranged your stitches. Perfect! Now you’re ready to carry on and knit.
After the stitches are all back on the left-hand needle you may continue knitting as usual. You can already see the twist in your work.
TA-DA!
That’s it! You’ve created a beautiful cable without a cable needle.
I realize that I’ve only included instructions for a 2×2 Left Cross here, but my hope is mainly to give you the courage to go forth without a cable needle. In fact, the pattern features left and right crosses; so if you choose to skip the cable needle you’ll have plenty of time to practice both.
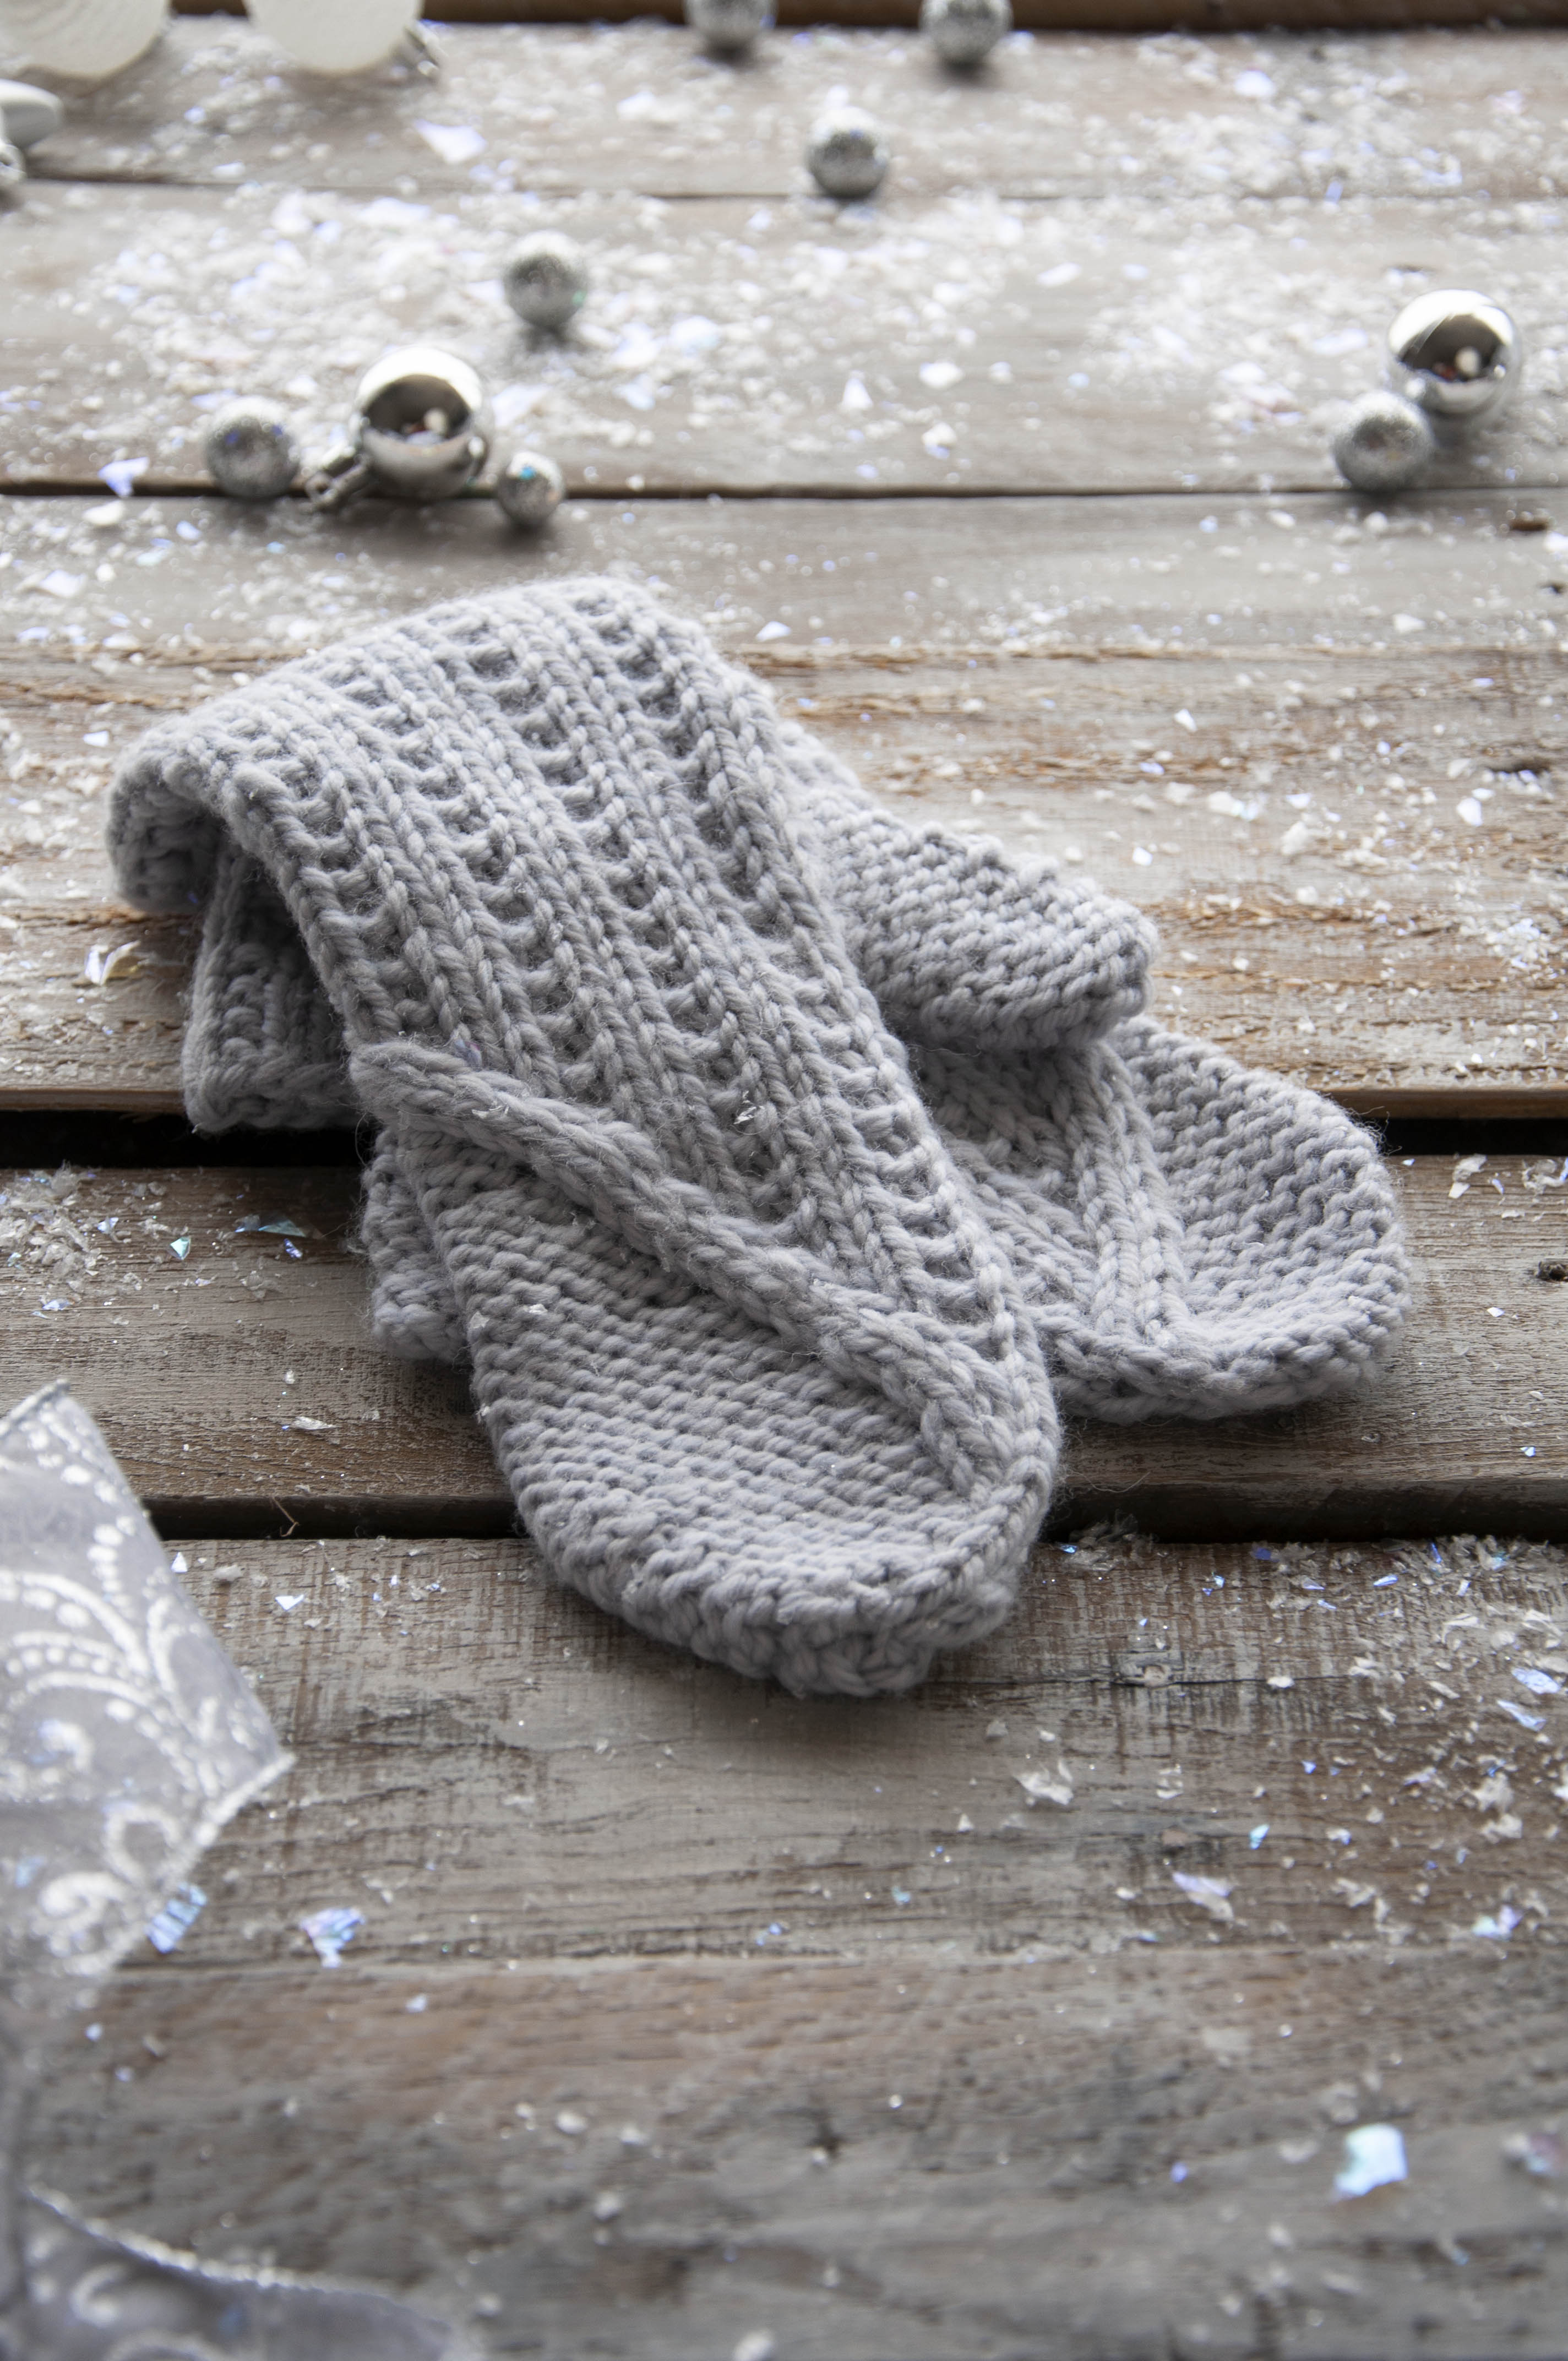
Left and right cable crosses are used to create the traveling cables in the hat. The cables in the crown use right crosses.
You can do this on any number of stitches, but I wouldn’t recommend working cables without a needle on anything more than 3×3 crosses. Any bigger than that and things can start to look sloppy and feel fiddly. Cable needles are great and help to maintain an even tension, but the same results can occur without them. Some find that skipping the cable needle feels faster, too. In personal projects, I go both ways. It depends on my mood and whether I can find my cable needle!
Cable stitches are also used in the mittens.
Remember, you can find the 12 Days of Winter Kit patterns on Ravelry.
This is part 8 in a 12 part series highlighting designs from our 12 Days of Winter, Series 2 Edition.
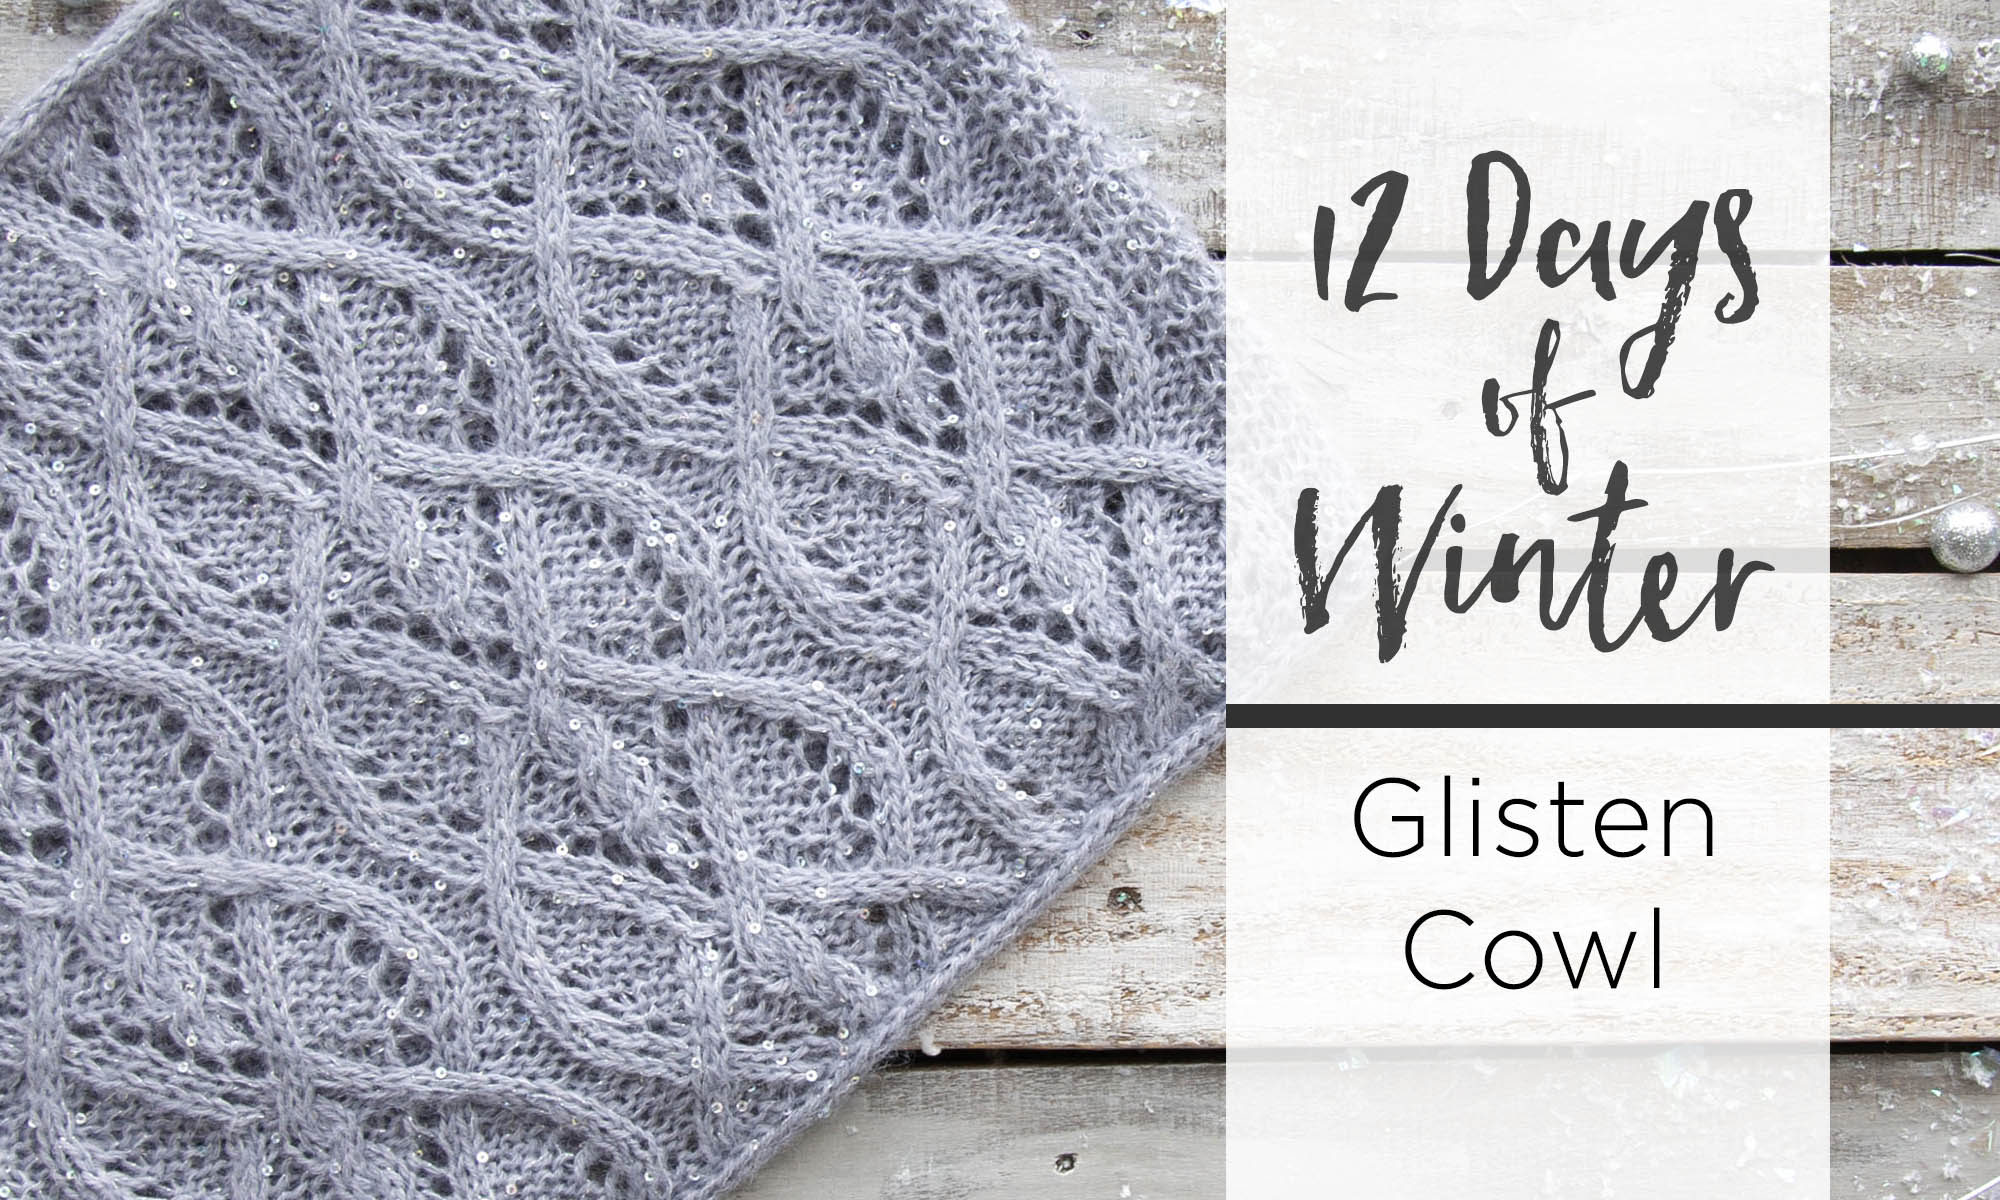
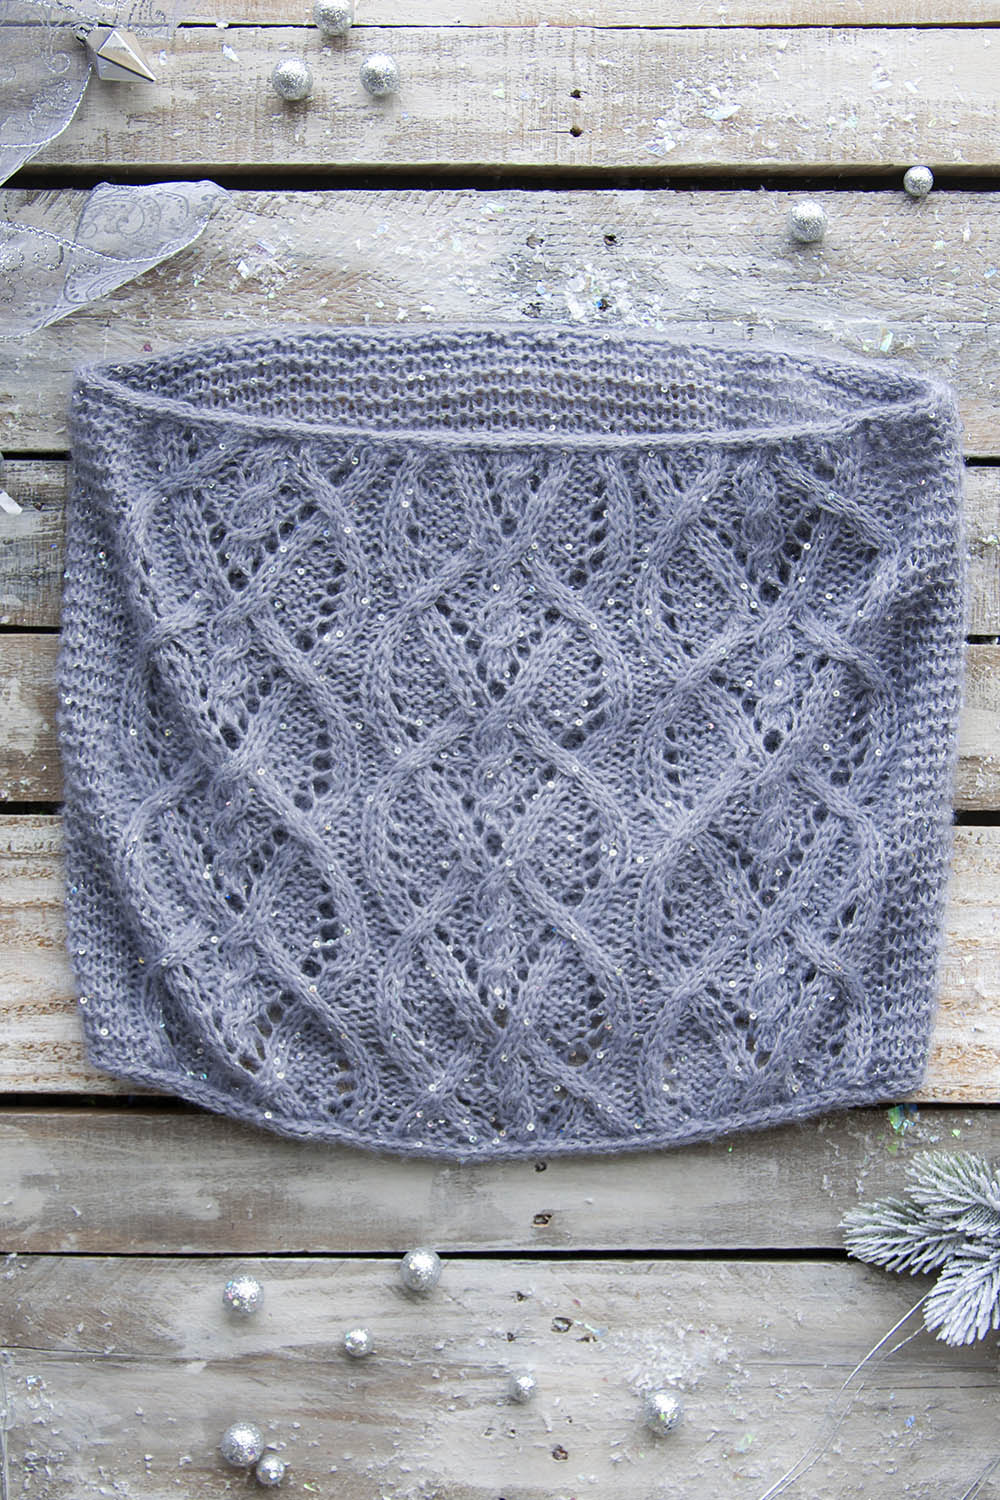
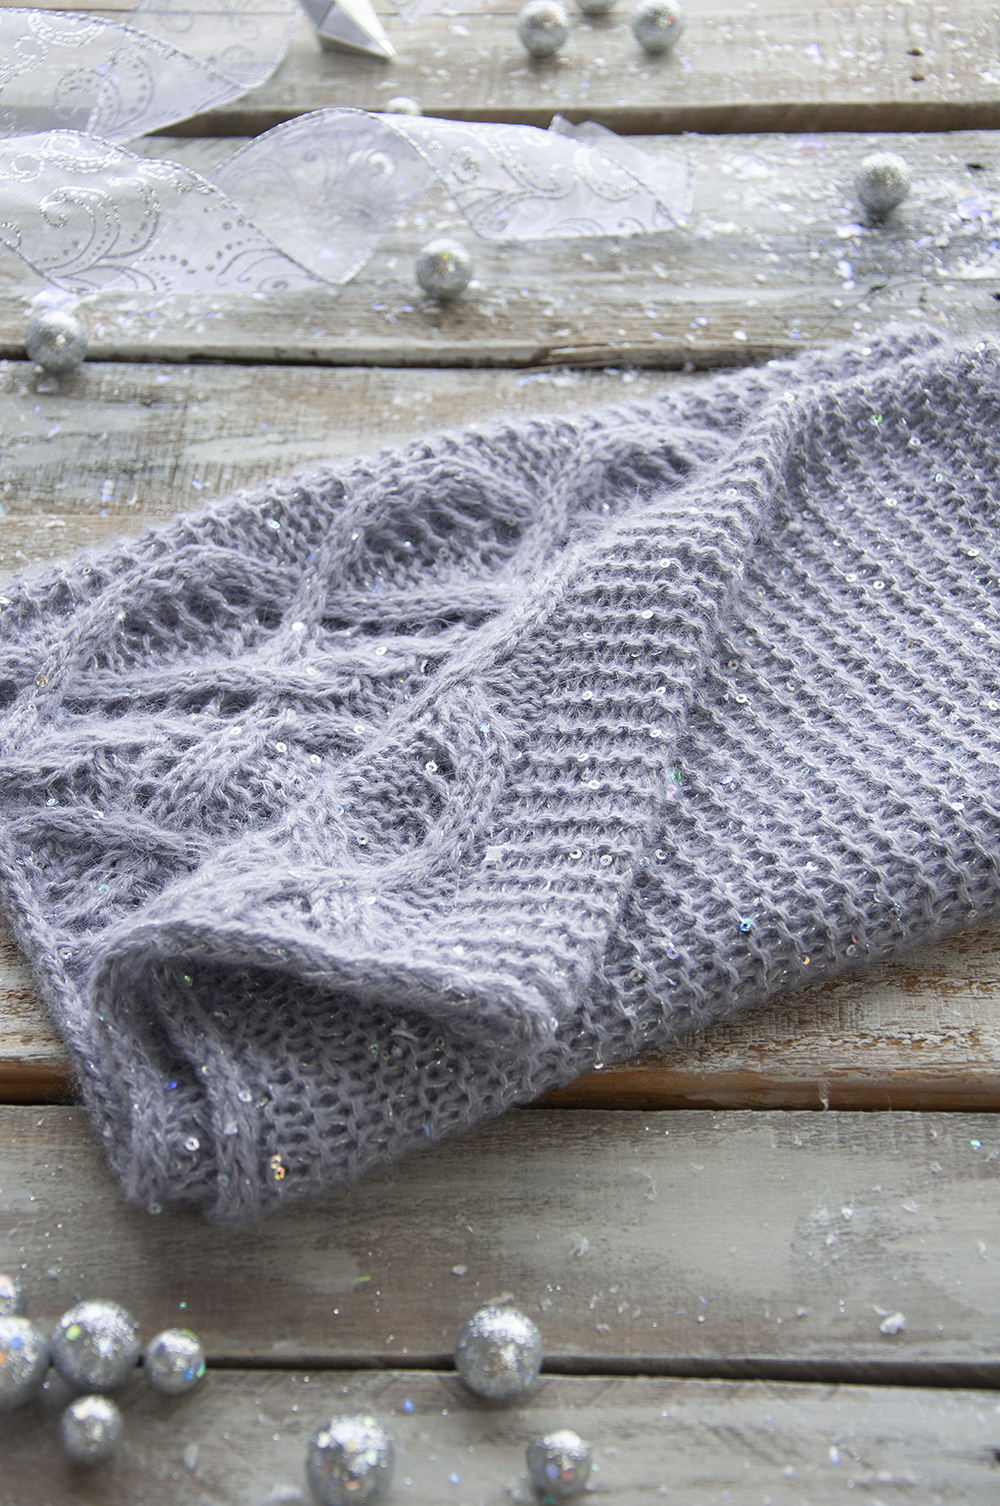
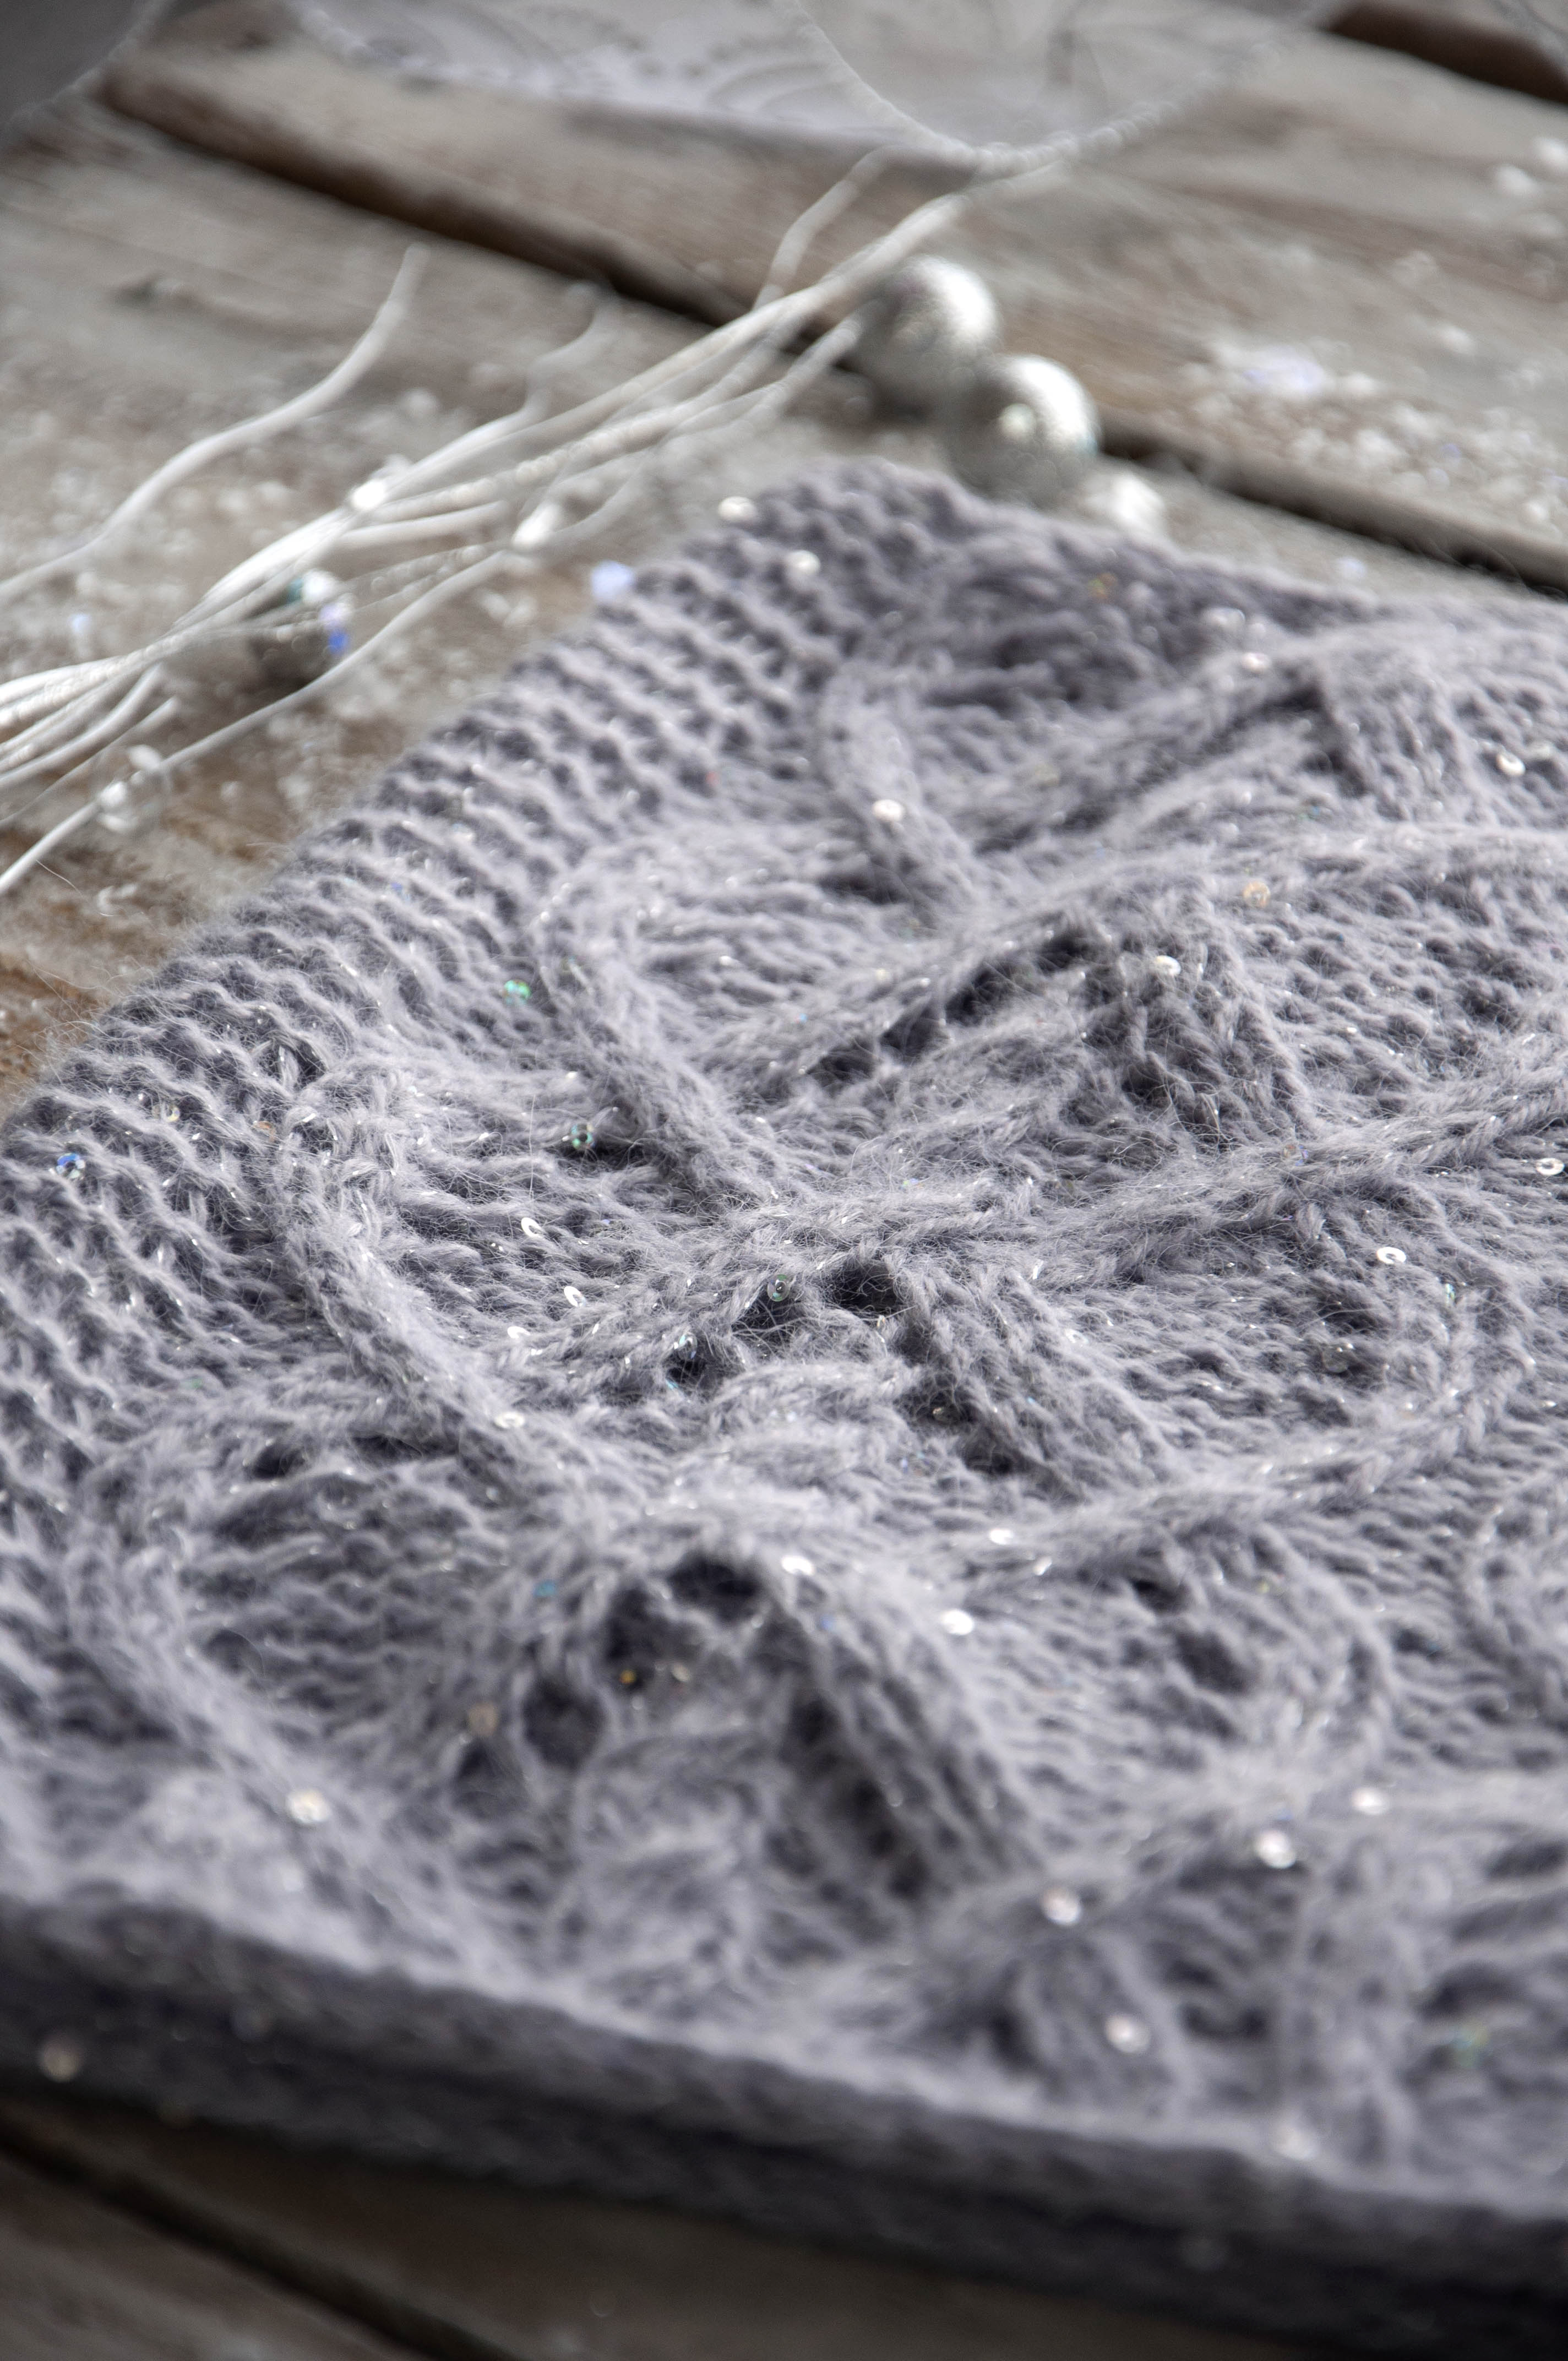
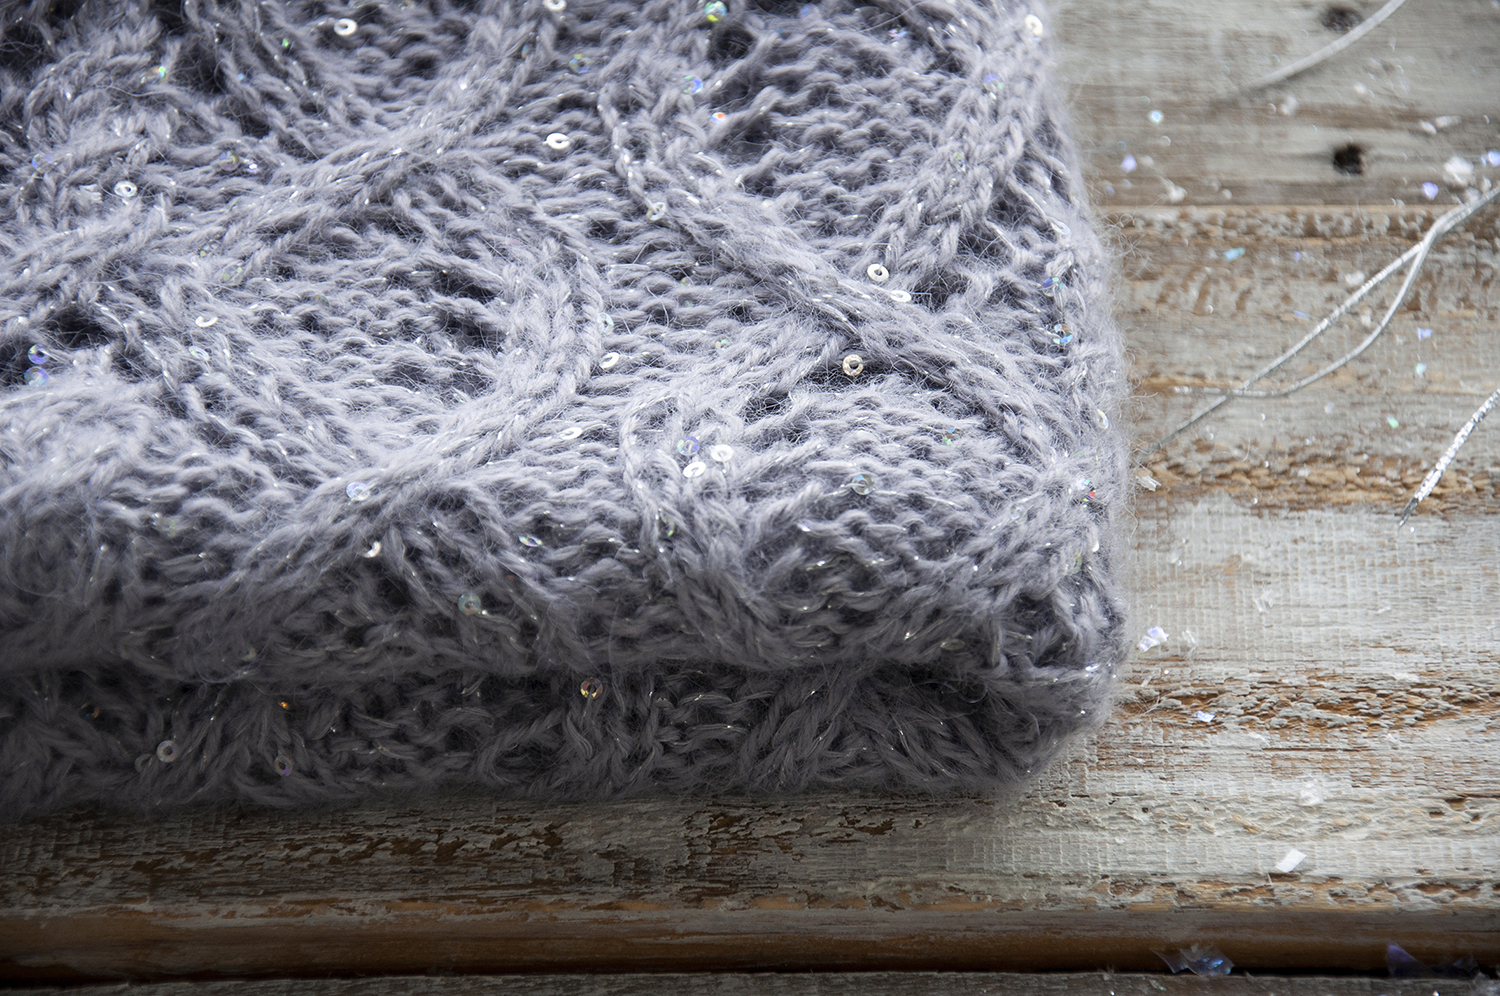
Say hello to the Glisten Cowl (link here). Winter, more than most seasons, elicits a desire to adorn ourselves with something sparkly. It’s probably because of all the bright lights, the glow of snow, and – as my dear friend Yukon Cornelius puts it: “gold; and silver!” So if you’re in the mood for sparkly seasonal splendor, I invite you to treat yourself to the Glisten Cowl.
Cables, lace, and sparkles – what more can you ask for?
The yarn is what truly makes this design special. Amphora and Cotton Gold are held together to create a fabric with a soft halo and radiant sparkle. It’s perfect for every special holiday event you attend.
The front part of the cowl is an intriguing cable and lace pattern, while the back is simple garter stitch. The garter section allows your mind to rest before diving back into the patterned section. The difference between the two sections is also visually pleasing allowing the intricate cables to shine more brightly.
The popular winter carol – Winter Wonderland – inspired the name of this cowl, so it’s only fitting that a knitters’ version of the song exists. I struggled a bit and recruited Heather’s talent for words. Get ready because it’s pretty amazing. I’m only sorry that we don’t have a recorded version of her singing it – I learned today that she has a lovely singing voice!
Would you look at those stitches? Magnificent – I tell ya!
Winter Wonderland – Knitters Edition
Needles click, are you listening You can see this cowl glistening A beautiful sight We’re happy tonight Knitting in a winter wonderland
We make sure, to do swatching So our gauge, we’re not botching Our tension’s not wrong As we finally cast on Knitting in a winter wonderland
In the meadow, we can knit a snowfolk Then pretend she runs our LYS. She’ll say, “did you mean to drop that stitch, dear? Don’t you fret a bit, I’ll fix your mess!”
Later on, we’ll admire As we knit by the fire The cowl that we’ve made In just the right shade Knitting in a winter wonderland.
Three cheers for Heather – she’s an invaluable part of our team!
Remember, you can find the Series 2 12 Days of Winter Kit Patterns on Ravelry.
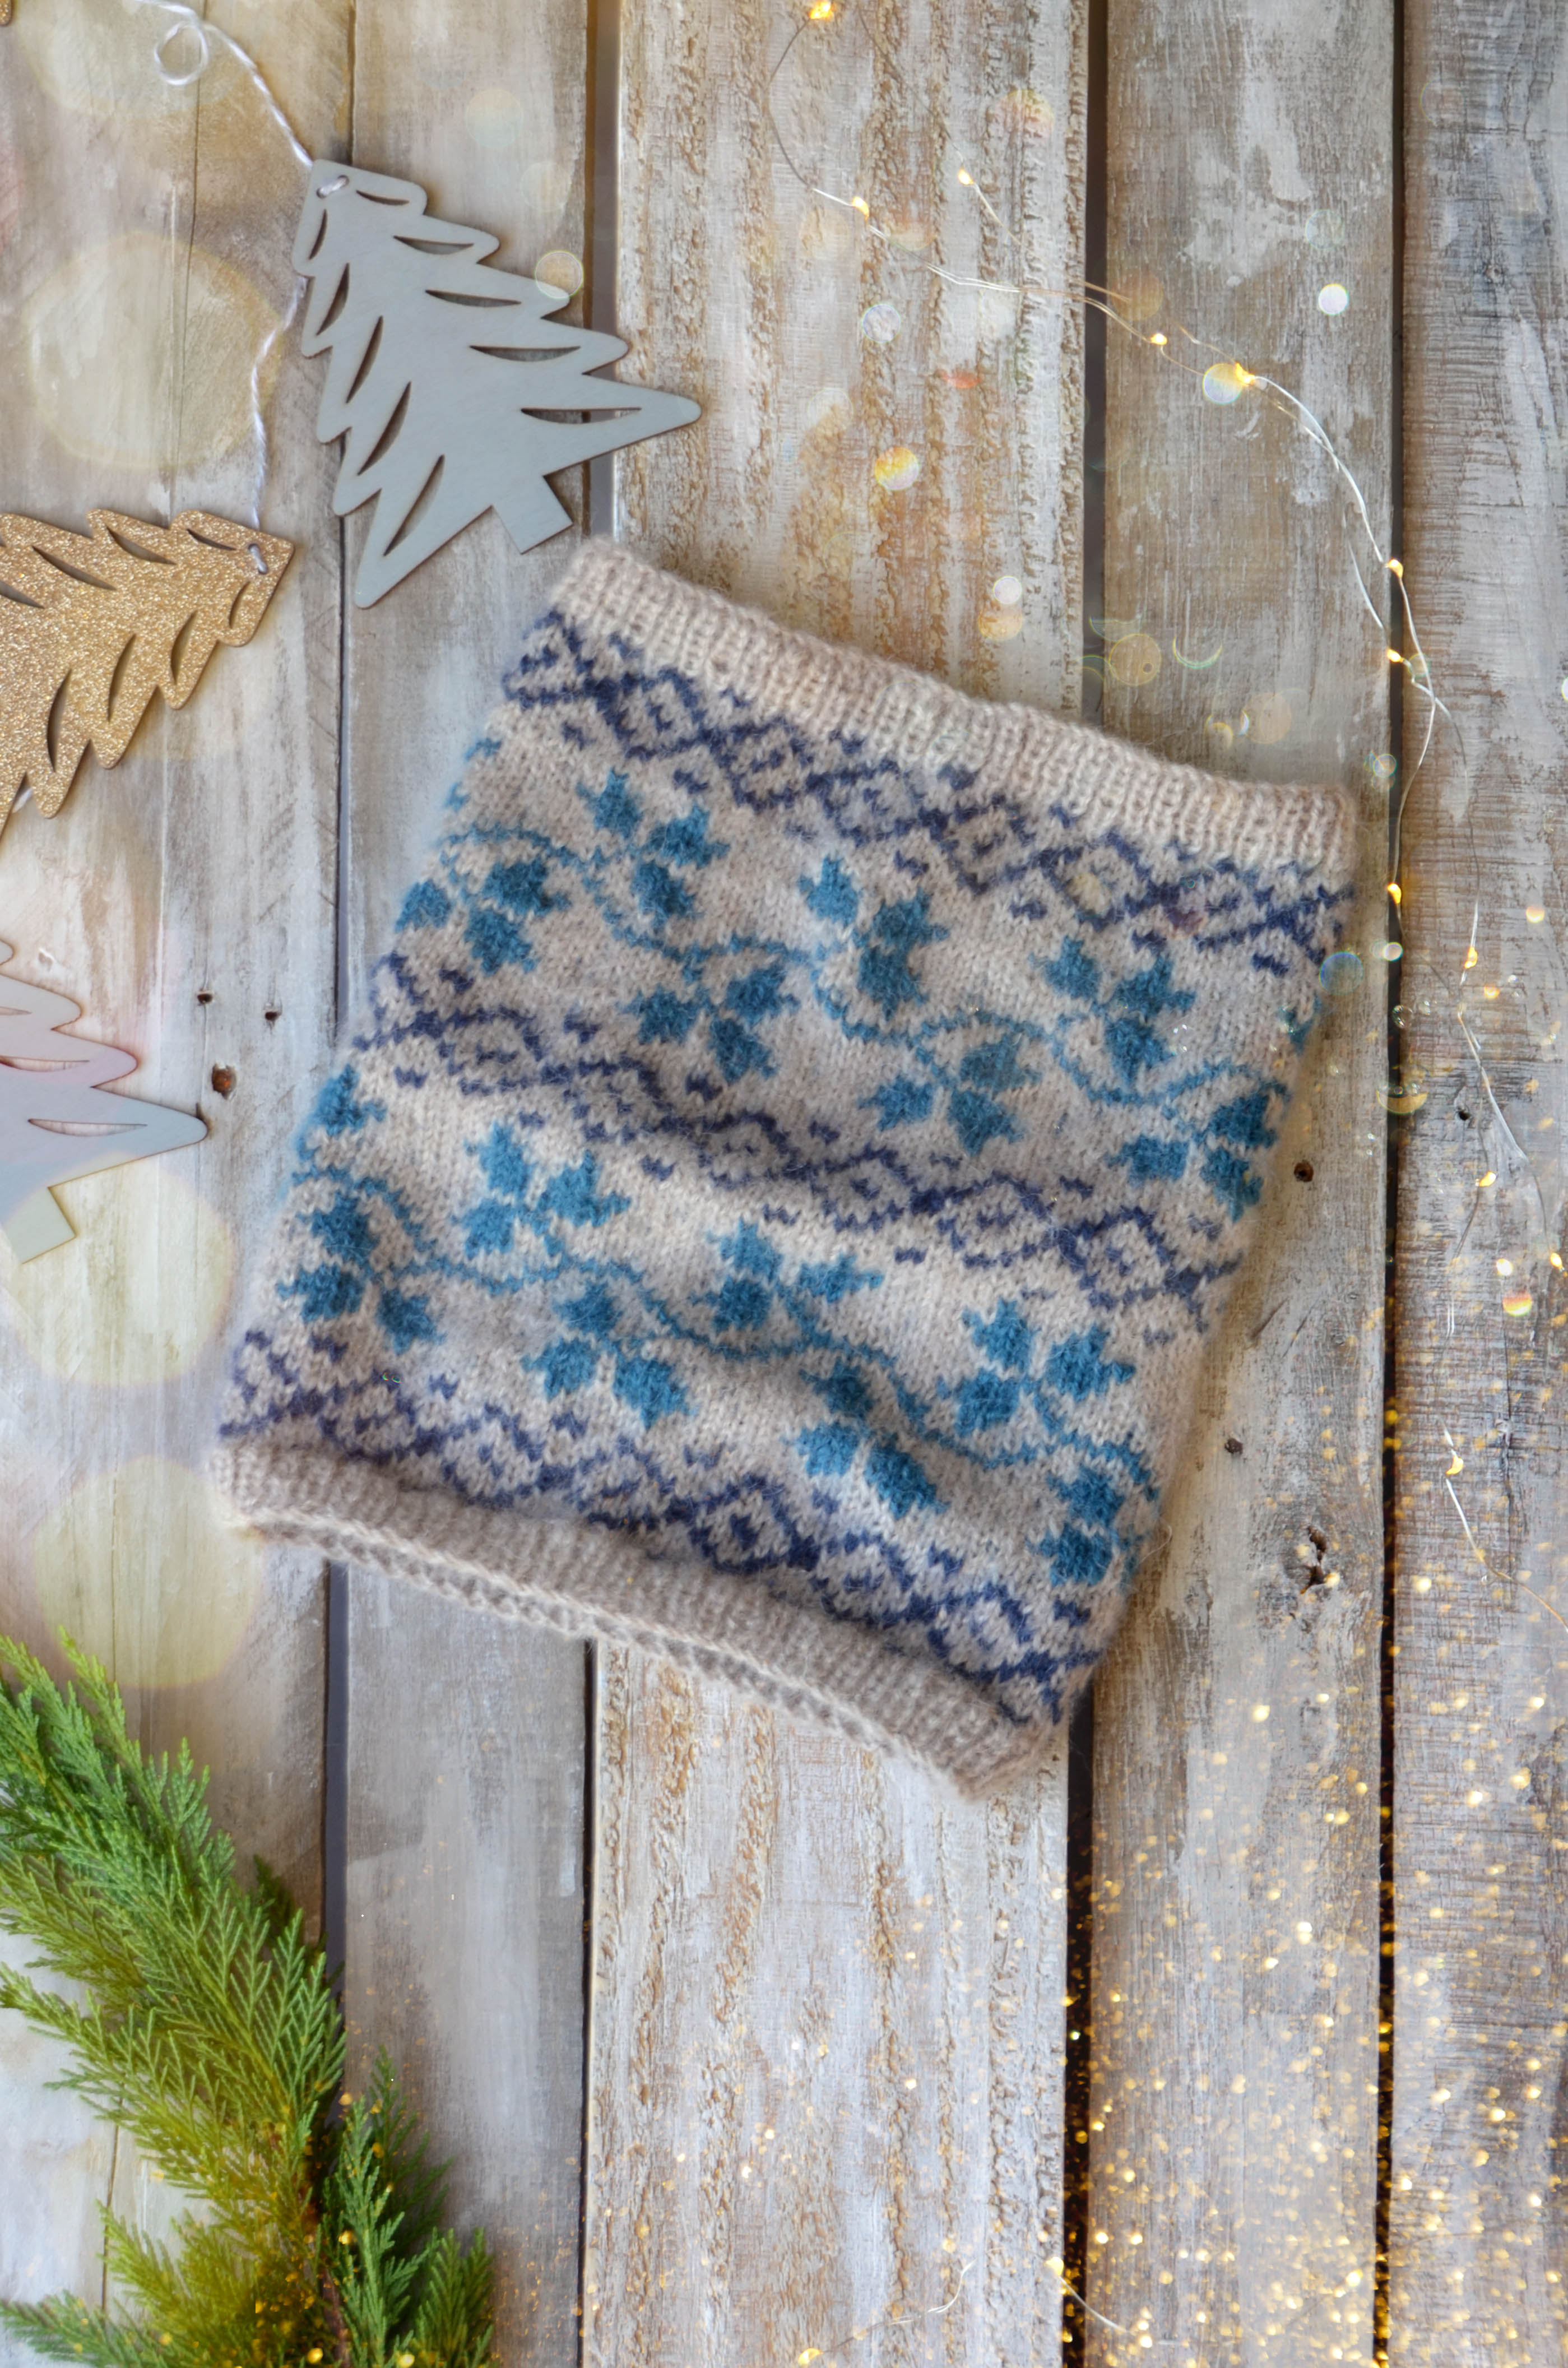
For the last installment of our blog series on our 12 Days of Winter Kit Collection, we’re unveiling the Twining Vines Cowl. Twining Vinesfeatures Amphora. It is a perfect yarn for colorwork because its gorgeous halo blends the fibers together seamlessly. The effect is almost like an impressionist painting.
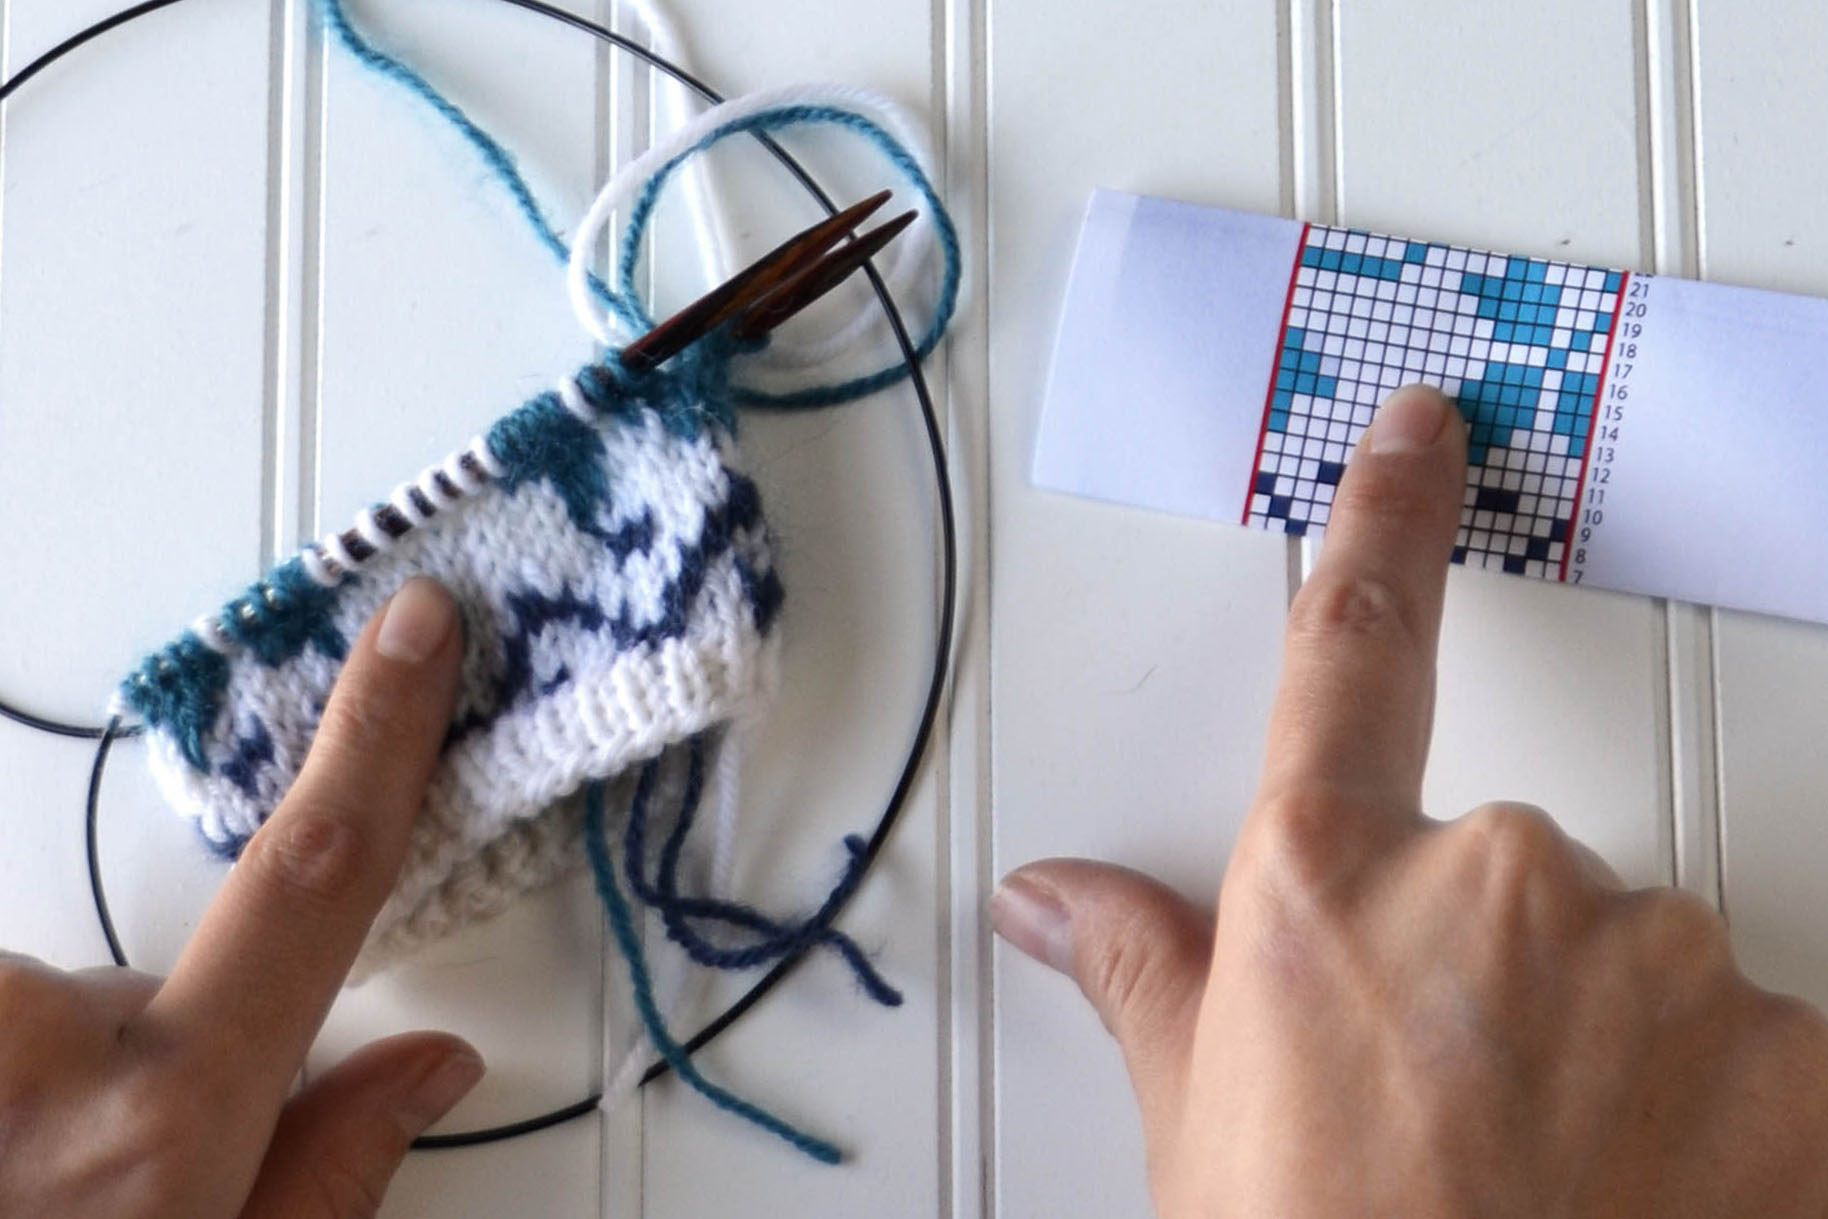
In addition to carrying two colors throughout this pattern, you’ll also need to trap your floats. It’s simpler than you might think. This tutorial is useful for any stranded project. If you’d like a closer look at the images, simply click on them.
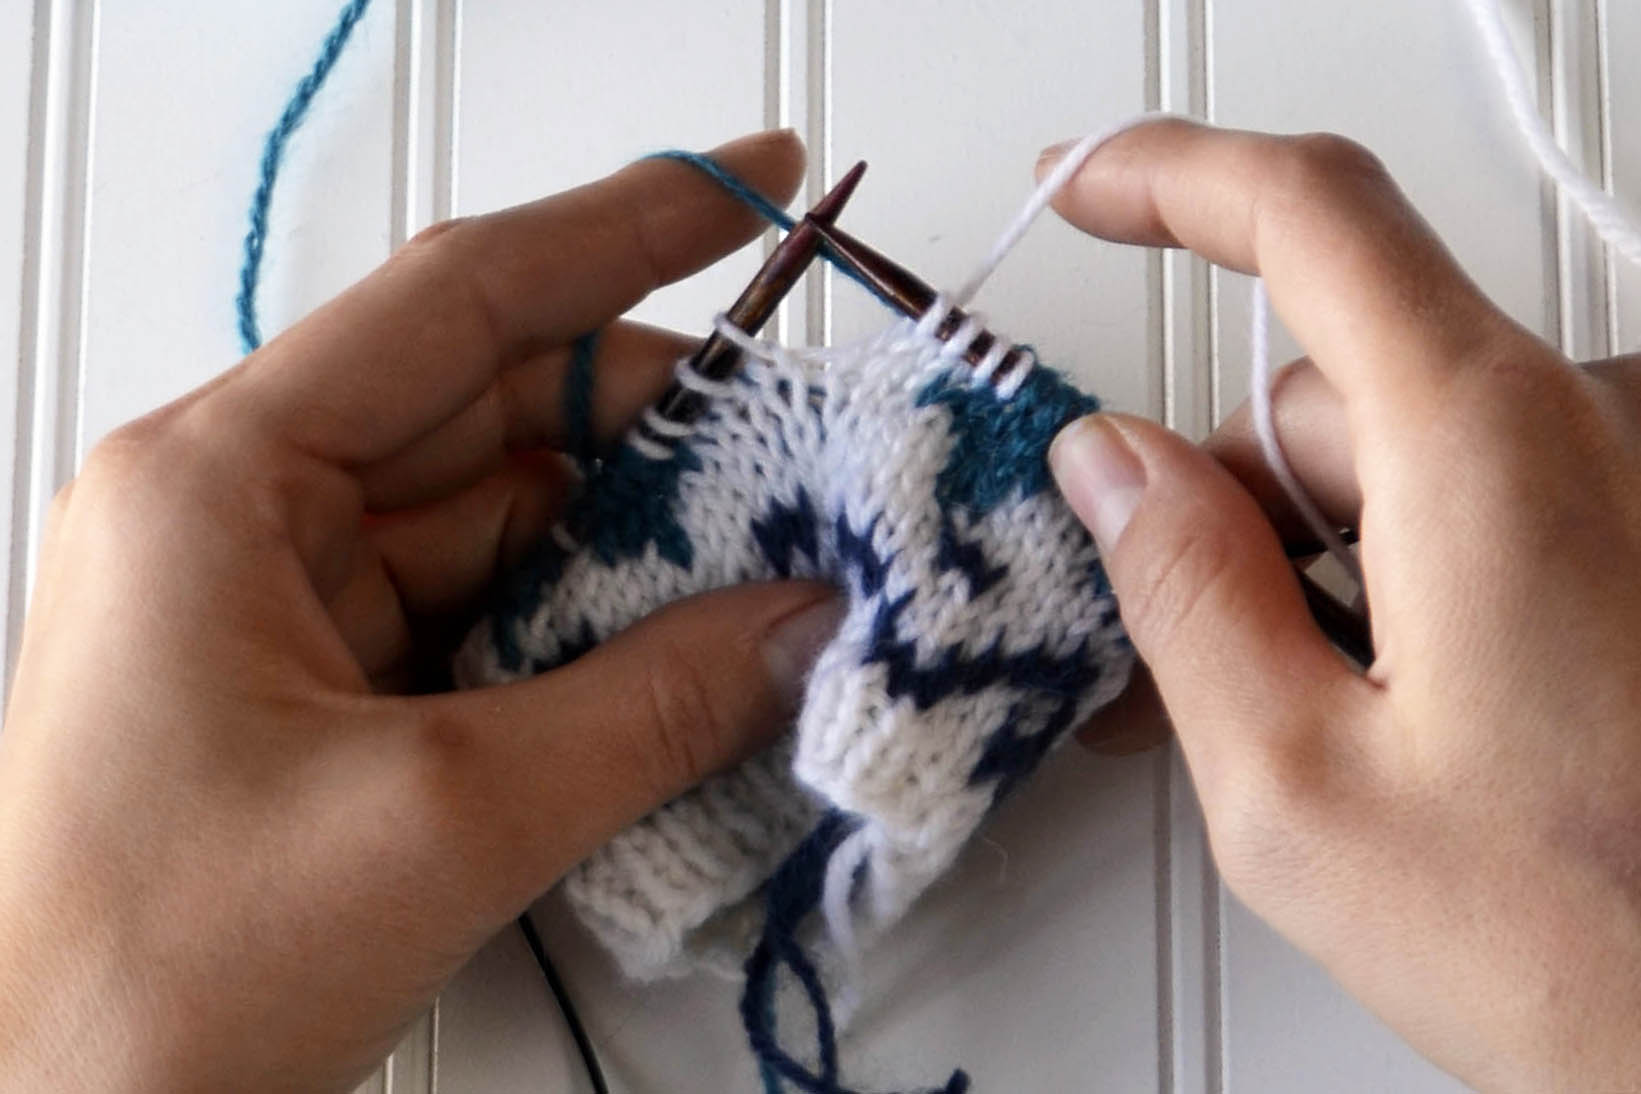
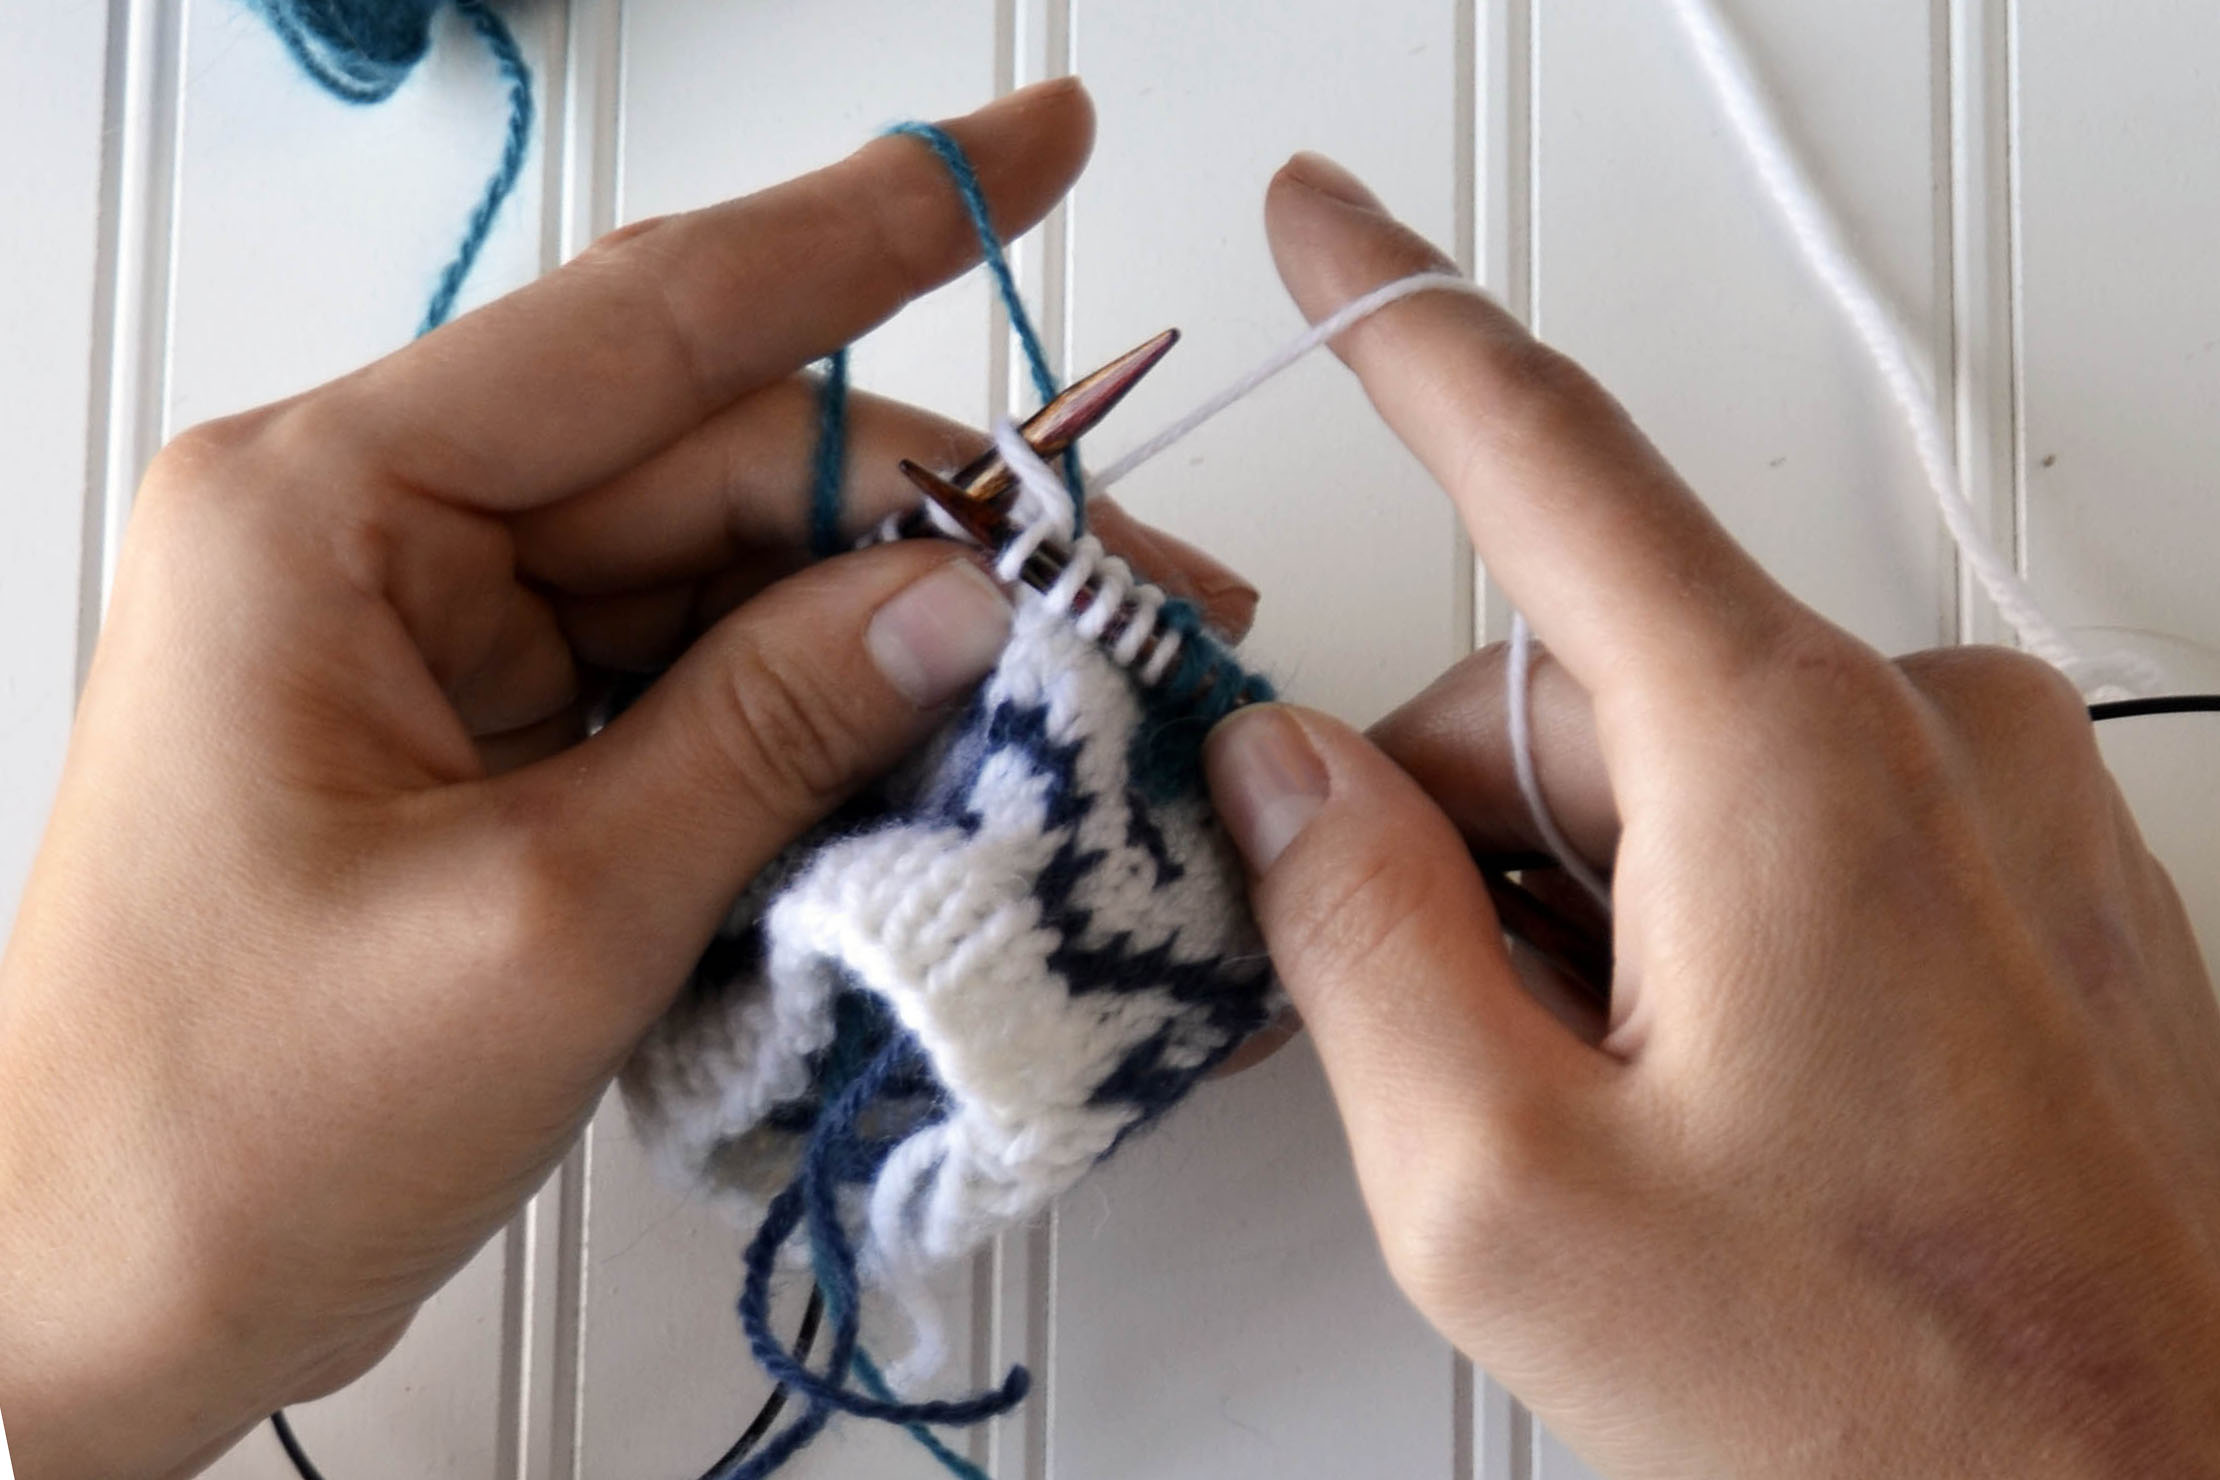
Notice the large number of white stitches between the blue stitches. This is an area you’ll want to “trap” or “catch” your float to prevent any snagging.
Begin by knitting across your row as usual. Continue until you reach the section that requires trapping a float. Usually, an area that requires trapping floats will have more than five stitches.
As a rule of thumb, I trap my floats every five stitches. I’ve knit across four stitches, and I will trap my float on the fifth stitch.
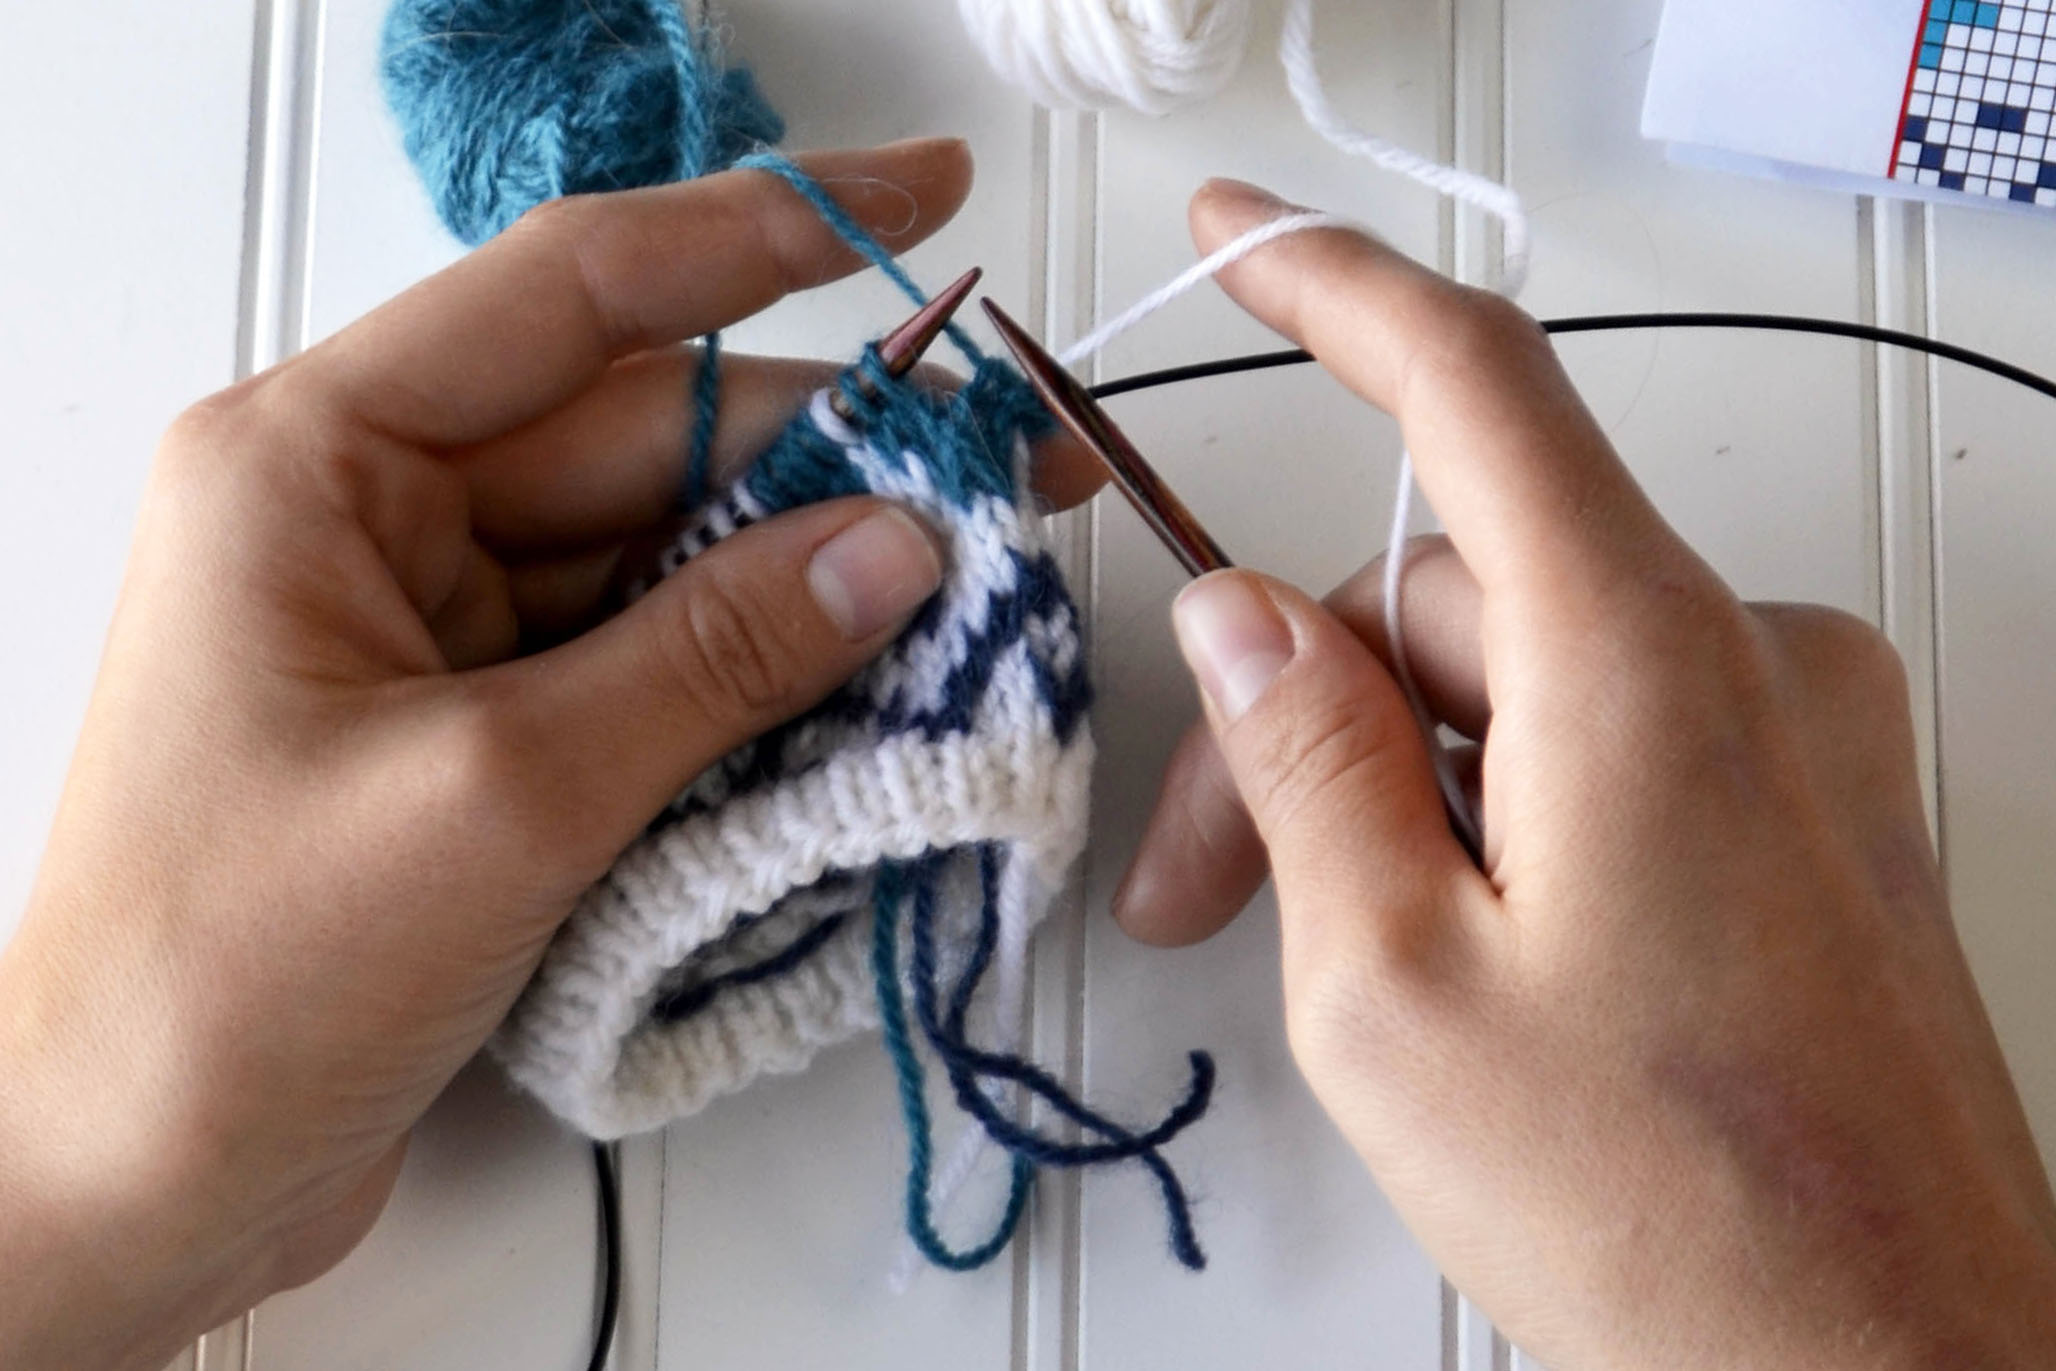
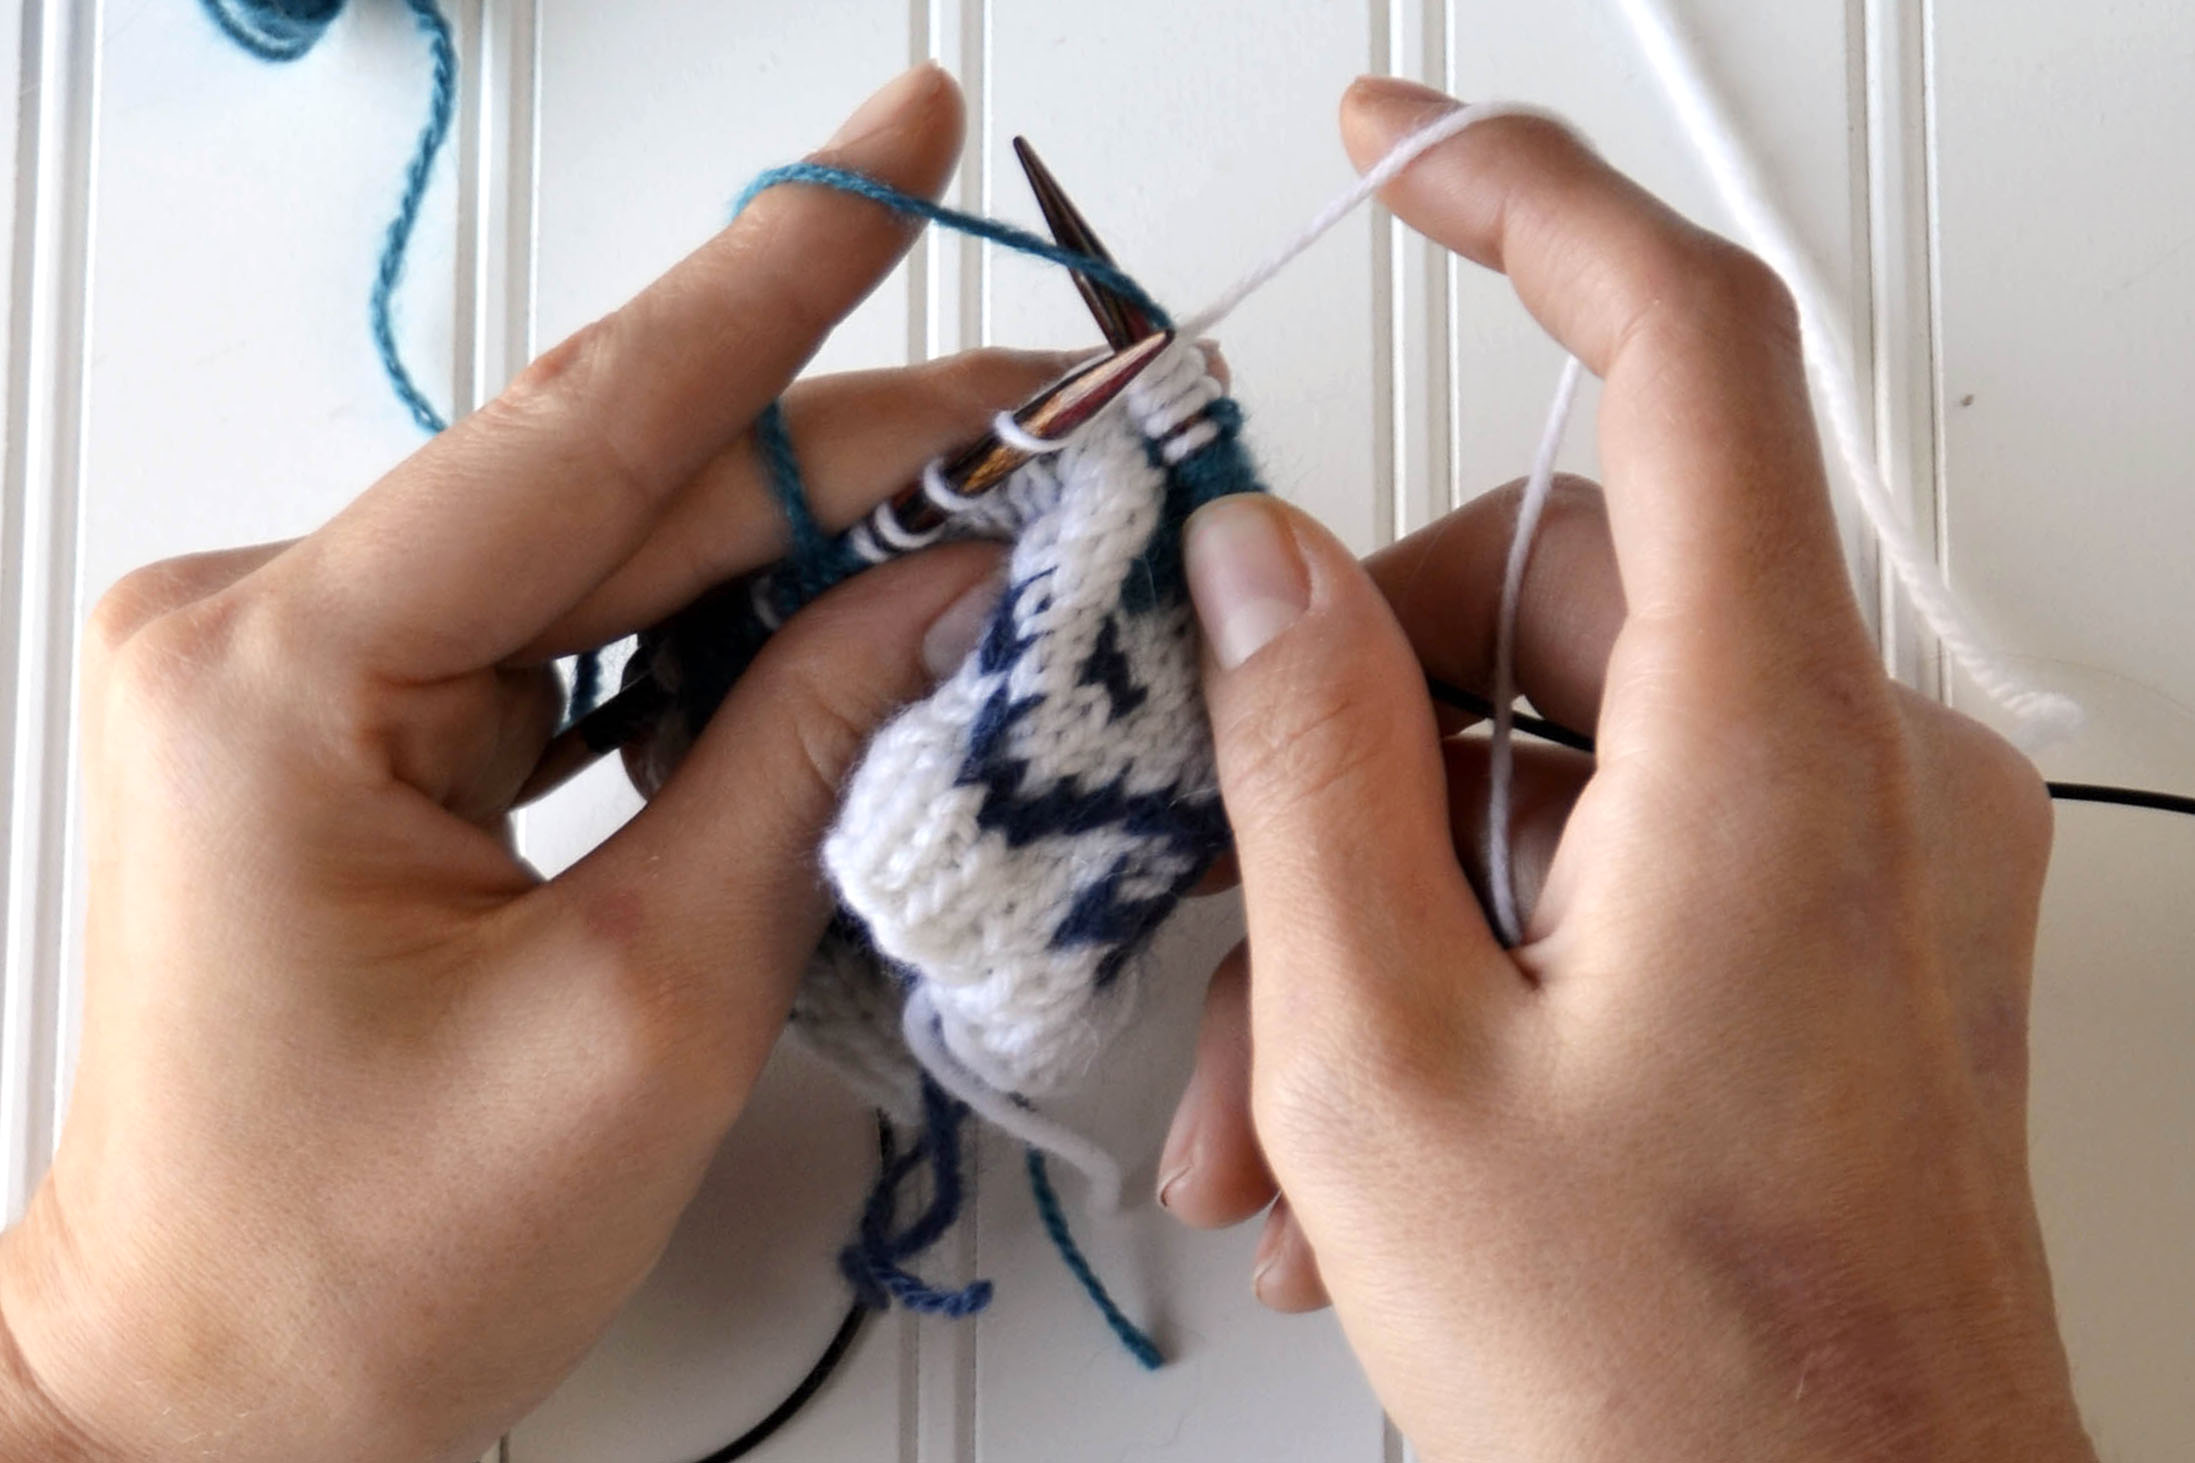
Simply place your non-working yarn over the right-hand needle, but do not knit with it.
Wrap your working yarn around the right-hand needle to knit. Make sure your non-working yarn (the blue yarn) is over the needle and the working yarn (the white yarn).
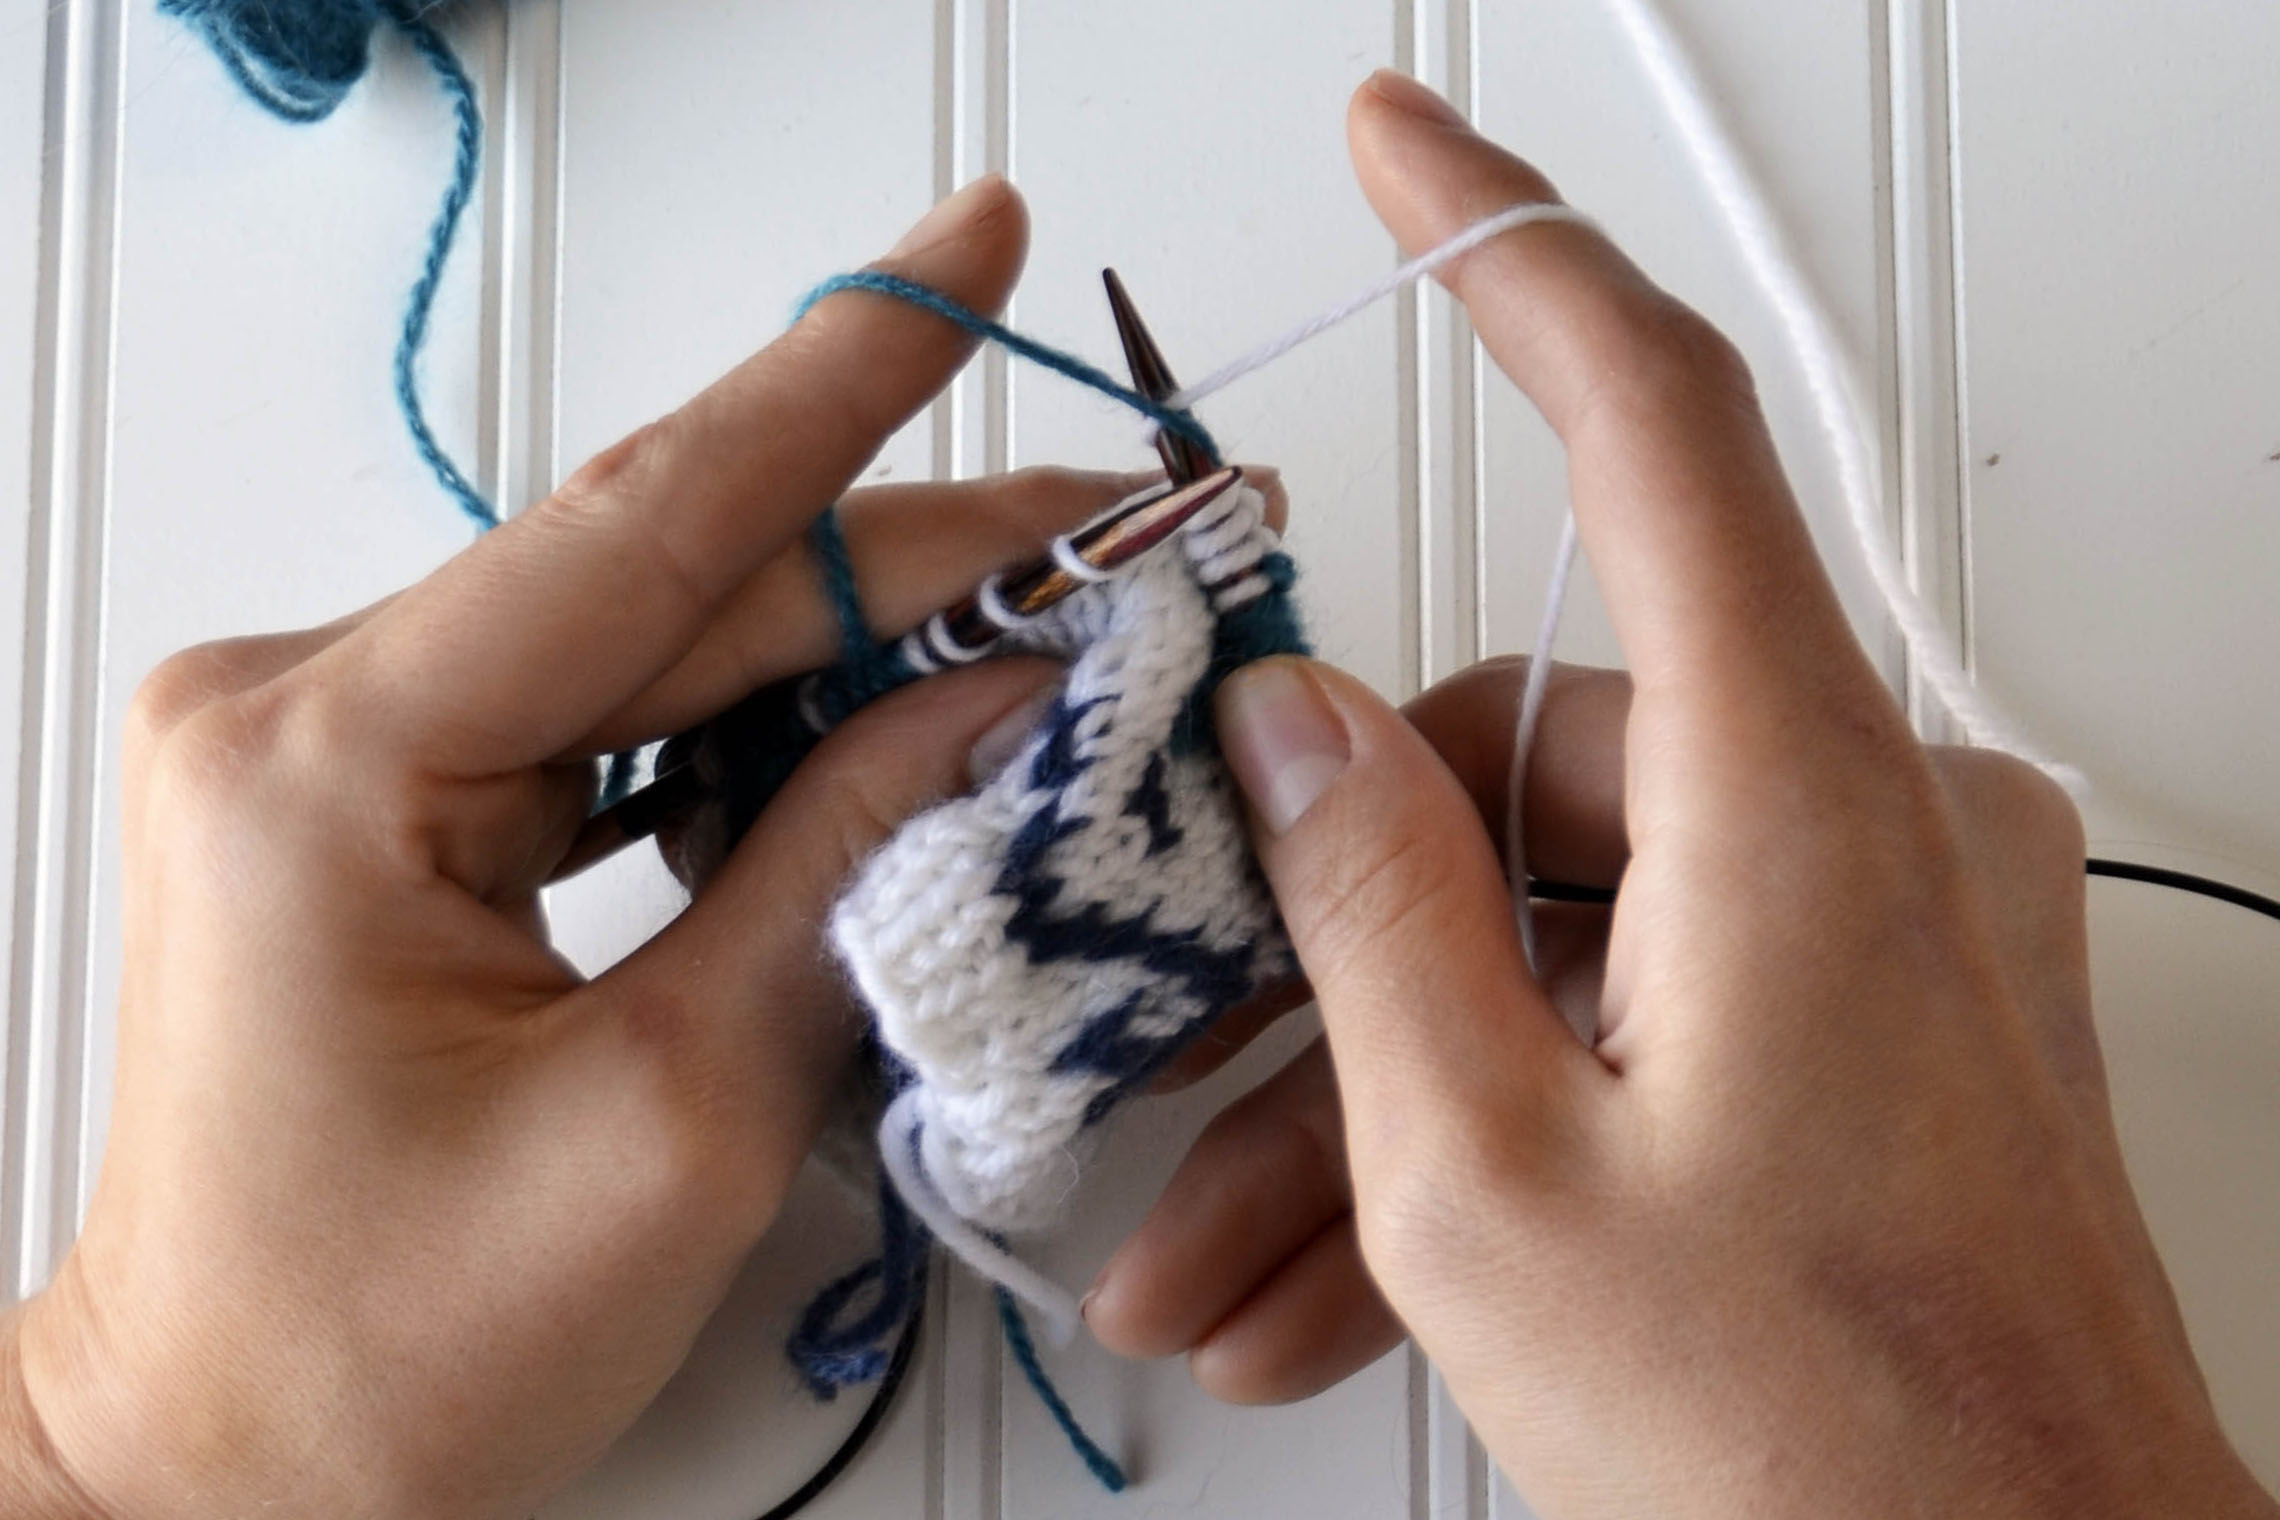
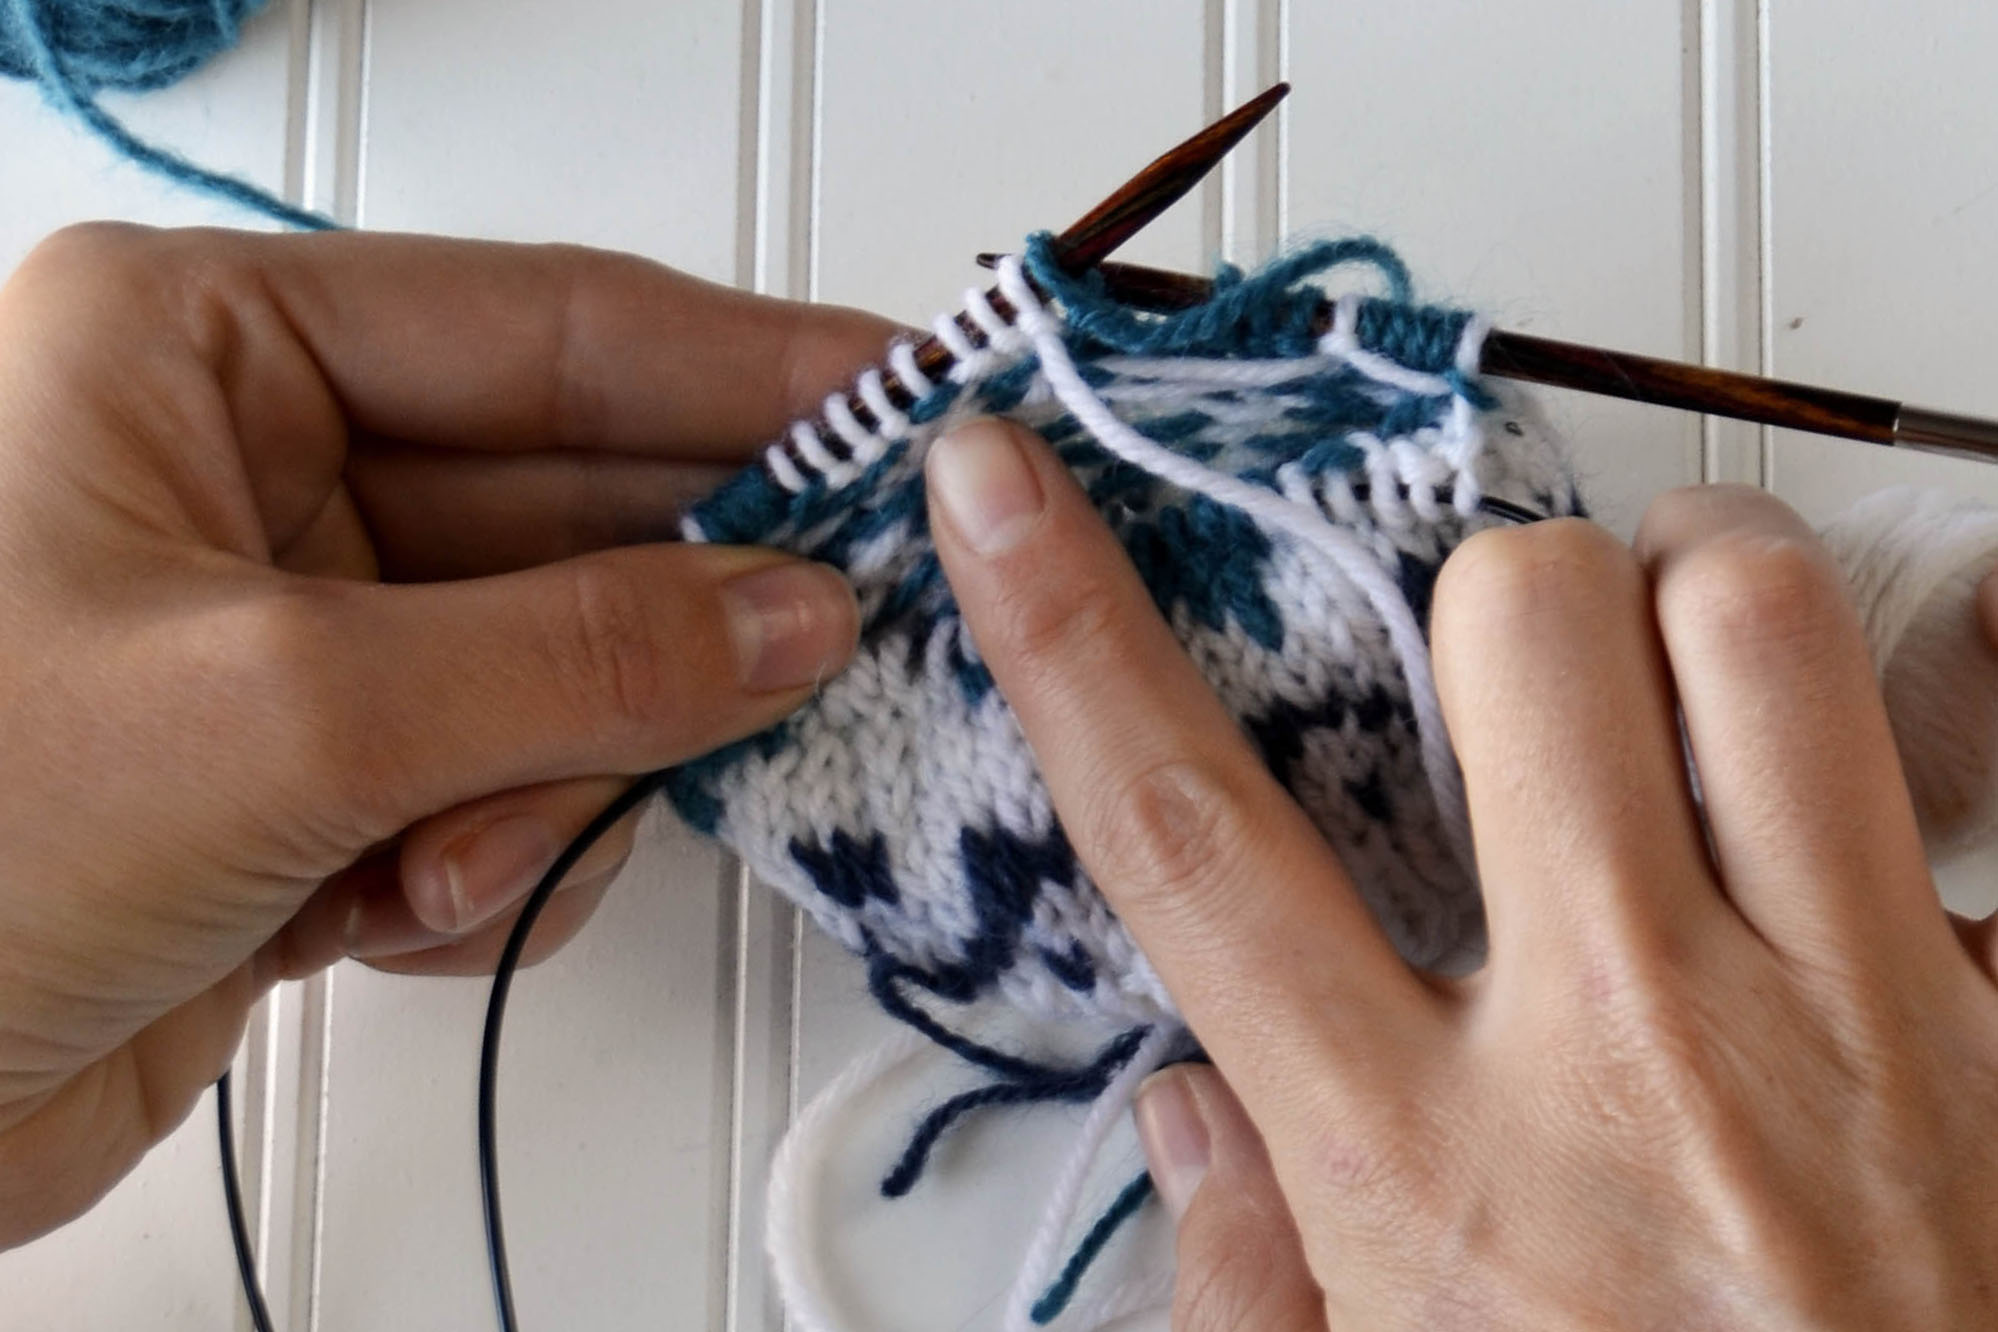
Begin to knit the stitch. Notice how I’m holding the blue yarn. It is still above the white yarn, but it is not wrapped around the right-hand needle. Take care not to pull the non-working (blue) yarn through the stitch.
Knit the stitch. As you can see, the blue yarn is still at the back of the work. You can continue knitting as usual after this. That’s really how simple it is!
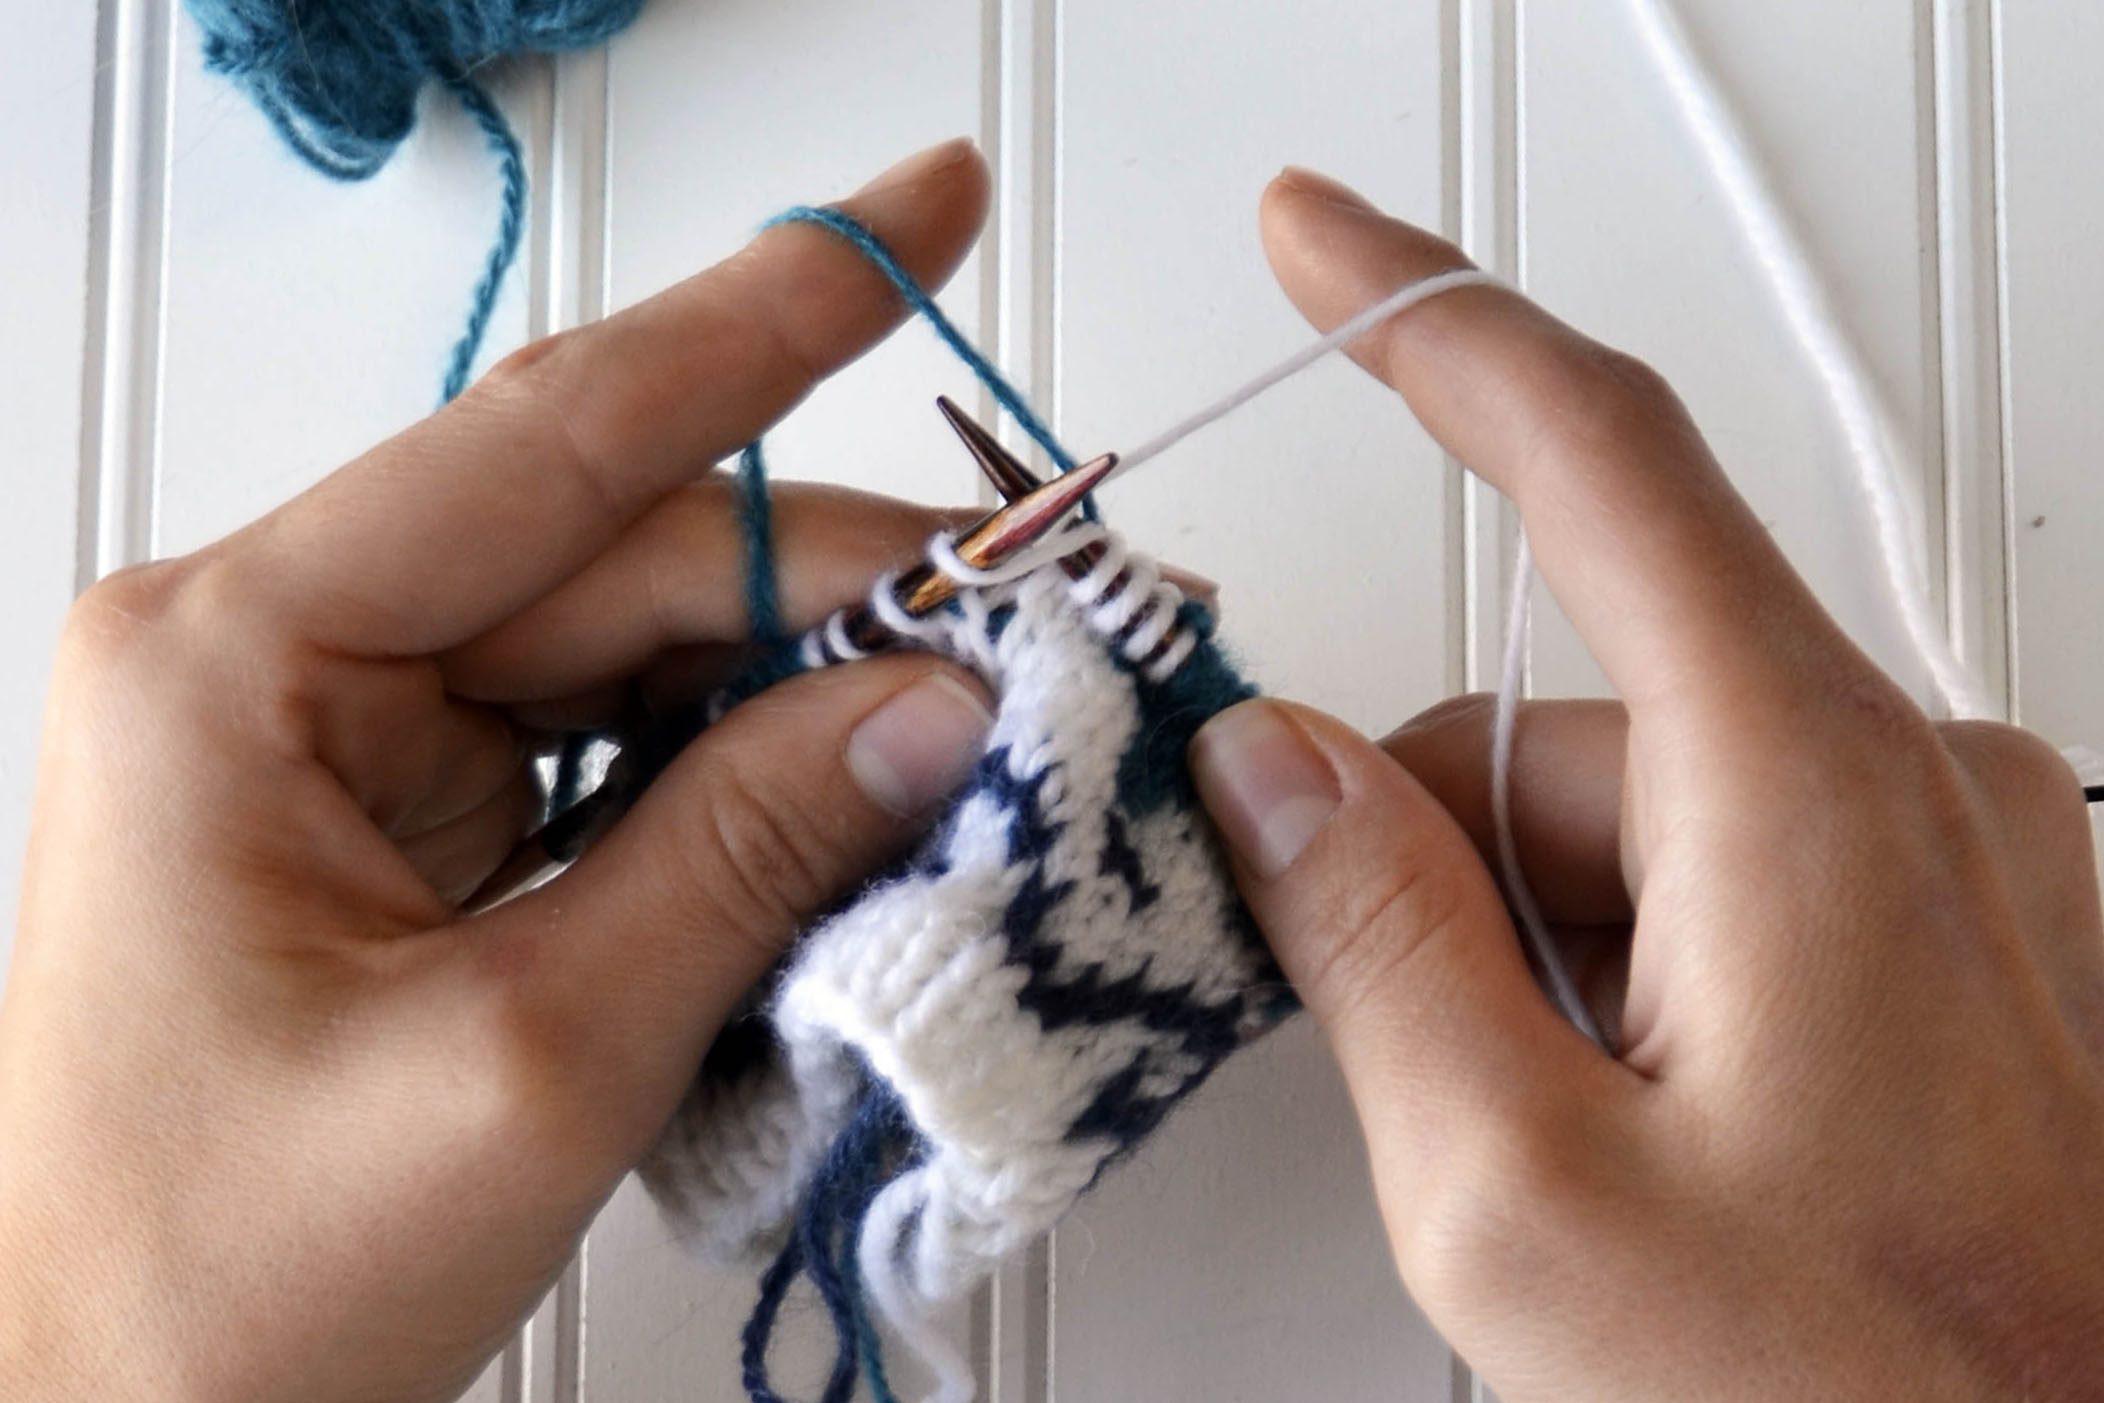
When you peek at the wrong side of your work, you’ll be able to see where you trapped the float. Notice the blue bump in the middle of the white stitches? That is where I’ve trapped the blue yarn underneath the white yarn.
Just like that, we’ve released all 12 of the patterns featured in our 12 Days of Winter Collection. We sincerely hope you’ve been enjoying our blog series highlighting each pattern. You can find the Twining Vines kit on our website here.
Now that you’ve seen them all, I’d also like to emphasize that tomorrow is Small Business Saturday. What better way to show your support for your local yarn shop than by stopping by to pick up one of our kits on Small Business Saturday?
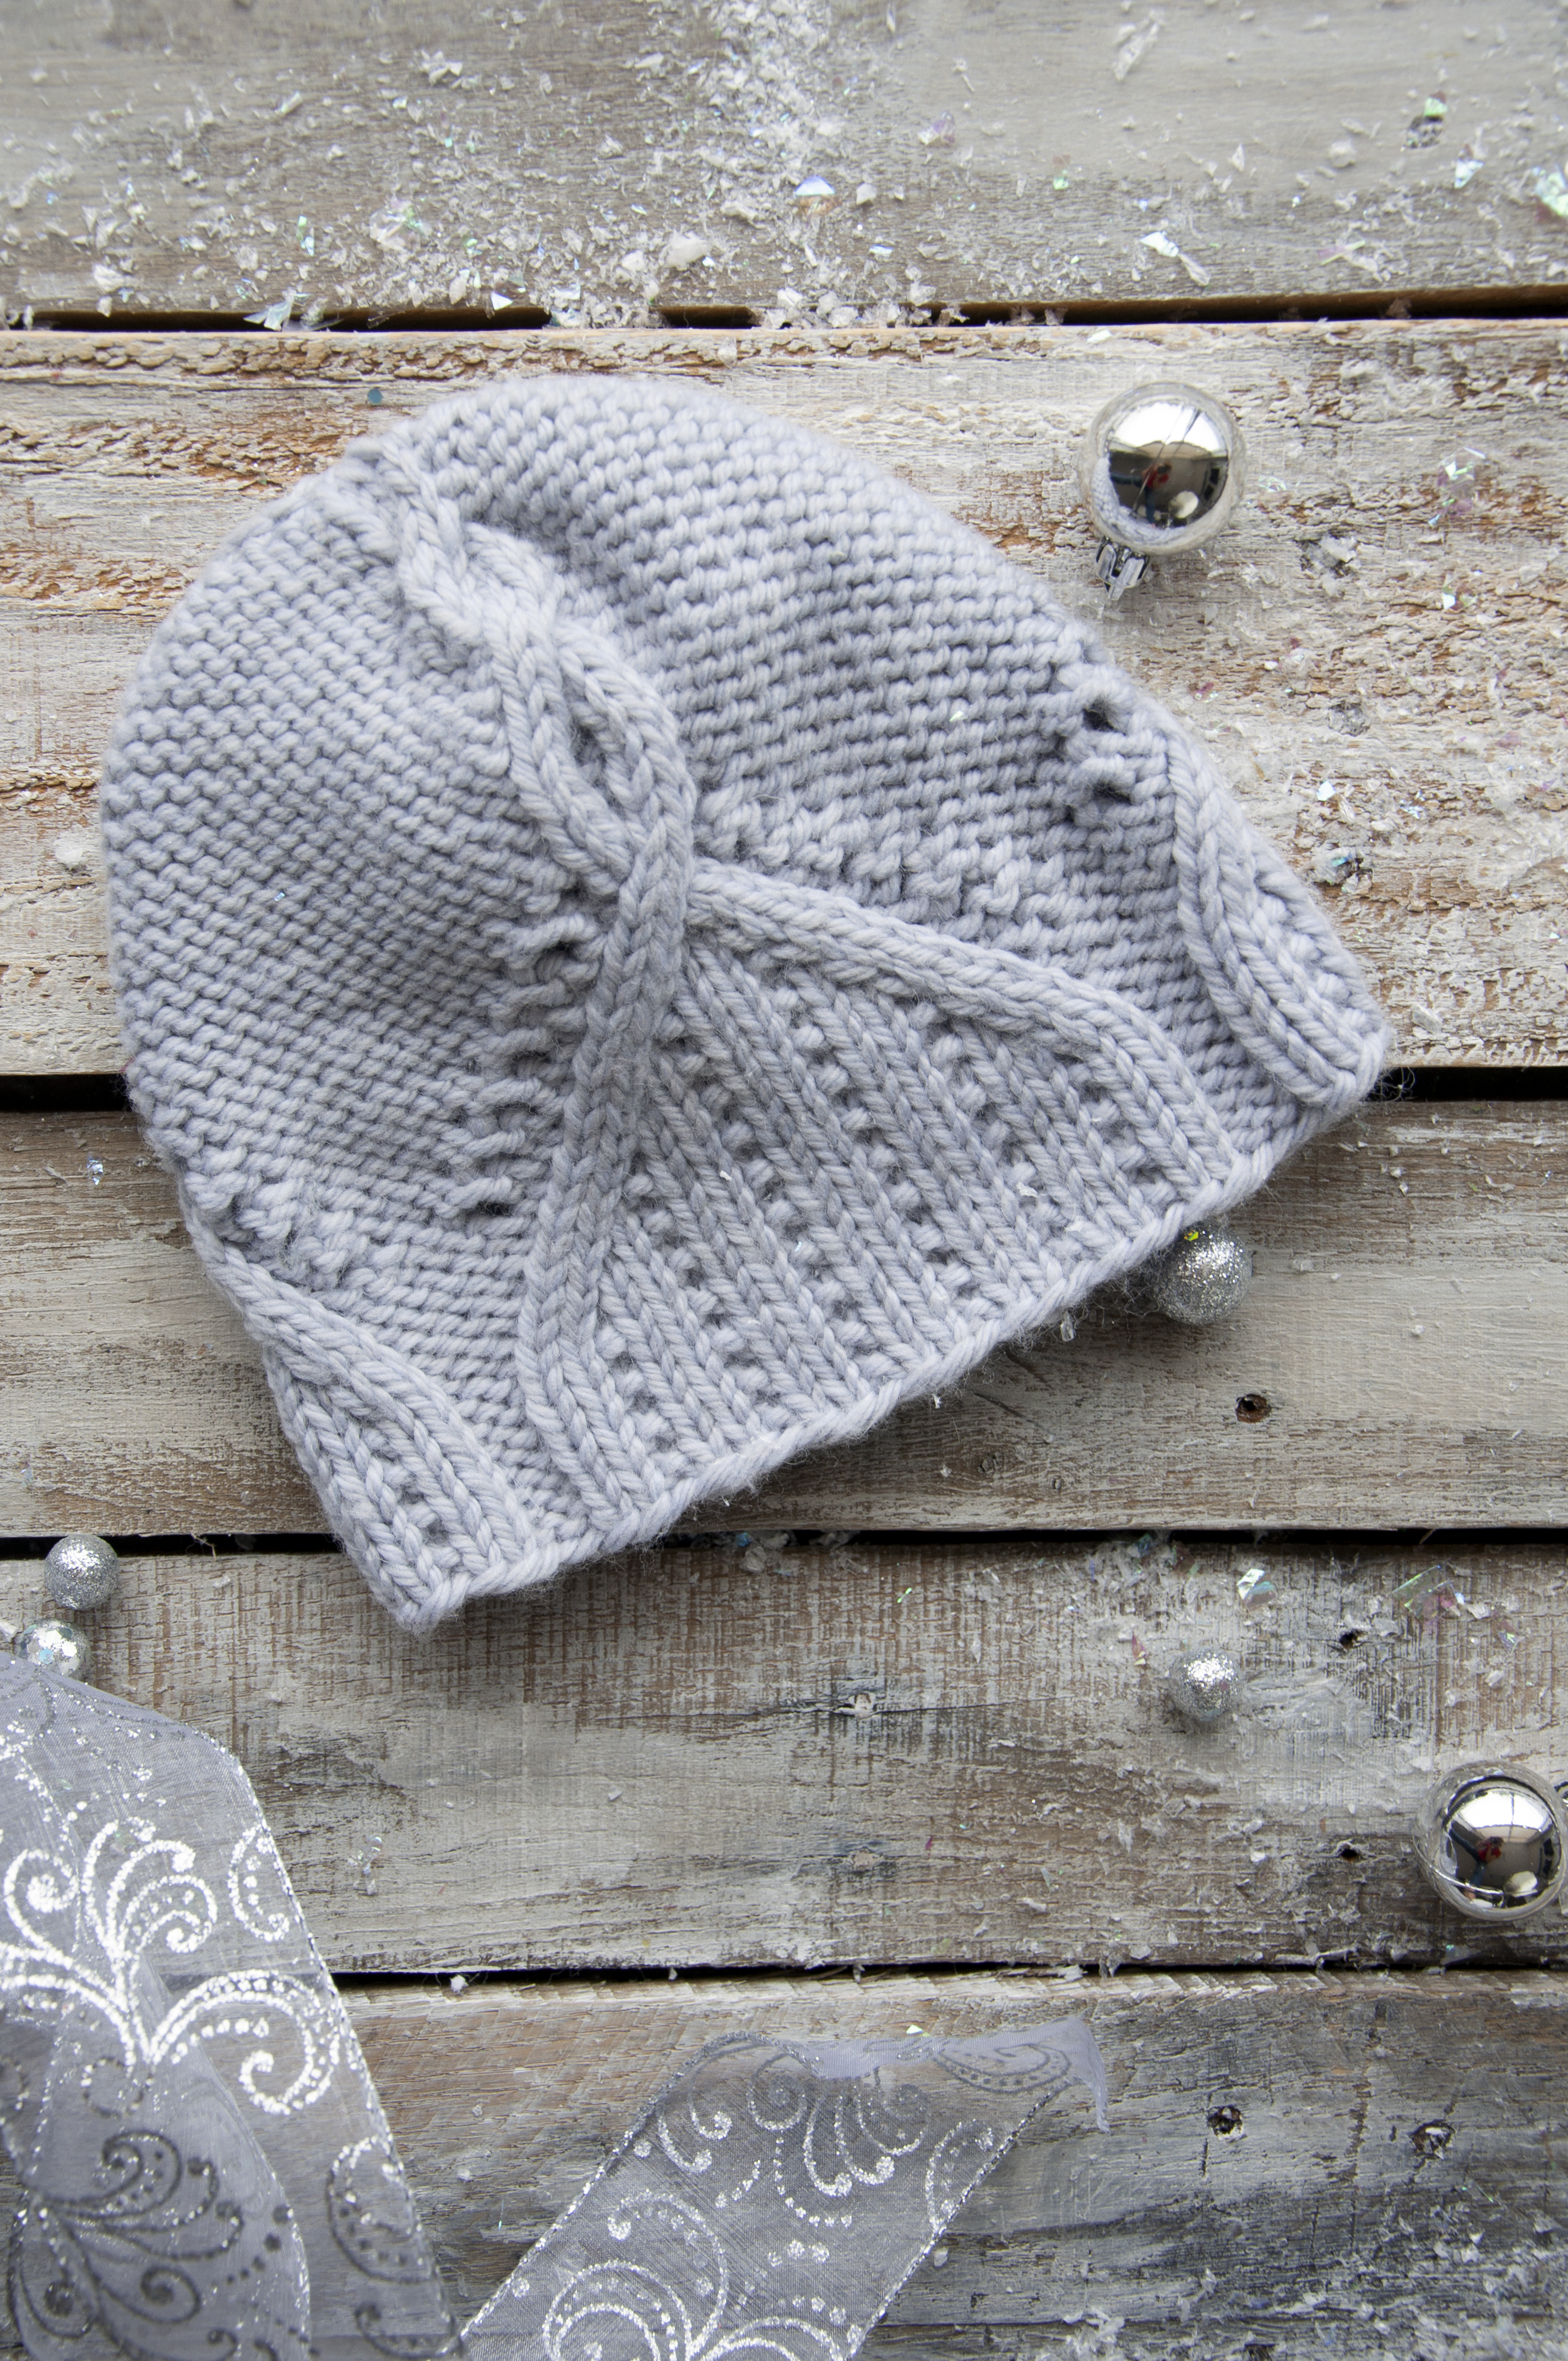
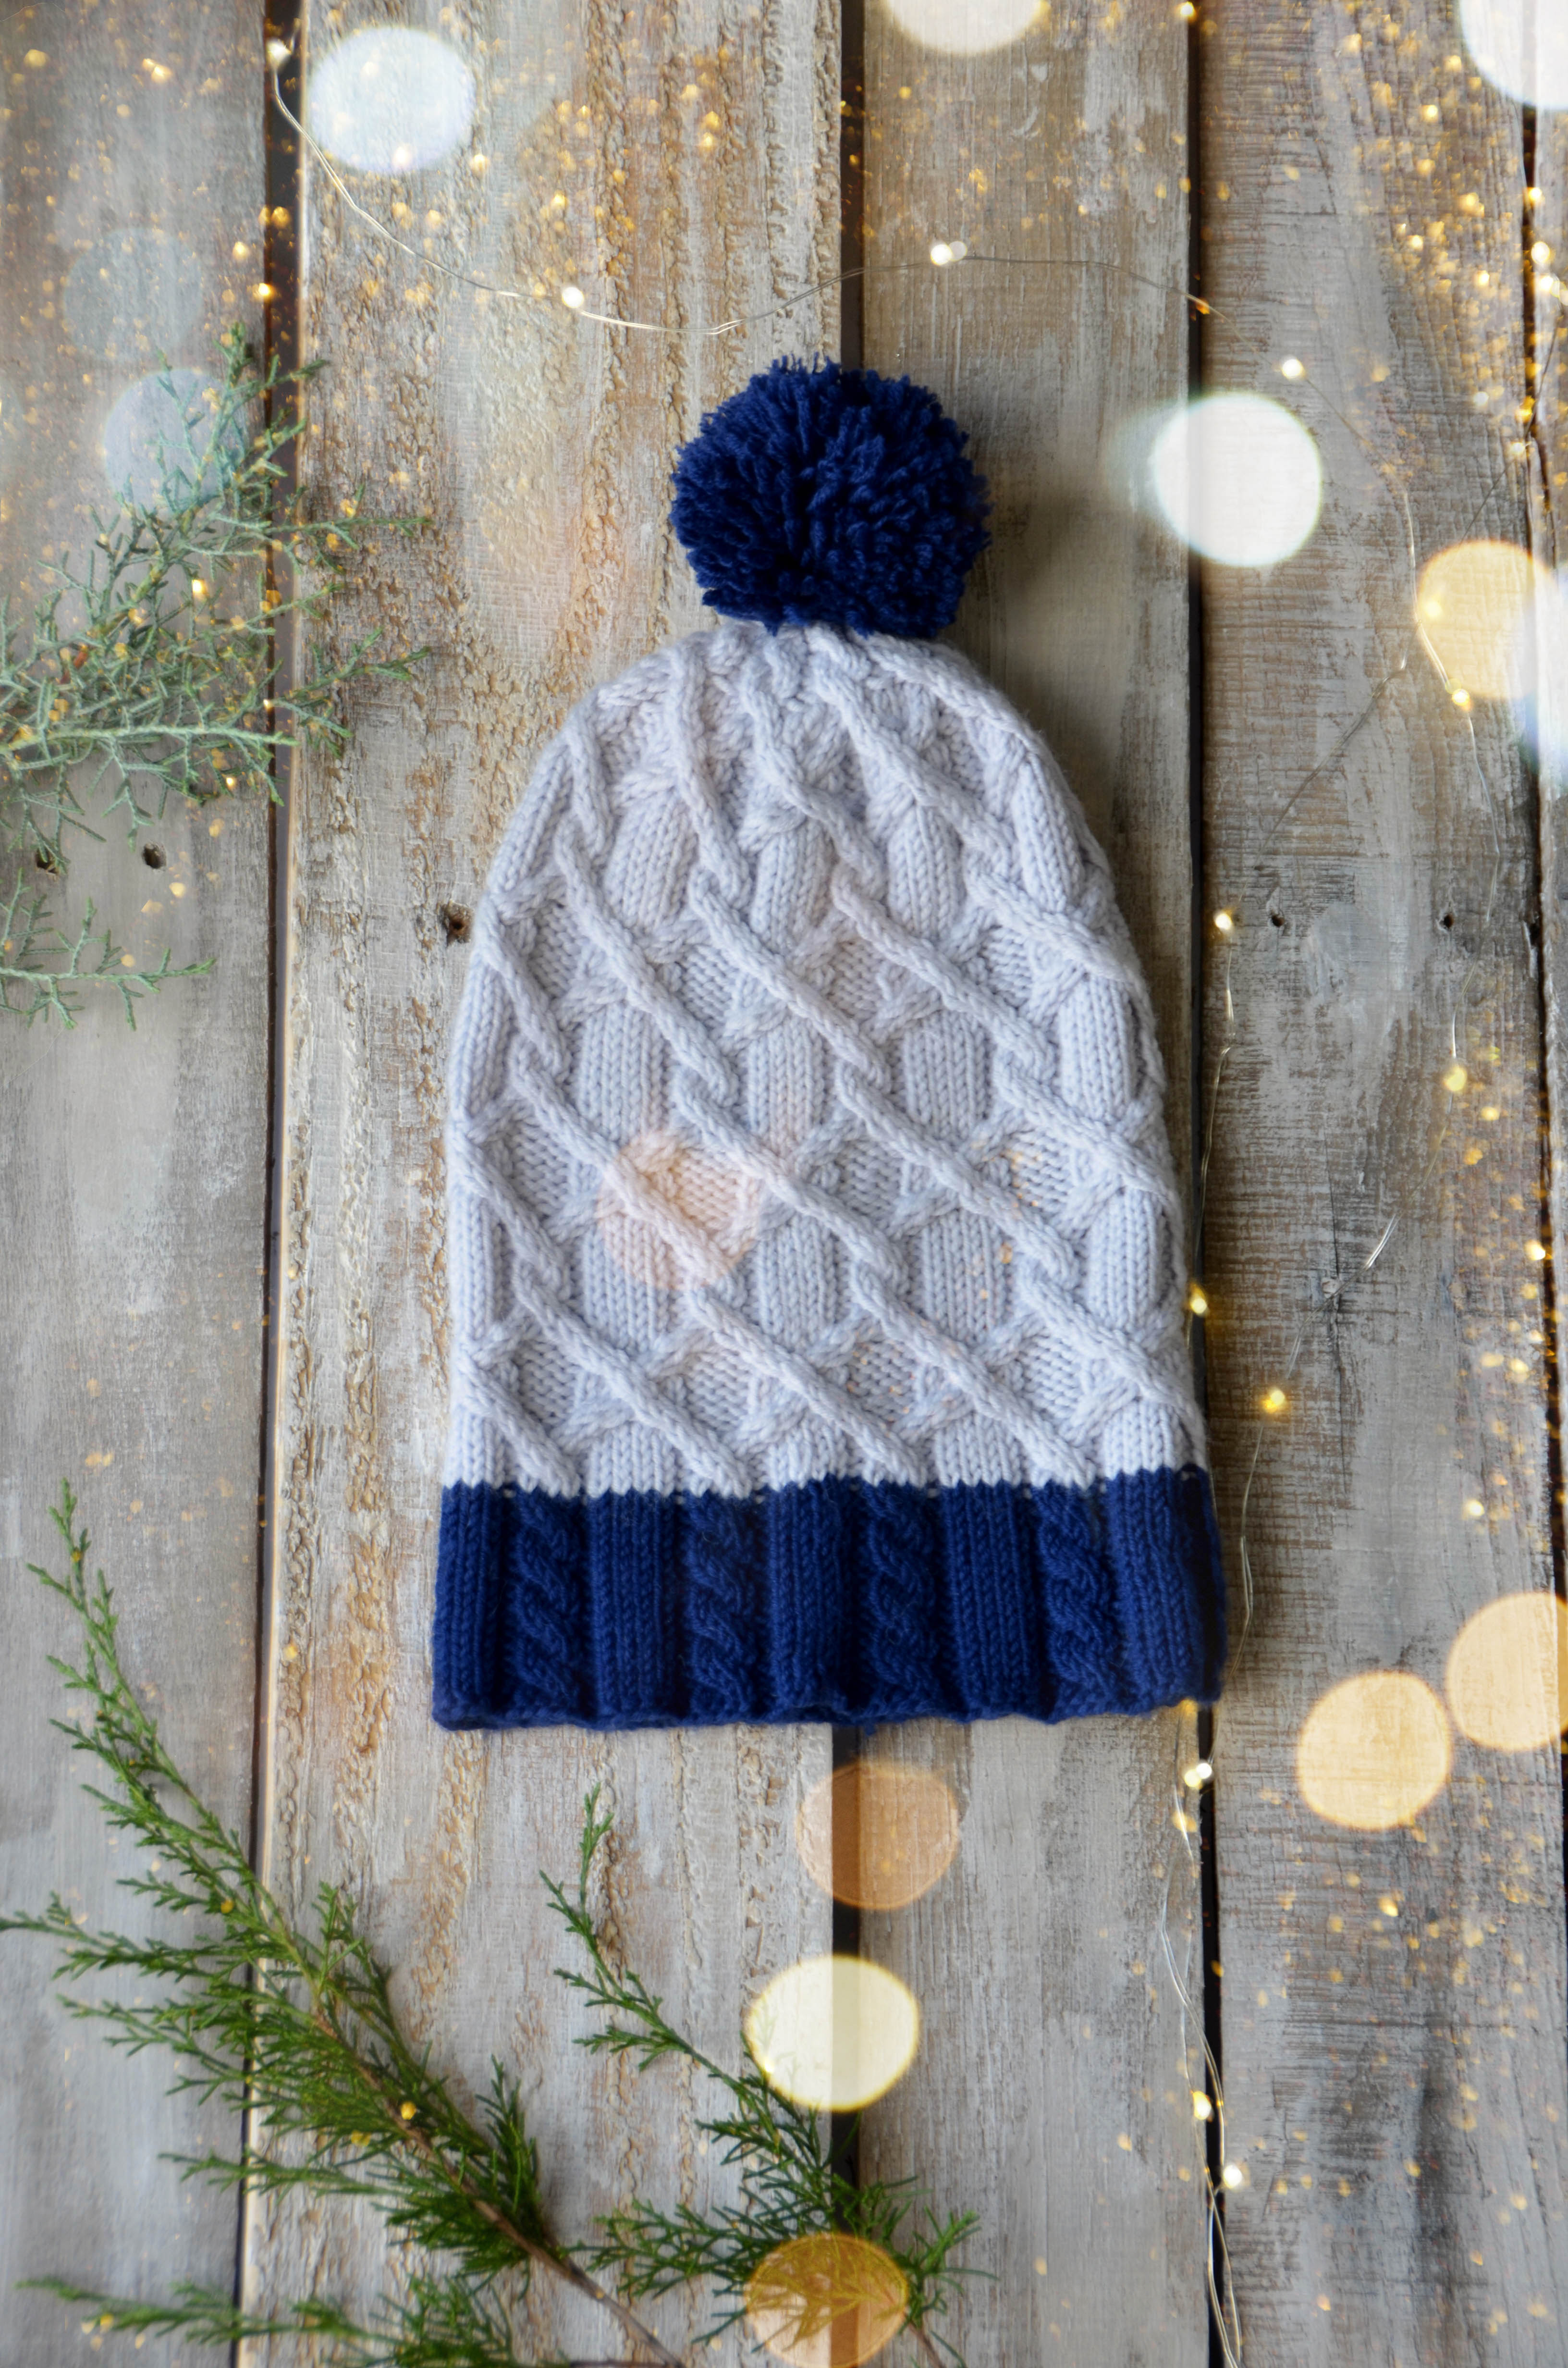
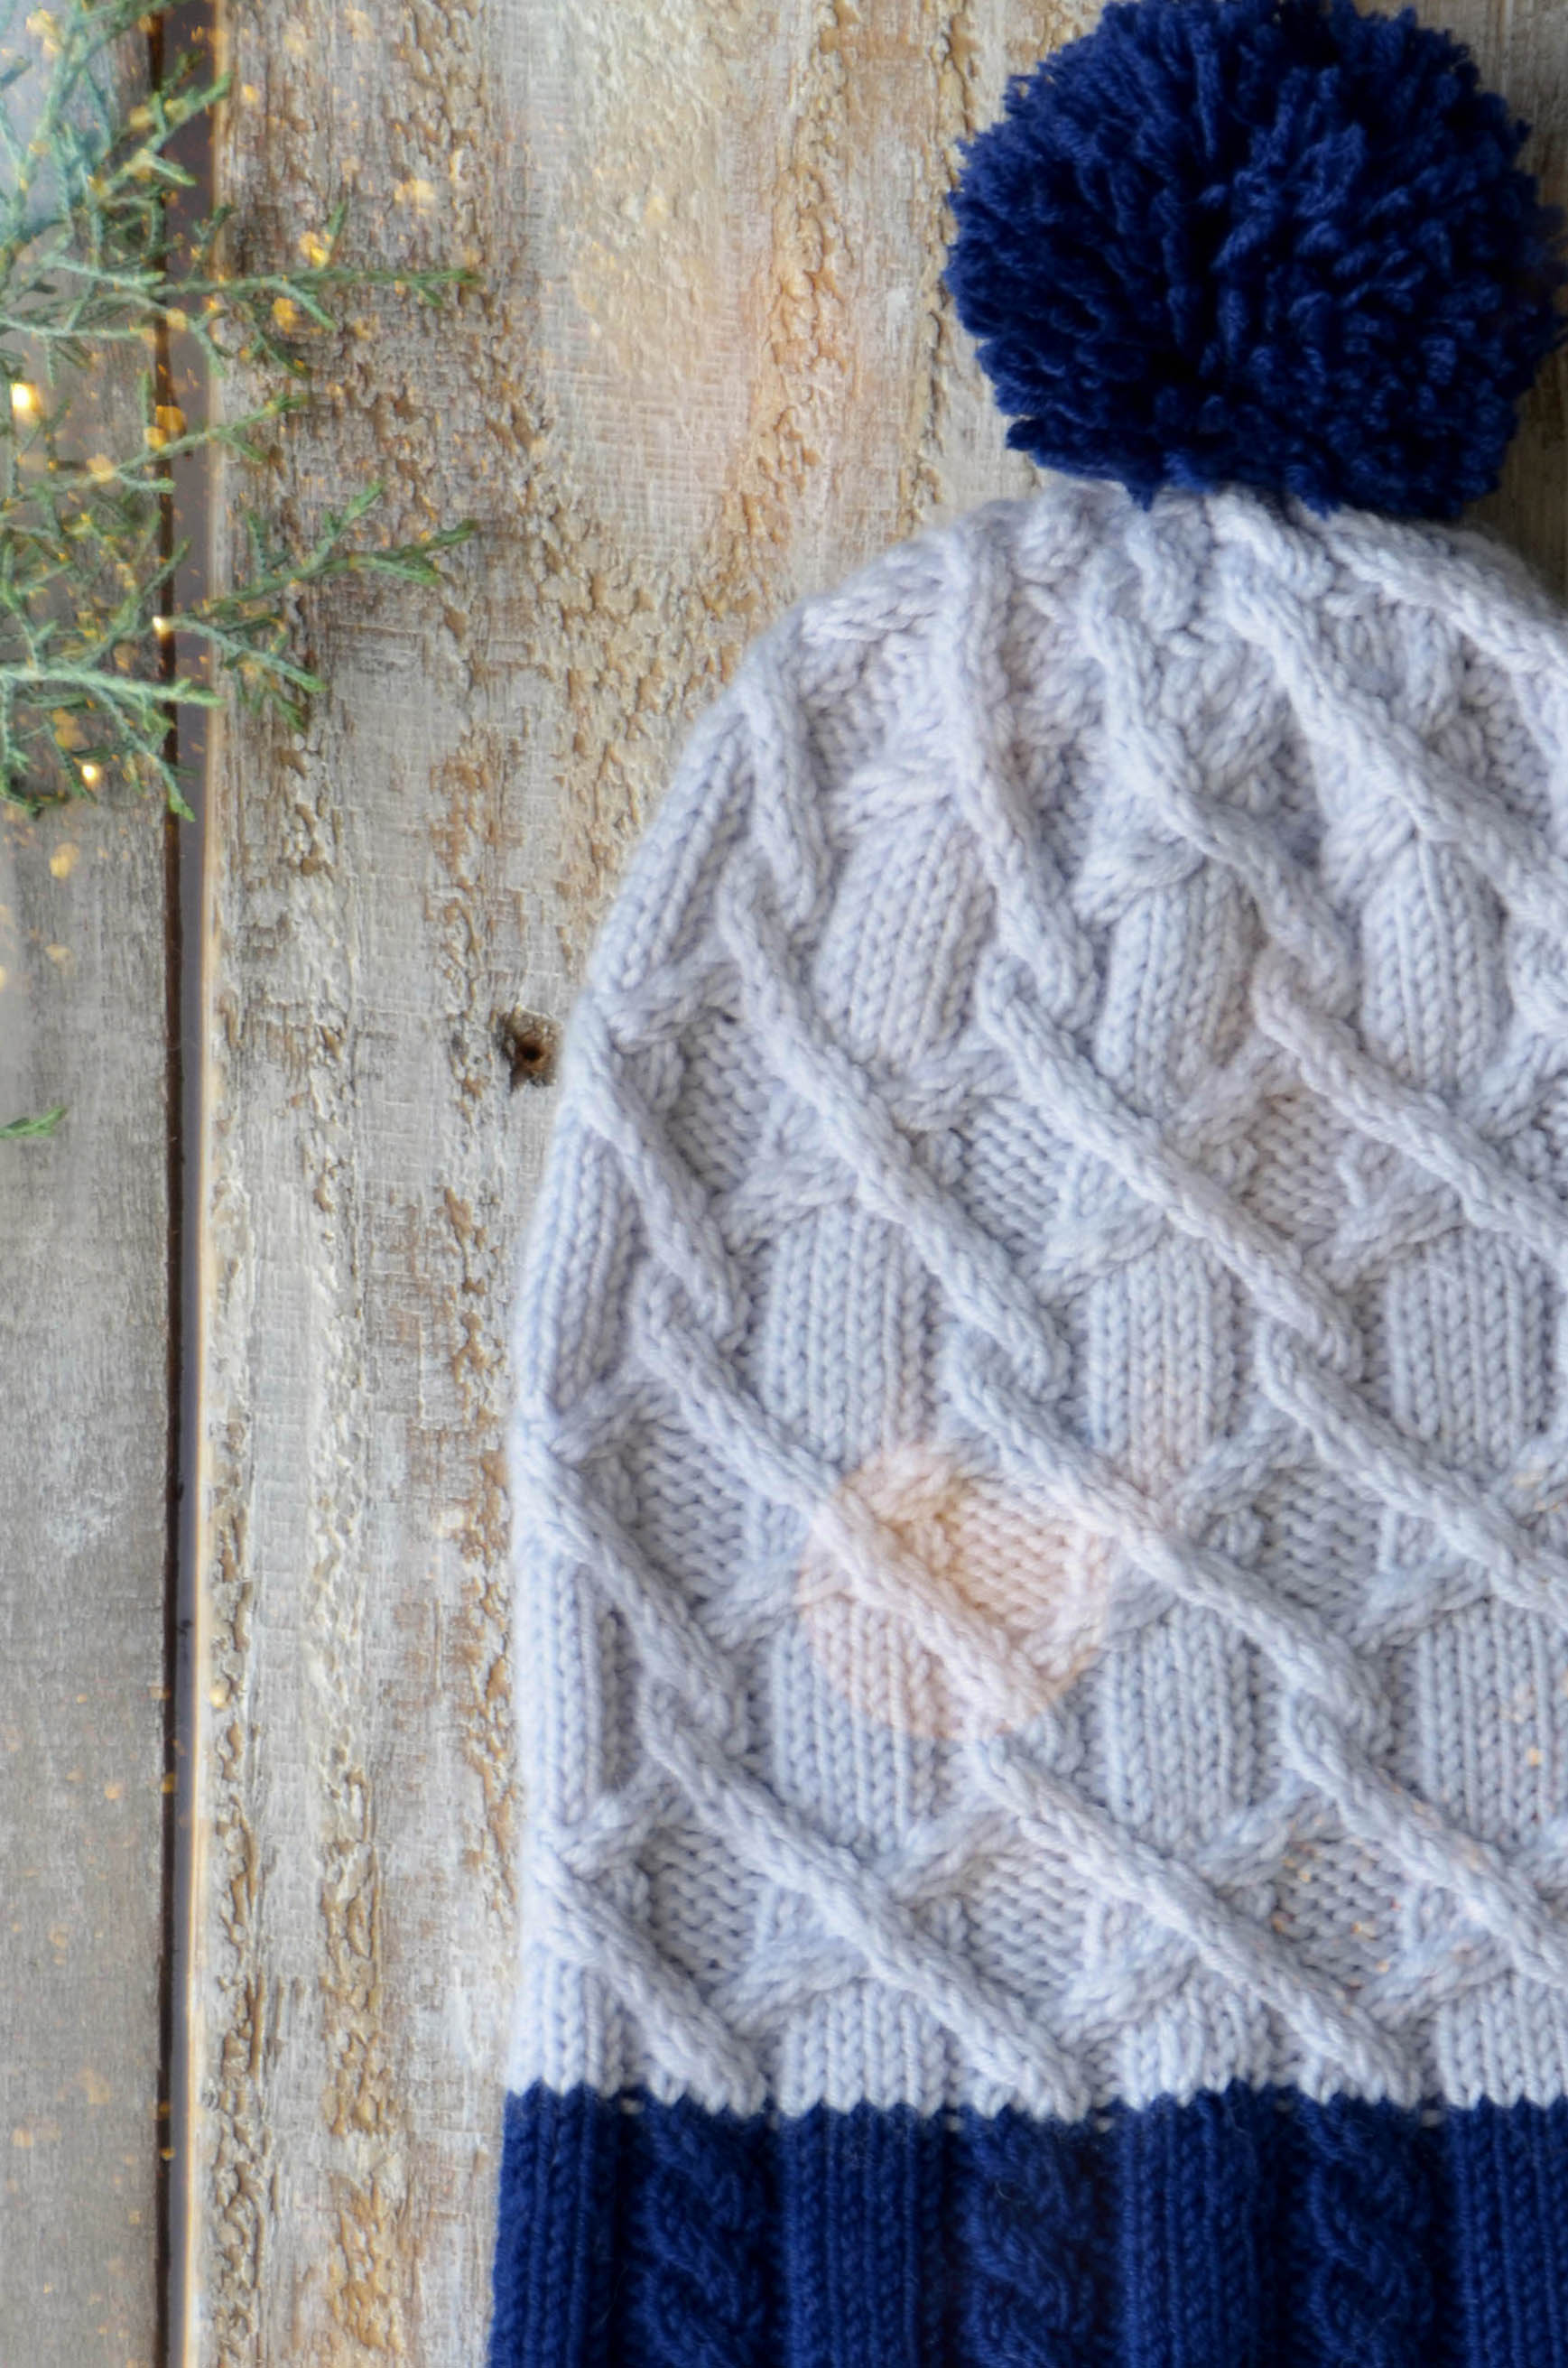
What are some things that come to mind when you think of winter? Seeing your breath in the cool air? Staying warm at home as snow falls softly to the ground? Building snowmen and coming inside to a cup of warm cocoa? Whatever you envision on a cold winter’s day, Tundra is sure to keep you warm.
Tundra is cabled hat that captures the look of icy winter days, yet keeps you snug and warm. It features all-over cables that begin at the cuff and are carried into the crown shaping.
If ever there was a yarn meant to be coupled with cables, Dona would be that yarn. It has impeccable stitch definition, which is perfect for the interlocking twists and turns of cabled fabric. The Tundra hat combines simple, but beautiful cables with the plump and incredibly soft Dona.
Like each kit in the 12 Days of Winter Collection, the Tundra Kit comes in a giftable package. Perhaps you’re the knitter doing the gifting (isn’t the act of knitting a gift to yourself anyway?)–great news–this pattern is sized baby through adult, so it’s perfect for anyone special in your life.
By the way, I’d be remiss not to mention that today is also Thanksgiving! Happy Thanksgiving to each and every one of you. I hope your day is full of delicious food, laughter among loved ones, and some comfort knitting while you recover from all of that feasting!
You can find the kit for Tundra on our website here.
Oh, how I adore stranded knitting in our Deluxe DK Tweed! Crisp, defined colorwork has its place. But when the yarn has more character like our tweed, it softens the lines of the patterning and gives more interest.
This title of this design has the caveat of “revisited” because the original Templetop Cowl indeed exists. The first incarnation of this design was knit in Amphora, another yarn with one of my favorite characteristics: halo.
With smooth, plied yarns, knitting is crisp, even, and predictable. But when a yarn has a special characteristic such as tweedy bits or loft, stitches are less cut and dry and more organic. They have a mind of their own, so to speak. And they become more like real life, too, where we can’t always control things down to every last detail. There is a level of relief that comes with that acceptance, where we just let things be how they’re going to be, and this is ultimately why I love yarns with character. They mirror our own lives in ways that we might not realize at first.
Golly, you never knew yarn and knitting could get so philosophical, right? You can find the Templetop Revisited kit on our website here.
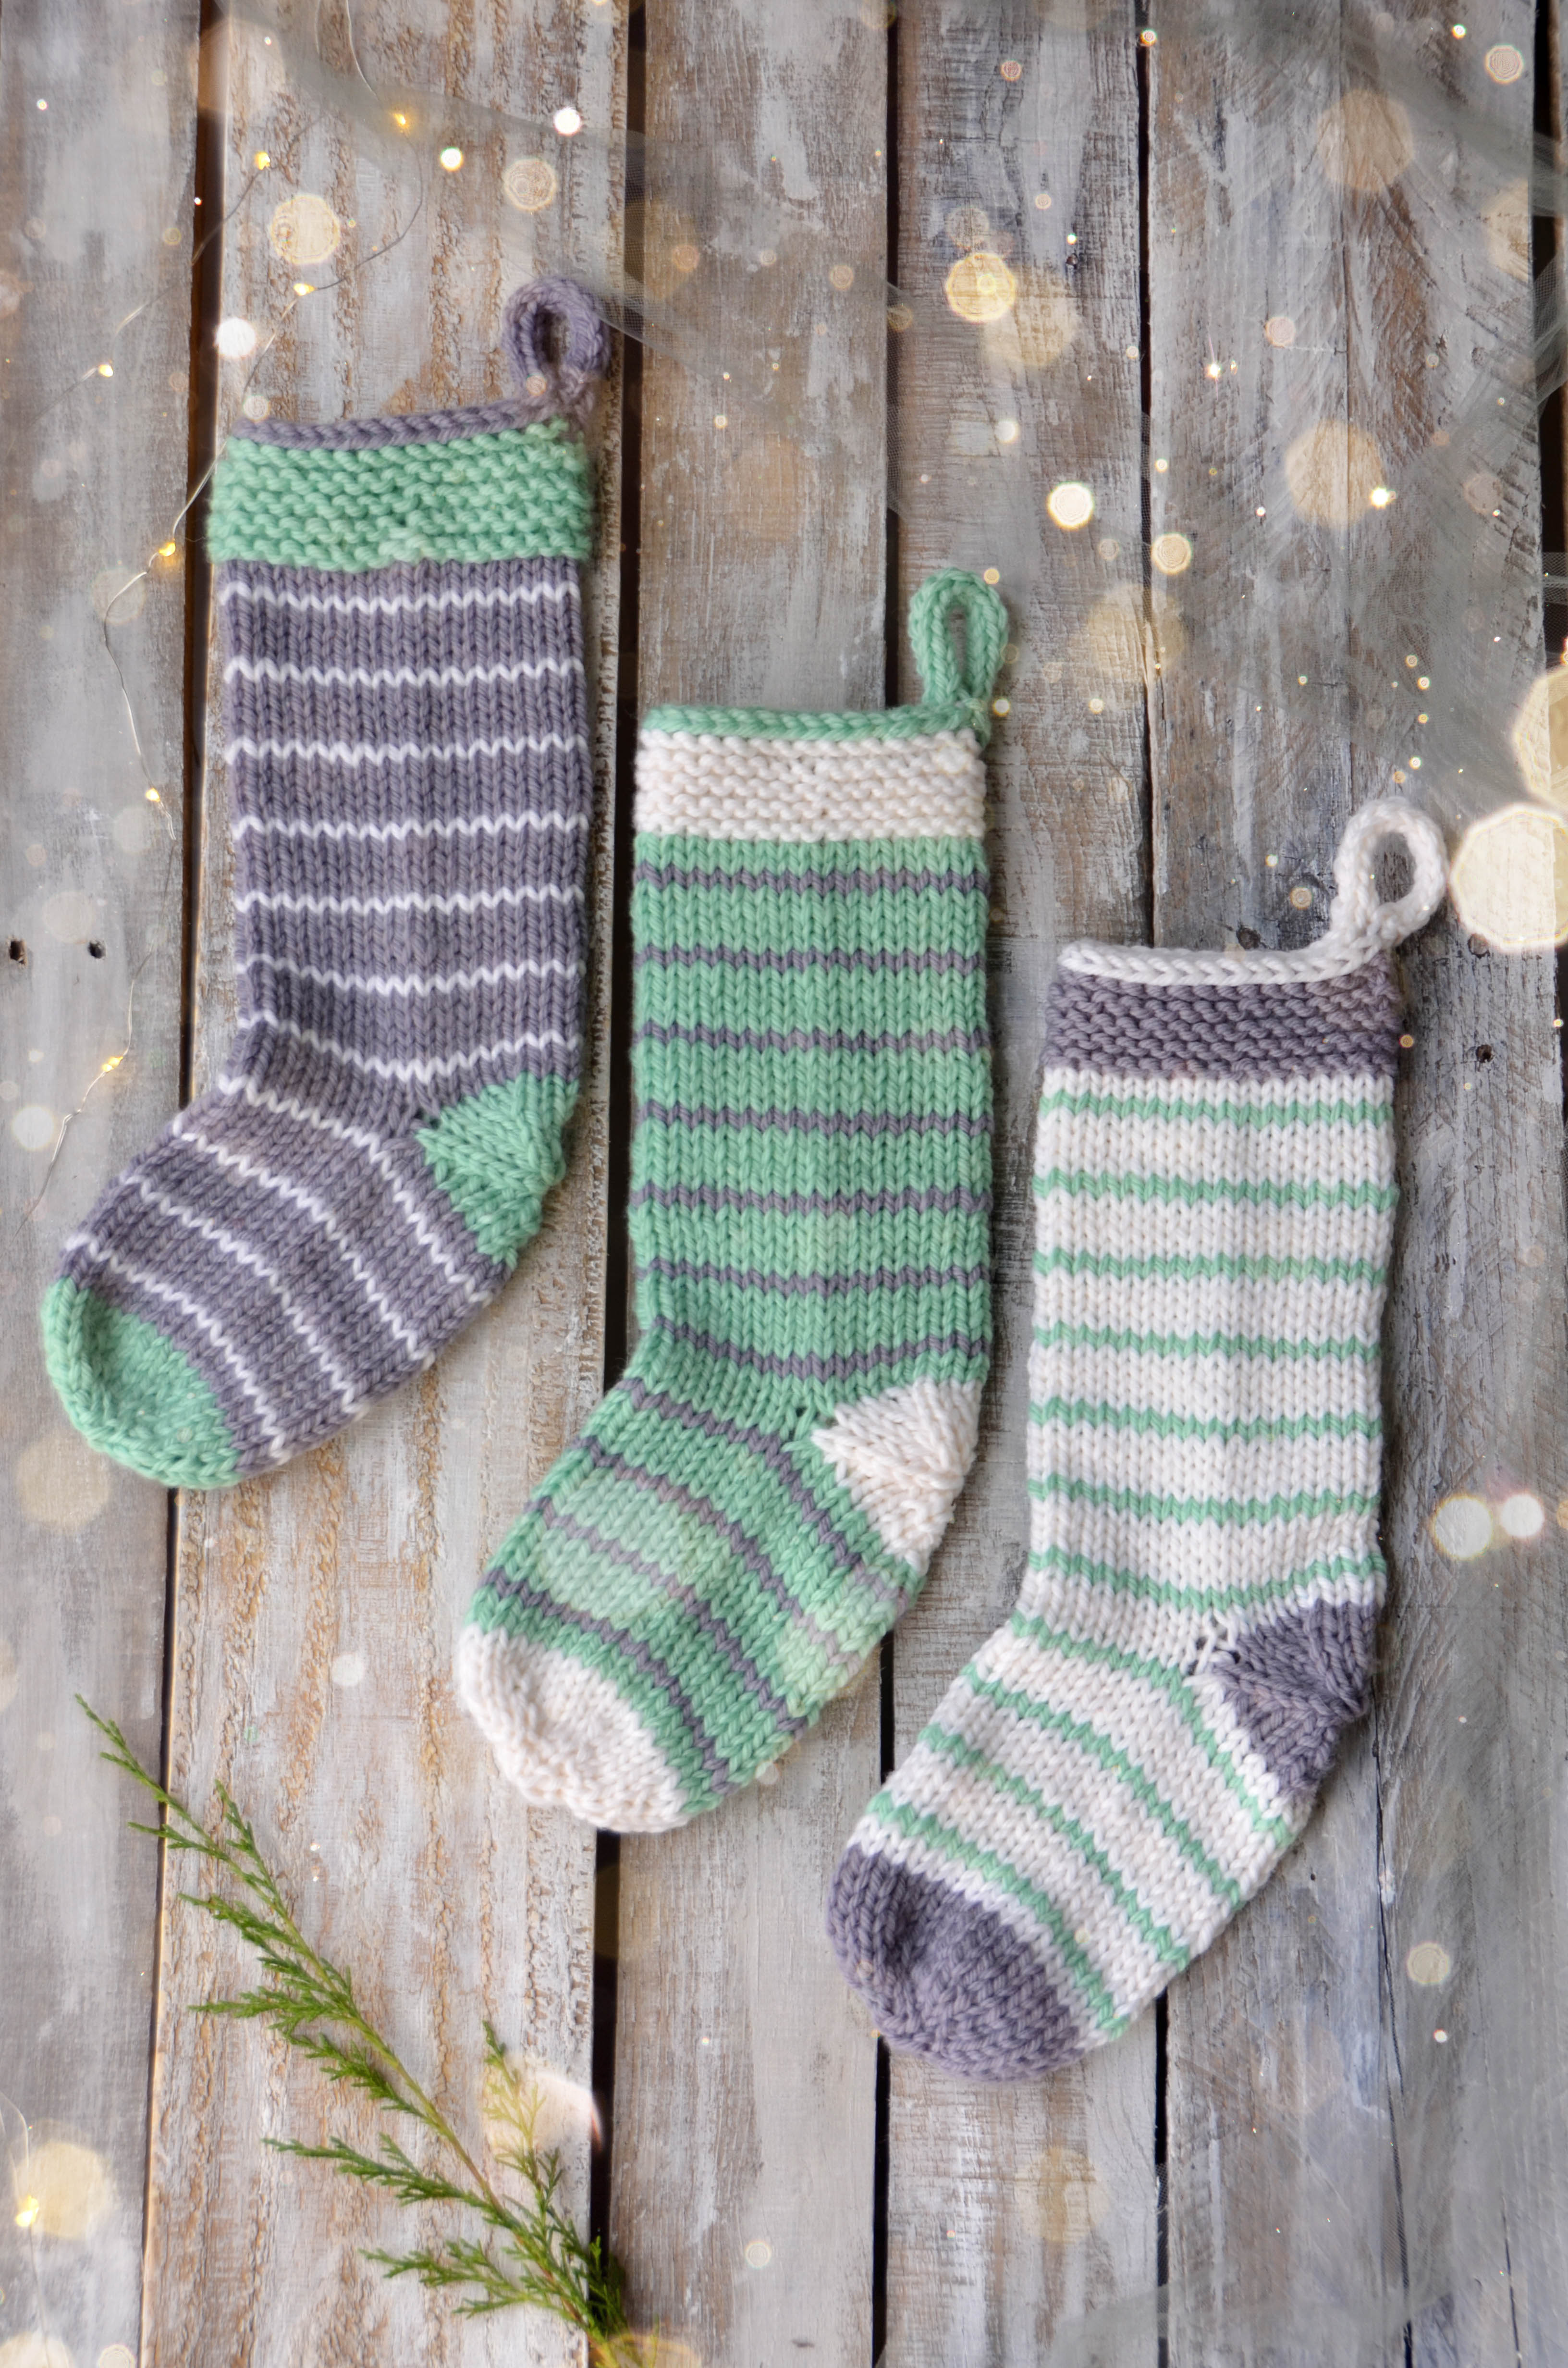
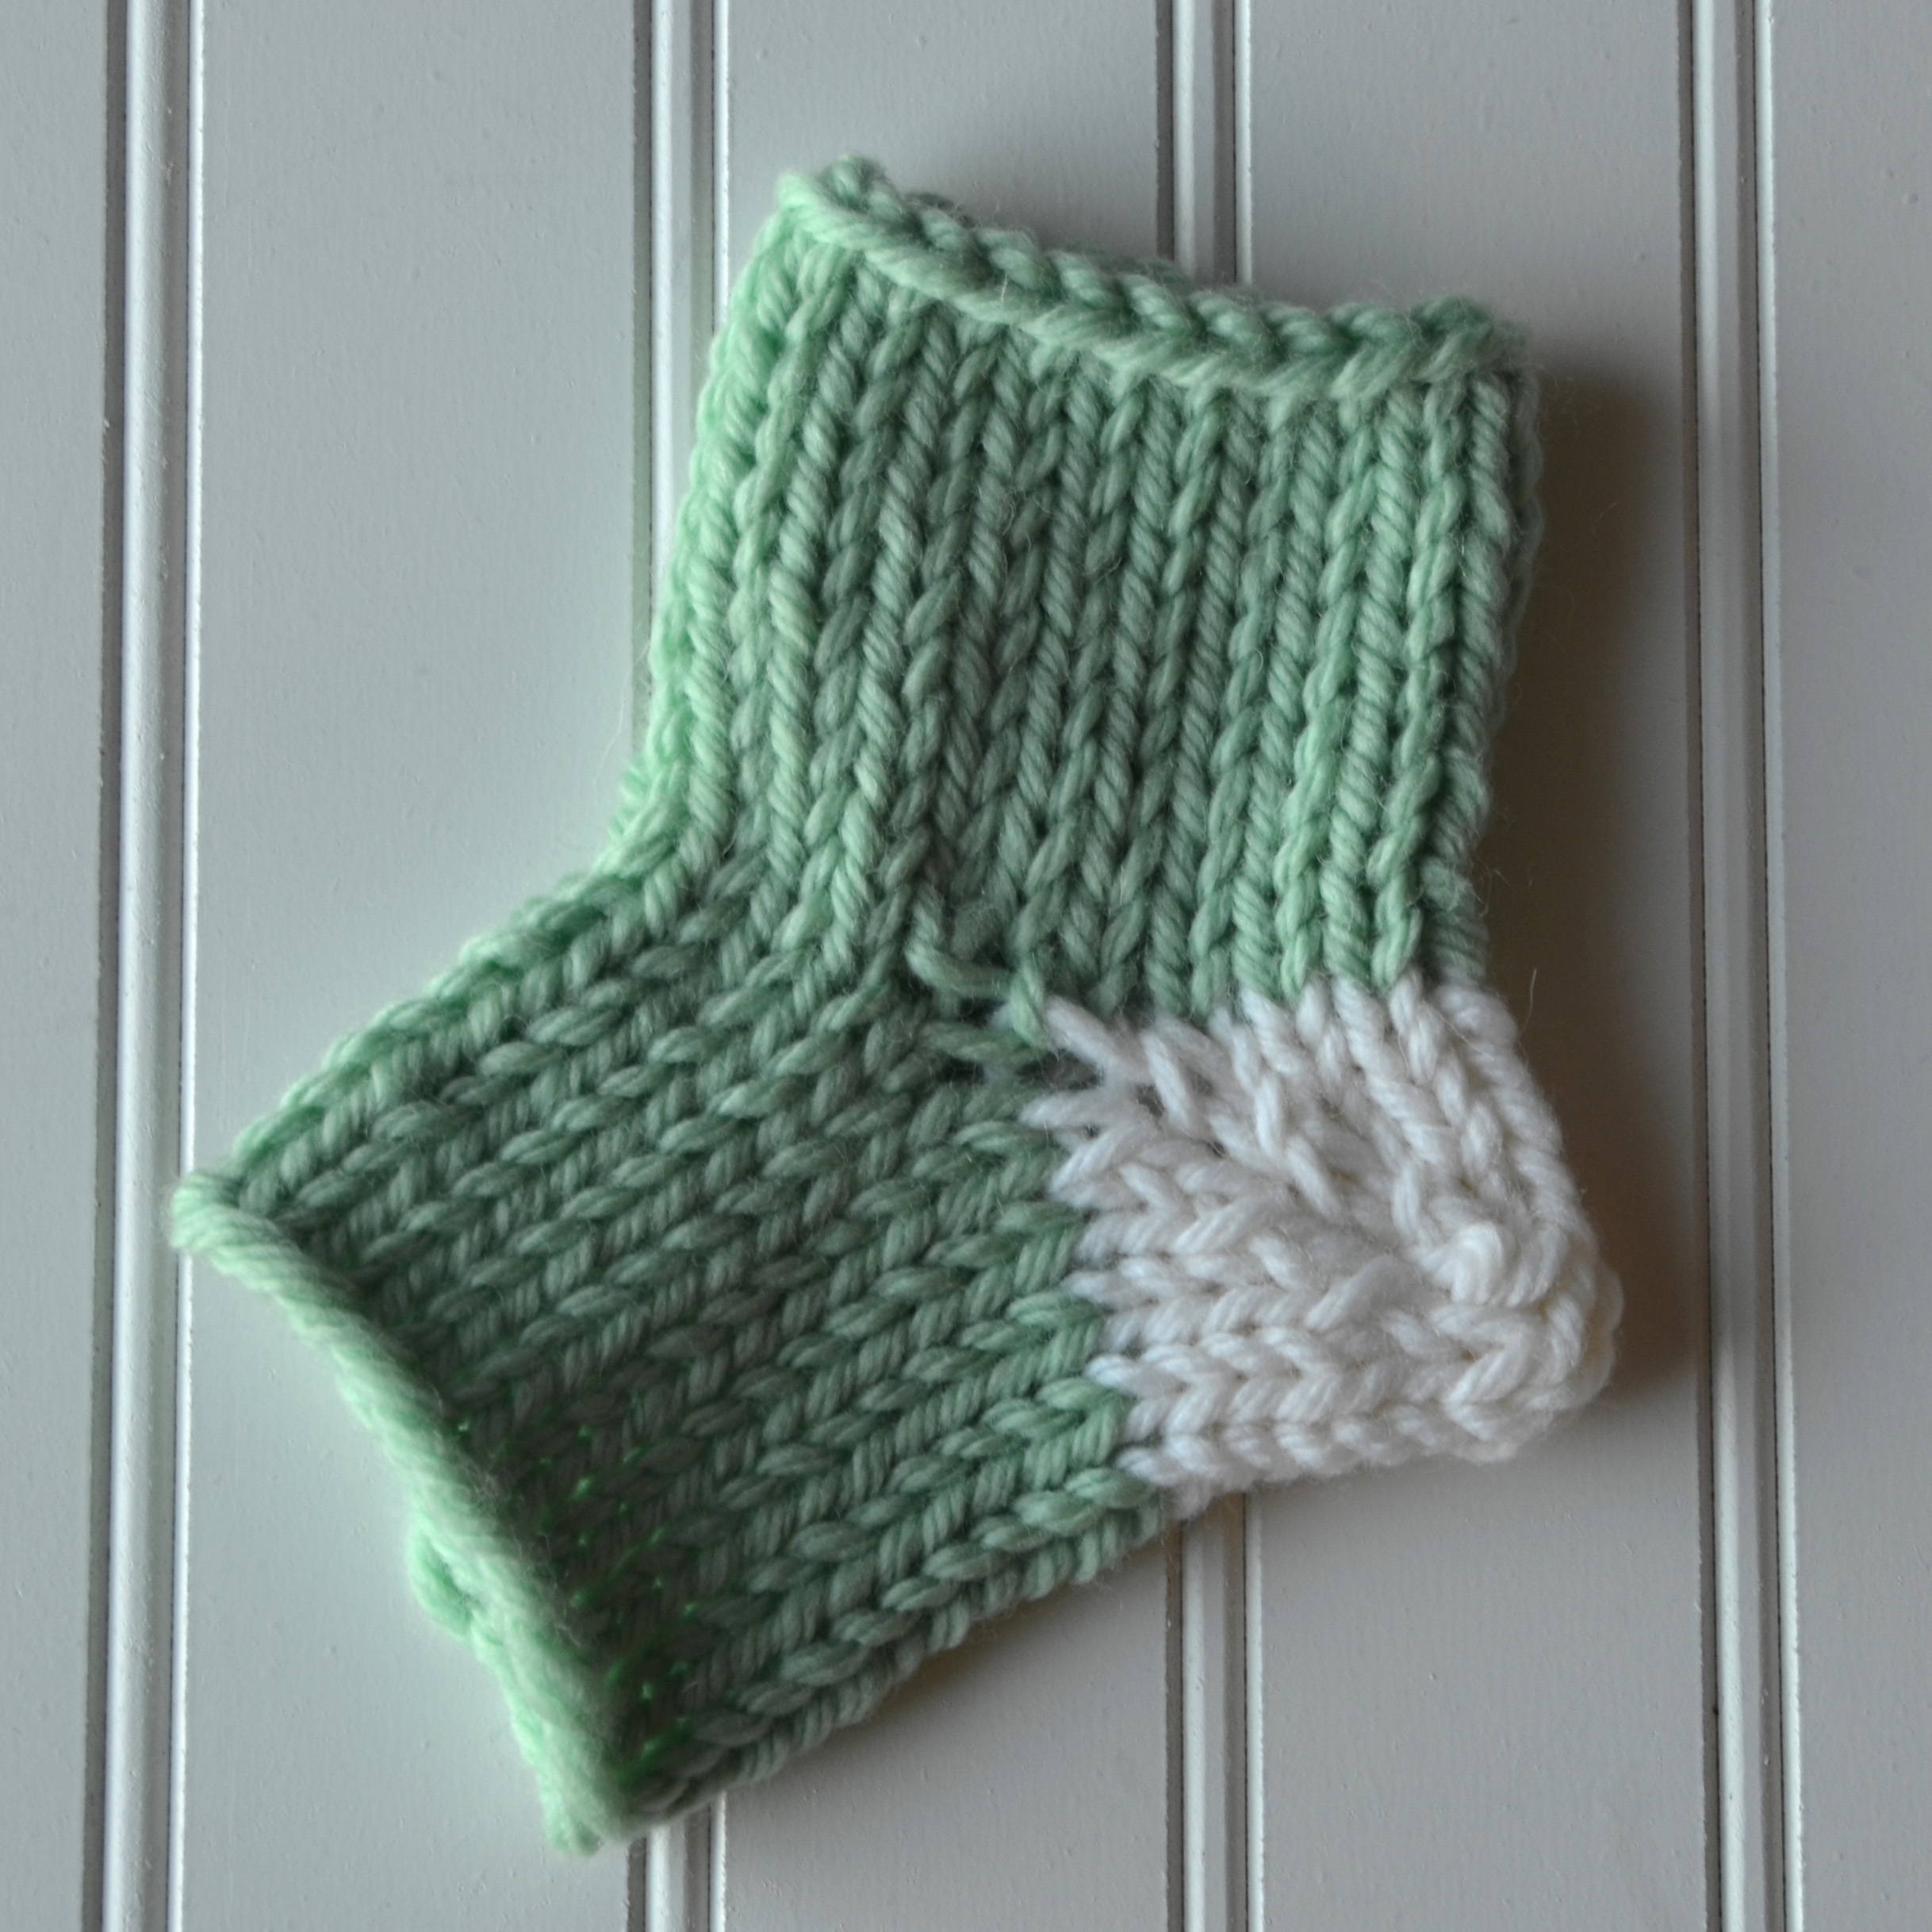
It’s hardly winter without stockings, amiright? Three balls of yarn make three stockings in the Stripe Stockings kit. Knit in Deluxe Bulky Superwash, these will virtually fly off your needles.
The knitting in these is relatively simple – mostly stockinette with a bit of garter and an i-cord bind-off. There are enough details to keep a seasoned knitter entertained, but are simple enough that they would also make a good first sock project.
One feature that I’d like to explain more in detail is the afterthought heel. Unlike the common short-row heel which is knit as the rest of your sock is knit, an afterthought heel is added later after the rest of the sock is complete. There are various reasons for choosing this type of heel. My reasoning for doing so in this project was both to keep my stripe sequence uninterrupted and also to make the most of my yarn.
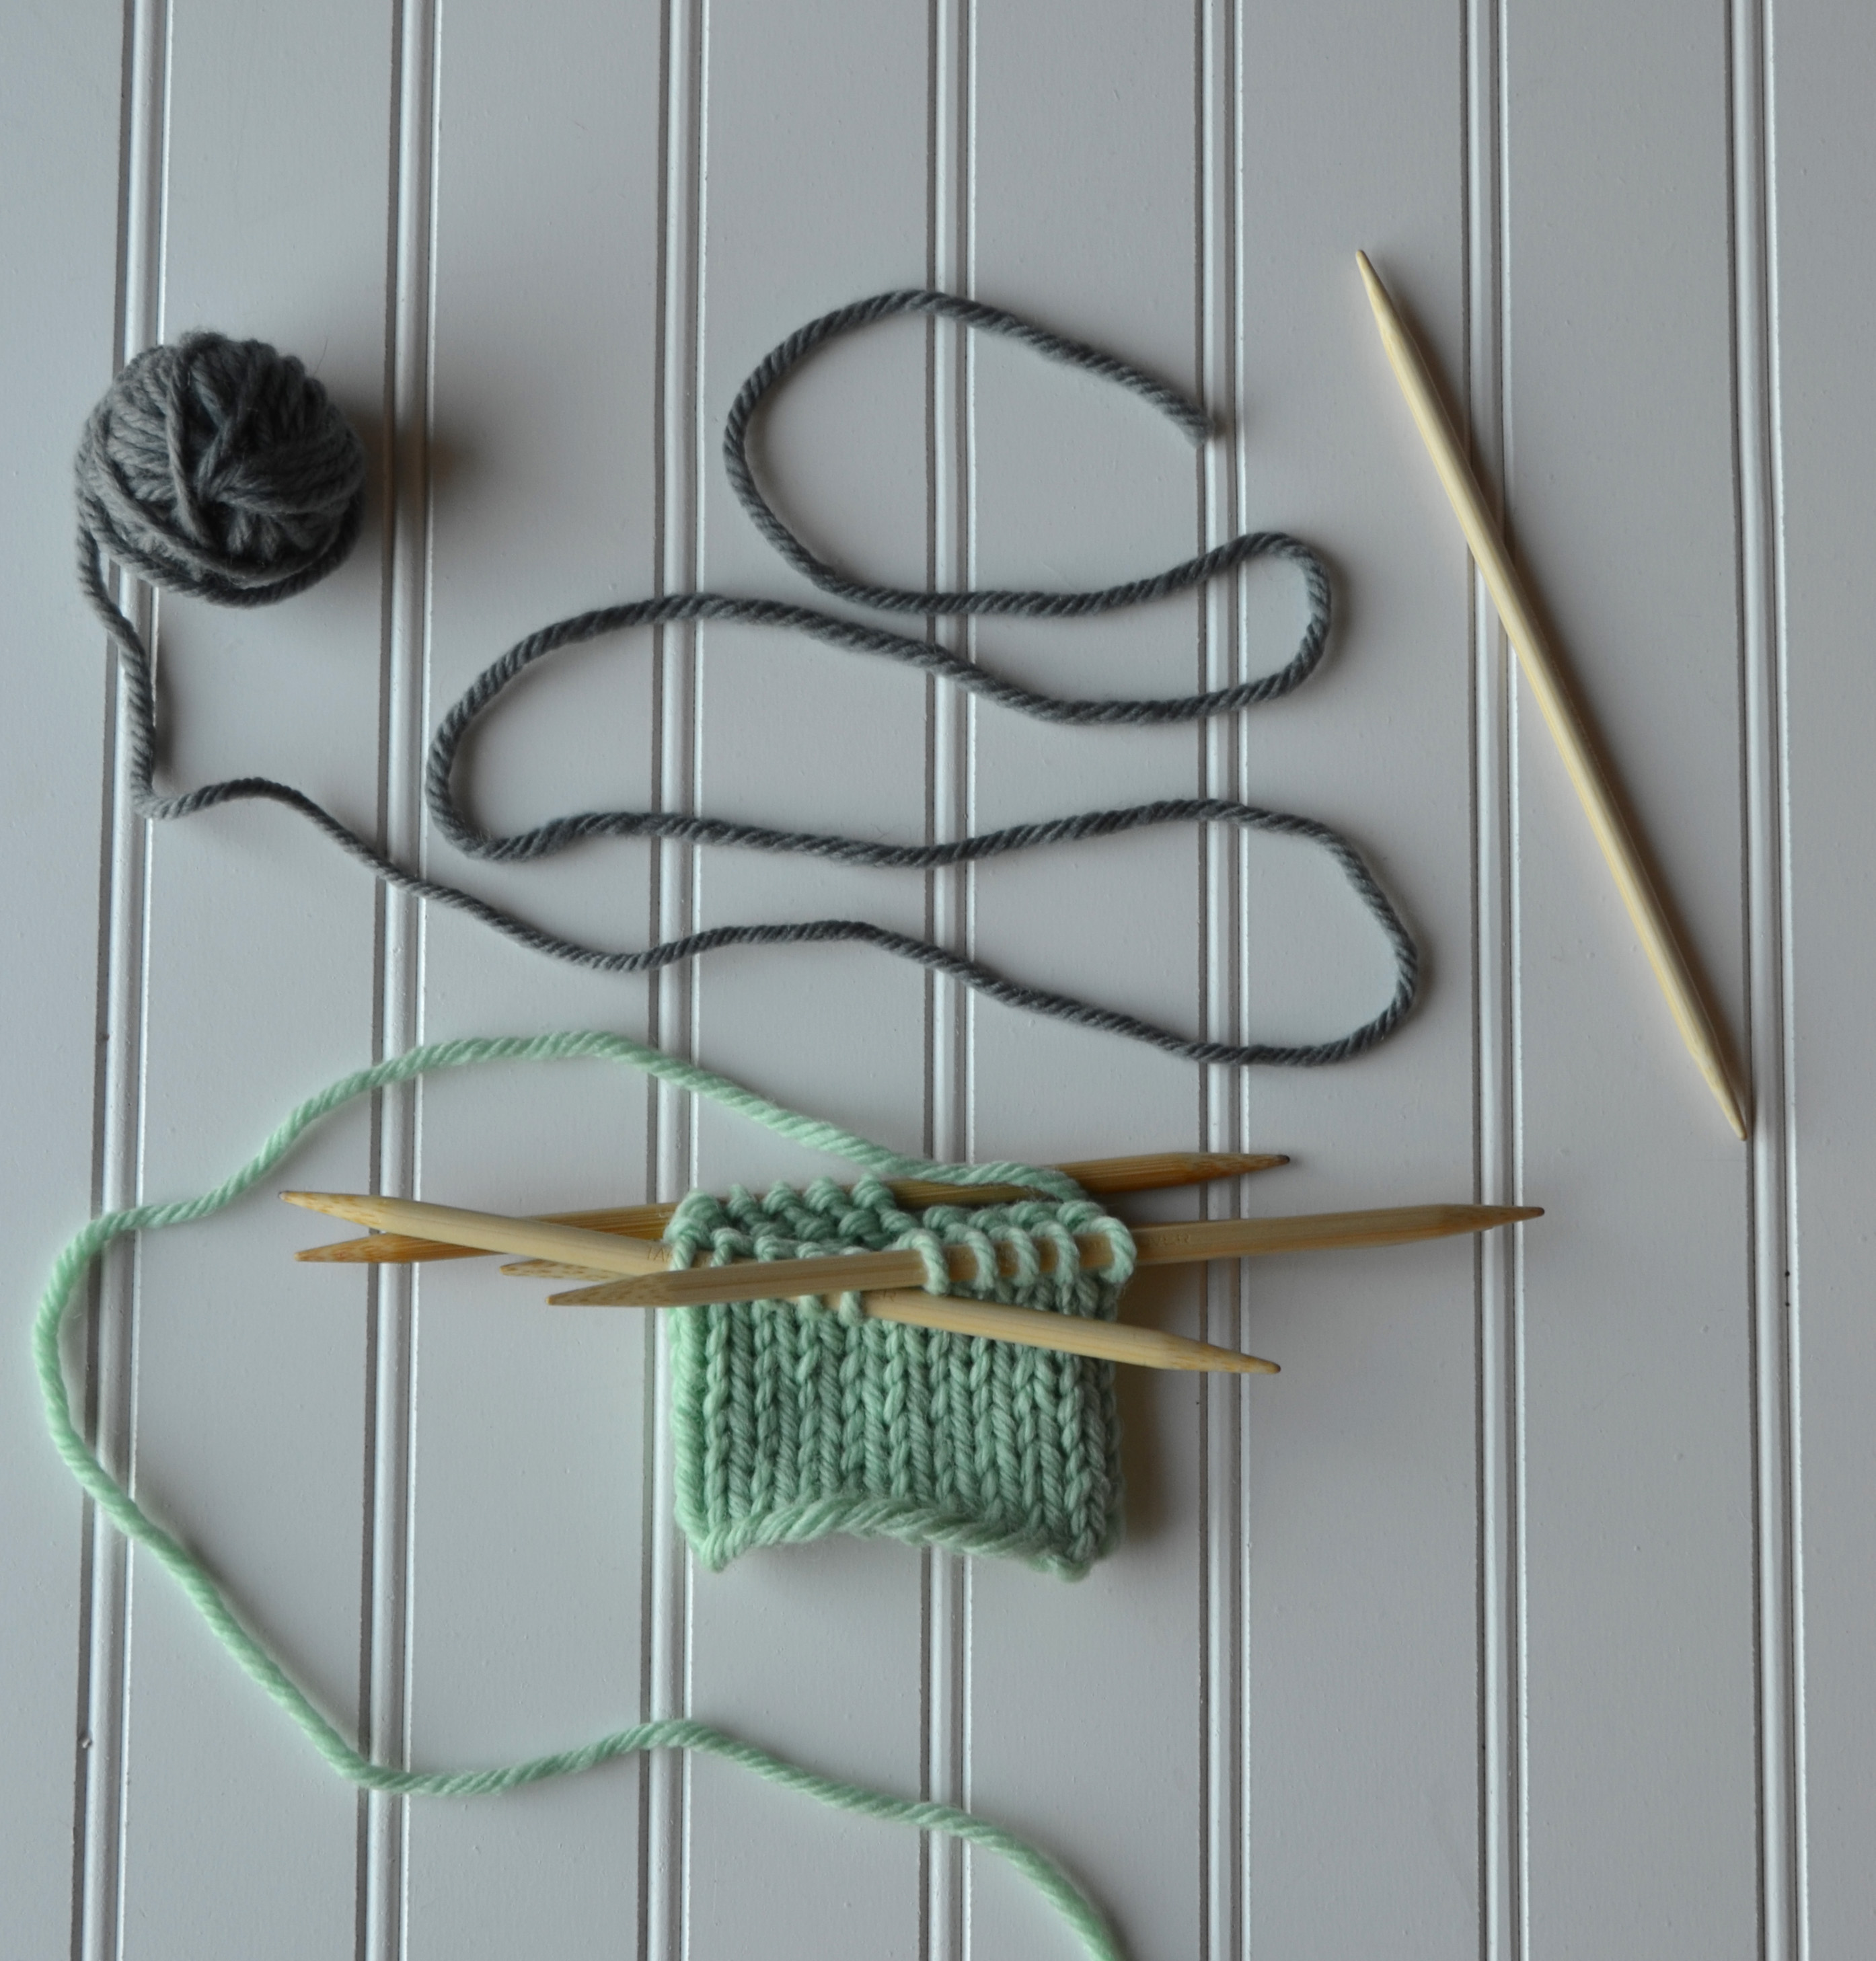
Grab your needles and yarn and let’s get to learning!
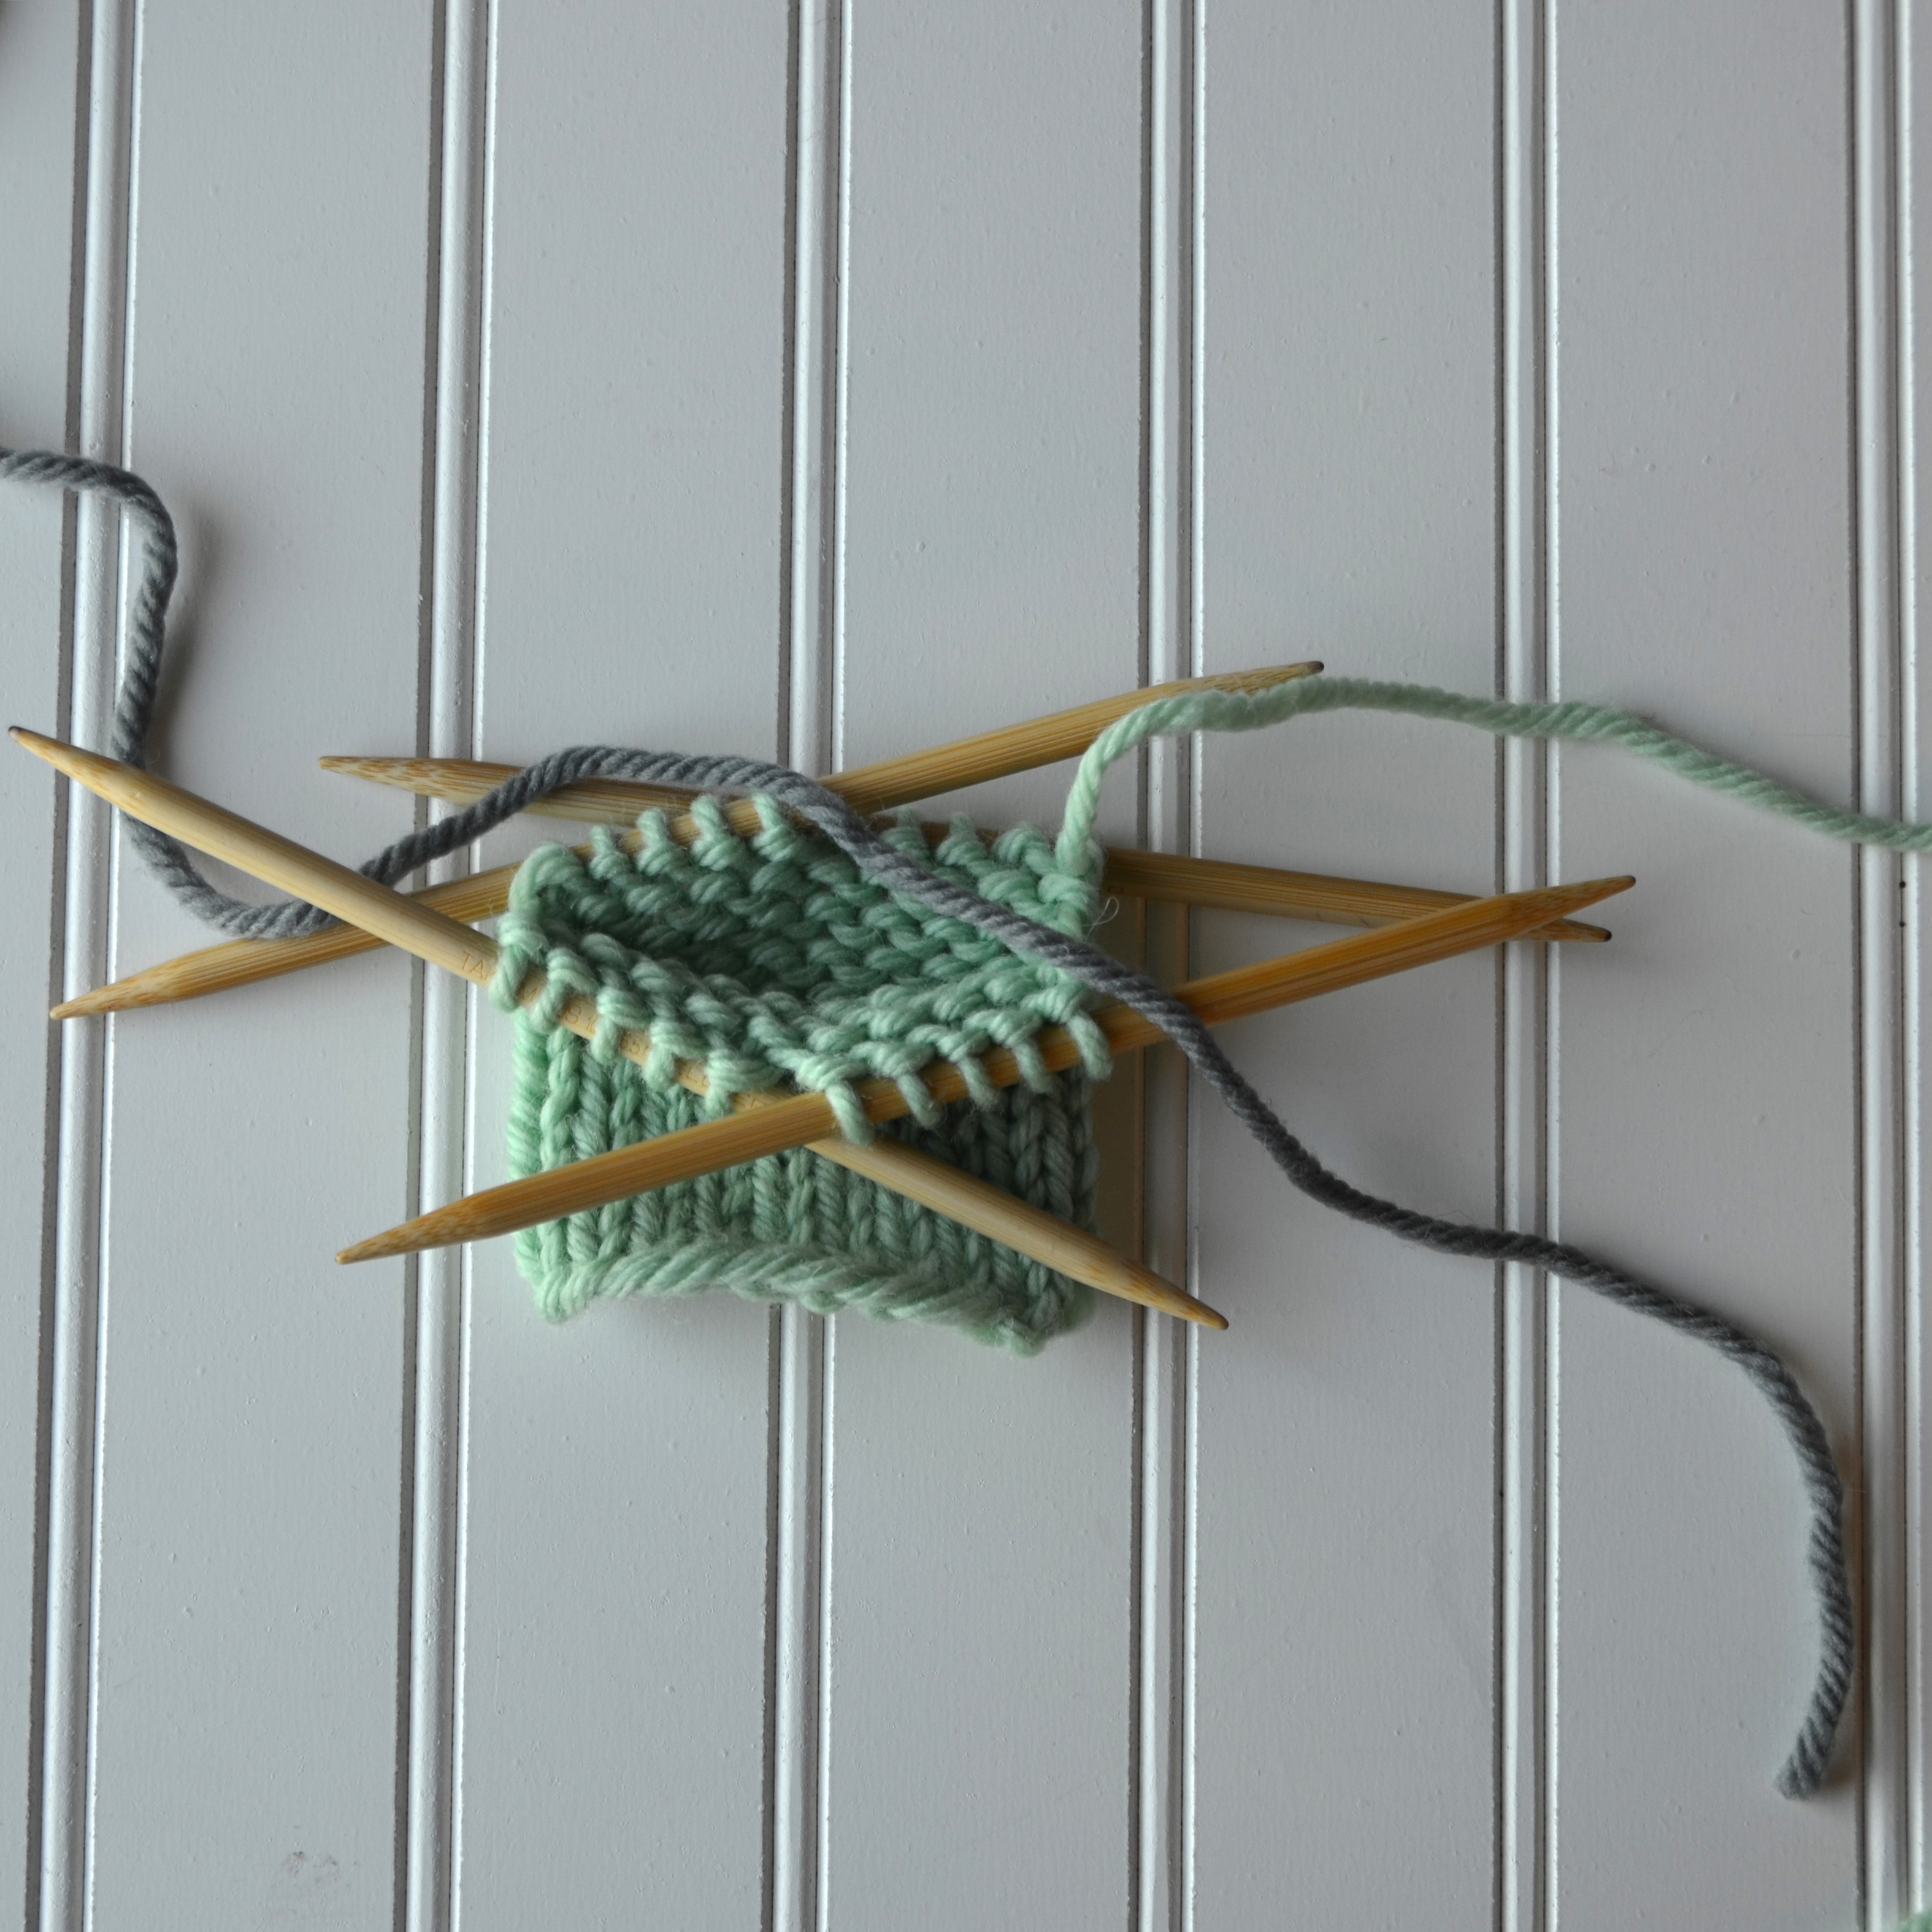
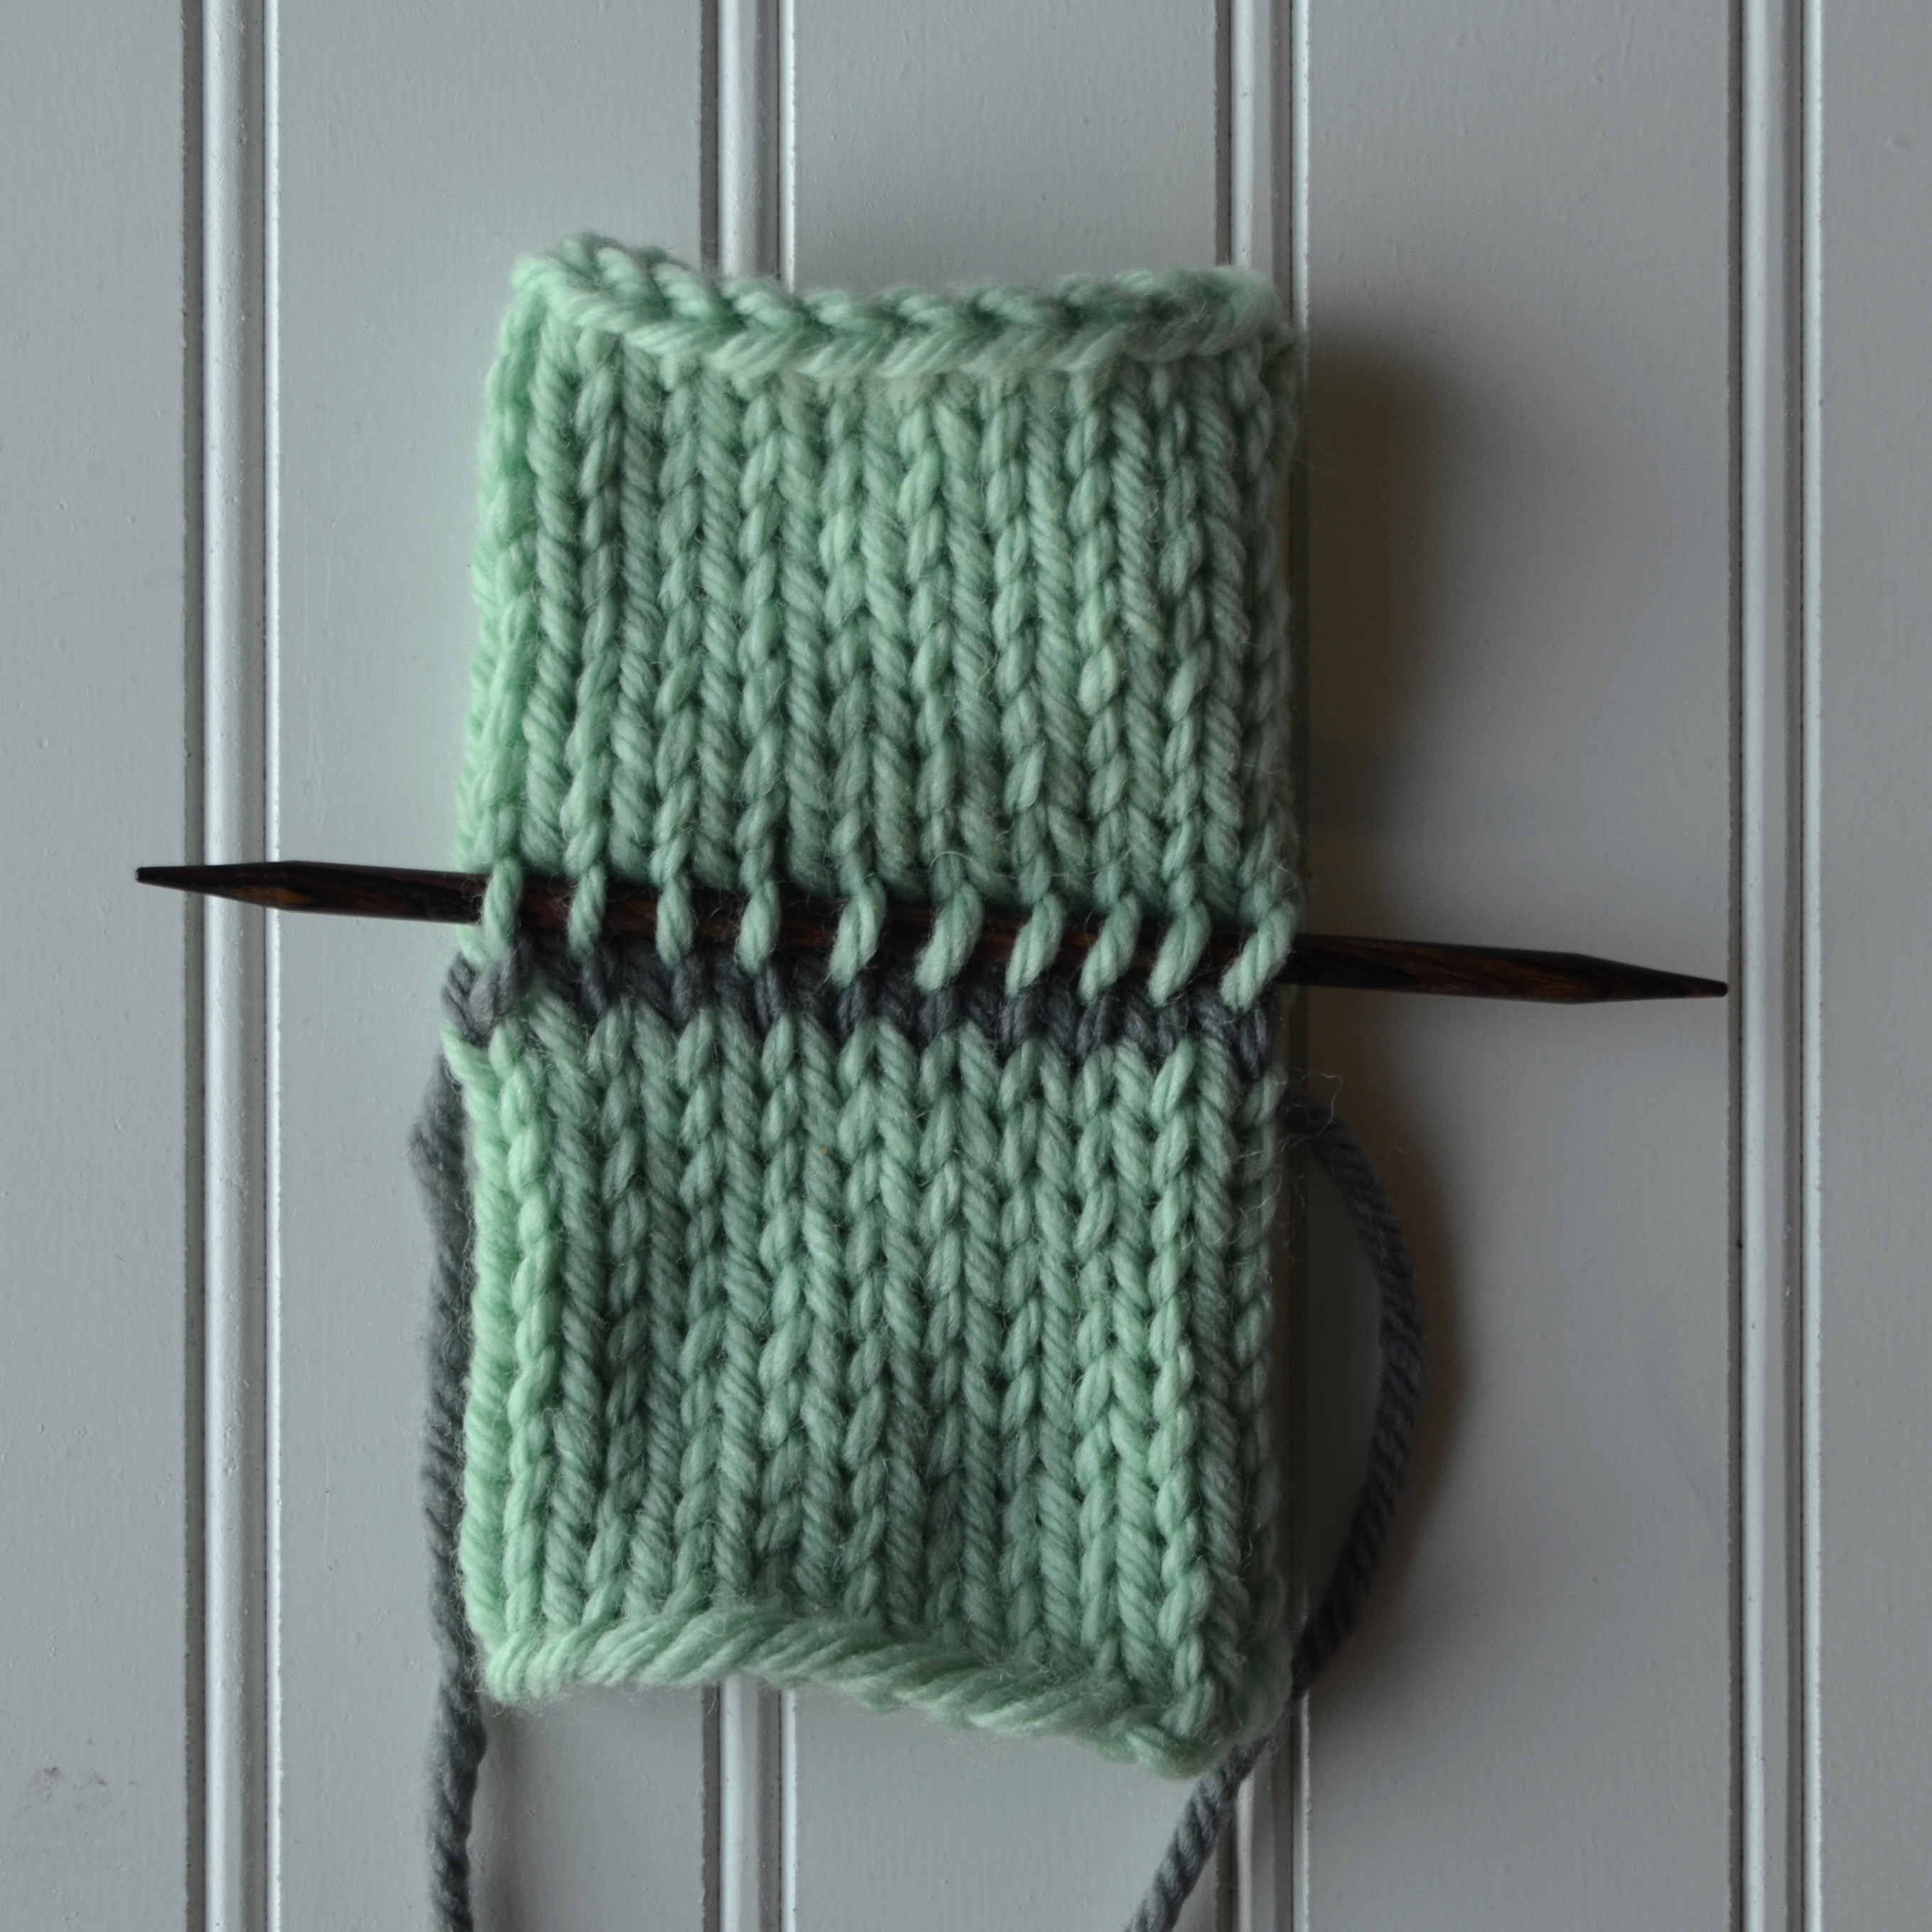
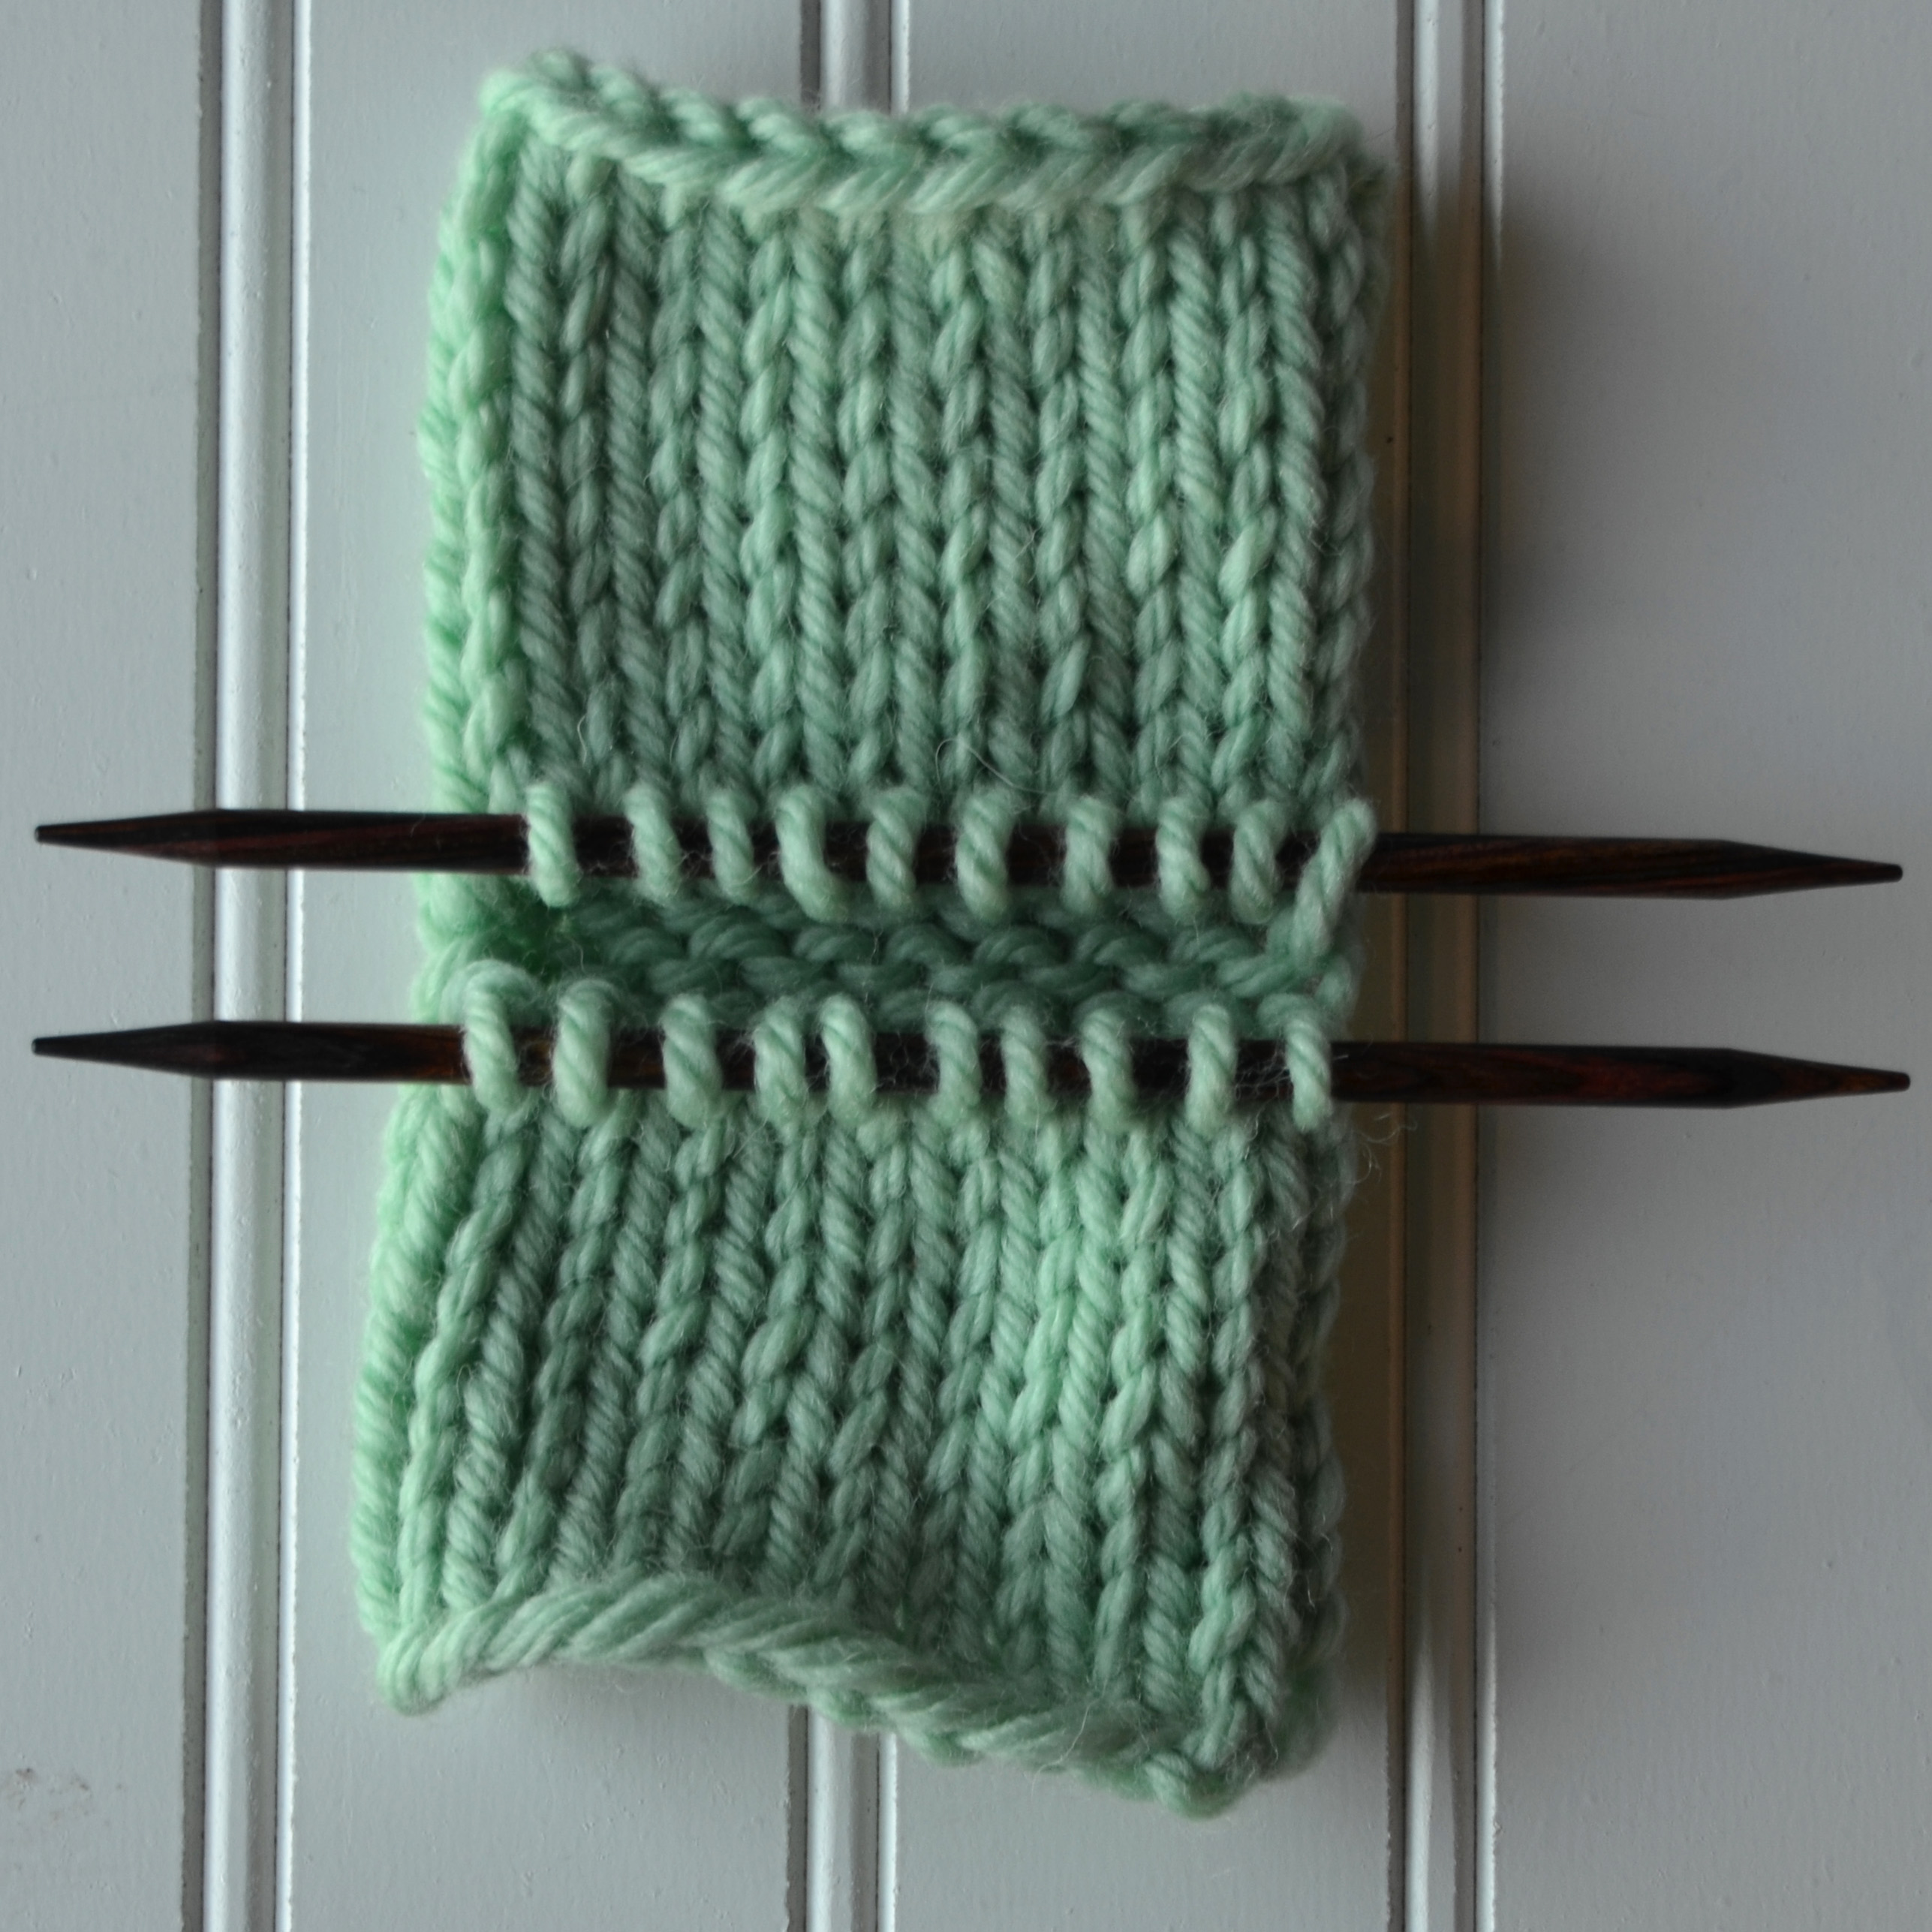
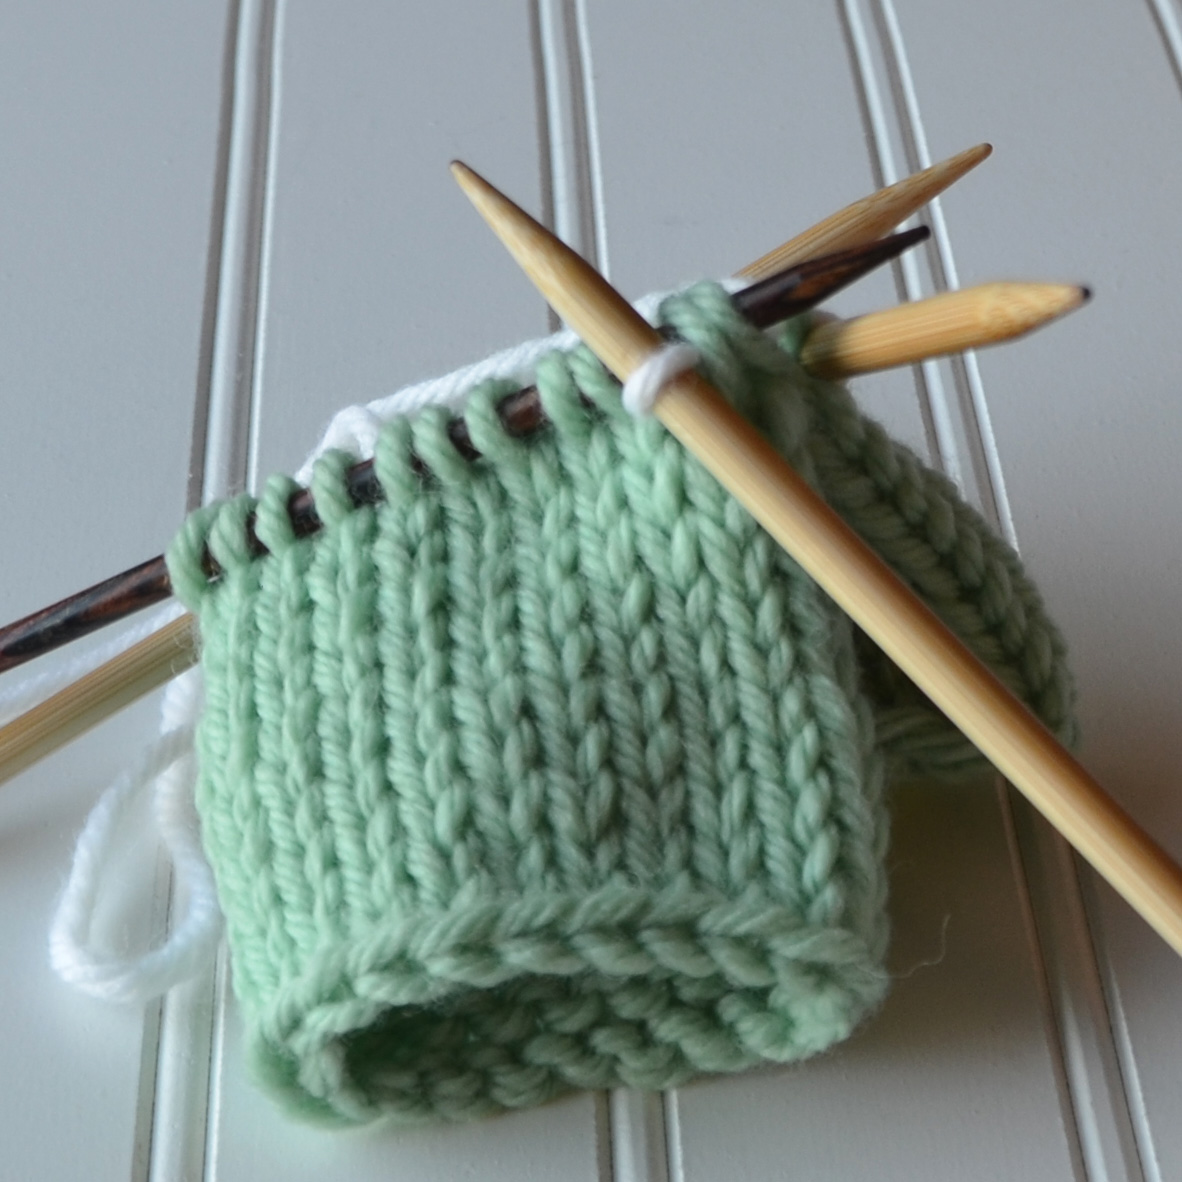
First, knit a stockinette swatch. I am knitting my swatch in the round just like the stockings, but this technique can just as easily be done worked flat in rows.
Next, get ready with your waste yarn. This waste yarn is temporarily going to hold the place of where your heel will eventually be.
Leaving your working (green) yarn where it is, knit across the heel stitches with the waste yarn. Your pattern will specify how many stitches this is. Typically, it is half of the total sock stitches.
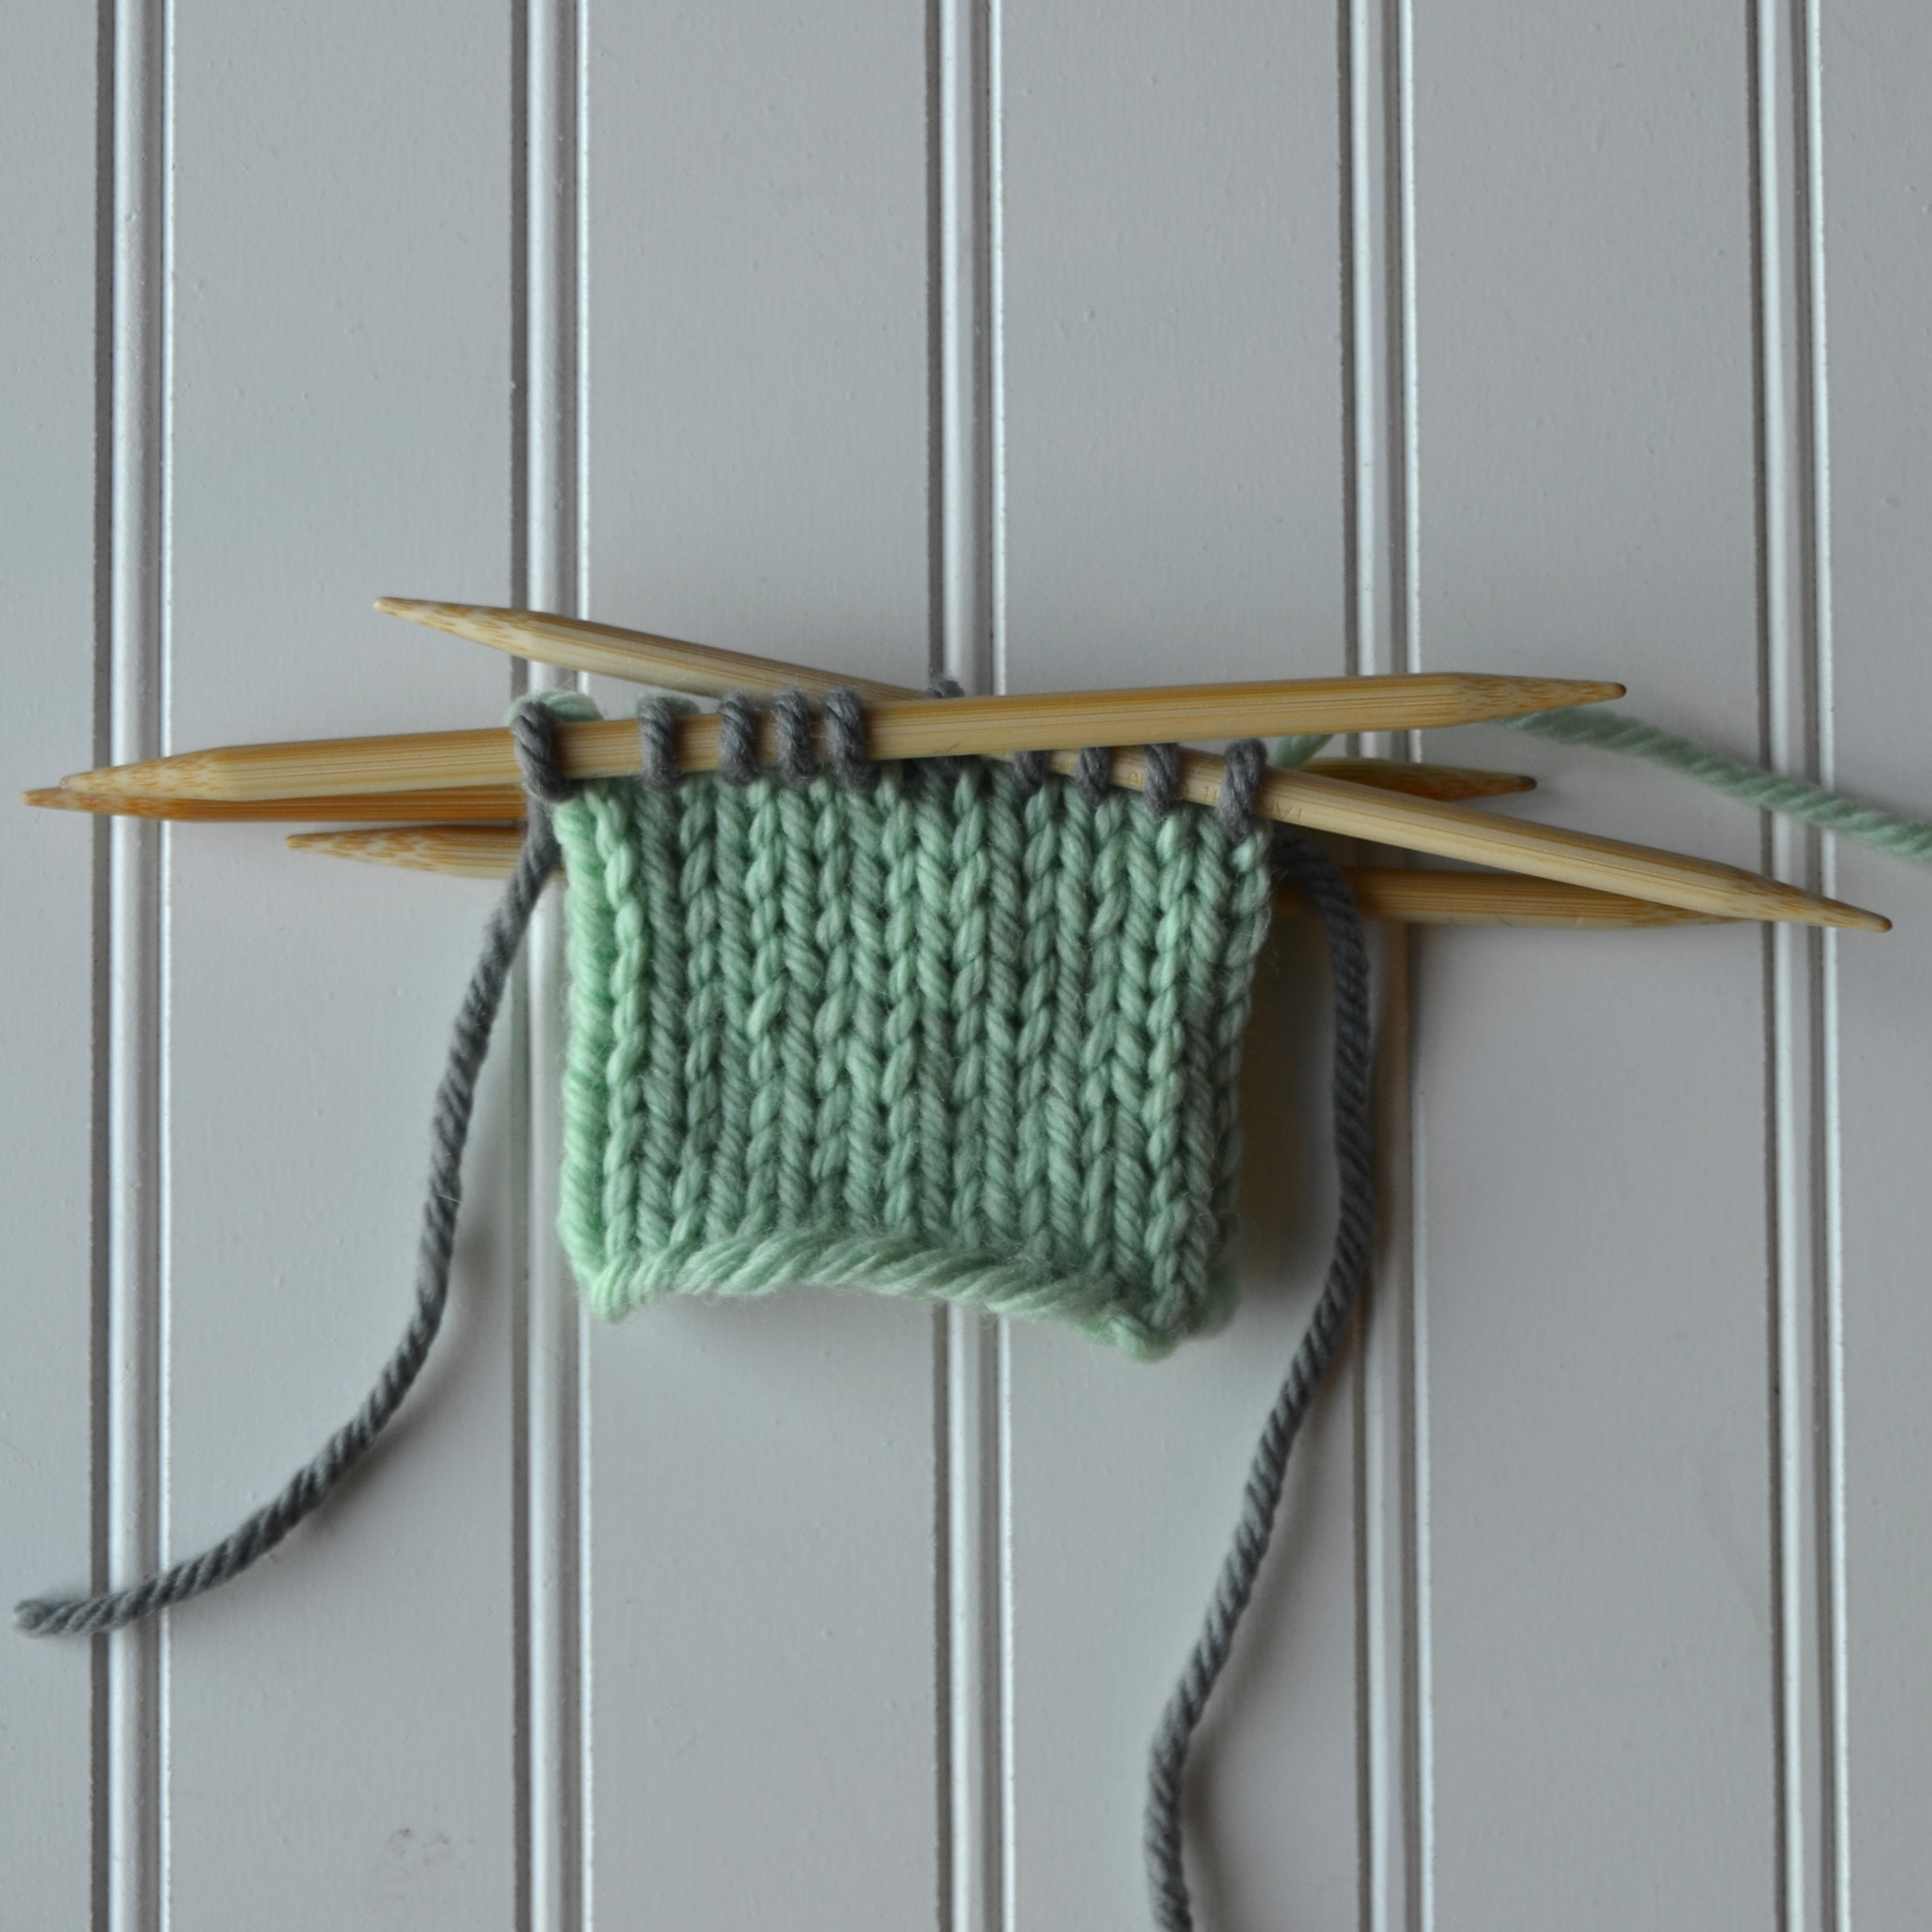
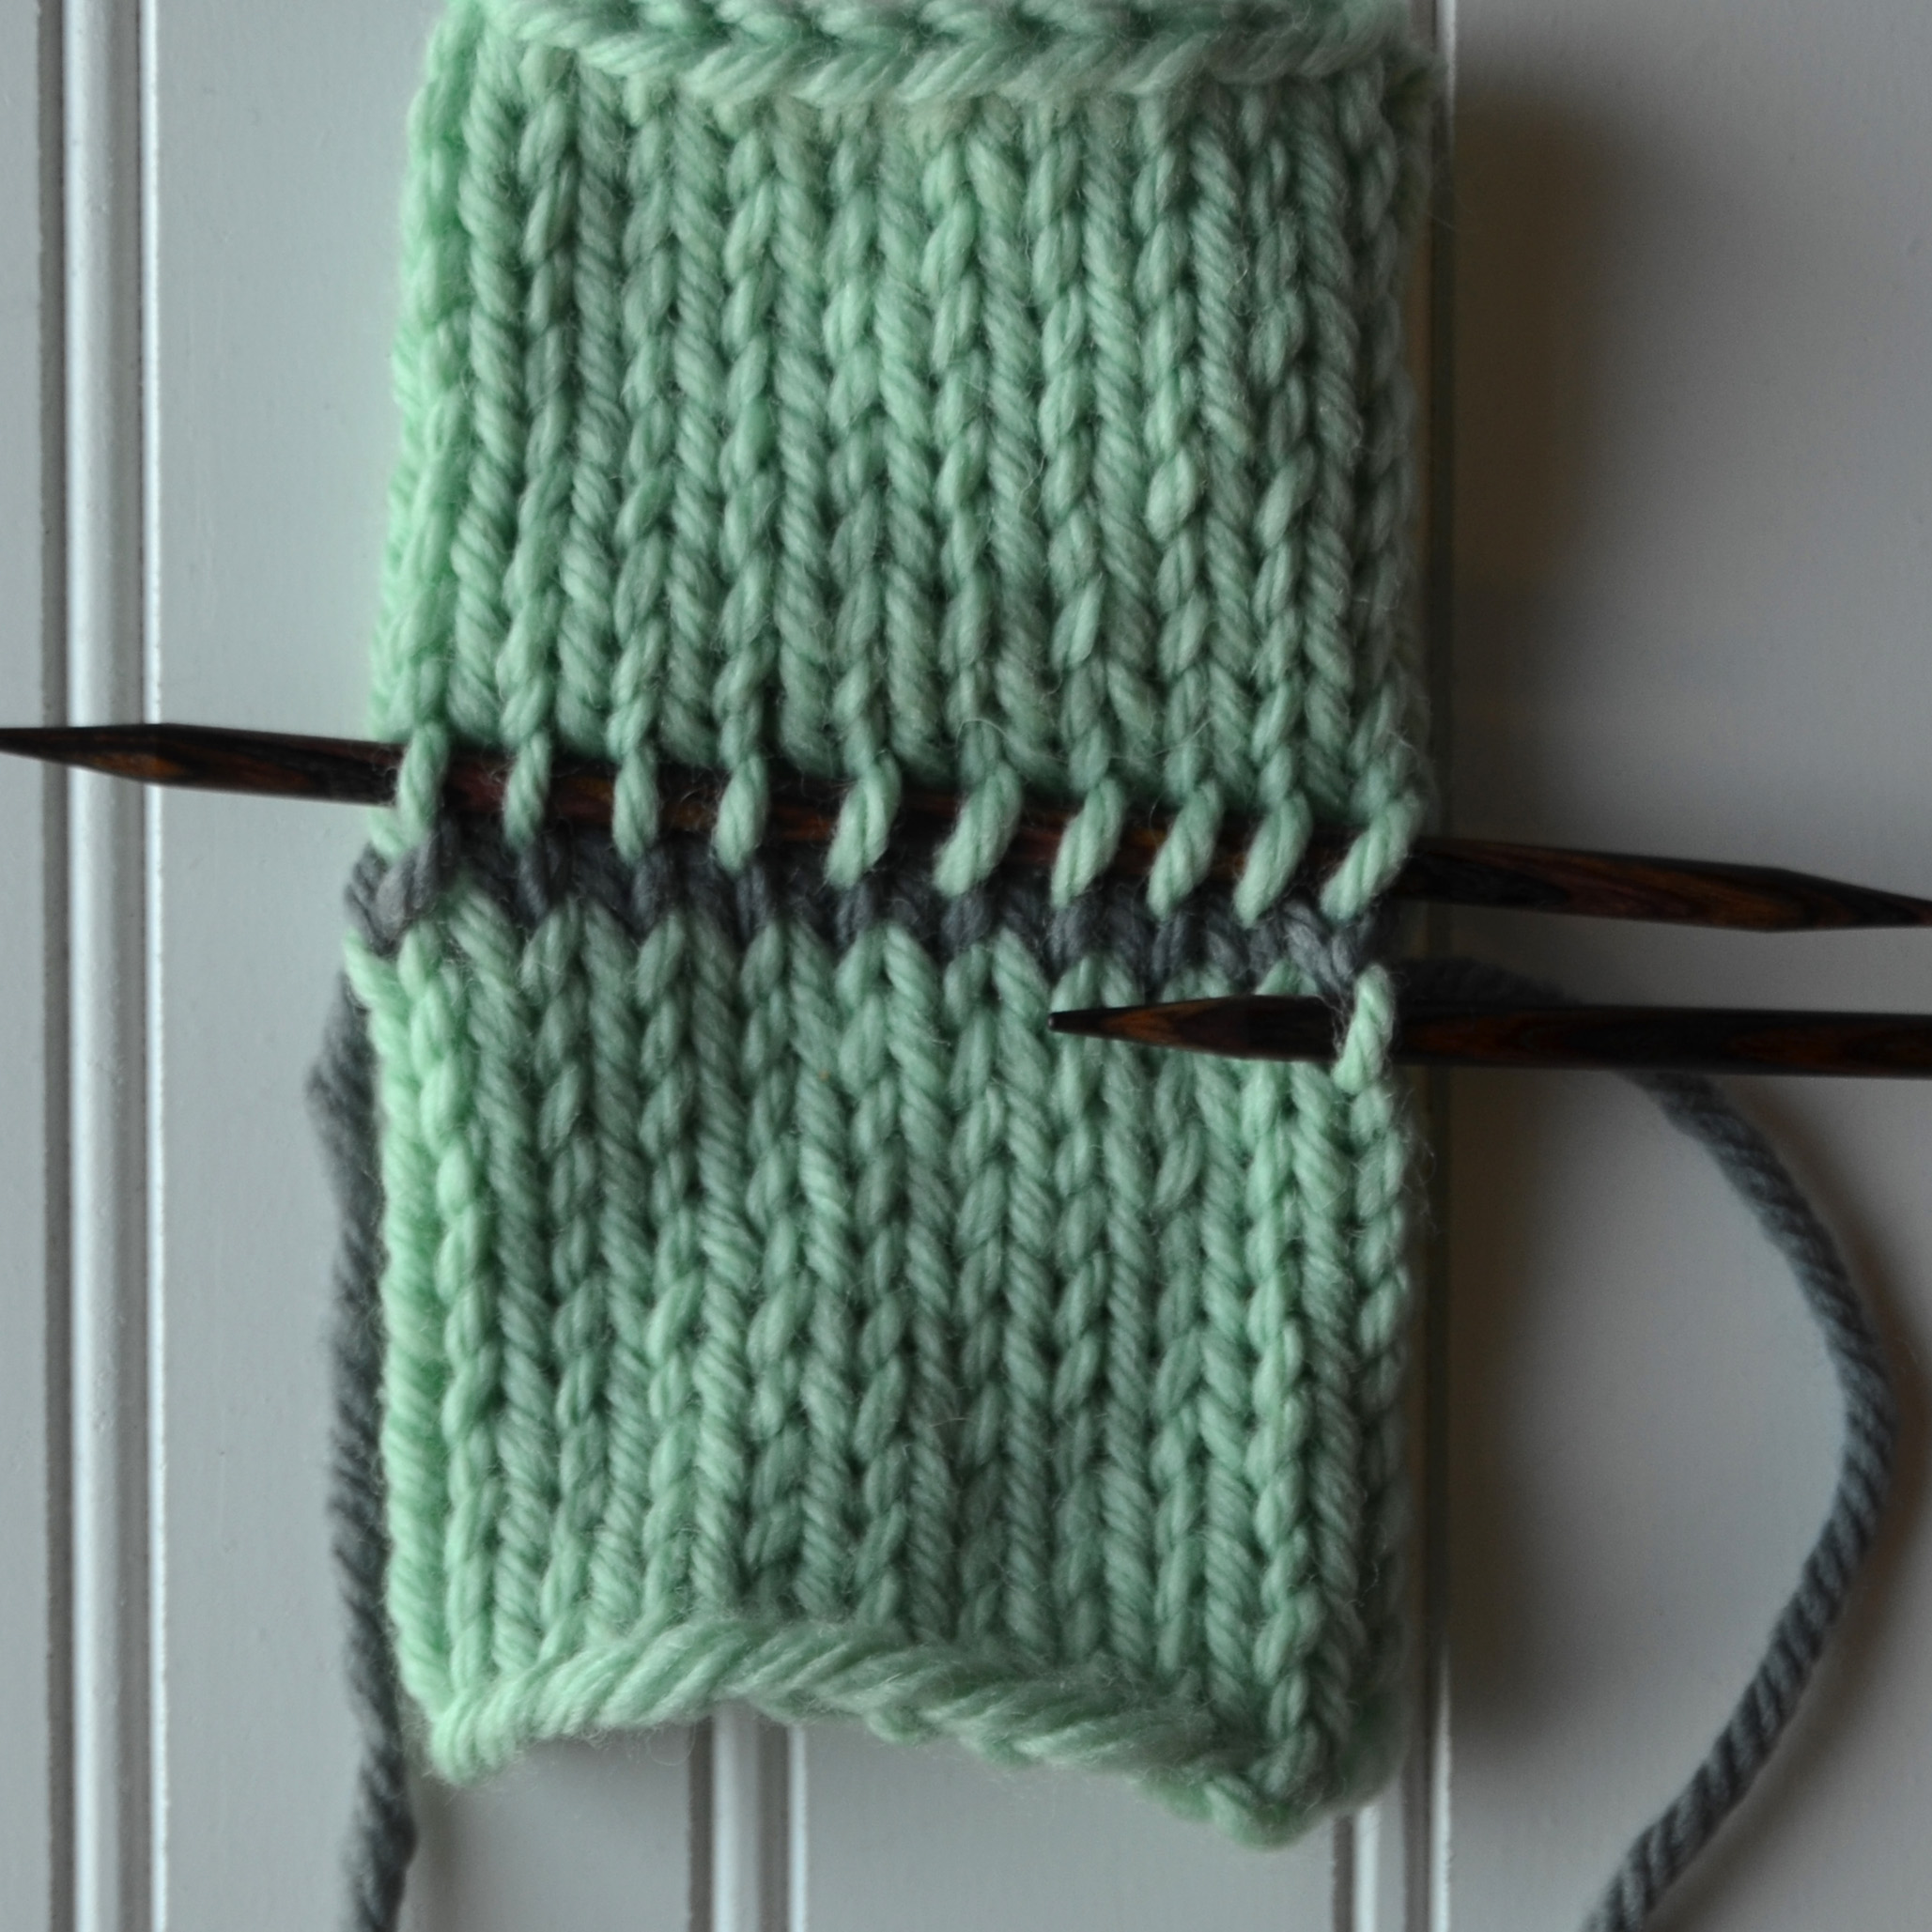
Continue to knit the rest of the sock/swatch. Knit across the waste yarn stitches and on around.
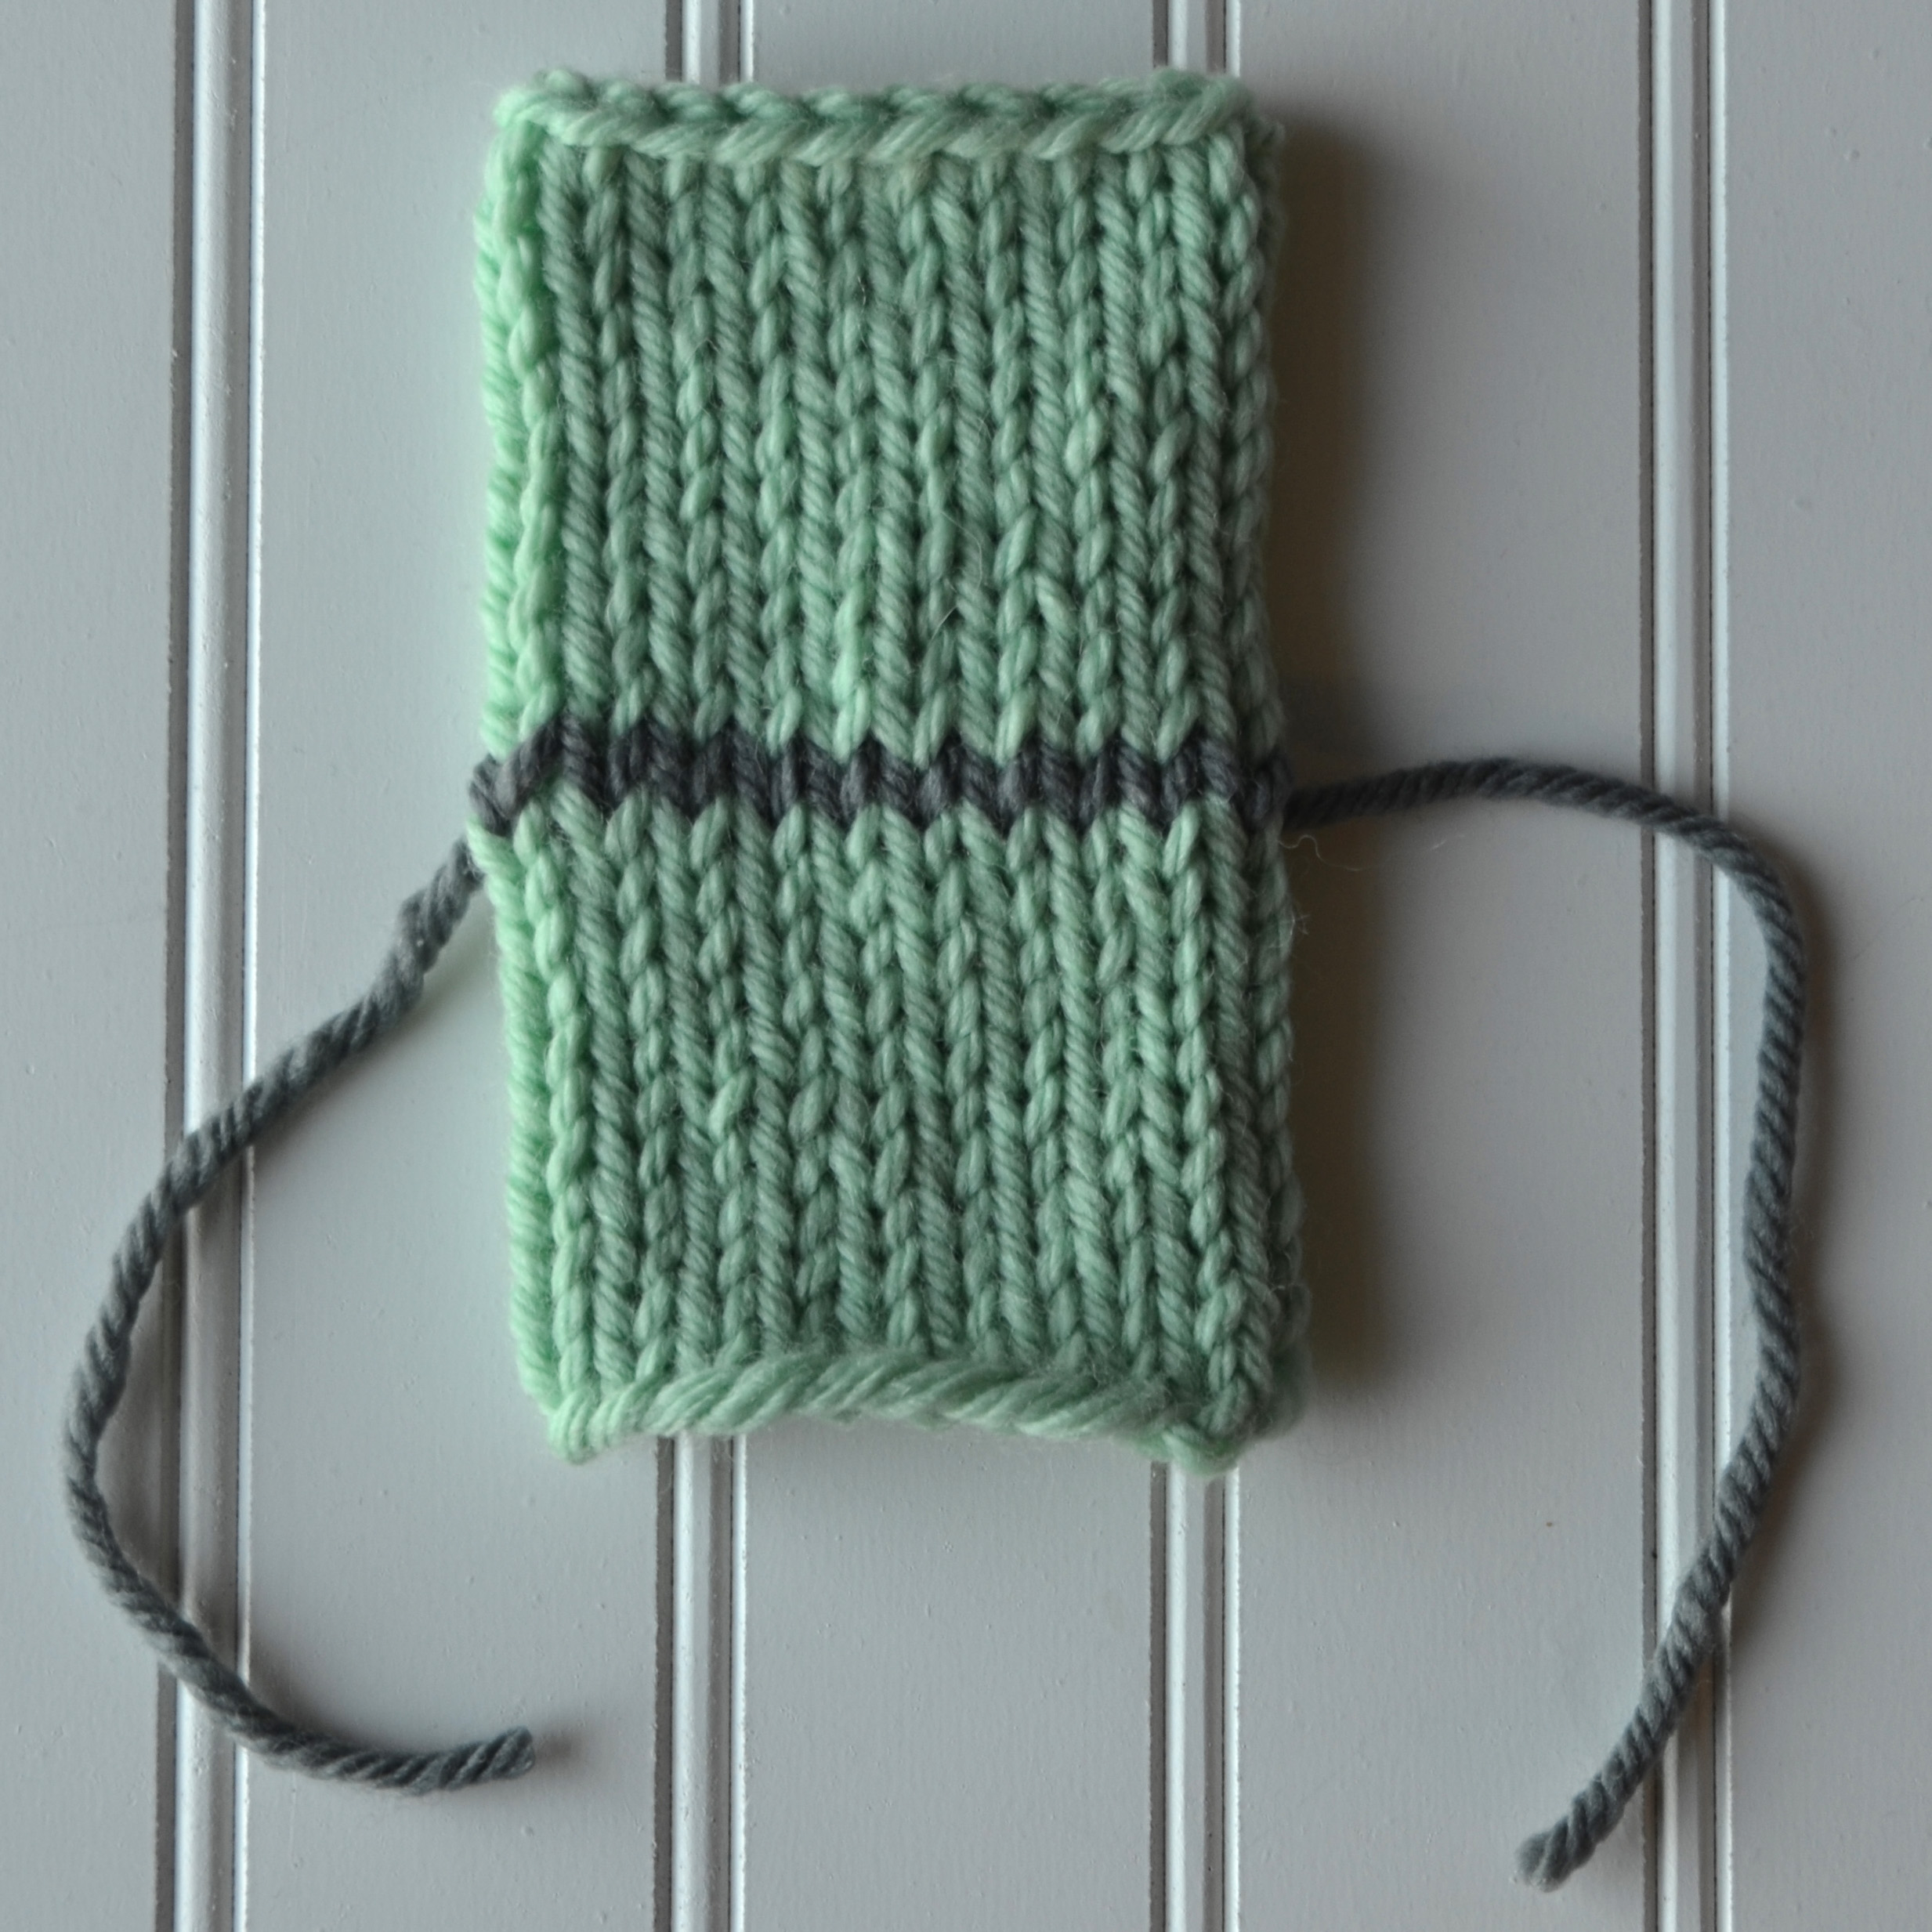
Bind off your swatch.
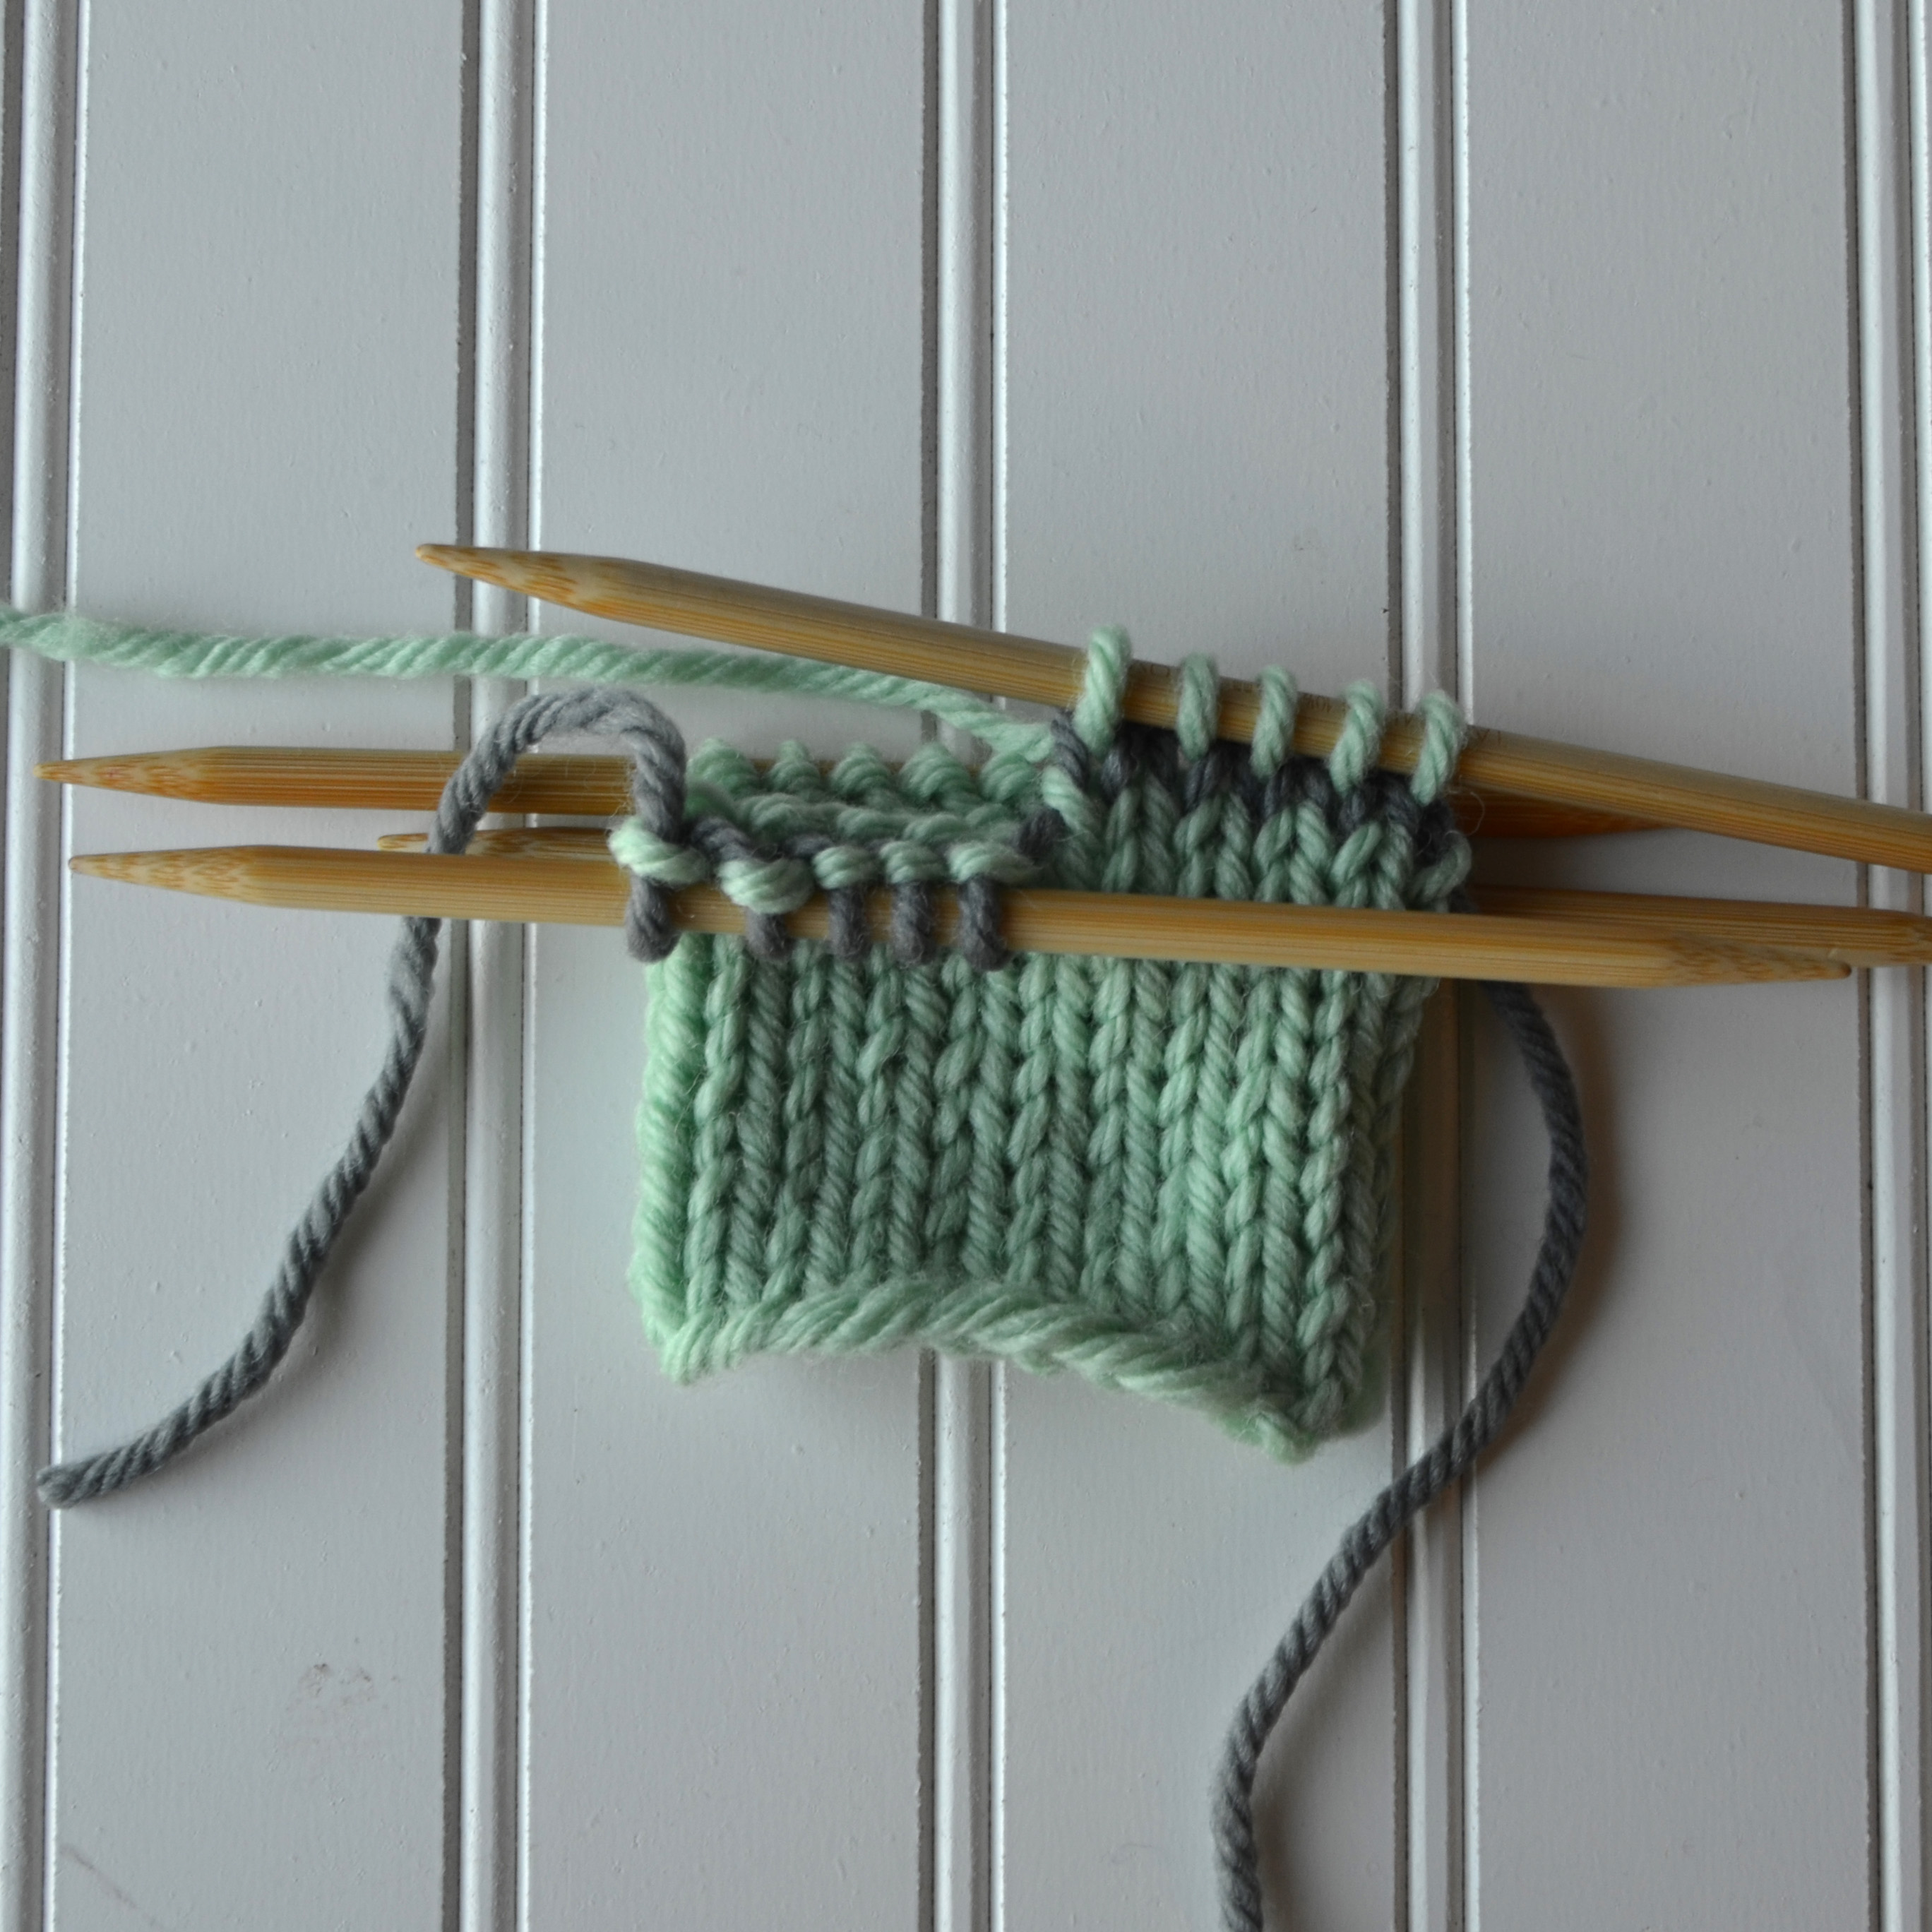
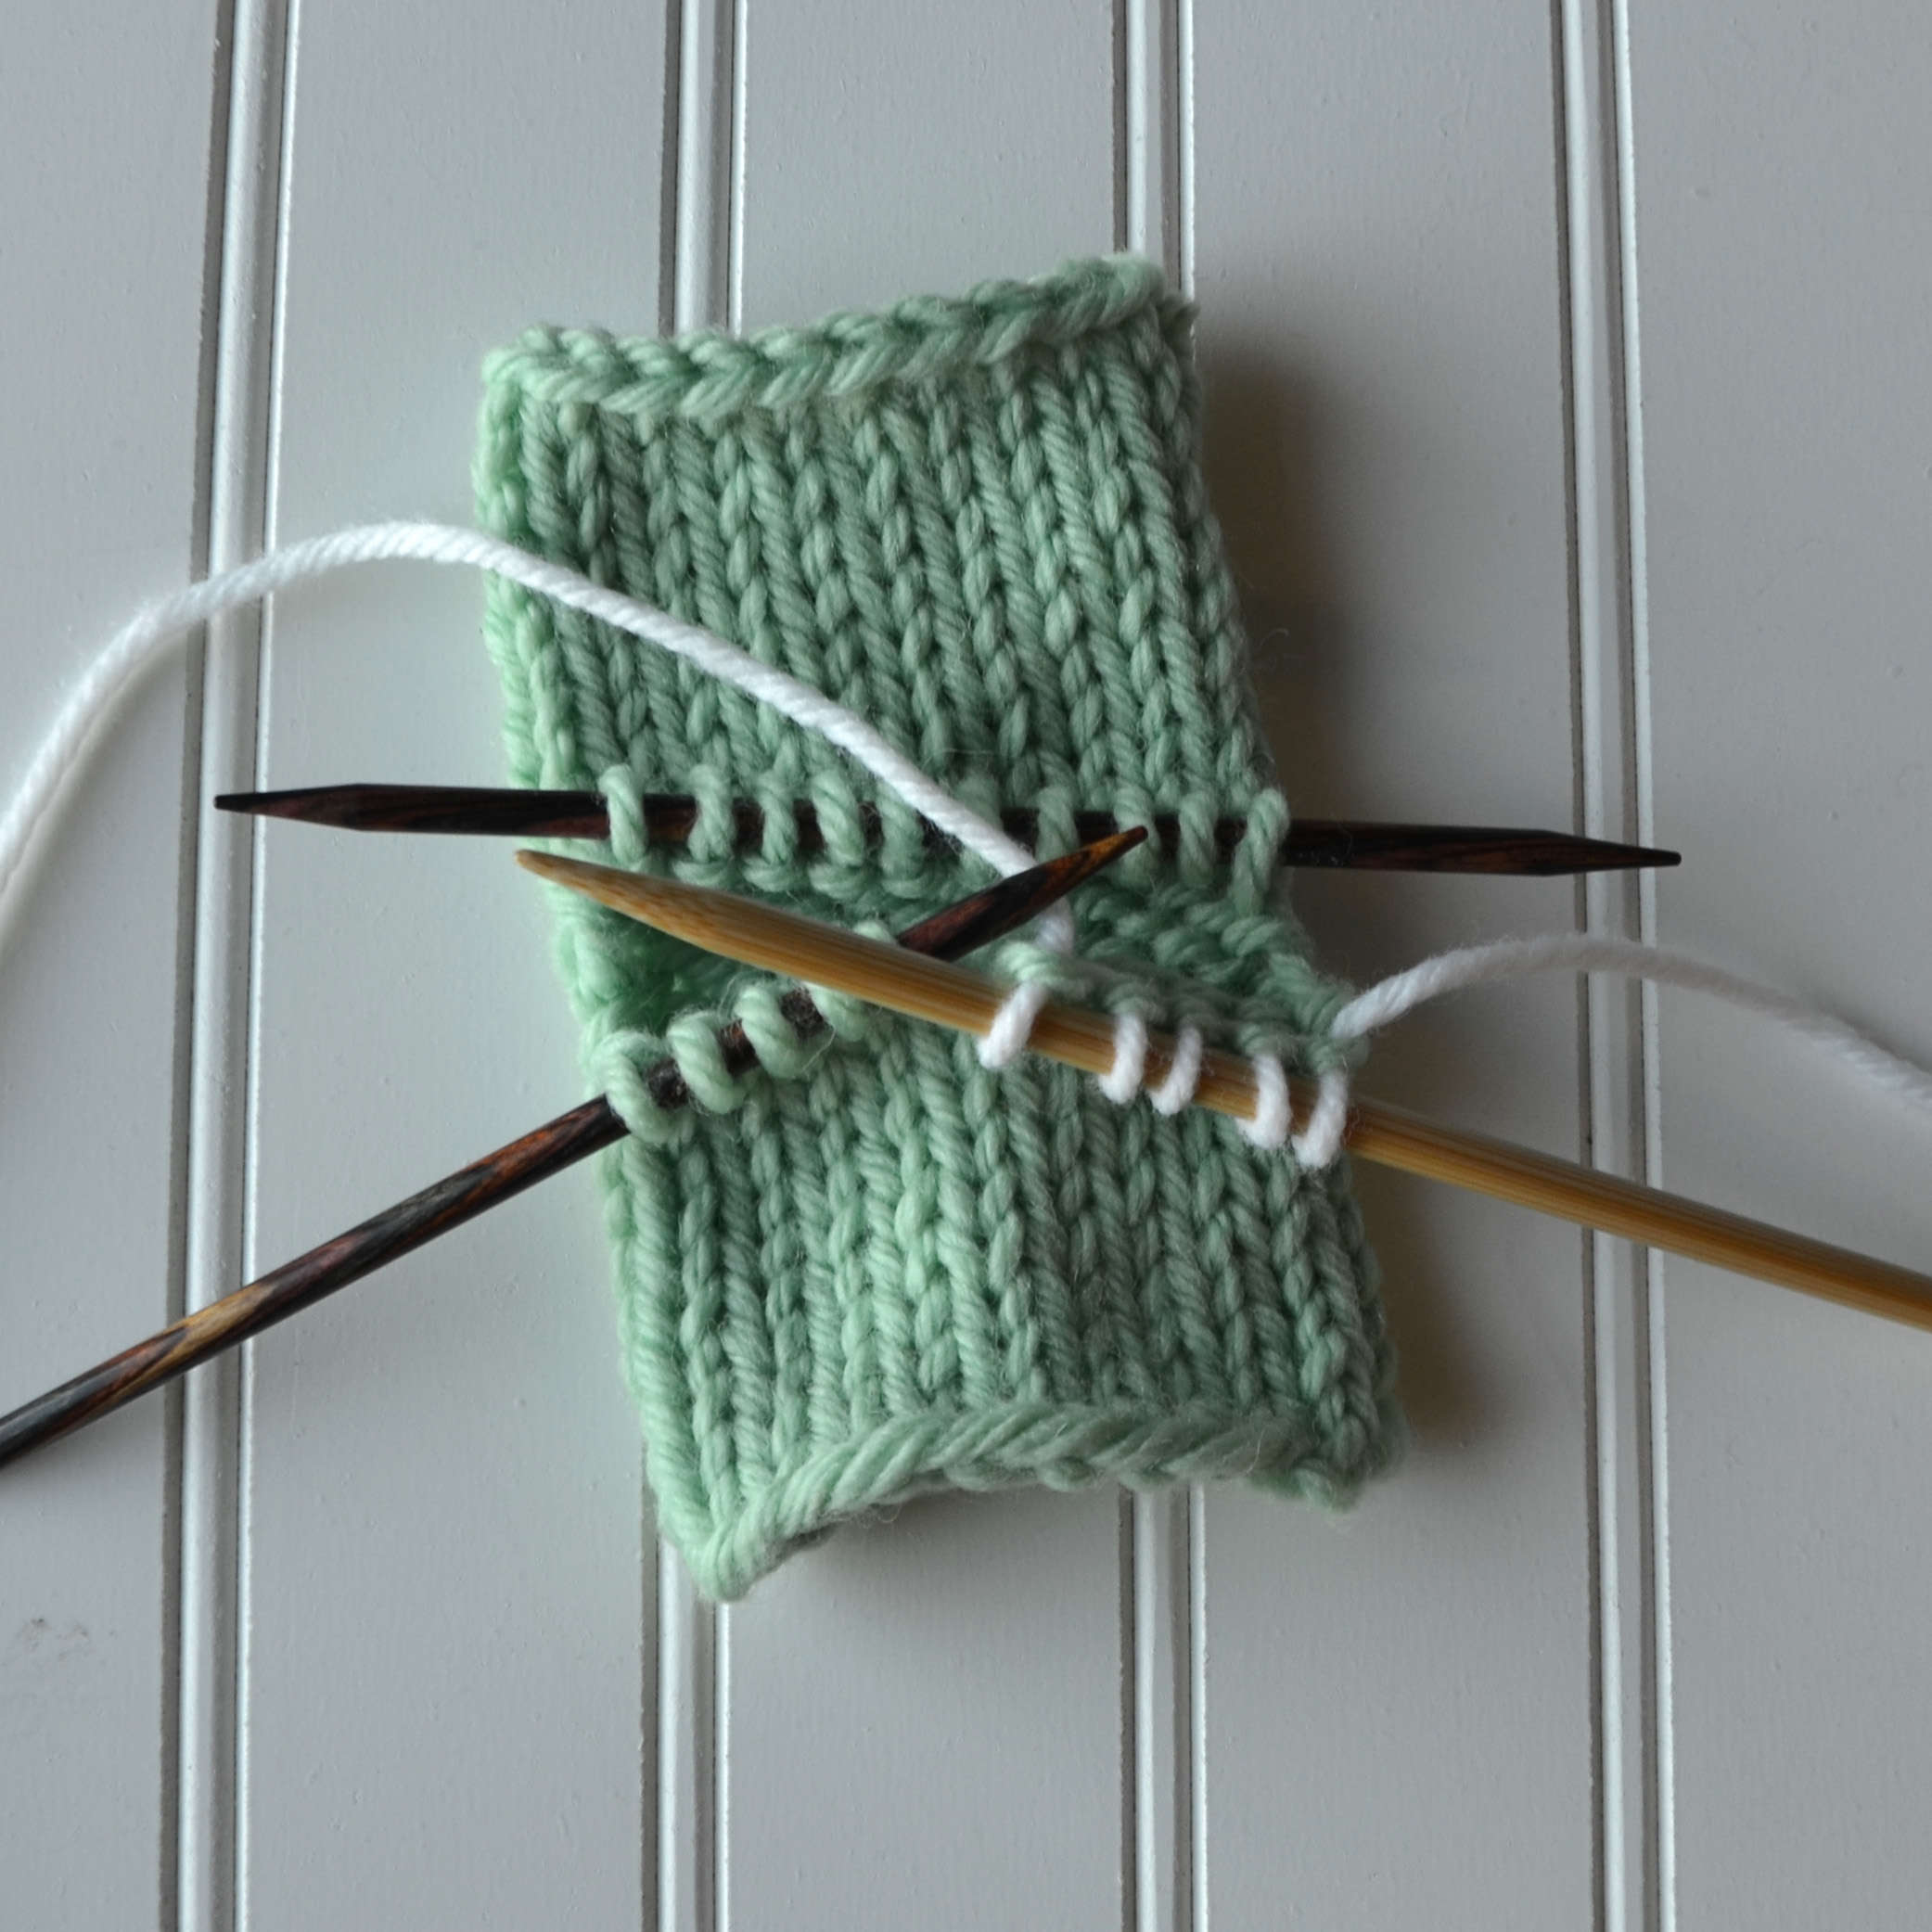
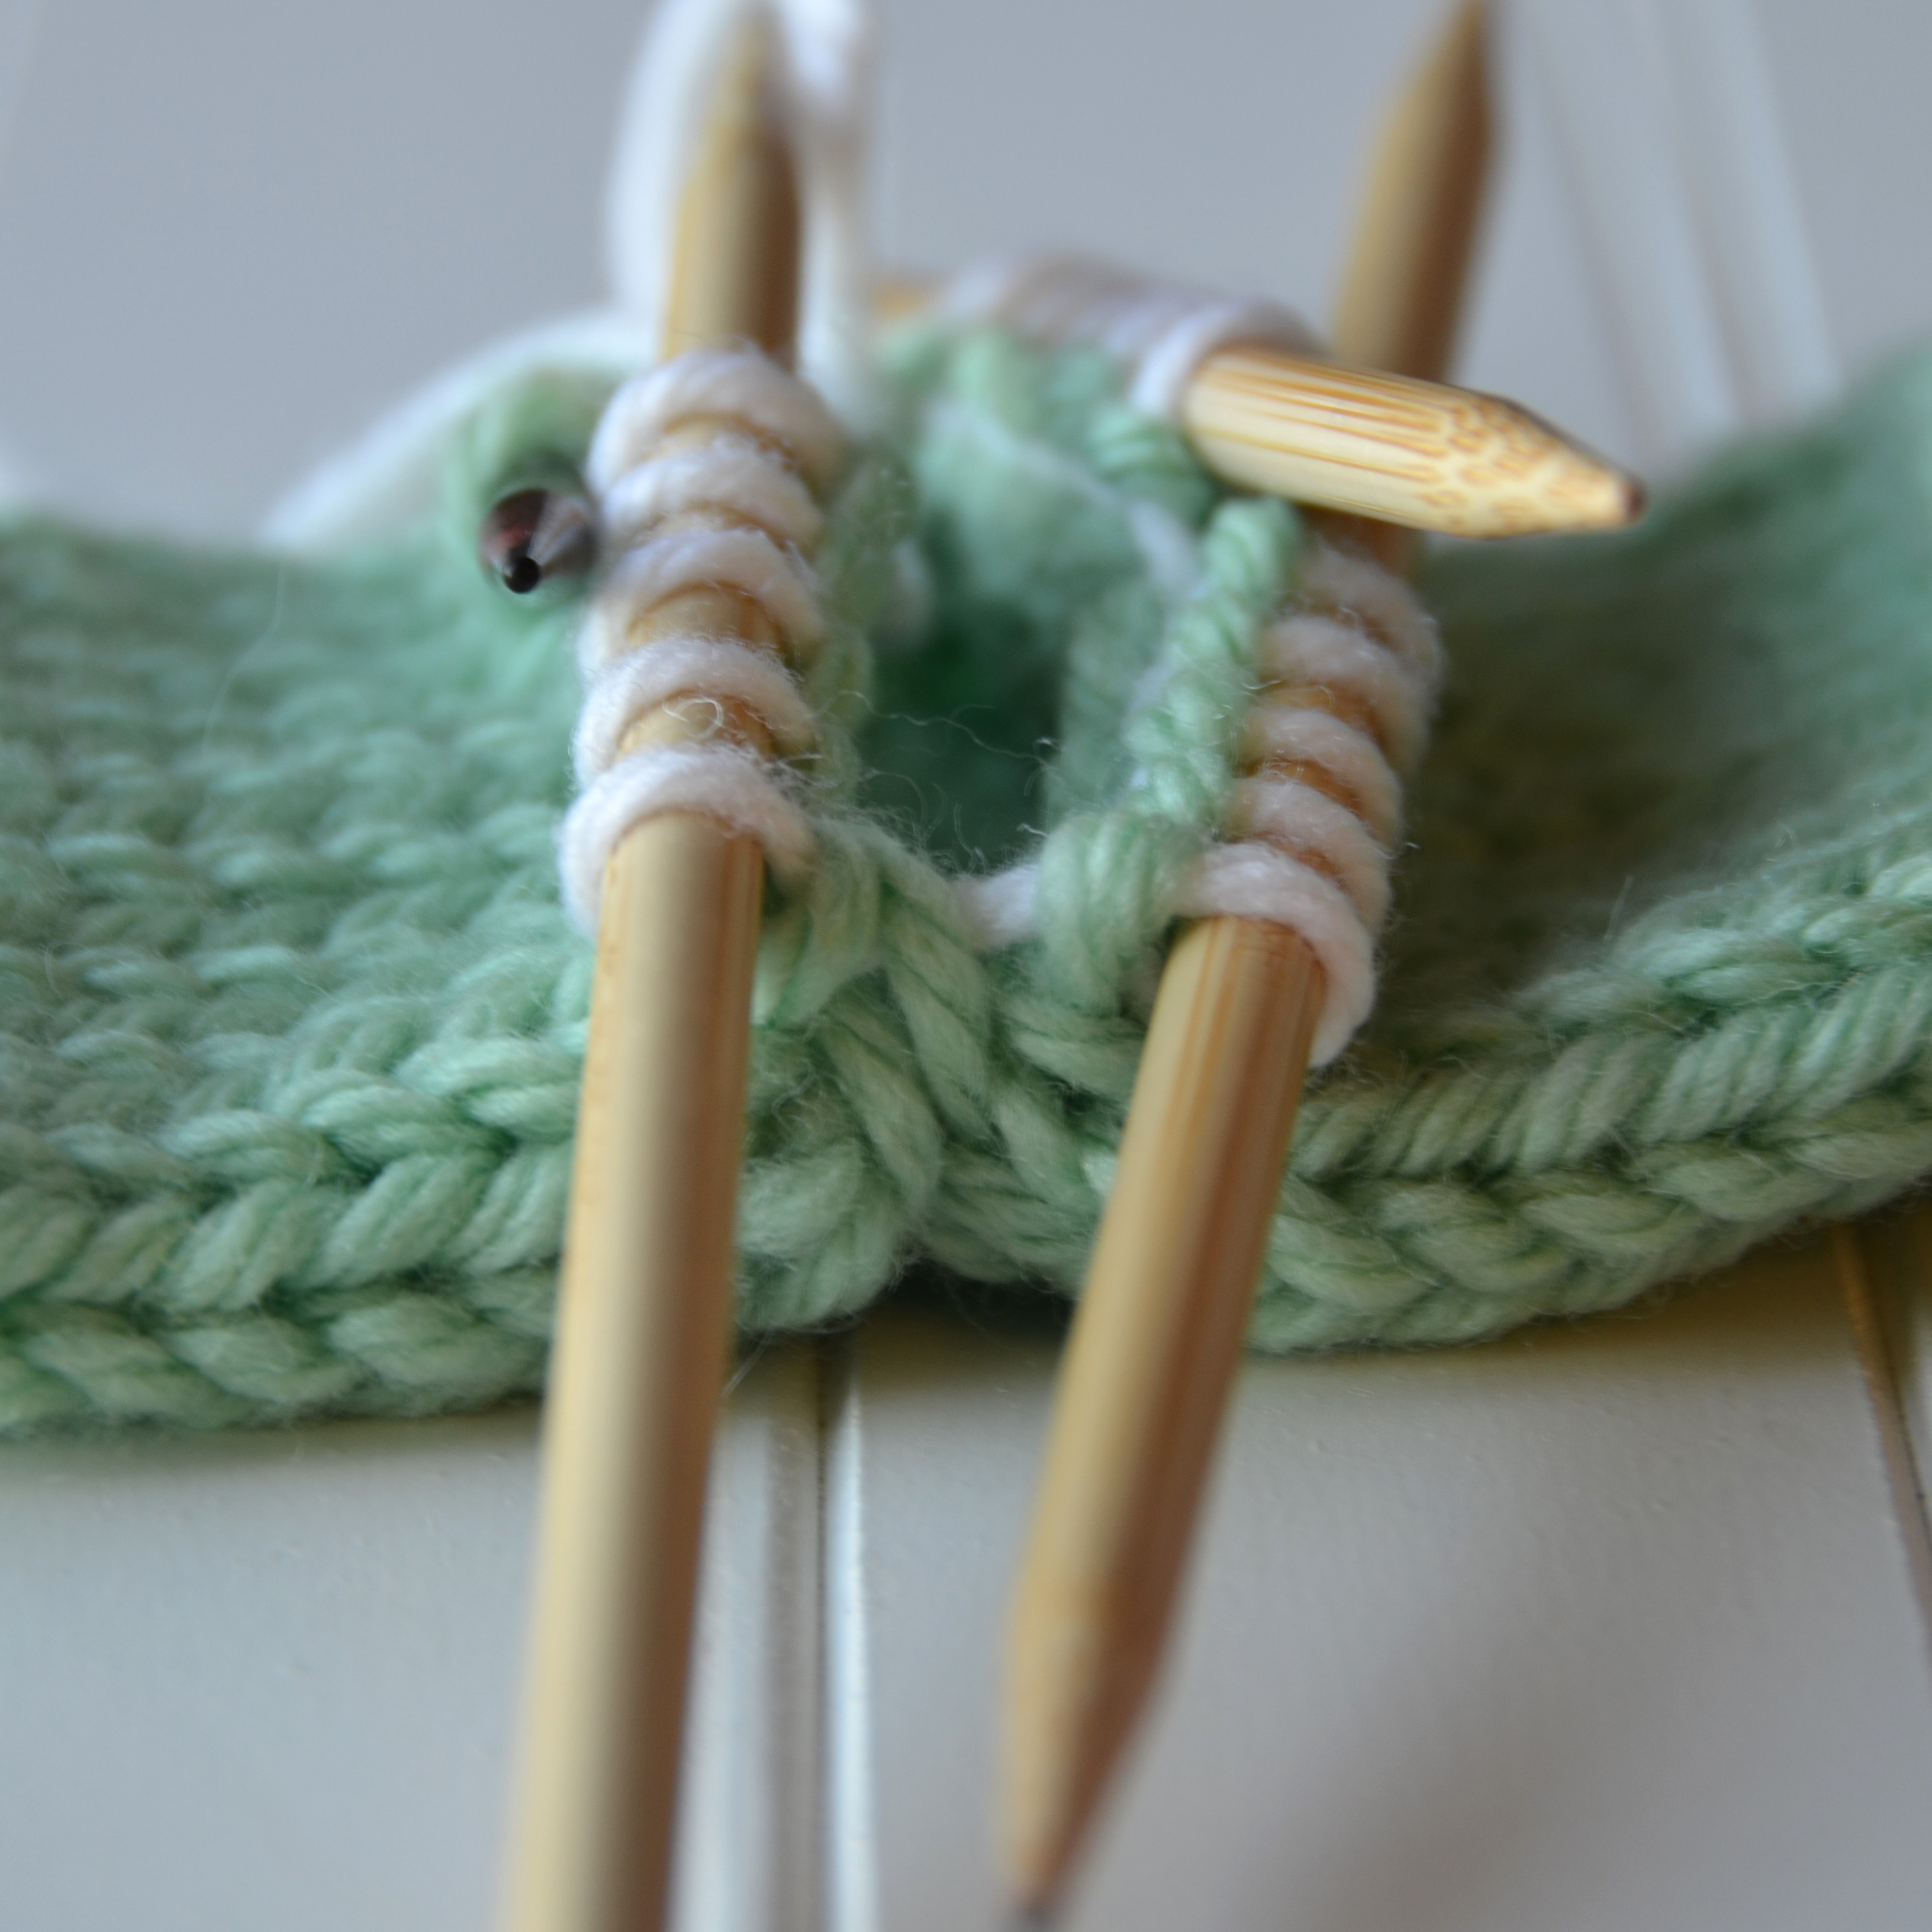
Next, we’re going to place the stitches from the row above and also the row below onto separate needles. I like to use a smaller needle for this step. Pick up stitches with the tip of your needle, going through the front leg of each stitch. By doing this, the stitches will be oriented correctly when you go to knit the first round.
My 10 stitches from the row above the waste yarn are now on a needle.
Insert a second needle through the front leg of each stitch below the waste yarn.
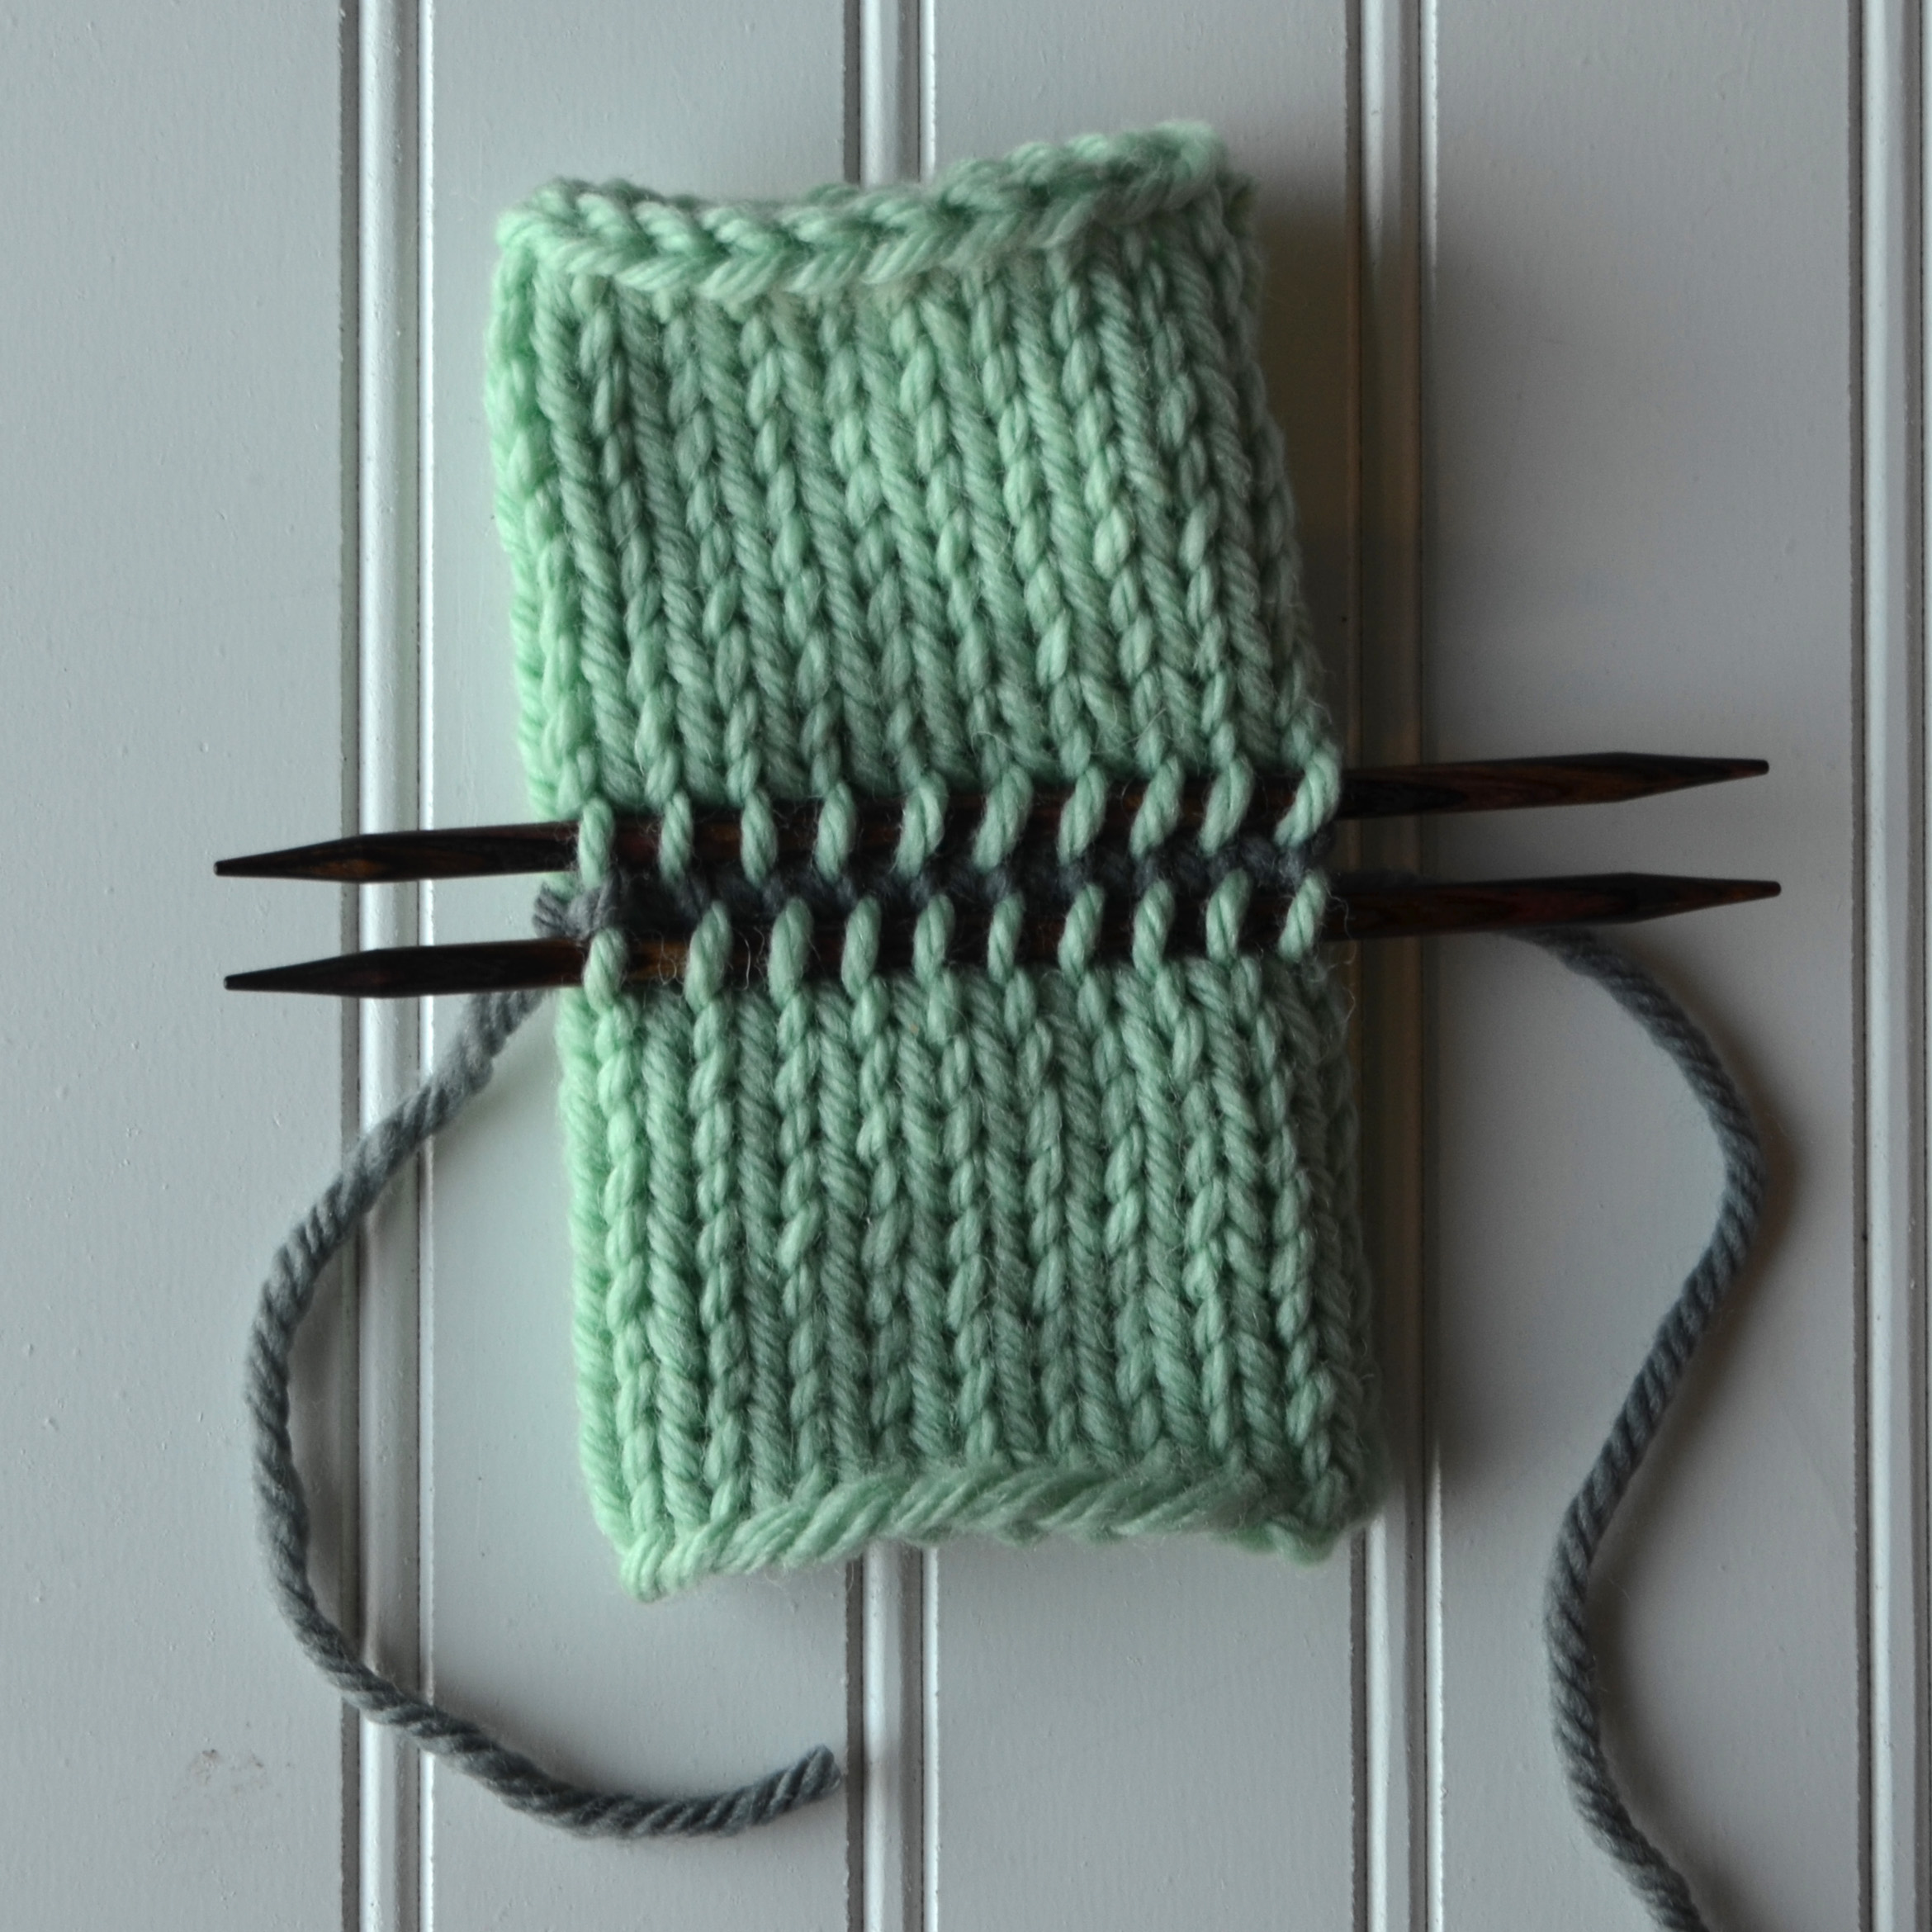
Now we’re ready to remove the waste yarn.
With a spare needle, carefully pick out the waste yarn.
Waste yarn be gone!
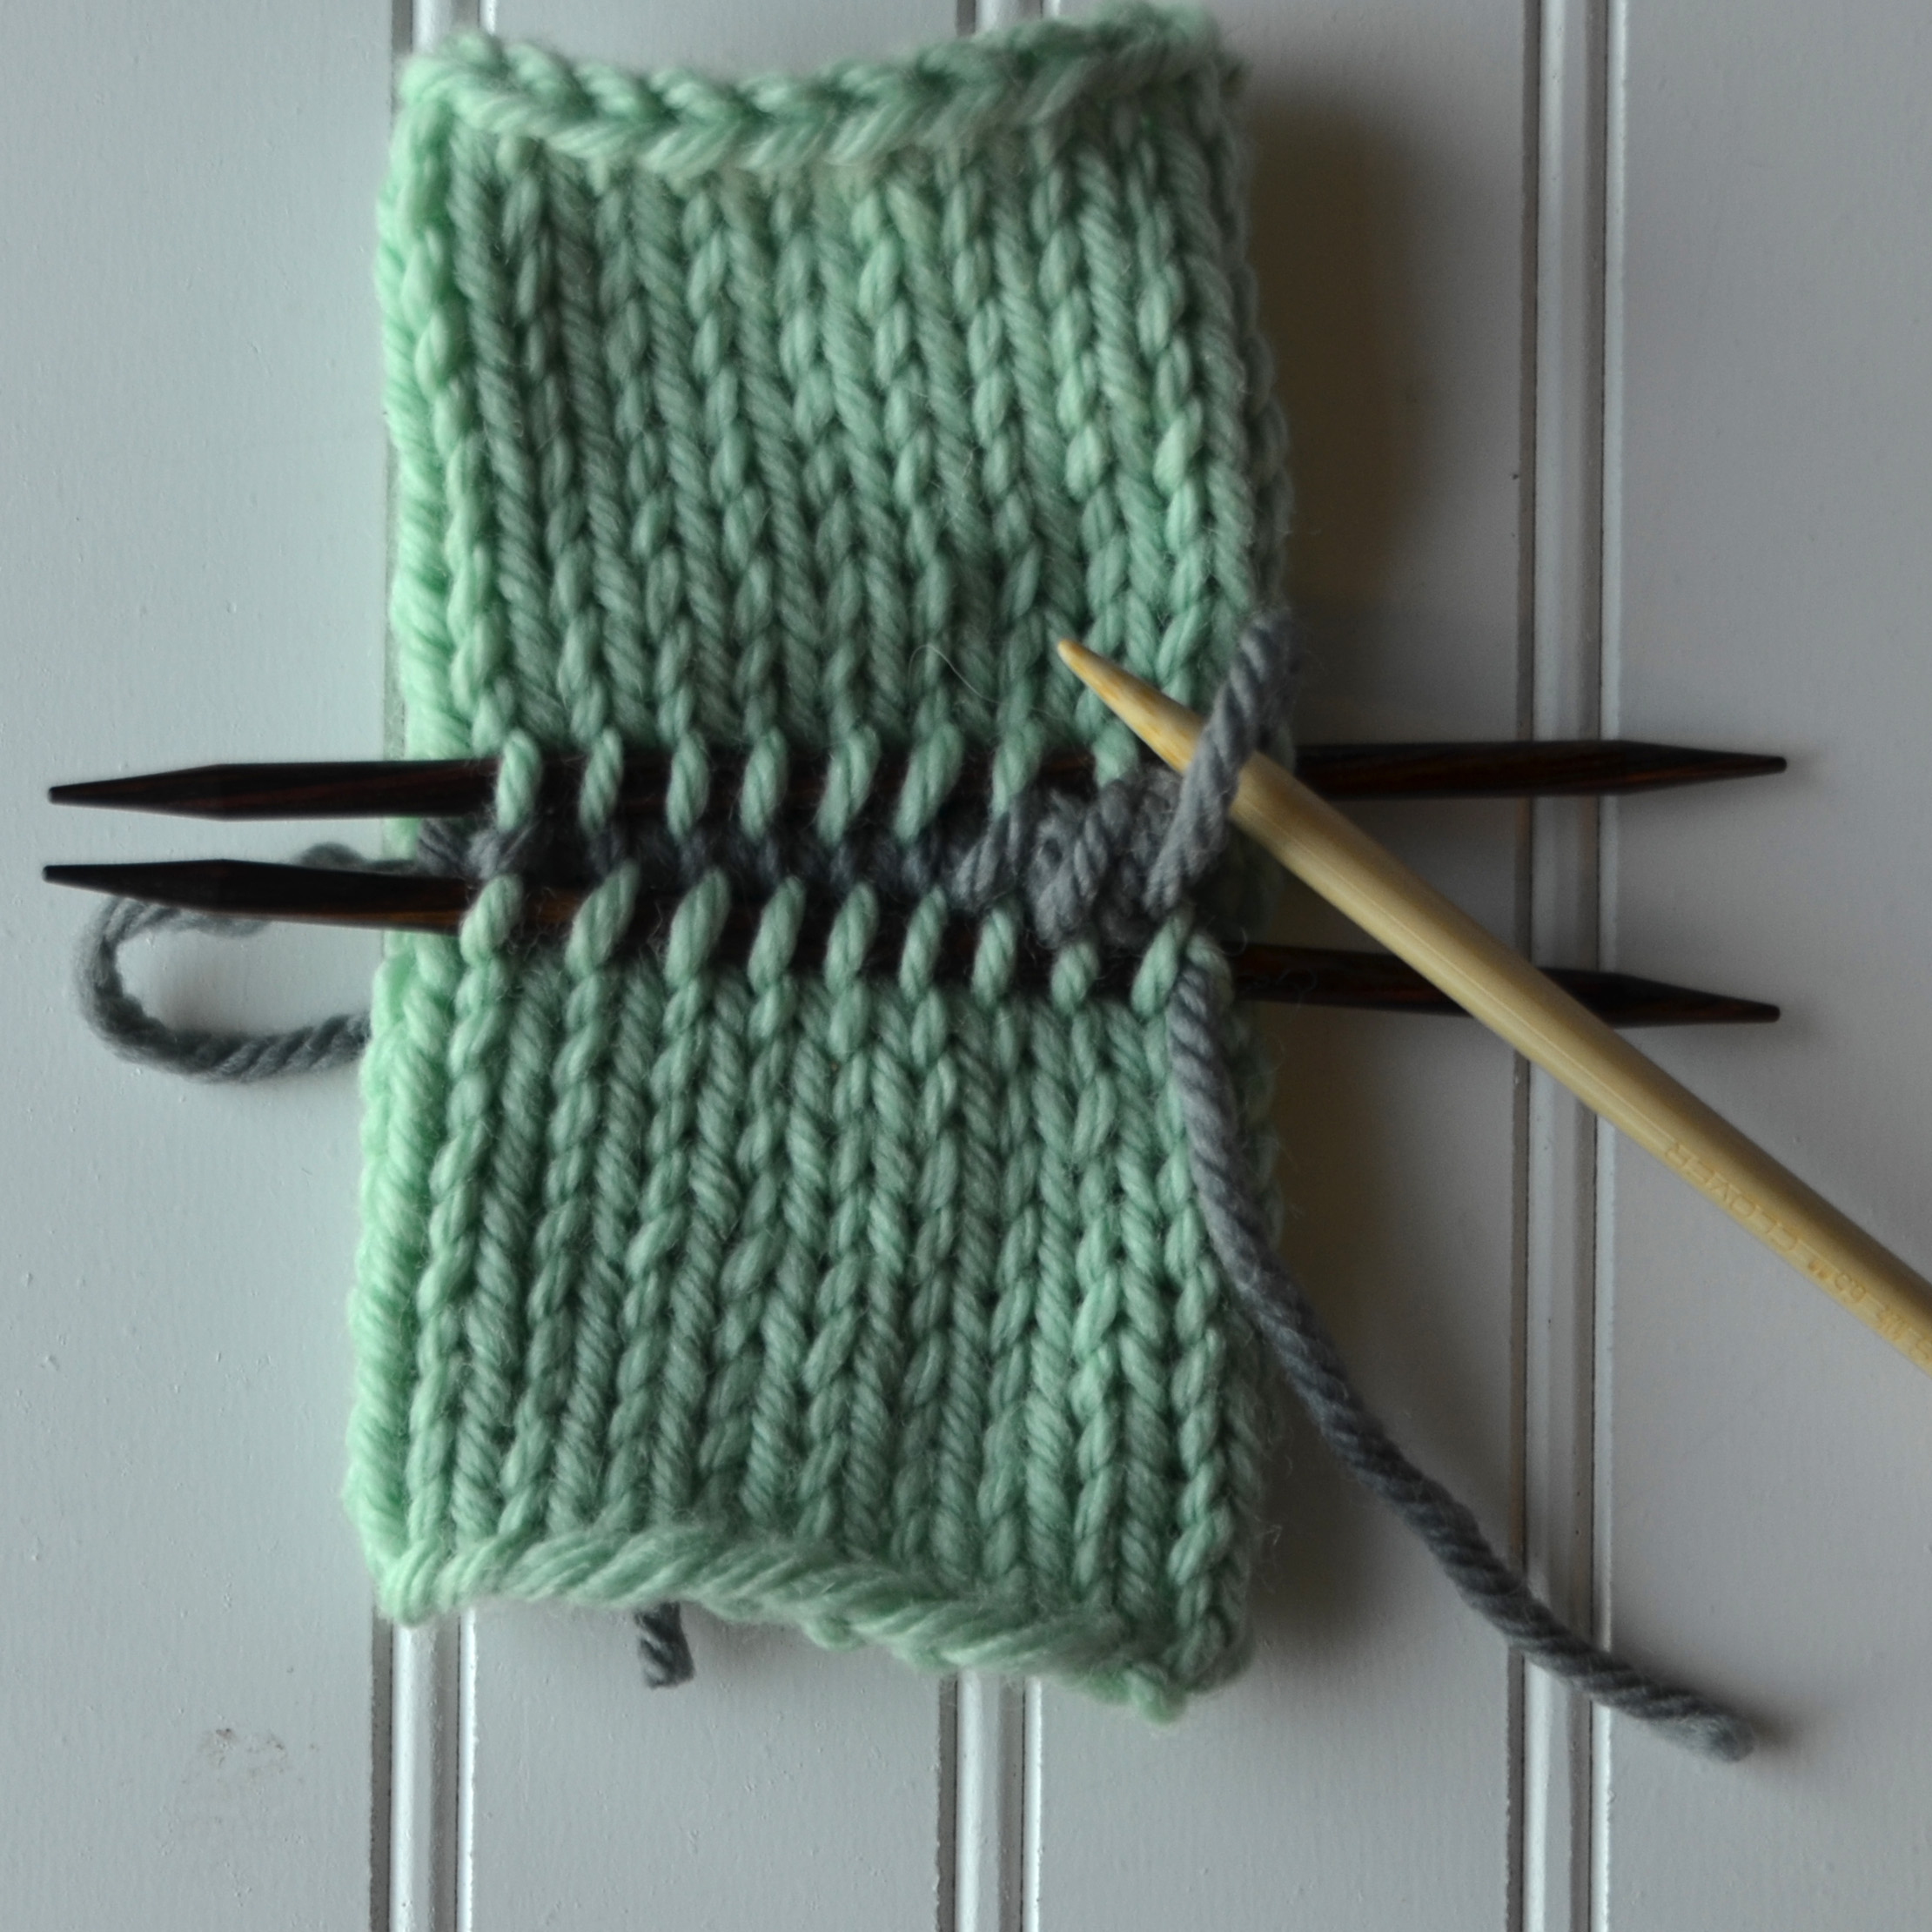
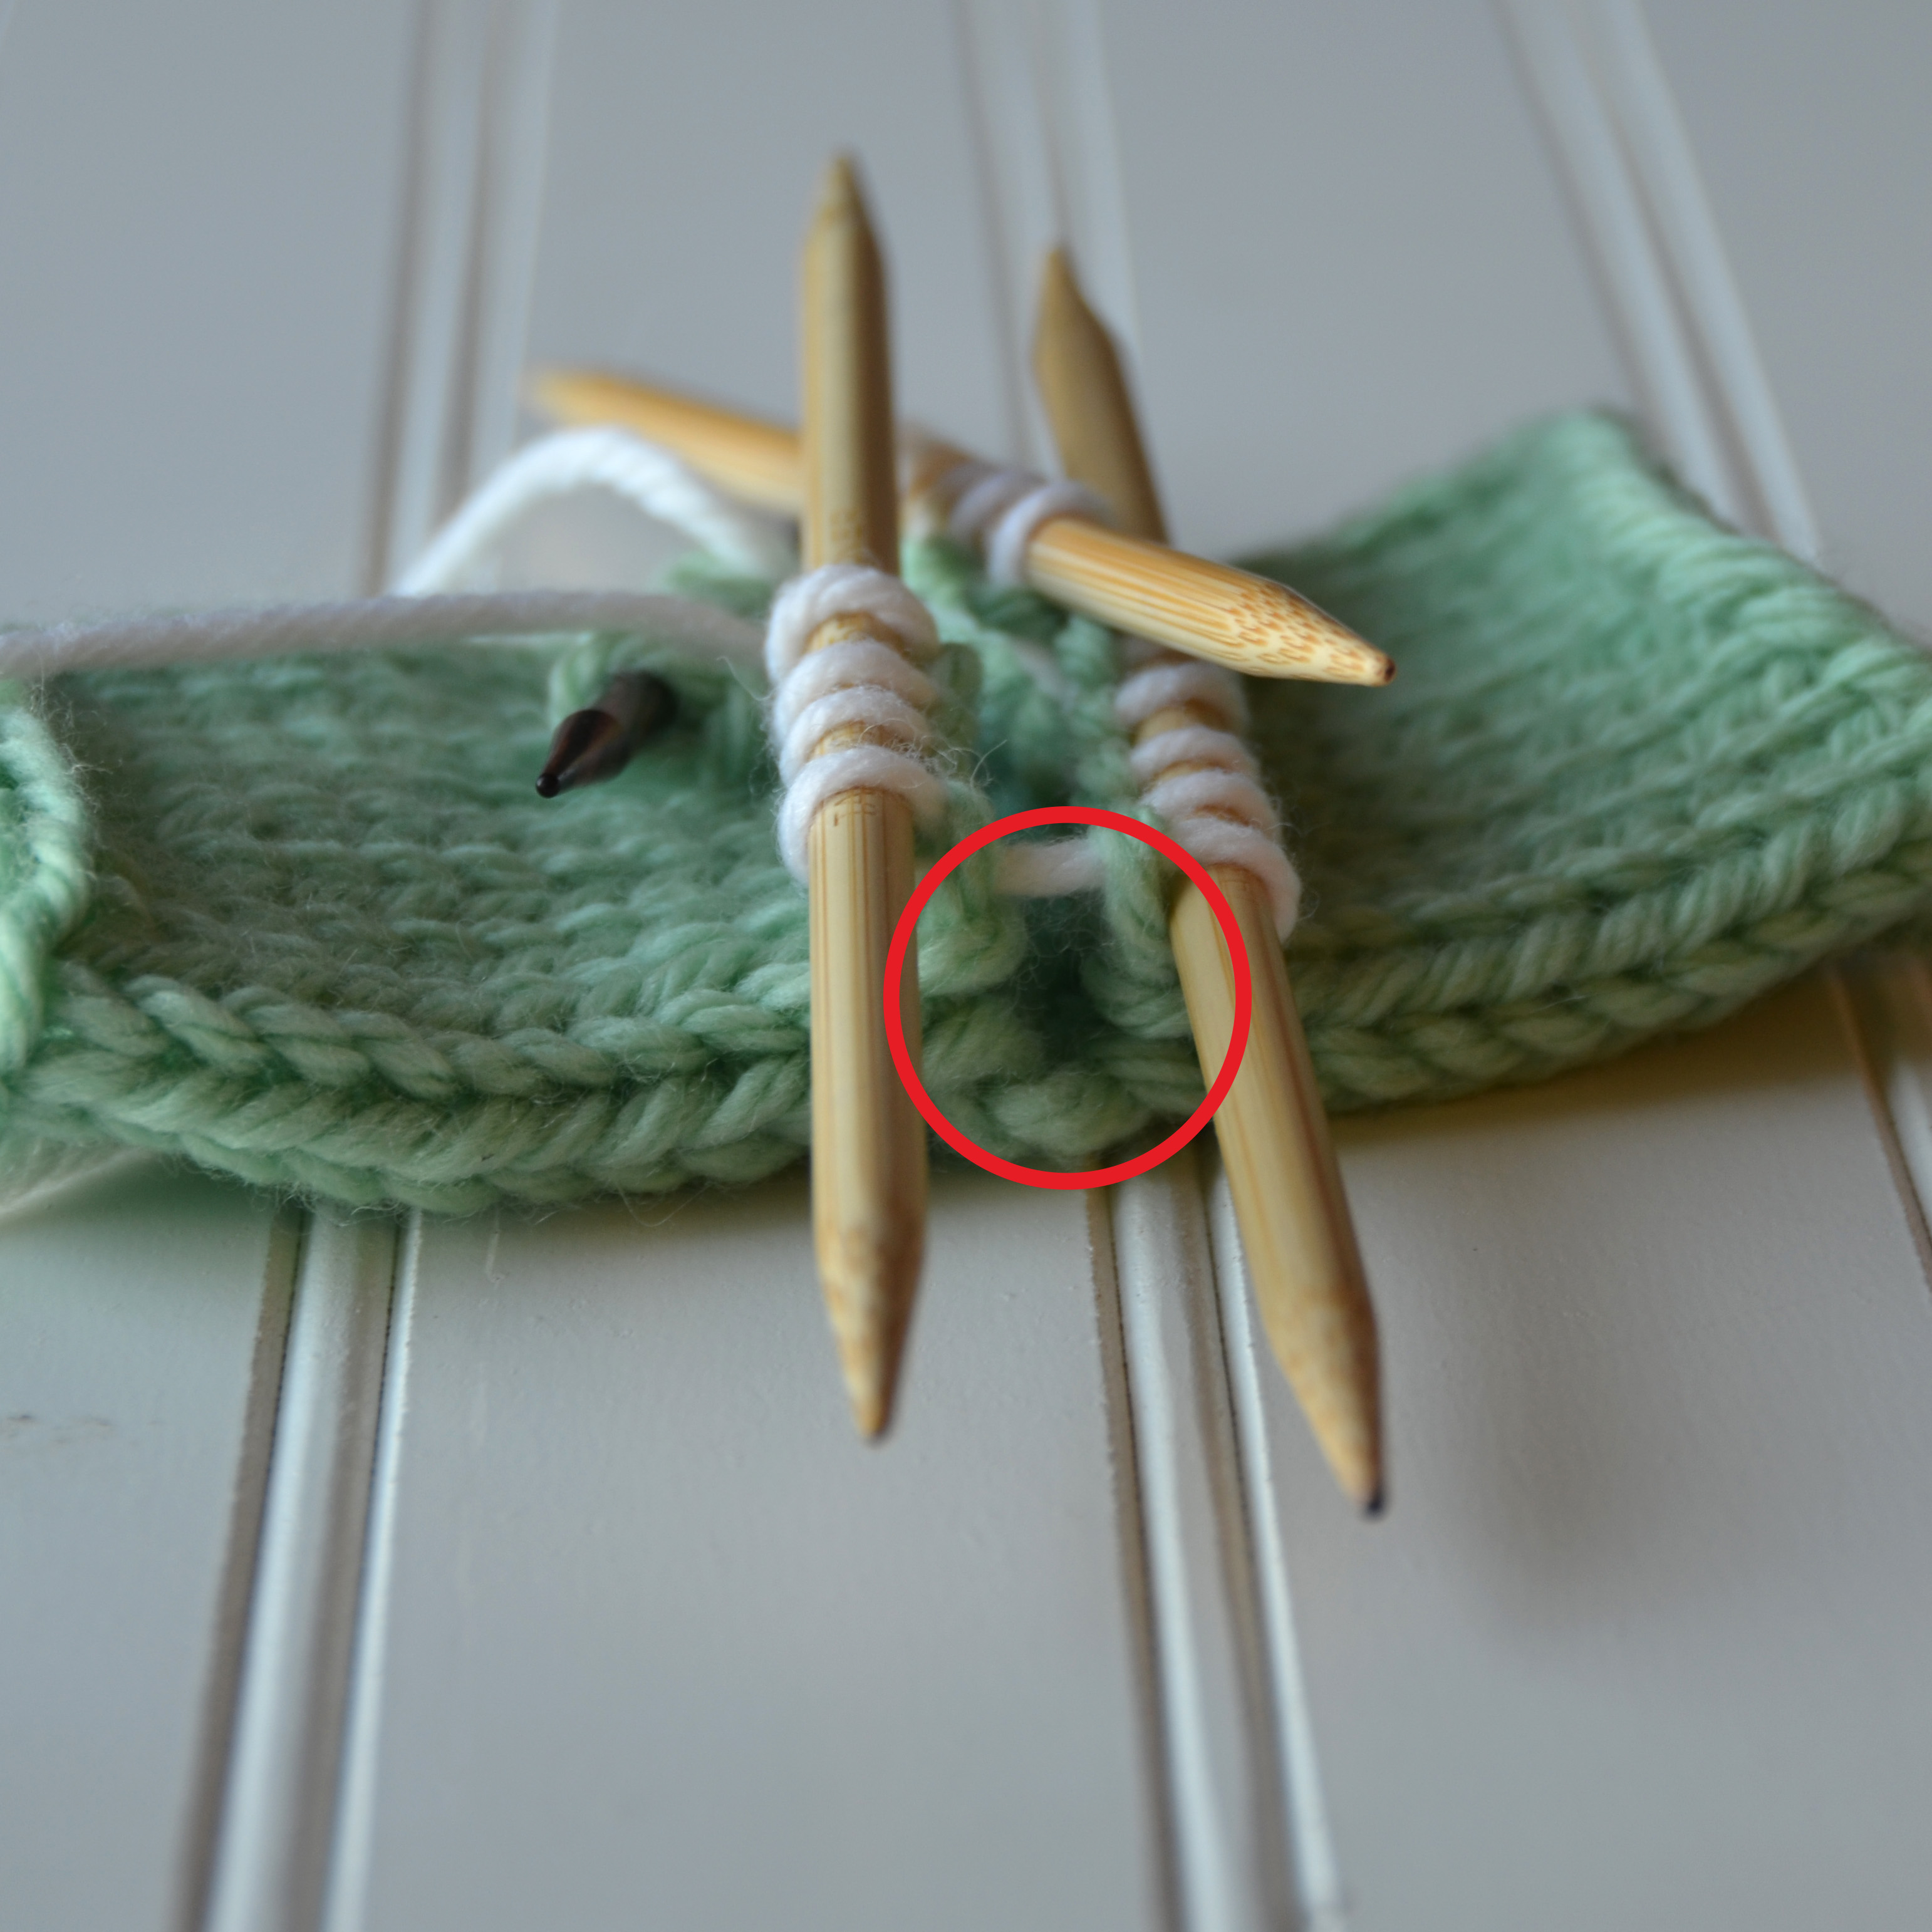
Now it’s time to knit the heel, and return to your larger dpns. This first round is usually a plain/knit round.
This photo shows what happens in that gap where the waste yarn was if you simply knit across and ignore it.
Pick up a stitch from the side of the row where the waste yarn was. It’s best not to pick up the very outermost part of this loop, but to pick up the half of the stitch just inside the opening.
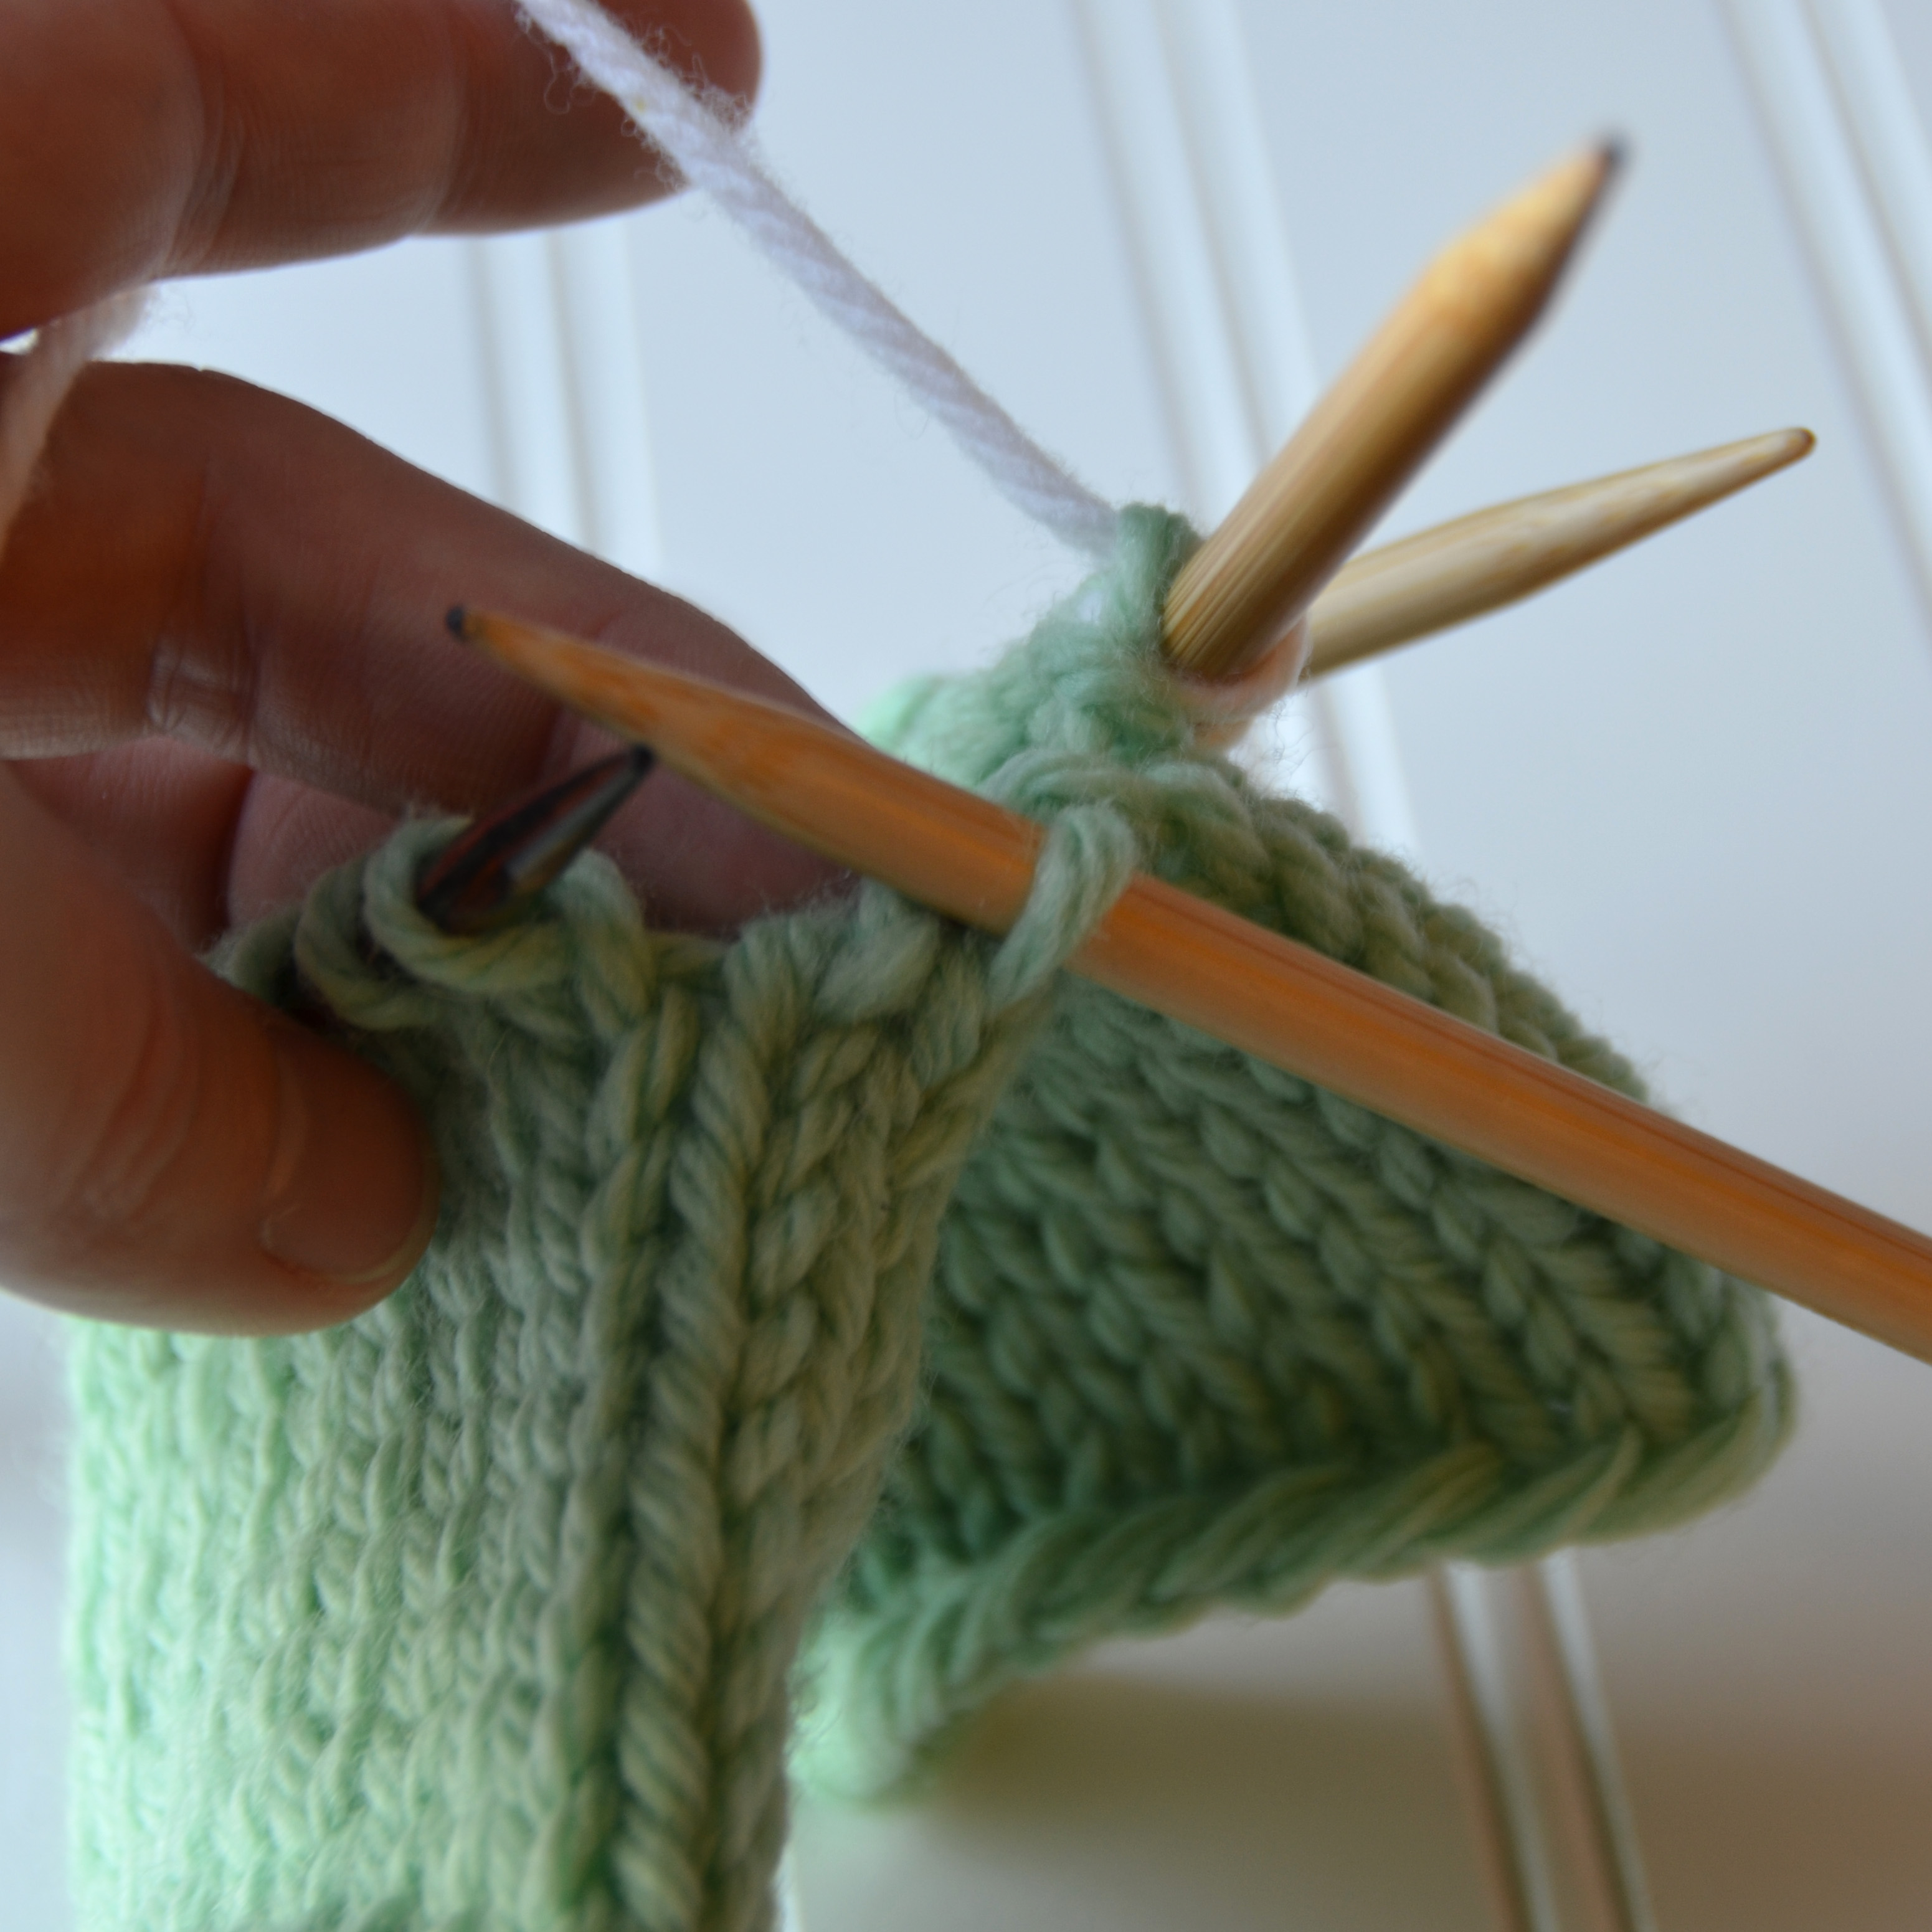
Place this picked up stitch on the needle and knit it together with the next stitch, closing the gap. Depending on the pattern and yarn, I might do this twice at each side of the gap. It’s best to experiment and see what looks best with your particular yarn and stitch pattern.
And here’s what that gap will look like now. No holes!
Knit the rest of the heel as instructed. It’s like a heel magically grew out of your knitting.
I also like this technique for set-in pockets on a top-down sweater. It’s not as hard as you thought it was going to be, right?