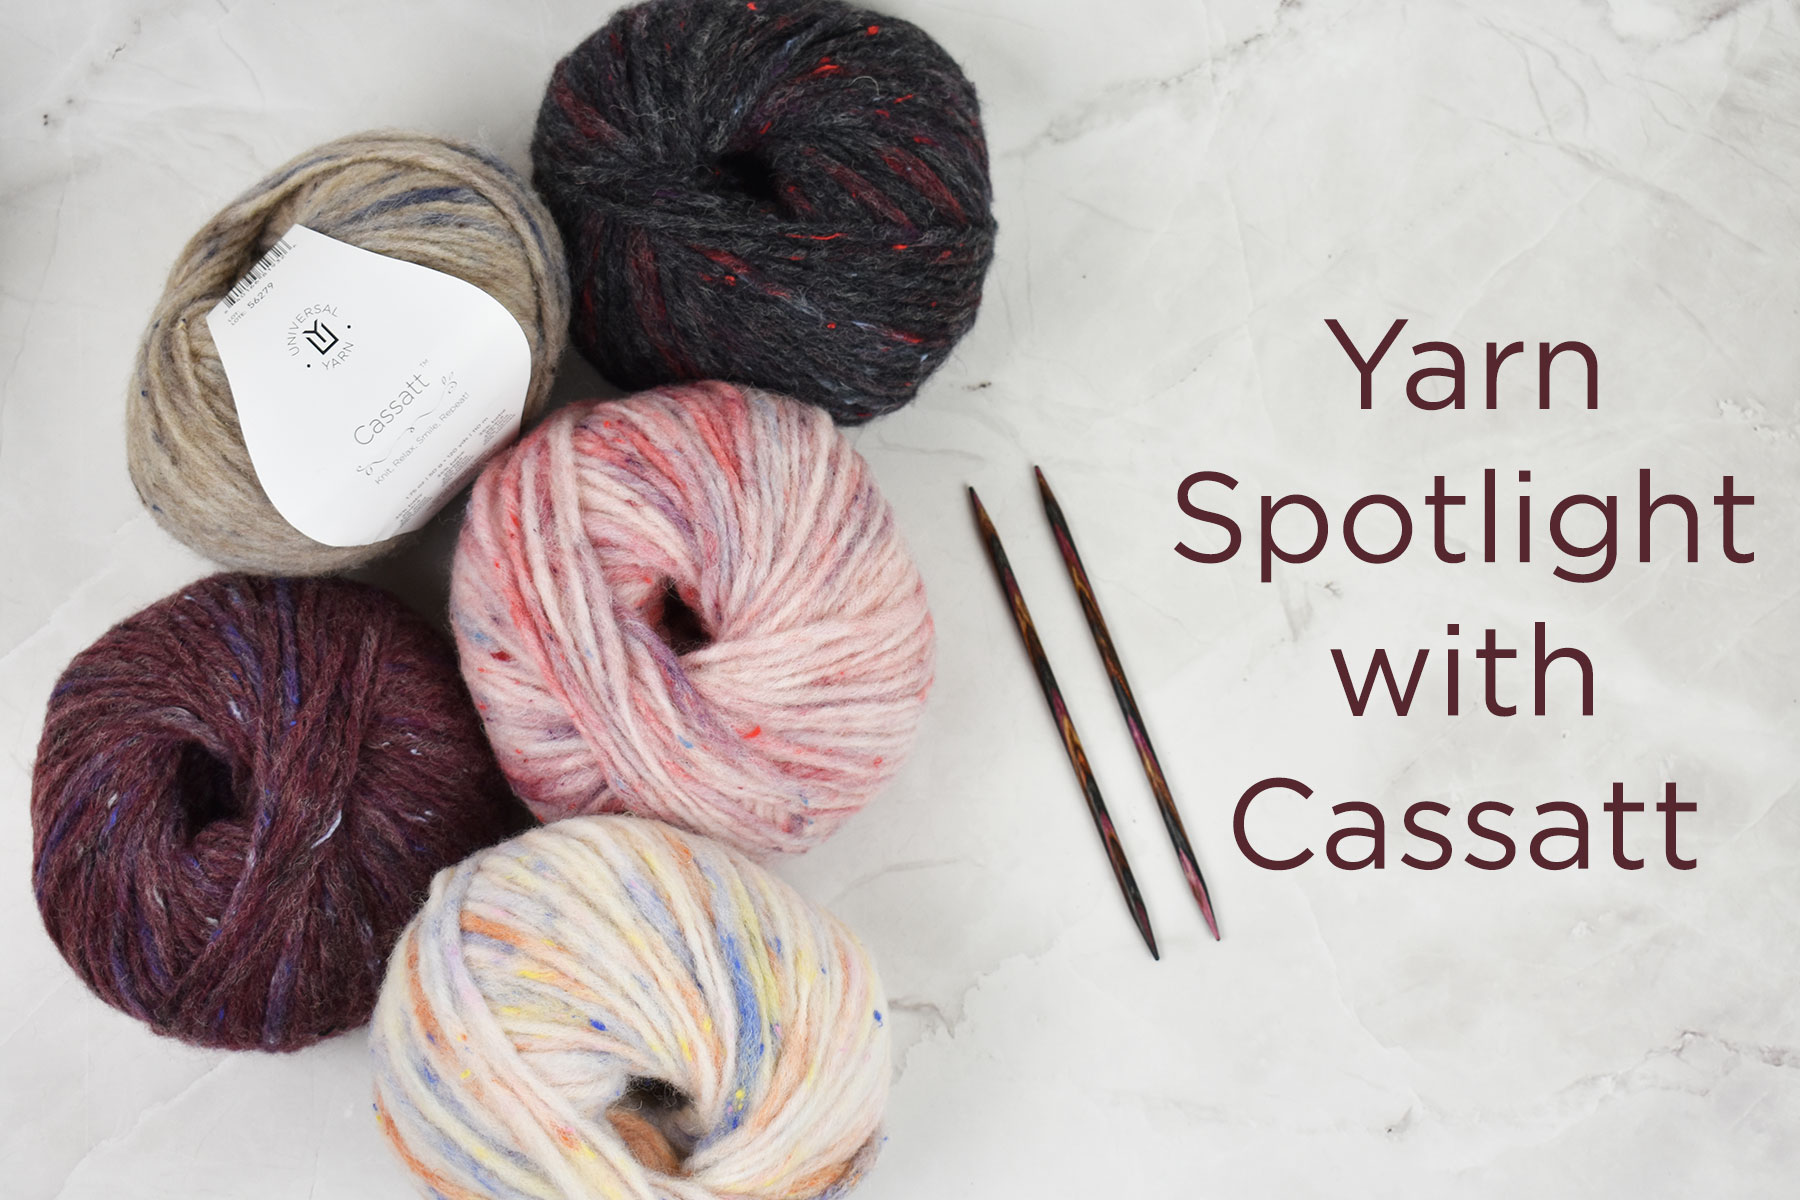
Hey fiber friends! If you’re like me, one of your favorite parts of a new season is finding new projects to line up along with new yarn to play with. Last fall, we created Cassatt, and while there is still a chill in the air, it’s the perfect time to try it out!
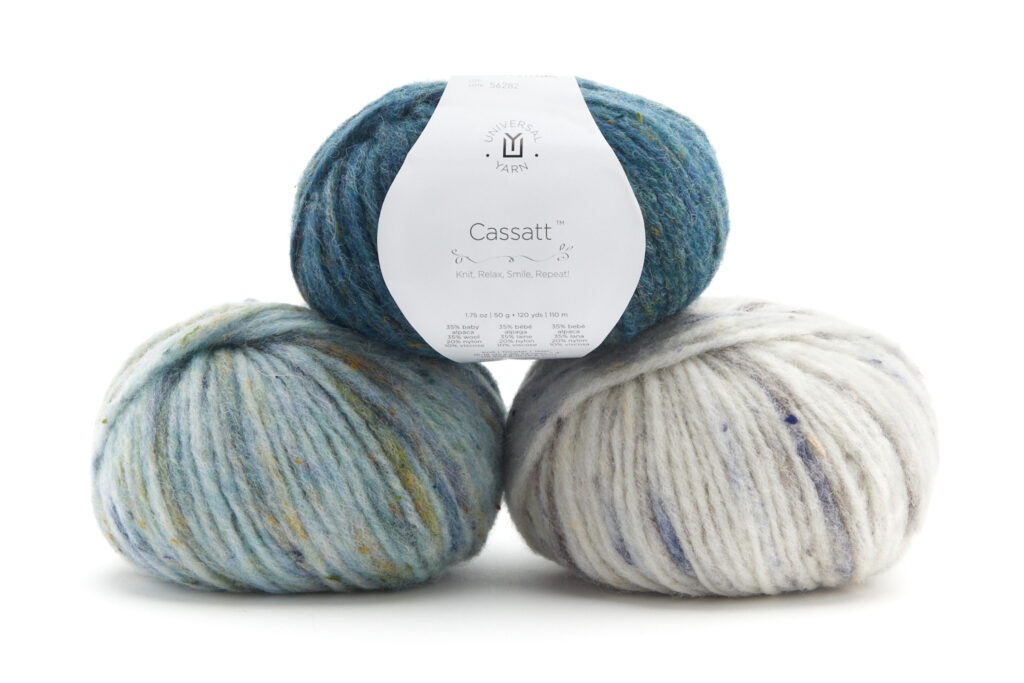
Cassatt colors clockwise from left: Water Lilies, Luncheon, Impasto.
Made in Italy, Cassatt is a lush blend of 35% baby alpaca, 35% wool, 20% nylon, and 10% viscose. It features a hollow core with fine fibers blown through, creating a halo that is ethereal to look at, and a soft texture that’s a dream to work with. With such enchanting characteristics, it’s no wonder that this yarn’s name is inspired by American Impressionist painter, Mary Cassatt. Furthermore, each of the eight colors are named after famous works of art, from equally impactful artists. You’ll find “Water Lilies” by Claude Monet, and “Haystacks” by Van Gogh, to name a few. Can you identify the other six?
Crochet hat, Wavelength, in the color 604 Water Lilies.
It’s fitting that this yarn carries the theme of “a work of art,” considering anything you make using it will be just that! Whether you knit or crochet, you’ll find your stitches will come to life. They’ll be popping with definition from the plumpness of the yarn, and dancing from the speckles found in the colors. The tweedy nubs make each piece all the more magical, like the small visible brushstrokes of an impressionist painting.
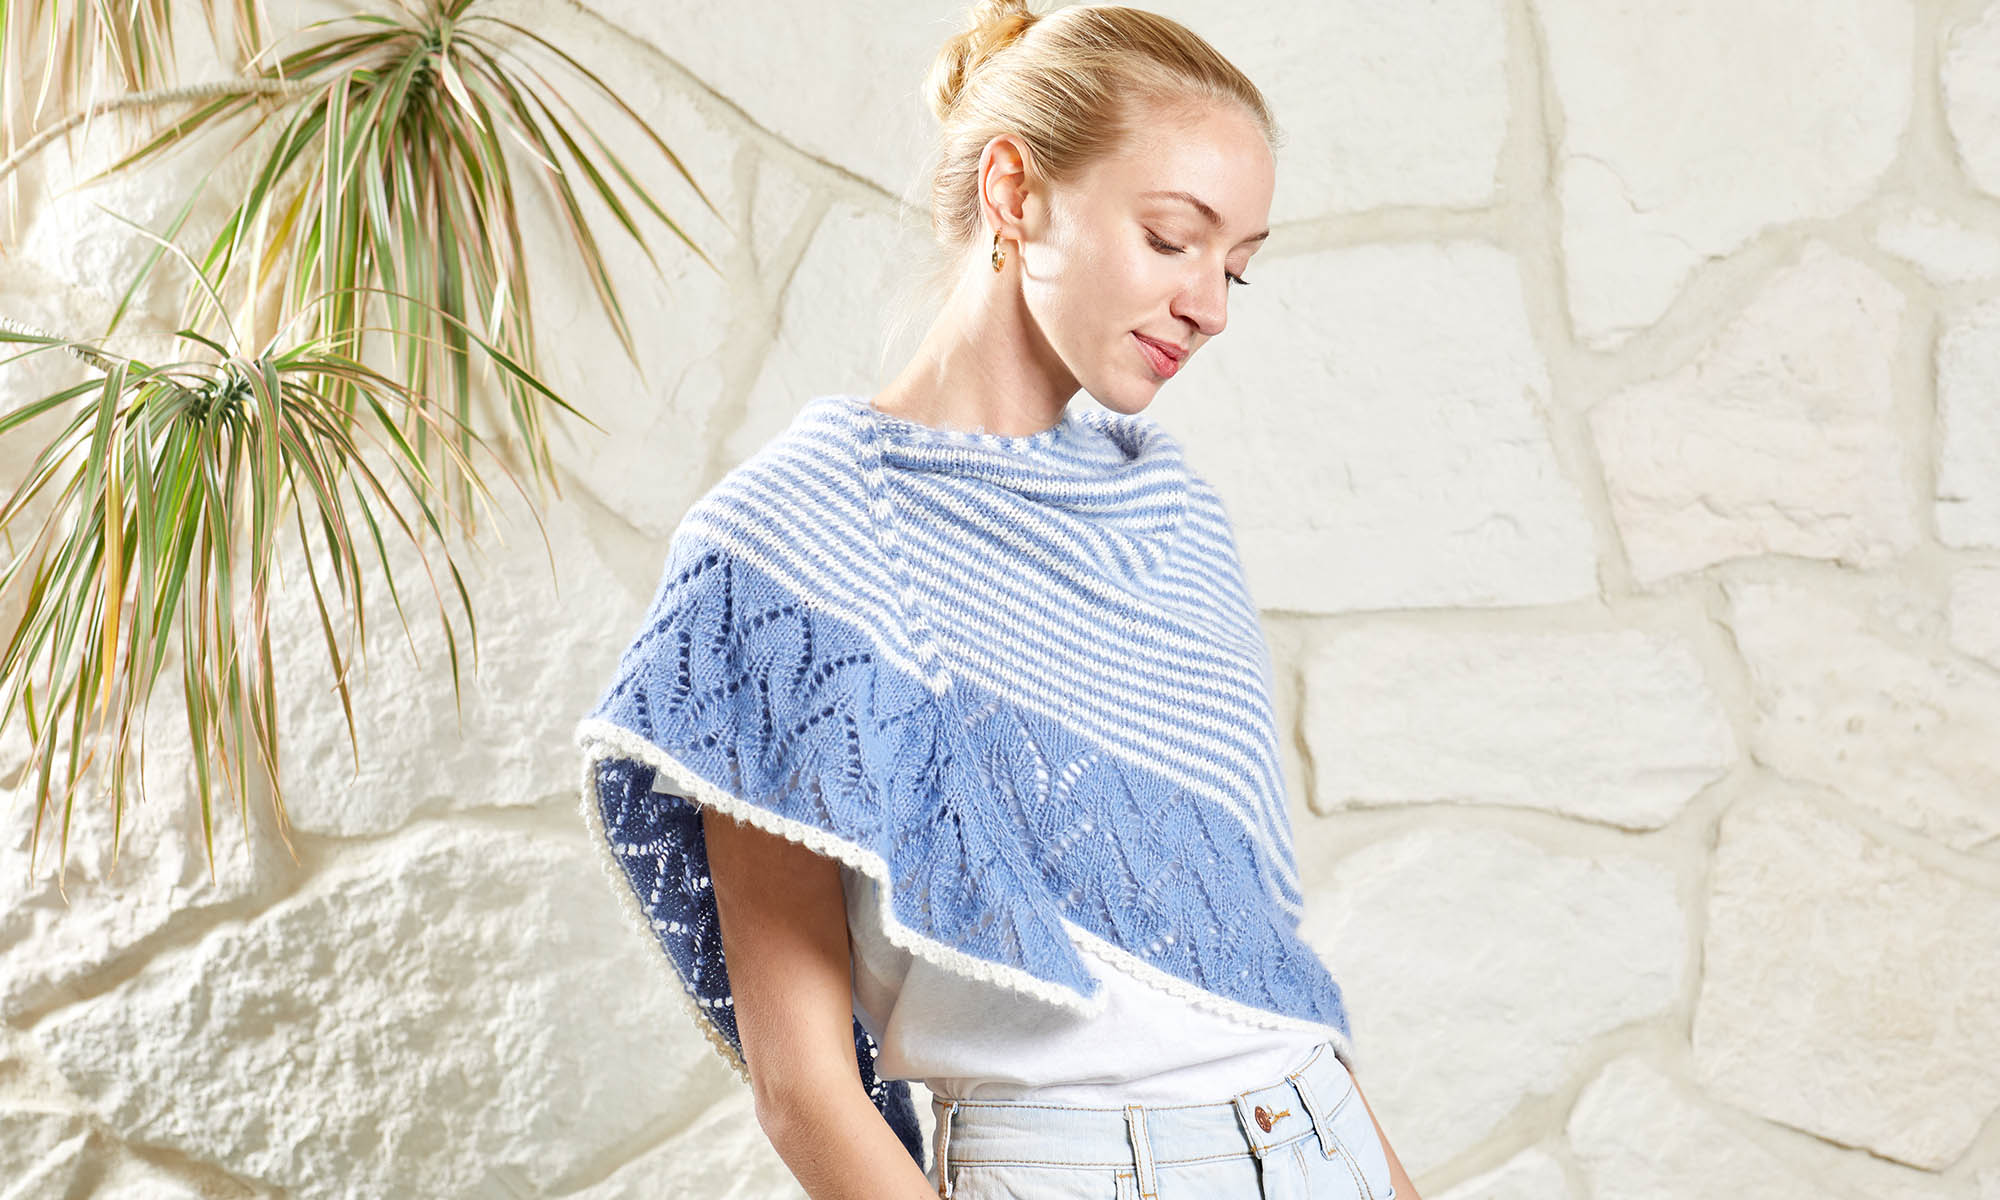
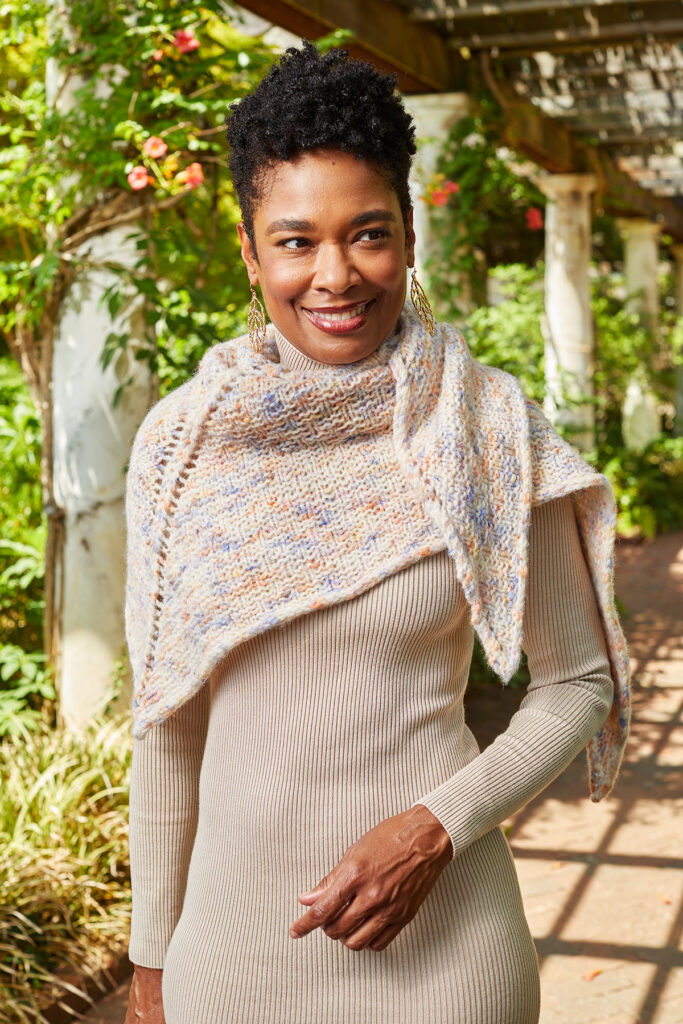
Knit accessory, the Painterly Shawl, in the color 602 Haystacks.
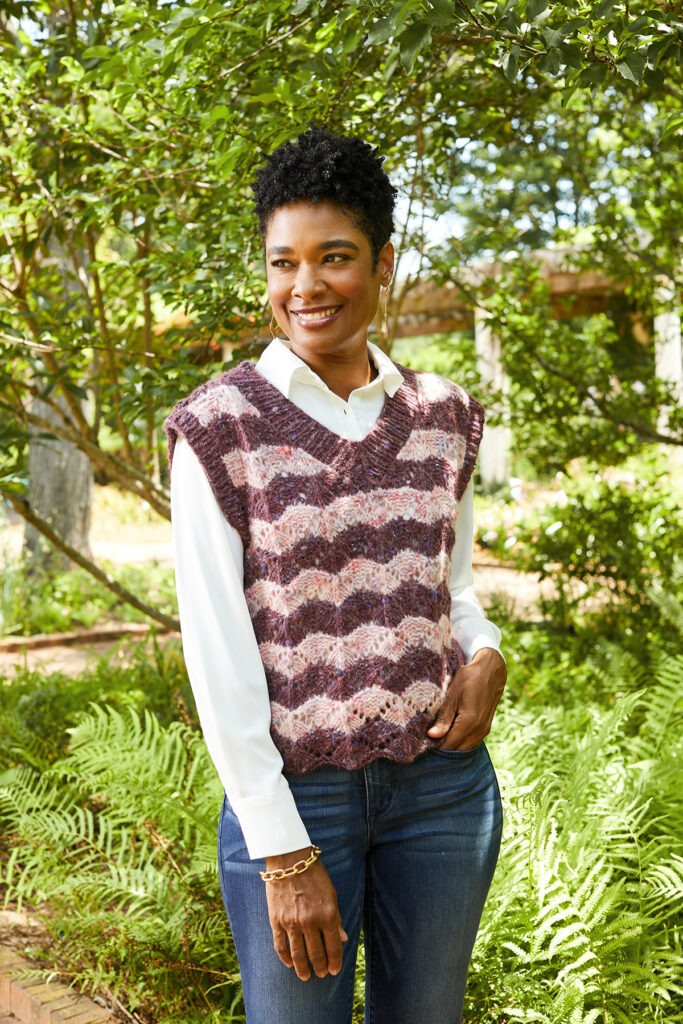
As with any fine art, you will want to treat this yarn with care. With 70% of this special blend being quality fibers, you’ll need to hand wash your work and lay it flat to dry. The effort is well worth the reward, though, as each item made will be a timeless treasure. Take, for instance, the Emma vest (below) by Rachel Brockman. The simple lace stitch pattern and stripes ensure that Cassatt remains the focal point, and the combination comes together to create a layering piece that you’ll celebrate wearing year after year.
Knit garment, the Emma vest, in colors 606 Opera and 603 Dancer.
I hope you have enjoyed this look at our beautiful yarn, Cassatt, and I can’t wait to see all of the inspired pieces that you create with it! What do you think you’ll try out?
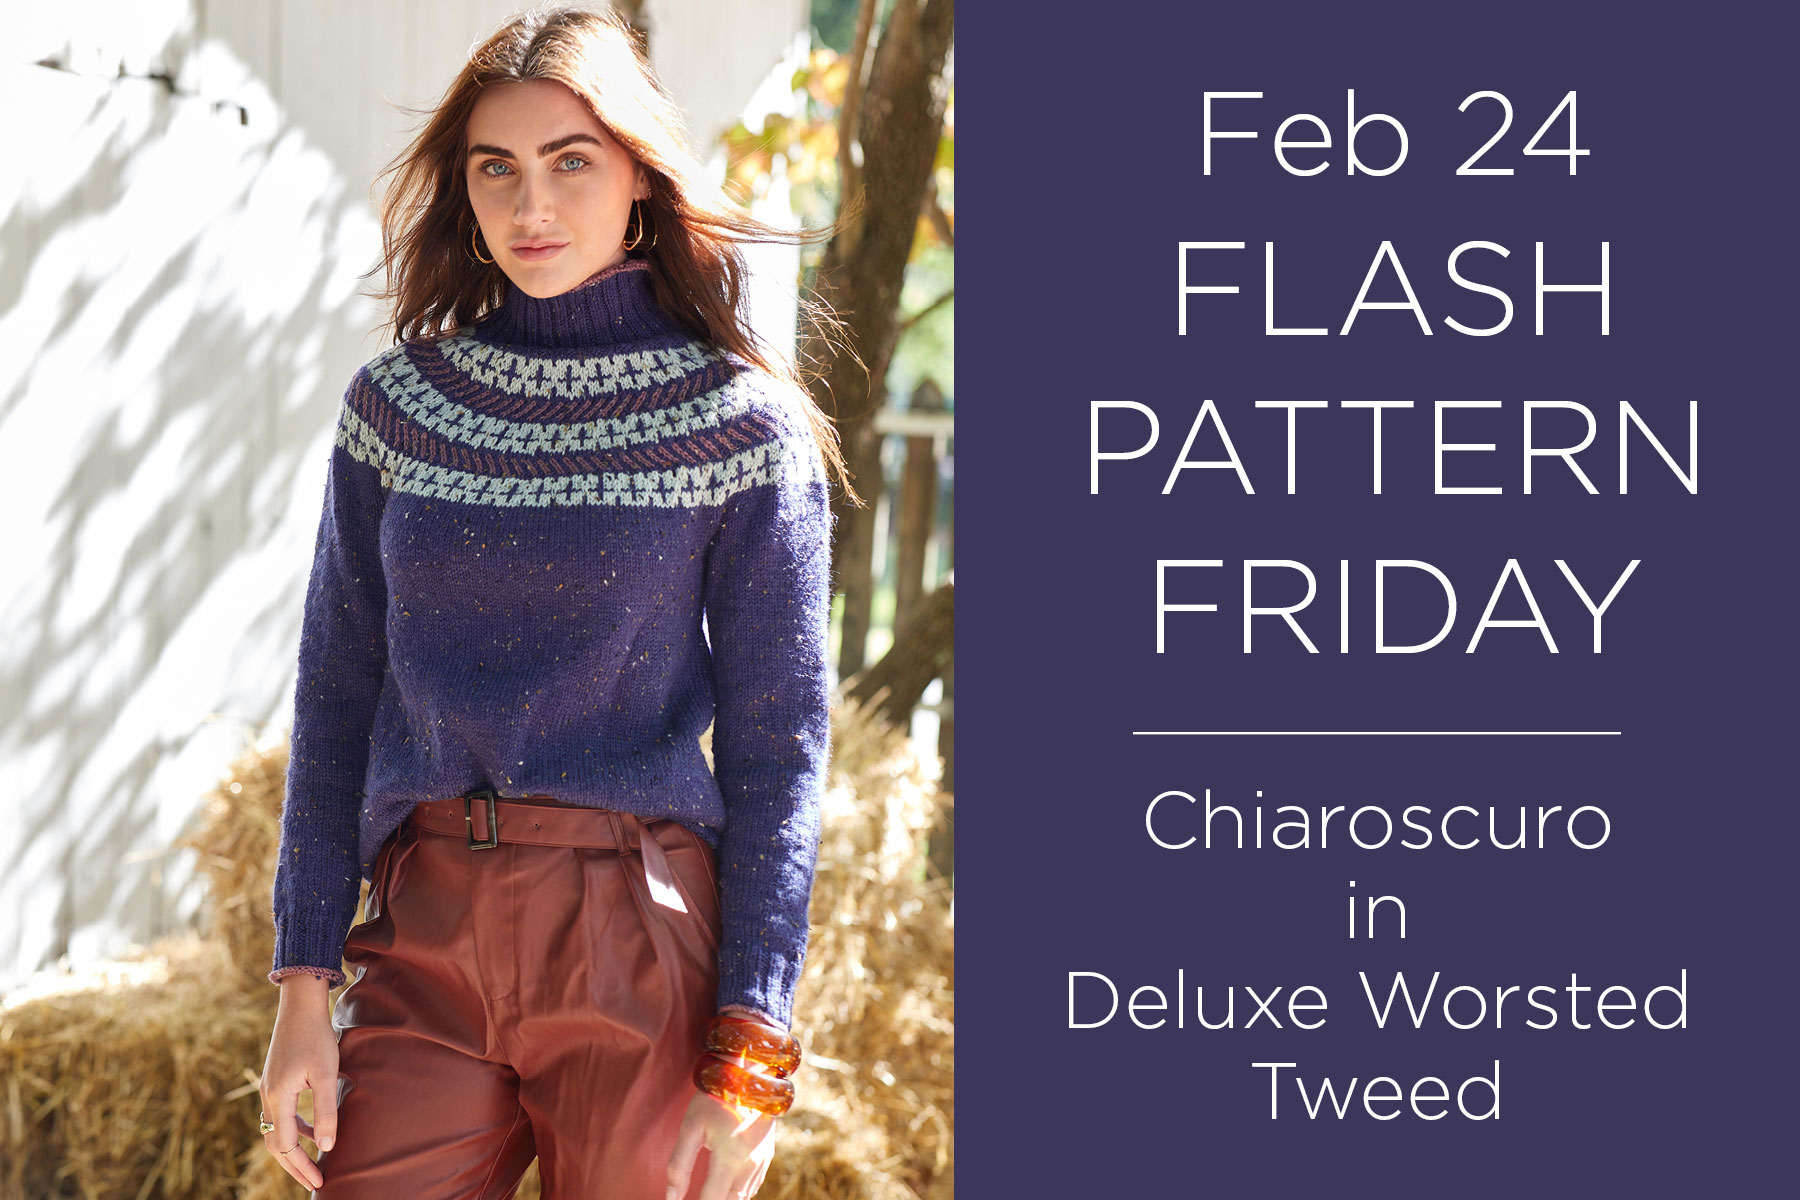
There’s nothing quite like Friday, and for this week’s Flash Pattern Friday, we have a fun surprise. Wool combined with classic tweedy nubs makes for the most exciting sweater projects, and today through Sunday, you can download the Chiaroscuro sweater for free on Ravelry!
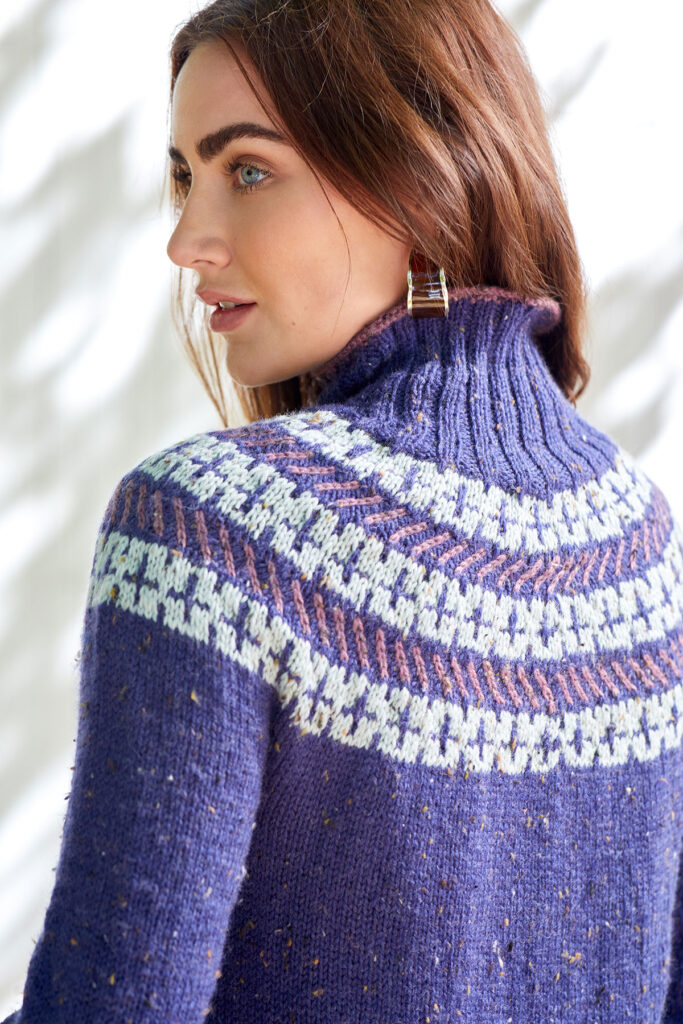
The Chiaroscuro sweater features beautiful colorwork throughout the yoke.
Designed by Amy Gunderson, Chiaroscuro offers so much to love, but what stands out the most is the colorwork patterns on the yoke of this sweater. Three colors combine, using rhythmic slip stitches to create a design of crosses and left and right slants. Add in a funnel neck design and a bit of added length, and you’ve got a cozy and comfortable sweater you’ll reach for time and time again. This pattern might sound intimidating but don’t worry – it’s perfect for those looking to grow their knitting skills!
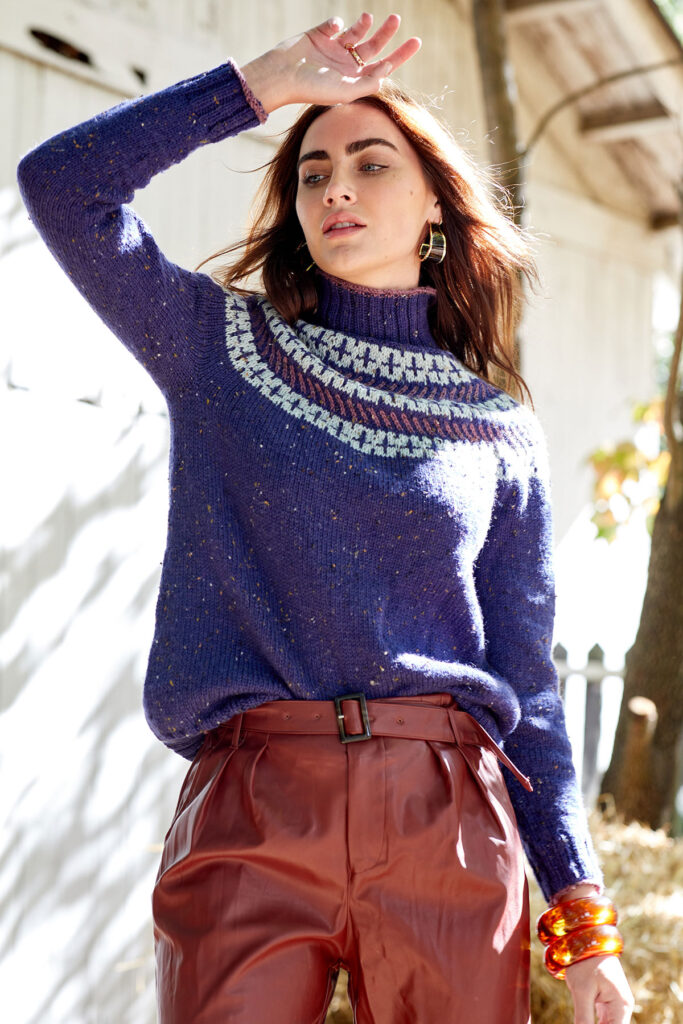
The oversized design of this sweater makes it nice and cozy.
The rolled and contrasting color hem, neckline, and sleeve cuffs add another element of excitement to the construction of this garment. Worked in a contrasting color, this added detail is not overbearing, but we know it will make others take notice. This sweater is found in the Still Life pattern collection, which features six garments and accessories in Deluxe Worsted Tweed Superwash and Deluxe Worsted Superwash. Deluxe Worsted Tweed Superwash has 24 different color options, so you can make a sweater that uses your favorite colors. The Chiaroscuro is sized from Small through 5X and is free to download on Ravelry through Sunday!
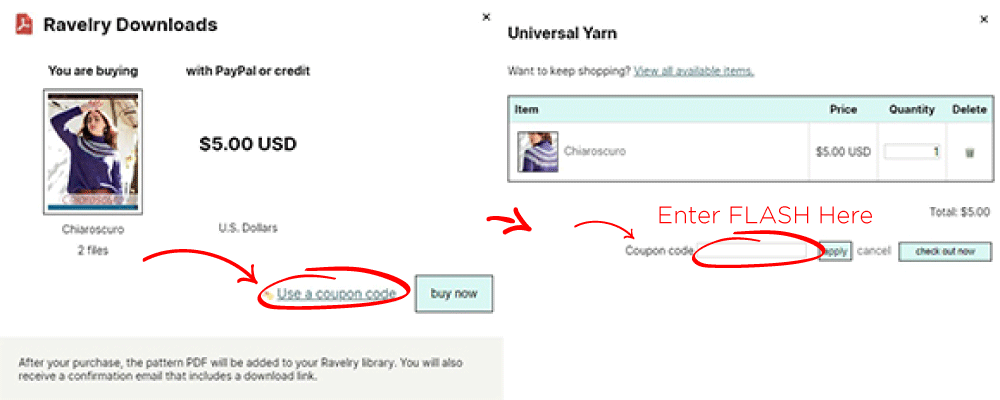
This graphic will help guide you to get the Chiaroscuro sweater for free.
To get Chiaroscuro for free, head to Ravelry and click “buy it now” or “add to cart” after searching for this pattern. When you reach the checkout, enter the code “FLASH” to get this pattern for free. Not a Ravelry user? Email us at patterns@universalyarn.com by Sunday, February 26th, and we will take care of you when we return to the office next week.
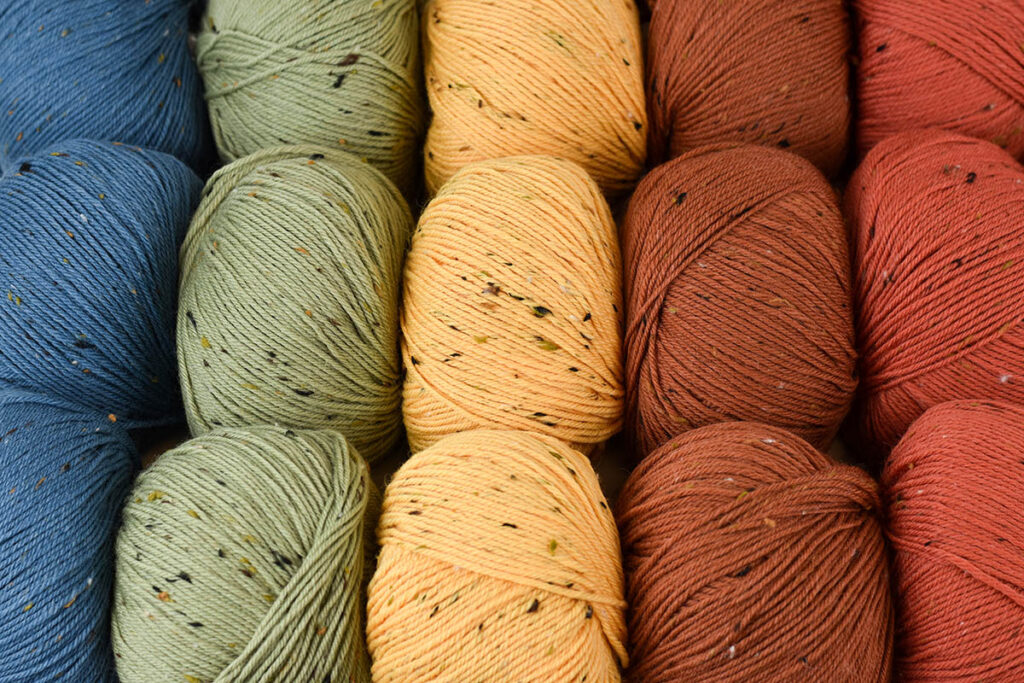
Deluxe Worsted Tweed Superwash is the perfect yarn for any sweater, including the Chiaroscuro. This blend of superwash wool, viscose, and acrylic makes for stylish garments and accessories because of the tweedy nubs. Plus, every project you make will be machine-washable, making your life easier. Your friends and family are sure to know it was hand-knit or crocheted due to the stitch definition found in Deluxe Worsted Tweed projects. Match it with Deluxe Worsted Superwash for even more fun! Check out your local yarn store to see if they have Deluxe Worsted Tweed Superwash in stock, and ask about drop shipping options if they don’t. If they are a Universal Yarn retailer, you can order any quantity of our yarns through your LYS for a flat shipping fee of $11. They’ll benefit from your patronage, and you’ll have the yarn shipped right to your door!
Deluxe Worsted Tweed is great for garments and accessories.
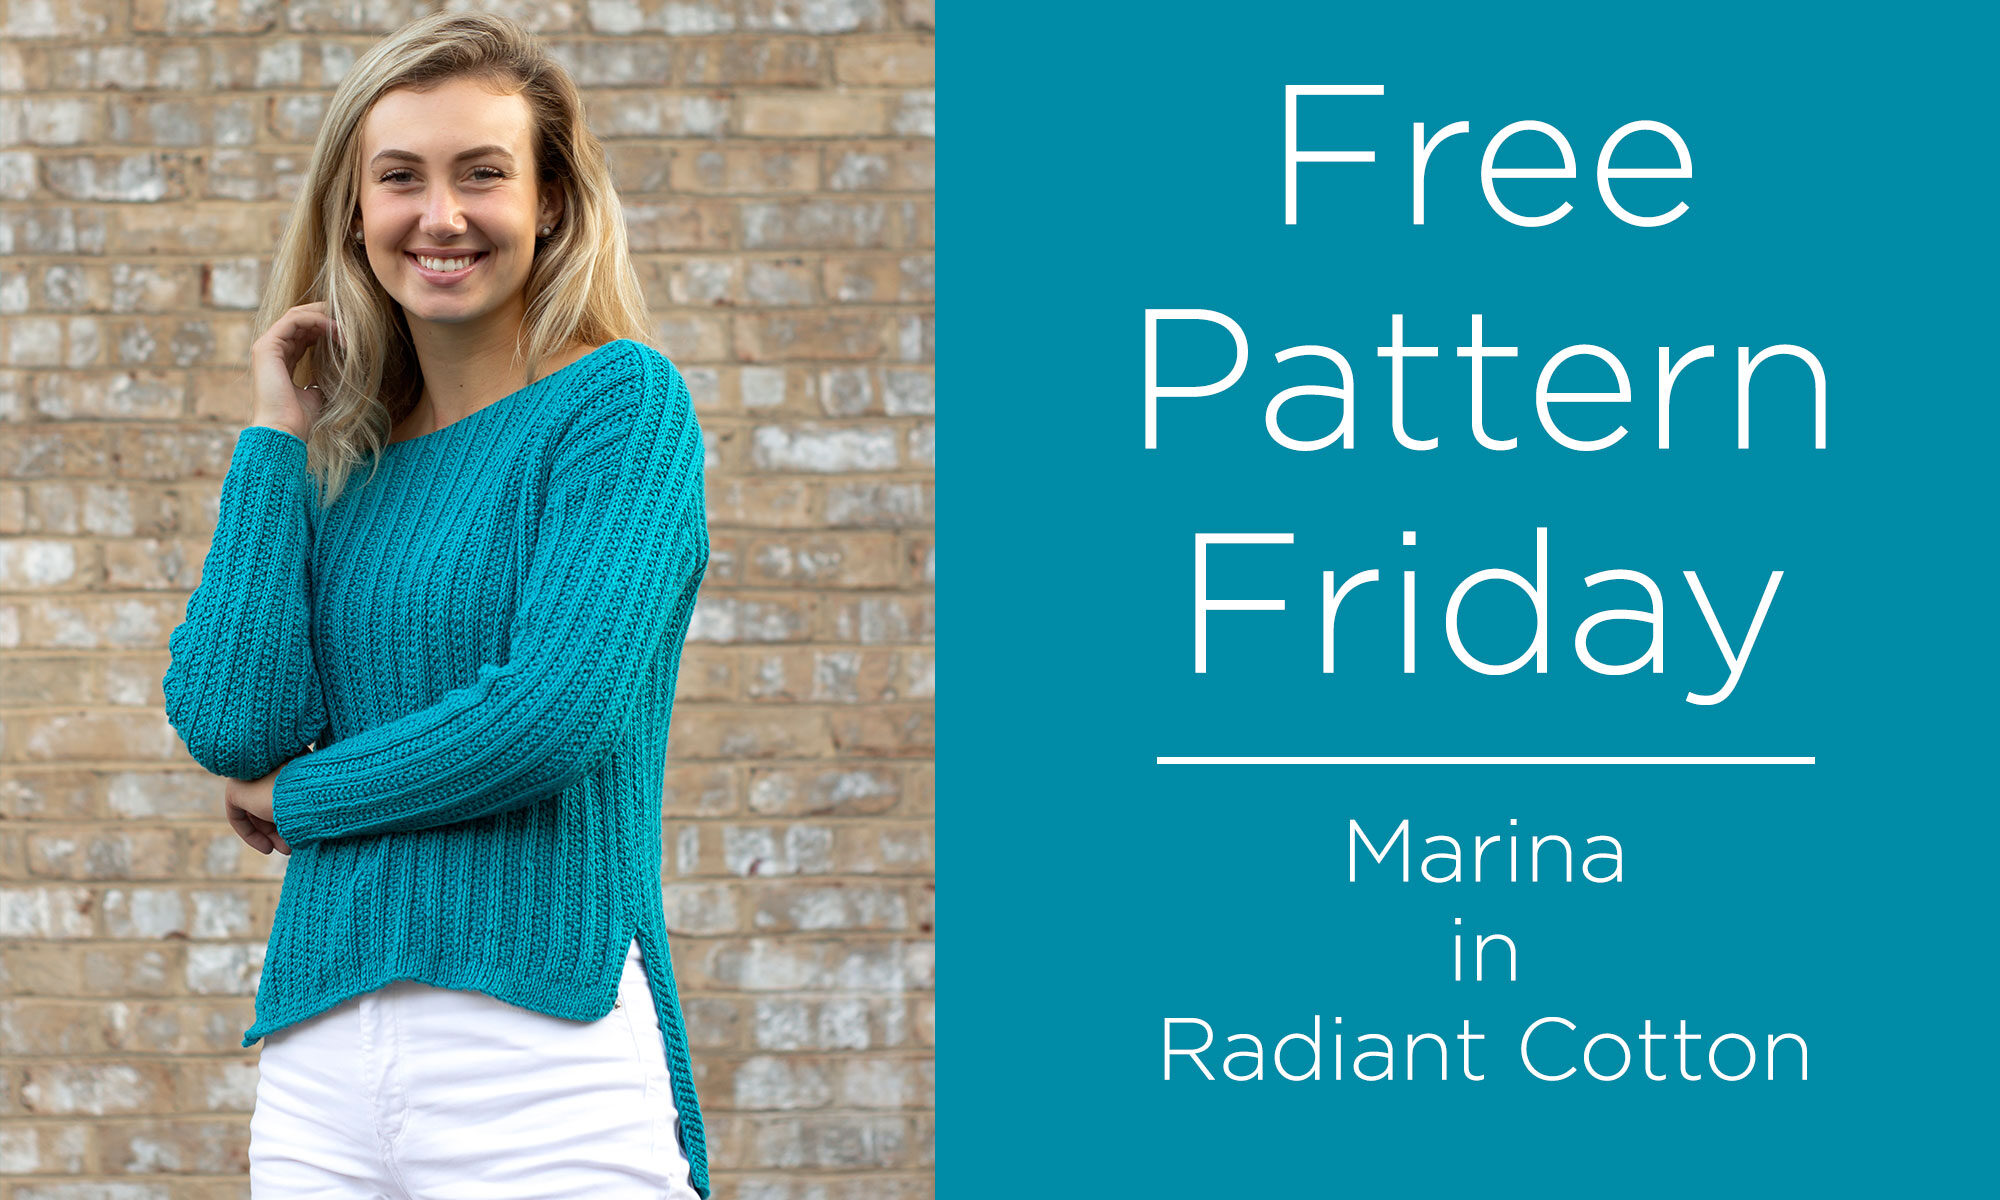
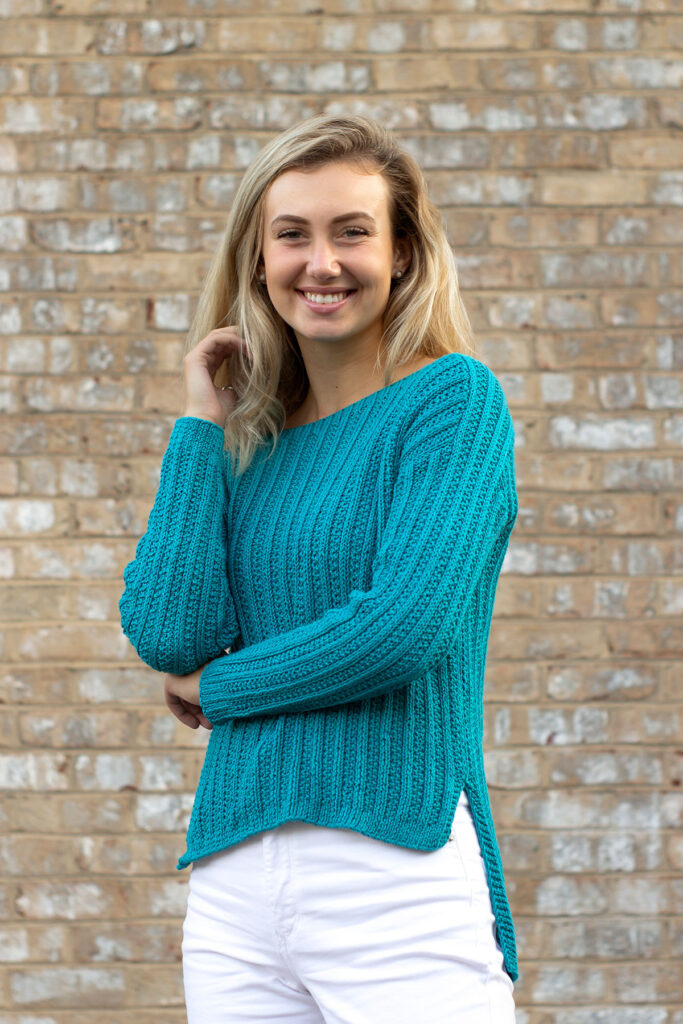
Another Friday, another incredible free pattern just for you! This week, Marina is permanently free! This previously paid for pattern is from our Spring Capsule collection, featuring our Radiant Cotton yarn.
This sweater is perfect for the upcoming spring season
There’s so much about the Marina sweater that makes you want to pick up your needles and get started. The first thing that sticks out is the beautiful sheen seen in the 100% Egyptian Giza cotton yarn, known as Radiant Cotton. Aside from the yarn, we know you will love the overall construction of this garment, so let’s take a look at those details!
The Marina pullover uses Radiant Cotton color 809 Atlantic
This sweater is worked flat in pieces and seamed. Seams add structure to the finished garment, enhancing the lifespan of your hand knits. A split hemline and saddle shoulders are additional details that add sophistication to the Marina pullover. Although this sweater may be long-sleeved, Radiant Cotton is a light and breathable yarn, so you can wear it comfortably throughout the coming year. Now that you’ve heard a little more about the construction of this sweater: let’s go ahead and look at our Radiant Cotton yarn!
Radiant Cotton has beautiful, bright color options
There is so much to love about our Radiant Cotton yarn. The 100% Egyptian Giza cotton fibers have a long staple length, giving it an unmatched luxurious feel, strength, and a gorgeous sheen that makes any of the 32 color options stand out. This yarn is an excellent choice for sophisticated and polished garment and accessory projects and looks beautiful in both knit and crochet stitch patterns. Now is the time to shop Radiant Cotton as it is 20% off its 50% off sale price this weekend only!
As always, thank you for reading! Stay up to date with us on social media and by joining our newsletter. You’ll be the first to know about all of our sales and new releases, plus you’ll get a 10% off welcome coupon for signing up!
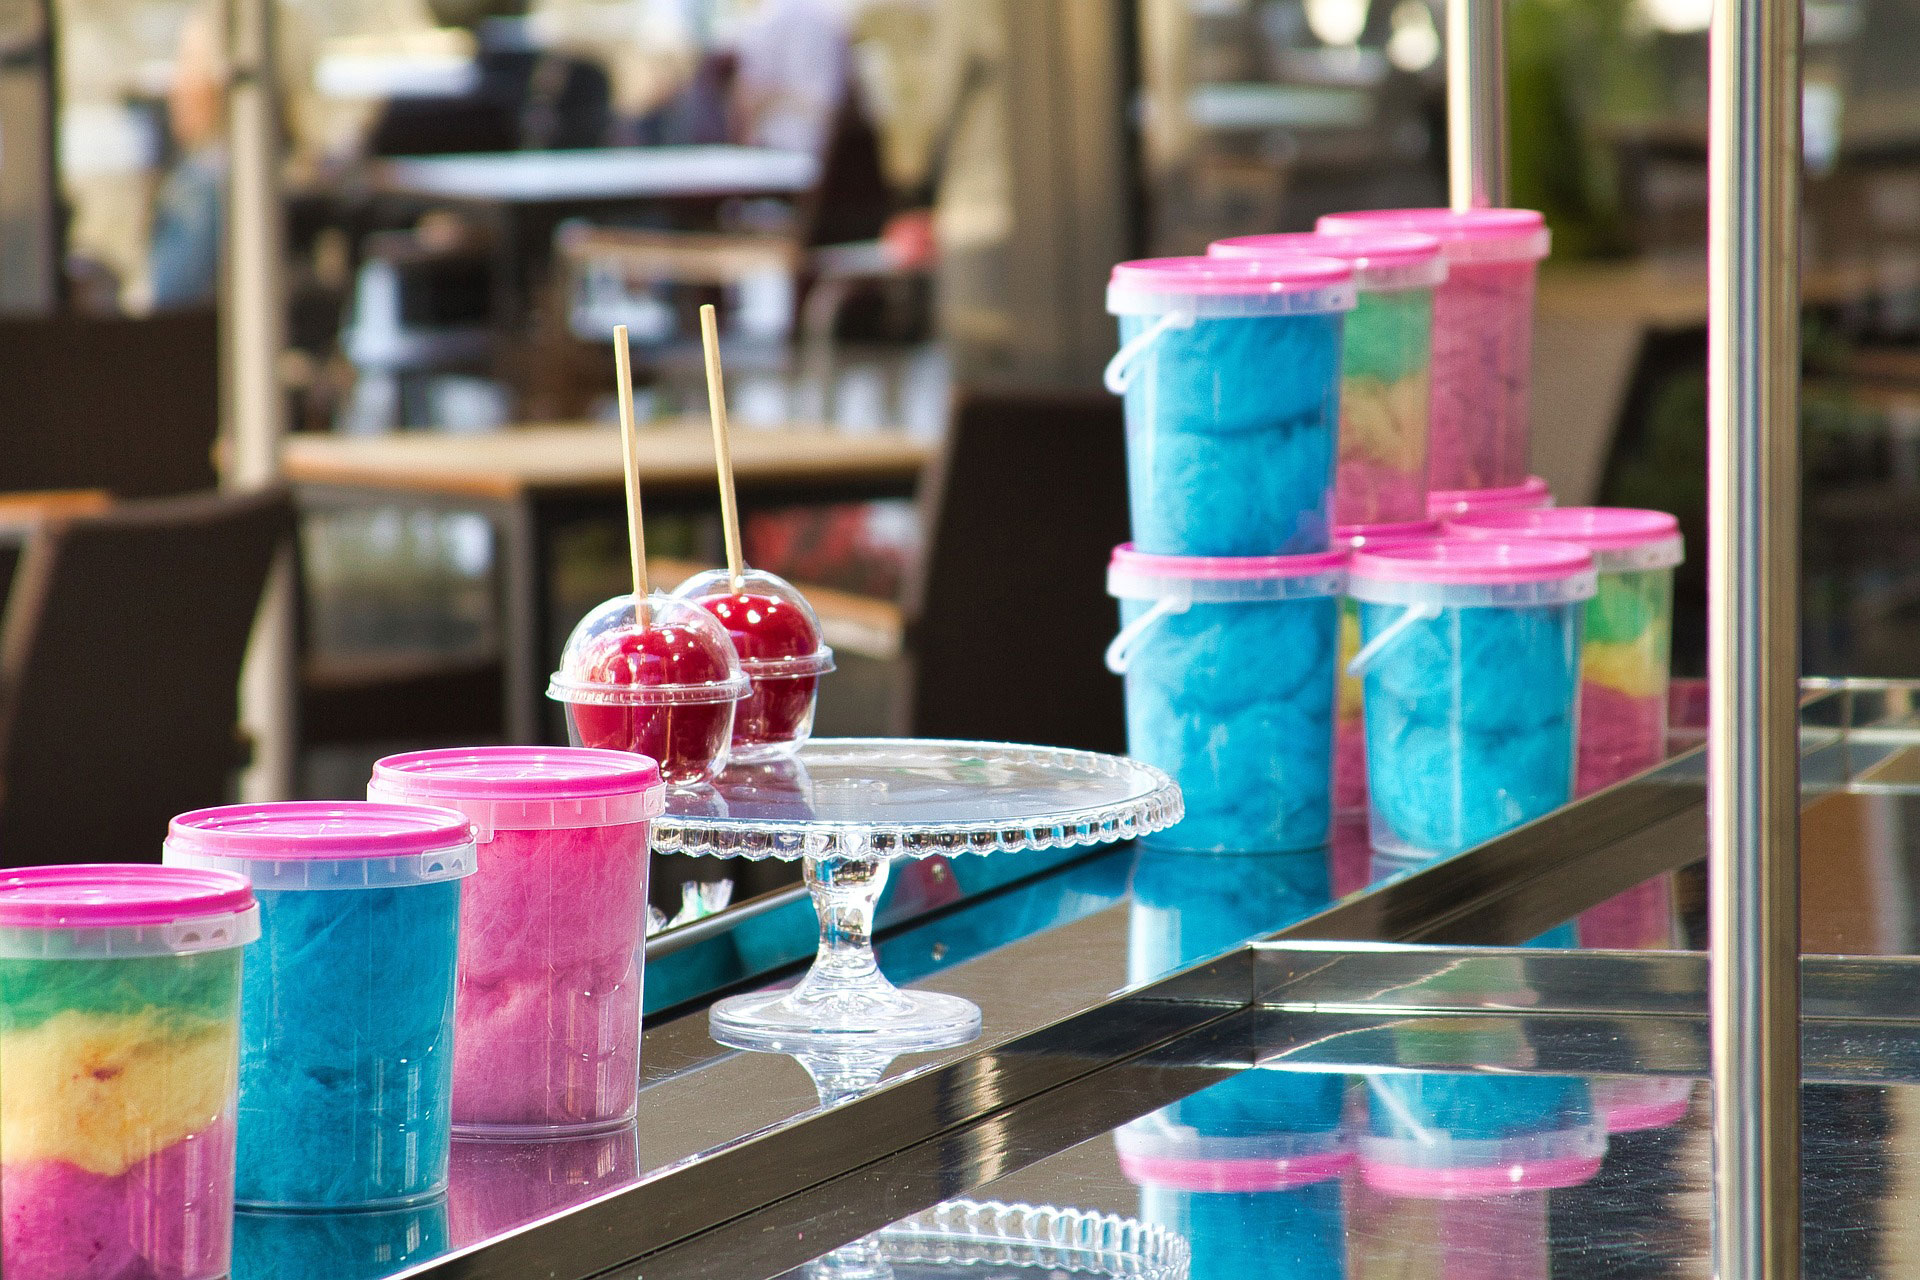
Picture this: you’re at a baseball game, and you pass by the Cotton Candy cart. This isn’t a treat you get to have often, so the memory of seeing the fun colors and the sugary sweet taste stays with you for years to come. Believe it or not, things like this can often serve as inspiration for design, and that is exactly what inspired today’s Free Pattern.
Photo from MINDSTEEL on Pixabay
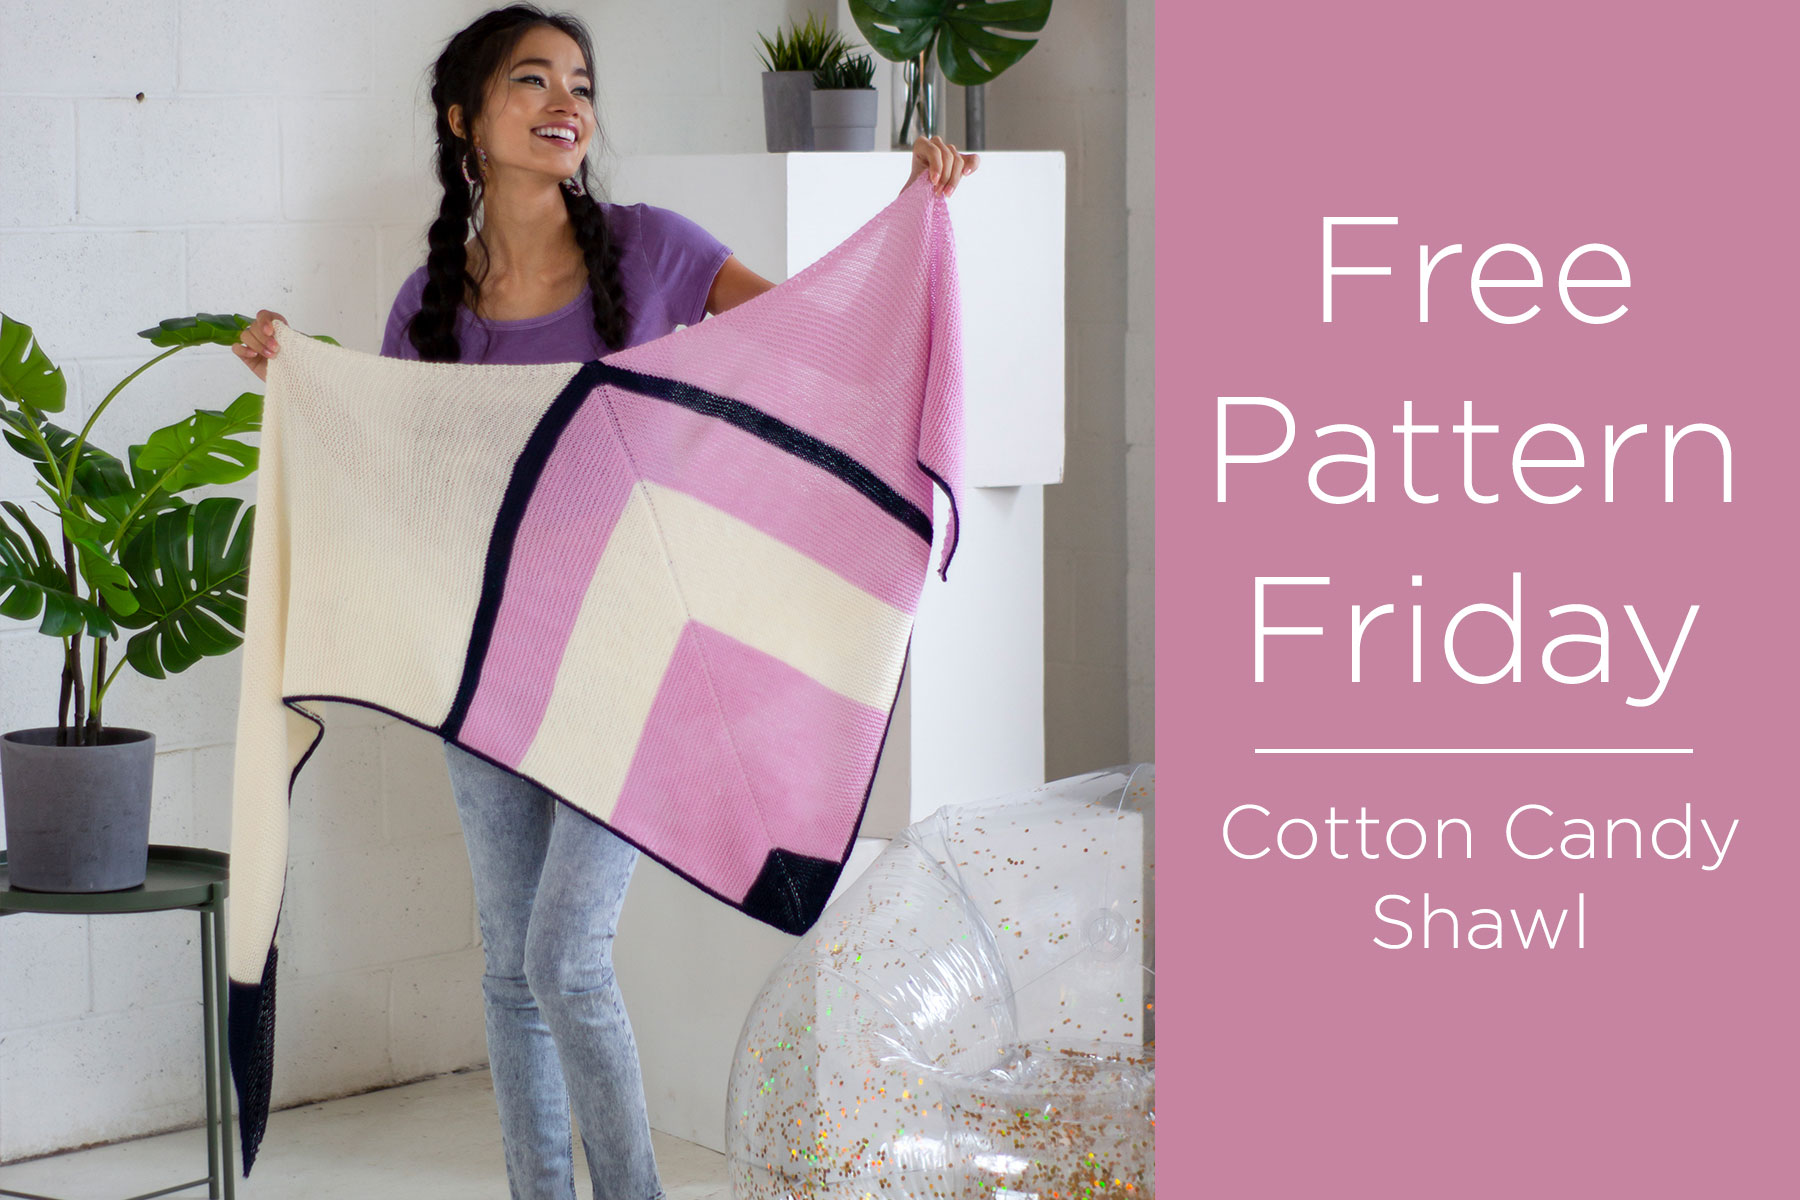
Sometimes our sugar rush leads us to look for a new pattern, and today, you’re in luck. The Cotton Candy Shawl is now permanently free to download. This beautiful asymmetric shawl uses our soft and woolly Donnina yarn to create an accessory that you will want to wear all year long.
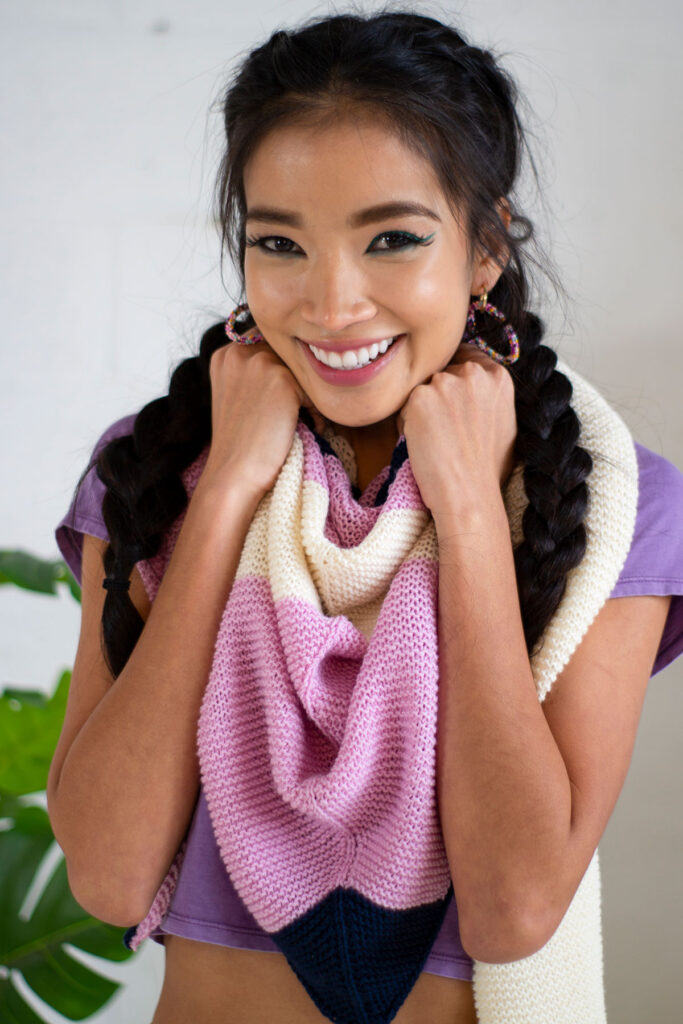
The Cotton Candy Shawl is the perfect accessory for this upcoming spring season!
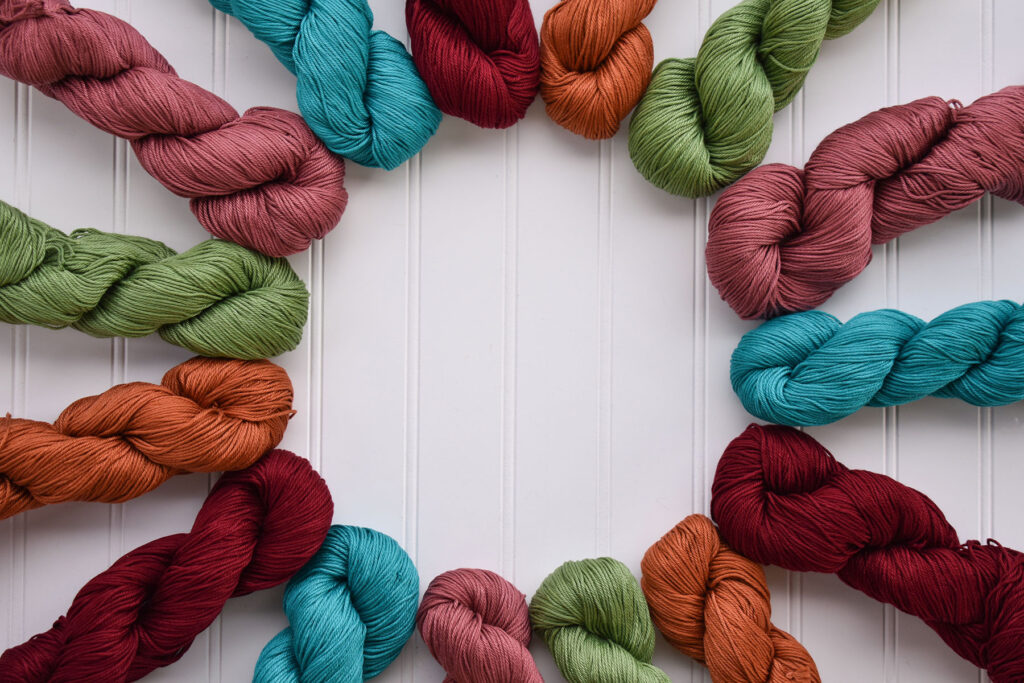
The Cotton Candy Shawl is knit with a modular construction, starting with a mitered square. Simple garter stitch is worked throughout so that you can focus on the construction of this pattern. Watch this shawl come to life as you knit one color at a time, resulting in a color-blocked appearance that shows off our bold Donnina yarn. The colors 224 Navy, 210 Sweet Pea, and 201 Vanilla are used in this project. As an added bonus, Donnina is a sport-weight yarn, meaning you can wear this shawl year-round.
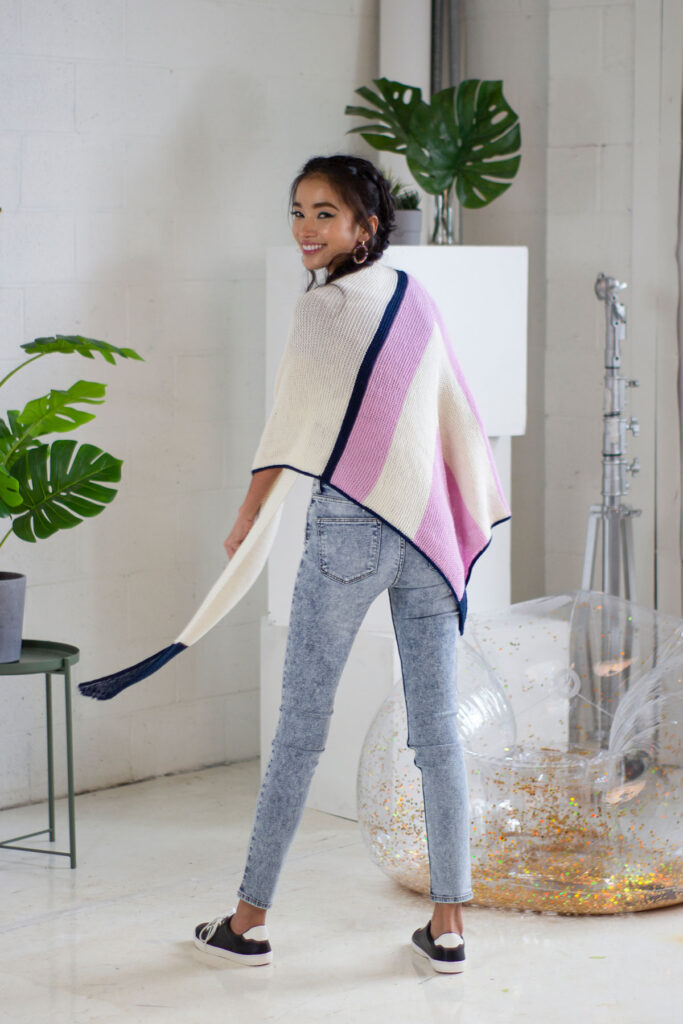
The Cotton Candy Shawl can be styled in many different ways
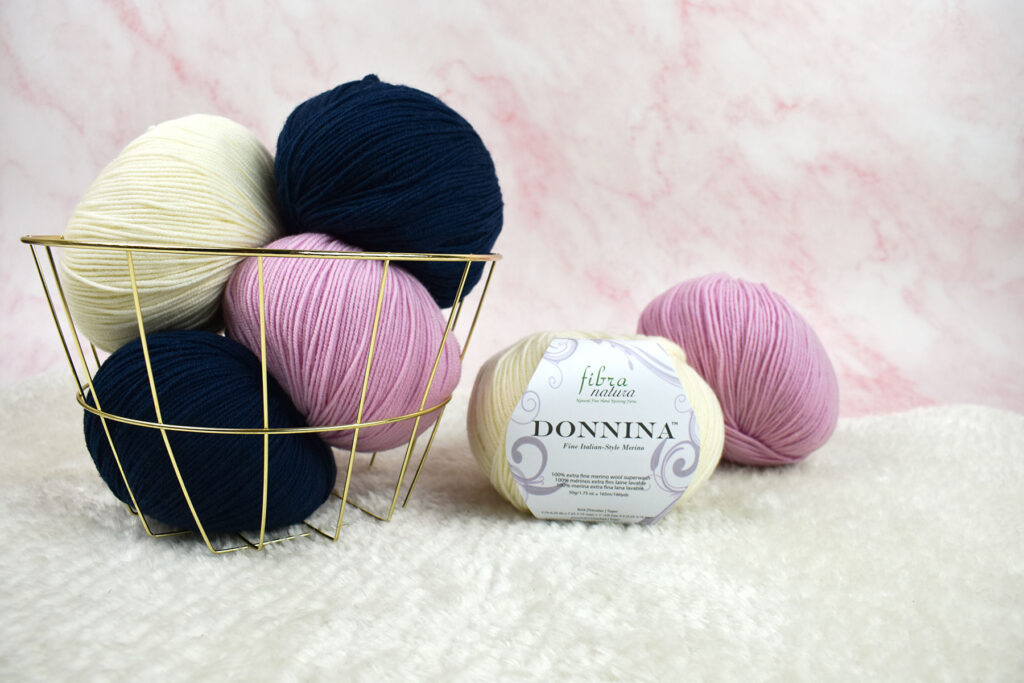
Sumptuous and smooth Donnina is the perfect complement to the Cotton Candy Shawl. Each 50g skein contains 180 yards of yarn that will leave you in awe. Donnina has 25 available colors, and you are more than welcome to substitute colors to create your own personalized Cotton Candy Shawl. It’s the perfect time to shop this yarn, as it recently went on sale for 40% off, and with this weekend’s sale, you can purchase Donnina for an extra 20% off. There are so many great patterns in this yarn, which you can see at this link.
Donnina is 100% superwash extra fine merino
I hope you enjoyed reading more about the Cotton Candy Shawl and our woolly Donnina yarn, and who knows, maybe you’re inspired to head to the grocery store for some Cotton Candy (no shame in that). We encourage you to share all your finished Universal Yarn projects with us at #universalyarn on Instagram.
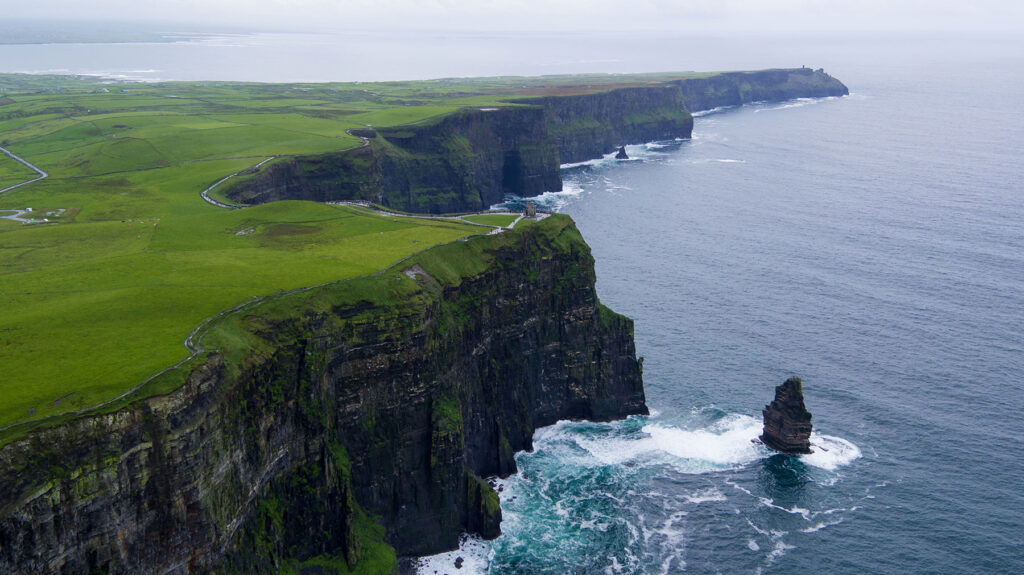
Whether you have visited in person, or only experienced it through photographs, no one can doubt the natural beauty of Ireland. Starting today, we’re bringing a touch of Ireland to your yarn stash – with Yarn Vibes.
Cliffs of Moher in County Clare, Ireland
We are now offering three beautiful yarns from Yarn Vibes, and I can’t wait to tell you more about these exciting yarns!
Before I begin talking about the yarns, let’s take a closer look at the Yarn Vibes brand. Each hank of yarn starts in Kildare with ninth-generation farmers; after the shearing, the fleece begins processing at Donegal Yarn in Ireland. Donegal Yarn is an authentic mill that produces beautiful Tweed and Irish yarns, including Yarn Vibes’ 100% Irish yarns. All of their yarns feature a variety of dyed and un-dyed options.
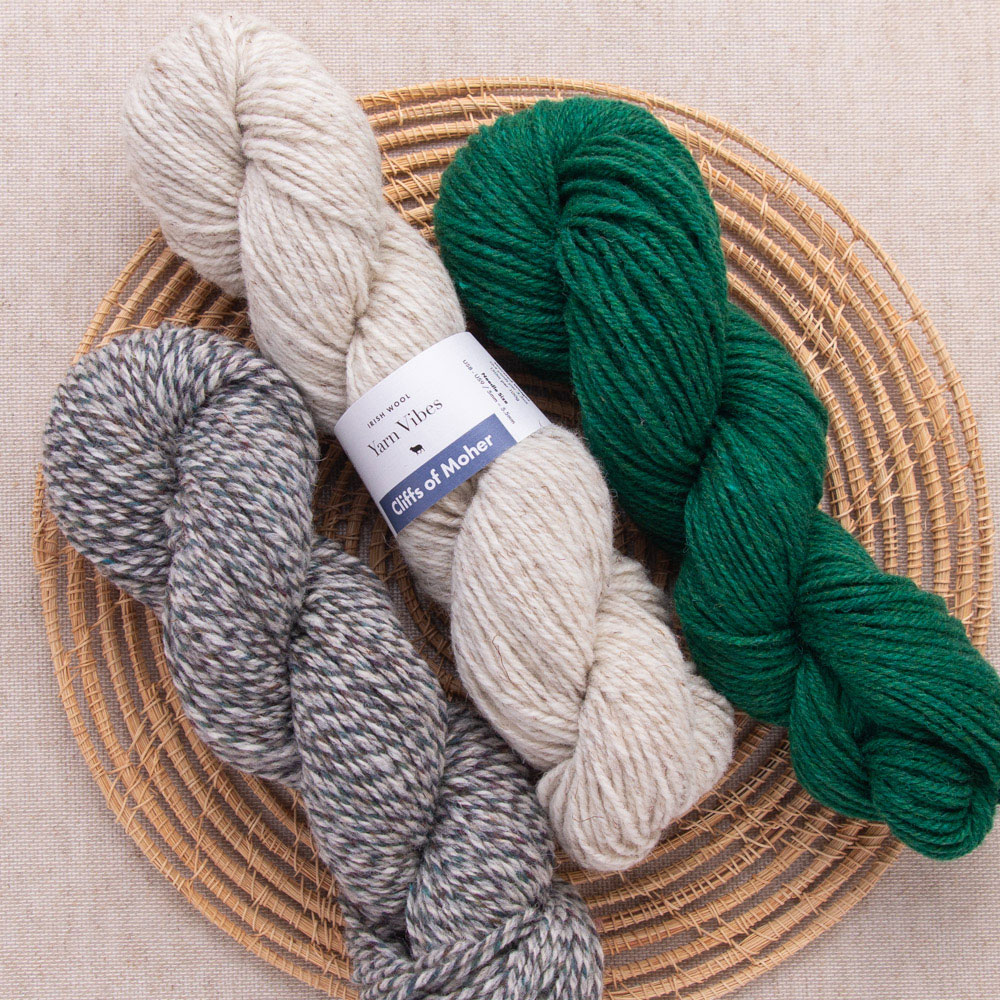
Cliffs of Moher yarn from Yarn Vibes
Now, let’s turn our attention to the yarn from Yarn Vibes, starting with Cliffs of Moher. Tradition and the roots of Ireland can be seen in this beautiful, nature-inspired yarn, named after the iconic cliffs of western Ireland. This worsted weight yarn is a blend of 60% Irish wool and 40% virgin wool. Cliffs of Moher is soft to the touch, with stitch definition that makes it perfect for any knitting or crochet project, from garments to accessories. With 16 color options, you can add a touch of your personality to your next project!
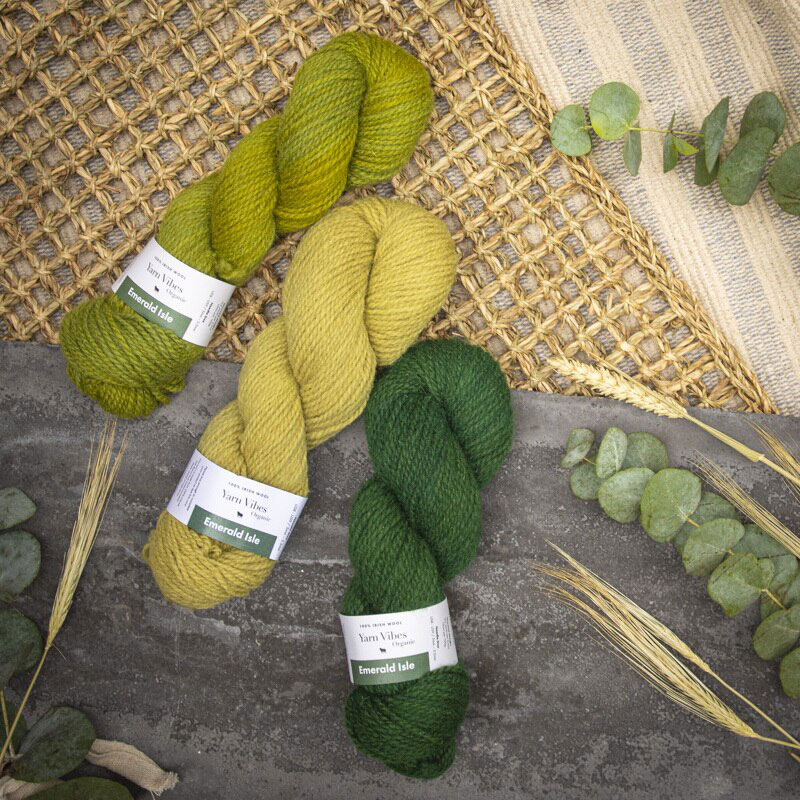
Organic – Worsted from Yarn Vibes
Next up is the Organic Yarn from Yarn Vibes. As we know, wool is lovable for so many reasons: insulating fibers, natural water resistance, breathability. With Yarn Vibes 100% Irish organic wool yarns, it is now environmentally conscious as well! Just another reason to fall in love with wool. These fibers have been thoughtfully handled to ensure you have the best knitting experience possible. Make a sweater for a loved one with peace of mind knowing you and your family will be safe from any harmful chemicals since their yarn uses GOTS-certified dyes (Global Organic Textile Standard). This organic yarn is found in both worsted and sport weight and features 19 different color options, including four undyed choices.
Pattern inspiration is something we all need, and Yarn Vibes has more than enough to spare. Let’s take a look at some projects you can start with!
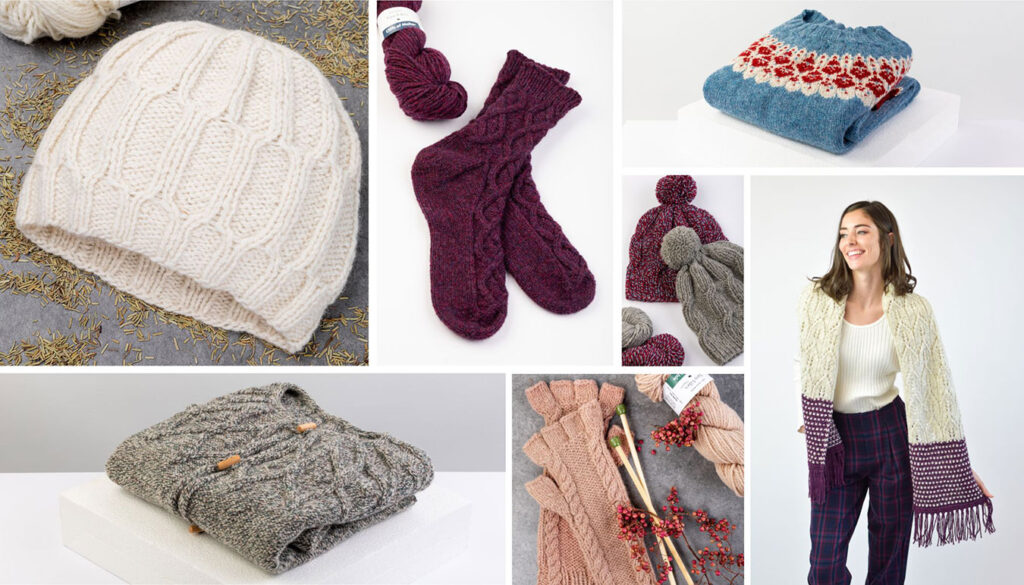
Whether you’re looking to knit a winter garment or accessory, here you’ll find the perfect pattern to add to your queue. The Orla Lattice Hat Knitting Pattern (top left) features a gorgeous textured design and includes multiple different sizing options in the Organic Worsted yarn. If you are more interested in knitting a garment, you might want to start with the Fia Cabled Cardigan (bottom left). Buttons and cables give this cardigan a classic look, and the 100% Irish organic wool will keep you warm on the coldest days of winter and spring. This project uses the Organic Worsted and allows you room to pick the color you prefer.
Our in-house design team was also inspired to create a pattern for Yarn Vibes! The Freya Scarf (bottom right) combines two different colors of Cliffs of Moher to create a classic Irish look with a soft and woolly texture. You can download it for free today!
Thank you for reading, and we can’t wait for you to try Yarn Vibes. Make sure to share all your Yarn Vibes projects with us on Instagram by using #universalyarn.
If you would like to learn even more about Yarn Vibes, please watch this YouTube video about their brand, which can be found at this link.
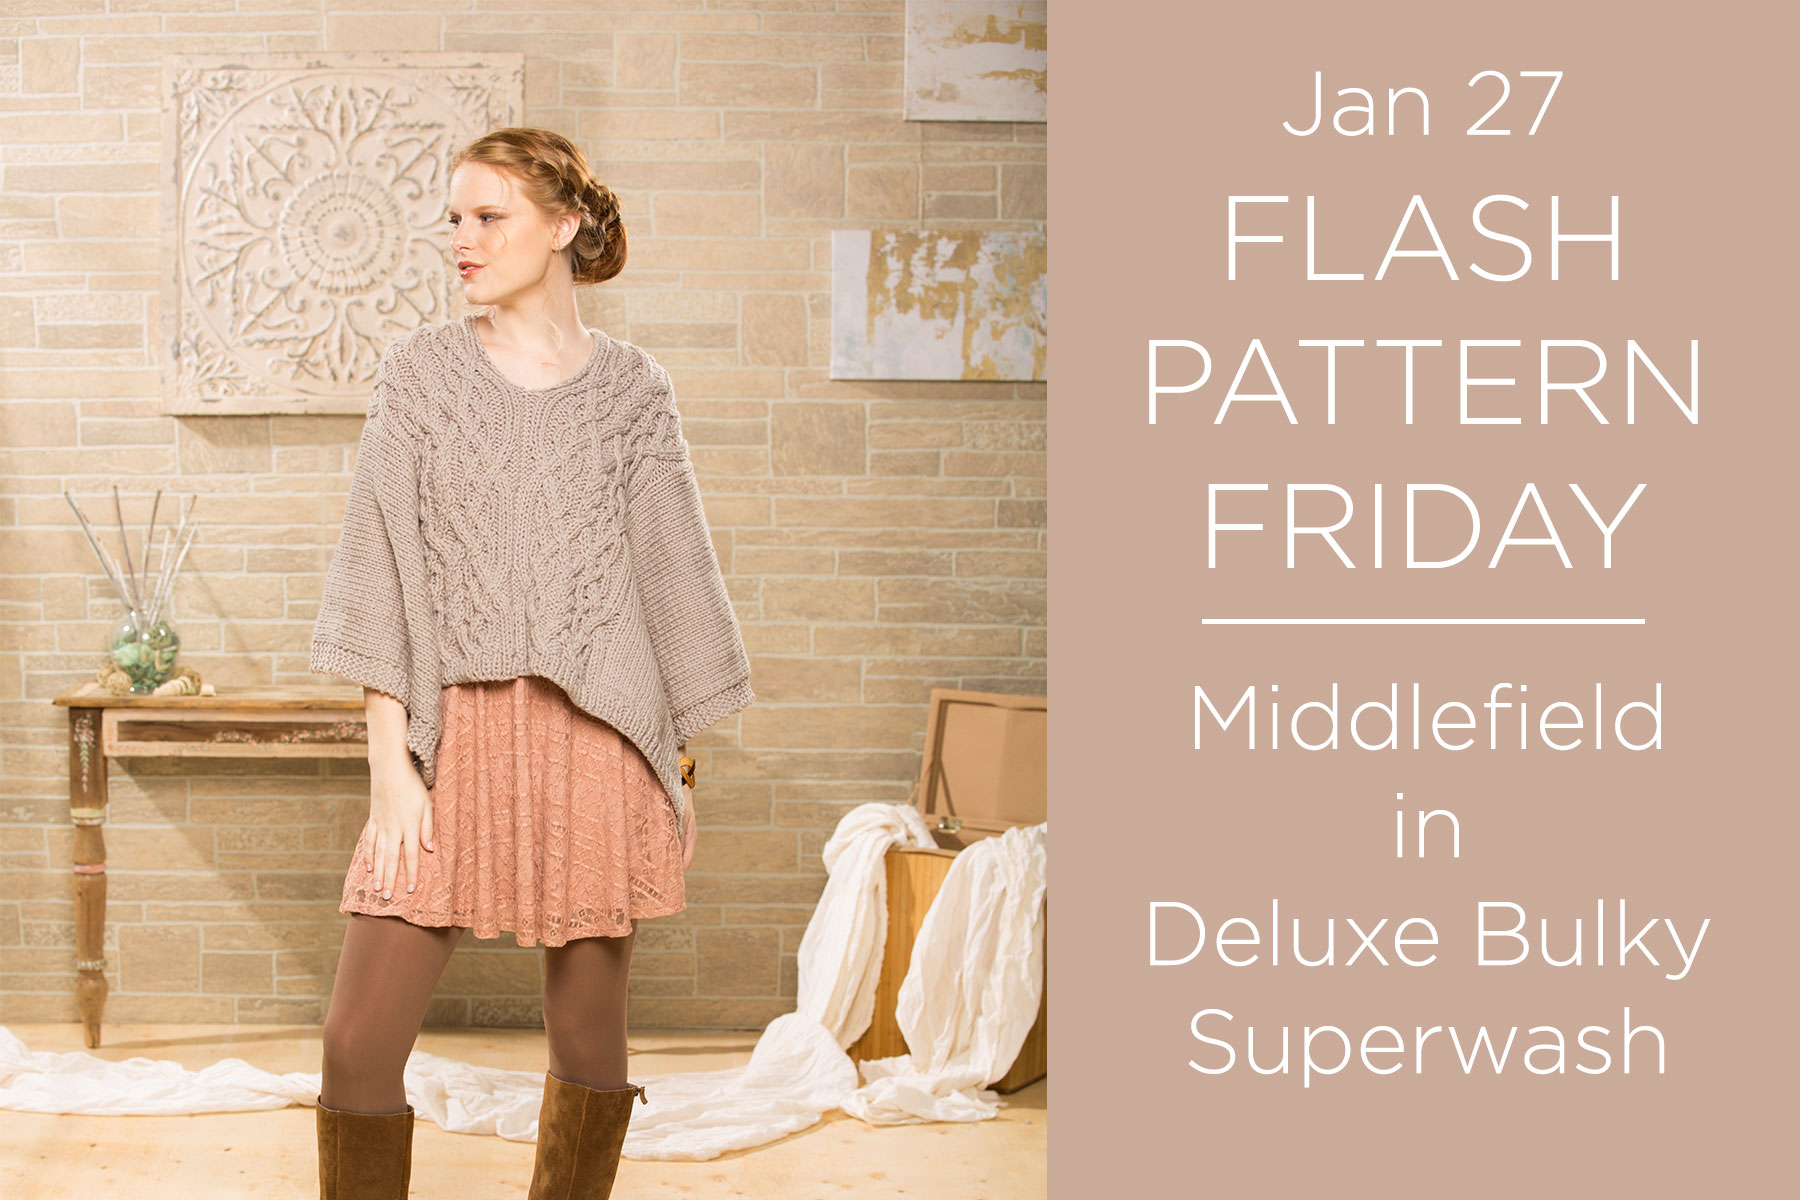
Our first Flash Pattern Friday of 2023 is finally here! This weekend only, grab a free copy of this gorgeous knitting pattern!
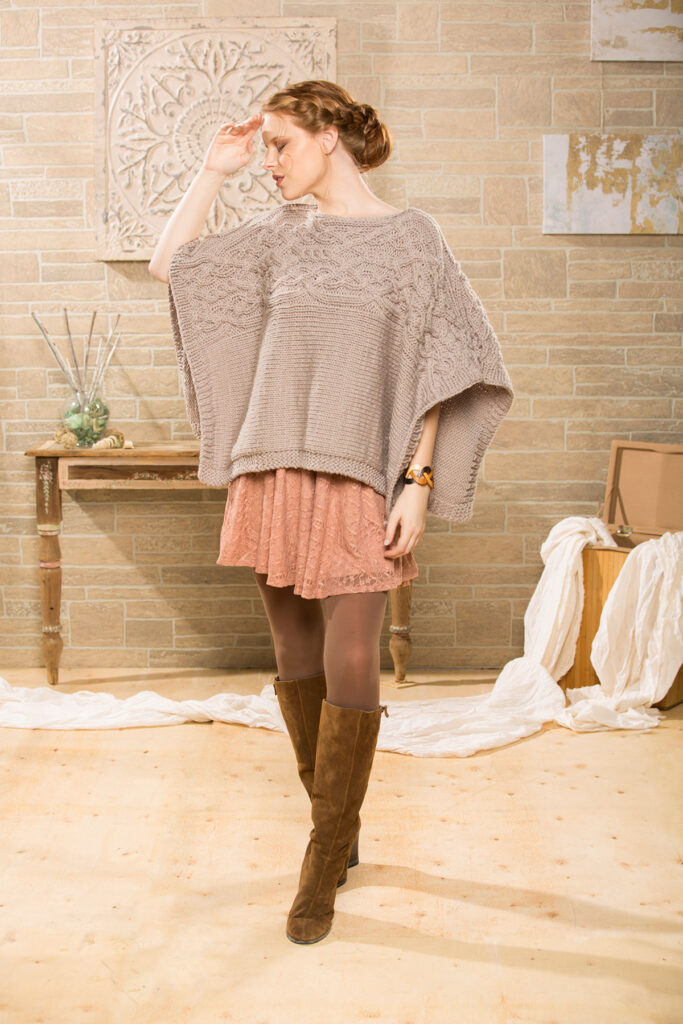
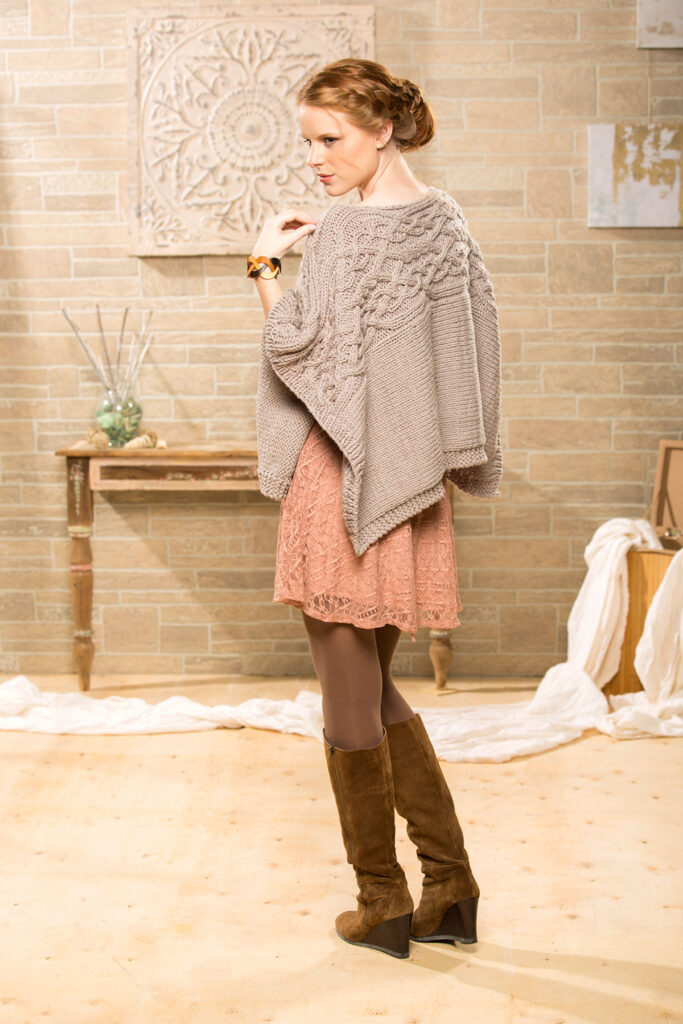
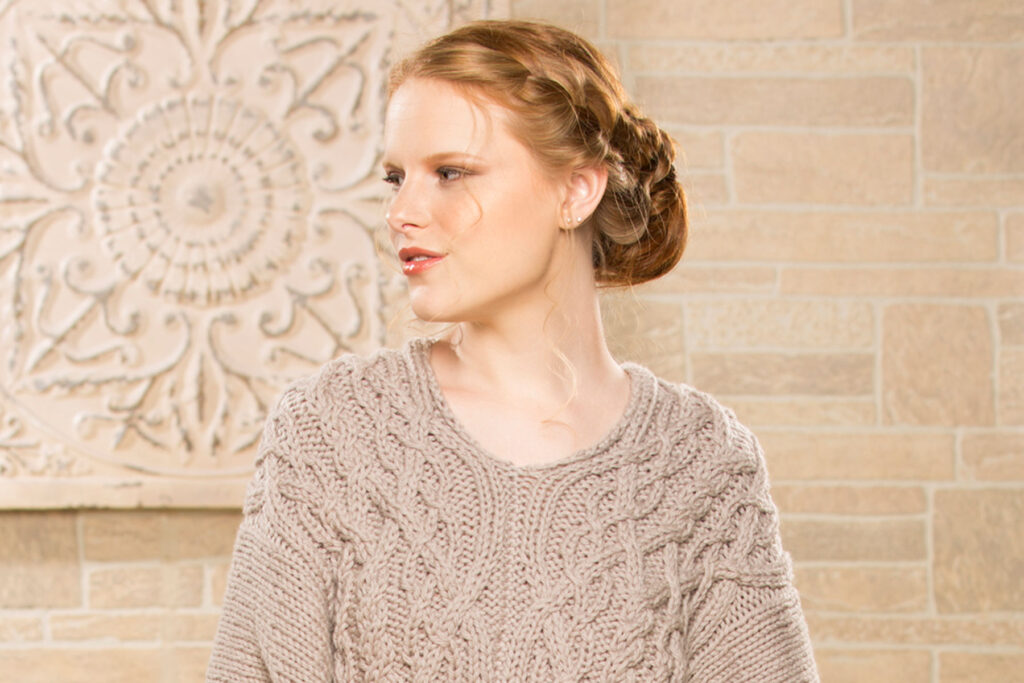
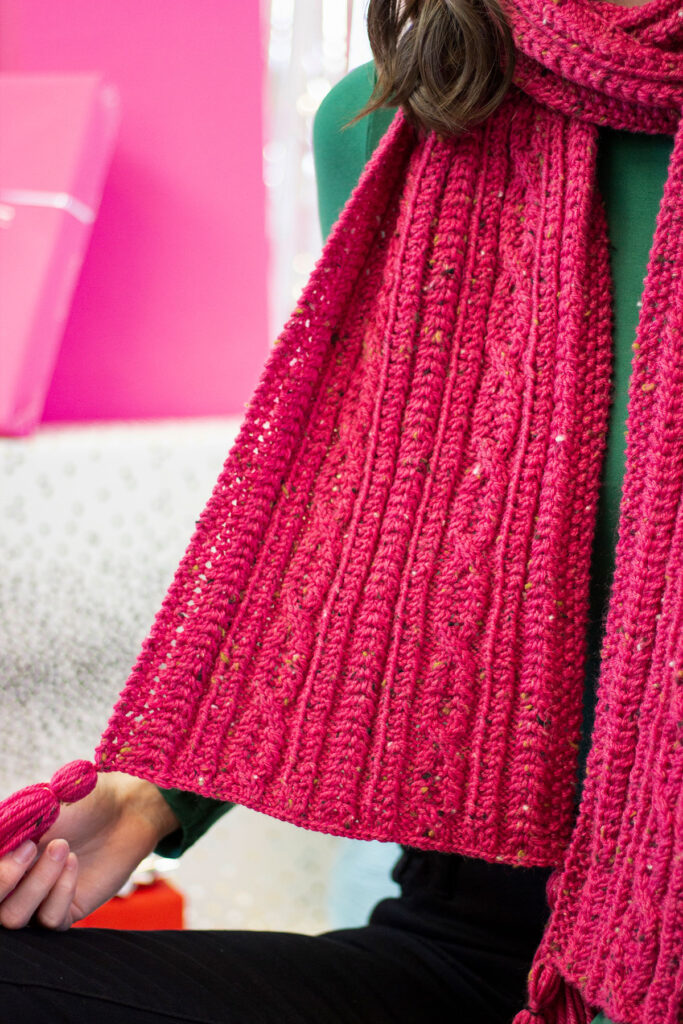
Middlefield is the perfect layering piece for the coldest days of winter
On the last Friday of every month, we take a beautiful paid pattern and make it free for the weekend! Today, we’re making the Middlefield (Ravelry link) free to you, a timeless cabled design in our Deluxe Bulky Superwash yarn.
This piece can be worn with the cabel panels horizontal or vertical, whichever you prefer!
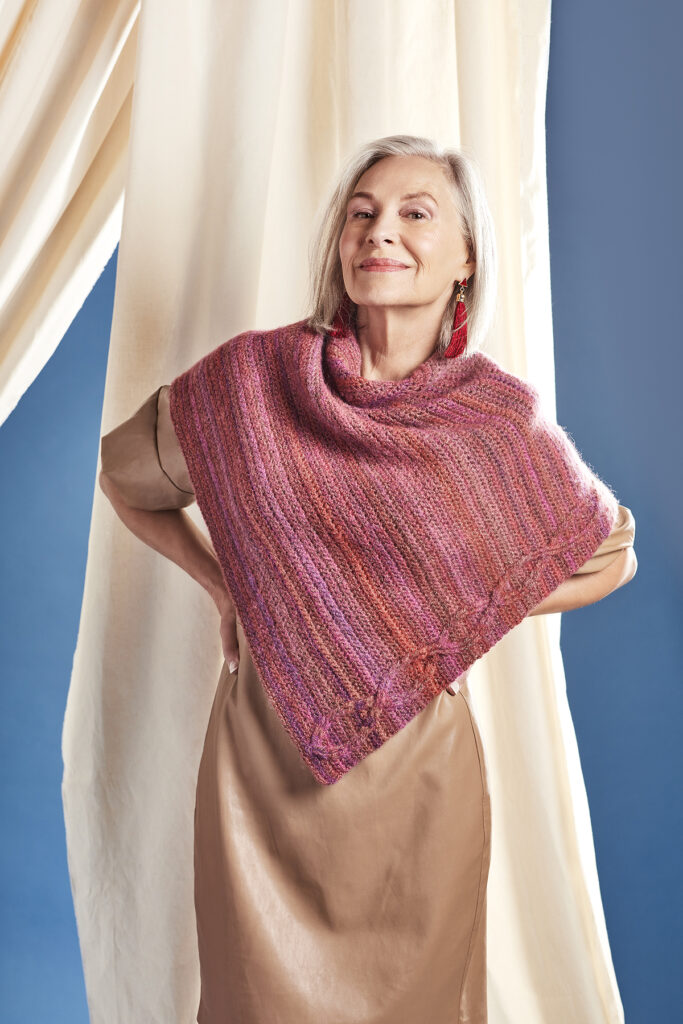
Middlefield was first published in 2017 as part of the Ethereal Knits ebook. This collection features seven garments and accessories that are perfect multi-season options for your wardrobe. However, Middlefield is a great challenge for those looking to grow their knitting skillset. This knitted poncho has cabled panels that can be worn horizontally or vertically, depending on your preference. The two sides are identical rectangles, knit sideways and then seamed together to complete this garment. While this outwear piece uses the color 930 Steel Cut Oats, there are plenty of options for those looking to go a different direction.
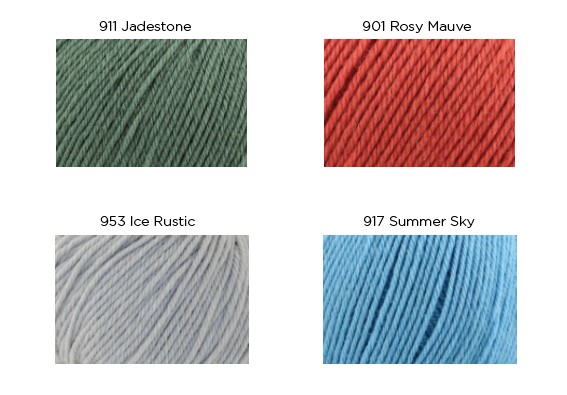
Here are some alternative color options that I would like to suggest. Jadestone brings a beautiful earthy tone that would be perfect for springtime (warm weather, we miss you). Pantone just released their 2023 Color Of The Year, Viva Magenta, and Rosy Mauve would make a great choice if you want to go that route. While winter is still here, Ice Rustic and Summer Sky present two frosty colors that would match the season perfectly. No matter what shade sparks your creativity, I know you will find inspiration from our 50+ color options in Deluxe Bulky Superwash.
This poncho will keep you warm year-round thanks to the 100% superwash wool and bulky yarn weight of Deluxe Bulky Superwash!
To get Middlefield for free, head to Ravelry and click “buy it now” or “add to cart” after searching for this pattern. When you reach the checkout, enter the code “FLASH” to get this pattern for free. Not a Ravelry user? Email us at pattern@universalyarn.com by Sunday, January 29th, and we will take care of you when we return to the office next week.
This graphic will help guide you through the checkout process to get Middlefield for free
We hope that you enjoy this limited-time free pattern, and make sure to shop Deluxe Bulky Superwash this weekend to save 20% off, no code necessary (1/27 – 1/29).
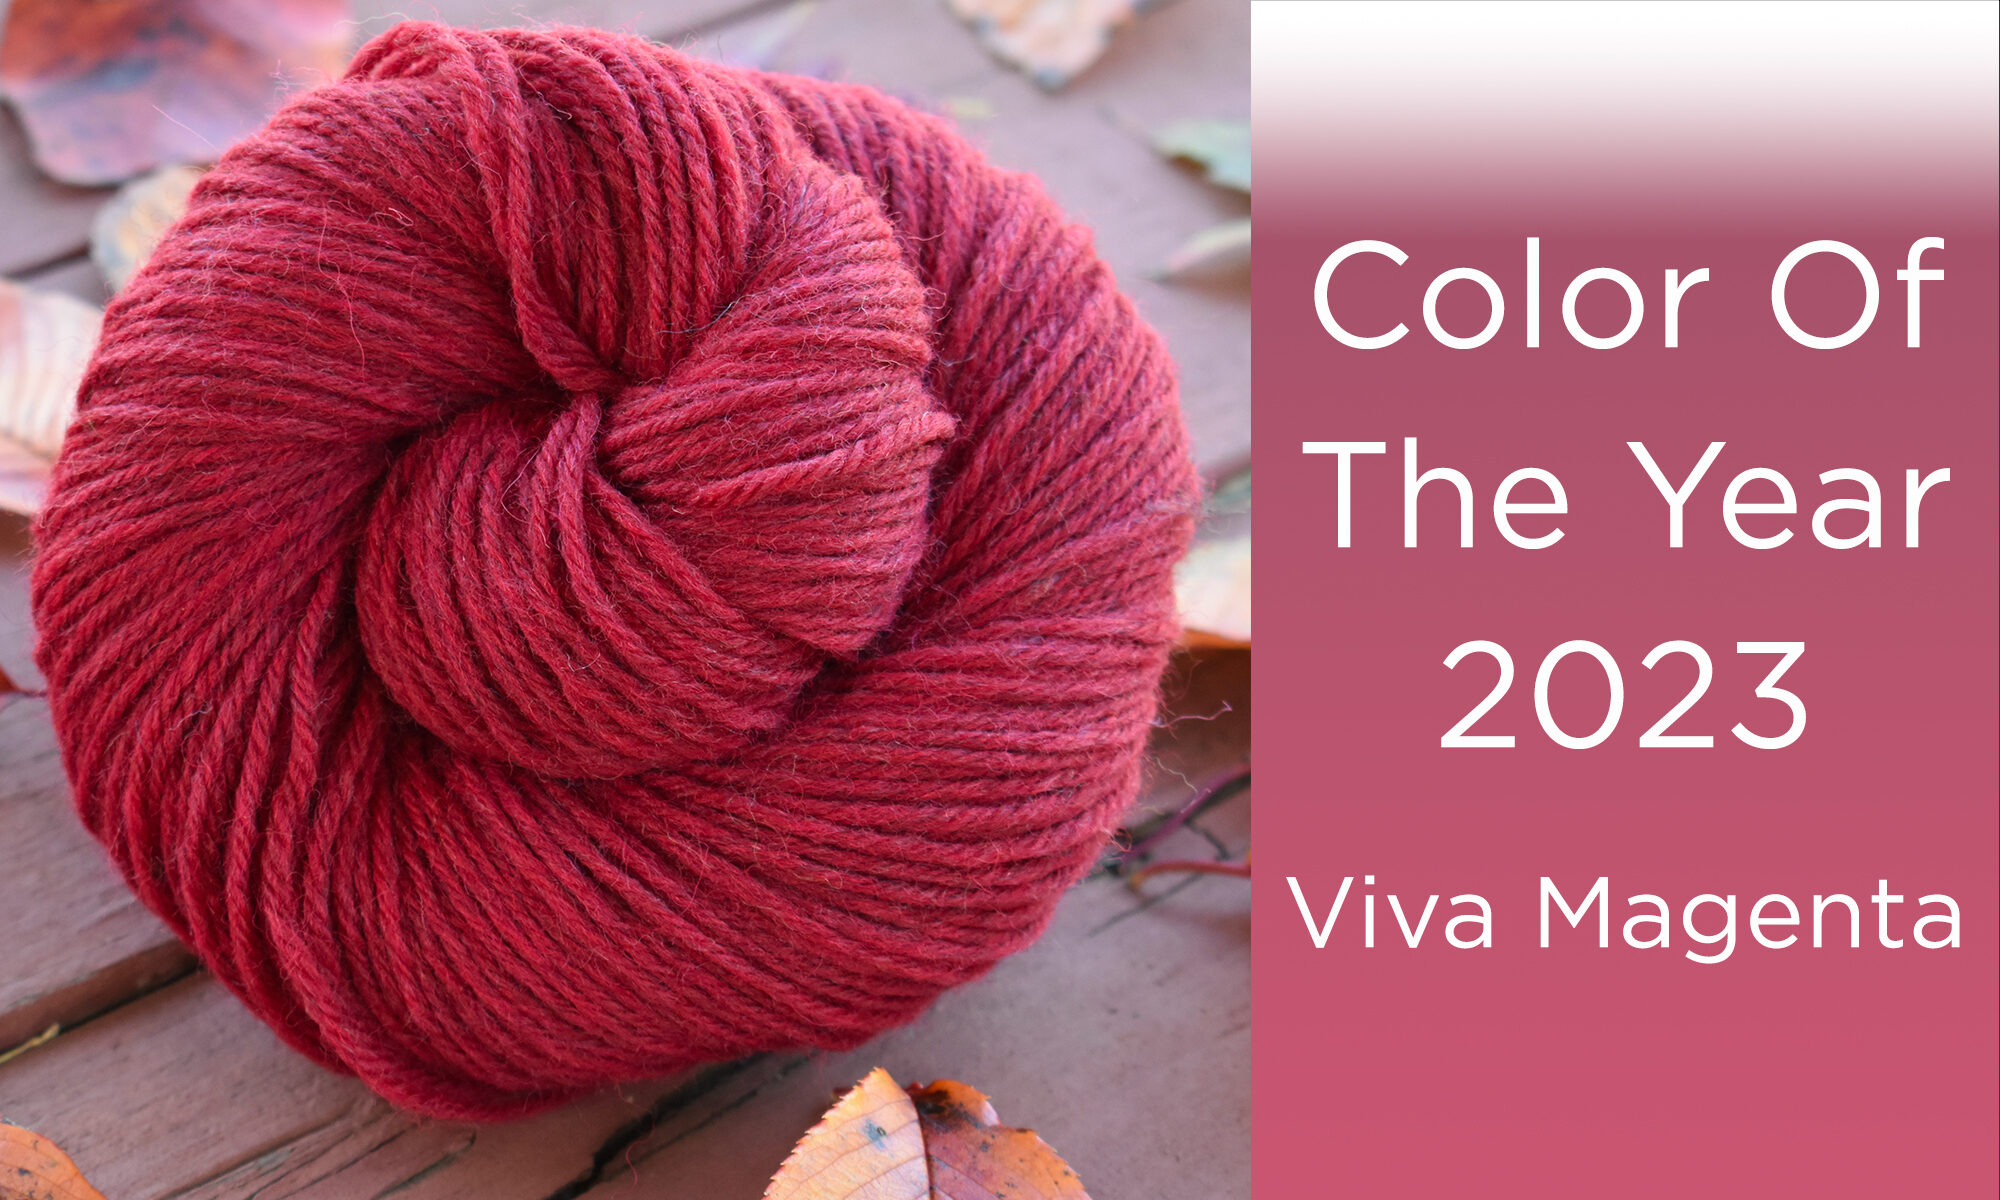
With this year coming to a close, we’re all wondering what is next for 2023. You might be thinking about your resolutions and goals for the year ahead, or perhaps a new project you’d like to get started on.
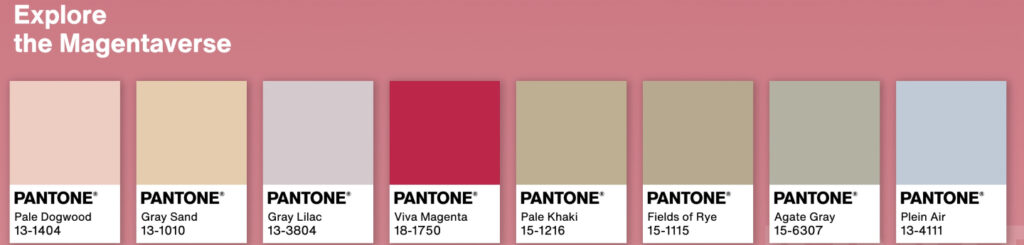
Every year, Pantone releases their ‘Color Of The Year’, which influences industries around the globe from things like paint manufacturers, to fashion brands, and all the way to yarn. The Color Of The Year is meant to be a forecast of the general mood for the year ahead, give direction to companies for product development, and serve as inspiration to all of us. The color for 2023 is Viva Magenta. So, lets dive into the Magentaverse!
Image sourced from Pantone’s Color Of The Year Report
Viva Magenta is a vibrant and bold shade that is a hybrid of red and pink. It immediately feels like a strong, expressive color, and is deeply rooted in nature. It has an almost rebellious tone to it, and is a fearless hue you can proudly sport in amounts both great and small.
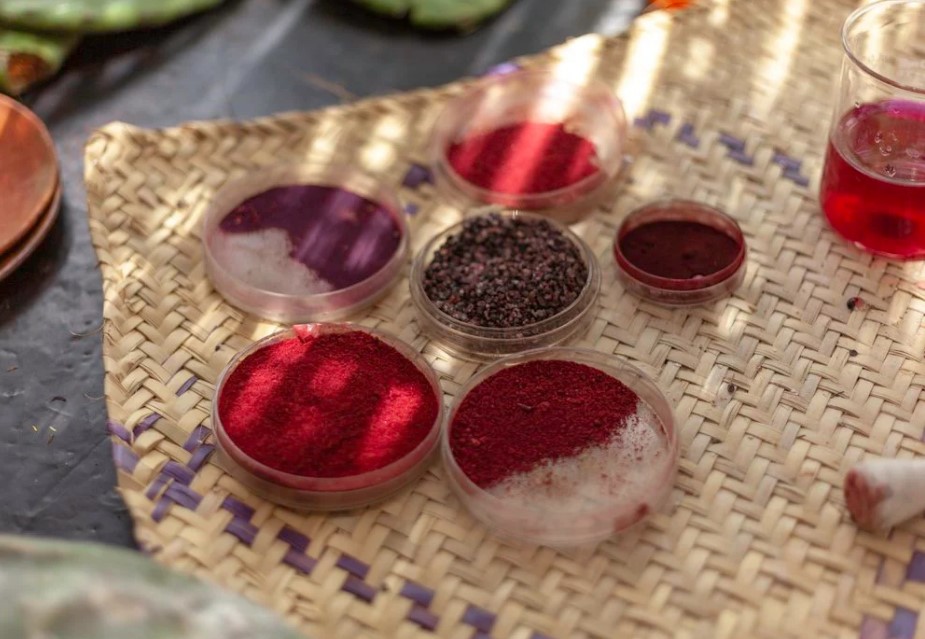
Image sourced from the Smithsonian
Although Viva Magenta feels a bit futuristic to look at, this color has ancient roots, being directly derived from Cochineal. These are scaly insects, which have been used for centuries to create powder dyes and colorants used for textiles, cosmetics, food, and more. If you’d like to read more about this interesting and historical process, please check out this article from the Smithsonian.
With the roots of this color being its use for natural dyes, it is no surprise that we can find Viva Magenta in so many yarns! From solids to multis, many of the yarns in our line feature this strong color. As Viva Magenta is a blend of pink and red, I’ve included some options for yarns that lean toward both sides of the hue, and hopefully will provide great inspiration for your next project!
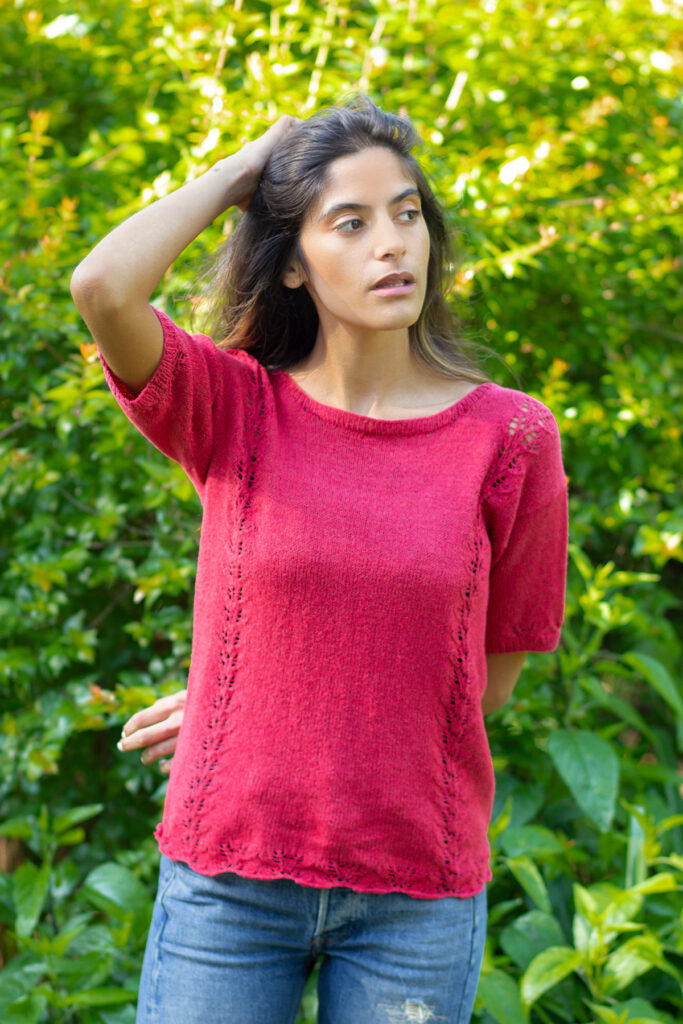
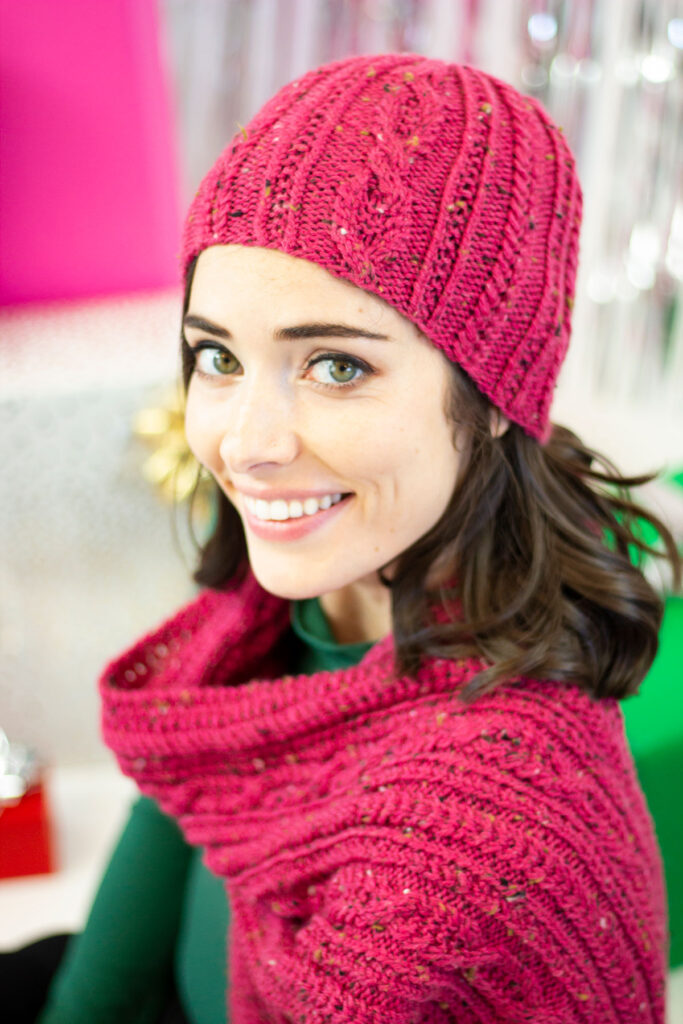
The Crimson Tee, a free pattern in Bamboo Pop Sock
Speaking of projects, I’ve selected some patterns that I think are perfect solutions for the 2023 Color Of The Year inspiration. First, I wanted to share the Crimson Tee. This free pattern was designed by Aubrey Busek (that’s me!) and uses our Bamboo Pop Sock yarn in the color 608 Pomegranate. This simple knit tee is sized from XS-5X, and has a relaxed silhouette that works for any occasion. The touches of lace are worked along the hemline of the body and sleeves, and panels of lace decorate the body. The Crimson Tee is a bold, fearless use of the Viva Magenta color, perfect for entering the new year with a bang.
The Parlamak Shawl in Noelle
For the crochet enthusiast, try the Parlamak Shawl! Designed by Brittany Garber, this sophisticated shawl is made using our Noelle yarn in the color 303 Pixie. I love that this shawl is simple and chic, so the vibrant red and pink colors in the yarn are really the focal point of the piece. Noelle has different shades that flow from one to the next throughout the skein, and its metallic core makes it extra special. This yarn is currently on sale, so don’t miss out on a great deal before its gone!
The Rose Garden Sweater in self-striping Offbeat
If you have a little one in your life to knit for, try the Rose Garden Sweater! Sized from 1-10 years old, this sweater is great for school days and fun outings. The cabled pattern on the body is easy to memorize, and adds just enough textural interest to not distract from the bold stripes created by the yarn. Offbeat is a blend of 90% acrylic and 10% alpaca that has been a hit since its launch in 2022. And it’s no question why: with a luxurious feel, bold colors, and 586 yards per skein, it is a great choice for all projects from blankets to sweaters. The color used for the Rose Garden sweater is 102 Tubular, and I love how the bold pops of red look with the soft neutral tones in this shade.
Image sourced from Pantone
Pairing Viva Magenta with soft neutral colors as seen in our Offbeat yarn (above) is exactly what is suggested by Pantone. The soft and dusty shades shown in their Color Of The Year report compliment Viva Magenta, but never take away from it being the focal point. However, if you prefer bright shades, do your thing! I think Viva Magenta would look wonderful paired with bright purple or hot pink. As with anything, you should do what speaks to YOU. Colors are personal, and a great way to express yourself.
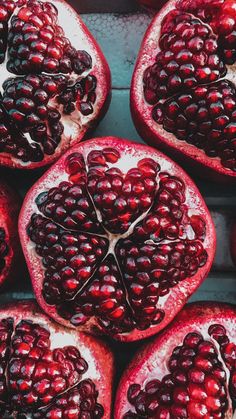
Image sourced from PinterestPomegranate Path Set
The last pattern I wanted to highlight was the Pomegranate Path set, designed by Rachel Brockman. New from our 12 Days of Winter Kit Collection, Series 6, this cabled hat and scarf set is perfect for just about anyone on your ‘to-knit-for’ list. The color of Deluxe Worsted Tweed used for this pattern is 921 Beet, but the pattern itself was named after the delicious fruit that also boasts the same color. When I was looking for inspiration for Viva Magenta on Pinterest, tons of photos of pomegranates immediately came up. They are my favorite fruit, so I knew I had to include this pattern!
Image from Pinterest Image from Pinterest
No matter how you want to explore the ‘Magentaverse‘, I can imagine that there is a shade of Viva Magenta that speaks to you. Personally, I think this color sets a wonderful tone for 2023. The past couple of years have been a rollercoaster for everyone on Earth in ways both great and small, and we can all benefit from the sense of inner strength that this type of bold color projects. I hope you get inspired, and have fun picking out some Magenta yarn for your next project!
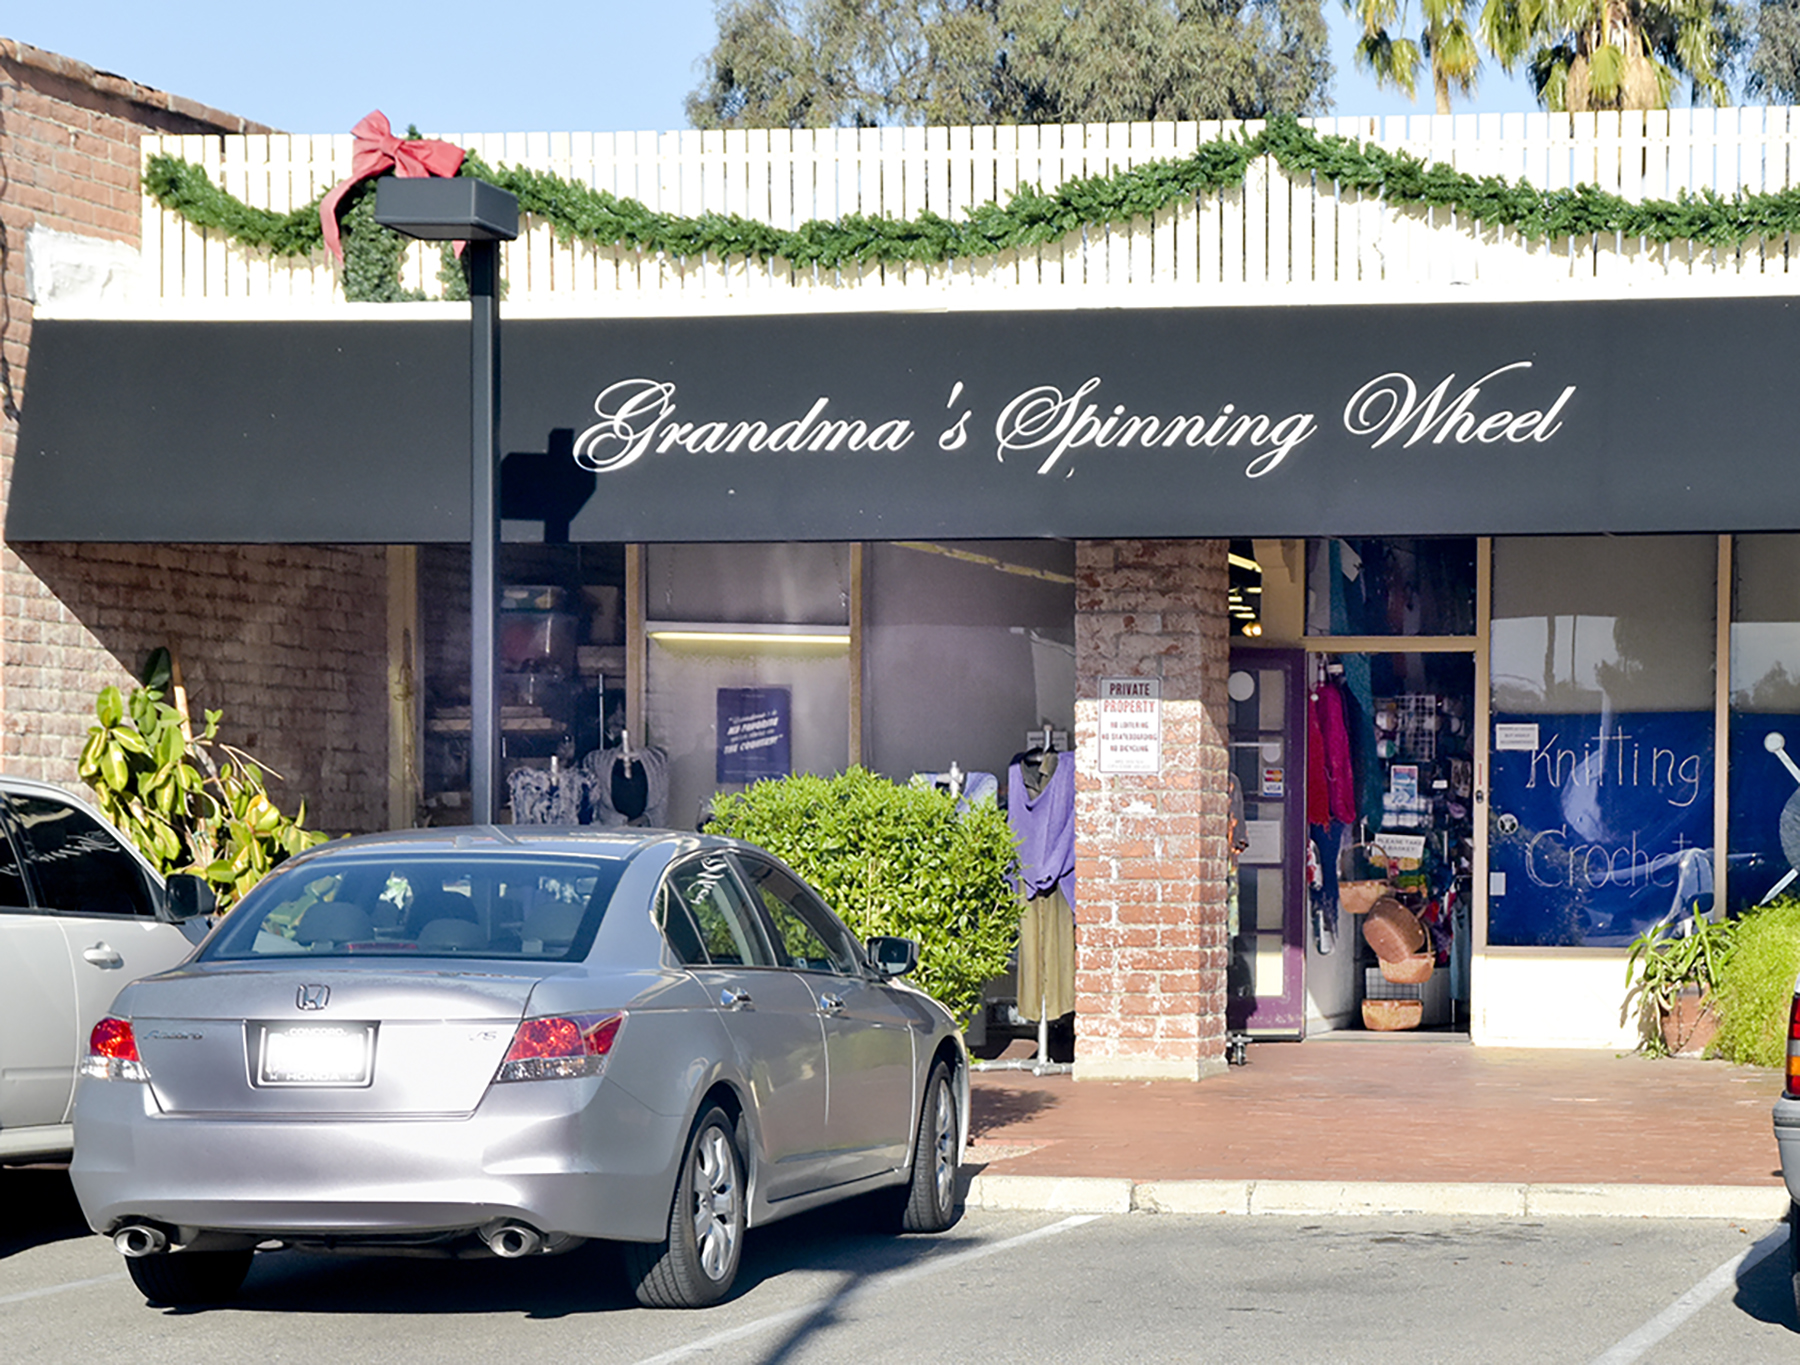
We love every opportunity to highlight the local yarn stores because they are the backbone of our business. This month for our “Meet a Local Yarn Shop” initiative; we went (virtually) to Tucson, Arizona to meet the wonderful people at Grandma’s Spinning Wheel. They are the featured store of the month for December!
Outside of Grandma’s Spinning Wheel in Tucson, Arizona!
If you ever find yourself taking a trip to Arizona, we highly suggest you stop by Grandma’s Spinning Wheel. The name itself is so inviting, and we know Vicky and the rest of the family will be happy to see you. Vicky and Michael Konecky are the owners of Grandma’s Spinning Wheel, which opened in Tucson, Arizona fifteen years ago (happy anniversary!!)
A former teacher, Vicky, decided to open a yarn shop upon retirement from the school system. One day she pulled up to the building in the above image, saw a “for rent” sign, and the rest is history. A lot can happen in 15 years of business ownership, but Vicky’s constant has been family. Her daughter, Cassondra, is now also very involved with the day-to-day at Grandma’s Spinning Wheel.
We know, you want to hear about the yarn that is inside of this wonderful store. Keep reading below to learn more about this shop, and see the yarns that are stocked on their shelves!
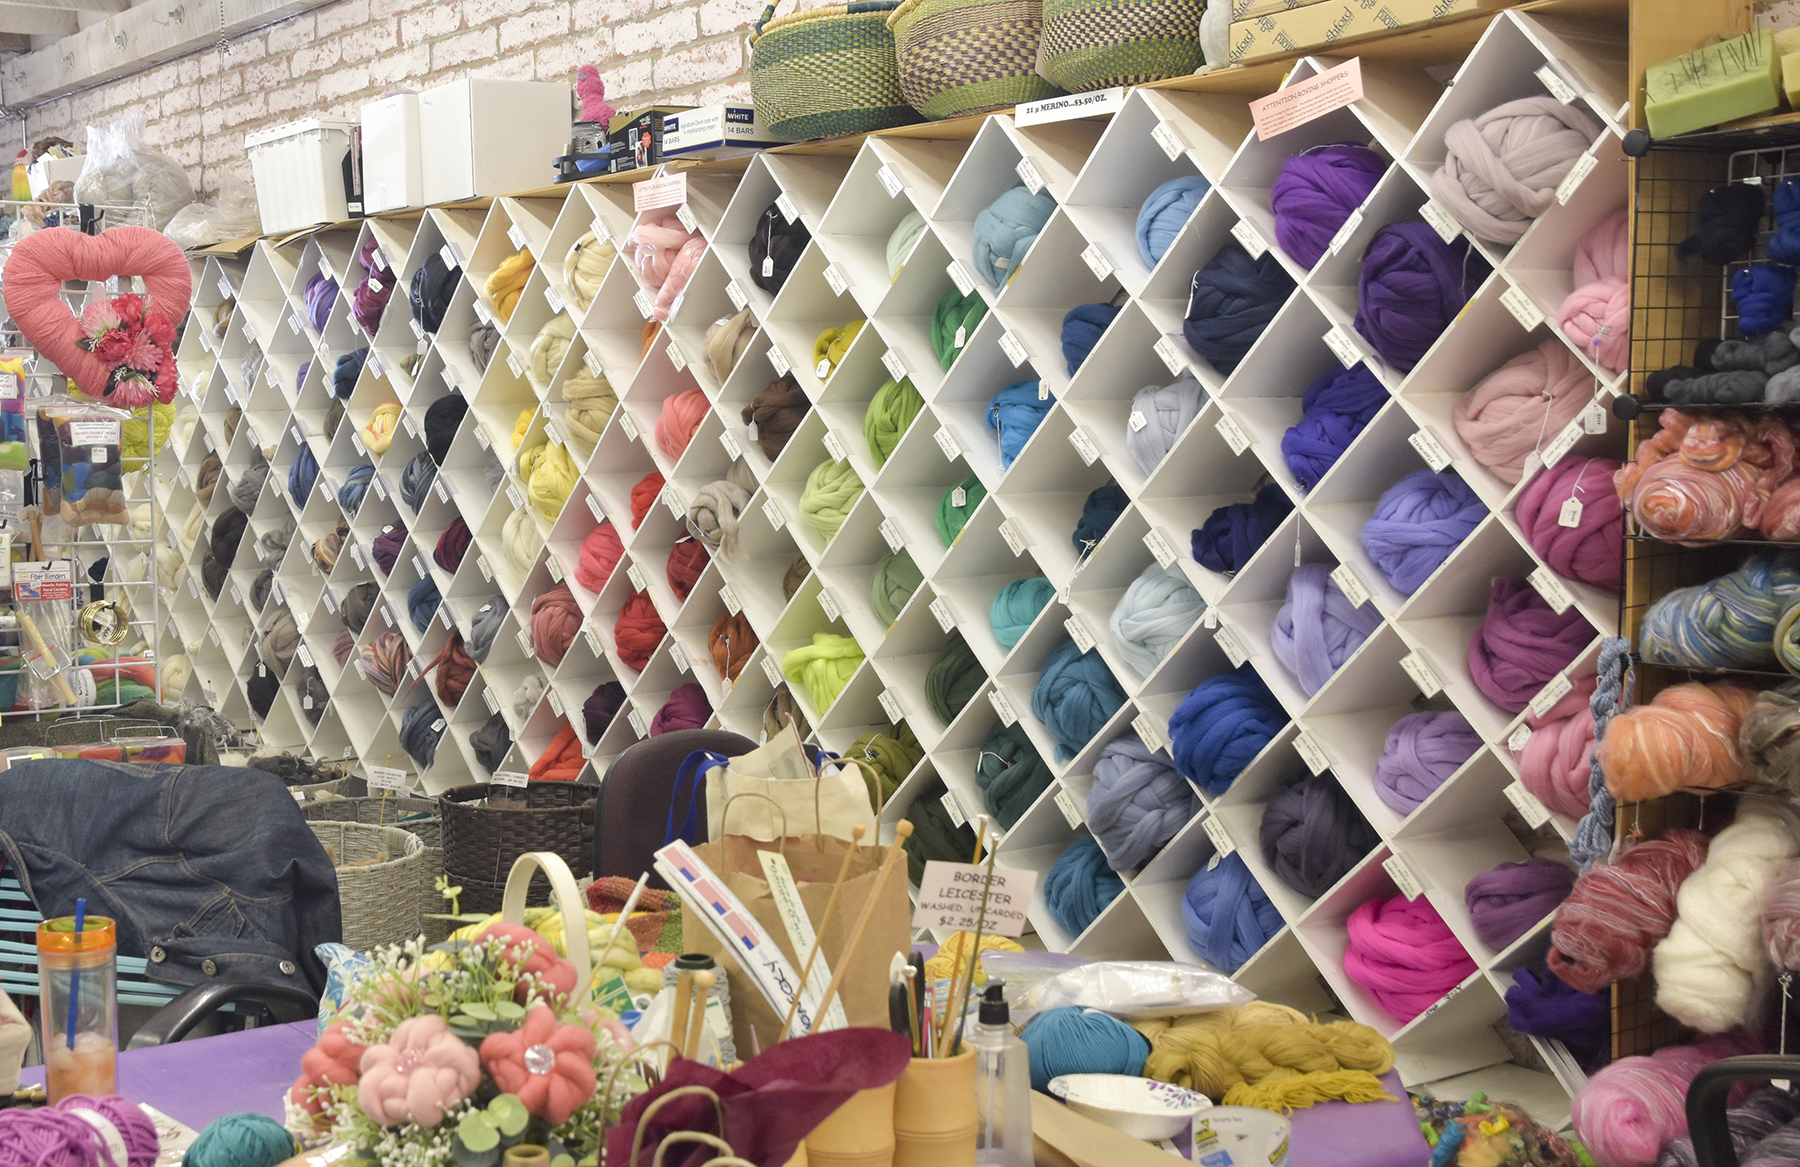
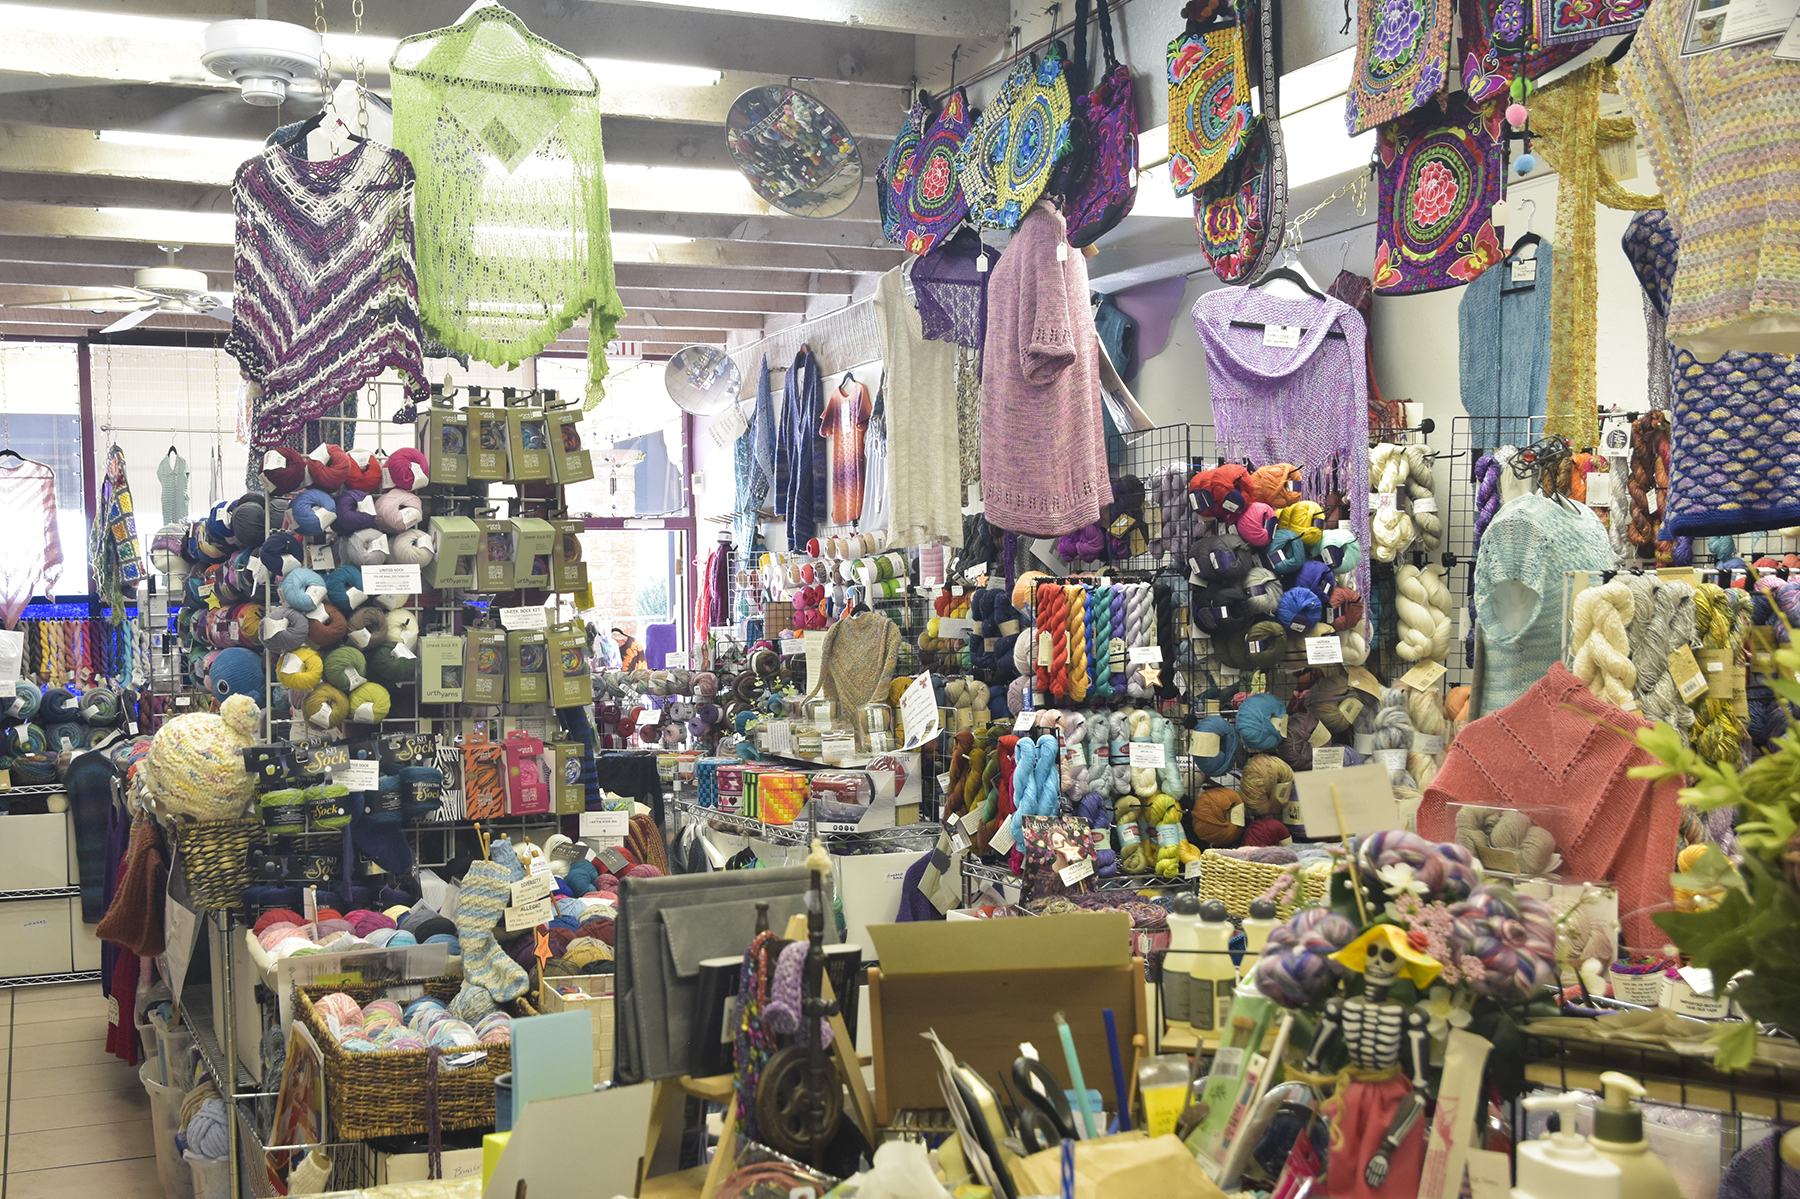
The Fiber Wall of Grandma’s Spinning Wheel features exciting colors for your next projects!!
Due to the climate of Arizona, Grandma’s Spinning Wheel features a lot of light-weight yarns, and breathable fibers. You can find several of our summer yarns on their shelves, including Clean Cotton, Clean Cotton Multi, and Cotton Supreme. In our interview with them, Vicky and Cassondra mention that it can get as hot as 120 degrees Fahrenheit in the summer, so it benefits their customers greatly to have yarn options well suited to the heat.
This store is full of yarn, and resources to set all different types of fiber artists up for success!
Wool in Arizona? You better believe there is wool in this shop. Wool is an excellent option for all climates because it is naturally moisture wicking and breathable. They mention that Deluxe Worsted is one of the favorites at the store and is often used for felting projects since it is 100% non-superwash wool.
Major is another favorite that it is often used by their customers to create baby blankets. This yarn features so many fun colorways, plus a soft and smooth texture that makes it great for all types of projects!
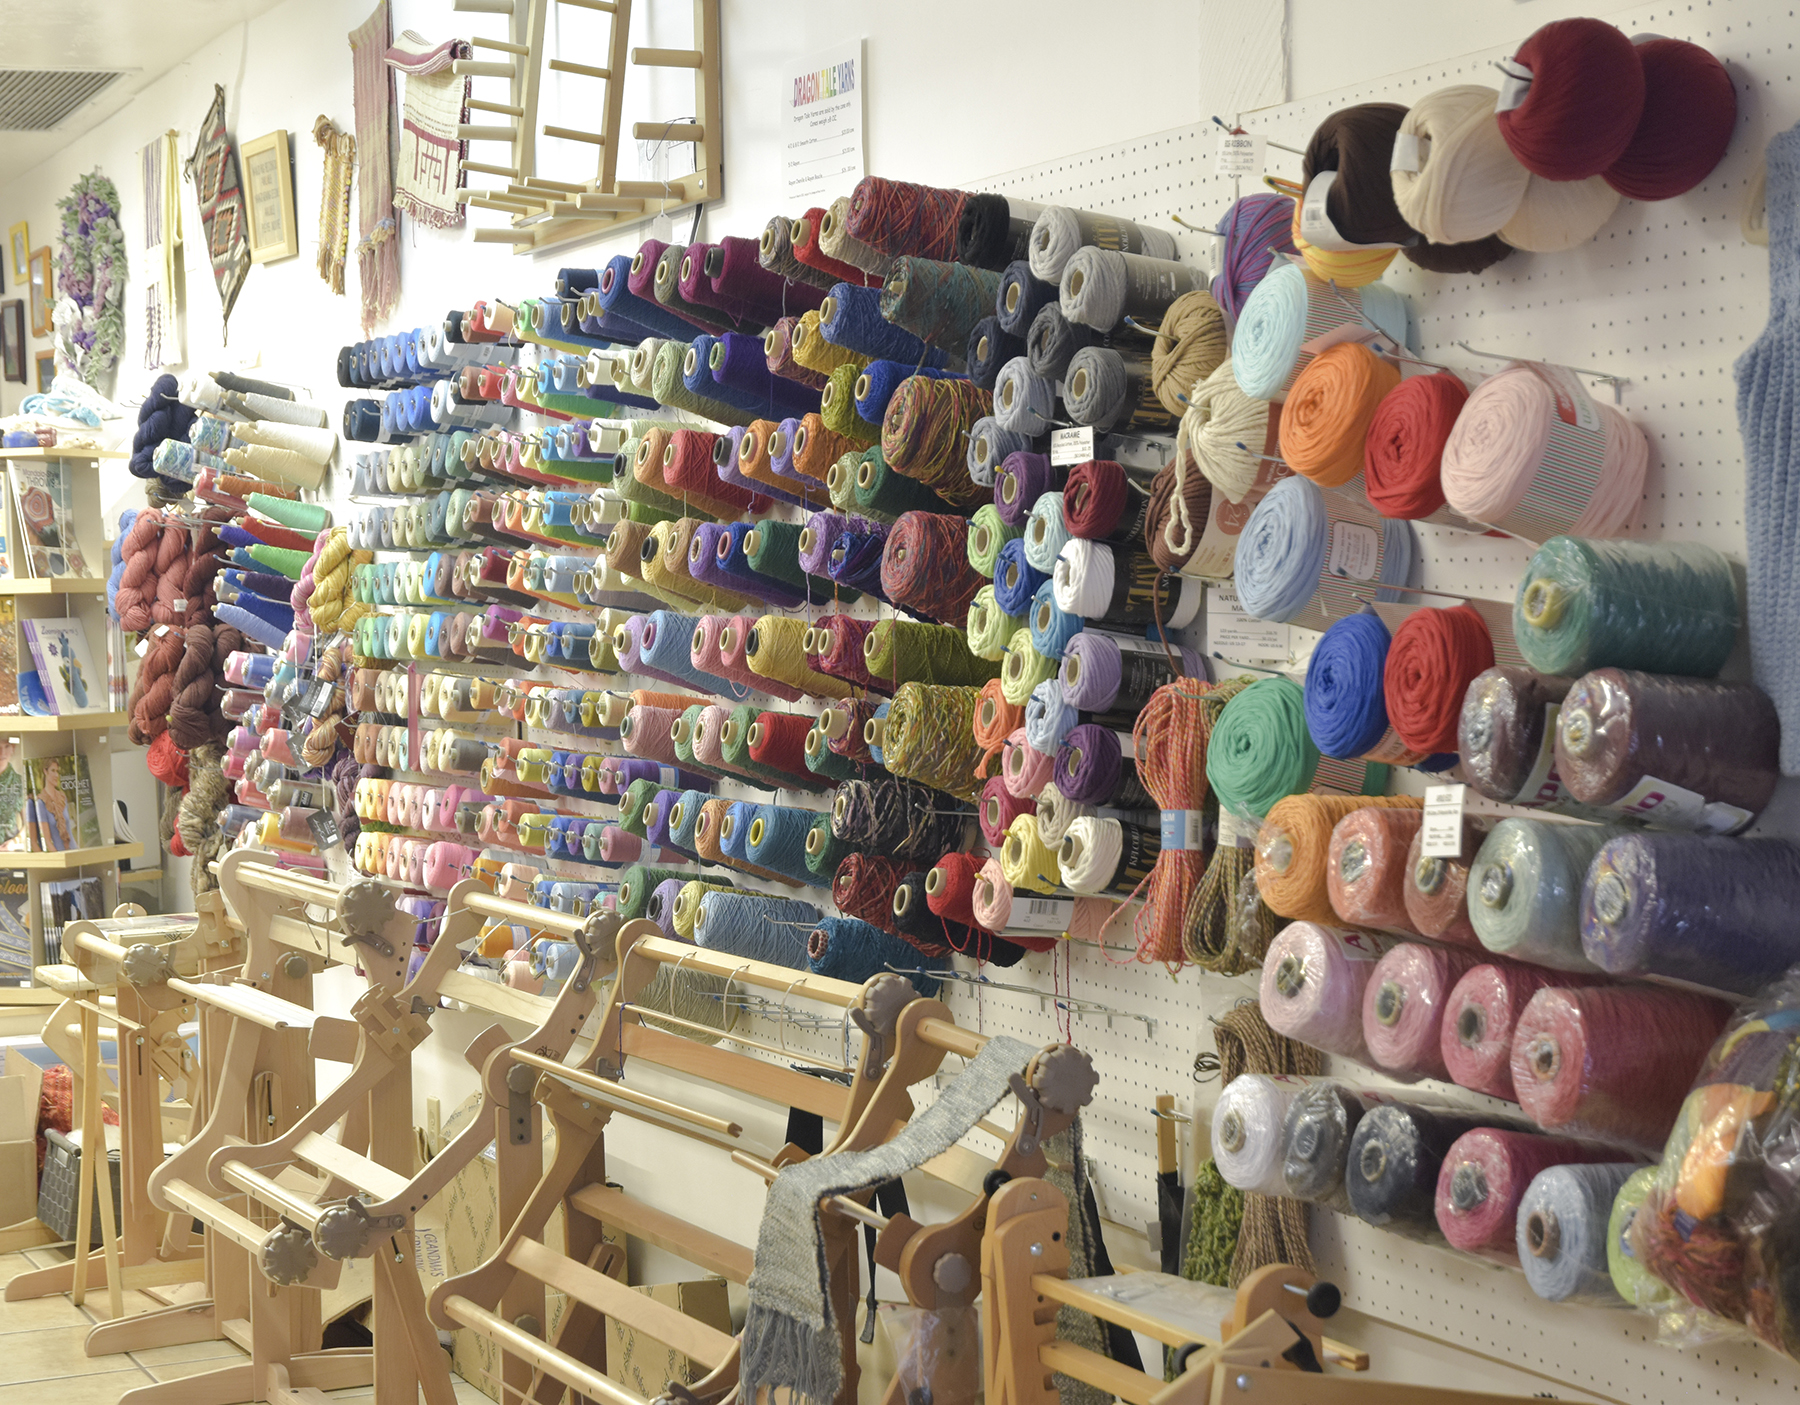
At Grandma’s Spinning Wheel, you can find plenty of weaving yarn and supplies as well!
When a customer completes their project, they are invited to bring it to the shop for it to be photographed, and then the shop shares the customer’s FO (finished object) in a post on their website. It’s a great way to “show and tell.”
That’s not the only way they give back to their customers, though. The shop offers many classes to grow customer skillsets. Examples of their offerings include “Beginning Spinning” and “3-D Needle Felting.” There is something for everyone!
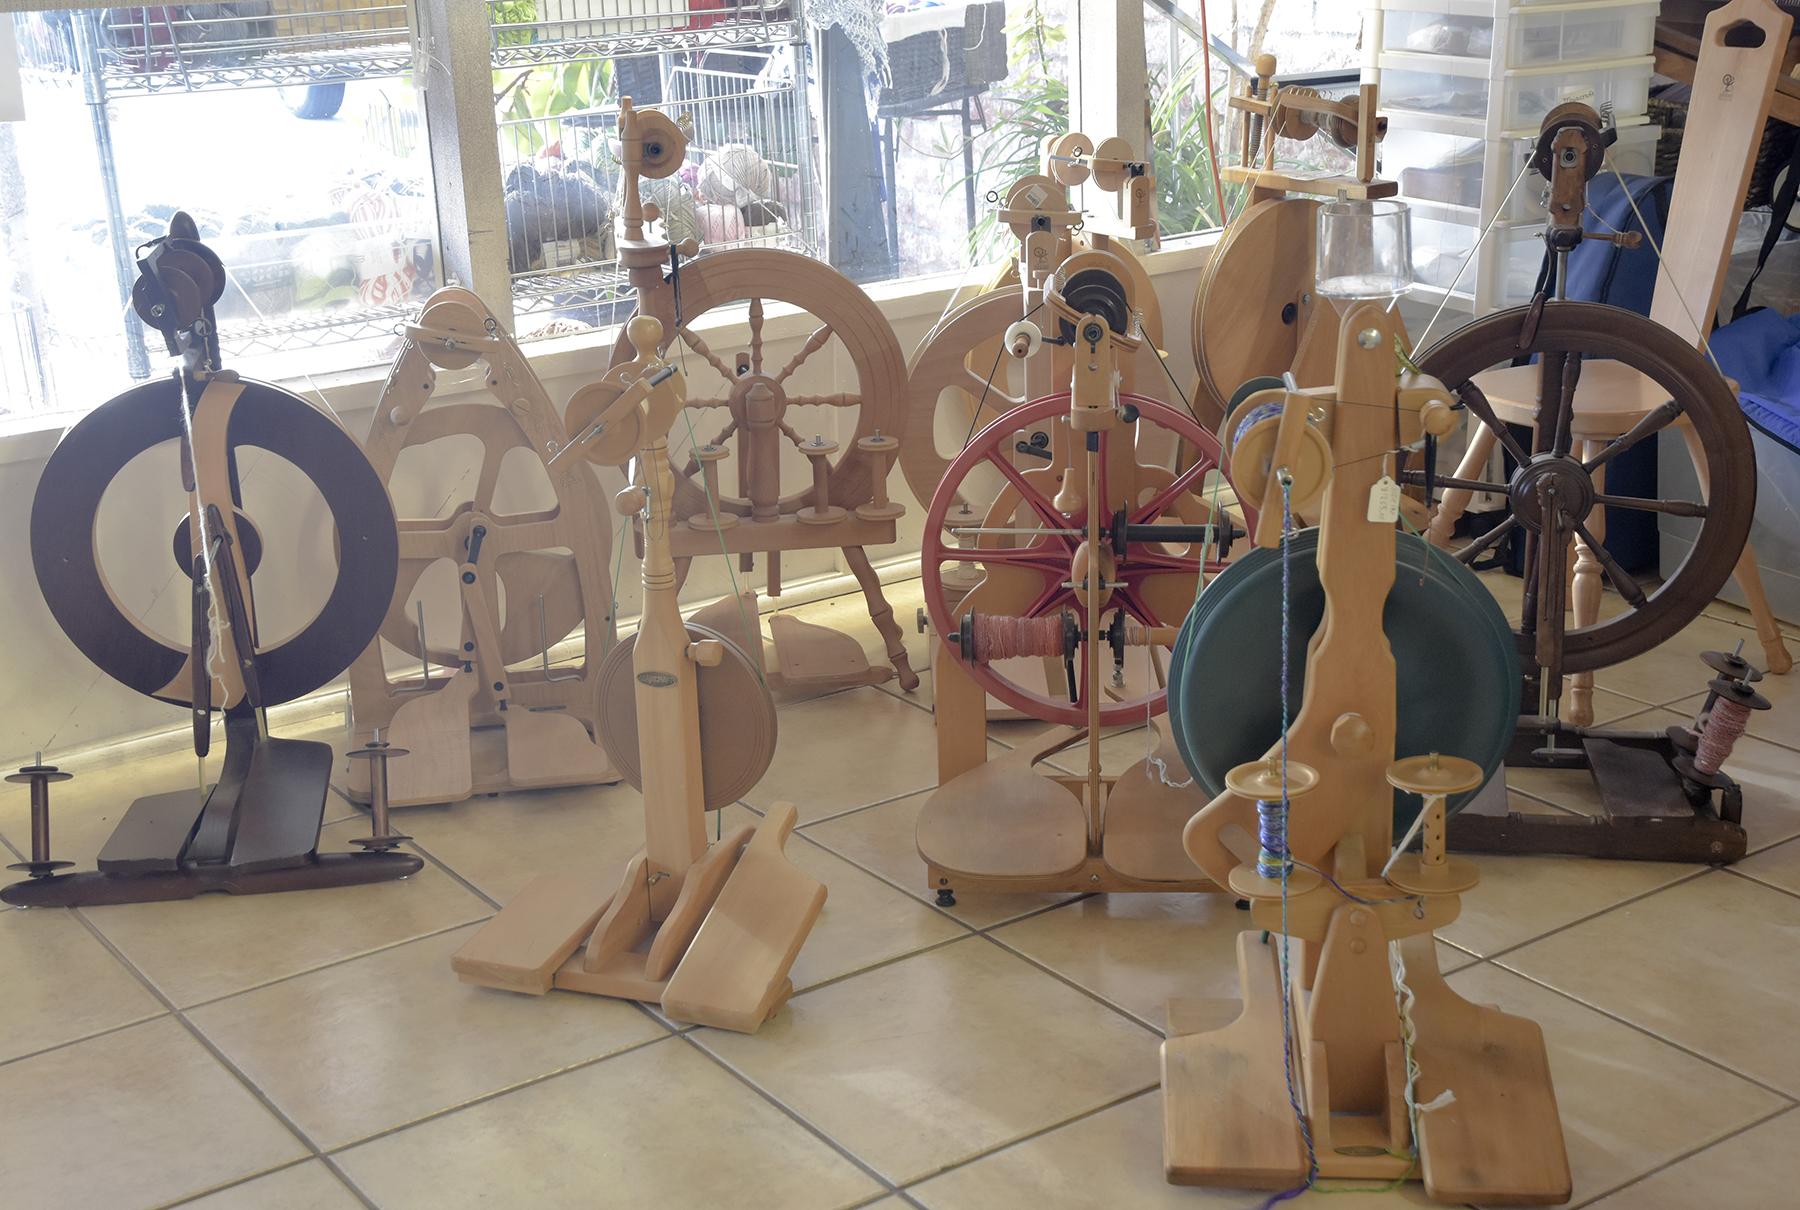
In addition to offering yarn, this shop sells supplies to spin your own. From spinning wheels, to fiber, Grandma’s Spinning Wheel has everything you need to get started.
We were absolutely honored at the opportunity to interview Vicky and Cassondra. We got to learn more about the inspiration that their store has provided the crafting community of Tucson, Arizona, and were particularly touched to hear about so many people making lifelong friends through connections at the shop. We hope that you give them a visit, whether in-person or virtually, via their website (where they sell to anywhere in the country), and check out their Facebook for even more!
If you are a local yarn shop interested in being featured by Universal Yarn, please reach out to us – we would love to interview you! Please email rferrel@universalyarn.com if you would like to be featured!
Check out our full interview with Vicky and Cassondra of Grandma’s Spinning Wheel!
This is part 2 in a four-part series highlighting designs from our 12 Days of Winter, Series 6 Edition.
In today’s installment of our blog series on our annual 12 Days of Winter Kit Collection, I’ll be highlighting three delightful knitting patterns: Hubble the Winter Wolf, the Hemlock Set, and the Pomegranate Path set.
Hubble the Winter WolfHemlock SetPomegranate Path
You may be asking yourself, “what do these three projects have in common?” The answer, my fiber-loving friend, is warm, woolly textures! With an emphasis on our “Deluxe” family of yarns, these projects utilize our three worsted lines: Deluxe Worsted, Deluxe Worsted Superwash, and Deluxe Worsted Tweed. A trifecta of worsted weight wools, if you will!
Additionally, these projects showcase texture. In Hubble the Winter Wolf, we’ve sprinkled in some Minou for fluffy interest, and in both the Hemlock Set and Pomegranate Path, we’ve incorporated plump cables throughout. The final thread tying these patterns together is headwear! A pom pom topper for a stuffed best friend, a headband for a dressier outing, and a beanie to ensure your warmth for the duration of the season! Shall we take a closer look?
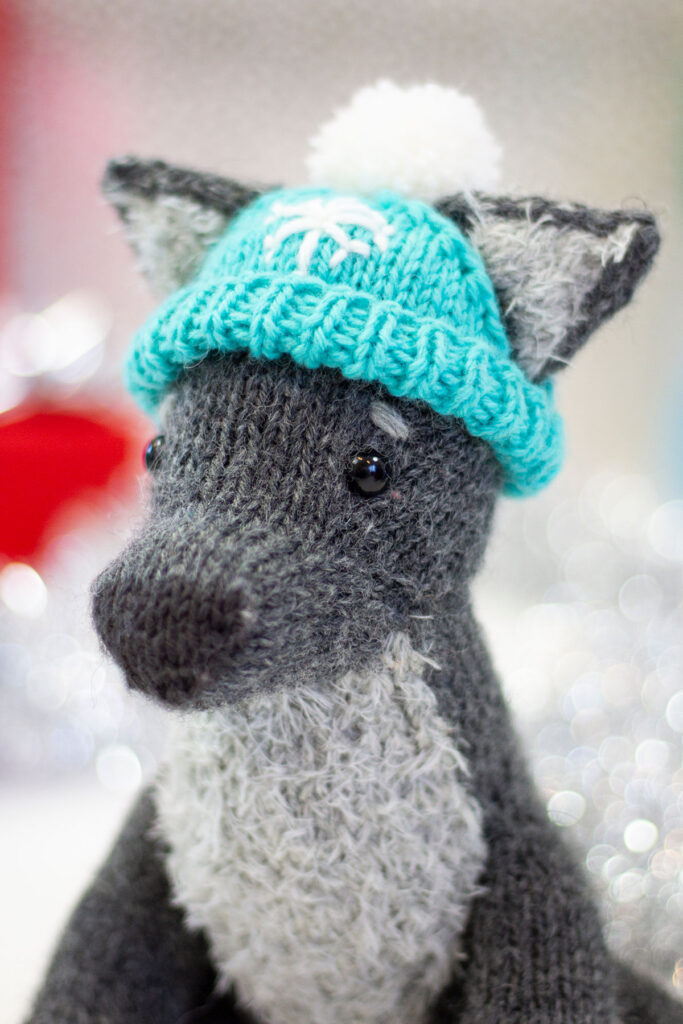
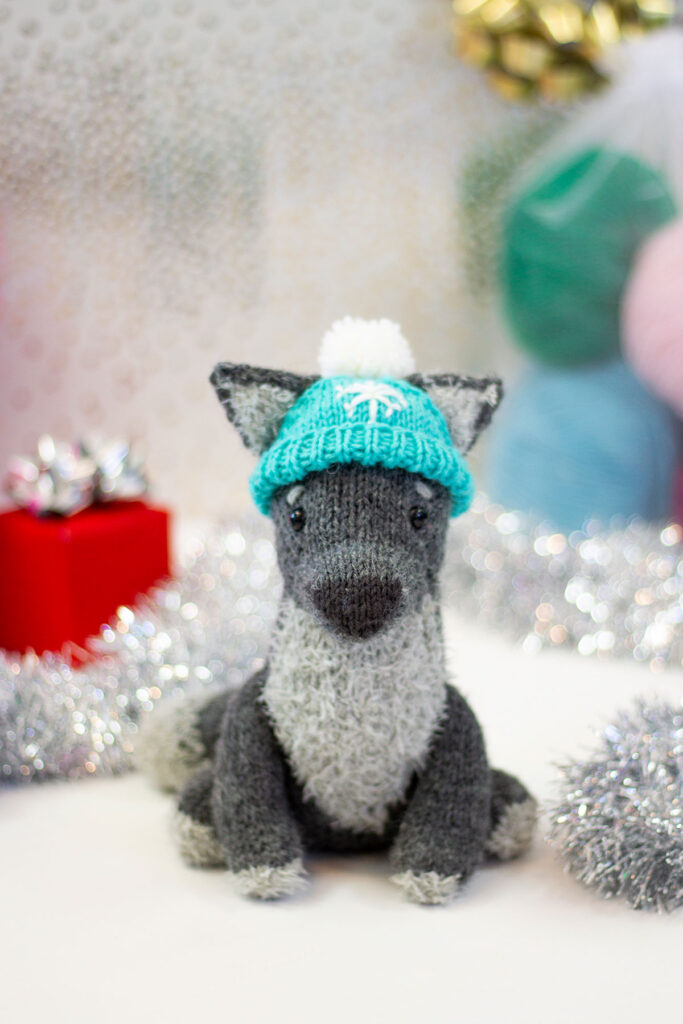
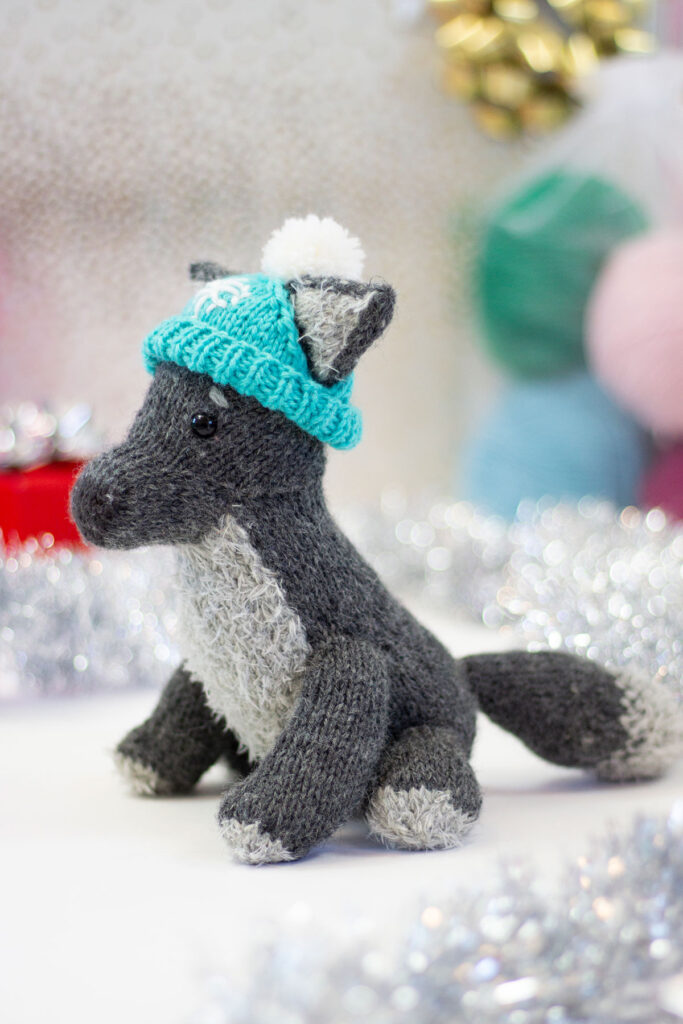
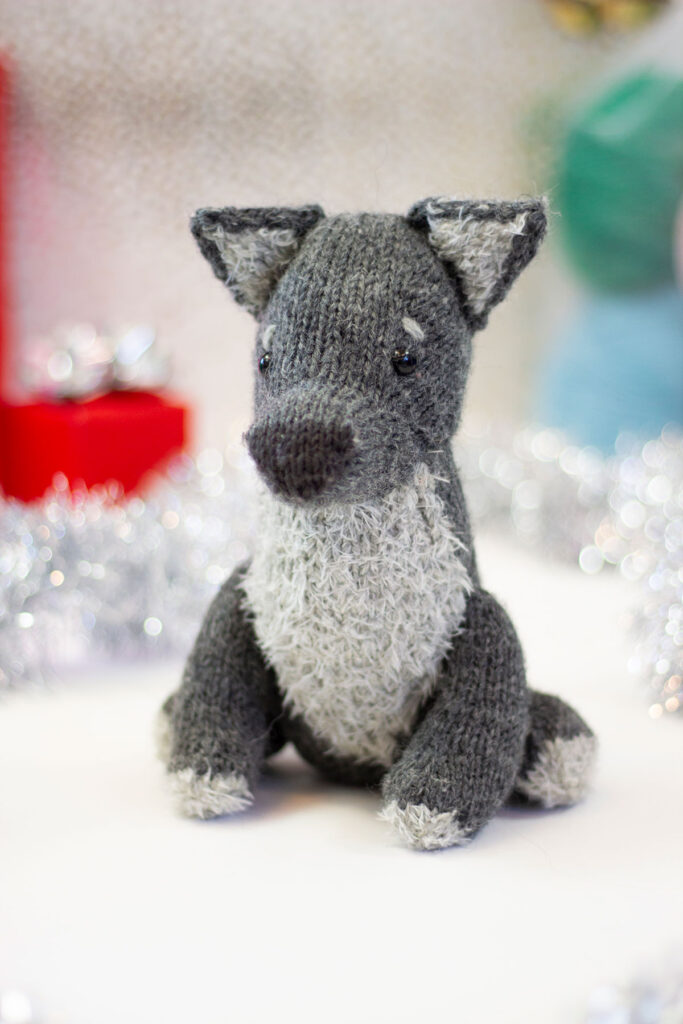
Hubble the Winter Wolf has the cutest floof around his chest, paws, ears, and tail. Irresistible!
I’ll be honest – this pattern is my pride and joy in the collection! This design took lots of experimentation and was an absolute joy to put together. If you’d like to know a little about the design process, it began with lots of ripping back, sketches, and jotting down scribbles of notes in my graph paper notebook (side note: every knitter who enjoys charts, designing, or modifying patterns will benefit from a graph paper notebook, throw one in their stocking!).
Hubble’s hat is constructed so that his little ears pop out – don’t worry, all that fur will keep him plenty warm! He only wears the hat to look stylish!
Hubble is knit modularly and is mostly seamless. He begins with the nose, which is worked flat. Then, stitches are picked up around the nose and joined in the round to create the snout. Some stitches are placed on hold while you utilize the rest of the live stitches to shape the head. Then, stitches are picked up again from an opening at the bottom of the head and everything is worked in the round, using a surprisingly simple intarsia in-the-round method. The ears are worked separately and sewn to the head. The legs and tail are picked up directly from the body and worked in the round, although I’ve included notes on how to modify them to be sewn on if that’s your preference. Finally, he’s finished with a simple hat that’s worked in the round from the bottom up and completed with a touch of embroidery and a pom pom. If that sounds like a lot, fear not! I’ve included some diagrams and photos that will help set you up for success.
Hubble’s hat is removable, so you can bring him along on winter and summer adventures alike!
This precious toy is knit using two heathered shades of Deluxe Worsted, a 100% non-superwash wool that I turn to again and again. The breadth of colors, smooth 4-ply construction, and soft yet rustic feel of this yarn make it perfect for every type of project. I chose two shades of grey to bring Hubble to life: #12503 Charcoal Heather and #12502 Smoke Heather. To add a more realistic element to the design, I opted to hold a strand of Minou in #104 Kitten together with Deluxe Worsted in select sections, including the chest, ears, tail, and paws. The pop of color is given through the hat, where I chose Deluxe Worsted again in the color #71662 Turquoise. Scrap yarn in white and black are suggested for the embroidery, pom pom, and nose.
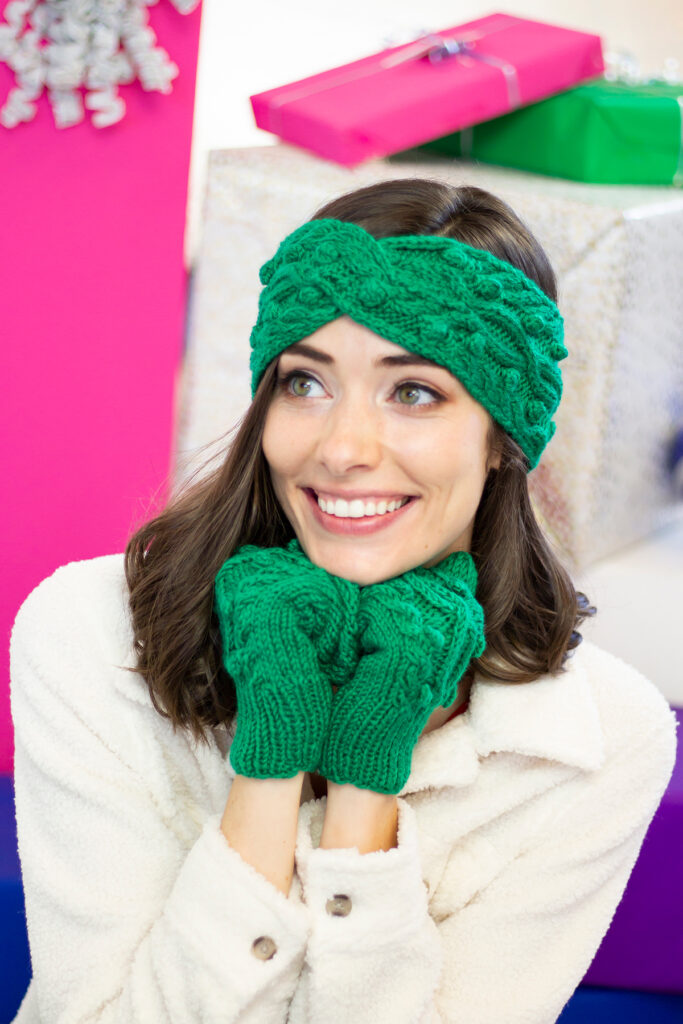
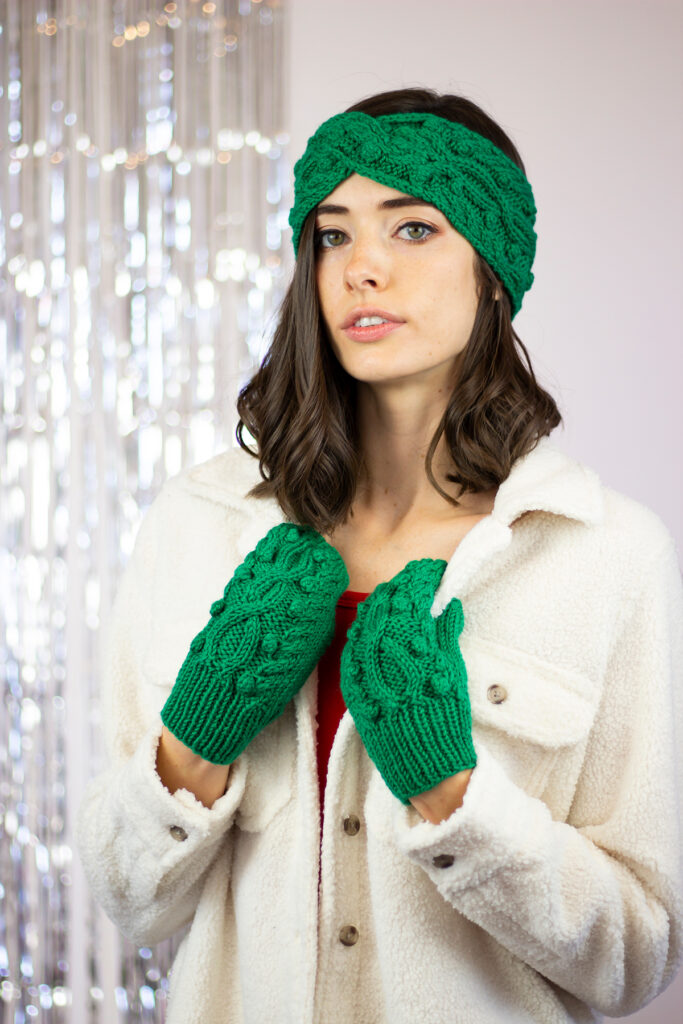
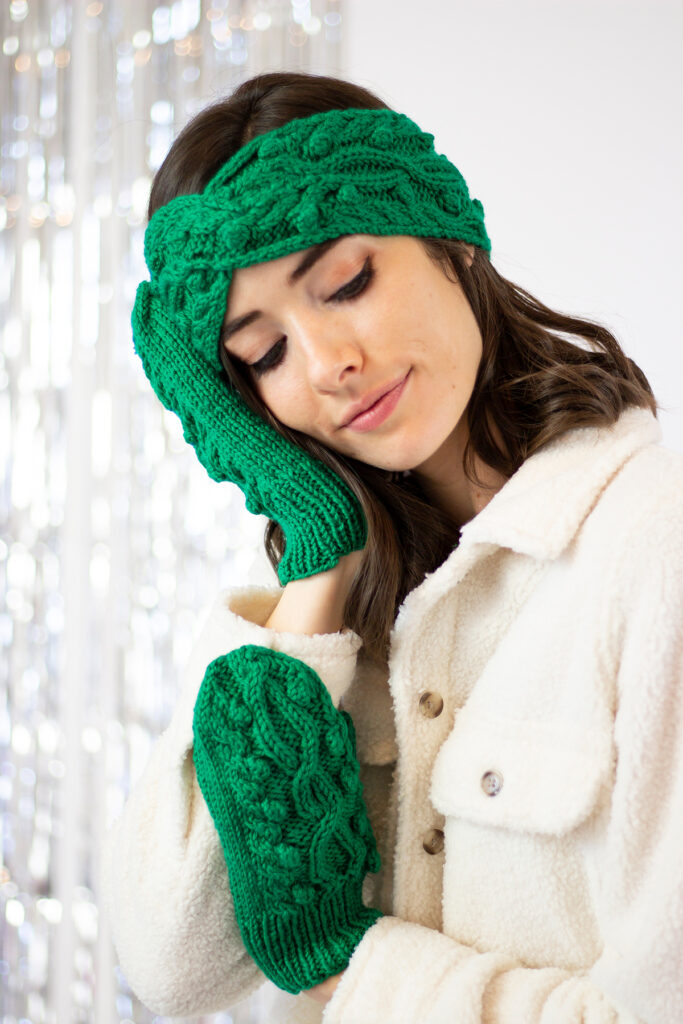
Elegant and understated, the Hemlock Set will tie together any winter ensemble. We love how it looks with this white jacket because it makes the knitted accessories the star of the show!
When planning any pattern collection, I know I can always rely on designer and social media extraordinaire, Aubrey Busek, to create elegant, thoughtful designs that are infinitely wearable. When she brought her sketches for the Hemlock Set to the table, I knew we needed to include them in the collection. After all, what could be more wintry and festive than mittens and an ear warmer to ward off the chilly temperatures?
Deluxe Worsted Superwash is soft and snuggly, making it a great choice for giftable projects like this one.
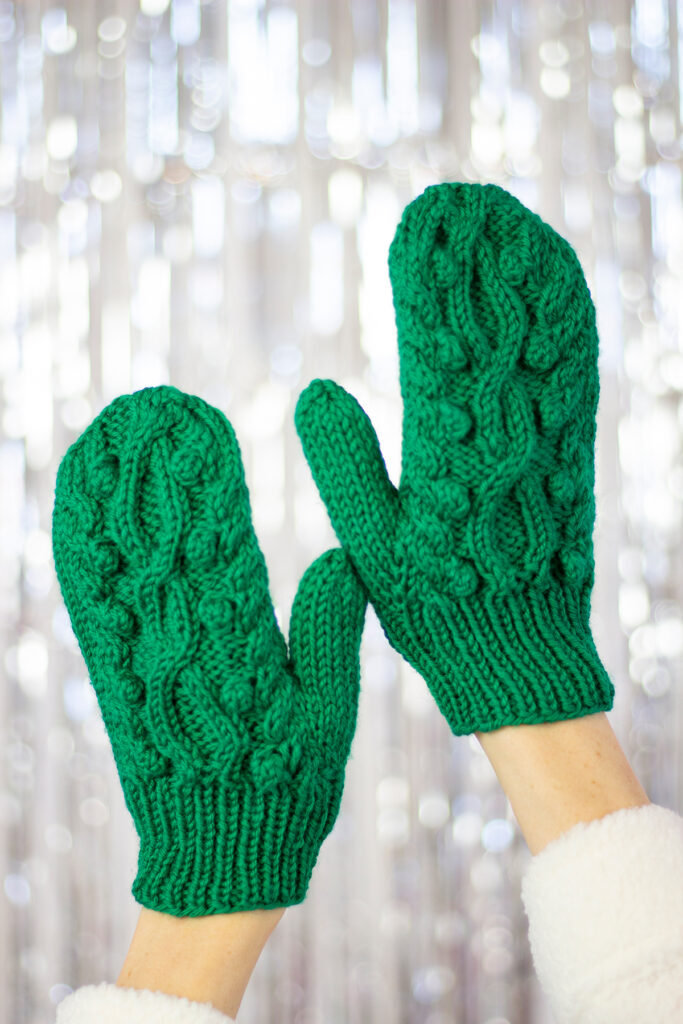
The Hemlock set is a matching accessory set featuring a headband and mittens. It’s an addictive and enjoyable project that works up pretty quickly, making it a great last-minute gift project that’s certain to please. For this project, we opted for soft, easy-care Deluxe Worsted Superwash in the festive new color, #774 Mistletoe. How fitting, right? The cables themselves seem to mimic the hanging holiday plant, and the bobbles echo their small berries.
The cables twist and turn their way across the mittens and around the headband. My favorite detail is the cross at the center of the headband – it’s like a cable within a cable, very meta! Plus, it’s easier to achieve than you might assume! It’s simply formed by separating the work in half, working to a specific length, and making a cross that forms an “X” before rejoining the two halves together once more. Easy, peasy!
The mittens in this set feature cables and bobbles on the top of the hand. Rest easy with stockinette on the palm side of the mittens.
Techniques you’ll explore while making the Hemlock Set include ribbing, stockinette stitch, cables, bobbles, basic shaping, working flat, and knitting small circumferences in the round. Personally, if you’re new to any of these methods, I recommend making the headband first and graduating to the mittens. The choice, of course, is yours!
Last year, Aubrey shared her love of bobbles in two of her designs, the Enchanted Scarf and Crystalline Cowl. She even created a helpful tutorial to demonstrate how bobbles are constructed. You can check that out at this link.
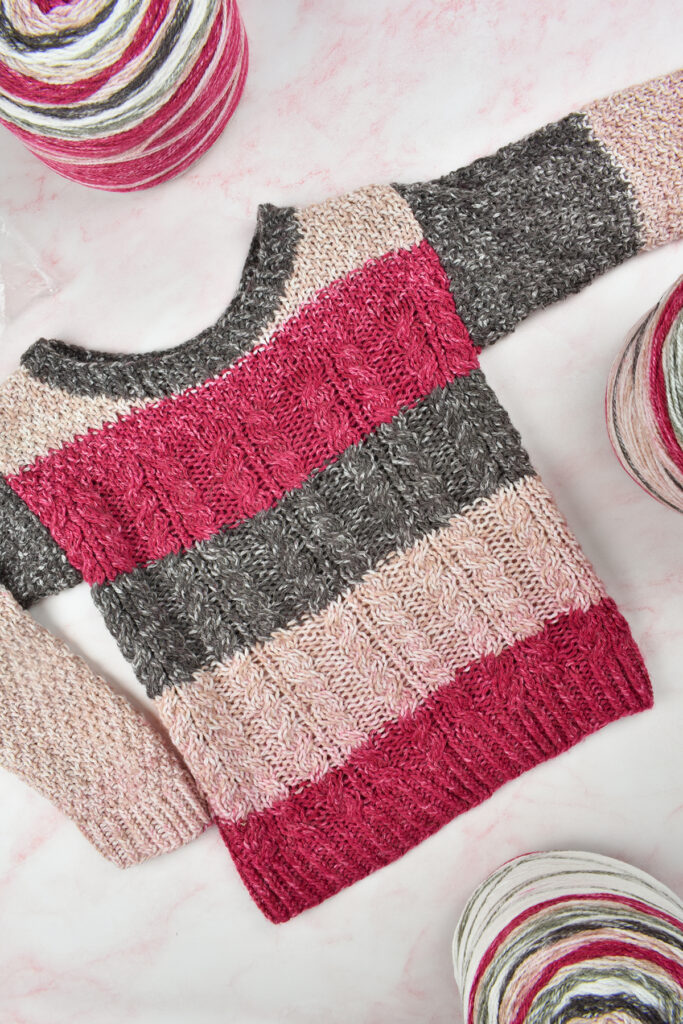
Pomegranate Path is a cozy accessory set to keep you warm on a winter’s day.
The final design we’re spotlighting today is another accessory set, Pomegranate Path. Rich texture and saturated color come together in this staple set. No winter wardrobe is complete without a scarf and a warm hat. This set is knit using Deluxe Worsted Tweed Superwash, which is undoubtedly a fan favorite! This yarn is predominantly made of superwash wool, with a touch of viscose and acrylic for the tweedy nubs. That means it’s machine-washable, making it a great yarn for gift knitting because you won’t have to worry about the recipient having an accidental felting disaster! Keeping with our bright holiday theme, we chose one of the more recent additions to the line, color #921 Beet.
Coordinating cables decorate both the hat and scarf.
Pomegranates are considered the jewel of winter – and why not? They generally ripen during this season, add a brilliant pop of color to a dreary day, and double as decor and a tasty treat! Yes, we primarily named this design for the bold, beautiful color, but we see the connection between the textures and the fruit, too! For example, a slender border of seed stitch pays homage to the juicy seeds that fill the pomegranate. And, much in the same way you enjoy the fruits of your labor when preparing and eating a pomegranate, you’ll love the process of knitting different twisted stitches and cables throughout this project!
Take a closer look at the variety of stitches used in this pattern – the texture is so tempting!
In the past year, I rekindled my love of scarves. I just cannot get over how enjoyable knitting a richly textured accessory can be. And hats will always be among my favorite types of projects to knit. This pattern offers plenty of interest, and we have several helpful tutorials to help you along the way. You might enjoy the Right and Left Twist tutorial (link), cabling without a cable needle is optional, but useful (link), and these handy chart-reading tips will help you with any project that includes them (link)!
Join us tomorrow for Part III of this blog series, where Aubrey will dish about a shawl, stole, and cozy blanket!
Remember, these exclusive kits can be purchased at local yarn store retailers near you. Not in stock at your local shop? Ask them about drop shipping – order through them, and we ship to you! Each kit comes with a printed version of the pattern and the yarn required to make it. Use our store locator to find your nearest Universal Yarn retailer!
We’ve received wonderful feedback from our customers about our initiative to highlight the local yarn stores we know and love so much. The Knittin’ Coop is the store we are featuring for the month of November!
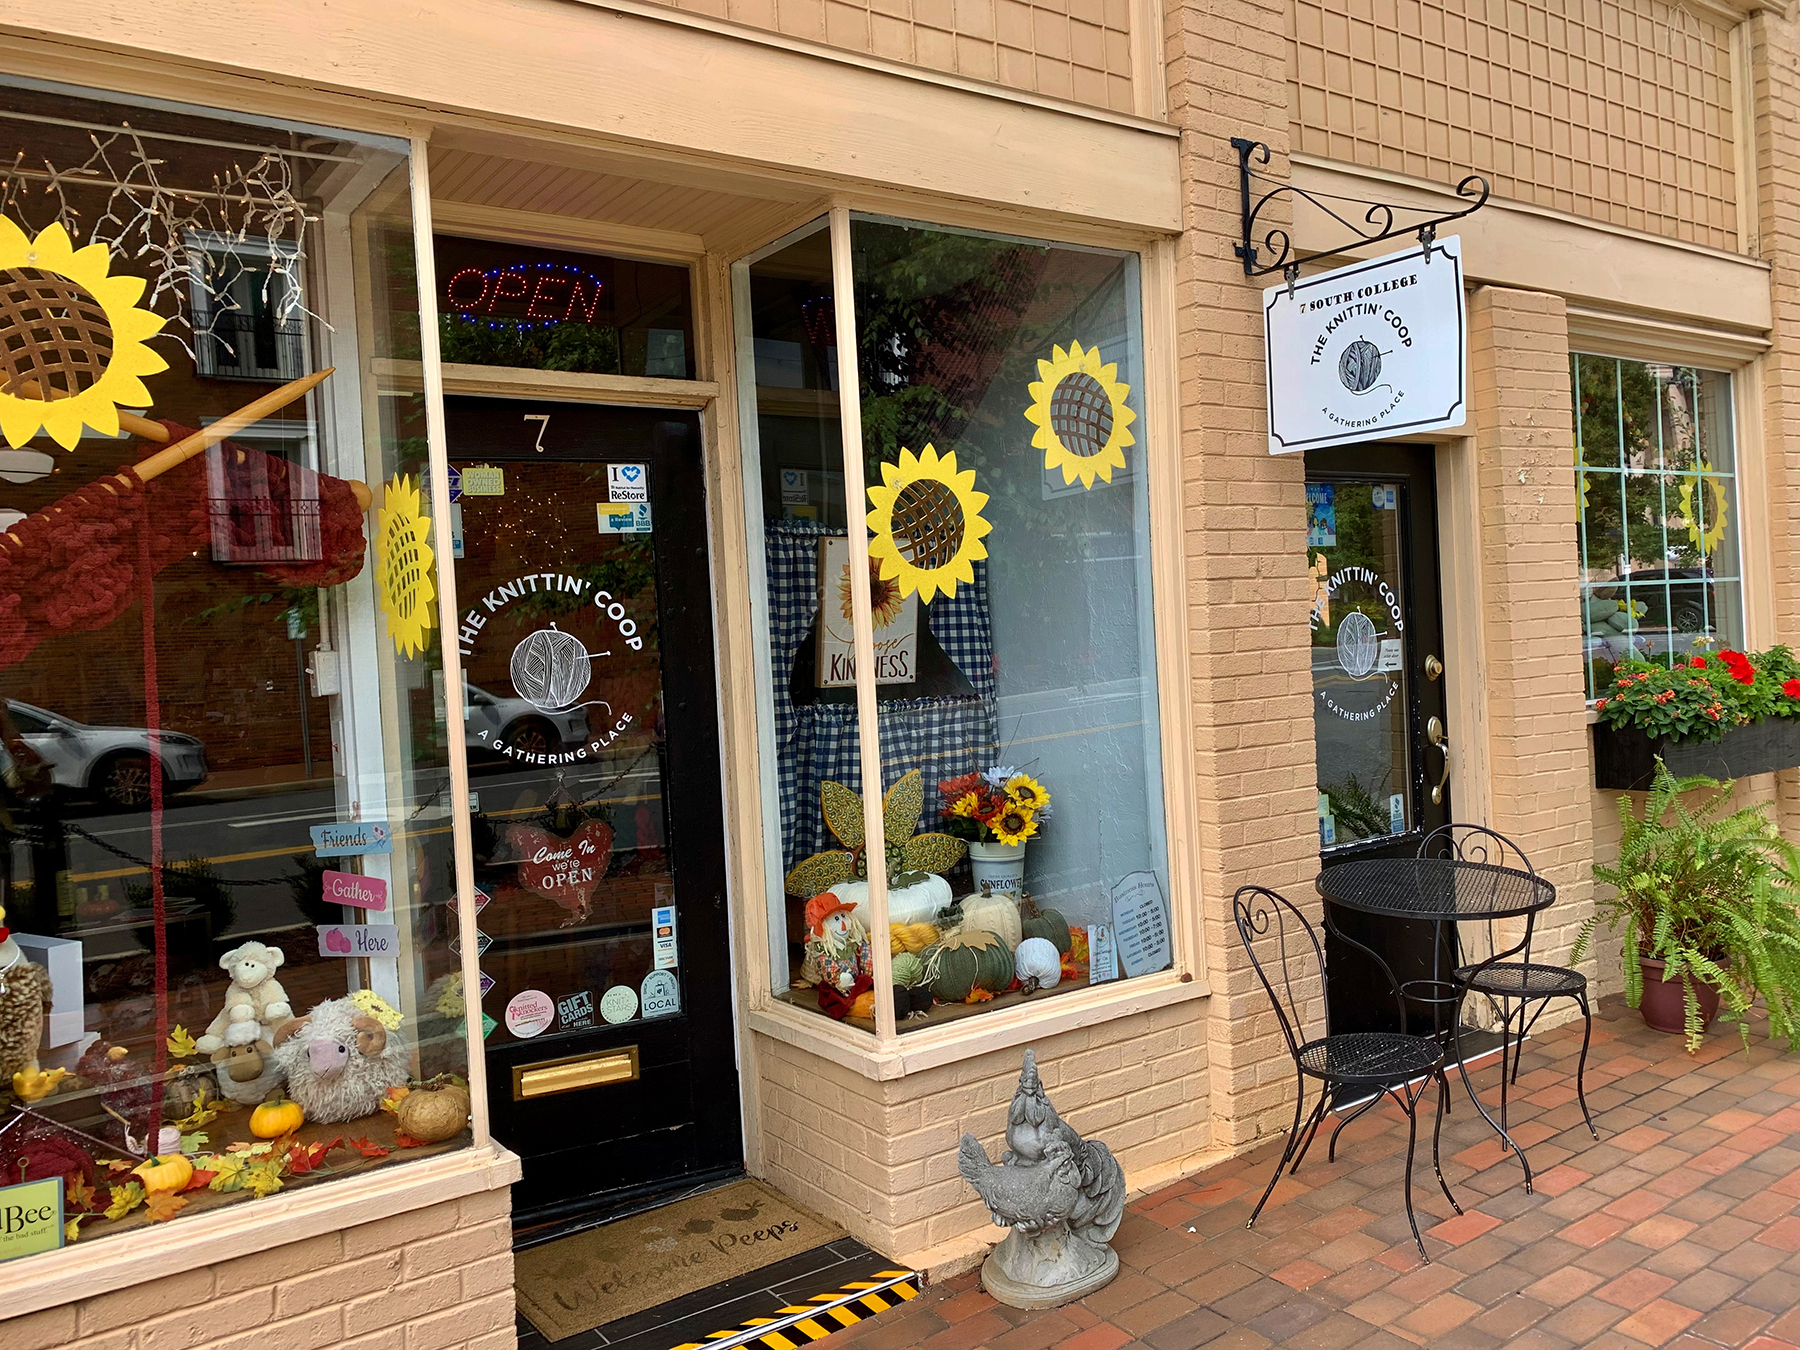
Front of The Knittin’ Coop – a perfect place to sit and work on your project
The Knittin’ Coop… what a name. Whether you’re a long-time customer, or just visiting, this is the name of a place that feels like home. If you travel to Salem, Virginia, you’ll find this cozy spot filled with a whole bunch of yarn! Robin Ferguson is the owner of The Knittin’ Coop, which opened back in August 2019.
Her store exists in an area that is home to many college students, as Roanoke College is right across the street. She says many of those students come by to the store to practice their knitting and crocheting. We love to see young people passionate about the knit/crochet community!
Opening the shop was a decision she made because of her lifelong exposure to knitting and crocheting from her mother and grandmother. It has always been a part of her life, so why not make it a career path? Now let’s take a look at what she has inside The Knittin’ Coop!
Offbeat in all 7 colors at The Knittin’ Coop
Universal Yarn is proud to be stocked on the shelves of The Knittin’ Coop. Some of our yarns featured on their shelves include Offbeat (pictured above), Bamboo Pop, Bamboo Pop Sock (solid version too), and Radiant Cotton. Robin mentions in our interview that due to the climate of Virginia, DK weight yarns are popular in her store.
She mentions Bamboo Pop Sock seems to be one of the favorites among her customers. She went along to say that this yarn is consistently used to create garments, shawls, and of course, socks.
Shawls seem to be a favorite project of The Knittin’ Coop customers, and it is no surprise, given what a versatile accessory they are. Sweaters also become a popular option for The Knittin’ Coop customers around the autumn season, which is when most of us get excited to start on some warmer projects!
Interior of The Knittin’ Coop
One of our favorite things about The Knittin’ Coop is the up-to-date website. They have a clear calendar of events that makes it easy for any guest to know what’s going on at the store. Their store features many different classes, from beginner classes to private lessons, and even some seasonal offerings! Check out their website to learn more.
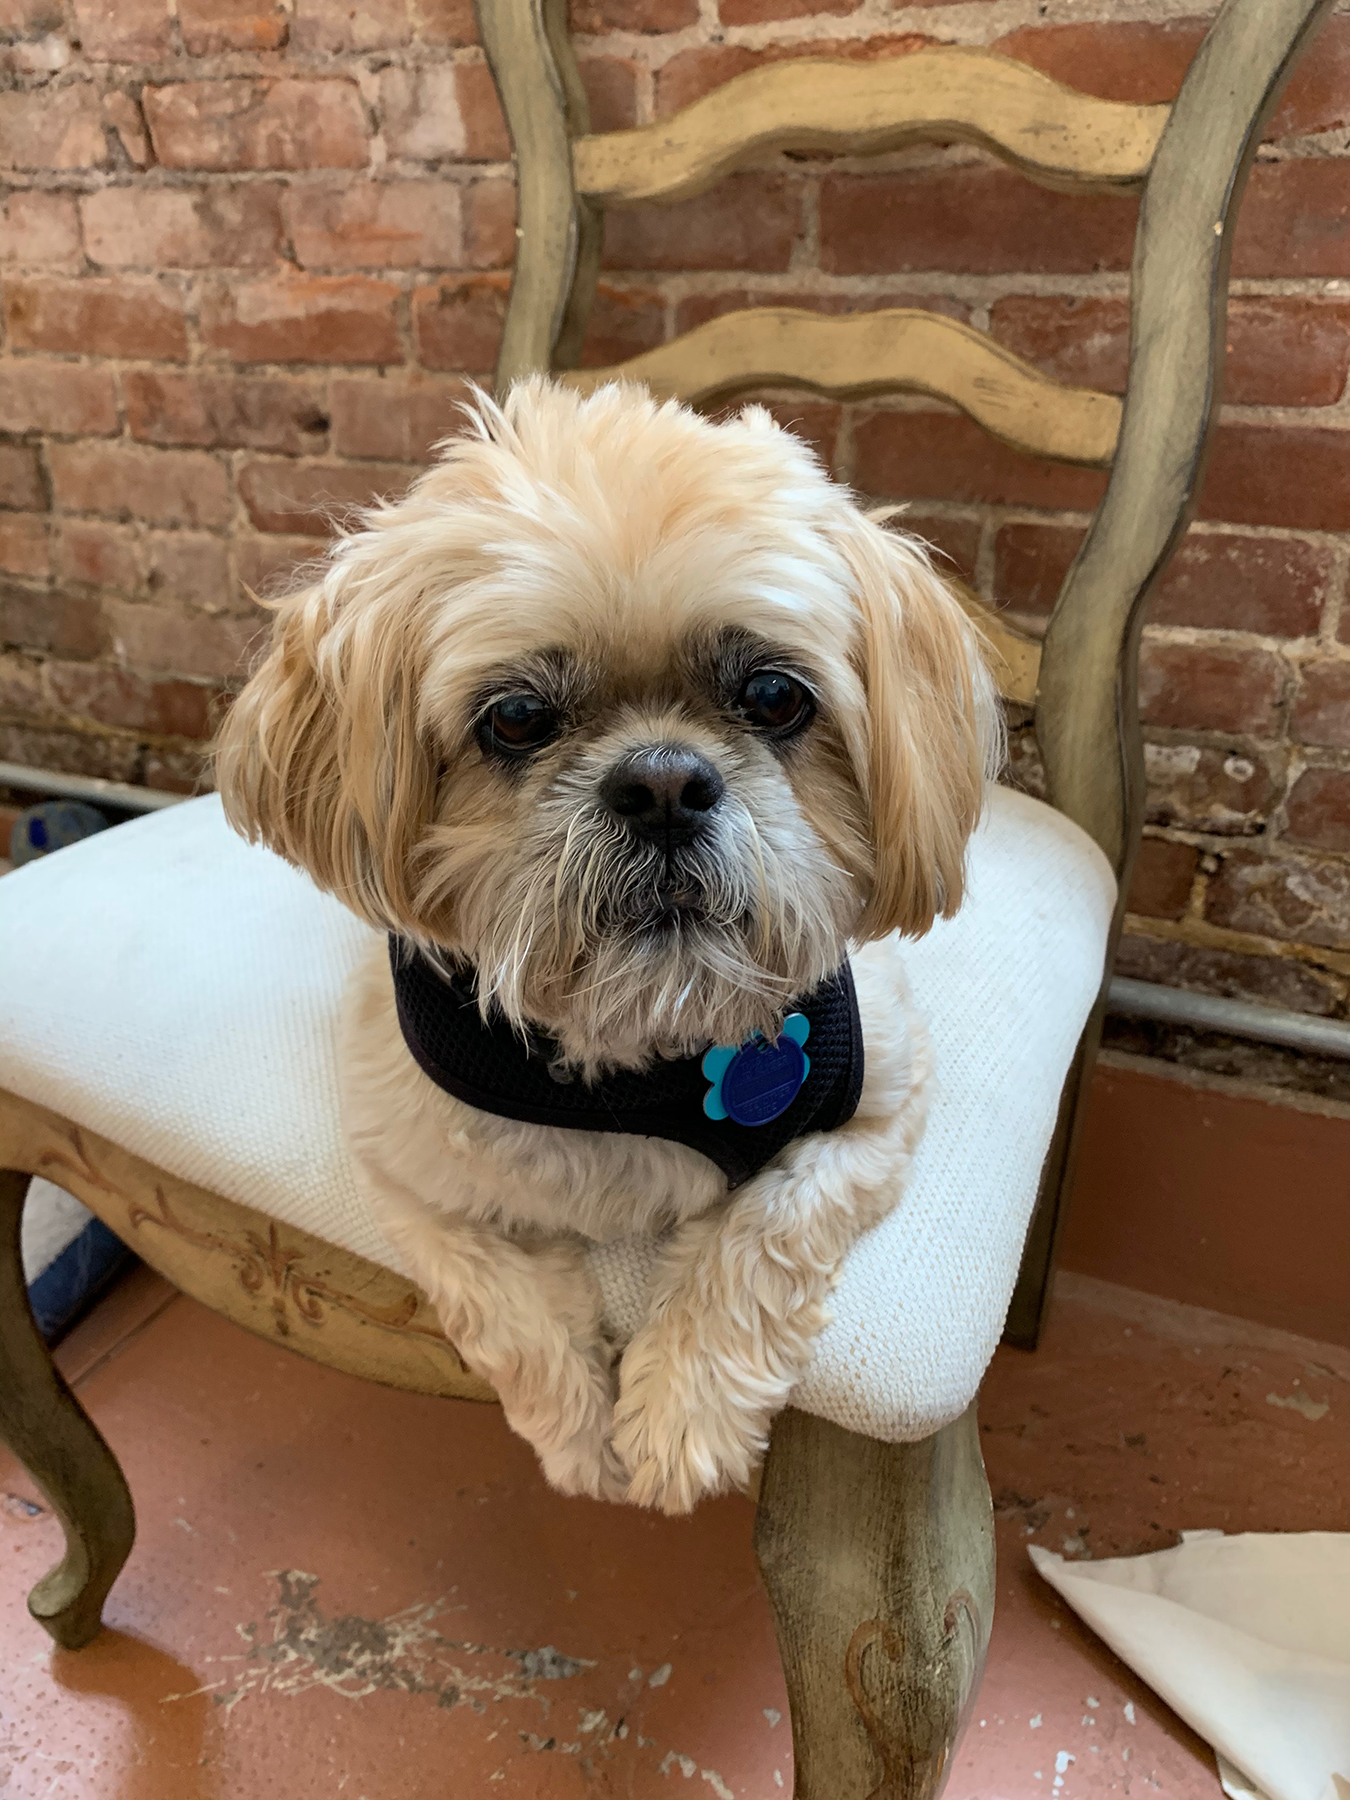
Lastly, if you’re thinking about stopping by The Knittin’ Coop. Rudy the shop dog will be very happy to see you!
The Knittin’ Coop has a furry friend named Rudy
We are so grateful for the opportunity to feature The Knittin’ Coop, and we encourage you to check them out on social media. If you are in the Salem, VA area, we highly recommend checking out this beautiful shop!
If you are a local yarn shop interested in being featured by Universal Yarn, please reach out to us – we would love to interview you! Please email rferrel@universalyarn.com if you would like to be featured!