Rocked Knitalong – another view on swatching

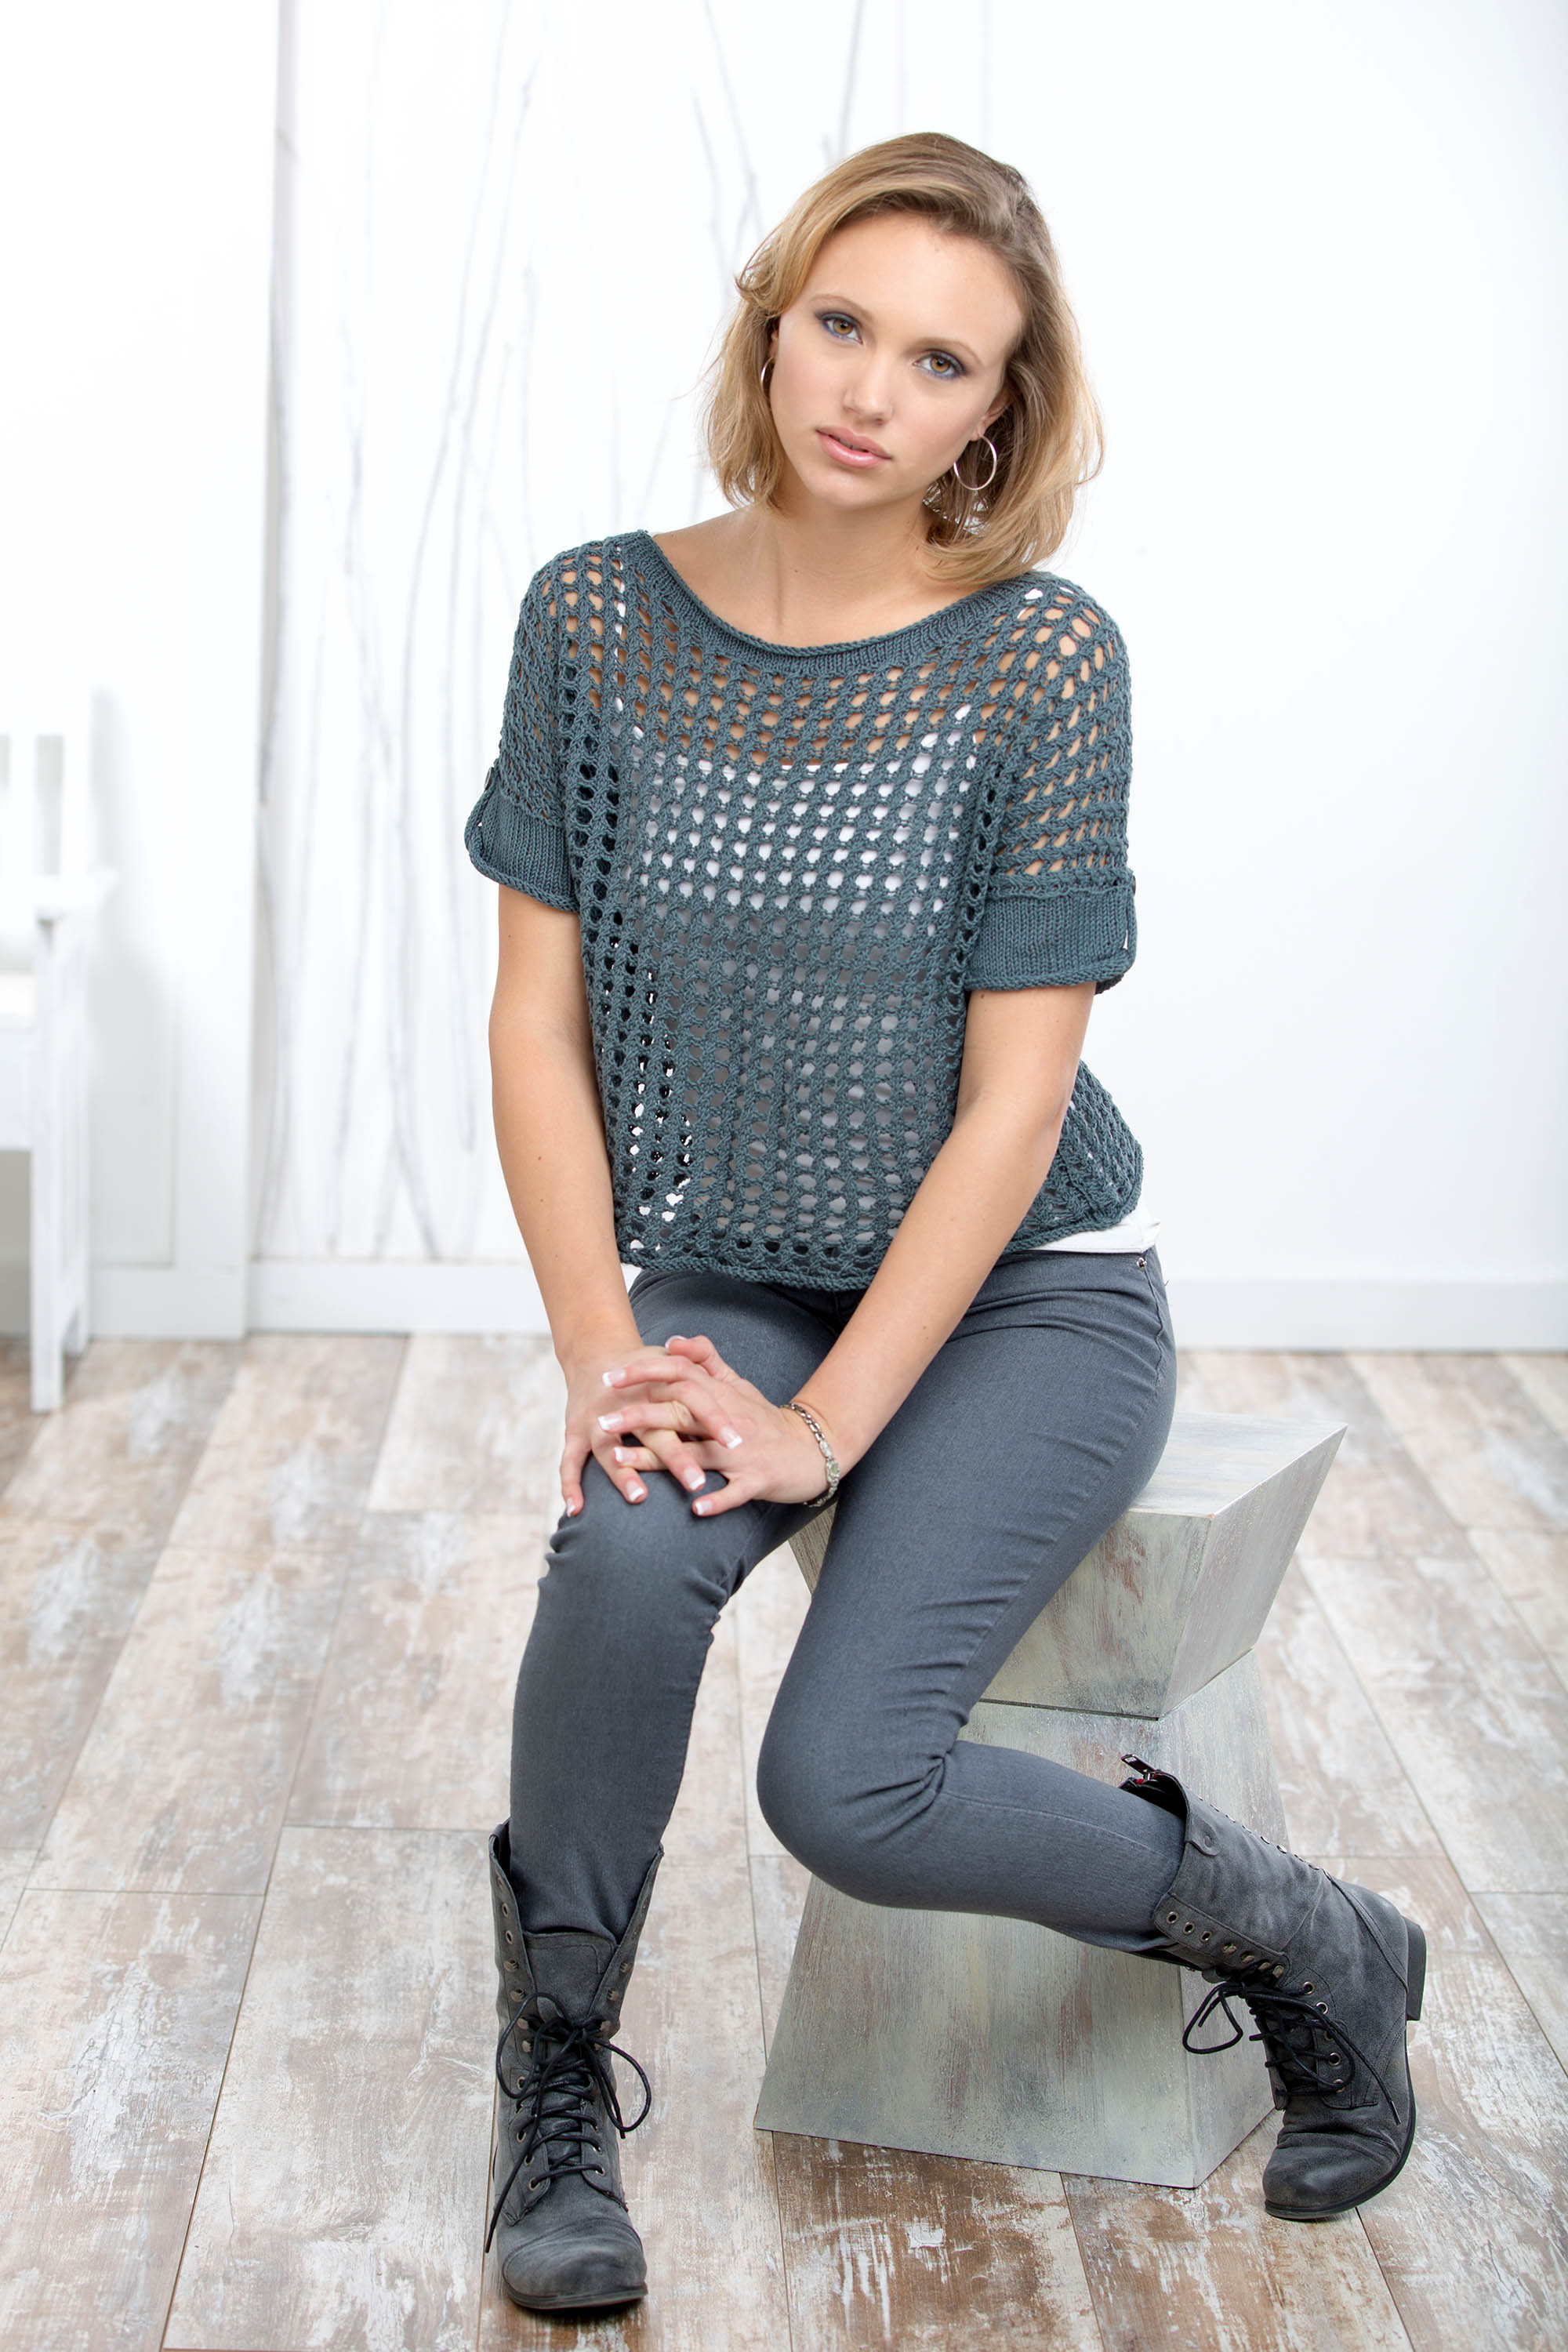
Today, I have the pleasure of handing over the proverbial mic to Sandi Rosner, the creative director for our sister company, Premier Yarns. Sandi elected to participate in our knitalong using Flax.

From Sandi:

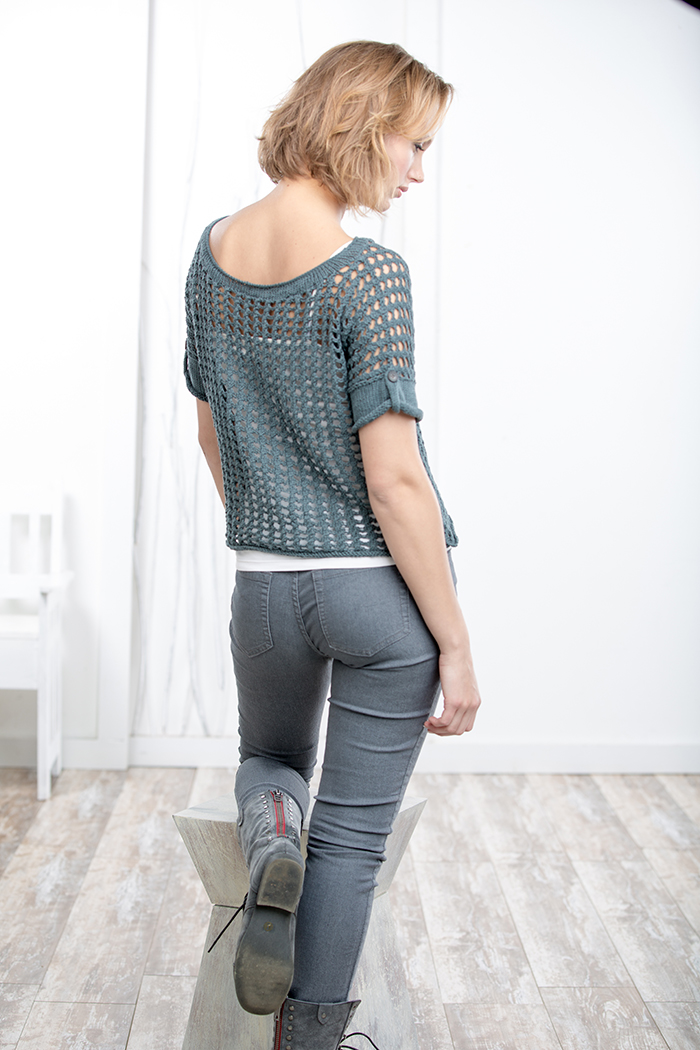
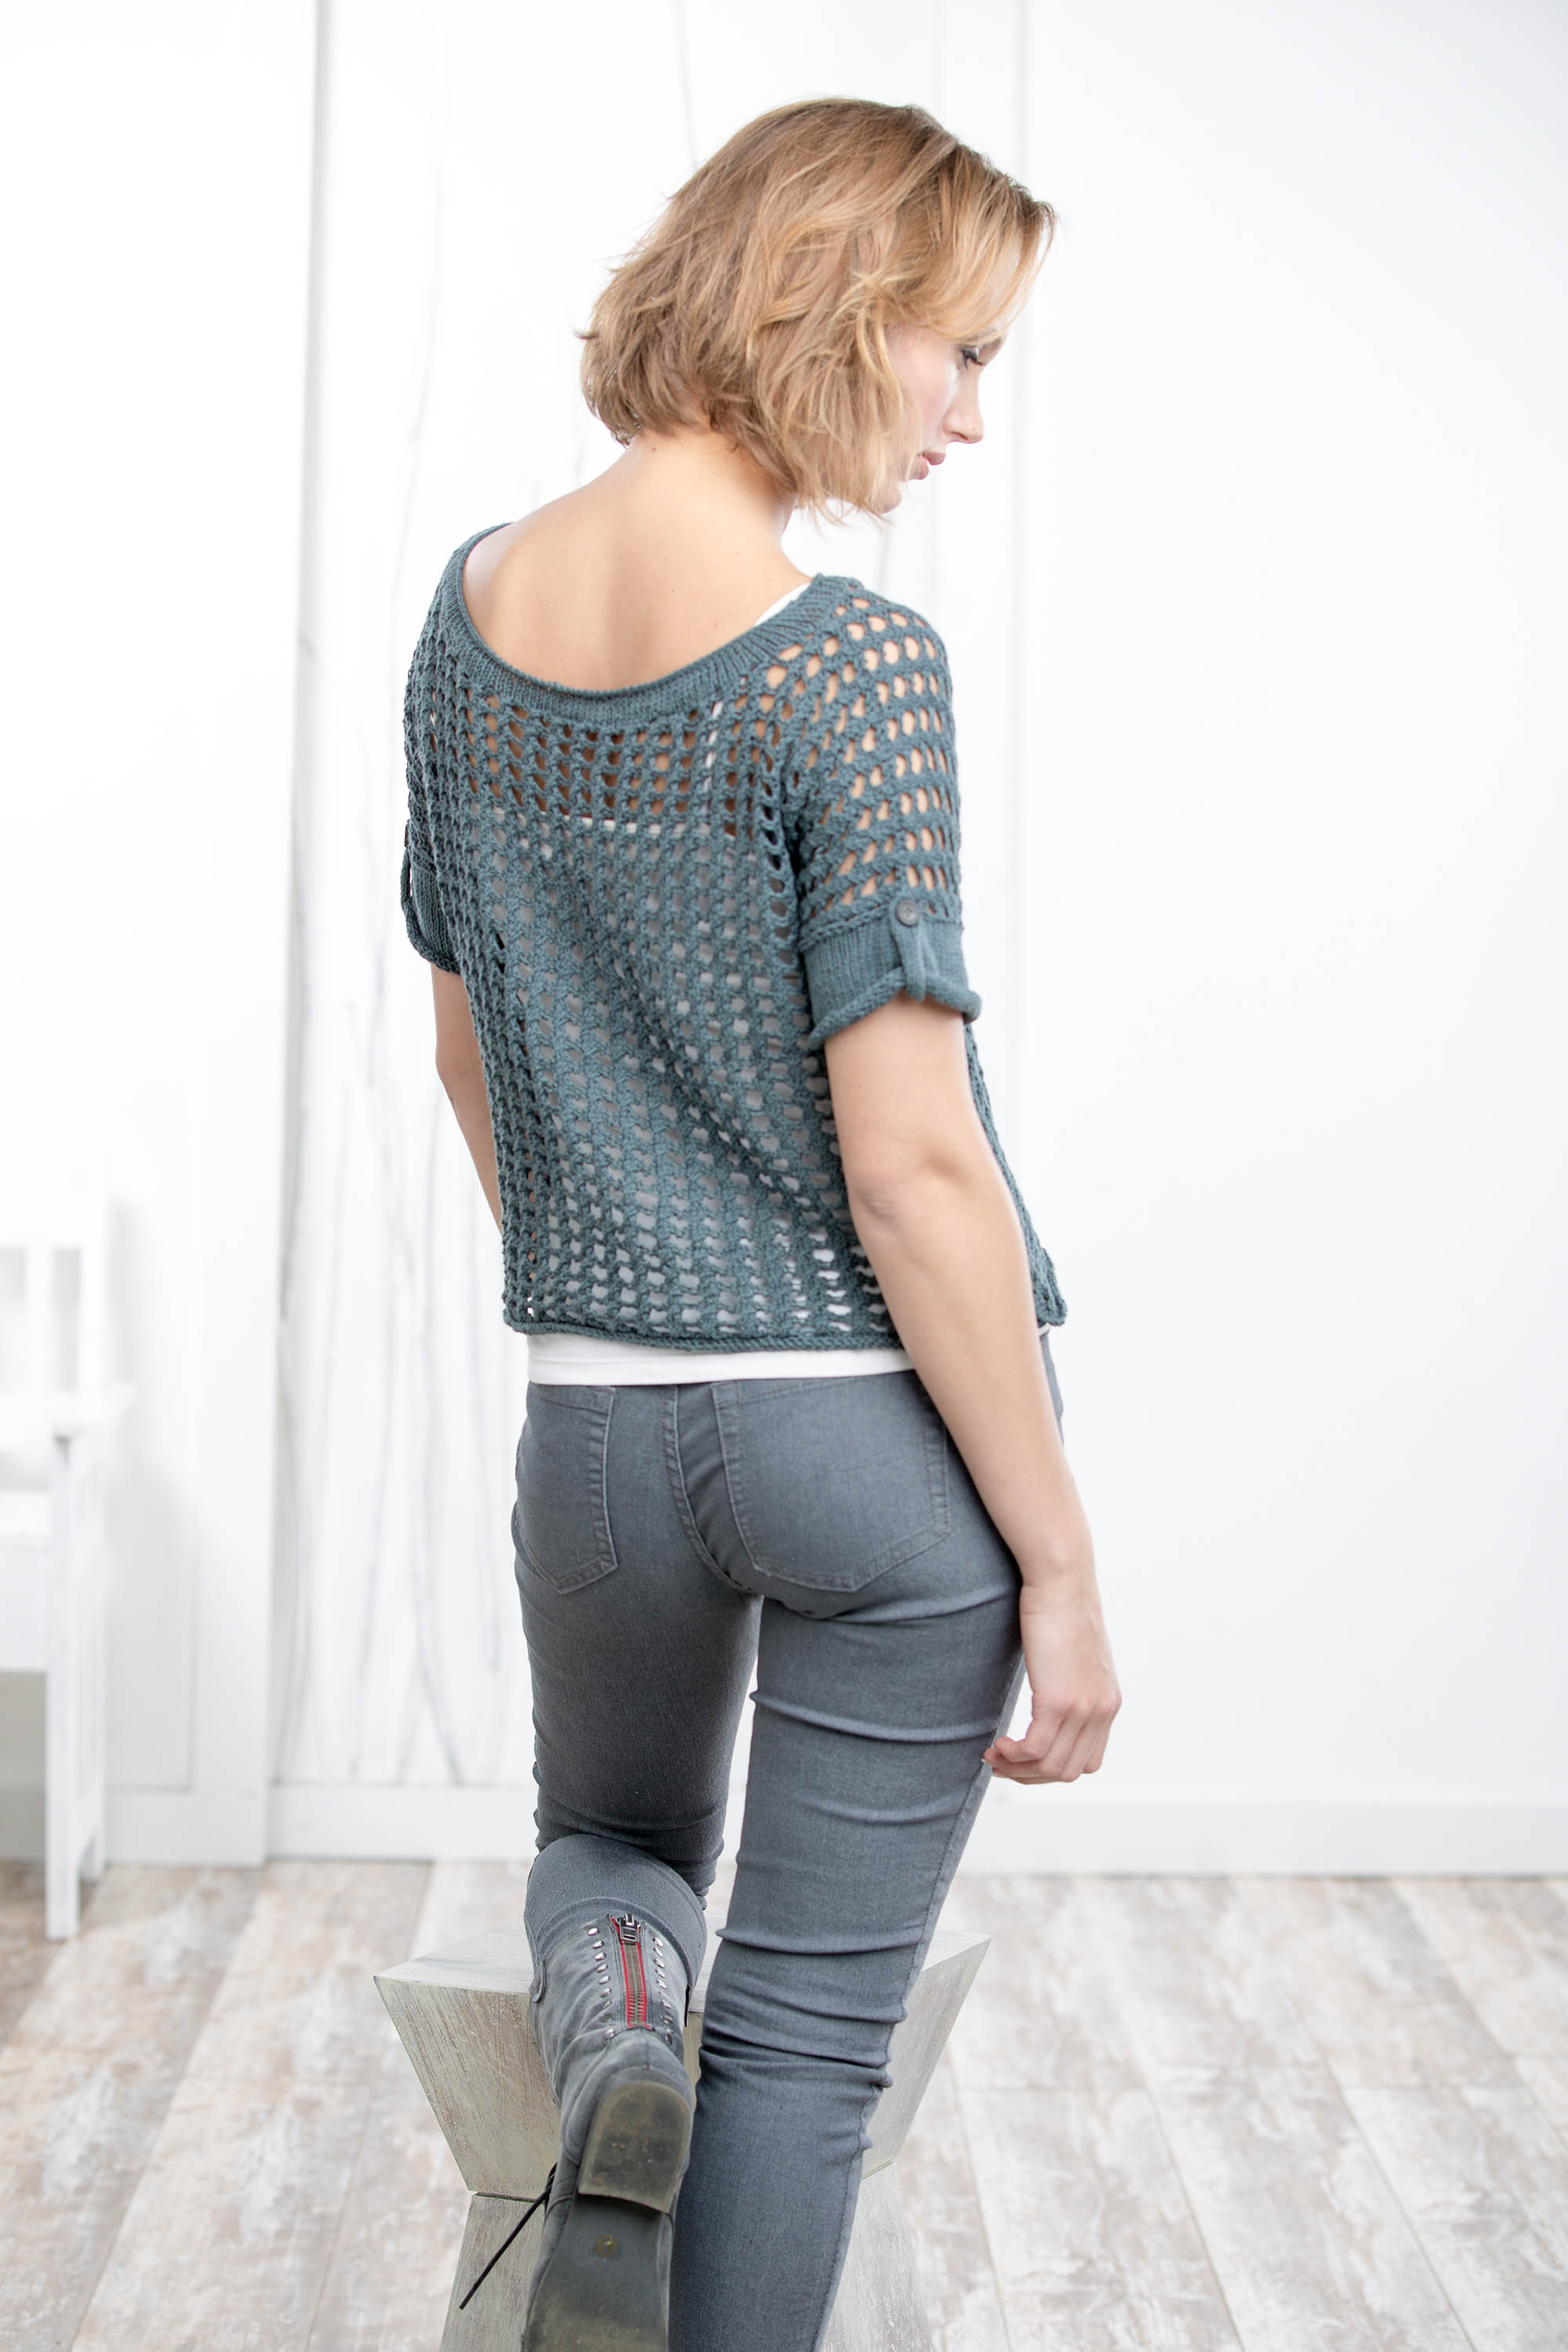
I’m thrilled at the opportunity to participate in this knit-a-long! I’m happy to have the chance to knit something for myself, and this versatile summer top is just the thing.

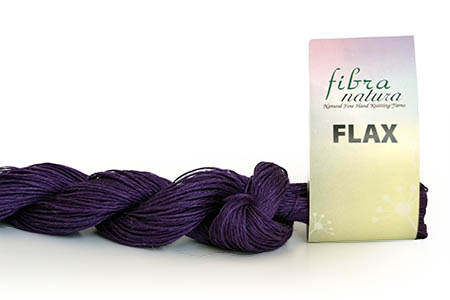
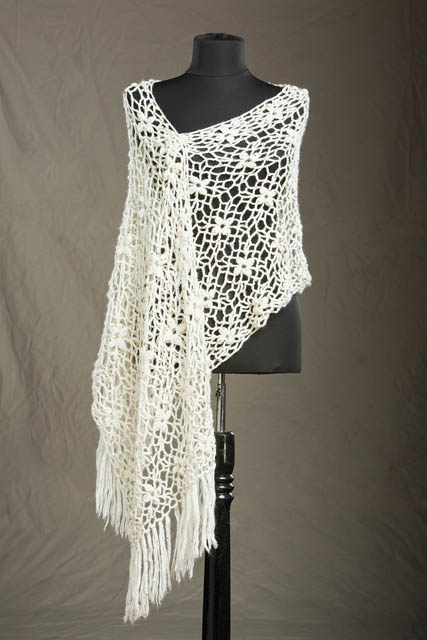
I’ve chosen to use Fibra Natura Flax for my Rocked. Why? Linen. I’ve recently moved from the mild, arid climate of Northern California to the steamy heat of North Carolina. With its lightweight absorbency and easy care, linen is a big part of my survival strategy as the dog days of summer loom. I asked Amy to choose a color for me, and she picked this lovely blue gray called Mineral. Over jeans and a tank, or a black cotton skirt and a cami, this top will be in heavy rotation all summer long.

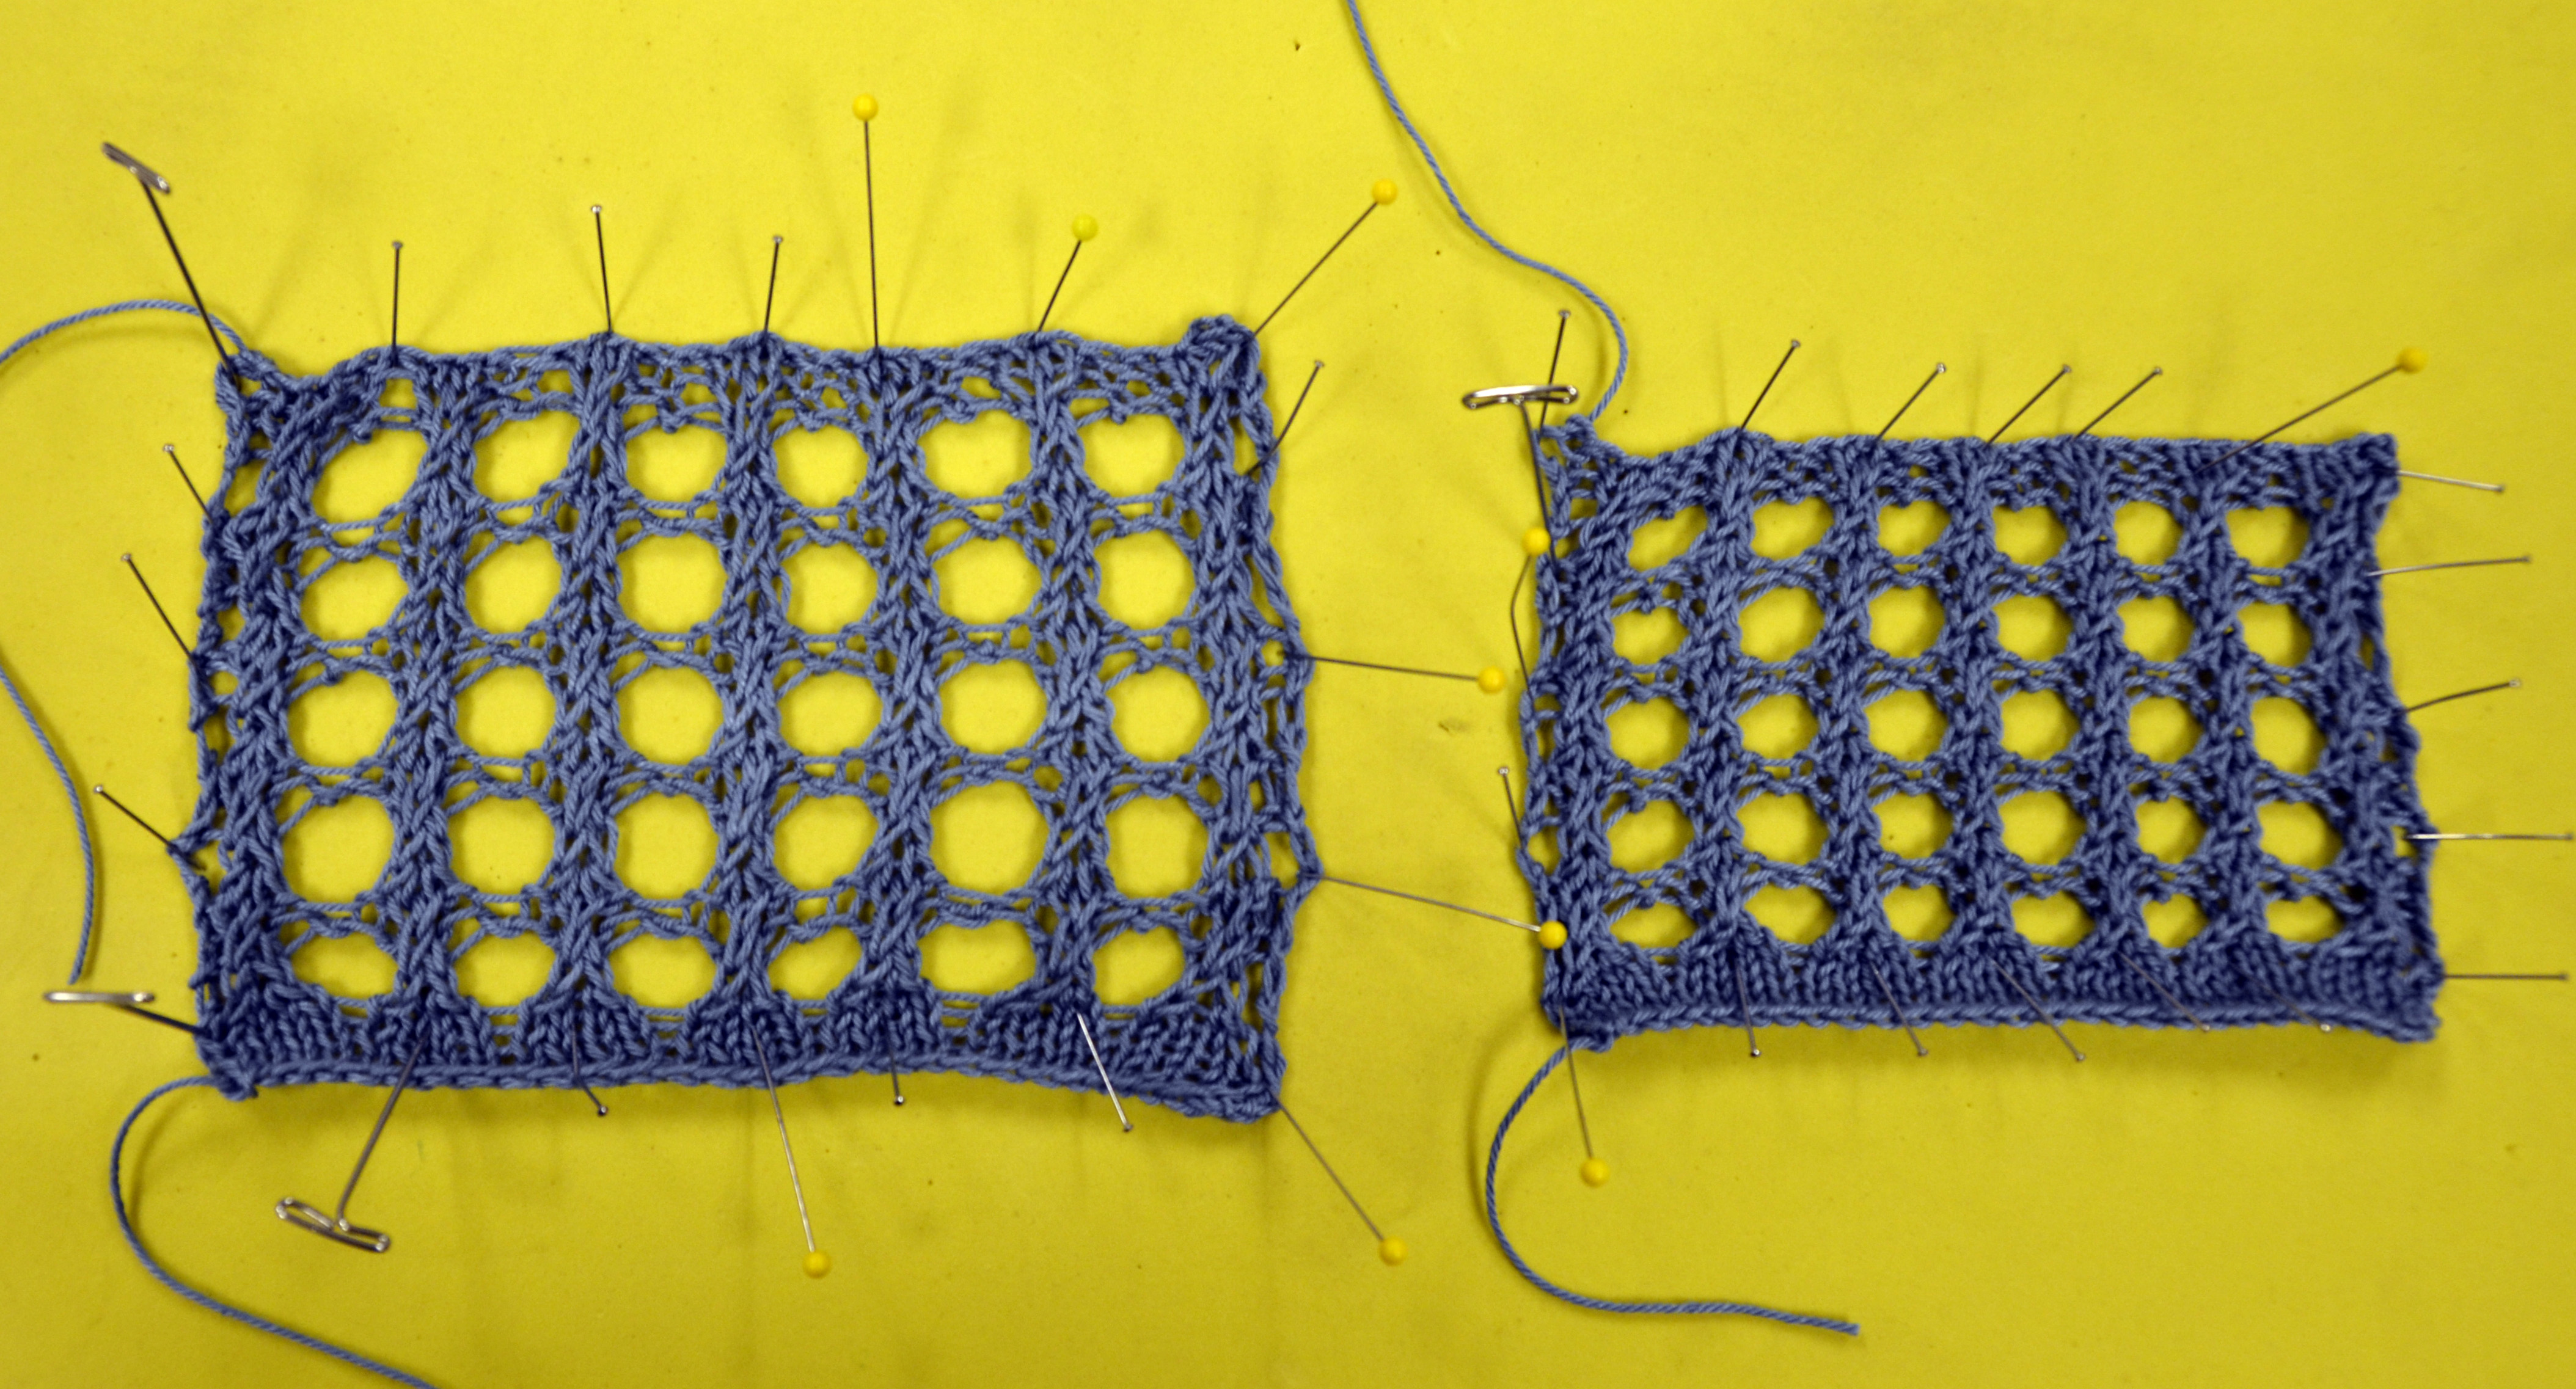
I cast on 38 sts with size 5 US/3.75 mm needles, and went straight into the Mesh pattern stitch. I worked 9 repeats of the 4 row pattern and bound off.

flax swatch 1

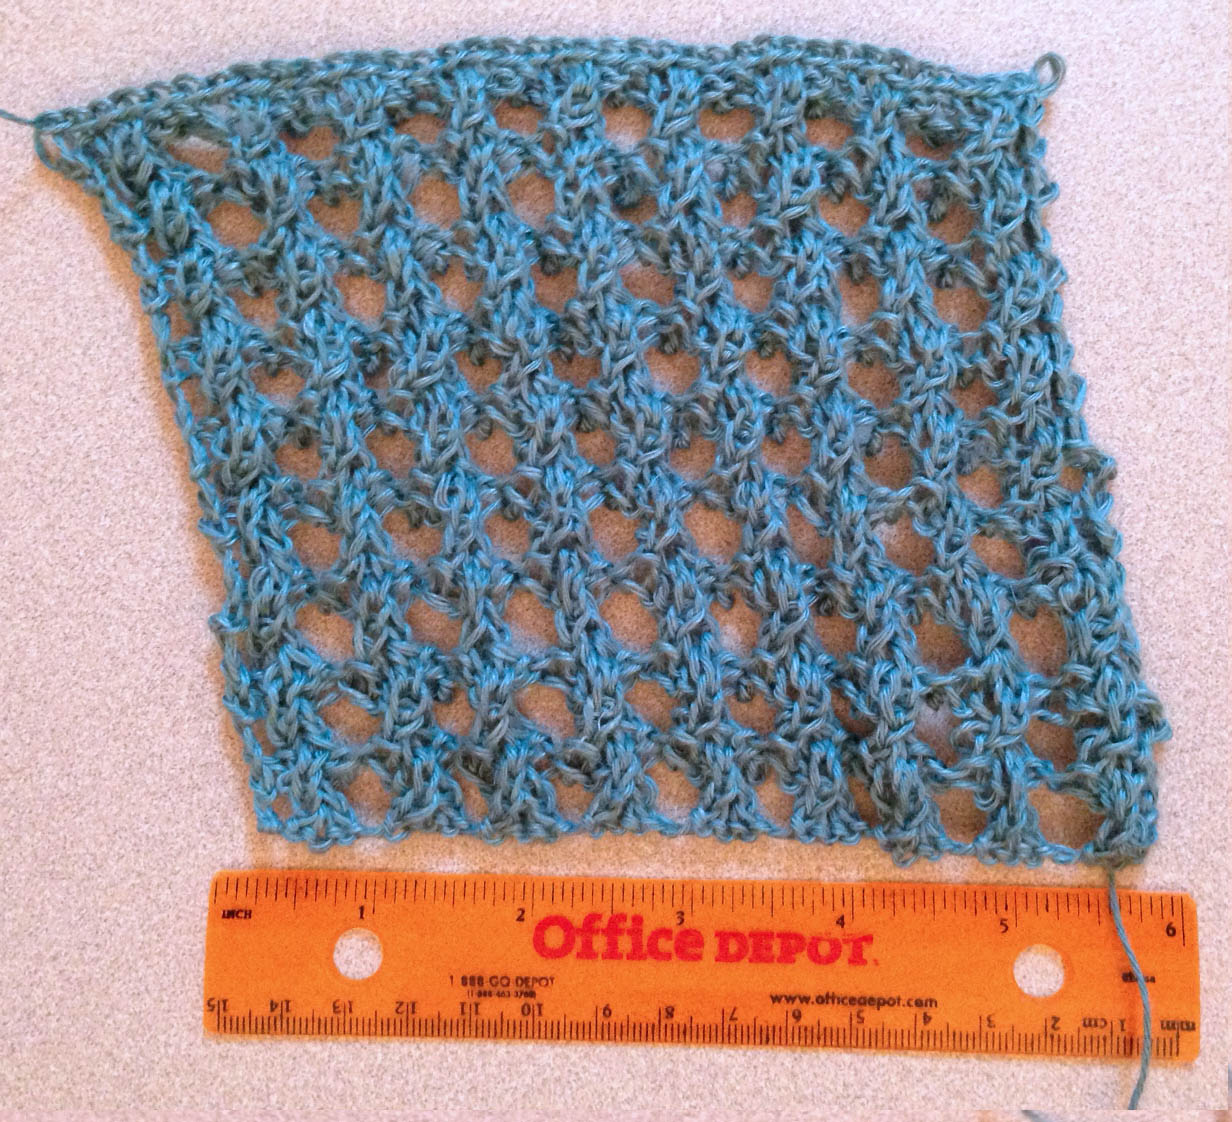
The first thing you’ll notice is that this swatch has a distinct bias to the left. Since the stitch pattern involves a Right Twist every 4 rows, this isn’t really surprising. That little maneuver is consistently pulling the fabric in the same direction causing the whole piece to slant. If this hold true through blocking, then the side seams of my top will want to twist around my body – not something I’m willing to try to pass off as a design feature. But I’m going to withhold judgement until after blocking.

I chose a rather unconventional blocking method – I threw my swatch in the washer and dryer with a load of laundry. Since I intend to machine wash and dry my finished top, I wanted to see 1) how the fabric transforms, and 2) how much shrinkage to expect.

flax swatch 2

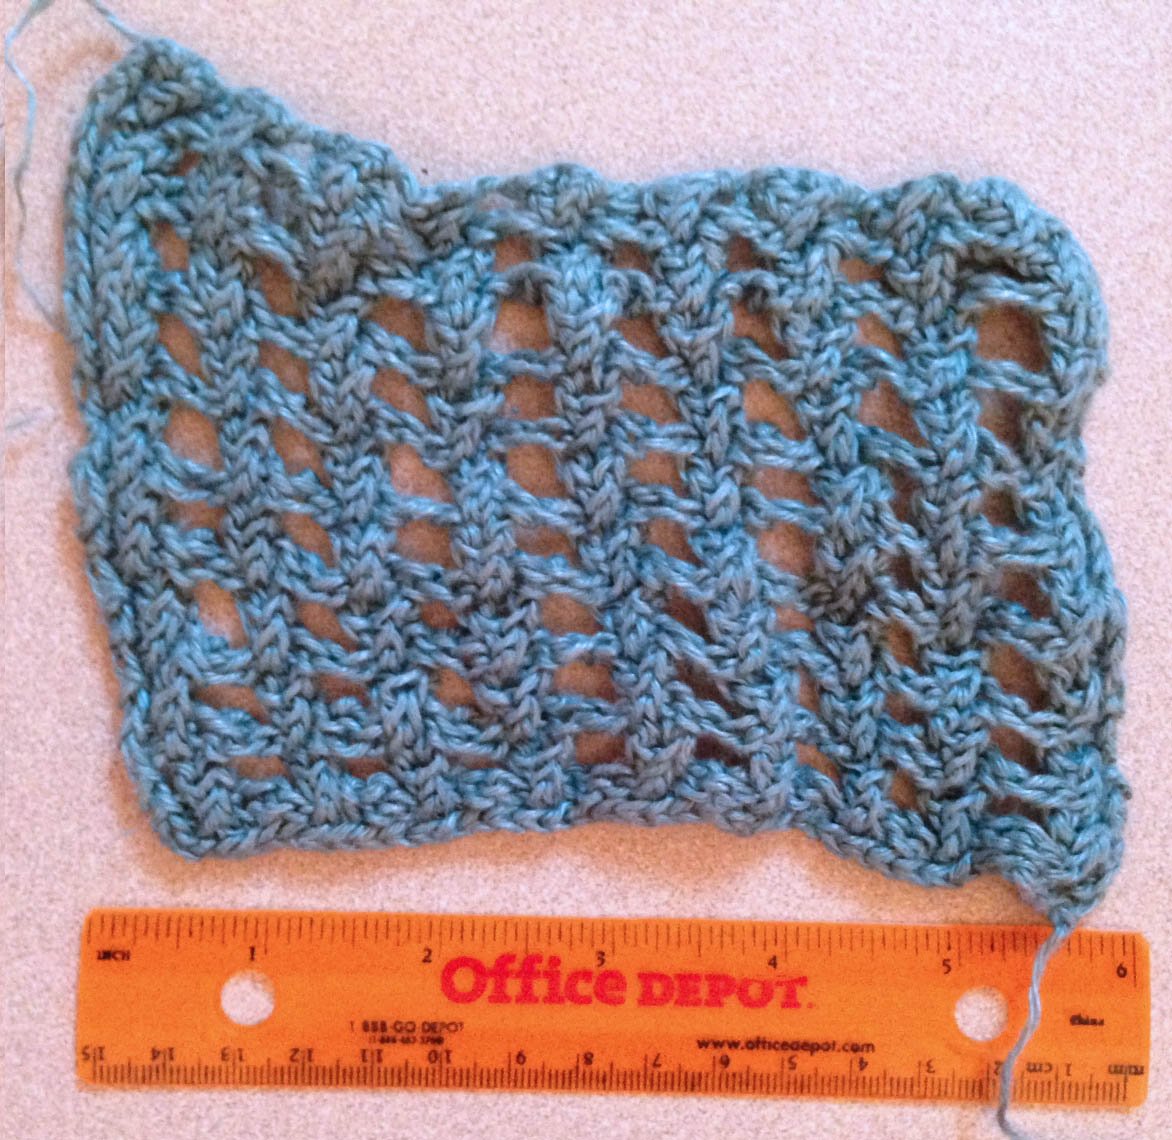
My swatch came out of the wash looking like a sad, rumpled little thing. What you can’t see is how much softer and more supple the fabric became. Flax can feel a little stiff and wiry in the knitting, but it softens up nicely in the wash.

You can also see that the bias problem was not entirely resolved by the wash. On to Step 2, a gentle steaming.

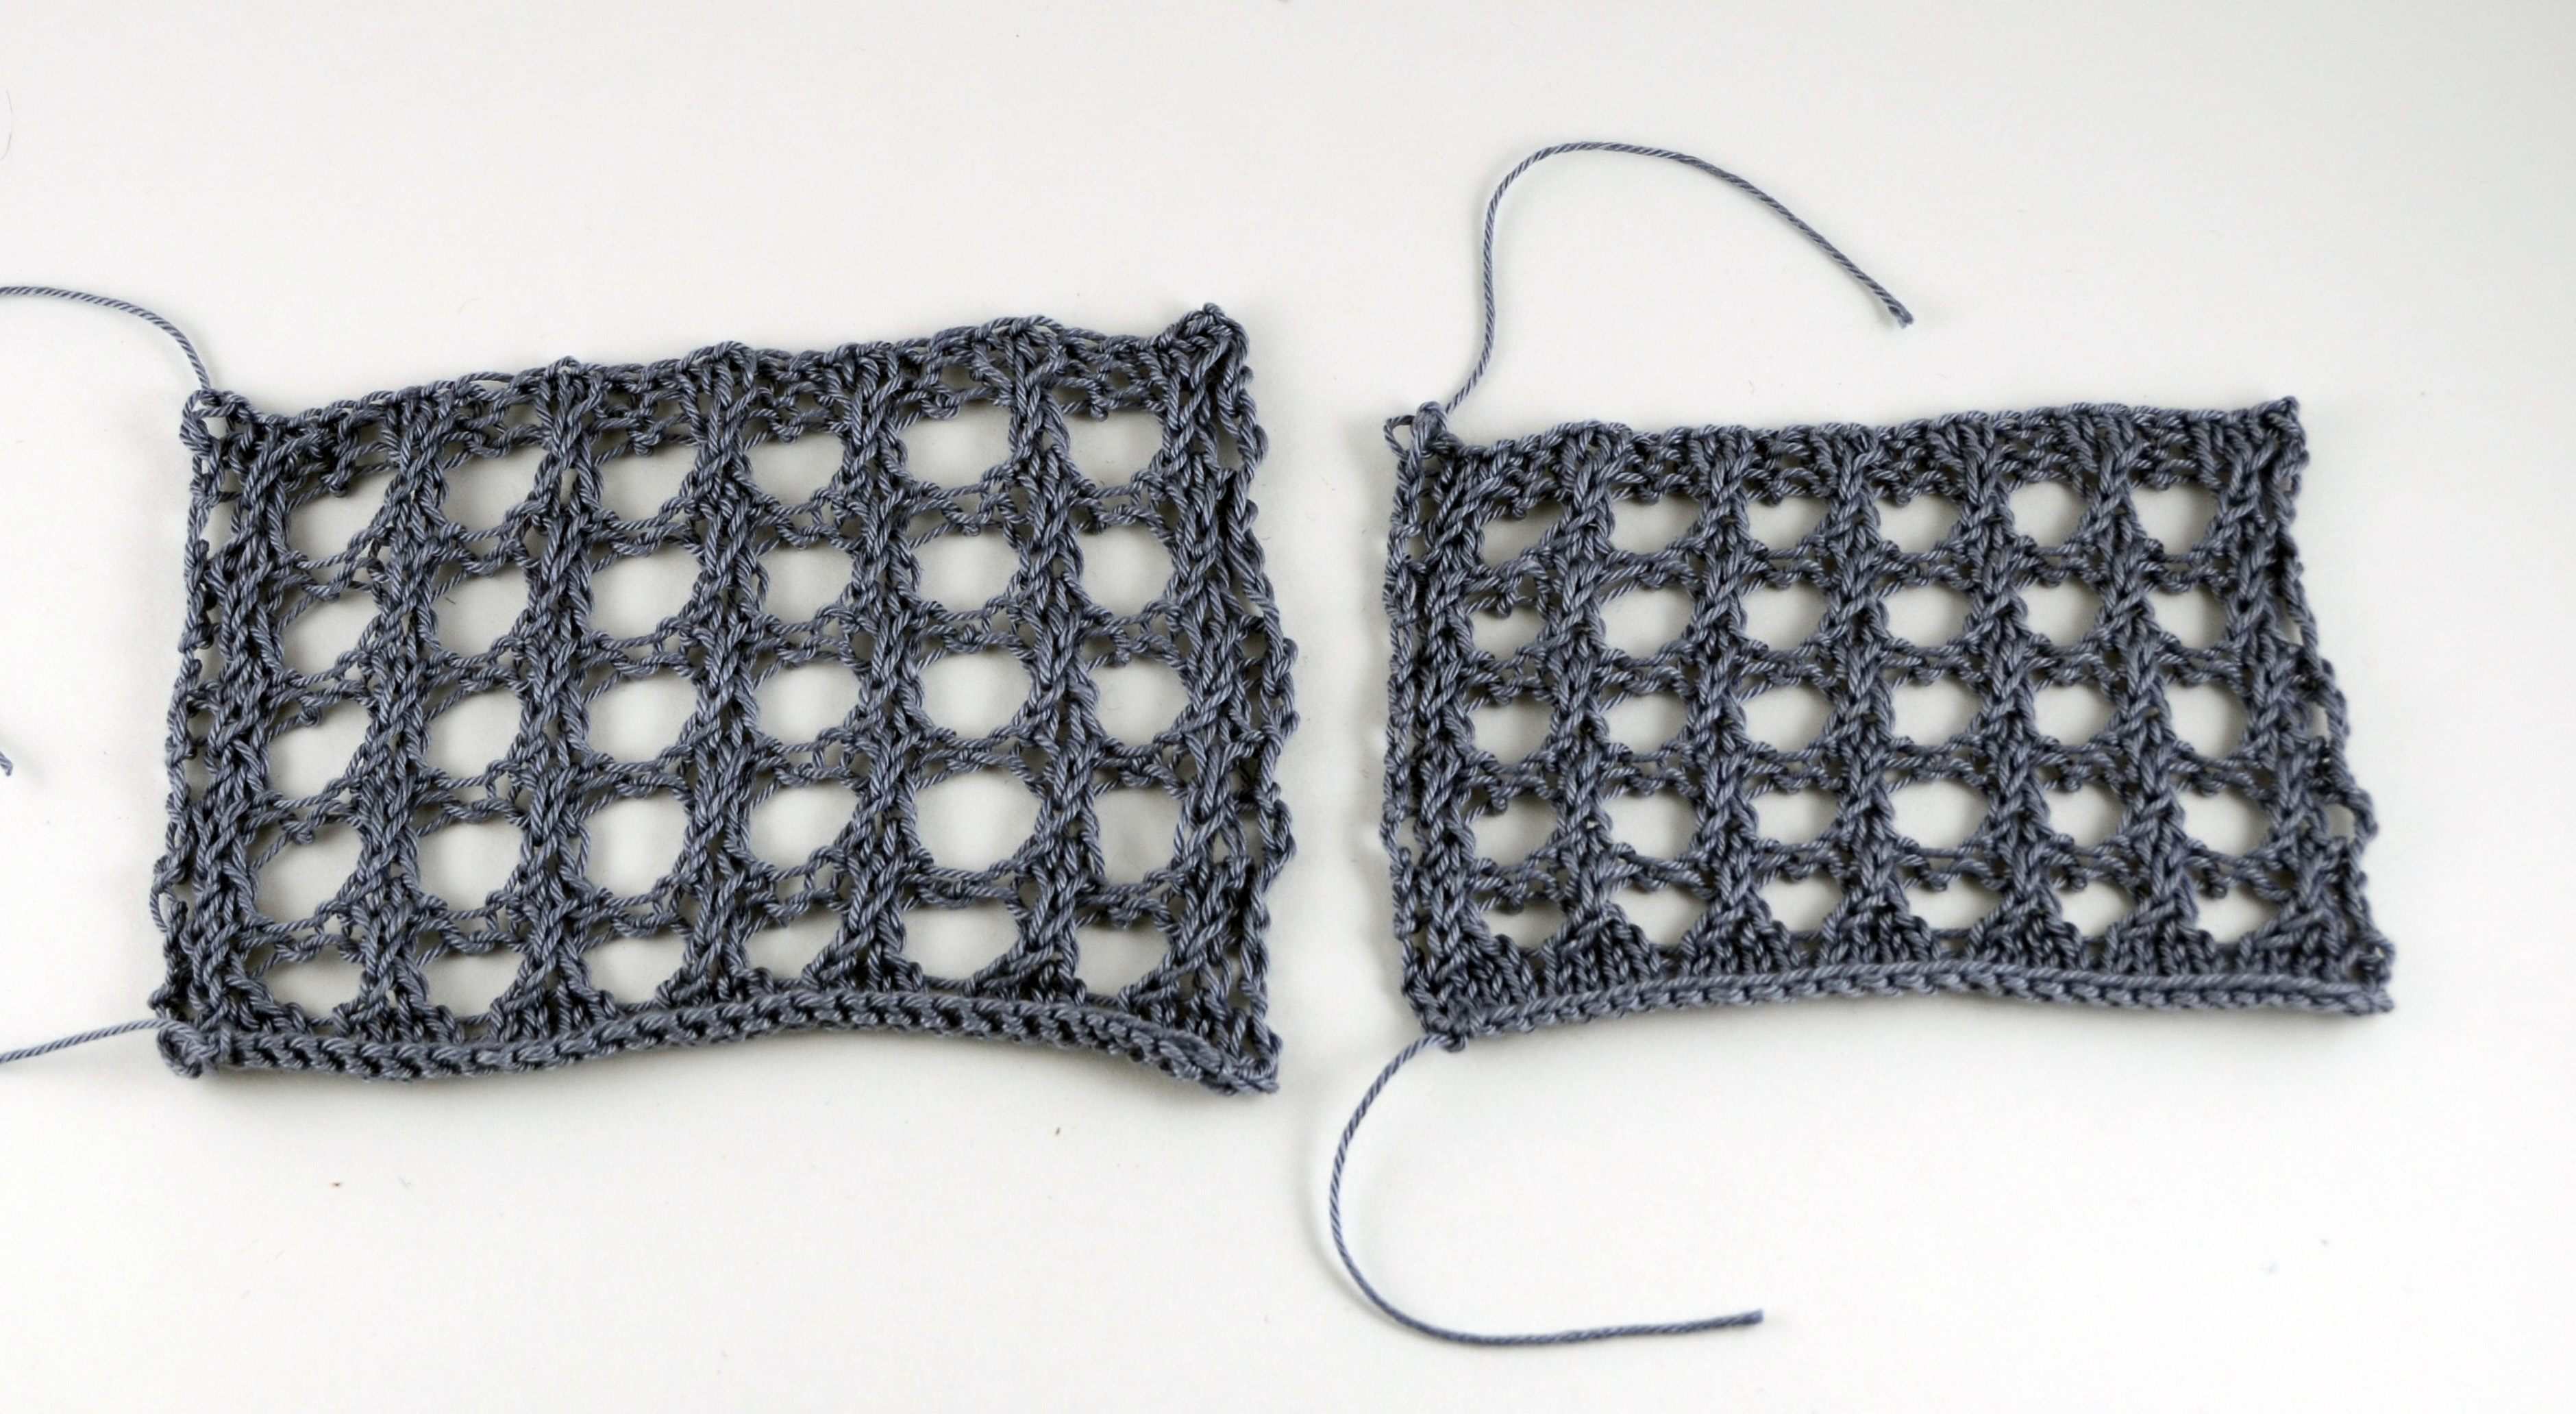
I took the swatch to my ironing board and applied a healthy shot of steam, without letting the iron actually touch the fabric – I didn’t want to flatten the texture. The steam relaxes the fibers and makes the piece malleable. I used my fingers to gently nudge, push and pull the piece into shape, then let it cool.

flax swatch 3

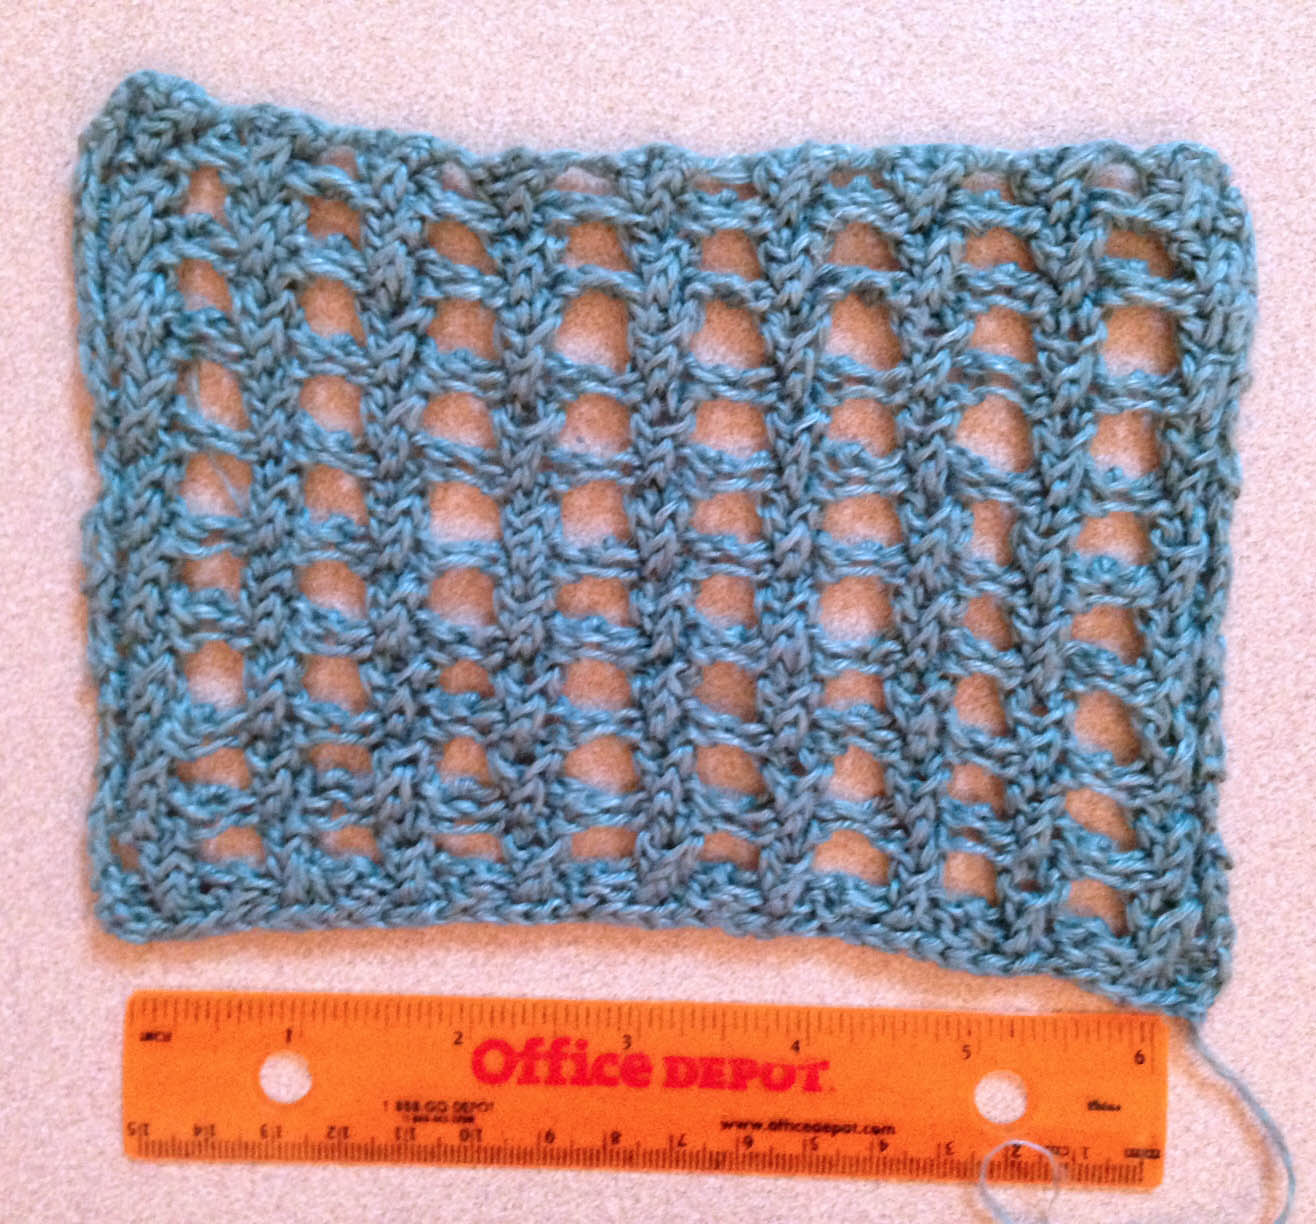
As you can see, the piece straightened out nicely. The fabric is smooth, with good stitch definition, and the bias is nearly gone. This will do.

My gauge came out at 22 sts and 32 rows = 4” in Mesh pattern. Not quite a match for the gauge called for in the pattern, but I like the fabric, and I’m willing to do the pattern modifications required to make it work.

Unlike the lovely model you see in the pattern photographs, I’m well past middle age. My body tells a tale of motherhood, gravity and many fine meals. I’d like 4-5” of ease for this top, so I’m going to aim for the largest size. I know I need a multiple of 4 sts + 6 for the pattern repeat, so I’m going to cast on 150 sts. This should give me a finished bust measurement of 53 ¾”.

For this style, I prefer my tops long enough to hang past the curve of my belly. Looking at the schematic, I can see that I want to add length in two places. I’ll add 2” before I begin the sleeve shaping. I also want the sleeves to fit loosely around my upper arms. I’ll add another 2” between the sleeve shaping and the neck shaping, making the sleeves 4” bigger around. With a total of 4” added length, and the bigger sleeves, this top will be both comfortable and flattering on my less-than-model-perfect body.

Hmm…I’d better ask Amy to set aside a couple more skeins in this lovely color, just in case.

Rocked Knitalong – swatching time

In preparation for casting on for the launch of our Rocked knitalong, I did some swatching over the weekend. I mentioned in the first post on the knitalong that my plan is to use Garden 5 instead of Cotton True Sport.

For my first swatch, I cast on 30 stitches using a US Size 4 (3.5 mm) needle. I did the 5 hem rows of stockinette stitch, and then worked 5 repeats of the Mesh stitch pattern. For my second swatch, I did exactly the same thing, except with a US Size 2 (2.75 mm) needle. Here are both of my swatches on the blocking board:

Garden5_swatch_1

And here they are, unpinned and relaxed:

Garden5_swatch_2

The swatch on the left gave me a gauge of 22 sts/4″, pretty close to the gauge called for in the pattern (which is 21 sts/4″). The swatch on the right gave me a gauge of 26 sts/4″.

Now is where my discretion comes into play. There is nothing wrong with either of my swatches. The swatch on the left is a bit looser since it was worked on larger needles, and therefore a bit drapier. The swatch on the right has a little nicer stitch definition but would obviously make for a more time-intensive garment. In either case, because my gauge does not match the pattern, I will have a little math to do.

First, I need to decide what kind of fit I want. The pattern tells me that this top is meant to fit with 4-10″ of positive ease. That’s a pretty wide range of ease, right? It also tells me that the garment in the pictures is the smallest size (40 1/2″ bust) modelled with 8″ of postitive ease. I know I like clothing that is oversized, so I know I want a reasonable amount of ease (postive ease = extra room to breathe!).

Rocked_web

My bust size is about 34-35″, and I think a 40″ bust will work fine for me. If I liked even roomier clothing, I might go to the medium size. If you are unsure what type of fit you want, go to your closet and do some measuring. Find a top that you feel has a similar fit to what you’re trying to achieve with Rocked and measure it. The fabric in Rocked is fairly lightweight, so positive ease is not going to add a lot of bulk.

Another thing to consider is the length. If you take a look at the schematic, you can see the length measurements. This top is inteded to be somewhat cropped. I’ve heard from some of the people here in the office that they plan on making a longer length. I do plan on keeping the length in the pattern. I’m on the short side at 5′ 5″, and plan on layering my Rocked over a tank top. If you plan on lengthening the top, you’ll want to pay even more attention to the ease, particularly if your lower half is larger than your bust like mine is! Most of us don’t like shirts clinging to our behinds, so you’ll want to be sure you have ease to accommodate this measurement.

Try this: determine the total length of the top and where you’d like the lower edge to sit on your body, whether it’s your waist, hips, or wherever. Now, measure the circumference of this location. For me, if I were going to lengthen my Rocked, I would go to a larger size. My hips are several inches larger than my bust, so I would probably knit the medium size, or something between a small and a medium.

So, back to my swatches, I still need to decide what I’m going to do. Both fabrics are perfectly nice, but I think I’m going to go with the option on the right, at 26 sts/4″.  Because I have more stitches per inch than called for in the pattern, it’s time to do a little math. 26 stitches per inch breaks down to 6.5 stitches per inch. The measurement I’m aiming for on both front and back pieces is 20.25″ (half of the full bust measurement). To figure out approximately how many stitches to cast on, I will multiple 20.25 x 6.5. That gives me 131.625.

Looking at the pattern, I can see I need a stitch count that is a multiple of 4 stitches + 6.  If I round down to 130, I get a number that will work. Or I could round up to 134, and also get a number that will work, which is what I’m going to do. I’d rather err on the side of a little more ease than a little less. I’m not getting any younger or smaller, and I’d like to get the most use I can out of my new shirt!

Be sure to join us in the Universal Yarn Ravelry group to participate in the knitalong. I’ll be there to help with questions and join in the fun over the next several weeks. See you next week here for cast-on fun!


IRL – Two-In-One Hat

Sometimes the best things in life come easy, right? In this week’s IRL, Heather’s Two-In-One hat shows off the beauty of Poems Chunky‘s self shading colors with a simple hat pattern. And the best part? You can squeeze two hats out of just a single ball of yarn.

IRL_Poems Chunky_Heatherhat_ms_150

I spotted Heather earlier this week in her adorable hat and had to know the details. When she told me it was her own hat pattern and that she had enough yarn to make two hats from her single ball of Poems Chunky, I knew I had to share it with the world!

The Two-In-One Hat pattern is available for free on our website. Thanks, Heather!

It’s knitalong time!

A couple of months ago we released Cotton True Sport: Collection 1, a small group of warm-weather knits.  One piece from this collection really seems to have struck a chord with knitters: Rocked.

Craftsy Rocked3 Craftsy Rocked1B


It’s the type of knit that is entertaining enough to do with its short-repeat lace pattern, yet with enough interest to keep the hands happy. Back and front pieces are worked separately, each in a single piece, and then the pieces are seamed. The neck edging and sleeve cuffs are worked in simple stockinette stitch and there’s even a cute button tab. Several of us in the office have been itching to start summer projects and it only seemed natural to go with Rocked.

As written, this project takes between 4-7 balls of Cotton True Sport. But we have a number of other yarns that would be suitable too! Redlands Yarn Company, located in Redlands California has knitters working this top in our Fibra Natura Flax, another great warm weather yarn.  Bamboo Pop, Little Bird, and Garden 5 would also work well. The gauges are not all exactly the same as Cotton True, but that’s something we’ll cover during the knitalong.

For those of us participating here in the office, 4 are using Cotton True Sport, 2 are going with Flax, and I am using Garden 5.

Cotton True is a sweet Pima cotton available in plenty of shades. It is easy on the hands and will make for a truly wearable summer garment.

Cotton True Sport 3 balls blog

Flax is a yarn I’m always looking for a reason to use. I love linen and have used Flax on many occasions for personal wearables. It also has a great color range.

Flax new label pic prelim 3_cutout_web


Bamboo Pop is a sportweight 50 bamboo/50 cotton blend. Since its launch two years ago, Bamboo Pop has shot to the top of our bestselling yarns list. And it’s no surprise! It is a soft lovely natural fiber blend in tons of great shades from brights to adult neutrals.

StackedBalls_smaller


Little Bird is a microfiber acrylic with a cottony feel and a nice sheen. Also in the sport range, this is a garment that can be machine washed and dried.

Little Bird 3 balls stacked_Ravelry


Lastly, I also suggest Garden 5, a high-quality mercerized Egyptian cotton. Garden also comes in 10 and 3 weights, but the 5 weight is closest to the gauge of Cotton True Sport. The mercerization of the cotton provides a nice shine and a bit of extra substance to finished projects.

262_skein

The details:

  • We will be casting on for the project on Monday, April 13th (about a week and half after the release of this blog post)
  • I will be blogging once per week on Mondays regarding aspects of the project, such as any potential problems to look out for, yarn substitution tips, adjusting stitch counts to fit your gauge, finishing, etc
  • I’ll be hosting the participation-aspect of the knitalong over in our Ravelry group.
  • I’ll be wrapping up the knitalong on Monday, May 11th.

And that’s it! This will be pretty informal; just a fun way to work on the same garment together and share our progress and stories about our own projects. You can find the Rocked pattern available for download on Ravelry and Craftsy.  I’m off to gauge swatch with my Garden 5.  See you soon!

Amy Answers – Basketry Handbag

I got a call today from Ginger at In Sheep’s Clothing, a friendly LYS in Torrington, CT.  She told me about a customer of hers who is working on the Basketry Handbag in Yashi and is having trouble with the Basketry stitch pattern.

Yashi Purse 2_DSC1262

The main stitch pattern on the bag body is really cool looking. In Yashi (100% raffia), it creates a rustic woven look. The stitch pattern is easy enough once you get the hang of it, but can be tricky to wrap your head around it by reading the text instructions only. I decided the best way to help Ginger’s customer was to take a short video demonstrating the technique.

One key piece of advice I have on knitting this handbag in Yashi, is to keep the work very loose on the needles. Yashi is not elastic, so if you’re not conscious of the tautness of the work, things go downhill very fast.

IRL – Ellery Cowl

The weather is finally warming up here in North Carolina, but it’s still chilly enough to wear our knitting. Thank goodness!

IRL_Llamalini_Katiecowl_ms_blog


I caught up with Katie as she was filling orders and wrangling paperwork earlier this week. I had glimpsed her in her new cowl and had to try and convince her to let me take a photo for the blog. She was shy but willing!

Katie is donning her version of the Ellery Reversible Cowl in Llamalini. She used color 112 Caspian which looks stunning with her fiery red hair. Llamalini is a favorite with all of us in the office. It’s a lovely choice for sweaters. The linen and silk add the most sumptuous earthy feel in combination with the llama, making garments that are breathable and not overly toasty.  But for those of us who aren’t ready to commit to a large project, just 3 50-gram hanks will make the lovely cowl above.

Amy Answers – Laurel Crochet Stole

I’m delighted to introduce a new occasional feature here on the blog: Amy Answers. Part of my job with Universal Yarn involves answering customer emails and phone calls when pattern issues arise. Sometimes these conversations are regarding an error in the pattern (I hate these! But unfortunately they do happen from time to time). Other times, we talk about what a pattern really means when it tells you to do x, y, and z.

Educating crafters is something I’m very passionate about. In this occasional section of the blog, I’ll be sharing what a customer learns through one of our phone calls, what I learn through one of our phone calls, how to do a stitch patterns in some of our new designs, and whatever else makes sense!

To kick things off, I’ll be doing a photo tutorial on how to join motifs in one of our Polaris patterns, the Laurel Crocheted Stole.

Laurel_Crocheted_Shawl_Polaris_low-res


I love love love join-as-you-go motif projects. What this method typically means is that first a full motif is made. Then, the next motif is made less the final round. On that final round, the current motif is joined to the previous motif in multiple places. Sometimes this occurs with just a slip stitch. But in the Laurel pattern, we join “in pattern” with dtrs (double treble crochet).

1

Here is the first motif, rounds 1 and 2. It is complete.


2

Here is motif 1. Next to it is motif 2 in progress. It shows the completion of round 1, and this first part of round 2: Ch 7, sc in next ch-7, ch 7, (dtr, ch 5, dtr) in next dtr, ch 7, [sc in next ch-7 sp, ch 7] twice,


3

Next we begin to join motif 1 to motif 2.  Here is what the next part of the instructions are: * (dtr, ch 2, dtr in corresponding corner sp on previously worked motif, ch 2, dtr) in next dtr *

Notice that there is a string of instructions inside a set of parentheses (we’ll call this A), and then after the parentheses is another string of text (B). This means that that entire set of instructions A happens in B, or in the next dtr. So, the first step is to dtr in the next dtr, which is pictured above on motif 2.


4

After that, it tells me to “ch 2, dtr in corresponding corner sp on previously worked motif”. This is shown above. The “corner” space is the chain 5 from round 2 of motif 1.


5

The last action inside the parentheses is to  ch 2, dtr in the next dtr (which is the SAME dtr from round 1 of motif 2 as we’ve just dtr’d in), shown above.


6

The next part of round 2 is: [ch 3, dtr in next sp on previously worked motif, ch 3, sc in next ch-7 sp] twice.

The photo above shows this done once…


7

and here it is done twice.


8

Next, we join to motif 1 in the next space along that same side: ch 3, dtr in next sp on previously worked motif.


9

Then we have arrived at the next corner, and we’re instructed to repeat from * to * once more.


10

The remainder of motif 2, round 2 is completed without further joining. You can see that motifs 1 and 2 are joined in 5 different spots. Two of them are in corner spaces, and the other 3 are in the chain 7 spaces in between the corners.

So this solves joining one motif to the side of another. But wait, there’s more! Because the Laurel stole is 5 motifs wide x 17 motifs high, there will be a number of motifs that will be joined on more than one side. Below demonstrates how to do the “Two-Sided Join” described in the pattern.


11

To demonstrate, first I’ve made a third motif and joined it to motif 1 in the same way as shown above.


12

Here we have motif 4 started and ready to begin joining to motif 3.


14

The joining process is the same as before until we get to that corner spot. This part is a little different.


18

This next part of round 2 reads: , (dtr, ch 2, dtr in corresponding ch-5 corner sp on previously worked motif, sk ch-5 corner sp on next previously worked motif, dtr in ch-5 corner sp of next previously worked motif, ch 2, dtr) in next dtr.

So, to break it down, we dtr in the next dtr (same motif, motif 4), ch 2, dtr in corresponding ch-5 corner on previously worked motif (motif 3/purple), skip the next ch-5 corner space (motif 1/pink), then dtr in the next  corner (motif 2/blue), ch 2, dtr in same dtr on current motif.

Whew!

19

Then we finish joining to motif 2 (blue) and then complete round 2 of the current motif, motif 4.

I’ve shown my motifs in different colors of Uptown Worsted for the sake of clarity. The original stole worked in Polaris 61002 is beautiful in pure white. I know this project would look really lovely in some of the more multi colors of Polaris too. Motifs show off colorful yarns nicely.

I hope this helps for any crocheters out there working on the Laurel stole or another join-as-you-go project.

IRL – Woven Whisper Lace

Whisper Lace two weeks in a row! Can you tell that’s one of our favorites here in the office?!

IRL_WhisperLace_Katiescarf

Today we’re sharing an “In Real Life” with Katie who works in customer service. She’s adorned with a scarf woven on a Schacht Cricket rigid heddle loom. She used both Llamalini and Whisper Lace for the warp, and just Whisper Lace for the plain-weave weft. It only took one ball/skein of each!

Thanks for sharing, Katie. Your scarf looks fantastic!

IRL – Wisp Scarf mod

I am lucky enough to work with a great group of ladies here at Universal Yarn. We mostly consist of Yonca (sales manager), Heather (social media goddess), and Katie and Jackie (customer service wizards), me (Amy) the design person. We’re a small group of 5 women, but we all knit, crochet or both. There’s hardly a day that goes by where one of us is not wearing our handmade preciousness.

Thus begins a new series I am calling “IRL”, or In Real Life. Every day I come to work in a building that houses more yarn than you can imagine. It can be overwhelming to look at it all boxed up in the warehouse, sitting on shelves, or piled on my desk. It’s always calling to me, “knit me! make something out of me!” We sell yarn here, but we also love using and wearing it. I thought you might be interested in some of the things we make, so here goes.

I’ll start first:

IRL_WhisperLace_WIsp

I’m wearing a scarf I knit up last year made out of Whisper Lace. With just 2 balls of color 103 Harbor, I came up with a whopping 20″ x 60″ scarf/stole. It’s long enough that I can keyhole it, or when it’s really cold, double wrap around my neck like the photo above. The pattern is a modified Wisp by Cheryl Niamath, free on Knitty. I didn’t add buttons; I just cast on extra stitches, added a couple of random vertical garter stitch columns for interest, and knit until I ran out of yarn. For me, a person who almost exclusively knits garments, it was a refreshing change!

How about you, what Universal Yarn are you wearing today?

Weaving Wednesday – challenge!

A few months ago, I sent a little care package to Denise over at Schacht, maker of our Cricket rigid heddle loom.  It contained several different yarns, all completely different in composition and construction: Infusion Handpaints, Cotton Gold, Poems Silk Solids, and Bamboo Bloom Handpaints.

Infusion HP 115 Gray Matters web BBH 310 Fuji_web Cotton Gold 1100_web Poems_Silk_Solid 701 Black_2_web Poems_Silk_Solid 702 Sterling2_web

The challenge for Denise was to take all these vastly different yarns and weave them up into something awesome. I didn’t make it easy for her, but I at least softened the blow by including coordinating shades in each different yarn. Well let me tell you, Denise passed this challenge with flying colors (so to speak, at least in greys and blues!).

Check out the Schacht newsletter for details on the finished project and a great how-to for repairing a float, or skipped warp thread.