Day 4 of Winter – Series 4 Edition

This is part 4 in a 12 part series highlighting designs from our 12 Days of Winter, Series 4 Edition.

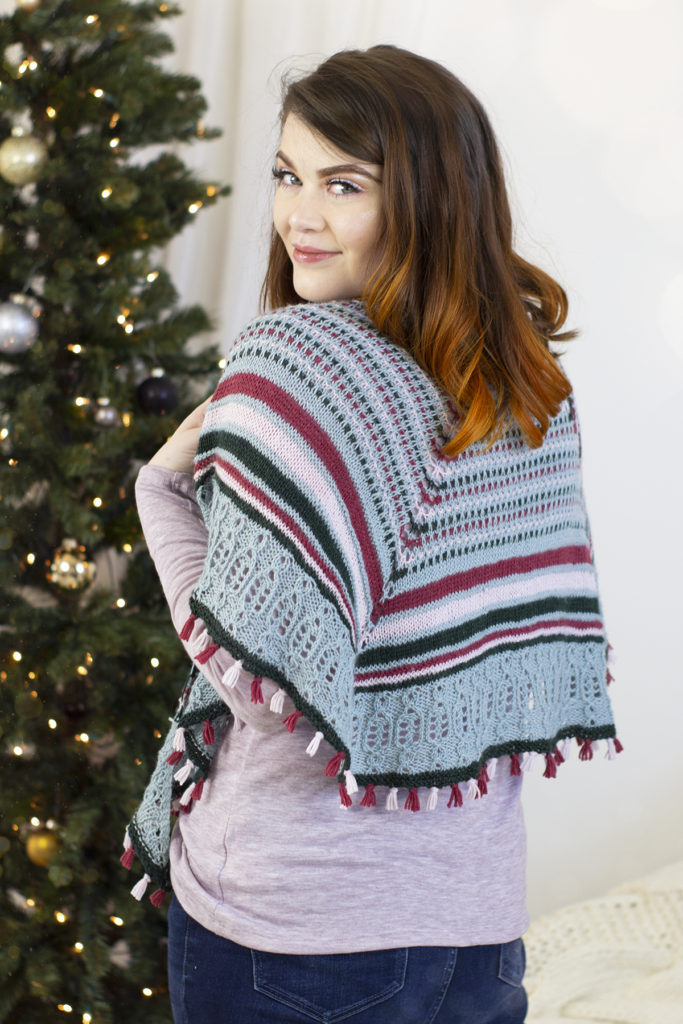
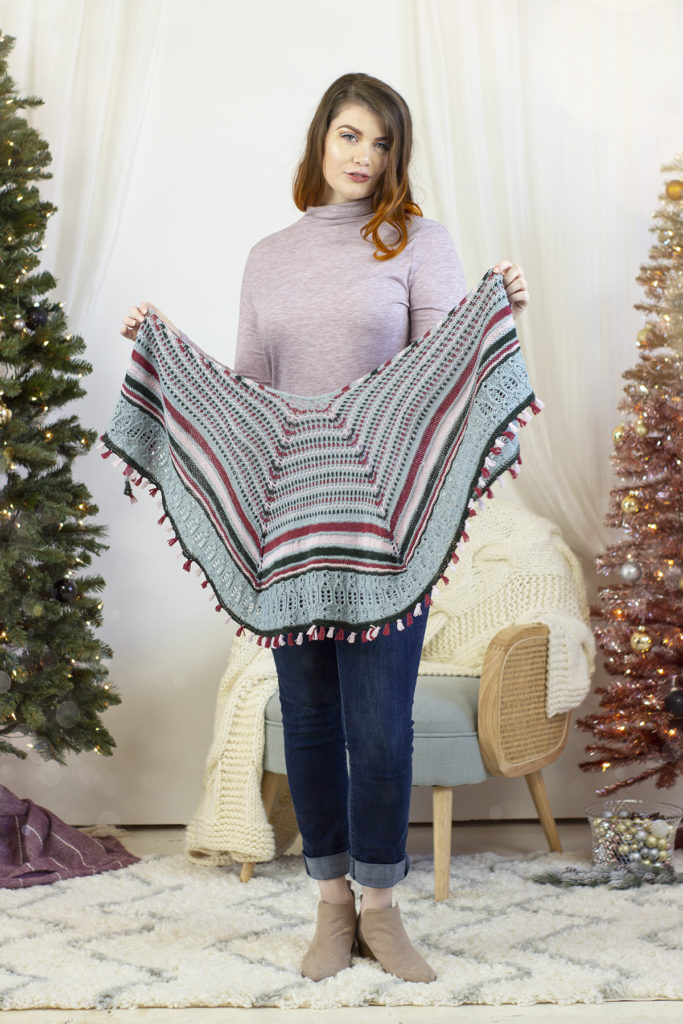
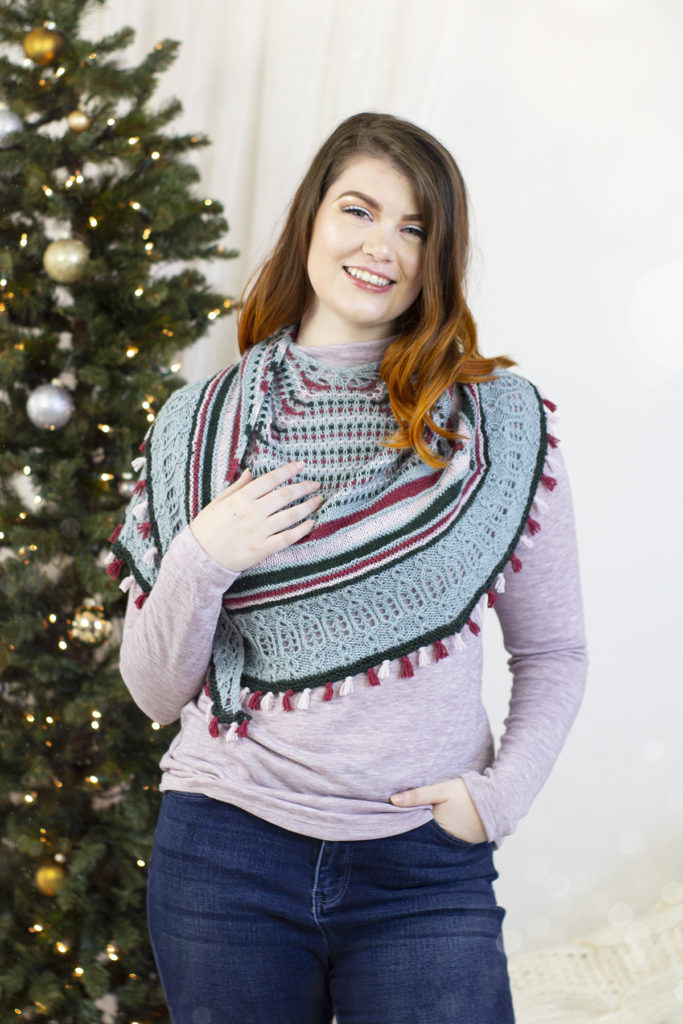
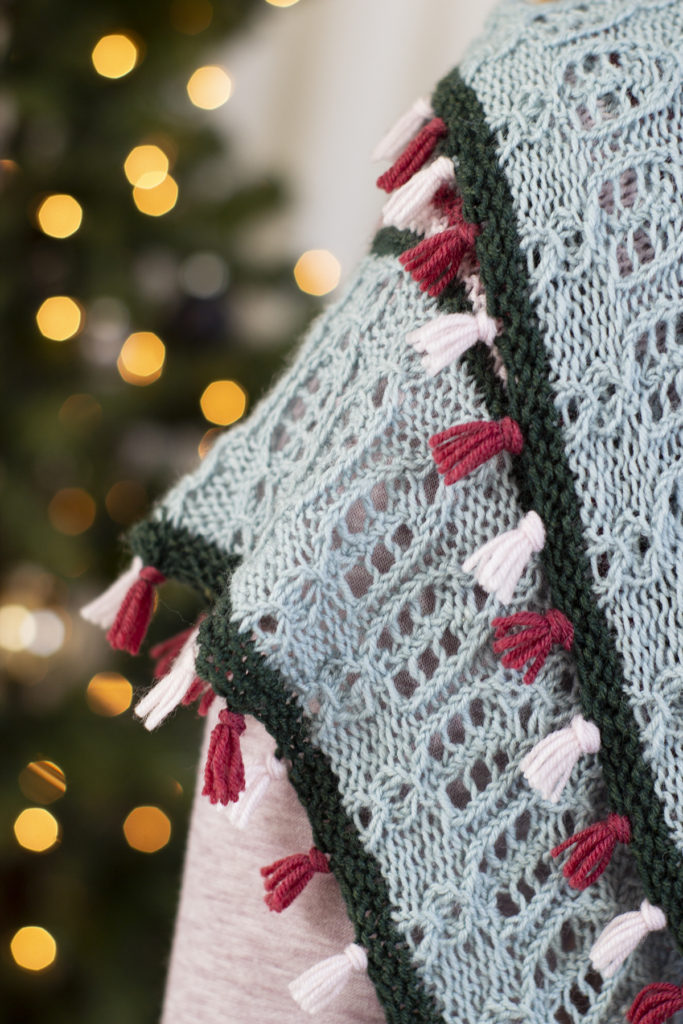
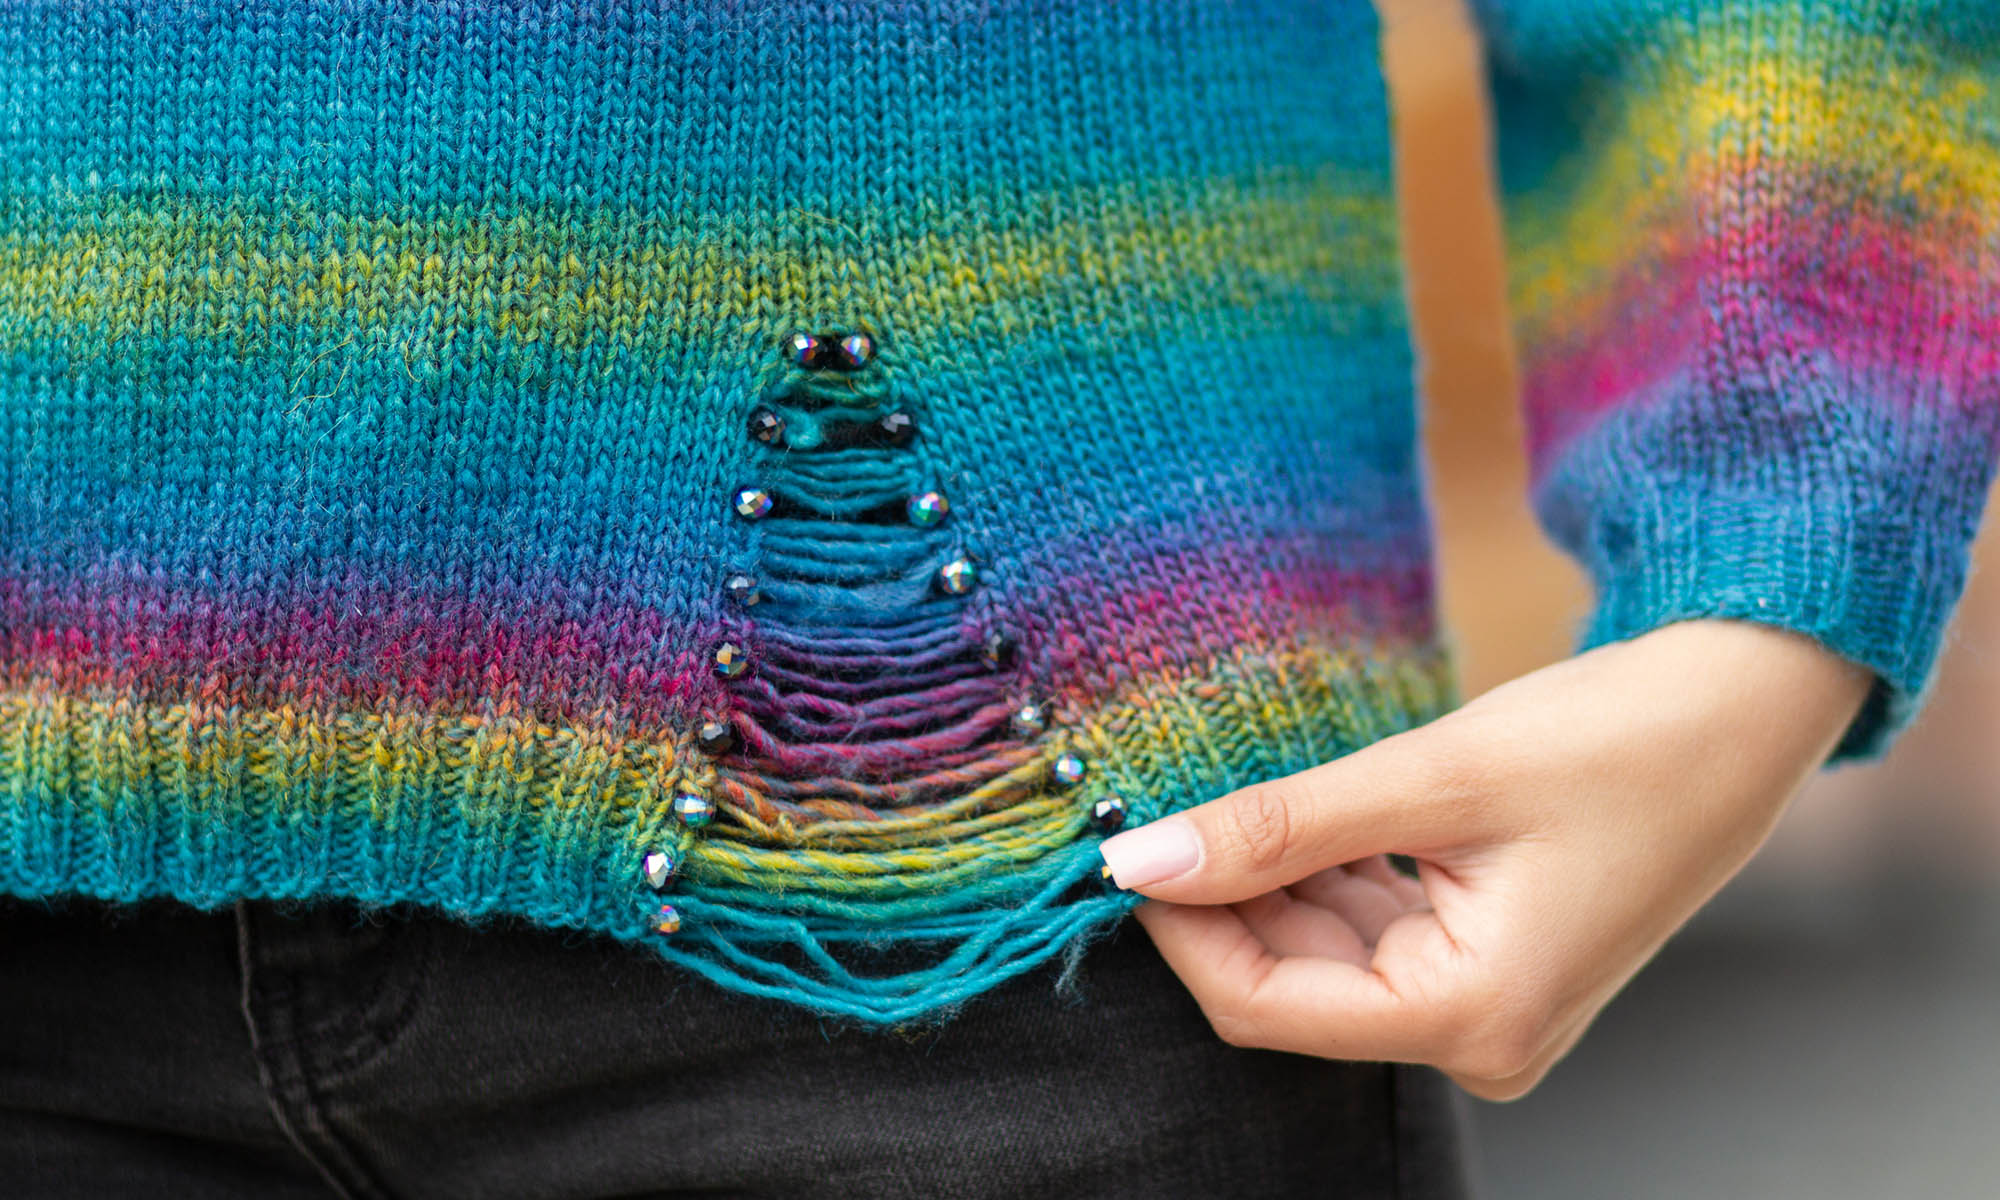
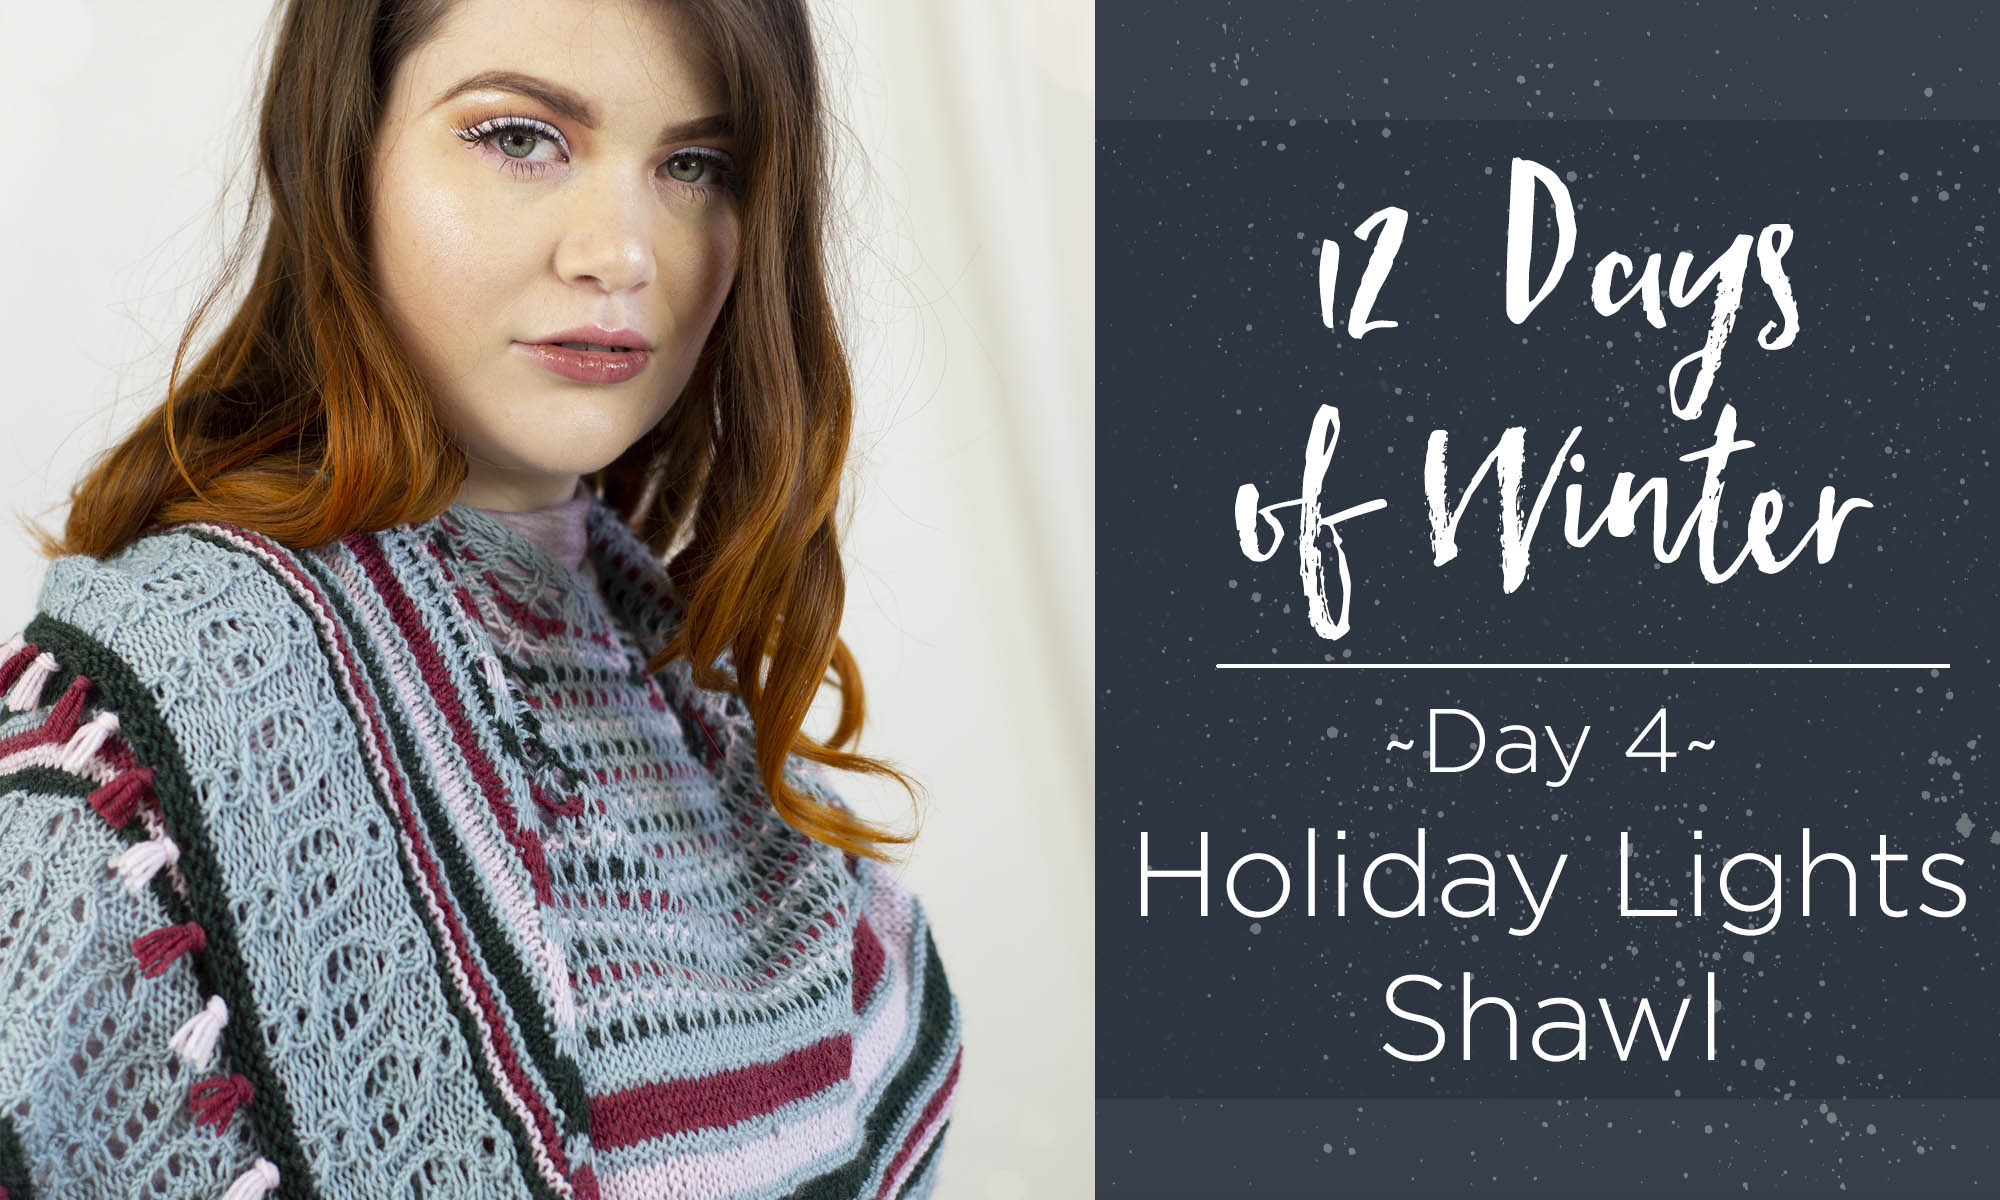
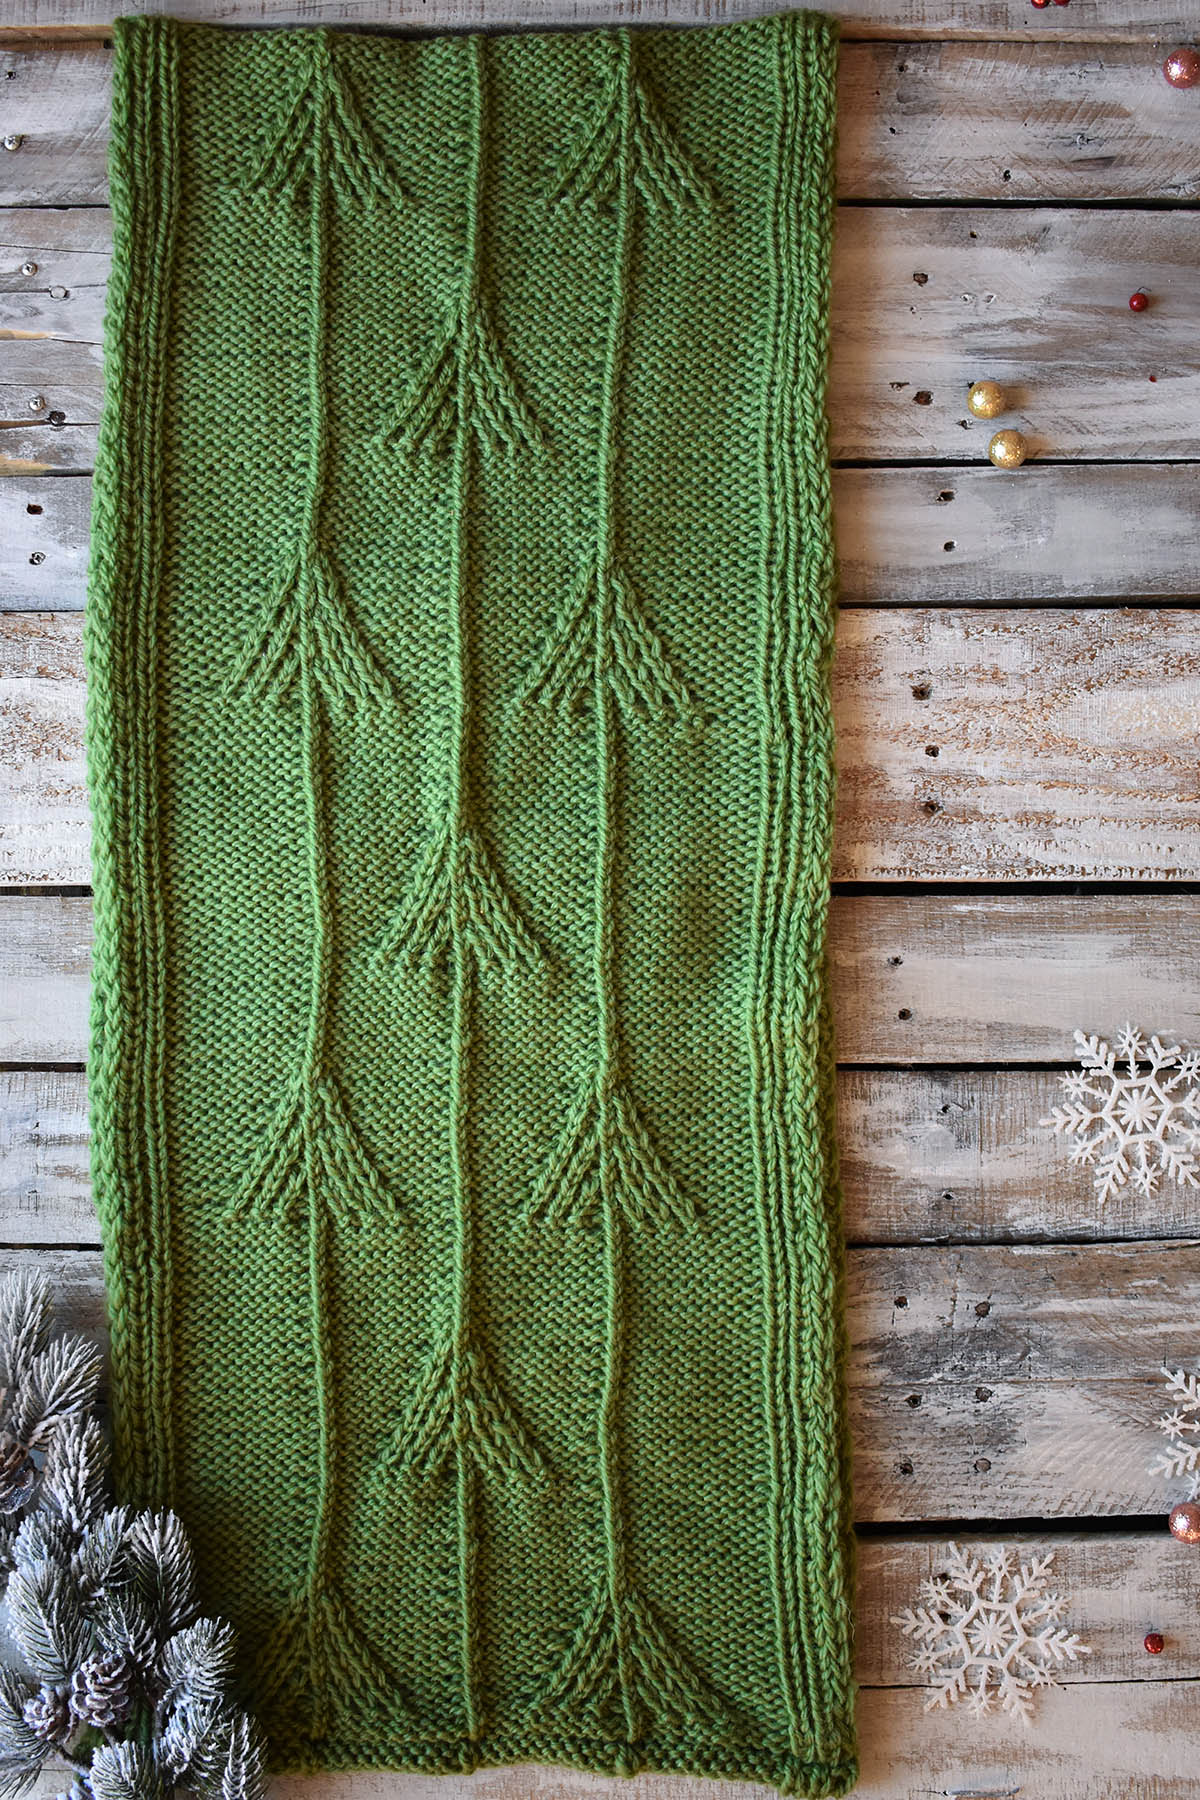
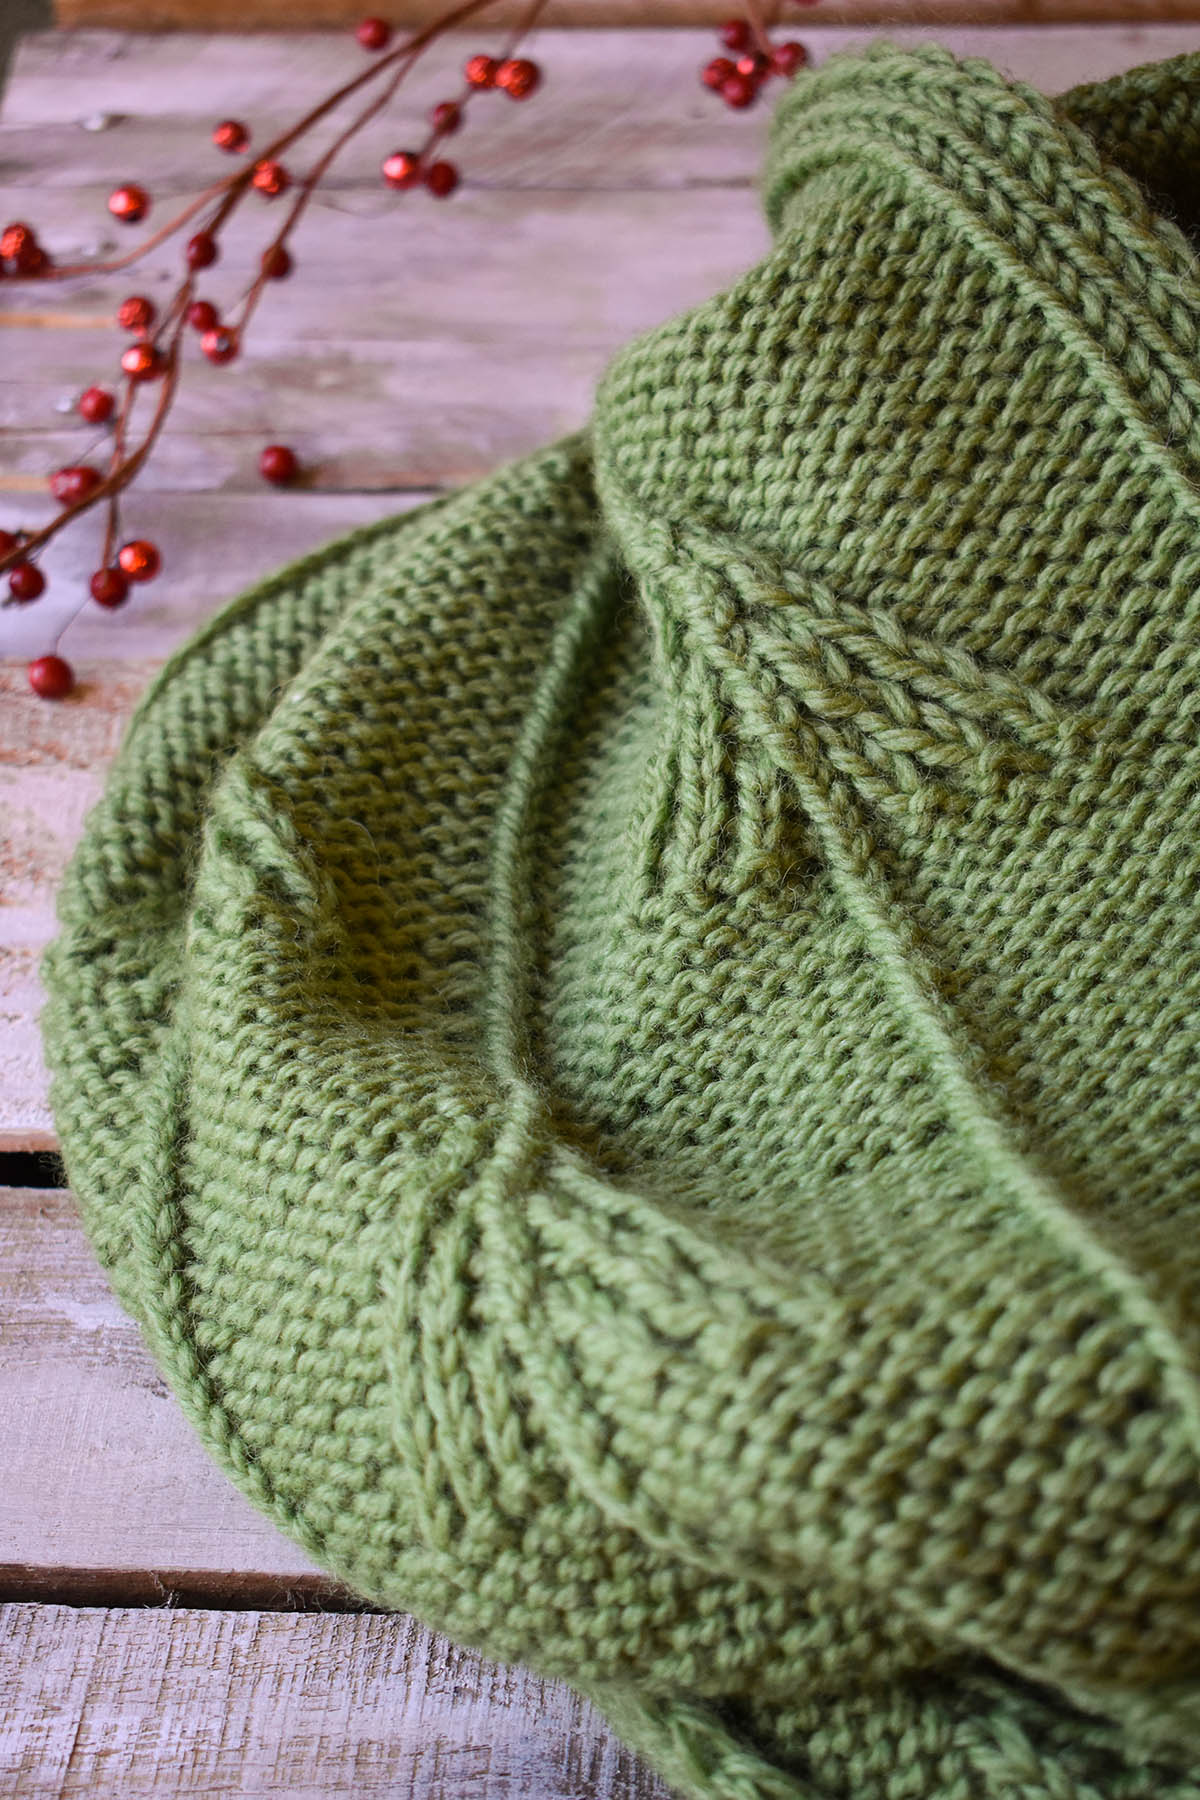
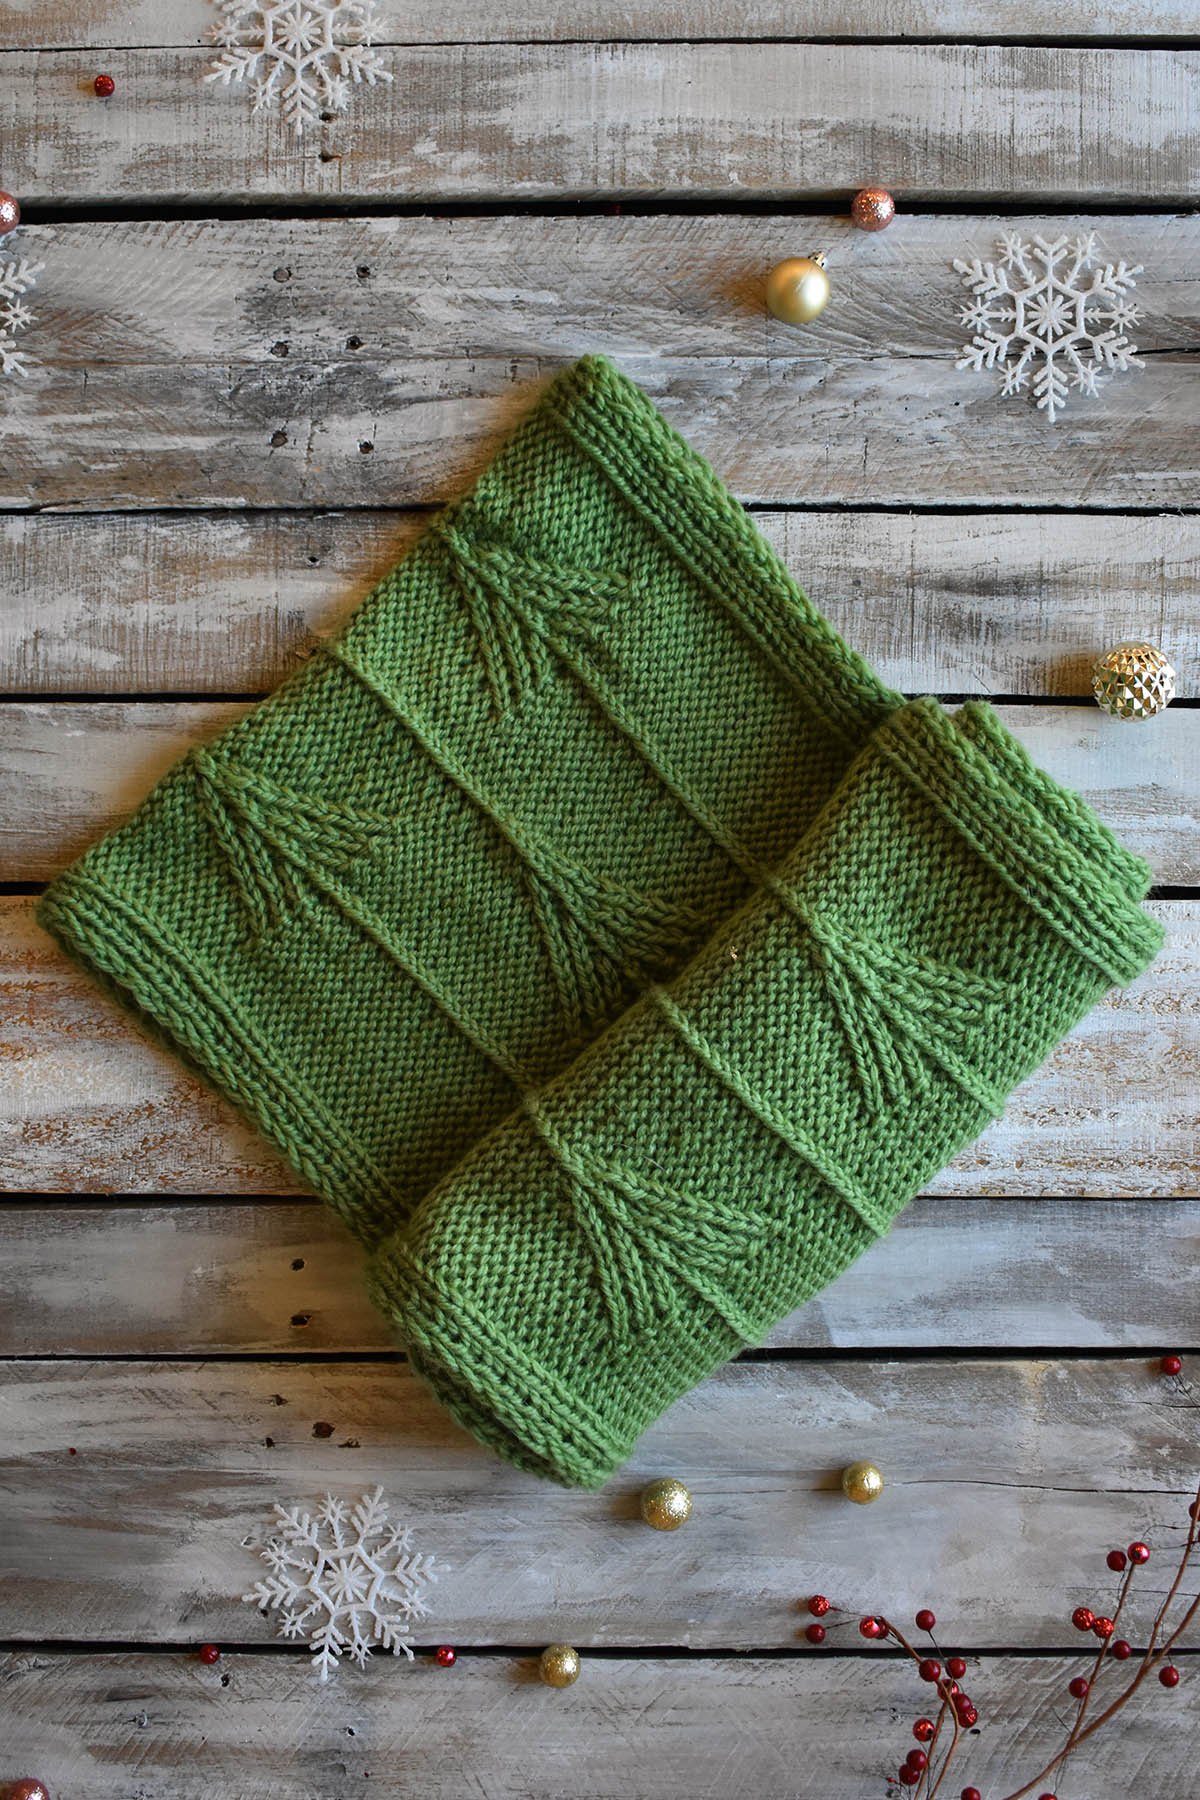
It’s Day 4 of the 12 Days of Winter Kit Collection! Today I’m excited to share a fun and festive design knit in luxurious and lightweight Bella Cash. Say hello to the Holiday Lights Shawl!
A sampling of stripes and textural stitches make this project an addictive knit!
If the name didn’t give it away, the shawl was inspired by strings of holiday lights that are so abundant during the season. I think festive lights are something we can all appreciate. Whenever I pass by a home brilliantly illuminated with thousands of little lights I feel such a childlike sense of awe and wonder. It just feels so magical to me!
The Holiday Lights Shawl features a semi-circular shape.
There are three elements that remind me of lights in this fun pattern. Slip stitches and texture to create the effect of dappled lights throughout the first section of the shawl. Following the first section of “lights,” addictive-to-knit stripes incorporate garter stitch for a graphic and bold effect.
You can wear this shawl wrapped bandana-style around your neck. This is my favorite way to style shawls.
The second set of lights adorn the border of the shawl and use a touch of lace, twisted stitches, and one of my favorite decorative stitches: the lifted knot stitch. Before I move onto the final string of lights (can you guess what that might be?) I want to share a little tutorial for working the Lifted Knot Stitch (LKS).
I hope you enjoyed the tutorial and that it makes things a bit easier as you knit. Now, the final touch: the mini fringe across the bottom edge. Soft and festive, the fringe reminds me of little gleams of lights during winter nights.
Peppermint-colored mini fringe decorates the bottom of the shawl.
Remember, you can find the Holiday Lights Kit and the rest of the 12 Days of Winter kits at your local yarn store. Click here to find a shop that carries our yarn near you. Happy knitting!


Bella Cash Socktober Mystery Knitalong – Week 4

Welcome to Week 4 of the Bella Cash Socktober Mystery Knitalong! We’re getting so close to the final stretch now that the cuff and leg are complete! Watching your projects come to life has been so inspiring. We’ve seen some lovely peeks at your Sweet Dumplin’ Socks progress, and we can’t wait to see more!
Use this graphic on Ravelry and on social media to share about the knitalong.
Just like my last post, I want to give a refresher about the knitalong for those who might be joining in late. Don’t worry – if you haven’t started, newcomers are more than welcome. To play a little catch-up, here is where you can find my previous blog posts:

Week 1 – Colors

Week 2 – The Cuff

Week 3 – The Leg

Each week in October I’ll be revealing a different portion of the pattern. The pattern is updated on our website every Wednesday and you can find it here (link). Grab your colors of beautiful merino/cashmere/nylon Bella Cash here (link).

This is a mystery knitalong, but if you don’t want to commit without seeing the socks first you can find spoiler images here (link).

If you join, we’d love for you to spread the love and share your progress on social media using the hashtag #UYSocktoberMKAL and tagging us on Instagram (link) and Facebook (link). Join in with chatter here on the blog and in our Ravelry forum (link).

Please add your project to Ravelry, too! You can find the Ravelry listing here (link). You can use the graphic above and on the Ravelry listing for your project page, too.
If you finished Week Three, your socks should look like this.
If you’ve been following along, whether by knitting or knitting vicariously, you’ll have seen the colorwork portion of the pattern, pictured above. The bold vine motif worked in the main color really pops against the contrast colors. For this week, though, you’ll return to working with a single color and have the opportunity to play with a fun textural pattern that is every bit as addicting as the leg and cuff.

This week you’ll be working on the foot. What’s that? Did you think I skipped the heel? Fear not – the heel is not forgotten! But, these socks feature an afterthought heel. Sorry for the small spoiler, but you were bound to find out in the first few rows of this portion! This is one of my favorite methods for knitting socks because I simply love the look of them, plus I feel like they make the knitting fly by. I’m not going to get into the how-to of that now, because that’s for another day.

Today I want to talk a bit about foot length to help ensure your socks fit well. Keeping the after-though heel in mind, it’s important to note that the heel will add to the final length of the foot. So will the toe. So, how long should you knit the “Foot” portion from this week? To answer that you need to know what the total length of the Foot should be, measuring from the back of the heel to the tip of the toes.
The Craft Yarn Council’s Foot Size Charts
If you aren’t sure, there are various sources available that tell you the average lengths for various shoe sizes. The Craft Yarn Council has handy sizing charts for standard body measurements, including foot sizes. The chart above suggests foot lengths based on shoe sizes. The Craft Yarn Council chart is pretty general, but more specific charts are available. I found this shoe size chart to be extremely helpful because it gives precise measurements for each shoe size in inches, centimeters, and includes conversions to sizing in different geographic locations. Sizing charts are especially helpful if you’re knitting for somebody else.

Measuring your own foot length is simple. Simply place a sheet of paper on a flat surface, then stand on it and trace your foot as closely as possible. Using a tape measure, measure your foot from the back of the heel to the longest toe. After you know your foot length, knitting the foot of the sock is a breeze. Simply work the foot pattern as long as the pattern instructs (this is different for each size). This pattern takes into account the total length the heel and the toe add to the sock, so the length of this portion will be different from your actual foot length. That’s all there is to it, so you can get cracking on the Foot portion of the pattern!

Remember, you can share your progress on social media using the hashtag #UYSocktoberMKAL and tagging us on Instagram (link) and Facebook (link). Join in with chatter here on the blog and in our Ravelry forum (link).

Happy knitting – I’ll see you next week!

Bella Cash Socktober Mystery Knitalong – Week 2

Welcome to Week 2 of the Bella Cash Socktober Mystery Knitalong! It has been a week since we shared about color choices and how to select your colors for the project. We hope you’ve selected your colors, received your Bella Cash yarn, and are ready to get to the best part: knitting!
Use this graphic on Ravelry and on social media to share about the knitalong.
Before we dive in, I just want to give a quick refresher about the knitalong, especially for those who might have missed my last post.

Each week in October I’ll be revealing a different portion of the pattern. The pattern is updated on our website every Wednesday and you can find it here (link).

This is a mystery knitalong, but if you don’t want to commit without seeing the socks first you can find spoiler images here (link).

If you join, we’d love for you to spread the love and share your progress on social media using the hashtag #UYSocktoberMKAL and tagging us on Instagram (link) and Facebook (link). Join in with chatter here on the blog and in our Ravelry forum (link).

Please add your project to Ravelry, too! You can find the Ravelry listing here (link). You can use the graphic above and on the Ravelry listing for your project page, too.

These are the suggested colors for the Sweet Dumplin’ Socks: #126 Forest (MC), #116 Sage (CC1), & #124 Mustard (CC2).
This week is exciting because it means you’re finally able to cast on your socks! It’s all about the cuffs. You’re sure to knock this portion out in no time at all. Without spoiling too much, I will say that the left and right socks in this pattern are the same. With that in mind, you may choose to start both of your socks this week. There are a couple ways to do this. One method would be knitting two-at-a-time (TAAT) socks – and you can find a great tutorial by Very Pink Knits for that method here (link). Personally, I’m not a fan of the method because I find it to be a bit fiddly and annoying to keep my yarn organized, but I know many knitters who swear by it. Another option is to knit them concurrently, but separately. Work the cuff for one sock, then set it aside and work the second sock cuff. You can either use two sets of needles for this method or place stitches on holders. Of course, you can absolutely knit these socks one at a time. That’s how I’ll be knitting my pair. The choice is yours!

Speaking of choices, knitters have many options for knitting small circumferences in the round. Many knitters are loyal and true to double-pointed needles. Some are fans of 9″ circular needles. Other knitters, myself included, love the Magic Loop method. It’s my go-to method whether I’m knitting socks, mitts, sleeves, or hats. If you haven’t tried the Magic Loop method, you’re in luck because I’ve created a tutorial to show you how to get started.
Learn how to knit small circumferences using the Magic Loop method.
I hope you enjoyed the tutorial and find it helpful. If you have any questions, don’t hesitate to reach out. Remember, you can share your progress on social media using the hashtag #UYSocktoberMKAL and tagging us on Instagram (link) and Facebook (link). Join in with chatter here on the blog and in our Ravelry forum (link).

See you next week!


Day 11 of Winter – Series 3 Edition

This is part 11 in a 12 part series highlighting designs from our 12 Days of Winter, Series 3 Edition.

It’s Day 11 in the 12 Days of Winter Kit Collection. We can’t believe how quickly time seems to be going. Before we dive into today’s kit and post, I’d like to take a moment to highlight that today is Small Business Saturday. We’re right in the midst of what is arguably the biggest shopping period of the year. As you gear up for the holiday season, don’t forget to support your local small businesses. For those of us who love all things yarny, it’s the perfect day to show some support to your local yarn stores. Without them, we wouldn’t be a business at all! Local yarn stores are front and center of the fiber community – offering a space to learn, socialize, and of course, purchase some yummy yarn.

And now, onto today’s kit (which you can find at your local yarn store).
A model wearing a pair of green socks knit using Universal Yarn Bella Cash.
Today we’re excited to introduce the Trinket Socks, knit up in deliciously soft, yet strong, Bella Cash. This is a great all-around yarn, but here in the office, it has become a favorite for knitting socks. Thanks to the superwash merino, they’re machine-washable and easy to care for. Cashmere adds a touch of luxury, and nylon ensures these socks will be strong enough to last for ages. These socks feature a lace and twisted stitch pattern that is addictive to knit, and quick to work up.
Back view of a model wearing a pair of green socks knit using Universal Yarn Bella Cash.
Speaking of twisted stitches – we have a tutorial to share today. If you can recall from Day 7 of Winter (the Mountain Pines Cowl), we shared a tutorial on Right and Left Purl Twists. Today, we’ll be showing you how to knit a regular Right and Left Twist – no purling necessary. Note that for today’s tutorial, we’re using Deluxe Chunky so that it’s easier for you to see.


Right Twist
Start by making a swatch. Swatches are not only crucial for getting the finished item you want but are also great for practicing new stitches.
Work in your pattern until you’ve reached the two stitches you need to twist. I’ve highlighted these stitches in purple so it’s easier to see. We want to change the position of these two stitches by moving the left stitch over the top of the right stitch.
Begin by knitting two stitches together, but do not drop the stitches from your needle.
As you can see, the two stitches remain on the left needle, but there is now a new stitch on the right needle.
Next, knit the first stitch on the left needle.
Drop both of the stitches from the left needle. You now have completed the Right Twist, and have two new stitches on the right needle. Easy, right?
Left Twist
Work in your pattern until you’ve reached the two stitches you need to twist. I’ve highlighted these stitches in purple so it’s easier to see. We want to change the position of these two stitches by moving the right stitch over the top of the left stitch.
The first step is to knit only the second stitch on the left needle. This stitch is highlighted in purple. As you can see, the first stitch on the left needle remains in place.
After knitting the second stitch, do not drop the stitches off the left needle.
Next, knit the first stitch on the left needle.
Drop both of the stitches from the left needle. You now have completed the Left Twist, and have two new stitches on the right needle.
Here is what each set of twisted stitches will look like. Notice that the Left Twist leans to the left, and the Right Twist leans to the right. In the Trinket Socks, Right Twists and Left Twists are alternated to create an undulating panel.
The Right and Left Twists are a great addition to your knitting toolbox. You’ll find that they’re quite fun to work, and they can really make a stitch pattern interesting. I hope you’ve found this tutorial to be useful.
A close-up of a green pair of socks knit using Universal Yarn Bella Cash.
Notice those panels of twisted stitches – pretty!
Remember, you can find the Trinket Socks kit, as well as the rest of the 12 Days of Winter Kits at your local yarn store. Happy knitting!

Day 7 of Winter – Series 3 Edition

This is part 7 in a 12 part series highlighting designs from our 12 Days of Winter, Series 3 Edition.

We’re a week into the 12 Days of Winter Kit Collection for 2019, and we hope you’re enjoying everything we’ve shared so far. Today we’re introducing an earthy green cowl that’s sure to hold your interest. Say Hello to the Mountain Pines Cowl, designed by Jennifer Sadler. This deliciously squishy cowl features twisted stitches that form the shapes of evergreen trees. Knit in soft, plump Deluxe Chunky, this is a fairly quick project that will keep you warm all winter long.
A green, twisted stitch cowl knit in Universal Yarn Deluxe Chunky.
Jennifer, who is based in Asheville , North Carolina, got her inspiration from pine trees. Here is what she had to say:


“Here in the North Carolina mountains, pine trees are easily found – there are actually six different kinds of pine trees native to the state. I love how in the winter they stay green, adding a touch of color to an otherwise brown landscape, and when it snows, the branches let the snow pile up, creating a pillow of white on top of the green needles. The Mountain Pines Cowl pays homage to those green monster trees.
Detail of a green, twisted stitch cowl knit in Universal Yarn Deluxe Chunky.
The pine tree motif is much simpler than it looks to knit. It uses twisted stitches, and no cable needle! Once you’ve experienced the ease of twisted stitches, you’ll want to incorporate them into your knitting as much as possible – they create a wonderful visual texture, with hardly any extra work.” -Jennifer

I couldn’t agree more with Jennifer – twisted stitches are a joy to work, especially when you get the hang of them. It eventually feels intuitive and you’ll be glad to have this skill in your toolbox. The Mountain Pines Cowl uses purl twists, so that’s what we’ll focus on in this tutorial. You’ll learn the Left Purl Twist (LPT) and the Right Purl Twist (RPT). The Left Purl Twist (LPT) leans to the left, and the Right Purl Twist (RPT) leans to the right. We’ll cover the LPT first, followed by the RPT.

Left Purl Twist
Small swatch on double-pointed needles and a small ball of yarn.
Start by making a swatch. Swatches are not only crucial for getting the finished item you want but are also great for practicing new stitches.
Work in your pattern until you’ve reached the two stitches you need to twist. I’ve highlighted these stitches in purple so it’s easier to see. As you can see we have a knit stitch and a purl stitch on the left-hand needle. We want to change their positioning by moving the knit stitch over the top of the purl stitch.
Admittedly, the LPT is just a bit more complex than the RPT. It might feel a little fiddly until you get the hang of it. Remember the order of the stitches from the previous photo? The order of the stitches from right to left was Knit, Purl. For the LPT, the first step is to purl the second stitch on the left needle through the back loop. This stitch is highlighted in blue. As you can see, the first (knit) stitch on the left needle remains in place.
After you purl the second stitch through the back loop, do not drop the first and second stitches off the left needle.
Next, move your yarn to the back of the work and knit the first stitch on the left needle.
Now you can drop both the first and second stitches on the left needle. These stitches are highlighted in purple. After you drop them, you’ve completed the LPT.
Notice how the stitches have changed position, and the knit stitch now leans to the left, over top of the purl stitch. Well done, now on to the RPT!
Right Purl Twist
Work in your pattern until you’ve reached the two stitches you need to twist. I’ve highlighted these stitches in purple so it’s easier to see. Here we have a purl stitch that precedes a knit stitch. We want to change the position of these stitches, so that the knit stitch leans to the left, over the purl stitch.
Begin by knitting two stitches together, but do not drop the stitches from your needle.
As you can see, the two stitches remain on the left needle, but there is now a new stitch on the right needle.
Bring your yarn to the front, then purl the first stitch on the left needle.
Now you can drop the two stitches on the left needle – I’ve highlighted them in purple so it’s easier for you to see.
And that’s it – you’ve completed your RPT. Notice how the knit stitch now precedes the purl stitch.
I hope you find this tutorial helpful, and I hope that it drums up excitement for you to start knitting this lovely cowl. Like Jennifer, I’m a big fan of coniferous trees, so this design sings to me!
A green, twisted stitch cowl knit in Universal Yarn Deluxe Chunky.
Remember, you can find the 12 Days of Winter Kits at your local yarn shop. Happy crafting!

Day 6 of Winter – Series 3 Edition

This is part 6 in a 12 part series highlighting designs from our 12 Days of Winter, Series 3 Edition.

It’s Day 6 of the 12 Days of Winter Kit Collection. Today we’re sharing a show-stopping shawl that’s incredibly quick to knit, largely thanks to beautiful drop stitches. Say hello to the Icicles shawl, designed by Adrienne Larsen.
A striped, drop-stitch shawl knit in Rozetti Yarns Cotton Gold and Rozetti Yarns Alaska
Knit up using Rozetti Yarns Cotton Gold and Alaska, held together as one strand, this project glistens and glows. Cotton Gold, with its luminous sequins, is one of our favorite carry-along yarns and adds magic to any project. Alaska is a super soft and featherweight yarn with a gorgeous halo. Together, these yarns are a match made in heaven.
A closeup of drop stitches featured in the Icicles shawl.
Aside from the glorious yarn combination, the stripes of undulating dropped stitches make this pattern shine (literally!). We love how quickly drop stitches make any project knit up, and they’re easy to work. The Icicles shawl, thanks to the stitch pattern, would be a great last-minute gift for someone truly special. If you’re feeling intimidated by dropped stitches, fear not – these are the good kind of dropped stitches. Today, we have a tutorial on how to work each of the dropped stitches featured in the pattern.

Kw2 – Knit and wrap yarn around the needle two times.
To work a kw2 on a right side row, knit the next stitch, but wrap your working yarn around the needle two times. Pull through.
On the wrong side of your work, a kw2 will look like two stitches on your needle, but you’re only going to work into one. The stitch you knit should be the first stitch on your needle, with the extra wrap behind it. Knit the stitch, and drop the wrap.
Kw3 – Knit and wrap yarn around the needle three times.
To work a kw3 on a right side, knit the next stitch, but wrap your working yarn around the needle three times. Pull through.
On the wrong side of your work, a kw3 will look like three stitches on your needle, but you’re only going to work into one. The stitch you knit should be the first stitch on your needle, with the two extra wraps behind it. Knit the stitch, and drop the two extra wraps.
Kw4 – Knit and wrap yarn around the needle four times.
To work a kw4 on the right side, knit the next stitch, but wrap your working yarn around the needle four times. Pull through.
On the wrong side of your work, a kw4 will look like four stitches on your needle, but you’re only going to work into one. The stitch you knit should be the first stitch on your needle, with the three extra wraps behind it. Knit the stitch, and drop the three extra wraps.
And that’s how you work each of the drop stitches – easy peasy. Depending on how these stitches are ordered in a stitch, you can get a variety of interesting shapes. Working sequentially from a kw2, kw3, and kw4, you create an upward slope in your knitting and working back drown from a kw4, kw3, and kw2 will give you a downward slope. This is how the wavy motif in the Icicles shawl is created. Fun, right?
A closeup of drop stitches featured in the Icicles shawl.
We hope you’ve found this tutorial to be helpful – and that you’ll have a great time with this technique. Remember, you can find the Icicles shawl kit and the rest of the 12 Days of Winter Kits at your local yarn shop.

Carolina Holly: Our Holiday Gift to You

Universal Yarn Deluxe Worsted

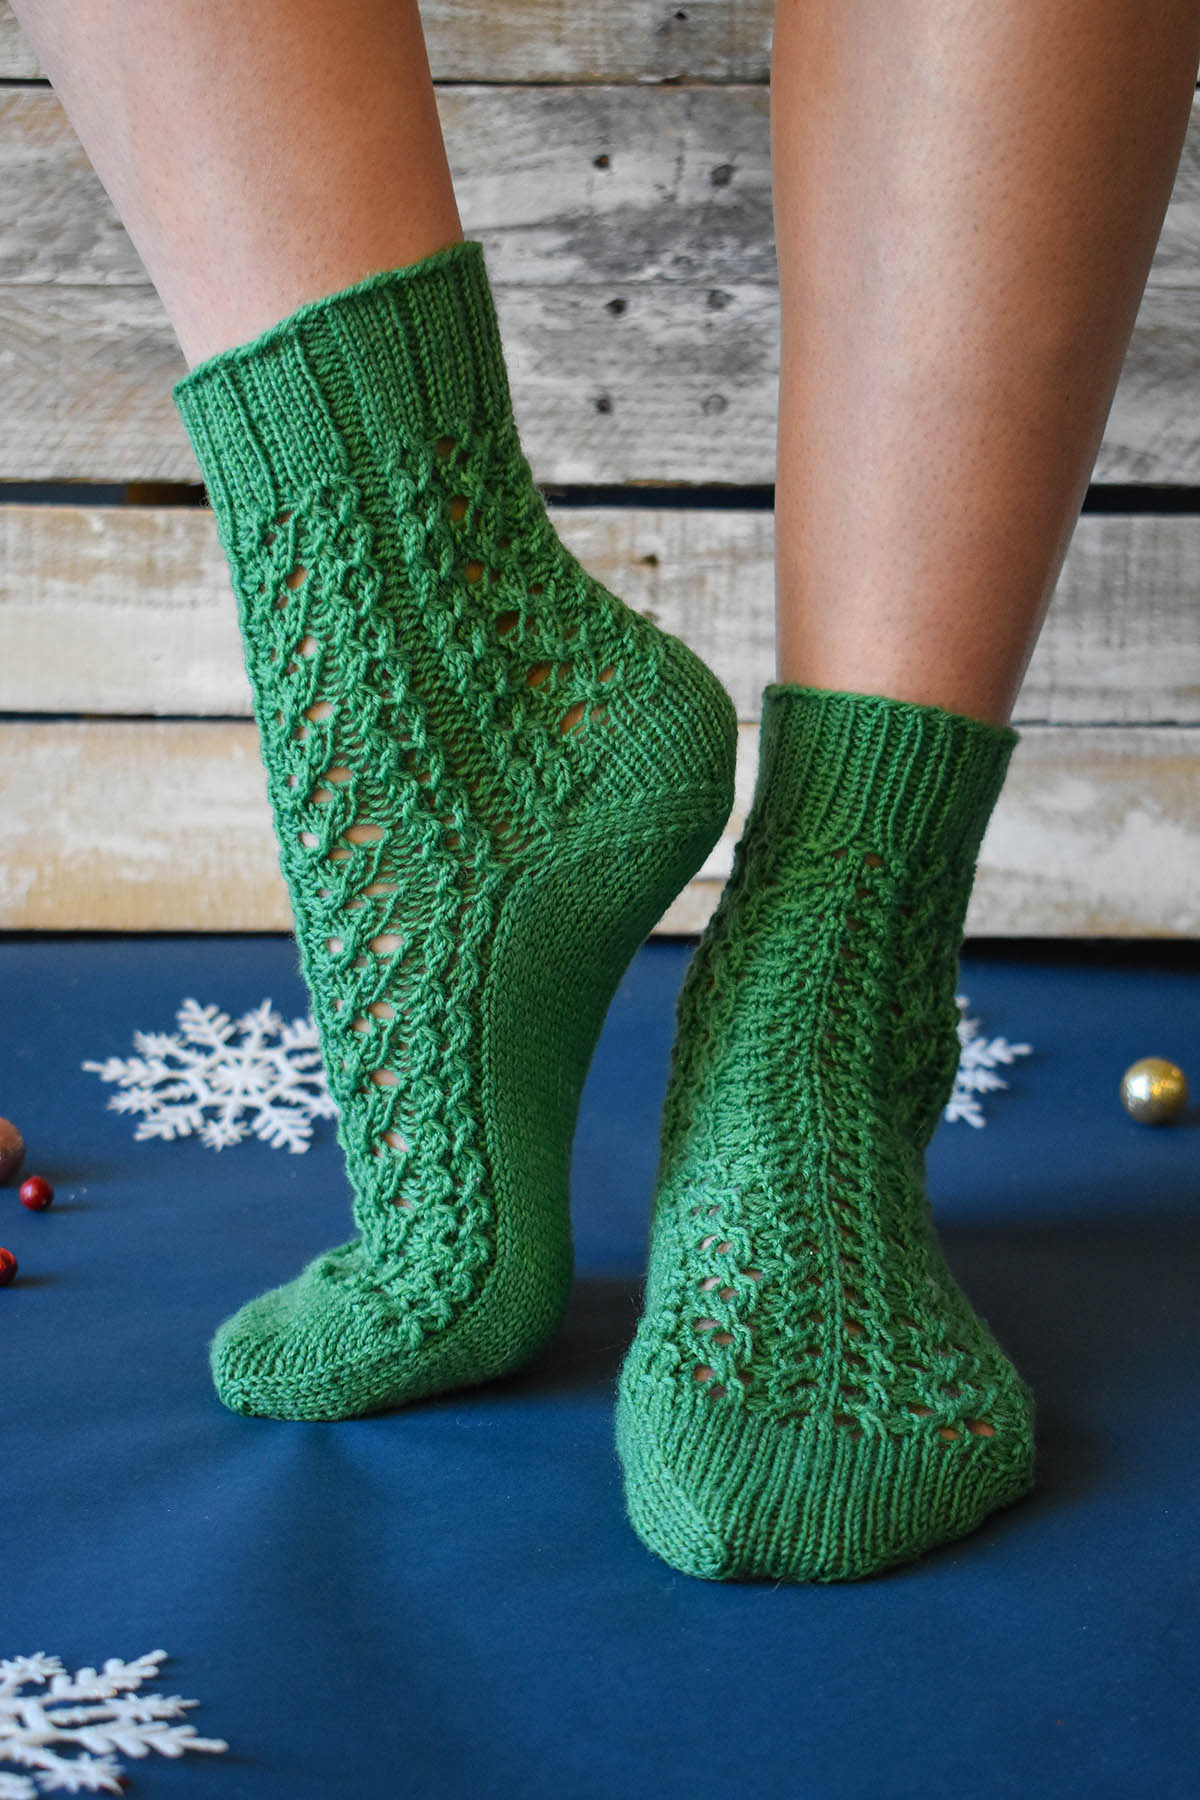
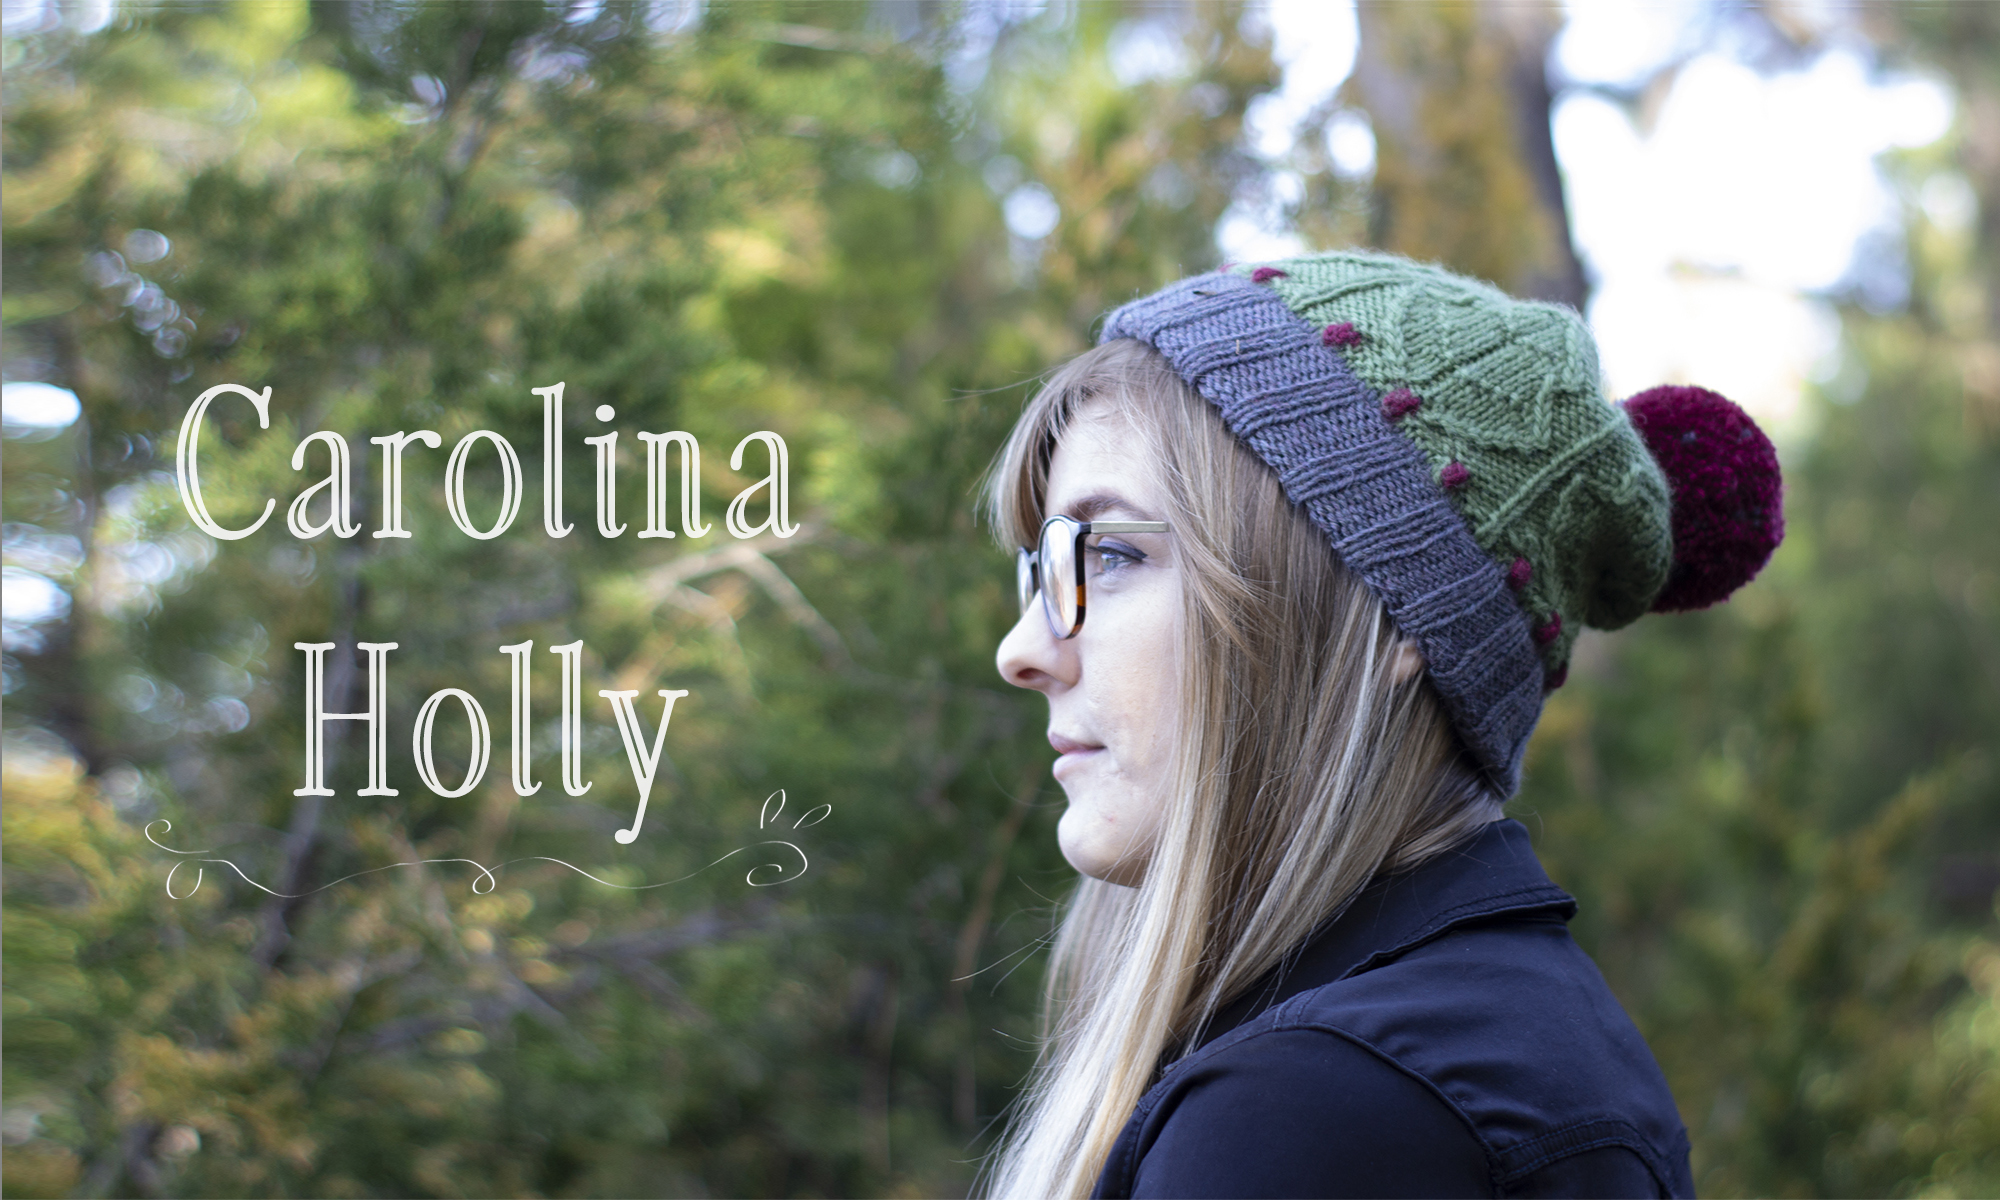
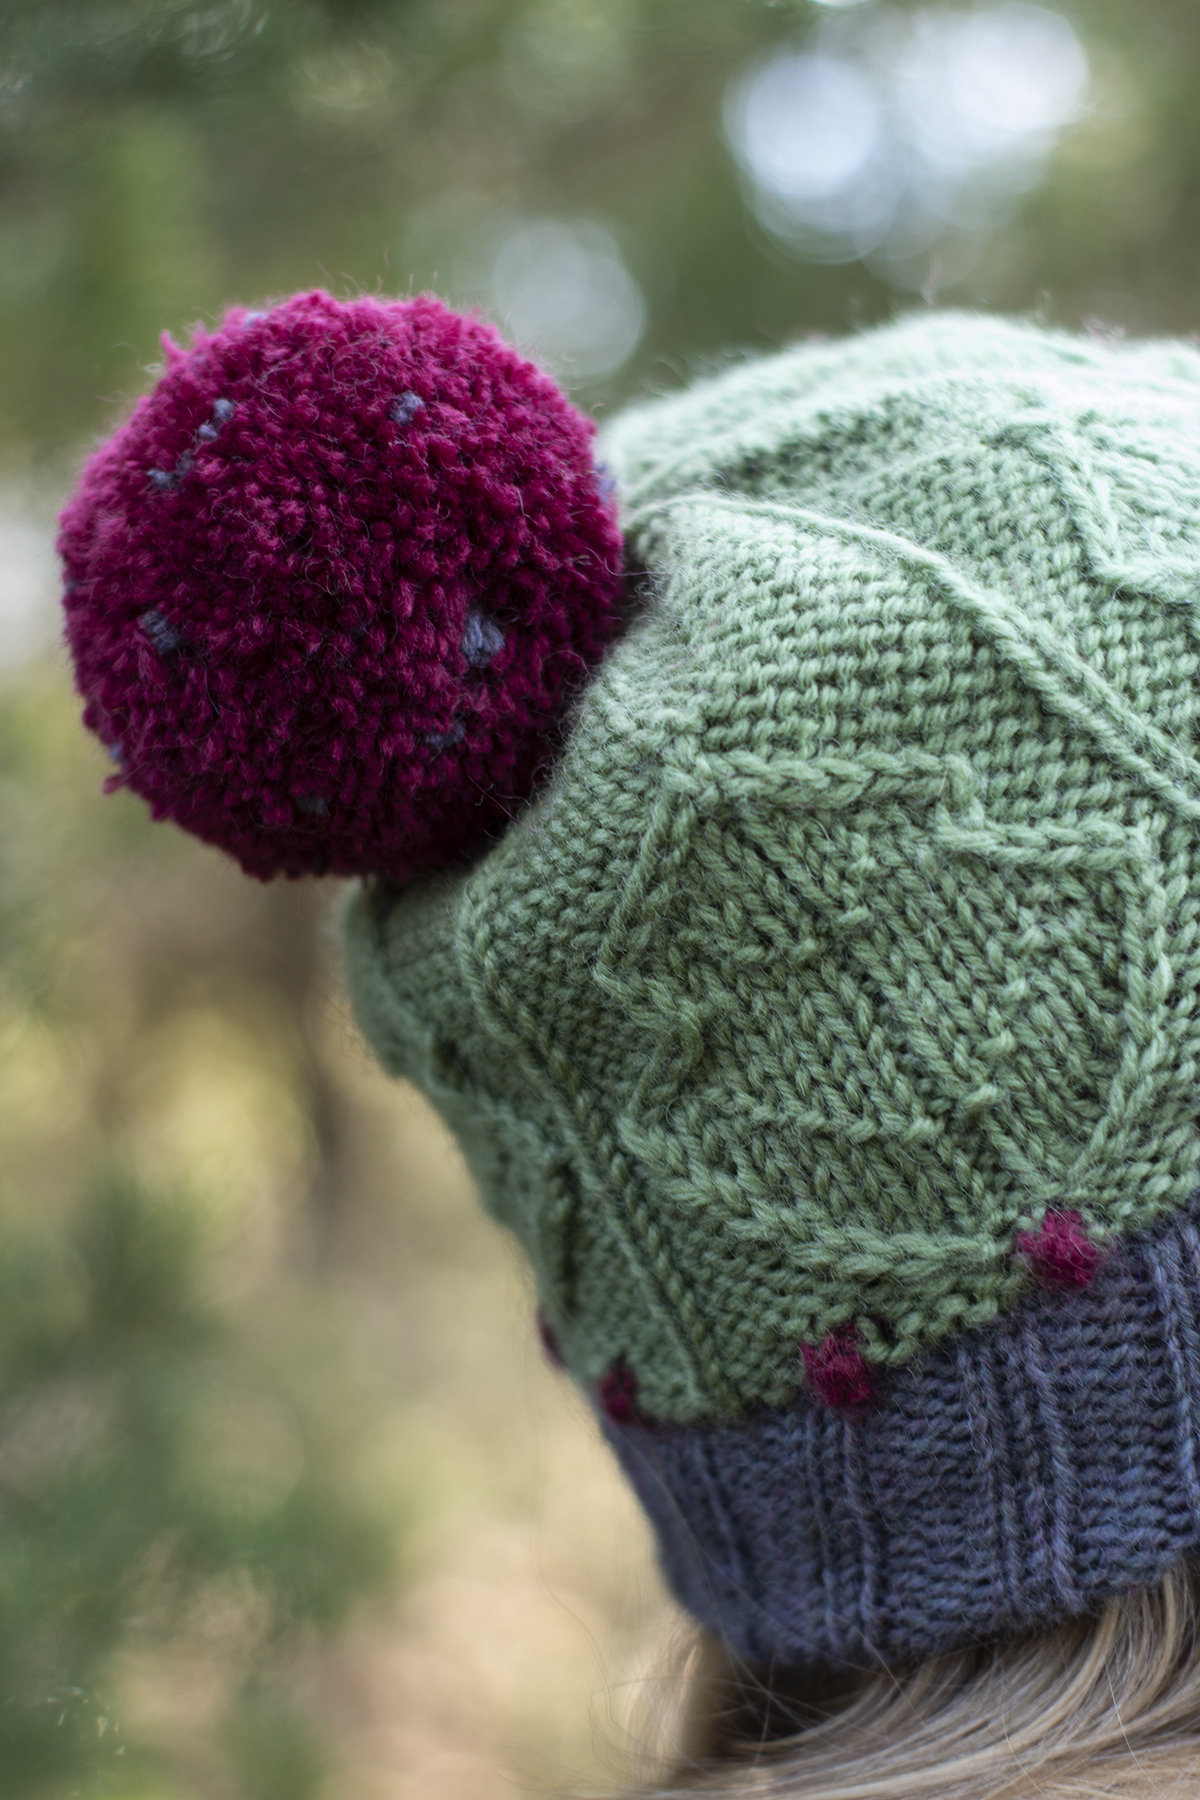
Seasons Greetings from the Universal Yarn Team! Today, we’re pleased to share a special free pattern with you for the Christmas season: the Carolina Holly hat (pattern link)! Holly – like poinsettias, mistletoe, and ivy – conjures images of the holidays. The spiky plant is evergreen and beautiful, and it was the inspiration for the Carolina Holly hat.

Worsted
Playing with pine cones, as one does. 

This free pattern is a load of fun to knit. It takes three skeins of Deluxe Worsted – and that’s enough to make two hats. Of our line of yarns, Deluxe Worsted might just be my favorite. It’s excellent for every type of project, creates long-wearing fabric, and perfectly balances softness with the crunch of pure wool that I love. Plus, there are so many colors to choose from. For this hat I chose Sangria, City Turf, and Slate, but there are so many shades of red, green, and grey in the palette. I encourage you to find the combination that leaves you feeling inspired!  Prefer superwash wool? You’re in luck – our machine-washable Deluxe Worsted Superwash would work perfectly as a substitute.

Universal Yarn Deluxe Worsted
Baby Bobbles!

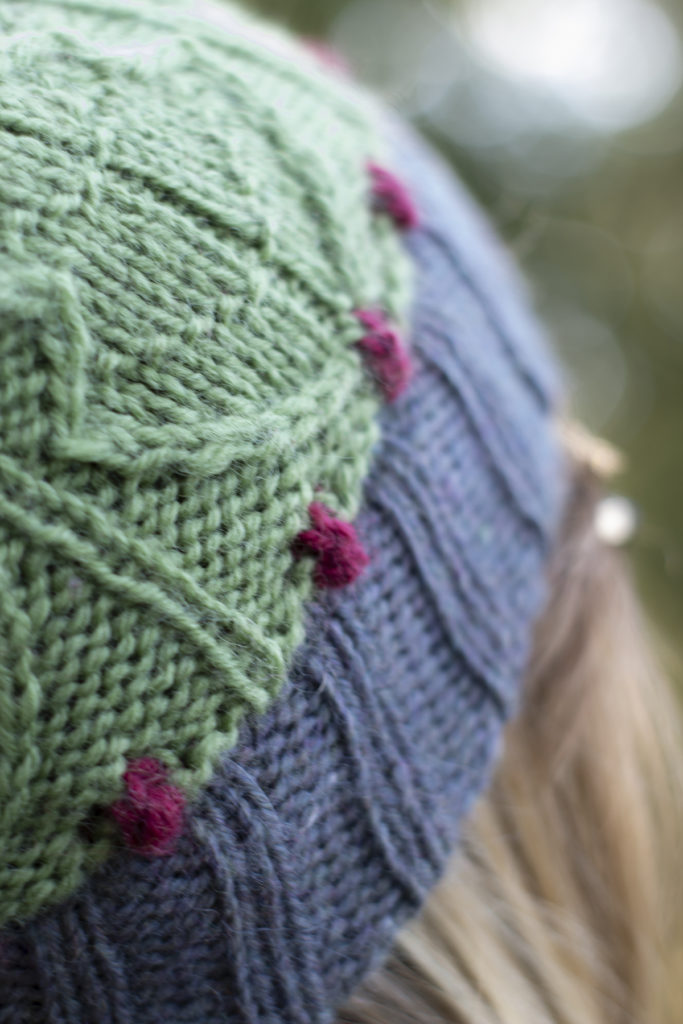
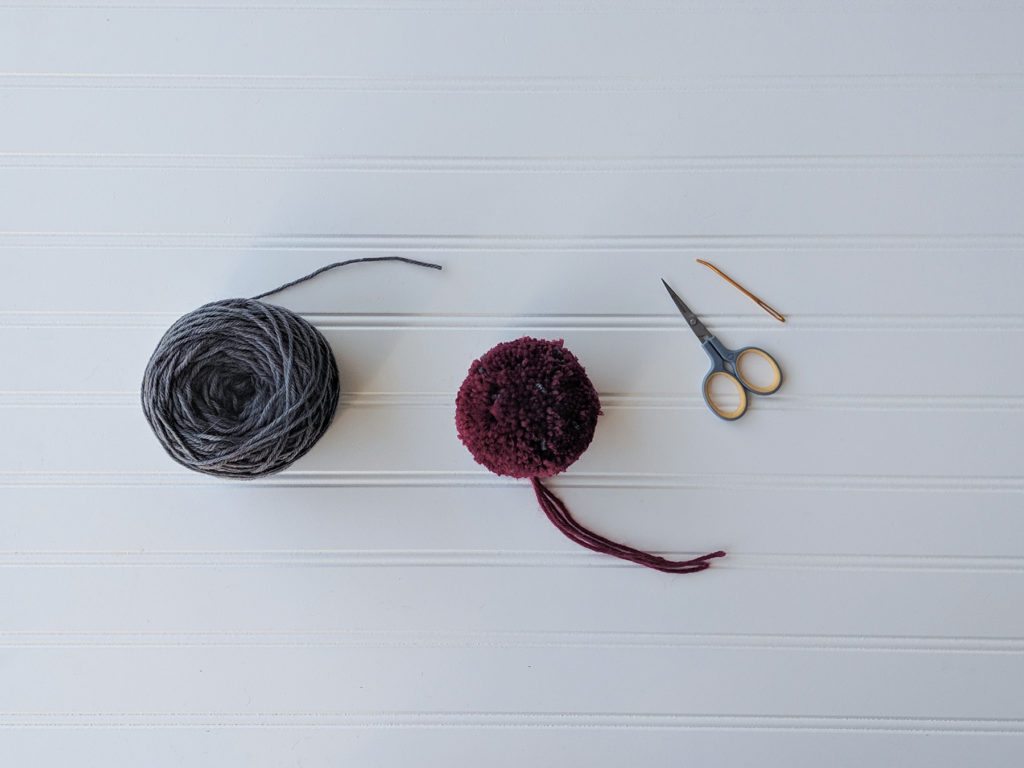
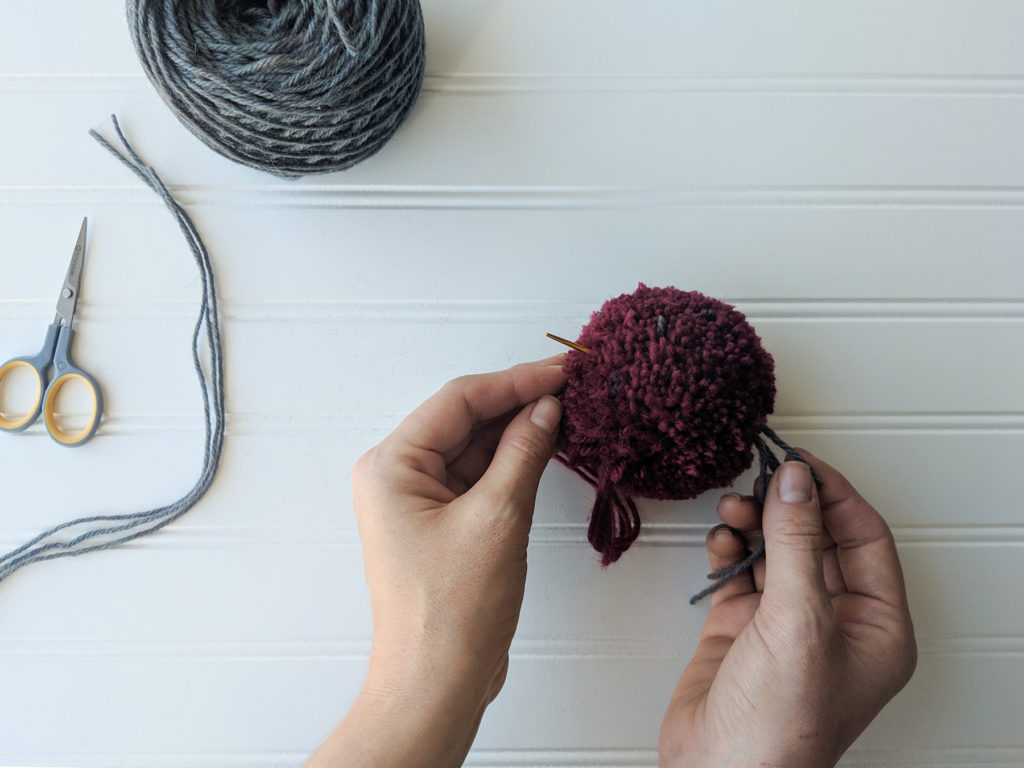
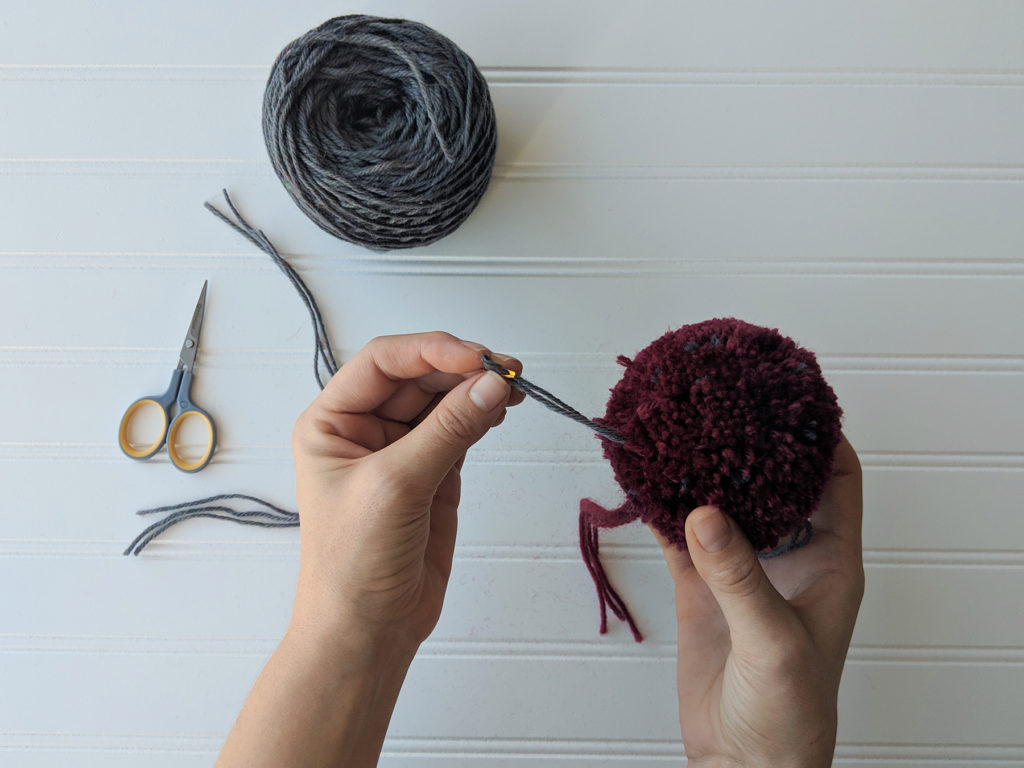
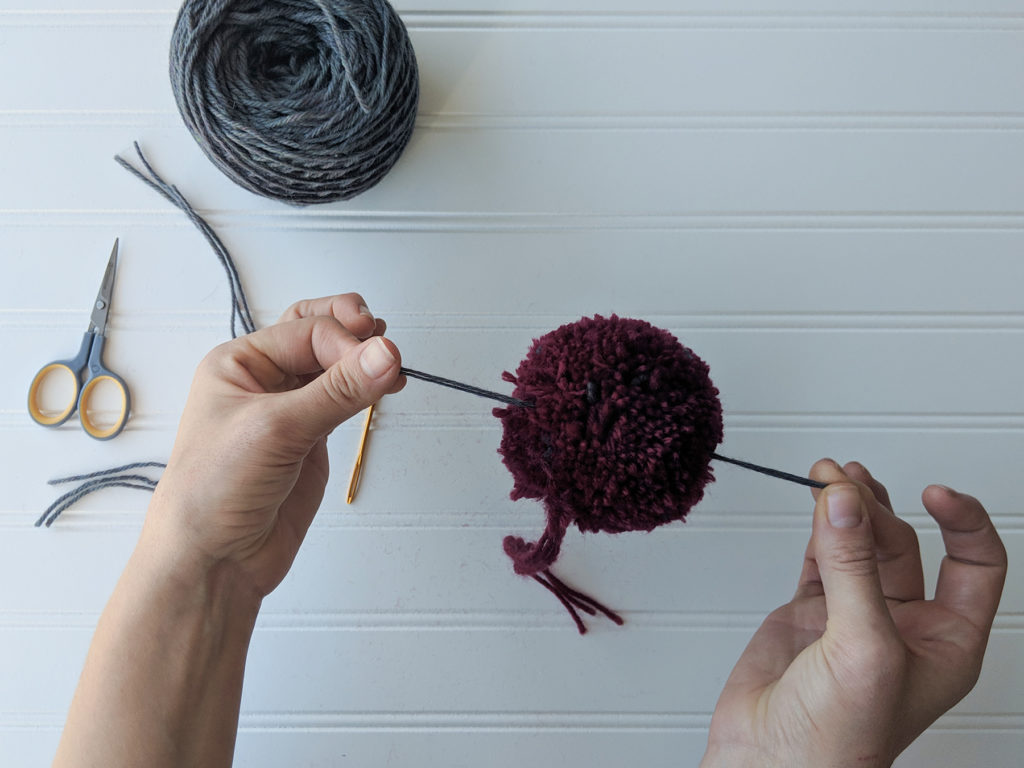
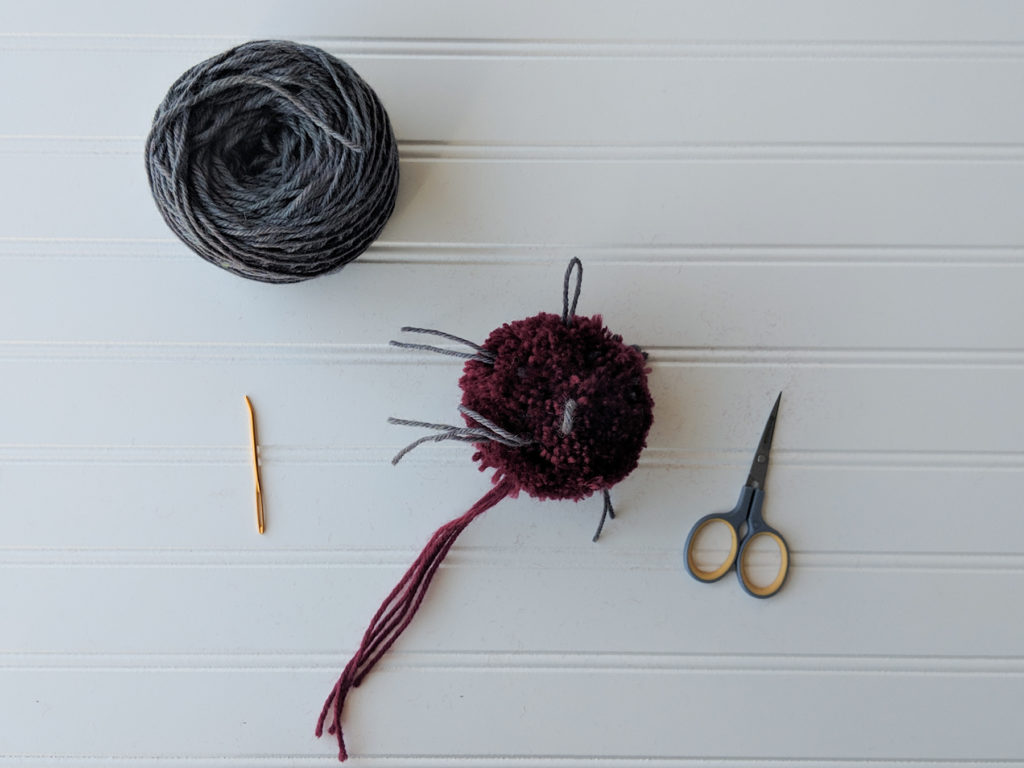
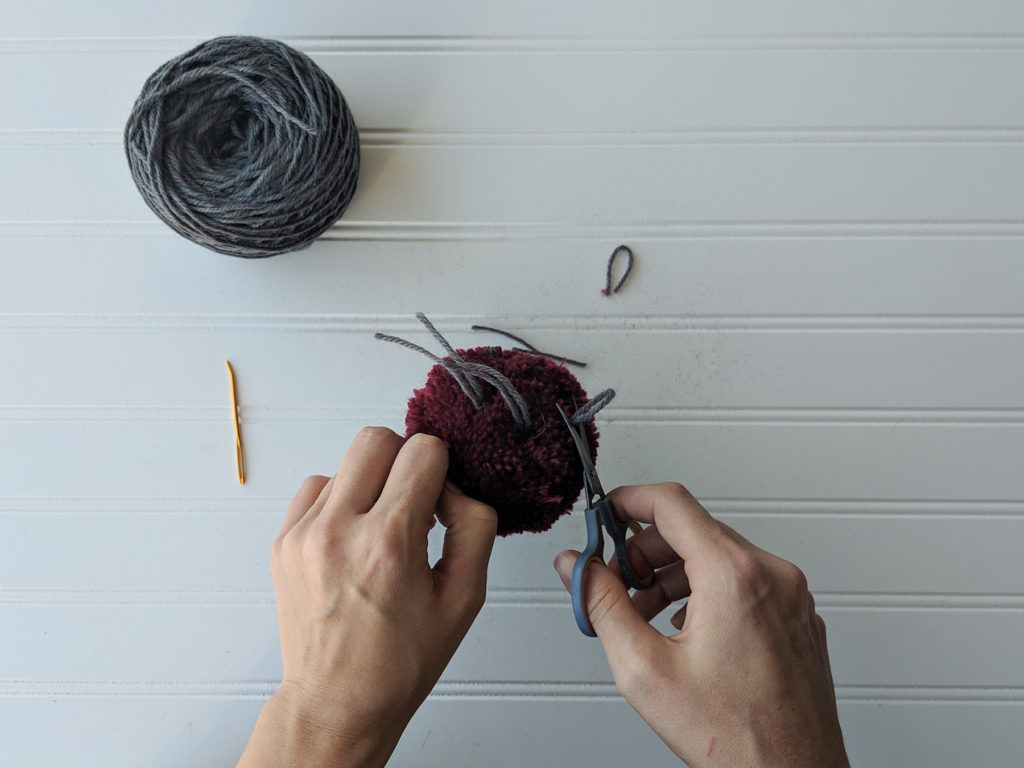
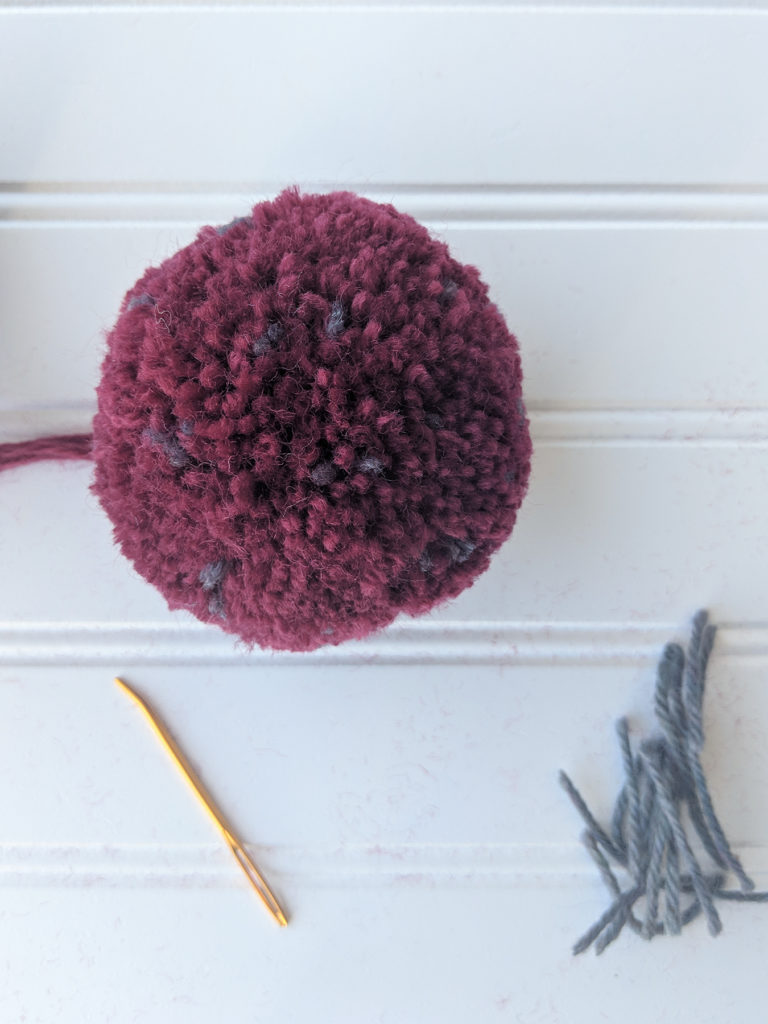
I wanted to give this hat some special touches. A double-thick brim ensures a warm and comfortable fit. A row of mini-bobbles knit in a rich red create little holly berries, and a large red pom-pom balances out the pop of red. Finally, to incorporate the grey used in the brim, the same color is used to add speckles to the pom-pom.  The speckled pom-pom idea was not my own. I was inspired by designer Kiyomi Burgin, who has used this technique in her own work. You can find her post on speckled pom-poms here (link).

Universal Yarn Deluxe Worsted
Subtle grey speckles in a big, poufy pom-pom – what’s not to love?

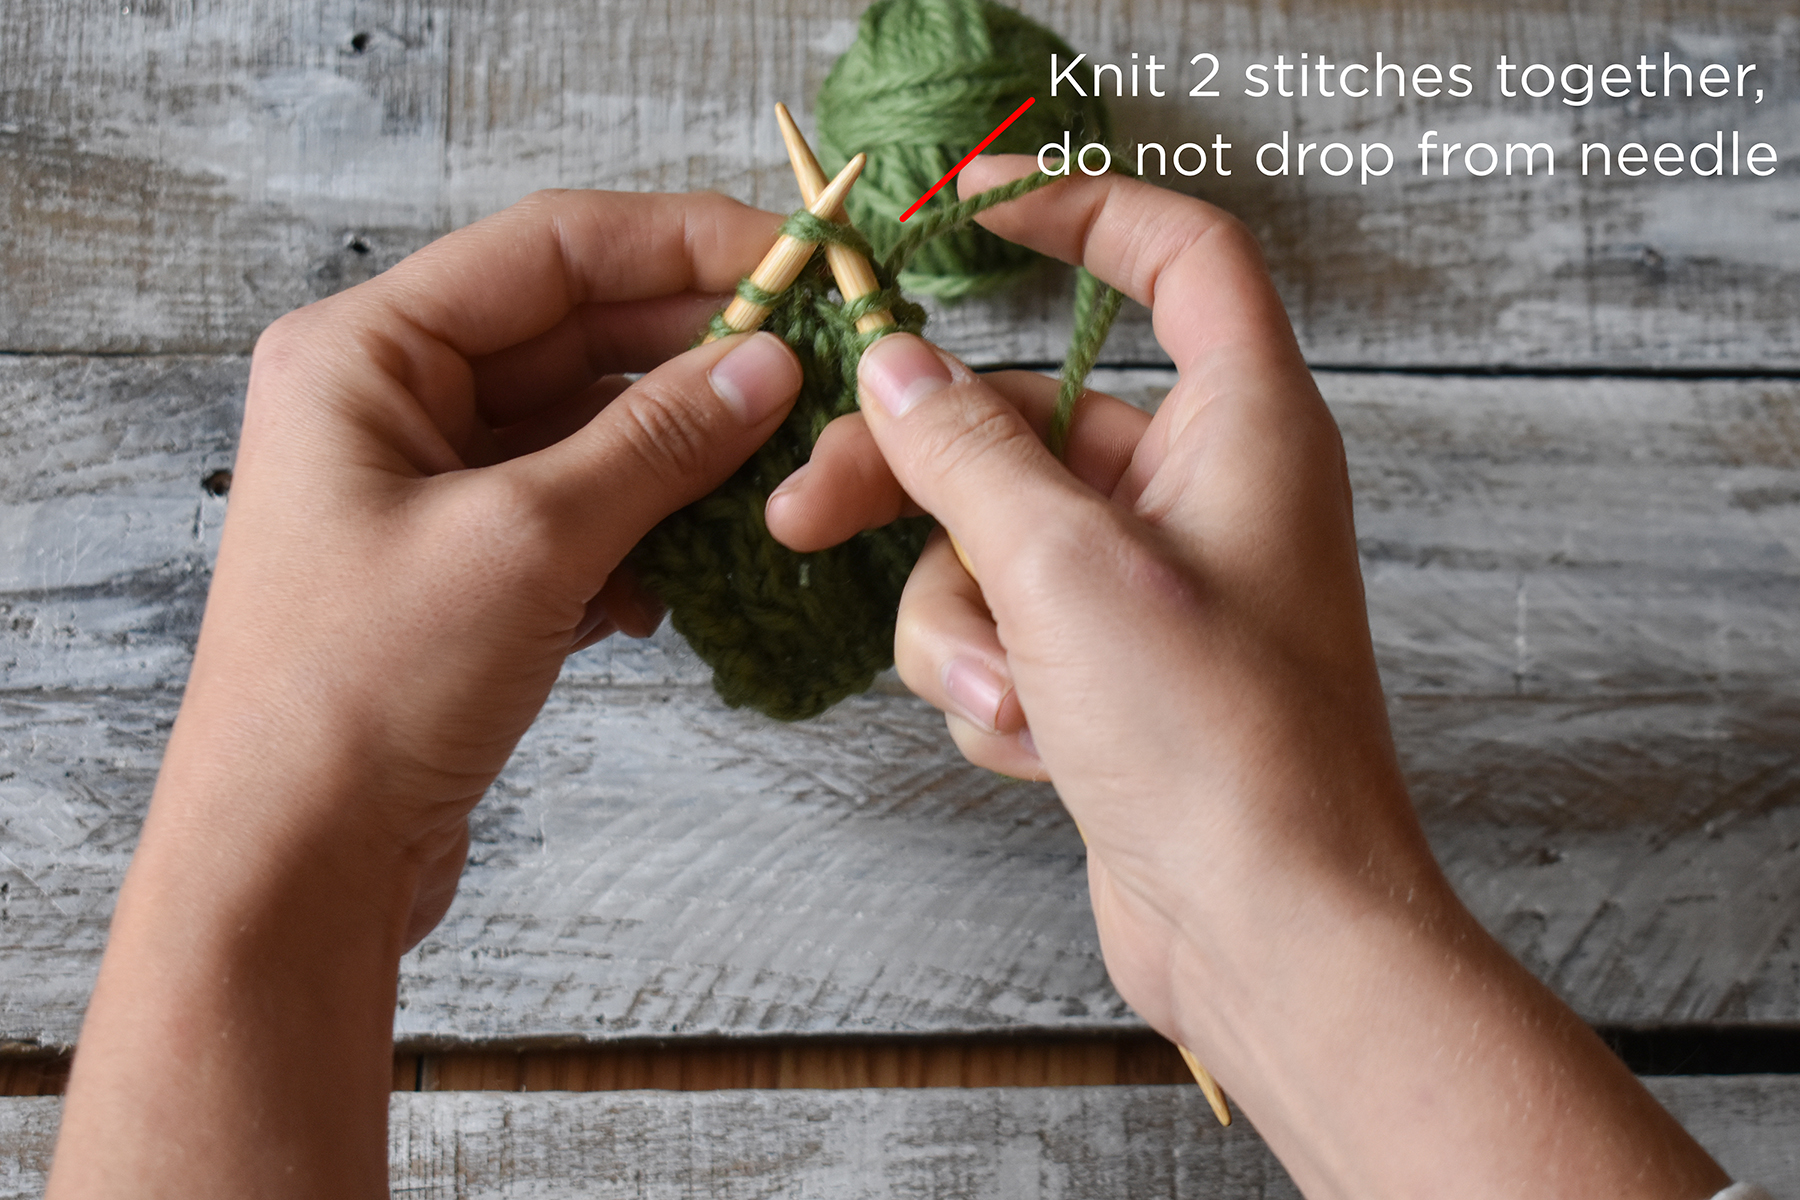
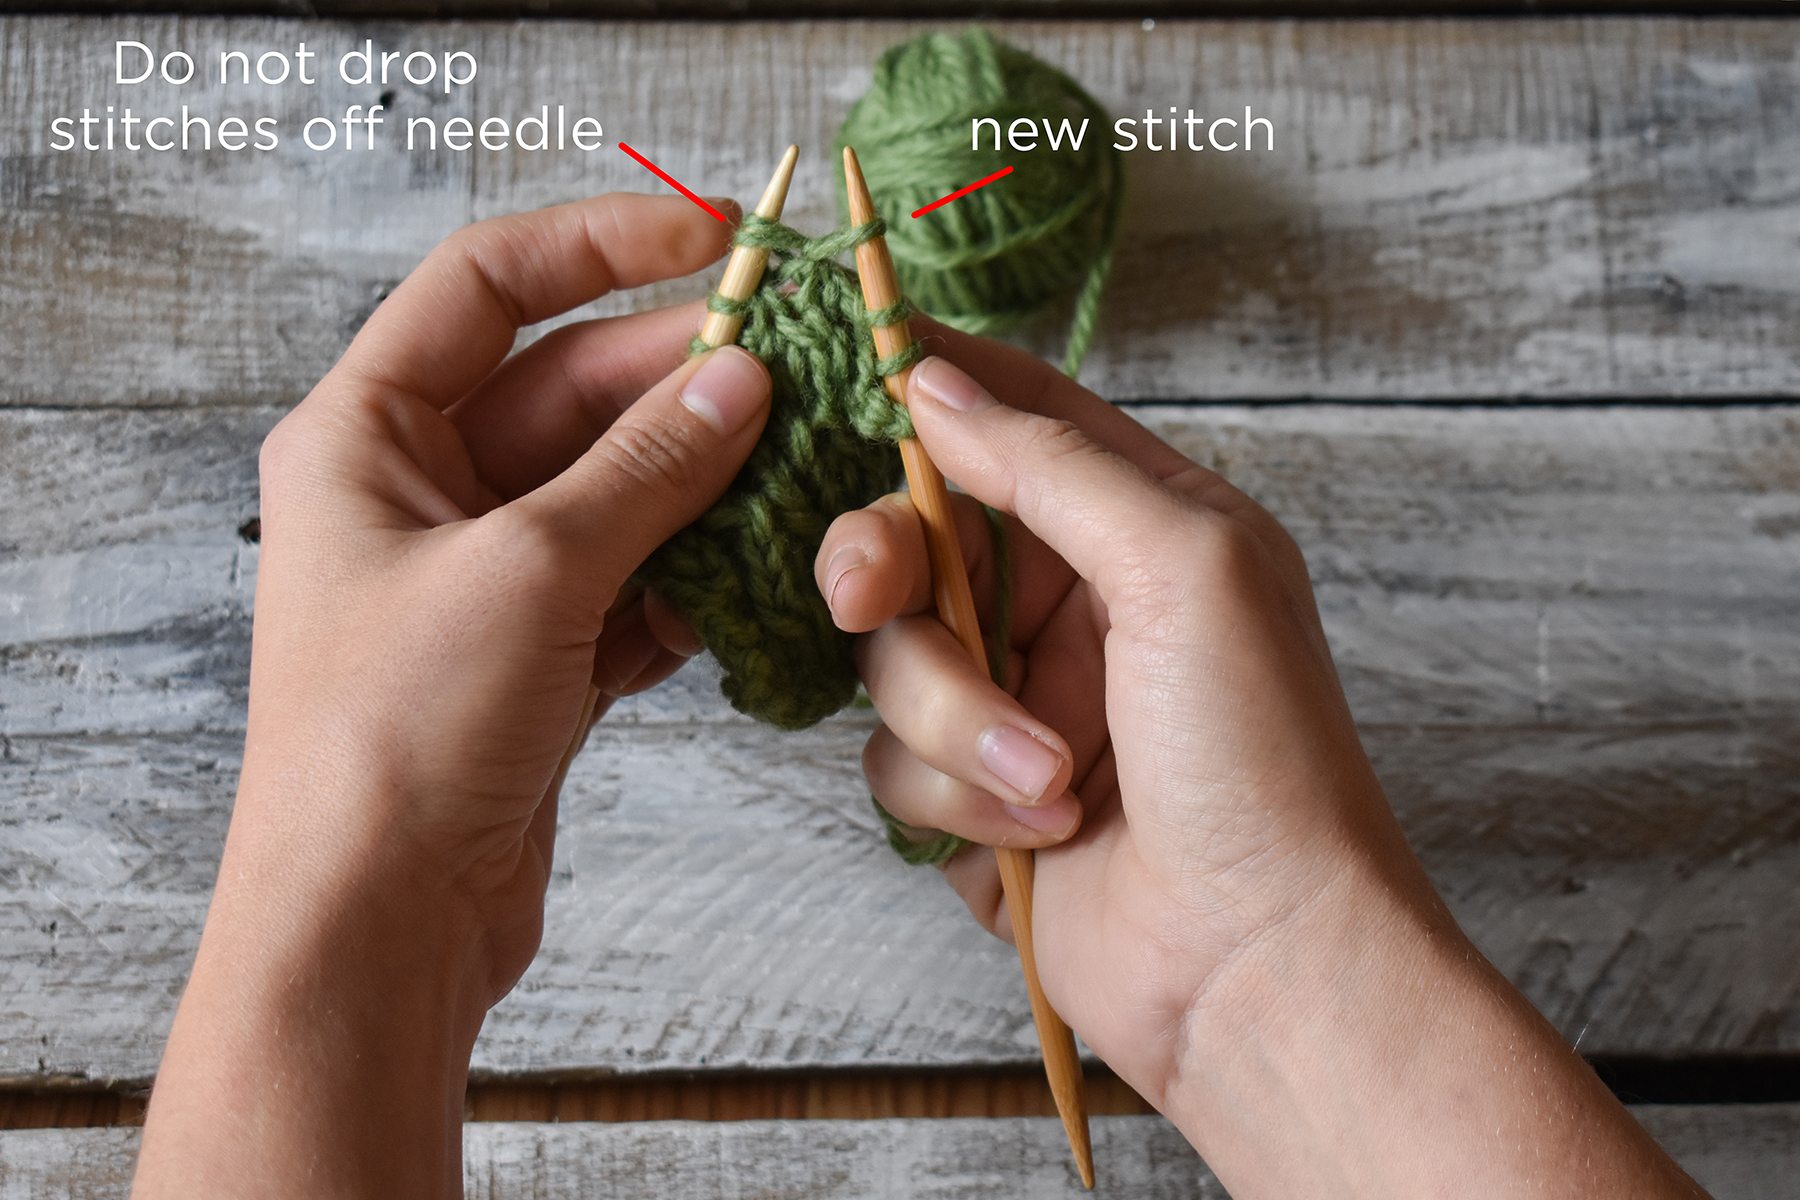
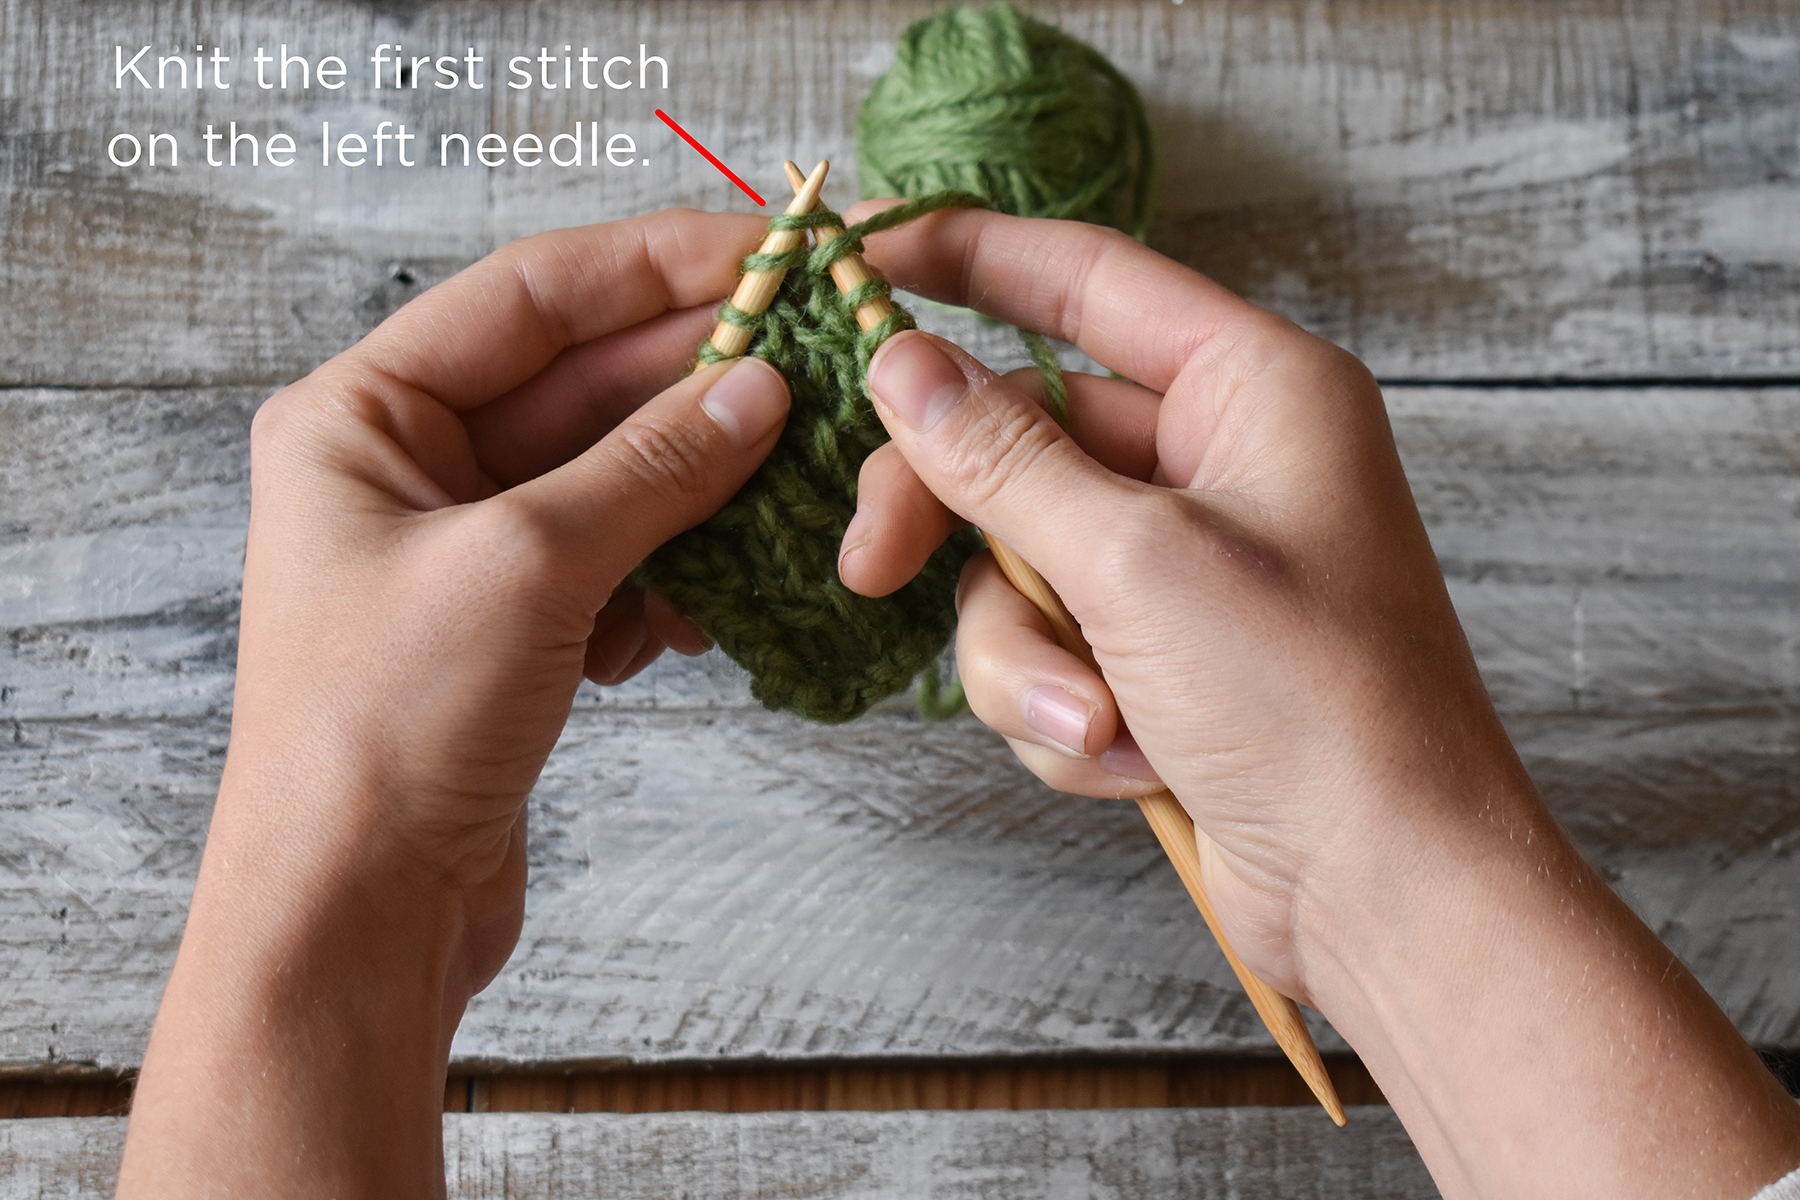
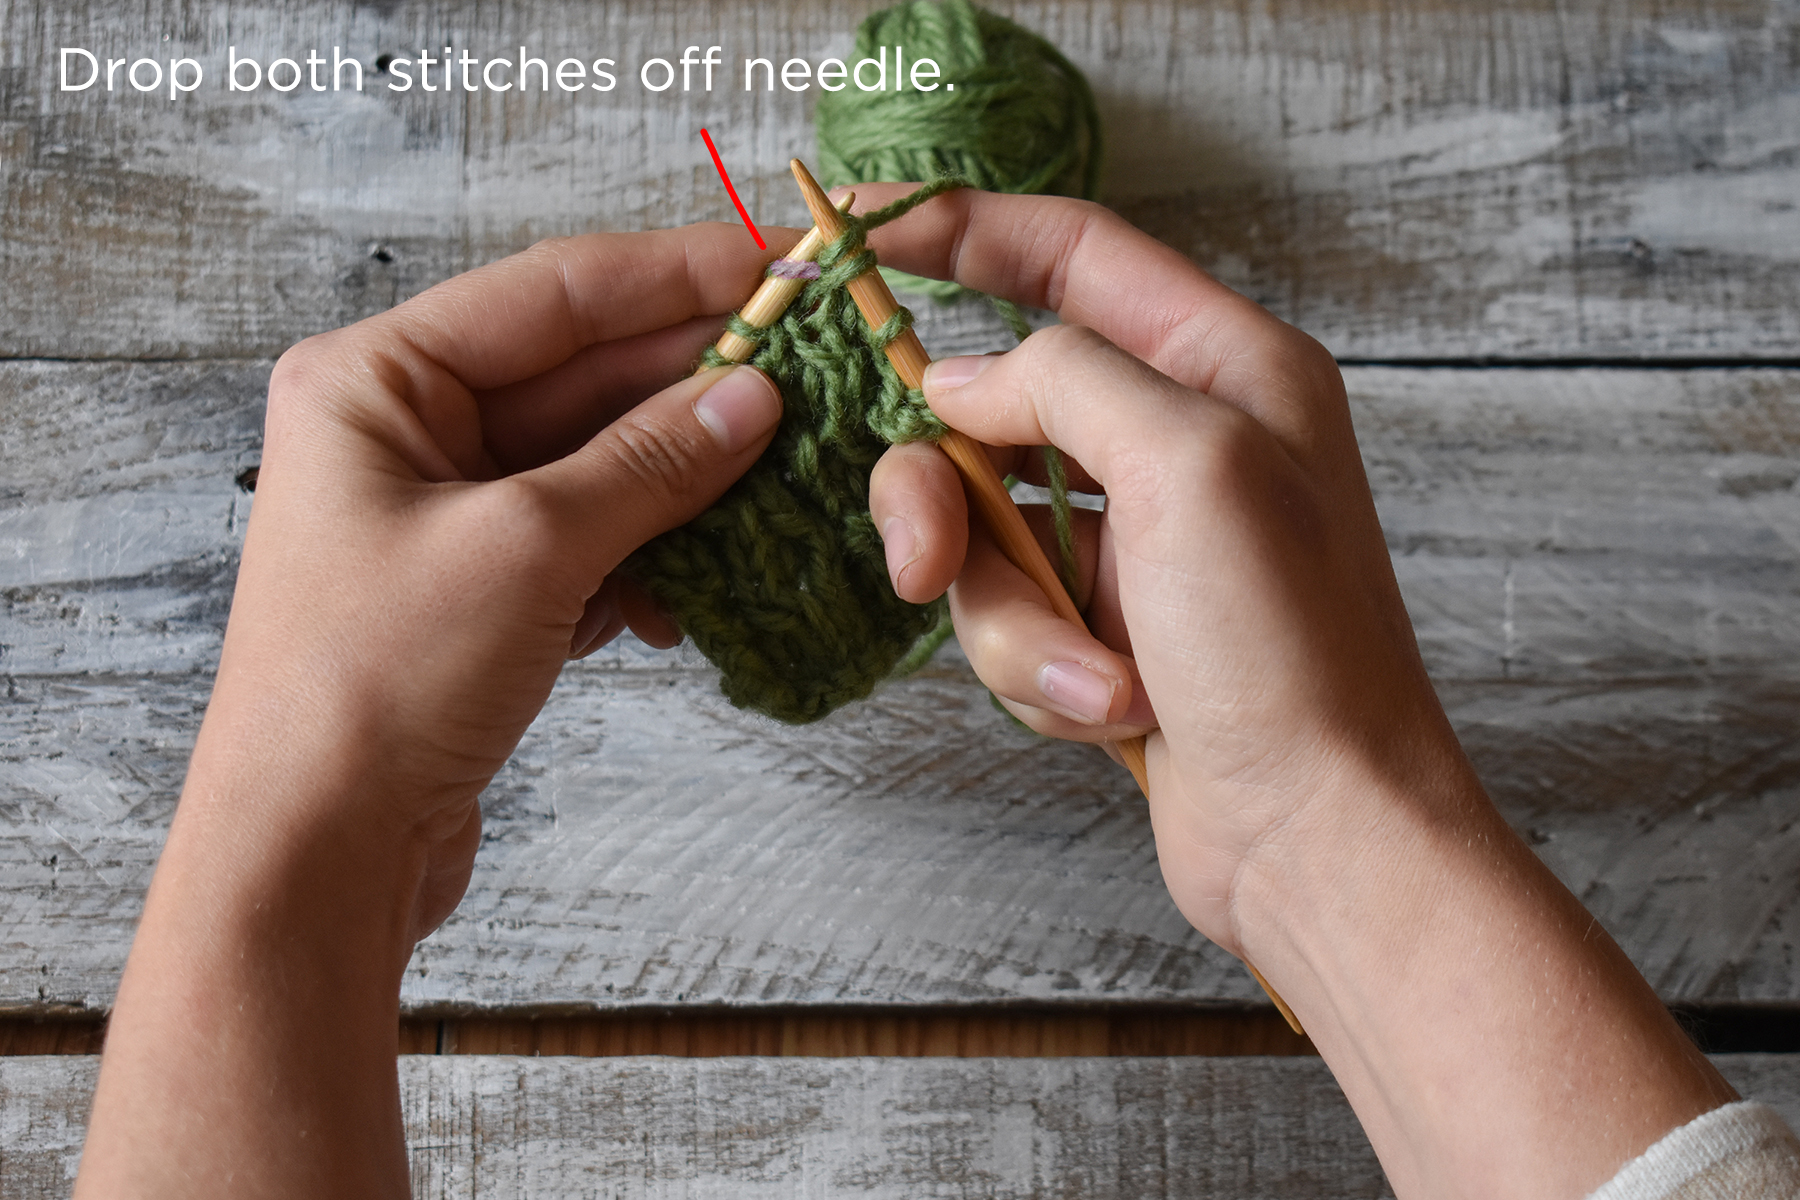
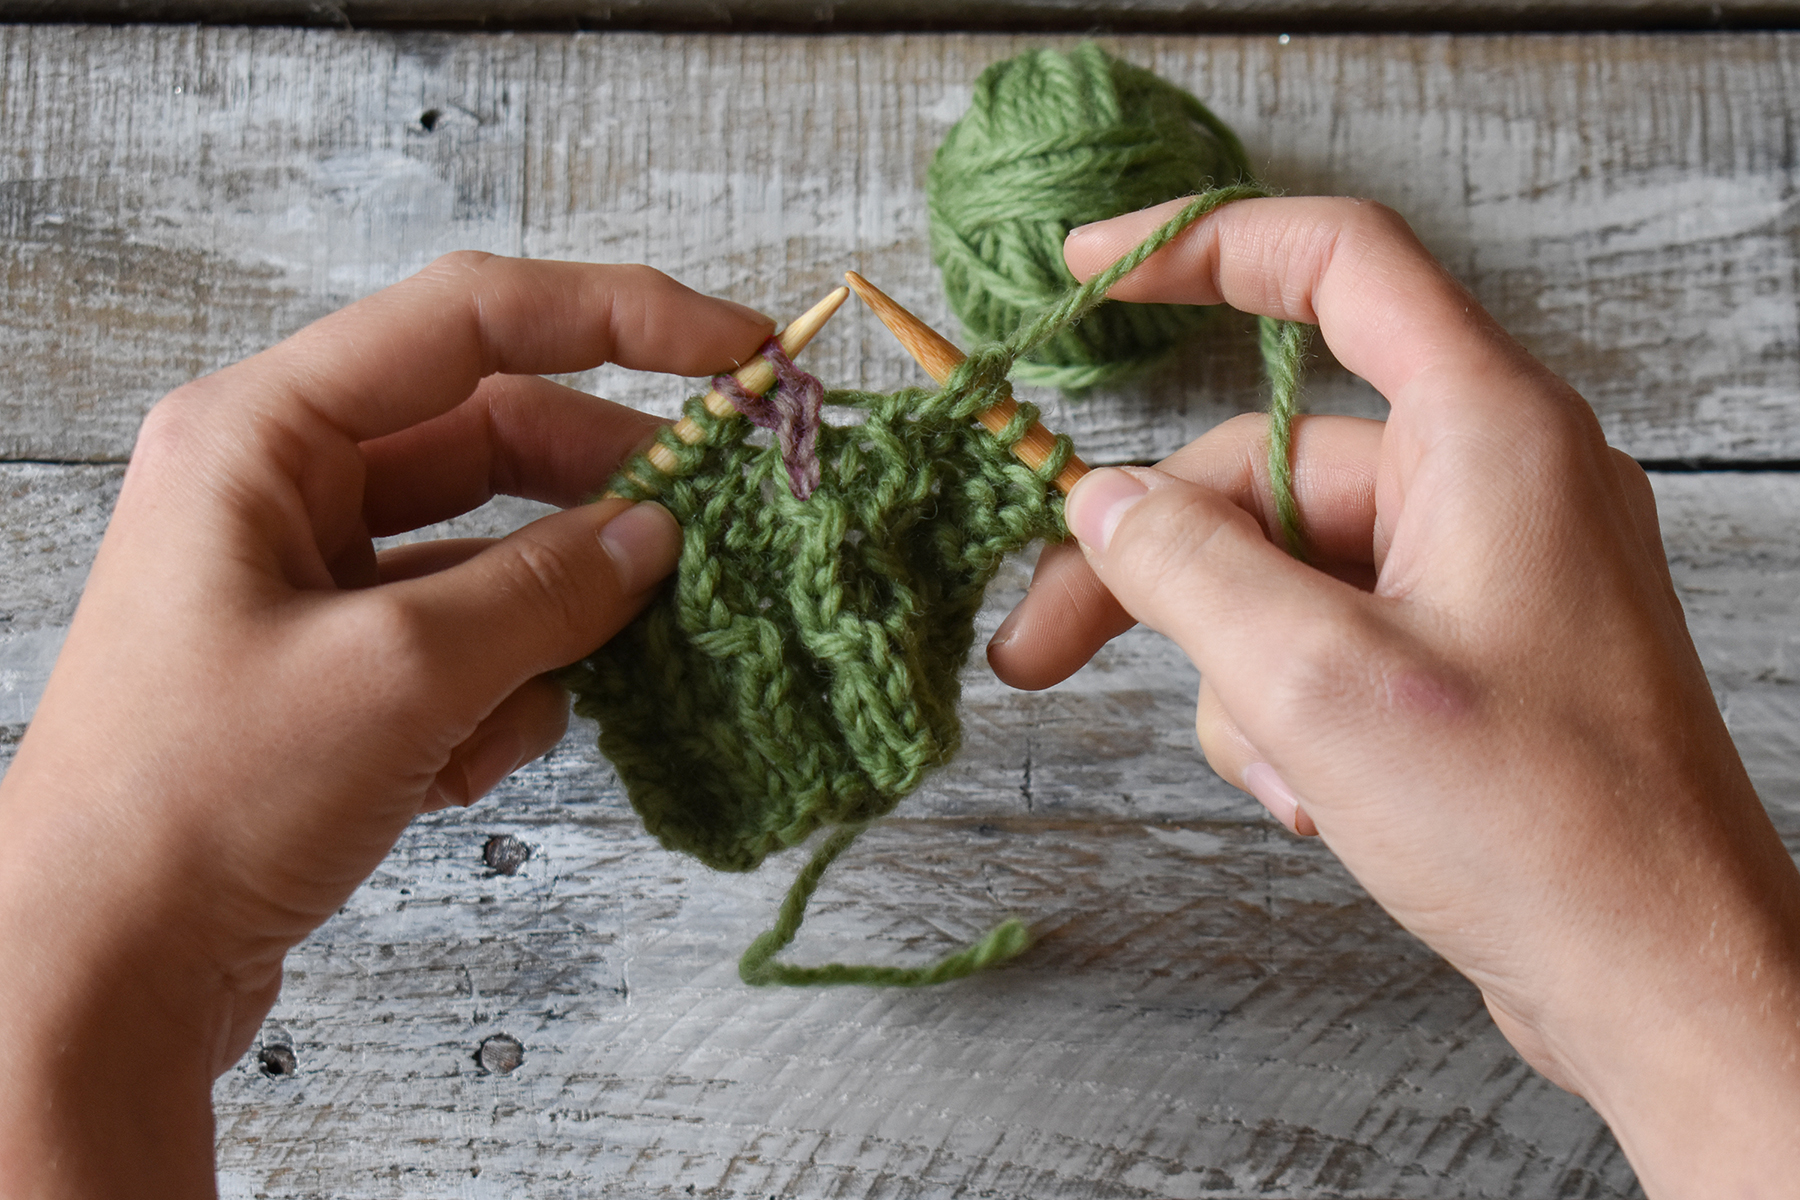
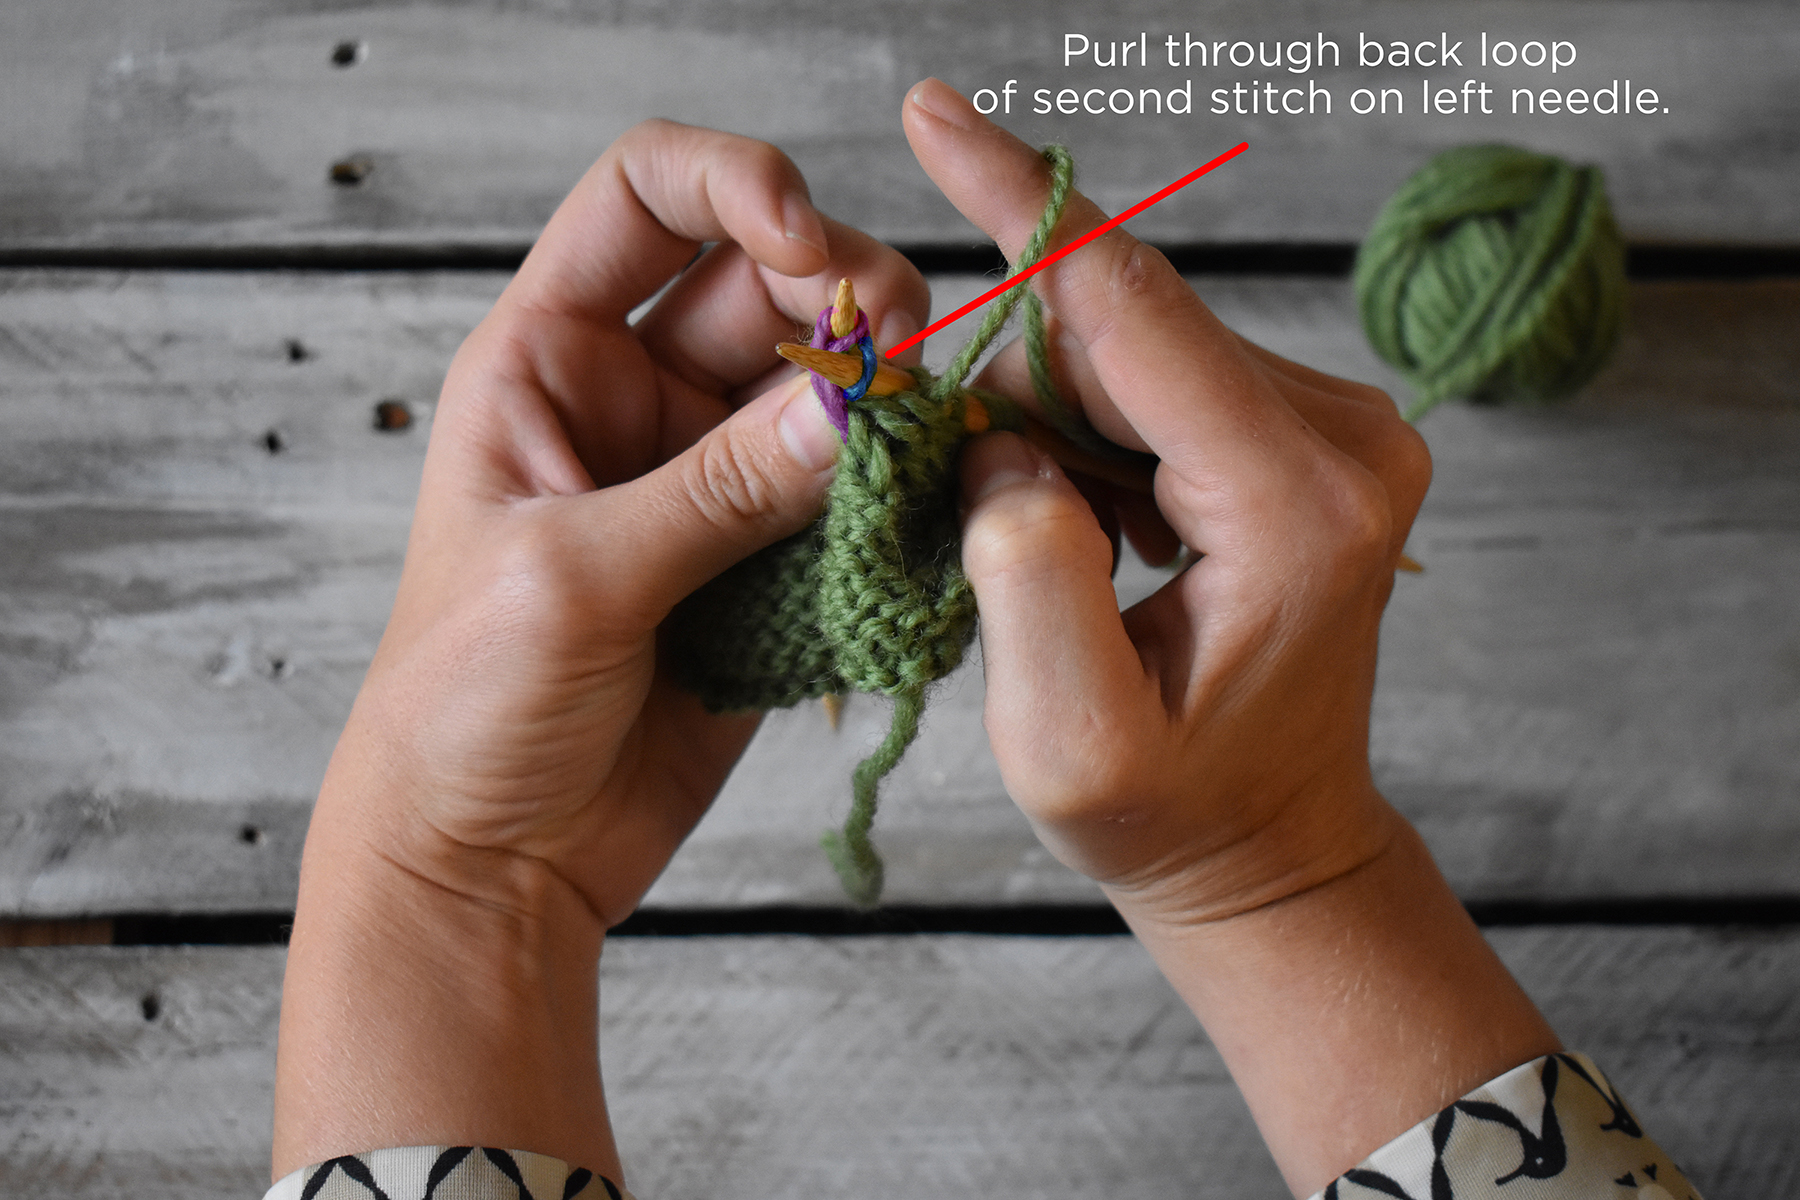
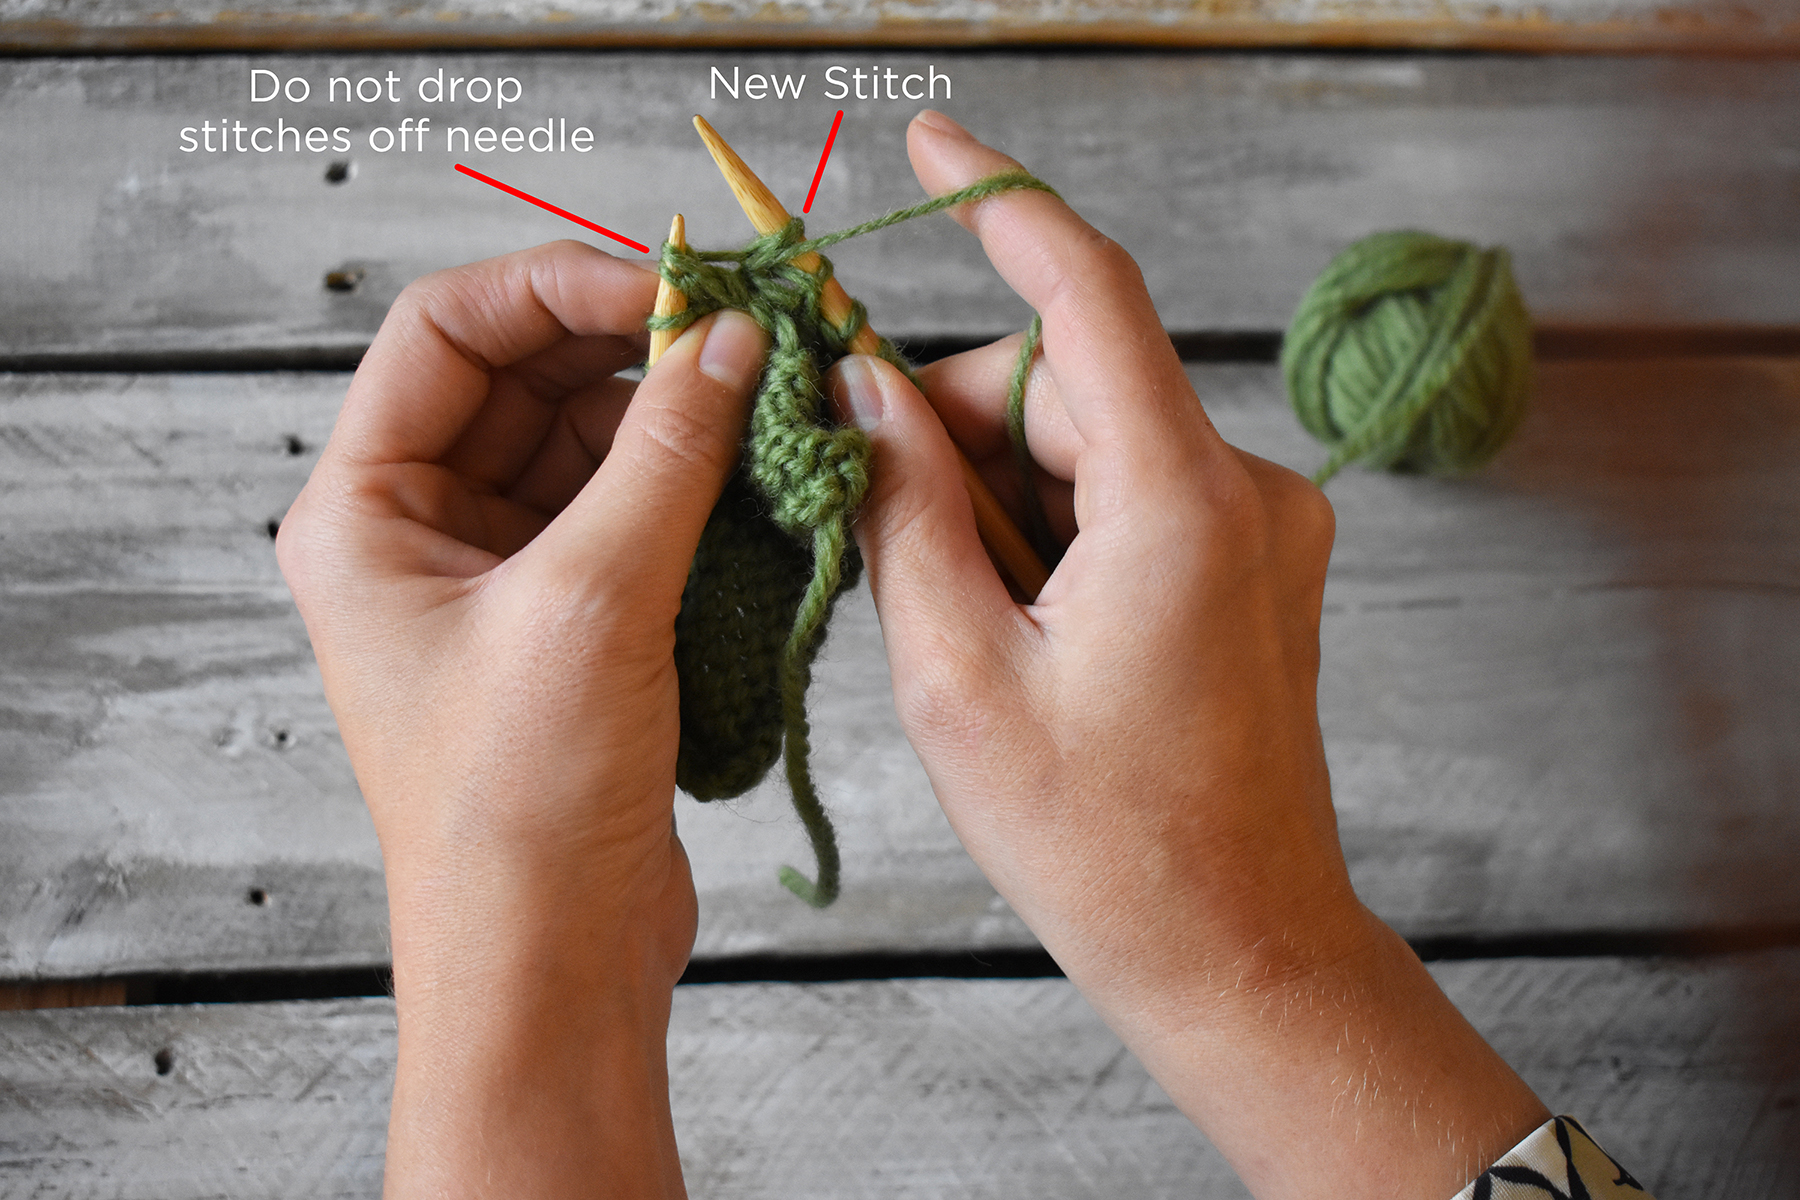
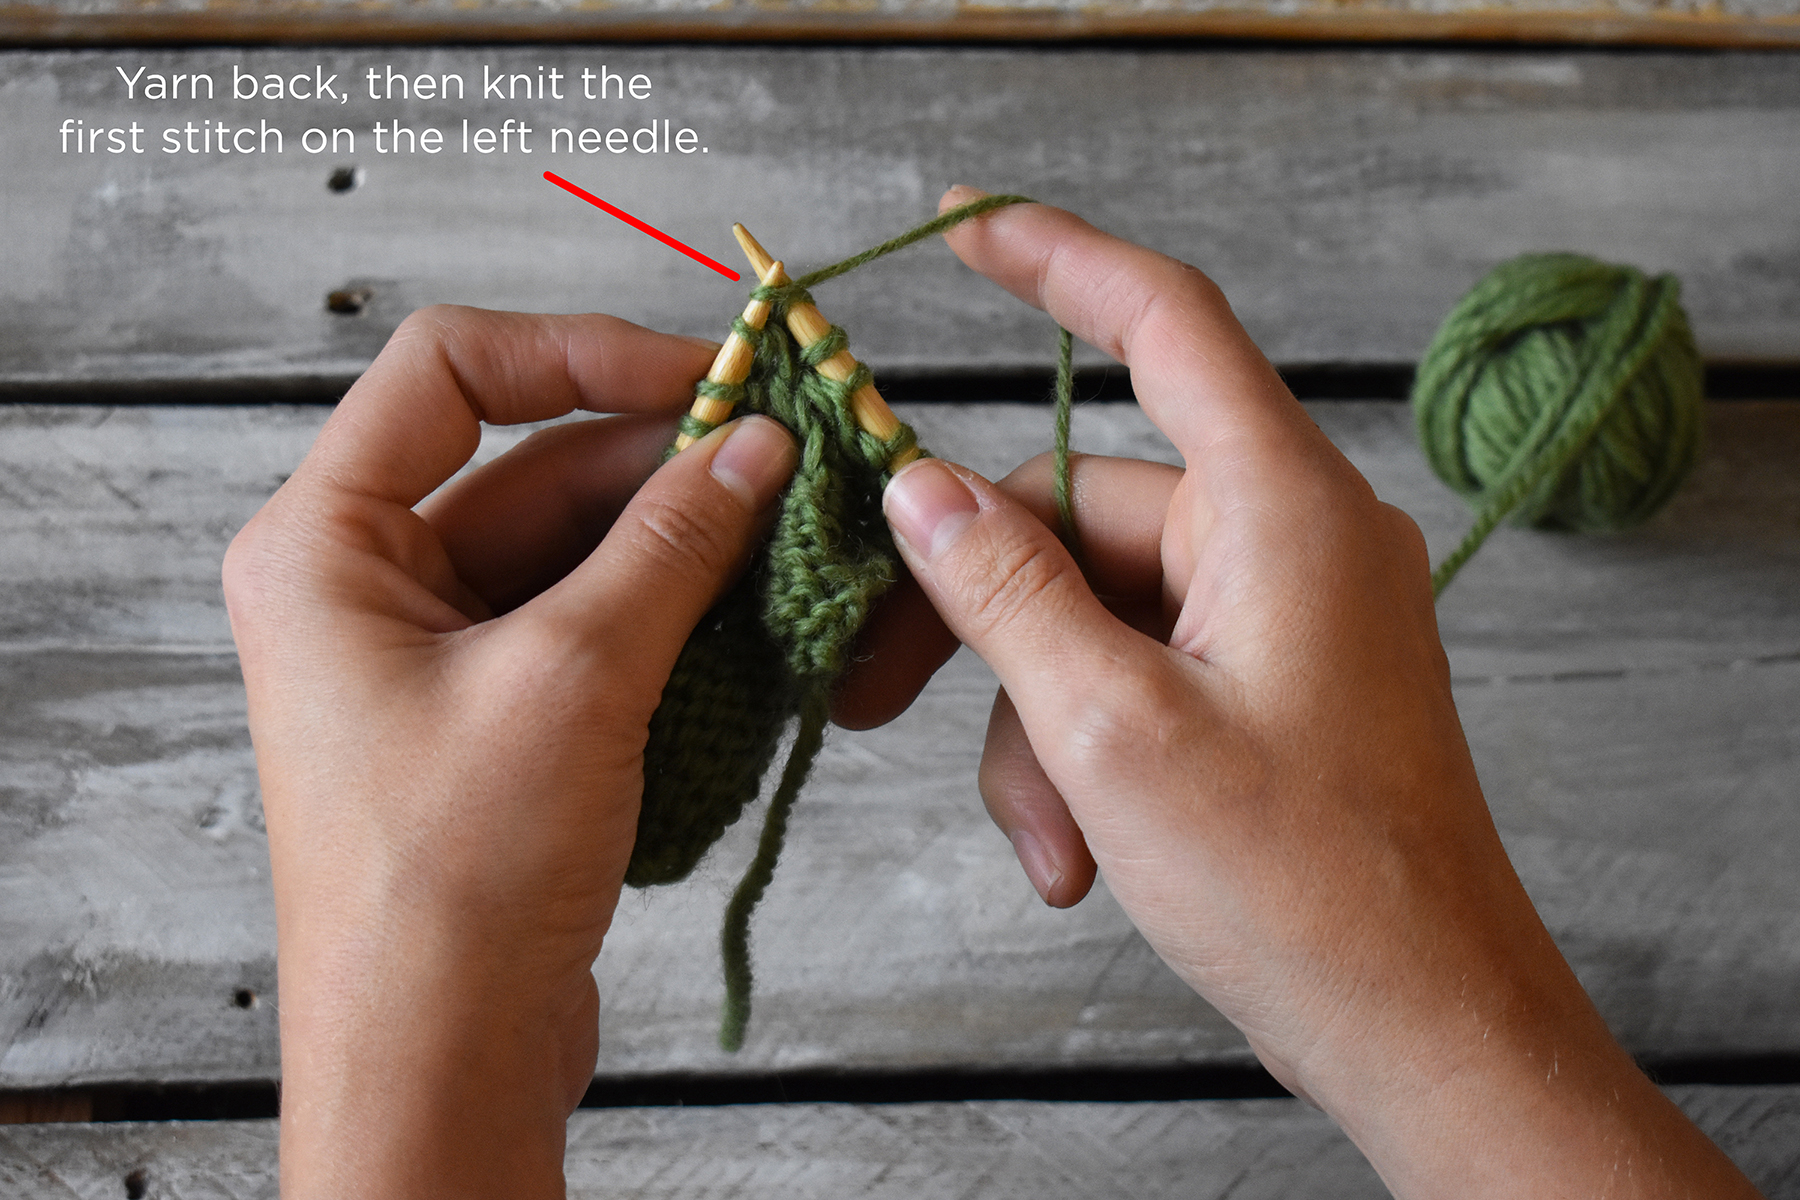
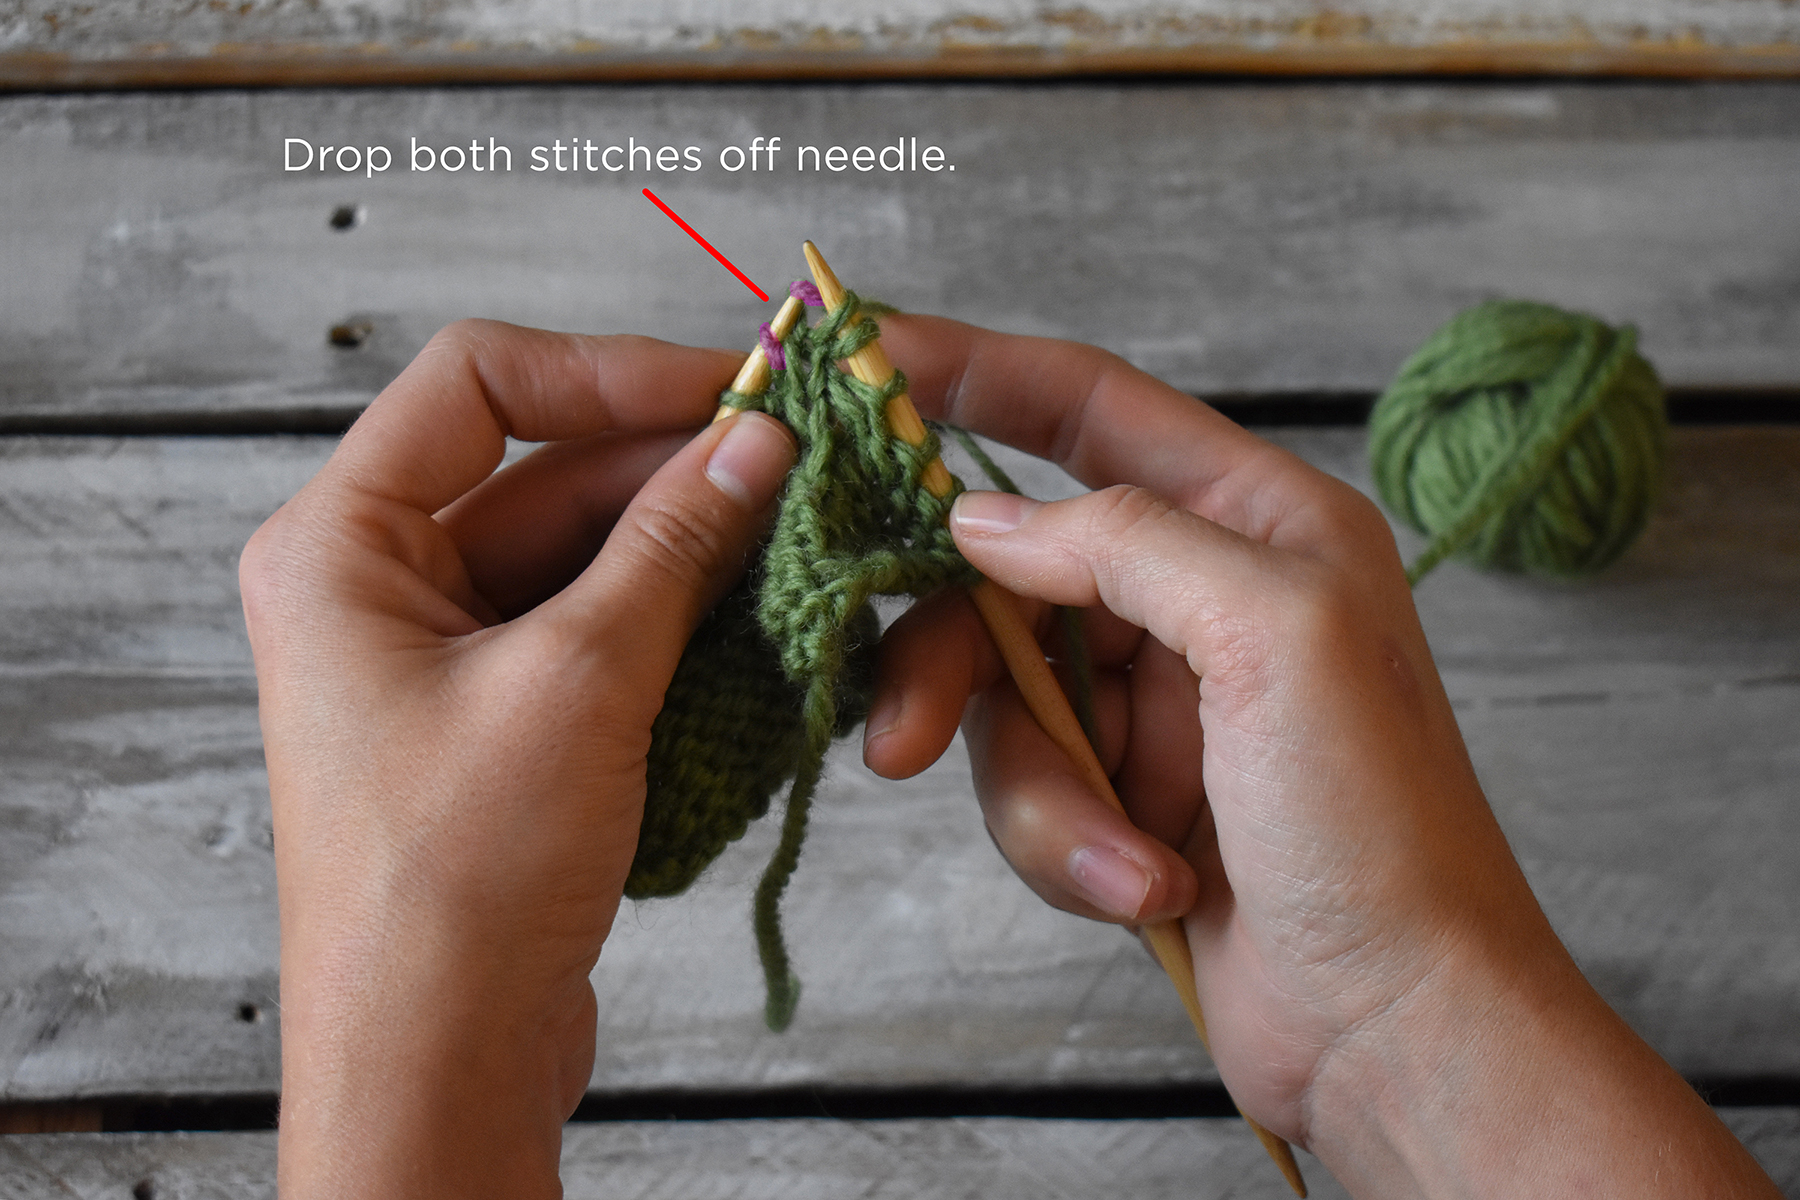
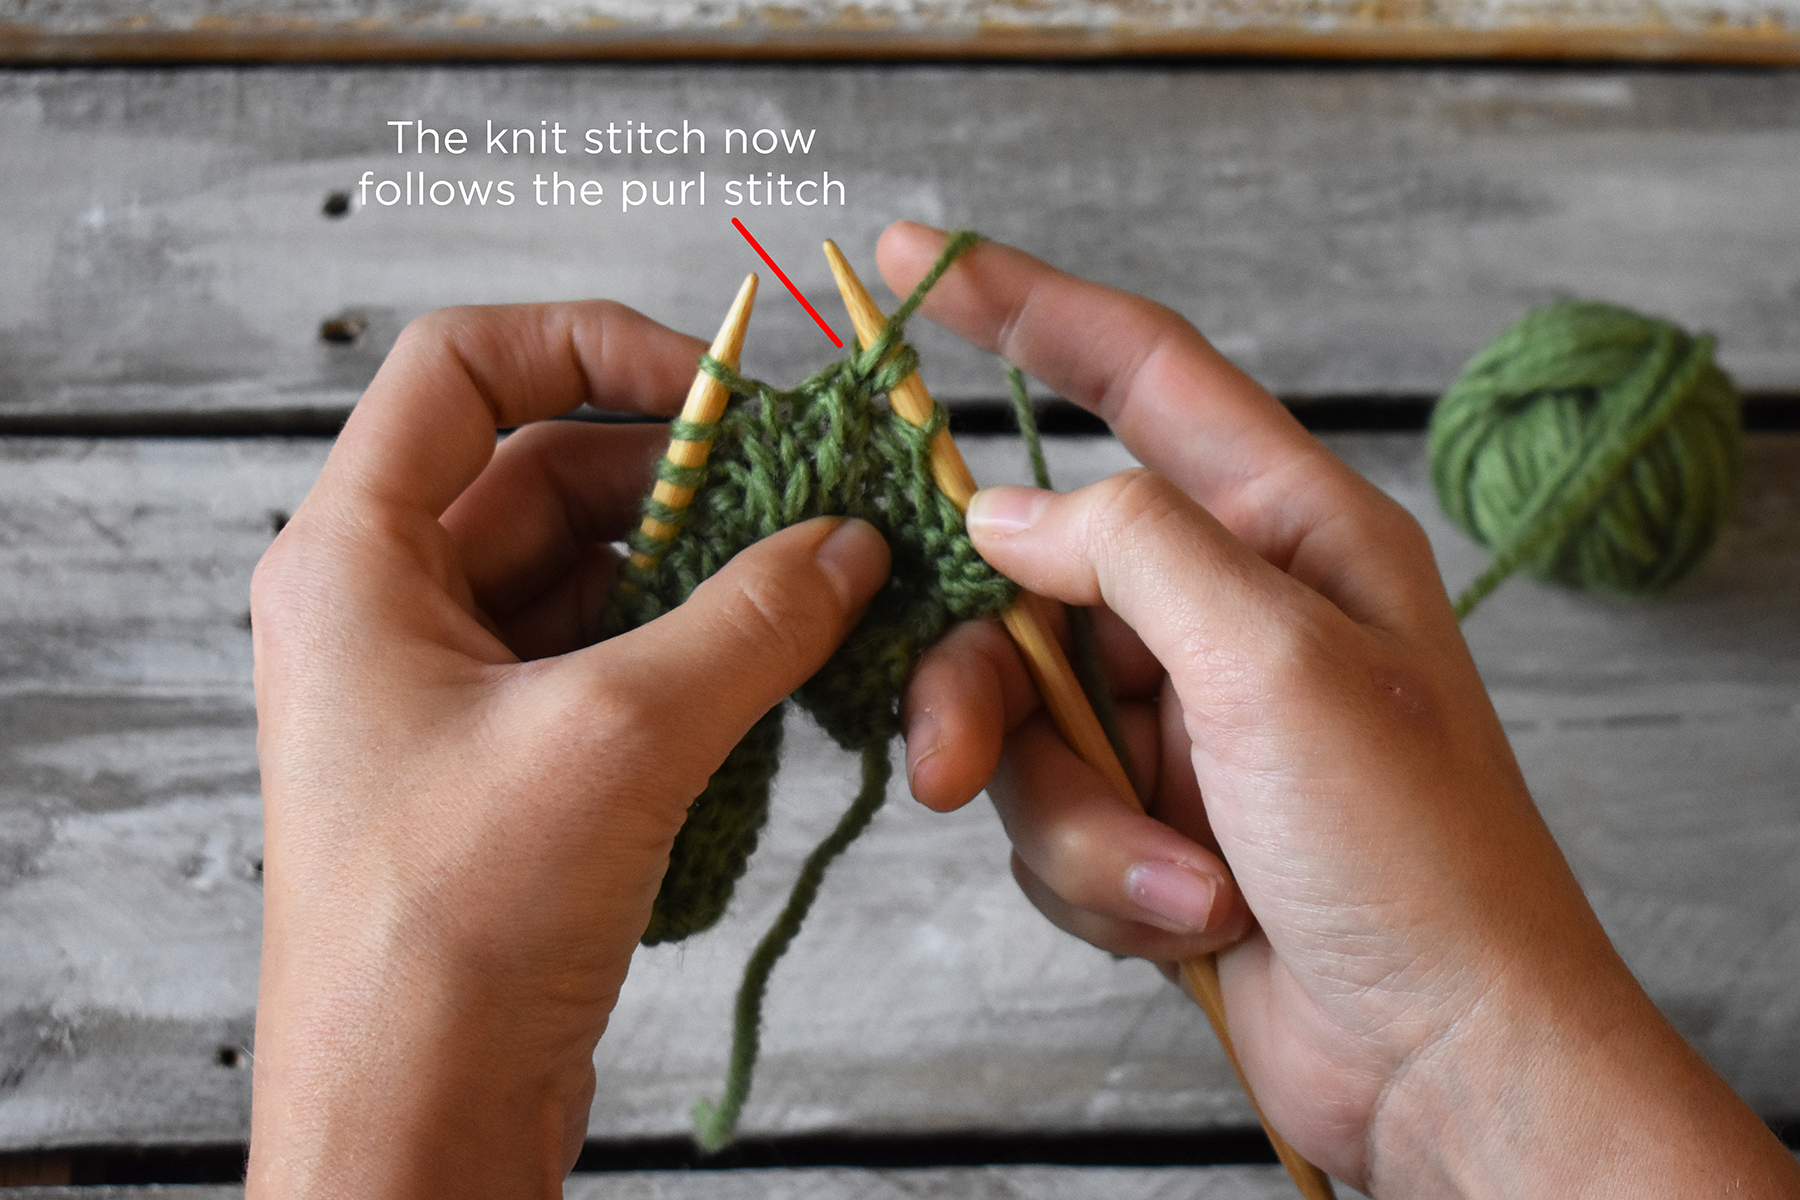
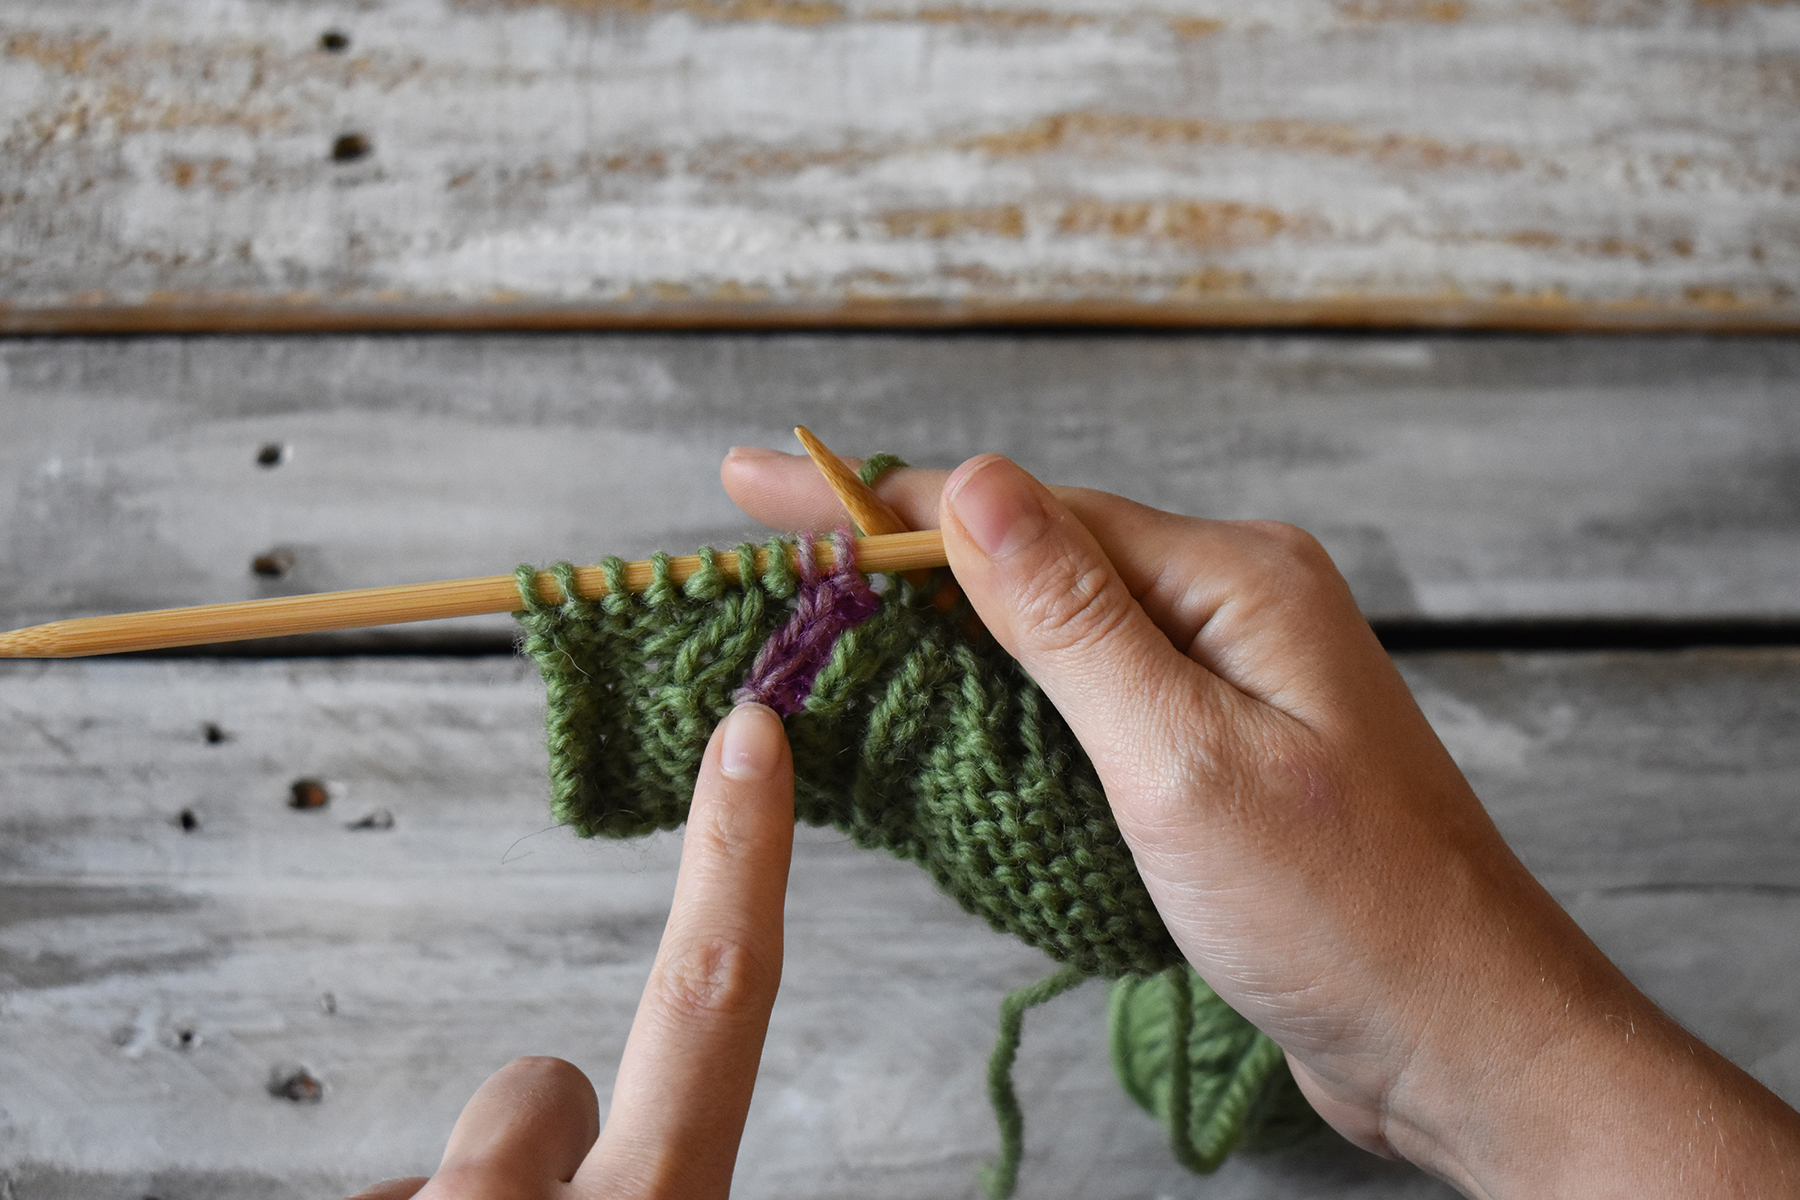
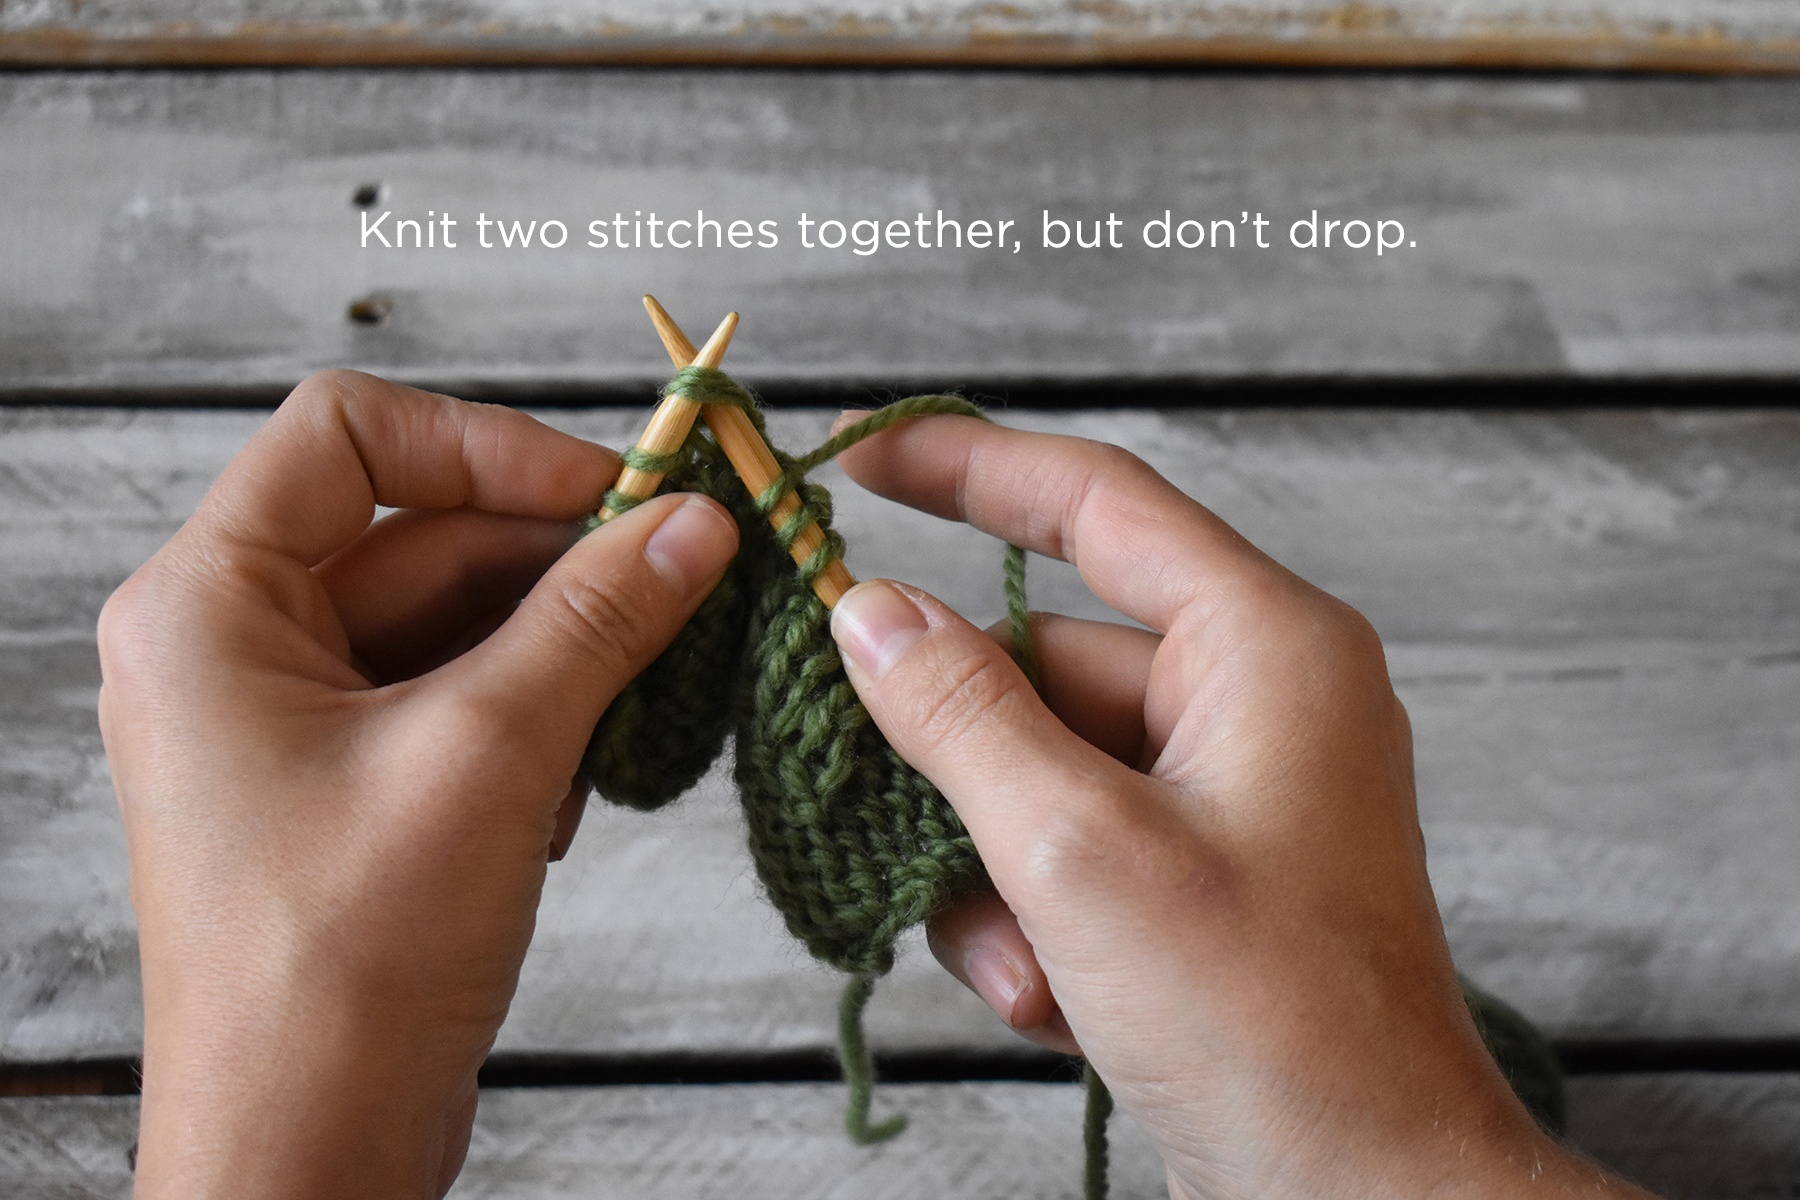
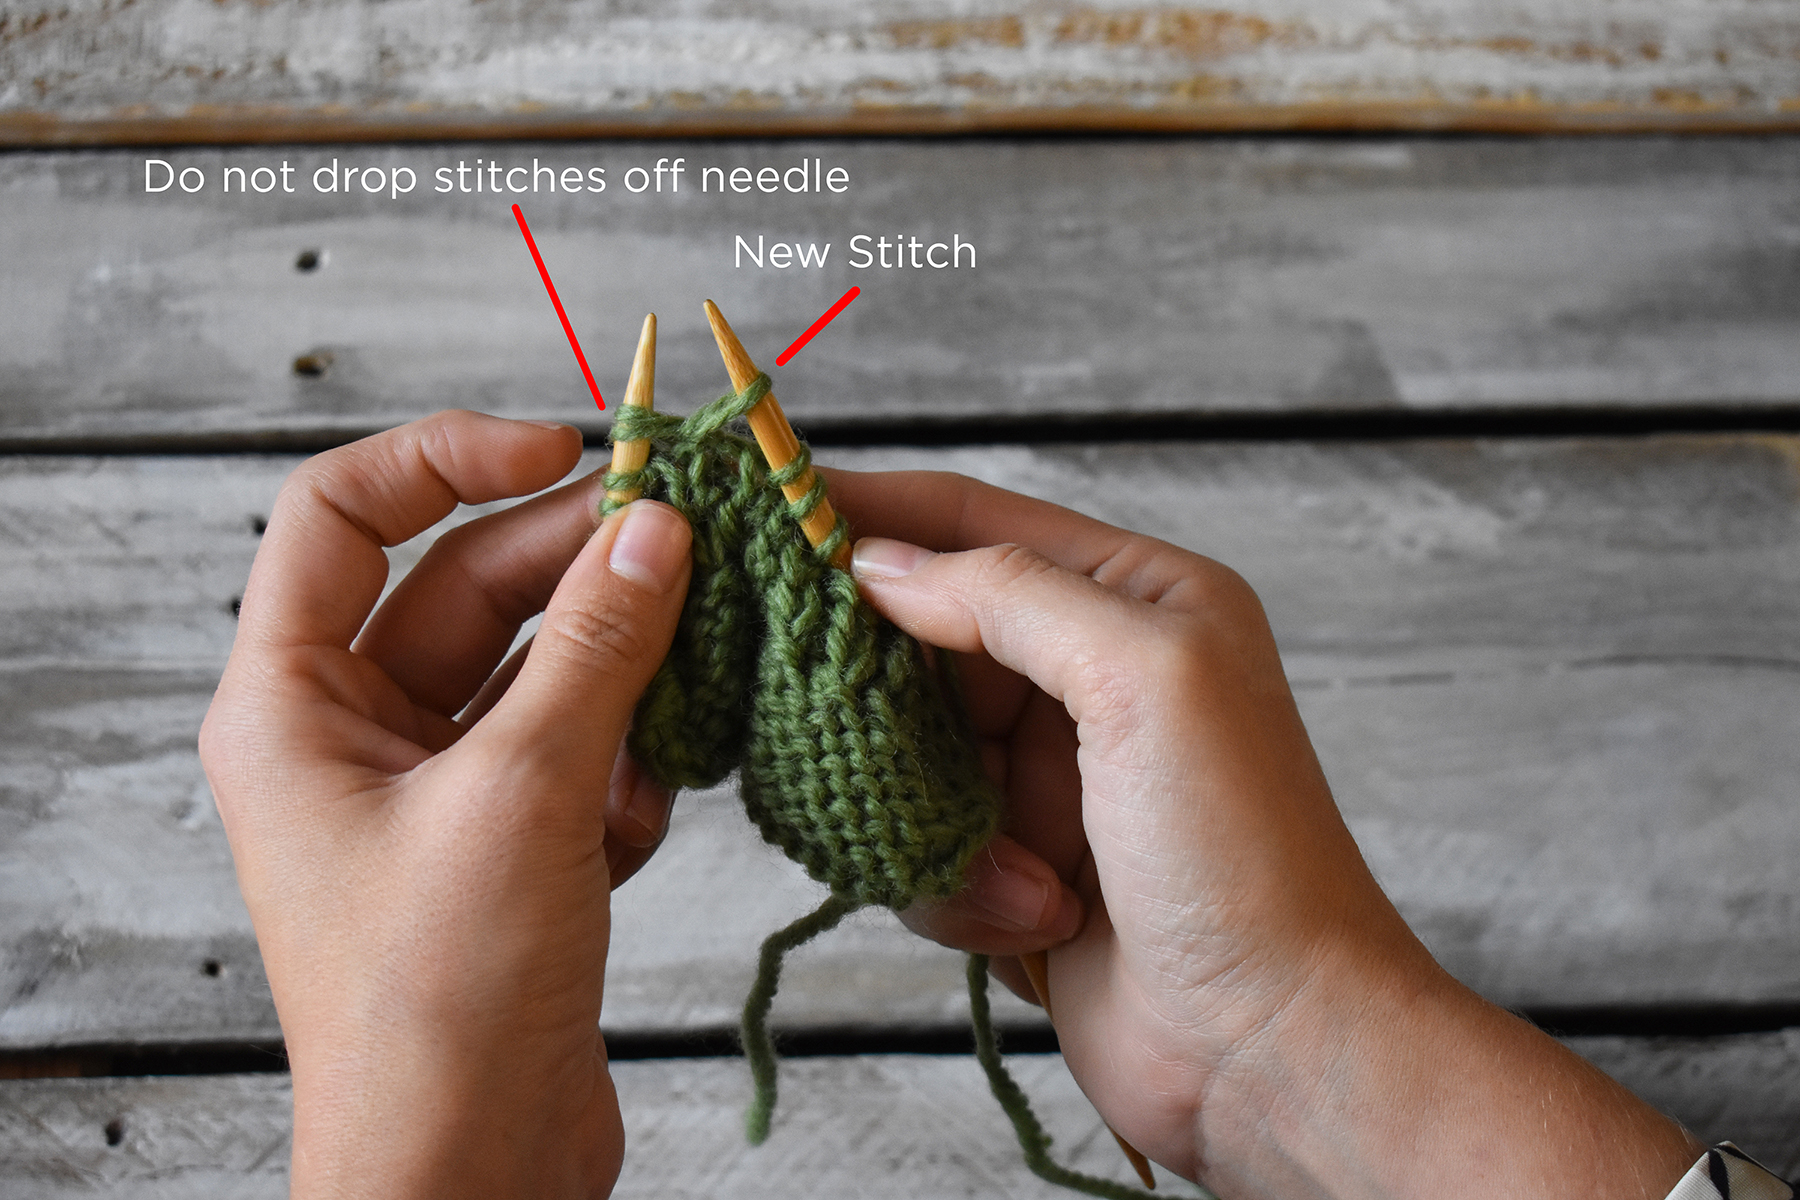
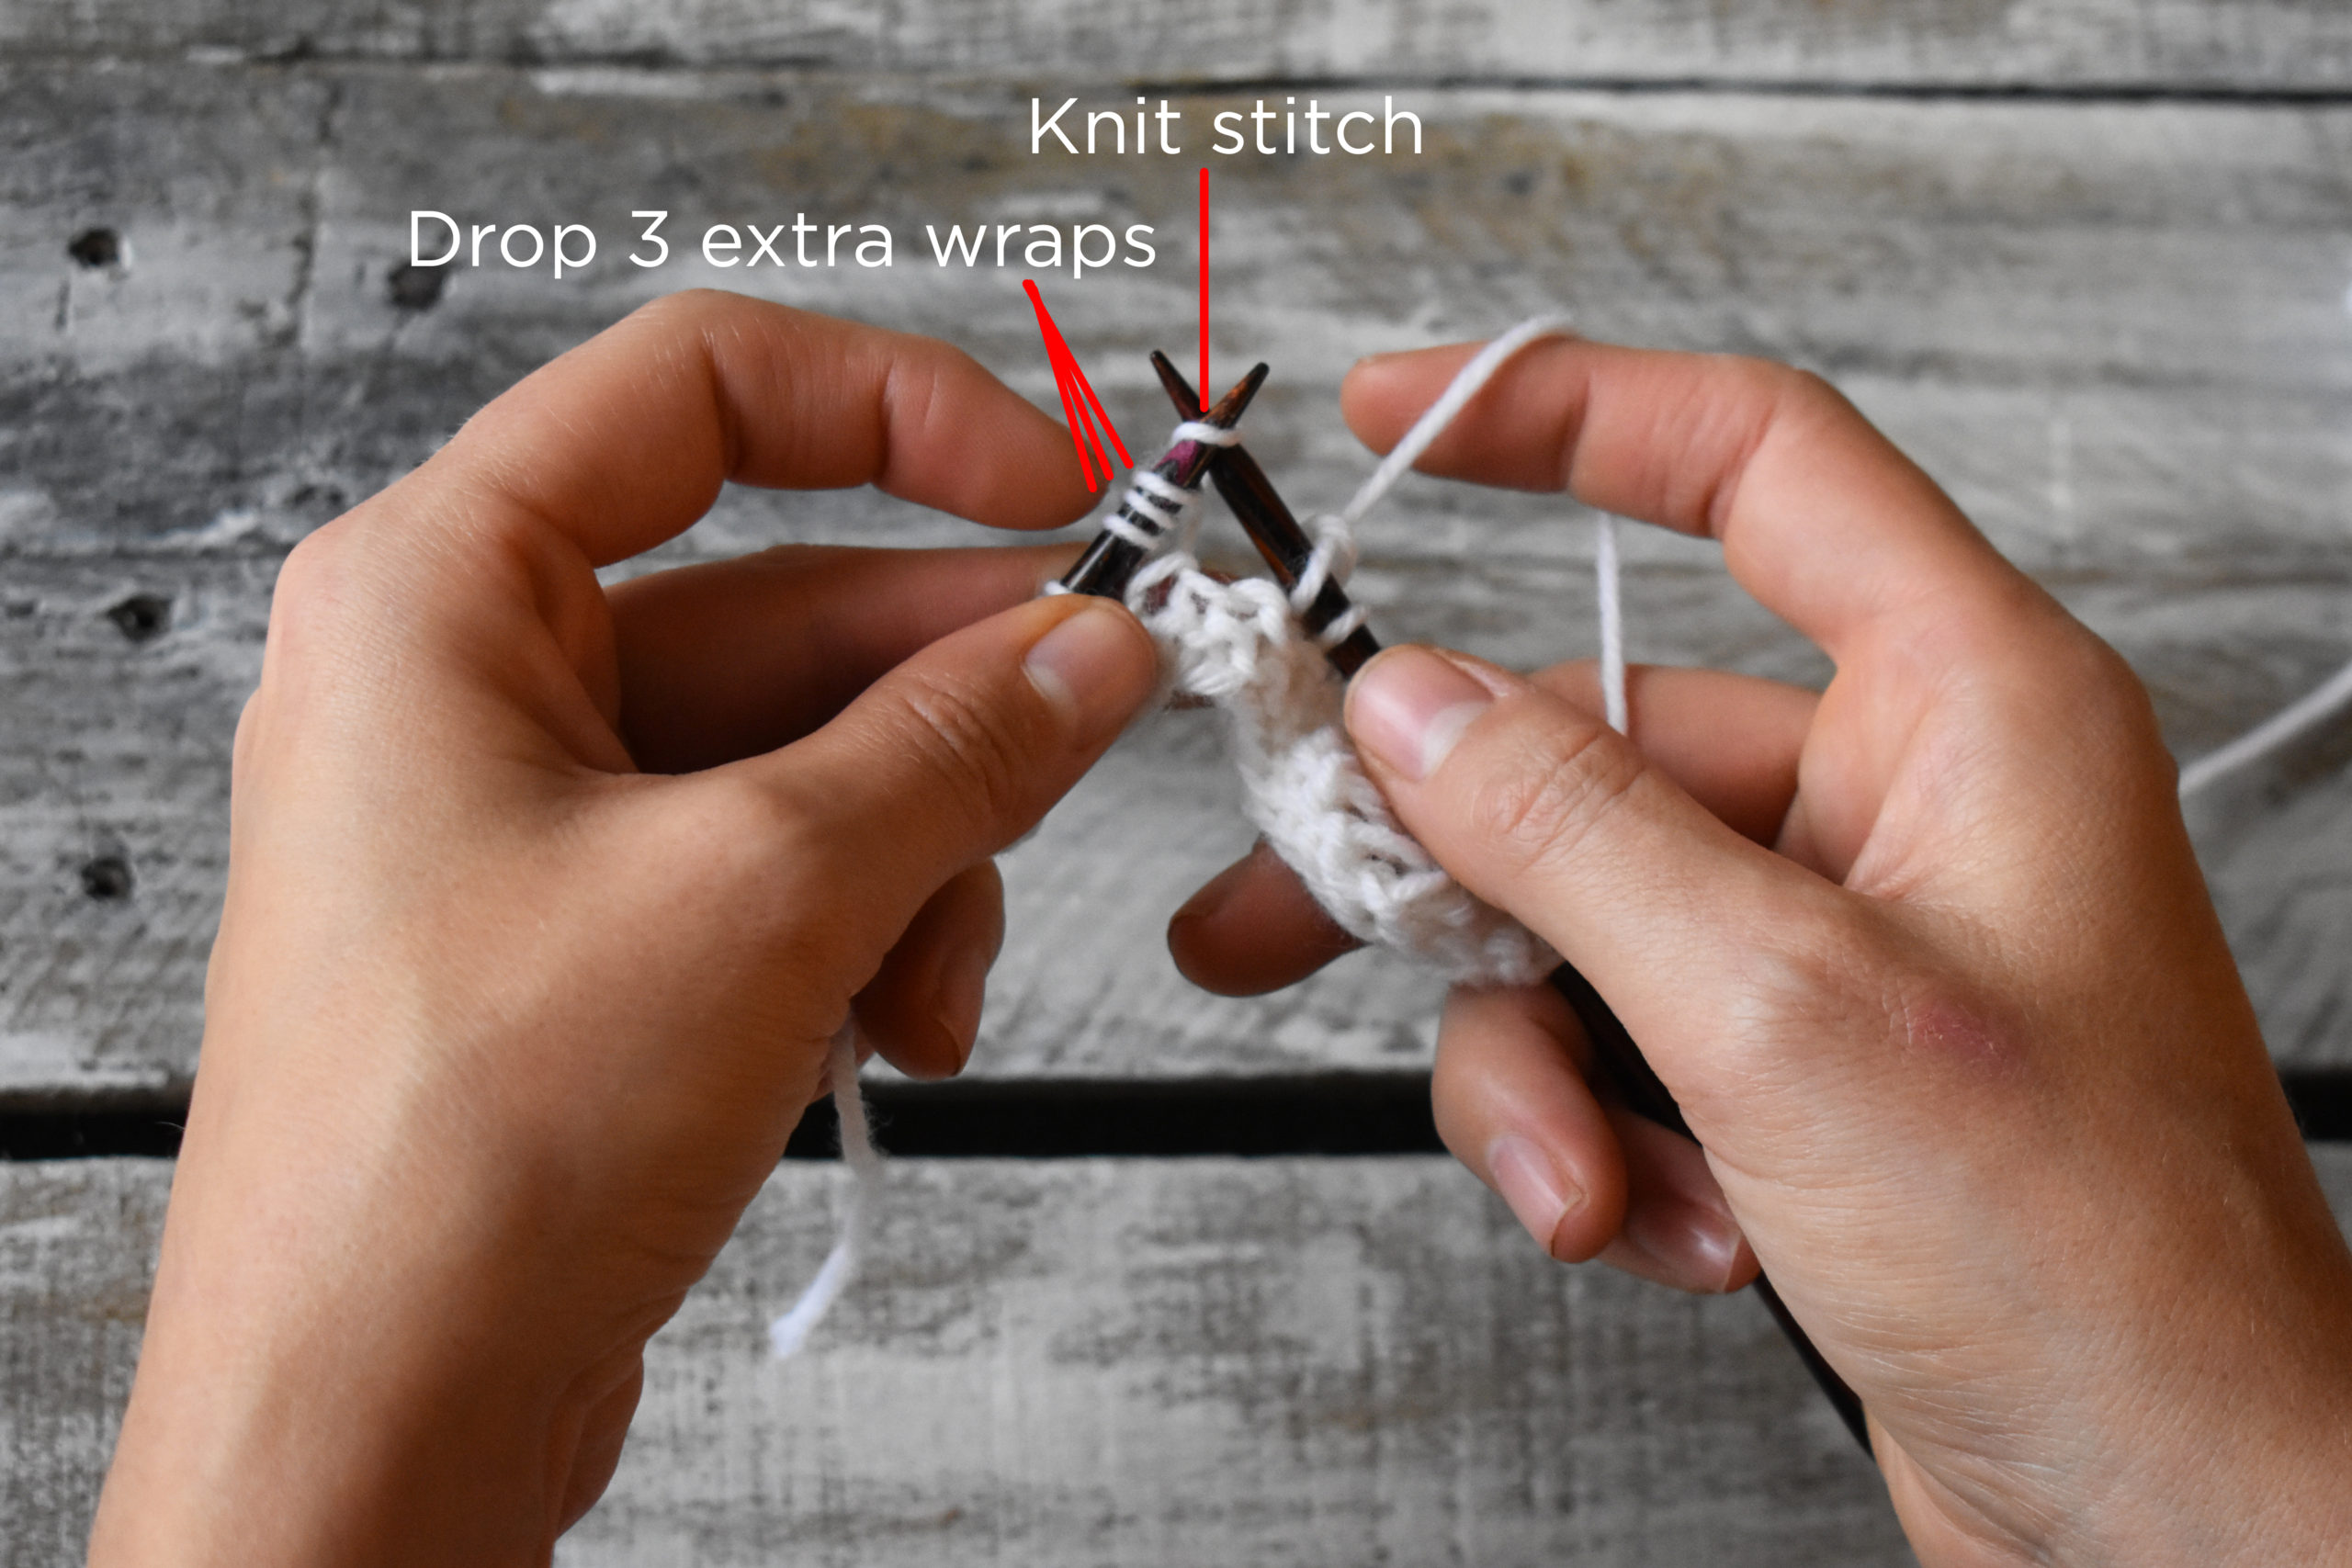
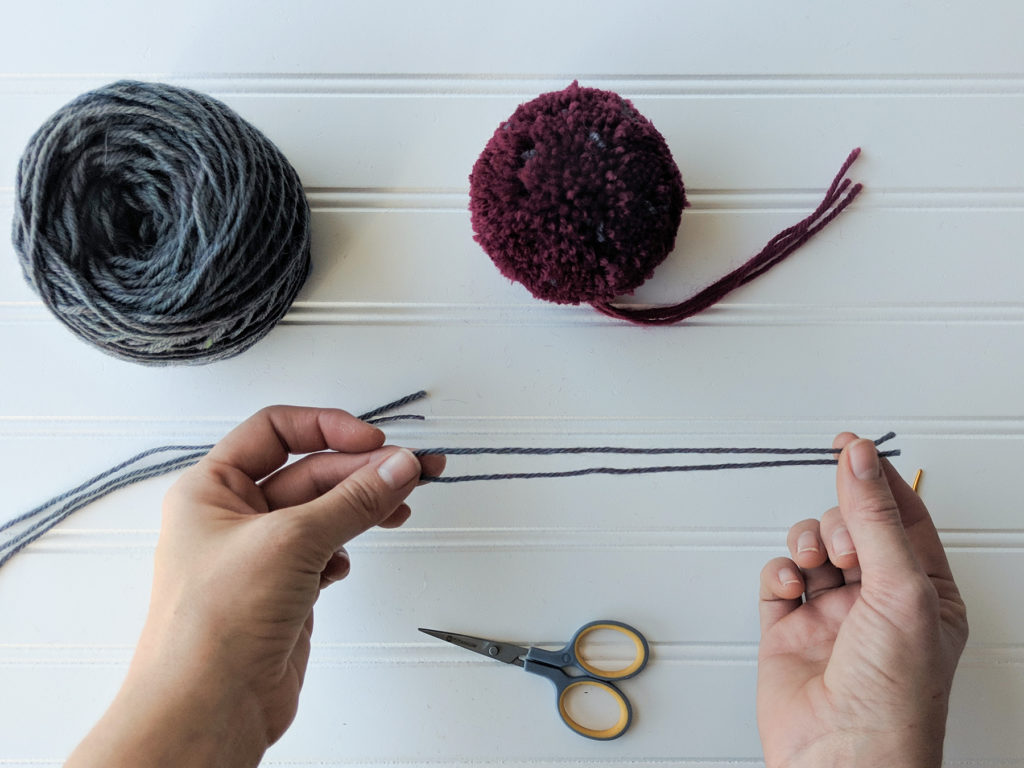
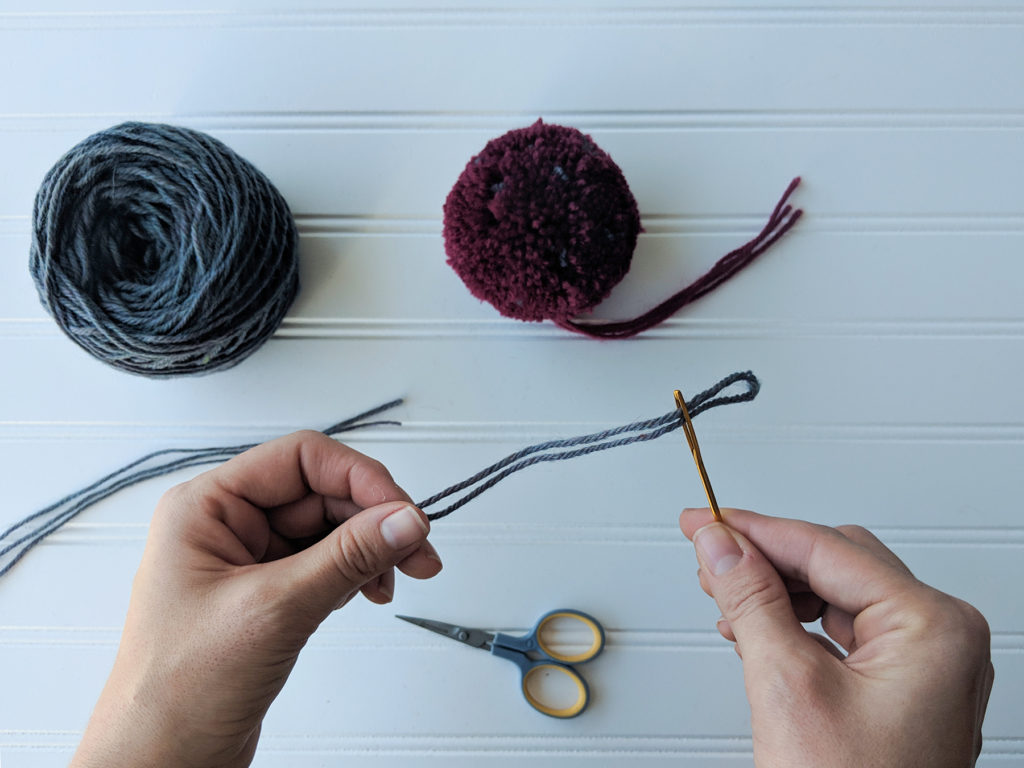
For your convenience, I’ve also created a tutorial. I hope you find it to be helpful! You’ll need to make your pom-pom before starting. If you haven’t done this before, don’t worry! You can find Amy’s tutorial on how to make pom-poms here (link).

Deluxe Worsted
To get started you’ll need a pom-pom, scissors, tapestry needle, and contrast color yarn. 
Universal Yarn Deluxe Worsted
Step 1: Cut your contrast color yarn into lengths of approximately 12″. In the pattern I’ve directed you to cut 15 pieces. Fold each piece in half. 
Universal Yarn Deluxe Worsted
Step 2: Keeping the strand of yarn folded, thread the tapestry needle.
Universal Yarn Deluxe Worsted
Step 3: Insert the tapestry needle through the center of the pom-pom. 
Universal Yarn Deluxe Worsted
Step 4: Pull one end of the strand through the pom-pom, but be sure to secure the other end.
Universal Yarn Deluxe Worsted
Step 5: You should be able to hold each end of the strand as shown. 
Universal Yarn Deluxe Worsted
Repeat Steps 1-5 until you’ve used each of the strands you cut. If desired, add more! When you finish you’ll have a medusa-looking pom-pom. 
Give your pom-pom a trim so that the contrast color ends are flush with the rest of the pom-pom. 
Universal Yarn Deluxe Worsted
Finished! Now you can secure your pom-pom to the hat. 

Day 1 of Winter – Series 2 Edition

This is part 1 in a 12 part series highlighting designs from our 12 Days of Winter, Series 2 Edition.

We can hardly believe it’s already November. Knitting season is in full swing. Our needles and hooks are full of warm and woolly goodness. We’re preparing for the holidays – working tirelessly on special projects for friends and family. Here at Universal Yarn, we’ve also been working hard to create the second annual installment of a beautiful collection of wintry kits to welcome the season. So, at long last, we’re able to reveal the first of twelve special kits. Say hello to the 12 Days of Winter 2018 Collection!

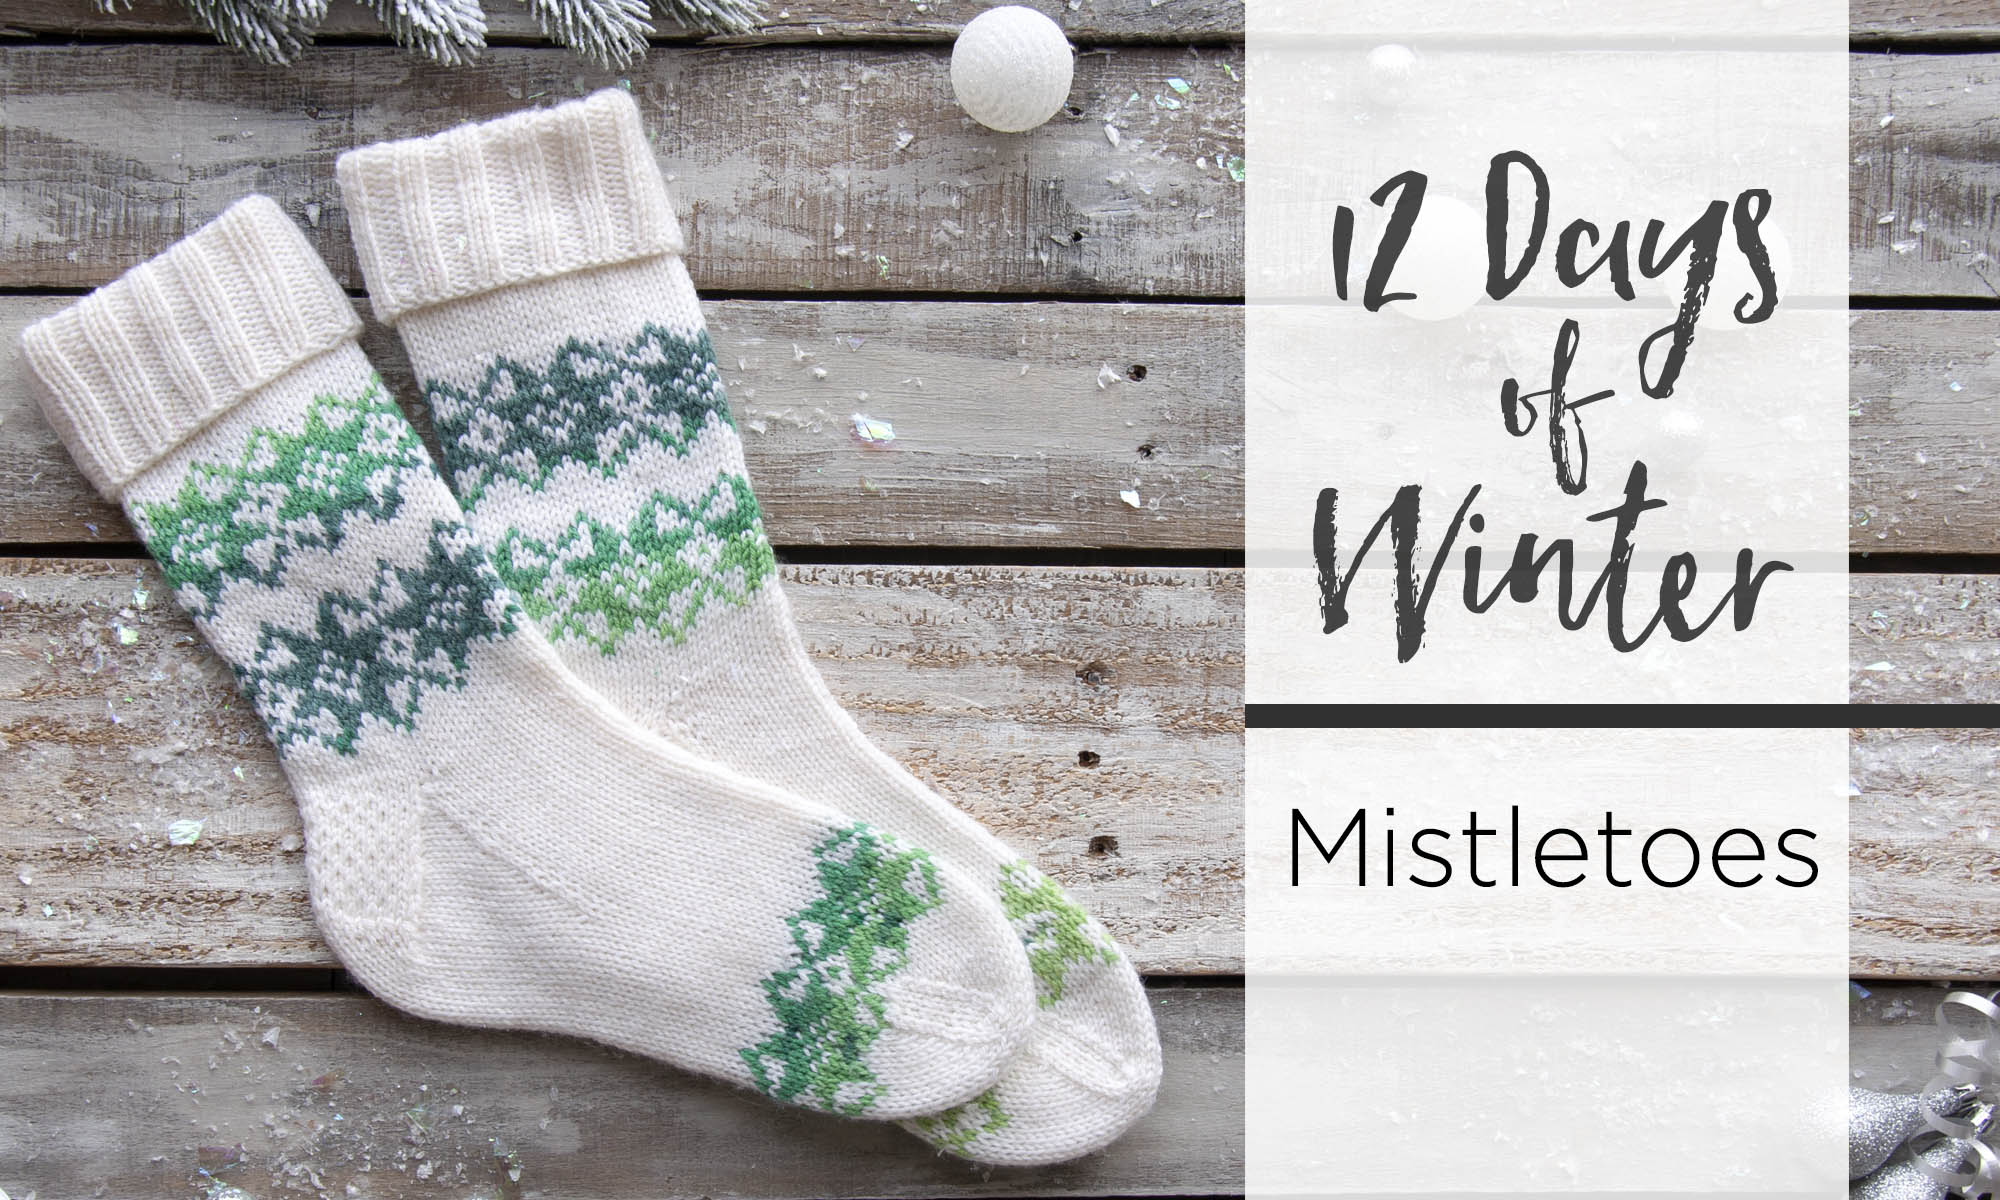
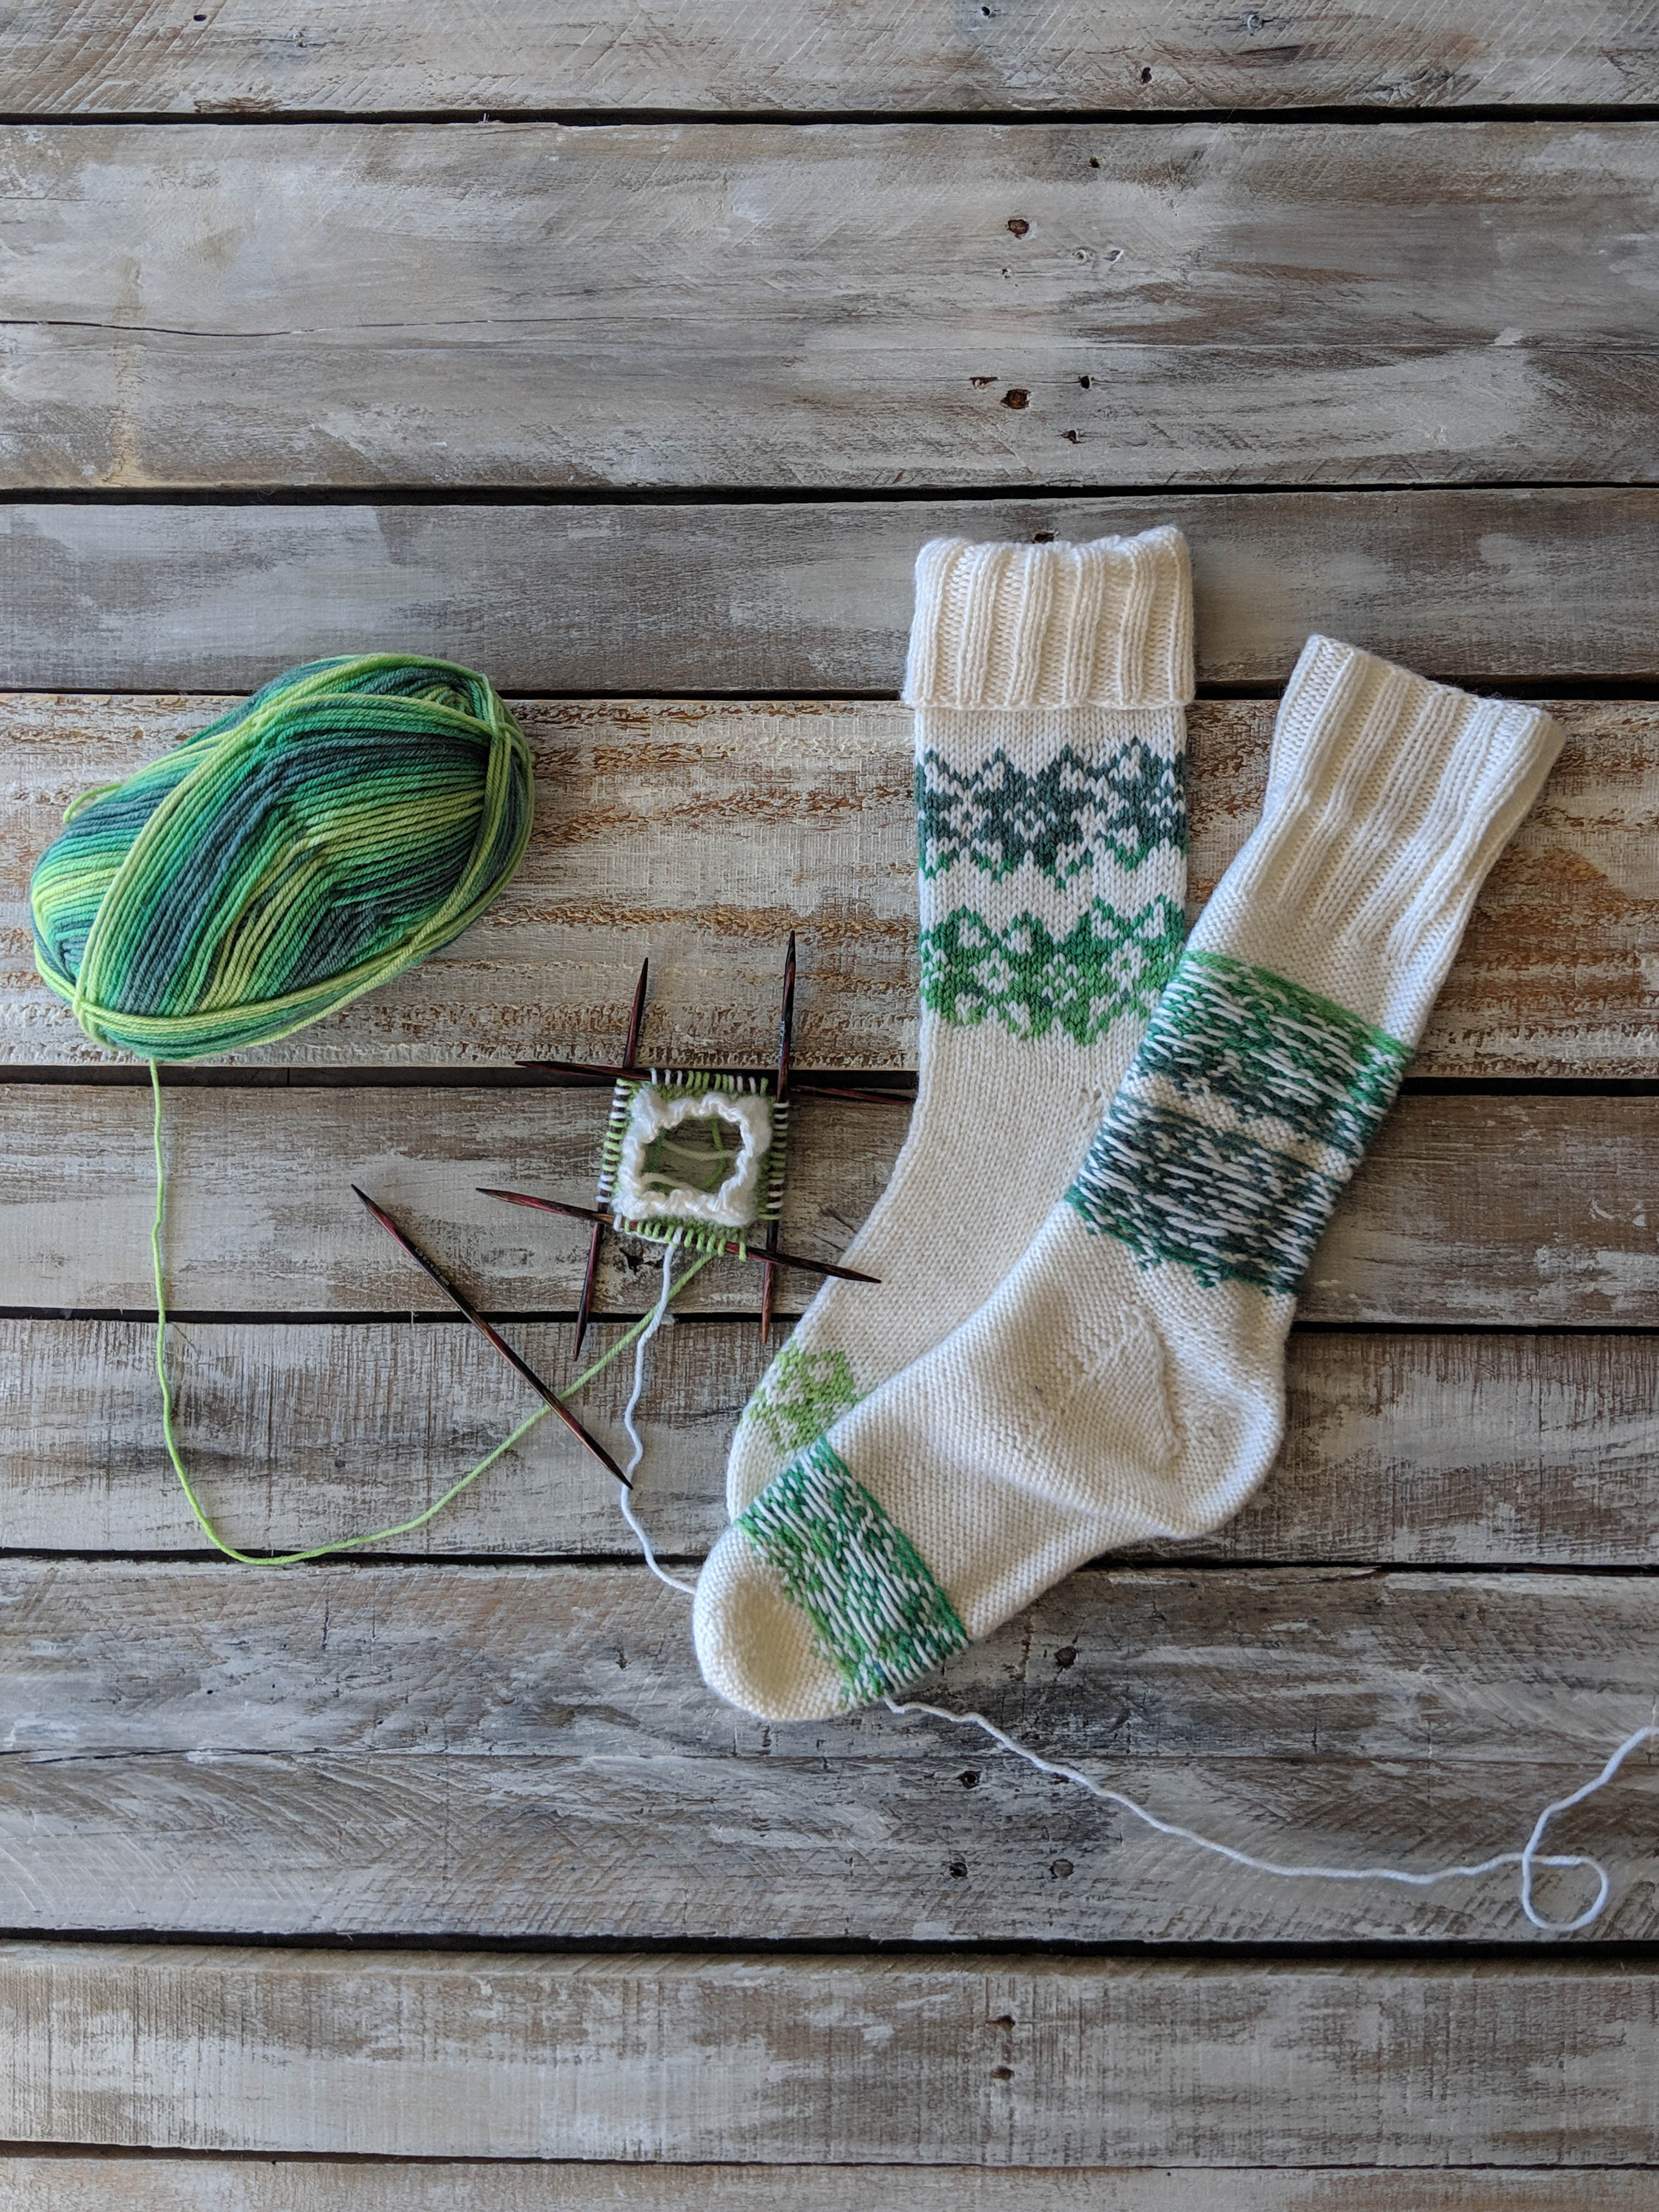
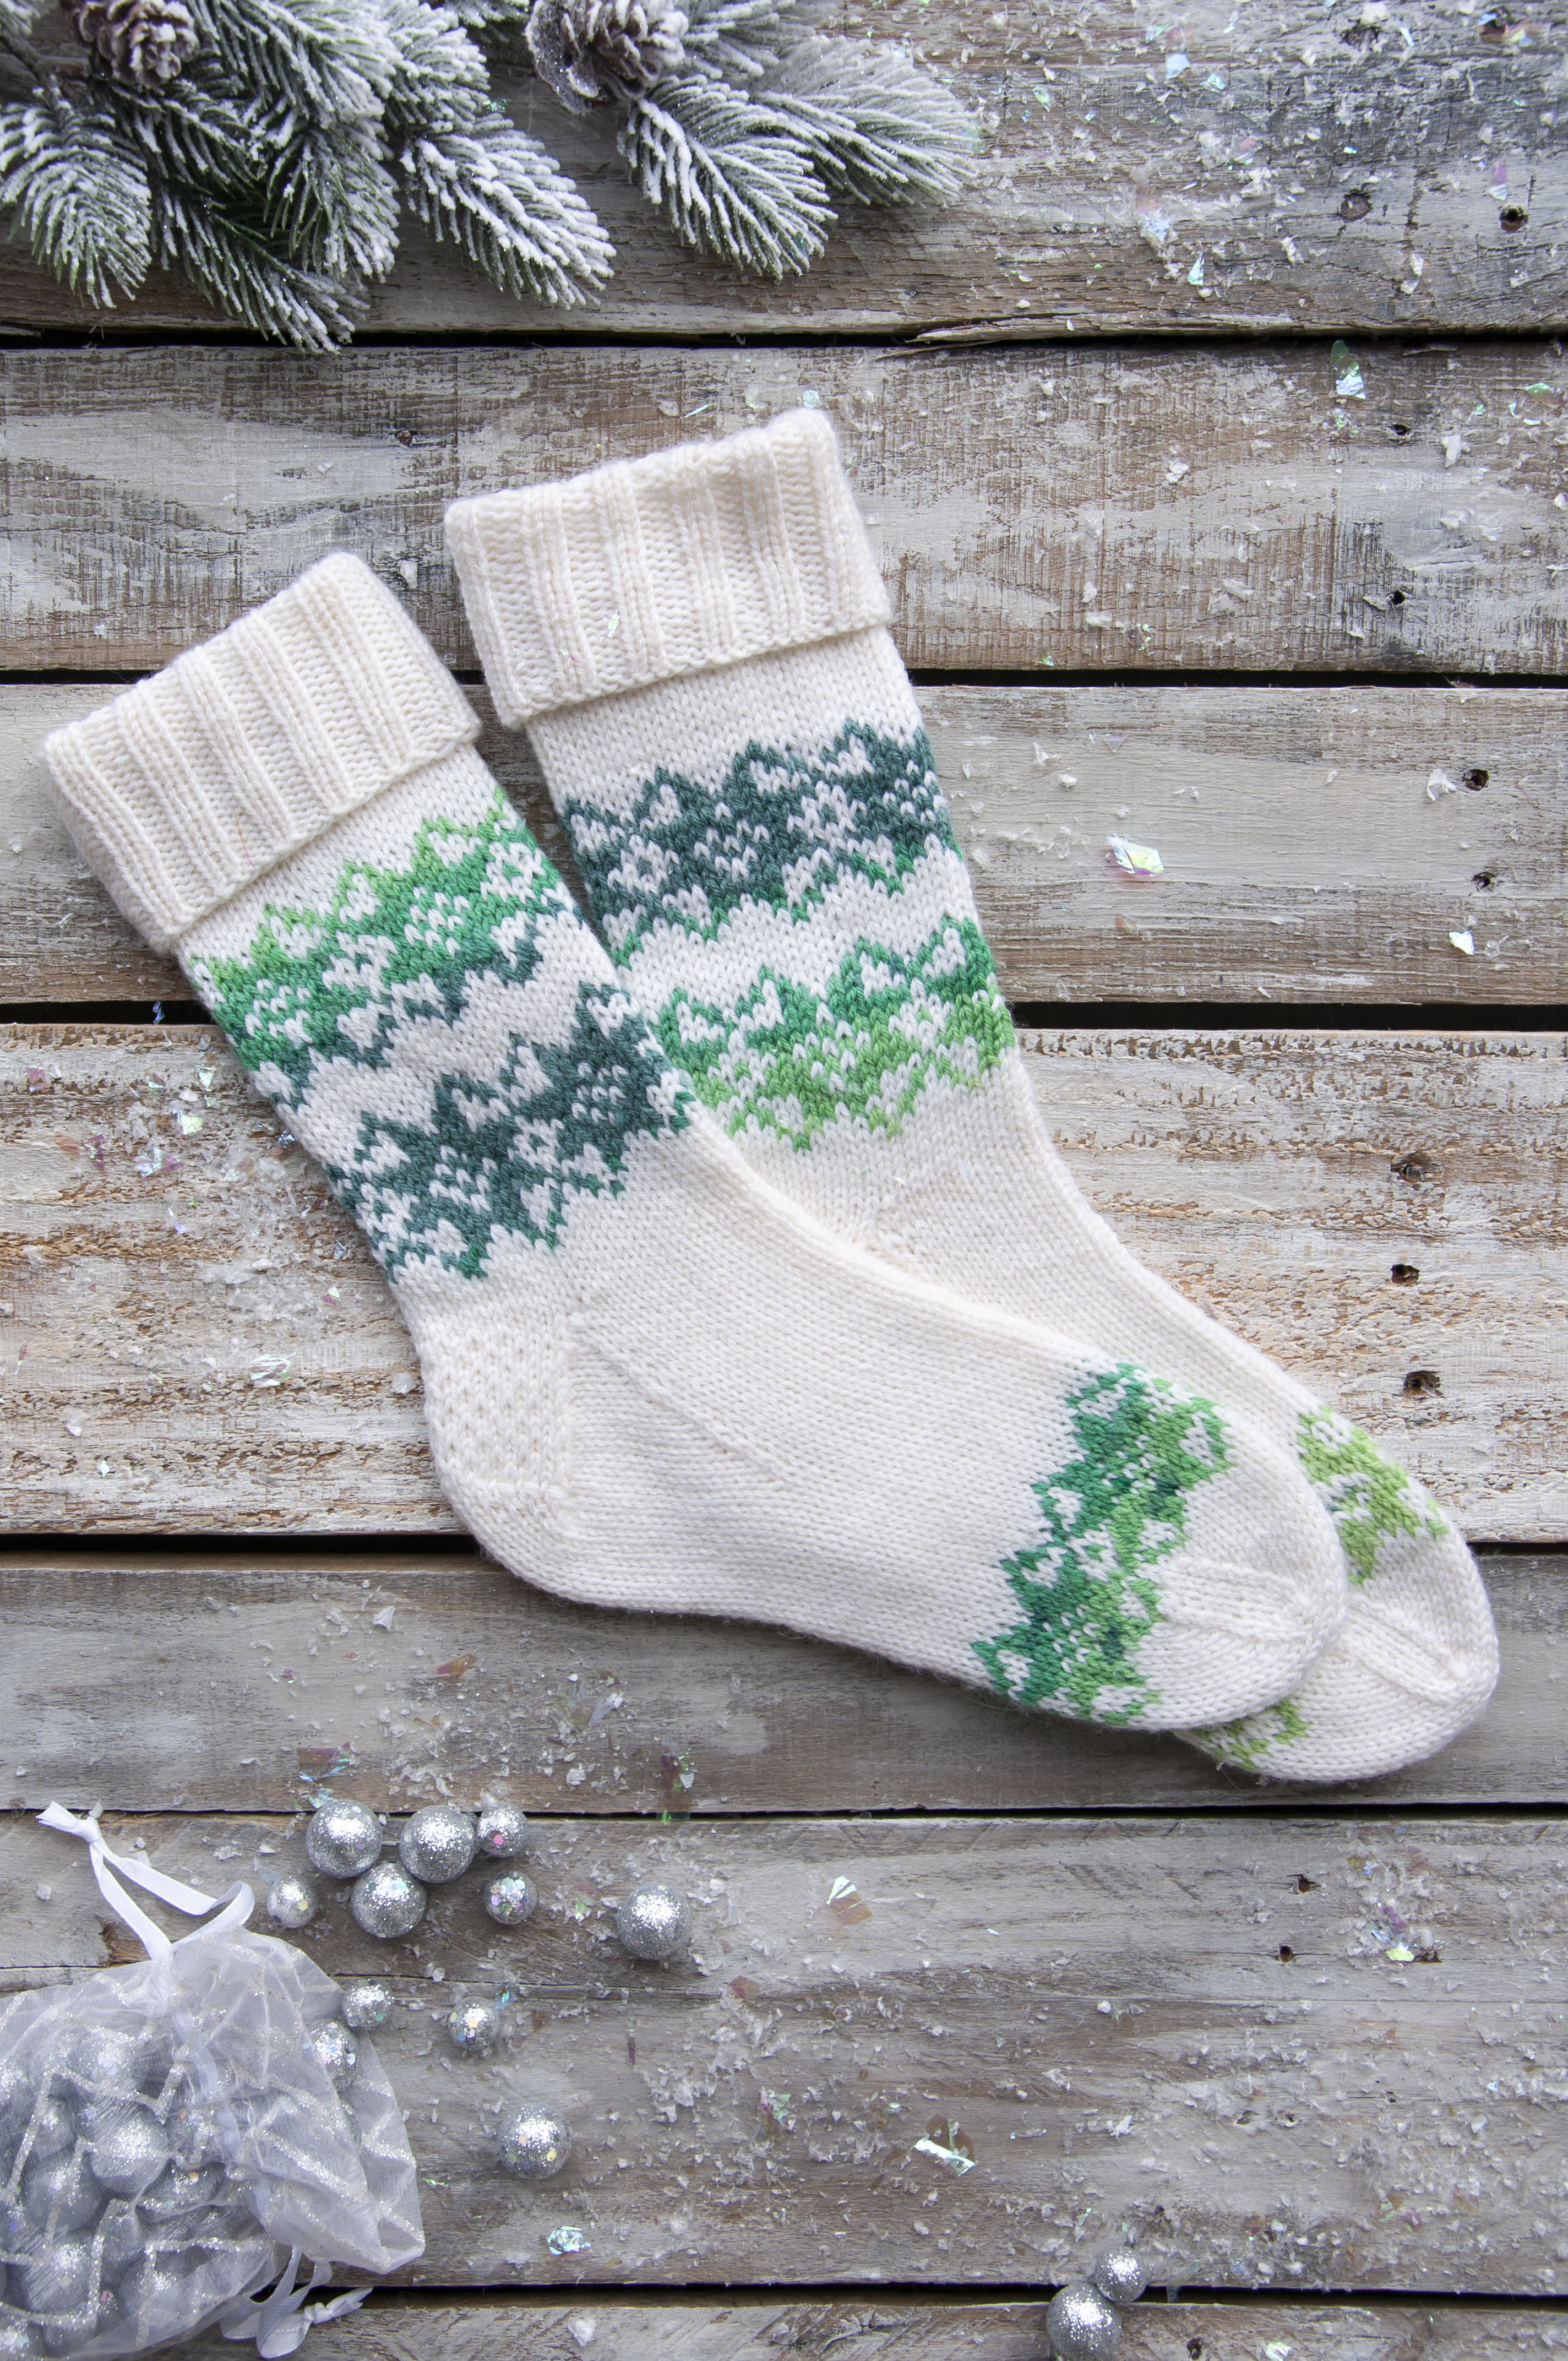
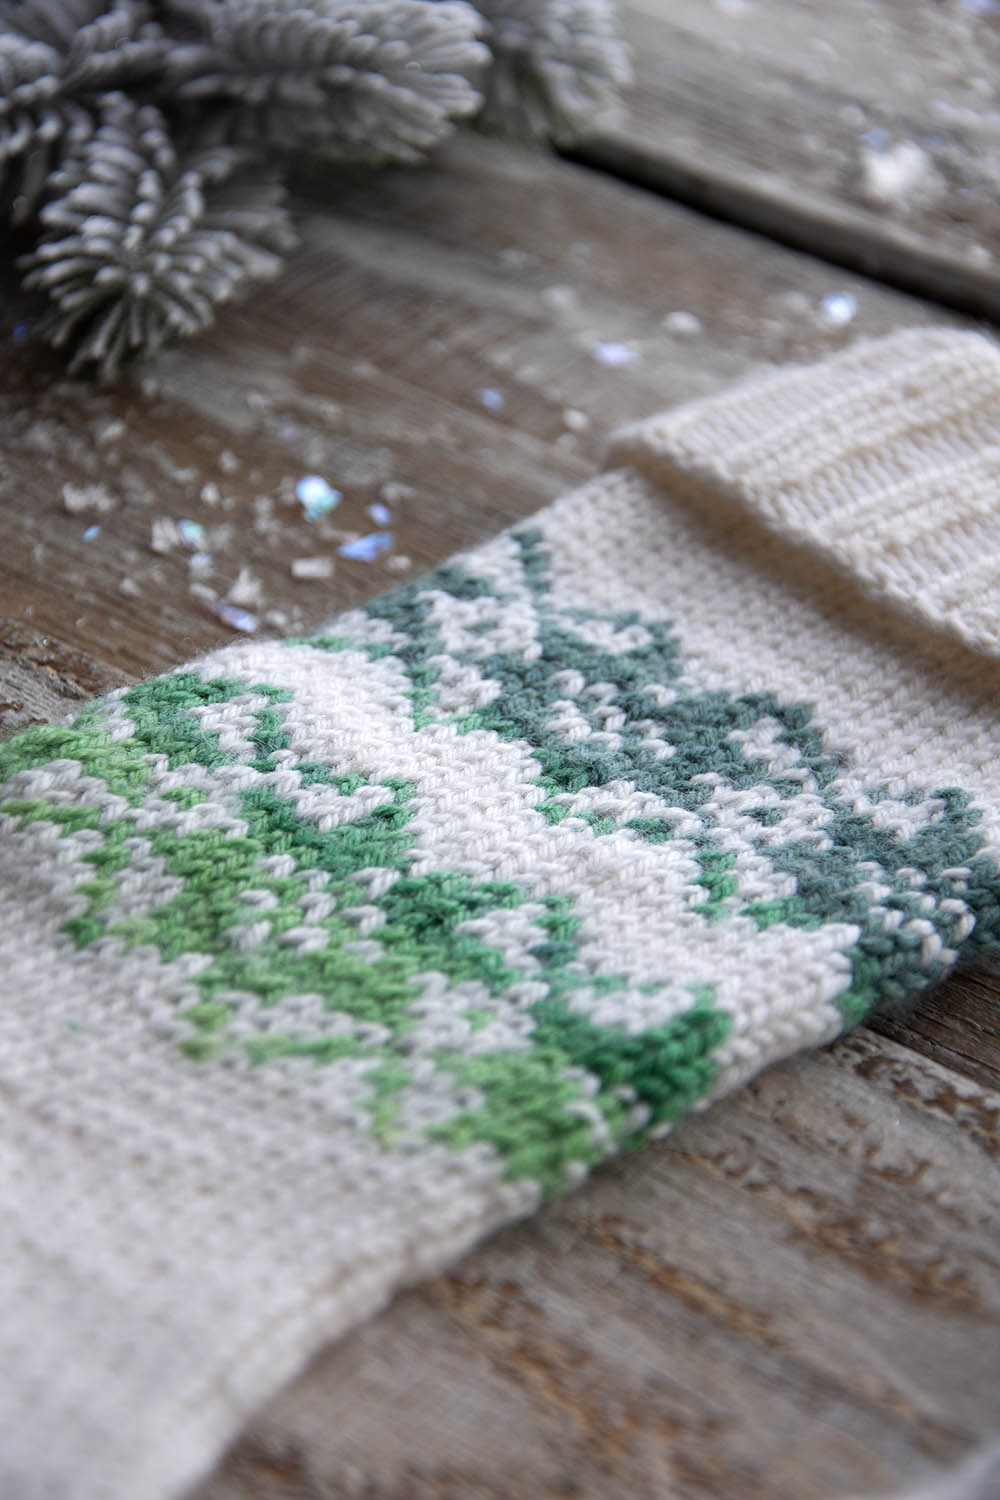
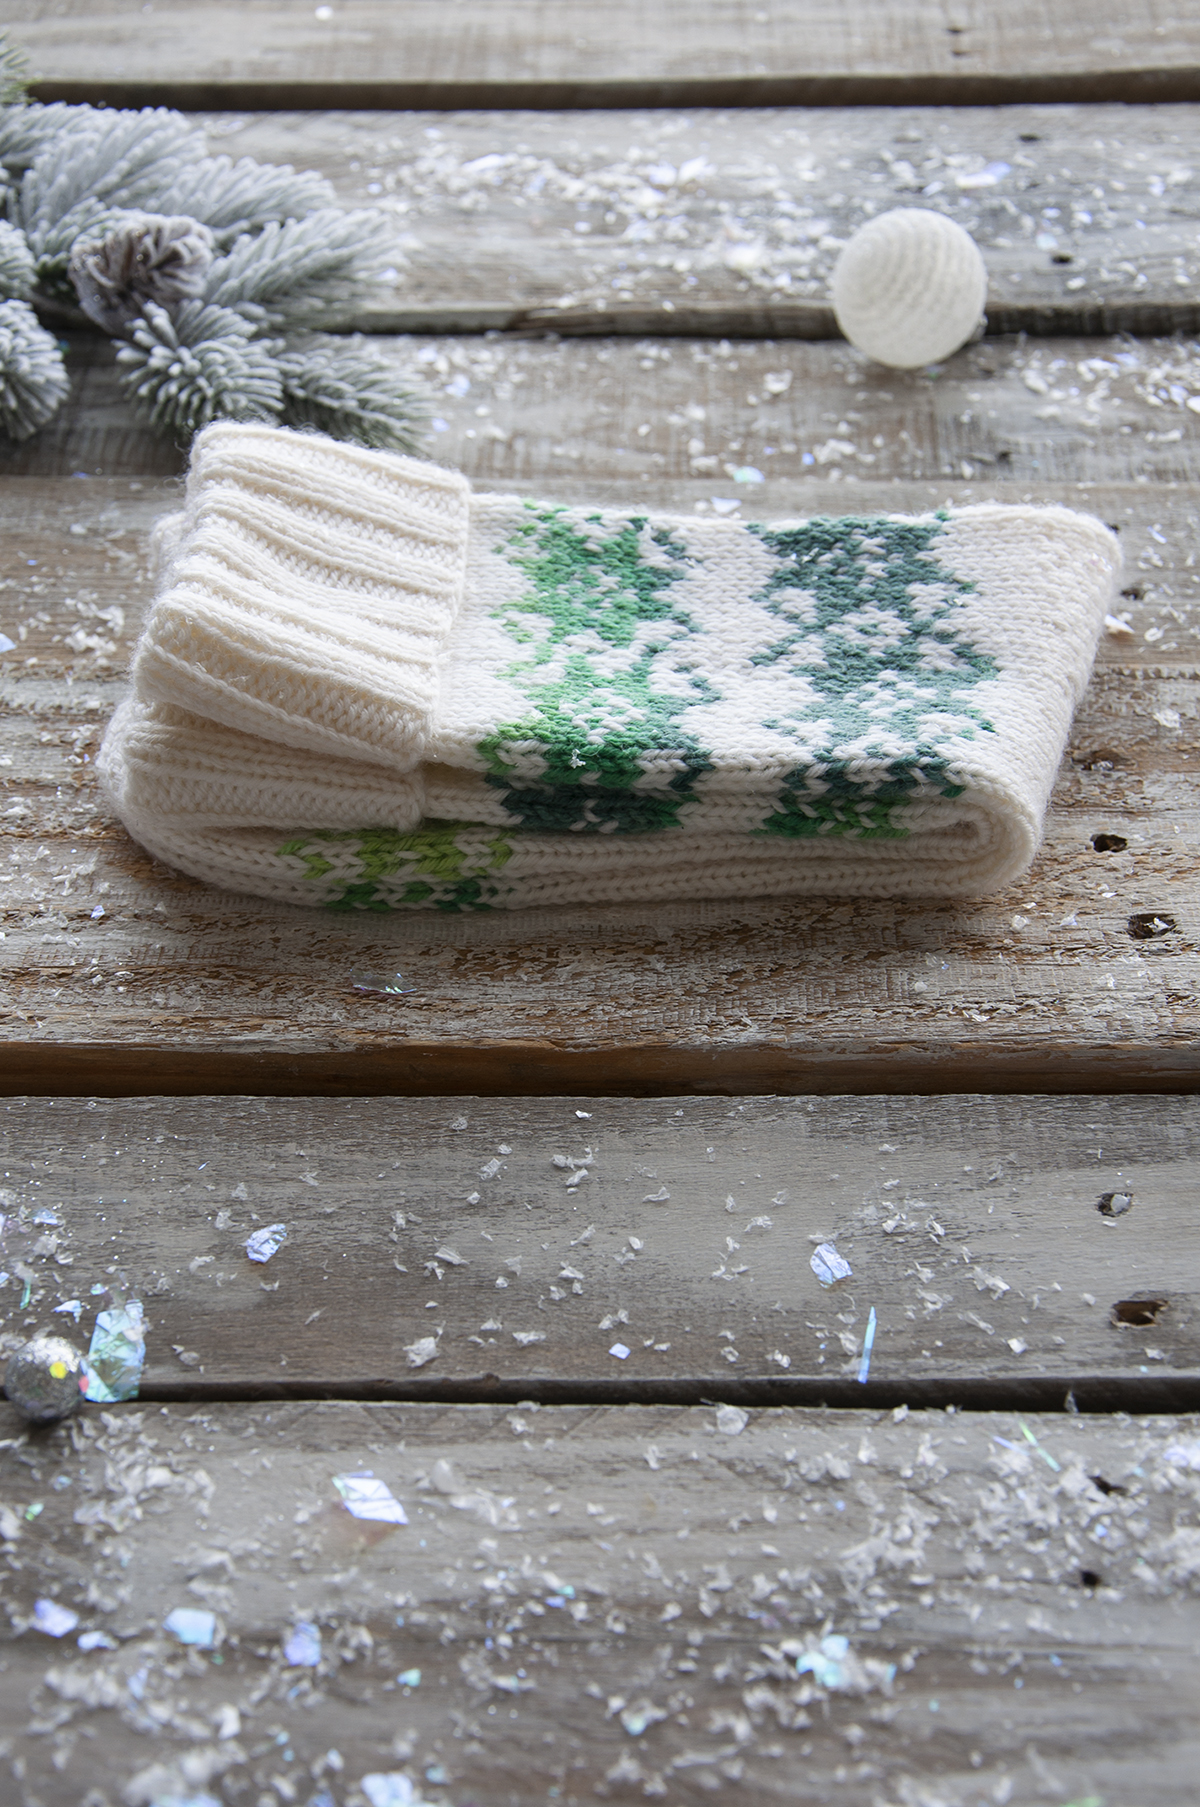
Last year we kicked off the collection with a pair of socks. This year we’re thrilled to do the same. For Day 1 of the collection, we have Mistletoes.

Universal Yarn Adore

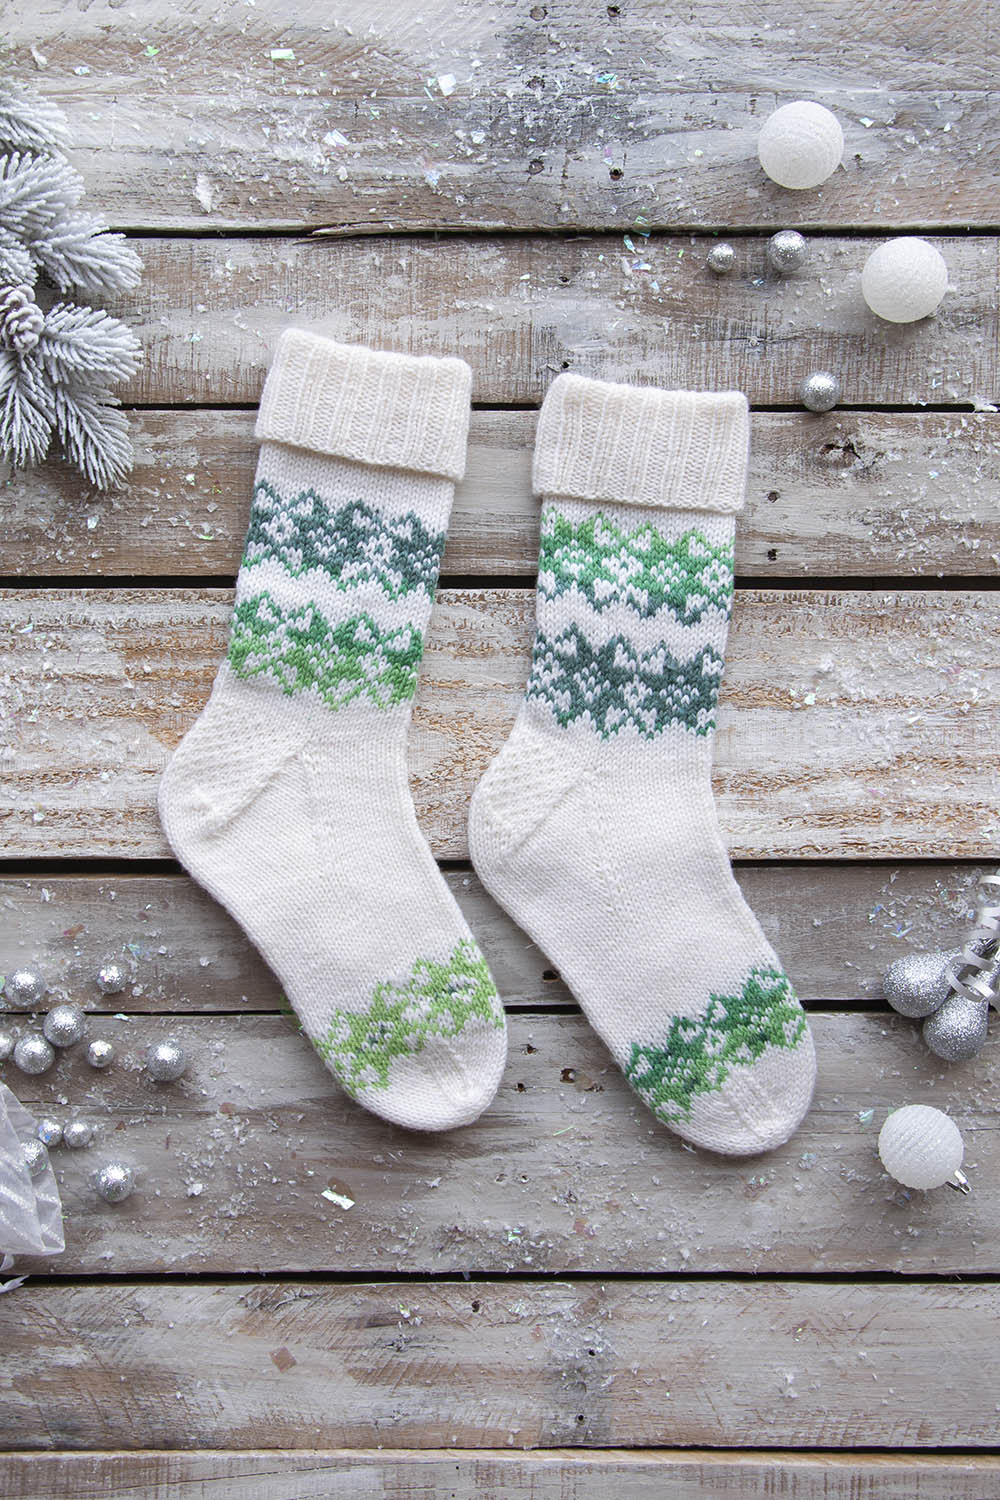
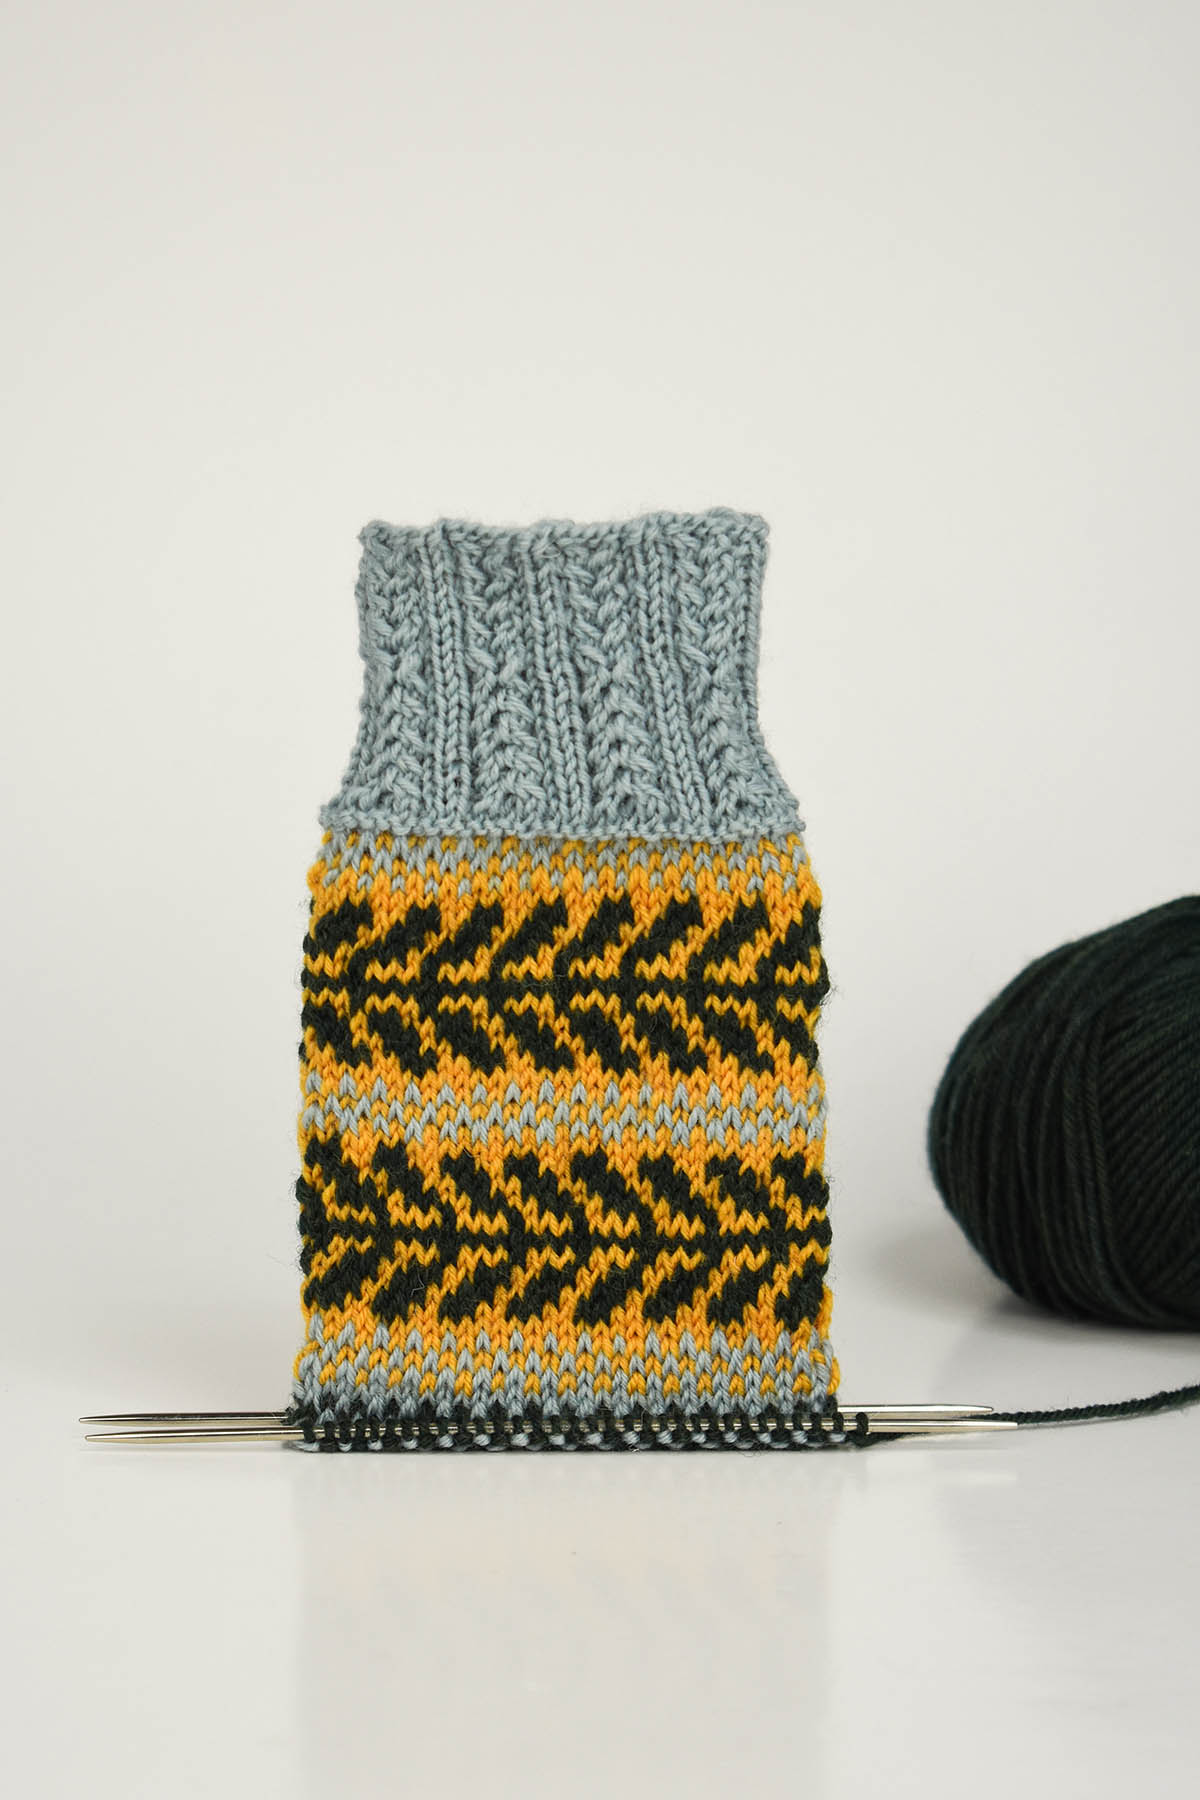
I’m a big fan of stranded colorwork. It may take a backseat to knitting cables, but for some reason, I simply cannot resist a good pair of colorwork socks. The Mistletoes socks combine self-striping Adore Colors and Adore for a visually striking effect.

Universal Yarn Adore Colors
Notice the changes in color for the colorwork portions. That effect is created by Adore Colors.

Despite the beauty of stranded colorwork, many knitters find themselves intimidated. Like everything else in knitting, once you’ve done it you realize how simple it really is. If you haven’t done colorwork before I want to empower you to get your feet wet – if you have, I want to encourage you to learn a bit more! Let’s get down to it! I’ve compiled a list of tips and tricks to help you along the way.

Get comfortable with charts.
This is something else that can intimidate knitters, but it’s essential for colorwork. I’d actually argue that colorwork is an excellent introduction to reading charts since you’re usually only looking at colors. Last year I included some tips and tricks for understanding charts. You can find the full post here (link). 

Manage your yarn.
Managing your yarn well when knitting colorwork can make the process so much more enjoyable. I recommend keeping each ball of yarn on a separate side to prevent unnecessary, annoying twists and tangles. 

Universal Yarn Adore Colors
Notice one ball is placed on the left and one is placed on the right. This prevents them from twisting around one another.

Taking care of tension.
This is probably the most important aspect of stranded knitting. To achieve the results you want, your tension should be even. Why? Floats. Since you’re carrying two strands of yarn across the back of your work, one of the yarns will always be “on hold” while you work stitches with the other color.

Universal Yarn Adore
The right and wrong sides of the work. Notice the floats of yarn on the wrong side. They’re quite pretty!

If your floats are too tight, the fabric will pucker. Puckered fabric is considerably less elastic and will appear a bit bumpy – taking away from the beautiful patterning you worked so hard on. Not to worry, though! There are ways to ensure that your floats are even and not too tight. I’m personally a pretty tight knitter, so I use these techniques, too.

Use larger needles. First things first: swatch, swatch, swatch! Once you do, you’ll realize that your gauge in stockinette stitch is different than your gauge in stranded knitting. To combat the difference, changing needles helps a lot. Expect to use needles that are one to two sizes larger for stranded portions of your knitting. Most patterns, including the Mistletoes, will direct you to do this. However; that’s not always the case. Keep this in mind whenever you’re knitting colorwork.

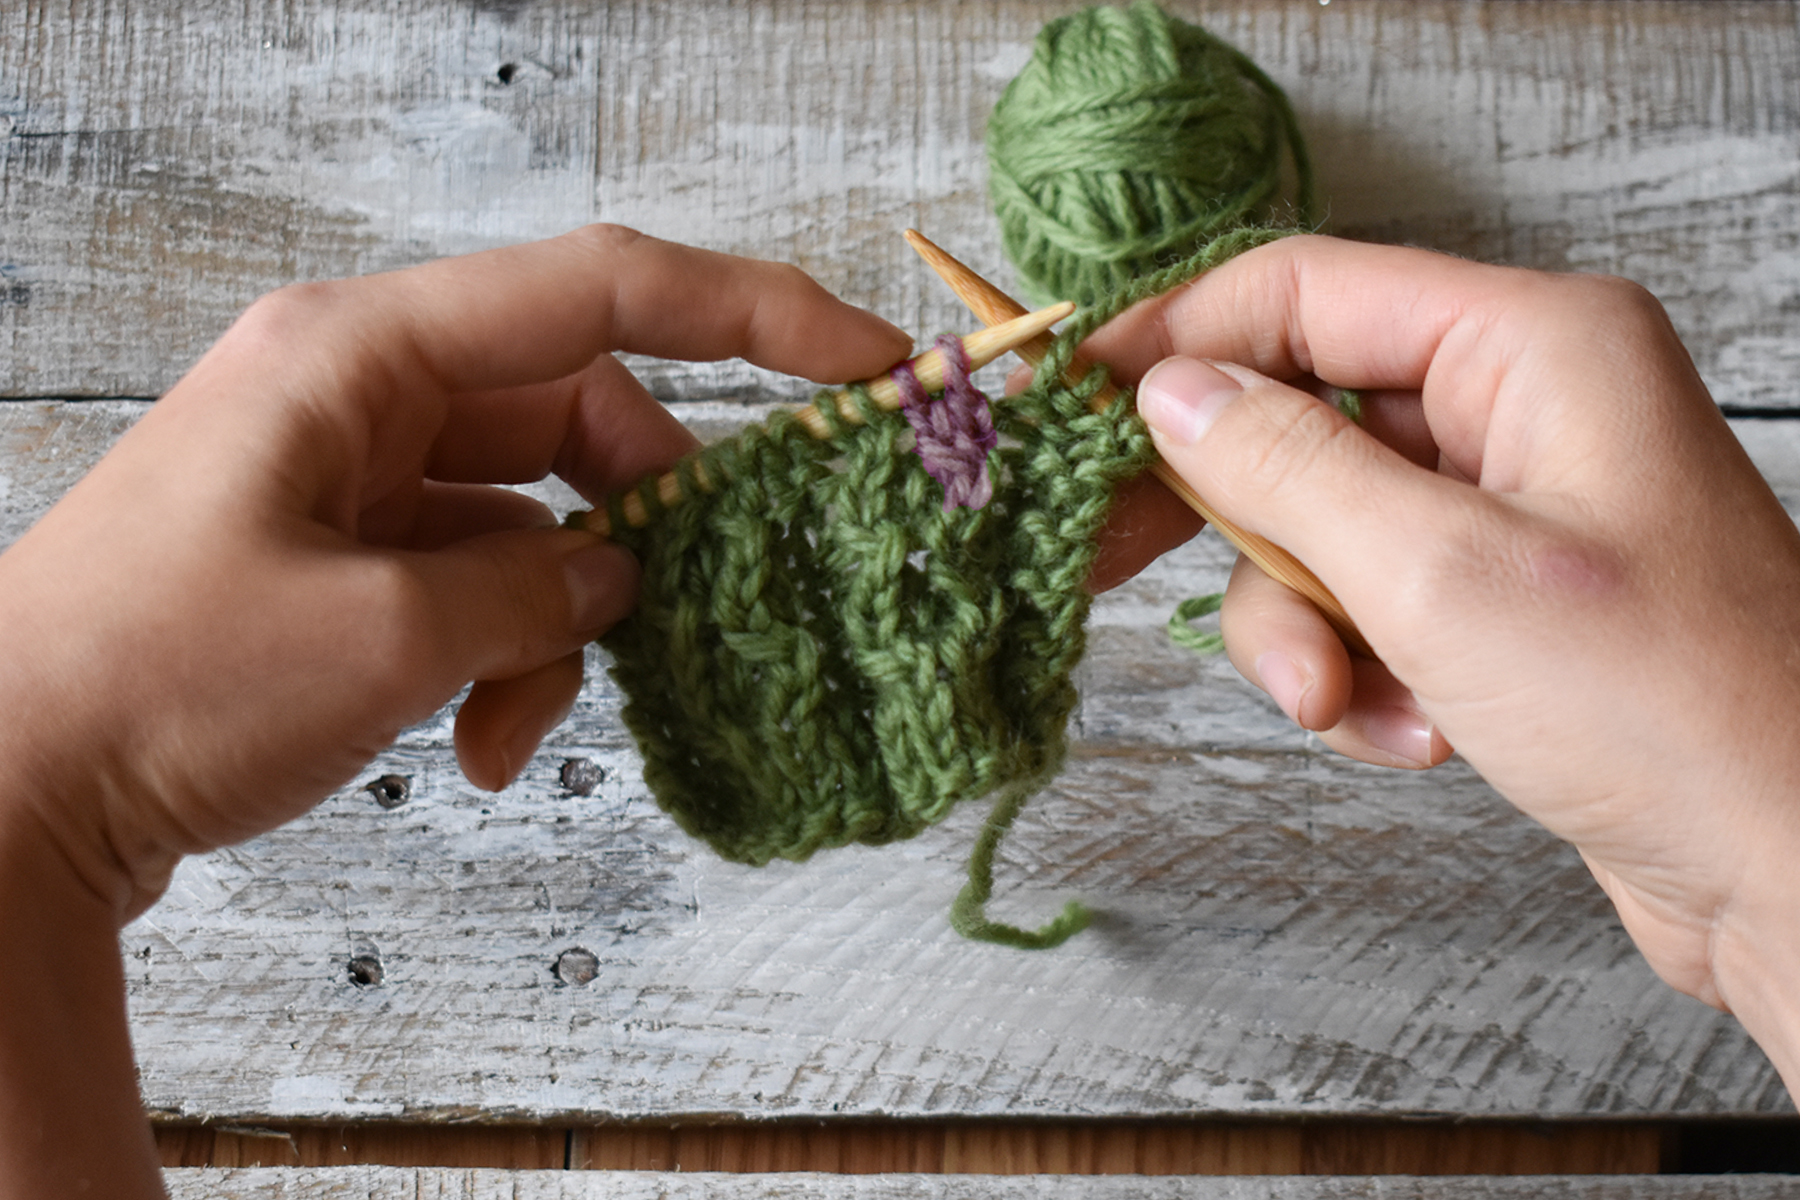
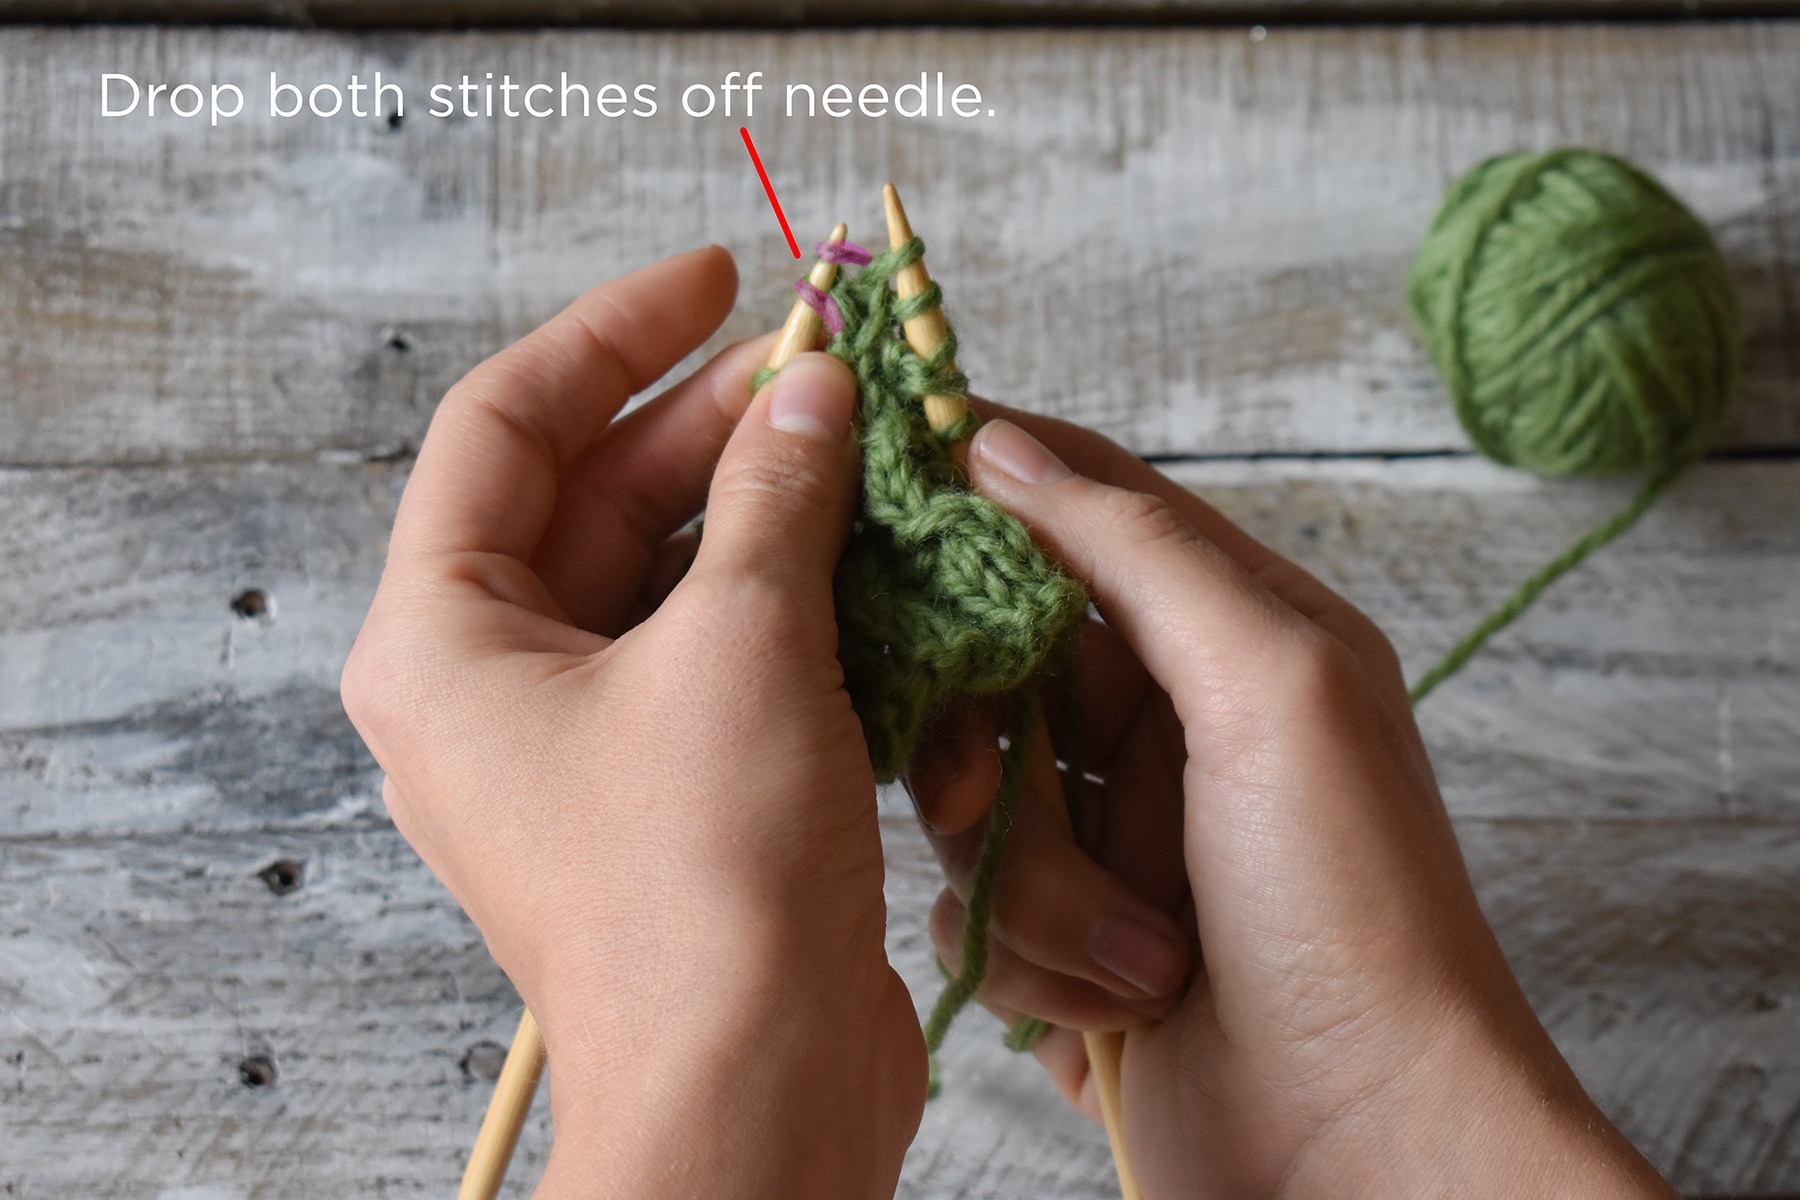
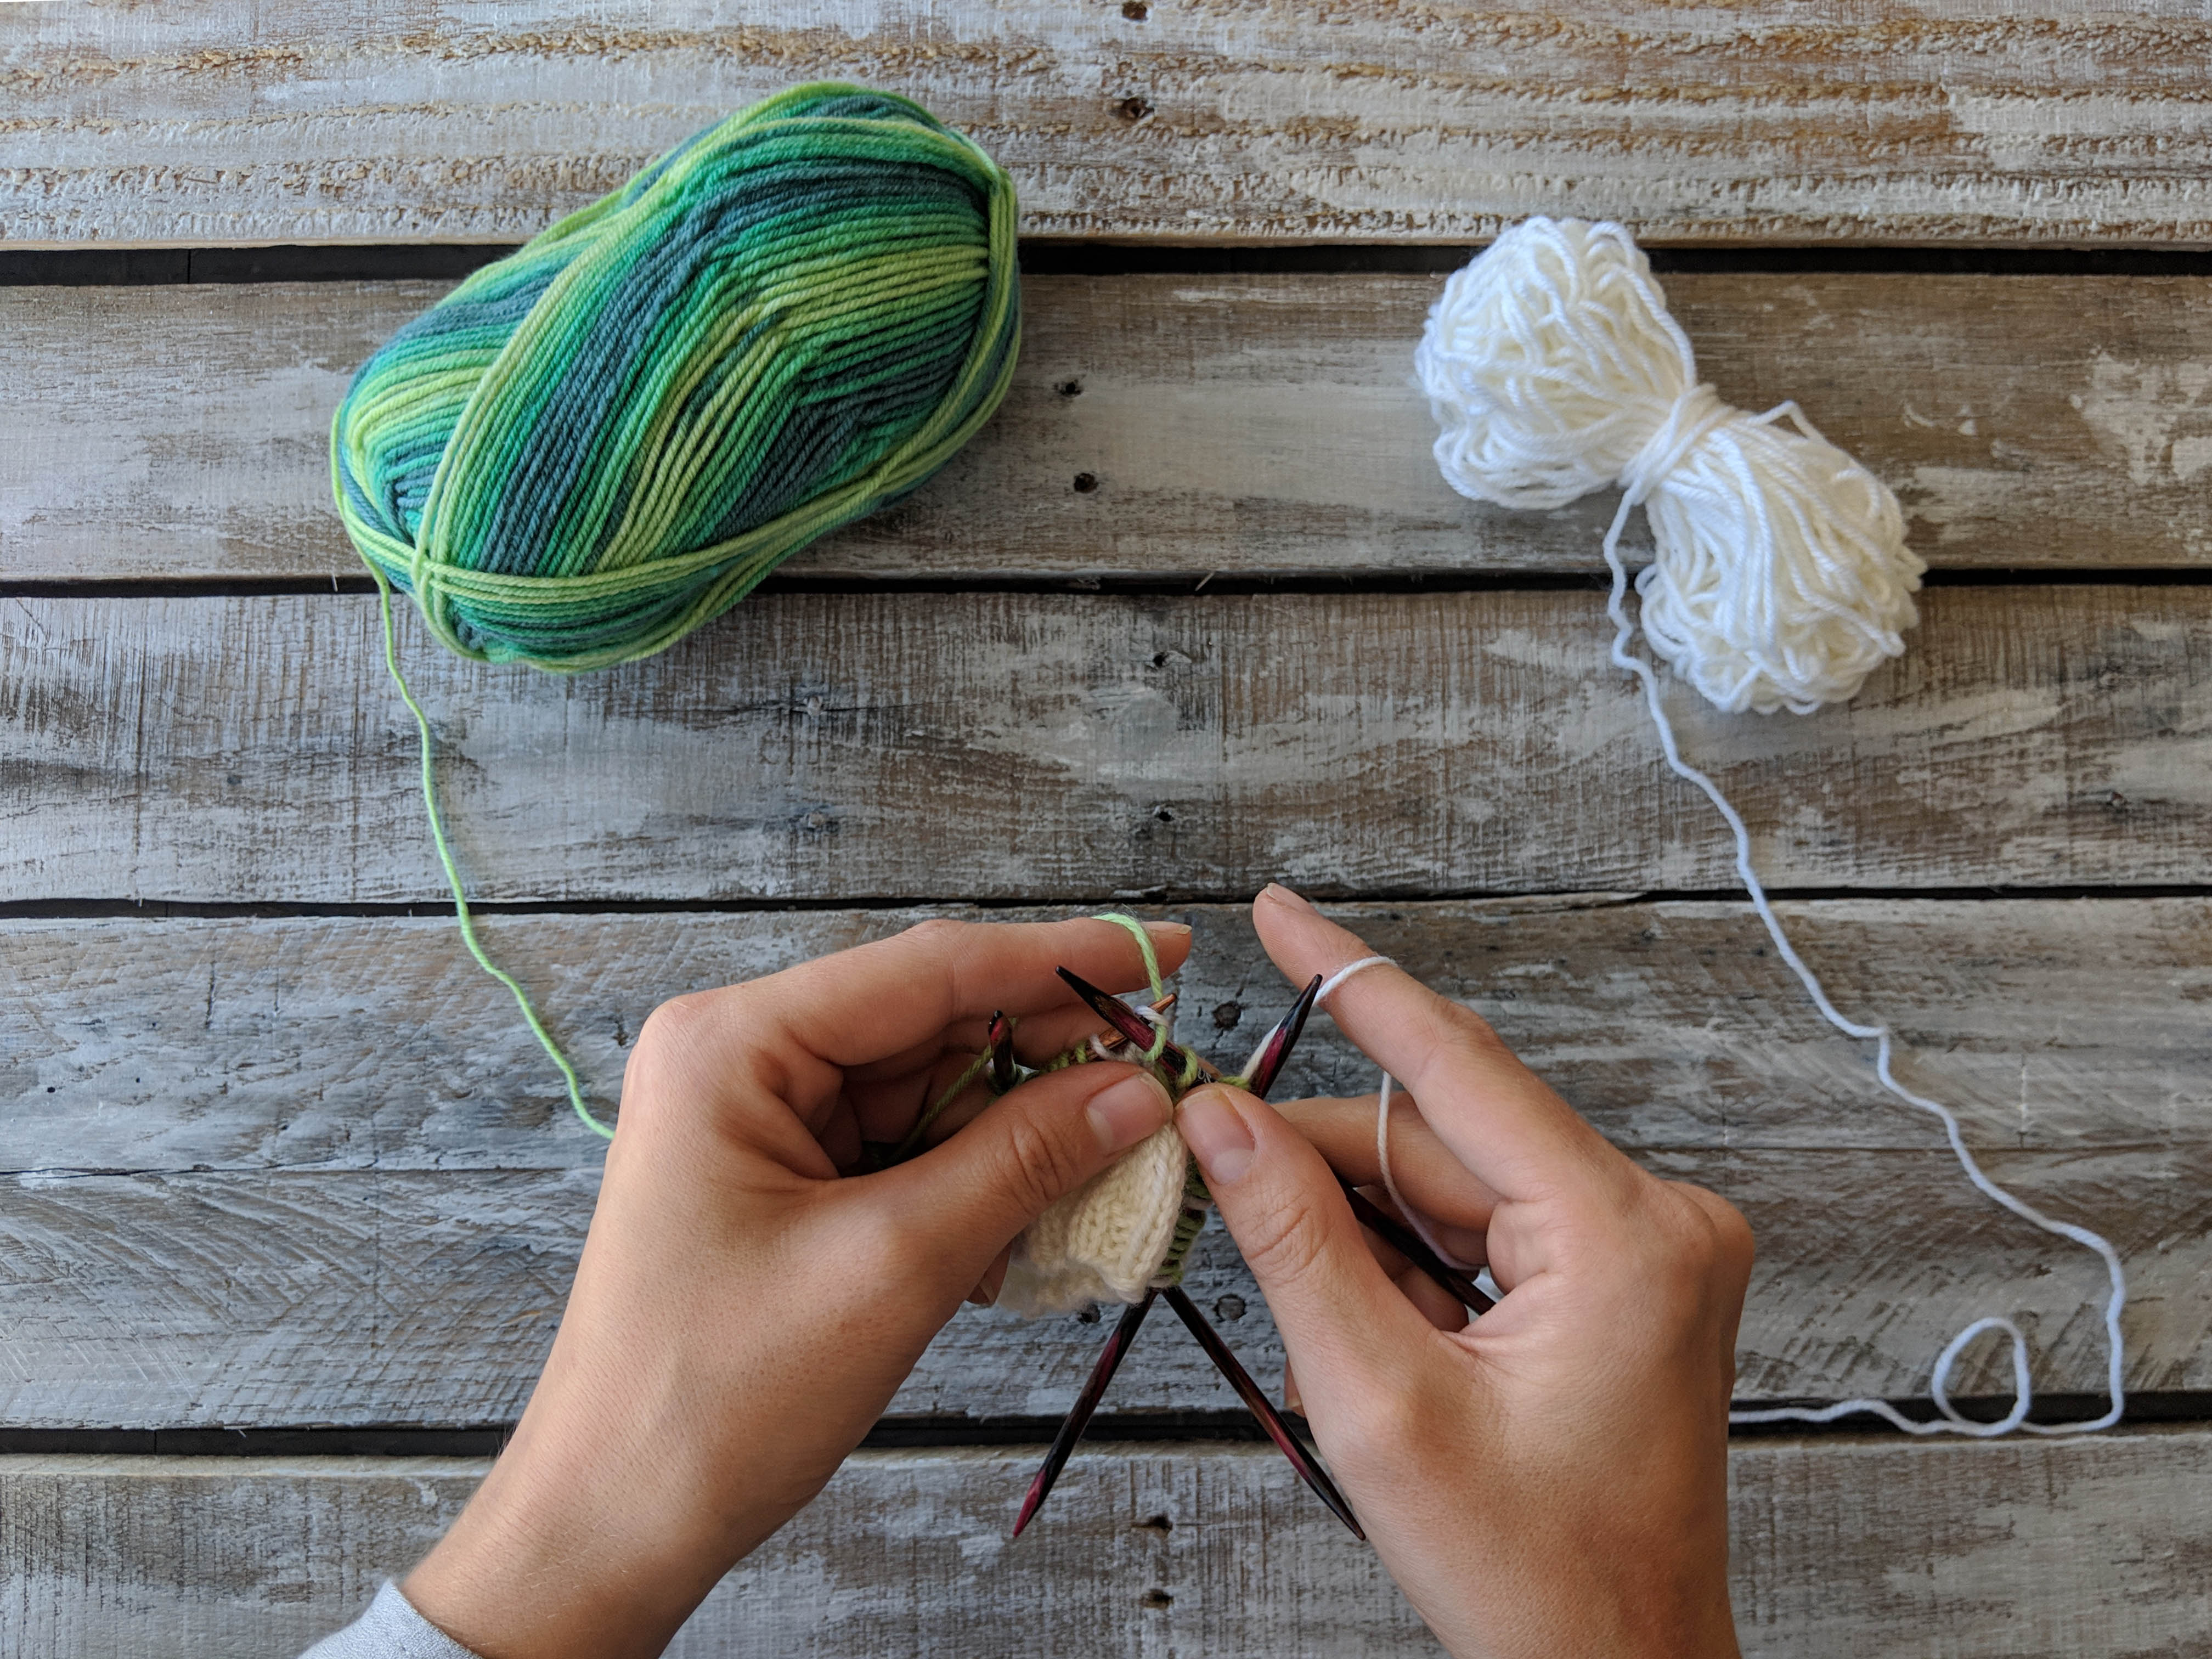
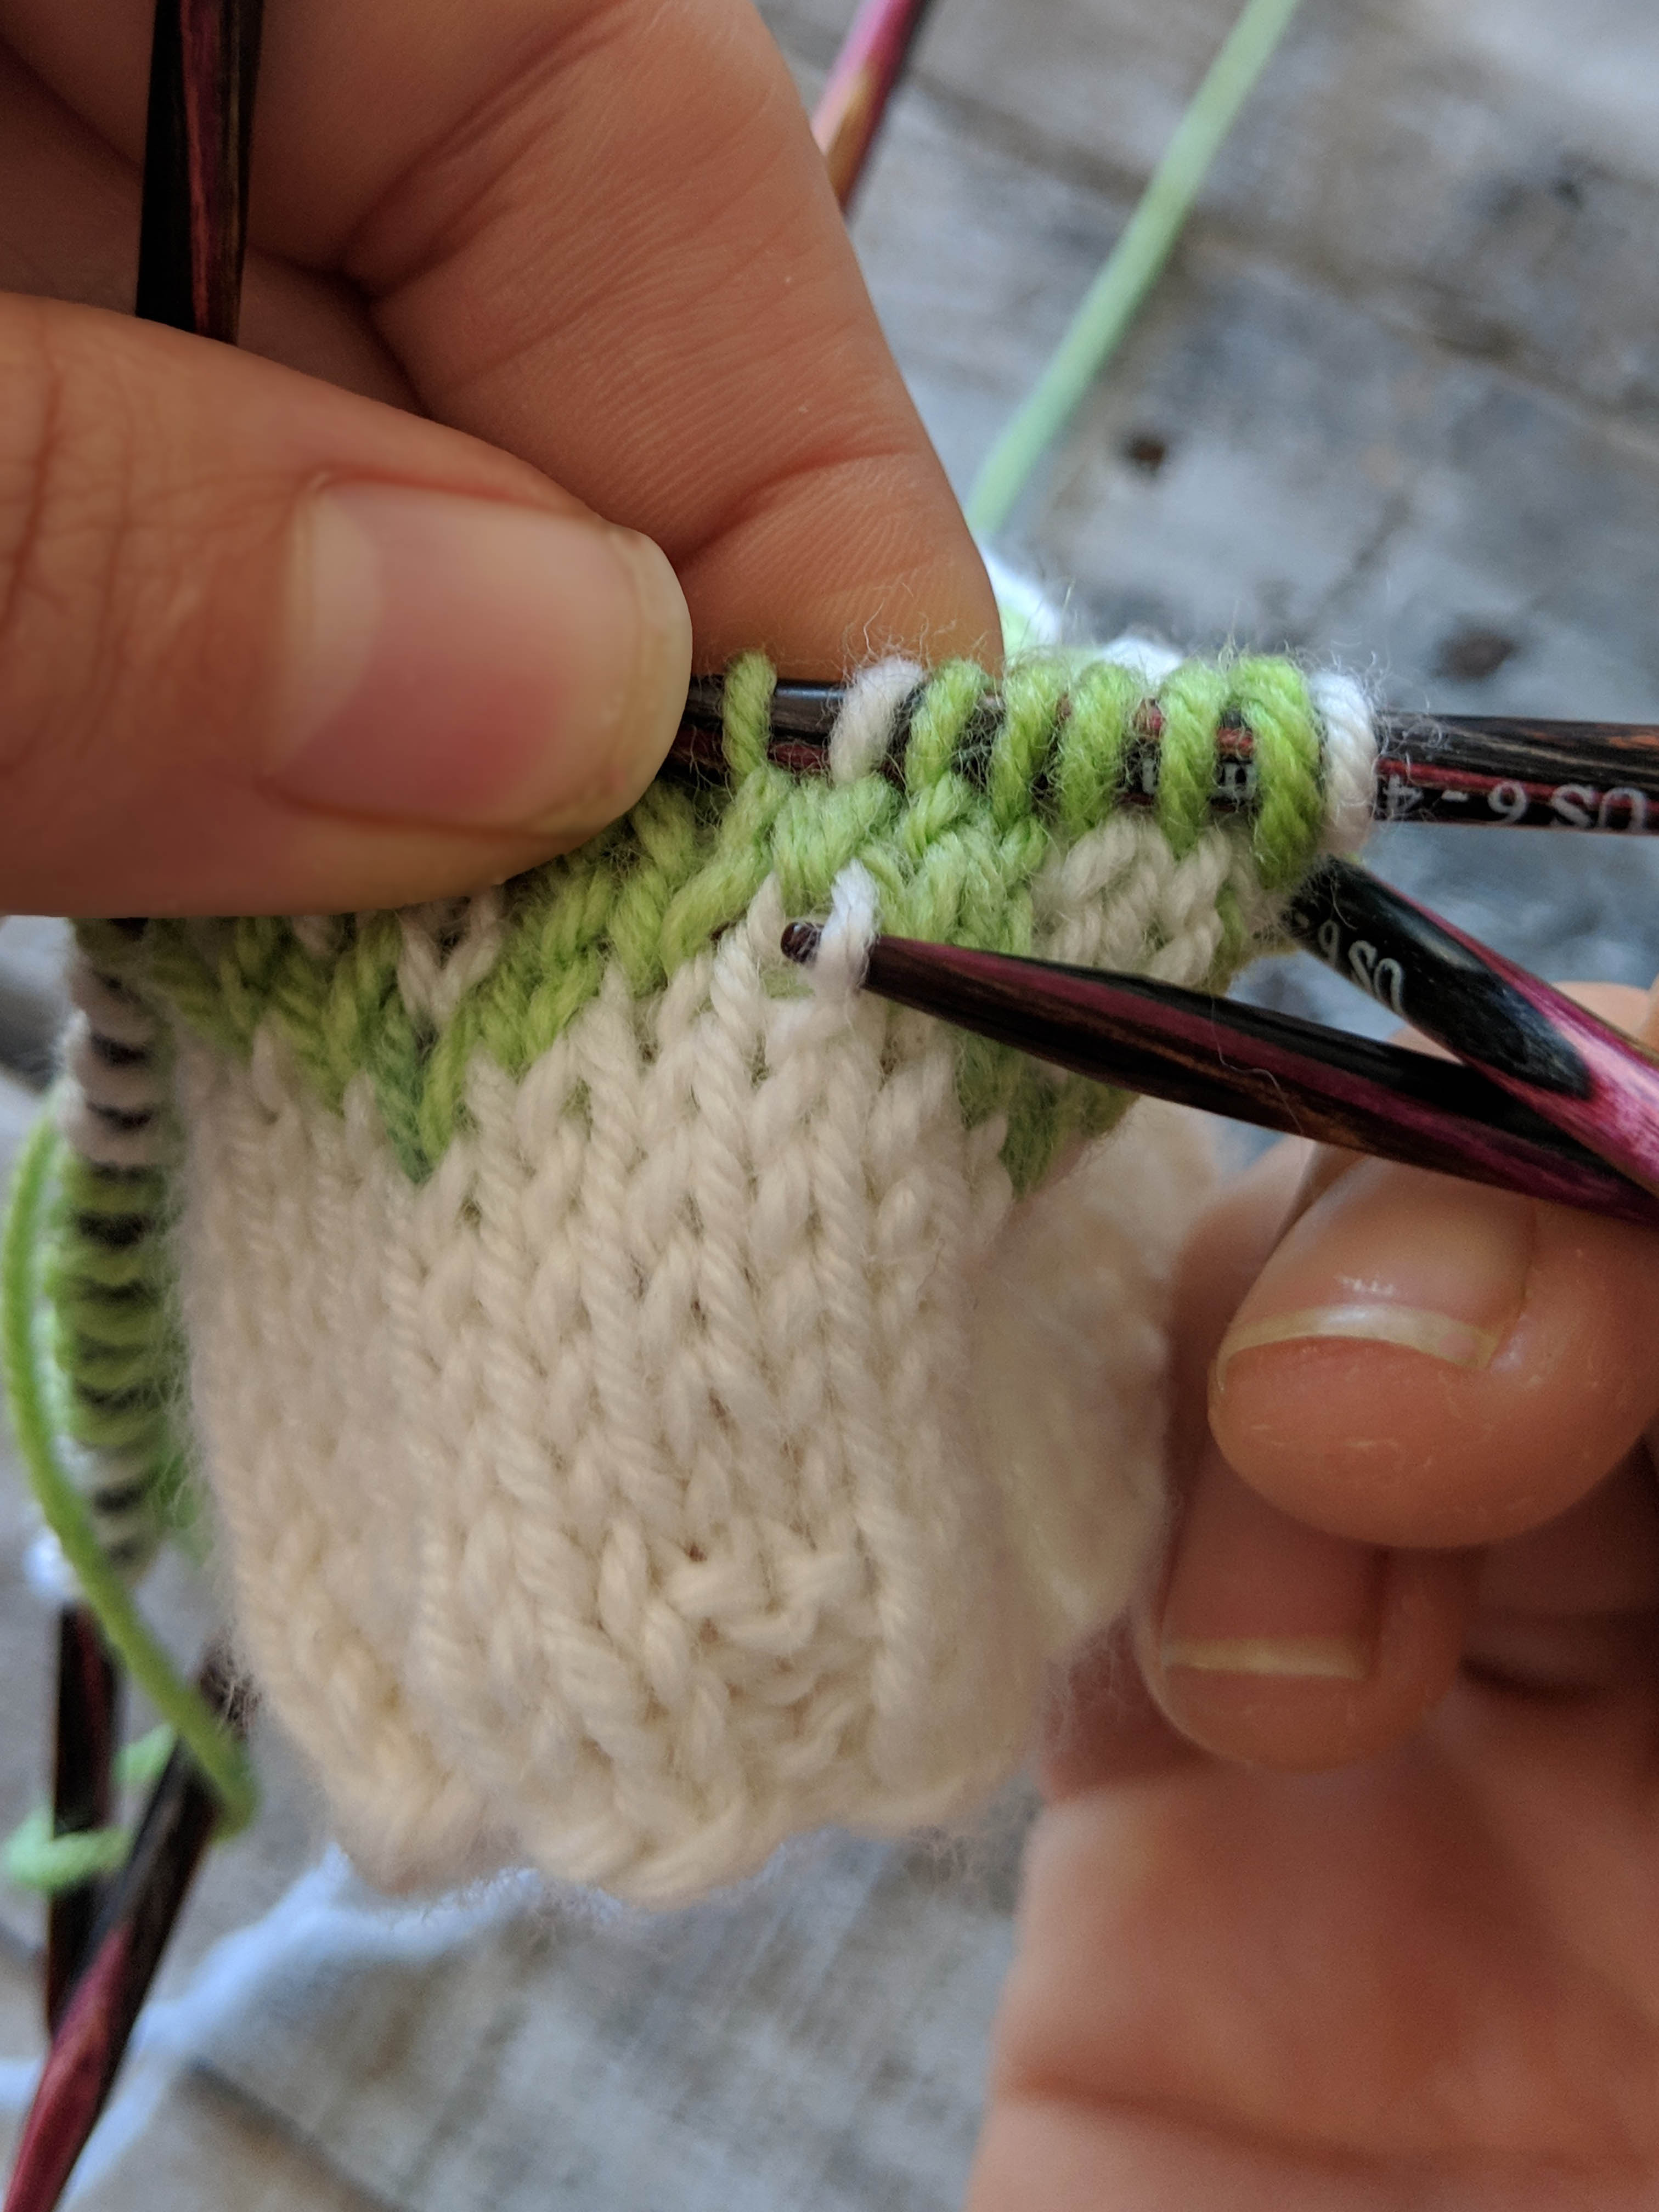
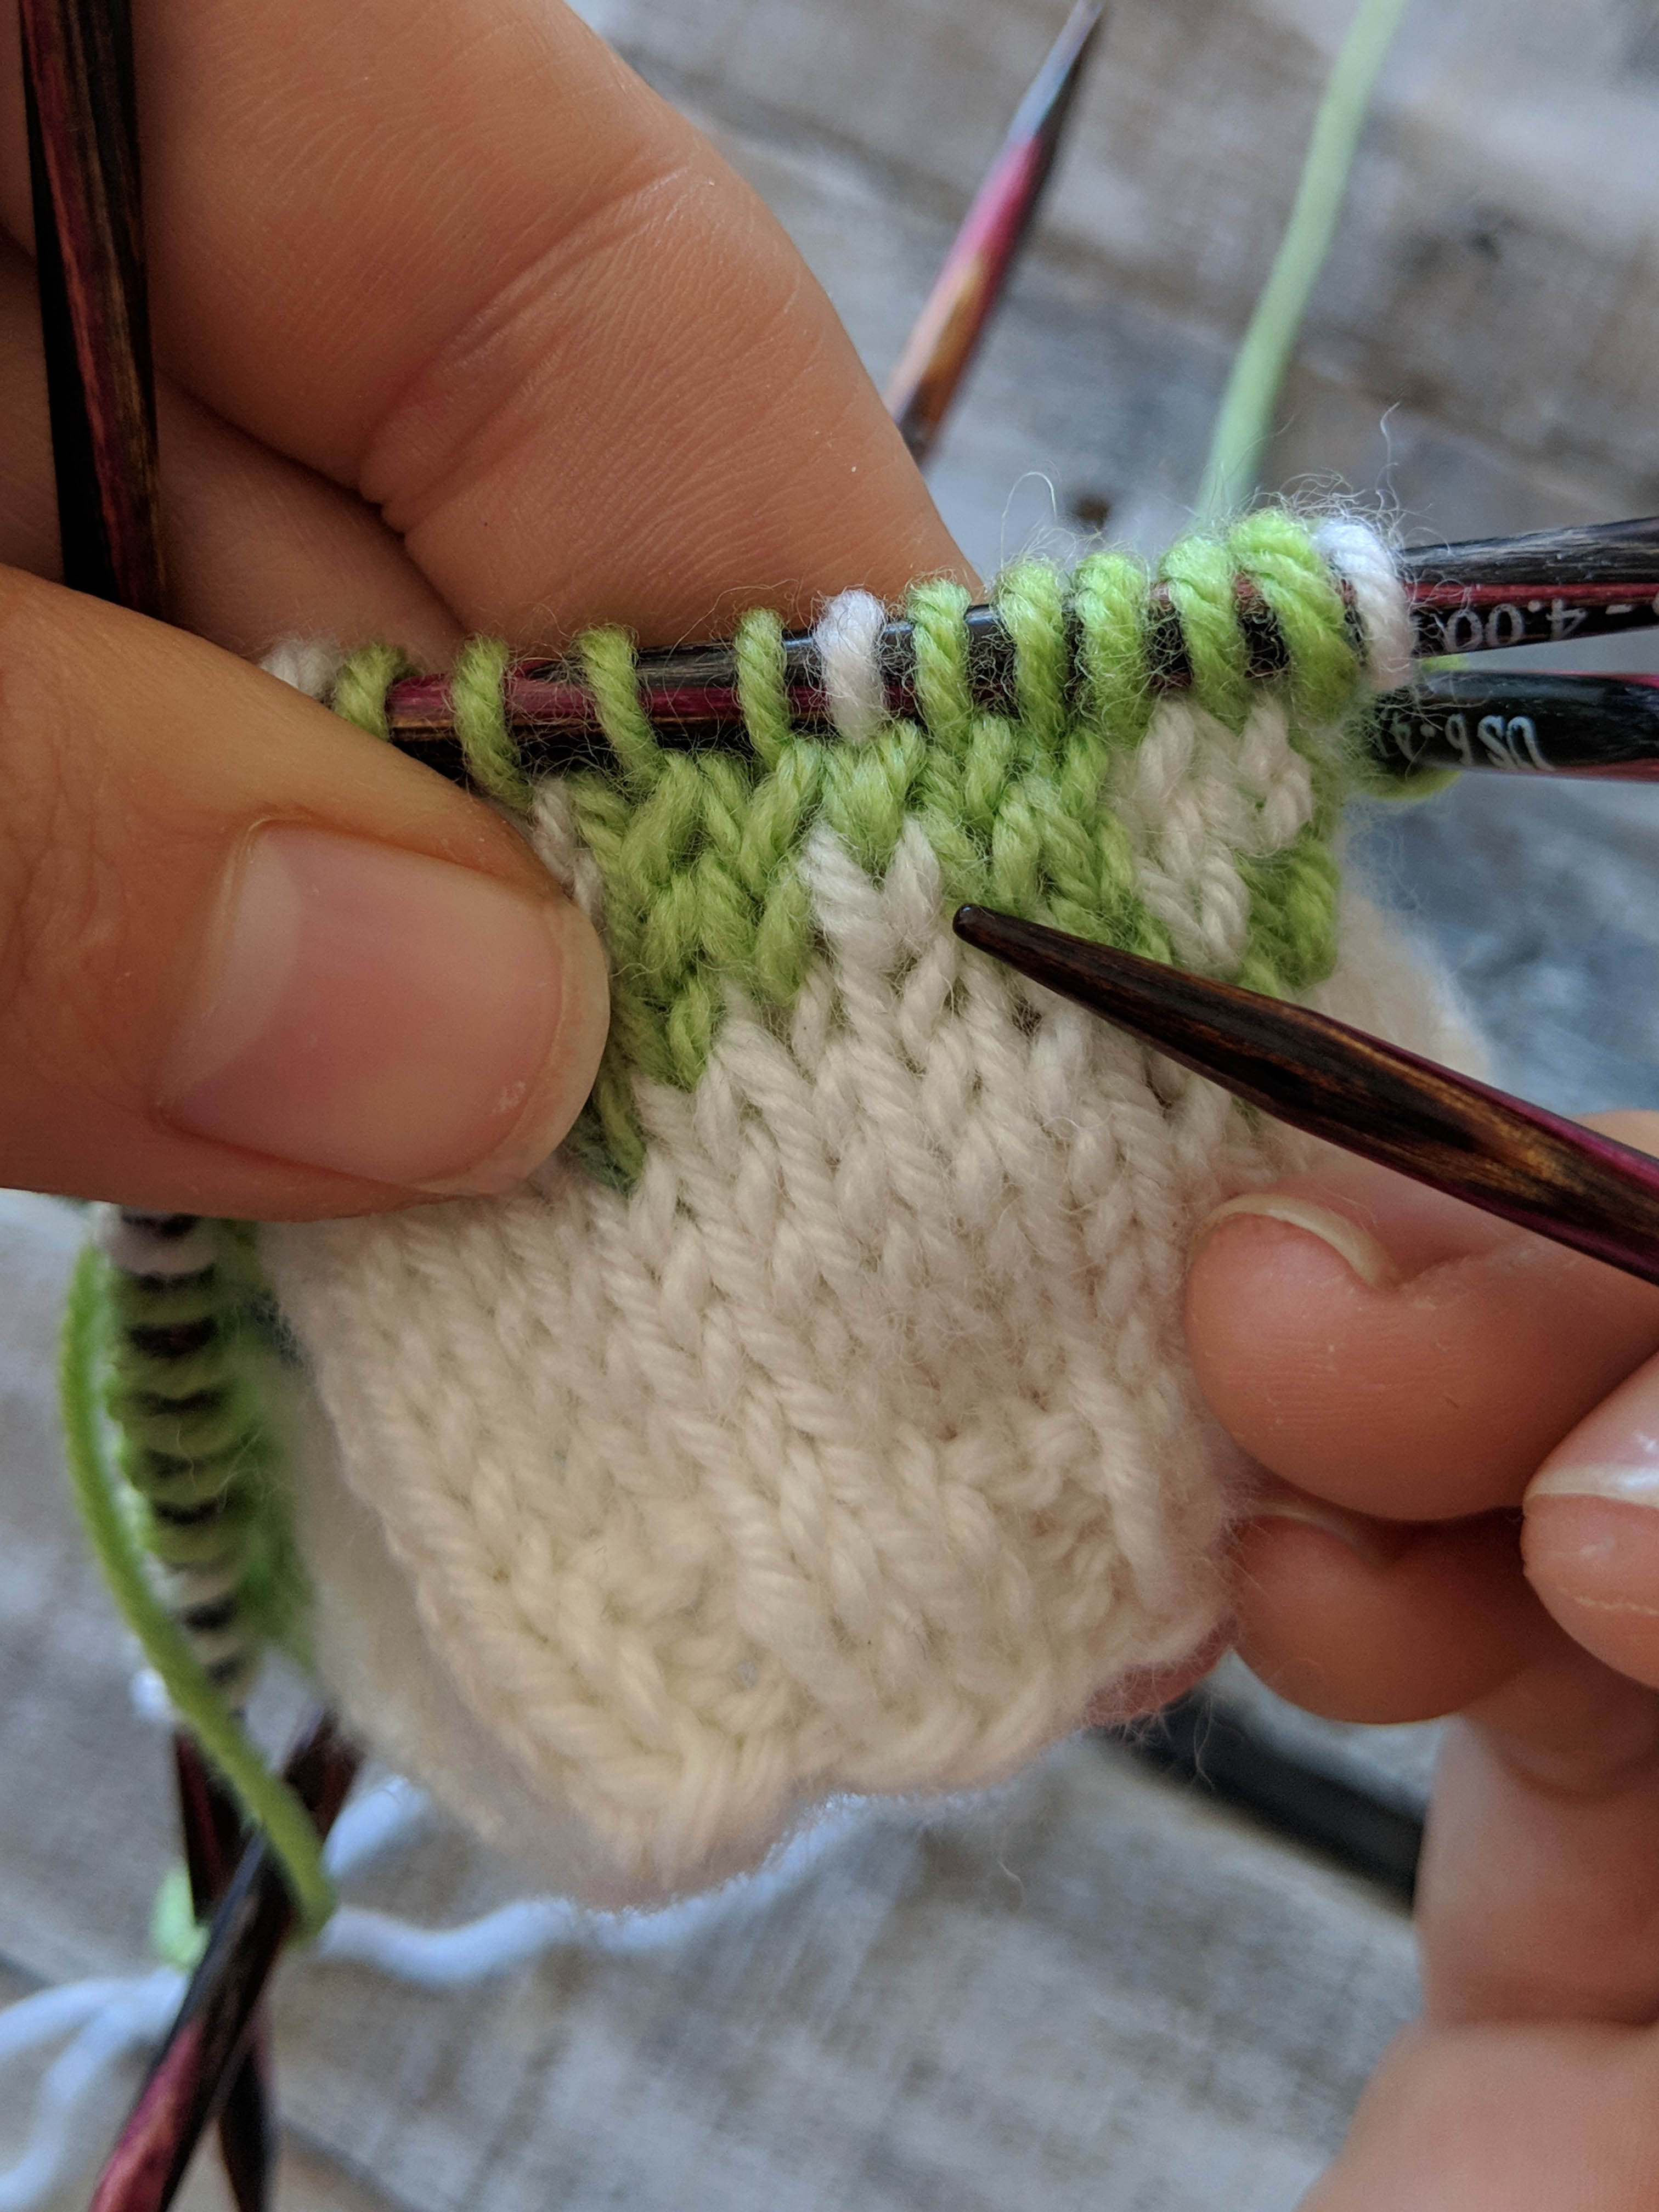
Turn your work inside-out. This is exactly what it sounds like. By turning your work inside-out, your floats will be facing you while you’re knitting. It doesn’t change the actual knitting at all, but it’s a simple way to manage your floats. By carrying your floats on the outside, you’re allowing them a bit more room. This trick is simple, easy, and effective.

Universal Yarn Adore Colors
Notice the right side is on the inside of the round.

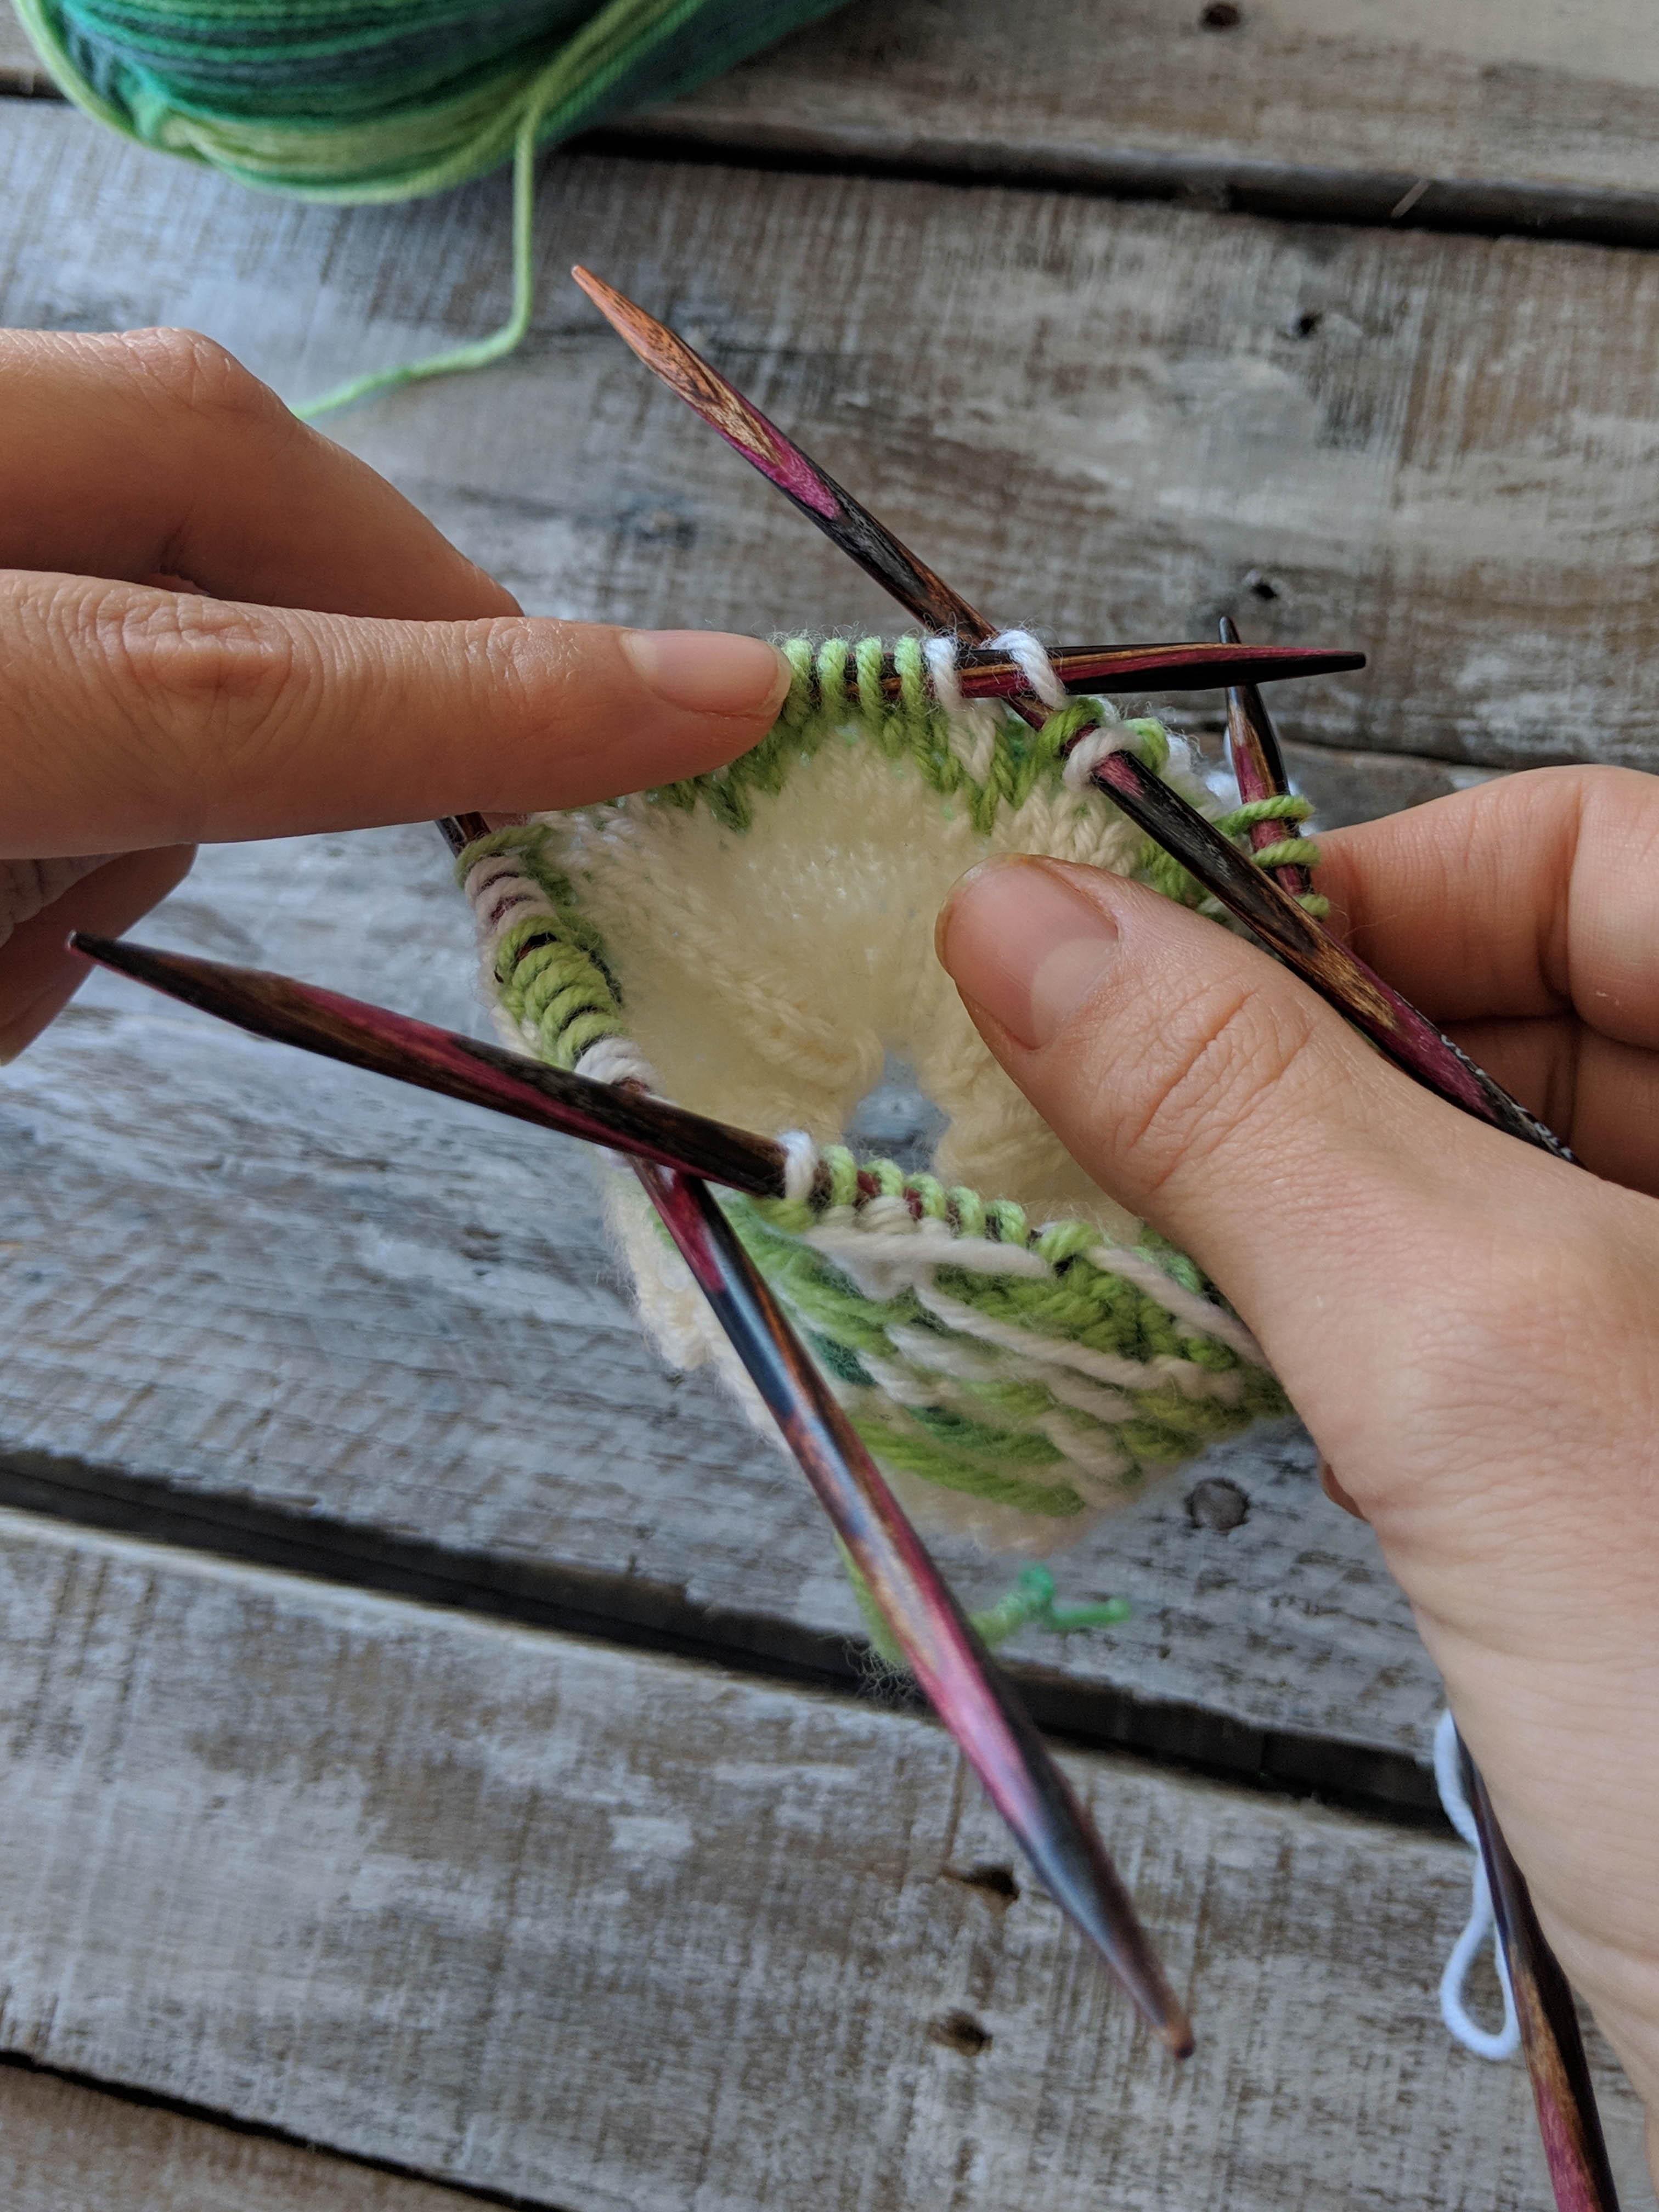
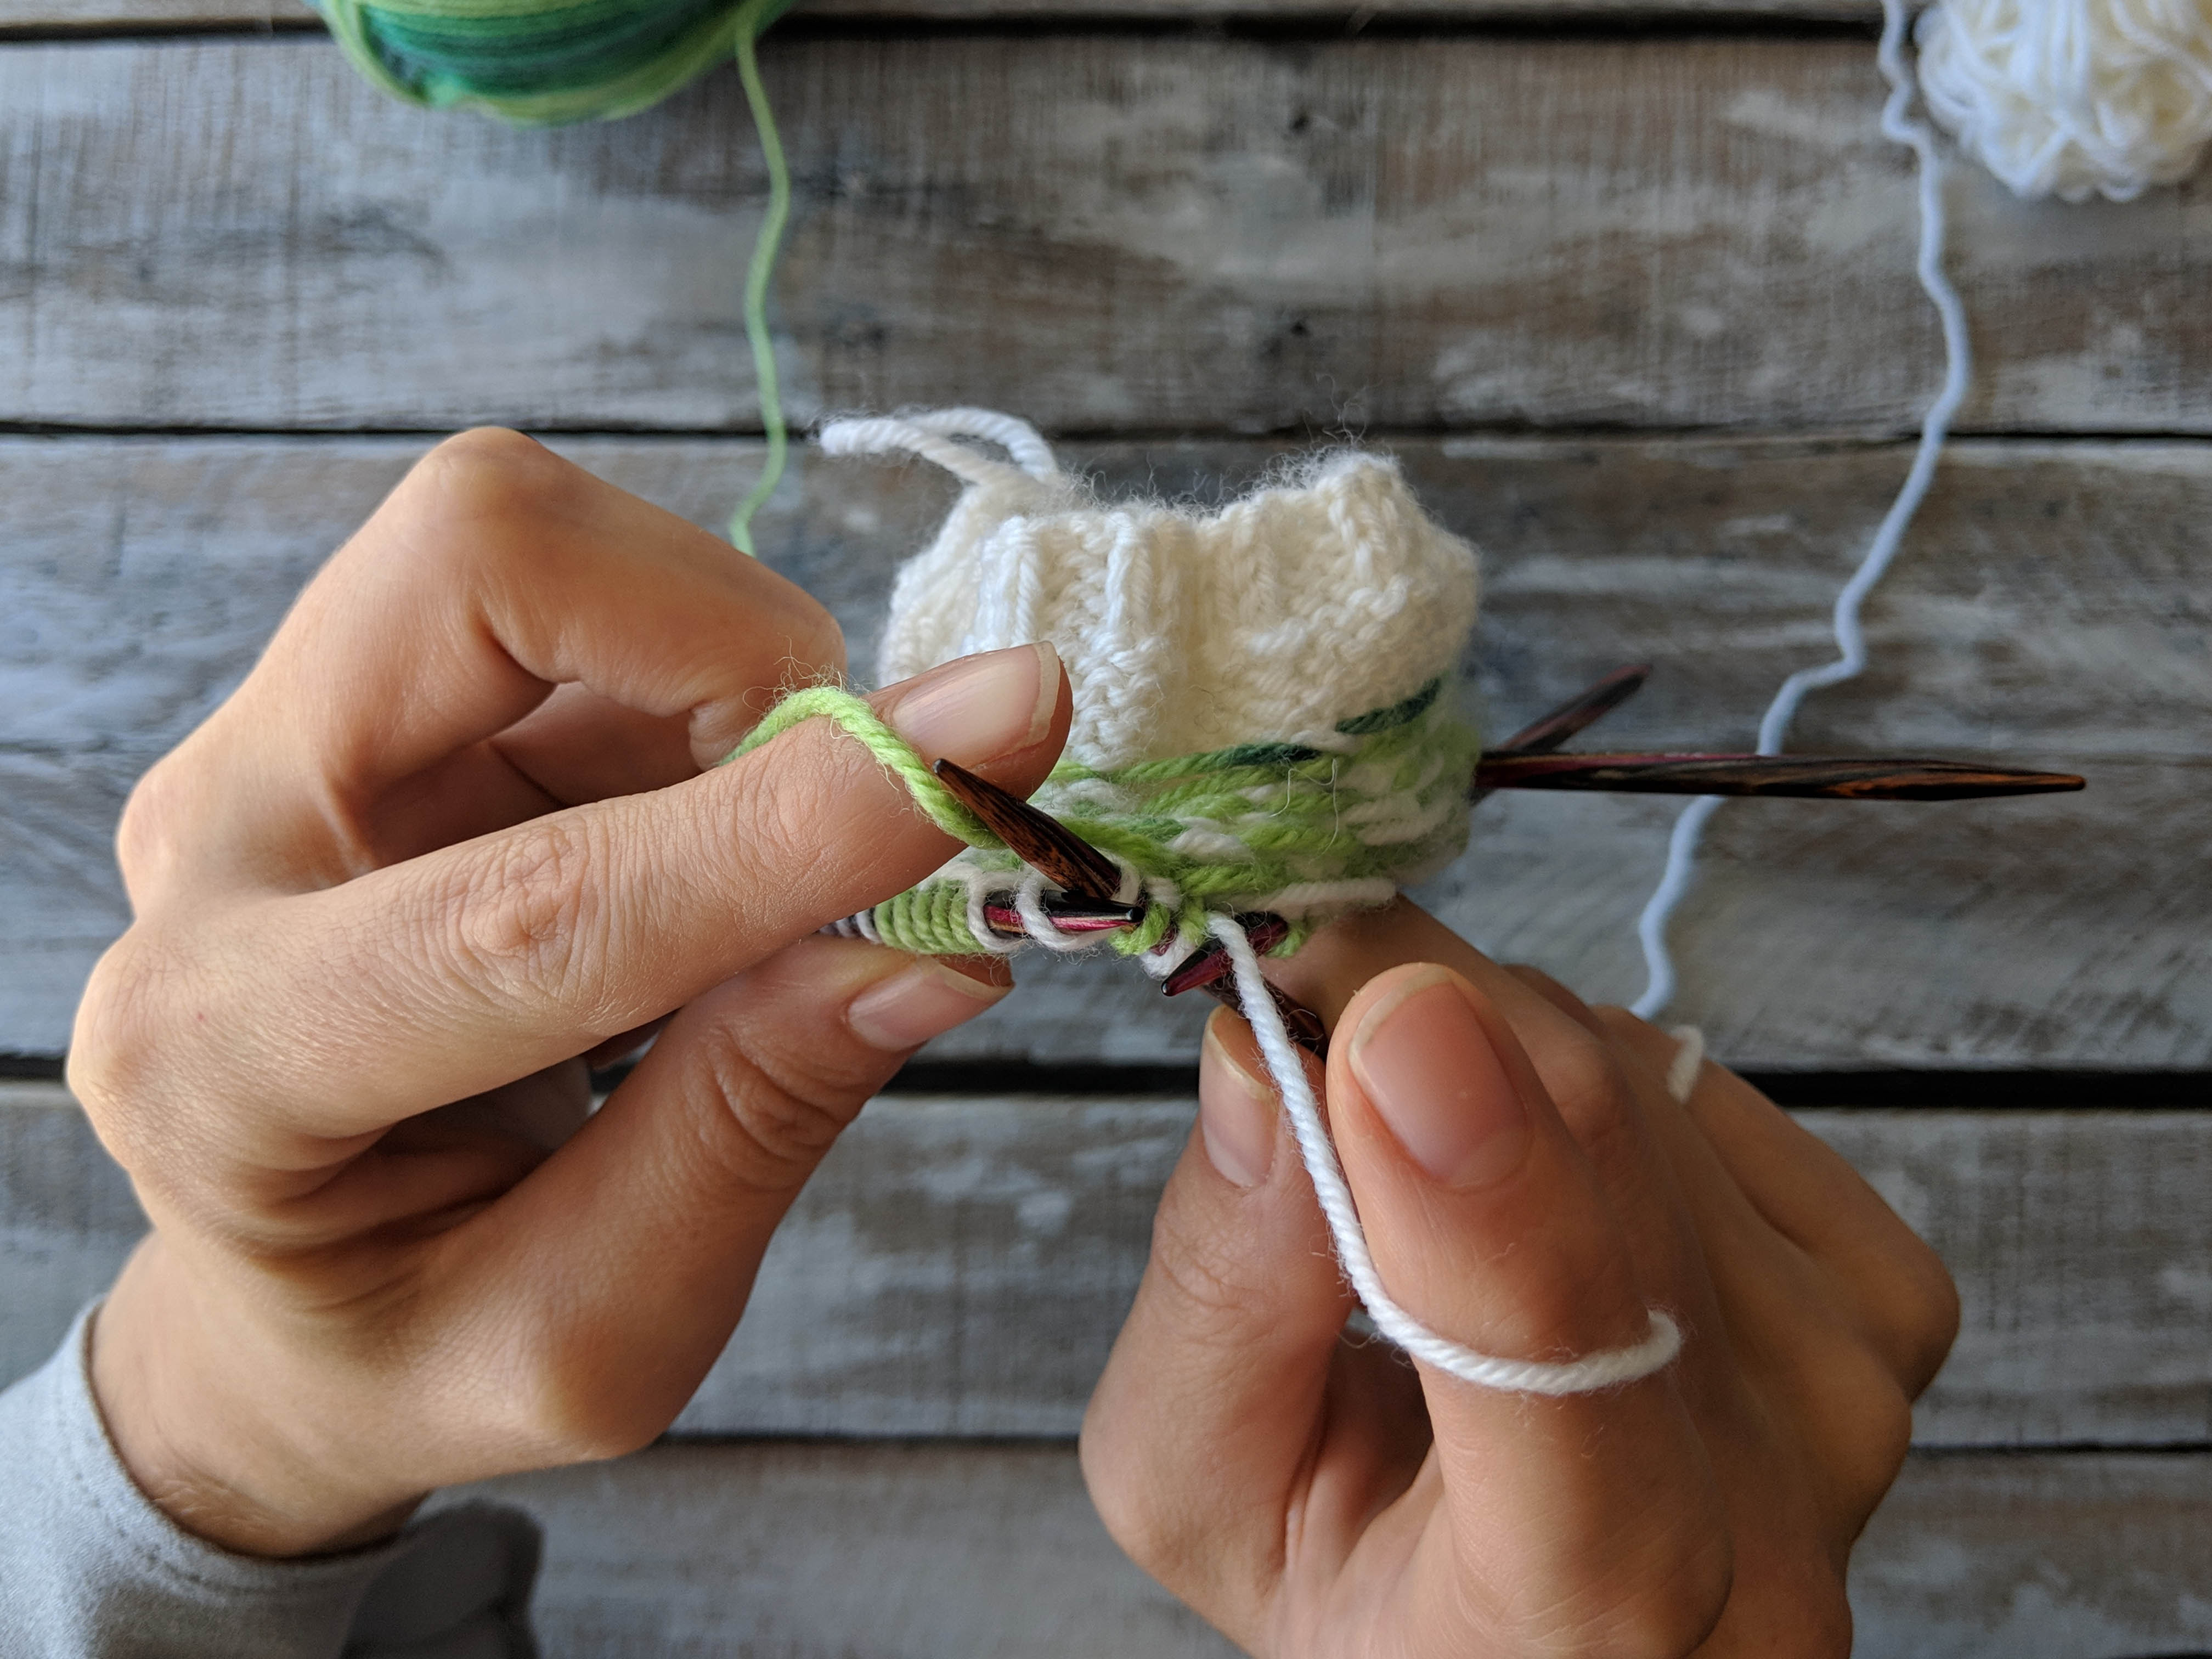
Notice that the wrong side of the fabric is facing outward.

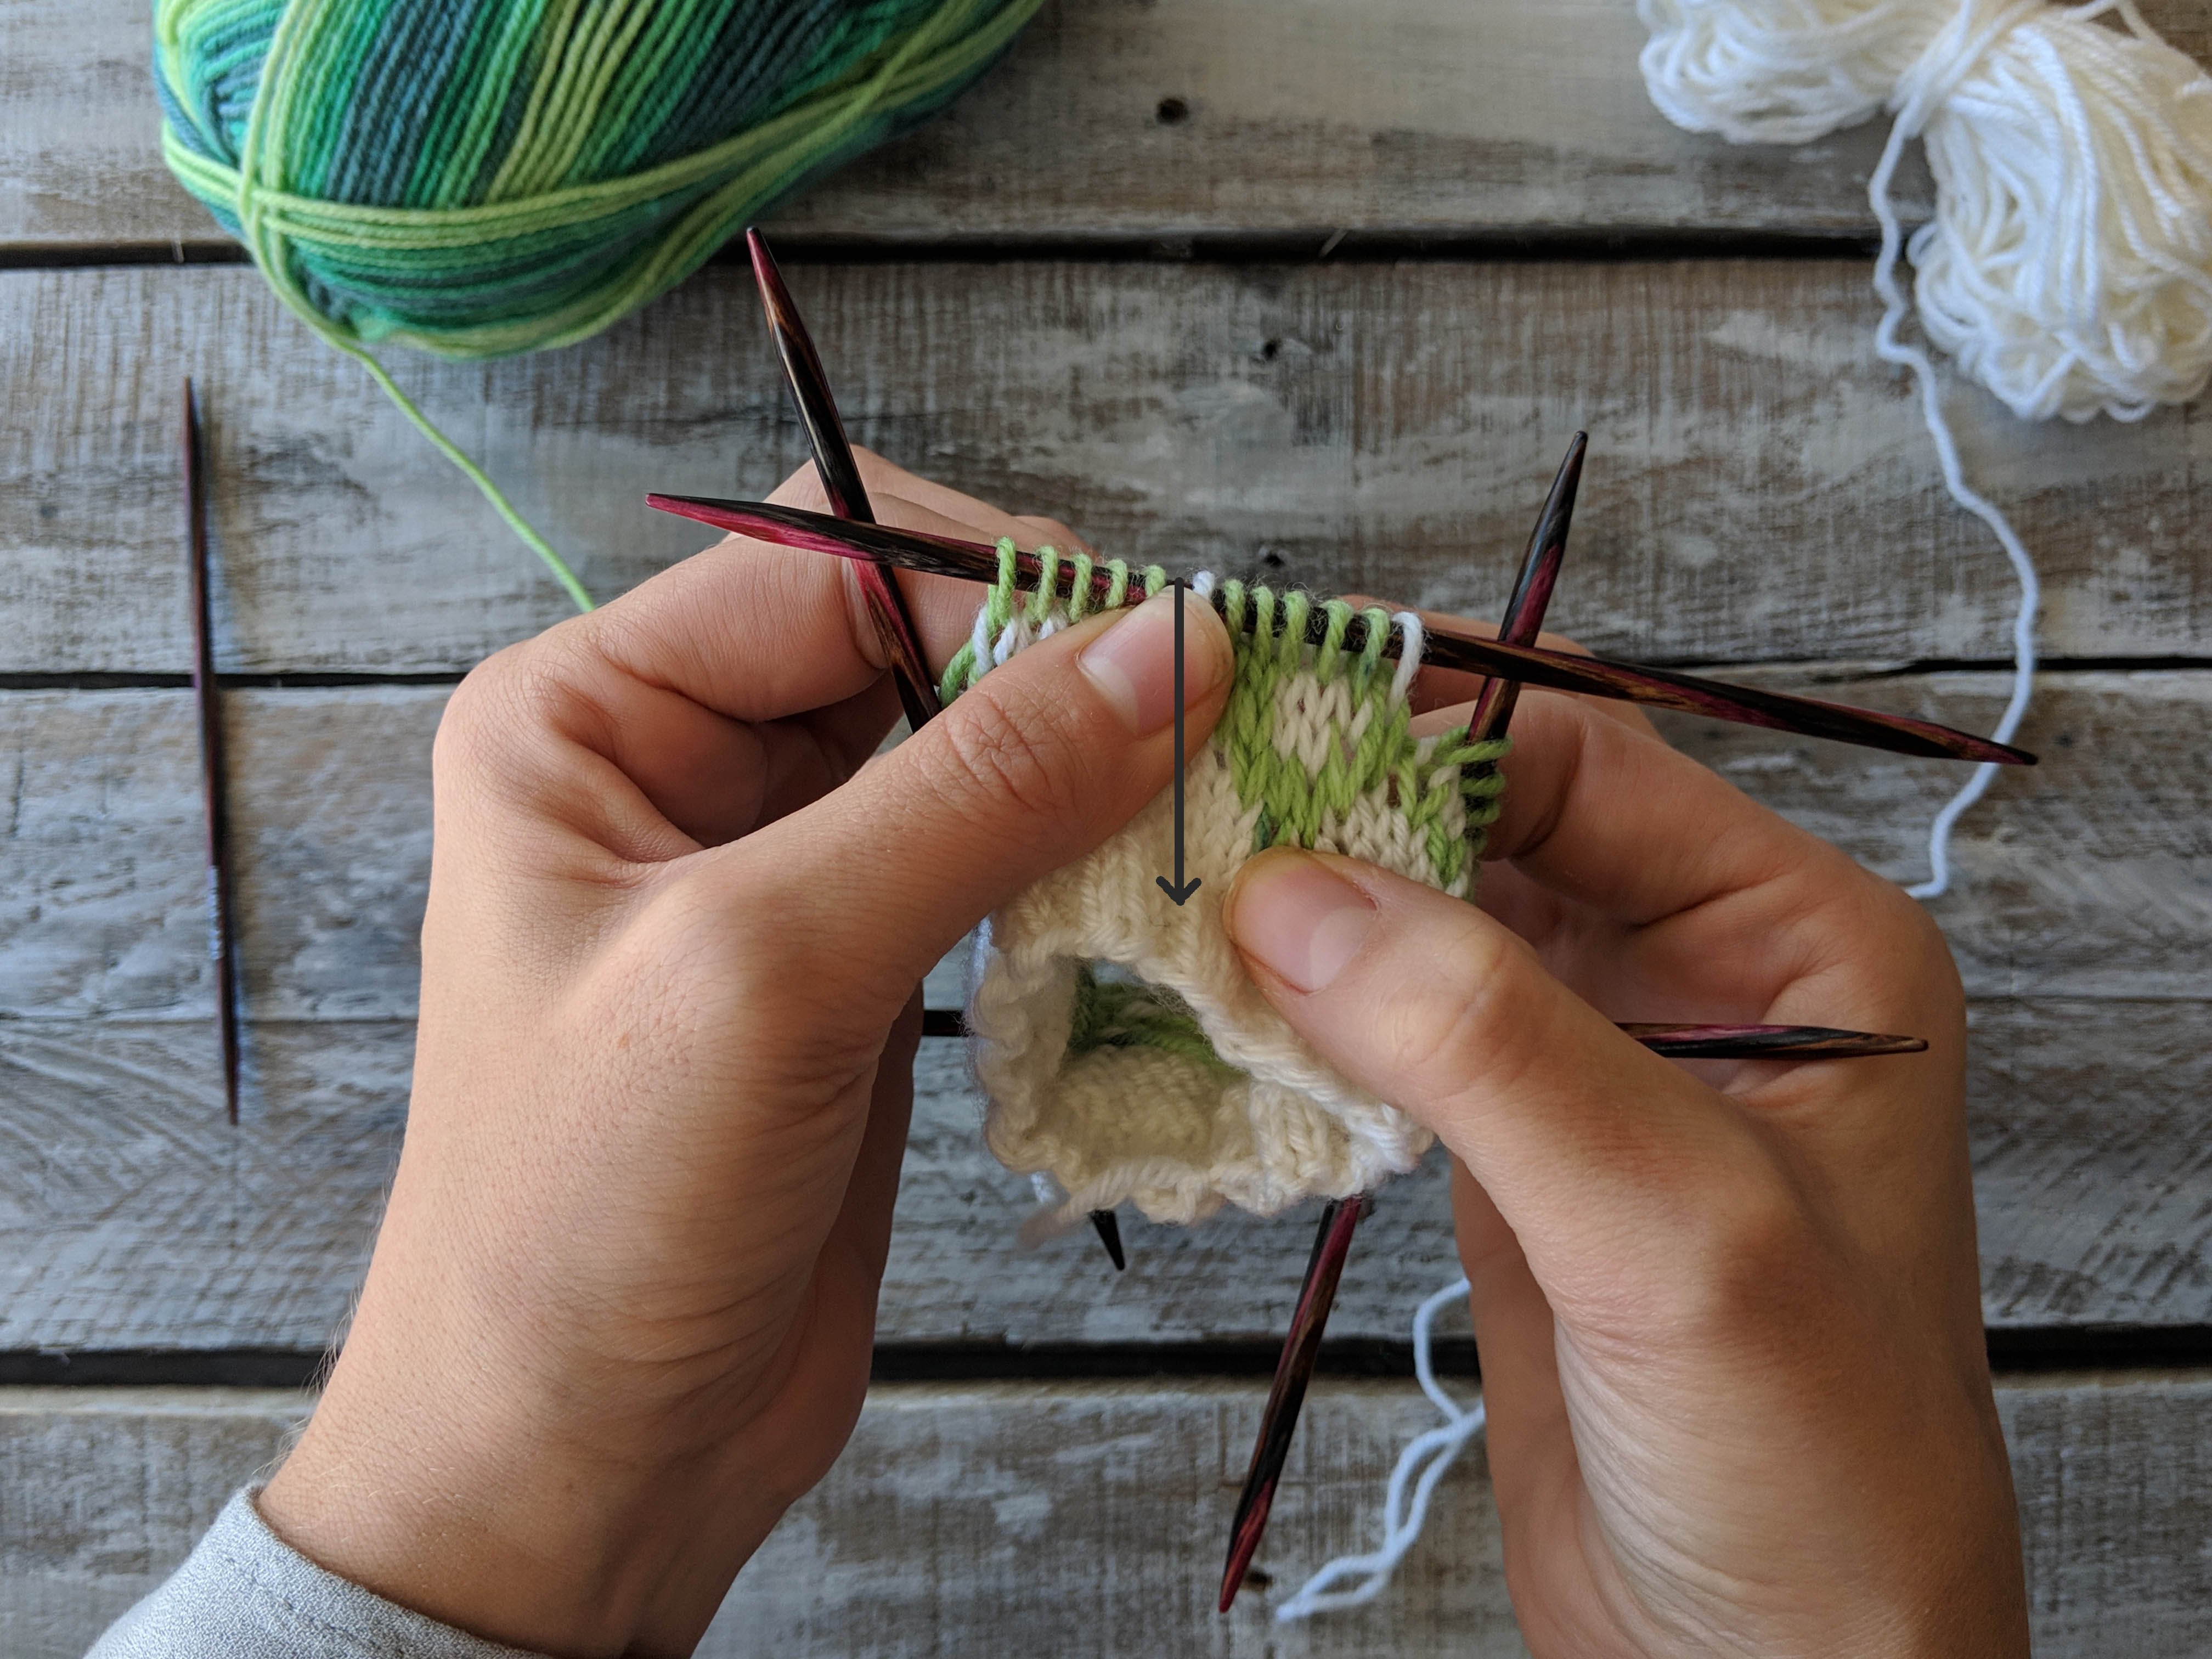
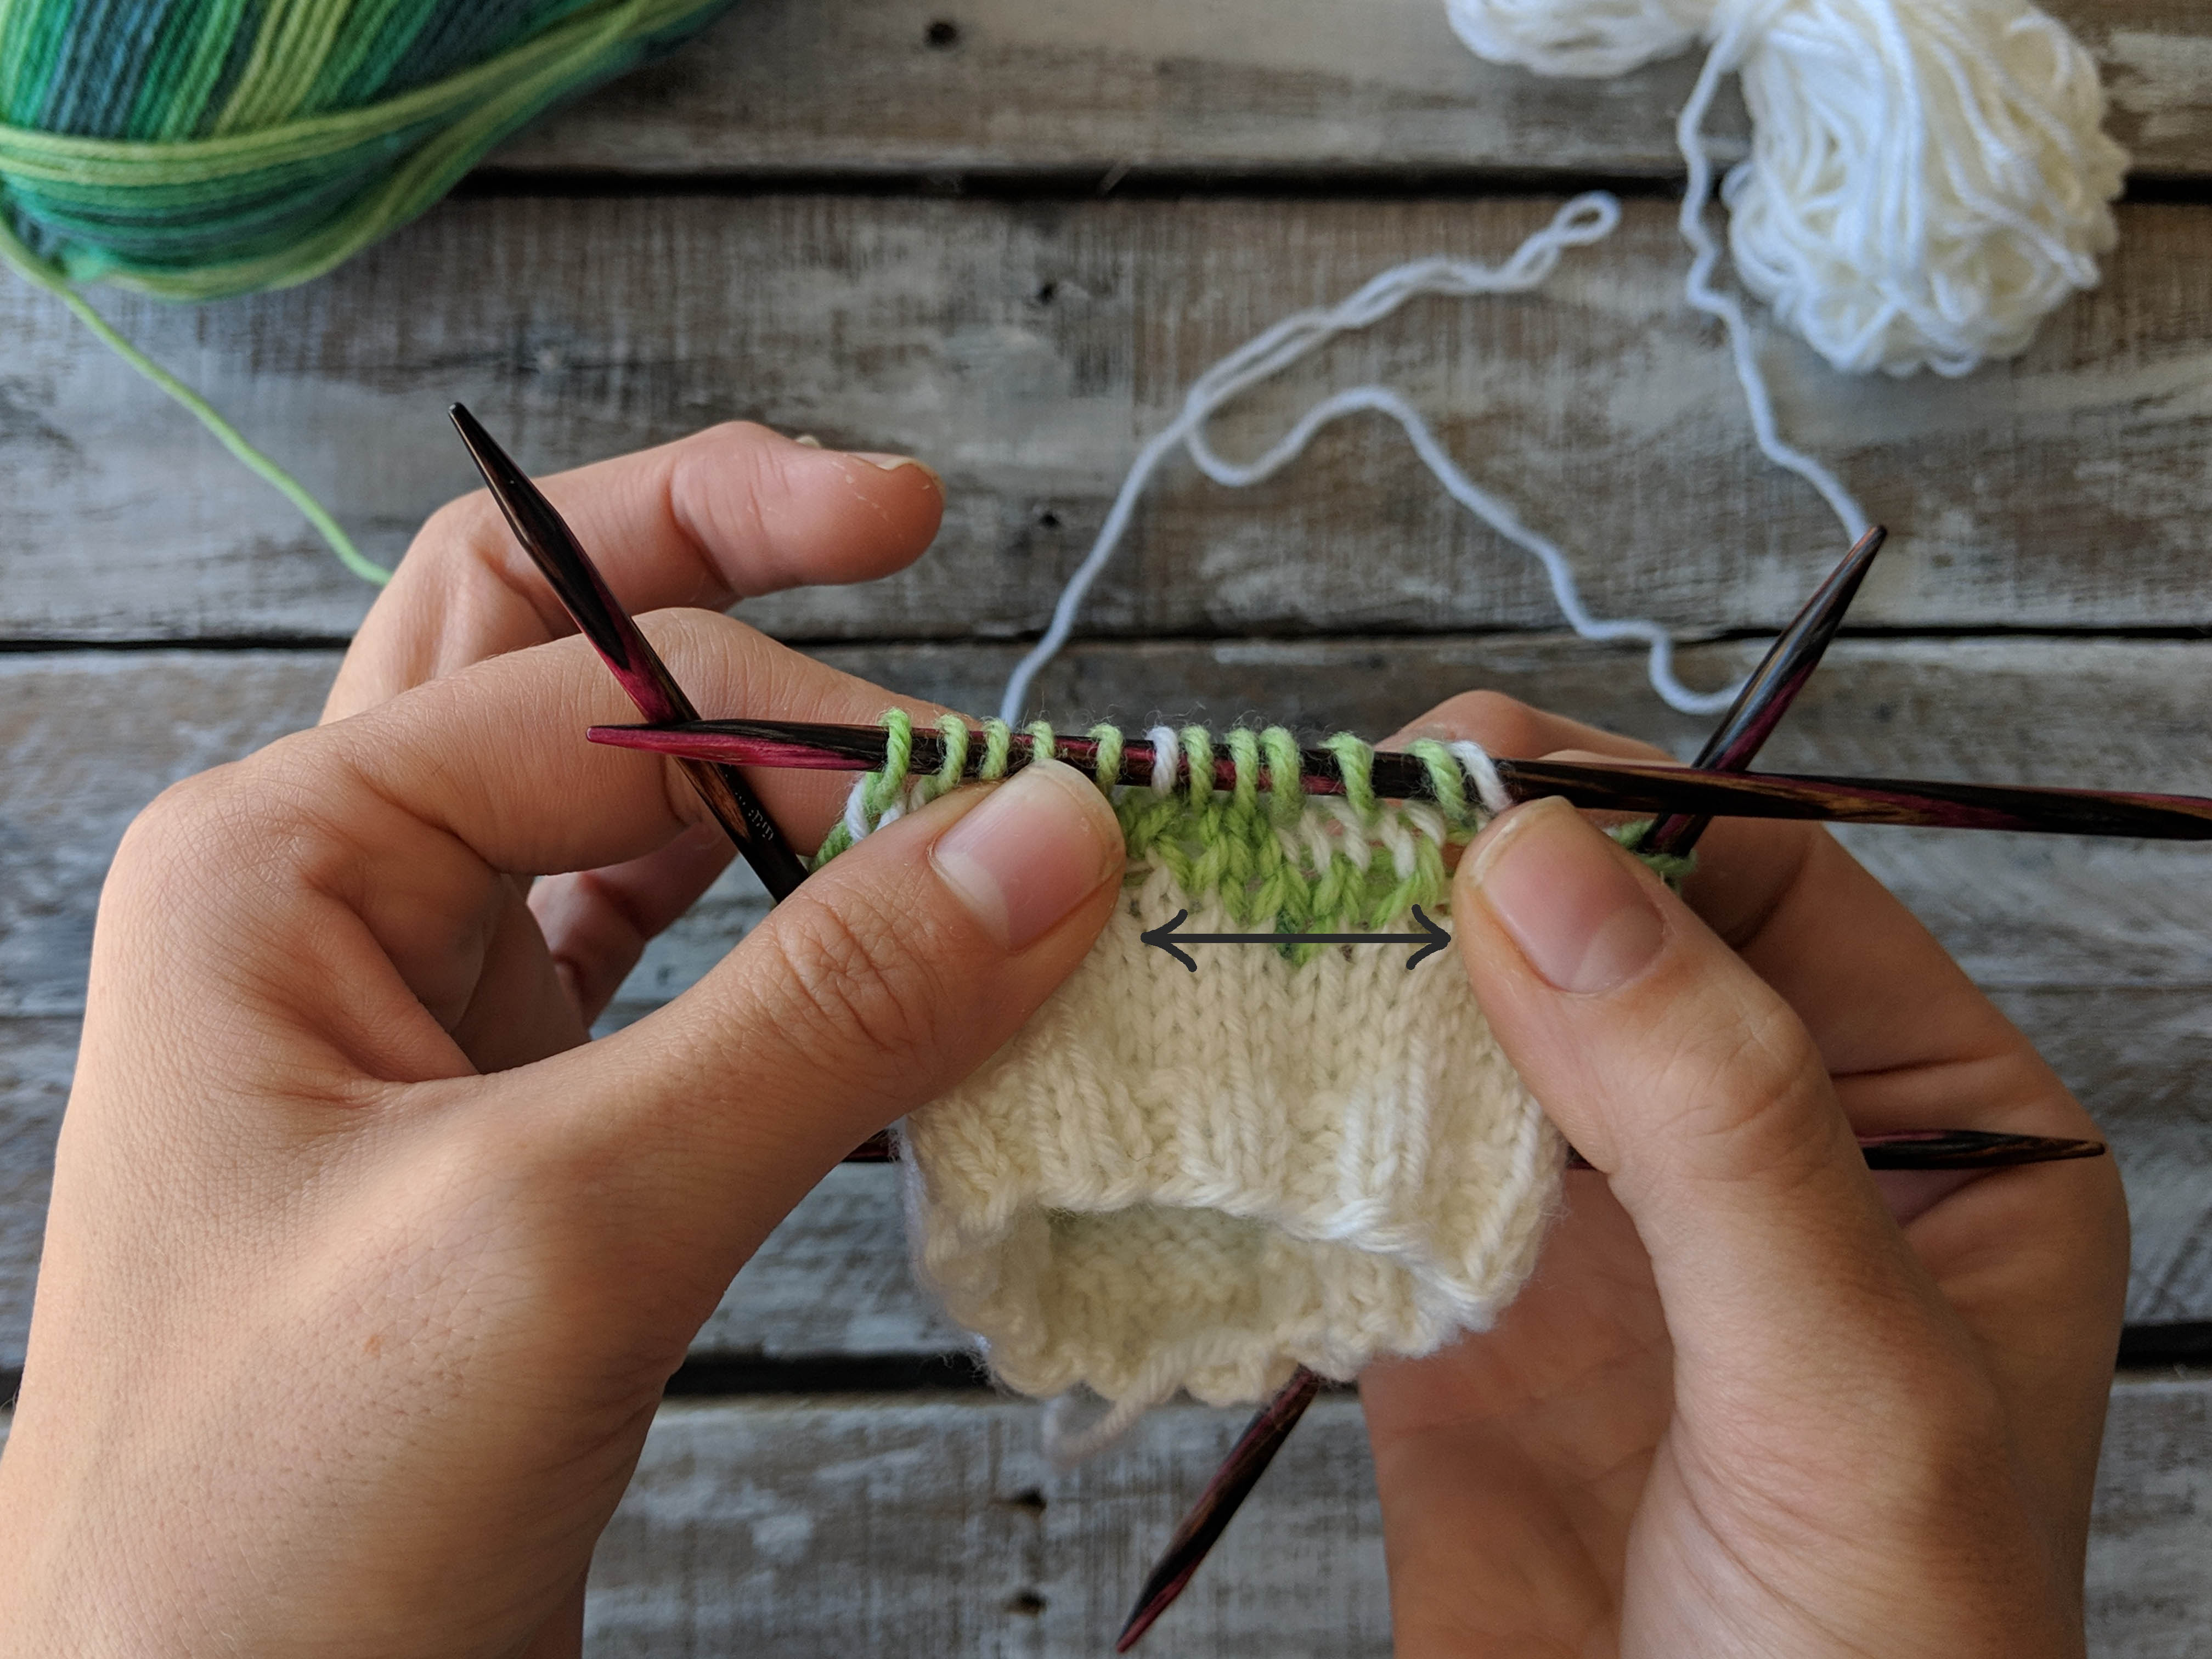
Gently stretch your work. Chances are that you’ll sometimes have a stitch that’s a bit odd – perhaps a bit too tight or a bit too loose. You can rectify the issue by occasionally stopping to give the fabric a gentle stretch. Don’t be overzealous as that can cause stitches to get more uneven. A little goes a long way.

Universal Yarn Adore Colors
Gently stretch the work downward.

Universal Yarn Adore
Gently stretch the work horizontally.

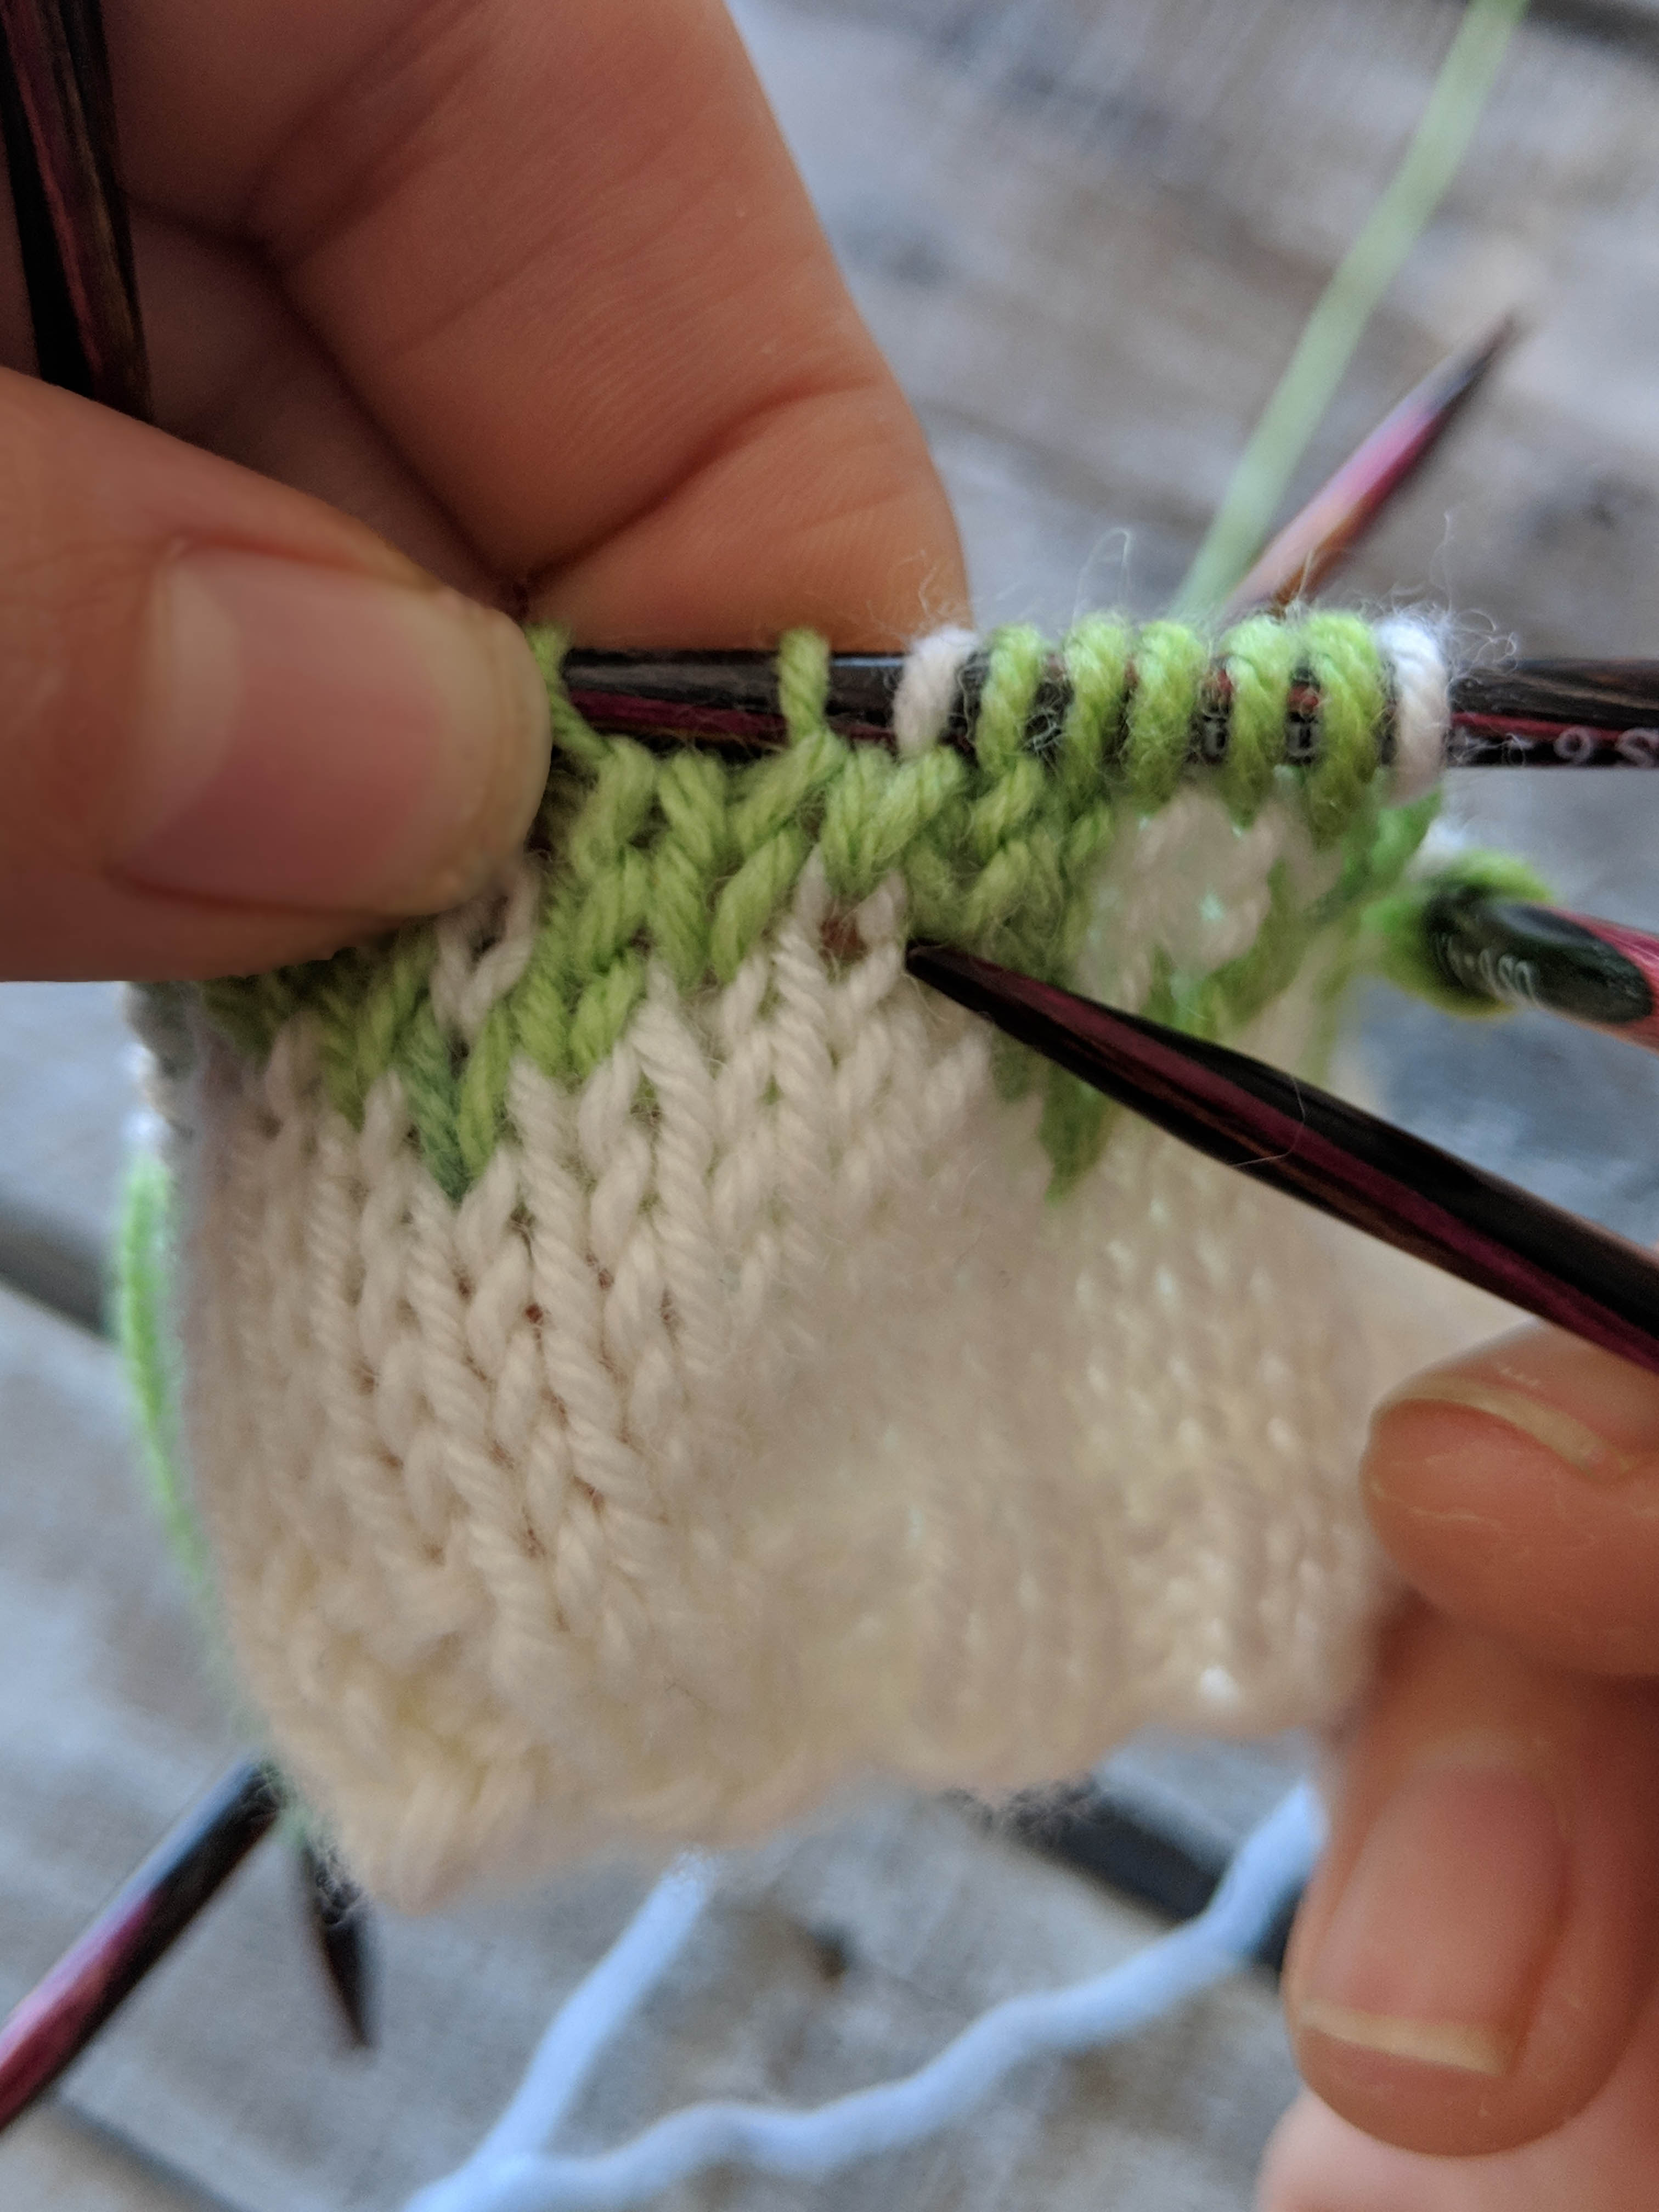
Manually even out oddball stitches. Like I’ve mentioned above, there are instances where a stitch looks a bit wonky. If a gentle stretch doesn’t help you can manually pick the stitches around it to try and even things out.

Universal Yarn Adore
Oh no! Look at this awful little stitch! It’s far too tight and hidden by the surrounding stitches. Good thing you can work some magic!

Insert your needle behind the right leg and then the left leg of the naughty stitch.

Universal Yarn Adore
Once you’ve picked up both legs, gently tug on the stitch – give it a little wiggle.

Universal Yarn Adore Colors
The naughty stitch has realized the error of its ways! You can now see the stitch very well and it looks lovely alongside its friends. Pat yourself on the back for a job well done!

Block it out! Blocking is magic. The process evens out stitches, so when you finish your work be sure to block it! Once the yarn blooms it will fill up any negative space in your fabric allowing your colorwork to shine! Just be sure to follow the care instructions on your yarn label so that you don’t unintentionally damage the fabric. Side note: we have a post to help you understand yarn labels, too. Find it here (link).

Look how pretty and even the colorwork is after blocking.

That’s it! I hope these tips and tricks will help you as you knit the Mistletoes or any stranded colorwork. Remember, you can find Series 2 of the 12 Days of Winter Kit patterns on Ravelry.

Schematics 101

Most knit and crochet garment patterns contain a super helpful thing in them called a schematic. Every garment pattern we release contains one of these. If an accessory has a unique construction, we’ll add one there, as well. A good schematic should at minimum incorporate these elements:

  • measurements for most, if not all, lengths/widths/circumference, etc of the item
  • be drawn to proportionally to scale (of course, as garments get larger in size, these proportions will change. I personally draw my schematics based on the smallest size)
  • show a single line drawing/piece for a seamless garment, or separate pieces for a seamed garment, or some combination of the two, depending on construction
  • bonus points for arrows or indications of what direction the various pieces are worked

I’ve had a few recent conversations with knitters who either completely ignored the schematic in a pattern, or were unsure about how to interpret the measurements and other details in them. With this uncertainty, things either went awry, or they lacked the confidence to feel like they were on the right track with their projects.

Right here, right now, I very passionately would like to clear some things up about the Mighty Schematic.

Example #1: Brook Cardigan:

It might be a little overwhelming at first with so many numbers and arrows and lines. But each of those things has a reason for being there, and it’s to help!

First, let’s take a look at the arrows on the drawing. At the very bottom edge, there are two arrows pointing upward. These arrows indicate the direction of knitting. It means you will knit the two front pieces separately to start. And see how they’re joined with a solid line at the neck? At this point you will join the two sides, and knit the back downward in one piece.

Likewise – see the sleeve with the arrow on it? This indicates that stitches are picked up along the side of the body, and the sleeve is knit outward from there.

The pattern notes are another place in a pattern where you can pick up helpful information about the construction of the item. It’s a good idea to read through these in addition to consulting the schematic.

Example #2: Grand Staff Cardi

I’m not going to name names (ah-Krista-em), but one of the folks in customer service is knitting this project in Bamboo Pop, and came to me with concerns a couple of months ago. In fairness, there is a lot going on in this schematic. But the issue Krista was having wasn’t particularly with the construction, as it’s clear from the pattern and pattern notes itself how the construction works.

Krista is a petite thing, so she’s making the small size, which has a finished bust of about 35″. Her concern was that as she was working on her back piece, it was measuring 24″ after casting on. This could be a valid concern – after all, 2 x 24″ would make for a whopping 48″ cardigan which would be much too large for Krista.

She measured gauge and was spot-on, so it wasn’t making sense why her stitches measured so wide on the needle. The detail that eluded Krista: this cardigan is A-line, which means it is wider at the hem than it is at the bust line.

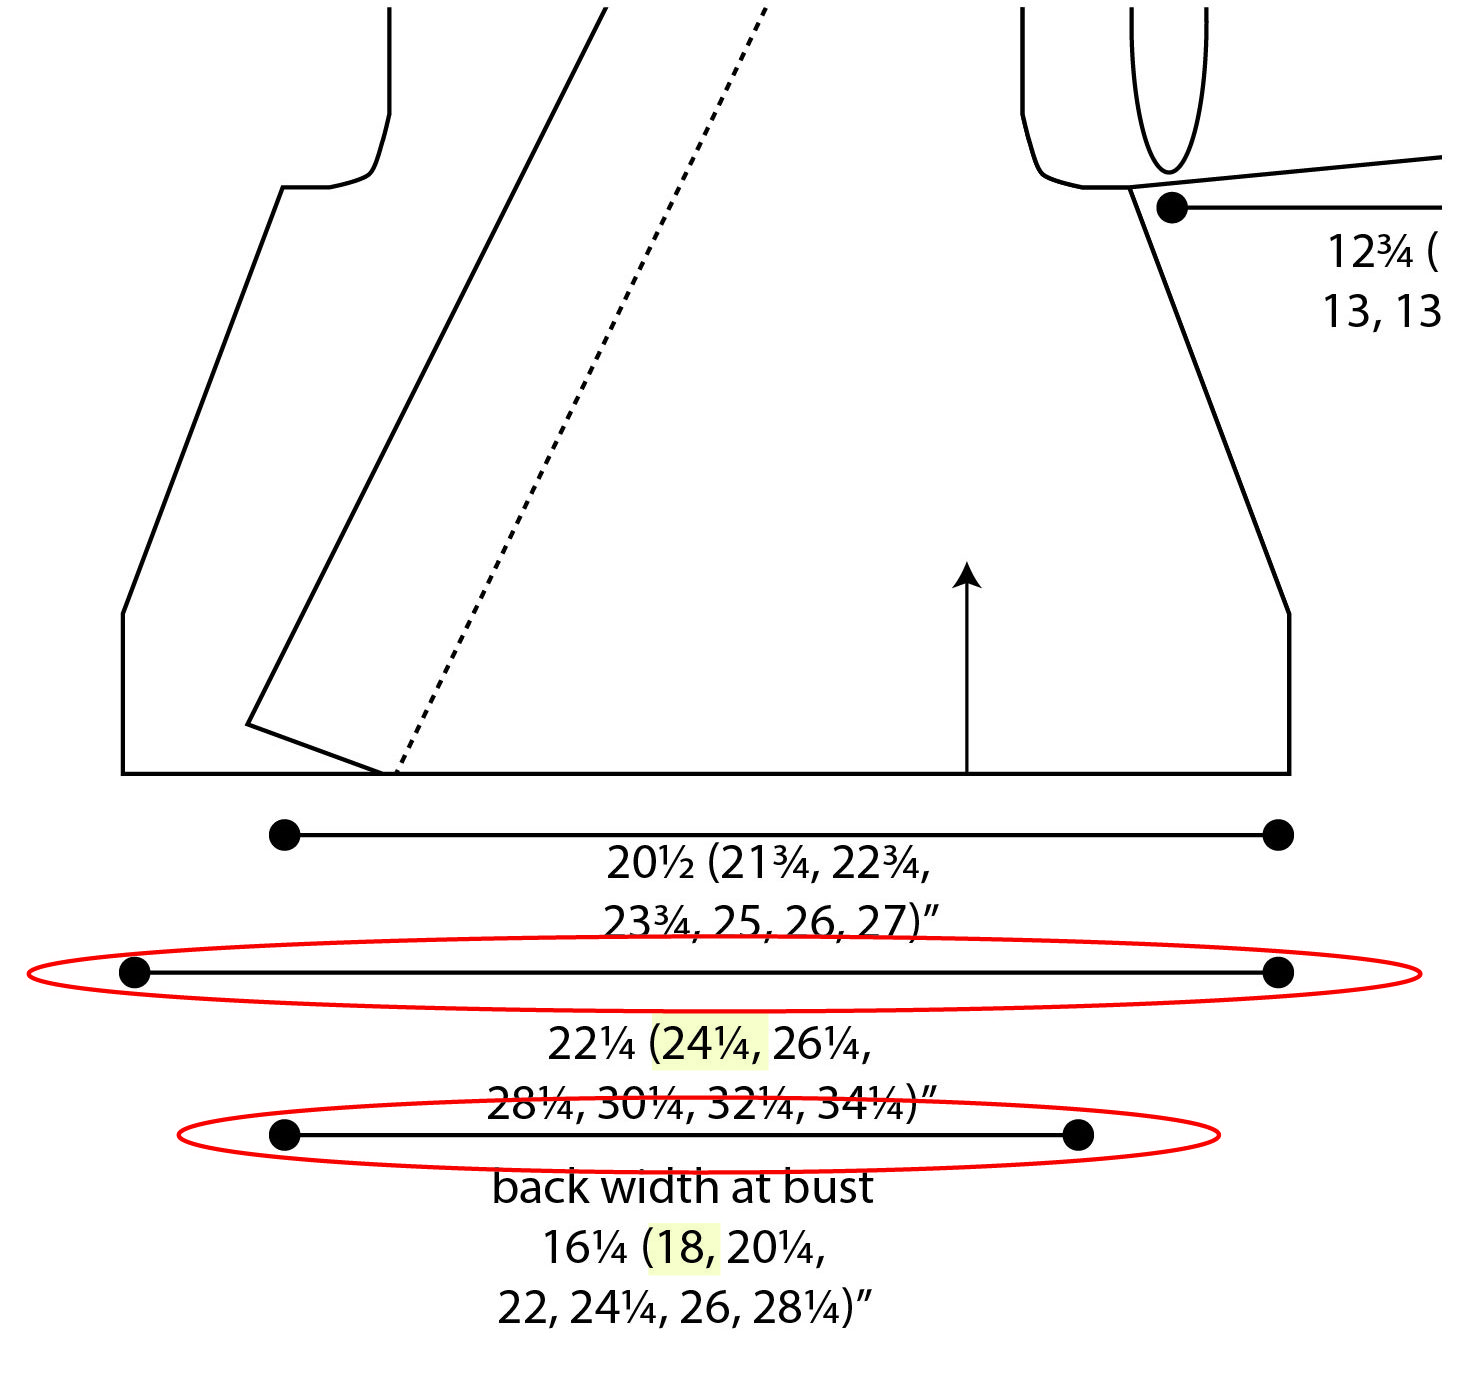
That wide line that’s circled up there – that is the measurement of the back at the cast-on edge. We know this because the line travels the full width of the back. The shorter line below it is the back width at the bust, which is 6″ less wide. Krista had not consulted the schematic, hence her panic. Once we took a look and I assured her she was on the right track, everything went swimmingly. And I can’t wait to see her FO!

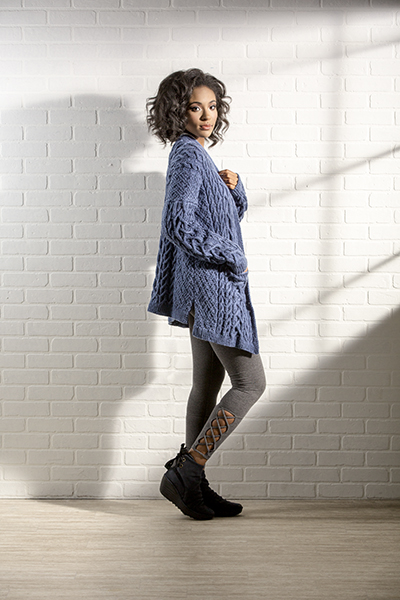
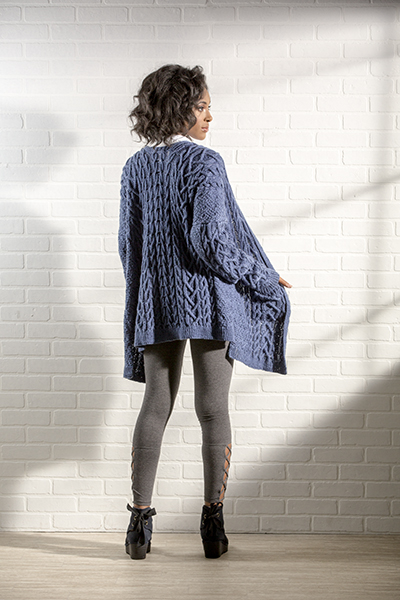
Example #3: Tranquil Tee

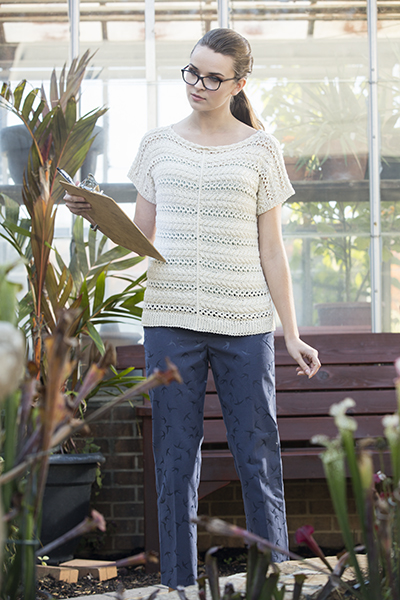
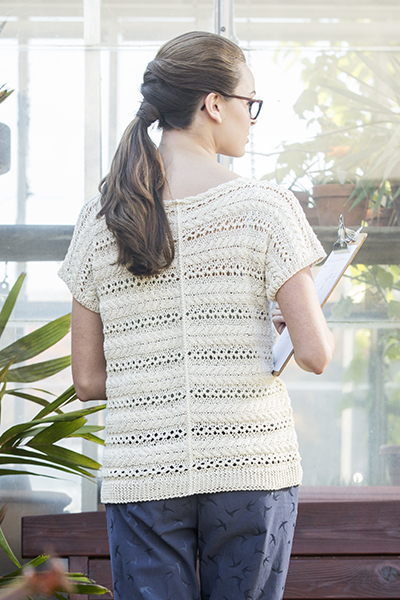
If you take a close look at the stitch patterns on this tee, you can probably figure out that it’s knit sideways. And if not, no worries – the pattern notes tell you so.

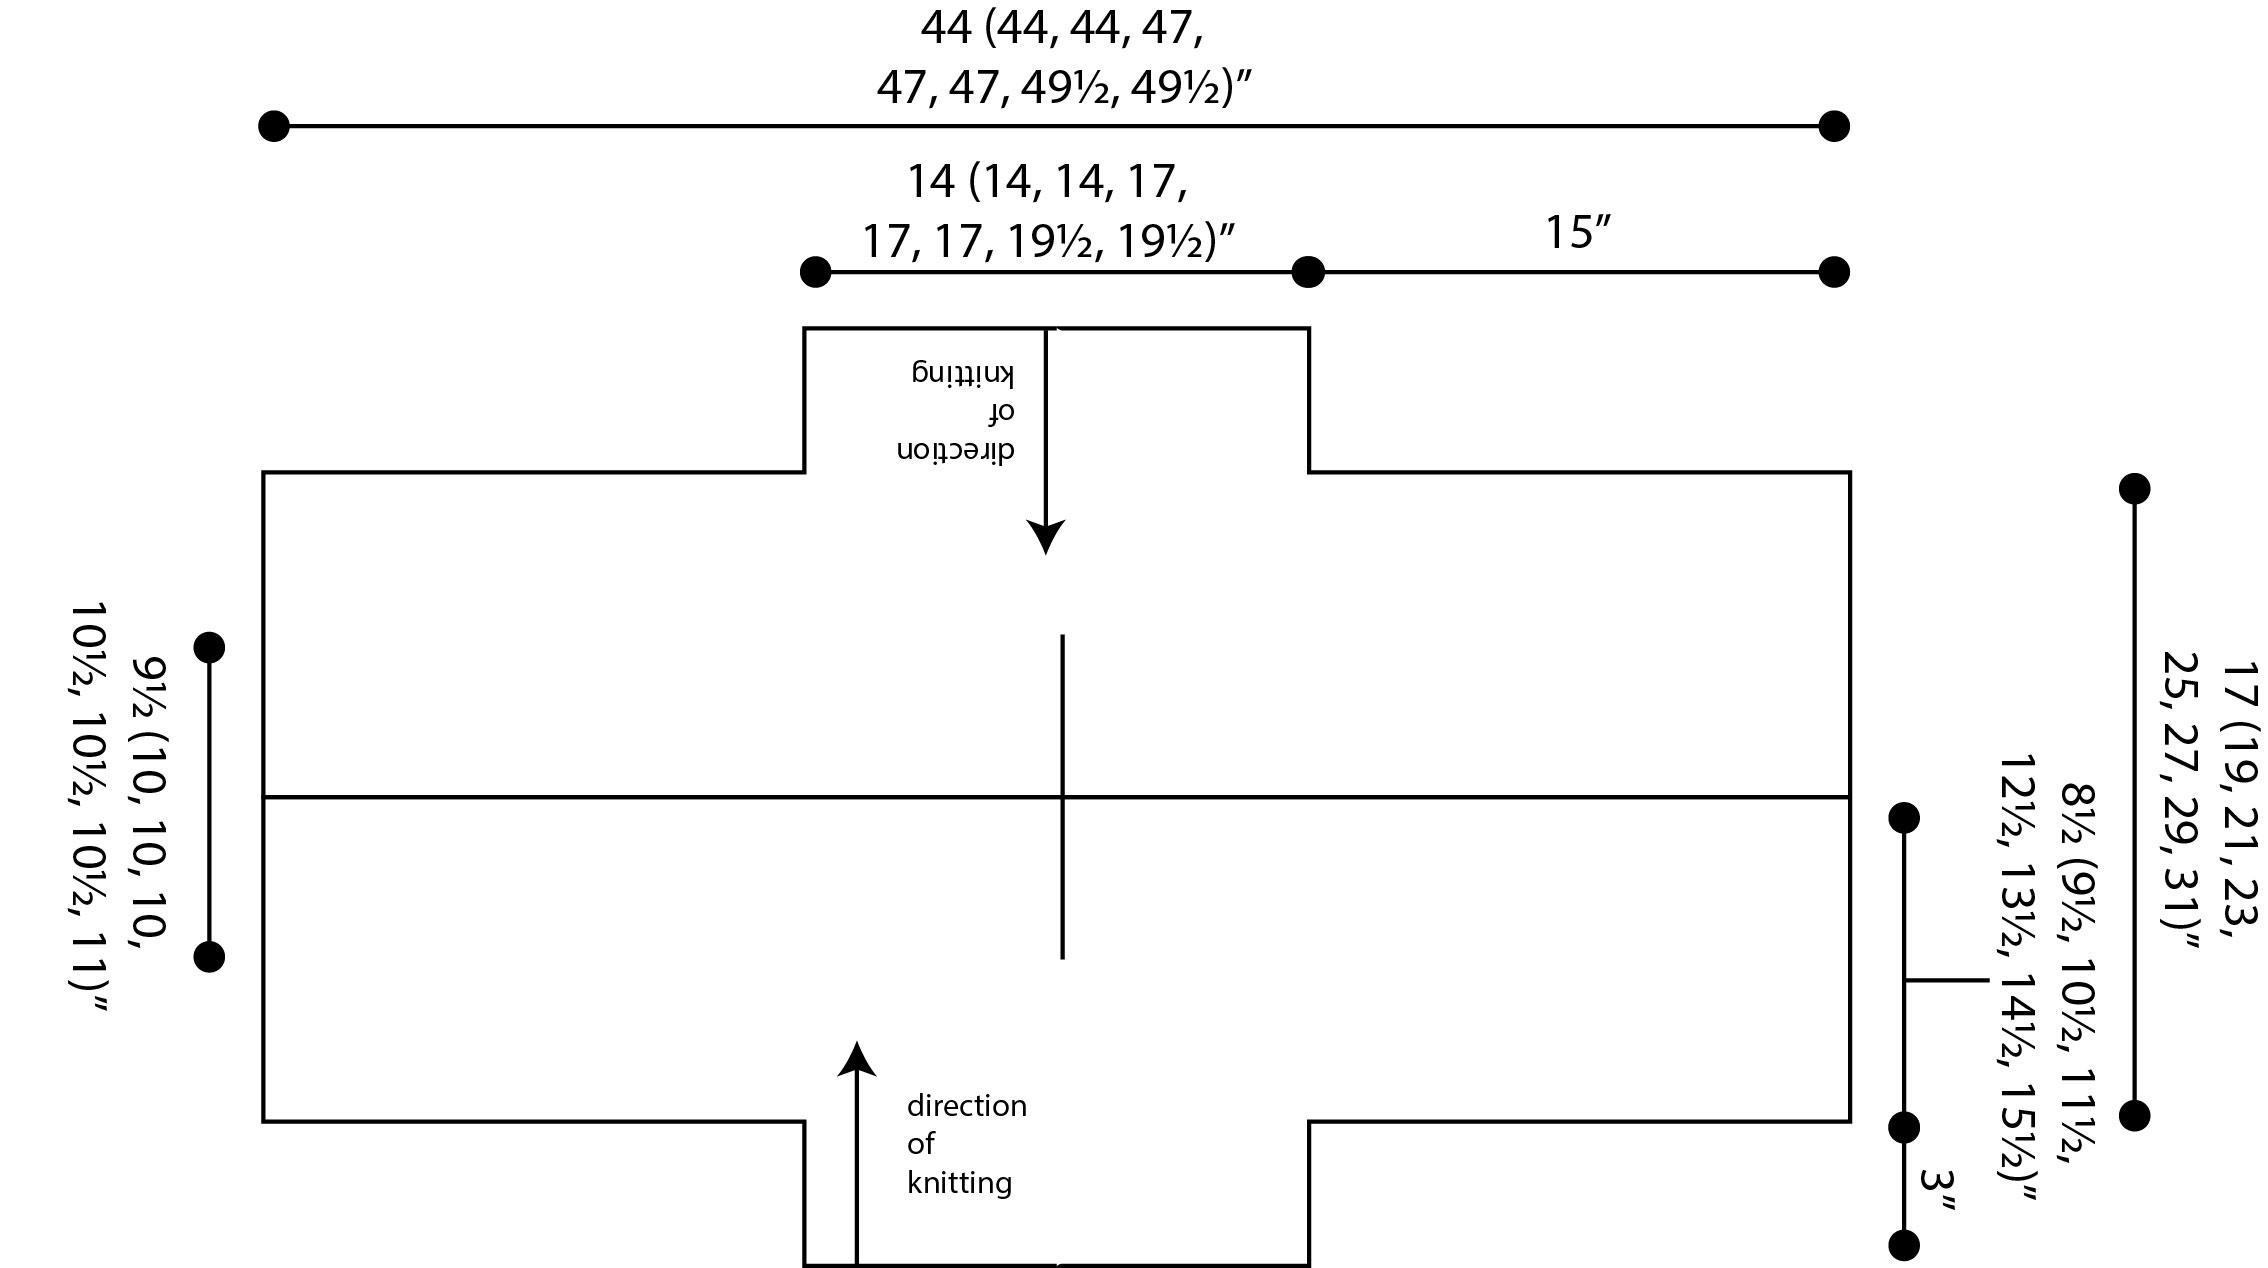
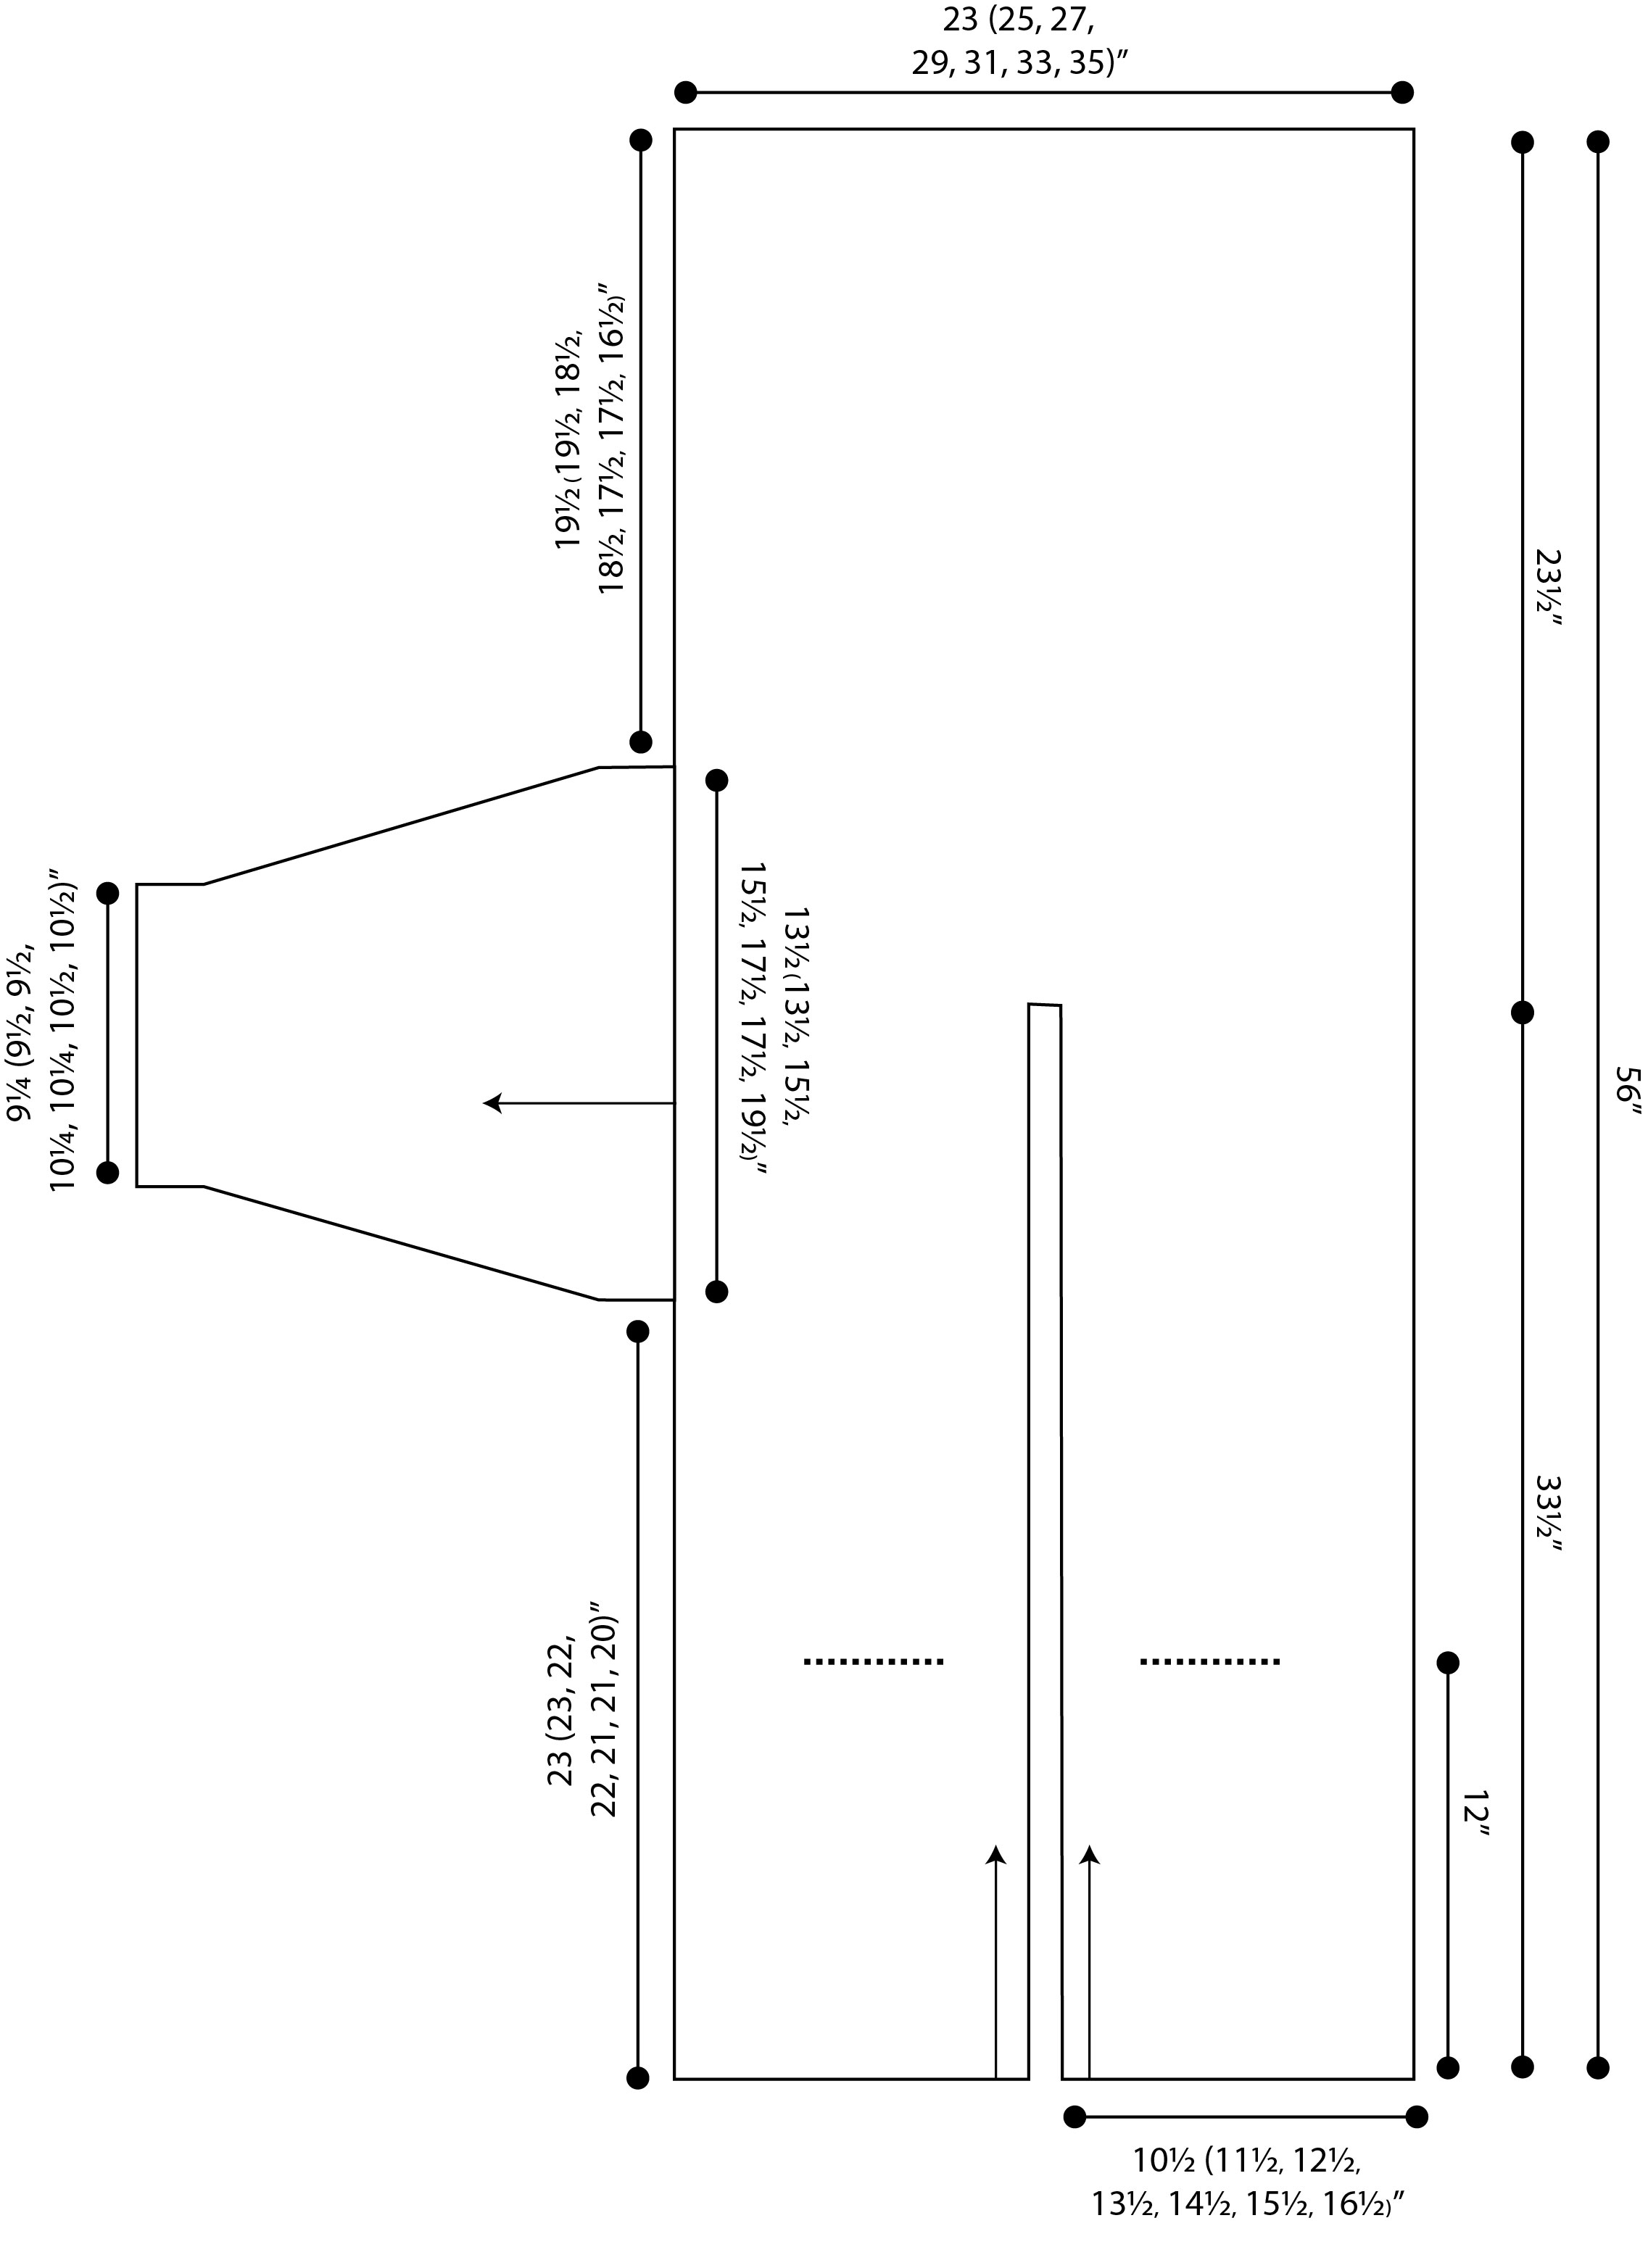
Additionally, the schematic shows exactly how your piece of knitting should look as you’re going along. You start by casting on with a sleeve, which is that rectangle at the bottom (and top) of the above schematic, knitting for 3″, and then casting on more stitches for the front and back of the sweater. The solid horizontal line indicates that this garment is knit in two pieces, and we can see that each piece is identical.

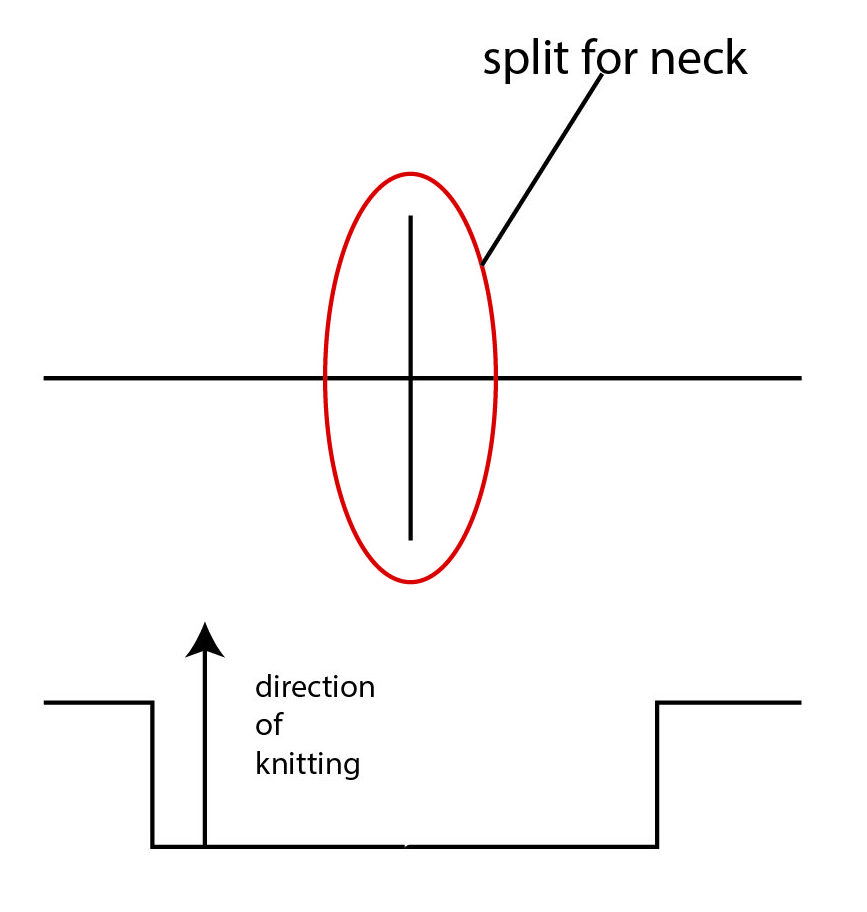
The solid vertical line right in the center is where each half is split for the neck. If you’re knitting along with this project, it might not make sense to split your piece right in the middle and knit the two sides separately. But with the help of the schematic, it helps to make sense of instructions that might not otherwise.

Example #4: Exhilarate

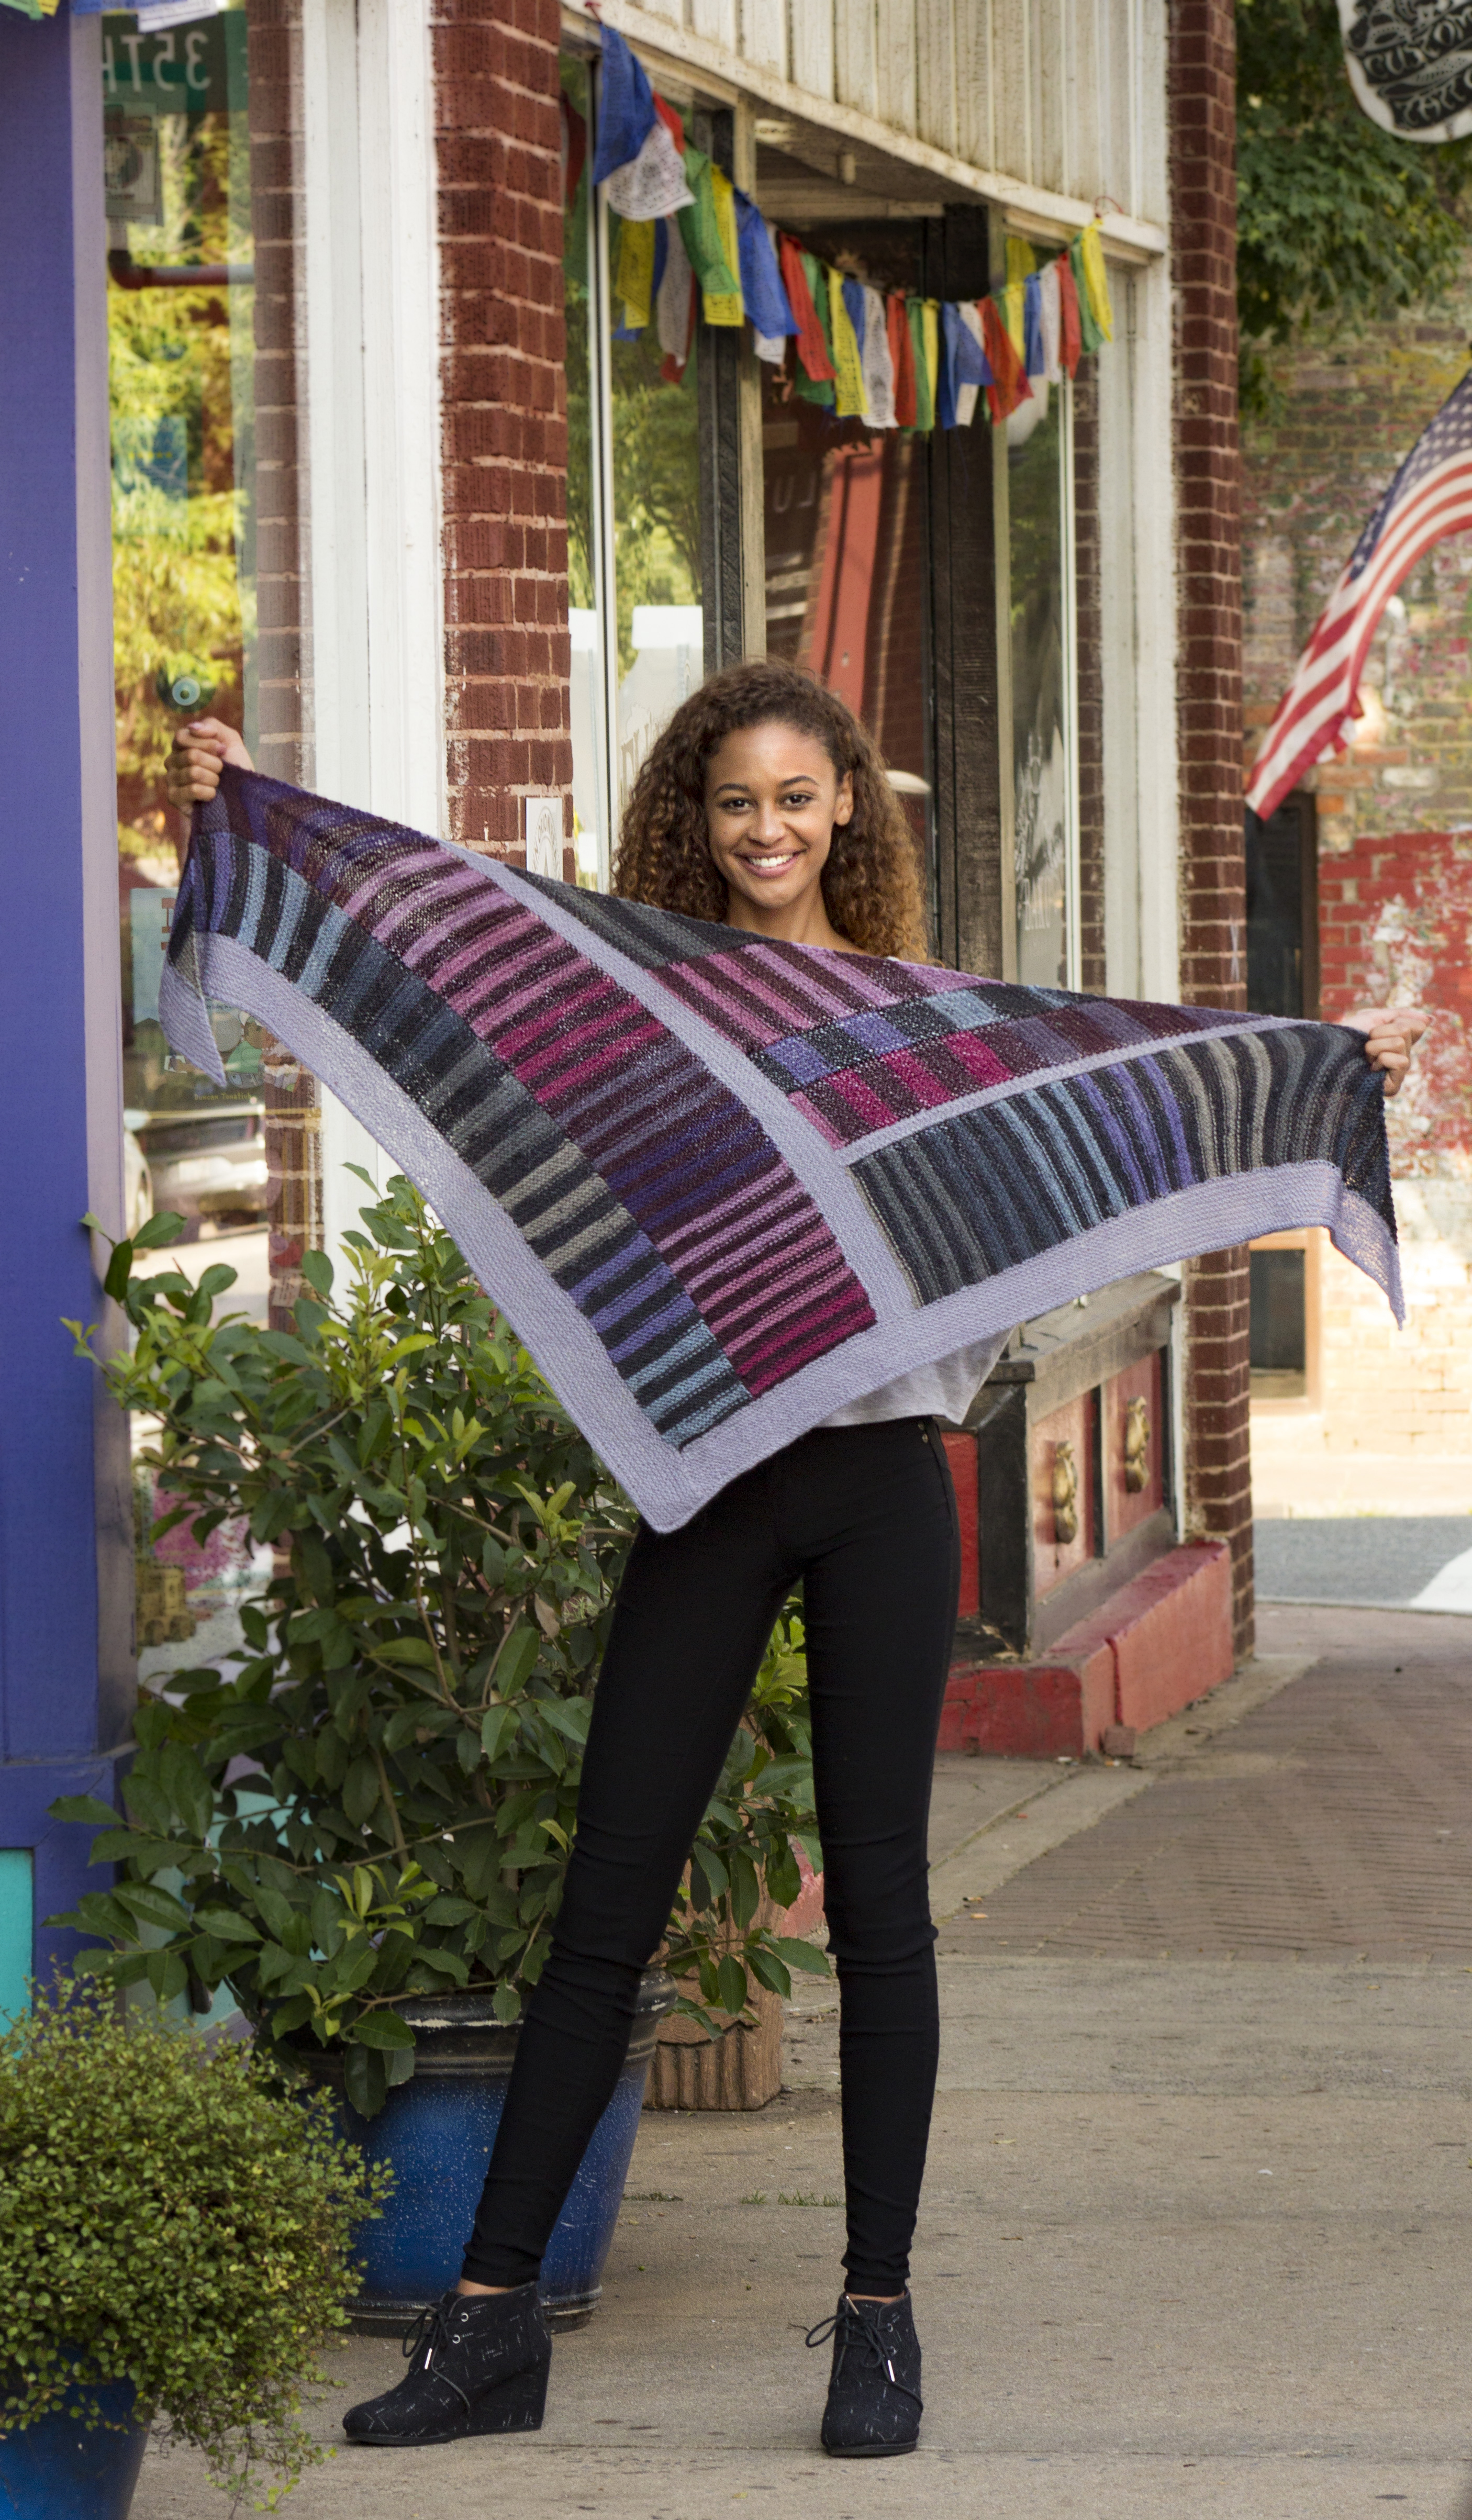
This is a garter stitch shawl, worked modularly. The knitting itself is not difficult, but without a diagram or schematic, it could be confusing to know where to pick up stitches for successive sections.

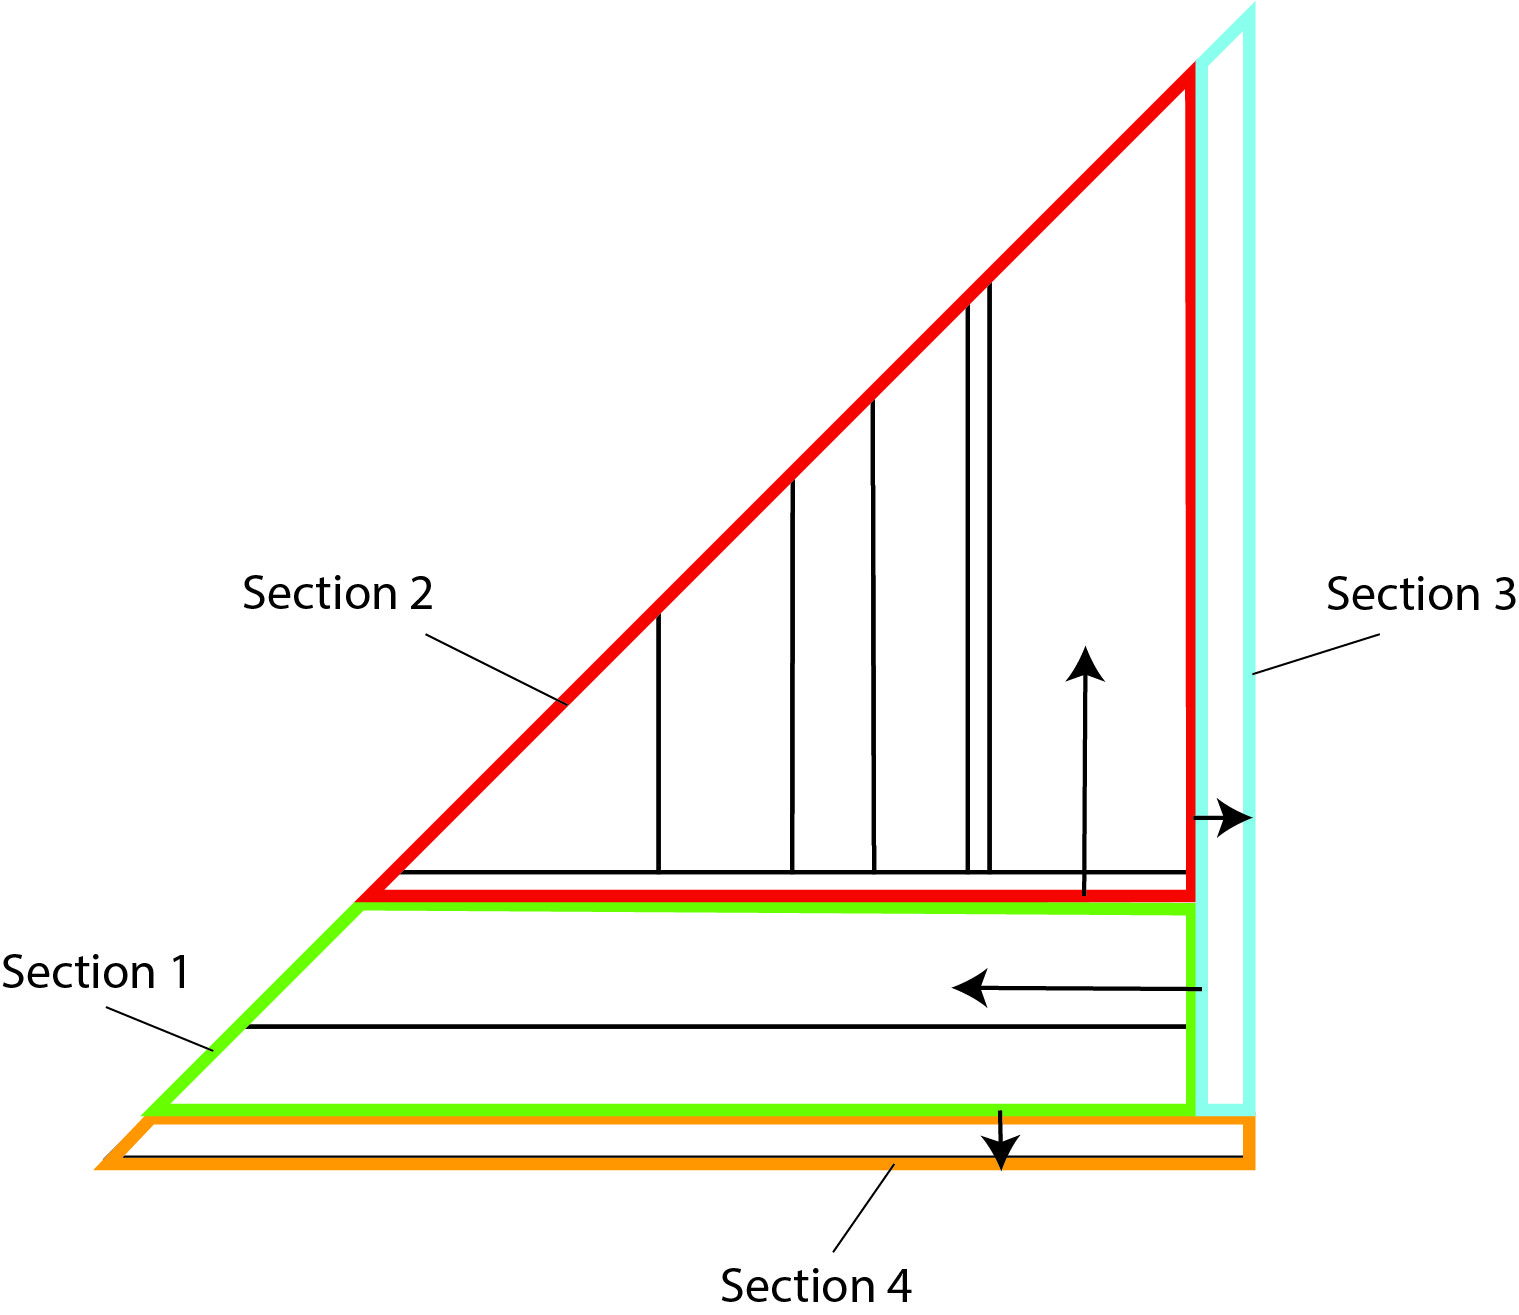
This drawing is really more of a diagram than a full-on schematic with numbers and things, but I wanted to include it anyway because it illustrates the construction of the piece.

In conclusion: Please don’t forget to look at your schematic! It is there to help, and it wants you to successfully knit your garment.

Do you have any other questions about schematics not mentioned above? Have a frustrating experience of your own about a schematic? I’d love to hear from you!


How to Read a Yarn Label

Greetings, yarn enthusiasts! Some of you may have seen our newly rebranded Universal Yarn label. It looks a little something like this:
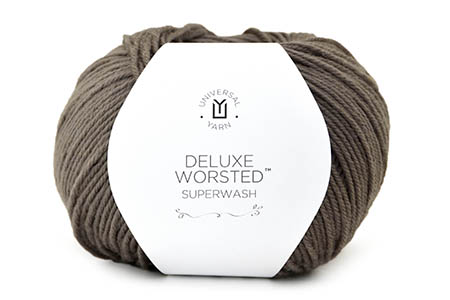
Snazzy.

And this:

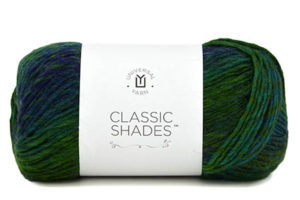
Though our label style has changed (for the better, amiright?), the same very useful information about each yarn can still be found on the label.

Let’s go over how to read one of our labels step by step:

First, let’s take the front side. This is what you will probably see if you encounter the yarn as it’s sitting on the shelf in your local yarn store.

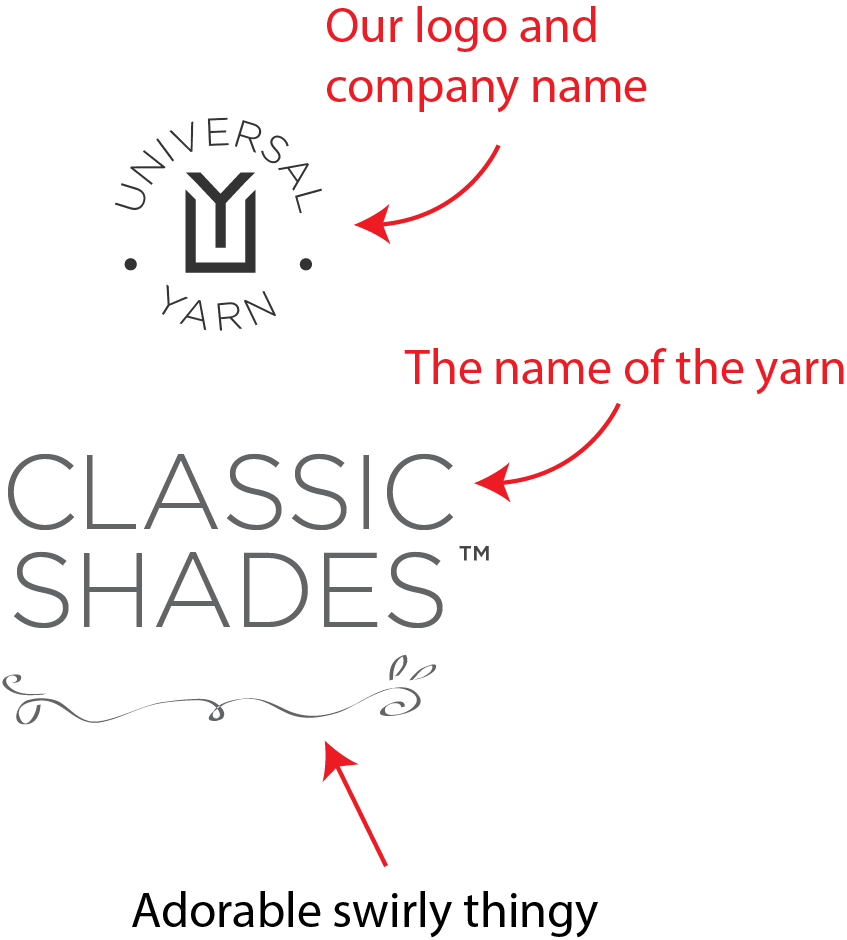
Part of my job is to take customer service calls regarding pattern issues, or sometimes folks with yarn questions. Often when I ask a knitter what the name of the yarn she/he is working with, they are not able to answer.

The name of the yarn will always be the most prominent text on the front of our label, and the same is true with most other companies. Knowing the name of the yarn is helpful in many ways, not the least of which is logging onto Ravelry and seeing what fabulous projects other people are making with that particular yarn.

Next, we’re going to explore the real meat and potatoes of a yarn label, section by section. Here’s what the back side of our labels look like:

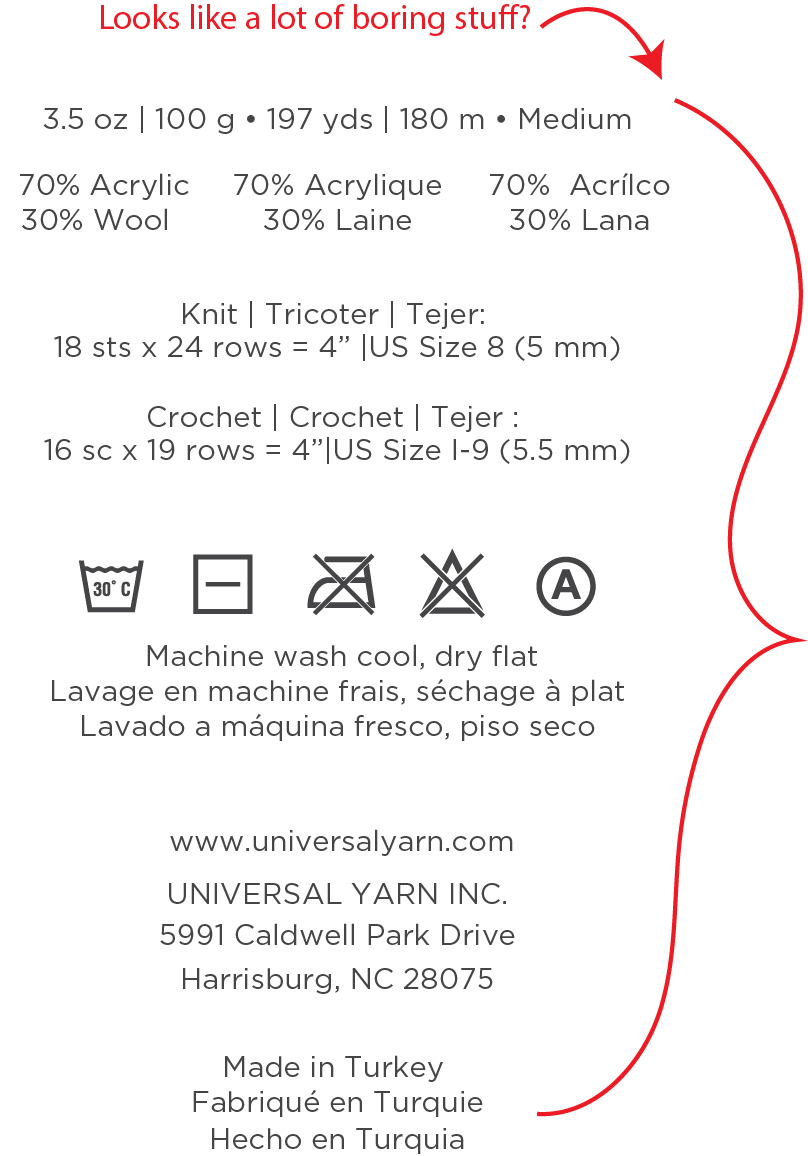
So most of the things on your label are actually pretty important, though I understand if your eyes might glaze over at the wall of text.


Let’s take the first line:

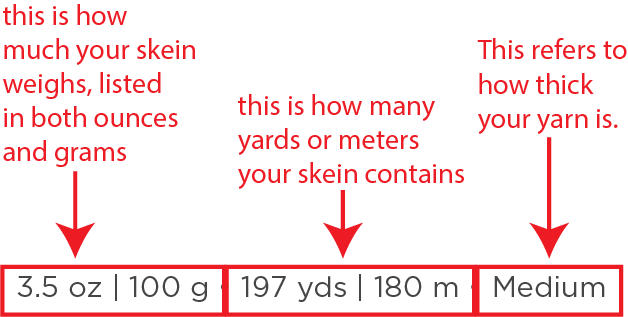
I think the first two are pretty self-explanatory – how big is your ball and how long is the yarn. The thickness or yarn weight, in this case medium/4, refers to a standardized system of classifying yarn thickness. There is a great reference page over at the CYC (Craft Yarn Council) that has a table (link) of all yarn weights and their corresponding gauges, recommended hook and needle sizes.

When we add a new yarn and are determining what yarn weight to assign to it, I always consult this table when doing so. The yarn weight is determined by gauge, not yardage. One example of this might be Classic Shades (which is the label we are examining) vs our Deluxe Worsted, another medium/4 weight yarn.

Both yarns are listed as worsted weight, yet Deluxe Worsted contains 220 yards/100g while Classic Shades contains only 200 yards/100g. Because both yarns produce a gauge that falls within a 4-weight category, they are both classified as such.

If you take a look at that table over at the CYC, you’ll see that a 4-weight yarn has a knit gauge range of 16-20 stitches over 4 inches. Classic Shades, with 18 stitches/4″ falls right in the center of that range. You might hear people sometimes refer to a “heavy worsted” or “light worsted”. What these people are referring to is gauge. If a worsted weight yarn produces 16 stitches/4″, then it would be considered a heavy worsted.


Next:

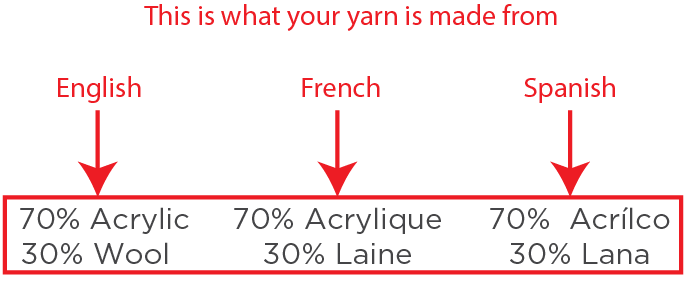
 Again, this is pretty self-explanatory: what’s in your yarn. Most of the words on our label are “3T”, or have been translated into three languages. Our yarn is distributed throughout North America, including Spanish-speaking Mexico and French-speaking parts of Canada.


And then, a topic about which I am quite passionate, particularly when having knitting discussions with my office mates (translation: I am a gauge Nazi):

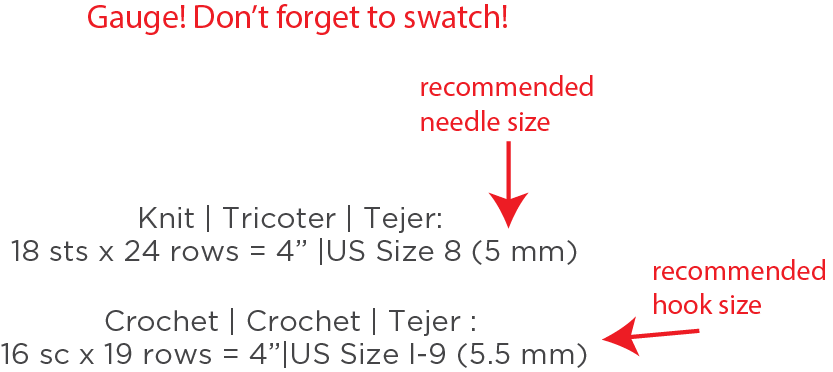
It is standard to talk about gauge, or number of stitches over 4″ or 10 cm. It is important to know approximately what gauge your yarn can get if you’re substituting yarn in a pattern. This is something I could write a book on, or at least a blog post. And I will. But for now, let’s just say that it’s very pertinent information.

Something to remember about gauge listed on a label is that we’re talking hand knitting, folks. When a new yarn is born, a person, usually me here at Universal, has sat down with a ball of yarn and a pair of needles or a crochet hook, and has made a gauge swatch. With their hands. It is not an exact science!

If I like the resulting fabric from my swatch, it becomes the recommended gauge. If it’s too dense or too loose, I change needle size and start again.

I consider myself to be “average” when it comes to tension. But I do want to remind you that your gauge is unique. With the same size needles and yarn, you may get a different gauge than me. To achieve the same gauge, you may need to go up or down a needle/hook size.


Next up:

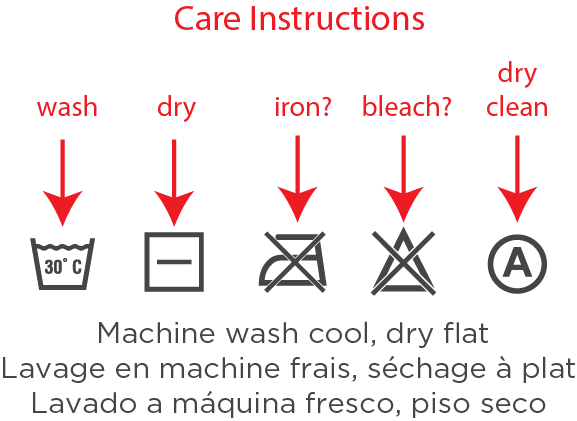
Also very important – how to wash your newly created masterpiece. All knit and crochet items can be washed, it’s just a matter of how. Some fibers shouldn’t be machine washed because the agitation would be too much for them. Others can be machine washed, but to err on the side of caution, we might recommend air drying instead of using a machine.

Some companies use text care instructions and symbols, or just one or the other. If those little symbols are like a foreign language to you, just google it! (yarn care symbols Google search result here)

I know a lot of knitters who are reluctant to throw any handmade item into the washing machine. Personally, I machine wash with abandon. I do it whenever possible, and I do it frequently as I own a lot of knitwear! Lace is another story – most lace I will hand wash, regardless of fiber. But I digress.


We’re on the home stretch here. We just have a couple more things to cover:

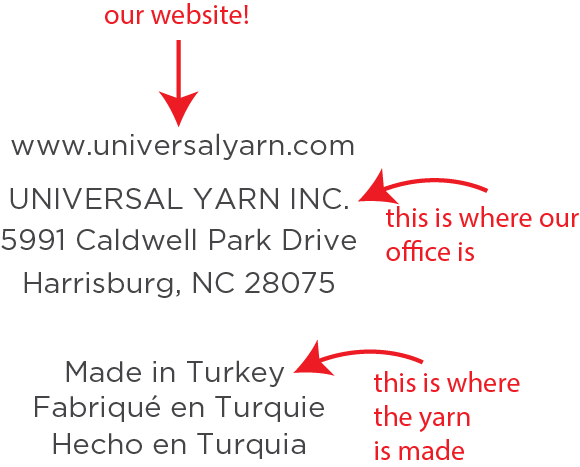
There’s not much to add here. It is a requirement for products to list country of origin. In case you’re curious, our yarn is manufactured specifically in Bursa, Turkey which is about a two-hour drive south of Istanbul. And it’s beautiful there!


And last:

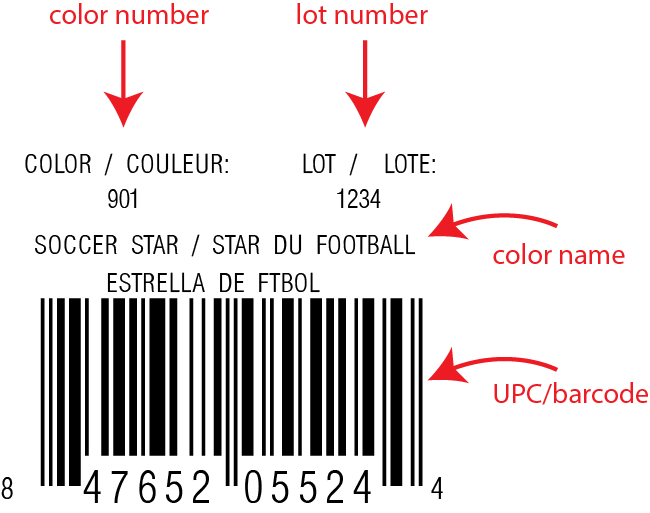
Any given colorway of your yarn should have a name, and hopefully it’s an interesting one. That can be a fun part of this job – naming colors. This color will usually also have a number associated with it, and also a lot number.

Lot numbers can be important if you happen to run out of yarn in your project and need to buy more. Some yarns can vary from dye lot to dye lot, so if you need to buy more, be sure to get the same dye lot if possible.

If you’ve been unsure about yarn labels before, I hope this has made things clearer. Have another question? Let me know!